The Japanese Gennou & Handle Part 4 – The Varieties of Gennou: Kataguchi, Ryoguchi & Daruma

It’s hubris to think that the way we see things is everything there is.

Lisa Randall

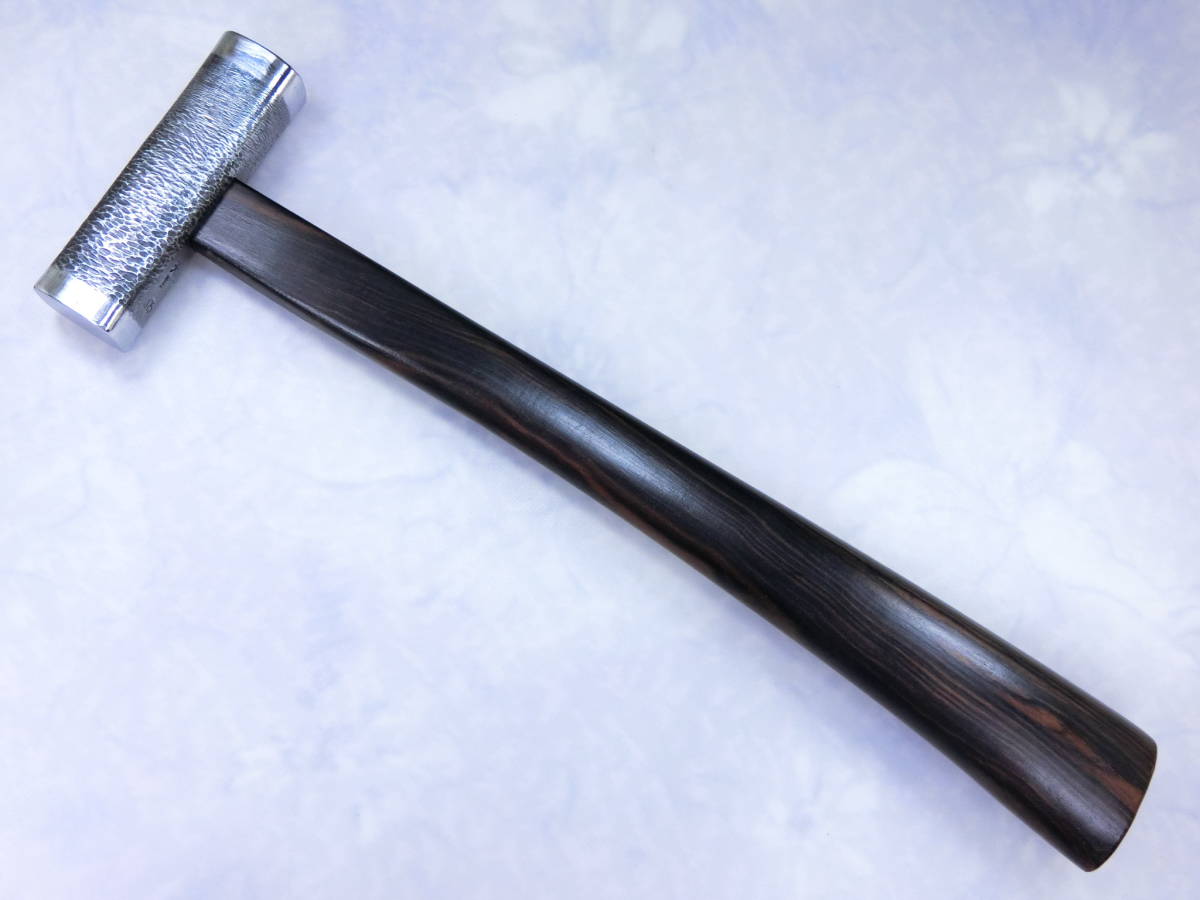
Varieties of Gennou: Ryouguchi Gennou

There are several types of gennou. The most popular is the standard, double-faced symmetrical gennou called the “ryouguchi gennou” 両口玄翁 pronounced ryoh/guchi/ghen-nouh. “Ryou” 両 translates to “both,” and ”kuchi” 口 means mouth, so a ryoguchi gennou is one with a striking face on both ends. This category includes its stumpy brother the daruma gennou, which is a shorter, stubbier version of the ryouguchi gennou. One face of ryouguchi gennou hammer is flat, and the opposite face is domed. The flat face is used for striking chisels and nails, while the domed face can be used for the last couple of hits on a nailhead to recess it below the wood’s surface. It can also be used for something called kigoroshi (“wood killing”木殺) which we will touch on in a future article.

This most popular style of gennou head is symmetrical in all axis, an extremely stable shape making it well-suited for using at many different angles and at different swing velocities to make powerful hits where stability during the swing is important. And stability is often not just important but critical because a hammer that easily wiggles or twists out of alignment during the swing, or jinks upon impact, will make the user look like a child.

Varieties of Gennou: Kataguchi Gennou

〔千吉〕片口玄能 小

Besides the ryoguchi, the other common variety of gennou is called a “kataguchi” 片口 or single-face gennou. “Kata” 片 in Japanese means “one” or “half” and “kuchi” 口 means “mouth” but for some reason unknown to me this term is used to mean “striking face” in the case of hammers. It has a slightly domed face on one end with the opposing end tapering to a small square face for setting nails. Besides setting nails, the tapered end is handy for “tapping-out” (uradashi) the hollow faces of Japanese plane blades. The domed face of the kataguchi gennou is shallow enough to be used for striking chisels, but is not as good for kigoroshi. Kataguchi genno include the yamakichi style common to Kyushu Island, the funate or Iwakuni style common to Western Honshu Island and Hokkaido way up north, and several variations thereof. 

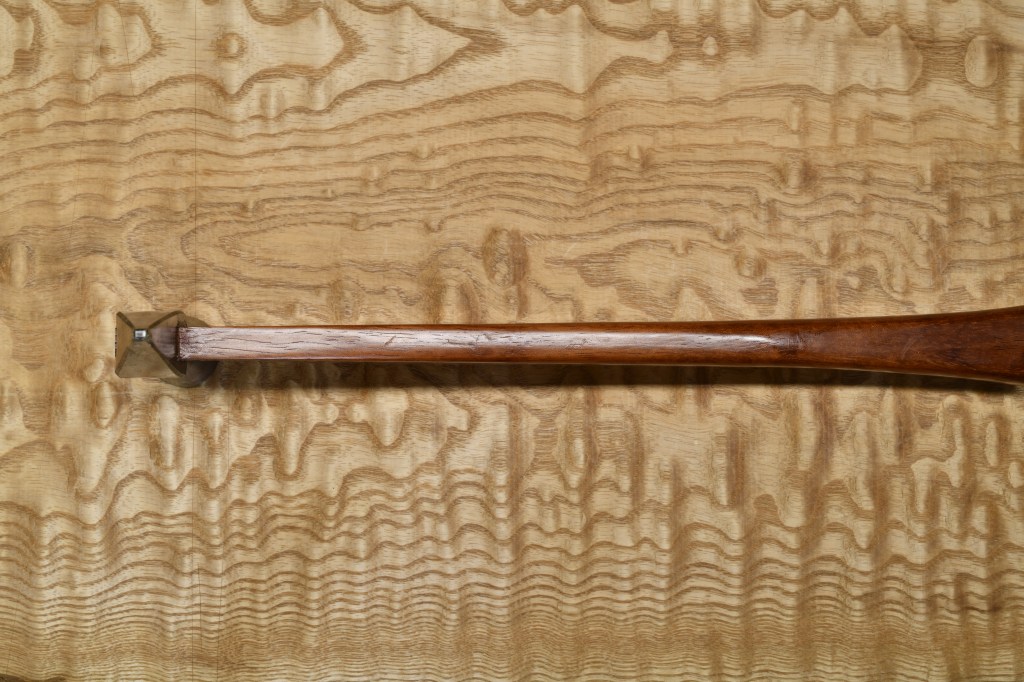
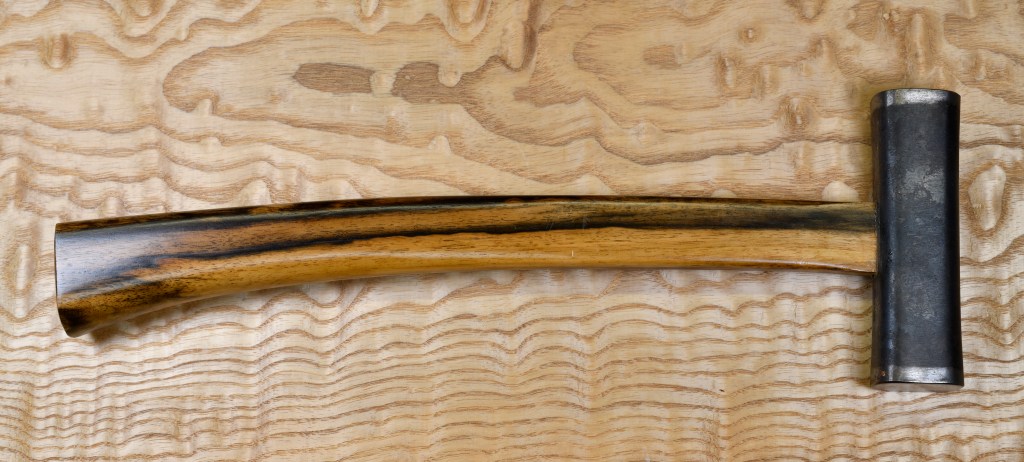
The hammer pictured immediately below is the “Funate Gennou” 船手 which translates to “boat hand” or perhaps “shipwright” gennou. It is especially suited to driving nails, while it’s tapered tail can be used to make a starting hole for nails, a capability especially suited to ship building.

A funate-style gennou hammer with bubinga handle. The eye has a built-in forward cant. This style is popular in much of Western Japan, but not so much in Eastern Japan and Tokyo.
The face of the tapered end of the funate gennou, much smaller than the Yamakichi-style gennou pictured below. If this end is sharpened it can be used to start a hole for the diagonal nails used to join ship planking, perhaps why it’s name references ship building.

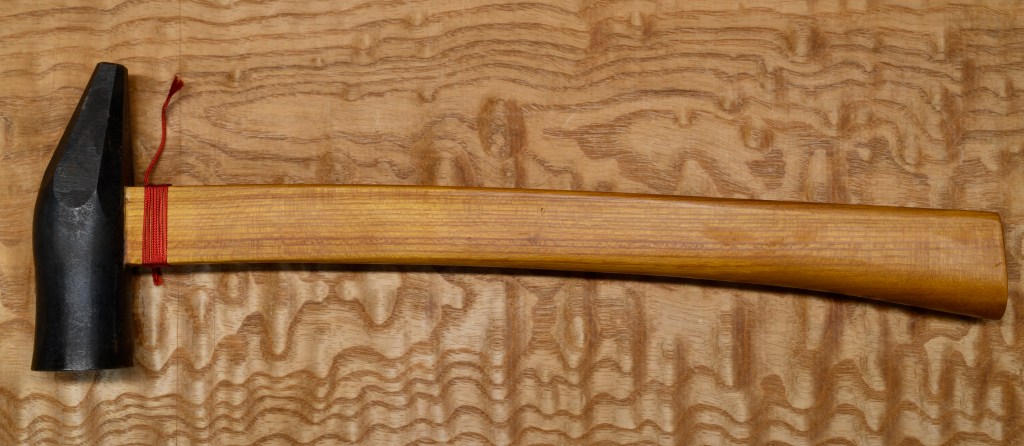
The style of gennou pictured immediately below is called the Yamakichi Gennou 山吉, with Yamakichi meaning “lucky mountain.” This was the working name of the blacksmith on Japan’s Kyushu Island who developed this style of hammer. It’s a stubbier, heavier hybrid of the ryouguchi and funate styles, better suited to chisel work while still being well-suited to driving nails. I am told that Kosaburo received permission from Yamakichi and modified the design slightly to better meet the requests of his customers in the Tokyo area. If you can only have one hammer with you in the field or when doing installations at the Client’s home or facilities, the Yamakichi gennou is hard to beat. It’s not only useful, but unusual and kinda sexy-looking.

A Yamakichi gennou by Hiroki with an American Osage Orange handle (thanks for the wood Matt!). This is the Kosaburo version of the Yamakichi style which originated on Kyushu Island. The face is not entirely flat, but is still flat enough for striking chisels without damaging them. The tapered end has a square face great for starting and setting nails. it also works well for “tapping-out” plane blades. Not quite as stable as the more symmetrical ryouguchi style, but it’s undeniably more versatile. If you need a gennou for driving nails, including finish nails, as well as striking chisels the yamakichi style gennou is hard to beat.
The tapered, square end of the Yamakichi gennou, perfect for starting and setting nails as well as tapping-out plane blades.
The butt of the osage orange handle. This shape, which we will explain in detail future posts, is a key factor in the handle design on which this series of articles is focused. Osage orange is a very tough, stringy wood used for fence posts, tool handles, musical instruments and bows for millennia. The color is a scary neon yellow when freshly cut, but when exposed to sunlight changes to this interesting color.

The Varieties of Gennou: Daruma Gennou
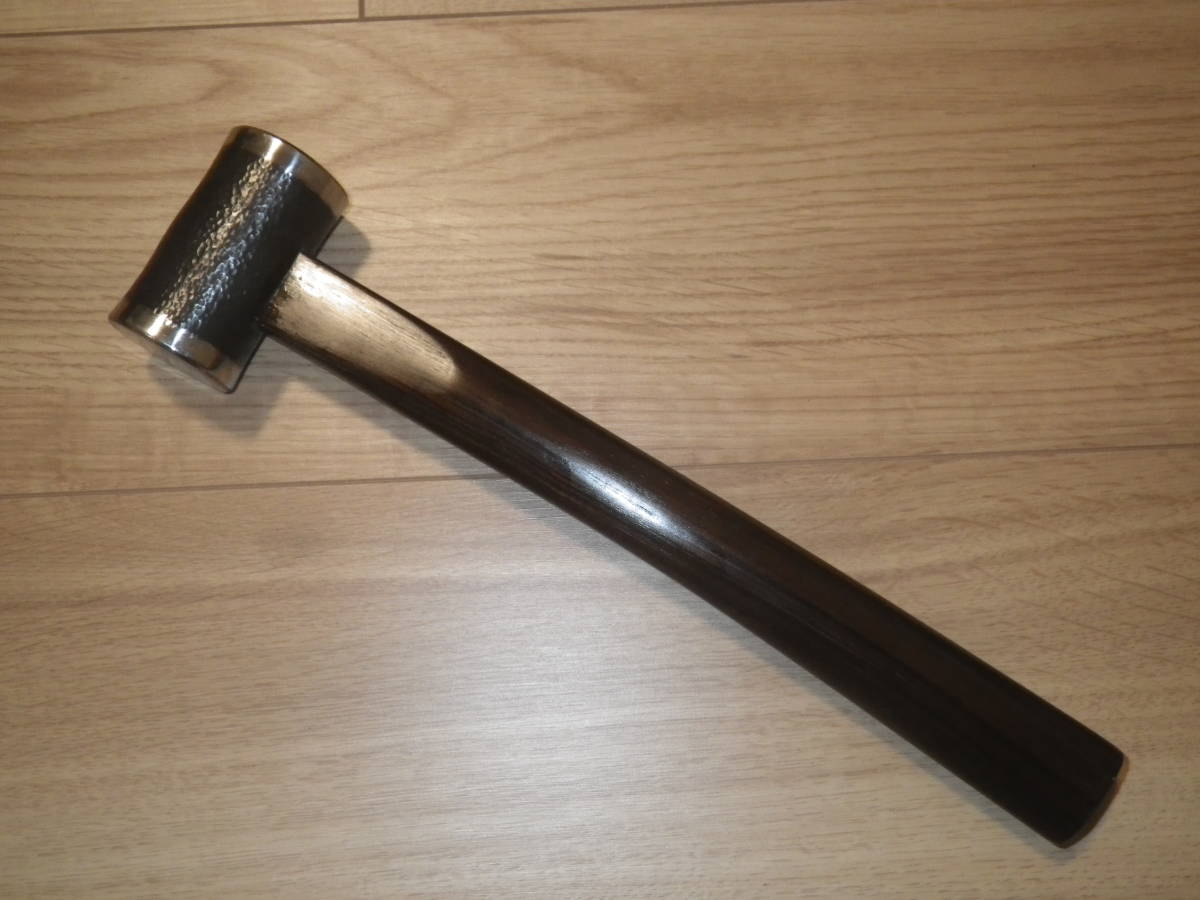
The daruma gennou (dah-ru-mah) 達磨玄翁 is a variation of the double-faced ryouguchi genno, but at the same weight, it is shorter and fatter. It is named after Bohdi Dharma, a Buddhist Monk who was the founder of the Zen (Chan) sect of Buddhism in China, as well as an important person in the history of the Shaolin Temple made famous in Hong Kong Kung Fu movies. You will remember seeing Shaolin Priests in Hong Kong movies dressed in saffron robes, and with rows of dots decorating their bald pates, jumping around thwarting evil drama-queen warlords with long mustaches. 

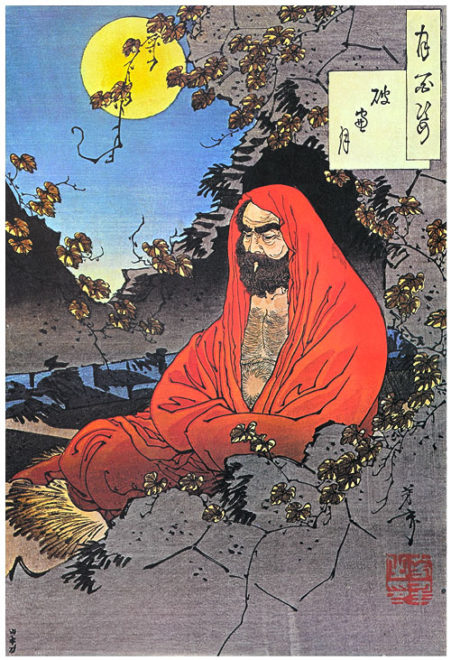
There are many legends about the Enlightened Dharma, but one story says that, while meditating for nine years in a cave near the Shaolin Temple, his atrophied arms and legs fell off leaving just his trunk and head. Because of this legend, in Japan he is portrayed as an oval-shaped figure without any limbs, and with bushy eyebrows glaring out from inside a red hood. He has come to symbolize wisdom and victory through persistence and endurance. This image has deep roots in Japanese culture.

The daruma genno is named after him because, like its namesake, it’s short, stubby, and round. Religious matters aside, at any given weight, the daruma is not as physically stable as the standard genno due to its reduced Moment of Inertia. 

The Moment of Inertia refers to the tendency of a body to resist changes in position. Quoting from Wikipedia (which is no doubt taken from some physics textbook): “It is the moment of inertia of the pole carried by a tight-rope walker that resists rotation and helps the walker maintain balance. In the same way the long axis of a dragster resists turning forces which helps to keep it moving in a straight line.” 

It is the increased Moment of Inertia that makes a steel I-beam so much stiffer and stronger than a plain steel rod of the same length and weight.

Like these three examples, the standard gennou head has its mass distributed away from the center, making it more resistant to movement than if the same mass were concentrated in a solid ball. 

The math for a rod about a center, which is a close approximation of a hammer head, is I = (1/12) x ML2, where I equals the Moment of Inertia, M equals the mass of the rod, and L equals the length of the rod. As you can see from the equation, the Moment of Inertia varies with the square of the object’s length, so that a ball has the lowest possible Moment of Inertia for a given mass, and is the easiest shape to get moving, while a hammer head with its mass moved away from the center will have a much higher Moment of Inertia, and will therefore be more resistant to changes in direction. 

For any given mass, the daruma gennou head has less length than the standard gennou head, and therefore has a reduced Moment of Inertia, and so is less stable. 

Why is this important? Because you, O Mighty Lord of Thunder, are not a machine, and when you swing your hammer several contradictory forces act on it, sometimes large and troublesome and sometimes small and insignificant, but too often they work to drive the hammer off-course so it misses the target, or more often twists during the swing so that a line drawn through center of the hammer’s face and the center of its mass is not aligned with the target producing a glancing blow that wastes time and energy. But since a longer hammer head has a higher Moment of Inertia, so long as you do your job it will tend to remain in alignment during the swing, making it more likely to impart more of its energy into the chisel even if the hit ends up being a bit off-center.

It may also be useful to remember that the head of a hammer is moved by the user in a cyclically pattern towards the chisel or nail, striking it, rebounding, and then swung to strike the chisel or nail again and again several times. If the rebound motion is wonky, one must struggle to realign the hammer head for each strike.

Compared to the shorter daruma, the longer standard ryouguchi gennou head, or even Yamakichi gennou, will tend to rebound straight back, instead of twisting, helping the user maintain a steady rhythm thereby saving time. Of course, with practice, the daruma can perform just as well as the standard ryouguchi gennou head, but if you intend to make a lot of fast, hard strokes at various angles, which is common in carpentry and timber framing, a standard ryouguchi gennou with its higher moment of inertia and resulting greater stability is a superior choice. 

The daruma gennou has traditionally been the preferred primary hammer for two trades: Joiners (tategushi), who use the daruma to their advantage in a specific way, and sculptors, who don’t require stability but do appreciate a large face. Cabinetmakers, tategushi and tansu makers often have a heavy daruma on hand for assembly work because the high face area/weight ratio is convenient for knocking joints together.

I learned about daruma gennou from a retired joiner in Tokyo who was kind enough to instruct me occasionally over a period of several years in the making of Japanese tategu, especially wooden doors, shoji, and free-standing screens (tsuitate). Nowadays, commercial joiners (tategushi) cut mortises mostly by machine, but traditionally, all joints were cut by hand, so the old boys were required to do very precise work, very quickly, frequently cutting hundreds of small mortises for a single screen or door.

The daruma gennou exceeds at this precise, repetitive, speedy work where the chisel is almost always oriented vertically in the cut, the workpiece is almost always located at an unchanging height from joint to joint, and the hammer is not so much swung at the chisel as dropped on it to ensure a very predictable depth of cut with stability not being a significant problem. In summary, the daruma gennou is especially suited for very precise cuts in narrower wooden components such as door and furniture parts.

For example, when cutting joints in shoji, the material remaining at the bottom of a mortise cut in a stile to receive a rail may be only be 1/4 millimeter thick, almost translucent, so if care is not taken, the chisel will cut all the way through ruining the stile. To avoid this, the joiner must be able to control the depth-of-cut very precisely, and rather than swinging the hammer, it is more-or-less allowed to drop imparting controlled, uniform impact forces than would be more difficult to achieve by swinging the hammer.

For this type of work the hammer should not rebound from the chisel but transfer all its energy to the workpiece for smooth, consistent cuts. When used properly, a daruma genno feels like it is sucked towards the chisel, and when it strikes, it feels like it sticks to the chisel for a fraction of second with little or no rebound providing more precise control of the depth of cut. This technique takes lots of practice to master.

I have seen carpenters in Japan laugh at a fellow that brought a daruma gennou to a jobsite because the stumpy things are thought by many carpenters to appear clumsy. I must agree. Also, they assume that a fellow that uses a hammer with a face as big as a daruma does so because he has a hard time finding the end of his chisel with a standard hammer. They may have a point. 

For reasons unclear to me, Americans and Europeans have an illogical affinity for the daruma gennou. That said, when I need to cut a lot of small, precise mortises, I use one. When I need to cut bigger or deeper mortises, or mortises at angles, however, I bring out a standard gennou of the appropriate weight for the relatively greater stability they provide. If you only have one gennou, the standard ryouguchi style head or even yamakichi style would be a good choice.

In the next chapter in this bodice-ripping yarn of romance and intrigue we will examine a more sinister application of the gennou hammer, namely kigoroshi, or “wood-killing.” Please visit the facilities before reading it to avoid embarrassing accidents.

YMHOS

The following link is to a folder containing pricelists and photos of most of our products. If you have questions or would like to learn more, please use the form located immediately below titled “Contact Us.”

Please share your insights and comments with everyone by using the form located further below labeled “Leave a Reply.” We aren’t evil Google, facist facebook, thuggish Twitter, or a US Congressman’s Chinese girlfriend and so won’t sell, share, or profitably “misplace” your information. May I be eternally tortured by ravenous ducks if I lie.

Previous Posts in The Japanese Gennou & Handle Series

The Japanese Gennou & Handle Part 3 – What is a Gennou?

Kiyomizu Temple, Kyoto, Japan

What we have is given by God; To teach it to others is to return it to him.

Gian Lorenzo Bernini

There are as many varieties of hammers in Japan as there are in Western countries. With one notable exception, and in one specific application, Japanese hammers are not especially superior to their Western counterparts. That exception is the gennou (pronounced gen/noh), a hammer intended specifically for striking chisels, adjusting plane blades, and crushing wood (i.e. “kigoroshi” or “wood killing”). This article will provide a further introduction to the gennou hammer.

What Is a Gennou?

A box-stock, garden-variety, economy Japanese gennou hammer with a one-size-fits-somebody handle

The Japanese have different terms for different hammers, of course. A hammer used strictly for driving nails, or banging sheet metal, or driving stakes is called a “kanazuchi” meaning “steel mallet.” A common slang term for this tool is “tonkachi.” The gennou, on the other hand, can of course be used to drive nails, but it’s especially suited to striking chisels and adjusting planes.

The word “gennou” was borrowed from the name of a Buddhist priest who lived, or so the story goes, in the 1300’s and used a steel hammer to destroy a poisonous rock that was troubling the common folk. I’m not sure what one has to do with the other, but there you are.

The Attraction of the Gennou

Many Japanese craftsmen often have an emotional attachment to their gennou. Perhaps this is because, unlike saws, chisels, and planes that are gradually but inevitably sharpened away until almost nothing remains, or squares or marking gauges that loose tolerance or wear out, a quality gennou will last for a lifetime relatively unchanged other than the occasional replacement handle. A good gennou is a simple, reliable, hardworking friend that never complains. It doesn’t have a pigtail; It doesn’t need to be sharpened. And most importantly, it will never ask to borrow your truck, or pose a dangerous question like “do these pants make my butt look huge?”

Technical Matters

The gennou is a simple tool consisting of a steel body of one shape or another attached to a wooden handle. The head has a rectangular hole called the “eye” in English and “hitsu” in Japanese to receive the wooden handle’s tenon.

The steel used for modern gennou is typically a standard, high-carbon Japanese tool steel used for making hammers, axes, and many other tools and designated “SK.” Chemically, it is very similar to 01 steel in the Americas; Not as pure as Hitachi Metal’s Shirogami or Aogami steels, of course, but still completely adequate for hammers. I wouldn’t pay extra for a gennou head made from Shirogami steel, much less purple-anodized unobtanium, and you shouldn’t either

Mass-produced gennou are either cast or drop-forged very inexpensively. The eyes are rough and the handles are secured with wedges. Indeed, the eyes are typically so irregular that the head will not stay on the handle without wedges, but a high-quality gennou with a good eye and a handle made by a skilled craftsman doesn’t need wedges or other silly contrivances that compensate for sloppy tolerances to connect the two. “High-quality” is the key.

A gennou head with a rough and/or irregular eye can create unnecessary problems for the user. “Irregular” has several connotations in this context. One obvious irregularity is an eye that is not truly rectangular. For instance, it may have curved, twisted walls, wonky interior dimensions, or interior corners that are not square. Not only will it be a right pain in the tuckus to make a handle to fit such an eye, but you can bet your sweet bippy it will produce strange vibrations and cause the handle tenon to loosen up sooner.

Another irregularity commonly seen in the eyes of poor-quality gennou is rough interior walls. You would think that rough walls would generate higher friction and grip the tenon better, and perhaps they do compared to highly-polished walls, but rough, uneven walls tend to wear-out the wooden tenon of the handle causing it to loosen over time. Imagine the vibrations the tenon is forced to absorb through those walls and the grinding action between wall surface and handle that results.

An intentional irregularity frequently seen is end walls (versus the longer side walls) that are sloped from each opening towards the center of the eye, essentially making the eye bulge inwards at its center. The purpose of these bulges is to crush the wood of the tenon when it is forced into the eye, increasing friction, while also providing a dovetail-like area for the steel wedge to expand the eye back into. It’s a reasonable solution for rough, irregular eyes in low-cost hammers to be used by amateurs, but one that the craftsmen who truly understands gennou and wants a lifetime tool finds undesirable. We will touch on this detail more in future posts.

Still another irregularity the careful craftsman must watch out for is an eye that is not perfectly centered in both axis in the head. You might think that an eye that is a little skewampus wouldn’t make a big difference, but it does because, not only is the balance and center of mass of such a head also skewampus so that the head tends to twist during the swing and wiggle on impact, but because making handles for such a head is unnecessarily troublesome. A clean, uniform, straight, properly-centered eye is worth every penny it costs, especially if you are a professional and consider your time and sanity of any value.

A difficult question I am frequently asked is “how much irregularity is acceptable?” The answer is simple: If you think it is too irregular, then it is, because the work to correct the defect or compensate for it will all be on you.

Please understand that correcting major defects in hammer eyes is hard work. It takes time, concentration, a good eye, a flashlight, and a deft hand with skinny files and rulers to remove just the right amount of metal in just the right places inside that narrow eye, a task that is much more difficult than removing metal on an exposed surface because the files are thin and bendy, it’s hard to see what you’re doing, you don’t have much leverage, and consistently making a straight pass is not easy. Blisters will bloom. Patience will be tried. Sanity may quiver. Try it yourself and you will quickly see why.

This is the whole point of high-quality heads like those made by Kosaburo and now Hiroki and why they are worth the high cost: Their eyes are true when new, no adjustment necessary, saving the purchaser many hours of tedious work and blisters over a lifetime of hard use. Every time you make a handle for a high-quality head it saves time and leaves you with a good feeling. It’s a true friend, one whose dog never craps on your lawn.

On the other hand, a poorly-made head is a curse, a money-pit (if your time is worth anything), and a frequent source of irritation (especially when it inexplicably loosens and soars free as a hardened-steel bird (ツ)。)

I hate to say it, but Beloved Customers and Gentle Readers should beware of one last defect when purchasing an expensive handmade gennou head. A perfect eye is truly a difficult thing to make, certainly more difficult than making a head cosmetically beautiful. Unfortunately, one or two famous blacksmiths (who shall remain unnamed in this series of articles, so don’t ask) have earned a reputation among knowledgeable professional woodworkers in Japan for occasionally making gennou with skewampus, eyes. Caveat emptor, baby. She may wear high-heels, a short skirt and be beautifully made-up, but if she has a curly tail and oinks she’s probably a pig, unless she’s a trans-boor.

If you cannot hold and inspect an expensive gennou head in-person before concluding the transaction, at least make sure you purchase from someone with a solid guarantee, one without weasel-words and that reimburses you for return shipping, like C&S Tools’ guarantee does. A guarantee that you must argue about and then spend more money to benefit from is less than half a guarantee IMO.

We will delve further into the tempering and differential hardening of gennou, as well as laminated gennou heads in future posts in this series, same bat time same bat channel.

Why Use a Gennou for Chiselwork?

This is a questions we addressed in a previous post, but which we also examine further here.

Almost any striking tool, from steel hammer to leather mallet, can be used to strike a chisel. The problem is that, unless one is either gentle or the handle of the chisel is reinforced, a steel or even brass hammer will eventually destroy the chisel’s handle. The solution in the West has been to use a mallet made of wood, leather, rubber, or plastic instead to cushion the blow and preserve the handle. Let’s consider this for a moment. 

The purpose of striking a chisel with a hammer is to drive the chisel into and through the wood by cutting it, right? But a soft-faced hammer/mallet, be it made of wood, plastic or rubber deforms when it impacts the chisel cushioning the blow and wasting energy through deformation and heat generation. It may also unnecessarily waste energy through air drag, as we discussed in the Part 2 of this series. Since energy is lost, more mallet strikes are necessary, wasting time. This is demonstrably counter-productive.

Besides being relatively soft, a fat-faced mallet is bulkier, slower to swing, and is therefore less precise than a slimmer steel hammer. While there may be some that are thrilled with cutting slowly and expending extra time and energy in the process of cutting a joint, most people want to cut as much wood as possible, as precisely as possible, in the shortest amount of time as possible, and with the least energy expenditure possible. But if a chisel handle is so fragile that one must expend extra time and energy to keep it intact, then it is only logical to conclude that there is something wrong with the design of the chisel.

Ise Jingu Shrine, Mie Prefecture, Japan

The Japanese are very serious about woodworking, as anyone who has gone to Kyoto or Nara and seen the ancient wooden temples there can attest. When it comes to chisel work, Japanese carpenters don’t tolerate such silly nonsense as a chisel that must be coddled, and so early-on Japanese craftsmen developed a wooden-handled chisel that can be struck hard with a steel hammer all day long without breaking. 

The excellent design of the Japanese chisel combined with the quality of steel, and the forging, lamination, and heat treatment techniques used in manufacturing most Japanese chisels provides a tough cutting edge that stays sharper longer, placing Japanese chisels at the very top of the evolutionary pyramid of chisels, IMHO. And as the Japanese are wont to do, they developed a hammer specifically for striking chisels.

Most hammers intended for driving nails have a domed face which does not work well with the wooden handles of Japanese chisels because it tends to dish in the end of the handle causing the hoop to loosen. This can even result in the handle cracking or splitting. A flat-faced hammer is much better. The Japanese “ryouguchi” double-faced gennou has one face that is forged flat, for striking chisels, and an opposing domed face for driving nails or performing “kigoroshi.”

And while one absolutely could grind the face of a Western claw hammer flat and use it to strike Japanese chisels without any problems, the gennou is designed specifically for striking chisels. In your humble servant’s opinion, it is a superior tool for the intended purpose.

In the next post in this series we will examine three varieties of gennou to help you decide which is best for you.

YMHOS

The Pagoda at Horyuji Temple, registered as one of Japan’s National Treasures. Yessireebob, a lot of hammer and chisel work went making this structure.

The following link is to a folder containing pricelists and photos of most of our products. If you have questions or would like to learn more, please use the form located immediately below titled “Contact Us.”

Please share your insights and comments with everyone by using the form located further below labeled “Leave a Reply.” We aren’t evil Google, facist facebook, thuggish Twitter, or a US Congressman’s Chinese girlfriend and so won’t sell, share, or profitably “misplace” your information. May my hammer heads all fly away to stinky adventures if I lie.

Previous Posts in The Japanese Gennou & Handle Series

Toolchests Part 2 – History

An Egyptian Chest with a very warlike decoration of chariots with archers, the main battle tank of the ancient world. What did the boy king store in it?

Advice is a dangerous gift, even from the wise to the wise, and all courses may run ill.

J.R.R. Tolkien, The Fellowship of the Ring

This is the second part of our series about toolchests. In this post, just to ensure we have a common understanding, we will examine some of the history and roles of chests in general.

The wooden chest is certainly the most ancient hard-sided container used by humankind. This fact alone makes it a method of tool storage Gentle Reader should at least consider.

The traditional chest is simply a box with a lid. Throughout human history, most chests have been made of wood, although there are examples made of rushes, wicker, bamboo, tree bark, stone and various metals.

The basic chest has 4 fixed sides, a fixed bottom, and an operable lid on top. Some have legs of one type or another, others don’t. Some have drawers, but historically most did not. There are many ways to construct them, with some materials and methods better than others. There are even a few examples of nordic chests made by hollowing-out logs.

A Scandinavian chest made from a section of tree trunk
Another antique chest made form a section of a tree trunk

Since at least the bronze age, chests used by common folk were expected to provide more than just storage space, but to do double, even triple duty as tables, benches, beds, food storage, food processing equipment and sometimes even fortifications.

Small Medieval oak ironbound chest, clamp front in construction and the iron work consists of flat straps with fleur-de-lys motifs and a large butterfly lock plate. Origin: Germany Date: Circa 1400 Dimensions: Width (inches) 36 1/2 x Height 21 3/4 x Depth 16

For millennia chests were used to house and protect clothes, blankets, linens, armor, weapons, boots, horse gear, cooking and eating utensils, food, and money, just to name a few categories. Nowadays we tend to think of chests as storage space for clothing and blankets, or as a bench seat placed at the foot of a bed, but they were also practical household tools used to store grain in hovels shared with livestock and lit by stinky rush lights when beeswax candles were a prohibitively expensive luxury. The inverted lid of these “grain arks” were used as a trough for kneading bread dough after the goodwife had turned the winnowed grain into meal during her “daily grind.”

An English oak clamped-front ark  17th century the canted boarded detachable cover above a twin panelled front and later filled lockplate, with channelled stiles
A medieval clamp-construction “grain ark.” A household’s goodwife would store her grain in this chest. The lid can be rotated open, but is not “hinged,” per-say. The goodwife would use a quern stone to grind the grain into flour, usually of a rough consistency. This is where the term “daily grind” originated. She would then turn the grain ark’s lid upside down, rest it on the base, and use the trough formed inside the lid to knead the dough to make the “daily bread.” When done, the lid was cleaned, turned right-side up and placed on the base to once again protect the grain from dust, water, bugs and vermin.
Milling Grain with Water Power
Quern stone used for grinding grain to make flour.
Using a quern stone to grind flour in the Czech Republic.

Chests throughout history have been mostly simple, durable boxes, but at times they have been fabulously expensive pieces of fragile high-art intended to communicate status and wealth, with many examples in museum collections.

An early Renaissance, cassoni, or marriage chest. These were usually made in pairs and sent by the groom’s family to the bride to hold her dowry during the very public bridal procession, making them ostentatious signs of wealth and prestige if only for a few hours, days or weeks while in-transit.

Throughout history chests have been carved, painted, lacquered, covered with nails, inlaid with mother of pearl or chased metal, and even gilded with gold leaf. They’ve served as strong-boxes for crusader banks, transported Inca and Aztec gold on Spanish galleons, and accompanied Italian princess to their new, married life. But whatever their purpose or appearance, chests were once the most common storage container in human civilization, with every well-established household throughout the world possessing at least one.

Regardless of where your forefathers hail from it is safe to say that thousands of chests served your ancestors down through history. The chest is older than the 4-legged chair, certainly older than the elevated bed. Only dirt has a longer track record.

A Zanzibar dowry chest with red paint, brass hardware and nails
Turkish Dowry Chest covered with mother-of-pearl inlay

Chests are not as ergonomic or convenient as modern cabinets, and for this reason and others have fallen out of fashion, but their utility is not diminished especially in the case of woodworking tools which do not wrinkle or molder.

There are many surviving examples of ancient toolchests we can learn from, and Europe and the Middle-east are not the only available sources of inspiration.

A very traditional “Nagamochi” tansu from Japan. These chests were specifically designed for not only general storage, but for transporting goods during the periods of Japan’s history when animal-powered carts were forbidden to all but royalty. The rectangular bit of hardware seen at the ends was rotated up and a wooden yoke passed through so that two or more men could carry the chest on their shoulders.
アンティーク家具 古民具 骨董 江戸時代 味の良い車長持ち(時代箪笥)
Another traditional Japanese chest called a “kuruma dansu 車箪笥,” which translates to “wheeled chest.” It too has the same nagamochi hardware on each end. Japan has a long history of fires that destroyed entire cities on a regular basis, so one justification for this style of chest was that it could be wheeled out of the house or business quickly before the building burnt to the ground saving valuables. Try doing that with a wall cabinet! My chest borrowed from this traditional design, but substituted modern materials and detachable wheels. I have no patience with tiny, fragile casters.
This antique example is made from softwood in the dimensions of the traditional chest used to store tea, but without the tin lining. A lockable drawer can be accessed from the front, a detail commonly found in Japanese tansu chests. The lid’s top panel is not floating but is constrained by the side pieces, and although it appears to exhibit little or no cracking, please notice that the top panel has separated from the perimeter framework in places and busted the left-hand corner joint, a failure common to this style of construction wherever it is employed.
Hand-forged wrought-iron (minimal carbon content) hardware in a pine-bough motif. The original black lacquer finish can still be seen in a few places, but corrosion has patinated the metal nicely.

One of the first pieces of furniture a journeyman woodworker in centuries past would make was a toolchest to house his valuable tools. Accordingly, many old woodworking instruction books included designs for toolchests. One such book was the inspiration for my toolchest.

Based on statistical data, the vast majority of modern buildings have a useful lifespan of around 50 years. Furniture and casework is much less nowadays. While this mindset has been a reality, indeed has been celebrated for the last 80 years or so, it is a wasteful attitude your humble servant strongly adjures, one that diminishes the quality of our current existence, beggars civilization’s future, and stuffs landfills. I have no interest in making low-cost objects that self-destruct or that might embarrass me in the eyes of my descendants. Accordingly, I set the useful lifespan of objects I make for my own use at 200 years. There is an off-chance I won’t be around that long, but God willing and the creek don’t rise, I can be sure a few of the things I make with my own hands will, including this toolchest. Do you have useful lifespan goals for your woodworking?

While there are many varieties, no piece of furniture has served humanity longer or better than the chest. If you value your woodworking tools and want a woodworking project that will have long-term value, the toolchest is a storage system you should at least consider.

An iron-bound chest for containing valuables, the ancient equivalent of a portable safe.

In the next post in this series on tool chests we will examine the goals and objectives you would be wise consider when designing a toolchest, as well as the challenges toolchests face in the real dirty world.

YMHOS

If you have questions or would like to learn more about our tools, please click the “Pricelist” link here or at the top of the page and use the “Contact Us” form located immediately below.

Please share your insights and comments with everyone in the form located further below labeled “Leave a Reply.” We aren’t evil Google, fascist facebook, or thuggish Twitter and so won’t sell, share, or profitably “misplace” your information. If I lie may the wheels on my toolchest become square.

Other Posts in this Series

Toolchests Part 1 – And Away We Go

And Awaaay We Go

No wise fish would go anywhere without a porpoise.

Lewis Carroll, Mock Turtle, Alice’s Adventures in Wonderland

Every woodworker has tools they need to store. The longer one is at it, and the wider one’s competent range of skills, the more tools one needs.

There are those who advocate owning minimal tools, as if owning many tools is an emotional burden and fewer tools is healthier. Perhaps they are suffering from Marie Kondo syndrome.

Your humble and obedient servant has known old men like that; Guys that grew up during the Great Depression and could not afford many tools, regardless of quality, and so learned to accomplish many tasks with the few tools they had. Accomplishing the job without adequate tools was a necessity, which became a habit, and later a matter of pride. But often the efficiency and quality of their work suffered.

Or perhaps these minimalists are like a guy I used to work with who owned a favorite pair of expensive loafers and wore them to the office, to the beach, and when camping. He even boasted about wearing them last year to climb Mount Fuji. He is wealthy but strangely proud of owning only one pair of shoes.

Last time I saw his beloved shoes they were scuffed and ragged and didn’t look good with a suit, but he never wore business attire even when he should have. His shoes would suck big donkey donuts in the snow or mud so he didn’t venture into such environments. They didn’t have steel toes, so he had to ask someone else to do his jobsite inspections for him. Sure he had fewer shoes, but because of that, he was limited in where he could go, what he could do, and how much he enjoyed those activities. Just another sort of strange obsession, I suppose.

I have a different sort of obsession that I suspect sprang from a time when I had little money, but couldn’t earn the money I needed because I couldn’t afford the necessary tools. A frustrating situation many Gentle Readers may have also experienced.

I enjoy the confidence being able to do many different kinds of physical work competently brings. Those skills are useful, however, only because I own the tools necessary to perform that work. Accordingly, so long as I have the space, I would never get rid of quality useful tools because to do so would mean I could no longer perform the type of work those tools make possible.

So I confess to owning lots of tools. Maybe I need a 12 step program.

I don’t leave my tools laying around in a rusty jumble or, heaven forbid, hanging on pegs in a dusty garage. I store them effectively so they will last and be ready to rock-n-roll when I need them. This, however, takes thought and preparation.

The purpose of my writing this series of articles is to share with Gentle Reader one effective solution to tool storage and usage. If even one Gentle Reader finds it helpful or even just amusing, then I will count my time writing this well spent.

My Toolchest. Built in Northern California 25+ years ago from Honduras Mahogany

In this series of posts we will discuss storage chests in general and toolchests in particular. I will also share a description of my toolchest, it’s design, and the goals, objectives and rational that drove the design and construction. I will even reveal some its failings and the remedies I employed. Chuckling may ensue (ツ).

At this point, I can imagine many Gentle Readers rolling their eyes and saying to themselves: “Oh no, not another nitwit bragging about his toy box.” As the Arkansas horndog so often said with a slight crack in his compassionate voice: “I feel your pain.”

Related image
Meet Junior: Someday he’ll be President.

Much like proud parents posting pictures of their child’s alien-looking carrot puree-smeared visage on facebook to horrify the entire world, thousands of people have boasted about their toolchests online.

This is natural; Everyone is proud when a project is complete. We want to share our satisfaction with others at least partly because the accomplishment of the child reflects on the parent. But too often toolchest blogs are boring tales of unoriginal, unimproved, uninspiring designs and mediocre execution, so I don’t blame you if you suspect this just might be another such waste of time.

Considering past blogosphere disappointments, and the fact that even you, Gentle Reader (may you live forever), have limited time, I have worked hard to make this article informative and even useful with explanations, photographs, and even a roughly dimensioned drawing.

Of course, right now you are probably asking yourself “What qualifies this putz to write about toolchests and why should I bother to read it?” Good questions. No, I don’t mind the harsh language because I have often said the same thing to myself when reading other’s toolchest blogs, albeit with great dignity and refinement (ツ). Allow me to explain.

My first qualification for writing this is that I know what I am talking about. No, I am not a journalist, an author of books or a teacher. I don’t even teach classes about making toolchests, and never will, the gods of handsaws willing. I am no longer a professional woodworker, but was for many years when people paid me to make durable, useful buildings, furniture, casework and joinery for them. Indeed, now I manage other people to make such items for my customers and am focused like a laser on design, performance, cost and time effectiveness, and quality.

The second qualification is that, while this toolchest has its roots in a traditional design, it is neither a copy of, nor does it purport to be “faithful” to, traditional designs, whatever the heck that means. It was born from original thinking to solve specific problems. Its design is neither accidental nor experimental.

I know how to manage the design of buildings and millwork costing many hundreds of millions of US dollars, and applied that experience to this design. Consequently, I considered, revised and improved each detail and dimension on paper again and again over a period of several years even before buying the wood, and for good reasons. Of course, I continued to tweak the interior fitout and tool mounting methods during the years after it was completed, and repaired and repainted the outside after an attack by a rabid forklift, but the box itself is essentially unchanged. I will explain those reasons and the resulting details and will share my conclusions. Then you, Gentle Reader (may the hair on your toes never fall out), may judge for yourself.

I am not suggesting that the decisions reflected in this toolchest are the best possible, and that you should slavishly imitate them. Nay, each Gentle Reader’s requirements are different; Their sensibilities are their own; Each must reach their own conclusions.

I read constantly, and believe I benefit from learning about other people’s solutions to the problems I face. I certainly learned from others before I designed and made this toolchest. Hopefully the information contained in this series of posts will help you make wise decisions in your woodworking.

Perhaps my most useful qualification for writing this is that I own very valuable, custom handmade tools I enjoy using and want to preserve. I also researched, built, and later tested this toolchest’s actual performance in housing those tools in several locations around the globe. So the results I will present here are not just a reproduction of historical examples, nor one intended to photograph well for publication in a book or magazine. It is an original design with a track record of hard travel to multiple nations.

Indeed, this toolchest has not been sitting in one place for 25 years, but has followed me through multiple international relocations where it has been used and abused heavily, successfully passing all trials. This dynamic track record sets this toolchest apart from most modern examples.

In this series of posts I will first touch on the definition of a toolchest, and the goals, objectives and rationale that drove the design. Next I’ll discuss the pros and cons of toolchests, and how to compensate for their inherent shortcomings. Then I will address the materials and construction of my toolchest followed by the finish I used.

I hope you will find this series interesting and perhaps even useful. Chuckles are welcome.

YMHOS

Touch me toolchest, matey, and I’ll pump ye full ‘o lead! Harghhh!

If you have questions or would like to learn more about our tools, please click the “Pricelist” link here or at the top of the page and use the “Contact Us” form located immediately below.

Please share your insights and comments with everyone in the form located further below labeled “Leave a Reply.” We aren’t evil Google, fascist facebook, or thuggish Twitter and so won’t sell, share, or profitably “misplace” your information. If I lie may pirates pillage my toolchest.

Other Post in the Toolchests Series:

The Japanese Gennou & Handle Part 2 – Ergonomics

A Kosaburo hand-forged gennou head hung on a Black Persimmon handle. This was the first professional-grade hand-forged gennou head I purchased many moons ago.

“We become what we behold. We shape our tools, and thereafter our tools shape us.” – 

Professor Marshall McLuhan

Marketing and mass-production have changed many things, but not how the human body works.

In this post we will examine some ergonomic factors of hammers Gentle Reader may find interesting, and ask some questions you may want to consider.

Ergonomic Factors

Making tools that fit the user’s body and way of working is an old idea. Here is an example.

Since the days when your humble servant was a scrawny kid with a Daisy BB gun, I have enjoyed making rifle stocks. As your humble servant matured, my efforts turned to marbled walnut stocks for bolt-action guns and curly maple for flintlock longrifles. But a custom gunstock is not just a chunk of beautiful wood, ooh no.

During my research into the art I learned how craftsmen have, for centuries, made custom shotgun and rifle stocks to fit each customer’s body. Indeed, unlike factory stocks, custom gunstocks are not straight, but are bent, twisted and offset in subtle ways to fit their user’s bodies and to provide a steadier hold, quicker target acquisition, and reduced recoil. These techniques work.

Indeed, like a bespoke suit or custom boots, there are a number of measurements that must be made of the user’s body and the rifle’s components, and numbers to crunch in advance of designing a custom rifle stock. I’m talking about a rifle made using thousands of dollars of wood and precision-machined steel, designed to fit a particular person’s body, and intended for a particular type of shooting, not a K-Mart blue-light-special killer of unsuspecting tin cans.

Through study, testing, trial and error and handwork I learned how employing these ergonomic principles could yield significant improvements in the performance of everything from reproduction flintlock longrifles to 1,000 yard target benchrest guns, and even .45 caliber bolt-action elephant rifles. When I heard that a group of specialist Japanese carpenters had, over centuries of experimentation, developed tool handle designs that applied similar principles, the pieces clicked together in my mind like a Purdy double-gun’s breech.

A hammer is not a complicated piece of precision machinery like a modern benchrest target rifle, so we tend to think of it as a stupid tool lacking finesse, but I disagree. Let us consider some of the challenges the lowly hammer is expected to meet.

The first challenge is air drag. The hammer is the most dynamic handtool a woodworker uses, moving relatively long distances at relatively high speeds. And during the swing the hammer pushes a lot of air aside creating drag and expending energy along the way. It adds up. This is just one reason why big-faced mallets are inefficient compared to a steel hammer. There are those who revel in their ignorance by disputing this fact, but to them I say: There is no medicinal cure for stupidity so I encourage them to learn some basic math. If you remember your freshman physics classes, you will recall that the formula for drag in a fluid (which includes air) is as follows:

F_{D}\,=\,{\tfrac {1}{2}}\,\rho \,v^{2}\,C_{D}\,A

where F D is the drag force, ρ is the density of the fluid, v is the speed of the object relative to the fluid, A is the cross sectional area, and C D is the drag coefficient, a dimensionless number.

The drag coefficient depends on the shape of the object and on the Reynolds number {\displaystyle Re={\frac {vD}{\nu }}},

You don’t need to input actual numbers into this formula to see that the two factors we, as consumers and craftsmen, can readily control are the area of the hammer (A) and its speed (v). The factor that we can manipulate to our benefit when designing our handle is the area (A), which includes not only the size of our hammer’s face but the width and length of its handle.

The second challenge the hammer must deal with is alignment during the swing because when using it we draw its head back beyond the range of our vision, and then, without looking back, swing it with great force to precisely hit targets as small as a nail head, while avoiding hitting our own head, ear and hand. If the hammer’s head naughtily wiggles out of proper alignment during the swing, a bent nail, headache or smashed finger may result, so we need a hammer head and handle combination that will be easy to instinctively keep in alignment during the swing without a thought.

The third challenge our hammer must overcome is the tendency of its striking face to impact the target with its center of mass misaligned with the centerline of the nail or chisel, or with the striking face canted forward, backward or to the side instead of square to the target’s centerline. Think about this next time you bend a nail or your chisel cuts in one direction when you intended it to cut in the opposite.

A person proficient in using mass-produced hammers has no choice but to make their eye and body match the hammer they are using at the moment. Of course, this can be done, but it is inefficient, uncertain, and frankly, bass-ackwards. What I am proposing in this article is that we design our hammer handles so they match our individual bodies and the work we need it to perform instead of forcing ourselves to adjust our grip and swing to fit standard one-size-fits-nobody hammers.

A lot of well-spoken, well-dressed and intelligent-looking blowhards in marketing departments give lip-service to so-called ergonomics, but here at C&S Tools ergonomics really matter for we strive to always hit the nail or chisel squarely instead of just meeting quarterly sales goals for tool-like products. Indeed, in future posts in this series we will discuss in great detail a number of ergonomic factors our Beloved Customers should include in their gennou design specific to their individual bodies and style of work, including the length of the hammer handle, twist and offset, grip location and shape, handle details to help the gennou index automatically in their hand without having to actually look it, and of course, the angle of the head.

We will both explain why and show you how to design, draft, and make a hammer handle suited to overcome these challenges while in your hand.

Three Questions

I am not fond of gaudy, decorated tools, but that does not mean my tools are plain as mud.

As you may be able to tell from the photographs of one of my favorite gennou in this article, I enjoy subtle details that give them a unique attractive appearance, especially if those details improve their performance while pleasing both my eyes and hands. I don’t know if they have shaped me, as Professor McLuhan suggests, but they certainly give me more confidence and joy in my work than a run-of-the-mill rubber-handled blister-maker ever could.

For years I have encouraged people to ask themselves three questions on the subject of hammers. So I pose them to Beloved Customers and Gentle Readers now.

First, does your hammer and its handle fit your body and style of work, or is it a “one-size-fits-nobody” product made by a conglomerate that knows everything about selling hammers but nothing about using them?

Second, is your hammer aesthetically pleasing to your eye and an extension of your hand, or is it like every other hammer that ever fell off the hardware store’s rack?

And finally, is your hammer likely to be a trusty partner in your woodworking projects, maybe even becoming an heirloom appreciated by your descendants, or will it end its days rusting away sad and lonely in a landfill?

If you answered nay to any of these questions, I promise you will find something of value in this series of articles.

In the next document in this series on designing and making gennou handles, we will examine some history and the ergonomic factors that resulted in the design that is the subject of this series. Until then, I have the honor to remain

YMHOS

The following link is to a folder containing pricelists and photos of most of our products. If you have questions or would like to learn more, please use the form located immediately below titled “Contact Us.”

Please share your insights and comments with everyone by using the form located further below labeled “Leave a Reply.” We aren’t evil Google, facist facebook, thuggish Twitter, or a US Congressman’s Chinese f*k buddy and so won’t sell, share, or profitably “misplace” your information. May dogs and puppies forever hate me if I lie.

Previous Posts in The Japanese Gennou & Handle Series

The Japanese Gennou & Handle Part 1 – Introduction

I do think a carpenter needs a good hammer to bang in the nail.

Oliver Reed

Introduction

This is the first in a series of articles about the Japanese gennou hammer in general (written 玄翁 in Chinese characters and pronounced “gen/noh”) and in particular how to design and make a unique one that perfectly fits your body and style of work.

The objective of these articles is to share with you, Gentle Reader, what your humble servant has learned over the years about gennou handles to help you design and make your own.

I will gladly share the entire series, including the drawings, as a single document with Beloved Customers upon request.

The True Craftsman Makes His Own Tools

A handful of generations ago quality high-carbon steel was difficult to make and expensive, so woodworkers worldwide, especially Japan, could not afford many tools, and the ones they did own or inherit were very important to them.

At least partly to reduce costs, it was standard practice back then for a woodworker (or his master) to commission the metal parts of his tools, such as the heads of his axe, hatchet, adze and hammer, and the blades of his chisels and planes from the local blacksmith. In the United States or other British colonies a craftsman may have purchased chisel and plane blades imported from Sheffield, but he would not want to pay the high costs of shipping wooden components across oceans and over mountains when he could make them himself. After all, woodworking was his business, so a self-respecting craftsman would make all the wooden components of his tools himself as a matter of course. Needless to say, those old boys knew how to make handles.

But things have changed. You may not realize it, but we live in a time of extreme wealth where even the poor live better than kings did 200 years ago, partly due to widespread industrialization making the necessities of life, and even what would have been called luxuries, available to everyone cheaply. This industrialization combined with cheap transportation has resulted in the prevalence of craftsmen purchasing pre-manufactured things, including tool handles.

Accustomed to the easy availability of standard mass-produced tools, lacking a clue about performance and focused like a laser on lowest cost, most woodworkers nowadays get by with colorful but poor quality tools designed by kids using computers working in marketing departments that have never used a handtool professionally, and fabricated by farmers in Chinese factories from higgily-piggily scrap metal. These tools may look great on the internet or wrapped in theft-proof plastic containers hanging on pegs in the big-box retailers, but how do they perform? And how long will they last? And what do they say about the men using them? Tools are terrible gossips, you know.

Gentle Reader cannot purchase a hammer handle like the one we will discuss in this series, and no one can make it for you. A hand-forged gennou head fitted with a handle made in accordance with the guidelines presented in this series will become a unique lifetime tool and the sure sign of a superior craftsman. More importantly, it will help you work more efficiently and precisely, make the joints in your shoulders, arms and hands hurt less, and give you greater confidence in your skills.

If you think this all sounds too good to be true, I challenge you to put it to the test. In fact, there is a series of performance tests listed in the last post of this series (when it is published, see link at the end of this post) that will allow you to generate hard proof of the truth of these claims for yourself. You will be impressed with the results.

While Japanese hammers are the primary focus of this series, you can apply the ergonomic principles and solutions I will describe to all varieties of hammer handles.

Modern Tools: Marketing, Design & Manufacturing

I grew up using hammers designed for maximum sales in a competitive marketplace of amateurs, of the type I call “One Size Fits Nobody.” Back then they were made in the USA, but nowadays they are cheaply mass-produced in China. Prices are rock-bottom, and quality is focused solely on getting an attractive product to the big-box retailers at the right price-point while fending off the slavering hordes of snaggle-tooth lawyers that specialize in product liability and personal injury lawsuits. To these corporations, you and I are beasts in a herd, of no import beyond the contents of our wallets and our willingness to empty them.

Like the cover of a manga comic book, mass-produced modern tools are carefully designed to immediately draw the eye and excite the senses of those passing by. Bright colors and futuristic shapes war with each other for attention on the pegboards of big-box retailers. Handles are made of plastic and rubber fitted over cast steel or molded fiberglass, secured with globs of glue intended to hide malformed ulcerous eyes.

The designers of these blister-makers and nail-benders intend their products to age poorly so they will be discarded by purchasers after just a few years to ensure unending sales of “new-and-improved” replacements. Plastic and rubber are the materials of choice because they are cheap to fabricate, easy to make into colorful, exciting shapes, and speedily surf the spiral wave into the depths of the toilet of planned obsolescence. 

The international playboy that Billy Crystal introduced the world to in “Nando’s Hideaway” might have been talking to one of these hammers when he said “This is from my heart which is deep inside my body: You look mahvelous, absolutely mahvelous dahling. Remember, it is better to look good than to feel good.”

Perhaps these tools do look mahvelous hanging on those pegboards. But how good do they feel?

The tool conglomerate’s product development departments and marketing geniuses have taken the Latin Lover’s philosophy to heart. They know that tools that look good and turn to garbage quickly are more profitable than efficient tools that merely feel good. I am sure ‘Nando would go “crazy nuts” if he observed modern hammers in their natural environment, but alas my friends (saludos, my darlings, you know who you are), Nando will not make the journey to a big-box home center to inspect their pegboard tools because he does not feel good.

Clever people, these marketing strategists, stuffing their pockets with money and landfills with plastic and scrap metal by selling imitation tools to the herd. But as for me, I’ll have none of that churlish fraud, thank you very much.

Would you buy a hammer like this? If so, please don’t call yourself a craftsman or operate heavy equipment.
Wow, a comprehensive torture kit. And just the right color too. Please don’t puke on your computer or smartphone.

Hammer Handle Morphology

The hammer is an extremely simple tool, literally as old as humanity. I suspect humans made the first multi-component tools by attaching wooden handles to stones to make hammers, axes and clubs. 

But despite millennia of history, modern folks have all but forgotten how to make a proper tool handle. It wasn’t always that way.  Everyone made their own replacement handles only five generations ago, and their expectations were guided by sweat and blisters. They didn’t need product development departments in Shanghai to tell them what handle worked best.

Axes are an obvious example of how marketing has morphed handle design. Take a gander at an old tool catalog and notice how axe handles have become thicker in the last 120 years. Do these changes mean that for millennia humans didn’t know how to use axes or make proper handles for them? Do modern human joints and tendons endure the higher vibration and impact forces a thicker, heavier, stiffer handle transmits better than those of our forefathers? Has the nature of modern trees changed such that grain runout no longer weakens a needlessly recurved handle made from their wood?

No, these recent changes in handle design are not intended to make tools more functional or more durable, but are rather to increase sales of cheaply mass-produced tools of apparently innovative design, mediocre quality and disposable utility. They simply look mahvelous, absolutely mahvelous dahling, especially as a picture on a website or hanging on a peg in a hardware store.

Please, don’t get me started on modern mass-market saw handles.

In the next article in this series about beaters we will look at the ergonomics of hammers. Until then, I am profoundly honored to remain,

YMHOS

PS: Here is an excellent article about the “Devolution of Axe Handles” that jives well with my research and experience, and the advice my grandfather gave me about making an axe handle 50+ years ago. And just to prove that we at C&S Tools have refined tastes, here’s some music from Fernando.

The following link is to a folder containing pricelists and photos of most of our products. If you have questions or would like to learn more, please use the form located immediately below titled “Contact Us.”

Please share your insights and comments with everyone by using the form located further below labeled “Leave a Reply.” We aren’t evil Google, facist facebook, thuggish Twitter, or a US Congressman’s Chinese girlfriend and so won’t sell, share, or profitably “misplace” your information. May I never know love or sunshine if I lie.

Subsequent Posts in The Japanese Gennou & Handle Series

Hammers to Use With Chisels Part 6 – Hammers & Health

A box-stock hardware store gennou hammer. Delicious Ambiguity. A good place to start.

I wanted a perfect ending. Now I’ve learned, the hard way, that some poems don’t rhyme, and some stories don’t have a clear beginning, middle, and end. Life is about not knowing, having to change, taking the moment and making the best of it, without knowing what’s going to happen next. Delicious Ambiguity.

Gilda Radner

In previous posts in this series about hammers to use with C&S Tools’s chisels, we looked at factors such as the type of hammer to use, the sort of face a hammer should have, how much it should weigh, and how to use hammers and chisel as a glorious dance team effectively. In this final post we will look at how hammers can impact our health.

Health Matters

This image has an empty alt attribute; its file name is af71ca_8a6942899be847ba9fba7a468c6c1da6~mv2.webp

Swinging a hammer is a violent movement that places large, repetitive impact and vibration stresses on joints, tendons, nerves and muscles. These stresses can make our bodies stronger, or break them down. Carpel tunnel syndrome in office workers clicking away at computer keyboards gets all the attention, but hammers are much more likely to cause health problems. Before nailguns it was common for carpenters to have nerve damage in their hands and arms, but chopping dovetails with a pneumatic chisel is not an option, however.

When your humble servant was a young apprentice carpenter working in Las Vegas I wanted to be like the older more experienced carpenters on the jobsite that used shiny 32oz waffle-face Vaughn hammers to drive 16d nails through stacked 2×4’s in a single swing (this was before the advent of nailguns and LGS studs). I got where I could do that. I still own that hammer, but like me it is no longer smooth and shiny. I have replaced the wooden handle 3 or 4 times. Would that I could do the same with my knees.

I barely remember him, but he was a young man with lots of energy focused on gaining respect and being productive. Fortunately, I was blessed to work on crews led by older guys with no ego left, whose joints ached (like mine do now), and who just wanted to get as much good work done as efficiently as possible each day until beer-thirty. What I learned from them went beyond wacking nails, and more about actually building things. 

At first I wondered why the bosses would hire old farts when younger guys moved faster and got more work accomplished. What I learned, however, was that, while the old guys did not appear to be as active as the younger carpenters, at the end of the day they had always accomplished more actual work, and with less rework. It was difficult for the young man I was back then to accept, but the bosses new their business, including two important points:

  1. “Fast” and “productive” are not the same thing (the tortoise and the hare principle, “Festina lente“);
  2. Rework takes more than twice the time and money to accomplish than doing the work right the first time.

These two principles are key to being a successful professional woodworker, so a forehead tattoo might help Gentle Reader to remember them. Just a suggestion….

None of those old boys I worked with used extra-long extra-heavy hammers because they knew that productive work required driving nails of different sizes in many different directions (not just straight down or straight forward) more accurately with fewer misses, something a heavy single-purpose framing hammer did not do well. They knew how to avoid wasted motion and time. They knew about rhythm.

They were not what could be called kindly gentlemen, but looking back I prefer to imagine they were looking out for me when they ordered me to “bring more 2×12’s, quick now dammit,” and “stop being a pain in the ass, kid.” Ah yes, good times!

They were prophets too when they warned me that the stresses I placed on my hands, arms, knees and back when I was young and dumb and full of something may not hurt at the time but would hurt every day many years later. It truly pains me to admit it, but those crusty old farts might have been right.

So in memory of those curmudgeonly carpenters now sorting boards in the big lumberyard in the sky, let me summarize three pieces of profound wisdom they taught me. Do with them as you will. If you still have room, you might want to add them to that forehead tattoo you’ve got going (ツ)。

First, strive to use your hammer efficiently with minimum force, minimum wasted motion, and minimum stress on joints and tendons. Or as the old boys put it: “less swingin more hittin.”

Second, use an efficient hammer of the right type and weight that will get the job done without damaging your joints and tendons.

And third, stop being a pain in the ass.

Just be thankful that I am kinder than those crusty critters were and will tell you clearly in words what they communicated to me only with grunts, curses and boots while chewing on stogies and chortling as they watched me struggle with concrete form-work 16 feet in the air like the proverbial amorous monkey with his football. Yes, love was in the air…

Indeed, just to prove what a sweetheart I am, here are two more pieces of detailed advice specifically related to hammers: First, determine the style of hammer and weight that works best for you and the work situation. This will take experimentation.

Second, make handles for your hammers that suit your body and the combined natural frequency and the work you use them for instead of settling for the usual one-size-fits-nobody hammers hanging like noxious neon-colored plastic fruit on the walls of big-box retailers.

This last point will be the subject of another series of future articles.

That forehead tattoo is down past your chin by now, I suppose. (ツ)

Series Summary

For such a simple subject this series has been rather long. Let me summarize what you should take away:

  1. Use a steel hammer to strike Japanese chisels instead of a mallet made of wood, rawhide, rubber, plastic or brass;
  2. Use a hammer with a flat, polished face to strike your C&S Tool’s chisels for greater work efficiency and increased tool longevity;
  3. Through experimentation, determine and use the hammer weight(s) that best compliments the chisel’s weight and width, the hardness of the wood, and the natural frequency of your hand and arm;
  4. Make a handle for your hammer that follows sound ergonomic principles (versus marketing hype), fits your body, and helps you work with greater speed and precision. This series of posts about designing and making a handle should help;
  5. Less swingin more cuttin;
  6. Cut the wood with a sharp blade instead of beating it to slivers and prying them out with a sharpened screwdriver;
  7. Control your chisel’s depth of cut to prevent your chisel’s cutting edge from binding in the wood, slowing the work down, and becoming dull early;
  8. Do the “chisel cha-cha” but never the “chisel wiggle;” Just don’t.
  9. Don’t use the chisel to lever out jammed-in waste, but instead flick loose waste out of joints with a quick twist of your wrist without slowing down or setting aside chisel or hammer;
  10. Work to a rhythm to maintain your cutting pace and focus.

Thank you for reading this series of articles. Until we meet around the water can next, I have the singular honor to remain,

YMHOS

If you have questions or would like to learn more about our tools, please click the “Pricelist” link here or at the top of the page and use the “Contact Us” form located immediately below.

Please share your insights and comments with everyone by using the form located further below labeled “Leave a Reply.” We aren’t evil Google, fascist facebook, or thuggish Twitter and so won’t sell, share, or profitably “misplace” your information. If I lie may my forehead tattoos merge.

Part 1 – Hammer Varieties

Part 2 – Hammer Faces

Part 3 – Hammer Weight

Part 4 – The Chisel Cha-Cha

Part 5 – Rhythm & Song

Part 6 – Hammers & Health