Japanese Handplanes: The Kiwaganna Skewed Rabbet Plane

I made myself a snowball
As perfect as could be.
I thought I’d keep it as a pet
And let it sleep with me.
I made it some pajamas
And a pillow for its head.
Then last night it ran away,
But first it wet the bed.

Shel Silverstein

In this article your humble servant will introduce a Japanese plane called the Kiwaganna, meaning “skewed rabbet plane.”

This is an important handplane in common use in Japan, and one we sell, although it’s not well known in the West. So for the benefit our Beloved Customers, I will explain of some of the solutions learned over the years from senior Japanese craftsmen, and acquired during many decades of brutal study at the University of Stoopid, School of Hard Knocks (Lower Outhouse Campus), which may prove useful.

What is the Kiwaganna Handplane?

The Japanese Kiwaganna is written 際鉋 in Chinese characters, and pronounced kee/wha/gah/nah. “Kiwa” means “edge” or “verge,” and “ganna” means handplane.

While the design of the Japanese version of this handplane is unique, as far as your humble servant is aware many other versions exist around the globe. The Japanese version has a wooden body, a laminated blade, and is significantly lighter in weight and smaller in volume than its counterparts. It is a superior tool, IMHO, but it can be quirky.

This plane can handle a number of tasks, but it specializes in planing a straight-sided groove or rabbet right up to an edge or line with a clean 90˚ inside corner. A few common applications include planing the tongue around the perimeter of a board to make the bottom of a drawer, and raising a panel in frame and panel construction. In construction work it is frequently used to pare and clean tenons in timbers, especially those cut with circular saws which tend to leave a step, and to fit finish woodwork, among many other tasks.

This plane is of course used by joiners, cabinetmakers, sashimonoshi, and furniture makers but you would be surprised at how popular it is with carpenters and timber framers for cleaning the 90˚ inside corners of joints such as tenons.

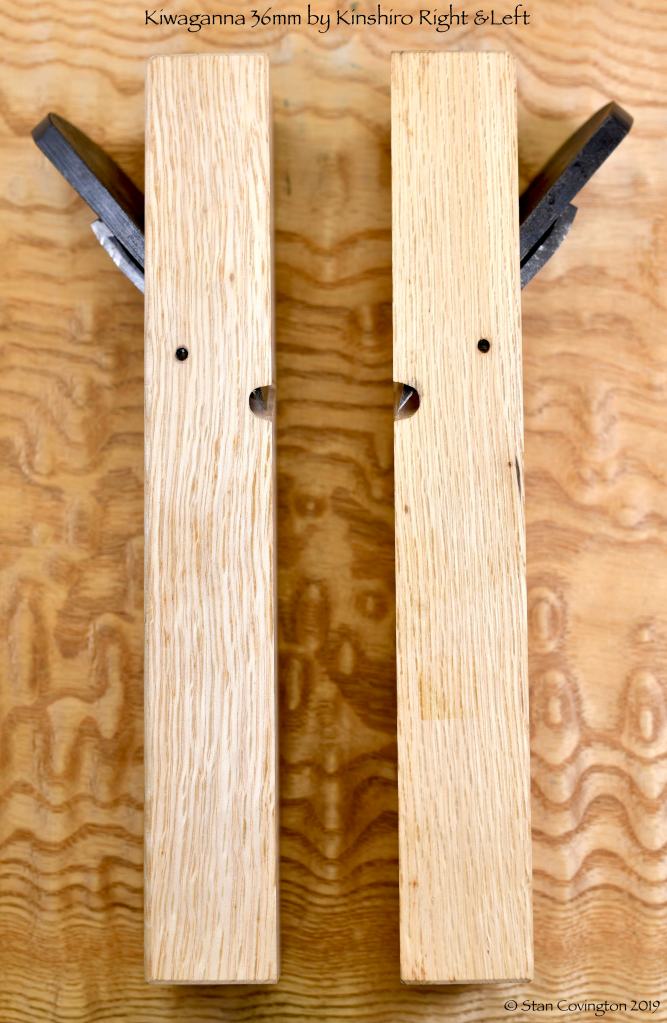
Craftsmen who use kiwaganna typically own a two-piece set comprised of a right-hand and left-hand version to deal with tight access and changing grain direction. But the right-hand version is the most popular by far.

Advantages of the Kiwaganna Plane

In general, a skewed blade in a rabbet plane provides two benefits. The first is that the reaction forces pushing back on the blade include a vector that tends to push the plane towards the line, edge, inside corner or verge being planed to, making the plane more stable in the cut, an important factor where precision is necessary.

The second and perhaps most important benefit of the skewed blade, however, is the smoother cut and reduced tearout it makes possible, especially important when planing cross-grain.

Another benefit the skewed blade provides in the case of the Japanese kiwaganna is the point of the skewed blade penetrating the body of the plane and ending flush with the side of the body, making possible a zero-clearance cut to a line without the extra weight and cost of complicated mechanisms and reinforcing plates. It’s a deceptively simple but clever design.

Points to Keep In Mind

While a simple tool, the kiwaganna often proves frustrating to first-timers. Indeed, your humble servant struggled with kiwaganna for far too long before he figured them out. To avoid similar damage to brain and ego, Beloved Customers that wish to become proficient in using this elegant tool will find it useful to understand the following nine points. The articles linked to below, while not written specifically about the kiwaganna, are nonetheless relevant and may prove helpful

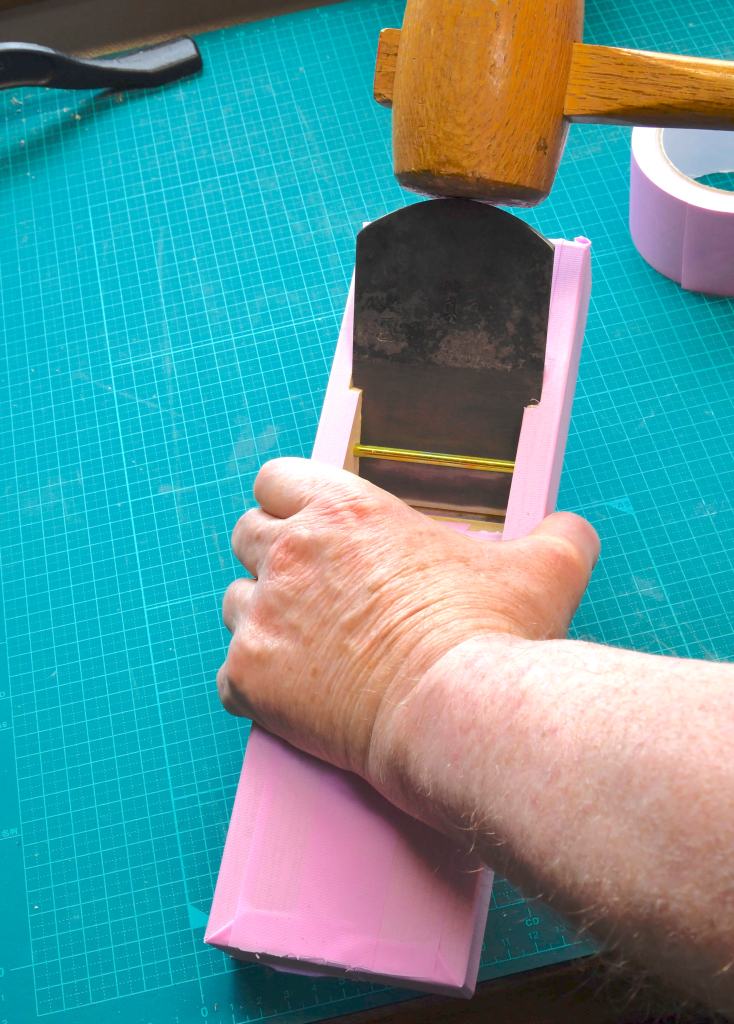
1. First, a brief inspection of the body and the cuts made to receive the blade will make it clear that kiwaganna dai (body) are more fragile than that of regular hiraganna planes, so when adjusting the blade, please use a wooden, plastic or rawhide mallet, not a steel hammer.

2. When removing the blade, strike the dai at the same angle as the blade is inlet into the dai to reduce unnecessary stresses. This means you will hit the top corner of the dai on the side opposite where the blade’s point exits. Clip off and round over this corner of the dai with a knife or chisel to prevent your mallet from chipping the dai. Striking the opposite corner can have bad results.


3. The first step in truing/adjusting the blade of a kiwaganna plane is to sharpen and polish the blade and uragane (chipbreaker) well, make sure they fit each other tightly without a gap near the cutting edge, and check that there is adequate and uniform clearance at the mouth so that shavings flow smoothly without clogging. The skewed nature of the blade and chipbreaker make this difficult to judge, so exercise caution. In many cases, the plane will work just fine, and maybe even better, without its uragane. The uragane has a bevel ground into its pointy corner. Make sure this is not touching the dai when inserted properly. Keep in mind that you will need to periodically grind this bevel down after sharpening the blade every few times or it will touch the dai creating a restriction where shavings will become jammed. When you sharpen the blade, you will also need to resharpen the uragane too to ensure they match each other tightly. Not every time, but once in a while. A lot of people fail to maintain the uragane and then suffer emotional anguish when their plane mysteriously stops working. Mystery solved.

4. The right and left side edges of the blade must fit the retention grooves tightly where they exit the top surface of the dai. If the fit is too loose, the blade will be difficult to keep in alignment, but if the fit is too tight the blade may crack the dai during seasonal shrinkage. Older dai are usually safe, but a plane shipped from a wet Tokyo summer to a hellishly dry Arizona may experience problems. This article provides more details about fitting the body to the blade.

If it becomes necessary to shave the grooves, work very slowly and carefully. Color the blade’s side edges with pencil lead, marking pen ink or Dykem. Insert it into the grooves and note the high colored areas. Shave these down just a tiny tiny bit with a very sharp chisel, or a metal file, then insert the blade and check. Repeat as necessary. Don’t create a big gap between the walls of the groove and the sides of the blade (versus face and underside of the blade which must be tightly pinched in the grooves), just make sure the width of the blade is not wedged tightly between the grooves.

5. Check that the “ear” of the blade (the chamfered corner at the cutting edge opposite the pointy corner) is ground back enough so it does not terminate inside the groove, because if it does, shavings will become jammed. Don’t forget that, with each sharpening, the sharp portion of the blade will become a little wider and this chamfer a little smaller. If it becomes too small, shavings will become jammed between the blade and retention groove, I promise you, so please grind this chamfer back after every few sharpenings.

6. Here is wisdom: Contact between the back of the blade and the block should not be too high-pressure, otherwise the area on the sole behind the mouth may be pushed out making the plane misbehave, an extremely common problem with this plane. You want uniform pressure where possible to ensure the blade is stable, but remember that it is the grooves pinching the blade that keep it in place, not pressure on its back. This is important: If you find your plane stops cutting, it may be because the portion of the dai at the sole behind the mouth is being pushed out as the blade becomes shorter/thicker. The surest way to check this is to use a notched straightedge like the 400mm Matsui Precision product we carry. If the sole behind the mouth is pushed out such that it contacts the straightedge, use a scraper or whatever to pare/shave/scrape excess material away. Indeed, a gap at this area is better than contact. As the blade becomes gradually shorter after much use, its wedging action on the dai may increase pushing the sole behind the mouth out, lifting the cutting edge away from the surface of the wood you need to plane thereby preventing it from cutting consistently, if at all, so check for proper clearance occasionally.

7. With the blade fitted to the grooves and most of the pressure relieved from its back, insert the blade. Check that it projects evenly from the mouth its full width. This is very important. If it projects further on one side than the other, resharpen/reshape the cutting edge so it projects perfectly uniformly. Uneven projection is almost always the result of the user unintentionally and gradually changing the angle of the skew over multiple sharpening sessions, and it always causes problems. Besides projecting uniformly from the mouth (when the sole is at the mouth is perfectly flat), the point of the blade must penetrate the dai (body) and be flush with the outside surface of the sidewall. Heed these words: Failure to get these two subtle details right is the most common cause of failure to perform in the Kiwaganna plane.


8. The mouth opening, in other words the gap between the blade and the sole of the dai where it exits the dai, must be narrow, and even in width, but not closed or skewed, otherwise shavings will jamb in the mouth, another common problem with kiwaganna. If the mouth is not even, use an adjustable steel protractor to match the angle of the blade measured from the side of the dai where the point of the blade exits. Remove the blade and mark the mouth with a sharp marking knife so the mouth is exactly the same angle as the blade. When doing this layout, be extremely careful to make the mouth opening of uniform width to match the cutting edge, but keep the mouth as narrow as possible. Use a sharp chisel to cut to this line making the mouth perfectly uniform. Insert a thin knife blade (or sharpened utility knife blade) into the mouth to shave and clean it after chiseling.


9. There is nothing wrong with leaving the sole perfectly flat instead of having the hollowed-out areas typically added to standard hiraganna planes. Just make sure it is truly perfectly flat. I have no problem with using sandpaper on float glass to true the sole of a kiwaganna, but a card scraper is a better tool for the job.

Juggling Blades

Although we addressed them above, let’s review the two critical factors you must juggle to keep a kiwaganna working well. I’m repeating these points not because I doubt Beloved Customer’s intelligence, but only because repetition improves understanding.

First, maintain the angle of the blade’s skew so that it projects a uniform distance from the mouth (with the mouth/sole flat and true). To do this you must pay more attention when sharpening the blade than is normally necessary. If you get this wrong, nothing will go right.

Second, as mentioned above, to cut into the corner of the rabbet cleanly, the point of the sharpened blade must penetrate the sidewall of the dai and be perfectly flush with the sidewall but without projecting out past the sidewall when the blade is projecting the right amount from the mouth and uniformly across its width. If the skew of the blade is wrong, or the dai is warped or worn, this point will end up being either recessed inside the sidewall or projecting outside it. It needs to be flush with the sidewall. If it is not, you may need to either shave material from the side of the plane (not recommended) or grind down the side edge of the blade near the point, a drastic measure. This is seldom necessary, and when it is, the reason is almost always a badly warped dai.

As you can see, this is a juggling act, but so long as you focus on these two points, and maintain the proper skew angle, all the blades will remain gleefully spinning in the air as you grin from ear to ear.

YMHOS

Relevant Articles:

If you have questions or would like to learn more about our tools, please click the “Pricelist” link here or at the top of the page and use the “Contact Us” form located immediately below.

Please share your insights and comments with everyone in the form located further below labeled “Leave a Reply.” We aren’t evil Google, fascist facebook, thuggish Twitter or a US government IT consultant and so won’t sell, share, or profitably “misplace” your information. If I lie may my kiwaganna planes all warp to resemble mushy bananas.


Leave a comment

The London Finish

A 70mm handplane with a blade by Nakano-san and body by Inomoto-san with a London Finish applied by YMHOS

A person who never made a mistake never tried anything new.

Albert Einstein

here are more ways to finish wood than there are to cook beans, but unlike the musical fruit, the fragrant finishing technique that is the subject of this article became famous through the products of London’s elite gunsmiths such as Durs Egg (Est. 1772), John Rigby & Co (Est, in Dublin in 1775 and moved to London in 1866), Joseph Manton (1766 – 1835), Boss & Co (Est. 1812), James Purdey & Sons (Est. 1814), Holland & Holland (Est. 1835), and a hundred other European gunmakers. However, the technique actually pre-dates the 1700’s by many centuries.

The Traditional London Finish

While the traditional London Finish got its name from the justifiably-famous products of the high-end London gunmakers, some of the most famous of which are named above, since ancient times this technique used to seal and finish high-quality woodwork employed linseed oil, the squeezings from the seeds of a stringy plant called flax.

The difference between the linseed oil widely used for paint production and woodworking and the flax seed oil sold as a health product in the West nowadays is simply the method used to extract the oil from the flax plant.

Of course, Gentle Reader is no doubt aware that the fibers of the cotton plant have been used to make textiles since at least 6,000 BC, but what you may not realize is that it was rare and so labor intensive to produce that at times cotton fabrics cost more than silk in the West, as recorded in tax records of the time. Indeed, it wasn’t until the invention of the Cotton Gin in 1793 that cotton textiles became affordable for ordinary people. My point is that linen cloth made from the fiber of the flax plant, and spun cloth made from animal hair, such as wool, goat and camel, were the most common textiles available probably since Methuselah wore goatskin nappies.

Indeed, flax can be grown in even poor soil, and can be spun and woven into useable thread and cloth in small lots in most any home, so “homespun linen” was once the cheapest most widely-used textile available worldwide, used for everything cotton, polyester, rayon and silk is nowadays, and linseed oil was an ordinary but economically-important by-product of flax production.

The London Finish made famous by the gunsmiths of Olde Londinium consisted of many coats of boiled linseed oil, betimes with some added dryers, forcefully rubbed into the wood by hand (the warm, bare hand, as a matter of fact), allowing days and weeks between coats for the oil to partially polymerize. Indeed, this manual application technique is the source of the term “hand-rubbed finish” that furniture and cabinet companies everywhere lie about applying in our time. If you have a free month, please give it a try.

This finish was also used for furniture and cabinetry since ancient times as referenced in texts of the era which is probably why some modern woodworkers, ignorant of chemistry and eager to employ historical techniques, still soak their projects in linseed oil potions.

While the final product of the traditional London Finish is indeed subtly beautiful, it takes a long time to accomplish, it’s expensive, it does little to prevent moisture from moving in and out of the wood (and therefore allows the wood to rapidly expand and contract with varying moisture content), and it does little to protect the wood from damage. Other downsides include the fact that linseed oil gives a yellow cast to wood, which gunstock makers and other woodworkers historically compensated for by dying the wood slightly red using alcanet root.

Also, linseed oil never fully solidifies and so attracts grime, eventually oxidizing and turning black forming a “patina” many people admire without realizing its dirty nature.

The Modern London Finish

The wood finishing technique described in this article is a modern, improved version of the traditional London Finish, one developed by American custom gunstock makers looking to replicate the beauty of the antique London Finish while providing better durability and moisture resistance for their customer’s expensive firearms and eliminating the expensive and time consuming work of rubbing in stinky, yellowing, dirt-magnet, spontaneously combusting linseed oil.

I learned about it when I was looking for a better finish for the stocks I made for my own smokepoles, everything from flintlock rifles and pistols to large-caliber bolt-action rifles. Through applying, using in the field, and comparing the long-term results of both the traditional linseed oil London Finish and this modern version, I came to treasure the modern version’s subtle beauty, durability and effectiveness at moisture control. Soon I was using it for everything from tool handles to furniture and casework with excellent results.

The primary difference between the traditional and modern versions of the London Finish is that the traditional technique relies heavily on boiled linseed oil, a product that does little to protect wood, while the modern technique relies on modern varnish or polyurethane resins, but with a twist.

Where the two finishes are alike is that neither are surface finishes, but are soaked into the wood’s fibers. By contrast, normally-applied varnish or PU finishes are film finishes that, while they may adhere to the wood well when fresh, do not penetrate deeply, but remain on the surface where they quickly degrade due to UV light exposure, and the stress cracks resulting from expansion and contraction of the wood. Eventually and unavoidably their bond with the wood they are tasked to protect or beautify always fails, usually sooner than later, whereupon it stops doing its job.

The modern London Finish is not a surface film but soaks into the wood’s fibers where it hardens, and is protected from UV and shrinkage damage. It also fills the wood’s pores sealing them long-term and forming a smooth, flat surface free of the dents and streaks at the wood pores that always develop when shrinkable varnish or PU are applied as a surface finish.

Most importantly, it seals the wood with a durable material that cannot be removed without actually carving or abrading the wood away, protecting it from moisture/dirt/oil intrusion. This makes it a better and more attractive long-term finishing solution, one that, unlike the traditional London Finish, doesn’t need to be refreshed annually (yes indeed, annually).

Next, allow your humble servant to present the performance criteria I consider important when selecting a wood finish for tools.

Performance Criteria

The following criteria are focused on improving the longevity, durability and stability of the wooden components of handtools used in woodworking. These include the wooden bodies of handplanes, and the wooden handles of chisels, axes, hammers and gennou.

So what do we need a finish used in these applications to accomplish?

  1. Stability: Minimize moisture movement into and out of the wood cells due to humidity changes, perspiration and rain thereby reducing the swelling, shrinking and warpage of the wood. This is specially important for handplanes, gennou handles, and some types of furniture and cabinetry. A surface finish that quickly oxidizes, suffers UV degradation, becomes inflexible and suffers shrinkage cracks or is easily chipped and/or abraded won’t get the job done for long.
  2. Protection from oil and dirt: Prevent dirt, dust and oil from the user’s hands or the environment from penetrating below the wood’s surface keeping it cleaner. To accomplish this a finish must both fill the ends of open cells exposed at the surface with a water-proof, non-shrink plug (a “filler”) and seal the cells with a waterproof and oil-resistant chemical binder.
  3. Insect and Bacteria Protection: The finish must lock away the yummy smell of raw wood so bugs will go beetling on by without stopping to snack, set up house, or lay eggs. It must also prevent bacteria spores, nasty things always present in dirt, from taking root.
  4. Appearance: A smooth surface that looks like wood, not plastic or varnish.

These are only your humble servant’s criteria, of course; Your needs and expectations may vary.

Why Is the Expansion, Contraction and Stability of a Wooden Tool Component a Concern?

Trees are water pumps. Evaporation at the leaves sucks water, and with it, dissolved chemicals up from the ground. After a tree dies, most of the water contained in its cells migrates out of the wood, the individual cells shrink in size and crinkle as they dry, and the cell walls become stiffer and much stronger. However, despite its transition from a flexible, moist, growing plant to a stiff, dry board, left as-is a dead wood cell does not abandon its God-appointed duty to pump water but will faithfully continue to absorb and expel water, albeit to a more limited degree than when it was alive and kicking, causing its dimensions to shrink and swell in response to changing moisture conditions in the surrounding environment.

The problem is that the rate water enters or leaves the wood cells varies with a number of factors. One such factor is the location of the cell within the block of wood, producing differential expansion/shrinkage along with stresses and warpage. Most importantly, end grain absorbs and releases moisture much more quickly than side/face grain does. Slowing down the rate of water gain/loss is important to minimize and equalize internal stresses and to keep a wood product stable.

Besides the natural seasonal changes in humidity, modern air conditioning and heating equipment can create wild swings in ambient humidity, causing wooden components of furniture and tools, such as the bodies of Japanese handplanes, to warp, harming their ability to plane wood as intended. When this happens, and it will, time and effort is periodically required to adjust a wooden-bodied plane’s sole. This can be frustrating. Short of using a vacuum pump to suck heavy hardening resins into a board’s cells, it is nigh impossible to entirely prevent moisture from entering and leaving wood with changes in environmental humidity, and the dimensional changes, internal stresses, and warping that results.

In the case of a wooden-bodied plane, both ends and the surfaces inside the hole cut to receive the blade have exposed endgrain which absorbs and releases moisture quicker than side grain, so that when the humidity of the surrounding air increases, airborne water penetrates the endgrain faster than the sidegrain, and the endgrain surface at the body’s ends and inside the mouth swell first, causing dimensional changes and differential stresses, and often, warping.

By reducing the rate of absorption of moisture by the endgrain fibers to more closely match that of sidegrain fibers, swelling, shrinking and warping can be reduced. This is where the London Finish shines.

Since learning this method, I have used it not only on my guns, but also on timber frames, doors, tools, workbenches, furniture, cabinets, chests, tansu, tsuitate, and other wood products with excellent results.

Danish Oil

A note about so-called “Danish Oil” finishes is called for at this point. Danish Oil is boiled linseed oil combined with thinners, dryers, and resins. It polymerizes much quicker than simple boiled linseed oil, and is much easier to apply. By itself, varnishes and polyurethanes will not soak far into the pores of the wood (xylem tracheid), but by reducing its viscosity with linseed oil and thinner, the liquid will soak further into the grain and pores before more-or-less hardening. While superior to plain BLO (boiled linseed oil), Danish Oil is still not effective at either preventing water migration, or protecting the wood from dirt and oils. And besides, it changes the color of the wood to which it is applied, it stinks and it starts fires. Nothing good.

A gennou hammer with a Kosaburo head and black persimmon handle with a London Finish

Applying the Modern London Finish

This technique requires only a few inexpensive tools and materials, and no equipment of any kind, but it does take some time and effort to apply.

Tools and Supplies

You will need the following tools and supplies:

  1. Clear varnish or polyurethane finish in a can. Gloss finish is fine, but I prefer a satin finish. Minwax PU works well, while Epifanes is the best I have experience using.
  2. Thinner or mineral spirits. Not the water/acetone/oil-based low-VOC toilet cleaner sold at home centers. A professional-grade thinner from a Sherwin Williams store or other specialist paint store selling professional-grade materials is best.
  3. Mixing container the size of a soup can or jam jar with a lid.
  4. Small paintbrush, perhaps 3/4″ wide. Cheap is fine.
  5. 320 grit and 600 grit wet-or-dry sandpaper.
  6. Clean rags,
  7. Brown paper from shopping bags
  8. Latex/rubber gloves to keep finish mixture off hands. It can get messy.
  9. Masking tape.

The Finish Mixture

The finish mixture to be used is the varnish or PU you selected thinned 100% with thinner. You won’t need much to complete a few plane bodies or tool handles, less than half a soup can in fact, and it’s best to use in small batches. The lid will keep it from hardening between sessions. It’s not a lot of work, but with drying time, the process may take five or six days.

The Steps in Finishing a Wooden Handplane Body or Tool Handle

1. Remove the blade and chipbreaker. Tape the chipbreaker retention rod with masking tape. In the case of gennou handles, tape the entire head except the wood exposed at the top surface of the eye. For chisel handles, tape the ferrule, crown and the striking end of the handle (you don’t want the finish mixture to soak into the end of the chisel handle because it will make the fibers too brittle.) For paring chisels like usunomi that are not struck with a hammer, soak as much of the mixture into the handle’s end as possible

2. Apply the finish mixture to the end grain at the plane body’s ends and all surfaces inside the mouth. In the case of hammer/gennou handles, apply it most heavily to the butt and eye. Apply it heavily, frequently, and forcefully to encourage the wood to soak up as much as possible. Repeat until the wood won’t soak up more. This is the step that matters most. Apply to all other surface of the dai as well. Allow to dry overnight. There’s absolutely no need to put any effort into making it pretty at this stage.

3. Repeat Step 2.

4. Apply another coat of finish mixture, and while it is still wet, use small pieces of 320WD paper with fingers and sticks to wet-sand all surfaces thoroughly. The goal is to produce a fine slurry of finish mixture and sawdust, and to force this deep into the wood’s grain, especially end-grain, clogging the pores solid. Don’t sand the area in front of the plane body’s mouth hard enough or long enough to remove material, change its shape, or round over the corners, though! This is extremely important. This slurry, combined with the varnish/PU already hardened in the wood’s pores, will serve to drastically slow down moisture movement once it sets. It won’t stop it entirely, but it will moderate it more than spindle oil, linseed oil or Danish oil ever could, and it won’t crack or flake off leaving the wood unprotected. Don’t wipe off the wet slurry, but leave it standing/smeared on the wood’s surface and let it dry overnight. It will look terrible for now, but never fear for tis all part of a cunning plan (ツ)!

5. Apply another coat of finish and wet sand with 320 grit WD paper again making sure to hit all the places you might have missed before and knocking down any hardened slurry from step 4. Allow to dry overnight.

6. Wet sand with the finish mixture using 600 grit WD sandpaper this time. Be sure to sand down and completely and thoroughly remove any hardened finish or slurry remaining on the wood’s surface. This is important. After sanding, but before the mixture hardens, scrub it down with clean rags and/or brown paper from shopping bags to remove all remaining finish from the wood’s surface. Allow to dry overnight. You may need to repeat this step for best results.

7. The next day examine the wood’s surface for any remaining finish/slurry visible on surfaces. Remove any you find with 600 grit WD sandpaper and the mixture.

8. Allow to dry for 24 hours.

9. Scrub with brown paper from a shopping bag.

10. Apply automotive carnuba paste wax, and polish out.

Remember that, if applied correctly, the London Finish as described herein should not create interference or change tolerances in the tool because there shouldn’t be any finish material left proud of any of the tool’s surfaces to cause interference.

When finishing the blade retention grooves, you will find it difficult to sand up inside them with your fingers, so use sticks. But don’t remove much material in creating a slurry or the blade may become too loose. And be sure to remove any and all slurry or finish that remains on the surface.

At this point in the process, the London Finish is complete. It is well suited, in my opinion, for guns, tools, workbenches, doors, timber frames, as well as any furniture or casework where protection is desired but a surface finish is not desired. This finish also works exceptionally well for carved wooden surfaces, but with less sanding. It also has the distinct advantage that it does not require careful application, so if brush hairs or sawdust get caught in the finish, or bubbles or sags develop, never fear, because in accordance with our plan so cunning we could stick a tail on it and call it a weasel, they are all going to be wet-sanded away. If you decide to apply a final surface coat, however, then greater care is necessary for the final coat.

If you are doing casework or need an attractive surface finish, a topcoat or two of the same mixture, freshly made, applied with a clean brush is just the ticket. If a really nice finish is desired, several coats can be applied, wet sanding between each, and finally polishing with polishing compound (automotive paint supply houses carry this in many grits) to create a mirror finish.

If you feel brave enough to tackle large surfaces, such as a tabletop where this finishing technique excels, some time and effort can be saved by using a pneumatic or brushless random orbital sander. The type of motor matters because you don’t want a spark to ignite the thinner when wet sanding. You have been warned.

A quick note on frame and panel construction is warranted at this point. If possible, it is best to apply the finish (any finish for that matter) to all surfaces of panels, especially endgrain, before gluing them into their frames. In any case, a bit of paste wax (I use beeswax-based Briwax) applied to the inside of frame rabbets and the edges of panels before assembly will prevent finish from accidentally gluing the panels into the frames, thereby restricting expansion and contraction, and eventually producing cracked panels.

An 80mm handplane with a blade by Yokosaka-san and body by Koyoshiya with a London Finish. If it looks as if no finish at all has been applied, that’s because there is no film finish on the wood’s surface to be seen.

The Story of Why I Started Using the London Finish for Plane Bodies

Back in 2010 I was transferred from Orange County in Southern California to Tokyo, Japan. Due to an error by the moving company, most of my beloved tools were left behind in a storage unit In Las Vegas, Nevada, placing my sanity at imminent risk. I bought replacement chisels and planes (hiraganna, mentori, shakuri, etc) in Tokyo at that time. I had become dreadfully tired of the warpage that often developed in my plane bodies each time I moved, so I considered ways to reduce this nasty tendency, and of course, tried the London Finish I had been using on my gunstocks back in the USA. The results were perfect.

After applying the London Finish to them in Tokyo, I used them for about a year through all the seasonal humidity changes common to Japan and exposed to indoor heating and cooling. They stayed straight the entire time. My job then transferred me to the Pacific island of Guam, with high temperatures and constant 85% humidity, where I used and stored these high-quality planes in a hot and humid garage for 1.5 years. They still stayed straight. When I returned to Tokyo, my wooden bodied planes again made the 35 day land and sea voyage inside a hot and humid container. They arrived at their new home straight. At the time I am writing this, those same planes have been in my home here in Tokyo for over 8 years through the various seasons and humidity changes, and have mostly remained straight.

Not having to regularly true the soles of my wooden planes since then has saved me a lot of time and headaches (as he is wont, Murphy carefully ensured that they warped and stopped working at the most inconvenient time possible), and of course has extended their useful life.

Another special benefit in my case is the resistance the finish has to sweat, oils, acid and dirt from my hands, which, in my case, causes white oak to turn black almost immediately. This is doubly true in the case of my chisel and hammer handles.

I have taught this method to many people that admired my completed woodworking projects and cabinets and handmade gunstocks, but few have had the patience required to actually attempt it. Of course, being all handwork, and taking quite a bit of time to accomplish, it is not suited to most commercial situations.

As for hobby woodworkers, there seem to be two schools of thought. The first hasn’t the patience to deal with any finish that can’t be applied with either a spraygun or power roller. Most of the woodworking publications energetically promote equipment-intensive commercial production methods even to the amateur, and feverishly foster this attitude. At the the risk of sounding cynical, I ask you Gentle Reader, is owning an airless spray system really necessary to perform quality woodworking, or is such equipment more of a profit center for manufacturers and retailers?

With this statement, I am certain I would receive piles of poisonous complaints from advertisers to this blog (if I had any), and perhaps even threats about pulling said advertisements. Good thing I don’t give a rodent’s ruddy fundament about such things or the feeling of rejection might crush my fragile ego like a raw egg in a little boy’s back pocket (シ)。

At the other extreme, there are devotees of the Neanderthal school that have been indoctrinated by romantic viewpoints in the woodworking press, or influenced by things written in books a hundred years ago. These gentle souls are drawn to archaic finishes such as boiled linseed oil, beeswax, and unicorn piss.

To the production-method advocates I say save production methods for production work, and seek better quality for your handmade projects.

To the Birkinstock-wearing Neanderthals I say, there is a reason old unrestored furniture and gunstocks are dark, grungy, and yes, dirty: Linseed oil and beeswax. Consider what you want your work to look like in 100 years. Certainly not cracked, water-damaged, and dirty. And genuine unicorn tinkle is practically impossible to come by nowadays, anyway, even on Amazon.

I promise you the results will be worthy, with no downside, and your planes, tools handles and wooden projects will not only look better longer, but will be tougher and more stable.

The Abura Dai

I would like to add a note here about a Japanese technique intended to improve the stability of handplane bodies, namely the “Abura Dai 油台” which translates to “Oil Body.”

The idea is to soak the oak body (dai) of a handplane in low-viscosity spindle oil until it takes up a significant amount thereby minimizing moisture exchange and improving the stability of the handplane’s body. Does it work?

I own and use a 65mm abura dai handplane I purchased as a sample around 10 years ago, and which seems to be fairly stable. But I am not a fan of abura dai for two reasons. First, by design spindle oil never dries and is always wet. Therefore, the dai is always a little oily and definitely stinky. I don’t like the smell of spindle oil nor do I want to feel it on my hands unless I’m being paid for it.

Second, it makes the sole of the handplane softer, an area I would prefer remain harder, increasing wear noticeably. I was told about the failings of the abura dai by professional woodworkers many years ago, and the wear on the sole of this 65mm plane confirms their observations.

I encourage Gentle Reader to give the London Finish a try. You will like the results. And please share your impressions with your humble servant and other Gentle Readers.

Until then, I have the honor to remain,

YMHOS

Byodoin Temple on a clear Winter’s day

If you have questions or would like to learn more about our tools, please click the “Pricelist” link here or at the top of the page and use the “Contact Us” form located immediately below.

Please share your insights and comments with everyone by using the form located further below labeled “Leave a Reply.” We aren’t evil Google, fascist facebook, or treacherous TikTok and so won’t sell, share, or profitably “misplace” your information. If I lie may my all my planes warp into pretzels.

Leave a comment

Japanese Handplanes – Part 4: The Marriage of Blade & Body

After tumbling down the rabbit hole, Alice discusses her options with her new friends Gryphon and Mock Turtle. After perusing this article, I hope Beloved Customer will be less discombobulated than poor Alice, less tearful than tender-hearted Mock Turtle, and less indignant than Noble Gryphon.

A Bruise Is A Lesson… And Each Lesson Makes Us Better.

George R.R. Martin, Syrio Forel, Game of Thrones,

In this the fourth article in our series about the Japanese hiraganna handplane, we will discuss how to fit the plane’s wooden body to the blade thereby improving the tool’s performance.

As is the case for most of the articles in this blog, this one too is intended primarily for the information and entertainment of our Beloved Customers, but all well-behaved Gentle Readers are welcome to partake. Bon apetit.

Why Fit Body to Blade?

Beloved Customers may wonder why your your most humble and obedient servant is inflicting the digital world with another pointless article about Japanese planes, especially since the handplanes purveyed by C&S Tools are advertised as “ready to use” when new. Please allow me to address this absolutely valid concern herein.

As mentioned in the Part 3 of the Japanese Handplane Series, Mr. Inomoto, the daiuchi shokunin that cuts the bodies of our planes from Japanese White Oak to fit the blades forged and sharpened by Mr. Nakano, does indeed do more than just cut a gap for a blade to slot into, but fits the body to fit the blade so each plane is able to produce a decent shaving before it leaves his workshop. However, due to cost considerations and practical limitations to his prodigious prophetic talents and clairvoyant insights regarding who will eventually own each plane, and their preferences for the blade-body marriage, he fits the blade on the tight side, assuming the end-user will fettle the body to best suit his own purposes. Ergo the paragraph titled “Plane Philosophy” in Part 3.

I suspect relatively few Beloved Customers have given the subject serious thought, but it is nonetheless true that each owner of a Japanese plane must develop their own philosophy regarding the relationship between blade and body, and if they deem it necessary, adjust their plane body accordingly.

This article assumes Beloved Customer has decided to refine the fit between blade and body, and instructs in how to achieve those refinements. Are they absolutely necessary? Nah. Will they make a difference? Yes, but the degree of improvement achieved will vary from plane to plane and person to person.

Nonetheless, your humble servant recommends Beloved Customers, especially those interested in obtaining professional-level plane maintenance and usage skills, to perform the operations described in this and future articles in this series. You’ll be glad you did even if it may take some years for the benefits obtained to become evident. At the very least you may be fortunate enough to avoid the stupid mistakes YMHOS made when he was green.

So with that out of the way, let’s assemble the tools we will need to make some righteous sawdust.

Tools

The following is a list of tools I recommend for this job.

  1. Wooden, plastic or rawhide mallet for striking the blade and body;
  2. Carpenter’s pencil and/or marking pen;
  3. Masking tape to protect the wooden body from oily/graphity fingerprints;
  4. Caliper (vernier, dial or digital) and/or divider for measuring and comparing;
  5. Various chisels (e.g. 3mm, 6mm, 9mm usunomi paring chisels). Although it may seem strange, wider chisels are typically not necessary for this task.
  6. Metal file (to be modified) or a 15~18mm wide chisel (to be modified).
The tools needed for fitting the body to the blade. The chisel next to the vernier caliper is an old Sorby chisel modified especially for working on plane beds and gifted to me by Chris Vandiver. Thanks, Chris.

Regarding the modified file or chisel listed above, this is a push scraper, a truly ancient tool once commonly used for precision metalwork. Your humble servant uses it to shave the bed to fit the blade. You can make this tool as wide as you wish, but please note that if the blade of either file or chisel is too wide, your shaving efforts may not produce smooth results.

You can easily make this scraping tool from a chisel or an old file by grinding a flat on the end of the file or cutting edge of the chisel square to the centerline of the blade and at an 80~90˚bevel angle. Then hone this square cutting edge and at least one of the two adjoining surfaces to 1000 grit. Voila.

If you adapt a file to make this tool you will want to attach a handle to its tang to avoid getting red sticky stuff on your pretty wood.

If you prefer to use a regular chisel, that’s OK too, but you will find this scraper does a cleaner job with less effort.

Blade Preparation

This explanation assumes the blade is sharp and the ura is in good shape. If not, please sharpen the blade because it will of course affect the fit of blade to body.

While you are at it, check that the side edges of the blade are free of burrs or rough grinder marks which might abrade the grooves after some use. Some grinder marks may be unavoidable, but if the sides feel rough and abrasive to the back of your hand, smooth the edges a little using a sander and/or sharpening stones.

In addition, please make sure the right and left clipped corners of the blade’s cutting edge, called “ears,” are properly trimmed, meaning that they are ground large enough to reduce the width of the sharp cutting edge so the cutting edge fills the width of the plane’s mouth but does not extend into the grooves, because if it does get into the grooves, shavings will become jammed between the blade and groove wasting your energy and leaving nasty scuff marks and sometimes even tracks on the planed surface. それは困る.

When sharpening a plane blade, therefore, it is important to check and trim these ears periodically. A few passes on a diamond plate or rough stone will do the job; It doesn’t need to be pretty, and the ears don’t need to be sharpened because they will never touch the surfaces to be planed.

The disassembled plane used as an example in this article, a 70mm finish plane with a Blue-label steel blade hand-forged by Mr. Nakano Takeo and a Japanese White Oak body by Mr. Inomoto Isao. An excellent tool.

Checking & Tuning the Mouth

Beloved Customers won’t need to worry about this, but Gentle Readers fettling plane bodies made by themselves or others should be careful the first time they adjust the blade’s cutting edge to project through the mouth to ensure there is adequate clearance because if the mouth isn’t wide enough to allow the cutting edge to pass through cleanly with a little clearance to spare, the blade may chip out the sole.

If there is any question about the adequacy of your plane’s mouth/blade clearance, the first time you extend the blade through the mouth press the plane sole-down on a piece of clean wood while tapping the head of the blade with your mallet to make a zero clearance cut at the mouth. The supporting board will prevent the mouth from chipping. This is also standard practice when opening the mouth of a new plane body.

Hold the plane up to a light and peer through the mouth to observe the gap between cutting edge and body. The width of this gap must be greater than zero, and it should be constant the full width of the blade, but how wide it needs to be will depend on the thickness of the shaving you intend to cut.

Ugly tear-out can be minimized and the polish of the planed surface increased by having a tight mouth. Indeed, the tightness of the mouth and the area of the sole directly in front of the mouth applying uniform pressure on the wooden surface being planed up to the last .001 millimeter in front of the mouth is critical for exceptionally fine tearout-free cuts. On the other hand a mouth gap that is too narrow to pass the intended thickness of shaving will jamb every time, so the user must balance the width of the mouth, the desired shaving thickness, and blade projection to obtain good results.

Here is wisdom: allowing shavings to repeatedly become tightly jammed in the mouth is not only hard on the blade, but it will damage the mouth, so before this happens too many times, you want to either adjust the mouth or your expectations for shaving thickness.

To open up or adjust the mouth, cut a hardwood guide block to use with a chisel to pare the mouth opening, and clamp it to the sole. The angle of the block will vary with the angle of the blade.

Then, using an exceptionally sharp paring chisel and this guide block, take minute shavings at the mouth using skewed strokes. A paring chisel with a three-hollow mitsuura ura is ideal for this task, but any sharp chisel with a longish blade will do the job.

Body Protection

This process will involve graphite pencils, marking pen ink and fingers, so to keep the wooden body from looking dirty, please cover the top and sides with a low-tack masking tape. In this example, I used a pretty pink tape.

Adjusting the Blade to the Mouth

As mentioned above, the blade fits into and is clamped in-place in the wooden body by the two tapered grooves cut into the body. Sometimes the fit between the side edges of the blade and the bottom of these grooves is too tight. This can occur in a new plane if the body was improperly cut to begin with, but the most common cause is shrinkage of the body due to humidity changes.

Of course, the wooden body will change dimensions with changes in ambient humidity, while the blade won’t. If a plane is shipped from a highly humid climate like Japan (at some times of the year) to a dry climate like the Mojave Desert (all times of the year), for example, the body may shrink in width developing tremendous pressure on the side edges of the blade, sometimes enough to crack or split the body. Therefore, if you are located in a dry climate and acquire a plane from a wetter climate, it may be wise to remove the blade and let the body acclimatize for a week or so.

As mentioned above, the blade is tapered in width, being wider at the head and narrowest near the cutting edge. This is intentional. Ideally, you want the side edges of the blade to just kiss the bottom of the grooves where they exit the top surface of the body, and not touch the bottom of the grooves anywhere else. This type of fit will make it easy to make minute right or left adjustments to the cutting edge’s projection by tapping the shoulders of the blade right or left.

Obviously (and this is an important point to understand), if both of the blade’s side edges are in close contact with the bottom of the grooves their full-length, this important method of adjustment will no bueno.

Use you vernier, dial or digital caliper or mechanical divider to check that the the blade does indeed become narrower in width from the point where it exits the grooves at the top surface of the body and the point where the cutting bevel begins. If it doesn’t, you will need to grind in some taper. How much? Mr. Nakano’s blades typically taper the amounts shown in the photos above, but they are handmade and each one is little different.

The distance measured between the blade grooves where the blade makes contact at the top of the grooves. Please notice that this distance is slightly greater than the width of the blade at this point as shown in the photo on the right above.

In any case, please ensure the body provides adequate clearance to just accommodate the blade’s width. Mark-1 Eyeball is often good enough for this task, but a divider is better and a caliper is ideal for this task.

Make a final check by applying marking pen ink to the sides of the blade 1cm down from where the blade would normally exit the grooves at the top surface of the body. More ink is not necessary.

If some paring of the grooves is necessary to provide adequate clearance, please remove no more wood than is absolutely necessary.

Remember that we want just a little clearance between the blade’s sides and the top of the grooves, as shown in the photos above, and more clearance at the bottom of the grooves to make it easy to adjust the blade’s projection from the mouth.

Groove Maintenance

A common problem we see with old planes is cracked and split bodies caused by the tapered blade becoming shorter over the years due to repeated sharpenings, and therefore the edges of the blade exerting excessive pressure on the bottom of the grooves when a careless user mercilessly pounds the blade into the body. This sort of damage is entirely avoidable by humans, but some gorillas advocate paring the bottom of the grooves of new planes to create a gap of 2~2.5mm between the groove and blade to accommodate all the reduction in length the blade may experience over many years of service at once. To this practice, your most humble and obedient servant can only respond “Poppycock!”

Why do I object to what seems to be a logical solution? Glad you asked.

If you chisel out a big gap between the side edges of the blade and bottom of the groove, not only will you unnecessarily weaken the body by severing continuous wood fibers at the narrowest, weakest, most critical point of the body (think about it real frikin hard), but the pivoting action required to adjust the blade’s projection right and left by tapping the head right and left will become more difficult, while at the same time the blade will become less stable in the body.

I write this based on bitter experience obtained from following bad advice received before I knew better, and later being mocked by more experienced craftsmen who noticed my silly error. An embarrassing episode indeed, one I was ashamed of for many years.

Beloved Customers will of course have purchased a high-quality plane from C&S Tools, with a blade hand-forged by Mr. Nakano Takeo and a Japanese White Oak body cut by Mr. Inomoto Isao, but just in case you are working on a lower-grade tool, here are some things you need to check.

The way to avoid body damage due to shrinkage of body or blade is simple: (1) Pay attention to the fit of the blade in the grooves; (2) Adjust the clearance when appropriate, and; (3) Avoid excessive use of recreational mushrooms which may dull the senses and cause chronic tool neglect.

In other words, when you notice the blade becoming tight in the grooves, simply pare the bottom of the grooves a nat’s mustache hair deeper. Don’t get carried away because a little contact is a good thing!

Our 6mm and 3mm usunomi paring chisels are ideal for this job. but standard oiirenomi chisels can accomplish the task too.

Another option is to grind the sides of the blade making the blade a little narrower in width.

Beloved Customer has the choice of learning from your humble servant’s stupid mistakes or from your own. Of course, I suppose there’s always the default option too many lost and wandering souls select of neglecting to learn anything at all…

Fitting the Bed to the Blade’s Back

Assuming Beloved Customer has completed the checks and adjustments in the previous sections, the general steps for fitting the bed to the blade are as follows:

  1. Begin by rubbing the back of the blade from where the cutting bevel begins to the end of the steel lamination with your carpenter’s pencil giving it decent coat of graphite. Marking pen ink or Dykem works too.
  2. Insert the blade into the grooves and tap it with your wood, plastic or rawhide metal mallet (not a metal hammer!) until the cutting edge is nearly projecting from the mouth. You may need to really wack the blade hard 5~10 times to accomplish this the first time.
  3. Next remove the blade by holding the plane in your hand and alternating strikes on the right and left sides of the chamfer on the body behind the blade’s head. Don’t strike the flat end of the body! The blade should wiggle out after some less-than-gentle persuasion. If your plane doesn’t already have a pretty 6~8mm wide chamfer cut on this edge, please make one.
  4. Examine the bed. You will notice how the areas in contact with the blade are now marked with graphite. We need to pare or scrape down these contact points to achieve a more uniform contact. Don’t fiddle with the grooves yet.
  5. Use your chisel or scraper tool to carefully shave down the high spots marked with graphite. Cut/scrape only those areas marked with graphite. Before you begin making sawdust, however, please be careful to not remove any wood from any of the three surfaces inside each side groove for now. You need to sneak up on the final shape of the bed like a kitten stalking a grasshopper, with eyes wide open, gently and a little bit at a time. It would be a serious mistake to try to make a perfect fit after only a few passes.
  6. Repeat steps 2~5. You may need to do this kitten stalk 10 times to get it right. You won’t need to apply more graphite each time, just rub the back with a piece of cloth to redistribute the graphite. Or you can use your carpenter’s pencil again. With each iteration, the graphite marks left on the bed will increase in number and become larger. You want to be able to seat the plane blade with only three or four medium strikes with your mallet, and make fine adjustments with just a few more. At no time should your plane squeal a complaint.
  7. When the blade can be easily seated with 3 or four medium wacks of your mallet, use a metal file to lightly smooth out the rest of the bed. Perfection is neither attainable nor should it be sought.
The bed before applying graphite and any shaving. Mr. Inomoto Isao does a nice job, so contact is good, but still tighter than I prefer. The No.13 is a mark he made to keep blade and body matched. Notice the “tsutsumi” shelf cut at the bed just inside the mouth. This is a nice, pretty detail that aids in preventing the blade from “sniping” the ends of narrow boards, but sometimes it gets in the way, and after much use, it becomes so thin it must be removed. It is neither necessary nor sacred.
The back of the blade has been rubbed with a graphite pencil, and is being tapped into the body. It takes some forceful strikes to get it into position. Notice the purty-pink low-tack masking tape applied to the body to help keep it free of graphity fingerprints. My planes seem to appreciate brighter, feminine colors.
Graphite marks left on the bed from the first insertion of the blade. Not terrible, but contact could be better.
Shaving the bed with a scraper chisel the first time
Shaving the bed with a scraper chisel after the blade was seated a second time
The bed after shaving it the third time.
The completed bed following final cleanup with a file. The blade can be inserted with three medium mallet strikes, and fine adjustments made in 3~4 strikes. The blade does not tend to twist out of alignment. Notice the graphite marks left on the tsutsumi shelf where the blade has contacted it.

The Peppermint Twist

Now that the bed is fitted to the blade, we need to return our attention to the grooves.

If one groove is pinching the blade significantly more than the other, the blade will want to twist out of alignment. This can be very irritating.

The surfaces inside the grooves touching the ura and back of the blade should be clean and straight. In any case, unless it causes a serious performance problem, it’s best to leave these surfaces alone for a while because after inserting and removing the blade several times the fit may improve automatically.

If the blade continues to twist out of alignment, however, determine where the high points are on the surface of the groove touching the blade’s ura. You can do this by peering into and through the mouth while shining a light into the groove.

Once you have identified the high spot(s) glue a piece of fine sandpaper to a thin stick of wood and sand it down a little bit at a time between inserting and removing the blade frequently to check the fit.

Don’t sand down the surface inside the groove which contacts the blade’s back unless absolutely necessary because this will effectively open up the mouth, something we want to avoid for as long as possible.

With this, your plane’s hard, sharp blade and soft wooden body should fit together like hand in glove. It may sound like a lot of work, but it usually isn’t. In fact, besides prepping the blade, the whole process can usually be completed in less time than it takes to read about it.

So far in this series your humble servant has provided a lot more detail and explanation than I have ever seen in writing elsewhere. It took me many years of fumbling in the dark, much consultation with older, more experienced craftsmen, no few curses and ungentle slaps to the back of the head, and numerous expensive mistakes to learn these things. I hope Beloved Customer profits from them.

In the next post in this ongoing adventure towards the perfect Japanese handplane we will shift our attention to marrying the chipbreaker (uragane 裏金) to the blade.

Y’all come back now, y’hear.

YMHOS

Alice asking advice of a caterpillar sitting on a magic mushroom, smoking magic mushroom. This nasty habit is perhaps the reason why this bug is never described in the story as having skill with a handplane.

If you have questions or would like to learn more about our tools, please click the “Pricelist” link here or at the top of the page and use the “Contact Us” form located immediately below.

Please share your insights and comments with everyone in the form located further below labeled “Leave a Reply.” We aren’t evil Google, fascist facebook, or thuggish Twitter and so won’t sell, share, or profitably “misplace” your information. If I lie, may the ears of all my plane blades become clogged with wax.

Leave a comment

Other Posts in the Japanese Handplane Series:

Japanese Handplanes – Part 3: The Blade

A beautiful and even poetic plane blade forged by the famous Chiyozuru Korehide. The carved inscription reads ”Shin, Un, Mu” meaning “God, Cloud, Dream.”

The best steel doesn’t always shine the brightest.

Joe Abercrombie, The Blade Itself

In this the third article in our series about the Japanese hiraganna handplane your most humble and obedient servant will review some of the design details of iron and steel plane blade. Why? Because to become proficient at using and maintaining the Japanese handplane, one must understand it more than just superficially, indeed, a healthy and mutually respectful relationship should be Beloved Customer’s goal.

In addition, I will be so bold as to briefly present the story of a single plane blade made for a famous carpenter by a famous blacksmith.

The Shin Un Mu Blade 神雲夢の刃

The plane blade pictured at the top of this article was forged 6 years after the end of World War II by a famous Tokyo blacksmith named Kato Hiroshi (加藤 廣 1874~1957), who used the nom de forge of Chiyozuru Korehide, (千代鶴是秀 ). The Chiyozuru name has been copyrighted and is still in use to this day, although the current holders of the rights to the name are unworthy to even pour Mr. Kato a beer, if Mr. Kato was still a drinking man.

Chiyozuru-san forged this blade at the request of a famous Tokyo carpenter named Nomura Sadao. The engraving on the back states the blade (and matching chipbreaker) was made by him for Nomura Sadao and was completed on June 4, 1951. I’m told Chiyozuru-san charged Nomura-san ¥10,000, a huge amount back in the day.

You will notice that it looks different from most plane blades in that it lacks the beveled “ears” at the right and left corners of the blade’s cutting edge commonly seen in Japanese plane blades intended to prevent the cutting edge from extending into the grooves on each side of the blade opening used to retain the wedge-shaped blade in-place thereby preventing wood shavings from becoming jammed between the groove and blade leaving unsightly marks on the surface of the wood being planed. More on this below.

The blade in question, however, has rabbets cut into the jigane at the left and right edges of the blade so the ura area is thicker than the sides which fit into the retaining grooves, and the cutting edge, therefore, does not intrude into the grooves, making beveled ears unnecessary. This is a very logical solution, although as it was explained to me by Tsuchida Noboru-san, it was not actually invented by either Chiyozuru-san or Nomura-san, but a design Nomura-san first observed at a technical school for cabinetmakers. He then made a wooden full-scale model and asked Chiyozuru-san to forge it for him.

While it is an elegant solution to a real performance issue, it is much more difficult to make this style of blade than the conventional one, and so never became popular.

On the subject of materials, Chiyozuru is well known for preferring to use imported steel, mostly from England, instead of traditional domestic Tamahagane steel. Although the source of the soft jigane is uncertain, there can be no doubt the steel lamination is made of British high-carbon steel.

Gentle Readers are no doubt aware that Japan has always been a land of many disasters, some man-made and others natural, with earthquakes and city-destroying fires being especially common. To protect this important blade from becoming lost to posterity, as were so many valuable things during the war, upon his retirement Nomura-san entrusted the blade to the Takenaka Carpentry Tools Museum located in Kobe, Japan.

Ironically, a large earthquake struck Kobe on January 17, 1995 killing over 6,400 people and tearing the city a new one. Fortunately, while the museum’s exhibits were jumbled up, this blade was not damaged.

Upon Nomura-san’s reassignment to the big lumberyard in the sky, his heirs formally donated the blade to the same museum where it remains to this day.

The four Chinese characters engraved into the face of the blade read, from top down, 神雲夢, pronounced “Shin, Un, Mu” which translates directly into English as “God, Cloud, Dream.” No doubt there is some deep poetic meaning being expressed through these three characters, but it is far above the poor understanding of your humble, barely-literate servant.

Interpretations from Beloved Customers and Gentle Readers are welcome.

Definition of Fettle

While we are on the subject of literacy, I would like to clarify the meaning of a word pertaining to working on tools, and especially planes.

Gentle readers have no doubt heard the word “fettle” used in the phrase “fine fettle,” usually referring to someone being in good health or physical condition. But it has other, older meanings.

In the British dialect, it means “to set in order,” or “to get ready,” from Middle English fetlen to shape, prepare; perhaps akin to Old English fetian to fetch.

Your humble servant commonly uses the word fettle as a verb, mostly for truing or adjusting a plane or other tool.

Never let it be said that the Gentle Readers of the C&S Tools blog are less than exquisitely erudite and edumacated.

Blade Details

Misunderstandings abound and deep, pungent rivers of BS frequently burst their banks when the details of the Japanese hiraganna plane’s blade are discussed; Buckets, mops and even garbage pumps are necessary to clean up the mess. I despair: What to do, what to do?

While it appears to be a simple, crude, even haphazard component to the uninformed, the design of a well-made plane blade is subtle and its execution elegant. I am confident Beloved Customers willing to ignore ridiculous internet rumor along with the squeals, grunts and farts emanating from the orc-infested woodworking forums, and forego magic mushrooms for a time will quickly understand. So without further ado, let’s turn on the pumps and get our mops moving.

Laminated Construction

The plane’s blade is made by forge-weld laminating a piece of hard high-carbon steel to a larger piece of softer low/no carbon steel/iron. These details are discussed in more detail in the two posts linked to below. It is important to understand these details if Beloved Customer intends to become skillful in using and maintaining Japanese planes.

Sharpening Part 8 – Soft Iron 地金

Sharpening Part 9 – Hard Steel & Soft Iron 鍛接

The Ura

The blades of quality Japanese chisels and planes have a hollow-ground area on the surface of the blade called the “flat” in the case of Western planes. In the case of plane blades, it is located on the surface your humble servant calls the “face,” which is oriented upwards facing the user when installed in the body. An accurate understanding of this structural detail is essential to using and maintaining the Japanese handplane. We discussed this detail in a previous article linked to below. Please review this post if you haven’t done so previously.

Sharpening Part 10 – The Ura 浦

We discussed how to perform periodical maintenance on the ura in an earlier post. Oh joy!

The face of another plane blade by Chiyozuru Korehide engraved with many of the brands he used during his career. His Korehide brand is the the lozenge-shaped mark at the lower left. It has a sweet, sculptural ura.

Blade Retention

The blade of the Japanese handplane is retained in its wooden body by the pinching action on the face and back (top and bottom surfaces) of the blade inside the tapered grooves cut into each side of the mouth opening, not pressure on the side edges. This arrangement eliminates the dedicated wedges, usually made of wood, employed since at least Roman times to retain the blades of Western planes. It also makes irrelevant the widgets and linkages common to modern planes such as the Bailey-pattern, considered by many to be the pinnacle of plane design in the West. Simple is best, don’t you agree?

A common misunderstanding about Japanese planes is that pressure between the wooden body and the back of the blade is necessary to both lock the blade into the body and to eliminate chatter resulting from blade vibration. In response, your humble servant can only turn up the speed dial on the garbage pump and say “poppycock!”

Except in the case of a poor quality body/blade, or one damaged through improper setup and maintenance, the pinching forces, and resulting friction, acting on the front and back of the narrow portion of the blade inserted into the two grooves in the body’s mouth must be sufficient to hold the blade in-place without relying on pressure on the blade’s back. If you know anyone who disagrees with this statement, rest assured the brown stuff dribbling out of their ears is not chocolate mousse.

Unlike the potato chip-thin blades common to many Western planes, the quality Japanese plane blade of the sort we carry with its relatively thick, laminated construction may have a few female characteristics such as beauty, elegance, and a cutting wit, but despite fitting into a truly tiny mouth it simply will not chatter. After all, it’s chisels and squares that love to gossip.

While a tiny amount of uniform contact and pressure between the bed in the wooden body and the back of the blade is desirable to steady the blade in-use, many fit their blades (or perhaps “neglect to properly fit their blades” would be a more accurate description) to develop high pressure between blade and bed, making it difficult to adjust the blade and distorting the body unnecessarily. In extreme cases, this pressure can even push out the sole, preventing the plane from working entirely, a situation that has shaken many a poor woodworker to the core! Pixie involvement cannot be dismissed. If your plane is misbehaving, this bulging sole phenomenon is something you would be wise to check for and remedy if found. You have been warned.

We will discuss this subject more in future posts.

Lengthwise Taper

A casual observation reveals that the blade is tapered in thickness along its length, being thickest at the head sticking proud of the body, and thinnest at the cutting edge bevel.

The purpose of this taper is simply to wedge the blade into the grooves in the body. Please note that this wedging action does tend to cause the body to deflect to some degree, something which must be taken into account when fettling the sole, a subject we will discuss in a future post in this series.

Transverse Taper

The blade is also tapered in its width, being widest at the head and narrowest at the cutting bevel.

Ideally the side edges of the blade are in intimate contact with the bottoms of the retention grooves only where they exit at the top surface of the body, but should normally have no contact in the grooves elsewhere, making it possible to adjust the blade’s projection through the mouth to a uniform distance by gently tapping its head either right or left a small amount.

Curved Back

Finally, please observe that the back (vs. the ura) of a quality blade is not flat, but is slightly hollow-ground around the centerline of the blade’s length. The depth of this hollow should be more-or-less uniform over the blade’s length, disappearing near the head and shoulders.

One purpose of this detail is of course to lighten the blade’s weight, but more importantly it helps keep the blade from twisting out of alignment in-use. If you have ever made a wooden plane body in the Krenovian style to fit a blade with a flat back, you may have experienced the irritating tendency of the blade to twist out of alignment under heavy planing forces. This is typically not a concern with the Japanese design because of the curved back detail, so long as the body’s bed is well-fitted to the blade.

Since each blade and its matched wooden body are a little different, and not yet in perfect accord when new, fitting the body to the blade is one of the first things one must do to a new plane. This fettling operation will be the subject of a future post.

A plane blade by Mr. Ogata. Notice the curved back. Notice also the trimmed and beveled “ears” at the right and left corners of the cutting edge.

Common Sense and Plane Philosophy

Traditionally, everywhere planes were used around the world, a craftsman would commission or purchase the metal parts for his plane and cut the wooden body himself.

In recent history in Japan professional plane body makers called “daiuchi shokunin” 台打ち職人, which translates directly to “plane-body beater” (I kid you not) have become common. These craftsmen fit blade to body making a nearly complete retail product.

Many of these ostensibly completed planes are sold in a “sugu tsukai” 直ぐ使い condition, meaning “ready-to-use.” As witness of this, such planes usually have a wood shaving resting in their mouths when sold. However, the fit between blade and body is intentionally very tight to allow for the end-user to fit the body to the blade and adjust it to his preferences. This is where philosophy comes into play.

There are regional preferences in Japan when it comes to tools, including sickles, saws, axes, adzes, chisels and of course plane blades. In far Eastern Japan, especially the Tohoku area and Hokkaido, thicker, heavier plane blades are preferred, whereas in Tokyo and Western Japan, thinner blades are traditional.

But while discussions of these differences make the hearts of historians go pitter patter, they are irrelevant to persons living outside Japan, so we will ignore them for now.

There are, however, two general, practical approaches to blade size and fit of which Beloved Customers should be aware. Namely, architectural (residential and temple) carpenters tend to prefer thicker blades that fit very tightly into the body because such planes tend to retain their settings better in the rough conditions of a construction jobsite. The downside to the thick blade is that it’s heavier, it takes longer to sharpen, and it’s more difficult to make fine adjustments to.

Craftsmen that do finer, more precise work such as joiners, sashimonoshi, furniture makers and cabinet/tansu makers typically prefer thinner blades that are quicker to sharpen and easier to frequently adjust to make fine, precise cuts. Is your humble servant suggesting that carpenters tend to be less-skilled, or less delicate in using planes than joiners, furniture makers and cabinetmakers? In general, yes.

We have Mr. Nakano forge the blades for our planes more in the Tokyo style: thicker than some but thinner than most.

Not knowing who will purchase the plane, unless directed otherwise most daiuchi shokunin cut tight-fitting bodies more suited to the carpenter, and assume the user will adjust the blade/body fit to their preference. This is the only practical solution in a “ride it like you stole it” handplane, but the reality is that too often the pressure on the back of the blade is so high it ends up creating problems for the user.

Too many inexperienced users of Japanese planes, especially amateurs located overseas, learn how to use Japanese planes without knowledgeable supervisors or fellow workers near at hand to notice their mistakes, wack them upside the head, and tell them how to correct their errors (welcome to the gentle world of the Japanese craftsman), and consequently never really figure out how to setup, fettle and maintain Japanese handplanes. I suspect a similar lack of expert supervision is why so many Western woodworkers who give Japanese planes a try fail to ever get satisfactory performance out of them and become frustrated, eventually selling them on PeeBay.

While your humble servant is eager to provide Beloved Customers all practical support and encouragement, the guidance I can provide is limited by distance, the written word, and the undeniable fact that he is a gentleman of great refinement and exquisite sensitivity (She Who Must Be Obeyed has been known to disagree, but what does she know?).

Therefore, upon making a significant mistake, Beloved Customers must instead call themselves rude names and slap their own heads to aid learning retention. May I suggest “Blockhead” as an appropriate self-imprecation in the case of planes? (ツ)

Conclusion

In this post we considered some of the unique design features of the Japanese hiraganna handplane’s uncompromising and bitterly sharp iron and steel blade.

We even examined a historically-important, unusual, and exceptionally beautiful blade made by a famous blacksmith for a famous craftsman with curious engraving of mysterious meaning.

And we discussed regional differences in tool design. You can’t make this stuff up, ladies and germs.

In the next adventure in this series we will turn our attention to the body of the Japanese handplane, the softer, gentler, wooden component of the tool, the one with the tiny mouth that directs and controls the work of cutting.

And I promise we will make some sawdust. Until then, I have the exquisite honor to remain,

YMHOS

Chiyozuru Korehide (1874~1957), the blacksmith of the blade shown above.

If you have questions or would like to learn more about our tools, please click the “Pricelist” link here or at the top of the page and use the “Contact Us” form located immediately below.

Please share your insights and comments with everyone using the form located further below labeled “Leave a Reply.” We aren’t evil Google, fascist facebook, or thuggish Twitter and so won’t sell, share, or profitably “misplace” your information. If I lie, may my plane blades chatter and gossip unceasingly!

Leave a comment

Tool Maintenance: Corrosion Prevention

A Rusted Plane Blade by Hatsukuni. What did it do to deserve such horrible neglect?

“How dull it is to pause, to make an end,
To rust unburnish’d, not to shine in use!
As tho’ to breathe were life!”

Alfred Lord Tennyson, Ulysses

Between damaged tools and guns, corrosion prevention has been a high priority for your humble servant over the years motivating me to purchase many corrosion-prevention products and test them in various climates. After scaling mountains of hype and fording floods of BS I think at last I have something of value, perhaps even the genuine article, to share with Gentle Readers.

While by no means comprehensive, in this article your humble servant will address three common causes of corrosion in steel woodworking tools, as well as some methods of prevention. The three causes are: Corrosion due to sharpening, corrosion due to handling, and corrosion due to storage.

But first, to help Gentle Reader understand the basis for the measures I will recommend below, allow me to explain my sharpening philosophy.

Tool Philosophy

The word “philosophy” is of Greek origin and means the “love of wisdom.” I won’t flatter myself that I developed any original wisdom about maintaining tools, because the truth is I stole most of what I know from better men and the rest came ipso facto from my own screw-ups. Shame is the best teacher.

Professional craftsmen have no choice but to constantly maintain and repair the tools of their trade, but necessary or no, clients and employers often resent the time the craftsmen they hire spend maintaining tools during the work day. After all, they are paying them to make a product, not to fiddle with tools, at least that’s how most Clients look at it. The perceptive craftsman will strive to understand his Client’s perspective if he wants to be trusted with profitable repeat work.

Therefore, I don’t sharpen, fettle, or repair my tools at the jobsite anymore than is absolutely necessary, and never in front of the Client or employer. This is not some feel-good yuppy-zen BS, but a serious, concrete work philosophy with physical and financial consequences. It was taught to me by experienced craftsmen in America and Japan, all since retired to the big lumberyard in the sky, who knew what they were about. It has served me well.

So how do I keep working when blades dull, planes stop shaving, power tools stop spinning, and bits stop biting? The most reliable solution is to have multiple saws, planes and chisels in the types/sizes critical for that day’s work, and even extra bits and power tools on-hand whenever possible, so that if a particular chisel or plane becomes too dull to get the job done, or a bit breaks, or a circular saw, for instance, goes tits-up, I need only pause work long enough to retrieve a sharp, ready to rock-n-roll replacement from my toolbox or tool bag.

This means I must purchase, sharpen, fettle and carry around more tools than I am likely to use during that workday. But since I don’t carry my tools in my “pocketses”, and they are partners that earn their keep, I do not consider it wasted money. In fact, this philosophy has resulted in tool-maintenance habits that I believe ultimately save me time and money while improving my work efficiency all while reinforcing my Client’s or employer’s confidence in me, just as the old boys I try to emulate said they would.

Of course, after a few days of continuous work I will have accumulated multiple blades that need sharpening, so if I am to keep making sawdust I must sharpen them in batches of 5~10 at a time. And because I sharpen in batches, as do professional sharpeners, I have given great thought over the years to maximizing positive results such as speed, sharpness achieved, and economical use of stones while minimizing negative results such as rusted steel. I humbly encourage Gentle Reader to give these matters just a few seconds of consideration. What have you got to lose besides steel?

Corrosion Prevention: Wet Sharpening

The bevel of the Hatsukuni blade shown above. An iron pixie’s joy.

The corrosion risk to tools when sharpening is caused by residual water in the scratches, cracks and crevices of the blade, as well as accumulated chlorine from tap water, promoting rust, especially at the very thin cutting edge. Yes, that’s right, I’m more worried about corrosion dulling the cutting edge than of it creating unsightly red spots elsewhere on the blade.

When sharpening a batch of blades in my workshop, after a blade is done on the final finish stone, I dry it with a clean rag or paper towel, apply a few drops of Corrosion Block, smear it around on the blade to ensure a complete coating, and set it aside to draw water out of the pores and seal the steel. It works.

Corrosion-X is another good, but stinkier, product. Neither is good enough long-term, however.

After the blades have sat for a while, usually at the conclusion of the batch, I wipe off the CB and apply CRC 3-36. This is a paraffin-based corrosion preventative that floats out water. Paraffin won’t evaporate or wick-off and is the best product I have found to prevent rust developing on a clean, moisture-free surface.

CRC 3-36 sprays on easily and soaks into everything, and if allowed to dry, will give good long-term protection, as in years. It’s especially good for saw blades because it gets deep into the teeth. But you don’t want to apply it to anything even a little wet with water because paraffin may seal it in promoting rust. Ergo, Corrosion Block first.

There are many rust-prevention products on the market, so I am not suggesting CRC3-36 is the best, only the one I prefer, partly because The Mistress of the Blue Horizons doesn’t object to the smell too strongly if it wafts into her holy chambers from the grubby workshop. If I use Corrosion-X, however, she bars the door with her trusty broom, bayonet fixed and leveled at my genital area, and makes me strip off my stinky clothes before she’ll let me back into the house. My love is a gentle flower… ! With sharp knives…! But I digress.

This system works fine for short-term purposes, and even for long-term storage if I wrap the tool in newspaper or plastic to protect the coating.

When sharpening in the field, or if I will be using the tool right away, I don’t bother with spray products, but just strop the blade on a clean cloth or the palm of my hand to generate friction heat, apply some oil from my oilpot, and call it good.

If you don’t own and use an oilpot already I won’t call you an idiot, but I still remember the time long ago when that word was directed at me by someone I respected for not making and using one. He was right.

A useful trick I learned from professional sword sharpeners in Japan is to use chlorine-free, slightly alkaline water for sharpening. I mix Borax powder with distilled water in a plastic lab bottle to use to keep stones wet and to wash blades when sharpening. Washing soda works too. A little lye added to sharpening water will also increase its pH. Using such water will not entirely prevent corrosion, but it certainly slows it way down. Test it for yourself.

Corrosion Prevention: Handling

We sometimes pull out a chisel, saw, or plane blade to gaze upon it. They are lovely creatures, after all, and deserve our adoration. There are two things to be aware of when doing this, however.

Recall that the adult human body is comprised of approximately 60% water, some of which is constantly leaking out of our skins mixed with oils and salts. When you touch bare steel with your hands, skin oils, sweat, and the salt contained in sweat stick to the steel and will cause rust. It’s only a matter of how quickly and deeply.

The solution is to avoid touching bare steel you will later store away with bare fingers, and if you do touch the blade, wipe it clean and apply some oil from your oilpot or spray can right away before returning it to storage.

Gentle Reader may be unaware, but there can be no doubt that harsh words not only hurt the tender feelings of quality tools, but can directly damage them. How do I know that rude language offends steel tools, you say? Well, I have ears don’t I? In addition, over the years I learned a thing or two from professional Japanese sword sharpeners and evaluators, who are even more obsessed with rust than your paranoid humble servant, no doubt because of the high financial and historical costs of corrosion in rare and expensive antique weapons.

With the gift to the entire world of the Wuhan Flu from Dr. Anthony Fauci (aka Mr. Fake Science) and his Chinese research team, we have all become more aware of the human tendency to constantly spew droplets of bodily fluids, often containing nasty bugs, into the air around us sometimes with unpleasant consequences. A handsaw can’t catch the Fauci Flu, but fine droplets may find their way to the steel surface when we talk to them or around them. Corrosion ensues.

In Japan it is considered rude to speak when holding a bare sword. Indeed, it is SOP to require viewers who will get close to a bare blade to grip a piece of clean paper between their teeth to confirm the mouth is indeed closed and not spewing droplets of spit onto the blade.

I am not exaggerating the cumulative long-term damage fingerprints and moisture droplets expelled from human mouths and noses cause to steel objects. Any museum curator can confirm.

How does this all apply to woodworking tools? If Gentle Reader takes a tool out of storage and either talks to it, or to humans around it, please wipe it clean, apply oil, and rewrap it unless you will be using it immediately. It’s the only polite thing to do.

Tools deserve respect. Perhaps I’m superstitious, but I’m convinced that if we avoid rudely smearing salty sweat or spraying globs of spittle that would cause our tools to turn red and go away, they in turn will be less inclined to cause us to leak red sticky stuff. Some tools are vindictive if offended, donchano, and many of them can bite.

Corrosion Prevention: Storage

The air on this earth contains dust and moisture. Dust often contains abrasive particles harder than steel as well as salts and other corrosive chemicals. We must keep these particles and chemicals away from our tools.

Air also contains moisture that, given access and a temperature differential, can condense on steel tool blades causing condensation rust.

Your humble servant discussed these matters in length in earlier articles about toolchests, but a critical criteria of proper storage is to prevent dust from landing on tools, and to prevent the tools from exposure to airborne moisture and temperature differentials. A closed, tightly sealed, clean container, cabinet, toolchest or toolbox is better for tool storage than pegboards or shelves.

If Gentle Reader does not already have such a tool container of some sort, I urge you to procure or make one.

Tool Rolls

Your humble servant owns and uses canvas tool rolls because they are handy for transporting tools such as chisels, files, rasps and saws to and from jobsites, but they have limitations of which Gentle Reader should be aware.

The first problem with tool rolls is that they appear to protect the cutting edges of chisels and saws, but that is only wishful thinking because the delicate and dangerous cutting edges are only hidden behind a thin layer of fabric. Guess what happens if you drop a cloth tool roll of sharp chisels onto a concrete slab.

If you bump a tool roll of chisels against another tool, then brush your hand against the now exposed but hidden cutting edges while digging in your toolbox, red sticky stuff may get everywhere. Oh, the humanity! Will this wanton bloodshed never end!?

Do tool rolls protect tools against corrosion? No, in fact they can make it much worse because fibers in contact with steel, especially organic fibers such as cotton, can wick moisture to the steel producing corrosion. Please see the photos above.

Leather tool rolls can be especially bad in some cases because of residual tanning chemicals.

I’m not saying don’t use tool rolls, only to be aware of their limitations and use them wisely.

As mentioned above, I do use fabric tool rolls in the field. The trick to preventing rusted blades is to insulate them from direct contact with the canvas, so I make little plastic liners from the hard but flexible plastic used for theft-proof retail product packaging that fit into the pockets. Just a strip of plastic cut wide enough to fit into the pocket tightly and folded in half. Besides preventing rusty blades (chisel crowns will still rust) these little liners make it much faster and easier to insert blades into the pockets without cutting the tool roll, and to keep the blades from cutting their way out of the tool roll once inserted. The price is right too.

Canvas tool wraps are convenient for transporting handsaws, but they too provide limited protection. I wrap my saw blades in thin polyethylene sheet foam to help protect the teeth, isolate the blade from direct contact with cotton fabric, and add some insulation.

If you need to use tool rolls for long-term storage, I recommend you clean the tools, coat them with a paraffin-based rust-prevention product like CRC3-36, and wrap them full-length in plastic wrap before inserting them into the tool roll’s plastic-lined pockets.

If tools are faithful and profitable servants, indeed extensions of our hands and minds, don’t they deserve more from us while they are in our care than a rusty, pitted, neglected fate like the plane blade pictured above?

YMHOS

Our erstwhile apprentice from the clothing-optional workshop has dropped a chisel into the water while sharpening it, and laments the inevitable corrosion. Being bald as a bowling ball, I’m desperately jealous of her long, curly tresses, but I suppose they must get in the way when sharpening. The sacrifices we make for art…

The Essential Oilpot

If you have questions or would like to learn more about our tools, please click the “Pricelist” link here or at the top of the page and use the “Contact Us” form located immediately below.

Please share your insights and comments with everyone in the form located further below labeled “Leave a Reply.” We aren’t evil Google, fascist facebook, or the IT department of the Democrat Congress of the USA and so won’t sell, share, or profitably “misplace” your information. If I lie may crickets be my only friends.

Leave a comment

The Matsui Precision Notched Straightedge

Matsui Precision Bevel-edged Straightedge with notch

You cannot teach a crab to walk straight.

Aristophanes

This post is about a tool that looks quite ordinary but is in fact extraordinary in subtle ways.

Why Do Woodworkers Need a Good Straightedge?

When woodworking we need to be able to mark and measure straight lines and examine the precision of edges and surfaces. There are several ways and tools available to accomplish these tasks, but the steel straightedge is efficient and the quickest tool in the case of shorter distances, assuming one’s straightedge is up to the job.

For most woodworking tasks we don’t need a precision straightedge. But for those few activities where it is necessary, nothing can take its place. So what are some of those activities? I can suggest a few from my experience:

  1. I use a precision straightedge as a “Standard” to check that my working straightedges and squares (the ones that are used and abused daily) are truly straight and square. This is necessary because, during use, Murphy governs all operations, while pernicious Iron Pixies dance among the piles of dandruff on his shoulders. Due to their malicious ministrations, measuring and marking tools are easily damaged, wear-out, and lose tolerance so I need a reliable “Standard” to check them against regularly. Of course, you can’t check for straight or square unless you have a truly straight line/surface to index from. It would be silly to imagine that the edge of one’s tablesaw top or jointer table are perfectly straight without first checking it against a reliable standard;
  2. I use a precision straightedge to examine the soles of my handplanes to help me keep them straight, flat and free of wind because it’s very difficult to plane a flat surface with a screwy plane. No matter how much time I invest in truing my planes, I’ve found the results are never better than the straightedge used.
  3. Check that lapping plates and the float-glass plate I use for truing stones and plane soles remain within tolerances. Yes, they wear out too.
  4. Check that the tables of stationary equipment such as tablesaws, bandsaws, jointers, and planers are true, and that infeed/outfeed soles of handheld electrical planers are properly aligned;
  5. Check that surfaces of wooden components of special projects requiring extra precision are true.

Do you ever need to accomplish any of these tasks?

Tasks for Which the Matsui Precision Straightedge is Not Ideally Suited

The Matsui Precision Straightedge is not an expensive tool, but since it is one I rely on, it is most cost-effective to protect it from premature wear and damage, so the following are tasks for which I use a less-expensive and less-protected “working straightedge” instead of my Matsui precision straightedge:

  1. I don’t use it for checking sharpening stones. The Matsui straightedge can do this job with style, but after a few years of being pressed against (and dragged over) abrasive stones, the tool’s precision would be degraded. Better to use a less-expensive straightedge for this job, and check it occasionally against the Matsui Precision Straightedge to confirm it’s still straight. If it isn’t, fix or replace it.
  2. I don’t use it for daily general woodworking tasks. Once again, the Matsui straightedge can do general jobs with style, but after a few years of being pressed against (and dragged over) wooden surfaces, the tool’s precision would become degraded prematurely. Instead I use a “working straightedge” that has been checked against my “Standard” Matsui Precision straightedge;

How To Use a Precision Straightedge for Checking Tools and Surfaces

Neither the human hand nor eye can measure a straight line or a true plane with any precision unaided, but there is one technique older than the pyramids all woodworkers must be proficient at, namely to place a truly straight, simple straightedge on-edge on a surface to be checked, be it a board, a jointer outfeed table, or the sole of a plane, and shine a light source at the gap between the straightedge and the surface being examined. If gaps exist, light will pass between the edge of the thin straightedge and the surface being checked confirming the surface is not straight and/or flat. The human eye can detect even a small amount of light this way and both quickly and effectively judge how flat the surface being checked is with a surprising degree of accuracy.

Feeler Gauge

Another technique that yields more precise values without relying on Mark1 Eyeball is to place the straightedge’s beveled edge against the surface to be checked, and insert feeler gauges into gaps between the straightedge and the surface. If the feeler gauge selected won’t fit, then one replaces it with thinner gauges until one that just fits is found.

Once you know the value of the gap between your straightedge and the area of the board you need to true, for instance, you can divide the measured thickness of the shaving your planes takes in a single pass (easily checked with a caliper) to calculate how many passes it will take to true the high-spots on a board. eliminating a lot of the guesswork that makes precise woodworking difficult at times.

To reliably perform these checks, we need a truly straight straightedge. Straight is a relative thing, but straightedges sold for woodworking are seldom straight because purveyors rely on purchasers to not bother, or even know how, to check the quality and precision of the straightedges they sell.

Another reason honest, precision straightedges are relatively rare among woodworking tools is that making a high-tolerance piece of hardened steel that is straight, and will stay that way, is hard work that most woodworkers are neither inclined to appreciate nor bother to check, much less pay for. Is ignorance bliss? I believe it is in the natures of our Gentle Readers to always strive to improve the quality and efficiency of their work. A high-quality precision straightedge is an essential tool in accomplishing that blissful quest.

Challenges & Solutions

The dilemma of the straightedge is that it must be thick and rigid enough to prevent warping and flopping around in-use, but reasonably lightweight and not too bulky or it will be clumsy. At the same time, it must not be too thick, or it will block out most of the light passing between its edge and work-piece making it useless.

Another challenge the straightedge faces is the constant threat of damage. If the delicate edge is too soft, it will become dinged and deformed instantly becoming inaccurate. And if the straightedge rusts (the bane of all steel), precision will suffer.

What are the viable solutions? They are obvious and proven, but seldom implemented well. Here is how Matsui Precision does it.

Stainless Steel Construction

First, they use high-quality stainless steel to prevent corrosion. If you work in humid conditions or if you will admit to perspiring salt-laden moisture at times, then this is important, but not rare.

Properly-sized, Precision-ground & Polished

This straightedge is not an insignificant piece of stainless steel. It is available in various lengths, but in the case of the Matsui’s 400mm straightedge (a handy, reasonably-priced length), the blade is 34mm wide and 3mm thick, enough to keep the blade rigid in use and prevent warping, but not so wide or thick as to feel heavy or clumsy. It weighs 320gm (11 ounces), a nice balance of rigidity and weight.

Compact, lightweight tools made using quality materials efficiently have a deep genetic attraction to the Japanese people.

What is more rare is the fact that Matsui then precision-grinds and precision polishes the stainless steel (not the same thing) so the tool is as straight and flat as machinists require, because this is a tool designed to the higher standards of machinists, not just woodworkers.

Hardened & Trued

Matsui also hardens the stainless steel to ensure the tool is rigid and will resist wear and damage over its long useful lifespan.

During heat treating and grinding the metal warps slightly. After stress-relieving the tool, Matsui inspects each tool one-by-one and corrects irregularities or rejects those that cannot be sufficiently corrected. It’s called quality control, something that never happens in China or India in the case of tools intended for woodworkers.

Beveled Edge

To make it easy to see light passing between the straightedge and surface being checked, one edge is beveled. The importance of this detail cannot be overstated.

The Notch

The Matsui Precision Straightedge being used to check the sole of a 70mm finish handplane with a blade by Sekikawa-san. The notch fits over the cutting edge so one can check the sole with the blade protruding as it will be in-use. In this photo the blade has been extended waaay too far out of the mouth to make it easy to see the cutting edge. Please notice the light showing between the straightedge and the sole indicating that something is not right. The wedging pressure of forcing the blade to project this ridiculous amount has warped the block so that the most important part of the sole, the area directly in front of the mouth, is not touching. The point is that the notch makes it possible to check the sole with the blade projecting the intended distance, a job simply not possible with an ordinary straightedge.

In the case of the tool we are introducing here, Matsui cuts a small semi-circular notch in the beveled edge of the blade to provide clearance for irregularities in the surface being checked, such as welds, or in the case of woodworking tools the cutting edges of the blades of handplanes, electrical planers and electrical jointers. This is an important and unique feature.

Why is this notch so useful? The problem with using a metal straightedge to check/true the sole of a handplane has always been that, in order to correctly check for flatness/wind, the blade must be set to project from the plane’s mouth the same amount it will when the plane is being used, because in the case of Japanese planes the wedge-shaped blade applies slightly different pressures on the wooden block at different depths in the block, producing variable degrees of deflection.

But if the blade is projecting from the mouth from the same amount it will when in use, then the straightedge will ride on top of the blade preventing a proper examination, and at the same time, possibly dull the blade and gouge the straightedge. The solution has always been to adjust the blade to not actually project, but to be just in-line with the sole, a fiddly process that has resulted in many dulled blades, scratched straightedges, and inaccurate examinations.

With the elegant Matsui Precision straightedge, however, the notch fits directly over the projecting blade avoiding the irritating and time-wasting fiddling normally required to get the blade in the exact position, one that ultimately yields an imperfect reading.

If you need to maintain handplanes, electrical woodworking tools, or do precision woodworking and need an accurate, reliable, lightweight, durable, reasonably-priced straightedge to help take the guesswork out of these jobs, this product is just what you need. I have been using one for years and couldn’t get by without it.

If you are interested, send us a message using the form below.

YMHOS

Links to Articles About Other Matsui Precision Tools:

If you have questions or would like to learn more about our tools, please click the “Pricelist” link here or at the top of the page and use the “Contact Us” form located immediately below.

Please share your insights and comments with everyone by using the form located further below labeled “Leave a Reply.” We aren’t evil Google, fascist facebook, or thuggish Twitter and so won’t sell, share, or profitably “misplace” your information. If I lie may I never be see a straight line again.

Leave a comment