“Living by faith includes the call to something greater than cowardly self-preservation.”
J.R.R. Tolkein
In this post your humble servant will present a few modern masterpieces of the blacksmith’s art produced recently by a single craftsman. I hope you are as thrilled as I am to know there is at least one craftsman left in the world that can produce chisels of this quality.
The Blacksmith
The craftsman that made these chisels is very unusual in that, unlike the frantically self-promoting, technically mediocre Hollywood blacksmiths such as Tasai, Funatsu, Kiyohisa, and the modern Chiyozuru gang, he is reclusive and shuns attention. Accordingly, I have been requested to not share any personal details about him, so please don’t ask. The fact is I don’t even know his real name just the brand he uses.
I won’t discuss why he is reclusive, but I will go so far as to say that he is self-employed, well-known in his chosen field, and that chisels are not his primary work product but only a sideline. He makes no more than 5 chisels monthly.
His business philosophy and blacksmithing techniques are interesting so I will share some details about them. He has four strict requirements that a Customer must satisfy before he will accept an order. The first two are business-related, and the last two are about the Customer.
The Blacksmith sets the delivery schedule. Period.
The Blacksmith sets the price. Period
The Customer must be a professional worker in wood who needs and will use the tools the Blacksmith will forge daily. His track record must be independently verifiable. Amateurs and/or hobbyists, regardless of their skill levels, need not apply. Collectors are specifically unwelcome.
Besides being expert in the use of chisels, the Customer must have a minimum level of skills, including the ability to make chisel handles and cut a high-quality Japanese plane block using only hand tools. Once again, this must be verified before an order will be accepted.
Your humble servant commissioned a few chisels from the Blacksmith many years ago and went through this same qualification process, although I didn’t realize it at the time.
The quality of his forging and heat-treat technique is unsurpassed producing a crystalline structure in hard steel that will take an extremely sharp edge, will hold that edge without easily dulling, chipping or rolling while cutting a lot of wood, and is easily sharpened.
But it is his metal shaping and finishing skills that are so awe-inspiring. Please notice the straightness and cleanness of the lines and planes, as well as the uniform and smooth curvature at the shoulders, and perfect symmetry. If Gentle Reader is unimpressed, I encourage you to make a full-scale model from cold wood before trying it in hot metal. I promise you will be convinced.
The Blacksmith uses only “free-forging” techniques, and does not employ the rough shaping dies other modern blacksmiths rely on to improve production speed. His forging technique is so sublime that the entire chisel is shaped to nearly final dimension by fire and hammer, not grinders and belt sanders.
He finishes his products using only hand-powered scrapers (sen) and files.
The performance of Blacksmith’s products are equal to or better than those of Kiyotada back in the day, and are more precisely shaped and more beautifully finished than those of Ichihiro (the Yamazaki Brothers) at their very best. They are simply the best chisels that have been made in Japan in the last 70 years.
Let’s take a look at four chisels recently completed for a Beloved Customer in the USA.
34 x 485mm Anaya Chisel
The Anaya chisel is an antique style used for cutting deep mortises and making other joints in large timbers. It is no longer commercially available.
Top view of a Anaya 34x485mm Anaya chiselUra view of 34x485mm Anaya chiselSide view of 34x485mm Anaya chisel
57 x 485mm Anaya Chisel
42 x 490mm Bachi Nomi
The Bachi nomi is the equivalent to the fishtail chisel in English-speaking countries. The word bachi comes from the splayed tool used to play the 3-string Japanese shamisen, a banjo-type musical instrument. Here is a link to a video of two ladies using shamisen and bachi to perform a famous traditional song in Tokyo.
The Bachi nomi excells at getting into tight places to cut joints with acute internal angles such as the dovetail joints that connect beams to purlins.
There are several ways to resolve the angles at the tool’s face, but in this case the Beloved Customer and Blacksmith agreed on the most difficult, rigid and beautiful solution, the shinogi. This design has the advantage of maintaining a shallower side-bevel angle from cutting edge to neck return providing better clearance in tight dovetail joints.
The handwork performed on this chisel’s face is simply amazing, but the hollow-ground ura is even more spectacular to those who know about this things.
54 x 540mm Sotomaru Incannel Gouge
The Sotomaru or incannel gouge is a strong and convenient chisel used for cutting joints in logs and rounded members on architecture. More information can be found at this link.
This is an especially beautiful example as seen the symmetrical confluence of planes and curves at the shoulders.
Conclusion
I hope Gentle Reader found this post informative. You will never find better examples of the Japanese blacksmith’s art outside of one particular museum. It is exciting to consider that there is still one craftsman alive that can routinely perform this level of work.
While your humble servant has praised these chisels and the blacksmith that made them highly, please do not make the mistake of assuming that I am soliciting orders, or even suggesting that commissioning them is possible, because they are simply not available at any price. Please don’t ask.
YMHOS
If you have questions or would like to learn more about our tools, please click the “Pricelist” link here or at the top of the page and use the “Contact Us” form located immediately below.
Please share your insights and comments with everyone in the form located further below labeled “Leave a Reply.” We aren’t evil Google, fascist facebook, or thuggish Twitter and so won’t sell, share, or profitably “misplace” your information. May my ootsukinomi roll from my workbench and land cutting-edge down on my toes if I lie.
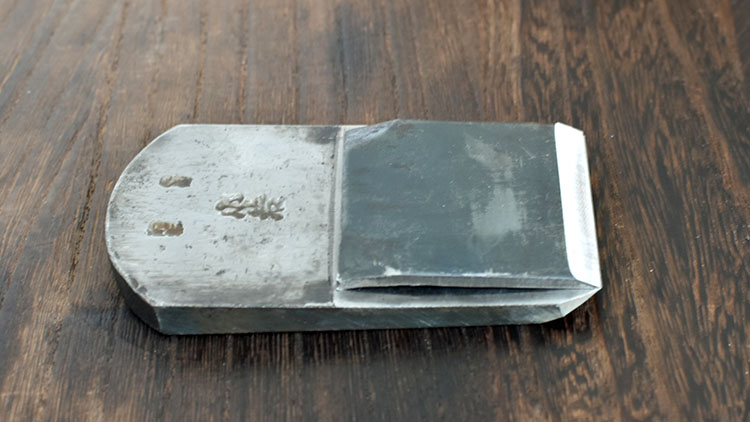
A 60mm plane blade with its chipbreaker resting on the ura as when installed into the wooden body. Please note that there are no screws connecting these two parts making it a simple and reliable system.
There are three things extremely hard: steel, a diamond, and to know one’s self.
Benjamin Franklin
n this fifth post in our series about the Japanese handplane, we will discuss a single one of its component parts, the chipbreaker.
Professional woodworkers that use handplanes daily usually have this simple widget thoroughly figured out, but your humble servant has been asked to clarify why the chipbreaker is necessary and how to make it work so many times recently that I can no longer gracefully avoid publishing a more complete, BS-free explanation for the benefit of our Beloved Customers, may the hair on their toes ever grow long.
As always, this post is intended to provide a bit of insight, or at least a different viewpoint, to our Beloved Customers, many of whom are professional woodworkers and Luthiers.
This is a longish article. If your humble servant was a lazy man I would simply state stand-alone conclusions as have so many with half-baked knowledge of handplanes, and leave it up to Beloved Customer to figure out the why of things on your own, but that would be boorish behavior.
Even if you already know everything there is know about the chipbreaker, you may still find a new crunchy, scrumptious tidbit or two in this scribbling if you look.
Factors Critical to Controlling Tearout
The sole purpose of the chipbreaker is to control and, whenever possible, completely prevent the unsightly and wasteful tearout that often occurs when using a handplane to surface wood. We will examine the causes of and some solutions to tearout below, but let’s begin this discussion by examining factors critical to controlling/eliminating tearout that are more important than the chipbreaker. Your efforts to control tearout should always begin with these factors. But first allow me to share a story.
Back when the world was younger and all heads turned my way, I learned advanced techniques for setting up and using Japanese handplanes at the feet of a master joiner of some renown named Honda-san. When I finally progressed to the point where he was satisfied with my proficiency with high-quality commercial planes, he surprised me with a new homework assignment to make a single-blade plane (台 body) from scratch.
FYI, while it’s counterintuitive, single-blade planes, which don’t have a chipbreaker, are more difficult to make successfully than a “double-blade” plane with a chipbreaker. But when done well, they are magical sweethearts.
So I purchased a 70mm blade by Yokosaka-san (this was well before he became famous), and a piece of well-seasoned white oak, and cut a block with “oimasa” grain orientation.
I later learned that this is a task Japanese masters always assign their apprentices, at least back then, and one they must accomplish to be recognized.
It was an educational effort, one that I magnificently failed twice before finally getting it right, but it taught me the three most important factors in reducing tearout in handplanes, whether with wooden or steel body, with chipbreaker or without. Beloved Customer too must master them if you aim to be proficient with the handplane.
Factor 1: The blade must be sharp. This factor depends on the quality of the blade and the skill of the person who sharpens it. We have a series of 30 posts about sharpening Japanese woodworking blades Beloved Customers may find beneficial. The series starts with this LINK.
Factor 2: The mouth opening (gap between the sole and the cutting edge) must be as tight as practically possible and still pass shavings. Please make an effort to truly understand what this means, because it is not always easily accomplished. Of course, the mouth opening of a super finishing plane intended to take transparent shavings will of necessity be narrower than that of a plane intended to dimension boards by taking thicker shavings; Horses for courses.
Factor 3: Prepare and maintain a strip, perhaps 3~10mm wide located directly in front of the mouth opening across the entire width of the sole of the plane, that is true and flat and applies even pressure on the board being planed. This is critical! Much else can be out of wack but if this is right the plane will usually cut well.
There are of course other variables worthy of consideration, but why are these three factors critical to mastering the handplane?
To begin with, a dull blade won’t sever fibers cleanly but will tend to tear contrary fibers up and out of the board’s surface, the very definition of “tear out.” Can’t have that, ergo, Factor 1.
Since the soles of handplanes wear and consequently the width of mouth openings change with that wear, Factors 2 & 3 are dependent on the team of craftsmen that originally made the handplane as well as the craftsman/owner that uses and maintains the handplane over its lifetime. That’s you, Beloved Customer, so please pay attention, learn the lessons and develop the necessary skills.
Indeed, Factors 2 & 3 act in unison to control the movement of contrary fibers immediately before and after they contact the blade directing them into the cutting edge to be cleanly severed by the sharp blade (Factor 1), while at the same time serving to bend, buckle and weaken those fibers preventing them from developing a lever arm that would cause them to lift up and tear out below the surface of the board.
If this doesn’t make sense to you, please give it careful thought because you must figure it out if you intend to become proficient with handplanes.
These three factors are bedrock essential to controlling tearout regardless of the type of handplane in question and whether it has a chipbreaker or not. Few new planes, whether made of wood or steel, satisfy these conditions. And after regular use, resharpening and adjustments become necessary, so Beloved Customers are strongly encouraged to understand how to evaluate these three factors in your handplanes and learn how fettle them. We will address the necessary techniques in future posts, but it will take more than just reading, so consider it an assignment. Indeed, expect to screw it up royally at first and learn from your mistakes, just as everyone does.
The Chipbreaker & Historical Lumber Processing Techniques
To better understand the chipbreaker, Beloved Customer may find it useful to understand a few historical factors about the wood they are shaving and some background about the tool making those shavings.
Before the proliferation of the large rip saw, and especially the water-powered sawmill, the only practical method of producing boards and beams from logs was to “rive” (split) them out using wedges, mallets and axes. This was the same worldwide.
Riven wood has two convenient advantages. The first one is that, because the grain of the lumber is relatively straight and continuous, grain runout is reduced, making it somewhat stronger structurally. And second, the occurrence of tearout when surfacing riven lumber is often less than what typically occurs in sawn lumber.
The thing about logs is that not all of them have grain straight enough to produce useful lumber when riven. Large, long, straight, old-growth trees are most efficiently processed, but as nearby old-growth primeval forests with large, straight trees were cut down and premium-quality logs became harder to come by, much construction and shipbuilding came to rely on more economical beams, posts and boards sawed from logs with wonky grain.
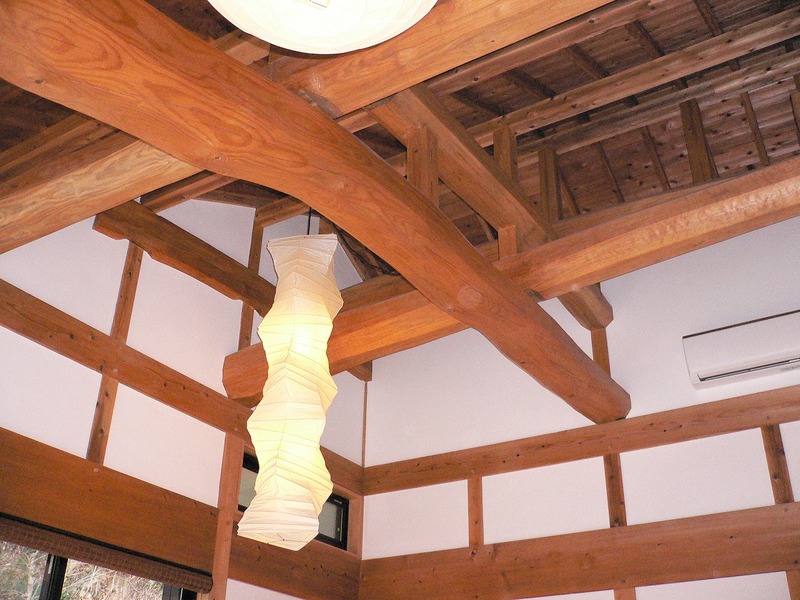
A beam sawn from a log to make an exposed structural member in a traditional Japanese house. Instead of trying to square it off, the carpenters have taken advantage of the natural curvature of the tree trunk to add strength as well as an interesting appearance. Please note, however, that being sawn, much contrary grain has been exposed that would have made riving such a log to this shape impossible, with the result that tearout is unavoidable. Also, and while this has nothing to do with tearout, the knots exposed at the bottom beam are in the worst possible location seriously weakening the integrity of this member in bending.
Unlike a team using axes and wedges, large rip saws in the hands of sawyers made practical through the proliferation of inexpensive, reliable steel, and especially the water-driven sawmill, could more easily and quickly cut long, straight boards and beams out of most any log regardless of grain direction. Consequently, logs that would have been rejected before the days of the sawmill can now be readily processed reducing the man-hours/cost of producing lumber significantly, at least that was the case until environmentalist grifters gained sway.
On the other hand, the grain direction of lumber produced using large saws and sawmills tends to wander everywhere increasing runout and making the job of cleanly surfacing the boards more difficult for subsequent craftsmen. This is the situation we face now.
We don’t know when or where the chipbreaker was invented, or how the concept spread around the world, but it’s a safe bet to assume its ability to calm the wild grain of sawn lumber during surfacing was one reason for its popularity. At least, that’s how it went in Japan. And wood is wood no matter where you are.
Two carpenters selecting a curved log to use a roof beam
Naturally-shaped logs used as roof beams in the restoration of a historically-significant building in Japan
Why Does Tearout Occur?
Let’s next examine some basic causes of tearout.
Please recall that wood is comprised of various types of cells, each with a job to do, but most of those that eventually become lumber specialize in exposing green leaves to the sunlight, transporting water from the ground up to the leaves, and nutrients formed in the leaves to the rest of the tree.
Transporting literally tons of water daily from the roots far up into the sky is the job of groups of cells that form what are effectively continuous waterpipes connecting the roots to the stomata in the leaves. In a living tree these pipes have semi-flexible cell walls, and while they mostly grow parallel with roots, limbs and trunk, their shape is influenced by wind, rain, snowload, shifting soil, microbes, bugs and ever-changing exposure to the sun over the life of the tree, so they are seldom perfectly straight. Indeed, once dried, it’s partly the changes in direction of these tubular cells, often called fibers, that gives harvested lumber its beautiful grain patterns and shimmering chatoyance.
The blade on the left is cutting with the grain and is unlikely to produce tearout, while the blade on right is cutting against the grain and is more likely to produce tearout.
When planing with the grain (the blade on the left in the illustration above), the blade severs fibers which are oriented either parallel with or sloping up to the board’s surface and angled in the plane’s direction of travel producing pretty shavings comprised of relatively short, flexible segments of fiber.
But when planing against the grain (blade on the right), the blade must sever fibers that are diving down into the board. Instead of consenting to being cleanly severed, often these longer, more rigid fibers tend to ride up the face of the blade, bridging and avoiding the cutting edge.
When this happens, instead of severing them cleanly, the blade tends to lever these longer fibers up out of the board’s surface until they suddenly break off below the surface of the board leaving a rough uneven surface. This damage is called “tear-out” in English and Sakame (sah/kah/meh 逆目) in Japanese, which translates directly to “reverse grain.”
How Does the Chipbreaker Work?
Whether the handplane in question be Western or Japanese in design, the chipbreaker, aka “uragane” 裏金 (oo/rah/gah/neh) as it is called in Japan, seems at first glance to provide little benefit in exchange for the added weight and complication. Indeed, if all the cuts you make when planing wood are in the direction of the grain (id est fibers either oriented parallel with, or rising up to, the surface of the board and angled away from the direction of the cut), the chipbreaker will be about as useful as a frilly lace brassier on a boar. But wood grain is seldom so cooperative, donchano.
With the addition of the chipbreaker, and in combination with the three factors listed above, those contrary fibers that try to bridge and ride up the face of the blade without being severed immediately run smack dab into the abrupt face of the chipbreaker thereby bending and buckling them and preventing them from bridging and developing the lever arm necessary to break them off below the surface of the board.
At the same time the collision with the chipbreaker redirects many of these mischievous fibers into the cutting edge to be severed, thereby preventing, or at least reducing, nasty tearout.
Bless us and splash us, preciousss! What a wonderful counterintuitive thing!
To better understand how the chipbreaker works, I highly recommend Beloved Customers devour, like starving little piggies, the video titled “Influence of the Cap-iron on Hand Plane,” Created by Professor Yasunori Kawai and Honorary Professor Chutaro Kato, Faculty of Education, Art and Science, Yamagata University (with subtitles). Much will come into focus after watching this.
Downsides to the Chipbreaker
While your humble servant has written glowing things about the chipbreaker, I am not so foolish as to suggest all is blue bunnies and fairy farts because the chipbreaker has some downsides:
The chipbreaker adds weight, complication and cost;
The impact of wood fibers on the chipbreaker produces friction heat and consumes energy whether cutting with or against the grain. This energy loss is not insignificant;
When cutting with the grain, the chipbreaker adds little benefit while tending to reduce the luster of the planed surface;
To be effective, the chipbreaker must be setup, tuned, installed and maintained properly, requiring the user to have adequate knowledge and to put forth effort periodically.
Despite these downsides, your humble servant believes, as have millions of craftsmen over untold centuries, that the chipbreaker is a component worth mastering.
Alternatives to the Chipbreak
In light of the gains and losses associated with the chipbreaker, it would be short-sighted, indeed amateurish, to assume it is always necessary, and just as short-sighted and amateurish to assume it is never necessary. So let’s examine some alternatives next.
Alternative 1: No Chipbreaker
The first alternative to the chipbreaker we must consider is, of course, no chipbreaker at all. Indeed, if you always plane with the grain of the wood, and your plane has a sharp blade and tight mouth, as mentioned above the chipbreaker adds no value while only wasting energy. Indeed it may even reduce the quality of the finished surface’s appearance.
In the case of the Bailey pattern plane or other styles with cap irons and the chipbreaker and blade attached to each other by screws, using the plane without the chipbreaker is inconvenient. But in the case of Japanese plane, the chipbreaker can be easily and speedily removed without influencing the cutter. The resulting finish created by the plane may or may not be improved, but the force required to motivate the tool will absolutely decrease. Sadly, such cooperative wood can be elusive.
This is an excellent solution, one I highly recommend to Beloved Customers.
Alternative 2: High Bedding Angle Without a Chipbreaker
Another option with a long history worldwide is to install the cutting blade in the plane’s body at a higher bedding angle, perhaps 50~55˚+. Combined with a sharp blade, tight mouth and solid uniform contact/pressure between the board being planed and the area of the sole directly in front of the mouth opening, the more abrupt change in direction forced on shavings by this high-angle blade will then tend to buckle the long contrary fibers on its own without a chipbreaker. But no guarantees.
While a high bedding angle does indeed tend to reduce tearout, adding a chipbreaker is a more reliable way to further reduce tearout in woods with contrary grain even more.
The one undeniable downside to a high bedding angle is the extra energy one must always expend to motivate the plane.
Alternative 3: Bevel-up Handplanes Without a Chipbreaker
Another alternative is the “bevel-up” planes that have become popular in recent years. This style of plane is not a new solution. I own some and have used them, but other than the block plane versions, I regret falling prey to specious marketing claims spouted by shills. Losing all credibility sucks.
Amateurs like BU planes because parts are fewer, maintenance is easier, and the necessary skills one must acquire are fewer.
One gentleman boldly informed me that he believes bevel-up planes to be superior to all others because he would rather spend the time it takes to master the chipbreaker on making wooden objects instead. My mind boggled like a weasel binging on crystal meth….
Bevel-up planes work in exactly the same way high bedding-angle planes described in Alternative 2 above do by presenting a steeper angle for contrary fibers to climb causing them to either be severed or to buckle instead of bridging and tearing-out. This assumes, of course, that the blade is sharp, the mouth is tight and contact between the board being planed and the area of the sole directly in front of the mouth opening is uniform.
Sadly, the efficacy of this action is no more consistent than the high-angle blade without a chipbreaker discussed above.
The downside to the bevel-up plane is that the additional, more-consistent results afforded by a well-tuned chipbreaker are, like heaven’s pearly gates to a Shat Francisco politician, forever unattainable.
Alternative 4: Back-bevels
Another alternative is the quick and dirty back bevel applied to the ura or face side of the cutting edge, as discussed in a previous post. This works for the same reason the high-angle blade does, but it is not an effective long-term solution, and certainly qualifies as tool abuse in the case of Japanese handplanes IMHO. Consider yourself well and truly warned.
I highly recommend Beloved Customers use planes with chipbreakers and learn how to sharpen, properly setup, maintain, and adjust them for maximum results. It’s the way advanced professional woodworkers with real skills get the job done.
Keys to Making Chipbreakers Work Effectively
A naturally curved log shaped as a “Nijibari” rainbow beam at the main entrance to a Buddhist temple.
The following is a condensed list of tasks Beloved Customer needs to accomplish to get consistently good results from their chipbreakers. We will discuss all these items in greater detail in future articles in this series. I strongly encourage you to invest in yourself by developing the requisite skills:
Fit the chipbreaker to the blade as lovey dovey as two newlyweds and so there is no gap between the cutting blade and extreme edge of the chipbreaker. This is not difficult to achieve, but the fit must be nearly perfect to prevent naughty shavings from being forced in between the blade and chipbreaker, because if they do get jammed in there, back-pressure will increase and the finished surface will look like poached crap on toast. We will discuss this more in the next post in this series;
Fit the chipbreaker to both the plane’s body and retention rod so the chipbreaker will remain in-place;
Grind a 70˚~80˚ striking bevel at the cutting edge of the chipbreaker to effectively buckle shavings. It doesn’t need to be a perfect bevel, and if it is rounded, that’s OK too. Yes, I know this seems ridiculously steep; If you don’t like it by all means experiment until your little pink heart sings, but after you’ve wasted a few months on hit-and-miss research, please remember that YMHOS toldjahso;
Polish the chipbreaker’s striking bevel to reduce friction and prevent wood sap from building up on it too quickly. Re-polish it as necessary. If you pay attention to the condition of this abrupt bevel you will notice that it may actually become pitted from the heat and friction of the wood shavings, especially when planing wood containing hardish minerals. Total neglect will harm efficiency;
Clean accumulated wood sap from the striking face regularly and oil it occasionally with your oilpot to reduce friction;
If shavings tend to become stuck in the mouth, check to see that the chipbreaker is not so thick as to obstruct their smooth passage. If necessary, grind the chipbreaker thinner near the mouth and polish it to improve the flow of shavings;
When you deem the chipbreaker to be necessary, install it as close as practical to the cutting edge. The ideal distance will depend on your plane, the wood you are cutting, and the depth of cut, but 0.5~0.8mm is usually a good place to start. I highly recommend you actively experiment to find the best distance. With practice it will become second nature. While it is not applicable to Japanese handplanes, Rhett Fulkerson of Nice Planes in Frankfort, Ky., has an intelligent technique for systematically setting chipbreakers and cap irons I find useful. LAP has an article about it here.
Conclusions
The chip breaker has been around a long time only because it consistently works.
In Japan, where the single-blade plane was the standard for hundreds of years, with the shift from riven lumber to more economical sawn lumber, the chipbreaker was added to the handplane, perhaps 150+ years ago, and remains in-use even today, solely because it consistently works.
The chip breaker won’t solve all your tearout problems, but it will definitely help on condition that you set it up and maintain it properly. It isn’t difficult and the results of doing so set the professional apart from the amateur.
In the next post in this swashbuckling tale of bare-chested Scottish warriors riding feather-footed war horses over the highlands to rescue buxom lassies clad in flowing gowns from evil leering Lords, we will describe in detail how to setup and maintain the awesome chip breaker. Don’t forget your kilt and claymore!
YMHOS
If you have questions or would like to learn more about our tools, please click the “Pricelist” link here or at the top of the page and use the “Contact Us” form located immediately below.
Please share your insights and comments with everyone in the form located further below labeled “Leave a Reply.” We aren’t evil Google, fascist facebook, or a manager of the Democrat Congressional IT team and so won’t sell, share, or profitably “misplace” your information. If I lie, may all my chipbreakers chip and fail.


Please Leave a Reply