Sharpening Part 21 – The Bulging Bevel

This is what a flat bevel looks like. So sweet.

For everybody in their busy lives, you need to invest in sharpening your tools, and you need to invest in longevity.

Ryan Holmes

In the previous article in this series about sharpening tools we looked at why and how to true the ura, the hollow-ground area on Japanese chisel and plane blades. This post will focus on the opposite side of the wedge that is a cutting edge: the bevel. This discussion is relevant to all plane and chisel blades, not just Japanese tools.

Preface

Before we dive in, your humble servant must clarify something.

Beloved Customers and Gentle Readers that have been blessed with the opportunity to learn about tools from accomplished Japanese craftsmen, as was I, or that have figured them out on their own, and consequently find this or other articles boring, should remember that the primary purpose of these scribbles is to provide instruction to our Beloved Customers, some of whom have not had similar opportunities.

These Beloved Customers are located in many countries and range in experience from newbies to professional woodworkers, so I try to include both advanced information for the professionals, and detailed explanations so newbies can keep up. Consequently, these articles are sometimes long and wordy. I humbly request your kind indulgence on behalf of those who may benefit from extra words.

Investing in Longevity

The quote above by Mr. Holmes is applicable to the all the principles of sharpening I have described in this series of posts so far. He is a computer dude, not a building contractor, joiner or furniture maker, but it is no coincidence he chose to use handtool terminology: it is encoded in human DNA.

His first point is a self-evident admonition, but what about this “investing in longevity” stuff? By definition, an investment is an expenditure of time, resources and/or effort intended to produce a return greater in value than the expenditure. Then how do we go about investing in the longevity of our chisels and planes, and what return should we expect?

While simply grinding sharp edges on our tools helps with making things from wood, I don’t see it as an investment in tools. Rather, if we train ourselves in professional sharpening techniques, and use those techniques to maintain our tools so they function more efficiently and last longer, we can hope to obtain a quantifiable real-world ROI.

The investment your humble servant encourages you to make, therefore, is not in stuff or lucre but in yourself, in your own skills.

The Pros and Cons of the Bulging Bevel

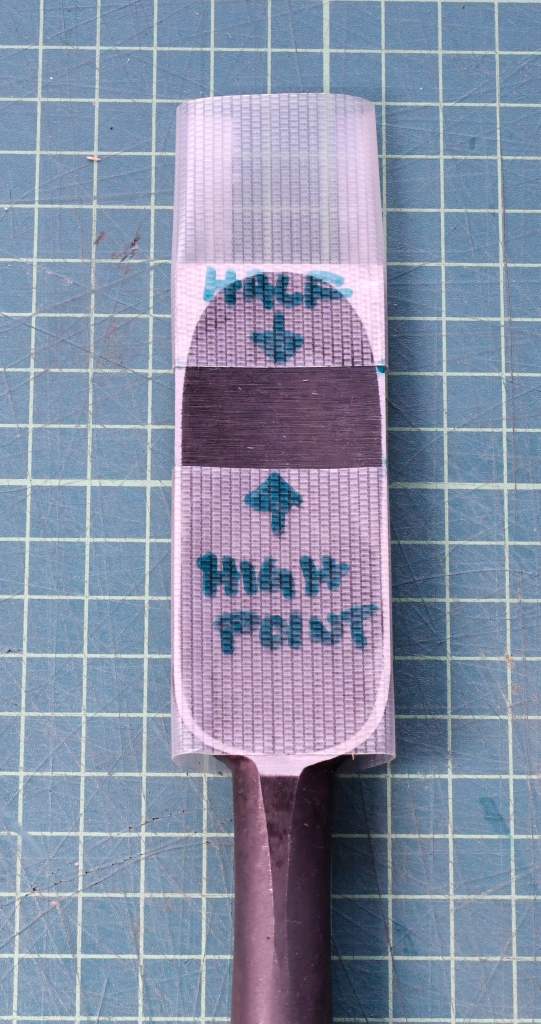
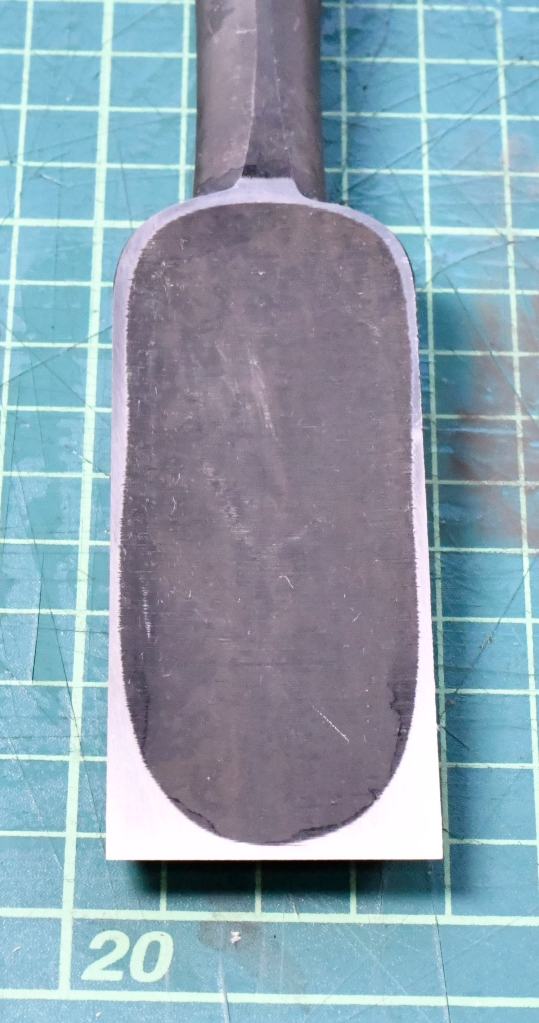
The “bulging bevel,” as I call it, is a deformation too frequently seen in plane, chisel and knife blades. It is simply a cutting edge bevel that is protruding and convex instead of flat. In most cases a bulging bevel can make it difficult to properly sharpen a blade adequately, so it deserves our attention.

Most bulging bevels are born unintentionally and are harmful, but indeed some are hatched with a purpose in mind. Let’s examine the pros and cons, and throw in some scientific results just for fun. 

The geometry of the bulging bevel is clearly superior in a few applications such as carving chisels and knives used in a gouging or scooping motion where a rounded bevel provides better control. Another valid application is chisels used for cutting large and deep mortises where a rounded bevel helps pop out waste easier. Only timber framers cut these kind of mortises, however, and most of them use machines to at least rough out the mortises nowadays.

Hidari no Ichihiro 42mm Oiirenomi. Nothing obese about this sweetheart’s bevel.

Our Beloved Customers are, without exception, extremely intelligent people, so right now some are no doubt saying to themselves: “Self,” (that’s what BCs call themselves when they silently cogitate matters of great weight) does a rotund bevel make my blades sharper or duller?” Let us consider some scientific results.

When I was a grad student in Japan, a fellow student wrote his thesis on the efficacy in plane blades of the bulging bevel versus the flat bevel. He developed experiments, fabricated testing apparatus, and used scientific methodology and microscopic photography yielding indisputable results. We repeated some of his experiments, discussed his research, and pored over photographs and fondled shavings late into the evenings at his lab in Building 11 at the University of Tokyo’s Hongo campus as I drank coke and he drank sake. I’m not sure he made it home some evenings.

The conclusion he reached was that, from the viewpoint of the wood, and based on the classic sharpness test of cutting rag typing paper, there is no difference in the cutting performance between flat and bulging bevels, so long as two conditions are met: (1) Both flat bevel and bulging bevel where they meet the test medium (paper) are sharpened to the same angle and same degree of sharpness; and (2) The bulge is not so large as to interfere with the cut. The “same degree of sharpness” condition in proviso 1 is critical to this discussion.

Let’s examine the cutting edge closely. It’s effective scope is only the last few microns (μ) or so of the blade’s width at the extreme edge. 1μ = one millionth of a meter. A human hair is 90μ in diameter. We need to precisely repair and polish this narrow strip of steel using our sharpening stones, but remember that working anything beyond this strip contributes nothing to making the blade sharp.

Here’s an important point we can learn from a careful examination: Given the same number of strokes to the same blade on the same stones over the same amount of time, it is difficult to make a bulging bevel as sharp as a flat bevel, unless one spends the time to use a sharpening machine and jigs as my grad school friend did during his research.

But the most important point, and one I want you to grasp violently with both hands, at least two feet, and all your teeth is that the time expended and amount of stone consumed when sharpening to a set level of sharpness at the last critical microns of a bulging bevel’s cutting edge is huge compared to a flat bevel. Sharpening using machines and/or honing jigs takes even longer.

In addition to time and cost, another factor we must consider is certainty, because if we are going to invest the time and stones to sharpen a tool, we need to be sure it will consistently achieve approximately the same level of sharpness every time. Unfortunately, the sharpness of the bulging bevel is often uncertain because, instead of guiding the blade to ensure consistent contact between steel and stone at the critical location on the cutting edge, the shape of the bulging bevel causes us to waste a significant number of strokes and time on polishing an irrelevant mound of metal that does nothing to make the blade sharper, but is simply in the way. Not convinced yet? 

Consider the undeniable fact that, despite your best efforts, this miserable lump causes the blade to rock around on the stone’s surface like a boat over ocean swells, with the result that, given a fixed number of strokes, a high percentage of those strokes end up polishing the bulge instead of the cutting edge. This is important because, once again, the last few microns of the blade is the only part that actually does any cutting, not the bulge. 

Please don’t misunderstand. I’m not saying that you can’t create a fiendishly sharp edge on a blade with an obese bevel. I’m also not saying that, within reasonable parameters, a convex bevel cuts less efficiently or dulls quicker than the same blade with a flat bevel. It absolutely doesn’t, as my fellow student’s research showed. Allow me to restate and summarize the facts so there is no confusion.

  1. It takes longer to create a given level of sharpness at the extreme cutting edge of a bulging bevel than a flat bevel, all else equal;
  2. It consumes more sharpening stone to achieve a given level of sharpness at the extreme cutting edge of a bulging bevel compared to a flat bevel, all else equal; and  
  3. There is greater uncertainty about the actual degree of sharpness achieved at the blade’s extreme cutting edge when sharpening a bulging bevel by hand compared to a flat bevel, all else equal. 

If you doubt these statements, you must arrive at the truth yourself.

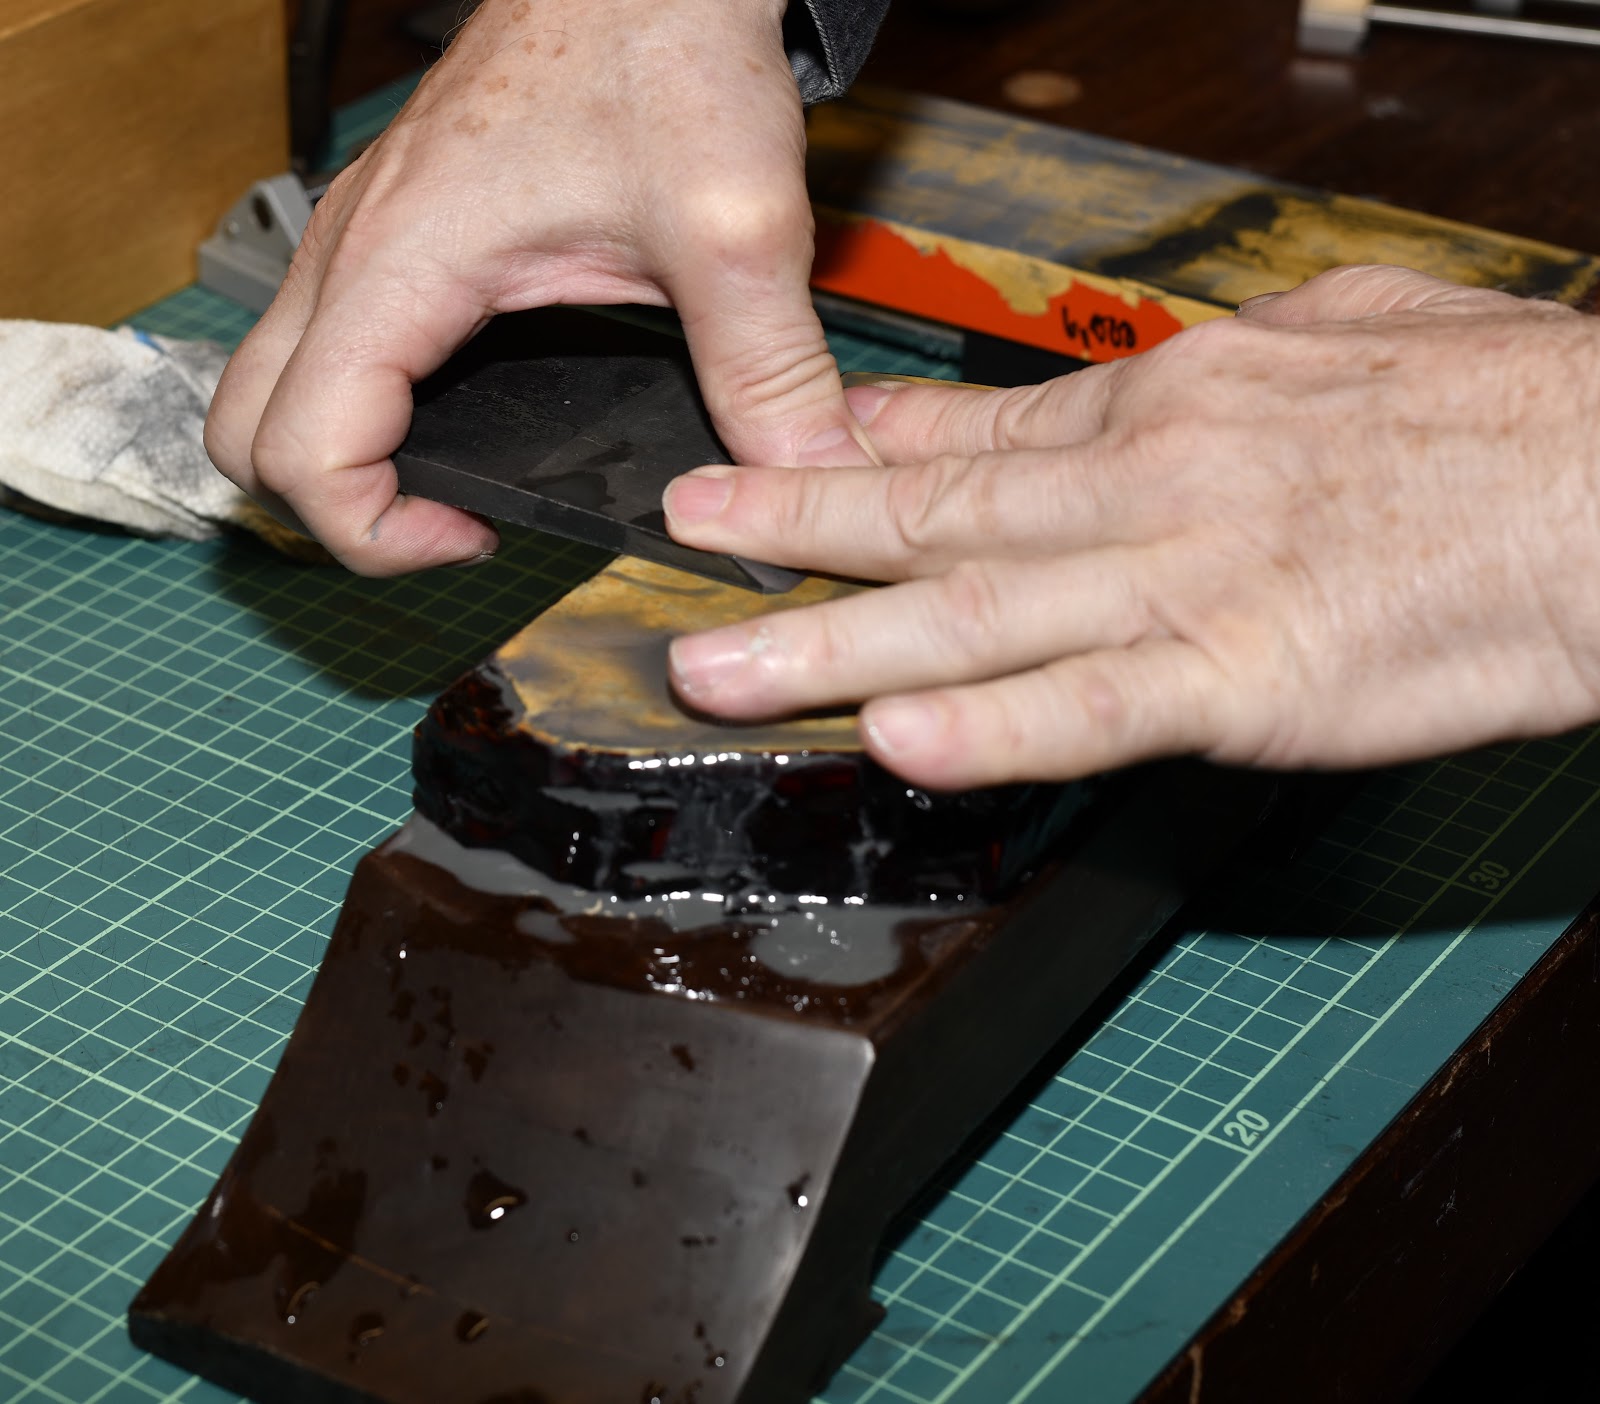
Buy or borrow a quality loupe or microscope with enough magnification to detect the scratches left by your usual finishing stone. Start with a dull blade with a truly flat bevel, sharpen it freehand using a pre-determined number of strokes, and observe the scratches at the last few microns of the cutting edge with your microscope. Then test the blade’s sharpness with your skin or fingernail. Next, repeat this test with a dull blade with a rounded bevel using the exact same sharpening tools and procedures and the exact same number of strokes. No deviations. Once again, observe the scratches and test the sharpness. My grad school friend and I performed this side-by-side experiment at the University of Tokyo several times, with consistent results. Actually, it was a bet and I won. He had to buy the drinks and snacks for a month.

The Causes of Bevel Obesity

Besides pernicious pixies, the most common cause of bevel bulge is simple carelessness, which Beloved Customer can take steps to avoid once you realize the causes.

It is human tendency to try to stabilize the blade’s bevel on the stone while sharpening by applying more pressure on the rear half of the bevel, resulting in the rear half of the bevel (which is all soft jigane in the case of Japanese plane blades, and mostly soft jigane in the case of chisels) being abraded quicker than the front half (which contains the harder steel lamination), causing the bevel angle to gradually decrease or even become rounded. Even the best craftsmen make this mistake sometimes.

To avoid this tendency, train yourself to focus pressure on the front half of the bevel closest to the cutting edge. At first, you may overbalance and dig the cutting edge into the stone a few times, but with practice and attention, it will become second nature. It is almost a meditative process. Every professional woodworker worth his salt must learn this skill.

There is nothing wrong with making mistakes when learning a muscle memory skill like freehand sharpening, but too many people can’t be bothered to learn, and then become frustrated when their skills don’t improve immediately. In the end, they become defensive, twist themselves into knots defending their inadequate techniques, and eventually adopt the self-justifying position that sharpness is overrated. Patience, grasshopper.

BTW, don’t forget to use your handy dandy brass bevel gauge to both check the bevel angle while sharpening and to keep those piratical pixies away.

Hidari no Ichihiro 30mm Atsunomi. What ignorant, smelly savage would grind multiple bevels on this work of art?

Another cause of the tumescent bevel is the use of secondary bevels or micro-bevels. We’ll look at these aberrations in the next article in this series.

To make multiple bevels work one almost must use a sharpening or honing jig of some sort. Many allow sharpening jigs to become a substitute for real sharpening skills they didn’t bother to learn. Such jigs can become, in effect, training wheels those who rely on them never grow out of. How amateurish.

Conclusion

I encourage you to “invest in longevity” with regards to your tools in three ways:

  1. First setup your planes and chisels properly so they will provide you with long, reliable and efficient service. Setting up chisels improves not only their longevity but in many cases their performance too, strange though it may seem. I will post articles about setting up and maintaining Japanese planes in the future.
  2. Second, true the ura of your plane and chisel blades efficiently without reducing their useful lifespan needlessly, as described in previous posts; and
  3. Third, invest in yourself by developing and honing the hand skills necessary to sharpen your blades quickly and efficiently while consuming only the absolute minimum of valuable time, steel and stone.
Image result for image of mandalorian helmet

Please master the ancient and bedrock-basic skill of freehand sharpening. All it takes is an understanding of correct principles, followed by concentration and practice; The rest will follow. I promise. “This is the way.”

We will look at other causes of bevel obesity in the next post in this series on science over barbarism.

YMHOS

If you have questions or would like to learn more about our tools, please click the “Pricelist” link here or at the top of the page and use the “Contact Us” form located immediately below.

Please share your insights and comments with everyone in the form located further below labeled “Leave a Reply.” We aren’t evil Google, fascist facebook, or thuggish Twitter and so won’t sell, share, or profitably “misplace” your information. If I lie may my eyeballs drip orange slime.

Sharpening Part 20 – Flattening and Polishing the Ura

Shall I compare thee to a summer’s day?
Thou art more lovely and more temperate:
Rough winds do shake the darling buds of May,
And summer’s lease hath all too short a date;
Sometime too hot the eye of heaven shines,
And often is his gold complexion dimm’d;
And every fair from fair sometime declines,
By chance or nature’s changing course untrimm’d;
But thy eternal summer shall not fade,
Nor lose possession of that fair thou ow’st;
Nor shall death brag thou wander’st in his shade,
When in eternal lines to time thou grow’st:
   So long as men can breathe or eyes can see,
   So long lives this, and this gives life to thee.

William Shakespeare, Sonnet 18

Your most humble and obedient servant began this post with the elegant sonnet quoted above, indisputably one of the most beautiful pieces of poetry ever written in the English language, instead of the usual pithy proverbs of Red Green, that towering Canadian Philosopher-Handyman and erudite Leader of Possum Lodge, just to show Gentle Readers how refined we at C&S Tools can be when no one is watching (ツ). But sadly we must now pause all such elegant distractions for a time to focus on the nuts-and-bolts of how to true the ura of a Japanese woodworking blade, the first step in making it sharp.

This tutorial is rather wordy because Beloved Customers sometimes find the task of managing the ura difficult at first. Indeed, while truing the ura of Japanese chisels and planes is a simple task, it’s one many get wrong the first time, occasionally resulting in emotional damage to both blade and it’s owner. I know it almost drove me non compos mentis the first few times I tried, but now that my psychiatric team has stumbled onto the right mix of meds, and Doctor Alonzo has released your humble servant from that unflattering canvas straight jacket, Beloved Customers have the opportunity to learn from my mistakes. Rejoice!

This is the first article in the series where we actually turn steel to mud, so let’s get to it.

Important General Principles

All standard chisel blades and plane blades, whether Japanese or Western, need to have a planar “flat,” or in the case of Japanese chisels “ura,” opposite the bevel in contact with the sharpening stones the blade’s full width, and ideally, full length. Perfection is not necessary, however, so don’t let yourself become obsessive; That way lies madness.

A few lost souls mistakenly assume (just before they go barking mad) that the lands surrounding the hollow-ground uratsuki must be perfectly planar for the chisel to function, but such is not the case. Granted, it does make it easier to sharpen the blade, but it need not be achieved immediately, especially since a planar ura can be easily obtained gradually over multiple sharpening sessions.

If Beloved Customer’s chisel does not have a fully-planar set of lands surrounding the hollow-ground uratsuki when new, understand that it may be a hand-forged, hand-shaped, hand-sharpened tool with imperfections, and perhaps not a CAD-CAM designed, mass-produced, chisel-shaped, sharpened screwdriver. If so, please understand that this is not an aberration but is normal. However, if such natural irregularities distract to the point your eye starts twitching like that of Chief Inspector Dreyfus after spending time with Inspector Clouseau, perhaps hand-forged tools are not your cup of tea.

Procuring Perfect Tools

The previous sentence may seem to suggest that we at C&S Tools prefer to not provide our humble tools to perfectionists, but that is not the case. Rather, we insist Beloved Customers seeking the perfect chisel plane, saw or knife fully acknowledge and comply with the rrealities procuring such tools entails nowadays. What conditions? First, multiply your tool budget at least tenfold (seriously) and set aside that budgeted amount in hard cashy money, maybe in roll in your sock drawer. You see, unlike your unworthy servant who many assume works for free, craftsmen with the skills required to produce perfect tools, and who are willing to invest their valuable time in doing so, are in high demand and do not work for free. If this seems steep, then perfection is not for you.

Next, plan your order carefully, and perhaps commission drawings. Not as easy as it sounds, mayhap.

Finally, steel yourself to wait a minimum of two years for the work to be completed, for you see, while many desire perfect tools and are willing to pay the price, you don’t need toes to count the number of overworked craftsmen that can actually forge them nowadays.

Oh yes, I almost forgot one thing. In the case of our Perfect Tool Blackmith, he has an unusual condition, one based on valid reasons I cannot disclose, that the recipient be a working professional craftsman, not an amateur, hobbyist or collector.

An option to having a perfect chisel custom-forged new is to seek out a genuine Hidari-no-Ichihiro chisel because the Yamazaki brother’s products, though very expensive back in the day and more expensive now, were pretty close to perfect in shape and appearance. But beware counterfeits.

On the other hand, the tools we sell to our regular Beloved Customers are extremely practical, they look OK, perform just as well as Perfect Tools, cost a helluvalot less, and most importantly they are waiting on our shelves right now quivering in anticipation of an airplane ride to new masters who will feed them oodles of yummy wood. So which do you think is is better? A perfect prima donna of a tool that takes years to procure and is too precious to use hard, or a reasonably-priced, hard-working, hand-forged, high-performance, eager but perhaps less than perfect tool you can have right away?

Working With the Imperfect Ura

In any case, please be aware that a chisel with an imperfect ura (nearly all of them have some problems when new) can be perfected over time and will work just fine as-is if you are patient, remain aware of the blades tendencies, and compensate using your eyes and hands accordingly. After all, the chisel only does what you direct it do, so please direct the blade instead of just going along for the ride while drinking adult beverages and smokin wacky-tabaccy in the back seat with Murphy. 〜(シ) 〜

If the plane formed by the ura’s lands is concave, the chisel will tend to undercut the end walls of a mortise, not difficult to avoid with some caution of the sort one must always exercise.

On the other hand (the one with 6 fingers) if the plane is convex, the chisel will tend to scoop away from the end walls of a mortise. All things considered, however, concave is far better than convex.

But whether concave or convex, such irregularities always exist to some degree from time to time in all chisels sharpened by hand. It is the craftsman’s job to manage his tools and find efficient ways to maintain them. Of course, this means we must strive to create and maintain a reasonably flat ura, so let’s consider some practical time-proven solutions that avoid wasting a lot of time, stone and steel, and at the same time don’t wear out the hollow at the ura in the process.

Let us begin by observing that the surface area (square millimeters) of the hard steel encompassed within the lands at the ura that we need to eventually make planar can be divided into four areas:

  1. The land immediately adjacent and parallel to the cutting edge (aka “itoura;)
  2. The land where the neck meets the blade, also kind sorta parallel to the cutting edge;
  3. The skinny side land more-or-less parallel with the blade’s long axis and located on the right side of the hollow-ground area called the uratsuki; and it’s mirror image
  4. The skinny side land on the left side of the uratsuki.

All four lands are necessary, but the one that matters most when sharpening and cutting is the last couple of millimeters at the itoura touching the cutting edge.

While some people fixate on it, the land near the neck matters least of the four. This is an important point to grasp.

The side lands are important bearing surfaces for aligning the chisel in the cut, but they are less important than the cutting edge land, the itoura. If you like your chisels and planes, prefer they remain as easy as possible to sharpen, and intend to use them for a long time, it’s important to understand that working the ura over-agressively on rough stones is the quickest way to wear the side lands down prematurely, thereby making the uratsuki shallower quicker, and defeating the subtle genius of the design of Japanese woodworking blades before their time. We want to maintain the ura as deep as reasonably possible for as long as reasonably possible.

Allow me to explain this further. As we inevitably grind away the skinny side lands, the hollow-grind at the uratsuki will become shallower and the amount of hard steel we will need to sharpen/polish will drastically increase, which is inconvenient in so many ways. Sadly, too many people make their chisel’s side lands fat as a sumo wrestler soon after purchasing a chisel in their anal-retentive quest for the totally flat ura. Makes me wanna cry.

The cost-efficient and time-efficient solution is to focus on the important itoura, make small corrections to the ura’s three other lands over multiple sharpening sessions thereby saving valuable time as well as expensive stones and steel while preserving the ura as long as possible. How to do this? Focus all your attention on the most important area, and patiently plan on accomplishing the job over 5~10 sharpening sessions, using the chisel in the meantime.

Don’t spend any effort correcting/polishing the ura full-length from cutting edge to neck, instead work the area behind the cutting edge on the stones (which must be flat). To do this, focus finger pressure nearest the cutting edge only. An effective approach is press down on the land nearest the cutting edge while moving the blade on the stones, while the rest of the blade hangs off the stone.

In other words, while pressing down with the fingertip(s) on the face of the blade (the surface opposite the ura with the brand on it) as near as possible to the cutting edge, move the last 5~15mm of the blade onto and off of the stone in a back-and-forth diagonal motion concentrating abrasion where it is needed most. This requires the ability to sense the balance of the blade on the stone, and to apply fingertip pressure where it is needed most. Wow, imagine that.. real hand skills. If you don’t have these skills now, they are easy to develop with concentration and practice.

During each subsequent sharpening session, increase the width of the area you work on the stones a tiny bit until the entire ura is flat and can be worked on the stones.

Through this technique and over multiple sharpening sessions, you will notice the ura’s lands will gradually become planar while only the lands nearest the cutting edge increase in width. Honest.

It helps to apply either marking pen ink or machinist’s blue to the blade to confirm whether or not you are applying pressure where it is need most and that abrasion is proceeding as desired.

Please also keep in mind that, when working the ura, in most cases, you should focus hand/finger pressure on the “ito-ura,” the land at the ura located right at the cutting edge, and almost no pressure elsewhere on the ura.

It is human nature to want to rely on the flatness of the ura’s lands to keep the blade flat on the stone, and therefore we tend to apply pressure at the midpoint of the back so that the pressure on the ura’s land is even at all points of contact. This feels good; It feels stable.

But if you consider the narrow width (and small area) of the hard steel exposed at the side lands compared to the lands at the ito-ura cutting edge and the corners of the blade, you will see why this technique will wear the skinny side lands quickly and prematurely.

Allow me to restate an important point: The goal therefore is to focus hand/finger pressure nearest the cutting with much less pressure focused on the sides lands preserving them, and the depth of the ura, as long as possible. This technique will also save time and expensive steel. It is an advanced skill, but one Beloved Customer should aim to perfect.

A detailed example follows.

Once the ura of your chisel is flat and true, you should not need to true it again unless the blade needs major repairs. Japanese plane blades, on the other hand, are a little more complicated because repeated sharpenings tend to gradually wear out the land right in front of the cutting edge, called the “ito ura,” and the bevel must be tapped-out to compensate, and the ura re-flattened. I won’t delve into the subject of “tapping out” the ura of plane blades in this post but a detailed explanation can be found in Part 30 of this series.

Evaluate the Ura

The first step in flattening or truing an ura is to evaluate its condition. Don’t start grinding away willy nilly without first checking it and making a plan. If you find you cannot stop yourself, don’t walk but run to the nearest pharmacy and buy a bucket of the medicine discussed in part 19 in this series about maintaining sharpening stones.

There are several ways to check the ura’s condition. A thin straightedge works well in most cases. A thick straightedge may be easier to keep stable on the ura, but it will shut out too much light making observation difficult. Place the straightedge edge-down on top of the full length of the side land all the way to the cutting edge. Keep the straightedge touching the land; Don’t let it span the hollow-ground uratsuki. Hold the straightedge and blade up to a strong light source and look for light passing between them. This technique is quick and dirty and will suffice in most cases, but does not tell you a lot about twist.

Use a straightedge to check the right and left lands for flatness. It doesn’t do any good to span the hollow-ground urasuki, so don’t bother. These photos are taken from above for clarity, but you want to hold the blade and straightedge together up to a strong light to observe any light showing between them that will indicate a gap. I am using a small square, but a simple small straightedge is more convenient. This takes a bit of coordination so be careful not to drop a chisel on your toe. I’ve done this once or twice before. Monkey meet football.
This is a 30mm Sukemaru atsunomi, a famous brand and an excellent and powerful chisel hand-forged by Mr. Usui from Shirogami No.1 Steel. It’s in pretty good shape, but can benefit from a little truing as can most new chisels and plane blades.

Another method to check the ura for planar is to paint the shiny lands with dark marking pen ink or Dykem liquid, apply a tiny bit of fine sharpening stone mud to a piece of flat glass, like the piece mentioned in Part 17, and rub the blade’s flat or ura over the glass. The high spots will become obvious. If the ura is banana shaped (convex), mark the high spot with your marking pen. More often than not, the ura of chisels will be generally flat, but sometimes the last 2mm or so of the cutting edge will be curved upwards towards the chisel’s face.

I learned two things from my examination of this atsunomi. First, there is a high spot (convex) at the skinny land on one side located approximately 1/2 to 5/8 the blades’ distance from the cutting edge. The land on the other side seems a little low. Hmm, curious. This is a bit unusual, but it happens when a blade warps during heat treat, which Shirogami steels tends to do frequently.

The second problem I observed was that the last 3~4mm of the itoura land at the cutting edge curves downward away from the ura just a tiny bit, enough to cause problems.

I next must formulate a plan to resolve these problems with a minimum of time and effort and without making things worse.

Make a Plan

The temptation to start grinding away immediately will be powerful. But… I must… resist… the… stupidity impulse!!

If it becomes too much, I’ll take a coffee cup or three of the medicine mentioned in the previous post and slather it on my head forcefully. Don’t hold back, for Pete’s sake, rub it in really good now. Some say my excessive use of this medicine is why I am as bald as an egg, but I prefer to believe it is caused by the high-intensity psychic waves radiating from my gigantic brain (ツ). Thank goodness for my aluminum foil skull cap with its artfully protruding copper wires or the radiating light might blind airline pilots passing overhead!

But getting back to practical matters, a useful plan must have goals and objectives. In this case the goal is a perfectly planar ura, but if this goal is difficult to achieve quickly there is an objective you achieve immediately in any case, one that may make it possible to achieve the larger goal over multiple routine sharpening sessions without any special effort.

As I keep harping, to make a chisel or plane work well, you need a sharp, flat bevel and a sharp flat area right at the thin land adjacent the cutting edge. This is where the cutting occurs and the area I need to keep sharp, so I will make creating this flat area the first objective in my plan, and then determine the steps to achieve it. I make certain every step in my plan and every stroke I make on the stones gets me closer to this objective, not further away. This means working smart, ruthlessly calming my inner badger (you know, that nearsighted, short-legged snuffling beast that just keeps digging) and repeatedly stomping my stupidity impulse into the ground. Frequent applications of idiot ointment help too.

If the blade is arched (concave), touching at two points, one near the neck of the chisel blade, or head of the plane blade, and at the other at the cutting edge, and not in between, all is well. I recommend you leave a blade like this as-is because after a few sharpening sessions the ura will become flat and twist-free without any special effort, and the blade will become very sharp and be entirely functional (assuming the faces of your stones are flat).

If the blade is wavy (rare) or banana-shaped (convex), your plan needs to take those details into account.

In this example I located the highest point of the bulging area at the ura and marked a line across it with my marking pen. I then measured halfway between this line and the cutting edge and made another line. which I will call the “focus line.” It is here where I need to focus the most pressure when grinding down the ura, NOT the entire length of the blade, despite what my inner badger demands.

The purpose of doing all this prissy planning and layout work is to protect the right and left side lands from being wasted unnecessarily. Newbies and those with poor badger control often insist on working the entire length of the blade on the stones, but this is illogical and ignores three points.

The first point often overlooked or ignored is that the majority of the metal I need to waste is usually located to the right and left of the itoura land nearest the cutting edge, not the full length of the blade, so there is little benefit to grinding the entire ura.

The second point is that the side lands are thin as a blade of grass and will abrade very quickly with almost no effort. Besides, without using large plates and stones, it is very difficult to work the blade’s full length accurately without wearing steps into the side lands anyway.

The third point often ignored is that it makes no sense at all to try to grind down the land nearest the neck since the plane of the ura hinges on this land anyway. Best to leave it alone and focus my efforts where they will make a useful improvement.

Plane blades don’t even have a land near the head, so the futility of working the entire ura on plane blades is even more obvious than for a chisel.

Work the Plan

The traditional Japanese tool used to flatten and/or correct ura is a smooth steel lapping plate called a kanaban, meaning “metal plate.” To use it, carborundum powder and water are placed on the plate, and the blade is lapped. This is not a difficult process at all, but there is a tendency for the blade’s perimeter to be ground more than the interior areas as the grit is forced in between the kanaban and the blade’s perimeter. To avoid this tendency, and to speed the process up, I prefer to use diamond plates or diamond stones instead of kanaban.

Whatever plan you developed, and whichever tool you selected for this job, the time has come to work the plan. Do you need more idiot-b-gone medicine? A bigger coffee cup?

First, color the ura’s perimeter lands with a marking pen or Dykem to help you see where the ura is being ground down. Don’t ever guess.

Place the most pressure on the focus line selected above. Move the blade back and forth (not side to side) onto and off of the diamond plate, diamond stone or kanaban with the cutting edge and the focus line always touching the diamond plate or kanaban. Don’t go past the high point for now. Be careful to not grind a notch into the narrow side lands where they meet the edge of the diamond plate or kanaban. Most people make this mistake at first. Please don’t you make it more than once.

Grind the ura down so the line at the highest point and the cutting edge is fairly flat.

Work the blade on and off the edge of the diamond plate using short strokes and without going much past the highest point marked earlier. This works because the right and left side lands are thin and can be abraded in just a few strokes. I have moved my fingers to reveal the lines, but in actuality my fingers will press down hard on the focus line while working the blade.
Using a stick to apply more pressure to the blade. I am holding the end of the stick and the chisel’s handle together in my right hand. This is simply illustrating a technique. This chisel did not actually require this sort of aggressive attention.
The same stick technique works even better for plane blades and makes it easier to apply pressure right behind the cutting edge. When doing this, however, be sure to work the blade both forward and backward while moving it right and left, on and off the plate’s edge to avoid digging a trench into the narrow side lands.

Remember, the narrow lands at the sides of the hollow-ground urasuki will abrade down quickly. And the rest of the ura can be gradually flattened during subsequent sharpening sessions using regular sharpening stones. It doesn’t need to be made perfect immediately. What matters most is the steel on the itoura land right at the cutting edge.

The high spot on the land near the top of the photo has been relieved after just a few passes on the #400 diamond plate. The side lands are in fair condition, and the land behind the cutting edge (itoura) needs just a little more work.
After a few more passes on the diamond plate, the ura is in good shape. Please observe that the side land at the botom of the photo is not in full contact, but the opposite side is. This is will not impact the blade’s performance, and will work itself out during future sharpening sessions without special attention.
Flattening my stones before using them. Notice I am using two 1,000 grit stones to save time and stones. Don’t neglect flattening your stones, whether you use waterstones, novaculite stones, coticule, or even sandpaper.
Working the ura on the flat 1000 grit waterstone. Did I mention it is flat? Notice that I am working on and off the stone, not side to side, to save the right and left lands. I am now focusing pressure nearest the cutting edge. Some but not all strokes are full length. The goal is simply to remove the deep scratches on the itoura left by the diamond plate. All other deep scratches can be left alone for now and removed during future sharpening sessions a little at a time.
The ura after polishing on the flat 1000 grit waterstone. At this point the ura is in good shape. Notice how the land at the photo’s left is wider that elsewhere. This increase in width developed because this location was the high spot on this convex ura. Notice how the land on the right side is not even touching the plane in one area. What you should take away from this photo is the realization that if I had focused my efforts on this high location first and ignored the downward curvature of the land nearest the cutting edge, I would have wasted a lot more time and valuable metal only to shorten the useful life of this excellent chisel. Do you see the benefit of carefully checking the ura’s condition, making a plan with clear goals and objectives, and then working the plan? Did the medicine work? Next, we’ll work on the bevel, make a tiny burr, polish it off by making a few strokes alternating from bevel to ura, and be ready for the finishing stone.
Working the bevel on the flat 1,000 grit waterstone. Notice the mud piling up in front of the blade indicating the extreme cutting edge is in contact with the stone. I am applying pressure only on the push stroke to prevent the stone from rocking and developing a “bulging bevel,” A honing jig is not necessary.
The bevel after working on the 1,000 grit waterstone. No jigs were used. No “tricks” involving rulers were used. A silly, inefficient “micro-bevel” was neither wanted nor needed. The bevel is perfectly flat. Flattening the ura and polishing both ura and bevel to this level took less than ten minutes. When the purchaser of this blade eventually dulls the edge, he should not need to spend more than 2~3 minutes to sharpen it once his gear is ready, assuming he is able to sharpen freehand.

This flattening process is seldom required except on new blades.

Polish a blade’s ura up to the level of your finest finishing stone once, and don’t touch it with rougher stones again unless it is absolutely necessary, or further gradual flattening is required. This means that in normal sharpening sessions you must remove all the damage at the cutting edge by abrading the bevel with the rougher stones, and only when the bevel is ready for the finish stone, do you work on the flat or ura, alternating from bevel to flat/ura until all defects, burrs, and even visible scratches are polished away.

If you condition the flat (ura) side of the blade correctly, and keep it polished, you should not need to work it on anything but your finish stone until it is time to tap out and grind the ura or back in the case of plane blades. Therefore, the bevel side of the blade is where we spend most of our time and effort.

Now that the ura is in good shape, we will look at sharpening the other side of the wedge, the blade’s bevel, in the next post in the series. In the meantime, keep yer stick on the ice.

YMHOS

If you have questions or would like to learn more about our tools, please click the “Pricelist” link here or at the top of the page and use the “Contact Us” form located immediately below.

Please share your insights and comments with everyone in the form located further below labeled “Leave a Reply.” We aren’t evil Google, fascist facebook, or thuggish Twitter and so won’t sell, share, or profitably “misplace” your information. If I lie may an elephant caress me with his toes.

Matsui Seimitsu Precision Squares

150mm hardened stainless steel precision square by Matsui Precision
Maestro Bruno Walter 1876~1962

By concentrating on precision, one arrives at technique, but by concentrating on technique one does not arrive at precision.

Bruno Walter

We would like to introduce some excellent tools made by a company called Matsui Seimitsu Kogyo located in the city of Sanjo in Niigata Prefecture in Japan. We have been using this company’s products for many years and have started carrying a few by popular demand. The time has come to share these with our Beloved Customers in general.

Matsui Seimitsu Kogyo translates to “Matsui Precision Industries,” but your humble servant is just going to call them Matsui Precision. The company has been around for over 100 years. They may not be the largest manufacturer of precision tools in Japan, but their reputation is unsurpassed.

Allow me to digress for a moment while I grind these oak galls to make some ink. Just about out, you see.

Anyway, as you can probably tell from my posts to this blog so far, and which will become even more obvious in the future, I love ancient tools and learning how beautiful work was done by determined people using basic, even crude tools. But I am also fond of excellent refined handtools that help me do a better job more efficiently. I am always on the lookout for such tools, and this post is about one such tool I discovered. One thing I like about this tool is that, while it is essentially unchanged from the days when Noah was knee-high to a grasshopper, Matsui Precision has subtly improved the ancient square in ways that are not immediately obvious. For one thing, it really is a “Precision Tool,” even though you wouldn’t think so just by looking at it.

The idea of using “precision tools” for woodworking is offensive to some. I have seen online discussions about using precision tools for woodworking induce psychotic events in some amateur woodworkers. Perhaps the very thought of such tools triggers hallucinations of digital micrometers swooping through their dreams while pissing down on the eternal beauty flowing from their masterful hands. Or perhaps they imagine the smelly poor-quality Chinese-made tools they buy in bundles from Harbor Freight to be more expressive of their artistic intentions than the cold precision tools of the sort less artistic machinists use. To the former I say “Don’t drink alcohol with your medications.” To the latter I exhort: “Extract thy head from thy nether regions and behold the light of civilization!” 

Anyway, that’s enough free psychoanalysis. Let’s get back to Matsui Precision Squares.

They have six distinct advantages over almost any other simple square you will find:

  1. Precision: Unlike any square ordinarily available to woodworkers, these are manufactured and certified in accordance with Japan Industrial Standards (JIS). The relevant standard is JIS B7516 (2005). The hardened steel model (SY Series) is rated Grade 1, and the graduated model SM Series) is rated Grade 2. Accordingly, these squares precisely measure 90°. Why should you care about a certification? Take it from me, a guy that regularly does quality inspections of not only manufacturer’s products but of their factories and workshops, both in Japan and abroad, as part of his day job: It means something for a manufacturer to have a nationwide standard to meet, especially in a quality-conscious country like Japan. Of all the handtools you own, which ones are made according to any recognized, independent standard? The MP square will pass JIS Standards. We guarantee it.
  2. Lightweight and Handy: You will not find a precision square lighter in weight or handier anywhere. The blade (long leg) and stock (short leg) are relatively thin, light in weight, and handy to use, unlike machinist’s squares and combination squares with their thick, heavy, clumsy, flat stocks and blades which make it difficult to see light showing between them and the workpiece. The Matsui blade is relatively thin making the square easy to use for woodworking.
  3. Durable: The stock and blade of both SY and SM series tools are joined by spot welds, unlike all but the most expensive machinists squares; Not a compression joint, not glued, not bolted, not pinned. They are not indestructible, of course, but the stock or blade will bend or melt before this connection fails.
  4. Corrosion-Resistant: both blade and stock are stainless steel so they won’t rust even if used and stored in constantly humid conditions, even if you have sweaty hands. Remember, rust makes surfaces rough and ruins tolerances.
  5. Hardened: This feature is most important in my opinion. The blade and stock of the SY series squares are hardened, a very unusual feature. For the woodworker, this means that the blade will better endure the scraping and shaving action of steel scribes and heat-treated marking knives used in layout, and will stay straighter much longer than all but the most expensive machinist’s and diemaker’s squares.
  6. Relief Cut: The stock has a small half-circle notch cut into where it meets the blade to prevent wood shavings etc. from jamming between the blade and/or stock preventing them from making clean contact with the workpiece ruining accuracy, an important detail indeed.

In short, the Matsui Precision square will help you do better woodworking, easier, and for many years.

We carry two models of Matsui Precision squares. The first is the SY Series pictured below, with a hardened stainless steel blade but without graduations (millimeter marks). The blade is hardened to Rc54~57 and the stock to Rc49~52. This is the tool we use and recommend for layout using a marking knife.

The SM series is different from the SY Series in three ways, reflected in the lower price. First, the blade is not hardened. Second, it has deeply etched graduations (not laser etching) which are perfect for using with a scribe or marking knife because the tool’s tip can get into the graduation for positive indexing. And third, the level of precision is one level lower at JIS Grade 2. The graduations include a √2 scale useful for determining the diagonal distance of a square by measuring a side.

If you are tired of squares that aren’t square, that are bulky, heavy, and clumsy to use, that are destroyed by a single drop, or that get eaten alive by your marking knife or scribe, then you should give these a try. You’ll never look back.

If you would like to purchase one, please inquire using the form below.

Matsui Precision Hardened Stainless Steel Squares (w/o graduations) Model SY-15
Product IDNominal Size (mm)Blade lStock lStock t¥ Price
SY-550524086,270
SY-770725686,270
SY-101001057086,270
SY-151502029986,820
SY-2020025212288,690
SY-252502521481012,320
SY-303003021761015,180
Matsui Precision Hardened Stainless Steel Squares (w/o graduations)
Matsui Precision Stainless Steel Square (w/o graduations) Model SM-10
Product IDNominal Size (mm)Blade lStock lStock t¥ Price
SM-550524083,080
SM-770725683,080
SM-101001127083,080
SM-121201408583,080
SM1515017010083,300
SM-2020022512084,840
SM-2525027514510.56,820
SM-3030032517310.58,800
Matsui Precision Stainless Steel Squares (w/ graduations)

YMHOS

Links to Articles About Other Matsui Precision Tools:

If you have questions or would like to learn more about our tools, please click the “Pricelist” link here or at the top of the page and use the “Contact Us” form located immediately below.

Please share your insights and comments with everyone in the form located further below labeled “Leave a Reply.” We aren’t evil Google, fascist facebook, or thuggish Twitter and so won’t sell, share, or profitably “misplace” your information. May my square always lie to me if I lie to you.

The Sewari Kerf

If the only tool you have is a hammer, it’s hard to eat spaghetti

The David Allen

You may have noticed sawkerfs cut into the sides of the peeled cedar logs in the pictures in my earlier post about Sotomaru nomi and wondered “what the heck!?” I know that was my reaction the first time I saw similar slits many years ago.

“Sewari Kerf” sounds a bit like the phrase for hello in Thai, but trust me, I know the difference. “Sewari” 背割りtranslates from Japanese to “back split.” Nothing to do with drafty pants.

This image has an empty alt attribute; its file name is 0sKRBOUMmMp9APyONhdUbLCeVNfpZQVTue7VKl0PpNFoagVfX1JwxUlHyLqhEfxhLKdqVv2vTSnG9PQsjhMJZvJXMLNOt_hwQEhryEpEbK0Unftq8UE8rgwH1bYUjvj-nCdu_6mT
Three peeled cedar logs joined for a structural frame. Oriented upside down in this photo. Notice the sewari kerfs and the minor cracking. This degree of cracking is acceptable.

You will also notice some narrow cracks in the peeled logs in the photo above. These are natural shrinkage cracks that always occur in timbers that contain the tree’s heart. If sewari had not been cut into the peeled cedar logs in the photos above, the cracking would not be hairline, but would be as wide and wandering and ugly as a politician’s morals.

A sewari kerf provides a predetermined location for shrinkage stresses to collect resulting in a more attractive and structurally sound post or beam. It also makes it possible to use these shiny peeled cedar posts and beams with less waste while achieving a more refined, orderly, reliable appearance.

Allow me to digress a bit while the ink dries.

The Japanese consumer places high value on uniformity of appearance even in natural materials. This is also why Japanese ladies will pay $120 for a perfect musk melon as a gift for someone knowing it won’t taste any better than a less-beautiful but still expensive $20 melon. Both giver and receiver understand and appreciate the sentiment inherent in such a gift beyond the melon’s taste.

A Father’s Day gift in a wooden box
 (102058)
Peeled cedar logs awaiting purchase at the Meibokuya warehouse. These exposed structural timbers are expensive and will be wrapped in foam and cardboard and plastic before shipping.

The point: A natural product is made to look more uniformly natural by eliminating all natural defects. Makes perfect sense, right? Welcome to Japan.

Another aspect of this cultural peculiarity can be seen most in the traditional Japanese garden, if you have eyes to see it. Tremendous time and effort and money is spent constructing and maintaining a miniature representation of the natural universe in a small space. In this case, not uniformity but exaggerated naturalness is the goal. While the ostensible goal is the appearance of natural growth and random placement of features, there is not a single natural or random thing to be found in a Japanese garden, except perhaps the water in the pond. A beautiful art form to be sure. A triumph of design and patience. But about as natural as most movie actresses nowadays.

Kutsura Rikyu Garden

The sewari kerf too is not natural, but it helps nature appear both more natural and more uniform. It is also better for the environment. Did someone just say “Poppycock?” Ah. In that case, let us reason together, Gentle Reader.

The sewari makes it possible to cut square posts and beams from smaller diameter trees at less cost and with less waste. Indeed, without the sewari, many millions of small trees that would otherwise be clear-cut to make room for roads, infrastructure, and development, then chipped and tossed aside on the forest floors of Japan to return to the soil and atmosphere, can instead be used for construction lumber.

This wasteful activity is common throughout the entire world and has a tremendously harmful impact on the atmosphere, soil erosion, and water quality. Sewari is an environmentally-friendly way to make more efficient use of the world’s most environmentally-friendly building material.

Please encourage wood producers and governments in your area to develop and employ better ways to use and maintain forests, because neither thoughtless harvesting focused solely on profits, nor abandoning forests to burn and rot and release particulate and chemical contaminants into the atmosphere and destroy animals and their habitats in the process, is responsible stewardship. We need the building materials, oxygen, and carbon dioxide entrapment capabilities of forests now more than ever. Bambi needs a home and dinner too.

I see the ink has dried so I will step down from my soapbox now (Oops, I almost tripped and broke my fool neck!).

Back to the subject of this post, please take a gander at the photos below of two square construction-grade Akita Cedar posts, both with hearts in their centers. The one on the left does not have a sewari cut, but it does have a nasty collection of shrinkage cracks. Ugly, oh sooo ugly. The one on the far right has a sewari cut, but only a couple of tiny shrinkage cracks. If you had a choice, which one would you buy? Which one do you think is more dimensionally stable? Which one is a more efficient use of natural resources?

img_7113
A beautiful Hinoki post with sewari cut and dimensioned to final width and thicknes and marked with location and orientation in the building. Notice how the kerf is narrow near the center and widens towards the timber’s exterior. This began as a simple sawcut with parallel sides, but as the wood dried and shrunk, the kerf spread into a V shape. The timber’s dimensions distorted accordingly, so this timber was trued to this final dimension after the shrinkage and internal stresses calmed down.

Japanese building codes, especially those governing wooden construction, have changed a great deal since the Great Hanshin Earthquake of 1995 mandating metal connectors in tension loading, and metal plates spanning many connections in wooden structural frames. To accomodate the sewari kerf, manufacturers of these structural connectors have developed extra-wide plates that span the kerf, with screws and nail holes offset from the centerline. The point I am trying to make in my meandering way is that sewari is now an integral but hidden part of public and private life in Japan.

Perhaps the sewari kerf looks unsightly. In the case of posts, the carpenter will orient it away from view as far as is reasonable. In the case of beams, he will orient the kerf upwards out of sight.

Sometimes, after the wood has reached equilibrium moisture content and internal shrinkage stresses have calmed down, the carpenter will glue a strip of wood into the sewari kerf to fill it. Sometimes this strip makes the member look better, sometimes it makes it look worse, especially when it pops out and flops around. What do you think?

In the top left-hand image a sawkerf is made in wet wood. As the wood shrinks, the kerf opens and the walls inside the kerf often develop a curvature. These surfaces must be trimmed straight after the wood reaches equilibrium moisture content. A wedge-shape strip of wood is then glued into the kerf. All four sides of the wood are then trued. This is an extreme example.
Related image
リフォーム改修用語 背割り埋め

In conclusion, I would like to add a few points of clarification and a real-world example from my long-list of screw-ups.

Sewari doesn’t usually add strength, but it makes it possible to use less than ideal timbers, and to process those timbers, including reducing the moisture content to allowable limits, in a shorter period of time and with much less waste than would otherwise be possible. This is a big deal if you care about conservation of natural resources. It’s also a big deal if you are concerned about the cost of materials.

So long as the kerf can be oriented away from view, the appearance of timbers with sewari is a heck of a lot better than those without. And have you ever noticed how customers will look aghast at wandering, gradually widening shrinkage cracks in a large timber post or beam imagining that it will cause the member to eventually fail? Of course you have.

I did one job in Nevada, the driest State in the USA, using many large and long square timber posts that developed shrinkage cracks after they were installed. The cracks alarmed the Client so badly they insisted they would not occupy the building unless we installed metal straps at three heights around the posts to ensure they wouldn’t explode, when in truth the timbers were not expanding but rather shrinking, and the cracks did not impact the posts’s strength or resistance to buckling to any significant degree.

But if we had cut a sewari kerf into those posts immediately when they arrived at the hot dry desert jobsite, the amount of shrinkage would not have been less, but that shrinkage would have concentrated at the kerf and not caused the Client to make illogical, pointless and expensive demands. On the other hand, if cosmetics had been a priority, the Client would have been right to object to those ugly cracks, not that straps would have made any difference.

So I put it to you, Gentle Reader, did we save money on that job by not taking the time to cut sewari kerfs and consequently being forced to spend money and time fabricating and installing silly metal straps to resolve the Client’s complaints later, invalid though they may have been? I think not.

Go forth and do better, my son!

YMHOS

kitayamasugi-5
A well-managed cedar forest in Japan

If you have questions or would like to learn more about our tools, please use the questions form located immediately below. Please share your insights and comments with everyone in the form located further below labeled “Leave a Reply.” We aren’t evil Google or incompetent facebook and so won’t sell, share, or conveniently and profitably “misplace” your information.

Sharpening Part 19 – Maintaining Sharpening Stones

砥石の面直しについて :鑿研ぎ練習 番外編_e0248405_17182931.jpg

Give me six hours to chop down a tree and I will spend the first four sharpening the axe.

Abraham Lincoln

Sharpening stones must be maintained if they are to perform effectively. Abe Lincoln’s quote above is especially relevant to this subject.

There is a lot of hogwash taught as holy gospel on this subject, so in this article your humble servant will suggest some more or less traditional methods that both work well, and are cost-effective. Do with them as you will.

Key Principles

Let’s begin with a few basic but critical principles about sharpening that Beloved Customer should understand and use:

  1. For the majority, but not all, applications, your blades need to meet the following standards:
    • Flat back/ura: perfection is not necessary but it must be flat enough for you to be able to consistently polish the last few millimeters of steel at the ito-ura (flat adjacent the cutting edge) on your finishing stone;
    • Flat bevel, for the same reason mentioned above;
    • Straight cutting edge (except when a curved cutting edge is required).
  2. All Stones get out of tolerance with use. Working a steel blade on a sharpening stone of any kind, whether waterstone, novaculite, coticule or carborundum, wears the stone a little bit with each stroke, creating a dished-out, twisted surface to one degree or another, even if you can’t detect the distortion with Mark-1 eyeball. Therefore, you need to develop the habit of frequently checking the flatness of your stones when in use and truing them when necessary;
  3. Despite what many imagine, a hollowed-out stone cannot reliably maintain a blade with a planar ura, a flat bevel, and a straight cutting edge, but it can damage the blade being sharpened.

The Rule of Seven applies, so reread these three critical points three times, click your heels three times, and ask the gods of handsaws to help you remember them.

Albrecht Dürer - Melencolia I - Google Art Project ( AGDdr3EHmNGyA).jpg
Melencolia I by Albrecht Dürer 1514
What are the angel and her little buddy pondering? Sharpening, no doubt.

Pretty simple stuff, right? I apologize if Beloved Customer already knows these things, but you would be surprised how many people know them but still ignore them, and then wonder why their blades won’t behave. Iron Pixies? Nah. Perhaps Mifune Toshiro said it best in Akira Kurosawa’s movie Yojimbo when he quoted the old Japanese proverb: “There’s no medicinal cure for foolishness” (馬鹿に付ける薬はない).

Toshirô Mifune in Yôjinbô (1961)
A scene from Akira Kurosawa’s classic movie Yojimbo (1961), the inspiration for the later spaghetti westerns beginning in 1964 and even the more recent TV show The Mandalorian. In this scene, the nameless loner anti-hero is warning off some hired ruffians who have bragged about their judicial tattoos, and the death sentences hanging over their heads, and informed him they aren’t afraid of him or the pain of being cut. The hero responds with the proverb “There’s no medicine for a fool,” then tests their resolve by cutting 3 of them. Ouchy! A hard lesson easily avoided. BTW, if you have tattoos and visit Japan, best to keep them covered since they have an old and indelible association with criminal organizations and judicial branding. On the other hand, if you enjoy being mistaken for a lowlife, violent, thieving piece of scum, by all means show off your ink.

Here’s the scene on YouTube. Please don’t watch it if you are squeamish. Never call the Man With No Name’s bluff.

Yôjinbô (1961)
The Man With No Name (aka Kawabatake Sanjuro played by Mifune Toshiro) pondering the interesting financial opportunities awaiting him in the troubled little post town. His older swordsmith friend (Tono Eijiro) bitterly objects to his plans. The old boy was right.

Although it has only happened once or twice in my recollection (my saintly wife of the jaundiced eye may disagree (ツ)), on those few occasions when I have made a stupid mistake I have been known to ask subordinates to fetch a large bucket of “Idiot Salve” for me from the drugstore. The jury is still out on the effectiveness of this ointment, but I would like some credit for writing this entire article without applying any.

But I digress.

Obviously, if every stroke wears the stone a little, then we must constantly check our stones with a stainless steel straightedge for flatness (length and width) and wind (diagonals) as we use them. It takes 3 seconds. Even if your stones are brand new, you may find distortions. Time spent checking is not wasted if it results in improvement, which it usually does. This is the heart of quality control, and is applicable to everything in life.

Truing Stones

When your check reveals the stone is out of tolerance, you need to flatten/true it. Don’t put it off.

There are many ways to get this job done. Some people advocate using diamond plates to flatten stones. Others insist that sandpaper is best. And then there are the specialty flattening stones. It ain’t rocket surgery. All these methods work, but are unnecessarily costly and time consuming in my humble opinion. The following is the procedure I use and recommend. Give it a try, Beloved Customer, before you dismiss it.

  • Always have two of each of your rougher stones soaked and ready to go when you start sharpening, space and weight permitting. This means 2 – 1,000 grit stones, and 2 – 2,000 grit stones in my case. If you use your tools, owning these extra stones is never wasted money and can improve your efficiency. For instance, beginning the day with two 1000 grit stones (the grit your humble servant uses the most) means I have 4 flat faces to use before I absolutely must stop work and true them.

  • If the blade is damaged, for instance chipped or dinged, begin with a rougher stone or diamond plate, whatever you have that will waste metal quickly and easily while keeping the blade’s bevel flat.

  • If your blade is not damaged, begin the sharpening process with a fresh, flat stone, for instance 1,000 grit if the blade is fairly dull, or 2,000 grit if it’s just partway to dull. Turn the stone end-for-end halfway through the estimated number of required strokes and continue sharpening. Yes, you need to keep track of your strokes, at least approximately. This will become second nature with practice.

  • Occasionally check the stone for dishing and wind using your thin stainless steel straightedge. With practice you will develop a sense of the stone’s condition without the need to use a straightedge, but check each stone frequently while you’re developing your advanced sharpening skills. Stop using the stone when the distortion becomes noticeable. 

  • Switch the distorted stone with your flat stone of the same grit and continue sharpening. 

  • When both stones of the same grit become distorted to the same degree, cross-hatch the faces of both with a carpenter’s pencil, then rub them against each other under running water if possible, or while frequently adding water if running water is not available. Take short strokes and be careful to apply even pressure to the stones. This requires self-control, switching the stones end for end frequently, and making an effort to apply even pressure with your hands, and is more difficult than it sounds until you get used to doing it. The friction and water will wear the high spots down, I promise.

  • Monitor the pencil marks to track progress.

  • Check with a straightedge frequently, and stop when both stones are flat, or maybe even a tiny bit convex. 

With practice, and if you don’t let your stone’s condition get out of hand, this process should take only a few seconds, but it will ensure you are always working on flat stones.

If you think this technique is slower than using a diamond plate, specialty flattening stone, or sandpaper, you may be overlooking a key point, namely, that using this method one can flatten the faces of two stones at the same time, in the same time period, and with the same hand movements. It may be slower than flattening a single stone with a diamond plate, but it is definitely quicker than using the same diamond plate to true two stones one at a time. Think about it.

It’s also cheaper because diamond plates are costly, and wear out. The specialty flattening stones are not cheap, and they too wear out. Both methods can contaminate stones, in my experience. And sandpaper sheds the most contaminating grit, and is the most expensive method long-term. No-brainer.

Now you have two stones of the same grit on-hand that are flat, free of contamination, and ready to rock-n-roll without wasting time or money on diamond plates, sandpaper, or special flattening tools. This means you have four fresh, flat surfaces at the beginning of the work day to use before you need to take time away from your paying job. And if you pay attention when sharpening, and take care to use each stone’s entire face, the time between sharpening sessions can be increased while saving significant amounts of cashy money.

Truing Stones Using a Glass Lapping Plate

Finishing stones seldom require flattening, but the same procedure can be used when necessary. A better solution is to the use the float-glass lapping plate described next.

If you need to get a stone extra flat, rub the stone on the  ⅜~1/2” (9~12mm) or thicker plate glass mentioned in the previous post. You can often bum scrap pieces of suitable glass from glass stores or contractors. Dumpster diving behind a glazing shop may prove useful if you are careful and don’t cut your arm off. Don’t forget to remove the sharp corners and edges with a carborundum stone or you might end up like the annoying guy in the video linked to above.

To turn the plate glass into a lapping plate, aggressively roughen one side with a carborundum stone or diamond plate, and clean it thoroughly using a scrub brush, soap and running water to remove every trace of glass and stone particles. Then clean your brush and scrub the glass again.

The scratches you just made will turn it into an inexpensive and efficient lapping plate. Trust me. Just wet the glass and rub the stone on it while rinsing frequently. Try to use the entire surface of the plate, not just the center. And be sure to apply uniform pressure to the stone.

If a stone becomes grossly distorted, you can use a rougher stone or diamond plate to true it. Even a concrete sidewalk and garden hose will do the job. However, if you do this, remember that there is no way to avoid contaminating the finer stone with embedded grit from the rougher stone or concrete. This embedded grit must be dealt with before using the stone.

To remove the offending stone particles, scrub the stone’s faces, sides and ends with a rough bristle brush under running water. Finish by polishing the stone’s face with a nagura stone, and rinsing well.

You should also use your nagura stone frequently to dress and true the faces of your finishing stones.

Don’t forget to maintain the edge chamfers on your stones and keep them free of contamination and pixies too.

As with all things, moderation is best. It can be be time-consuming and expensive to keep one’s sharpening stones perfectly flat, but perfect stones are not especially better for general woodworking than a pretty-flat stone.

Beware! For the rabbit-hole of perfect flatness is dark and deep, and sleepless nights and gibbering insanity afflict many who strive to plumb its furthest depths.

Rough Stone vs. Finer Stone

Here is an important factoid you should remember: A stone trued using a rougher stone or diamond plate will be effectively of rougher grit than its designation until its surface is worn smooth again. And it will wear faster too. But if you use identical grit stones (same brand is best) to true each other, the effective grit of each will remain unchanged.

Reread the last paragraph three times, click your heels three times, and do that prayer thing again. Namu Amida Butsu.

In this post we looked at inexpensive traditional ways to effectively flatten and maintain our sharpening stones long-term.

Now that our stones are looking good, in the next post in this series of hogwash refutation we will be ready to consider how to use them to flatten and polish the ura of our blades. Y’all come back now y’hear.

YMHOS

Related image
I don’t want to hear no more cracks about hogwash. You said to clean the stones, didn’cha!?

If you have questions or would like to learn more about our tools, please click the “Pricelist” link here or at the top of the page and use the “Contact Us” form located immediately below.

Please share your insights and comments with everyone in the form located further below labeled “Leave a Reply.” We aren’t evil Google, fascist facebook, or thuggish Twitter and so won’t sell, share, or profitably “misplace” your information. If I lie may a family of hogs move into my shorts.

Sharpening Japanese Woodworking Tools Part 1

Sharpening Part 18 – The Nagura Stone

A Tsushima Black Nagura stone 55x55x55mm

In the previous article in this series your unworthy servant listed some of the tools and accouterments necessary for sharpening Japanese tools using waterstones. In this article we will examine one especially useful stone mentioned previously: the Nagura. I know, it sounds like the name of some evil thing that crawled out of a mountain cave in Angmar in Middle Earth, but if you don’t have this little stone, you should get one.

The Nagura Stone

Nagura stones have been used in Japan for millennia, but they are not unique to Japan. For instance, the Coticule stones of Northern Europe have been used with nagura-equivalent stones since before Roman times. And I would not be surprised if the same tradition existed elsewhere too, they are so useful.

Mikawa Nagura Stone

There are several varieties of Nagura stones mined in Japan, the two most popular being the grey/black Tsushima stone pictured above and the softer white Mikawa stone pictured below. I use a soft white Mikawa Nagura stone for my straight razor.

The black Tsushima variety is cut from sedimentary stone on the ocean floor near Tsushima in Nagasaki Prefecture, located midway between Japan’s Kyushu island and South Korea. I believe it to be the best for general usage so I will discuss this stone in particular.

Like all Japanese natural stones, Tsushima Black Nagura are mined from sedimentary deposits created by airborne volcanic ash being sifted by distance and wind and filtered by waves and tides by the time they reach the ocean floor. But they have not been subjected to the metamorphic weight and heat that makes harder stones, and are relatively soft and permeable. They also tend to crack in the same plane they were laid down in, especially if subjected to wet/dry and/ or freeze/ thaw cycles, so special measures are necessary to protect them.

The Job of the Nagura Stone

The Nagura stone is typically used to perform five tasks.

1. Cleaning Finishing Stones: Finishing stones always become contaminated with pixie dust and grit from rougher stones. A 10,000 grit stone with 1,000 grit particles mixed in is much less than 10,000 grit effective. If you think a stone is contaminated, wash it well with a scrub brush and clean water then work the surface with a clean Nagura stone to loosen and float up the contaminate particles, then wash off the slurry. The stone will be clean.

2. Removing Clogging: Similar to 1 above, the Nagura stone is effective at unclogging dried slurry and metal swarth from the sharpening stone’s surface helping it get back to work sooner.

3. Truing Stone Surfaces: Finishing Stones need to be trued occasionally, usually the corners and edges. Use the Nagura periodically to knock these high spots down. The resulting slurry can be used for your normal sharpening process without it all going to waste. This is wisdom.

4. Reducing Startup Time: Time is money. Waterstones abrade most efficiently when they have a slurry worked up, but it can take time to get decent slurry started on some stones, especially hard ones, and with some blades, especially those with soft jigane. Use the Nagura to quickly bring up this necessary slurry saving time and money. If you focus on the corners and perimeter of your stones, which tend to be high anyway, it will contribute to truing the stone as mentioned in 2 above.

5. Reducing the Average Particle Size in the Slurry: Nagura grit is quite fine. You can add Nagura slurry to a stone (by rubbing the stone to create slurry at corners and edges, BTW) to reduce the average grit size of the slurry making a stone create finer scratches and a better polish on your blades. For instance, adding Nagura slurry to a 8,000 grit stone makes it function more like a 9,000-10,000 grit natural stone without the bulk and weight of an additional full-size stone.

Using the Nagura Stone

Nagura stones are just as useful when sharpening with synthetic sharpening stones as they are with natural stones. In fact, they may be even more useful with synthetic stones since they tend to be harder and synthetic stone slurry containing nagura particles more closely approximates the performance of natural stones.

Nagura stones are easy to use. Simply wet the large stone and rub the small stone on its surface. You may need to add additional drops of clean water while doing this. The goal is to wear down the high spots on the large stone while at the same time producing a slurry mixture from both stones to use when sharpening blades.

The key is to pay attention, use your handy dandy stainless steel ruler to identify the high spots, maybe mark them with a pencil, and use the nagura on those areas first. Don’t be a ninny and rub the nagura all over the stone willy nilly like you’re washing your pet goat. Make a plan. Work the plan. Develop good habits and speed will follow.

If the large stone is already perfectly flat, and you need to produce a starting slurry, work the ends and corners of the large stone with the nagura in anticipation of those areas becoming high in the near future. That’s a good boy.

Protecting the Tsushima Nagura Stone

Nagura stones are fragile. To avoid water penetration between the sedimentary layers and the cracks that may result, it is wise to use the side of the stone that was in a horizontal plane when it was formed. It is also wisdom to use only one surface of the stone and to coat the stone’s other 5 sides with paint to prevent water infiltration and cracking, and to keep skin oils from penetrating. Traditionally, natural urushi lacquer made from an irritating tree sap has been used for this purpose in Japan, but any high-solids urethane will do the job.

The Nagura stone is a subtle tool. As your sharpening skills improve the value of this tool will become apparent.

In the next article in this depraved series about sex, drugs and goat washing, we will discuss ways to maintain sharpening stones. Some people will be miffed. Others will be thrilled. Goats will be indifferent. What about you?

YMHOS

If you have questions or would like to learn more about our tools, please click the “Pricelist” link here or at the top of the page and use the “Contact Us” form located immediately below.

Please share your insights and comments with everyone in the form located further below labeled “Leave a Reply.” We aren’t evil Google, fascist facebook, or thuggish Twitter and so won’t sell, share, or profitably “misplace” your information. If I lie may all my sharpening stones sprout clumps of sand.