

The least initial deviation from truth is multiplied later a thousandfold.”
Aristotle (384-322 BC)

n the previous post about designing a handle for your gennou hammer on paper we discussed the reasons for making a drawing and a few of the details. In this post we will begin by representing the head and its key lines in our drawing.
But first, a disclaimer. Some Gentle Readers may find the idea of making a drawing in preparation for fabricating something as apparently simple as a handle from a single stick of wood nonsense. Indeed, I felt the same way once, but I was wrong. That is not, heaven forefend, to imply that Gentle Reader could ever possibly be wrong in anything you undertake, or less than a towering intellectual giant, only that the gennou handle is not as simple as it appears.
You may recall your humble servant mentioned the two points listed below in a previous post. They remain valid principles that should guide your eye and hand when making a drawing. Or, if wood costs you nothing and your time is worth even less, feel free to ignore them.
The first point goes like this: “When making some things, past a certain point there is simply no room for either improvisation or trial & error without starting all over again.”
The second point is a little longer, but no less valid: “The principle of “less is more” absolutely applies, but achieving an elegant and functionally superior “Less” is neither accidental nor serendipitous, but can only be consistently realized through “More” thought, planning, and eyeball time, things difficult to do without a drawing.”
A Sample Drawing
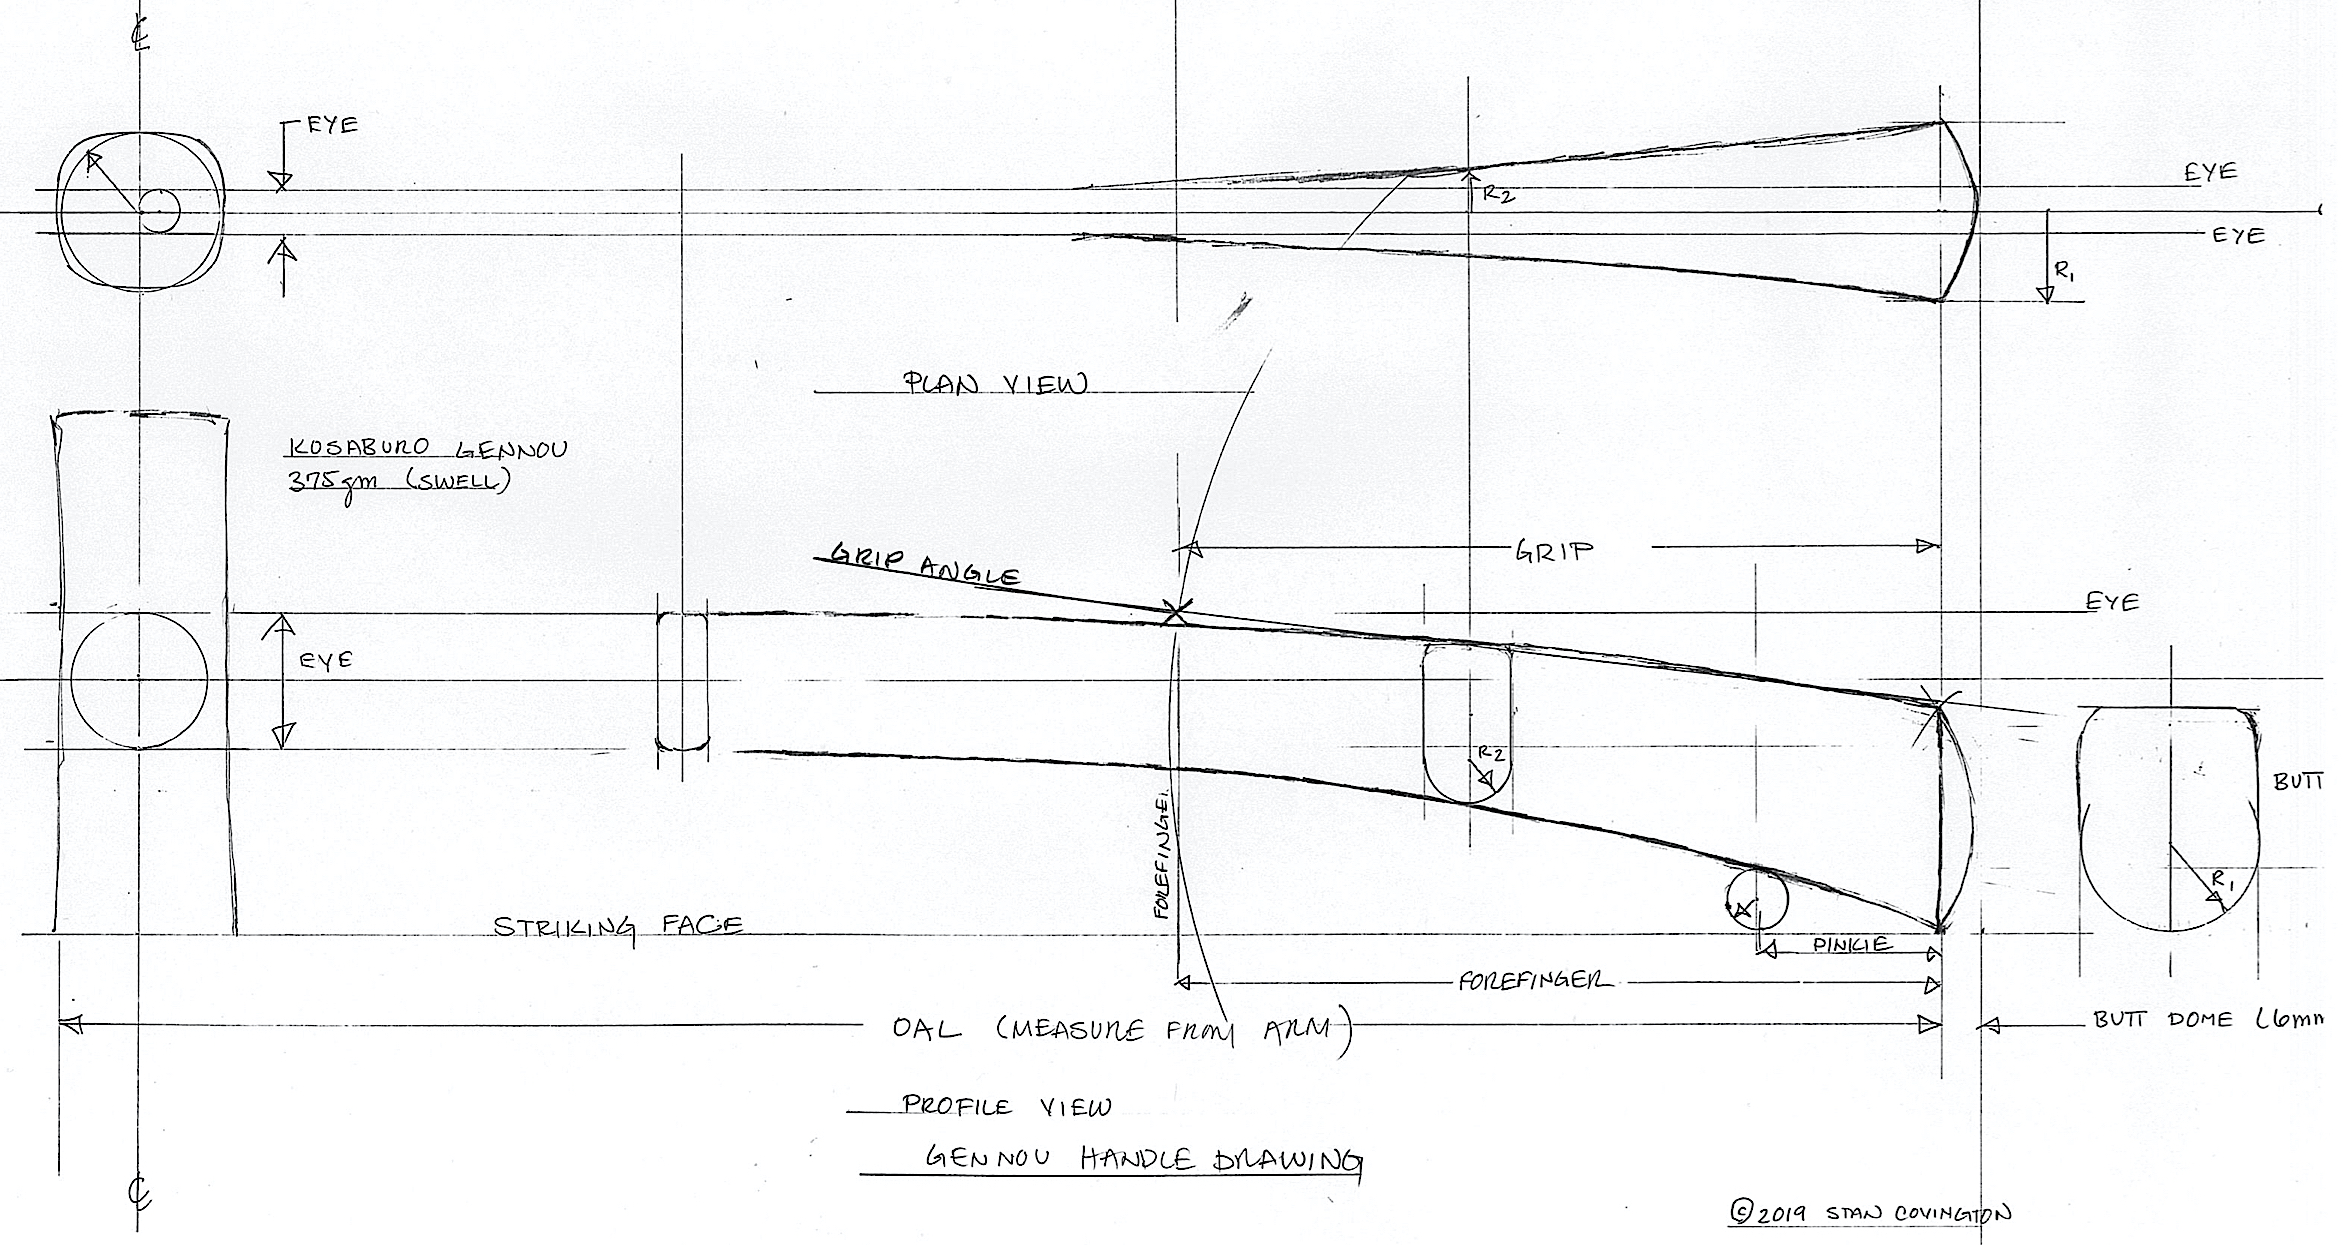
The drawing below is an actual drawing your humble servant prepared for one of his gennou incorporating a 375gm (100monme) classical-style head forged by Kosaburo. Although it’s a simple drawing made entirely by hand, it includes all the critical details other than the species of wood and flow of the grain. Please notice that it consists of a top view, side view, end view (butt) and 2 sections, all combined in a one-sheet, compact drawing.
You will want to make a similar drawing incorporating all the lines shown but adapted to your gennou head, your body’s dimensions, and your preferences.
You can download this drawing in jpeg format by clicking the link below.
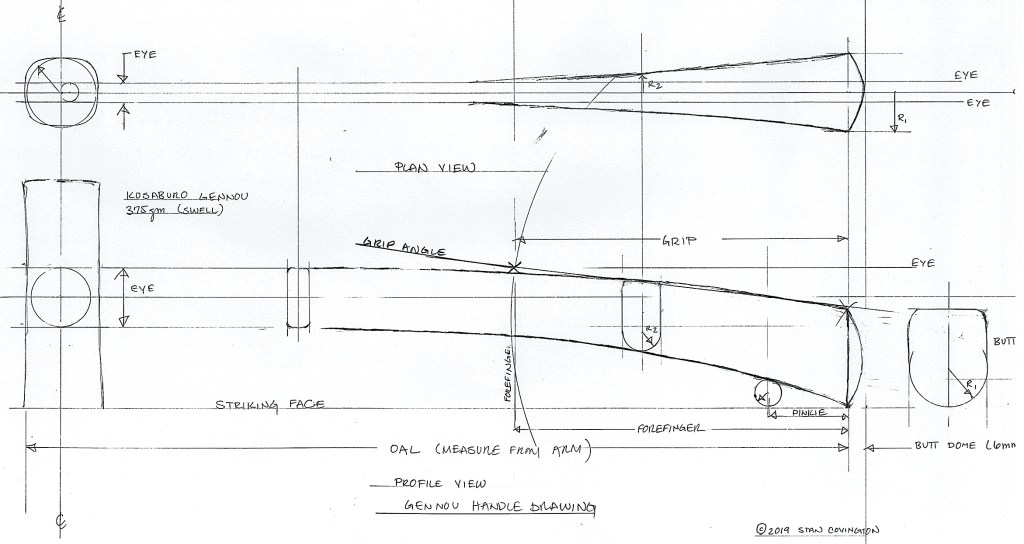
Draw the Key Lines for the Side-view
You can make your drawing on paper or wood, with wood being the more durable medium since ancient times because it does double duty as both parchment and drafting board, and can be erased entirely with a handplane. Moreover, the combined drawing and drafting board can be hung on a nail on the wall for future reference without fear of deterioration. But paper is easier to use.
Begin by making one horizontal line across the sheet of paper. In the drawing above, this is the horizontal line touching the flat face of the hammer labeled “Striking Face.”
When orienting your head on the drawing, its flat striking face must be touching this line.
Gennou heads usually have a maker’s brand stamped into the steel body adjacent the flat striking face and facing the handle’s butt. Please orient this brand closest to the “Striking Face” line.
You can of course orient the brand facing either the butt end or the tenon end of the handle. In Japan the standard convention is the butt, making the brand a little less visible. Some Westerners prefer the opposite orientation because, I assume, they want the brand to be immediately visible. This is understandable and entirely practical, but from the viewpoint of the Japanese craftsman it is akin to using underwear as headgear.
Your humble servant would never be so rude as to dictate fashion to anyone, after all, beauty is in the eye of the bean holder.
Back to the drawing, next make a vertical line, of course perpendicular to the Striking Face Line you just drew, and to the left of the page through the centerline of the gennou head. We will call this the “Vertical Centerline.”
Next, draw a horizontal line parallel with the Striking Face line, through the perfect center of the head’s eye (the mortise hole in the gennou head). To do this, you will need to first mark the center of the eye on the Vertical Centerline.
Begin by measuring the distance from the actual head’s striking face to the endwall of the eye closest to the striking face, and transfer this distance onto the Vertical Centerline starting from the Striking Face line using either a caliper or a sharp compass. Then measure the interior length of the eye, and add this distance to the measurement you just made. Now you have the location of both endwalls of the eye located on the drawing. Divide this line in half using your calipers or compass, and you now have located the center-point of the eye.
Be sure to precisely measure and mark these distances because if you get it wrong, problems will result. Please see the quote listed above of the Greek dude Aristotle’s opinion on the subject.
Next draw a “Horizontal Centerline” through the center-point of the eye across the sheet, of course perfectly parallel with the Striking Face line.
Next draw two more horizontal lines from the top and bottom endwalls of the eye across the page. The width of these two lines is labeled “Eye” on the side-view drawing above.
Place the head on the drawing, with its flat face perfectly flush with the Striking Face line. You may want to lay/clamp a piece of wood along the Striking Face line make sure you get the head oriented properly centered on the vertical and horizontal centerlines you drew earlier. Then draw the outline of the head on the drawing.
Insert the wooden layout tenon you made previously into the eye, place the head back on the drawing as before, and transfer the layout tenon’s outline onto the drawing. If the eye is perfectly perpendicular to the head’s centerline then the layout tenon may not be necessary, but using the layout tenon helps to ensure the eye’s angle is accurately represented in the drawing to avoid unpleasant surprises.
Draw the Key Lines for the Top-view

Moving onto the Top View, make another horizontal line 5~6 inches above the Horizontal Centerline across the page. This line will be the centerline through the head and handle seen from above. Measure the width of the eye (the narrowest dimension), divide it in half, and transfer it to the drawing. Draw two horizontal lines from the location of the eye’s endwalls across the page. These lines are labeled “Eye” on the Top View.
Place the gennou head on the drawing and trace the outline of the striking face.
The head, it’s striking face and profile, the width, length and angle of the eye, the centerline of the handle in both side view and top view are all now accurately represented on the drawing.
In the next post in this series we will measure your body and add those details to the drawing. You don’t need a Savile Row tailor for this task, but if you have one just lounging around on your couch, hogging the remote control, drinking your beer and smoking your cigs, go ahead and put the bum to work! (ツ)

YMHOS
The following link is to a folder containing pricelists and photos of most of our products. If you have questions or would like to learn more, please use the form located immediately below titled “Contact Us,” or email us directly at Covingtonandsons@gmail.com .
Please share your insights and comments with everyone by using the form located further below labeled “Leave a Reply.” We aren’t evil Google, fascist facebook, thuggish X, or a US Congressman’s Chinese girlfriend and so won’t sell, share, or profitably “misplace” your information. May I inhale a thousand needles if I lie.


All Posts in The Japanese Gennou Hammer & Handle Series
- Part 1 – Introduction
- Part 2 – Ergonomics
- Part 3 – What is a Gennou?
- Part 4 – The Varieties of Gennou: Kataguchi, Ryoguchi & Daruma
- Part 5 – Kigoroshi
- Part 6 – The Ergonomic Anaya
- Part 7 – The Unblinking Eye
- Part 8 – Head Style & Weight
- Part 9 – Factory vs. Hand-forged Gennou Heads
- Part 10 – Laminated Gennou Heads
- Part 11 – Decorative Gennou Heads
- Part 12 – The Drawing: Part 1/6
- Part 13 – The Drawing: Part 2/6
- Part 14 – The Drawing: Part 3/6
- Part 15 – The Drawing: Part 4/6
- Part 16 – The Drawing: Part 5/6
- Part 17 – The Drawing: Part 6/6
- Part 18 – Wood Selection
- Part 19 – Laying-out the Handle
- Part 20 – Making Sawdust
- Part 21 – Installing the Head
- Part 22 – Tasting the Pudding
- Part 23 – Finishing the Job

Please Leave a Reply