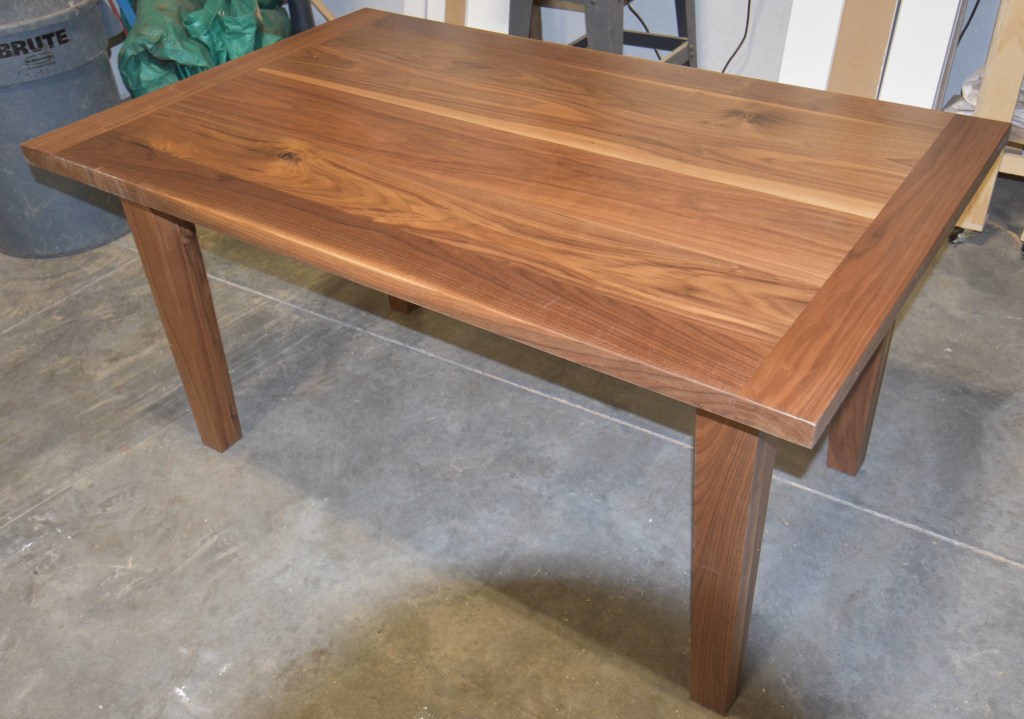
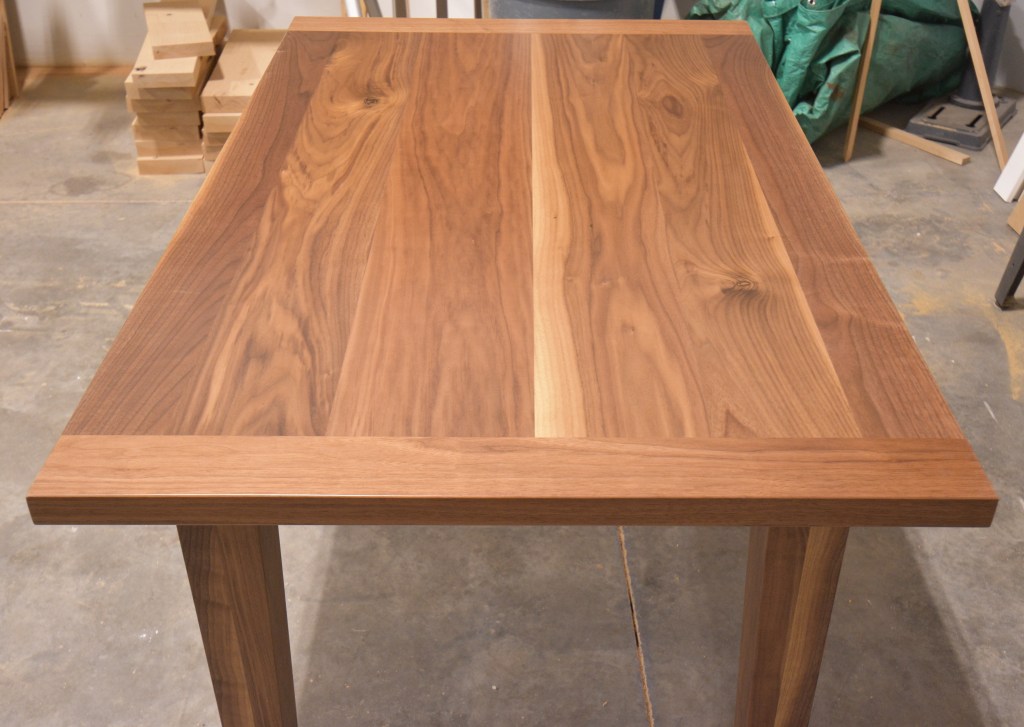
We occasionally publish testimonials from our Beloved Customers. This one by a talented and diligent professional in Montana is especially well-written, and representative of much of the customer feedback we’ve received over the years. More importantly, it contains pictures of a beautifully-made solid-walnut table.
Stan Covington, C&S Tools
As a 4th generation carpenter, I’ve always been interested in the legacy of well crafted items. Finally, after 25 years as a carpenter I was ready to build my collection of heirloom-quality hand tools.
I’ve owned many chisels, most of them new Stanley chisels, but they never held a satisfactory edge. I bought some older chisels off eBay and rehabilitated them, hoping for a better steel (based on my research), but the blades always curled when they hit knots. During my in-depth research of quality chisels I eventually came across Covington and Sons Tools.
I learned a lot from the C&S website and blog posts. Stan took the time to make sure I was purchasing the right tools for my needs.
The tools that Stan provides are made by craftsmen whose attention to detail and legacy is crystallized in the tools they forge. You’ll know what I mean when you use them.
Honing a high-quality blade to a mirror finish, and then feeling it slide through wood with just light hand pressure is an experience lesser woodworking tools truly cannot provide.
Working with people who understand quality is a pleasure.
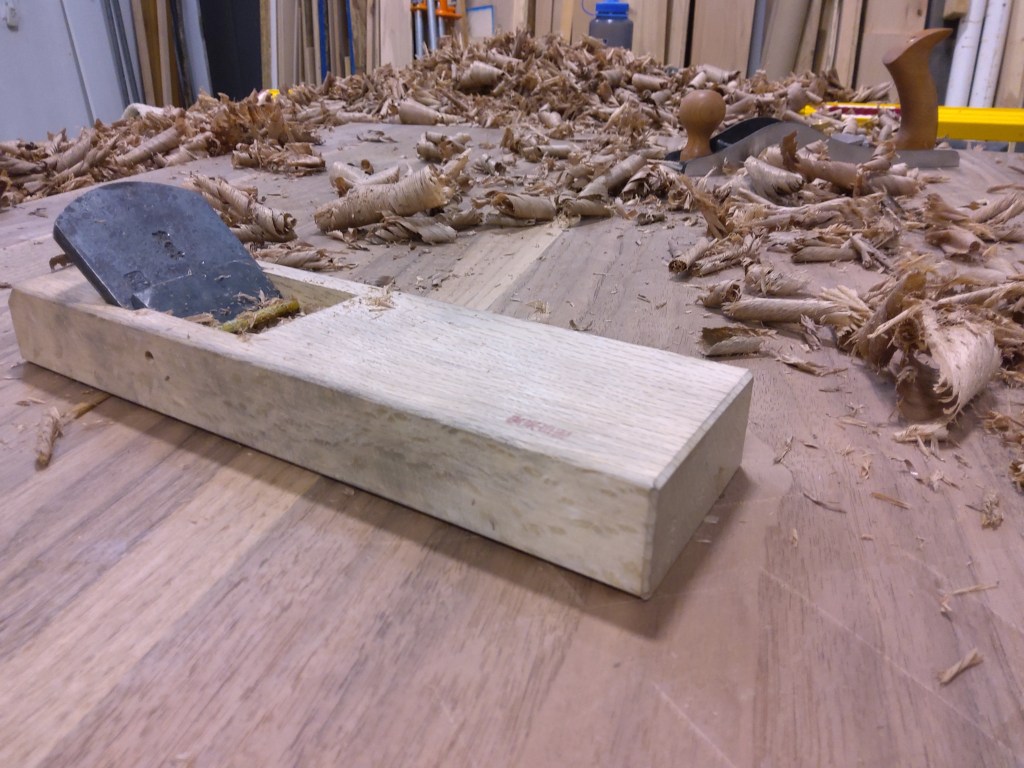
Here are some photos of my most recent project, using chisels and a plane purchased from Covington and Sons.
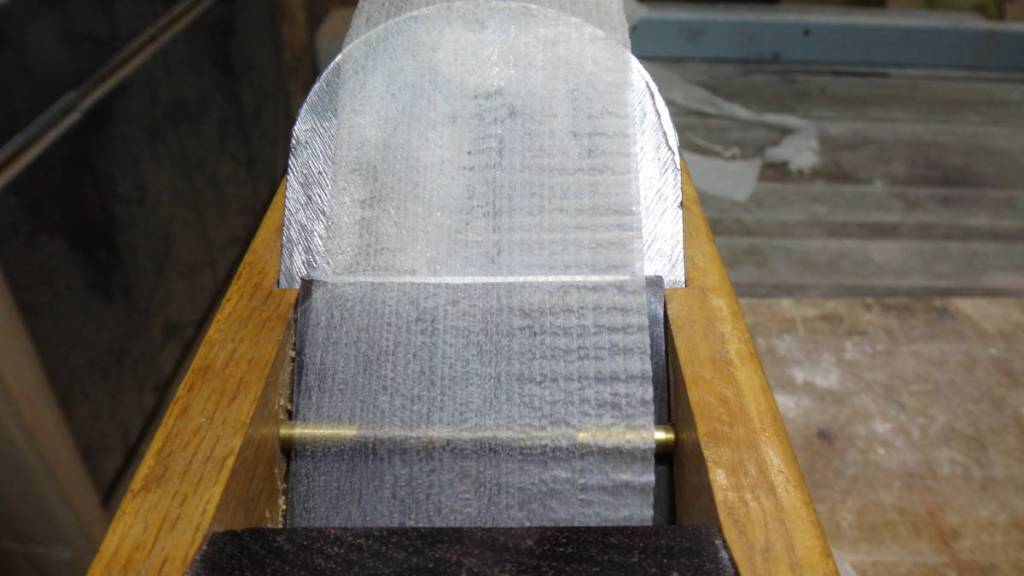
C&S Tools Sukezane brand 70mm finish plane. Shirogami No.1 steel blade hand-forged by Nakano Takeo, body by Inomoto-san.
The Road goes ever on and on, Down from the door where it began. Now far ahead the Road has gone, And I must follow, if I can, Pursuing it with eager feet, Until it joins some larger way Where many paths and errands meet. And whither then? I cannot say.
The Road goes ever on and on Out from the door where it began. Now far ahead the Road has gone, Let others follow it who can! Let them a journey new begin, But I at last with weary feet Will turn towards the lighted inn, My evening-rest and sleep to meet.
Bilbo Baggins
Your humble servant has received many inquiries over the years from Honorable Friends and Beloved Customers (may the hair on their toes never fall out!) about how to setup, maintain and use Japanese planes to which I have gladly responded when the request for information was made politely.
The Japanese hiraganna handplane is an elegant tool with a simple yet deceptively sophisticated design, not a difficult tool to master once one understands its unique design principles and learns a few basic techniques easily taught in person; But it can be frustrating to master them using only written guidance.
But despite my hesitation heretofore, I believe the time has come to begin this journey. I pray Beloved Customers will have the courage to accompany me down this road that goes ever on and on until we reach the lighted inn. When we arrive, the first round of root beer will be on me, so drink up!
Let’s begin the journey by examining some relevant terminology. Don’t forget your handkerchief!
Terminology
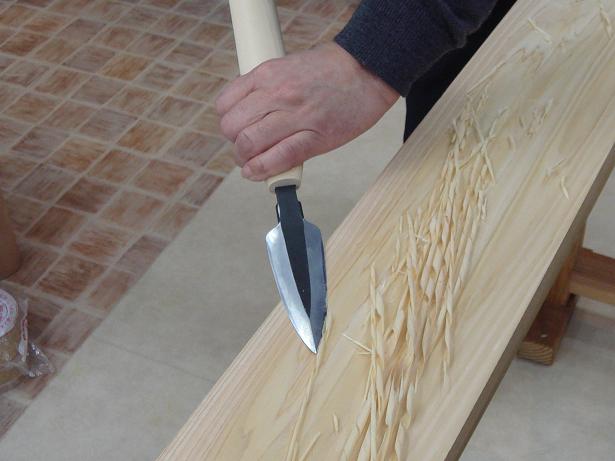
The Japanese Yariganna in-use. Prior to the advent of the handplane to the islands of Japan, an approximation of this tool was used for finish-planing the surfaces of wood following the adze. It creates a unique and practical surface texture.
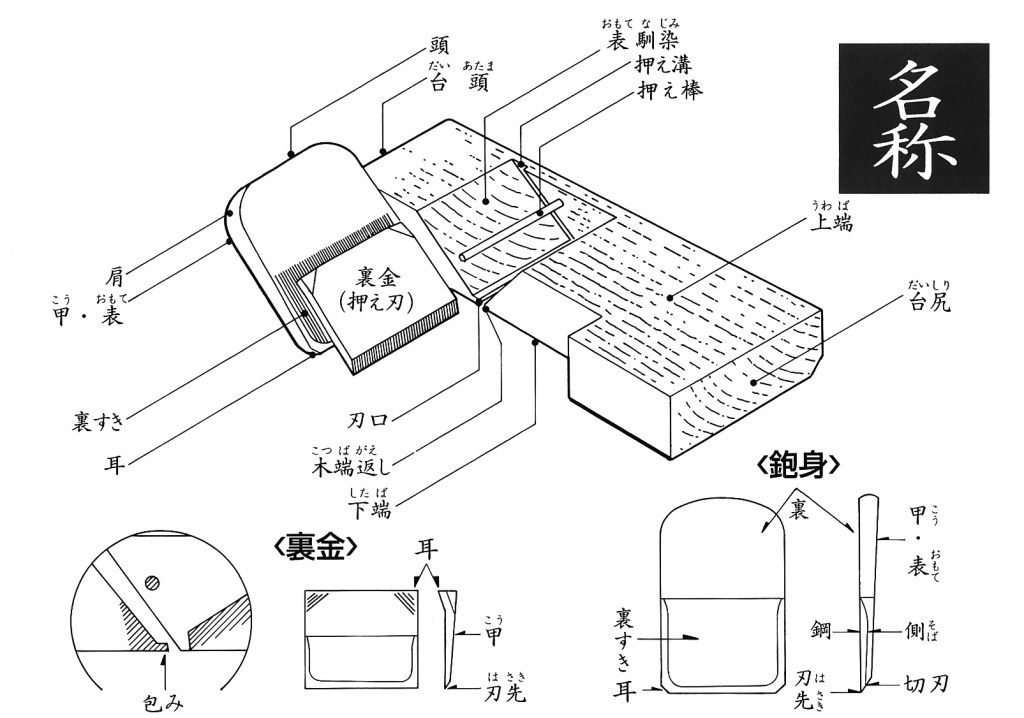
In this and subsequent posts in this series your humble servant will not attempt to educate Beloved Customers in all the Japanese language terms for every part of the plane, nor will I use Japanese conventions for describing handplanes, since that would be about as useful as ice-skates on a hog. Instead I will use standard English language terms wherever possible. There is an illustration below that shows the various components and features along with Japanese language labels for those interested.
Indeed, since the plane is a relatively recent tool in the Japanese woodworker’s toolbox, and has a much longer archeological history in the West, it seems silly to use more Japanese words than absolutely necessary to describe something that did not originate in Japan, and can easily be described in English. I will, however, venture to describe some of the more common general terms specific to the Japanese handplane.
I am neither a lawyer nor a government employee and so see no need to make things more confusing than necessary. I humbly apologize in advance to any purists who enjoy being confused.
The standard handplane in Japan, and the one used for creating and/or smoothing flat surfaces (versus rabbet, chamfer or molding planes) is called the “hiraganna,” pronounced hee/rah/gahn/nah, and written using the Chinese ideograms 平鉋 , without emphasis on any part of the word.
The first character 平 is pronounced, in this case, “hira” (there are at least 6 standard pronunciations for this character as it is used in Japan) and means “flat.” makes sense, right?
The second character 鉋 , written “kanna” in the Latin alphabet and pronounced “kan/nah,” means “plane” (as in “handplane”). This character is comprised of two standalone characters combined to make a single character, a common practice in the Chinese and Japanese languages. The one on the left side, 金, means gold or metal, while the one on the right, 包 means “to wrap.” Kinda sorta makes sense; Almost hardly.
The character for kanna was not invented in Japan but is said to have been used in China since the Táng period AD618 – 907, although the tool it represented at the time was a multi-blade scraper of sorts and not a handplane.
Comparison Between Western and Japanese Wooden-bodied Bench Planes
If your humble servant may be permitted a brief digression on a personal subject, I would like to clarify a point of some small relevance to this explanation of the Japanese handplane.
I have at times been called a Japanophile, and although I confess to being fond of the mountainous islands and the wonderful people of Japan, the years I have spent living in Japan, and my ability to read, write and speak the language were not born of some starry-eyed infatuation with or even simple admiration of Japan, but by practical service obligations, educational pursuits and my work in the construction industry.
My point is that I prefer Japanese tools and techniques when I think they are superior, and by the same token prefer Western tools and techniques when I believe they are superior. Consequently, I like to flatter myself that I can provide a relatively unbiased viewpoint, one which will come into clearer focus near the end of this article.
Of course, those who prefer Western tools and techniques above all others will say I am biased towards the Japanese way, while those who prefer Japanese tools and techniques above all others will insist I am biased toward Western tools and techniques. There is no way to win such an argument, so Beloved Customers must judge for themselves. Anyway, back to the subject at hand.
A detailed treatise comparing wooden-bodied Japanese handplanes to steel-bodied Western handplanes would be an extravagant waste of Beloved Customer’s precious time, so I will resist the temptation. But I would be remiss to not point out that Bailey-pattern steel-body handplanes do have a few serious advantages over wooden-bodied planes in general, while wooden-bodied planes in general, and Japanese hiraganna planes in particular, have several serious advantages over modern Bailey-pattern planes the thoughtful woodworker should understand.
Some of the advantages of modern steel-bodied Baily-pattern planes over all wooden-bodied planes include the following:
The steel plane’s body is unaffected by seasonal humidity changes and therefore warps less and requires less fettling. This is a huge advantage;
The steel plane’s sole is harder and wears slower than a wooden sole, and therefore lasts longer and requires less fettling. Also, since the sole wears slower, the mouth does not easily become wider as soon, and seldom if ever needs to have a new mouth inlet. This is another huge advantage.
Both of these advantages can have a humongous impact on the effectiveness and productivity of the tool over the years.
Some of the advantages of Japanese wooden-bodied planes over steel-bodied planes include the following:
The wooden body is not as easily damaged as a traditional cast-iron steel-bodied plane’s body which will bend and/or fracture if dropped onto a hard surface (the ductile cast iron used in some high-end planes nowadays is a significant improvement in this regard). Fracturing has been the bane of cast-iron-bodied planes since the beginning. This is a huge advantage;
The plane’s Owner can modify, repair, or make a replacement wooden body exactly to his preferences quickly and inexpensively;
The wooden sole is softer than a steel sole and therefore is not only less likely to scratch the surface being planed, but will tend to burnish it instead;
The wooden sole is easier to true, fettle, and even modify;
The wooden body is lighter in weight and therefore both less tiring to use and easier to transport;
Japanese handplanes have lower profiles so they take up less volume in the toolchest and/or toolbag, and are easier to store and transport;
Japanese handplanes have few if any screws and no levers so adjustment is simpler, more intuitive, and entirely dispenses with the clumsy, often sloppy mechanical linkage common to mass-produced Bailey-pattern steel-bodied planes;
And finally, the biggest advantage of the Japanese handplane is, (drumroll please), the blade. If hand-forged from high-quality steel and properly heat-treated, the blade of the hiraganna plane will become much sharper, stay sharper longer and will be easier to sharpen than the blades of modern steel-bodied Bailey-pattern handplanes. No contest. Your humble servant believes the blade’s performance is the most important aspect of a handplane because, after all, it is a cutting tool, not a paperweight (although I admit to having a pretty little LN No.1 benchplane in white bronze I use as a paperweight. My associates here in Japan can’t figure out what it is so I tell them it’s for shaving kiwi fruit (ツ)).
Allow me to expound a little further on the advantages of the Japanese handplane:
Blade Performance:
A beautifully-polished kanna blade with what appears to be excellent grey jigane and a milky-silver hagane cutting edge. It takes your humble servant’s breathe away.
The Japanese planes we carry have hand-forged laminated blades made from specialized high-carbon tool steel to meet the performance expectations of professional woodworkers in Japan. Not steel intended for farming implements, car springs, or dies.
The crystalline structure of this steel once made into a blade by our blacksmiths is fine-grained and uniform. Blades are exceptionally hard at 65~66Rc, and remain sharp a long time while being easily sharpened.
There was a time in centuries past when Western blades were of near equal quality, but the Western tool corporations and their Chinese suppliers ended those days with a knife to the gut.
Sadly, the blades of most Bailey-pattern planes manufactured nowadays are made of high-alloy steels for which quality control can be easily automated, but which were never intended for handplane blades. These steels are undeniably tough, but won’t become very sharp initially, quickly dull, and are, relatively speaking, an “evil screaming bitch” to sharpen (pardon the excessively-technical jargon).
Blade Appearance:
While it used to be that Western wooden-bodied planes had interesting maker’s marks stamped in their blades, such is no longer the case. Japanese planes, on the other hand, make a point of having decorative engraving, stampings and surface treatments applied to their blades for a significantly more interesting presentation of the blacksmith’s art than the plain, boring sanded steel of modern Western planes.
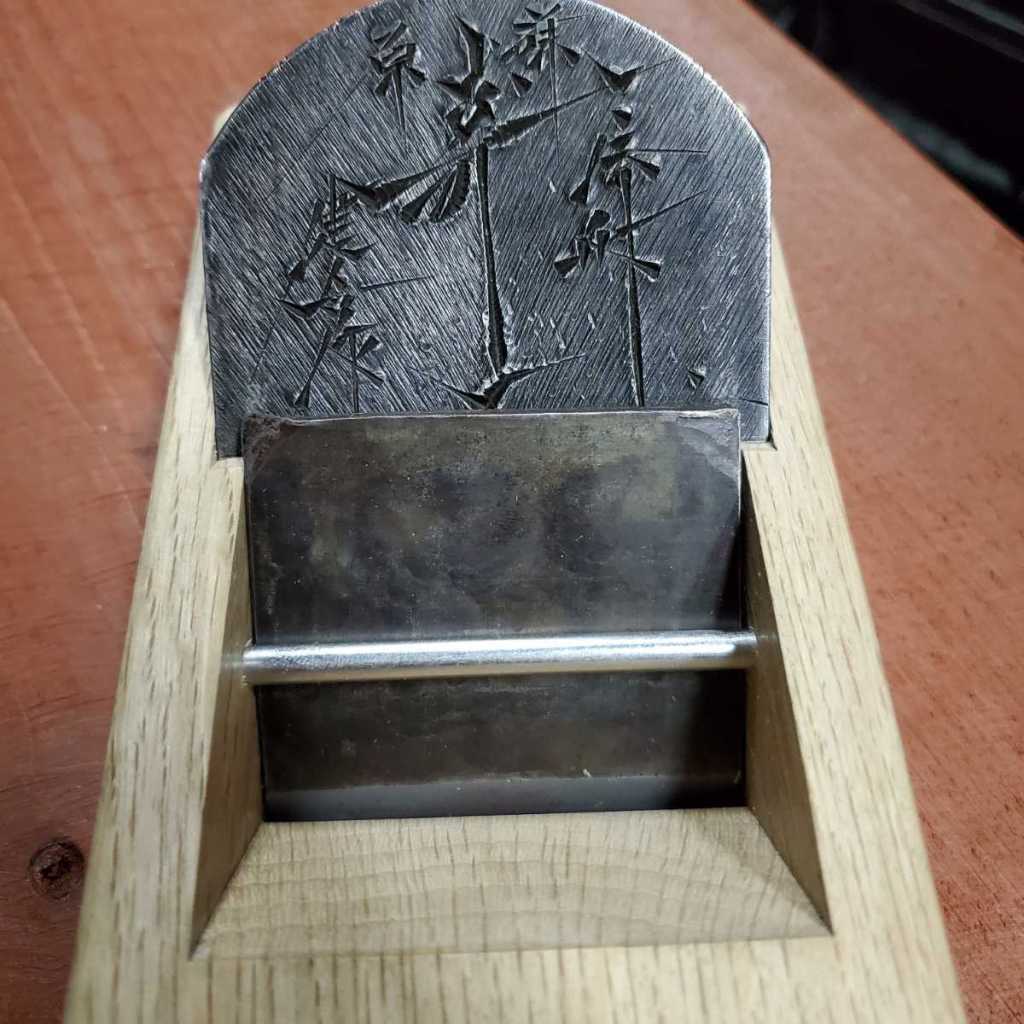
A plane by Usui Kengo with a nekkiri yabane (cut arrow feather) ground and stunningly artful calligraphy handcut into the face.
Reliable Blade Retention:
The blade of Japanese handplanes is wedged tightly into two grooves in the side of the body preventing shifting and rotation, and providing reliable settings. Most modern Western handplanes rely on a relatively complicated and less-secure blade retention and adjustment mechanism.
Simplicity:
The standard Japanese hiraganna plane has at most 4 components: The body, blade, chipbreaker (uragane), and chipbreaker rod. Planes with adjustable mouths will have more parts, but those are not standard planes. Screwdrivers and wrenches are not necessary for adjusting or disassembly of Japanese handplanes. Western planes often, but not always, have at least 21 and sometimes more components and require tools to field-strip.
And all the parts in Bailey-pattern handplanes have built-in slop which grows worse with use and often makes adjustment irritating and sometimes even unreliable.
The Japanese hiraganna does not have a separate wedge or a mechanical assembly securing the blade in-place. Instead, the blade itself is wedge-shaped, narrowing in thickness from the head to the cutting edge, so that it fits tightly into two grooves, one cut into each sidewall of the mouth opening, for a secure fit, an elegant, simple and utterly reliable design.
The various component parts of a Japanese Hiraganna. There are only 4.
Lower Profile and Reduced Weight:
Japanese hiraganna have thinner bodies and a lower profile than Western Bailey-pattern planes and even Western wooden-bodied planes. Accordingly, they weigh less and take up less space in the toolbox.
While there are times when your humble servant appreciates the extra momentum a heavier steel body affords when making deep cuts, those instances are limited to specific applications. The rest of the time the extra mass is like a bloated and corrupt government agency: a pointless burden.
In all other applications, the lighter weight of the wooden-bodied Japanese hiraganna plane is a blessing.
Smoother Surface
Where wooden-bodied planes of all types excel is the superior finish they leave on the wood they are used to plane. That is not to say steel-bodied planes cannot create a perfectly smooth surface, but it is the nature of steel to develop dings and burrs in-use that frequently leave scratches in the wood they are planing. And while a wooden sole will burnish a wooden surface, the best steel can do is rub it.
Western Steel-bodied Handplanes: The Right Tool for the Right Job 適材適所
There is a saying in Japan I am told that comes from the boat-building tradition where many types of wood are used for the various components in a quality vessel, and it goes something like this: Tekizai tekisho 適材適所 meaning: “The right wood for the right place.”
Your humble servant is a pragmatic son of a gun, and a firm believer in using the best tool available to achieve the best results possible. Accordingly, it would be exceedingly foolish to insist that Japanese handplanes are always the best tool for every planing job. Indeed, I have used a combination of both Bailey-pattern steel-bodied handplanes and Japanese-style handplanes for many decades, selecting the best tool for the specific job at-hand. So what steel-bodied planes do I believe excel?
Scrub Plane
I have found the Stanley No.40 furring plane and especially its more modern equivalent the Lie-Nielson 40 1/2 scrub plane to be superior for removing material when dimensioning lumber (making it thinner and flatter).
This is an extremely simple plane with a narrow, thick blade 1.450″ x 3/16″ ground to a large curvature and a big mouth designed to hog lots of wood. The handles make it easier to leverage body weight into the cuts.
In the case of the LN model, the blade is A2 steel, a material developed originally for dies, not plane blades, a tool steel that will never become especially sharp, and which dulls quickly, but once it has dulled to a certain point simply keeps on cutting, seemingly forever. And while the blade may become dented and dinged, it will not easily chip, perfect for the rough work of dimensioning dirty and stone-infested rough-sawn lumber.
The ductile iron sole of the LN product will be of course be scratched by dirt and stones hidden in the wood, but who cares? Better a steel scrub plane than the white oak of my Japanese planes. I consider Lie-Nielson 40 1/2 to be an essential plane in my toolchest.
Block Plane
The steel-bodied Western block plane is also an essential tool IMHO.
There are of course Japanese planes with similar dimensions, of lighter weight and with better blades, but they all have one weak point, namely the area right in front of the mouth becomes scratched and grooved and wears quickly because block planes are often used to trim and clean edges, a job which applies high point loads on the mouth. The fix used in Japan is to inlet a brass plate at the mouth. We carry small planes with this feature when new.
Also, I use my block planes for finish carpentry and installations which involves working around hidden finish nails, little pieces of steel that damage wooden bodies and hard blades, but which a steel block plane shrugs off.
I own several block planes, being fond of experimenting with tools, but have found the Lie-Nielson No. 60-1/2 rabbet block plane with nicker to be the one most useful for me.
Jointer Plane
Another Bailey-pattern steel-bodied plane I consider to be excellent is the jointer plane. When a young man I owned an old Stanley No.7 jointer plane I bought at a flea market, but it fell from the back of my 1966 VW van many moons ago and suffered the fate common to most old cast-iron planes, breaking both the old cast iron body and my younger heart in half. I bought the Lie-Nielson version many years later and have been pleased with it’s performance (my expectations were never very high).
It’s a monster at 22″ long and weighing 8-1/4 lbs. I hate the heck out of the A2 steel blade. To make things worse, the sole was warped when I bought it new, so I had to spend hours flattening it on sandpaper and glass. Why do I like it? The cast ductile iron sole is tough and never warps (or at least hasn’t since it came to me). The extra length makes it especially stable for cuts ending or starting off the piece of wood I am planing. When I have a large surface such as a table to flatten, my No.7 may not cut like a dream or be easy to use, but it always makes the job go quicker.
Conclusion
In this post we have briefly touched on the history, terminology, advantages and disadvantages of the Japanese hiraganna plane. We have also compared it to Western planes, and concluded with several examples of Western handplanes your humble servant believes to be superior to their Japanese counterpart.
I hope you will agree that the Japanese handplane is a tool worth mastering if only because of the excellent work it can help you execute. Besides, they’re a lot of fun.
In the next post in this story of supernatural intrigue and inter-dimensional romance we will discuss how to properly adjust a Japanese hiraganna plane without hurting its feelings.
YMHOS
‘Look at them,’ mother Troll said. ‘Look at my sons! You won’t find more beautiful trolls on this side of the moon’ (John Albert Bauer (1882–1918) A difficult choice indeed for a fairy princess.
If you have questions or would like to learn more about our tools, please click the “Pricelist” link here or at the top of the page and use the “Contact Us” form located immediately below.
Please share your insights and comments with everyone in the form located further below labeled “Leave a Reply.” We aren’t evil Google, fascist facebook, or thuggish Twitter and so won’t sell, share, or profitably “misplace” your information. If I lie may my jointer plane break in half and bust my toes.
There are few blessings without a curse hidden inside, nor curses without a whiff of blessing. Like most things, it’s a matter of how you look at it.
Joe Abercrombie, Isern, “A Little Hatred”
In this article your humble servant will attempt to shed more light on the ancient “Mystery of Steel.”
This story does not begin on a dark Scottish moor, nor on a foggy London night in a drawing room with the door inexplicably locked from the inside concealing bloody mayhem splattered across intricately carved linenfold oak paneling; Rather, it begins in an ordinary woodworking shop. And it goes something like this.
The Brittle Edge
The curtain rises on a humble detached workshop where, unbeknownst to our victim, an erstwhile woodworker we shall call “Woody,” dastardly events are about to unfold (cue the deep, ominous music). It’s really just an old dilapidated garage, but it’s Woody’s kingdom and he is master here, or so his bench cat allows him to imagine. He’s expecting us, so we’ll just go on in.
Make sure the door is firmly closed behind you now; It tends to stick and Woody’s bench dog loves to jet out and root around in the neighbor’s garbage. No mystery about why they call the fuzzy leg-humper “Stinky.” (ツ)
Pine and cedar plane shavings litter the floor of Woody’s shop and their fragrant aroma fills the air erasing the mutt funk. Autumn sunlight filters gently through the single dusty window as sawdust motes dance above a limp bench cat sleeping at the far end of the workbench dreaming of buffalo wings and big-eyed kittens. All appears well in Woody World.
Woody’s sitting at his workbench on his white Smith & Wesson padded stool where he has just unpacked his new chisel, admired it, checked the fit, finish and edge, and appears quite satisfied. He lays out a test mortise hole on a piece of scrap oak, picks up his gennou hammer (the one with the classic Kosaburo head and the sexy Osage Orange handle that turned out so well), and begins to chop a test mortise. But, wait!… Something’s not right!
With trembling hands, Woody examines the chisel’s cutting edge to discover the last thousandth of an inch or so has changed from smooth and sharp to ragged and dull. “Nooooo!” Woody wails as he lifts his arms to the ceiling, arches his back, and slumps to the floor on his knees in a pose reminiscent of Sergent Elias in that poignant moment on a battlefield in Vietnam; “I have been betrayed!” he cries with wavering voice. Yes, Woody’s a talented and enthusiastic drama queen in the Smeagle mold; Maybe even good enough to run for the US Congress.
Another of Woody’s qualifications for high public office is that he dearly loves to pull a cork, so while he walks to the corner Piggly Wiggly to get a 5th of tequila to anesthetize his emotional shock and refill his thespian fuel tanks, let’s take a load off and sit on his workshop sofa over there while I explain the cause of his emotional fragility. Yep, you’re right; It’s a recycled bench seat from an old Dodge Power Wagon he salvaged from a junkyard and converted to a sofa for watching ballgames and taking naps in the shop away from the jaundiced eye of “She Who Must Be Obeyed.” Don’t worry about your pretty pink dress, princess, it’s just honest sawdust.
With tools, tequila, and the mystery of steel involved, this could be a long story, so let’s consider how to solve this particular mystery before Woody gets back and starts up his caterwauling again.
But just so you don’t become discouraged, let me state right now that while all seems dark and hopeless to Woody now, there’s a tunnel at the end of the light, and he may actually have reason to rejoice greatly! But that’s for later in the story.
The Questions
A Japanese blacksmith fluxing and placing a piece of high-carbon steel onto a hot piece of jigane in preparation for forge-welding the lamination of a blade.
Your humble servant always asks the following questions when someone complains of a chipped cutting edge on a chisel or plane blade. When Woody gets back, and if he manages to remain coherent and vertical long enough, we’ll ask him these same questions. If your blades are causing you grief, you should consider asking yourself these questions too. Jose Cuervo and acting skills are not required.
What sort of quality is your problem chisel/plane? Low? Medium? High? How do you know? This is relevant because a poor-quality chisel/plane will fail just by looking at it too hard;
What type of chisel is it? A striking chisel or a paring chisel? Each type of chisel is used for different tasks and in different ways;
What and how were you cutting when the edge failed? This is important because some woods are best cut in a different manner than others, and some cuts require a special approach if we are to avoid damaging the tool;
What is the bevel angle? If the angle is much less than the ideal for the type of chisel/plane, cut and wood, we may have found the culprit. Finding the perfect angle for your chisel and situation may take some experimentation;
How did the edge fail? Did it crumble? Chip? Roll? Dent? A combo failure (with cheese)? This will tell us a lot about the tool.
Was the wood you were cutting dirty? Did it contain embedded grit? This is an important question because many people carelessly use their valuable chisels, planes and powertool blades to cut hard minerals instead of scrumptious wood. The lesson? Don’t be a slob: Scrub your wood with a steel brush before cutting it. And saw the last 3~4 millimeters off both ends of every board, or at least chamfer the ends with a block plane, drawknife or knife to remove the grit always embedded in end grain, before you put it through your jointer, thickness planner or tablesaw, or cut it with handsaws, planes or chisel. If you have not made a habit of doing this, don your scratchy sackcloth tidy whiteies, smear ashes on your face, then repent and be baptized because you have been abusing your innocent tools, Bubba. Clean your wood and you will notice the difference. Strange that no one I have ever asked this question has admitted to using dirty, stony wood at first. The reason is usually simply that they didn’t realize it was filthy until I pointed it out to them, just as it was pointed out to me many years ago. What’s that you say? You don’t have a stiff steel wire brush in your toolbox?! Shame on you;
Did you abuse the chisel by trying to lever wood out of the cut, a mortise for instance? This is a common cause of failure. People accustomed to using amateur-grade tools with soft cutting edges frequently discover the edge of their new chisel has chipped after using it like a cheap Chinese screwdriver to lever waste, never imagining the harder and more brittle steel of a quality chisel might be damaged. Such boorish behavior voids the warranty on our chisels, BTW, because a chisel is a cutting tool, not a prybar, can opener, or paint stirrer, much less a screwdriver.
Did your answers to these questions suggest any remedial action to you? The best answer to Question 1 is often to procure a better-performing tool.
But if your tool is professional-grade instead of hardware-store grade, then you may need to learn how to use it and maintain it properly. But that is a story for another day.
Let us shift our attention briefly to another, related mystery, one that has more to do with human nature.
Why Are the Blades of So Many Modern Tools Mediocre Performers?
It wasn’t always that way, but there are sound business reasons why chisel and plane blades are such poor performers nowadays, even in Japan, and like many things, it boils down to money as taught by the Harvard School of Business Department of Quality Adulteration. The numbers of craftsmen that routinely use handtools has decreased, and therefore the demand for professional-grade tools is way down. In Western countries the degradation of tool standards started even earlier.
In this situation, and where customer expectations are as high as an earthworm’s vest pocket, mediocre tools are simply more profitable for manufacturers and retailers. After all, low-quality materials are cheaper and it only takes ordinary machines and minimum-wage factory workers, not expensive trained blacksmiths, to make tool-shaped objects from mediocre-quality materials. Professional woodworkers won’t touch such crap, but amateurs, the inexperienced and those bewildered souls who judge performance based solely on lowest costbuy them by the ton.
More now than ever, “sustainability” is given pious, pompous lip-service, while the reality of modern society is that high-volume sales of colorful but poor-quality tools designed to meet planned obsolescence goals, manufactured in lots of thousands by Chinese farmers, and destined to become early landfill stuffing has become the only viable business model left standing. Gofigga.
More importantly, even if they would do better if given half a chance, inexperienced amateurs seldom have anyone to teach them how to use and maintain their tools, so they never learn proper maintenance principles and cutting techniques. When they damage their woodworking tool blades carelessly, they blame the tool supplier for their own failure. As Mr. T would say: “I pity the fool.”
Faced with this sort of consumer, it is simply easier and more profitable for tool companies to manufacture, and for retailers to sell, chisels and planes with softer, tougher, cheaper blades suited to amateurs. I think you can see the vicious cycle.
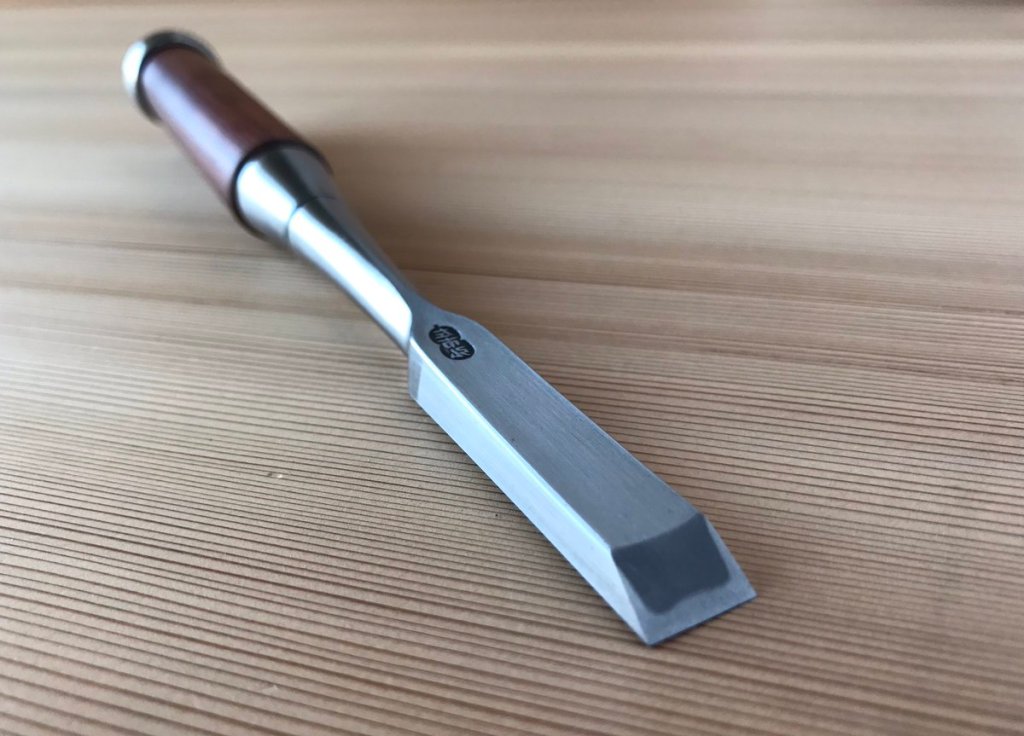
A kakuuchi oiirenomi chisel by Hidari no IchihiroAn Atsunomi chisel by Hidari no Ichihiro
A Non-technical Technical Explanation
Your humble servant’s earlier comment that Woody may have cause to rejoice about what appears to be metallurgical malfeasance may cause some Gentle Readers to wonder if I am mad as a sack of owls; Perhaps my most excellent aluminum-foil skull cap (the one with purty curly copper wires) malfunctioned permitting those icky inter-dimensional aliens’ mind-control waves to leak through?
Like our absent drama queen, I too was devastated when first faced with a manifestation of the Mystery of the Brittle Blade many years ago, but I can now explain why it may be sign of a blessing instead of a curse. But allow your unworthy and slothful servant to provide some background and explain some time proven solutions before presenting the good news. Steak before ice-cream, you see.
I beg the indulgence of knowledgeable Gentle Readers who feel insulted by the lack of temperature curve drawings and jargon such as “pearlite,” “martensite” and “ austentite,” and ask them to understand that, while this blog is focused primarily on informing our professional Beloved Customers, many Gentle Readers require a less technical explanation. Simple hospitality demands that your humble servant make an effort to provide useful insight to a wide range of Gentle Readers. As a dude wearing a leather skirt and sandals in a movie once said: “ Are you not entertained?”
A shinogi oiirenomi chisel blade by Hidari no Ichihiro
Quenching the Blade
When a blacksmith quenches a high-carbon steel blade in water in the ancient manner (called “Yakiire” 焼き入れ in Japanese which translates to “burn in” in English), the steel suffers a thermal shock, sometimes severe enough to crack it. This violent cooling also causes a peculiar crystalline structure to form in the metal, one that causes it to become harder and increase in volume, and even to warp to some degree. The casual observer may imagine the water cools the entire blade uniformly, but ‘tain’t so.
Those areas of the blade that cool the quickest form the highest volume of carbide crystals, the bulkiest latticework, and become hardest. In the case of chisels, planes, and kiridashi knives, the end of the blade has the most exposure to water, cools quickest, and therefore becomes hardest, at least during the first quench.
The blacksmith may carefully repeat the heating and quenching process multiple times, sometimes varying the heat time and temperature to achieve the desired crystalline structure and uniform distribution of small, hard carbides that define “fine-grained steel,” but the quenching process by itself always leaves the blade too hard and too brittle to be useful as-is.
Tempering the Blade
Now that the blade is hardened, indeed too hard, the blacksmith must mellow the steel, reducing its hardness while at the same time increasing its toughness by carefully reheating and cooling the steel to modify the crystallized steel in a process called “tempering,” in English and “yakimodoshi “ 焼戻し ( literally “ burn return” ) in Japanese. In this way, a steel blade hardened to Rc85 degrees during the first quench, indeed brittle enough to break into pieces if dropped onto a concrete floor, can be softened to a useful hardness while becoming at the same time much tougher.
In materials science and metallurgy, toughness is defined as the ability of a material to absorb energy and elastically deform without fracturing. To “elastically deform” means an object changes shape or deforms when pressure is applied, but returns to its original shape when the pressure is removed. For example, if you clamp one end of a piece of mild-steel wire in a vise and apply a little force with your hand at the other end it will bend at first and then spring back to its original shape when you remove pressure. This is an example of “elastic deformation.” But if you apply enough pressure the wire will not spring back (“rebound”) but will remain bent. This permanent bend is called “plastic deformation.” Mild steel wire is truly “tough as nails.”
Glass is the opposite case. While it exhibits more elastic deformation than most people realize it can, it will tolerate no plastic deformation, because when the stresses in glass reach the “yield point,” instead of bending plastically, it breaks.
A brittle blade is hard but not tough, and while it will elastically deform a little bit (often so little it’s unnoticeable), it too easily breaks. Proper tempering therefore, is critical to obtain useful toughness.
But this reduction in hardness and increase in toughness brought about through tempering is not always 100% uniform, and as mentioned above, the extreme cutting edge of the blade of a chisel or plane tends to be hardest and therefore most brittle in the case of hand-forged tools, even after tempering. The cheap, mass-production solution is to simply make the entire blade softer, say HRc45 for example, so brittleness will never be a problem. But such a tool is more a sharpened screwdriver than a cutting tool suited to the needs of professional woodworkers, IMHO.
I’m being too harsh, you say? Not even a little bit. A soft blade dulls quickly, wastes the professional woodworker’s time and money, and is irritating instead of useful. Perfect for turning screws, spreading spackle or stirring paint but not much good for quickly and precisely cutting lots of wood for pay, thank you very much.
Solutions 1 & 2
The Mystery we are investigating on Woody’s behalf is as ancient as steel itself. And of course there are reliable ancient solutions our blacksmiths employ. Let’s consider two of them.
First, create a crystalline structure in the blade through hand-forging that is more resistant to fracturing than ordinary steel regardless of its hardness. The difference hand-forging produces occurs in the crystalline structures in the steel and is not visible to the naked eye. It doesn’t happen by accident.
Second, employ painstaking heat-treatment techniques combined with uncompromising quality control to achieve the right balance of hardness vs. toughness.
To help control the heat-treat process, our blacksmiths apply a special mud-like compound to specific areas of the blade to slow down the thermal shock during the quench and improve the steel’s crystalline structure. Every blacksmith has their own “secret sauce,” so I can’t tell you what it contains, but I’m confident there’s no mayonnaise or Tabasco Sauce involved. This technique is not unique to Japan, BTW, but we know it has been successfully used by Japanese swordsmiths for at least 900+ years. I’m confident there were some old boys in ancient Syria and India that had the knack too.
It ain’t rocket surgery, but factory workers in Guangzhou or Mumbai can’t do it even with unlimited supplies of Tabasco Sauce.
So, we have discussed the reasons, and some solutions, but what to do about a blade that’s already chippy?
Solution 3
Assuming the blade has been forged by an expert blacksmith in accordance with the principles outlined above, as our tools are, the fix to chippiness (oops, did I coin a word?) is to be patient and sharpen the blade three or four times thereby removing the extra-brittle steel exposed at the cutting edge, the area that became harder and less tough than the rest of the blade during the heat-treating process. With few exceptions, the blade will then “calm down” and stop misbehaving.
This is the solution we ask our Beloved Customers to employ when this problem infrequently arises. It requires faith, and patience, but it almost always works.
Solution 4
The last solution, and one I certainly do not recommend to anyone except as a last resort, is to heat the cutting edge under a candle flame. Not an acetylene torch; Not a gas stove; Not a propane torch; Not even a butane cigarette lighter; A candle flame only. You want the extreme cutting edge to become just a smidge hotter than you can comfortably touch with your bare finger. Don’t heat the entire blade, just the cutting edge.
BIG FRIKIN DISCLAIMER 1: This method won’t fix a poor-quality blade or one that was initially ruined during forging or heat-treat.
BIG FRIKIN DISCLAIMER 2: If you do this wrong you can easily ruin the blade!
Rejoice Greatly!
But what parasitic-worm-induced brain fever made your silly deranged servant suggest that Woody should rejoice when the cutting edge of his new chisel crumbles? I assure you, my reasoning is sound, I have Woody’s best interests at heart, and I will explain all to him when he sobers up. Probably tomorrow afternoon, at this rate. (ツ)
But I’ll explain it now to you, Beloved Customer, if you will be good enough to get me a root beer to wet my whistle from Woody’s cooler over there. No, that’s not a Class M-3 Model B-9 General Utility Non-Theorizing Environmental Control Robot, it’s a mini-fridge with a glass candy bowl epoxied to its top supported by a shop vac perched on two skateboards and wrapped in miniature blinking Christmas lights. Woody puts it out on his front porch for Halloween to thrill the kids. And its no coincidence it’s a good place to stash some cold adult beverages, and root beer too of course, close at hand. He’s very practical that way. Oh, BTW, please don’t tell SWMBO about the adult beverages, or you’ll ruin a great Halloween tradition and preclude many erudite discussions in the future: Vino Veritas
Ahh, that’s better. Nothing like an ice-cold root beer.
Now where was I? Oh yes, the reason for my optimism: A high-quality blade that crumbles like Woody’s did when brand new, and mellows after a few sharpenings, is highly likely to be an exceptionally fine tool!
On the other hand, a blade that is too soft when new will never crumble or chip, but it will always quickly dull and never improve. A veritable gasket scraper. (个_个)
There are exceptions, of course: some hand-forged blades are defective and crumbly from beginning to end, usually a result of overheating the steel during the forging process (called “burning” the steel), a rookie mistake. You should return such a defective blade to the retailer you purchased it from. If, however, to save a few bucks, you rolled the dice and bought a tool without a warranty, or purchased it from an online auction, to obtain satisfaction you will need to enlist the services of Murphy’s two bubbly buddies at the law firm of Doodly & Squat. Good luck with that!
Somehow I doubt Woody will thank me for solving this piece of the Mystery of Steel for him, but I am confident he will love the flavor of that chisel for the rest of his life.
YMHOS
PS: If you found this interesting, you may find other posts regarding the Mystery of Steel found in our “Sharpening Series” interesting too. The one at this link in particular is relevant to this discussion.
A kakuuchi oiirenomi chisel by Hidari no Ichihiro. The blade has been polished removing the black oxide formed in the forge. Beautiful work like this is no longer available.
If you have questions or would like to learn more about our tools, please click the “Pricelist” link here or at the top of the page and use the “Contact Us” form located immediately below.
Please share your insights and comments with everyone in the form located further below labeled “Leave a Reply.” We aren’t evil Google, fascist facebook, or thuggish Twitter and so won’t sell, share, or profitably “misplace” your information. May I gag on a hairball if I lie.
If your wife’s having a good time and you’re not, you’re still having a better time than if you’re having a good time and she’s not.
Red Green
The sumitsubo is a Japanese marking and layout tool similar in function to the Western chalk line. Although few Gentle Readers in Western countries have experience using this tool, it has much to recommend it.
In this post we will briefly examine this tool so prevalent in Asia. Our focus however, will be on the traditional wooden versions, not the modern plastic one, a version of less beauty but perhaps greater utility.
The Japanese word “Sumitsubo” is written using the Chinese characters 墨壷 which directly translates to “ink pot.” It’s pronounced “sue/me/tsu/bow.”
The inkpot has been a common tool in many Asian countries since ancient times. Indeed, until recently, few craftsmen in Asia had even heard of the dusty chalkbox used in the West.
This is just conjecture by your humble servant, but the fact that nearly all writing and much artwork in many Asian countries during recorded history relied heavily on brushes and sumi ink, the black carbon reside of burnt pine sap, may be the reason the inkpot became the standard tool for marking straight (and sometimes intentionally curved) lines.
Using the Sumitsubo
The sumitsubo works on various surfaces including wood, stone, concrete, gypsum board, and other construction materials. It is not unique to Japan, but is found in one form or another throughout Asia. It is an essential tool for carpenters.
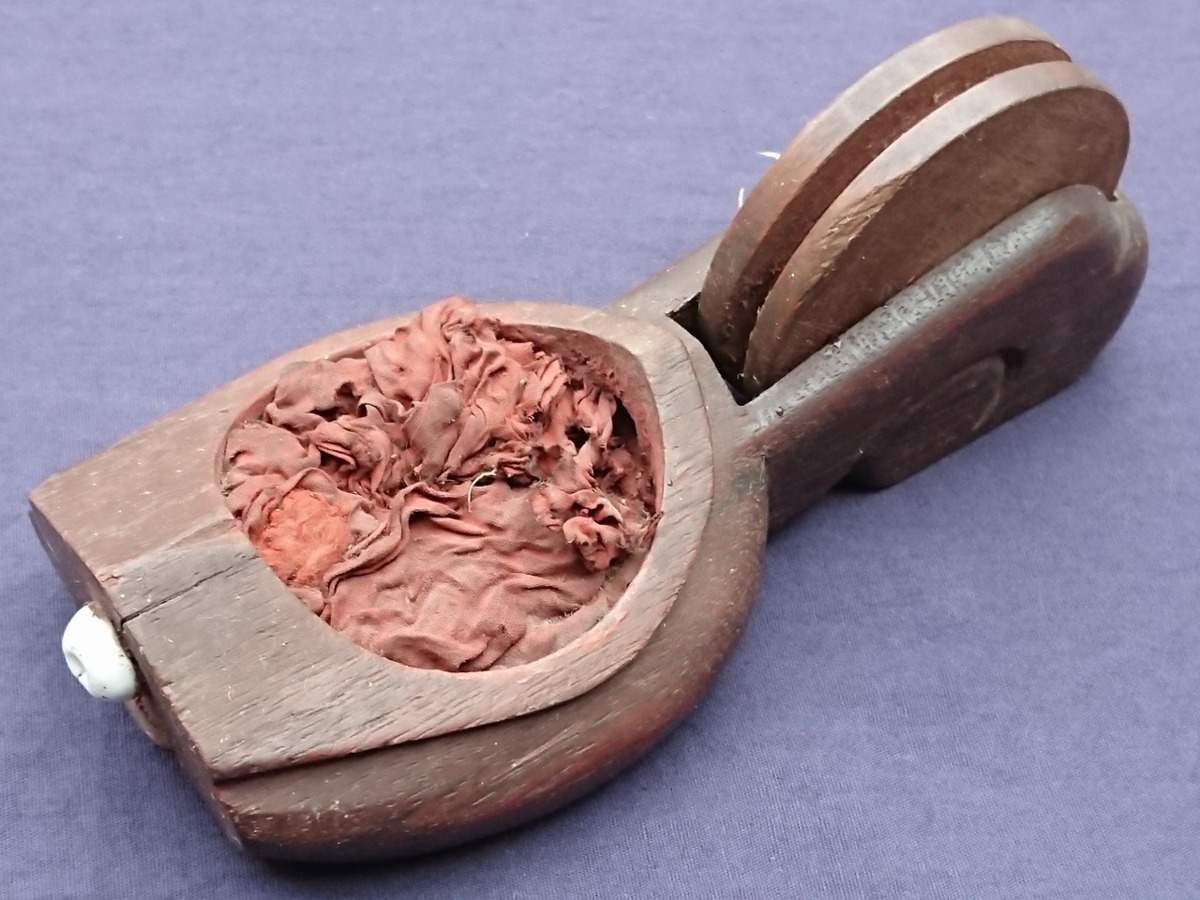
A thin line spooled around a reel attached to the sumitsubo passes through holes at each end of a “pond” or inkwell filled with absorbent silk or cotton waste soaked with ink. As the line is let out, and with encouraging pressure applied by the user, it soaks up ink from the inkwell.
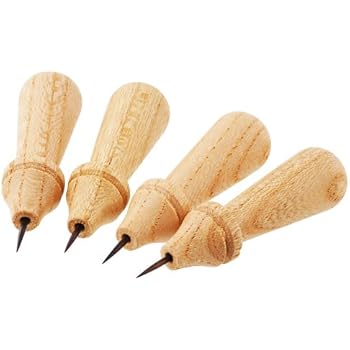
Wooden “karuko” bobs.
In Japan, a wooden bob called a “karuko” with a sharpened steel pin is attached at the line’s far end. The workman pushes this pin into the surface of the wood being marked to secure the end of the line in place for marking.
To use the sumitsubo, the workman stretches the damp inkline over the surface of the object to be marked, secures it in the desired position at the far end using a pin, weight, or helper, reels out and stretches the line, picks up the line with his fingers and releases it snapping an inkline. There are other more subtle actions that the user must perform at the same time, but this is the essence.
Depending on the user’s skill and the available line, a perfectly straight line can be marked on a flat, level surface to many meters in length.
The ink line has several undeniable advantages over the Western chalk line. First, the line it leaves is narrower and less “ fuzzy,” sufficient for fairly accurate carpentry work, much more precise than the typical chalk line.
Second, it is not as easily rubbed off or blown away as chalk.
Third, while inks of various colors can be used, black is most common and contrasts nicely with most building materials, but red is another traditional color. Nowadays, ink can be purchased in a rainbow of colors, some in permanent ink and even some that glow-in-the-dark.
The standard variety of ink used with sumitsubo is not entirely waterproof and if applied to a non-absorbent material like stone or steel, will not endure a rainstorm well. There are waterproof inks available, however, and of course the standard trick of using a spray can of clear lacquer to seal the snapline works as well with ink lines as it does with chalk lines.
History and Design
As your humble servant has mentioned in previous articles, the marketplace development that makes it possible to purchase completed woodworking tools is fairly recent. In previous centuries and millennia, when material costs were high, transportation of goods was difficult, and labor costs were low, craftsmen would commission a blacksmith to make the metal components of their tools while would make the wooden components themselves. In Japan at least, the sumitsubo too was made by the individual craftsman and became an opportunity to display both his skills and imagination, yielding unique, beautiful, and sometimes even bizarre tools.
There is neither adequate time nor space in this insignificant little blog to go into the evolution of sumitsubo design in any detail, much less the design variations, but the Takenaka Tool Museum’s website has pictures of representative examples.
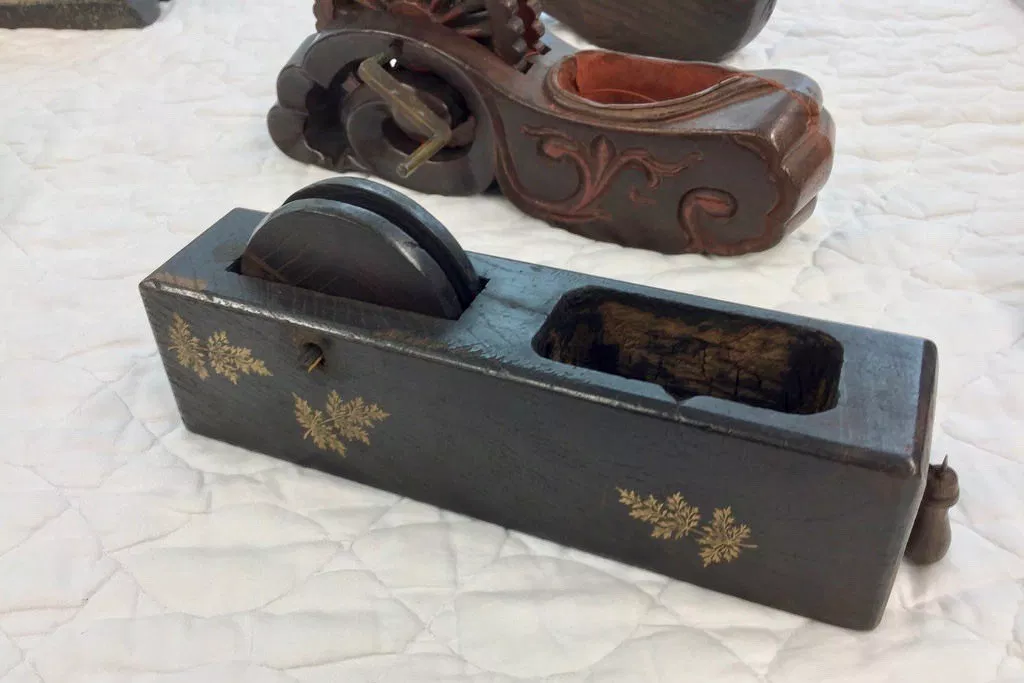
An old “Ichimonji” style sumitsubo. These squarish sumitsubo have their own charm, but are not as functional or convenient as later designs.This antique sumitsubo shows the design evolution of the tool with the narrow tail, which is easily held, the large reel which not only holds more line but helps the line dry retarding fungal growth, the wide and shallow pond, and the ceramic ferrule for the line. The owner used this tool exclusively for red ink. This sample does not have a crank for working the reel, typical of Western Japan.A fancier craftsman-made version of the sumitsubo above, with a smaller pond, a hand crank, and a more elegant wave motif
The style used for the last 200 hundred years or so is shown at the top of this post, and in the photo below. The major improvements include a larger ink pond with a grinning mouth designed to both hold more ink work better with the bamboo sumisashi inkpen used for layout, a larger, more exposed reel to hold more line, making it quicker to reel in, and providing better ventilation to reduce mildew, and a narrower, easier to grip tail containing the reel greatly improving functionality while reducing fumbling and drop damage.
Appearance aside, the genius of this design does not become apparent until you’ve used several types in the field in side-by-side comparisons, but I assure you the intelligence on display in the design of this chunk of carved wood and silk string makes Bill Gates look like a wealthy hot dog vendor.
A typical sumitsubo nowadays with crane and turtle facing each other across the ink pond, no doubt talking about sports scores. Zelkova wood
The carving seen in sumitsubo has meanings, of course, which varied with the craftsman and popular whim. The most popular style nowadays has a turtle and a crane facing each other across the ink pond. In Japanese mythology, both are considered lucky, with the crane said to live 1,000 years and the turtle 10,000 years. The turtle normally has a hair skirt flowing behind.
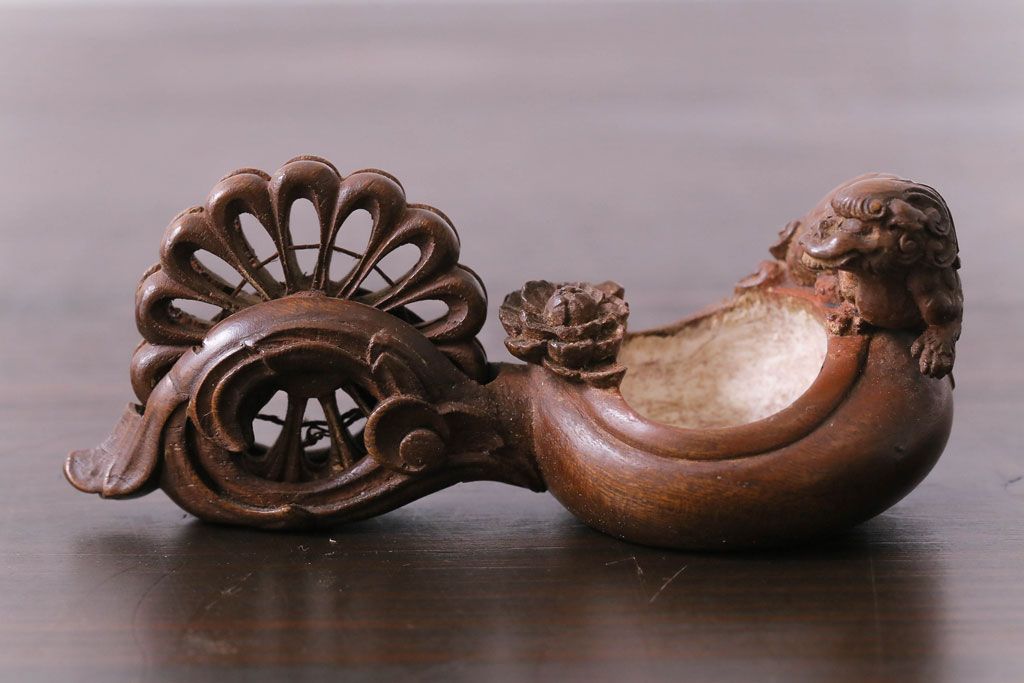
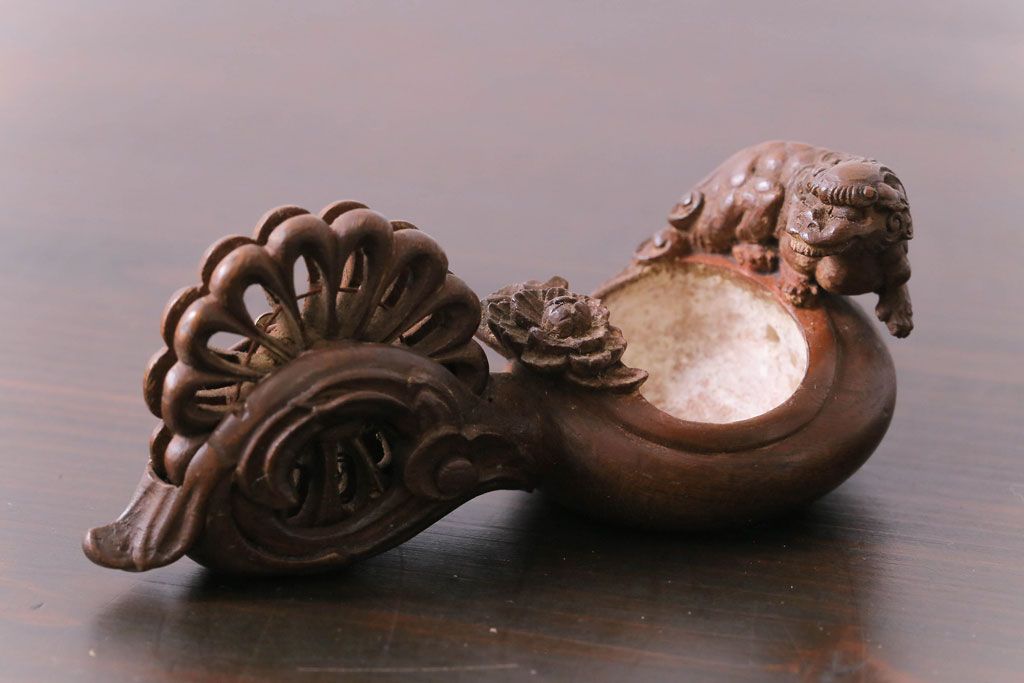
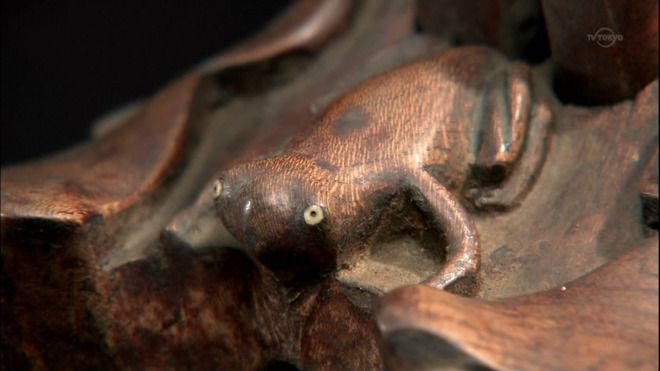
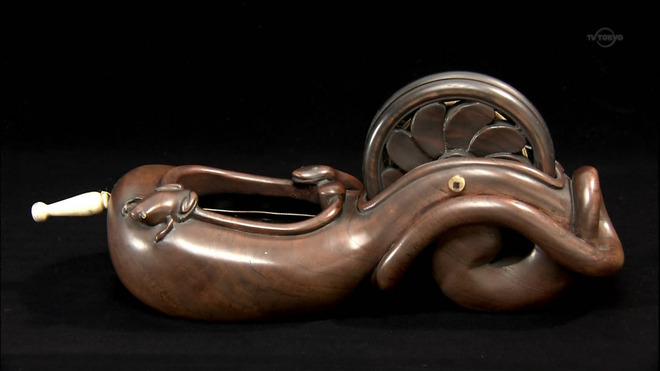
A very artistic craftsman-made sumitsubo with a peony blossom and Chinese lion holding court at each end of the ink pond, and a lotus leaf reel. These three symbols hark back to a famous Japanese Noh play titled “Shakkyou.” The lion in mythology is the king of beasts. It drives away demons and evil forces and protects against disease. The peony is the king of flowers. The lotus is a thing of grace and beauty that lives in, yet floats above the dirty mortal world, and with its roots purifies it. A potent symbol in Buddhism as well. However carved this sumitsubo was well-educated. It has never been used, but several cracks reveal its fragility, and the size of the lion on his precarious perch would limit its practicality in the field. Bottom view. Notice the opening below the reel to intended to promote air circulationA side view of the Chinese lion, facing away from Gentle Reader. No offense intended, of course, but dignity must be maintained.A professionally-carved sumitsubo by Kimura Isaburo showing lotsu leaves surrounding the ink pond with a tiny frog poised on the rim of the pond. “Jump little guy!”A closeup of the lotus ink-pond’s froggy.Another sumitsubo carved by by Kimura Isaburo. This one too has a tiny frog on the rim of the ink pond, but instead of reposing, he is preparing to jump to escape the snake on the opposite edge. The body of the snake wraps around the wheel and tail of the tool.
Dragons are another mythological motif seen in sumitsubo, being a fierce but noble and benevolent creature in Japanese tradition
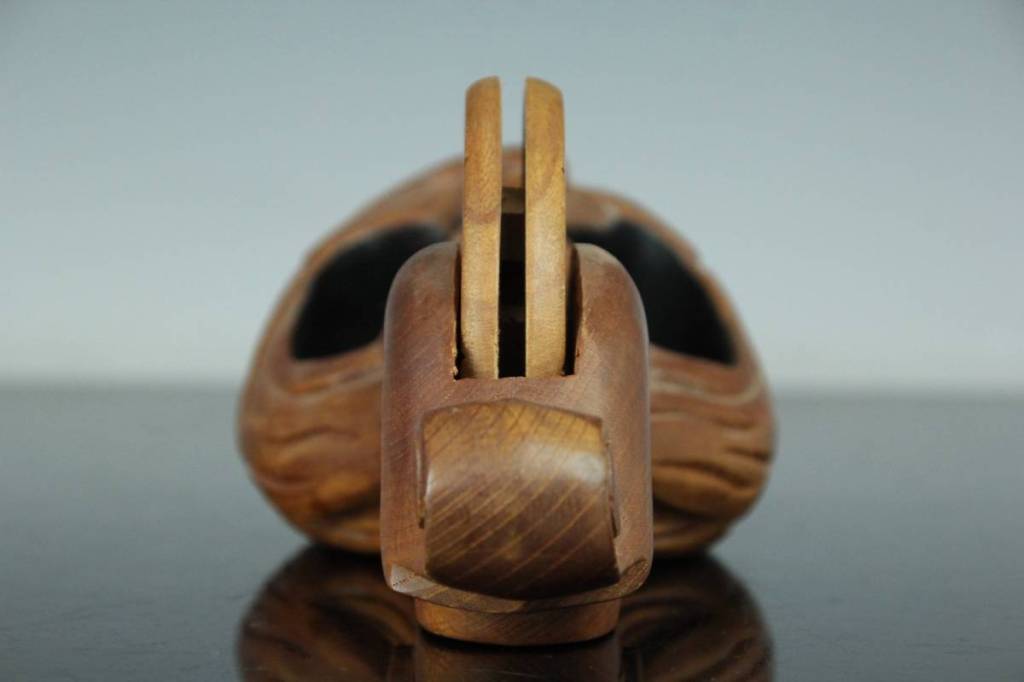
The reel end of the sumitsubo typically incorporates water or wave details, perhaps related to the ancient Japanese motif of wagon wheels in flowing water.
The last sumitsubo maker in Niigata Prefecture was Mr. Tamaki (RIP). Those Gentle Readers who have visited Kezuroukai competitions in Japan may have seen him doing exhibitions. Here is a link to a video of him making sawdust.
Here is a link to a video of a huge (2.3 shaku = 700mm = 27.4″) sumitsubo by a famous Niigata craftsman named Ichimonji Masakane. The size brings the carving details into focus. This is of course not a practical tool, but was created for decorative purposes. Once, every major tool store had a similar sumitsubo on display. If you visit Suiheiya in Tokyo you can see similar examples.
The sumitsubo is a tool Western woodworkers could benefit from when making straight layout lines because it’s not only cheaper, more convenient and more reliable than a long steel or wooden straightedge, it produces a finer, easier to see, and more indelible mark than a chalkbox can.
The sumitsubo was once said to be the symbol of the master carpenter, the craftsman that created the design and performed layout of major aspects of a construction project. Even today, older carpenters prefer the wooden sumitsubo and insist that it does a better job. I suppose every generation in human history had similar attachments to older ways and older tools. But I won’t dismiss it as retro obsession because even your humble servant has a hand-carved Zelkova wood sumitsubo mounted under the lid of my toolbox.
Does that make me an old fart?
A drachma for your thoughts.
YMHOS
A traditional wooden crane and turtle sumitsubo at work.
If you have questions or would like to learn more about our tools, please click the see the “Pricelist” link here or at the top of the page and use the “Contact Us” form located immediately below.
Please share your insights and comments with everyone in the form located further below labeled “Leave a Reply.” We aren’t evil Google, fascist facebook, or thuggish Twitter and so won’t sell, share, or profitably “misplace” your information. If I lie may a fortuitous crane do a damp doodoo on my head.
Sukezane brand 9mm mortise chisel (mukomachinomi) side view
It is well with me only when I have a chisel in my hand
Michelangelo 1475-1564
This is the first in a series of articles about the Mortise Chisel, especially the Japanese version called the “mukomachi nomi.”
Also called the “Joiner’s Chisel” in Japan, this is a specialized chisel used by specialist craftsmen to cut precise, smallish mortise & tenon joints when making furniture, cabinetry and joinery. Carpenters don’t use it, and few in that august trade have even seen one.
In this article your humble servant will introduce a tiny bit of the terribly long history of the mortise and tenon joint, and give a description of this tool.
In future articles in this series of international intrigue we will consider how to evaluate, adjust and even how to use the Mortise Chisel in general and the Japanese Mortise Chisel in particular. We will also touch on bevel angles and blade hardness problems, what to look for in a good mortise chisel, and how to examine it with an eye to increasing its performance. This is something most users of chisels never consider, but it can make a big difference in the case of mortise chisels. Indeed, I daresay most Gentle Readers and even a few Beloved Customers will mutter the equivalent of “Bless us and splash us” when they read it.
Of course we must not neglect to discuss how to effectively correct irregularities in our mortise chisel that negatively impact performance, irregularities most people never notice.
After our Mortise Chisel is properly fettled (they almost always have some problems) we will take our racing chisel out for a few laps, but prior to that we will consider how to effectively use it. Too few receive proper training nowadays in chisel work, but here are C&S Tools we feel it our duty to help our Beloved Customers maximize their skills.
We will conclude this series by taking the “Old Master’s Test,” just to make sure both our Mortise Chisel and our skills are improving.
While focused on the Japanese Mortise Chisel, the principles and improvements discussed in this series of articles are applicable to any chisel used to cut mortises.
While all Gentle Readers with eyes to see, ears to hear, and hands that love wood are welcome to share this hard-earned knowledge, it is intended primarily for our Beloved Customers, especially those who use chisels professionally to keep body and soul in close proximity.
Some Background
Your humble servant drafted this series of posts years ago, and has shared bits of it with friends and Beloved Customers from time to time when requested, but the information has not always been well-received for a number of reasons.
There is an old Japanese saying, one which probably originated in China, written 「馬の耳に念仏」and pronounced “Uma no mimi ni nenbutsu,” which translates to “Prayers in a horse’s ear.” Why are Buddhist prayers relevant you ask? Good question. You see, some of the principles your humble servant will present in this series directly contradict doctrine profitably expounded by some of the Popes & Professors of Woodworking in the West, and may offend their disciples. But like vespers to a beast of burden, wisdom is wasted on the willfully, woefully ignorant (wow, that sounds almost like iambic pentameter!).
But our Beloved Customers are neither angels nor asses but shockingly intelligent mortal humans with whom your humble servant is convinced the time has come to share the gospel of the Mortise Chisel as it was taught to me by Masters who have since abandoned this impure world to sort boards in the big lumberyard in the sky.
This series of posts is equivalent to a graduate school course in chisels, something like “Mortise Chisels 701.” And just like a course in advanced differential equations, most Gentle Readers will never need it. But never let it be said that your humble servant didn’t do his best to improve both the skills and the tools of our Beloved Customers.
Some History of the Mortise & Tenon Joint
Mortise chisels are used for cutting rectangular holes in wood usually intended to receive matching tenons to form a structural connection called the “mortise and tenon joint” between pieces of wood.
No one knows how long humans have been using the mortise and tenon joint, but it’s a technique older than nails, although modern humans with their lithium battery-powered, made in China, landfill-bound, multicolored plastic and rubber screwdrivers may find it difficult to imagine.
So let’s begin the journey by briefly examining just two well-documented extant physical examples that may provide motivation for using this enduring joint.
The oldest known wooden structure is a neolithic well liner discovered near Leipzig Germany, constructed from oak timbers shaped by stone adze and joined at the corners with half-lap joints and pinned tusk-tenons at through-mortises. Tests indicate the trees these timbers were split from were felled between the years 5206 and 5098 BC, making the assembly at least 7200 years old.
Next, let’s look at a less soggy but more recent, more complicated and elegant example.
The oldest existing wooden building in the world is a Buddhist Temple named Horyuji located in Nara Japan. Originally constructed around 600 A.D. and rebuilt around 700 A.D. after a fire, this huge 1300 year-old temple and pagoda complex was reconstructed using hundreds of thousands of hand-cut mortise and tenon joints, testifying to the longevity of wooden structural systems and the value of this universal connection technique.
Horyuji is far more than just a temple to Buddhism, it is a temple to woodworking. If you haven’t yet visited it, you’re truly missing something.
I mention these two examples to illustrate the universality, strength, and durability of the mortise and tenon joint. Anyone serious about woodworking must master this most ancient and essential connection.
The mortise chisel is the best handtool for the job of cutting mortises less than 15mm in width. For wider mortises, well-fettled oiirenomi or atsunomi are more efficient.
Japanese Mortise Chisels
12mm mortise chisel (mukomachinomi) Face (top) View12mm mortise chisel (mukomachinomi) Side ViewView of ura (flat) of the same 12mm mortise chisel 12mm mortise chisel (mukomachinomi). Please notice the rectangular cross-section precise right angles, and straight, clean sides. This is the most precise of the Japanese chisels. The apparent tan-colored stains on the shoulder are not rust but easily-removed sharpening stone residue left by the professional sharpener who prepared the blade.
In the Japanese language mortise chisels are called “mukomachi nomi” (向待鑿), with “nomi” meaning “chisel.” Don’t ask me the origin of the rest of the word because I don’t have a clue, and have heard few plausible explanations. There is another post linked to here that contains more information about this chisel.
I will use the term mortise chisel in this article to refer to the mukomachi nomi.
For our Gentle Readers interested in the Japanese language, there are several combinations of Chinese characters used to write mukomachi, none of which make much sense or seem related in any way to either tools or woodworking. The most common characters used are “向待” with the first character meaning “there” or “direction,” and the second character meaning “wait.” Combined, they seem to mean “Waiting over there,” or something like that.
I assume the name was originally phonetic and somebody decided to use these kanji because their pronunciation matched the phonetic name. This sort of linguistic contortion is seen frequently in Japan, and has been a source of confusion for all and sundry for many centuries. I blame it on elitist Buddhist priests going back and forth between Japan and China over the centuries, but it is typical of the Japanese people in general and priests in particular to take a perverse pleasure in intentionally making and using terms others can’t figure out.
This confusing practice is not unique to bald priests. When I was an engineering student, I recall the professors insisting we never attempt to simplify or too clearly explain the technical jargon of the trade to non-professionals because it was essential to job security for them to never quite understand it.
If you are familiar with Japanese architecture, you have seen the wooden lattice work that defines it in doors, windows, dividers, shoji, fusuma, koshido, glass doors, ceilings, and even fences, all items made by “tategushi” or “joiners” in Japan. Each piece of any lattice needs two tenons and two matching mortises to stay in-place, so a single piece of traditional Japanese joinery may contain literally hundreds of small, highly precise mortises, indeed thousands in the more complicated pieces. The Japanese mortise chisel was developed specifically at the request of joiners for this type of work. Therefore, it is also known as the “Tategu Nomi” which translates to “joinery chisel.” Few carpenters use this chisel.
Nora Brand 6mm Mortise Chisel (Mukomachinomi) Side View. Although it appears to be a simple, unsophisticated tool, nothing could be further from the truth. Based on the Kiyotada pattern, this is an especially beautiful example to those with eyes to see.Nora Brand 6mm Mortise Chisel (Mukomachinomi) Ura ViewNora Brand 6mm Mortise Chisel (Mukomachinomi) Shoulder View. Exceptional shaping and filework .
Japanese mortise chisels are similar to other Japanese chisels in having a laminated steel structure with a hollow-ground ura (flat), an integral tang, wooden handle, and steel ferrule and hoop. Unlike most other chisels it has a rectangular cross-section with sides usually oriented 90˚square to the hollow-ground ura, and either flat or just slightly hollow-ground to better keep the blade aligned in the cut and to dimension and smooth the mortise’s walls.
Western mortise chisels do not typically share this detail, although unusually intelligent and observant Western woodworkers of course modify their chisels to gain similar benefits.
If speed and precision are important to you, then the sides of the chisel being oriented at 90° to the ura absolutely provide a serious advantage when cutting most mortises because the sides, and especially the two sharpish corners where these three planes meet, will effectively shave and precisely dimension the mortise’s side walls as the mortise is being cut without the need to pare them later.
Unlike most mortise joints cut with oiirenomi or atsunomi, so long as the mortise is the same width as the mortise chisel, and the user has the ability to maintain the chisel at the right angle while striking it with a hammer, the width of mortises cut with this chisel are usually quite precise and seldom if ever need be cleaned with a paring chisel. This functionality means that you can cut mortises, and especially small ones, both precisely and quickly with great confidence. It’s not called the “joiner’s chisel” for nothing.
The mukomachi chisel does not work as well in wider widths because of the increased friction between the chisel’s sides and the mortise’s walls. For joints wider than 15mm, please use a trued oiirenomi or atsunomi. And don’t forget to use your oilpot.
Conclusion
In the next class in our graduate course on the care and feeding of the wild mortise chisel, we will examine the various details to look for in an effective mukomachi nomi, most of which are applicable to other chisels such as oiirenomi and atsunomi too, indeed any chisel intended to be used to cut mortises including Western mortise chisels.
But wait a minute! Before ya’ll run out of the classroom like a caravan of crazy stoats chasing a pixie, please pick up your homework assignments from the table by the exit doors. And please, don’t leave your empties behind on the floor. Paper coffee cups are one thing, but discarded aluminum beer cans attract out-of-work divorce lawyers and other slavering vermin.
See you next time.
YMHOS
Your most humble and obedient servant’s set of well-used mortise chisels. The 8 older pieces on the right are by Kiyotada (1.5mm~15mm). The two 2 newer chisels on the far left are by Nora. Over the years I have used these tools both professionally and as a hobbyist more than any other of my chisels, as you can perhaps tell from the differing blade and handle lengths which have become shorter with use. A stoic tool, they gossip among themselves less than most other chisels. They are good friends and reliable workmates that worked hard for many years to pay rent, tuition and to buy food for the wife and babies.
If you have questions or would like to learn more about our tools, please click the see the “Pricelist” link here or at the top of the page and use the “Contact Us” form located immediately below.
Please share your insights and comments with everyone in the form located further below labeled “Leave a Reply.” We aren’t evil Google, fascist facebook, or thuggish Twitter and so won’t sell, share, or profitably “misplace” your information. If I lie may Mama Shishi bite my head off.


Please Leave a Reply