Sawdust production is the essence of woodworking, but a little planning early in the process will always result in more efficient work.
In this article we’ll examine the four planning tools and documents critical to efficient woodworking, and which beginners to the craft need to know (whether they decide use them or not): (1) Design drawings; (2) Bill of materials or cutting list; (3) Cost estimate and; (4) Schedule, or programme.
Planning Tool No. 1 – Drawings
A drawing of a 6-panel entry door. It needs dimensions and a cross-section, but as drawings go, it’s a good start. BTW, this style of door is also called a “cross and bible” door because the arrangement of rails and mullions in the top half create a cross, while the two panels in the lower half can be imagined to represent the Old and New Testaments in the Bible, three features that are said to prevent evil from crossing the threshold of such a door. Many say this is totally coincidental, but in light of the superstitions surrounding doors and entrances since ancient times, I think not.
There’s not enough time or space in this humble website to discuss drawings in any detail, but for purposes of solidifying your thoughts into a goal, and determining the objectives necessary to reach that goal, you will need a design, of some sort, recorded in a drawing, of some sort.
Without a drawing, even if it’s just a sketch on a paper napkin using a drinking straw and ketchup, you have no plan. And without a drawing, you lack the most important tool to maintain quality, cost and schedule. Do any of these factors matter to you?
For this purpose you would be wise to own the tools and develop the skills necessary to make simple technical drawings of your project including plan views, elevations (side views of all six sides) and cross sections. Isometric drawings are nice too, but not mandatory for most projects.
A computer with CAD software won’t hurt, but such expensive, complicated tools are not necessary unless you’re required to submit design drawings for review and approval by a paying Client, or perhaps She Who Must Be Obeyed. If a paying client, make sure you allow time in your schedule, and funds in you budget if you are paying a draftsman or CAD monkey, to revise and resubmit drawings. I strongly advise you to never begin making sawdust before your Client has approved (and ideally, signed) the design drawings, even if they’re drawn in Heinz ink.
For simple projects, such as furniture or joinery, dimensioned pencil drawings on plain paper will usually suffice. So you’ll need paper (mylar drafting paper is worth the cost for its durability), a board to tape your drawing paper to while you’re working on it, drafting or masking tape to secure the drawing, a square (a framing square will work fine), a 45˚plastic, steel or aluminum drafting triangle, and a straightedge to guide your lines, a pencil and eraser, a scale (e.g. 1/4″= 1′), a divider or two, and a drafting scale.
Planning Tool No. 2 – Cutting List or Bill of Materials
Once your design drawing is near completion, you can get started on making a Cutting List or Bill of Materials (BoM)
A BoM (AKA Materials List) lists all the pieces, parts, components and supplies required to fabricate the project. You may not need that much detail, but you will absolutely need a Cutting List. The following are the primary reasons for making a cutting list:
Efficiency: Reduces guesswork and speeds up the build process.
Accuracy: Ensures each part is laid-out, measured and cut correctly.
Material Management: Helps you to accurately estimate the quantity of lumber needed, it’s minimum length, width and thickness, as well as its cost.
Organization: Keeps your workflow structured, so you know what to cut and the most efficient order to cut each part.
Reproducibility: Acts as a record should you want to recreate the project in the future.
A cutting list is simply a table, often written in MS Excel, Google Sheets, other spreadsheet software or even by hand on a paper notepad in ketchup. Professionals purchase or develop cutting list computer templates for the type of project they typically undertake, but this only make sense in production work.
List all the major wooden components in this table, including the name of each part, its location in the assembly, all its dimensions (length, width, thickness) and species of wood, if more than one is used, and its designation. If special surfaces treatments (e.g. roughsawn, hewn, adze, paint, stain, pink candy apple glitter with rhinestones, etc.)
Regarding the term “designation,” this is simply a non-permanent marking convention you employ at your discretion. Whatever method you choose, you need to be able to place this mark quickly, legibly and directly on each part, in pencil or lumber crayon. Indelible marking pen, for instance, is not good because it’s permanent and can bleed through the finish months after the project is finished.
A glance at any mark you’ve made should tell you exactly where it belongs within the assembly in an instant.
I use a version of the cabinetmaker’s triangle. Include these marks in the cutting table to describe each individual part. Please also mark this designation directly on the wood so there is absolutely no confusion.
Consistency is mandatory and care must be taken to avoid confusion. If you do a good job developing your marking convention it will serve you well for many years and many projects turning cursing and confusion to deep satisfaction. This is a big step in developing professional-level skills.
Can you get by without a cutting list? Sure you can. But you save nothing by not preparing one, not even time, and can loose much. Moreover the process is excellent training that will give you confidence moving forward. It may improve your overall analytical capabilities too.
Planning Tool No. 3 – Cost Estimate
If Gentle Reader has bottomless pockets, such that the quantity and quality of wood available to you are unlimited, then a cost estimate may be unnecessary. But even then, I encourage you to prepare a cost estimate because, as a wise construction estimator named Warren (RIP) once told me, you can never truly understand a project until you’ve made a cost estimate. Why? Because to make a cost estimate you need to analyze the project in detail and list (1) all the materials and (2) the dimensions and quantity of the parts, calculate anticipated waste, estimate the time to make and assemble all the parts, and then multiply the quantity of materials (perform a quantity takeoff) required by the unit cost of those materials, and add the labor cost.
As you can see, a cost estimate is the natural expansion of a cutting list, which in turn is a natural extension of a design drawing.
This may not be an easy job, but if you aspire to professional-grade skills, then the exercise is worthwhile even if the resulting accuracy the first few times is not stellar. Two steps forward one step back is still progress!
Planning Tool No. 4 – Schedule
Part of creating a final cost estimate, as in a commercial bid, is to breakdown the work required to accomplish the project into pieces and assign a time value and unit price to each, analyze the best workflow combining all the tasks, and then to insert this information into a document called a “schedule” in countries influenced by USA where the CPM (critical path method) schedule was first formally developed for planning and managing factory shutdowns and shipbuilding, or a “Programme” in the UK, or a kouteihyou (工程表) in Japan.
A schedule is the actual step-by-step plan for the build. Is it absolutely necessary to write one? No, of course not, but until you can write a simple schedule, you don’t have a real plan, just a SWAG (scientific wild-ass guess).
Computer programs are commonly used to write and manage schedules nowadays, MS Project, SureTrak (now defunct) and Primavera P6 are some your humble servant has used over the years. Such software is extremely convenient and even useful, at least they were until Oracle got involved. That said, I learned to write and manage schedules by hand long before commercial computer software was available, and continue to make rough schedules for even complicated construction projects by hand, so fancy software is not necessary, especially for hobby woodworking projects.
The key points to pin down when writing a schedule are to first plan the the project with drawings and cutting lists, and to then identify the various task or jobs it will take to get the job done, and time it will take to complete each. Then figure out which of those tasks can only be done one after the other, and if they can be worked on consecutively, what the timing of the work progression will be.
For instance, when making a door, the parts must be cut to size before the joints can be cut, which in turn can only begun after the wood has been procured, thickness planed and jointed. On the other hand, you can procure the wood, hinges and begin thickness planing before, or even at the same time some of the joints are being cut.
For example, your breakdown might include the following tasks, some of which you may perform directly, or you may subcontract out to others, finishing for example.:
Produce drawings: 4hr
Procure materials: 16 hrs
Mark materials: 1hr
Saw materials to approximate length and width: 8hrs
Thickness plane and joint one edge of materials: 3hrs
Layout: 1hr
Cut joints: 8hr
Test-ft & Glue-up: 1hr
Cleanup: 0.5hr
Finish sand/plane: 2hr
Apply finish: 3hr
Install hardware: 1hr
Deliver/install final product: 6hr
Invoice Final Payment: 1hr
In the case of hobby woodworking, a detailed schedule may be psychologically onerous, taking all the joy out of the project. On the other hand, it can help prevent simple projects and small cash investments from morphing into complicated, expensive projects. But you never know until you give it a try.
Conclusion
Gentle Reader may be off-put by these steps and document-prep because they seem like actual work, contrary to the spirit of woodworking as an excuse to drink beer hidden away from the flaming eye of She Who Must Be Obeyed. But please keep two absolute truths in mind: First, regardless of how or when or to what degree of detail you perform the tasks I’ve described in this humble article, none of them are busywork. Indeed, documents have been found (on papyrus, no less) that evidence that Pharoh’s project manager for the pyramids did the same.
Second, whether you realize it or not, in one way or another you will do every single one of these jobs before the project is complete, you just won’t realize you’ve done them until after the fact. And if you proceed without a plan, you will have done them in a disorganized manner, out-of-sequence, on the fly, inefficiently, and perhaps with haphazard results. Such is human nature.
While the planning and documents these steps require may seem like they will make the job take longer, the truth is it will go quicker, with better results, and with better quality at less cost. I promise.
Until we meet again to gather herbs and posies in the troll woods, I have the honor to remain,
YMHOS
Translated title : Here is a piece of a troll herb which nobody else but me can find by John Bauer (1882–1918). From a tale written by Alfred Smedberg and published in the 1912 edition of Bland tomtar och troll (Among gnomes and trolls)
If you have questions or would like to learn more about our tools, please click the “Pricelist” link here or at the top of the page and use the “Contact Us” form located immediately below.
Please share your insights and comments with everyone in the form located further below labeled “Leave a Reply.” We aren’t evil Google, fascist facebook, or a Whitehouse staffer and so won’t sell, share, or profitably “misplace” your information. If I lie may all my sawteeth shatter.
I’m not only a philosopher, sir, I’m a fatalist. Somewhere, sometime, there may be the right bullet or the wrong bottle waiting for Josiah Boone. Why worry about when or where?
Doctor Josiah Boone, Stagecoach, 1939
This series of articles is about tools that have been around a long time, used by nearly every craftsman and builder throughout the span of human existence. Tools without batteries, with no plastic parts, with no need to update or replace glitchy decepticon software that intentionally breaks or evaporates after a few months. These are tools that don’t lend themselves to mass-production and corporate profits. You could even make them yourself with little effort.
I call them “Ancient Tools” because their origins are older than writing.
In this post, your humble servant would like to consider two of the most ancient such tools: the noble stringline and its stiffer brother: the straight edge. We will also touch on the divider.
But before we go into details, let’s consider some background about these tools and why they are so important.
Some History
It’s not even a featherweight of exaggeration to say that each of these tools was essential to the design, fabrication and installation of the wood, brick, stone and steel that make up the foundation of both ancient and modern human civilization.
Indeed, beyond simply making stuff, these small tools were critical to the elevation of human civilization above subsistence hunting, gathering, and the herding of goats. How did these simple tools build civilization, Gentle Reader may ask?
Well the reasons are simply that the stringline and straightedge were essential to the development of mathematics, geometry, trigonometry, navigation, astronomy, architecture, engineering, external ballistics, and many other practical sciences, all of which are essential to not only craftsmen, but modern civilization in total. An exaggeration? Not in the least degree.
Does Gentle Reader use round objects? Do you know how the number Pi was first approximated?
Does Gentle Reader ever ride ships on oceans, or airplanes in the sky? Or use objects transported by trains, cars or trucks over long railways and highways? Have you given thought to how ancient builders were able to plan and layout those railways, roads, highways and bridges? Or layout and cut the earth, stones and wood to make them? Have you considered how the Parthenon in Rome, the world’s oldest, and until recently, largest domes was designed and laid-out?
Have you considered how ancient sailing vessels were able to navigate oceans and chart constantly changing courses?
You may think that these tasks are all handled by theodolites, lasers, computers and GPS widgets nowadays, and that may be so, but it was the string line and straightedge that started it all.
It’s my humble contention that these simple tools remain of significant utility even to modern woodworkers.
Relevant History
Pardon me while I momentarily wax academic.
Did you know that the oldest and most respected treatise on geometry was a 13 book collection titled Elements of Geometry, written around 300 BC by the Greek mathematician, Euclid? That was along time ago.
A fragment of Euclid’s Elements on part of the Oxyrhynchus papyri.
The fact is that Elements is the world’s oldest, extant, large-scale deductive treatment of mathematics, and for nearly two thousand years was the definitive document studied in the West and Middle East by those seeking an education about the physical world. This includes, of course, Leonardo of Pisa (Fibonacci) (c. 1170–1250 CE), René Descartes (1596–1650), Sir Isaac Newton (1642–1727), and every other mathematical giant. It’s an impressive set of books by any standard.
The exact same principles of mathematics and geometry written about in the Elements are taught in schools and universities nowadays, although the textbooks employed are abbreviated, fancier, plagiarized versions of the Elements shamefully giving no credit to Maestro Euclid or his teachers. Interestingly, the word plagiarize comes from the Latin word plagium, meaning to kidnap.
And here’s why The Elements is relevant to this humble scribble, because, you see, Euclid limited the constructions he presented in his books to those that could be produced using just a simple straight edge (not a ruler) and a basic divider, the two most important tools to civilization, and worthy of mastery.
Let’s first examine the father of both the straightedge, ruler and divider: the string line.
The Stringline
Before the straightedge there was the string line, a simple tool older than the straightedge, the ruler and the divider. Anyone can make one.
Think about it. If you must draw a straight line, or check that something is straight, and you lack a precision straightedge or carpenter’s square, or the tools you have are too short, how would you do it? The quickest, cheapest, most reliable tool for the job is the simple string line, be it made from palm fiber, camel hair, hemp, nettles or dried fish guts. Anyone can make it, and anyone can use it. They sell it at Home Despot, but batteries are not required!
The same string line can also be used as a divider or compass.
For example, if you need to divide a distance into 4 segments, simply stretch the line over the total distance and fold it back on itself 3 times. Each fold is a perfect 1/4 division of the total distance. This may be the origin of the 1/2″, 1/4″, 1/8″, 1/16″ progressions of divisions used in imperial measurements.
If we tie a knot, or make an ink mark at each of these divisions, we’ve now made a very accurate, graduated string line which can be used like a tape measure. And all it took was just some cordage made from a nettle plant or horse tail. Batteries not included.
A commercially-available string line I recently purchased for quality control of a robotic customer fulfillment center construction project in Chiba, Japan. In Japan this tool is called a “mizuito” (水糸), which translates to “water string.” In Japan the “water line” has nothing to do with boats but is a datum line critical to layout in construction, BTW. Made by Takumi in 4 colors, this string line is made of 0.8mm x 120m low-stretch nylon. Stretchy nylon would be a big failure. The black plastic reel that came with it measures 80×52×31mm and comes in both 120m and 240m sizes and is designed to fit into a breast pocket. To use this reel, one places one’s thumb and forefinger on the opposing free-wheeling red circular centers on each edge of the reel. This allows one to completely control the reel with just two fingers while spooling line in or out and all without striking the web of the hand. A very handy tool indeed and one I use all the time.
The Straightedge
The straightedge is a stiffer, shorter, handier version of the string line. It takes some skill to make.
The ruler is a straightedge with marks (graduations) instead of knots. This takes more skill to make.
The folding rule and metal ruler are more durable, convenient versions of the wooden ruler, but take a lot of skill and expensive materials to make. They were too costly for ordinary craftsman to own until recent times.
Civilization & Public Standards of Measurement
In ancient times, each upstanding, well-organized community, be it town, city, abbey, temple, or castle, had a person responsible for establishing local legal standards of weights and distances, for maintaining official references materials (e.g. actual weights, graduated rulers or containers), and for checking on behalf of the local authorities, such as the Pharaoh, king, baron, castle owner, abbot or mayor, that the subordinate members of the community were in compliance with those standards.
In past millennia this system of public standards was considered proof of civilization, one of the primary justifications for government and taxes, while the lack thereof was considered a sure sign of barbarism and crooked government.
Indeed, failure to establish, maintain and enforce these standards frequently resulted in bitter disputes and even bloody wars even in the recent past.
With every Tom, Dick and Pharaoh striving madly to become emperor of the world and establish themself in history forever as the person who governs “standards” (aka the “ruler”), until relatively recently, these weights and measures varied from kingdom to kingdom, castle to castle, and town to town. What a confusing mess!
Matters of health, welfare and uniform commerce aside, from the days of Melchizedek, standards were, and still remain, absolutely essential to taxation, of course.
To ensure that buyers and vendors were familiar with the standard measures current in a certain place, in ancient times these standards were carved onto or embedded into the walls of public buildings and church facades in such a way that all could see and copy them, and so they could not be removed or defaced.
Defacing/modifying standards, sometimes by the taxed and often by those imposing taxes, has always been a convenient but ruinous way to make money. The recent bout of intentional high inflation and currency devaluation the world is experiencing is a symptom of currency adulteration, another ancient criminal activity related to defacement of standards.
Indeed failure to comply with officially-established standards was deemed a serious offense in many communities punishable by fines, imprisonment, dunking, public exposure, dismemberment, hanging and even crucifixion. Worldwide more than a few shopkeepers, bakers, brewers, weavers and even tile makers were maimed or executed for “shorting” their customers.
Historically, master builders and tool makers were often required to provide a letter from the local standards officer attesting that their scales and measuring tools were in full accord with the latest standards.
While we no longer embed standards of measure made of iron or stone in the walls of churches and city halls, in one form or another, this practice continues even today.
Standard measures on the façade of the Torre Civica in Assisi (photograph Elizabeth den Hartog). Shown are public standards for various units of length at the time (yard, foot and palm), as well as the respective official standards for the thickness and size of roof tiles, bricks and floor tiles. These standards often included the minimum size of a loaf of bread and size of a tankard of ale.
How To Use a Straightedge
I learned how to use straightedges, scales, dividers and compasses for carpentry and woodworking as a boy from my father, and from carpenters and other craftsman on jobsites over the years. But I learned the most from drafting classes in college. This was before drafting heads, digital protractors, dot-matrix printers, and CAD. Back then even lettering was done by hand or using plastic/metal templates. The professors back then were justifiably proud of their hard-earned skills and the beautiful and precise documents they could deftly produce entirely by hand.
The first lesson the Masters taught was this: Never lay one’s tape measure, rule or scale on the drawing/workpiece and mark from it directly using pencil, pen, scribe or marking knife, but instead use dividers to first measure the required distance on the scale/ruler, indexing the divider’s points in the engraved lines, and then use those same dividers to transfer and mark the distance onto the workpiece or paper. High precision indeed.
The intuitive, but inefficient way most careful people do the job is lay the ruler, yardstick or tape measure on the workpiece, index one end (a careful man will always “burn” 1″ or 12″ or 10mm and not index directly on the tool’s end), locate the target distance on the measuring tool, and make a mark. But if he is trying to layout an irregular distance like 2-3/64″ (= 52 (51.99) mm), for instance, a pencil’s lead or pen’s tip is too wide for precision, so he will use a scribe or marking knife instead. But in many cases, this requires extremely good eyesight, and sometimes even a magnifying glass. When I as a young man, many senior carpenters kept a magnifying glass in their toolbox. It works.
The wiser craftsman will tip the scale or ruler on its edge, kneel or bend down so he can see the scale’s/ruler’s marks clearly, fit the point of his marking knife or scribe into the engraved line on scale/ruler, and then transfer that to the workpiece, paper, or story stick with a quick “tick.”
There is a risk that the far end of the ruler/scale at the point he is measuring from may wiggle out of alignment messing up his precision. Or that the scribe/knife point may shift while making the “tick.” With practice, these tendencies can be overcome, but clearly this method is time consuming and the results may be questionable.
The improvements I recommend to make one’s marking knife more effective at this task can be seen here.
But using dividers, the wise craftsman can fit/index their points quickly and precisely into the engraved lines in scale/ruler at each end of the measurement, first time everytime, and without kneeling, squinting, pressing down, or worrying about wiggling and shifting mark the desired distance on the workpiece. Once he has set the dividers to the required distance, he can fit one of the sharp points precisely into the index hole, or onto the line he is measuring from, and then use the other point to make a precise scratch or hole in the workpiece, which can be used again for future layout reference. This technique greatly improves precision without using a magnifying glass.
This technique works with both dividers and trammel heads.
Standard dividers are quickest, but a locking divider with screw adjustment is easier to adjust precisely and is more likely to retain the measured distance with repeated usage.
You will find when drafting or doing layout that you repeat some distances frequently. Having 2 or 3 locking dividers set to these distances close at hand will allow you to layout those distances quickly and accurately without the need to refer to scale/ruler. Your humble servant keeps three in my toolchest.
The quality of your scale/ruler becomes important when attempting precision layout. A high-quality, professional-grade scale or ruler must of course be of proper length and uniform width and thickness, be free of twist, and have accurate lines. But to qualify as a high-quality scale/ruler, it must pass 2 simple quality tests, not an easy task nowadays.
Accurately spaced graduations. Performing this quality check requires the skillful use of precision tools and time, so it is seldom economical to purchase discount scales/rulers.
Consistently engraved graduations. Besides being spaced at the right distances, the graduations engraved into the metal must be the right length, width, depth and have smooth, straight walls. This too is also uncommon. Don’t settle for cheapo tools with shallow, uneven laser-etched or acid etched graduations. Photo-engraved graduations are best. Seldom found in Chinese or Indian tools.
We’ll consider more uses for these tools in the next installment of this crazy adventure.
YMHOS
A fusuma screen by Kano Nagatoku, a designated National Treasure of Japan, commissioned by the Tokugawa clan, Japan’s last and most famous shogunate. Imagine presiding over a meeting with this as your background!
If you have questions or would like to learn more about our tools, please click the “Pricelist” link here or at the top of the page and use the “Contact Us” form located immediately below.
Please share your insights and comments with everyone in the form located further below labeled “Leave a Reply.” We aren’t evil Google, fascist facebook, or raunchy Reddit and so won’t sell, share, or profitably “misplace” your information. If I lie may my straightedge warp and my string lines all break!
An antique craftsman-made sumitsubo with shishi lion and peony perched on the lip of the “pond.”
A good tool improves the way you work. A great tool improves the way you think.
– Jeff Duntemann
Over the years your most humble and obedient servant has received many inquiries from Gentle Readers new to woodworking about what tools they should procure at the very beginning of their adventure. The internet is chock-a-block with both confounding confusion and beaucoup BS on this subject, some dribbling from amateurs and even more sprayed by marketing pukes and clickbait sages. Heretofore I haven’t really scribbled anything on the subject in this blog.
But now, at this fork in the crossroads, beginning with this article your penitent servant will share some thoughts about what tools a beginner needs to perform a lifetime of excellent woodworking, with minimum wasted time and funds, and the recommended priority for obtaining them.
Reluctant Advice
From this point forward I will be so bold as to make some suggestions about the the tools I recommend.
But first allow me to explain my viewpoint on the subject to help you gauge how much saltpeter and sulfur to mix with your charcoal, if you follow the allusion. You see, I enjoy giving Beloved Customers excellent choices in tools, but I’m allergic to giving casual advice. Why? Because even advice given honestly, with the best of intentions, and without profit motive often yields bad consequences. And sneezing.
In Proverbs 12:15 it’s recorded that Solomon the Wise (and disobedient) taught the following: “The way of a fool is right in his own eyes; But he who heeds counsel is wise.” Sounds good, I suppose, but does this mean that the man who’s convinced his honest decisions are correct, even after much study and experience, must still be a fool? Are only those who rely on counsel wise? What if the counselor he relies on is a blasted fool or a greedy, lazy influencer? Is all counsel equal in value?
King Solomon’s most famous descendant once said “Ye shall know them by their fruits.” Sounds like reasonable evidence-based judgment to me. So what were the fruits of Solomon’s advice? The record tells us that he thought his judgement so wise that he frequently ignored it on an epically immoral scale and with tragic, destructive results.
While less decisive than Proverbs but equally concise, I think Professor Tolkien’s insight on the subject may be even wiser, and so I have taken it to heart. In the Lord of the Rings he wrote “Advice is a dangerous gift, even from the wise to the wise, and all courses may run ill.”
Solomon’s fabulous famous folly aside, your humble servant has seen first-hand ostensibly wise advice purchased from reputedly wise “experts” at unjustifiably high cost run horribly ill too many times, so I dislike giving advice. And there’s the sneezing thing too, of course.
But since advice is what’s required, in this series of articles I will climb far out on a skinny tree limb to offer the following advice on two conditions. First, I insist Gentle Reader accept the value of this advice as worth no more than what you pay for it (nothing), and second, that any consequences that spring from your acting on this advice are entirely yours. Accordingly, I won’t be offended if, like Solomon the Wise, you decide to ignore it entirely and get yourself another hundred foreign girlfriends instead.
Anyway, back to the subject at hand.
Tool Categories
The following are the four basic categories, by function, of the tools I believe a beginner needs to possess to get started in a lifetime of woodworking, whether as a career or hobby. You’ll most likely need all the tools listed here eventually, but you won’t need them all at once to make excellent things from wood. The categories are as follows:
Measuring, Marking and Layout Tools:
Sawing Tools
Chiseling Tools
Planing Tools
Of course, depending on your projects, you’ll need tools that don’t fit neatly into these four categories, such as those used for processing trees and making lumber, nailing, boring/drilling, screwing, gluing, clamping, laminating, sanding, edge treatment, assembly, and finishing. When it comes to these other categories of tools, I can only encourage Gentle Reader to rely on your prodigious innate common sense.
Each list is divided into two tiers. The first tier includes absolutely necessary tools. The second tier lists essential tools you will eventually need, but can get by without until later.
So let’s begin by examining the minimum measuring, marking and layout tools every beginner needs. I will deal with the other categories in future posts. If I’ve forgotten anything critical, please let me know in the comments form below.
Essential Measuring Tools (Tier 1)
While chopping, sawing, carving, joining and planing get all the attention, final results in woodworking (and all physical trades for that matter) can never be better than one’s skills at measuring, marking and layout, so woodworkers and builders need to own the related tools and master them.
By no means sexy jobs, both ancient and modern history provides endless examples of poorly performed measuring, marking and layout work buggering cost, schedule and quality goals with a barge pole wrapped in barbed wire. No wonder these jobs have historically been assigned to the most experienced and intelligent craftsmen. The simple tools included in this category will serve you well in any handwork activity, not just woodworking.
One caveat. I have listed a few tools below that are modern precision tools beginners should own and learn to use skillfully, but I know a few purists who find such tools violently repulsive. The truth is that the more experience one obtains, the less one tends to rely on absolute measurements in millimeters, inches, or cubits, and more on relative precision. But possessing the tools to perform precise measurement is nonetheless necessary if you plan to do quality work.
Necessary Measuring Tools (Tier 1)
You’ll need the following essential measuring tools from day one.
1. Quality Tape Measure with an accurate sliding hook (check to make sure it’s not sloppy). Size will depend on the projects you plan to undertake, but 2-4 meters is a minimum useful length for cabinetry, furniture making and joinery. Get a reputable name brand, with a warranty. Avoid like an Asian giant hornet with flaming hemorrhoids any cheapo crap made in China, India or Vietnam. Tape measures are a bit delicate and don’t last forever, so treat yours gently and check it frequently against your precision straightedge for accuracy and damage. Do not rely on it for great precision. Since ancient times the folding scale has been thought superior, a sentiment with which I agree in the case of some jobs. But in general nothing beats a quality steel tape measure for most quick and dirty measuring tasks.
2. Precision Straightedge (12”/300mm long) with accurately, deeply etched graduations. This is a precision measuring and layout tool. Good quality graduations are useful for precisely indexing and guiding layout tools such as pencils, pens, divider points, and a marking knife. Hardened stainless steel is ideal for durability. Best if it’s made to high quality standards (JIS, etc.). You’ll use it not only for measuring and checking the accuracy of your other tools, but more frequently for checking that surfaces are flat and free of wind (twist). If treated with respect, it will serve you well for a lifetime.
3. Try-square (see item 2 below). The handy dandy try square has many uses as a measuring tool, but rather than making numerical measurements, its most important job is checking that right angles of components, tools and assemblies are indeed 90˚ , a check one must make constantly and quickly when planing/machining the components of furniture, joinery and cabinetry and casework not to mention setting up portable and stationary power tools. Most try-squares sold nowadays are poor quality Chinese or Indian junk that are out-of-tolerance when new. I too like pretty tools and realize that a plain stainless steel square doesn’t look as cool as more traditional squares with rosewood stocks and brass fittings, but the blade and the stock should both be made of stainless steel and should be solidly welded to each other, not glued or pinned. Best if the blade is hardened. Graduations are not necessary. Get this essential tool wrong and all is lost.
Necessary Measuring Tools (Tier 2)
4. 1-meter stainless steel precision straightedge. This tool needs to be certified by a reputable standards organization, such as Japan Industrial Standards Committee (JIS), NIST: National Institute of Standards and Technology (USA); UKAS United Kingdom Accreditation Service (UK); DIN (Deutsches Institut für Normung), etc.. Why does certification matter, and why is it worth the extra cost? Fraud and deceptive marketing are more common now than ever, with many well-known manufacturers taking a page from Chinese Best Industrial Practices of bait, lie, mislable & switch. In the case of a tool certified by an organization such as NIST, JIS, DIN etc. with a valuable reputation to lose, you are much less likely to be fleeced by quality crooks. Indeed, this tool, along with the 12″/300mm straightedge and try square listed above must be accurate enough to serve as one of your own in-house “standards.” It must not only be extremely straight when new and stress-relieved, to avoid future warping, but it must have deeply, uniformly, precisely-etched graduations. It’s OK if it spends most of its life hanging from a nail on the workshop wall, because there will be times when it will be critical for quickly for checking surfaces for flatness and wind, layout, assembly, dimensioning boards and fettling handplanes.
5. Caliper Gauge: This gauge can be of the vernier, dial or digital variety, whichever type you like and can afford. Once again, buy a certified product. This tool is useful for precisely and quickly measuring, comparing and laying out distances and dimensions. Some are sold with carbide tips convenient for directly scratching layout arcs/lines/points in harder materials such as metal or stone. Will you use it constantly? No, but for those tasks where it’s needed, nothing works as well or as quickly. Quality vernier calipers cost much less than the dial or digital variants, and are not as delicate, but take more time and concentration to use well. Once again, nothing made in China, India, Vietnam, Cambodia, etc. When in doubt, I buy Mitsutoyo.
Necessary Layout & Marking Tools
Try Square (same as see item 3 above). This tool is absolutely indispensable for layout and marking of joinery, cabinetry, and furniture work. 100-150mm is a handy size for furniture work. Even if your workshop has been thoroughly purged of pernicious pixies this tool will be dropped, and will wear out in-use, so a useful one will have a welded (not just pinned) connection between the thinner blade (aka beam or tongue) and the stock. And, this is important, the blade will be made of hardened stainless steel. Graduations are totally unnecessary. Used for marking 90˚ lines and checking for squareness. Matsui Precision makes the best one I am aware of after much searching and hands-on experience in the field.
7. Framing/Carpenter’s/Builder’s Square.
Essential for checking lumber, laying-out and marking of larger joints, casework, checking square of larger joints and assemblies, working with doors, panels, and plywood, and many other tasks. Regarding materials, carbon steel squares are heavy and always turn red and go away, so I don’t recommend them if you have a choice. Stainless steel is more durable, but still heavy and costlier. Aluminum will suffice. You may need to true it, but this is easily done with a hammer, punch and file. Just ask me how when you think it’s necessary. This is a tool with a long history you should be proud to own. In all nations more than a few centuries old, the carpenter’s square has been associated with stability, honesty, righteousness and order, all traits a craftsman should seek to foster in himself, his family and his crew. In Japan, this tool was traditionally extremely expensive and was considered the craftsman’s “spirit” in the same way the sword was revered as the warrior’s spirit by the warrior caste. Indeed, in past centuries, stepping over a carpenter’s square resting on the floor or even ground was seen as a mortal offense resulting in bloodshed at times. Such emotional sentiments did not extend to other carpentry tools. The Japanese version of this tool goes by several names written several ways including “kanejaku,” “magarijaku”(written 曲尺or 矩尺), “sashigane”指矩, and several other names. Don’t ask me why. Unlike the Western square of uniform thickness, the better Japanese kanejaku have a variable cross section for less weight/greater rigidity. Being thinner, smaller, more flexible, and much lighter in weight, the Japanese square is handier to transport and use in the field. Of course, it has a couple of disadvantages such as not handling longer/wider boards as well, and being more difficult to control because it’s more flexible. Horses for courses, of course, so I own and use both types.
8. 45˚ Stainless Steel Layout Tool or quality speed square for laying-out miters. An accurate combination square will work too, but such tools are relatively expensive and quite fragile. The Shinwa tool shown below is cheaper, much tougher and absolutely reliable.
9. Marking Gauge: There are many types of marking gauges, most of which the craftsman can make himself without special tools or machinery. Perhaps this will be the subject of future articles. In any case, you will need at least 2 types of gauges.
The venerable old Stanley No.65 marking gauge.
The classic type has a single pin or blade to cut/scratch a single line with each stroke and has been around since Moses wore gator skin loafers. You can make versions from scrap wood, nails, or scrap steel easily yourself.
An excellent kamakebiki mortise gauge by Kinshiro
The second marking gauge you should have is called a “mortise gauge.” This tool has two pins or blades to make 2 parallel lines, at a set distance from each other, with a single stroke. It’s especially suited for quickly and precisely marking mortises and tenons and installing hardware. I prefer the Japanese version of the mortise gauge called the “kamakebiki” (sickle mortise gauge shown above) which has two L-shaped steel blades, easily adjusted and easily resharpened. A handy tool indeed.
Having multiple marking gauges on-hand will help to minimize the time you must spend resetting/adjusting the pins/cutters, a principle key to performing precise work consistently because every time a gauge is reset, error creeps in, sure as pigs are made from bacon. Marking gauges are simple tools easily mastered, but don’t underestimate the importance of owning a few and mastering them completely.
TheTite-Mark marking gauge
The Titemark gauge is an excellent tool, not only because it cuts consistent lines, but because it can be quickly and precisely set using a single hand and no tools. The only downside is the depth of cut is shallow and the cutter is easily damaged.
10. Carpenter’s Pencil. Useful for the same marking jobs as a plain pencil, but if one sharpens its wider lead to a chisel edge, it will be more durable (won’t break as easily) and last much longer than a standard pencil.
11. Divider/Compass. An essential tool for layout used to quickly and accurately transfer distances from straightedge or layout stick etc. to a workpiece. Of course, it can perform all the classical geometrical tasks that have made this tool essential to skilled craftsmen, architects and engineers worldwide for millennia. A spring divider is adequate, but finances permitting, Starrett 92-6 or 92-9 dividers shown below are worth every penny. I always have at least two on-hand to minimize the lost time and inaccuracy frequent resetting entails.
12. Ballpoint Pens:Not often thought of as a precision layout tool, inexpensive ballpoint pens are more durable than pencils and can make a permanent mark or line of consistent width without needing to be resharpened. Too wide for accurate layout, you say? Practice perfectly sawing in half the centerline of a line drawn with a pen and you’ll change your tune.
13. Marking Knife and/or Scriber. Instead of leaving a line of ink, chalk or graphite on the surface of a board, these tools cut or scratch a permanent line into the surface of material being worked into which divider points and the blades of cutting tools such as chisels, saws and even planes can be indexed quickly, reliably and without the need for expending much attention, greatly increasing speed and confidence in one’s layout. Essential tools. Here’s a Link to an article on the subject.
A Japanese-style marking knife, a simple but surprisingly sophisticated tool.
14. Inkpot and/or Chalkline: For making long straight lines on wood, concrete, steel, gypsum board, etc. The article at this LINK contains more details
15. Colored Marking Pens or Lumber Crayons: Marks made with colored marking pens or lumber crayons, while not precise, are helpful for speedily marking/identifying the orientation and/or relative position of parts, pieces and components in an assembly. For instance, a blue stripe, or two parallel black lines on the end of a part or tenon, might be drawn to indicate right-hand, or North, or front direction in an assembly. I sometimes draw an arrow to orient the front of the assembly or to indicated the direction/location of a reference surface or part, etc. Of course, drawing the cabinetmaker’s pyramid is essential for joinery and casework. The marking convention you choose is, of course, up to Gentle Reader, but having one and using it will help your work go faster and with less confusion, especially if you must set the part aside for a few days or even months. Lumber crayons are especially useful for marking lumber for dimensioning and planing.
Storage, Transportation & Protection
With the exception of the 1-meter long straightedge, and that only because it’s inconveniently long and I want to protect it from dents and dings, I always keep these measuring, layout and marking tools located in the handiest place in my toolchest when I’m in my workshop, or in my portable toolbox and/or toolbag when I’m working in the field.
If you carry these tools outside the workshop, and intend them to be lifetime tools, I recommend you make a simple case for each tool, of cardboard perhaps, to cushion them in your toolbox to help retain precision, to keep them from dinging each other, and help to them last longer. Only then can you reasonably expect a long, mutually profitable relationship with these good friends.
In the next installment in this swashbuckling adventure we will consider the next category of tools the beginner needs: Saws.
YMHOS
I salute you! Woof!
If you have questions or would like to learn more about our tools, please click the “Pricelist” link here or at the top of the page and use the “Contact Us” form located immediately below.
Please share your insights and comments with everyone in the form located below labeled “Leave a Reply.” We aren’t evil Google, fascist facebook, or thievin Tik-Tok and so won’t sell, share, or profitably “misplace” your information. If I lie may pug pirates make me walk the plank!
Practice doesn’t make perfect if you’re doing it wrong.
Frank Sonnenberg
This is the first in a series of articles about the tools and techniques used for laying-out joints in wooden cabinetry, joinery and furniture. They were not invented by your humble servant; Indeed, they are older than all the pyramids. I have no doubt Father Adam taught them to some of his sons and daughters.
We will delve into the specifics of layout tools in future articles, but in this article your humble servant would like to discuss an ancient layout concept sometimes called “Reference Surfaces.”
Reference Surfaces
The purpose of employing reference surfaces is simply to limit Murphy’s influence on the craftsman’s efforts, thereby improving the precision and speed of his work, saving time, material and in the end, yielding a better product. Why is this a concern? Simply because, as Gentle Reader is no doubt aware, Murphy’s Law of Thermodynamics ruthlessly dictates that errors in layout do not cancel each other out, as the optimists and theorists naively assert, but rather accumulate in the direction of maximum chaos. Thus it has always been.
There is a old Architect’s saying that goes something like this: “Cut to fit, paint to match.” There’s another version used by finish carpenters that better reflects reality in the field: “Cut to match, paint to fit.” Indeed, the painter is often the finish carpenter’s best friend hiding many layout and fitting mistakes with his clever brush and globs of paint. Thank heaven for spackle (ツ).
But the wise professional woodworker will hone his skills so that the concealing spells and potions of the painter are not necessary to make his work look acceptable because, while many errors can be excused, the open mouths of sloppy joints will gleefully mock the craftsman that made them for as long as they exist, even from underneath thick coats of latex paint. Implementing the concept of Reference Surfaces during layout is one sure way to reduce this shameful razzing. But I digress.
A Reference Surface (RS) is usually a flat surface or plane on a piece of material, be it cardboard, wood, stone or steel, that a craftsman intentionally designates for layout purposes.
To help explain why reference surfaces are useful let’s consider an example using them to make a typical component in a door or cabinet, such as a stick or board with a rectangular cross-section and a tenon on one (or both) ends.
The Primary Reference Surface
It is usually most efficient to prepare and mark a Primary Reference Surface (PRS) on a workpiece first.
Begin by sawing, milling and/or planing the stick under consideration so all four long-grain surfaces are flat, adjoining surfaces are square (90˚) to each other, and opposing sides are parallel to each other. Easy stuff right? Maybe not, because in the real world, it is time consuming and often wasteful to try to make materials perfect, at least when there are cheaper, quicker alternatives. How perfect do the dimensions of our materials really need to be? And even when we aim for perfection, how can we consistently deal with the small discrepancies that always creep into human efforts when subjected to cost and time pressures? But I digress again. Back to our stick of wood.
The first step in making the stick ready for layout of a tenon is to make at least one long-grain surface as straight, flat, and free of wind (twist) as we can. This is not difficult to accomplish using handplanes or even a well-setup thickness planer. The stick should initially be slightly oversized, of course. If Gentle Reader is not yet able to make one face of a stick straight, flat and free of wind using handtools alone, I encourage you to practice until you can. You will succeed.
The essence of quality control is to constantly compare the results of one’s efforts against reliable standards. You can check that the surface you intend to designate to be a Reference Surface is flat using a precision, beveled or thin straightedge and/or a flat surface such as a flat workbench top.
To use a straightedge, place its edge along the surface, hold it up to a light, and check for light showing between the straightedge and the surface of the stick. So long as the straightedge is truly straight, not dinged or dented, and not too thick, human eyes can easily detect light passing through extremely narrow gaps (kick-ass “hyper-acuity”). Perfection is neither necessary nor attainable, but it should be pretty darn close.
Now repeat this step with the straightedge laid between diagonal corners. If the gap between the surface and the straightedge laid along the diagonals is not identical (ideally non-existent), or the straightedge won’t contact both corners at the same time, then you may have discovered some wind (twist). This technique works especially well for wider boards, but not so much for narrower sticks. So what’s another way to check for wind?
To quickly check if a stick or board is flat, simple place the board or stick on the truly flat top of a workbench or atedai, press down on the ends with one’s fingertips, and pay attention to see if the stick or board rocks. Then flip it over and repeat. If it rocks, it isn’t flat. This is a quick (takes only a few seconds) and reliable technique, one that Gentle Reader should perfect, but the information it can convey is limited.
To check for wind, tap the corners of the board or stick with your fingertips while the board is resting on a flat benchtop. Flip and repeat. If the board or stick rocks on its diagonals, then you have discovered wind. Once again, fast and reliable, but not extremely precise. Use a straightedge to perform a more precise check for flatness and wind.
By the way, anyone intending to do high-quality woodworking (especially when using handtools) needs a stiff, flat workbench or atedai (The Atedai Part 1, Part 2) of some sort because this working surface not only helps us to plane flat, twist-free wooden components, it also helps us quickly identify areas of wooden components or assemblies that are not flat or that are twisted as described above. It is the woodworker’s most important jig.
After checking for flatness and wind, use a carpenter’s pencil or lumber crayon to mark high spots and directions of twist. When everything is marked, examine the board and make a plan of attack for your plane. The subject of how to plane a board efficiently is worthy of another dedicated article, but I have abbreviated the process here.
For now, please remember to always plane only the high spots on the board/stick without touching the low spots. Think about what this means and how you might go about doing it because it takes self-control to develop a plan and then tame one’s inner badger to execute it efficiently, something many newbies without a master or senpai nearby to slap them upside the head when they err often find difficult to make a habit.
Remember, at this stage we are not yet trying to make the board pretty, just to knock down the high spots without lowering the low spots further.
After all the high spots have been removed and the board is flat and free of wind, only then should we use a finish plane with a true sole, tight mouth and sharp blade to remove all cosmetic defects and make the make the board’s surface shine.
Now that we have one surface flat, free of wind, and clean we will call this our Primary Reference Surface and mark it.
Marking
There are as many ways to mark a woodworking project as there are to cook beans, but they all accomplish the same thing.
I have learned several techniques over the years, but find myself using Krenov’s Cabinetmaker’s Pyramid most frequently (if you haven’t yet read JK’s book “The Impractical Cabinetmaker,” you should). Whichever marking technique you employ to identify the location and orientation of each component in a woodworking project, be it ABC, 123, イロハニホヘ、the palindrome “KAYAK,” odd-shaped butterfly wings, or some other mushroom-inspired scribble, it must consistently make the orientation of the piece of wood in the finished product clear at a glance (up, down, top, bottom, front, back, right side, left side, etc.). Make this mark on the freshly completed Primary Reference Surface (PRS). For cabinetry, joinery, furniture etc., a pencil seems to work best. In the case of dark woods, white or yellow lumber crayon works too. Six of one half-dozen of the other.
Another thing Gentle Reader should consider when marking the components of your project is the visibility of each component. For example, when planning a project such as a cabinet, especially one where visible grain and beautiful color are important features, it is often beneficial to place the most beautiful pieces of wood in the most important, most visible locations in a project. Once again, this demands some planning.
Likewise, the joints where components meet in high-visibility locations , such as mortise and tenon or dovetail joints, need to form flush surfaces when assembled. This typically means placing references surfaces in the finished product where they will be most visible, and have the fewest defects, or the most beautiful grain, or a complementary grain pattern.
On the other hand, this planning process should also orient the visible surfaces of component that exhibit less than perfect surfaces, or have less than perfect color, grain, joints, and even obvious defects, so they are concealed inside the cabinet. While not the pinnacle of workmanship, this is a compromise that has been standard operating procedure forever, especially where funds and/or time are limited.
Taking this marking concept one step further, it is useful to combine reference surface markings with identifying marks for each individual component. If you have a good marking plan and execute it consistently, you will always know at a glance which component belongs in which location and how it is to be oriented (up, down, right, left, front, top, bottom, back, right side, left sides, etc.) during assembly. Confusion during a complicated assembly is to be avoided.
The cabinetmaker’s pyramid combined with simple letter annotations is useful, but not the only solution by any means, For example, inside the piece of the pyramid applicable to a component, a corresponding annotation such as the following can be made: F = front, B = back, R= right, L = left, P1 = first panel from front/right, P2 = second panel from front/right), etc.. When things are more complicated, it helps to name each piece on the drawing, give it an abbreviated designation, and mark that designation on the component. Anyway, enough on this subject.
The Secondary Reference Surface
Assuming we are making a stick or board with a rectangular cross-section, as mentioned above, we next need to make a partner reference surface I like to call the “Secondary Reference Surface” (SRS), adjacent the PRS and oriented 90˚ to it. It too must be flat and free of wind as it will be an important reference surface for layout purposes.
If you are using an electric thickness planer, go ahead and plane to the appropriate thickness now, but always check to make sure the stick/board is truly flat, free of wind, and its ends are free of snipes. May the gods of handsaws guide your hand.
I strongly suggest you use your vernier, dial, or digital calipers to actually check thickness because, without putting too fine a point on it, Murphy’s pointy purple pecker is always promiscuously probing.
If you are thickness planing by hand, I suggest you begin making the SRS by shooting one edge, as described in the next section.
Shooting the Edges
Enma, the Buddhist King of Hell, presiding over festivities. A good time was had by all!
Many (but not all) of the gurus and well-published scribblers who shill for the woodworking tool manufacturers (may the Lord Amidha give them a few years roasting over Lord Enma’s fire on a barbed spit before tossing their sorry souls back into this miserable existence as termites) advocate shooting edges by clamping a board or stick into a vise and then balancing a jointer plane on the narrow side edges to plane the edges square to the wide faces. This technique works, sorta, but unless one is planing thick boards, it is often slow, unsure and silly. Here is the way I was taught in Japan and the way I do it now. Gentle Reader is free to choose, but I suggest it would be less than thoughtful to ignore this intelligent, efficient and nearly fool-proof technique.
This technique relies on the reliable precision of two common tools. The first thing to check is that the angle between the sole and side of the handplane we use for shooting (usually a jointer) is exactly 90˚degrees (do you really have a tool that will precisely check 90˚or do you just assume you do?). Of course, the blade extending past the mouth must also form a perfect 90˚ angle with the sole. These are common standard tolerances any woodworker worthy of breathing air must learn to maintain. If your handplane’s tolerances are out of wack, best to correct them first.
The second precision tool you need is a workbench, atedai or planing beam with a truly flat, wind-free top working surface. This too is a standard tool a woodworker who intends to perform high-quality work needs.
The Japanese atedai and planing beam frequently have a board a little wider than than the thickness of the handplane used for shooting screwed to its edge (usually the right-hand edge) which is stepped down from the atedai or planing beam’s top surface. The step is usually just a little more than the thickness of the plane’s cheek. One places the board or stick on the top of the atedai or planing beam, holds or clamps the workpiece in-place, rests the jointer plane’s side cheek on the ledge, and while pressing it towards the workpiece, pulls it to plane a flat, wind-free surface. Please note that this is possible because the top surface of the atedai or planing beam is flat, and the plane’s sole/blade are oriented 90˚ to it, so a square edge can be shot easily and reliably without any silly antics.
There are a number of wooden/plywood jigs used in by Japanese craftsmen in place of the ledge. One of those works well with the Western-style workbench too.
All it takes is a flat wind-free piece of plain plywood or a plain solid wood board (I call it a “shooting board”) at least as long and wide as the workpiece to be shot, and a little thicker than the cheek of the plane. Much thicker is not efficient.
One lays this shooting board on top of the workbench (or atedai or planing beam). The workpiece in turn is laid with its PRS or SRS side facing down on top of the shooting board with the edge to be shot projecting past the the edge of the shooting board a small amount. Clamp these two boards to the workbench, atedai or planing beam with C clamps or other holdfast mechanisms. Stops or benchdogs projecting from the benchtop are useful too.
Then, after checking that the blade of your jointer plane is projecting the right amount and angled properly, simply lay it cheek-down on the work surface, against the surface of the workpiece to be shot, and pull or push it to plane a shaving. Voila: a straight, flat, wind-free edge at a 90˚ angle to the PRS or SRS.
Of course, before making shavings you will have examined the stick/board and made a plan in your head for shooting it efficiently. You will have also marked a straight line to plane to, and of course you will have an accurate square and straightedge on-hand to check results.
This technique is quick, reliable, extremely precise, and can handle boards as long as your workbench, atedai or planing beam can accommodate without any amorous monkey-football theater.
In any case, the goal is to create a surface (SRS) that is straight, flat, free of twist and square (90˚) to the PRS. You can mark this surface however you see fit, but it is important that you be able to tell its relationship to the PRS at a glance. I do this by drawing diagonal lines along the PRS ending at the edge adjoining the SRS, and then continuing those line onto the SRS. Simple stuff.
Dimensioning to Final Width &Thickness
Now that we have established and marked our a Primary Reference Surface and Secondary Reference Surface, we have two options before us. One option is to use a marking gauge to layout the width of the stick/board on all four edges and saw/plane it to final dimension, or to use a marking gauge to layout the thickness in preparation for sawing/planing the stick/board to final dimension. The choice is up to you, but your PRS and SRS will make the job quick and certain because the hard work of checking and planning were done right, done early and therefore need not be repeated.
Relative Precision
It is worth observing at this point that, once you have accurately established a PRS and SRS, the surfaces opposite each of them often do not need to be precisely dimensioned. Indeed, this has historically commonly been the case when craftsmen made products, whether of wood, stone or steel, with surfaces where precision and/or appearance was unimportant. A word to the wise.
About now, thoughtful Gentle Reader (may the hair on your toes ever grow long) may be asking yourself just how the heck to go about doing the rest of your layout if two out of four surfaces of a workpiece are not precisely dimensioned. That you ask this question is clear evidence of your astonishing intelligence!
The answer is simple. When measuring a distance or making a layout line, whether using a scale, divider, caliper or marking gauge, always do it from either the PRS or SRS, not the less-precise surfaces. This will yield maximum precision with minimum effort and less opportunity for Murphy to pointedly intervene.
For example, when marking the width, thickness or length of the stick/board in the previous section using a marking gauge or marking knife/square (tools of inestimable value), you should always rest the fence of your marking gauge/marking knife & square against either the PRS or SRS. In this way, so long as you have not over-imbibed planing fluid, and have held up your end of the job, the layout line your gauge/marking knife & square makes, and the plane delinated by two such lines, will be as straight, flat, free of wind, and square as are the PRS and SRS that guided their formation. I recommend you make this procedure a habit.
Laying-out The Tenon
Our stick or board should now have two surfaces (the PRS and SRS) that are precisely straight, flat, free of wind and square to each other. The sides opposite these two surfaces should be pretty straight, flat, free of wind and square to each other too. Remember, perfection is unattainable and seldom really necessary, but so long as we have a good PRS and SRS, all will be well. With this established, we can now layout a tenon one end of our stick or board.
The first task is to cut the stick/board to length while at the same time making flat, square ends.
Please take note that the order of the steps in this process is important to ensure maximum precision in imprecise wood with minimum effort.
Begin by making a small tick mark with the very sharp, pointy corner of our marking knife where we want the stick to end.
Then, with your accurate, hardened stainless steel square at hand, set the point of your marking knife into this tiny cut and slide the blade (thin part) of your accurate, precision square (most are neither accurate nor precision, and they are often shaved, dinged and practically knackered) against the flat of the marking knife. The beam (the shorter, thicker part of the square) must rest firmly against either the PRS or SRS, not their opposing surfaces. It really doesn’t matter which reference surface you begin with, but for this example, let’s say we pressed the beam against the PRS. With your marking knife guided by your square’s blade, make a straight, clean cut across the width of the SRS taking care to make the cut vertical and not angled right or left.
Next, place the beam of your square so it is pressed against the SRS this time, set the sharp little point of your marking knife into the cut you just made, and slide your square so its blade is stopped against the point of your marking knife and spanning the width of the PRS. Note that it is the marking knife, indexed in the skinny cut you made previously to the SRS, that determines the location of the square’s blade, no squinting or straining necessary.
Now repeat for the other two sides, but be sure to index your square only from the PRS and SRS. This means you will need to change the way you hold your square.
I would like you to perform an experiment to confirm why you should use reference surfaces and your square and marking knife as described.
Take another stick, one that has not been precisely trued, and layout or “spin” a layout line near the end as if in preparation for cutting it to final length, but instead of using any reference surfaces, use the square and marking knife exactly the same for all four sides, but when marking each new line, index your marking knife in the layout line you cut on the previous side. Check to see if there is any gap between where the the layout line on the last side meets the layout line on the first side. Often there is a noticeable gap, and the wider the sides, the greater the gap will be.
This gap can be caused by either; (1) Using a square that is out of tolerance (a common enough problem); or (2) Sides of the stick/board that are either not straight, flat, or square or parallel to each other.
Think about the errors that can creep into a project and how they might accumulate as it progresses. Then consider how accurate reference surfaces can help prevent these errors. Most people’s minds boggle just a little bit the first time they perform this test and come to understand the likely consequences, and realize how often they have sabotaged their own efforts.
Now that the stick is the right length and we have clean, square ends, let’s layout the shoulders of the tenons.
Cutting the Stick to Final Length
You can then use your handsaw to cut the stick to length. It need not be a special saw unless the end of the tenon will be exposed, but do remember to keep the saw’s point inside the marking knife’s cut, with the sawcut to the side of the marking knife’s layout line. This is not a difficult skill to develop, but it is essential, so please make the effort.
Laying out the Tenon’s Shoulders and Cheeks
Laying out the tenon’s shoulders is simply a repeat of the steps listed above, but don’t use a saw just yet.
With the tenon shoulder line marked, next use a marking gauge to layout the cheeks of the tenon. Once again, when making all these layout lines, index the marking gauge’s fence against the PRS and SRS only. Please also remember that, unless you are using a double-bladed mortise gauge, you will need between two and four marking gauges to make all the layout lines without resetting your single marking gauge. I highly recommend having multiple gauges on-hand so you don’t need to fiddle with settings midway through a project because fiddling with marking gauge settings is a common path for errors to sneak into layout efforts.
Sawing the Tenon’s Shoulders and Cheeks
With all the tenon’s layout lines made, you now have the choice of cutting either the shoulders or cheeks of the tenon first. I prefer to cut the shoulders first using a high-quality dozuki saw, a tool intended, in fact named, for this task because an error here is irreparable. Nothing beats a good dozuki saw for this job. But it really makes no difference which you cut first so long as you stop each shoulder cut before severing fibers in the finished tenon.
Your humble servant recommends using a high-quality, very sharp, fine-toothed rip saw such as a hozohiki saw or tenon saw to cut the cheeks.
Some woodworking gurus/scribblers and BoobTube Geniuses insist that one must cut short of the layout line, leaving the the tenon short and fat, and pare to final dimensions using a chisel, or even a plane blade. This is pure, time-wasting, Mickey Mouse codswallop. Anyone who calls themself skilled in woodworking with handtools must be able to saw cleanly and precisely right to the layout line so that paring is only rarely necessary. If you can’t yet do this already, I strongly urge you to practice this bedrock-basic skill until you can. The article at this LINK may be helpful.
That said, I do sometimes use a 90˚ wooden jig, similar to a large, thick square, to save time when cutting deep shoulders. Perhaps we can discuss such aids in a future article.
Conclusions
I hope this article has been helpful in increasing Gentle Reader’s understanding of the usefulness of Reference Surfaces, and how to plan, mark, make and use them.
I have tried to condense a tremendous amount of information into this post, not just about Reference Surfaces and using them for layout, but about the immutable laws of error accumulation, dimensioning material, edge shooting, workbench tops as jigs, layout marks, orienting materials in a project based on appearance goals, and even simian sporting events (ツ).
I apologize, however, for the somewhat jumbled presentation.
I also apologize for the lack of photographs and illustrations, but your humble servant has many pressures on his time, and most of this article was written during a long flight between London and Tokyo on an empty airplane. It was so empty I was unable to resist the temptation to lay down across the center row of seats and saw some wood. Don’t worry, I cleaned up the sawdust (ツ)。
In future articles in this series we will discuss more tools and techniques for laying out and cutting basic woodworking joints. In the meantime, please remember that Practice Makes the Master.
YMHOS
Practice makes the master
If you have questions or would like to learn more about our tools, please click the “Pricelist” link here or at the top of the page and use the “Contact Us” form located immediately below.
Please share your insights and comments with everyone in the form located further below labeled “Leave a Reply.” We aren’t evil Google, fascist facebook, or thuggish Twitter and so won’t sell, share, or profitably “misplace” your information. If I lie may all my all my layout tools lay down on the job.
“Make sure that you always have the right tools for the job. It’s no use trying to eat a steak with a teaspoon and a straw.”
Anthony T. Hincks
There are many varieties of marking knives used for woodworking around the world. In this article your humble servant would like to discuss the Japanese version.
Let’s will begin with some definitions, followed by an explanation of the design details and structure of the tool.
We’ll save the best for last by presenting two subtle but effective professional modifications to improve the tool’s performance and possibly even the quality of the results produced Beloved Customer might deign to employ.
Definitions
The Japanese marking knife is called a “shiragaki” or sometimes “shirabiki” in the Japanese language. Don’t bother looking it up in a dictionary, though. The characters used vary, but can translate directly to “white pull” (白引き), which makes some sense, or “white persimmon” (白柿), which makes little sense, so I suppose the persimmon character is used as a phonetic substitute for “kaki” (書き) which means to write. I choose to write the word as 白書 so the Kanji translate directly to “white writing.” That makes more sense to me.
Such confusing substitutions are all too common in the Japanese language in the case of words with purely phonetic origins. The fact is that, much like psychologists, lawyers, and priests, the Japanese people almost perversely enjoy confusing terminology. It’s an ancient habit that probably won’t change soon. I say this as someone that has been reading, writing and speaking the Japanese language at graduate school level for 45 years, been a resident of, attended school and worked in Japan for 30+ years, and been married to a Japanese woman and had Japanese relatives for 44 years. I can get into serious trouble in the Japanese language.
Now that we are done with the Japanese language lesson, I will simply call this tool a “marking knife.”
Purpose of the Marking Knife
Precise and speedy layout is an essential aspect of executing quality woodworking. “Layout” in this case refers to the task of making lines in the material being worked, whether it be wood, steel, glass, stone, concrete, asphalt or even dirt, indicating where items such as walls or foundations are to be constructed, cuts are to be made, and joints between components are to be aligned. It often, but not always, involves transferring dimensions and intersections of lines shown in drawings, or existing in the craftsman’s head, to the material to be worked. The quality of the final product depends heavily on the quality of the craftsman’s efforts in layout, which is why the job of layout was historically assigned to the most experienced craftsmen worldwide.
In Japanese this process is called “sumitsuke” 墨付け, which translates to “marking with ink,” a term more easily understood than “layout” IMHO. The term springs no doubt from the Asian tradition of using black/red ink and inklines to mark layout. This article will focus on the marking knife used in laying-out joints in wood.
The Japanese marking knife is a bladed tool made of iron and steel used to cut thin, precise layout lines in a board’s surface, most often but not always at a 90 ° angle to the direction of the wood grain.
Every woodworking tradition I am aware of includes the marking knife, and regardless of their preferred style, anyone serious about woodworking will own at least one, and know how to use it.
Advantages of the Marking Knife
The marking knife has distinct advantages over other methods of marking a line more-or-less perpendicular to the direction of the wood grain. Here are a few:
The line it makes can be as thin as the edge of nothing, achieving precision unapproachable by pencils, pens, scribes, sumisashi, inklines, chalklines, laser-sights, or even wishful thinking for layout in wood in the case of lines at more-or-less 90˚ to the direction of the grain. The line it makes, however, is not as easy to see as an ink or even pencil line, so it is not always useful for rough layout work;
The layout line cut by a marking knife penetrates the wood’s surface providing a physical place into which the woodworker can index the edge of his chisel, or nicker of his plow plane or rabbet plane, or the teeth of his saw, or points of his divider quickly, precisely and confidently without relying heavily on Mark-1 Eyeball, improving the efficiency and quality of both his layout and fabrication efforts. The resulting time savings, improvement in accuracy, and reduced eye strain this indexing effect provides are absolutely huge.
When making layout lines perpendicular to the grain of the wood on the faces of a member, such as a table apron, for instance, after making one line on the reference face, the remaining three lines can be indexed and extended from each other with a marking knife, confirming the accuracy of the member’s dimensions and ensuring the tenon shoulders will be sawed accurately creating an excellent tenon, assuming the craftsman knows how to use a saw properly, of course. This is a subtle but powerful technique.
The line cut by a marking knife severs the fibers near the board’s surface helping to prevent fibers from being torn out of the board by the blades of saws, chisels or the even router bits leaving ragged, chipped edges.
Are you convinced yet?
Design & Materials
Shirabiki face by Konobu (Swedish Steel)Shirabiki Ura by Konobu
There are many styles of marking knives used around the world, and your humble servant has tried most of them at one time or another, but none that I am aware of are as simple as, or functionally superior to, the Japanese version.
Lacking a pretty, turned handle and looking more like a blackened steel popsicle stick than a precision tool, the Japanese marking knife appears unfinished, even barbaric. But despite its stark appearance, it has a sophisticated design that employs superior metallurgical and blacksmithing techniques.
Like many Japanese woodworking tools, the professional-grade marking knife is made with a layer of hard high-carbon steel forming the cutting edge which is forge-welded to a softer layer of low-carbon steel comprising the body of the tool.
They are almost always flat, generally thin, and not especially wide tools. Perhaps 1/2 the length of one side is ground flat and bright. This surface is called the “ura.” A hollow-ground depression called the “uratsuki” is ground into the ura. The opposite side is plain and includes the cutting edge’s bevel.
Some marking knives, such as the photo at the top of this article, have a spear point or “kensaki” (剣先)meaning “sword point” which is convenient because the same knife can be used either left-handed or right-handed. It’s a logical and attractive feature that some people prefer, but in my experience it has limited usefulness. To each his own.
The demands on the marking knife in terms of sharpness, durability, and edge-holding capability are not as severe as for chisel and plane blades. The better-quality ones are hand-forged of high-carbon steel and quality jigane, properly shaped and filed, and carefully heat-treated.
Because of their thinness, marking knives tend to warp badly during heat treat, and consequently demand either a blacksmith with better than average skills or the use of high-alloy steels that warp little. Even experienced blacksmiths end up with a few rejects due to cracking and excess warpage, which perhaps explains the relatively high cost of handmade ones. It has mostly been a tool made by specialist blacksmiths, which is the case for those carried by C&S Tools.
For this reason, and because the performance demands on the cutting edge are not severe, Blue Label steel is entirely acceptable IMO. But ours are hand-forged from White Label Steel No.1.
The Ura
I mentioned the “ura” above, but let’s examine it a bit more. Ura is a Japanese word written using the Chinese character 浦. It means a bay or inlet from a lake or ocean, usually without rocks, and often with a sandy or gravelly shore. This word also means “depression,” as in a low area in a field, not the feeling your humble servant experiences when he sees his head in the mirror in the morning and remembers his once energetic head of hair in an afro do (ツ)。You can imagine why this word was employed to describe the hollow-ground depression in many Japanese woodworking blades.
In North America, similar curved surfaces and depressions were once said to be “swamped” even though they were made in metal. This term is obsolete nowadays.
The ura is what makes the Japanese marking knife superior to its Western counterparts for two reasons. The first reason is that the ura makes it easier to keep the hard layer of steel at the reference side of the blade flat, an important feature when using a knife for layout using a steel straightedge or square. Second, the ura makes it much quicker to accurately sharpen the blade and especially the extremely hard layer of high-carbon steel that forms the cutting edge.
Without the ura, the hard steel would be time consuming to sharpen and would tend to become rounded instead of remaining a flat reference face to index against a steel square or straightedge. It’s a subtle and clever design more sophisticated than its simple appearance suggests.
In use, the flat ura side is pressed lightly against the leg of a steel square with the point cutting lightly into the wood and the heel floating above. The blade is then pulled toward the user to cut a straight layout line.
Lubrication
I recommend Beloved Customer use an oilpot to lubricate the marking knife’s blade to reduce friction and wear between the blade and the straightedge or square, as well as friction between the cutting point and the wood. Not only will your square last longer, but your layout lines will be more accurate. Don’t believe me? Give it a try.
Recommended Modifications
Marking knives are simple tools for a simple job, but there are a couple of subtle improvements some advanced Japanese craftsmen, especially joiners, make that Beloved Customer may want to consider.
1. Habiki
This first improvement is intended to minimize one downside of the marking knife, namely its tendency to shave metal from the square or straightedge used to guide it, shortening their useful lifespan and reducing their accuracy.
In Japanese this modification is called ” habiki “ 刃引き which translates directly to “blade pulling, ” as in pulling the blade’s cutting edge over a stone to intentionally dull it. It is a term borrowed from the Japanese sword world.
The steps to accomplish this modification are as follows:
First, sharpen the blade;
Then, with the tool’s ura side facing towards you, stand the blade vertically on the face of a medium grit waterstone, diamond stone, diamond plate or oilstone with its cutting edge resting on the stone. Adjust the position of the cutting edge on the stone so the last 2~3 millimeters of the blade, measured from the tip, hang off the stone’s side so the tip does not contact the stone;
Finally, drag the blade towards you creating a flat on the cutting edge, while leaving 2~3mm of the blade’s tip sharp. A single light stroke will usually suffice. Voila.
The dulled portion of the cutting edge will now be less likely to shave your square or straightedge, while the sharp tip will cut the wood and make a pretty, accurate layout line, assuming you do your job, of course.
I know that the idea of sharpening a good blade and then intentionally dulling part of the cutting edge sounds gaga. In fact, when Honda-san showed it to me, I thought the old guy was pulling my leg, even though he didn’t ask for a nickle (ツ) or pass wind. But Honda-san was a nationally-recognized master among masters, a man in his 80’s who had been making extremely high-end custom joinery since he was 17 years old, one who took his tools extremely seriously, so although I was skeptical I wisely gave him the benefit of the doubt. In addition, he let me try his knife so I was quickly convinced.
Honda-san’s habiki technique works, so gather up your courage and give it a try before allowing your inner-troll to embarrass you. I promise you’ll like the results and your square will thank you.
2. Tip Bevel
The second modification is also one Honda-san taught me. There are several ways of doing it, but the essence is to grind an angled flat 15~18mm long on the top edge of the blade’s side angled away from the ura, ending at the cutting edge’s point. The goal is to create a sharp “clipped” point at the meeting point of three surfaces or planes.
This angled flat has three purposes: First, it removes metal that would otherwise get in the way of your clearly seeing the knife’s cutting tip. This is important because often a marking knife must be indexed off a tiny mark left by a divider’s leg or a previous layout line, for instance when marking the shoulders of a tenon on four sides of a stick of wood. Removing this unnecessary metal will make it easier to both see and index the knife’s point, and begin the layout mark exactly where it is needed. The positive impact of this small modification on accuracy and speed cannot be overstated.
The second purpose is to reduce the friction between blade and wood when cutting a layout line, thereby improving control, like racing tires on a fast car.
And third, it provides a convenient place to rest your fingertip to better control the knife.
If you imagine this modification can’t make much of a difference, then your lack of experience is showing. How embarrassing >~(ツ)~<
Squares to Use With Marking Knives
Some prefer to use a wooden square for layout work, and others brass squares. Both work just fine with a marking knife until they don’t. A steel square is a big improvement over these two options, but Gentle Reader would be wise to consider using a hardened steel square, or better yet, a precision hardened stainless steel square with your Japanese marking knife. Anyone with eyes who has used a steel marking knife for layout for a period of time has observed that their layout square tends to become worn and lose precision with use as the marking knife gradually shaves metal from the square’s blade changing its shape. A hardened steel square will simply resist this wear longer. And a stainless steel square will resist rust from salty sweat better than plain steel.
There are hardened carbon steel and hardened stainless steel combination squares and die maker squares available on the market, but I think they are too bulky, clumsy and too costly for making simple 90° layout lines on wood, especially for furniture and joinery work.
Matsui Precision produces a series of excellent hardened stainless steel squares that are popular in Japan and which we carry. They are well worth the cost. I have been using them for years. Send me a note if you are interested.
The Japanese marking knife is a great tool. Once you use one, especially after making the modifications described herein, your confidence in your layout efforts as well as the precision of your joints will increase. Indeed, I daresay you will wonder how you ever got decent layout work done without one.
You can see the marking knife we carry at the link below.
My old marking knife was hard on my eyes and fingers, but now I know how to fix it!
If you have questions or would like to learn more about our tools, please click the “Pricelist” link here or at the top of the page and use the “Contact Us” form located immediately below.
Please share your insights and comments with everyone in the form located further below labeled “Leave a Reply.” We aren’t evil Google or fascist facebook and so won’t sell, share, or profitably “misplace” your information. May my square warp and wiggle if I lie.
Remember me when I am gone away, Gone far away into the silent land; When you can no more hold me by the hand, Nor I half turn to go yet turning stay …
Christina Rossetti
The tool pictured above is a very old “split-tail” variety of “sumitsubo” inkpot.
Versions of this tool are used in many trades worldwide to mark a straight layout line on material being worked. In the West, the line is coated in chalk to produce a “chalkline” when snapped, but in Japan a silk line wound on the spool near the tail of the tool is soaked in ink as it passes through the “pond” near the pointy front of the tool to produce the same sort of layout line when snapped.
This particular tool is unusual not only because it is one of the best-preserved examples of Japanese sumitsubo in existence, but also because it was discovered during restoration work on the 27m tall Nandaimon gate of Todaiji temple in Nara Japan in 1879. Since its discovery it has become famous as the so-called “Forgotten Sumitsubo.”
The reason for the unusual name, indeed the very reason it has survived in such a good state of preservation, is that Todaiji Temple’s Nandaimon gatehouse where this sumitsubo was found perched peacefully on top of a beam high in the structure that was built in the year 1199, so it is likely this sumitsubo had remained there undisturbed for around 680 years, a long time for a wooden tool.
Was it really forgotten? I like to think some carpenter left it there on purpose to look after his work. But that’s just me…
Front elevation of the Nandaimon gate of Todaiji temple, Nara, Japan. The deer of Nara are like pigeons. The stall to the left is selling “deer crackers” for tourists to feed them.The eaves of Nandaimon GateLooking up into the structure of Todaiji’s Nandaimon Gatehouse
Cross-section sketch of Todaiji’s Nadaimon Gate
So, if you ever misplace a tool at a jobsite, instead of fretting about it, just imagine that someone, someday, will find it hidden inside the building 700 years later and reverently put it in a museum. Certainly more romantic than any other more likely option. (ツ)
YMHOS
The two guardian kings that reside in Nandaimon Gate. Notice the gangsta hand signs. Over 3 meters tall, these supernatural warriors make the fiercest gangsters look like quivering little pussies.
If you have questions or would like to learn more about our tools, please click the “Pricelist” link here or at the top of the page and use the “Contact Us” form located immediately below.
Please share your insights and comments with everyone in the form located further below labeled “Leave a Reply.” We aren’t evil Google, fascist facebook, or thuggish Twitter and so won’t sell, share, or profitably “misplace” your information. If I lie may the two guardian kings above refuse to let me shower alone.
If your wife’s having a good time and you’re not, you’re still having a better time than if you’re having a good time and she’s not.
Red Green
The sumitsubo is a Japanese marking and layout tool similar in function to the Western chalk line. Although few Gentle Readers in Western countries have experience using this tool, it has much to recommend it.
In this post we will briefly examine this tool so prevalent in Asia. Our focus however, will be on the traditional wooden versions, not the modern plastic one, a version of less beauty but perhaps greater utility.
The Japanese word “Sumitsubo” is written using the Chinese characters 墨壷 which directly translates to “ink pot.” It’s pronounced “sue/me/tsu/bow.”
The inkpot has been a common tool in many Asian countries since ancient times. Indeed, until recently, few craftsmen in Asia had even heard of the dusty chalkbox used in the West.
This is just conjecture by your humble servant, but the fact that nearly all writing and much artwork in many Asian countries during recorded history relied heavily on brushes and sumi ink, the black carbon reside of burnt pine sap, may be the reason the inkpot became the standard tool for marking straight (and sometimes intentionally curved) lines.
Using the Sumitsubo
The sumitsubo works on various surfaces including wood, stone, concrete, gypsum board, and other construction materials. It is not unique to Japan, but is found in one form or another throughout Asia. It is an essential tool for carpenters.
A thin line spooled around a reel attached to the sumitsubo passes through holes at each end of a “pond” or inkwell filled with absorbent silk or cotton waste soaked with ink. As the line is let out, and with encouraging pressure applied by the user, it soaks up ink from the inkwell.
Wooden “karuko” bobs.
In Japan, a wooden bob called a “karuko” with a sharpened steel pin is attached at the line’s far end. The workman pushes this pin into the surface of the wood being marked to secure the end of the line in place for marking.
To use the sumitsubo, the workman stretches the damp inkline over the surface of the object to be marked, secures it in the desired position at the far end using a pin, weight, or helper, reels out and stretches the line, picks up the line with his fingers and releases it snapping an inkline. There are other more subtle actions that the user must perform at the same time, but this is the essence.
Depending on the user’s skill and the available line, a perfectly straight line can be marked on a flat, level surface to many meters in length.
The ink line has several undeniable advantages over the Western chalk line. First, the line it leaves is narrower and less “ fuzzy,” sufficient for fairly accurate carpentry work, much more precise than the typical chalk line.
Second, it is not as easily rubbed off or blown away as chalk.
Third, while inks of various colors can be used, black is most common and contrasts nicely with most building materials, but red is another traditional color. Nowadays, ink can be purchased in a rainbow of colors, some in permanent ink and even some that glow-in-the-dark.
The standard variety of ink used with sumitsubo is not entirely waterproof and if applied to a non-absorbent material like stone or steel, will not endure a rainstorm well. There are waterproof inks available, however, and of course the standard trick of using a spray can of clear lacquer to seal the snapline works as well with ink lines as it does with chalk lines.
History and Design
As your humble servant has mentioned in previous articles, the marketplace development that makes it possible to purchase completed woodworking tools is fairly recent. In previous centuries and millennia, when material costs were high, transportation of goods was difficult, and labor costs were low, craftsmen would commission a blacksmith to make the metal components of their tools while would make the wooden components themselves. In Japan at least, the sumitsubo too was made by the individual craftsman and became an opportunity to display both his skills and imagination, yielding unique, beautiful, and sometimes even bizarre tools.
There is neither adequate time nor space in this insignificant little blog to go into the evolution of sumitsubo design in any detail, much less the design variations, but the Takenaka Tool Museum’s website has pictures of representative examples.
An old “Ichimonji” style sumitsubo. These squarish sumitsubo have their own charm, but are not as functional or convenient as later designs.This antique sumitsubo shows the design evolution of the tool with the narrow tail, which is easily held, the large reel which not only holds more line but helps the line dry retarding fungal growth, the wide and shallow pond, and the ceramic ferrule for the line. The owner used this tool exclusively for red ink. This sample does not have a crank for working the reel, typical of Western Japan.A fancier craftsman-made version of the sumitsubo above, with a smaller pond, a hand crank, and a more elegant wave motif
The style used for the last 200 hundred years or so is shown at the top of this post, and in the photo below. The major improvements include a larger ink pond with a grinning mouth designed to both hold more ink work better with the bamboo sumisashi inkpen used for layout, a larger, more exposed reel to hold more line, making it quicker to reel in, and providing better ventilation to reduce mildew, and a narrower, easier to grip tail containing the reel greatly improving functionality while reducing fumbling and drop damage.
Appearance aside, the genius of this design does not become apparent until you’ve used several types in the field in side-by-side comparisons, but I assure you the intelligence on display in the design of this chunk of carved wood and silk string makes Bill Gates look like a wealthy hot dog vendor.
A typical sumitsubo nowadays with crane and turtle facing each other across the ink pond, no doubt talking about sports scores. Zelkova wood
The carving seen in sumitsubo has meanings, of course, which varied with the craftsman and popular whim. The most popular style nowadays has a turtle and a crane facing each other across the ink pond. In Japanese mythology, both are considered lucky, with the crane said to live 1,000 years and the turtle 10,000 years. The turtle normally has a hair skirt flowing behind.
A very artistic craftsman-made sumitsubo with a peony blossom and Chinese lion holding court at each end of the ink pond, and a lotus leaf reel. These three symbols hark back to a famous Japanese Noh play titled “Shakkyou.” The lion in mythology is the king of beasts. It drives away demons and evil forces and protects against disease. The peony is the king of flowers. The lotus is a thing of grace and beauty that lives in, yet floats above the dirty mortal world, and with its roots purifies it. A potent symbol in Buddhism as well. However carved this sumitsubo was well-educated. It has never been used, but several cracks reveal its fragility, and the size of the lion on his precarious perch would limit its practicality in the field. Bottom view. Notice the opening below the reel to intended to promote air circulationA side view of the Chinese lion, facing away from Gentle Reader. No offense intended, of course, but dignity must be maintained.A professionally-carved sumitsubo by Kimura Isaburo showing lotsu leaves surrounding the ink pond with a tiny frog poised on the rim of the pond. “Jump little guy!”A closeup of the lotus ink-pond’s froggy.Another sumitsubo carved by by Kimura Isaburo. This one too has a tiny frog on the rim of the ink pond, but instead of reposing, he is preparing to jump to escape the snake on the opposite edge. The body of the snake wraps around the wheel and tail of the tool.
Dragons are another mythological motif seen in sumitsubo, being a fierce but noble and benevolent creature in Japanese tradition
The reel end of the sumitsubo typically incorporates water or wave details, perhaps related to the ancient Japanese motif of wagon wheels in flowing water.
The last sumitsubo maker in Niigata Prefecture was Mr. Tamaki (RIP). Those Gentle Readers who have visited Kezuroukai competitions in Japan may have seen him doing exhibitions. Here is a link to a video of him making sawdust.
Here is a link to a video of a huge (2.3 shaku = 700mm = 27.4″) sumitsubo by a famous Niigata craftsman named Ichimonji Masakane. The size brings the carving details into focus. This is of course not a practical tool, but was created for decorative purposes. Once, every major tool store had a similar sumitsubo on display. If you visit Suiheiya in Tokyo you can see similar examples.
The sumitsubo is a tool Western woodworkers could benefit from when making straight layout lines because it’s not only cheaper, more convenient and more reliable than a long steel or wooden straightedge, it produces a finer, easier to see, and more indelible mark than a chalkbox can.
The sumitsubo was once said to be the symbol of the master carpenter, the craftsman that created the design and performed layout of major aspects of a construction project. Even today, older carpenters prefer the wooden sumitsubo and insist that it does a better job. I suppose every generation in human history had similar attachments to older ways and older tools. But I won’t dismiss it as retro obsession because even your humble servant has a hand-carved Zelkova wood sumitsubo mounted under the lid of my toolbox.
Does that make me an old fart?
A drachma for your thoughts.
YMHOS
A traditional wooden crane and turtle sumitsubo at work.
If you have questions or would like to learn more about our tools, please click the see the “Pricelist” link here or at the top of the page and use the “Contact Us” form located immediately below.
Please share your insights and comments with everyone in the form located further below labeled “Leave a Reply.” We aren’t evil Google, fascist facebook, or thuggish Twitter and so won’t sell, share, or profitably “misplace” your information. If I lie may a fortuitous crane do a damp doodoo on my head.
Matsui Precision Bevel-edged Straightedge with notch
You cannot teach a crab to walk straight.
Aristophanes
This post is about a tool that looks quite ordinary but is in fact extraordinary in subtle ways.
Why Do Woodworkers Need a Good Straightedge?
When woodworking we need to be able to mark and measure straight lines and examine the precision of edges and surfaces. There are several ways and tools available to accomplish these tasks, but the steel straightedge is efficient and the quickest tool in the case of shorter distances, assuming one’s straightedge is up to the job.
For most woodworking tasks we don’t need a precision straightedge. But for those few activities where it is necessary, nothing can take its place. So what are some of those activities? I can suggest a few from my experience:
I use a precision straightedge as a “Standard” to check that my working straightedges and squares (the ones that are used and abused daily) are truly straight and square. This is necessary because, during use, Murphy governs all operations, while pernicious Iron Pixies dance among the piles of dandruff on his shoulders. Due to their malicious ministrations, measuring and marking tools are easily damaged, wear-out, and lose tolerance so I need a reliable “Standard” to check them against regularly. Of course, you can’t check for straight or square unless you have a truly straight line/surface to index from. It would be silly to imagine that the edge of one’s tablesaw top or jointer table are perfectly straight without first checking it against a reliable standard;
I use a precision straightedge to examine the soles of my handplanes to help me keep them straight, flat and free of wind because it’s very difficult to plane a flat surface with a screwy plane. No matter how much time I invest in truing my planes, I’ve found the results are never better than the straightedge I use.
Check that lapping plates and the float-glass plate I use for truing stones and plane soles remain within tolerances. Yes, they wear out too.
Check that the tables of stationary equipment such as tablesaws, bandsaws, jointers, and planers are true, and that infeed/outfeed soles of handheld electrical planers are properly aligned;
Check that surfaces of wooden components of special projects requiring extra precision are true.
Do you ever need to accomplish any of these tasks?
Tasks for Which the Matsui Precision Straightedge is Not Ideally Suited
The Matsui Precision Straightedge is not an expensive tool, but since it is one I rely on, it is most cost-effective to protect it from premature wear and damage, so the following are tasks for which I use a less-expensive and less-protected “working straightedge” instead of my Matsui precision straightedge:
I don’t use it for checking sharpening stones. The Matsui straightedge can do this job with style, but after a few years of being pressed against (and dragged over) abrasive stones, the tool’s precision would be degraded. Better to use a less-expensive straightedge for this job, and check it occasionally against the Matsui Precision Straightedge to confirm it’s still straight. If it isn’t, fix or replace it.
I don’t use it for daily general woodworking tasks. Once again, the Matsui straightedge can do general jobs with style, but after a few years of being pressed against (and dragged over) wooden surfaces, the tool’s precision would become degraded prematurely. Instead I use a “working straightedge” that has been checked against my “Standard” Matsui Precision straightedge;
How To Use a Precision Straightedge for Checking Tools and Surfaces
Neither the human hand nor eye can measure a straight line or a true plane with any precision unaided, but there is one technique older than the pyramids all woodworkers must be proficient at, namely to place a truly straight, simple straightedge on-edge on a surface to be checked, be it a board, a jointer outfeed table, or the sole of a plane, and shine a light source at the gap between the straightedge and the surface being examined. If gaps exist, light will pass between the edge of the thin straightedge and the surface being checked confirming the surface is not straight and/or flat. The human eye can detect even a small amount of light this way and both quickly and effectively judge how flat the surface being checked is with a surprising degree of accuracy.
Feeler Gauge
Another technique that yields more precise values without relying on Mark1 Eyeball is to place the straightedge’s beveled edge against the surface to be checked, and insert feeler gauges into gaps between the straightedge and the surface. If the feeler gauge selected won’t fit, then one replaces it with thinner gauges until one that just fits is found.
Once you know the value of the gap between your straightedge and the area of the board you need to true, for instance, you can divide the measured thickness of the shaving your planes takes in a single pass (easily checked with a caliper) to calculate how many passes it will take to true the high-spots on a board, thereby eliminating a lot of the guesswork that makes precise woodworking difficult at times.
To reliably perform these checks, we need a truly straight straightedge. Straight is a relative thing, but straightedges sold for woodworking are seldom straight because purveyors rely on purchasers to not bother, or even know how, to check the quality and precision of the straightedges they sell.
Another reason honest, precision straightedges are relatively rare among woodworking tool collections is that making a high-tolerance piece of hardened steel that is straight, and will stay that way, is hard work that most woodworkers are neither inclined to appreciate nor bother to check, much less pay for. Is ignorance bliss? I believe it is in the exalted natures of our Gentle Readers to always strive to improve the quality and efficiency of their work. A high-quality precision straightedge is an essential tool in undertaking that blissful quest.
Challenges & Solutions
The dilemma of the straightedge is that it must be thick and rigid enough to prevent warping and flopping around in-use, but reasonably lightweight and not too bulky, otherwise it will be clumsy. At the same time, it must not be so thick as to block out most of the light passing between its edge and work-piece making it useless.
Another challenge the straightedge faces is the constant threat of damage. If the delicate edge is too soft, it will become dinged and deformed instantly becoming inaccurate. And if the straightedge rusts (the bane of all steel), precision will suffer.
What are the viable solutions? They are obvious and proven, but seldom implemented well. Here is how Matsui Precision does it.
1. Stainless Steel Construction
First, they use high-quality stainless steel to prevent corrosion. If you work in humid conditions or if you will admit to perspiring salt-laden moisture at times, then this is important, but not rare.
2. Properly-sized, Precision-ground & Polished
This straightedge is not an insignificant piece of stainless steel. It is available in various lengths, but in the case of the Matsui’s 400mm straightedge (a handy, reasonably-priced length), the blade is 34mm wide and 3mm thick, enough to keep the blade rigid in use and prevent warping, but not so wide or thick as to feel heavy or clumsy. It weighs 320gm (11 ounces), a nice, and unusual, balance of rigidity and weight.
In many countries, thick and heavy are viewed as hallmarks of quality. The Japanese people of course, value quality highly, but where they differ is a strong dislike of needlessly heavy, clunky tools, seeing the extra weight and bulk as signs of inefficient design and careless manufacturing. Their love of slim, compact lightweight tools made efficiently from quality materials permeates Japanese sensibilities.
What is more rare is the fact that Matsui then precision-grinds and precision polishes the stainless steel (not the same thing) so the tool is as straight and flat as machinists require, because this is a tool designed to the higher standards of machinists, not just woodworkers, who are by default typically consigned second-rate tools falsely misrepresented as being “high-precision.”
Hardened & Trued
Matsui also hardens the stainless steel to ensure the tool is rigid and will resist wear and damage over its long useful lifespan.
During heat treating and grinding metal warps slightly. After stress-relieving, Matsui inspects each tool one-by-one and corrects irregularities or rejects those that cannot be sufficiently corrected. It’s called quality control, something that never happens in China, India, Vietnam, or Cambodia.
Beveled Edge
To make it easy to see light passing between the straightedge and surface being checked, one edge is beveled. The importance of this detail cannot be overstated.
The Notch
The Matsui Precision Straightedge being used to check the sole of a 70mm finish handplane with a blade by Sekikawa-san. The notch fits over the cutting edge so one can check the sole with the blade protruding as it will be in-use. In this photo the blade has been extended waaay too far out of the mouth to make it easy to see the cutting edge. Please notice the light showing between the straightedge and the sole indicating that something is not right. The wedging pressure of forcing the blade to project this ridiculous amount has warped the block so that the most important part of the sole, the area directly in front of the mouth, is not touching. The point is that the notch makes it possible to check the sole with the blade projecting the intended distance, a job simply not possible with an ordinary straightedge.
In the case of the tool we are introducing here, Matsui cuts a small semi-circular notch in the beveled edge of the blade to provide clearance for irregularities in the surface being checked, such as welds, or in the case of woodworking tools, the cutting edges of the blades of handplanes, electrical planers and electrical jointers. This is an important and unique feature.
Why is this notch so useful? The problem with using a metal straightedge to check/true the sole of a handplane has always been that, in order to correctly check for flatness/wind, the blade must be set to project from the plane’s mouth the same amount it will when the plane is being used, because in the case of Japanese planes the wedge-shaped blade applies slightly different pressures on the wooden block at different depths in the block, producing variable degrees of deflection.
But if the blade is projecting from the mouth the same amount it will when in use, then the straightedge will ride on top of the cutting edge preventing a proper examination, and at the same time, will possibly dull the blade and gouge the straightedge. The solution has always been to adjust the blade to not actually project, but to be just in-line with the sole, a fiddly process that has resulted in many dulled blades, scratched straightedges, and inaccurate examinations. Don’t ask me how I know this (シ)
With the elegant Matsui Precision straightedge, however, the notch fits directly over the projecting blade avoiding the irritating and time-wasting fiddling normally required to get the blade in the exact position, one that often yields an imperfect reading.
If you need to maintain handplanes, electrical woodworking tools, or do precision woodworking and need an accurate, reliable, lightweight, durable, reasonably-priced straightedge to help take the guesswork out of these jobs, this product is just what you need. I have been using one for years and couldn’t get by without it.
If you are interested, send us a message using the form below.
YMHOS
Links to Articles About Other Matsui Precision Tools:
If you have questions or would like to learn more about our tools, please click the “Pricelist” link here or at the top of the page and use the “Contact Us” form located immediately below.
Please share your insights and comments with everyone by using the form located further below labeled “Leave a Reply.” We aren’t evil Google, fascist facebook, or thuggish Twitter and so won’t sell, share, or profitably “misplace” your information. If I lie may I never be see a straight line again.
150mm hardened stainless steel precision square by Matsui Precision
Maestro Bruno Walter 1876~1962
By concentrating on precision, one arrives at technique, but by concentrating on technique one does not arrive at precision.
Bruno Walter
We would like to introduce some excellent tools made by a company located in the city of Sanjo in Japan’s Niigata Prefecture called Matsui Seimitsu Kogyo. We have been using this company’s products for many years and have started carrying a few by popular demand. The time has come to share these with our Beloved Customers in general.
Matsui Seimitsu Kogyo translates to “Matsui Precision Industries,” but your humble servant is just going to call them Matsui Precision. The company has been around for over 100 years. They may not be the largest manufacturer of precision tools in Japan, but their reputation is unsurpassed.
Allow me to digress for a moment while I grind these oak galls to make some ink. Just about out, you see.
Anyway, as you can probably tell from my posts to this blog so far, and which will become even more obvious in the future, I love ancient tools and learning how beautiful work was done by determined people using basic, even crude tools. But I am also fond of excellent refined handtools that help me do a better job more efficiently. I am always on the lookout for such tools, and this post is about one such tool I discovered. One thing I like about this tool is that, while it is essentially unchanged from the days when Noah was knee-high to a grasshopper, in typical Japanese fashion, Matsui Precision has subtly improved the ancient square in ways that are not immediately obvious. For one thing, it really is a “Precision Tool,” one formally certified compliant with Japan’s Industrial standards (JIS), even though you wouldn’t think so just by looking at it.
The idea of using “precision tools” for woodworking is offensive to some. I have seen online discussions about using precision tools for woodworking induce psychotic events in some amateur woodworkers. Perhaps the very thought of such tools triggers hallucinations of digital micrometers swooping through their dreams while pissing down on the eternal beauty flowing from their masterful hands. Or perhaps they imagine the smelly poor-quality Chinese-made tools they buy in bundles from Harbor Freight to be more expressive of their artistic intentions than the cold precision tools of the sort less artistic machinists use. To the former I say “Don’t drink alcohol with your medications.” To the latter I exhort: “Extract thy head from thy nether regions and behold the light of civilization!”
Anyway, that’s enough free psychoanalysis. Let’s get back to Matsui Precision Squares.
They have six distinct advantages over almost any other simple square you will find:
Precision: Unlike any square ordinarily available to woodworkers, these are manufactured and certified in accordance with Japan Industrial Standards (JIS). The relevant standard is JIS B7516 (2005). The hardened steel model (SY Series) is rated Grade 1, and the graduated model SM Series) is rated Grade 2. Accordingly, these squares precisely measure 90°. Why should you care about a certification? Take it from me, a guy that regularly does quality inspections of not only manufacturer’s products but of their factories and workshops, both in Japan and abroad, as part of his day job: It means something for a manufacturer to have a nationwide standard to meet, especially in a quality-conscious country like Japan. Of all the handtools you own, which ones are compliant with any recognized, independent standard? The MP square will pass JIS Standards. We guarantee it.
Lightweight and Handy: You will not find a precision square slimmer, lighter in weight or handier anywhere. The blade (long leg) and stock (short leg) are relatively thin, light in weight, and handy to use, unlike machinist’s squares, diemaker squares, and combination squares with their thick, heavy, clumsy, flat stocks and blades which make it difficult to see light showing between them and the workpiece. The Matsui blade is relatively thin making the square easy to use for woodworking.
Durable: The stock and blade of both SY and SM series tools are joined by through spot welds, unlike all but the most expensive machinists squares; Not a compression joint, not glued, not bolted, not pinned. They are not indestructible, of course, but the stock or blade will bend or melt before this connection fails.
Corrosion-Resistant: both blade and stock are stainless steel so they won’t rust even if used and stored in constantly humid conditions, even if you have sweaty hands. Remember, rust makes surfaces rough and ruins tolerances.
Hardened: This feature is most important in my opinion. The blade and stock of the SY series squares are hardened, a very unusual feature. For the woodworker, this means that the blade will better endure the scraping and shaving action of steel scribes and heat-treated marking knives used in layout, and will stay straighter much longer than all but the most expensive machinist’s and diemaker’s squares.
Relief Cut: The stock has a small half-circle notch cut into where it meets the blade to prevent wood shavings etc. from jamming between the blade and/or stock preventing them from making clean contact with the workpiece ruining accuracy, an important detail indeed.
In short, the Matsui Precision square will help you do better woodworking, easier, and for many more years.
We carry two models of Matsui Precision squares. The first is the SY Series pictured below, with a hardened stainless steel blade but without graduations (millimeter marks). The blade is hardened to Rc54~57 and the stock to Rc49~52. This is the tool we use and recommend for layout using a marking knife.
The SM series is different from the SY Series in three ways, reflected in the lower price. First, the blade is not hardened. Second, it has deeply etched graduations (not laser etching) which are perfect for using with a scribe or marking knife because the tool’s tip can get into the graduation for positive indexing. And third, the level of precision is one level lower at JIS Grade 2. The graduations include a √2 scale useful for determining the diagonal distance of a square by measuring a side.
If you are tired of squares that aren’t square, that are bulky, heavy, and clumsy to use, that are destroyed by a single drop, or that get eaten alive by your marking knife or scribe, then you should give these a try. You’ll never look back.
If you would like to purchase one, please inquire using the form below.
Matsui Precision Hardened Stainless Steel Squares (w/o graduations) Model SY-15
If you have questions or would like to learn more about our tools, please click the “Pricelist” link here or at the top of the page and use the “Contact Us” form located immediately below.
Please share your insights and comments with everyone in the form located further below labeled “Leave a Reply.” We aren’t evil Google, fascist facebook, or a Chinese intern with the DNC and so won’t sell, share, or profitably “misplace” your information. May my square always lie to me if I lie to you.


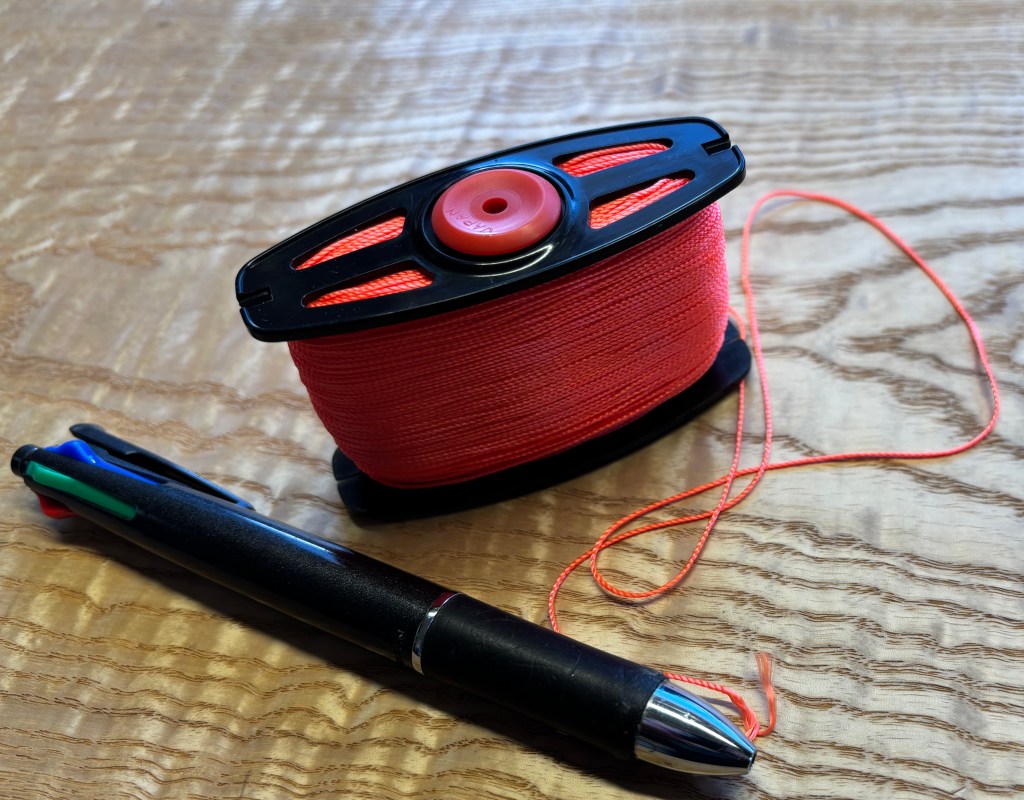
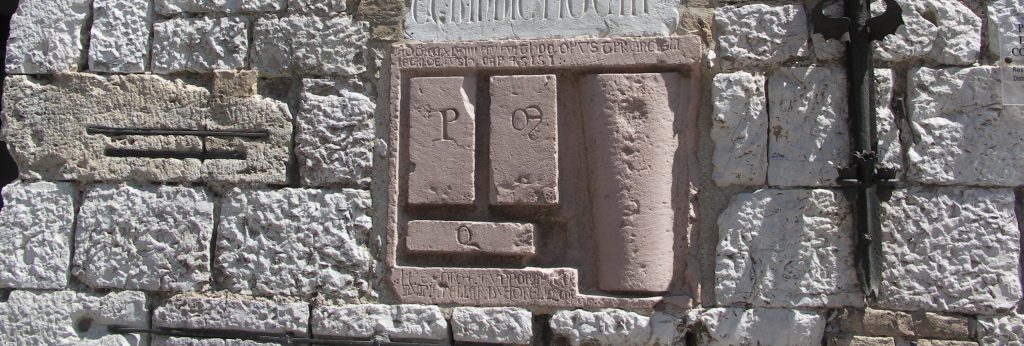


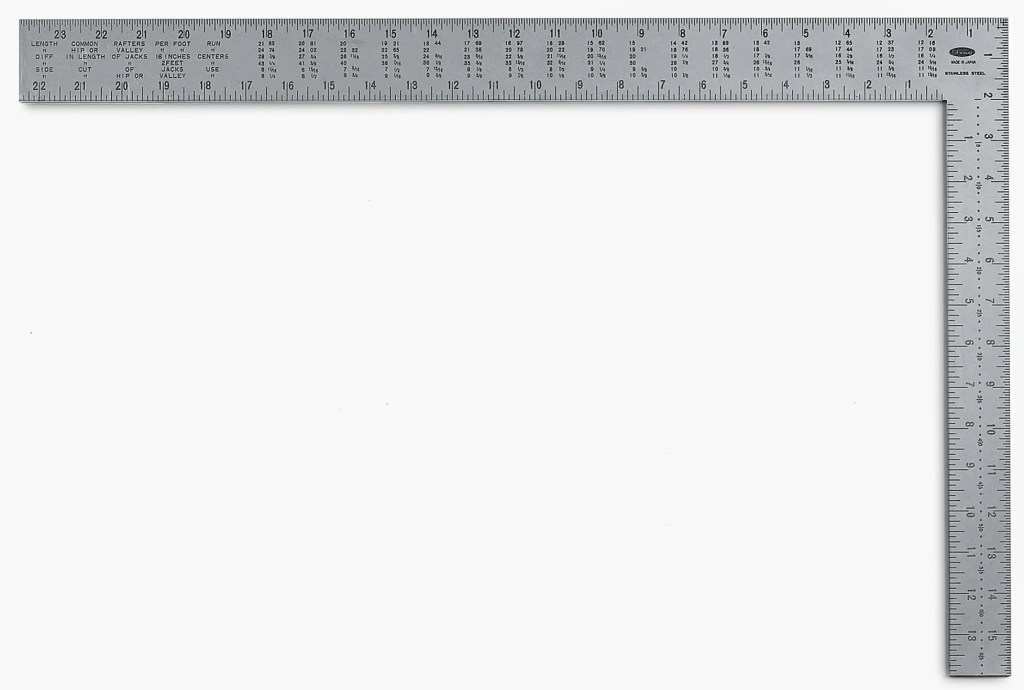
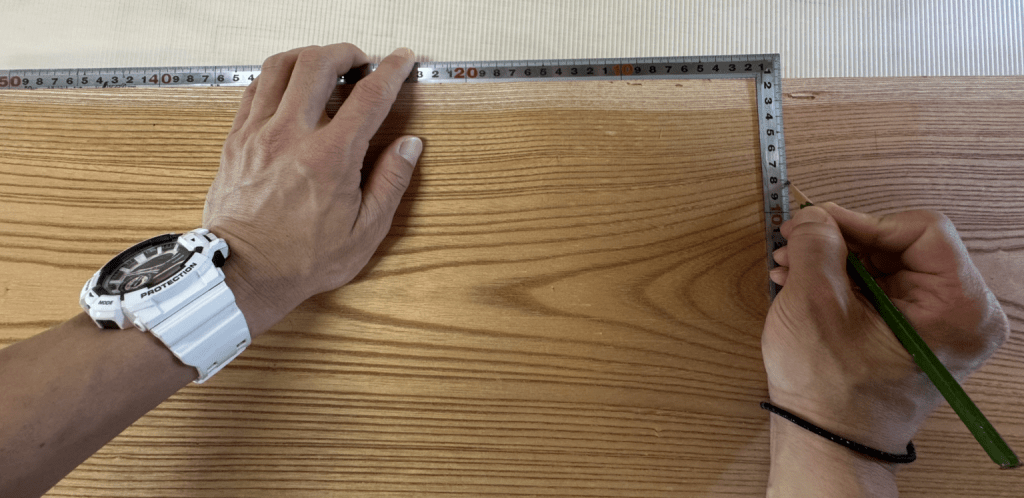

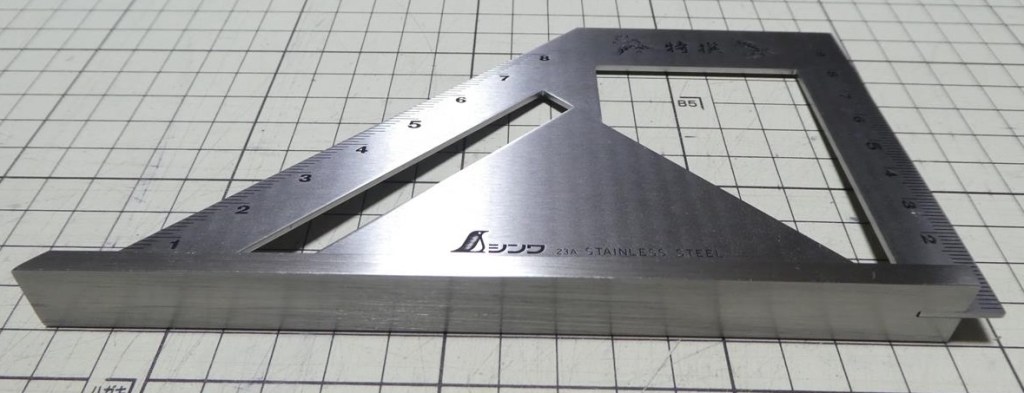


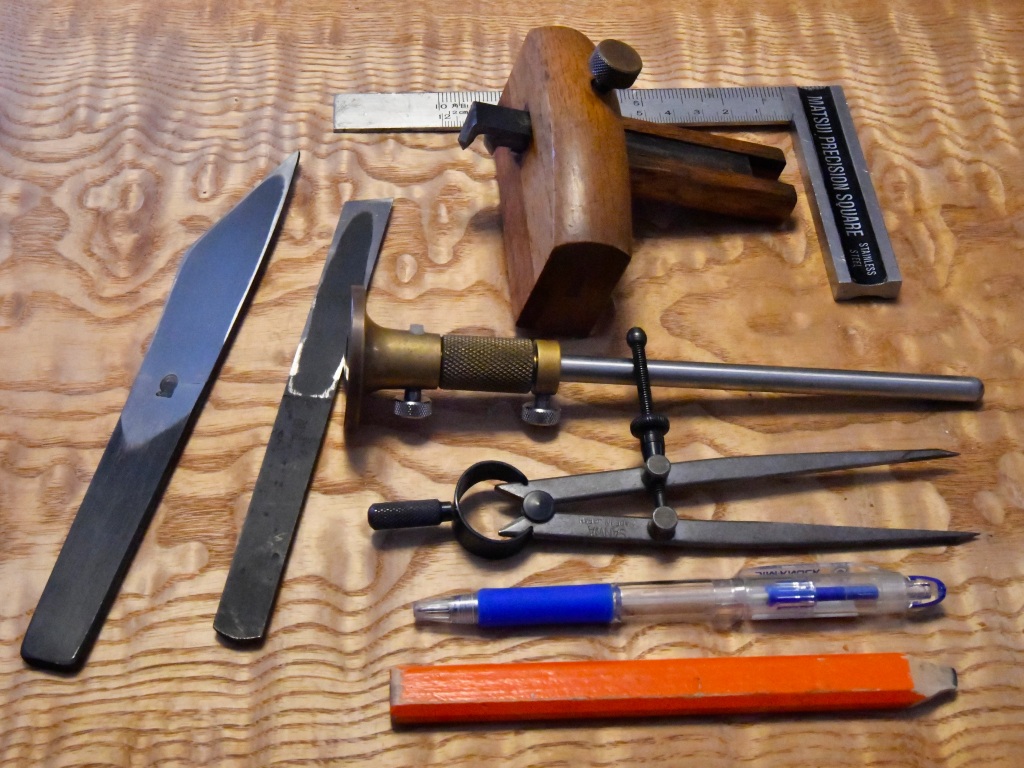


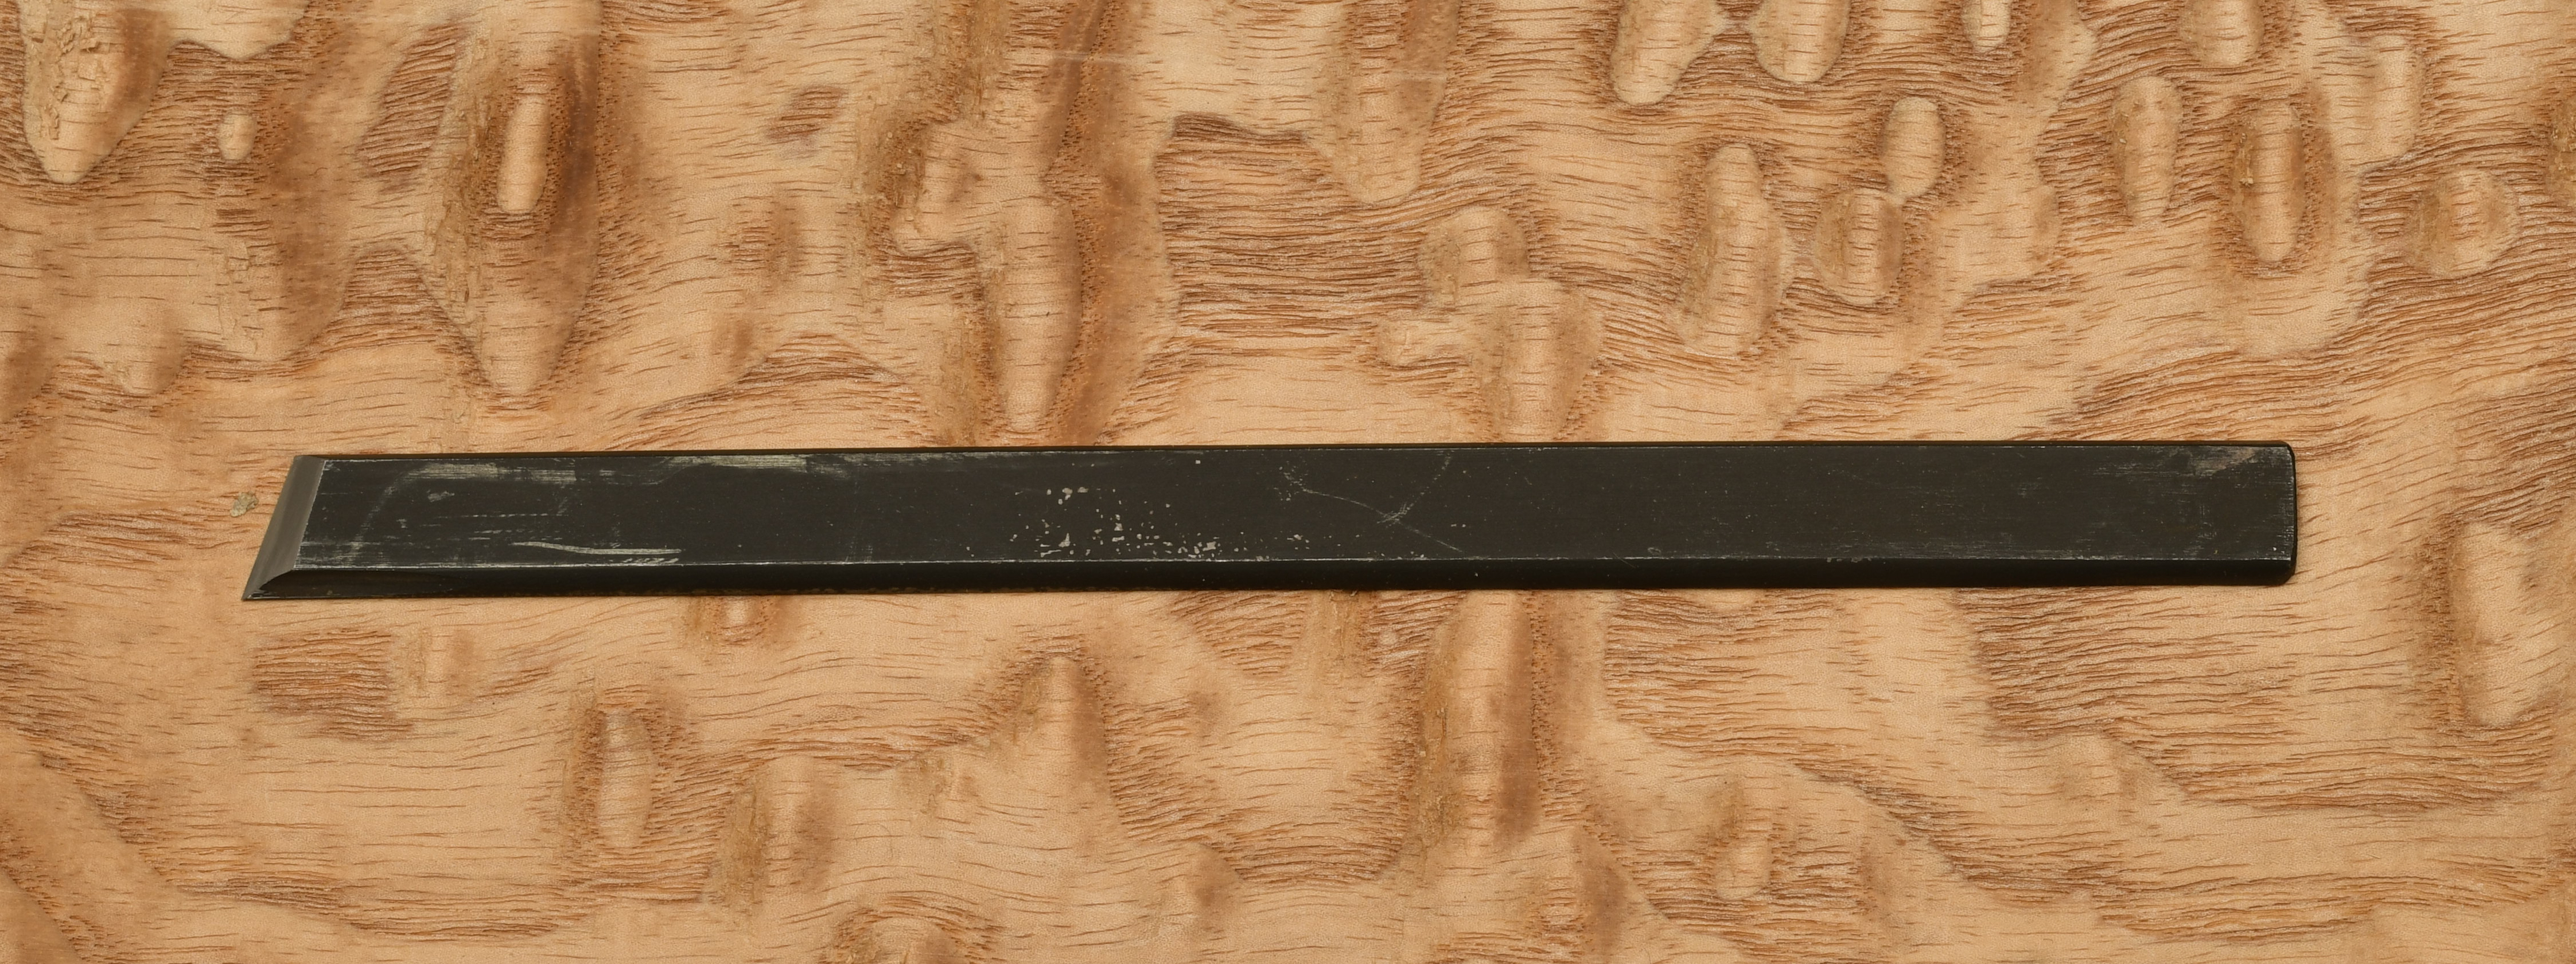
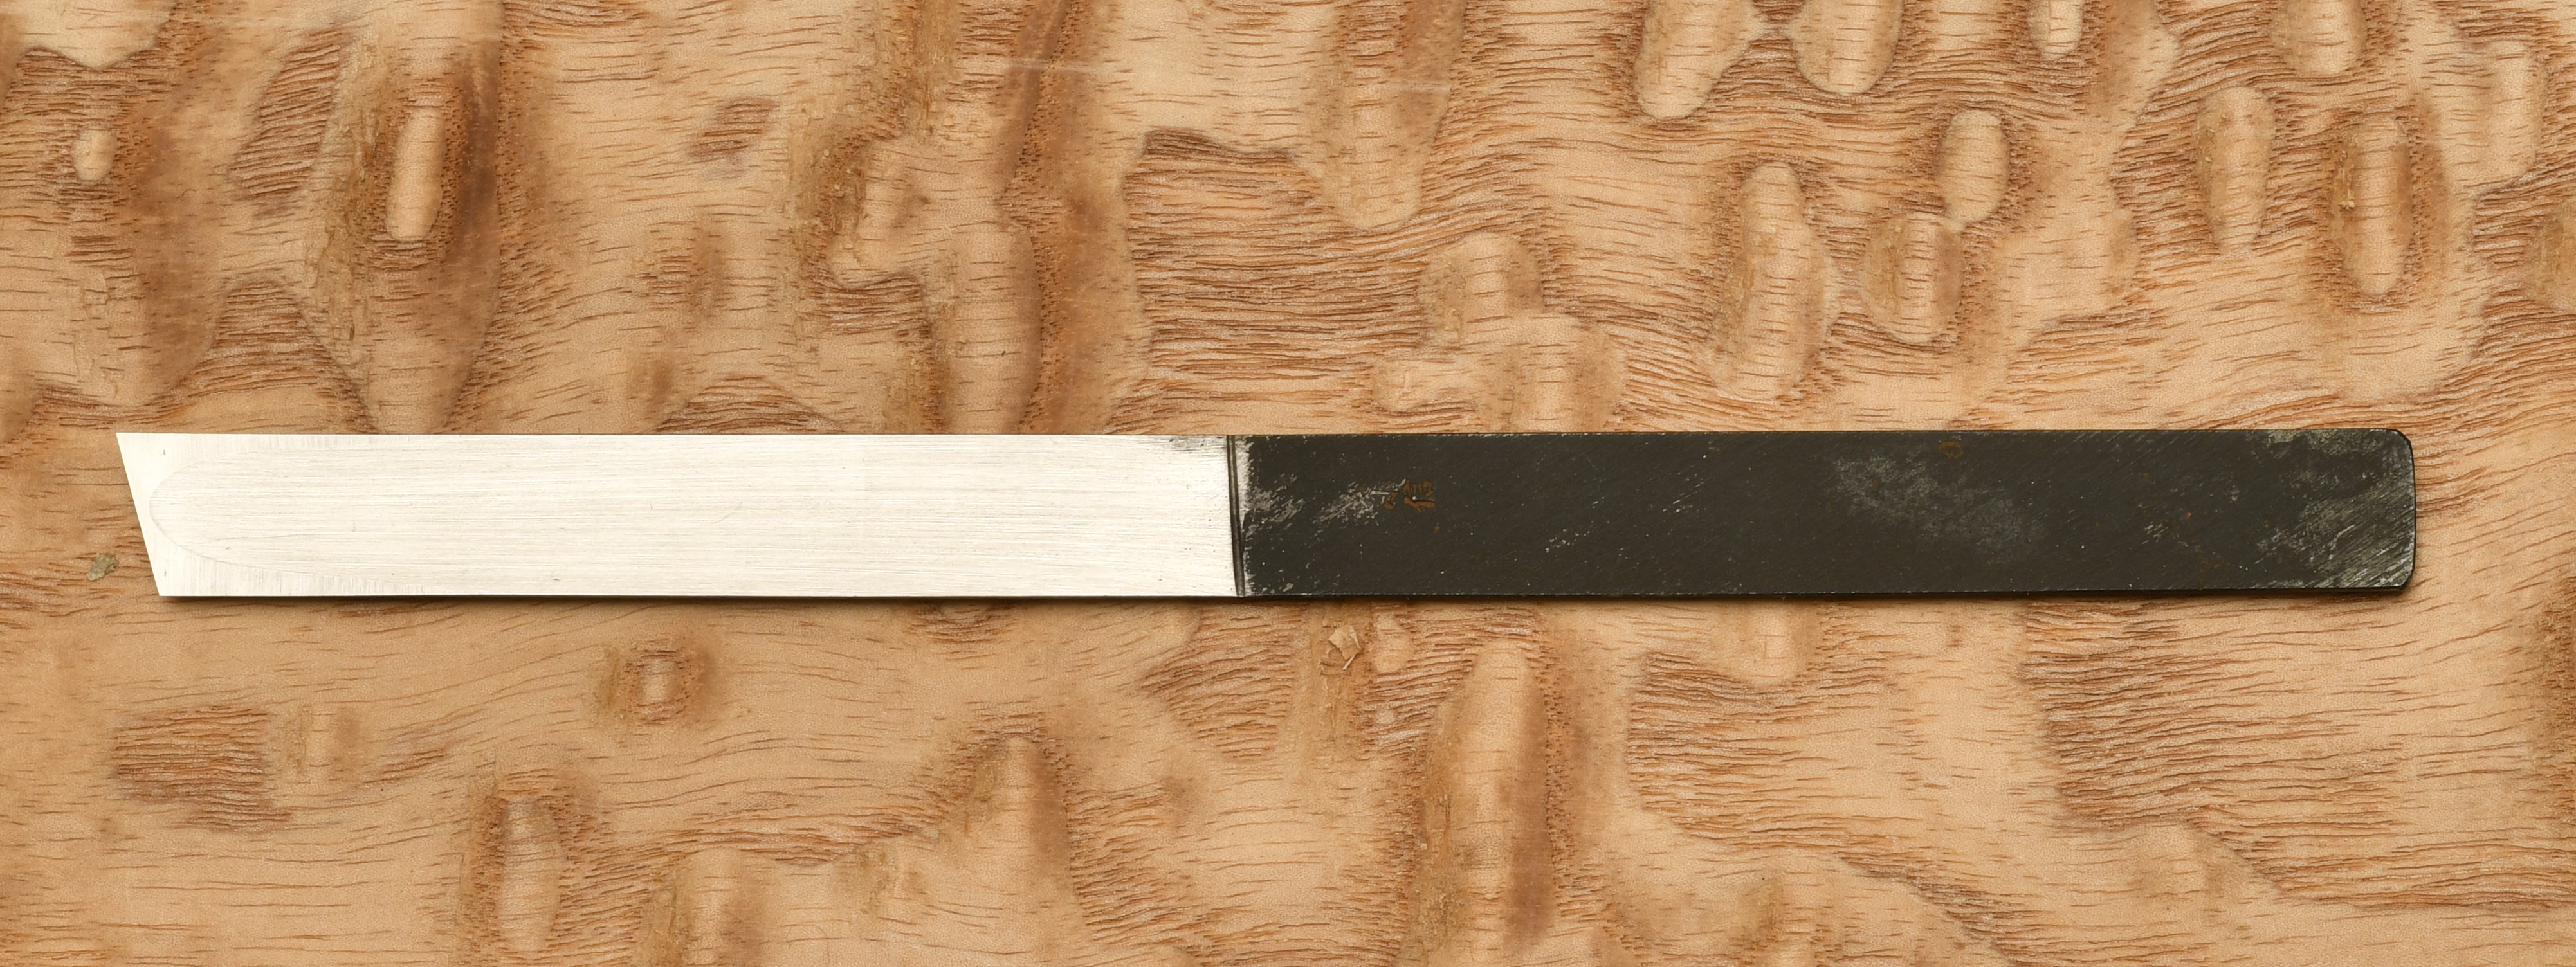
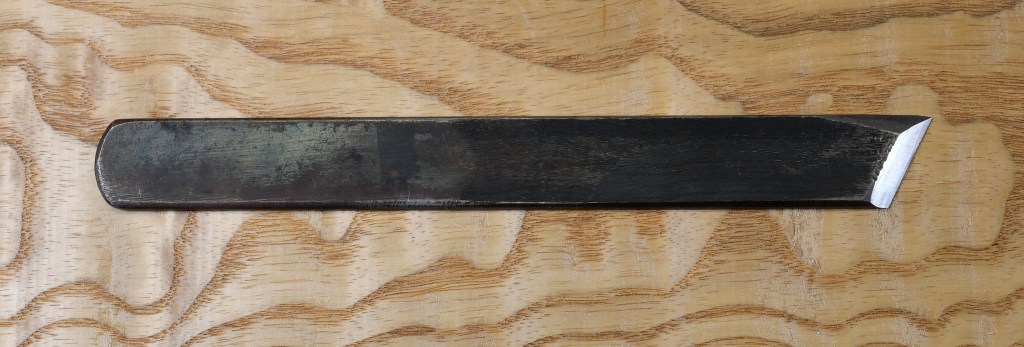
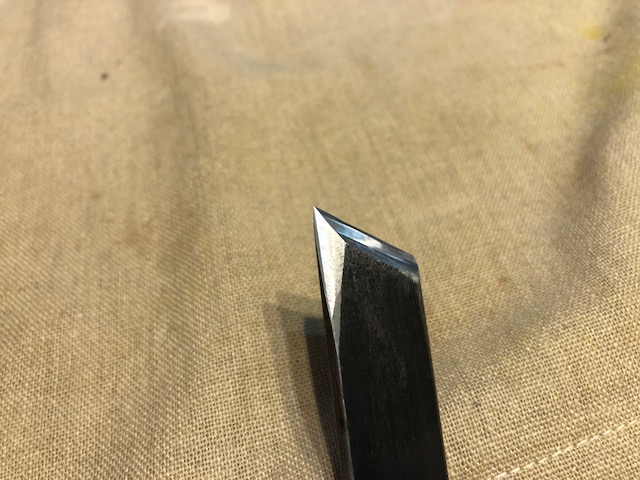

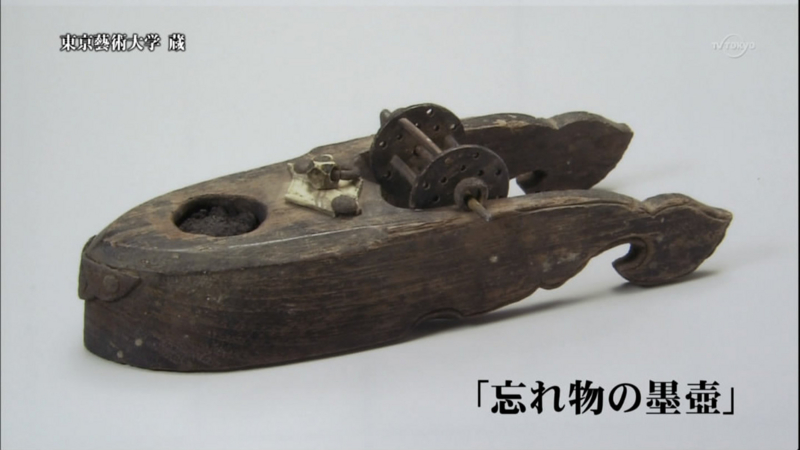


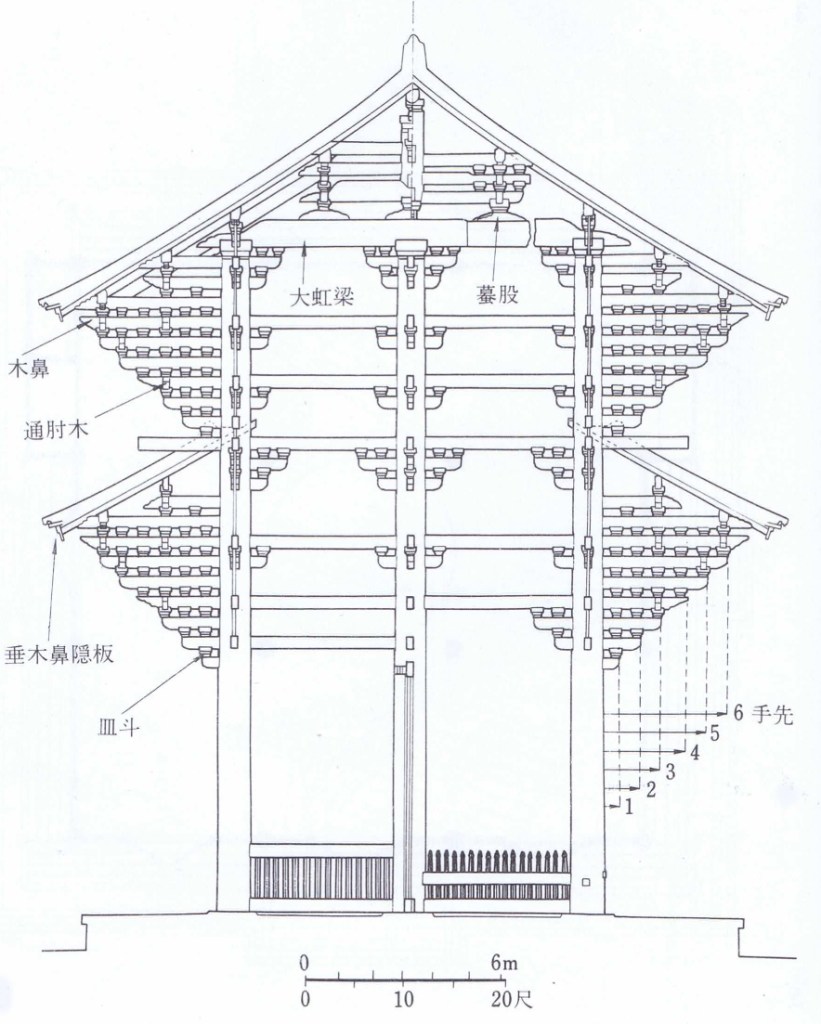


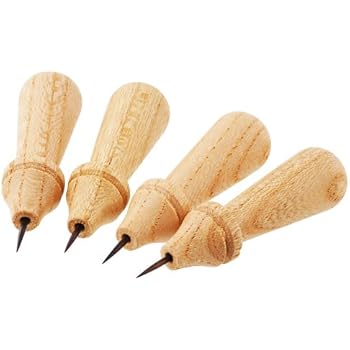
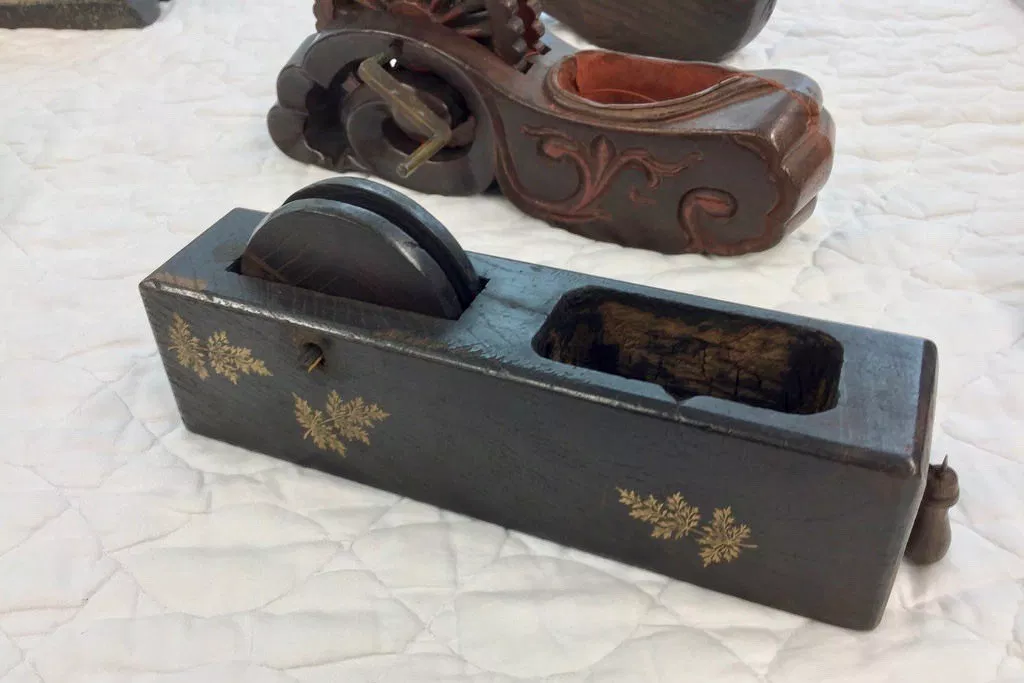
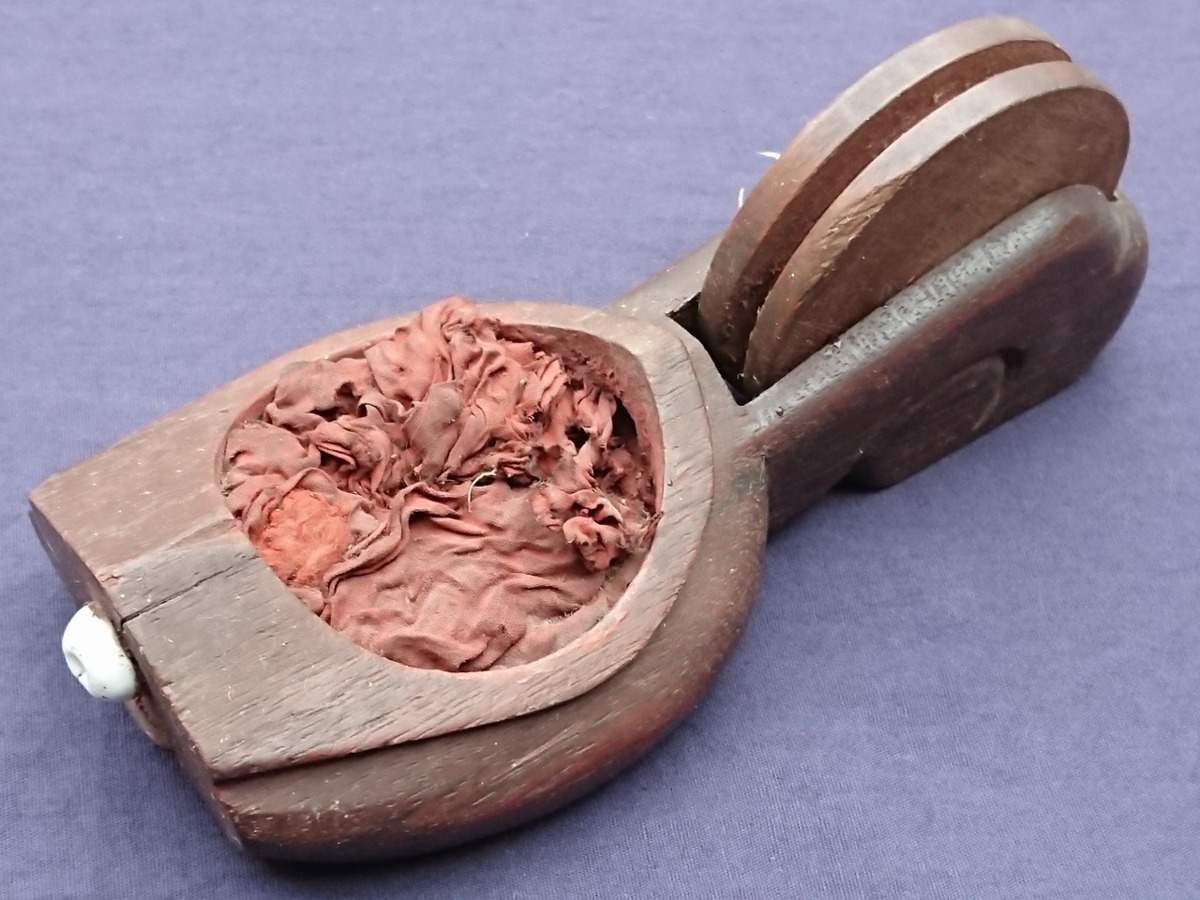


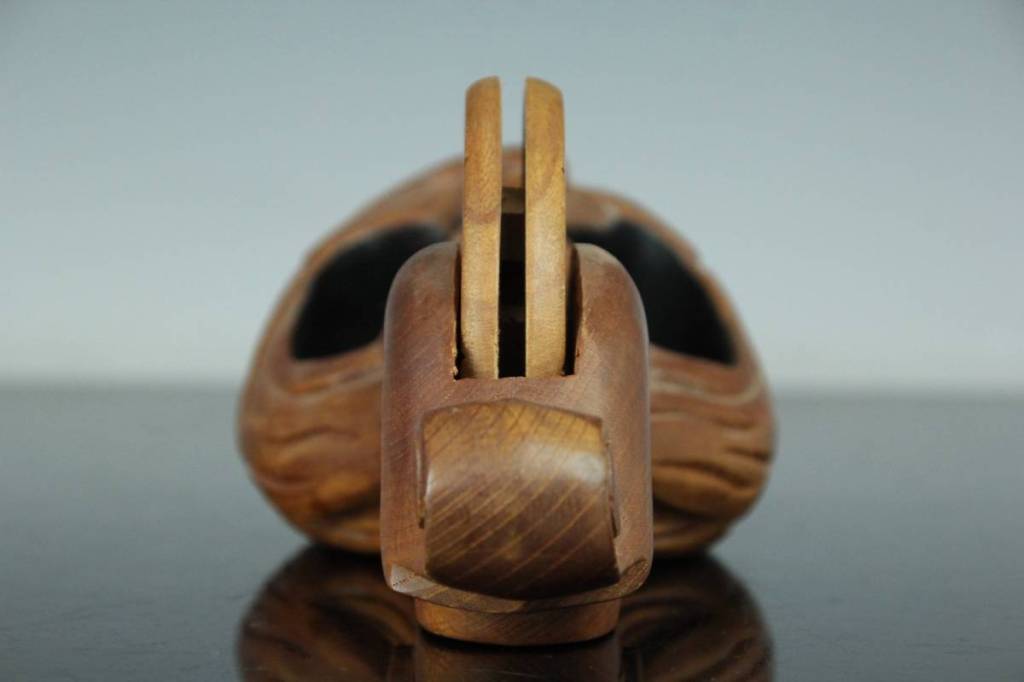

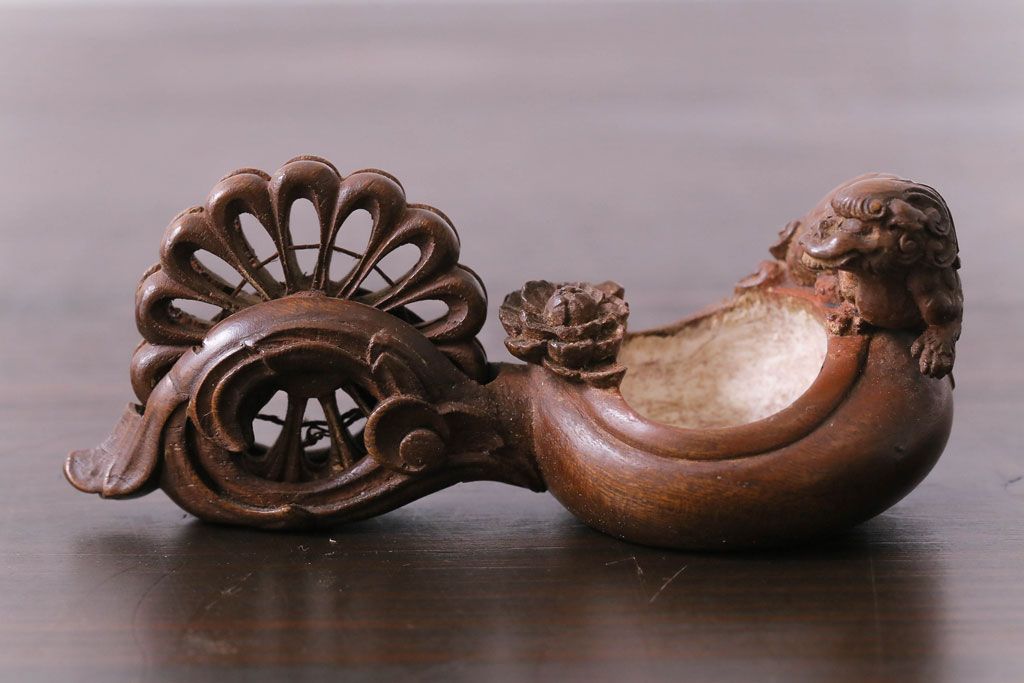
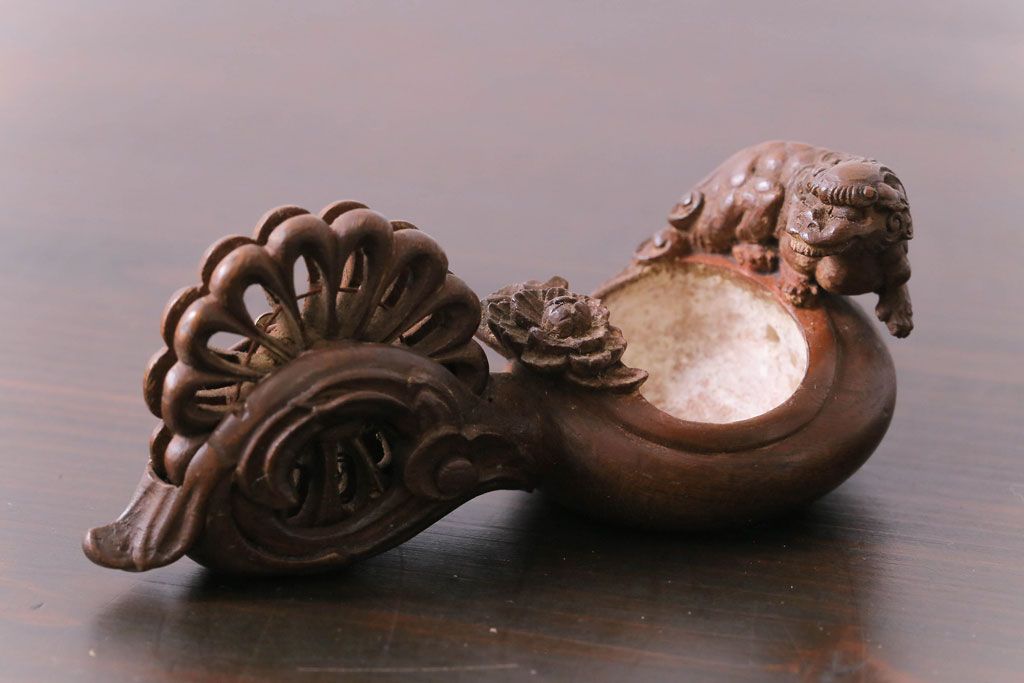


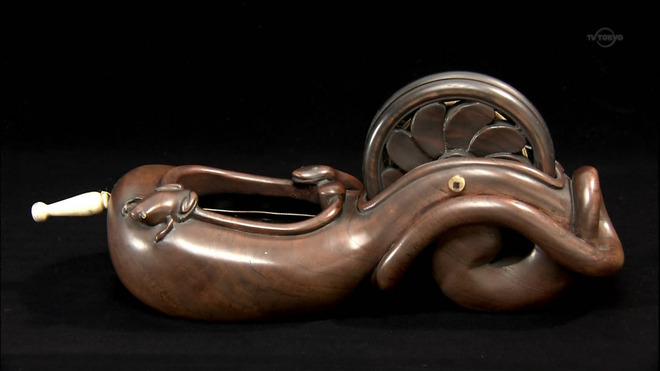


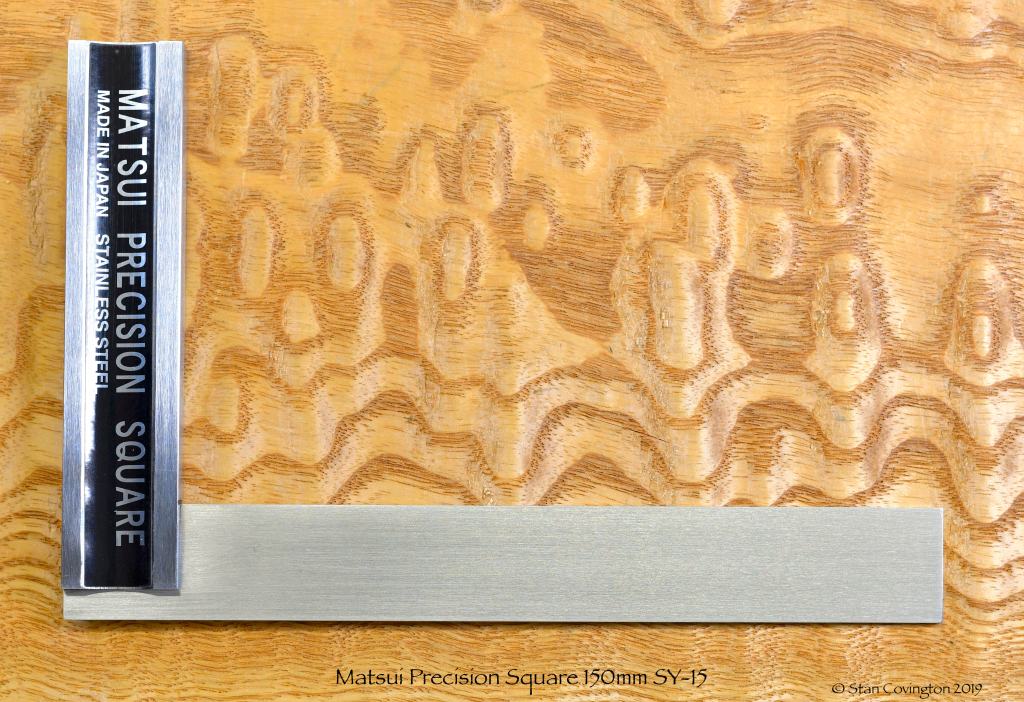


Please Leave a Reply