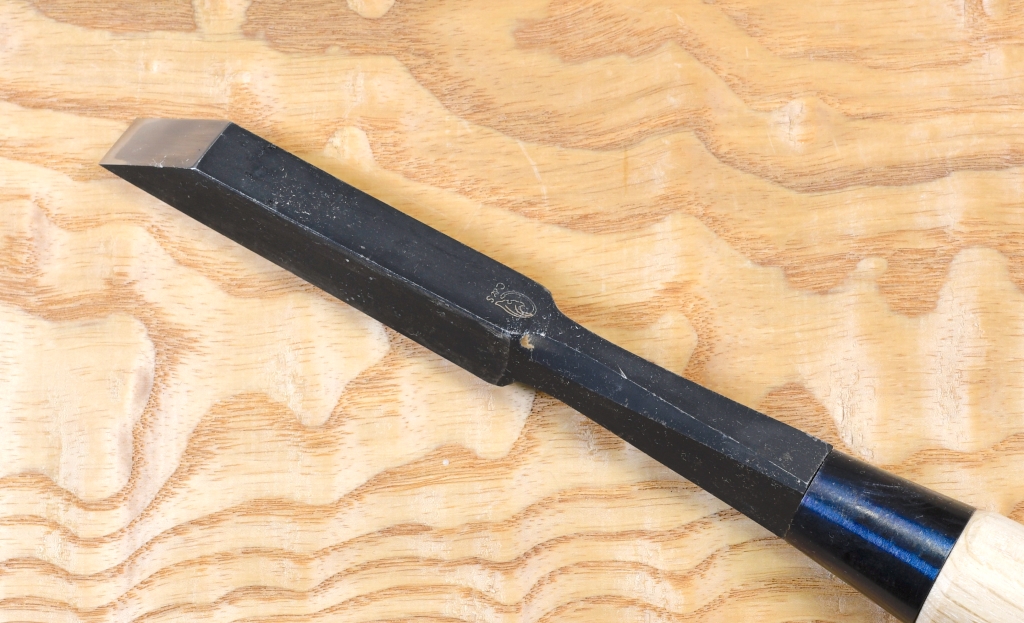
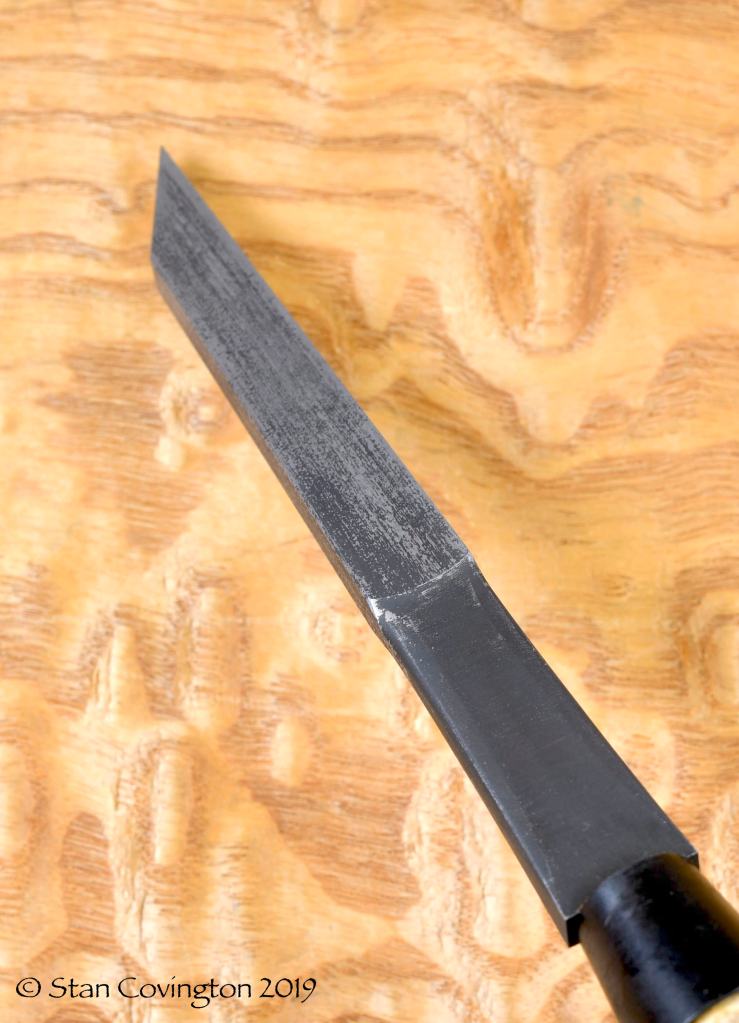
New Ootsukinomi Paring Chisels

Envy was once considered to be one of the seven deadly sins before it became one of the most admired virtues under its new name, ‘social justice’.

Thomas Sowell

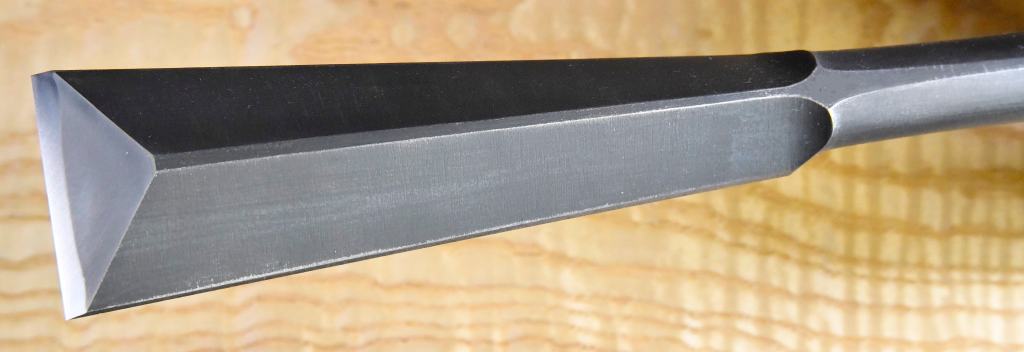
We’ve recently received a long-awaited (and we feared long-forgotten) order of two-handed Ootsukinomi paring chisels from our blacksmith. This post is a simple show and tell.

Your humble servant has scribbled about this tool in this article in our series about the varieties of Japanese chisels

Ootsukino, pronounced oh/tsuki/noh/mee, are large, long-handled paring chisels, the equivalent to the “slick” in the US woodworking tradition, a standard tool for timber framing. It is a rare chisel nowadays, and difficult to make.
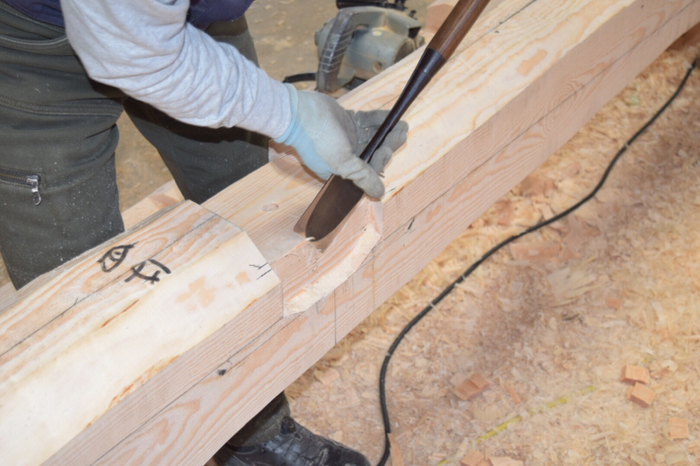
This chisel is never struck with a hammer, but is pushed two-handed to pare surfaces and joints in wood to final dimensions. The long handle provides much greater angular control and precision than a standard paring chisel, while the ability to grasp it firmly in two hands makes it possible to effectively employ the greater power of one’s back and legs.

We also carry Mr. Usui’s Sukemaru-brand ootsukinomi, but after looking for a less-expensive option for our Beloved Customers, we ordered these from our Nagamitsu blacksmith over five years ago. Soon after placing the order we despaired of them ever being completed due to the difficulty of forging and shaping them in his advanced years, and did not want to pressure him. But we were surprised to learn recently, indeed after he had retired, that he had actually made significant progress on nine 2-piece sets, lacking only sharpening and handles, and so arranged for them to be completed. At long last they have been delivered.

Yes, this variety of chisel can be procured individually, and Mr. Usui of Sukemaru fame has been kind enough to fill many special orders to meet specific requirements of our Beloved Customer. But the standard way to purchase these in Japan is a 2-piece set, one chisel in 42~54mm blade width and the other in 24mm. We had these forged in the most common 48mm and 24mm boxed sets.

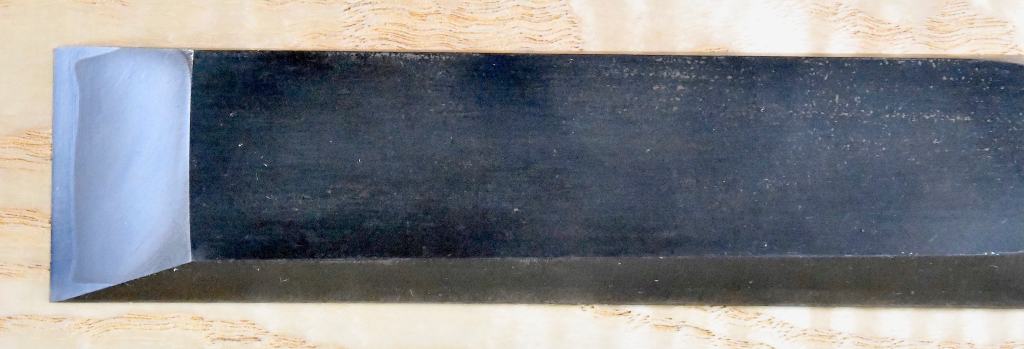
The overall length of both chisels is approximately 640mm (25-13/16″) with a 140mm (5-1/2″) long blade, 160mm (6 -19/64″) neck, and a 340mm (13-25/64″) handle made of an attractive grade of dark-red Japanese red oak. Both chisels have a standard, nicely-formed single ura with the hardened steel lamination properly wrapped up the blade’s sides for the extra toughness and rigidity essential to this tool.

A triple-ura on the 48mm chisel is a useful feature, and we have had Mr. Usui forge his chisels with this detail, but it would have added quite a bit to the cost and so is not available in this more economical brand.

The 48mm chisel is used for paring wider joint surfaces, the cheeks of tenons, and the interior side walls of mortises. It’s the standard mentori beveled-side design seen in our mentori oiirenomi, hantatakinomi and atsunomi.

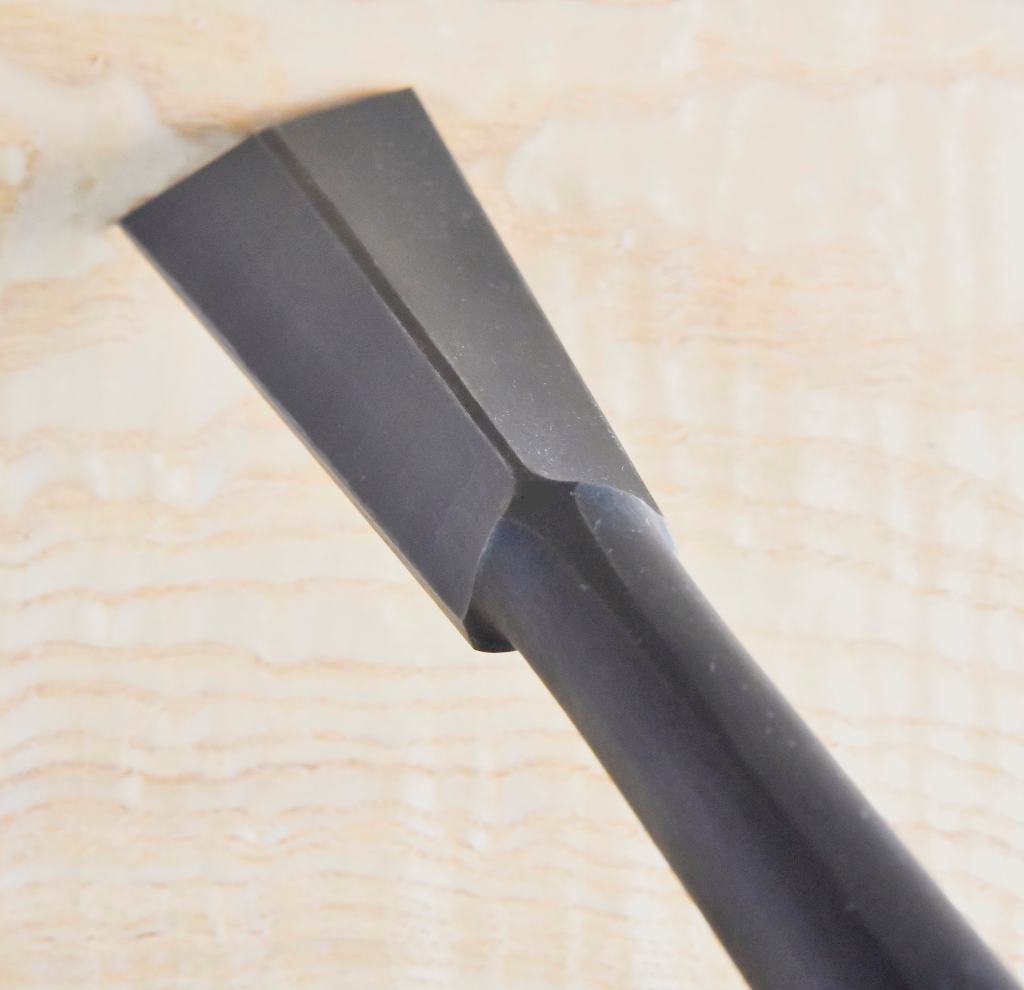
The 24mm chisel is forged in the shinogi style with a more triangular cross-section to provide clearance for the blade in tight places to pare the many dovetail joints used to attach beams, purlins and bottom-plate (土台) timbers, as well as the end walls of the many 24mm mortises commonly found in traditional timber framing work.

These are not mass-produced tools but hand-forged in Japan from beginning to end by a highly-experienced blacksmith in his one-man smithy using Hitachi Metal’s Yasugi Shirogami No.1 high-carbon steel (White Label No.1 steel), famous for its superior sharpness, ease of sharpening, and sharpness retention performance for the cutting layer, forge-laminated to a softer low-carbon steel body and neck for toughness, typical of all our Nagamitsu-brand products.

These are nicely shaped and finished, top-quality, serious chisels for serious work, but are not suited to everyone. While joiners that make large doors and panels often have a set in their workshop, most cabinetmakers and furniture makers will seldom need such large chisels. But they are one of those tools that when you need them, nothing else will do. Indeed they are indispensable for cutting precise joints in large timbers and joinery, even when those joints are hogged-out using electrical equipment.

At this reduced price, We only have a few sets looking for new masters who will feed them lots of yummy wood, so if you are interested, please contact us using the form below.

YMHOS

SONY DSC

If you have questions or would like to learn more about our tools, please click the “Pricelist” link here or at the top of the page and use the “Contact Us” form located immediately below.

Please share your insights and comments with everyone in the form located further below labeled “Leave a Reply.” We aren’t evil Google, fascist facebook, or thuggish Twitter and so won’t sell, share, or profitably “misplace” your information. If I lie may every spoonful of burgundy cherry ice cream I ever eat taste like dirty truck tires.

8 responses to “New Ootsukinomi Paring Chisels”

  1. Gary Avatar
    Gary

    Very nice, Stan. I have a couple of similarly sized ootsukinomi. Besides large joinery, I find that picking one up and waving it around is useful for chasing people out of the shop. It gets their attention.
    I have a question about sharpening these. I know that it is easier to remove the handle for sharpening the blade. But after a few rounds of this the handles have become too loose. I have added paper shims inside the mortise for the tang, but that seems a short term solution. Is there a better long term solution, or should I just continue to add shims?

    Like

    1. covingtonandsons Avatar

      Thanks for your comment, Gary! I have never waved an ootsukinomi at, or used one to chase away, people, politicians or even pixies (descending order of humanity), but it sounds like a fun time was had by all. Please send link to video! (ツ) An ootsukinomi with a loose handle is extremely irritating, and if it becomes loose enough for the blade to separate from the handle on it’s own at an importune time that pervert Murphy may have a wonderful time dancing naked in puddles of red sticky stuff (sorry, no video). So while I don’t recommend routinely removing the handle after the initial sharpening, I do recommend using a honing jig to help maintain the proper bevel angle on the stones. Most people use a large block of hardwood cut at an angle and inlet to fit the chisel’s face for stability. When the wood becomes worn and the angle skewampus it can be refreshed with a thin angle-cut on a table saw, or maybe a pass or two on a jointer. I suppose the commercially-available jigs like the Lie-Nielson widget (perhaps with jaw extensions?) would work too and last longer, but whatever method used, it requires more physical effort and concentration than a shorter chisel does. Looking forward to the video! Stan

      Like

  2. Gary Avatar
    Gary

    Thanks, Stan. I have a little sharpening widget that fits the blades but the long handle makes using it awkwardly unbalanced. I’ll go with a shop made hardwood fixture. And I’ll work on that video.

    Like

    1. covingtonandsons Avatar

      You’re right of course about how awkward and over-balanced the handle makes the process. Two options for the block. The first is moving the block/chisel on the stationary stone, and the second is to clamp the chisel/block down and move the stone over the blade’s bevel. The latter takes gear and time to setup, but perhaps yields better results with less risk. 2 drachma.

      Like

  3. Bruce MILBURN Avatar
    Bruce MILBURN

    COVINGTON & SON

    To your humble servant from another humble servant. Let’s not argue our spiritual merits! I enclose a couple of photos of a chisel I sadly only use occasionally. I’m too ignorant to identify its origins but it feels good in the hand when working or not. You might enjoy! Yours Bruce Milburn (convictions in darkness)

    Sent from my iPad

    >

    Like

  4. The Lost Scrolls of Handwork Avatar

    I’d like your opinion on this brand of Japanese waterstone, Ikeda, which has 10 000 grit. Is it all the vendor has made it out to be? I’m thinking of switching from a strop to a 10,000 grit stone . There are several reasons why I desire to change. The most accurate response is that I’ve always been interested in higher grit stones and am eager to compare them to strops.

    Like

    1. covingtonandsons Avatar

      Sorry, I don’t have experience with the Ikeda stones. I suggest you beware of hype related to stones, especially if costs are high.

      Liked by 1 person

      1. The Lost Scrolls of Handwork Avatar

        Thanks for your quick response. The costs for everything is too high, but it’s on special $150 down from 200. Basically, it’s down to what it was originally priced a year or so ago. On average, the 10k grit stone irrespective of the brand is priced around $150-200

        Liked by 1 person

Leave a comment

The Varieties of Japanese Chisels Part 18 – The Hantataki Chisel

A clever person solves a problem. A wise person avoids it.” 

Albert Einstein

We recently added a new product to our lineup of frightfully-sharp chisels called the “Hantatakinomi,” aka “Hanataki Chisels” which is the subject of this article.

Definition

Hantatakinomi means “Half-sized tatakinomi” and is pronounced Han/tah/tah/kee/no/mee.Traditionally popular in the Kansai area of Japan, this style of chisel never really caught on in the Tokyo area where your most humble and obedient servant is located, so developing a relationship with a reliable blacksmith willing to forge them to our specifications, and at a reasonable price, was an effort of several years.

Like all our tatakinomi, these Hantataki chisels have steel hoops and ferrules installed on tough Japanese oak handles, so as long as you are feeding them lots of yummy wood, they will simply wiggle with joy at being motivated by a heavy steel hammer from the break of day till the cows come home.

Product Development

Quality and performance are extremely important priorities to us at C&S Tools because we believe these qualities, combined with good customer service and a solid, pro-active warranty, are key to both customer satisfaction and wholesome guilt-free living. Don’t you agree?

After three years of meeting with blacksmiths, inspecting their forges, confirming their forging techniques and quality control methodology, having samples made, testing those samples to destruction, and repeatedly fine-tuning the design and specifications, we are at last ready to send our Hantataki chisels out into the world to find new masters, and much yummy wood.

That squeaking sound you may hear, BTW, is their joyous singing as they march forth; They love music, you know, even if they couldn’t carry a tune in a bucket.

If Gentle Reader wants to experience this heartfelt sound firsthand, try cutting a mortise with one of our Hanatataki chisels while humming The Heimatdamisch’s version of “Poker Face,” or The Ukulele Orchestra of Great Britain’s version of “Psycho Killer.” They especially seem to like music made by wooden instruments, you know.

Specifications

A comparison of the size of our 48mm Oiirenomi chisel (top), Hantataki Chisel (center), and Atsunomi chisel (bottom)

Our Hantataki chisels are of course hand-forged from Hitachi Yasugi Shirogami No.1 steel (White Label No.1 steel) and heat treated using the very best blacksmithing techniques.

At approximately 270mm long (10-⅝”) in length, these chisels are essentially smaller versions of our regular Sukemaru-brand atsunomi at 295mm long (11-⅝”). All dimensions are likewise reduced producing a handier, lighter-weight version of the atsunomi on the one hand, or a longer, beefed up version of the oiirenomi on the other, depending on your viewpoint.

Woodworkers with larger hands who appreciate a little longer/larger oak handle, or who need a chisel with a little longer/thicker blade with extra reach, or who need a tool with more heft than the standard oiirenomi, but don’t want the higher price or greater weight of the atsunomi chisel will find these elegant chisels to be real honeys. They are especially suited for field installations and light timber framing, but work well in the shop too.

We offer them in standard widths: 6, 9, 12, 15, 21, 24, 30, 36, 42, 48 and 54mm. Custom widths are available upon request.

We stock these chisels fitted with either Japanese White Oak or Red Oak handles. These woods are a little denser and tougher than their American and European counterparts, although the appearance of the grain is not especially exciting. I think this is a fair trade in the case of a tool handle that must routinely endure many thousand violent impacts, don’t you?

Pricing

Consistent with our policy of providing the best-performing tools possible to professional woodworkers at a reasonable price, and knowing that inflation is causing prices of all products to rise universally nowadays (ouch!), we worked with our blacksmith, sharpener and handle maker to keep prices as low as possible. As a result of those efforts, our Hantataki chisels are about half the price of Sukemaru’s atsunomi chisels, and just a few pennies more than our standard oiirenomi bench chisels making them an excellent value. In other words, it’s a chisel that is almost as big and tough as an atsunomi, but for the price of an oiirenomi.

The level of the fit and finish is not as high as our Sukemaru brand chisels, which is the prime reason for the reduced cost, but cutting performance, edge durability and ease of sharpening is equivalent to our other chisels, that is to say, excellent.

In summary, this is a medium-sized professional-grade chisel at a bargain price.

You can confirm pricing and availability, and view more photographs by clicking the pricelist at this link. Not sure how long we will be able to continue to provide them at these low prices, so gittem while they’re hot!

YMHOS

The grounds of the Imperial Palace in Tokyo seen from a bridge over the moat.

If you have questions or would like to learn more about our tools, please click the “Pricelist” link here or at the top of the page and use the “Contact Us” form located immediately below.

Please share your insights and comments with everyone in the form located further below labeled “Leave a Reply.” We aren’t evil Google, fascist facebook, or thuggish Twitter and so won’t sell, share, or profitably “misplace” your information. If I lie may the Emperor decline to invite me to his birthday party (again (シ)).

Leave a comment

The Varieties of Japanese Chisels Part 17 – The Sokozarai Chisel

底さらえ鑿の一分五厘 : 日々の製作と研ぎの記録 ~木工 藤原次朗のブログ~

Quality is not an act, it is a habit.

Aristotle, 384–322 BC

In this article your humble servant will introduce a standard woodworking tool which I believe to be unique to Japan, although I have no doubt individual craftsmen around the world have produced versions of it for their own use for hundreds, maybe thousands, of years.

I will explain the jobs this tool is used for, how it is used, how to fettle it, and how to sharpen it. I will also share some first-hand business insight regarding why Japanese women make this tool essential to the joiner in both performing traditional joinery in Japan, as well as the sometimes challenging task of getting paid for his work.

Mr. Spock will also make a brief contribution to the discussion.

Definition & Pronunciation

The Sokozarai Nomi (pronounced Soh/koh/zah/rahi noh/me and written 底浚い鑿 ) translates to “bottom-cleaning chisel.”

It is a simple tool consisting of a differentially-hardened steel shaft, with a small, short, sharp foot formed at the end, attached via a tang to a wooden handle, and secured by a conical ferrule.

The Sokozarai chisel is one of three specialized chisels used specifically for joinery work. Cabinetmakers and furniture makers use it too. Two other specialty joiner chisels are the “Mori Nomi,” which translates to “harpoon chisel,” and “Kama nomi,” which translates to “sickle chisel.” Perhaps we will discuss these in a future article.

A larger version of the sokozarai chisel is used for cleaning the bottom of the larger mortises commonly cut in timber frames.

The Role of the Sokozarai Chisel

The sokozarai chisel is used for two purposes. The first is loosening and removing chips from inside mortises. One simply hooks the offending waste with the chisel’s toe and flips it out. 

The second role of the sokozarai chisel is to flatten and even plane mortise bottoms. When set up correctly, it will cut shavings from the bottom of mortises cut in softwood planing them flat and clean.

Indeed, in advanced joinery work, a skillful joiner will plan and execute his joints such that the material left remaining at the bottom of a mortise cut into a stile intended to receive the tenon from a rail is less than 1mm thick, thin enough to allow light to pass through. The ability to routinely cut joints like this, without cutting all the way through, is a mandatory skill of the professional joiner.

I suspect that about now Gentle Reader is forming his elegant eyebrow into an artistic and skeptical arc as he ponders why one would go to the trouble of making clean and pretty the bottom of a hole upon which no one will ever gaze, leaving a paper-thin wall of uniform thickness at the bottom admitting light into a space no one will ever see. Can there possibly be method to this madness? Welcome to traditional Japanese joinery.

Consider that a rough, bumpy floor in a mortise prevents the tenon from seating the last few millimeters, but by planing it flat with a sokozarai chisel, those last few millimeters can be converted to useful space to house maximum-length tenons ensuring maximum resistance to withdrawal and bending forces resulting in strong, slender but durable joinery without adding extra weight. This is a big deal in the case of the slim, flexible frame members found in operable traditional Japanese joinery such as shoji, itado and tsuitate screens, joinery that must satisfy the severe eye and meet the high standards of fit and finish expected by many Japanese women, the most unforgiving consumers in the world.

I don’t know when this detail entered common use, but as Gentle Reader is no doubt aware, the older and more common type of mortise and tenon joint found in joinery worldwide is the through single or double tenon with the tenon’s end exposed at the rail where it is often wedged, a technique that is undoubtedly stronger.

On the other hand, the fully-housed tenon made easier to fabricate using the sokozarai chisel has two advantages over its older, less-refined brother the through-wedged tenon. First, it simply looks better and more elegant when new, and is therefore better able to survive the strict final inspection by the lady of the house thereby more reliably earning the reward of final payment. Hallelujah, pass the bottle brother!

Second, it simply looks better to the eye and feels better in the hand as time goes by because, as the stile shrinks during drier months, the once flush end of the through-tenon won’t project past the surface of the stile creating an unslightly, uncomfortable bump, and during the wetter months it won’t recede back into the mortise leaving an indentation in the stile and an uneven appearance.

These details are not based on esoteric imaginings about quality, but are make or break business decisions essential to avoiding complaints from the same unforgiving Japanese women. And of course, in a country where advertising and representations are routinely and intentionally false (sad but true), word of mouth among sharp-eyed quick-tongued women is critical to a craftsman’s success. Please note that I say this as someone who has has been married to a Japanese woman for 45 years, has lived and worked in Japan for over 32 years, and during those years has had plenty of direct commercial experience working with Japanese women as both customers and team members.

Next time we are sharing a cup of hot cocoa around the evening fire, remind me to tell you the story about two stressful days spent inspecting Thassos marble slabs for a new building’s lobby walls in the company of three Japanese women: an Architect, a Quantity Surveyor, and a Project Manager. All the story lacks is a Rabbi and a Priest to make a gut-splitting joke (ツ)。

A 4.5mm differentially-hardened sokozarai chisel with red oak handle

Using the Sokozarai Chisel

To use the Sokozarai chisel, and assuming you are right-handed, hold the handle in a fist in your right hand with the blade projecting from the bottom of the fist. Lay the back of the fingers of your left hand on top of and crosswise to the long direction of the mortise. Insert the blade of the chisel into the previously cut mortise hole and press the back of the blade’s neck (opposite the cutting edge of the foot) against the outside edge of your forefinger. Then pinch the blade’s neck between your thumb and forefinger. This is the grip.

To remove loose waste, insert the sokozarai chisel into the mortise hole and move it around gathering chips on the chisel’s toe. Then pull the chisel up and out of the mortise quickly to pop chips out.

To cut loose chips still attached in the mortise hole, press the chisel’s foot to the bottom, move it forward until it snags on irregularities, then rotate the handle towards your body using the forefinger of your left hand as a fulcrum to lever waste out.

To shave the bottom, simply move both hands forward with the bottom of the foot parallel with the intended bottom of the mortise. Developing a sense of the chisel’s action will take practice. Shining a flashlight into the mortise frequently at first will help develop these senses.

To check the depth of the mortise, a specialist kamakebiki, essentially a small router plane, is ideal. But you can make a simple depth gauge by sharpening the edges of the head of a nail or drywall screw, driving or screwing it into a small block of wood, then cutting off and filing the point to avoid ouchies. Using this, you will be able to detect bumps and irregularities remaining on the bottom. Indeed, it too can be used to shave the bottom, but it won’t clean all the way into corners unless you grind the head square or rectangular.

For advanced work, make a slightly undersized test stub tenon with shoulders from hardwood the depth of the finished mortise, and anoint the end with cheap dark lipstick or Vaseline with black oil pigment mixed in. High spots remaining at the bottom of the mortise will be highlighted. With practice, you won’t need this test tenon, but you will still definitely need a sokozarai that is sharp enough to plane the bottom.

Next, let’s consider how to prepare a new sokozarai chisel.

Fettling the Sokozarai Chisel

Unlike most other Japanese chisels, the Sokozari chisel is not laminated construction, but is formed of one piece of differentially-hardened high-carbon steel. Differentially-hardened in this case means that the foot and lower 1/4 of the leg’s length are hardest, becoming progressively softer going up the leg until it is dead soft at the tang. This means the cutting blade, (what your humble servant calls the “foot”) of this chisel will become sharp and stay sharp, but the neck is left softer so it will not snap off, and can even be bent a little to adjust the angle of the foot if necessary.

Low-quality sokozarai have both soft shafts and feet.

Flatten and Polish the Foot’s Bottom

The bottom of the foot needs to be flat and polished, but because of this surface’s narrow width and short length, it can be challenging to accomplish without rounding it over or skewing it.

It often helps to grind a hollow into the foot’s bottom the thickness of a nat’s eyebrow to help speed up the flattening and polishing process. If you use a grinder, be very careful to avoid overheating. It should take no more than one or two brief touches to the wheel.

When flattening and polishing the foot’s bottom surface on diamond plates and stones, it also helps to make a guide block. Cut a slot in the side of a small block of hardwood to house the bent shaft with the bottom of the foot located flush with the block’s bottom surface. Lock the shaft into the guide block with a wedge or a clamp to stabilize it. 

The jig in the photos above was made by a Most Beloved Customer who does exceptional high-quality joinery work.

An alternate sharpening jig can made by cutting a crosswise groove, similar to the one shown in the photo below, into the top surface of a stick of scrap wood, perhaps 50mm wide, 200mm long and 20mm thick. The bottom surface of the foot should be almost, but not quite flush with the stick’s edge, projecting the thickness of a piece of paper. Secure this jig to your workbench with a clamp or in a vise, press down on the blade with one hand, and move a sharpening stone along the side of the jig over the foot.

This guide block rides directly on the stone as you flatten and polish the foot’s bottom. Don’t let the foot’s bottom get skewed or rounded over. Work slowly and check constantly. This is a one-time operation.

Once the bottom is flat and polished, you should only need to polish the bottom of the foot on your finishing stone.

Adjust and Polish the Cutting Edge’s Bevel

The bottom of the foot is now flat and pretty, but the angle of the cutting edge is usually still far too steep, and the bevel’s surface is rough. This must be corrected.

Modify the cutting edge’s angle by grinding the bevel on a diamond plate. The final angle you chose for the cutting edge will depend on your preferences and the wood you will be cutting. Steeper angles are more durable. Shallower angles cut better, but dull quicker. 20~24 degrees is usually OK. When I was a young man, I knew professionals who took the bevel angle down to 15 degrees. 

You may want to make another narrower guide-block clamping 90 degrees across the the shaft to help hold/stabilize the blade during this operation. When you have adjusted the angle to where you want it to be, then polish it on your sharpening stones. Be careful to avoid skewing it or rounding it over. You want sharp, clean corners.

To routinely sharpen/polish the bevel, hold the chisel in one hand with the bevel face-down on the long side of your sharpening stone. While stabilizing the blade and applying pressure on the bottom of the foot with a fingertip, move the sokozarai chisel back and forth in small strokes being careful to avoid rocking it and rounding it over.

Adjust the Foot’s Length

This step is unnecessary for most applications, but I will touch on it just to be thorough.

The length of the foot is fine as-is for most furniture mortises, but for very tiny mortises as in screens, light fixtures, and small casework, the foot may need to be made shorter. It is not unusual for a tategushi or sashimonoshi to own multiple sokozarai nomi with feet and shafts of different widths and lengths and bevel angles to clean the mortises he makes the most.

Please note that the mortise holes for kumiko members installed in shoji screen and most other types of latticework are shallow and do not require the strength of long tenons, so the mortises are usually cut using mori nomi (harpoon chisels) with a hook on the end to pull out waste quickly, and the bottoms are left rougher.

Conclusion

Beloved Customers that have purchased our chisels, and diligent Gentle Readers that have read this blog, are aware that your humble servant insists our chisels not be used to scrape or lever waste out of joints. The reasons for this are my desire for Beloved Customer’s most excellent chisels to remain as sharp as possible as long as possible, and to avoid chipping the cutting edge. They are, after all, refined cutting tools with sensitive feelings, neither thuggish prybars nor pot-metal screwdrivers.

The Sokozarai chisel was invented specifically as a partner to chisels used for cutting the clean mortises essential to Japanese joinery, and to protect the super-sharp cutting edges of those chisels from damage resulting from barbaric treatment. I encourage you to level-up your joinery skills by procuring and using one. You will be glad you did.

And so I wave farewell until the evening we share a cup of hot cocoa around the irori fire. In the meantime, I am humbly grateful for the honor to remain,

YMHOS

Adieu for now, Gentle Reader!

If you have questions or would like to learn more about our tools, please click the “Pricelist” link here or at the top of the page and use the “Contact Us” form located immediately below.

Please share your insights and comments with everyone by using the form located further below labeled “Leave a Reply.” We aren’t evil Google, fascist facebook, or thuggish Twitter and so won’t sell, share, or profitably “misplace” your information. If I lie may my sokozarai chisels get athletes feet!

A Few Masterpieces

“Living by faith includes the call to something greater than cowardly self-preservation.”

J.R.R. Tolkein

In this post your humble servant will present a few modern masterpieces of the blacksmith’s art produced recently by a single craftsman. I hope you are as thrilled as I am to know there is at least one craftsman left in the world that can produce chisels of this quality.

The Blacksmith

The craftsman that made these chisels is very unusual in that, unlike the frantically self-promoting, technically mediocre Hollywood blacksmiths such as Tasai, Funatsu, Kiyohisa, and the modern Chiyozuru gang, he is reclusive and shuns attention. Accordingly, I have been requested to not share any personal details about him, so please don’t ask. The fact is I don’t even know his real name just the brand he uses.

I won’t discuss why he is reclusive, but I will go so far as to say that he is self-employed, well-known in his chosen field, and that chisels are not his primary work product but only a sideline. He makes no more than 5 chisels monthly.

His business philosophy and blacksmithing techniques are interesting so I will share some details about them. He has four strict requirements that a Customer must satisfy before he will accept an order. The first two are business-related, and the last two are about the Customer.

  1. The Blacksmith sets the delivery schedule. Period.
  2. The Blacksmith sets the price. Period
  3. The Customer must be a professional worker in wood who needs and will use the tools the Blacksmith will forge daily. His track record must be independently verifiable. Amateurs and/or hobbyists, regardless of their skill levels, need not apply. Collectors are specifically unwelcome.
  4. Besides being expert in the use of chisels, the Customer must have a minimum level of skills, including the ability to make chisel handles and cut a high-quality Japanese plane block using only hand tools. Once again, this must be verified before an order will be accepted.

Your humble servant commissioned a few chisels from the Blacksmith many years ago and went through this same qualification process, although I didn’t realize it at the time.

The quality of his forging and heat-treat technique is unsurpassed producing a crystalline structure in hard steel that will take an extremely sharp edge, will hold that edge without easily dulling, chipping or rolling while cutting a lot of wood, and is easily sharpened.

But it is his metal shaping and finishing skills that are so awe-inspiring. Please notice the straightness and cleanness of the lines and planes, as well as the uniform and smooth curvature at the shoulders, and perfect symmetry. If Gentle Reader is unimpressed, I encourage you to make a full-scale model from cold wood before trying it in hot metal. I promise you will be convinced.

The Blacksmith uses only “free-forging” techniques, and does not employ the rough shaping dies other modern blacksmiths rely on to improve production speed. His forging technique is so sublime that the entire chisel is shaped to nearly final dimension by fire and hammer, not grinders and belt sanders.

He finishes his products using only hand-powered scrapers (sen) and files.

The performance of Blacksmith’s products are equal to or better than those of Kiyotada back in the day, and are more precisely shaped and more beautifully finished than those of Ichihiro (the Yamazaki Brothers) at their very best. They are simply the best chisels that have been made in Japan in the last 70 years.

Let’s take a look at four chisels recently completed for a Beloved Customer in the USA.

34 x 485mm Anaya Chisel

The Anaya chisel is an antique style used for cutting deep mortises and making other joints in large timbers. It is no longer commercially available.

Top view of a Anaya 34x485mm Anaya chisel
Ura view of 34x485mm Anaya chisel
Side view of 34x485mm Anaya chisel

57 x 485mm Anaya Chisel

42 x 490mm Bachi Nomi

The Bachi nomi is the equivalent to the fishtail chisel in English-speaking countries. The word bachi comes from the splayed tool used to play the 3-string Japanese shamisen, a banjo-type musical instrument. Here is a link to a video of two ladies using shamisen and bachi to perform a famous traditional song in Tokyo.

The Bachi nomi excells at getting into tight places to cut joints with acute internal angles such as the dovetail joints that connect beams to purlins.

There are several ways to resolve the angles at the tool’s face, but in this case the Beloved Customer and Blacksmith agreed on the most difficult, rigid and beautiful solution, the shinogi. This design has the advantage of maintaining a shallower side-bevel angle from cutting edge to neck return providing better clearance in tight dovetail joints.

The handwork performed on this chisel’s face is simply amazing, but the hollow-ground ura is even more spectacular to those who know about this things.

54 x 540mm Sotomaru Incannel Gouge

The Sotomaru or incannel gouge is a strong and convenient chisel used for cutting joints in logs and rounded members on architecture. More information can be found at this link.

This is an especially beautiful example as seen the symmetrical confluence of planes and curves at the shoulders.

Conclusion

I hope Gentle Reader found this post informative. You will never find better examples of the Japanese blacksmith’s art outside of one particular museum. It is exciting to consider that there is still one craftsman alive that can routinely perform this level of work.

While your humble servant has praised these chisels and the blacksmith that made them highly, please do not make the mistake of assuming that I am soliciting orders, or even suggesting that commissioning them is possible, because they are simply not available at any price. Please don’t ask.

YMHOS

If you have questions or would like to learn more about our tools, please click the “Pricelist” link here or at the top of the page and use the “Contact Us” form located immediately below.

Please share your insights and comments with everyone in the form located further below labeled “Leave a Reply.” We aren’t evil Google, fascist facebook, or thuggish Twitter and so won’t sell, share, or profitably “misplace” your information. May my ootsukinomi roll from my workbench and land cutting-edge down on my toes if I lie.

Leave a comment

The Care and Feeding of the Wild Mortise Chisel – Part 1

Sukezane brand 9mm mortise chisel (mukomachinomi) side view

It is well with me only when I have a chisel in my hand

Michelangelo 1475-1564

This is the first in a series of articles about the Mortise Chisel, especially the Japanese version called the “mukomachi nomi.”

Also called the “Joiner’s Chisel” in Japan, this is a specialized chisel used by specialist craftsmen to cut precise, smallish mortise & tenon joints when making furniture, cabinetry and joinery. Carpenters don’t use it, and few in that august trade have even seen one.

In this article your humble servant will introduce a tiny bit of the terribly long history of the mortise and tenon joint, and give a description of this tool.

In future articles in this series of international intrigue we will consider how to evaluate, adjust and even how to use the Mortise Chisel in general and the Japanese Mortise Chisel in particular. We will also touch on bevel angles and blade hardness problems, what to look for in a good mortise chisel, and how to examine it with an eye to increasing its performance. This is something most users of chisels never consider, but it can make a big difference in the case of mortise chisels. Indeed, I daresay most Gentle Readers and even a few Beloved Customers will mutter the equivalent of “Bless us and splash us” when they read it.

Of course we must not neglect to discuss how to effectively correct irregularities in our mortise chisel that negatively impact performance, irregularities most people never notice.

After our Mortise Chisel is properly fettled (they almost always have some problems) we will take our racing chisel out for a few laps, but prior to that we will consider how to effectively use it. Too few receive proper training nowadays in chisel work, but here are C&S Tools we feel it our duty to help our Beloved Customers maximize their skills.

We will conclude this series by taking the “Old Master’s Test,” just to make sure both our Mortise Chisel and our skills are improving.

While focused on the Japanese Mortise Chisel, the principles and improvements discussed in this series of articles are applicable to any chisel used to cut mortises.

While all Gentle Readers with eyes to see, ears to hear, and hands that love wood are welcome to share this hard-earned knowledge, it is intended primarily for our Beloved Customers, especially those who use chisels professionally to keep body and soul in close proximity.

Some Background

Your humble servant drafted this series of posts years ago, and has shared bits of it with friends and Beloved Customers from time to time when requested, but the information has not always been well-received for a number of reasons.

There is an old Japanese saying, one which probably originated in China, written 「馬の耳に念仏」and pronounced “Uma no mimi ni nenbutsu,” which translates to “Prayers in a horse’s ear.” Why are Buddhist prayers relevant you ask? Good question. You see, some of the principles your humble servant will present in this series directly contradict doctrine profitably expounded by some of the Popes & Professors of Woodworking in the West, and may offend their disciples. But like vespers to a beast of burden, wisdom is wasted on the willfully, woefully ignorant (wow, that sounds almost like iambic pentameter!).

But our Beloved Customers are neither angels nor asses but shockingly intelligent mortal humans with whom your humble servant is convinced the time has come to share the gospel of the Mortise Chisel as it was taught to me by Masters who have since abandoned this impure world to sort boards in the big lumberyard in the sky.

This series of posts is equivalent to a graduate school course in chisels, something like “Mortise Chisels 701.” And just like a course in advanced differential equations, most Gentle Readers will never need it. But never let it be said that your humble servant didn’t do his best to improve both the skills and the tools of our Beloved Customers.

Some History of the Mortise & Tenon Joint

Mortise chisels are used for cutting rectangular holes in wood usually intended to receive matching tenons to form a structural connection called the “mortise and tenon joint” between pieces of wood.

No one knows how long humans have been using the mortise and tenon joint, but it’s a technique older than nails, although modern humans with their lithium battery-powered, made in China, landfill-bound, multicolored plastic and rubber screwdrivers may find it difficult to imagine.

So let’s begin the journey by briefly examining just two well-documented extant physical examples that may provide motivation for using this enduring joint.

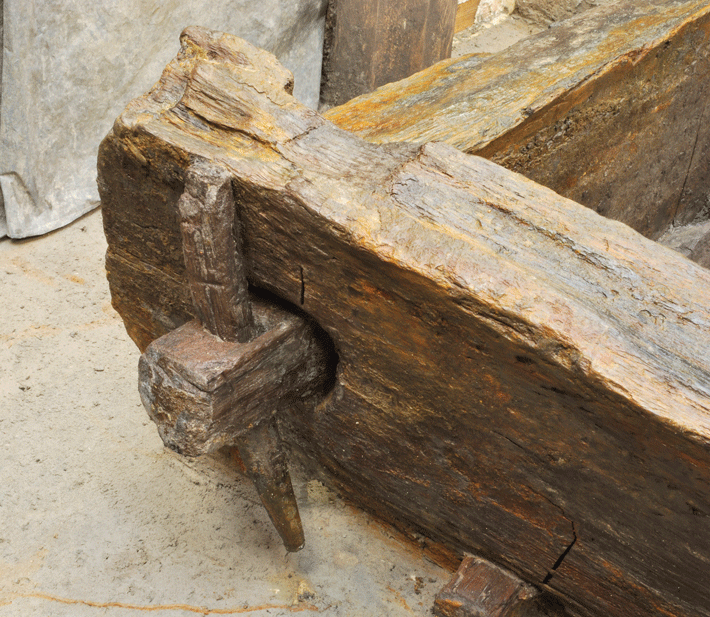
The oldest known wooden structure is a neolithic well liner discovered near Leipzig Germany, constructed from oak timbers shaped by stone adze and joined at the corners with half-lap joints and pinned tusk-tenons at through-mortises. Tests indicate the trees these timbers were split from were felled between the years 5206 and 5098 BC, making the assembly at least 7200 years old.

Next, let’s look at a less soggy but more recent, more complicated and elegant example.

The oldest existing wooden building in the world is a Buddhist Temple named Horyuji located in Nara Japan. Originally constructed around 600 A.D. and rebuilt around 700 A.D. after a fire, this huge 1300 year-old temple and pagoda complex was reconstructed using hundreds of thousands of hand-cut mortise and tenon joints, testifying to the longevity of wooden structural systems and the value of this universal connection technique.

Horyuji  is far more than just a temple to Buddhism, it is a temple to woodworking. If you haven’t yet visited it, you’re truly missing something. 

I mention these two examples to illustrate the universality, strength, and durability of the mortise and tenon joint. Anyone serious about woodworking must master this most ancient and essential connection.

The mortise chisel is the best handtool for the job of cutting mortises less than 15mm in width. For wider mortises, well-fettled oiirenomi or atsunomi are more efficient.

Japanese Mortise Chisels

12mm mortise chisel (mukomachinomi) Face (top) View
12mm mortise chisel (mukomachinomi) Side View
View of ura (flat) of the same 12mm mortise chisel
12mm mortise chisel (mukomachinomi). Please notice the rectangular cross-section precise right angles, and straight, clean sides. This is the most precise of the Japanese chisels. The apparent tan-colored stains on the shoulder are not rust but easily-removed sharpening stone residue left by the professional sharpener who prepared the blade.

In the Japanese language mortise chisels are called “mukomachi nomi” (向待鑿), with “nomi” meaning “chisel.” Don’t ask me the origin of the rest of the word because I don’t have a clue, and have heard few plausible explanations. There is another post linked to here that contains more information about this chisel.

I will use the term mortise chisel in this article to refer to the mukomachi nomi.

For our Gentle Readers interested in the Japanese language, there are several combinations of Chinese characters used to write mukomachi, none of which make much sense or seem related in any way to either tools or woodworking. The most common characters used are “向待” with the first character meaning “there” or “direction,” and the second character meaning “wait.” Combined, they seem to mean “Waiting over there,” or something like that.

I assume the name was originally phonetic and somebody decided to use these kanji because their pronunciation matched the phonetic name. This sort of linguistic contortion is seen frequently in Japan, and has been a source of confusion for all and sundry for many centuries. I blame it on elitist Buddhist priests going back and forth between Japan and China over the centuries, but it is typical of the Japanese people in general and priests in particular to take a perverse pleasure in intentionally making and using terms others can’t figure out.

This confusing practice is not unique to bald priests. When I was an engineering student, I recall the professors insisting we never attempt to simplify or too clearly explain the technical jargon of the trade to non-professionals because it was essential to job security for them to never quite understand it.

If you are familiar with Japanese architecture, you have seen the wooden lattice work that defines it in doors, windows, dividers, shoji, fusuma, koshido, glass doors, ceilings, and even fences, all items made by “tategushi” or “joiners” in Japan. Each piece of any lattice needs two tenons and two matching mortises to stay in-place, so a single piece of traditional Japanese joinery may contain literally hundreds of small, highly precise mortises, indeed thousands in the more complicated pieces. The Japanese mortise chisel was developed specifically at the request of joiners for this type of work. Therefore, it is also known as the “Tategu Nomi” which translates to “joinery chisel.” Few carpenters use this chisel.

Nora Brand 6mm Mortise Chisel (Mukomachinomi) Side View. Although it appears to be a simple, unsophisticated tool, nothing could be further from the truth. Based on the Kiyotada pattern, this is an especially beautiful example to those with eyes to see.
Nora Brand 6mm Mortise Chisel (Mukomachinomi) Ura View
Nora Brand 6mm Mortise Chisel (Mukomachinomi) Shoulder View. Exceptional shaping and filework .

Japanese mortise chisels are similar to other Japanese chisels in having a laminated steel structure with a hollow-ground ura (flat), an integral tang, wooden handle, and steel ferrule and hoop. Unlike most other chisels it has a rectangular cross-section with sides usually oriented 90˚square to the hollow-ground ura, and either flat or just slightly hollow-ground to better keep the blade aligned in the cut and to dimension and smooth the mortise’s walls.

Western mortise chisels do not typically share this detail, although unusually intelligent and observant Western woodworkers of course modify their chisels to gain similar benefits.

If speed and precision are important to you, then the sides of the chisel being oriented at 90° to the ura absolutely provide a serious advantage when cutting most mortises because the sides, and especially the two sharpish corners where these three planes meet, will effectively shave and precisely dimension the mortise’s side walls as the mortise is being cut without the need to pare them later.

Unlike most mortise joints cut with oiirenomi or atsunomi, so long as the mortise is the same width as the mortise chisel, and the user has the ability to maintain the chisel at the right angle while striking it with a hammer, the width of mortises cut with this chisel are usually quite precise and seldom if ever need be cleaned with a paring chisel. This functionality means that you can cut mortises, and especially small ones, both precisely and quickly with great confidence. It’s not called the “joiner’s chisel” for nothing.

The mukomachi chisel does not work as well in wider widths because of the increased friction between the chisel’s sides and the mortise’s walls. For joints wider than 15mm, please use a trued oiirenomi or atsunomi. And don’t forget to use your oilpot.

Conclusion

In the next class in our graduate course on the care and feeding of the wild mortise chisel, we will examine the various details to look for in an effective mukomachi nomi, most of which are applicable to other chisels such as oiirenomi and atsunomi too, indeed any chisel intended to be used to cut mortises including Western mortise chisels.

But wait a minute! Before ya’ll run out of the classroom like a caravan of crazy stoats chasing a pixie, please pick up your homework assignments from the table by the exit doors. And please, don’t leave your empties behind on the floor. Paper coffee cups are one thing, but discarded aluminum beer cans attract out-of-work divorce lawyers and other slavering vermin.

See you next time.

YMHOS

Your most humble and obedient servant’s set of well-used mortise chisels. The 8 older pieces on the right are by Kiyotada (1.5mm~15mm). The two 2 newer chisels on the far left are by Nora. Over the years I have used these tools both professionally and as a hobbyist more than any other of my chisels, as you can perhaps tell from the differing blade and handle lengths which have become shorter with use. A stoic tool, they gossip among themselves less than most other chisels. They are good friends and reliable workmates that worked hard for many years to pay rent, tuition and to buy food for the wife and babies.

If you have questions or would like to learn more about our tools, please click the see the “Pricelist” link here or at the top of the page and use the “Contact Us” form located immediately below.

Please share your insights and comments with everyone in the form located further below labeled “Leave a Reply.” We aren’t evil Google, fascist facebook, or thuggish Twitter and so won’t sell, share, or profitably “misplace” your information. If I lie may Mama Shishi bite my head off.

YMHOS

The Varieties of Japanese Chisels Part 16 – High-speed Steel Atsunomi

I am past scorching; not easily can’st thou scorch a scar.”

Herman Melville, Moby-Dick or, the Whale

Your humble servant has previously presented 15 varieties of Japanese chisels for Gentle Reader’s kind consideration in this series so far. In this article we will examine a specialized version of the Atsunomi previously presented in Part 8 of this series, one made from high-speed steel.

The C&S Tools High-speed Steel Atsunomi

The chisel in question is made by Mr. Usui Yoshio of Yoita-cho, Nagaoka City, Niigata Prefecture, under his brand name of Sukemaru. The shape of this tool is identical to his standard atsunomi, the only significant differences being the type of steel used and the bright appearance of the blade.

This is not a small chisel but a professional-grade, rugged tool with an overall length of approximately 300mm (12″). It is an indispensable tool in some situations.

If you need a smaller, handier, and more economical HSS chisel, please take a look at our HSS Oiirenomi also by Sukemaru.

What is High-speed Steel?

So just what is high-speed steel (HSS)?

HSS is a tool steel developed for manufacturing commercial cutters, dies, etc. In this case, Usui-san uses a high-speed steel designated SKH51 in Japan, the equivalent to M2 in the USA, BM2 in the UK, HS6-5-2 in Germany, and Z85WDCV06-05-04-02 in France. This is the most popular HSS formula in the world. If you own router bits without carbide cutters, and not made in China, you own this steel.

This variety of HSS contains buckets-full of tungsten, molybdenum and chrome, with a stout vanadium chaser.

After oven heat-treat, these chemicals make the steel tougher, more abrasion-resistant, and more resistant to softening (aka “temper-loss”) when subjected to high-temperatures than regular high-carbon steel. Its nickname of high-speed steel comes from the tendency of cutters made from this steel to retain their hardness even when worked so hard blade temperatures become hot enough to draw the temper of standard steel cutters, softening and making them useless.

The chemical composition is listed below, just in case you are interested. You can see what I mean about “buckets.”

CMNSiCrWMoV
0.85%0.28%0.30%4.15%6.15%5.00%1.85%
Chemical composition of SKH51/M2 HSS Steel

Why Use High-speed Steel?

No doubt a question jumping up and down and screaming in Gentle Reader’s mind at this point is “what are the properties of high-speed steel and what difficulties can a chisel made from this special steel help me overcome?”

Toughness and Shock Resistance

Perhaps the most significant property of high-speed steel is its toughness. SKH51 (M2) steel is the most shock-resistant of the high-speed steels, making it especially suitable for use in a chisel that may impact hard objects in daily use but must survive without chipping or breaking. This toughness provides huge benefits in the situations described further below.

Abrasion Resistance

Abrasion resistance goes hand-in-hand with toughness, but it is a different characteristic many misunderstand. It does not mean a cutting edge will be sharper than a cutter made of high-carbon steel, only that it won’t wear and become dramatically rounded-over as quickly. In the case of chisels, a blade made from highly abrasion-resistant tool steel will reach a certain level of sharpness (or dullness) and remain at that level a relatively longer time allowing a cutter to keep on cutting without becoming useless. But the quality of the cut will decrease, and energy necessary to motivate the blade will of course increase as the blade dulls. No free lunch, sorry to say.

Abrasion resistance is not typically considered overly important in blades where great sharpness is high-priority, but it is extremely important when the blade is used to cut materials such as exotic hardwoods that contain silica crystals, or Engineered Wood Products that contain hard adhesives and/or highly-abrasive particles such as silicon carbide deposited by sandpaper, or dirty wood contaminated with sand, grit and other contaminants that will literally destroy the cutting edge of a plain high-carbon steel blade making it useless.

Just as a low-revving high-torque truck would be at a hopeless disadvantage in a Formula One race, a screaming McLaren MP4/6 with all its speed, power and agility couldn’t tow a heavy trailer 100 yards through the mountains. Horses for courses.

Engineered Wood Products

One major challenge the HSS atsunomi excels at overcoming is modern wood products called Engineered Wood Products (EWP)

Commercial carpenters and cabinet makers nowadays have no choice but to use modern EWP such as plywood, MDF, HDF, OSB, LVL, glulams, etc.. Unlike new, clean, solid lumber cut with saws and planed with knives to final dimensions, engineered wood products are comprised of wood veneer, chipped wood and/or sawdust glued together by hard adhesives that will harm standard steel tool blades. HSS handles these difficult adhesives easily.

A bigger problem associated with EWP is the extremely hard abrasive particles left embedded in them by the sanding belts used to dimension and smooth them, particles much harder than any heat-treated steel, and that will quickly destroy a good high-carbon steel chisel. Being much tougher and more abrasion resistant than high-carbon steel, HSS can handle this abrasive residue without being destroyed. That does not mean abrasive particles do not scratch and dull HSS atsunomi cutting edges; After all, silica carbide particles are harder than high-speed steel. It just means HSS blades won’t chip or break and will keep on cutting longer than HC steel blades.

Restoration & Remodeling Work

Another type of work this HSS atsunomi excels at is restoration work, remodeling work, and chisel work around concrete and masonry.

In the case of restoration work, the job usually involves cutting wooden structural members and finish materials that are old and dirty and contain hard abrasive dirt, sand, small stones and of course hidden nails and screws that will not only dull a chisel blade but may badly chip it. 

For instance, a Beloved Customer who is a timber-frame carpenter in the Czech Republic was tasked with splicing segments of new timber to replace rotted-out sections of a large number of 300 year-old rafters during the ongoing restoration of the Grand Priory Palace located in Prague (constructed from 1726 to 1731), an ancient city with many beautiful, old structures.

Grand Priory Prague
Grand Priory Prague
Grand Priory Prague Roof Frame Restoration

The wood was dirty and full of gravel and broken-off nails that chowed down on standard chisels without even pausing for a drop o’ Tabasco Sauce. But our HSS atsunomi chisel made it possible for him to cut and fit the timber splices while working on the steeply-slanted roof far above cobble-stone streets without chipping the blade and without stopping the work for frequent resharpenings beyond an occasional touchup with a belt sander.

In the case of remodeling work, one must routinely cut precise holes through existing wood contaminated with abrasive dirt and hiding screws and nails, as well as lathe, plaster and drywall containing abrasive sand, and in close proximity to mortar and concrete which contains sand and gravel aggregates that will dull, chip and even destroy a standard chisel in two shakes of a lamb’s tail. 

If you have ever done remodeling work or an installation requiring chiselwork, you know the despair one feels when gazing upon the damage done to a beloved tool.

Likewise, during installations, cabinetmakers must make precision cuts in abrasive engineered wood products such as plywood, OSB and MDF. Our HSS atsunomi chisel, as well as our HSS oiirenomi chisel excel at this job being far more durable than standard chisels with high-carbon steel blades.

Jigane

The jigane Usui-san uses for his HSS Atsunomi is a harder version of the standard low-carbon steel he uses for his standard atsunomi. It is not stainless steel, however, and can corrode.

Likewise, the furniture (katsura (hoop) and kuchigane (ferrule)) are made from mild steel, not stainless steel, despite the bright appearance, and will exhibit corrosion over time. As an option, these two parts can be ordered blackened creating a two-toned chisel some people find attractive.

Heat-treat and Hardness

To prevent chipping, the HSS blade is heat-treated in a special computer-controlled oven following a specific temp/time curve to achieve a hardness of Rc63, intentionally a little softer than the maximum hardness of Rc64 listed for this steel. Even then, this is harder than nearly all currently-produced Western chisels we are aware of. 

The blade’s bevel angle is 30°, the standard angle for Japanese woodworking chisels. To reduce denting you may want to increase the angle to 35° if you will be cutting through hard materials.

Resharpening in the Field

Another huge advantage of Sukemaru’s HSS chisels is that they can be quickly resharpened to a usable cutting edge in the field using angle grinders and belt sanders without losing temper and softening so long as one is careful to keep temperatures below 650°C (1200°F), not difficult to do if one pays attention. Don’t underestimate the efficiency this feature will bring to your work some days.

The compromise with HSS chisels is that, while they can be made extremely sharp using stones and proper technique, they will never become as sharp as our hand-forged high-carbon steel chisels. Moreover, they will take twice as long to sharpen by hand using conventional wetstones and waterstones.

Sharpening time can be reduced dramatically by using aggressive diamond plates or diamond stones.

We have personally tested these chisels to failure and resharpened them. We are confident of their quality and performance.

If you need an exceptionally tough chisel that can “take a lickin and keep on tickin” even in conditions that would utterly destroy a regular chisel, then the HSS Atsunomi, or where a smaller tool is required, its tough little sister the HSS Oiirenomi, will get the job done for you.

If you would like to know more about these chisels, please drop a note in the form below titled “Contact Us.”

YMHOS

If you have questions or would like to learn more about our tools, please click the see the “Pricelist” link here or at the top of the page and use the “Contact Us” form located immediately below.

Please share your insights and comments with everyone in the form located further below labeled “Leave a Reply.” We aren’t evil Google, fascist facebook, or thuggish Twitter and so won’t sell, share, or profitably “misplace” your information. May a thousand bot flies make a home in my eyebrows if I lie.

The Varieties of Japanese Chisels Part 15 – Ootsuki Nomi 大突き鑿

All times are good for those who know how to work and have the tools to do so.

Carlos Slim

The Ootsuki nomi is the largest of the Japanese chisels. It is essentially a scaled-up tsukinomi paring chisel, equivalent to what is called a “slick” in the West.

Definitions

The name is written 大突鑿 using Chinese characters. The first character 大 means “large,” or “ big.” Besides “Oo “ this character can also be pronounced “dai.” You may notice it looks like a man with his legs spread and arms extended, as if he is describing to his buddies the size of the fish that got away. At least that’s how I remembered the meaning when I was a young man in Japan many moons ago.

The second character 突 means to “push against.” And the last character 鑿 , pronounced “nomi” means chisel. It is a very complicated character the origin of which is a mystery to me and everyone I have asked.

So the name translates directly to “large push chisel.”

Applications

If you have never done timber framing, a brief explanation may be helpful. 

When doing production work (versus hobby stuff) one cuts the pieces and parts of most open joints using electrical circular saws. Chainsaws kinda work too, but with much less precision.

Handsaws are also necessary for some cuts, but for most situations a circular saw is much quicker and less tiring. There’s a lot of wood that needs cutting after all and only so many hours of sunlight in a day.

Mortises are typically cut with portable electric hollow-chisel machines. There are other options such as portable chainsaw mortisers, stationary router machines, or the amazing German Hundegger machines. http://hundeggerusa.com

I once worked for a Japanese company that cut entire wooden structural frames using CAD driven CNC machines in a factory. In that situation however, the CNC machinery, while very precise and very quick, was so expensive and so inflexible that the building had to be designed around the repertoire of joints and sizes the machinery could cut rather than the joints required to make the best building. And it could not handle significant dimensional irregularities in the timbers used, so only machined glulams were suitable. A very limiting endeavor indeed. I left that job after 2 years.

In any case, hand-operated powertools tend to be less-precise than large CNC machines, leaving rougher surfaces and tolerances that often need fine adjustment without messing around. This is where the ootsukinomi excels because, with the combination of its sharp blade, long handle, and the power of the user’s back and legs, it can quickly gouge out large swaths of wood when cutting joints. But make no mistake, for it is not a brutish tool like an axe or adze, but can deftly pare fine shavings to achieve precise dimensions for tight fitting joints and smooth finished surfaces due to the angular control the longer blade, neck and handle afford the accomplished craftsman.

Sharp tools guided by human hands, controlled by human minds with years of experience are indispensable in the final analysis.

Paring a saddle
Paring a splice joint with a 48mm chisel
Paring a housed semi-half-lap notch where two beams will cross over and under each other

Indeed, handtools like axes, adzes, chisels and handsaws are necessary especially when doing “ round work” in logs or when the design calls for irregular-shaped timbers. Paring chisels are also needed to achieve the relatively precise tolerances and smooth surfaces such work demands.

Ootsuki nomi are relatively heavier than other Japanese paring chisel with larger diameter and longer handles. They are  built to resist the large bending moment forces created by a large man gripping the handle with both hands and pushing like a plow horse to pare wood. This is the task this chisel excels at.

Most Japanese carpenters that use this tool buy them in sets of two: a wide 48~54mm wide one for paring open joints and the sides of mortises, and a narrower 24mm chisel in shinogi profile for paring the housed dovetail joints to house beams and purlins commonly used in Japan, although other sizes are available. I have owned a custom 2-pc set hand-forged for me by Mr. Shimamura (Kiyotada) many years ago, one with a 60mm blade and an extra-large handle intended for working especially large North American  timbers. 

As mentioned above, the 24mm chisel is used for paring standard rectangular mortise, dovetail mortises and dovetail tenons, besides a hundred other tasks. In cross section, it is essentially a large shinogi usunomi chisel to help it get into tight places.

A carpenter paring the end walls of a mortise with a 24mm ootsukinomi chisel

Mitsuura

When paring large surfaces with the wider ootuskinomi chisel the hollow ground ura may allow bumps in the wood to slide up into the hollow-ground ura unseen escaping paring, requiring multiple passes to knock them down. This sneaky behavior is easy to overcome with practice, but some people prefer an ura with not a single, but multiple grinds with lands between each hollow-ground area to help index the blade and shave these bumps the first time.

I believe this is one of the few situations where these multiple ura, called mistuura or “triple-ura” are useful.

Kensaki (swordpoint) Ura by Sukemaru. A very unique style of mitsuura cut with EDM equipment. Pretty cool, huh. Sadly, Mr. Usui no longer does this detail no many how much I beg and grovel.

Some people like the unusual appearance of mitsuura. I must admit they look sexy in wide blades, but they have some downsides. The first downside is that, because there is more hard steel in contact with the stone, mitsuura blades can take a little longer to sharpen.

Second, they can be a little harder to keep flat. Neither of these are difficult problems to overcome. But the third downside is more problematic. 

A worn-out mitsuura oiirenomi

Because the three hollow-ground areas are shallower and have less total volume than a single ura, they tend to wear out and disappear sooner. This is not a serious deficiency unless you use and sharpen a mitsuura chisel a lot, or have a heavy hand when sharpening the ura. The negative impacts are minor in most cases.

Beloved Customers need to be aware of these peculiarities and to be gentle when sharpening mitsuura blades.

C&S’s 24mm Ootsukinomi. Notice the shinogi shape

These are not chisels most people will ever have need of but as long as humans are doing timber framing, there will always be a demand for this unique tool.

C&S’s 24mm Ootsukinomi (face)
C&S’s 24mm Ootsukinomi (side)
C&S’s 24mm Ootsukinomi (Ura)
C&S’s 48mm Ootsukinomi (mitsuura)
C&S’s 48mm Ootsukinomi (side)

YMHOS

If you have questions or would like to learn more about our tools, please click the see the “Pricelist” link here or at the top of the page and use the “Contact Us” form located immediately below.

Please share your insights and comments with everyone by using the form located further below labeled “Leave a Reply.” We aren’t evil Google, fascist facebook, or thuggish Twitter and so won’t sell, share, or profitably “misplace” your information. If I lie may the bird of paradise poop on my face.

Leave a comment

The Varieties of Japanese Chisels Part 14 – The Kote Nomi (鏝鑿Trowel Chisel)

You cannot mandate productivity, you must provide the tools to let people become their best.

Steve Jobs

This post will diverge a little from the pattern of previous articles in this series in several ways. First, because although your humble servant loves this tool, it has become difficult to procuring them anymore, so this is more of a show and tell. And second, because I have a couple of stories to tell about the blacksmith that made it, and the store that sold it to me.

The Kotenomi

The kote nomi is written 鏝鑿 in Chinese characters meaning ” trowel chisel.” It is not an elegant name, but is accurately descriptive. It is essentially the same as the Western ” cranked-neck chisel. ” It is used to pare grooves, dadoes, sliding dovetails, rabbits and mortises, anywhere the handle of a regular paring chisel would get in the way.

The sides have a steeper bevel than regular chisels, much like a shinogi usunomi, to help it get into tight places and cut right up against the sides of sliding dovetail groves, dadoes, etc..

These are not easy chisels to sharpen because of both the offset, and the tendency for the neck to get in the way.

This is one of those chisels that you may not need often, but when you do need it, you need it badly.

Kiyotada Kotenomi 21mm (Left Face View)
Kiyotada Kotenomi 21mm (Face View)
Kiyotada Kotenomi 21mm (Ura View)
Kiyotada Kotenomi 21mm (Right Shoulder View)
Kiyotada Kotenomi 21mm (Face View CU)

The shape of the two Kiyotada kotenomi shown in the 10 photographs on this page is graceful, elegant and minimalist. The filework is very nice. The black oxide skin is consistent, indicative of a perfect heat treat. The blade, made of Shirogami No.1 steel (aka “White Steel 1”) is, unsurpassed by anything I have experienced. It is one of those rare tools that clears the mind as it cuts wood.

Background

The kotenomi in the pictures above have an interesting back story. It was forged by a famous and exceptionally skillful blacksmith named Kosaburo Shimamura (島村幸三郎)using the brand ”Kiyotada” (清忠). It is not the standard Japanese kotenomi in terms of design, appearance or performance, but is based on those forged by an even more famous blacksmith named Hiroshi Kato (加藤廣1874-1957) under the name of Chiyozuru Korehide (千代鶴貞秀), one of Japan’s greatest tool designers and blacksmiths. Much of his work is seen as great works of art in Japan.

As Mr. Ichiro Tsuchida told the story to me, he lent one or more of his collection of Chiyozuru Korehide kotenomi to Mr. Shimamura and asked him to forge some just like it to sell in his tool store Sangenjaya in Tokyo. After much trial and error, Mr Shimamura succeeded in approximating the Chiyozuru design in the chisels shown here.

As you can see from the pictures, the blade’s sides are sloped inwards from ura to face, a detail that provides clearance when cutting sliding dovetails, a joint this tool excels at making.

I use it, as well as my other Kiyotada kotenomi, for making dadoes, rabbets, and inletting swamped rifle barrels in reproduction flintlock barrels (sadly, I can’t pursue that activity here in Japan).

Kiyotada Kotenomi 9mm (Face View)
Kiyotada Kotenomi 9mm (Ura View)
Kiyotada Kotenomi 9mm (Right Side Neck View)
Kiyotada Kotenomi 9mm (Left Side View)

Kiyotada Kotenomi 9mm (Left Face View)

The following are pictures of the standard garden-variety kotenomi.

As you can see, the standard kotenomi are very clunky in appearance and crudely finished compared to Shimamura’s chisel, with a more abrupt, angular transition between neck and blade, whereas the handle in the Kiyotada design approaches the neck at more of an angle, a detail that stiffens the neck, reduces the bending moment on the neck/blade junction, and helps force flow into the blade more smoothly.

The standard model works just fine, but a comparison of their the appearance and tactile qualities would be like a Lear jet and Cessna 172: both vehicles will get you there, but the speed, comfort and style will vary.

Standard kotenomi chisel (face view)
Standard kotenomi chisel (Right shoulder view). Please observe the rougher finish and the less-sculptural shape.

The Kiyotada Brandname

A bit if trivia some may find interesting. The Kiyotada brandname was registered by, and remains the property of, a tool store in Tokyo called ” Suiheiya” (水平屋).

Suiheiya means ”level store,” probably named for the bubble-level tool imported from the West and which is so critical to construction and other trades. This store is old and was once the largest tool retailer in Japan. Last time I visited it was still large and packed to the concrete rafters with planes and chisels.

I first visited Suiheiya when I was a student in Tokyo in the ‘80’s when the premises was a 2-story wooden structure probably built right after the end of WWII. The proprietor was an old sourpuss who had no patience with foreigners and treated me like a shoplifter-in-training with a turd perched on my head. For some reason I can’t put my finger on I didn’t visit the store frequently, but I did buy this and other tools from him.

But I digress. Shimamura San made chisels and knives for Suiheiya his entire career and marked those tools with Suiheiya’s own Kiyotada brand. I suppose it would have seemed silly, or at least confusing, to mark a chisel or knife with a brand that could only be read as ”bubble level.”

I’m unsure how it happened, but as his products became more famous Shimamura-san made chisels for other retailers using the same Kiyotada brand. I was told by the owner of Suiheiya that Shimamura-san used the Kiyotada brand for all his products with Suiheiya’s permission.

By the way, although Shimamura-san has gone to the big lumber yard in the sky, Suiheiya continues to sell planes and chisels with the Kiyotada brand, although they are not made by Shimamura-san, who is busy with more important matters nowadays.

Sadly, my blacksmiths won’t make kotenomi for me anymore. I tend to be picky about quality, and with Kiyotada’s kotenomi as the standard, you can see why customer satisfaction in my case is difficult to achieve.

YMHOS

If you have questions or would like to learn more about our tools, please click the see the “Pricelist” link here or at the top of the page and use the “Contact Us” form located immediately below.

Please share your insights and comments with everyone by using the form located further below labeled “Leave a Reply.” We aren’t evil Google, fascist facebook, or thuggish Twitter and so won’t sell, share, or profitably “misplace” your information. If I lie may the bird of paradise poop on my face.

© 2019 Stanley Covington All Rights Reserved

The Varieties of Japanese Chisels Part 13 – The Shinogi Usunomi 鎬薄鑿 Paring Chisel

Kiyotada Shinogi usunomi

“All times are good for those who know how to work and have the tools to do so.”

Carlos Slim

The shinogi usunomi is another variety of paring chisel in the tsukinomi family.

We examined the word ” shinogi” in a previous post.

It means ”ridge” as in the ridge of a mountain, or a building’s roof, or the back of some Japanese swords. Shinogi-style chisels have two wide bevels on their face that meet at the bade’s centerline creating a ridge. Sometimes there is a narrow flat at the top of the ridge, depending on the blacksmith’s style and customer request.

If the atsunomi is the draught horse, the oiirenomis are the quarter horse, and the usunomi is the falcon of the chisel world (the one in my slightly addled head, that is), then the shinogi usunomi is a Goshawk, severe in appearance, fierce, strong, fast, and skilled at maneuvering nimbly in tight situations.

Shinogi usunomi have these same two bevels and center ridge as the shinogi oiirenomi. The side edges tend to be thinner than standard usunomi, and with less material in the way, they are often just the ticket for paring into right corners. And because the ridge is higher than the standard usunomi is thick, they tend to be a bit more rigid.

And of course, since it is an usunomi (meaning “thin chisel”) it has a relatively longer and more slender neck and handle, and no crown.

A pox on anyone that would strike one of these beauties with a mallet or hammer.

One downside to this design is that the ridge down the face, which increases the overall thickness of this chisel, may make it difficult to pare down into skinny mortises. Another potential downside, but not one that bothers me, is that the ridge is not as comfortable to press on with your fingers when paring. I find this ridge gives my fingers a better sense of the blade’s precise location in my hand and in the cut. This is all personal preference that can only be evaluated through experience using both varieties of usunomi.

You may be able to tell from my choice of words that I am fond of shinogi usunomi. Indeed, I admit to prefering them. I like how they look. I like how they feel. I like sharpening them. I like how they cut. I like how the extra clearance on the side lets me see what I am paring. Subjective? Of course. And I admit they can’t do all jobs. The standard usunomi is probably a better general-use paring chisel.

The shinogi usunomi is a serious tool for serious work that looks good while doing it.

YMHOS

If you have questions or would like to learn more about our tools, please click the “Pricelist” link here or at the top of the page and use the “Contact Us” form located immediately below.

Please share your insights and comments with everyone in the form located further below labeled “Leave a Reply.” We aren’t evil Google, fascist facebook, or thuggish Twitter and so won’t sell, share, or profitably “misplace” your information. May my square always lie to me if I lie to you.

The Varieties of Japanese Chisels Part 12 – The Usunomi Paring Chisel (薄鑿)

24mm Mentori Usunomi by Sukezane (Face View)

Our thoughts flow to our hands; our tools become as part of our bodies, the blade of our bodies.

Tsunekazu Nishioka, Temple Carpenter, Horyuji Temple Restoration, Nara Japan.

In the first post in this series, we examined the two main categories of Japanese chisels: the tatakinomi designed to be struck with hammer, and the tsukinomi used to pare wood without using a hammer. Beginning with this post we will shift our focus to several varieties of tsukinomi.

If you need to cut precise joints in wood, then you need both striking and paring chisels.

The most popular variety of tsukinomi is the mentori usunomi (面取り薄鑿)which translates to “beveled thin chisel.” The name is appropriate as the blade is long and thin and the neck gently tapered.

42mm Mentori Usunomi by Sukezane (Side View)
42mm Mentori Usunomi by Sukezane (Face View)
42mm Mentori Usunomi by Sukezane (Ura View)
24mm Mentori Usunomi by Sukezane (Ura View)

Description

Just as with oiirenomi, the blades of tsukinomi can be made with different profiles, such as the stiffer rectangular cross-section of the kakuuchi, or the more triangular cross-section of the shinogi usunomi.

The mentori usunomi has a streamlined cross-section similar to the mentori oiirenomi with two bevels ground into the right and left sides of the blade’s face, flowing over the shoulders and feathering into the neck.

An atsunomi or oiirenomi can pare joints, of course, but the steel crown and mushroomed wood fibers on the handle’s end make them uncomfortable for using hours on end.

In comparison, lacking the steel crown and mushroomed handle, the usunomi is more comfortable to use. More importantly, the blades and handles of these chisels are longer and lighter in weight providing superior angular control for precision paring operations.

Western paring chisels by comparison are even thinner and have longer blades than Japanese paring chisels. There can be no denying they do a fine job. But Japanese paring chisels like the usunomi have a few potential advantages worth considering.

The most significant advantage is that the steel cutting edges of Japanese paring chisels are much harder. The paring chisels our blacksmiths forge are around 65~66 HRc in hardness, whereas Western paring chisels are usually around 55 HRc. A Western style paring chisel with its thin blade of uniform steel hardened to 65 HRc would easily snap in half in practical use.

This extra-hard lamination is hand-forged by our blacksmith from Hitachi Metal’s Yasugi Shirogami No.1 steel (aka “White Label Steel”), an exceptionally pure high-carbon steel that makes possible an edge that stays sharper longer, with the result that, given the same number of sharpening opportunities and time in a given workday, a professional-grade usunomi will help you do more hours of high-quality work than a softer blade.

For craftsmen that use their tools to feed their families this higher-level of performance is not something to be sniffed at.

The second advantage of the Japanese paring chisel is their hollow-ground ura which makes it easier to maintain a flat bearing surface, especially important in the case of the hard steel used in our chisels. If you haven’t used Japanese chisels, this claim may sound unlikely. But please recall that there are narrow lands surrounding the ura, all in the same plane, that create a flat bearing surface to guide the chisel.

Usage

This tool is well-suited to reaching into narrow mortises and other wood joints to clean and pare surfaces roughed out by axe, adze, saw and tatakinomi to precise tolerances.

It excels at trimming mortise side walls and end walls. And shaving tenon cheeks and shoulders to precise dimensions without causing spelching or cutting too deeply as shoulder planes are wont to do is a piece of cake.

In addition, the longer blade and flat face of the usunomi make it ideal for paring angles, such a 45° mitres, in combination with wooden guide blocks or jigs.

The usunomi may be struck with the heel of the hand, but never with a hammer or mallet. The slender neck, thin blade, and un-reinforced handle will simply not accept such abuse gracefully.

Chisels intended to be struck with a hammer typically perform best with a cutting edge bevel of 27~30°. Any shallower and the hard steel at the cutting edge may chip instantly dulling the tool. However, the cutting edges of usunomi along with other tsukinomi are not normally subjected to the high stresses chisels motivated with hammers must endure, so the cutting efficiency can be increased by lowering the angle to 24° or so without creating problems, depending of course, on nature of the wood you need to pare and the type of paring you intend. For instance, paring end the grain of maple may require a steeper angle than when paring the long grain of pine.

If you have used long-bladed Western chisels hard for a few years, you will have no doubt experienced your chisel’s flat becoming somewhat rounded over after many sharpenings. This occurs because, for various reasons, the center portion of the blade’s flat is abraded at a slower rate when being sharpened than the blade’s perimeter, resulting in distortion regardless of whether you keep your stones perfectly flat or not.

Obviously, a chisel with a flat that is banana-shaped lengthwise and crosswise is not ideal for paring flat surfaces, but there is a bigger problem. Namely, it is simply more difficult and time-consuming  to create a sharp edge on a blade with a curved flat than one with a true flat. A flat like this begs for amateurish tricks using rulers, etc.. of the sort professionals would be embarrassed to use. A friend once scathingly described these techniques as “training wheels.” Oh my.

The ura on the Japanese chisel is specifically designed to deal with this shortcoming, and it does a great job of it.

30mm Unsunomi by Nagamitsu – View of Mitsuura
30mm Unsunomi by Nagamitsu – View of Face
30mm Unsunomi by Nagamitsu – Closeup of Mitsuura

The 30mm usunomi in the photo above has an ura with three hollow-ground areas instead of one. This detail is called a ” mitsuura” ミツ浦 meaning ”triple ura.” It has the advantage of providing a larger bearing surface than the standard ura does, one that is helpful when used with wooden jigs for paring to precise angles, for instance. It also helps the ura index better when paring large surfaces, especially with chisel blades wider than 24mm.

Some people prefer chisels with the mitsuura detail for their appearance. I admit mitsuura look sexy, but I am not a fan of using this detail unless it is truly necessary because of the downsides I will not deal with in this already overlong post.

If I can liken the atsunomi to a shire horse, then the usunomi is a falcon. Both are beautiful powerful animals, but just as one wouldn’t use a draught horse to chase down a rabbit, or a peregrine to pull a plow, neither oiirenomi nor atsunomi are as effective as the usunomi for paring and cleaning joints.

A Shire Horse and His Little Friend. Stout, heavy and strong is good for some jobs, but…
Slim, light, fast and sharp is better for others.

The usunomi is one of those tools that is a pleasure to use.

Among woodworking tools, the usunomi is special: as it becomes part of your hand, you will discover that neither the blade nor your hand but your mind is shaping the wood.

YMHOS

If you have questions or would like to learn more about our tools, please click the see the “Pricelist” link here or at the top of the page and use the “Contact Us” form located immediately below.

Please share your insights and comments with everyone by using the form located further below labeled “Leave a Reply.” We aren’t evil Google, fascist facebook, or thuggish Twitter and so won’t sell, share, or profitably “misplace” your information. If I lie may a shire horse polish his hooves on my back.