Salt, Rice, Sake and a Prayer

Mother troll introducing her two handsome, well-dressed sons as suitors to a fairy princess. A difficult choice!

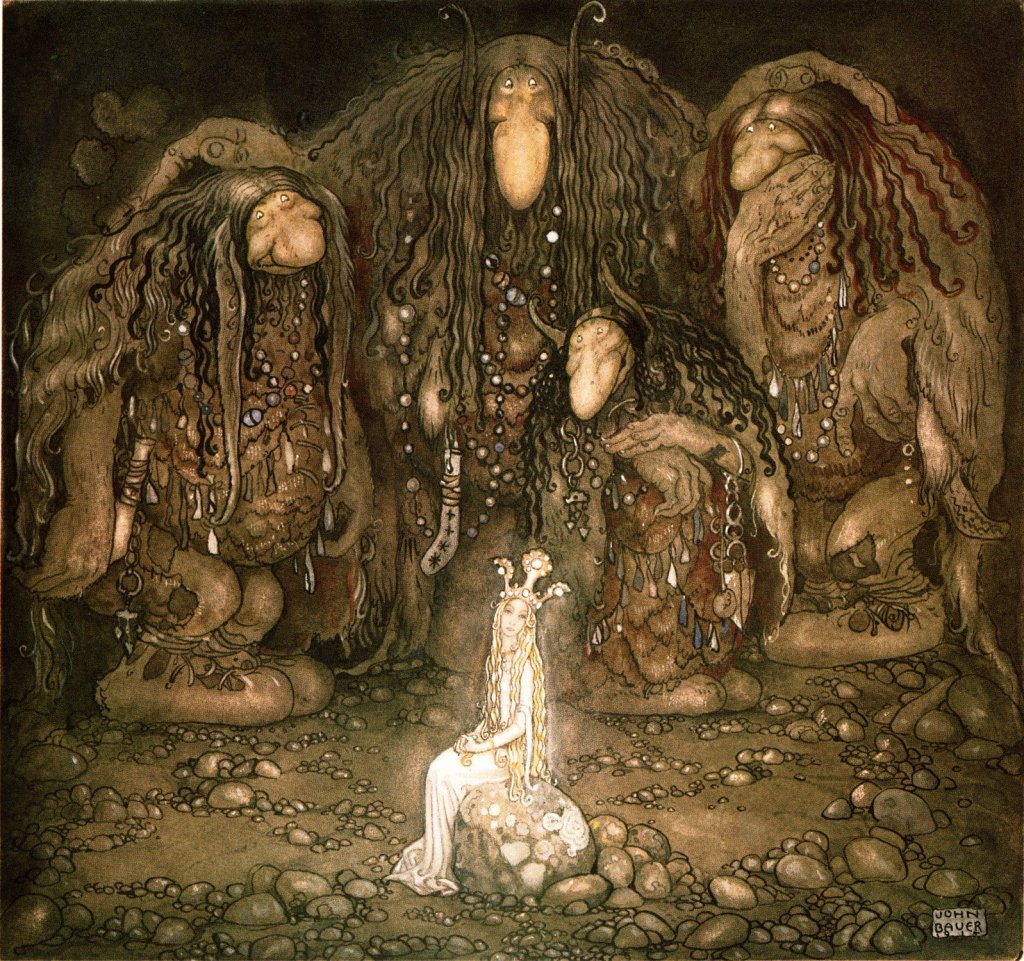
But when the fairy sang the whole world listened to him. Stephen felt clouds pause in their passing; he felt sleeping hills shift and murmur; he felt cold mists dance. He understood for the first time that the world is not dumb at all, but merely waiting for someone to speak to it in a language it understands. In the fairy’s song the earth recognized the names by which it called itself.

Susanna Clarke, Jonathan Strange & Mr Norrell

Most of the articles at the C&S Tools blog are focused on how to select, maintain and use woodworking handtools. But in this article your humble servant would like to examine the relationship between supernatural influences and construction jobsite safety from a Japanese perspective.

We will also briefly examine a traditional way to deal with supernatural beings in order to increase both safety during construction and the welfare of those who will occupy the completed structure.

Gentle Readers involved in construction, either as customer or worker, may find this article informative and maybe even helpful.

Supernatural Beings

Your humble servant has often sensed unexplainable presences when alone in deep forests, high mountains, dark caves, and open deserts where human influence is absent. These irrational feelings may spring from an overactive imagination, or perhaps the gentle ministrations of a butter-fingered baby-sitter when I was small, but I’m not alone in my perceptions because humans in all parts of the world have felt similarly about certain places on the earth such as hills, groves, and caves since before recorded history. What about you?

Likewise, the peoples occupying the heavily-forested islands of Japan have, since ancient times, believed that spirits reside in trees, hills, rocks, rivers and of course the ground. Indeed, Japan’s indigenous religion, called Shinto, which can be translated as “The Path of the Gods,” is a vague belief system lacking the systematic doctrine of most religions, being based almost entirely on this amorphous perception. It is no coincidence that Shinto has heavily influenced Japanese architecture and carpentry traditions.

If one believes that supernatural beings reside in trees, groves, mountains, water and even rocks, it’s not a stretch to believe that some of those beings, or spirits, are naughty and some are nice. Besides, the bad things that happen to us can’t all be blamed on Fortuna, right?

Since most people can neither see nor readily converse with these beings or spirits that don’t give a rodent’s ruddy fundament about what judges and lawyers do and say, how can we protect ourselves from their naughty tendencies, especially when human activities evoke their ire?

Indeed, it may be productive to consider what human activities piss-off vengeful supernatural beings in nature. Loud music, perhaps? Racism against pixies? Wearing socks with sandals? Nah, none of those. In the case of Japan it has been traditionally held that clearing and grubbing trees and vegetation and excavating soil for construction projects is asking for trouble from the supernatural beings that call such places home. Accidents, injuries and even deaths during construction work are believed to be a direct result of such activities, and the malevolent effects of PO’d spirits can make entire buildings dangerous, unhealthy and unlucky places both short-term and over the entire life of the building.

So how does one keep potentially dangerous spirits happy? A traditional approach is a ceremony called the Jichinsai.

Jichinsai Ceremony

The name of this common ceremony is pronounced jee/cheen/sah/ee, and is written 地鎮祭 in Chinese characters as used in Japan.

The first character 地, pronounced “Ji” or “Chi,” means ground or earth. The second character means “weight” as in “paper weight,” but it also means to “suppress” or “calm.” The last character is pronounced “sai” and can also be read “matsuri,” meaning ceremony or festival. One practical translation of this ceremony is “Earth-calming ceremony.”

There are records of Jichinsai being performed in Japan as early as AD 690.

I think I participated in my first Jichinsai in Japan in 1987. I have since attended many in Japan and even a couple more since then in the United States.

I like to think of the Jinchinsai as a ceremony to keep mischievous pixies sleepy and to hide the building and workers from Murphy’s attentions.

The Jichinsai ceremony is typically performed prior to the beginning of a construction project. Its goal is to show respect to and appease the local spirits, and thereby forestall them from seeking revenge for the contractor’s rude disruption of their happy homes.

The ceremony accomplishes these goals by providing offerings of food, booze and greeting to the spirits, showing proper respect, a bit of entertainment, and saying prayers informing them of the construction plans and asking for their protection. Basically, salt, munchies, wine and flattery followed by a polite, well-phrased request, just like a good pickup line. (ツ)

Nowadays, this ceremony has been appropriated by Shinto priests hired to conduct the ceremony, but it is neither Buddhist nor even Shinto in origin, having roots older than formal religion.

Indeed, while priests saying theatrical prayers and dressed in silk brocade robes and wearing oh so goofy hats add to the pageantry, and they insist the efficacy, of the ceremony, in your humble servant’s opinion they add little but cost because, at its heart, the only true participants in the ceremony are the workmen who will perform the construction work, those who will live in or will use the completed building, and the spirits that reside in the vegetation and ground to be disturbed. But it is human nature to enjoy and even find meaning in pageantry. If not, the Academy Awards program would have been canceled years ago for being such a boring, preachy stinker. And besides, priests need work too. 

Indeed, if only the builder conducts and attends the ceremony, that is sufficient for purposes of promoting safety for himself and his workers during the construction work, although the Owner, if he doesn’t participate, could arguably miss out on some of the blessings possibly provided by the ceremony such as his safety and prosperity in using the land and building.

A Shinto priest dressed in silk robes, wooden shoes and lacquered hat conducting a Jichinsai ceremony for a corporate construction project. A specialist subcontractor has erected the tent and provided seating and props. Notice the wooden stand with offerings of salt, foods and wine, standing bamboo at the four corners, and Cleyera Japonica cuttings below and behind. At this point in the ceremony, the Priest has sung several prayers and scattered bits of paper around. The pile of sand in the foreground is still undisturbed, but towards the end of the ceremony the Client’s representatives will poke it with a wooden hoe to let the spirits know dirt work will start soon. The step-by-step program for the ceremony is listed on the board to the right. Participants in the ceremony are required to stand, clap hands, bow, drink a drop of demon rum and make plant offerings several times. It is a deadly serious business.

Groundbreaking ceremonies have been around for a long time in other nations too. Nowadays in the West, they have degraded to a photo opportunity for publicity hounds like politicians and business owners, but the tradition of dedicating, blessing and/or sanctifying the ground upon which a building will stand has ancient roots in Christian and Pagan traditions too. 

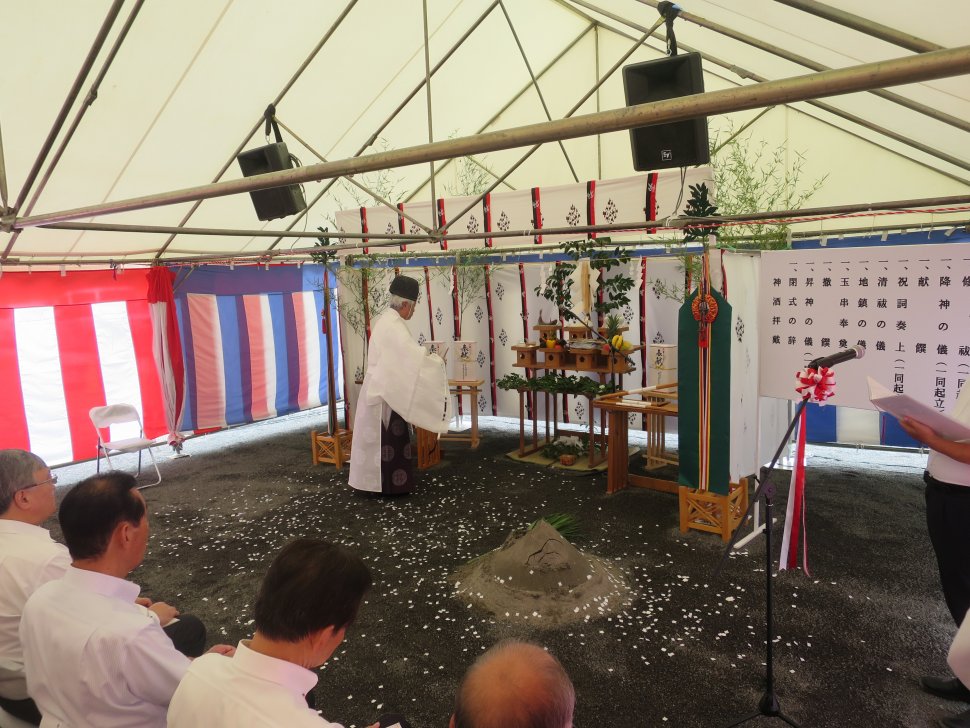
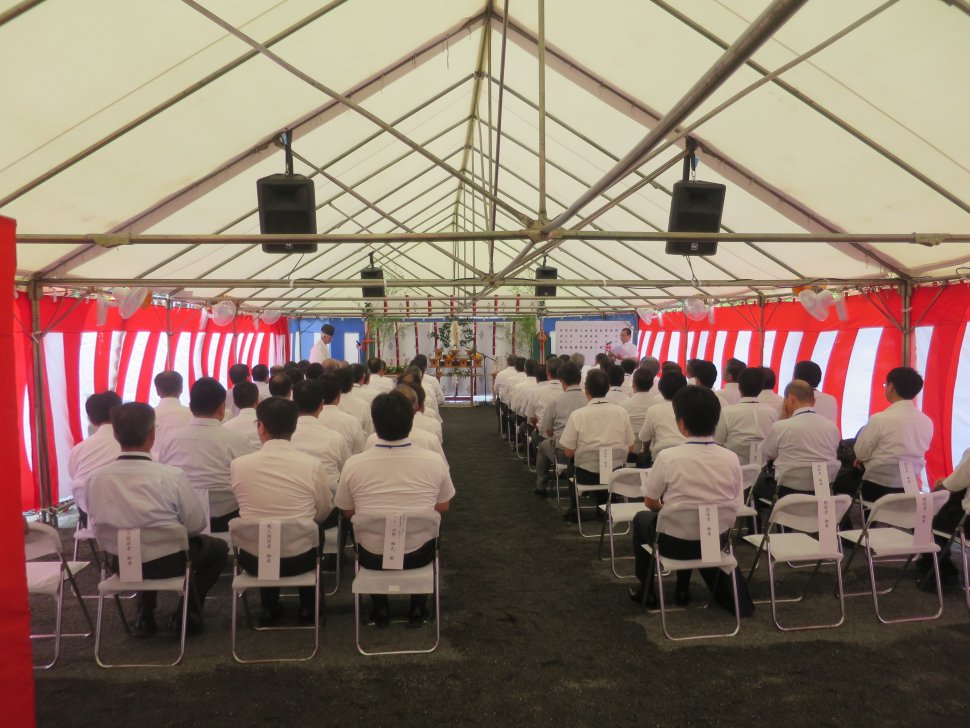
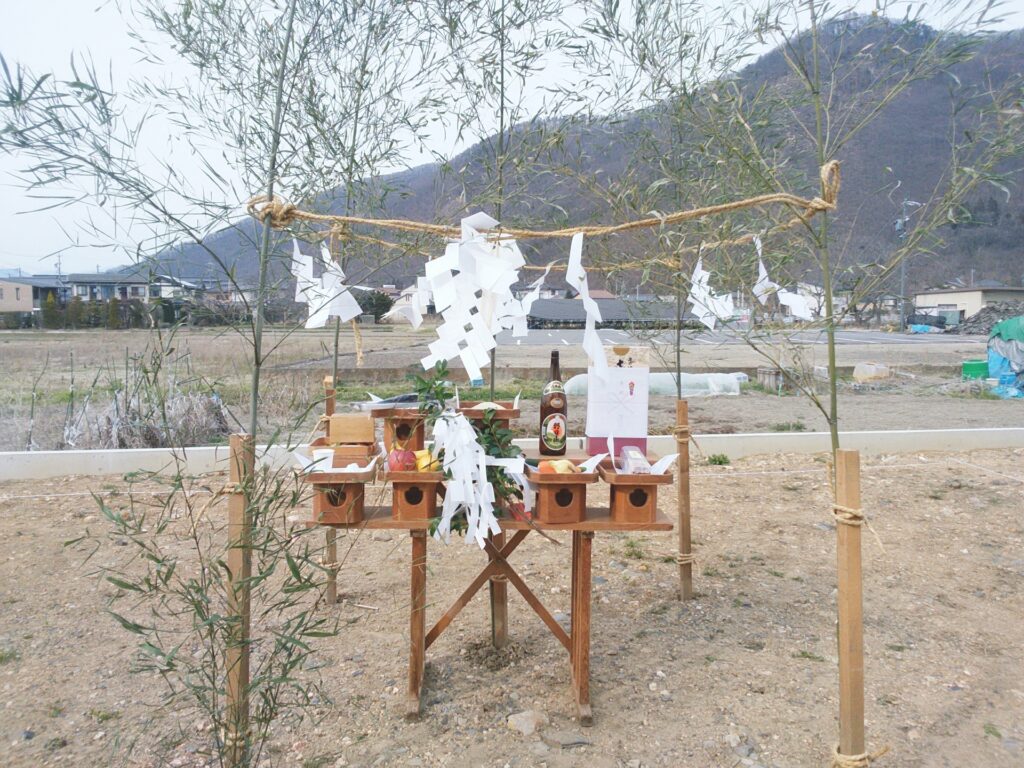
Nowadays most versions of the ceremony are centralized on a wooden table set up on the site where the building will be constructed surrounded by green bamboo cuttings stuck into the ground forming a square. A rope is strung around these poles and pieces of paper cut into a special pattern particular to Shinto ceremonies are hung from these ropes. 

Various offerings are placed on the table, always including at least rice, salt and sake. Some additional offerings might include products from the sea, such as fish, and products from the mountains, such as the various herbs and vegetables that supernatural beings like to munch on. Fruits are often included as well, but no red meat.

The general contractor usually hosts the ceremony, sets the stage, makes other arrangements and pays the costs. Of course priests don’t work for free so the cost of the ceremony is included in the contractor’s construction contract amount, although it is seldom shown as a line item. Often, however, the GC will inquire before submitting his bid or tender if the Owner desires a Jinchinsai to ascertain if the cost should be included or not. 

I won’t go into all the details of what goes into a Jinchinsai because it would take months of research and a book I do not have the time to write.

The following links are to YouTube videos of an actual Jichinsai with all the trimmings. Video 1 Video 2

Why Perform a Jichinsai Ceremony?

I mentioned above that I do a lot of work for international corporate Clients in Japan. Indeed, Gentle Reader no doubt uses their products daily. These are corporations that are decidedly non-religious and are careful to avoid allowing religious influence to become apparent in their business dealings. So how do they justify spending money and time on a ceremony intended to deal with metaphysical influences? The reasons, as I understand them, are threefold: (1) Peace of mind; (2) Employee and Customer relations; and (3) Avoidance of blame. 

Let’s examine reasons 1 & 2 first.

After many millennia of belief, the local employees of even large international corporations have a fear of malevolent supernatural influences embedded in their DNA, so to actively reject a harmless, basically non-religious, non-controversial tradition intended to protect them may cause undue stress in some individuals.

You don’t believe me? Here’s a true story.

A Ghost Story

Some years ago my team and I were managing a two-phase construction project for a very wealthy and well-known international consumer electronics company.

Phase One included office fitout work and cleanroom construction (tenant improvements) in a leased space in a brand spankin new building located in Yokohama. Although the grade of the completed project was exceptionally high, it was just a temporary facility.

Phase Two, however, was the construction of a large, elegant, high-tech, structurally-advanced building intended for long-term operations. When completed it was without doubt the most beautiful and both technologically and environmentally advanced building in Japan, if I do say so myself.

The Client anticipated hiring hundreds of new engineers to work in both the Phase One and Phase Two spaces, but sadly hiring lagged far behind plan, so even though we had completed the construction work of the Phase One office spaces on-time and installed some nice office furniture too, it was mostly empty.

For many months after most of Phase One was complete, my team and I used the otherwise unoccupied, high-ceiling leased space as our workplace for the planning and design of Phase Two. It was a large, lonely space.

This intense project involved working late into the evening far too often. An exceptionally diligent lady on my team I will call Naomi worked many evenings alone in these empty spaces. After a few months Naomi became seriously stressed and complained about hearing strange noises and feeling like she was being watched by unkind eyes. Even I thought the place felt creepy. Soon the entire team was feeling weird and stressed.

I took Naomi’s complaints seriously because, when it comes to workplace stress, perception is absolutely reality. And so I shifted our base of operations to a less-comfortable pre-fab jobsite office sooner than originally planned to get the team out of that creepy place. Problem solved.

Indeed, there may have been problematic influences on the leased building because, besides the hiring SNAFU, the Client’s operations in the building accomplished much less than planned. Indeed, serious and very unpleasant acrimony developed among the Client’s employees that occupied it. When the new building was completed, they too moved out of the leased space as soon as humanly possible.

We later learned from the general contractor that developed, constructed and owned the office building that it had been built smack dab on an old graveyard. Hmmmm.

Did I mention that the Client decided to not perform a Jinchinsai prior to construction of the leased space? Big mistake, maybe…

A Good Beginning

For the new building, however, the Client wisely decided they wanted to avoid the risk of not doing a Jichinsai, a decision that was welcomed by the general contractor, the thousands of workmen that were involved in its construction and the Owner’s employees.

Despite having 14 large crawler cranes lifting heavy stuff and drilling deep piles, and 600+ heavy trucks carrying soil out of and concrete and materials into the extremely tight and dangerous site daily, and over 10,000 workmen on-site for months on end, we only experienced one injury when a sheet-metal worker cut his hand on some sharp metal scrap, and one accident when a careless iron-worker managed to start a small localized fire in some urethane concrete blankets with a cutting torch.

Another worker with a well-documented history of a bad ticker had a fatal heart attack on the way home one day, but that incident was ultimately deemed unrelated to the construction work.

This safety record was a miracle in my book. Was it a direct result of the Jichinsai? Who can say. I only know that if we hadn’t done the ceremony, and a serious accident or death had occurred on the job site, the Client would have been blamed for carelessly not performing the ceremony and the work would probably have suffered as a consequence.

And this illustrates the ultimate reason for conducting a Jichinsai ceremony: Better to be safe than sore. 

The Simplified Jichinsai

There are various approaches to pacifying possibly malevolent spirits. One is the full-blown Jichinsai ceremony, of course. Another is a simpler, humbler, and less-expensive version, because, after all, what the ceremony boils down to is a sincere offering of salt, rice and sake wine and a sincere request to the resident spirits for forbearance.

One such simplified example is quietly and routinely performed by either the general contractor or his steel erection subcontractor. They simply place a small mound of salt, another of uncooked rice, and a small cup of sake wine at the base of the first column erected, then the employees of the GC and/or the erection team offer a silent prayer. No muss, no fuss, no silly hats, but it’s still taken very seriously by the workers.

When I was a self-employed contractor, I would do something similar. Before beginning any excavation, I would politely place a small mound of salt, another of rice, and a small cup of local wine on the ground at what would later become the center of the completed building or renovation and leave it overnight. I would also lay a branch of the local vegetation, be it tree or bush, beside the offerings. Before leaving at the end of the day, I would offer a silent prayer to wherever, and to whoever might bother to listen, that the job would proceed without accident or injury to any workmen involved, and that it would remain on-schedule and under-budget.

Did it work? I don’t know, but the only serious jobsite injuries and deaths I have experienced over the years have been where a Jichinsai of some sort was not performed. Cheaper insurance you will never find.

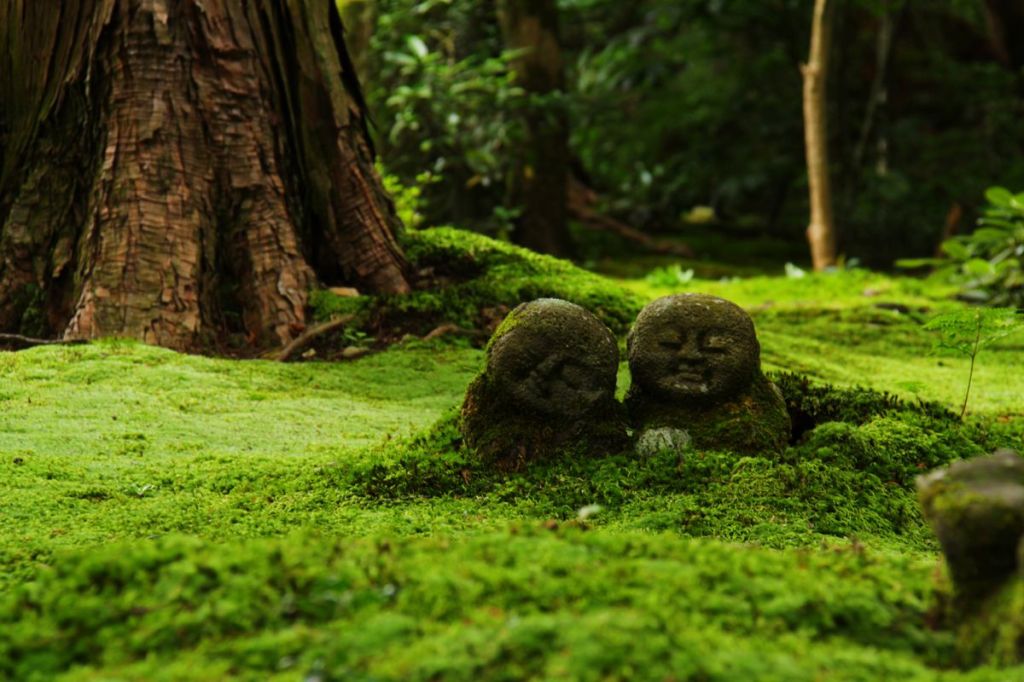
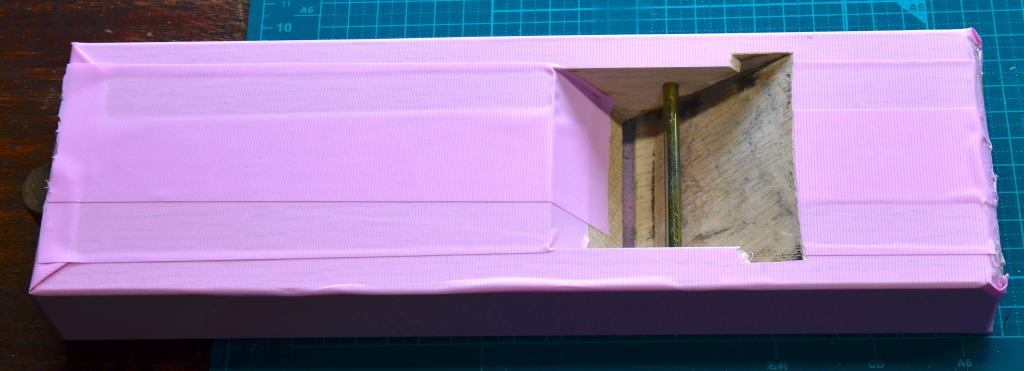
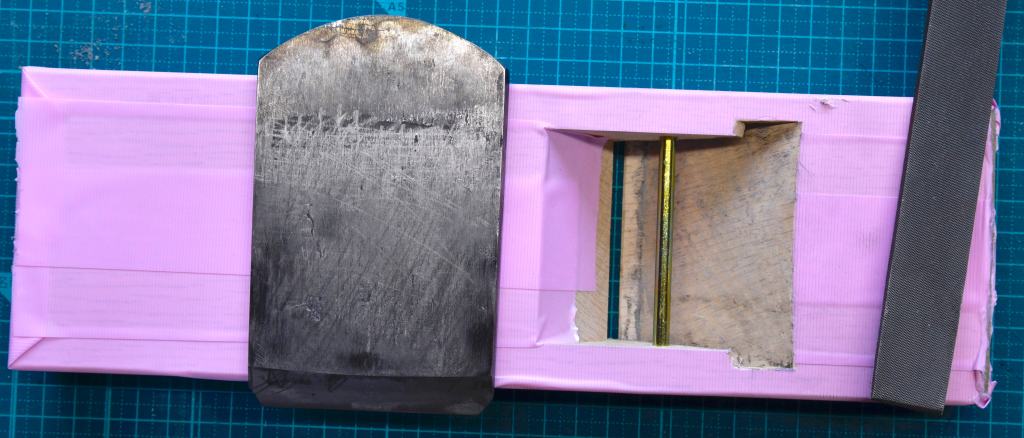
One Beloved Customer located in the Pacific Northwest of the United States Coast recently began construction on a small but elegant outbuilding using beautiful Port Orford Cedar wood with traditional and extremely intricate interlocking Japanese handcut joints and hand-plane-finished, and natural stone foundations with fitted posts.

The photos below are of his simple Jichinsai. No accidents or injuries so far!

YMHOS

If you have questions or would like to learn more about our tools, please click the “Pricelist” link here or at the top of the page and use the “Contact Us” form located immediately below.

Please share your insights and comments with everyone in the form located further below labeled “Leave a Reply.” We aren’t evil Google, fascist facebook, or thuggish Twitter and so won’t sell, share, or profitably “misplace” your information. If I lie, may tree spirits drop limbs on me from a great height.

Japanese Handplanes – Part 4: The Marriage of Blade & Body

After tumbling down the rabbit hole, Alice discusses her options with her new friends Gryphon and Mock Turtle. After perusing this article, I hope Beloved Customer will be less discombobulated than poor Alice, less tearful than tender-hearted Mock Turtle, and less indignant than Noble Gryphon.

A Bruise Is A Lesson… And Each Lesson Makes Us Better.

George R.R. Martin, Syrio Forel, Game of Thrones,

In this the fourth article in our series about the Japanese hiraganna handplane, we will discuss how to fit the plane’s wooden body to the blade thereby improving the tool’s performance.

As is the case for most of the articles in this blog, this one too is intended primarily for the information and entertainment of our Beloved Customers, but all well-behaved Gentle Readers are welcome to partake. Bon apetit.

Why Fit Body to Blade?

Beloved Customers may wonder why your your most humble and obedient servant is inflicting the digital world with another pointless article about Japanese planes, especially since the handplanes purveyed by C&S Tools are advertised as “ready to use” when new. Please allow me to address this absolutely valid concern herein.

As mentioned in the Part 3 of the Japanese Handplane Series, Mr. Inomoto, the daiuchi shokunin that cuts the bodies of our planes from Japanese White Oak to fit the blades forged and sharpened by Mr. Nakano, does indeed do more than just cut a gap for a blade to slot into, but fits the body to fit the blade so each plane is able to produce a decent shaving before it leaves his workshop. However, due to cost considerations and practical limitations to his prodigious prophetic talents and clairvoyant insights regarding who will eventually own each plane, and their preferences for the blade-body marriage, he fits the blade on the tight side, assuming the end-user will fettle the body to best suit his own purposes. Ergo the paragraph titled “Plane Philosophy” in Part 3.

I suspect relatively few Beloved Customers have given the subject serious thought, but it is nonetheless true that each owner of a Japanese plane must develop their own philosophy regarding the relationship between blade and body, and if they deem it necessary, adjust their plane body accordingly.

This article assumes Beloved Customer has decided to refine the fit between blade and body, and instructs in how to achieve those refinements. Are they absolutely necessary? Nah. Will they make a difference? Yes, but the degree of improvement achieved will vary from plane to plane and person to person.

Nonetheless, your humble servant recommends Beloved Customers, especially those interested in obtaining professional-level plane maintenance and usage skills, to perform the operations described in this and future articles in this series. You’ll be glad you did even if it may take some years for the benefits obtained to become evident. At the very least you may be fortunate enough to avoid the stupid mistakes YMHOS did when he was green.

So with that out of the way, let’s assemble the tools we will need to make some righteous sawdust.

Tools

The following is a list of tools I recommend for this job.

  1. Wooden, plastic or rawhide mallet for striking the blade and body;
  2. Carpenter’s pencil and/or marking pen;
  3. Masking tape to protect the wooden body from oily/graphity fingerprints;
  4. Caliper (vernier, dial or digital) and/or divider for measuring and comparing;
  5. Various chisels (e.g. 3mm, 6mm, 9mm usunomi paring chisels). Although it may seem strange, wider chisels are typically not necessary for this task.
  6. Metal file (to be modified) or a 15~18mm wide chisel (to be modified).
The tools needed for fitting the body to the blade. The chisel next to the vernier caliper is an old Sorby chisel modified especially for working on plane beds and gifted to me by Chris Vandiver. Thanks, Chris.

Regarding the modified file or chisel listed above, this is a push scraper, a truly ancient tool once commonly used for precision metalwork. Your humble servant uses it to shave the bed to fit the blade. You can make this tool as wide as you wish, but please note that if the blade of either file or chisel is too wide, your shaving efforts may not produce smooth results.

You can easily make this scraping tool from a chisel or an old file by grinding a flat on the end of the file or cutting edge of the chisel square to the centerline of the blade and at an 80~90˚bevel angle. Then hone this square cutting edge and at least one of the two adjoining surfaces to 1000 grit. Voila.

If you adapt a file to make this tool you will want to attach a handle to its tang to avoid getting red sticky stuff on your pretty wood.

If you prefer to use a regular chisel, that’s OK too, but you will find this scraper does a cleaner job with less effort.

Blade Preparation

This explanation assumes the blade is sharp and the ura is in good shape. If not, please sharpen the blade because it will of course affect the fit of blade to body.

While you are at it, check that the side edges of the blade are free of burrs or rough grinder marks which might abrade the grooves after some use. Some grinder marks may be unavoidable, but if the sides feel rough and abrasive to the back of your hand, smooth the edges a little using a sander and/or sharpening stones.

In addition, please make sure the right and left clipped corners of the blade’s cutting edge, called “ears,” are properly trimmed, meaning that they are ground large enough to reduce the width of the sharp cutting edge so the cutting edge fills the width of the plane’s mouth but does not extend into the grooves, because if it does get into the grooves, shavings will become jammed between the blade and groove wasting your energy and leaving nasty scuff marks and sometimes even tracks on the planed surface. それは困る.

When sharpening a plane blade, therefore, it is important to check and trim these ears periodically. A few passes on a diamond plate or rough stone will do the job; It doesn’t need to be pretty, and the ears don’t need to be sharpened because they will never touch the surfaces to be planed.

The disassembled plane used as an example in this article, a 70mm finish plane with a Blue-label steel blade hand-forged by Mr. Nakano Takeo and a Japanese White Oak body by Mr. Inomoto Isao. An excellent tool.

Checking & Tuning the Mouth

Beloved Customers won’t need to worry about this, but Gentle Readers fettling plane bodies made by themselves or others should be careful the first time they adjust the blade’s cutting edge to project through the mouth to ensure there is adequate clearance because if the mouth isn’t wide enough to allow the cutting edge to pass through cleanly with a little clearance to spare, the blade may chip out the sole.

If there is any question about the adequacy of your plane’s mouth/blade clearance, the first time you extend the blade through the mouth press the plane sole-down on a piece of clean wood while tapping the head of the blade with your mallet to make a zero clearance cut at the mouth. The supporting board will prevent the mouth from chipping. This is also standard practice when opening the mouth of a new plane body.

Hold the plane up to a light and peer through the mouth to observe the gap between cutting edge and body. The width of this gap must be greater than zero, and it should be constant the full width of the blade, but how wide it needs to be will depend on the thickness of the shaving you intend to cut.

Ugly tear-out can be minimized and the polish of the planed surface increased by having a tight mouth. Indeed, the tightness of the mouth and the area of the sole directly in front of the mouth applying uniform pressure on the wooden surface being planed up to the last .001 millimeter in front of the mouth is critical for exceptionally fine tearout-free cuts. On the other hand a mouth gap that is too narrow to pass the intended thickness of shaving will jamb every time, so the user must balance the width of the mouth, the desired shaving thickness, and blade projection to obtain good results.

Here is wisdom: allowing shavings to repeatedly become tightly jammed in the mouth is not only hard on the blade, but it will damage the mouth, so before this happens too many times, you want to either adjust the mouth or your expectations for shaving thickness.

To open up or adjust the mouth, cut a hardwood guide block to use with a chisel to pare the mouth opening, and clamp it to the sole. The angle of the block will vary with the angle of the blade.

Then, using an exceptionally sharp paring chisel and this guide block, take minute shavings at the mouth using skewed strokes. A paring chisel with a three-hollow mitsuura ura is ideal for this task, but any sharp chisel with a longish blade will do the job.

Body Protection

This process will involve graphite pencils, marking pen ink and fingers, so to keep the wooden body from looking dirty, please cover the top and sides with a low-tack masking tape. In this example, I used a pretty pink tape.

Adjusting the Blade to the Mouth

As mentioned above, the blade fits into and is clamped in-place in the wooden body by the two tapered grooves cut into the body. Sometimes the fit between the side edges of the blade and the bottom of these grooves is too tight. This can occur in a new plane if the body was improperly cut to begin with, but the most common cause is shrinkage of the body due to humidity changes.

Of course, the wooden body will change dimensions with changes in ambient humidity, while the blade won’t. If a plane is shipped from a highly humid climate like Japan (at some times of the year) to a dry climate like the Mojave Desert (all times of the year), for example, the body may shrink in width developing tremendous pressure on the side edges of the blade, sometimes enough to crack or split the body. Therefore, if you are located in a dry climate and acquire a plane from a wetter climate, it may be wise to remove the blade and let the body acclimatize for a week or so.

As mentioned above, the blade is tapered in width, being wider at the head and narrowest near the cutting edge. This is intentional. Ideally, you want the side edges of the blade to just kiss the bottom of the grooves where they exit the top surface of the body, and not touch the bottom of the grooves anywhere else. This type of fit will make it easy to make minute right or left adjustments to the cutting edge’s projection by tapping the head of the blade right or left.

Obviously (and this is an important point to understand), if both of the blade’s side edges are in close contact with the bottom of the grooves their full-length, this important method of adjustment will no bueno.

Use you vernier, dial or digital caliper or mechanical divider to check that the the blade does indeed become narrower in width from the point where it exits the grooves at the top surface of the body and the point where the cutting bevel begins. If it doesn’t, you will need to grind in some taper. How much? Mr. Nakano’s blades typically taper the amounts shown in the photos above, but they are handmade and each one is little different.

The distance measured between the blade grooves where the blade makes contact at the top of the grooves. Please notice that this distance is slightly greater than the width of the blade at this point as shown in the photo on the right above.

In any case, please ensure the body provides adequate clearance to just accommodate the blade’s width. Mark 1 Eyeball is often good enough for this task, but a divider is better and a vernier caliper is ideal for this task.

Make a final check by applying marking pen ink to the sides of the blade 1cm down from where the blade would normally exit the grooves at the top surface of the body. More ink is not necessary.

If some paring of the grooves is necessary to provide adequate clearance, please remove no more wood than is absolutely necessary.

Remember that we want just a little clearance between the blade’s sides and the top of the grooves, as shown in the photos above, and more clearance at the bottom of the grooves to make it easy to adjust the blade’s projection from the mouth.

Groove Maintenance

A common problem we see with old planes is cracked and split bodies caused by the tapered blade becoming shorter over the years due to repeated sharpenings, and therefore the edges of the blade exerting excessive pressure on the bottom of the grooves when a careless user mercilessly pounds the blade into the body. This sort of damage is entirely avoidable by humans, but some gorillas advocate paring the bottom of the grooves of new planes to create a gap of 2~2.5mm between the groove and blade to accommodate all the reduction in length the blade may experience over many years of service at once. To this practice, your most humble and obedient servant can only respond “Poppycock!”

Why do I object to what seems to be a logical solution? Glad you asked.

If you chisel out a big gap between the side edges of the blade and bottom of the groove, not only will you unnecessarily weaken the body by severing continuous wood fibers at the narrowest, weakest, most critical point of the body (think about it real frikin hard), but the pivoting action required to adjust the blade’s projection right and left by tapping the head right and left will become more difficult, while at the same time the blade will become less stable in the body.

I write this based on bitter experience obtained from following bad advice received before I knew better, and later being mocked by more experienced craftsmen who noticed my silly error. An embarrassing episode indeed, one I was ashamed of for many years.

Beloved Customers will of course have purchased a high-quality plane from C&S Tools, with a blade hand-forged by Mr. Nakano Takeo and a Japanese White Oak body cut by Mr. Inomoto Isao, but just in case you are working on a lower-grade tool, here are some things you need to check.

The way to avoid body damage due to shrinkage of body or blade is simple: (1) Pay attention to the fit of the blade in the grooves; (2) Adjust the clearance when appropriate, and; (3) Avoid excessive use of recreational mushrooms which may dull the senses and cause chronic tool neglect.

In other words, when you notice the blade becoming tight in the grooves, simply pare the bottom of the grooves a nat’s mustache hair deeper. Don’t get carried away because a little contact is a good thing!

Our 6mm and 3mm usunomi paring chisels are ideal for this job. but standard oiirenomi chisels can accomplish the task too.

Another option is to grind the sides of the blade making the blade a little narrower in width.

Beloved Customers have the choice of learning from your humble servant’s stupid mistakes or from your own. Of course, I suppose there’s always the default option too many lost and wandering souls select of neglecting to learn anything at all…

Fitting the Bed to the Blade’s Back

Assuming Beloved Customer has completed the checks and adjustments in the previous sections, the general steps for fitting the bed to the blade are as follows:

  1. Begin by rubbing the back of the blade from where the cutting bevel begins to the end of the steel lamination with your carpenter’s pencil giving it decent coat of graphite. Marking pen ink or Dykem works too.
  2. Insert the blade into the grooves and tap it with your wood, plastic or rawhide metal mallet (not a metal hammer!) until the cutting edge is nearly projecting from the mouth. You may need to really wack the blade hard 5~10 times to accomplish this the first time.
  3. Next remove the blade by holding the plane in your hand and alternating strikes on the right and left sides of the chamfer on the body behind the blade’s head. Don’t strike the flat end of the body! The blade should wiggle out after some less-than-gentle persuasion. If your plane doesn’t already have a pretty 6~8mm wide chamfer cut on this edge, please make one.
  4. Examine the bed. You will notice how the areas in contact with the blade are now marked with graphite. We need to pare or scrape down these contact points to achieve a more uniform contact. Don’t fiddle with the grooves yet.
  5. Use your chisel or scraper tool to carefully shave down the high spots marked with graphite. Cut/scrape only those areas marked with graphite. Before you begin making sawdust, however, please be careful to not remove any wood from any of the three surfaces inside each side groove for now. You need to sneak up on the final shape of the bed like a kitten stalking a grasshopper, with eyes wide open, gently and a little bit at a time. It would be a serious mistake to try to make a perfect fit after only a few passes.
  6. Repeat steps 2~5. You may need to do this kitten stalk 10 times to get it right. You won’t need to apply more graphite each time, just rub the back with a piece of cloth to redistribute the graphite. Or you can use your carpenter’s pencil again. With each iteration, the graphite marks left on the bed will increase in number and become larger. You want to be able to seat the plane blade with only three or four medium strikes with your mallet, and make fine adjustments with just a few more. At no time should your plane squeal a complaint.
  7. When the blade can be easily seated with 3 or four medium wacks of your mallet, use a metal file to lightly smooth out the rest of the bed. Perfection is neither attainable nor should it be sought.
The bed before applying graphite and any shaving. Mr. Inomoto Isao does a nice job, so contact is good, but still tighter than I prefer. The No.13 is a mark he made to keep blade and body matched. Notice the “tsutsumi” shelf cut at the bed just inside the mouth. This is a nice, pretty detail that aids in preventing the blade from “sniping” the ends of narrow boards, but sometimes it gets in the way, and after much use, it becomes so thin it must be removed. It is neither necessary nor sacred.
The back of the blade has been rubbed with a graphite pencil, and is being tapped into the body. It takes some forceful strikes to get it into position. Notice the purty-pink low-tack masking tape applied to the body to help keep it free of graphity fingerprints. My planes seem to appreciate brighter, feminine colors.
Graphite marks left on the bed from the first insertion of the blade. Not terrible, but contact could be better.
Shaving the bed with a scraper chisel the first time
Shaving the bed with a scraper chisel after the blade was seated a second time
The bed after shaving it the third time.
The completed bed following final cleanup with a file. The blade can be inserted with three medium mallet strikes, and fine adjustments made in 3~4 strikes. The blade does not tend to twist out of alignment. Notice the graphite marks left on the tsutsumi shelf where the blade has contacted it.

The Peppermint Twist

Now that the bed is fitted to the blade, we need to return our attention to the grooves.

If one groove is pinching the blade significantly more than the other, the blade will want to twist out of alignment. This can be very irritating.

The surfaces inside the grooves touching the ura and back of the blade should be clean and straight. In any case, unless it causes a serious performance problem, it’s best to leave these surfaces alone for a while because after inserting and removing the blade several times the fit may improve automatically.

If the blade continues to twist out of alignment, however, determine where the high points are on the surface of the groove touching the blade’s ura. You can do this by peering into and through the mouth while shining a light into the groove.

Once you have identified the high spot(s) glue a piece of fine sandpaper to a thin stick of wood and sand it down a little bit at a time between inserting and removing the blade frequently to check the fit.

Don’t sand down the surface inside the groove which contacts the blade’s back unless absolutely necessary because this will effectively open up the mouth, something we want to avoid for as long as possible.

With this, your plane’s hard, sharp blade and soft wooden body should fit together like hand in glove. It may sound like a lot of work, but it usually isn’t. In fact, besides prepping the blade, the whole process can usually be completed in less time than it takes to read about it.

So far in this series your humble servant has provided a lot more detail and explanation than I have ever seen in writing elsewhere. It took me many years of fumbling in the dark, much consultation with older, more experienced craftsmen, no few curses and ungentle slaps to the back of the head, and numerous expensive mistakes to learn these things. I hope Beloved Customer profits from them.

In the next post in this ongoing adventure towards the perfect Japanese handplane we will shift our attention to marrying the chipbreaker (uragane 裏金) to the blade.

Y’all come back now, y’hear.

YMHOS

Alice asking advice of a caterpillar sitting on a magic mushroom, smoking magic mushroom. This nasty habit is perhaps the reason why this bug is never described in the story as having skill with a handplane.

Other Posts in the Japanese Handplane Series:

If you have questions or would like to learn more about our tools, please click the “Pricelist” link here or at the top of the page and use the “Contact Us” form located immediately below.

Please share your insights and comments with everyone in the form located further below labeled “Leave a Reply.” We aren’t evil Google, fascist facebook, or thuggish Twitter and so won’t sell, share, or profitably “misplace” your information. If I lie, may the ears of all my plane blades become clogged with wax.

Japanese Handplanes – Part 3: The Blade

A beautiful and even poetic plane blade forged by the famous Chiyozuru Korehide. The carved inscription reads ”Shin, Un, Mu” meaning “God, Cloud, Dream.”

The best steel doesn’t always shine the brightest.

Joe Abercrombie, The Blade Itself

In this the third article in our series about the Japanese hiraganna handplane your most humble and obedient servant will review some of the design details of iron and steel plane blade. Why? Because to become proficient at using and maintaining the Japanese handplane, one must understand it more than just superficially, indeed, a healthy and mutually respectful relationship should be Beloved Customer’s goal.

In addition, I will be so bold as to briefly present the story of a single plane blade made for a famous carpenter by a famous blacksmith.

The Shin Un Mu Blade 神雲夢の刃

The plane blade pictured at the top of this article was forged 6 years after the end of World War II by a famous Tokyo blacksmith named Kato Hiroshi (加藤 廣 1874~1957), who used the nom de forge of Chiyozuru Korehide, (千代鶴是秀 ). The Chiyozuru name has been copyrighted and is still in use to this day, although the current holders of the rights to the name are unworthy to even pour Mr. Kato a beer, if Mr. Kato was still a drinking man.

Chiyozuru-san forged this blade at the request of a famous Tokyo carpenter named Nomura Sadao. The engraving on the back states the blade (and matching chipbreaker) was made by him for Nomura Sadao and was completed on June 4, 1951. I’m told Chiyozuru-san charged Nomura-san ¥10,000, a huge amount back in the day.

You will notice that it looks different from most plane blades in that it lacks the beveled “ears” at the right and left corners of the blade’s cutting edge commonly seen in Japanese plane blades intended to prevent the cutting edge from extending into the grooves on each side of the blade opening used to retain the wedge-shaped blade in-place thereby preventing wood shavings from becoming jammed between the groove and blade leaving unsightly marks on the surface of the wood being planed. More on this below.

The blade in question, however, has rabbets cut into the jigane at the left and right edges of the blade so the ura area is thicker than the sides which fit into the retaining grooves, and the cutting edge, therefore, does not intrude into the grooves, making beveled ears unnecessary. This is a very logical solution, although as it was explained to me by Tsuchida Noboru-san, it was not actually invented by either Chiyozuru-san or Nomura-san, but a design Nomura-san first observed at a technical school for cabinetmakers. He then made a wooden full-scale model and asked Chiyozuru-san to forge it for him.

While it is an elegant solution to a real performance issue, it is much more difficult to make this style of blade than the conventional one, and so never became popular.

On the subject of materials, Chiyozuru is well known for preferring to use imported steel, mostly from England, instead of traditional domestic Tamahagane steel. Although the source of the soft jigane is uncertain, there can be no doubt the steel lamination is made of British high-carbon steel.

Gentle Readers are no doubt aware that Japan has always been a land of many disasters, some man-made and others natural, with earthquakes and city-destroying fires being especially common. To protect this important blade from becoming lost to posterity, as were so many valuable things during the war, upon his retirement Nomura-san entrusted the blade to the Takenaka Carpentry Tools Museum located in Kobe, Japan.

Ironically, a large earthquake struck Kobe on January 17, 1995 killing over 6,400 people and tearing the city a new one. Fortunately, while the museum’s exhibits were jumbled up, this blade was not damaged.

Upon Nomura-san’s reassignment to the big lumberyard in the sky, his heirs formally donated the blade to the same museum where it remains to this day.

The four Chinese characters engraved into the face of the blade read, from top down, 神雲夢, pronounced “Shin, Un, Mu” which translates directly into English as “God, Cloud, Dream.” No doubt there is some deep poetic meaning being expressed through these three characters, but it is far above the poor understanding of your humble, barely-literate servant.

Interpretations from Beloved Customers and Gentle Readers are welcome.

Definition of Fettle

While we are on the subject of literacy, I would like to clarify the meaning of a word pertaining to working on tools, and especially planes.

Gentle readers have no doubt heard the word “fettle” used in the phrase “fine fettle,” usually referring to someone being in good health or physical condition. But it has other, older meanings.

In the British dialect, it means “to set in order,” or “to get ready,” from Middle English fetlen to shape, prepare; perhaps akin to Old English fetian to fetch.

Your humble servant commonly uses the word fettle as a verb, mostly for truing or adjusting a plane or other tool.

Never let it be said that the Gentle Readers of the C&S Tools blog are less than exquisitely erudite and edumacated.

Blade Details

Misunderstandings abound and deep, pungent rivers of BS frequently burst their banks when the details of the Japanese hiraganna plane’s blade are discussed; Buckets, mops and even garbage pumps are necessary to clean up the mess. I despair: What to do, what to do?

While it appears to be a simple, crude, even haphazard component to the uninformed, the design of a well-made plane blade is subtle and its execution elegant. I am confident Beloved Customers willing to ignore ridiculous internet rumor along with the squeals, grunts and farts emanating from the orc-infested woodworking forums, and forego magic mushrooms for a time will quickly understand. So without further ado, let’s turn on the pumps and get our mops moving.

Laminated Construction

The plane’s blade is made by forge-weld laminating a piece of hard high-carbon steel to a larger piece of softer low/no carbon steel/iron. These details are discussed in more detail in the two posts linked to below. It is important to understand these details if Beloved Customer intends to become skillful in using and maintaining Japanese planes.

Sharpening Part 8 – Soft Iron 地金

Sharpening Part 9 – Hard Steel & Soft Iron 鍛接

The Ura

The blades of quality Japanese chisels and planes have a hollow-ground area on the surface of the blade called the “flat” in the case of Western planes. In the case of plane blades, it is located on the surface your humble servant calls the “face,” which is oriented upwards facing the user when installed in the body. An accurate understanding of this structural detail is essential to using and maintaining the Japanese handplane. We discussed this detail in a previous article linked to below. Please review this post if you haven’t done so previously.

Sharpening Part 10 – The Ura 浦

We discussed how to perform periodical maintenance on the ura in an earlier post. Oh joy!

The face of another plane blade by Chiyozuru Korehide engraved with many of the brands he used during his career. His Korehide brand is the the lozenge-shaped mark at the lower left. It has a sweet, sculptural ura.

Blade Retention

The blade of the Japanese handplane is retained in its wooden body by the pinching action on the top and bottom surfaces of the blade (not pressure on the edges) inside the tapered grooves cut into each side of the mouth opening. This arrangement eliminates the dedicated wedges, usually made of wood, used since at least Roman times to retain the blades of Western planes. It also makes irrelevant the widgets and linkages common to modern planes such as the Bailey-pattern, considered by many to be the pinnacle of plane design in the West. Simple is best, don’t you agree?

A common misunderstanding about Japanese planes is that pressure between the wooden body and the back of the blade is necessary to both lock the blade into the body and to eliminate chatter resulting from blade vibration. In response, your humble servant can only turn up the speed dial on the garbage pump and say “poppycock!”

Except in the case of a poor quality body/blade, or one damaged through improper setup and maintenance, the pinching forces, and resulting friction, acting on the front and back of the narrow portion of the blade inserted into the two grooves in the body’s mouth must be sufficient to hold the blade in-place without relying on pressure on the blade’s back. If you know anyone who disagrees with this statement, rest assured the brown stuff dribbling out of their ears is not chocolate mousse.

Unlike the potato chip-thin blades common to many Western planes, the quality Japanese plane blade of the sort we carry with its relatively thick, laminated construction may have a few female characteristics such as beauty, elegance, and a cutting wit, but despite fitting into a truly tiny mouth it simply will not chatter. After all, it’s chisels and squares that love to gossip.

While a tiny amount of uniform contact and pressure between the bed in the wooden body and the back of the blade is desirable to steady the blade in-use, many fit their blades (or perhaps “neglect to properly fit their blades” would be a more accurate description) to develop high pressure between blade and bed, making it difficult to adjust the blade and distorting the body unnecessarily. In extreme cases, this pressure can even push out the sole, preventing the plane from working entirely, a situation that has shaken many a poor woodworker to the core! Pixie involvement cannot be dismissed. If your plane is misbehaving, this bulging sole phenomenon is something you would be wise to check for and remedy if found.

We will discuss this subject more in future posts.

Lengthwise Taper

A casual observation reveals that the blade is tapered in thickness along its length, being thickest at the head sticking proud of the body, and thinnest at the cutting edge bevel.

The purpose of this taper is simply to wedge the blade into the grooves in the body. Please note that this wedging action does tend to cause the body to deflect to some degree, something which must be taken into account when fettling the sole, a subject we will discuss in a future post in this series.

Transverse Taper

The blade is also tapered in its width, being widest at the head and narrowest at the cutting bevel.

Ideally the side edges of the blade are in intimate contact with the grooves only where they exit at the top surface of the body, but should normally have no contact in the grooves elsewhere, making it possible to adjust the blade’s projection through the mouth to a uniform distance by gently tapping its head either right or left a small amount.

Curved Back

Finally, please observe that the back (vs. the ura) of a quality blade is not flat, but is slightly hollow-ground around the centerline of the blade’s length. The depth of this hollow should be more-or-less uniform over the blade’s length.

One purpose of this detail is of course to lighten the blade’s weight, but more importantly it helps keep the blade from twisting out of alignment in-use. If you have ever made a wooden plane body in the Krenovian style to fit a blade with a flat back, you may have experienced the irritating tendency of the blade to twist out of alignment under heavy planing forces. This is typically not a concern with the Japanese design because of the curved back detail, so long as the body’s bed is well-fitted to the blade.

Since each blade and its matched wooden body are a little different, and not yet in perfect accord when new, fitting the body to the blade is one of the first things one must do to a new plane. This fettling operation will be the subject of a future post.

A plane blade by Mr. Ogata. Notice the curved back. Notice also the trimmed and beveled “ears” at the right and left corners of the cutting edge.

Common Sense and Plane Philosophy

Traditionally, everywhere planes were used around the world, a craftsman would commission or purchase the metal parts for his plane and cut the wooden body himself.

In recent history in Japan professional plane body makers called “daiuchi shokunin” 台打ち職人, which translates directly to “plane-body beater” (I kid you not) have become common. These craftsmen fit blade to body making a nearly complete retail product.

Many of these ostensibly completed planes are sold in a “sugu tsukai” 直ぐ使い condition, meaning “ready-to-use.” As witness of this, such planes usually have a wood shaving resting in their mouths when sold. However, the fit between blade and body is intentionally too tight to allow for the end-user is expected to adjust it to his preferences.. This is where philosophy comes into play.

There are regional preferences in Japan when it comes to tools, including sickles, saws, axes, adzes, chisels and of course plane blades. In far Eastern Japan, especially the Tohoku area and Hokkaido, thicker, heavier plane blades are preferred, whereas in Tokyo and Western Japan, thinner blades are traditional.

But while discussions of these differences make the hearts of historians go pitter patter, they are irrelevant to persons living outside Japan, so we will ignore them for now.

But there are two general, practical approaches to blade size and fit of which Beloved Customers should be aware. Namely, architectural carpenters tend to prefer thicker blades that fit very tightly into the body because such planes tend to retain their settings better in the rough conditions of a construction jobsite. The downside to the thick blade is that it’s heavier, it takes longer to sharpen, and it’s more difficult to make fine adjustments to.

Craftsmen that do finer, more precise work such as joiners, sashimonoshi, furniture makers and cabinet/tansu makers typically prefer thinner blades that are quicker to sharpen and easier to frequently adjust to make fine, precise cuts.

We have Mr. Nakano forge the blades for our planes more in the Tokyo style: thicker than some but thinner than most.

Not knowing who will purchase the plane, unless directed otherwise most daiuchi shokunin cut tight-fitting bodies more suited to the carpenter, and assume the user will adjust the blade/body fit to their preference. This is the only practical solution in a “ride it like you stole it” handplane, but the reality is that too often the pressure on the back of the blade is so high it ends up creating problems for the user.

Too many inexperienced users of Japanese planes, especially amateurs located overseas, learn how to use Japanese planes without knowledgeable supervisors or fellow workers near at hand to notice their mistakes, wack them upside the head, and tell them how to correct their errors (welcome to the gentle world of the Japanese craftsman), and consequently never really figure out how to setup, fettle and maintain Japanese handplanes. I suspect a similar lack of expert supervision is why so many Western woodworkers who give Japanese planes a try fail to ever get satisfactory performance out of them and become frustrated, eventually selling them on PeeBay.

While your humble servant is eager to provide Beloved Customers all practical support and encouragement, the guidance I can provide is limited by distance, the written word, and the undeniable fact that he is a gentleman of great refinement and exquisite sensitivity (She Who Must Be Obeyed has been known to disagree, but what does she know?).

Therefore, upon making a significant mistake, Beloved Customers must instead call themselves rude names and slap their own heads to aid learning retention. May I suggest “Blockhead” as an appropriate self-imprecation in the case of planes? (ツ)

Conclusion

In this post we considered some of the unique design features of the Japanese hiraganna handplane’s uncompromising and bitterly sharp iron and steel blade.

We even examined a historically-important, unusual, and exceptionally beautiful blade made by a famous blacksmith for a famous craftsman with curious engraving of mysterious meaning.

And we discussed regional differences in tool design. You can’t make this stuff up, ladies and germs.

In the next adventure in this series we will turn our attention to the body of the Japanese handplane, the softer, gentler, wooden component of the tool, the one with the tiny mouth that directs and controls the work of cutting.

And I promise we will make some sawdust.

YMHOS

Chiyozuru Korehide (1874~1957), the blacksmith of the blade shown above.

If you have questions or would like to learn more about our tools, please click the “Pricelist” link here or at the top of the page and use the “Contact Us” form located immediately below.

Please share your insights and comments with everyone using the form located further below labeled “Leave a Reply.” We aren’t evil Google, fascist facebook, or thuggish Twitter and so won’t sell, share, or profitably “misplace” your information. If I lie, may my plane blades chatter and gossip unceasingly!