

Three things are needed for success in painting and sculpture: to see beauty when young and accustom oneself to it, to work hard, and to obtain good advice.
Gian Lorenzo Bernini
In the previous post in this series about toolchests we examined solutions to two of the Key Performance Criteria your most humble and obedient servant established when planning this toolchest, namely durability and longevity. In this post we will examine the solutions to three more performance criteria: Sealing, Insulation, and Security. It may be long, but I hope Gentle Reader will at least find it diverting.
Sealing & Insulation
Sealing the toolchest tightly and insulating it are important factors to consider when planning a toolchest, as mentioned in previous posts in this series, because a leaky chest can allow cold air, dust, excess humidity, and insects access to the tools stored inside it, potentially soiling, corroding, and damaging them. There are several details one can include in a toolchest design to minimize this problem. Some of the measures I employed are explained below.
The Lid

The criticality of a toolchest’s lid in sealing and insulating it over many years cannot be overstated. Unfortunately, many historical examples eventually failed miserably either through poor design or poor execution. Your humble servant was determined to avoid those failures.
As I mentioned in previous posts, chests in museum exhibits and books all look great, many having been at least partially restored, but if Gentle Readers want to get a sense of how chests fail, they should also inspect the busted examples collecting dust in antique stores and restoration shops.
While my investigation was not exhaustive, the first common failure inspecting antique chests revealed was a poor seal at the lid. This is almost universal. In the chests I examined it frequently stemmed from a poorly-fitting lid, one that probably fit nice and tight when new but warped over time.
In other cases, the lid had cracked and split like the seaman’s chest in the photo at the end of Part 2 of this series.
Another common problem was due to what could only be an intentional gap on the hinge side of the lid. And then there were the gaps caused by thin, narrow and weak iron hinges secured by short wood screws bending, wearing and/or loosening. So how to avoid these problems?
Let’s consider wood first. A policy that has served me well over the years is to always assume that a solid board of more than a few inches in length will eventually warp if left to its own devices. Of course, in the real world this is not always the case, but I’m a belt & suspenders & safety harness kinda guy. Besides, remember the 200 year useful life-cycle objective.
I also assume that a board more than a few inches wide will eventually split, or cause damage to another board in the assembly, if overly constrained from responding to both normal seasonal changes in humidity and the unnaturally dry conditions created by air conditioning systems inside modern buildings. Am I overly cautious? Perhaps more so than the optimistic captain Edward Smith of the RMS Titanic was on a cold night in April 1912.
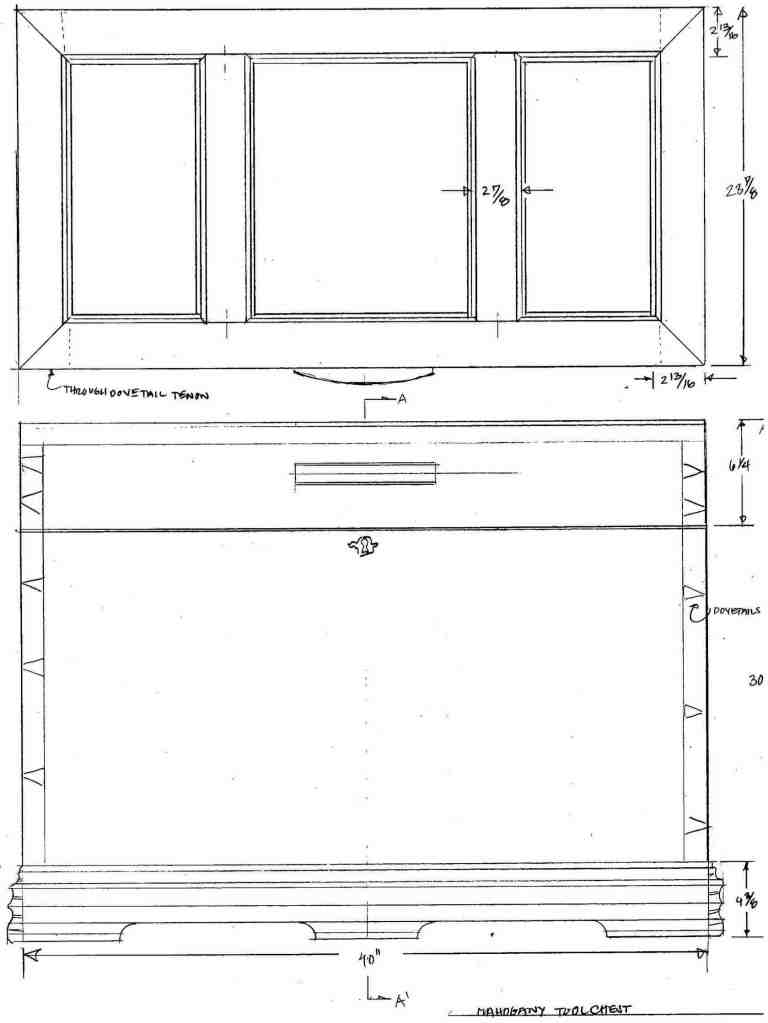
The historical record represented in the museums and antique stores I visited support these assumptions in the long-term, especially when one considers the effects of AC and central heating systems lacking expensive humidity controls. Therefore I designed and constructed the lid so it included no constrained boards more than 2-13/16″ inches in width. In addition I also reinforced the lid from warping as a unit to prevent it from self-destructing during the planned 200 year useful lifespan. Not that hard to achieve with a little thought and a few sharp saws, chisels and planes.
Strength, Durability, and Rigidity of the Lid
As will be revealed in Part 8 of this series, a large number of tools are mounted inside the lid, the cumulative weight of which would cause a simpler, lighter lid to flex, twist and fail rather quickly, I fear. To provide the strength, durability and resistance to torsion needed, I went with a more complicated design.
Instead of having a simple flat board lid or one using F&P construction, this one is comprised of two sub-assemblies: A horizontal top F&P panel joined to the lid’s vertical side assembly.
Frame and panel (F&P) construction is a technique which allows the craftsman to build wide, stable surfaces using a joined framework of narrower pieces of wood with free-floating panels set in between. The framing pieces are narrow enough to accommodate cross-grain construction at the joints safely. The larger inset panels are too wide to permit cross-grain construction without their eventually failing, so they are not glued to the frame members, but are free-floating in grooves so they can expand/contract with humidity changes without cracking, splitting or breaking the frame. Gentle Readers who have never done F&P work before should learn how, for it is a skill every self-respecting maker of solid-wood casework or joinery must have.

The top panel’s frame consists of 6 pieces of wood 30mm (1-3/16″) thick by 70mm (2-13/16″) wide. Four perimeter pieces are joined at the corners using pinned (wooden dowels) dovetailed bridle joints to form a rectangular frame 1,015mm (39-15/16″) x 595mm (23-7/16″). Two pieces of the frame divide the long dimension of this rectangle into 3 equal-sized spaces filled with 21mm (13/16″) thick free-floating raised panels contained by tongue and groove joints. Both tongues and grooves are coated with Briwax (beesewax and naptha) to prevent glue squeeze-out and paint from gluing the panels into their grooves, something that happens frequently and almost always causes the panels to crack and even split.
I just hope that future generations are wise enough to not refinish the chest by glooping paint on these joints effectively gluing the panels in-place eventually destroying the lid. Much excellent antique woodwork has been destroyed by careless painting.
Given the thickness of the frame, the sturdiness of the corner joints, and the quality of the wood, the lid is an extremely stable construction all by itself, one that has not warped or cracked in 25+ years. Good enough, perhaps. But wait, were are my suspenders?!
This flat top panel is attached by glue and wooden pins to a four-piece vertical perimeter framework that extends downwards an additional 130mm (5-1/8″) making the total external depth of the lid 160mm (6-5/16″). The four vertical boards of the side assembly are also 30mm (1-3/16″) thick, joined at each of their four corners by 7 pinned through-dovetails. Even if the glue fails someday, the pins will keep the dovetails locked in-place. This construction makes the lid assembly extremely rigid and resistant to wracking preventing the top and sides from warping. This lid assembly has never cracked, warped, stuck, bound or even squeaked. Not once.
Besides providing stability and a gap and crack-free seal, this construction creates the space I required to house many heavy tools inside the lid as well as the structural strength to handle this heavy load without noticeably flexing or twisting. This is directly related to Performance Criteria No. 4: Accessibility.
But this is a lot of weight to deal with so I was concerned that, like many antique chests, the forces required to open and close the lid would eventually cause the lid to fail, or at least make the top panel to separate from the side assembly over decades of use, ruining the lid’s functionality.
Opening the Lid
The solution I selected was to design the lid so that the only way to open it is to use the wooden handle secured to the front board of the side assembly by tenons, glue and heavy screws from the inside. In this way, the forces acting on the lid will always keep the top panel and side assembly together instead of tending to separate them.
To ensure using the handle is the only way to open the lid, I intentionally did not design a projecting lip at the perimeter of the top panel. This was a difficult decision because the addition of such a lip would appear more classically graceful in the Western tradition. But the temptation to use the lip to open the lid would be overpowering to future generations, eventually weakening and even destroying the lid. This too is a mode of failure I’d observed in antique chests.
While these design details made the chest extremely strong and durable, they do give the chest a bob-tail appearance, such that it looks more like a box than a typical Western chest. Being a belt, suspenders and full safety harness kind guy I believe the improved performance more than justifies the compromise in aesthetics.
Iron Mongery
A wide, bold surface like this lid with exposed joints just begs for the addition of engraved metal plates and hand-forged straps of the sort easily obtainable in Japan. I freely admit that decorative hardware would really look cool, and I went so far as to procure some beautiful pieces intended for Japanese tansu, but I managed to avoid the temptation to install them because, after study and reflection, I realized that history shows that, if firmly affixed to the wood, metal plates and straps tend to constrain the wood’s natural expansion and contraction often eventually opening joints and cracking the wood totally defeating the purpose of the elegant frame and panel construction. None of that nonsense for me, you wascally wabbit.
The Seal Between Lid and Case
Chests made in the tradition of Western countries often have an interlocking lip between lid and base which more or less seals three sides, but which leaves a gap at the hinge side where dust, humidity, cold air, fungi, insects and pixies can enter. That’s nonsense. But what are the realistic options?
One well-published toolchest intelligently overcomes this sealing problem by using hinges supported on corbels attached to the exterior back wall of the chest making the installation of a lip around all four sides of the case workable. I think this is a clever solution, and one I long considered, but ultimately rejected because it increases the toolchest’s overall width by the corbel dimension without increasing internal storage space one whit.
I also considered rubber gaskets, and even magnetic refrigerator gaskets. Either would have sealed excellently, at least until the unavoidable day of reckoning when the rubber and plastic oxidized, cracked and crumbled. They wouldn’t have lasted 200 years anymore than Cher’s beauty will. Oops, too late…
The solution I eventually settled on was a detail common to Japanese casework, namely a vertical lip applied to the inside of the lid where it meets the lower case. While not quite airtight, this lip does ensure the lid and case are precisely aligned when closed, that there is no gap at the hinge side, and that very little cold air, dust, fungi, bugs, or even anorexic pixies can infiltrate the toolchest once closed. I used a tough, fibrous, exotic hardwood for this lip that has held up well. The seal is so good that, even with 25 pounds of tools mounted inside the lid, I can drop the lid from full-open and the air-pressure created by this tight seal will make the lid close slowly without a sound. I have not had to replace it in 25+ years, but it would be easy to do if necessary.
This simple detail, combined with the natural thermal properties of the 30mm thick wooden sidewalls and lid, satisfied the criteria for insulation too.
Hinges
We discussed a few methods involving wood to prevent drafty lids above. Next let’s examine metal hinges.
Another failing of antique chests common to all the traditions I was able to investigate was inadequate and/or poor-quality hinges. When hinges are flimsy and sloppy when new, or become sloppy over time due to wear and/or corrosion, or when the tiny, often poor-quality nails, staples or screws used to attach most hinges loosen and become “idiots,” as they say in Japan, the lid won’t align with the case and/or a gap develops between lid and case. Secondary damage results. Dirt, air, bugs and pugilistic pixies penetrate. It’s the beginning of the end.

Traditional blacksmith-forged iron or steel hinges with decorative engraving or hammer marks are extremely attractive, but they just don’t meet my performance criteria. To begin with, iron/steel always rusts, with the corroded steel expanding in volume, becoming abrasive, and destroying tolerances, a nasty cycle. Handmade hinges look cool, but tolerances are always poor. And most importantly, traditional hinge pins are short and small in diameter with tiny bearing surfaces that wear quickly, and since their ends are peened, they cannot be removed easily. That would never do.
Instead of installing pretty traditional hinges or the cheap hardware-store hinges most people use for chests, I chose to use five solid-brass commercial door hinges with removable steel pins, made possible by the 30mm thickness of the case walls. I give them a dab of oil every couple of years. There is a reason modern door butt hinges can endure a lot of wear and abuse, and it has nothing to do with historical accuracy, I assure you.
I inset both leaves of these hinges and fastened them using 2″ long grade 18-8 stainless steel screws (made in the USA not China) after dripping glue into the holes. They have not loosened or even developed a squeak in 25+ years.
The long strap hinges used on American and British chests may look sexy, but they often cause the lid to crack and split. Think about it.
Security
More often than not, quality chests have historically had locks of one sort or another installed. If you, Gentle Reader, decide your toolchest needs a lock, you should develop a security strategy early in the design process. Here’s mine.
As part of my day job planning restricted-access facilities for Clients that have a lot to lose if their corporate secrets are stolen, I’ve talked with many building security experts. I’m not suggesting you need 10-lb locks with biometrics, multiple layers of 1/2″ hardened plate steel doors, contact switches, keypads, video cameras backed-up live in vaults in the mountains of Colorado, or armed guards. But I can share with you a philosophy regarding security locks applicable to cabinetry.
A lock on a wooden cabinet or chest won’t dissuade a determined thief with a crowbar for even a minute, but it may help keep an honest man honest. How does this old saying apply to the real world? Simply put, unless you are willing to go all-out to construct a locking container that outwardly appears entirely impenetrable, is in fact practically impenetrable, and that cannot be carried away, the next best option is to build one that will prevent quick and easy pilfering, will not be destroyed by a thief’s efforts to penetrate it, and at the same time, will make any attempt to break-in obvious.
But slimy thieves are not all we need to worry about.
Ever have one of your adoring children or your loving spouse (yes, the one that thinks you have too many tools already and should buy new kitchen counters instead) borrow a tool, or even worse, lend it to a friend or neighbor without telling you? How often did that tool find its way back to its proper place in your toolbox or workshop?
How often has one of your precious, carefully-sharpened chisels ended up being used as a combined paint can opener and stirring stick only to spend the following months or years smeared with paint, humiliated, alone, forgotten, sadly weeping behind old paint cans in your neighbor’s garage? Besides the indignity of paint spots (chisels are often vain, you know), imagine the emotional trauma the poor thing suffered. Not to be borne….
To help preclude this trauma, Gentle Reader has three choices when it comes to casework locks. The first is to use standard locking hardware that requires a modern keyed lock with a tumbler or a combination lock. These work pretty well, but most look ugly in handmade casework. Appearance aside, the most serious problem with such locks is that, given time and privacy, and lacking lock-picking skills, a determined thief will simply break wooden casework with a crowbar. We see this sort of damage in modern cabinets frequently. It’s expensive to repair.
The second choice is to use heavy bars, locks and chains. I use this technique when I ship my toolchest by first padding the chest with plywood and blankets and then running a 10mm hardened-steel chain (chain-hoist chain) around the chest through the hardened-steel lifting eyes on both ends crossing underneath and on top of the case. This I secure with a heavy, high-security padlock underneath the rolling base. Hand-powered bolt cutters won’t cut the locks or chain, but a largish hydraulic bolt cutter could. Likewise, an angle grinder could get through given some time, noise and sparks. This is a lot of trouble both for me and the thief, but it will absolutely stop a pilferer with a crowbar. 30mm thick sides and lid, remember. But it is not at all practical for routine access to the tools inside.

The third method is to install a lock that is convenient to use but easily defeated so a determined thief won’t destroy the chest in the process of bypassing it. A strange approach, I know, but it is logical and practical. The locking system I selected is a simple, old-fashioned brass half-mortise chest lock. You could pick it with a hairpin if you know how, or pop it open with a claw hammer. It’s quick and easy to lock and unlock, and it deters rugrats, wives, casual pilferers and even pernicious pixies, all while looking classic and unobtrusive. If a determined thief has the opportunity, he can easily break the lock and get in. The upsides are that he can do it without destroying the chest, and you will know he did it. Not ideal, but nothing ever is.
Portability
The portability criteria I established during the planning phase required the toolchest be light enough in weight to be carried up stairs by two men when empty. It had to also be easily moved over flat surfaces by one man with a full complement of tools inside.
Gentle Readers may recall the following image of a Japanese kuruma dansu from Part 2 in this series. This tradition served as inspiration for my design.
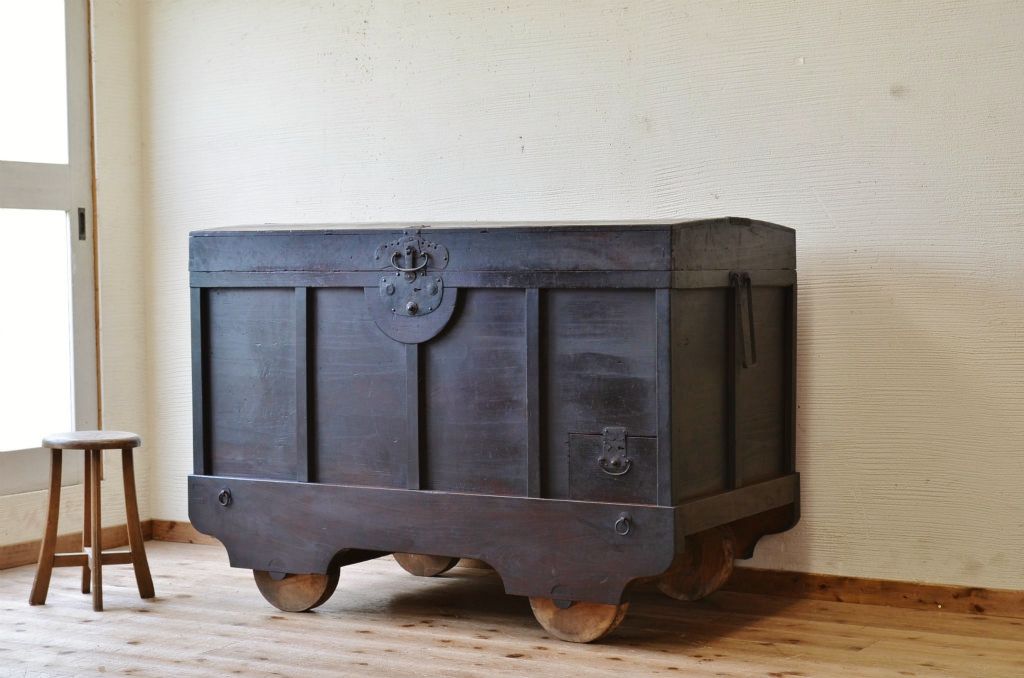
In Japan this type of chest is called a “kuruma dansu 車箪笥,” which translates to “wheeled chest.”
You may wonder why anyone would need wheels on a piece of casework intended for interior use. The reason is simple practicality: Japan has a long history of urban fires that destroyed entire cities on a regular basis, but the addition of wheels to casework made it possible to quickly roll them out before the house burnt down, thereby saving valuables. Try doing that with a wall cabinet! Or try doing it over unpaved streets with tiny fragile casters screwed to the base of a loaded chest.
Wooden wheels are cool and mecha retro, but I rejected them for two reasons. First, they have solid axles, and if rolled around much both the wheels and the floor will be damaged, a lot, especially once grit and small stones become embedded in the wood. Not practical.
The second reason is more complicated. To begin with I wanted to be able to remove the wheels at times to comply with the maximum height criteria I had established in order to move the chest up narrow Asian stairs. Even with the current design, I need to remove the lid to get it up some stairs, including the house I currently live in.
The wheels in a kuruma dansu not only add a lot of fixed additional height, but that height is volume I would prefer to have inside the chest for tool storage instead of being occupied by an integral undercarriage, wheels and axles. But by using a detachable torsion box base with modern extra-heavy-duty lockable industrial casters with urethane tires, ball-bearings, and crazy pivots (free to rotate around a vertical axis), I was able to raise the chest further above the floor to improve access, satisfy the maximum height and portability criteria, and secure more interior space. If the casters go bad, I can replace them easily without impacting the chest in any way, unlike some examples where the casters are screwed directly to the bottom of the chest.
Besides, there have been a few years when the toolchest spent time in state (in full view) in our living rooms, and while my wife is Japanese, she simply doesn’t like the appearance of kuruma dansu. Go figure. During those periods, I simply removed the wheeled torsion box and rested the chest directly on the floor. My wife placed a colorful cloth noren over the chest with a flower vase on top. Some of her lady friends from church who visit occasionally liked it enough to ask if I would make chests for them.
Tie-down & Lifting
The performance criteria for tie-down and lifting were as follows: “Can be secured to the walls or floor of a shipping container or moving truck, and lifted by crane quickly and easily and without employing complicated rigging or straps touching the wooden surfaces.”
As seen in the picture above, a hardened steel ring is through-bolted to each endwall of the toolchest. These are not reproductions or homemade rings, but industrial load-rated hardware made from hardened steel that serves three purposes. First, they make it easy to secure the toolchest to the side or floor of a container or truck. This capability is very important in the case of a toolchest that must make international moves frequently. If you think it would be easier to just have the movers throw blankets over the chest and strap it down, you’re absolutely right. The problem is that the likelihood of the conscientious, patient, gentle, sober professionals that load conex boxes and trucks properly positioning the toolchest so it won’t shift, and then tightening the straps or ropes (if they even bother to use straps or ropes) so they don’t loosen, or scratch and abrade the toolchest, are slim and none, and Murphy always goes out drinking with Slim on moving day. I’ve seen them share a doobie afterwards.
The second purpose of these rings is to make it easy for two men to carry the (empty) chest by looping straps through each ring and over a 2×4 passed over the chest and placed on each man’s shoulder. This too is a traditional Japanese method of transporting heavy boxes, and is directly related to the “Portability” criteria discussed above.
And third, if I need to chain the chest closed to prevent pilfering, as I do when it is stored in a warehouse, I can pass a hardened chain through the rings, over the top and secure it with a padlock under the base without fear of the chain being slipped off, as described above under “Security.”
Sorry this article was so long. Perhaps these scribbles will suggest some solutions to Gentle Reader’s tool storage systems.
In the next post in our tale of supernatural beings and nekid workers in workshops we will take another look at hinges and examine the tools mounted inside the lid.
YMHOS

If you have questions or would like to learn more about our tools, please click the “Pricelist” link here or at the top of the page and use the “Contact Us” form located immediately below.
Please share your insights and comments with everyone in the form located further below labeled “Leave a Reply.” We aren’t evil Google, fascist facebook, or thuggish Twitter and so won’t sell, share, or profitably “misplace” your information. If I lie may the screws in my hinges all dance the reverse macarena.


Please Leave a Reply