Gary’s Tool Cabinet

Figure 1: The Chest front view

She walks in beauty, like the night
Of cloudless climes and starry skies;
And all that’s best of dark and bright
Meet in her aspect and her eyes…

Lord Byron

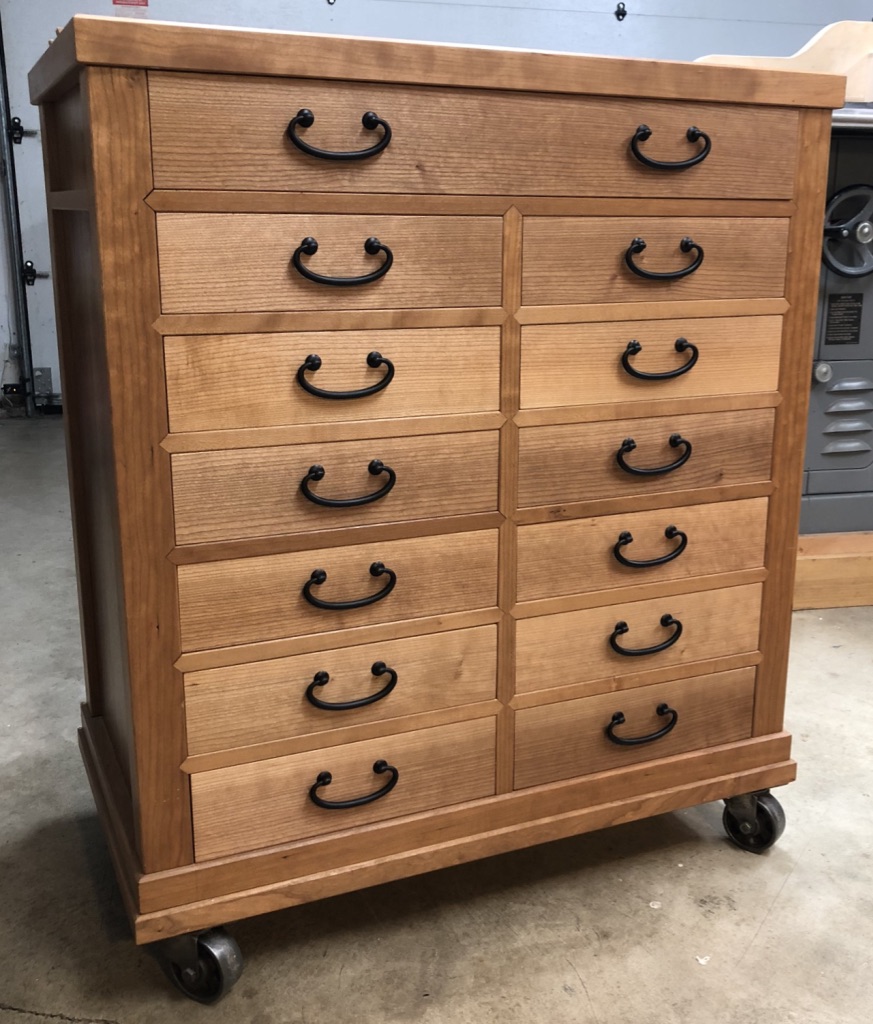
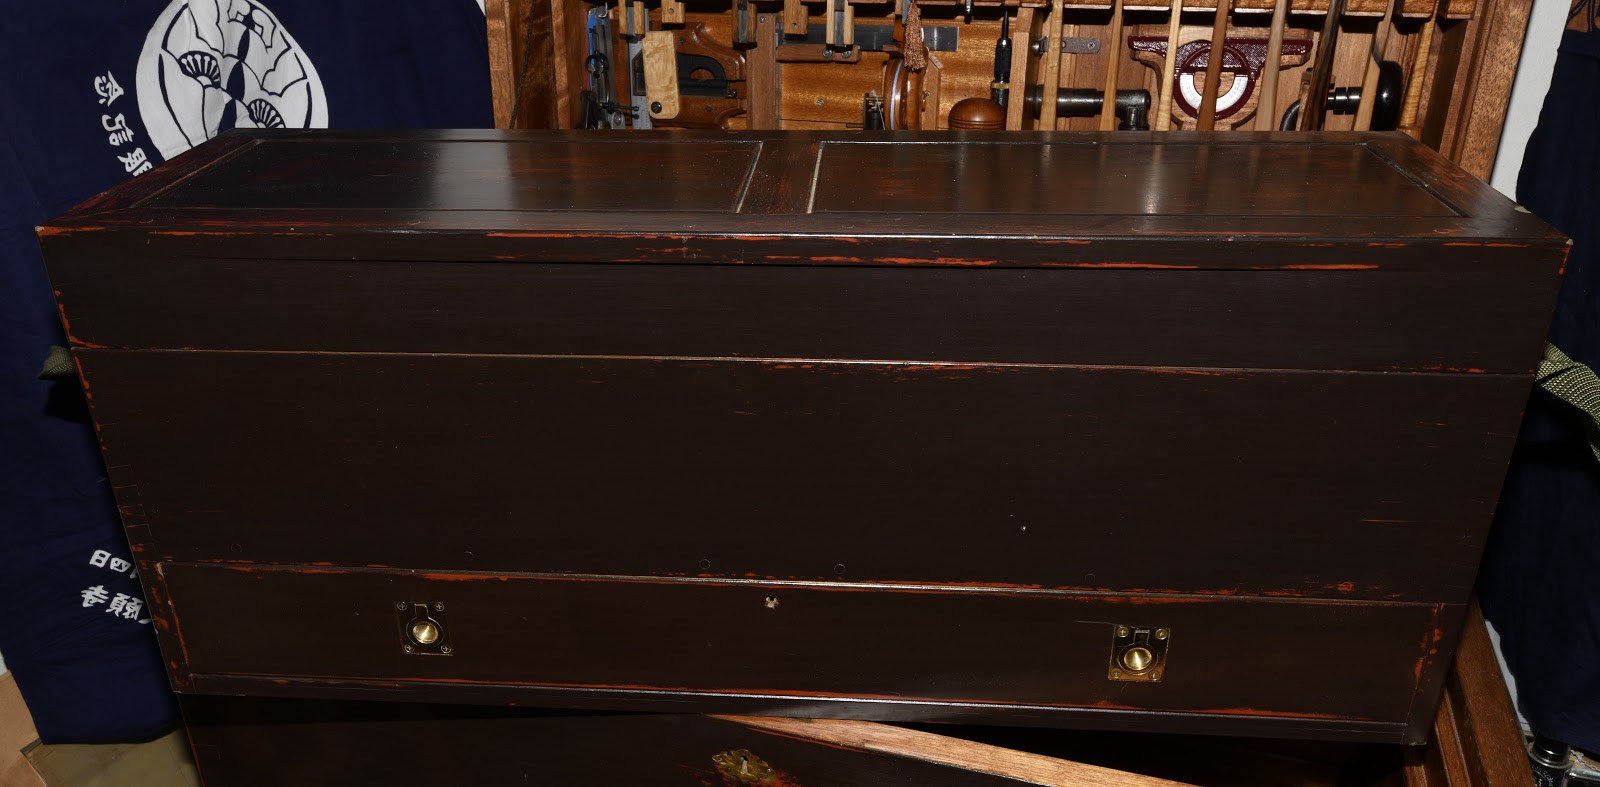
Gary, a truly Beloved Customer, has produced a well-designed and beautifully-executed chest of drawers to be the base of a future larger tool cabinet. The joinery is amazing, and his solutions to the challenges tool cabinets and chests all face are excellent. He was kind enough to put together this guest post for the edification of our Gentle Readers. We hope you enjoy it as much as we did.

YMHOS

Introduction

I’ve been avidly following Stan’s series of posts about tool storage because I’m deep into making my own tool cabinet. After some back and forth with Stan to get his input on some design and hardware options, he asked if I would write a guest post to describe my efforts. I now have completed the chest of drawers, which will be the base for a future upper cabinet. In this post I’ll describe my design decisions and the chest’s unusual construction.

If anyone would like more details, I have a lengthy thread describing the build in even more detail at the Woodworking forum at OWWM.org. (Free registration is required. It is a wonderful site if you are interested in restoring and using vintage woodworking machinery). 

Design Criteria: Functionality
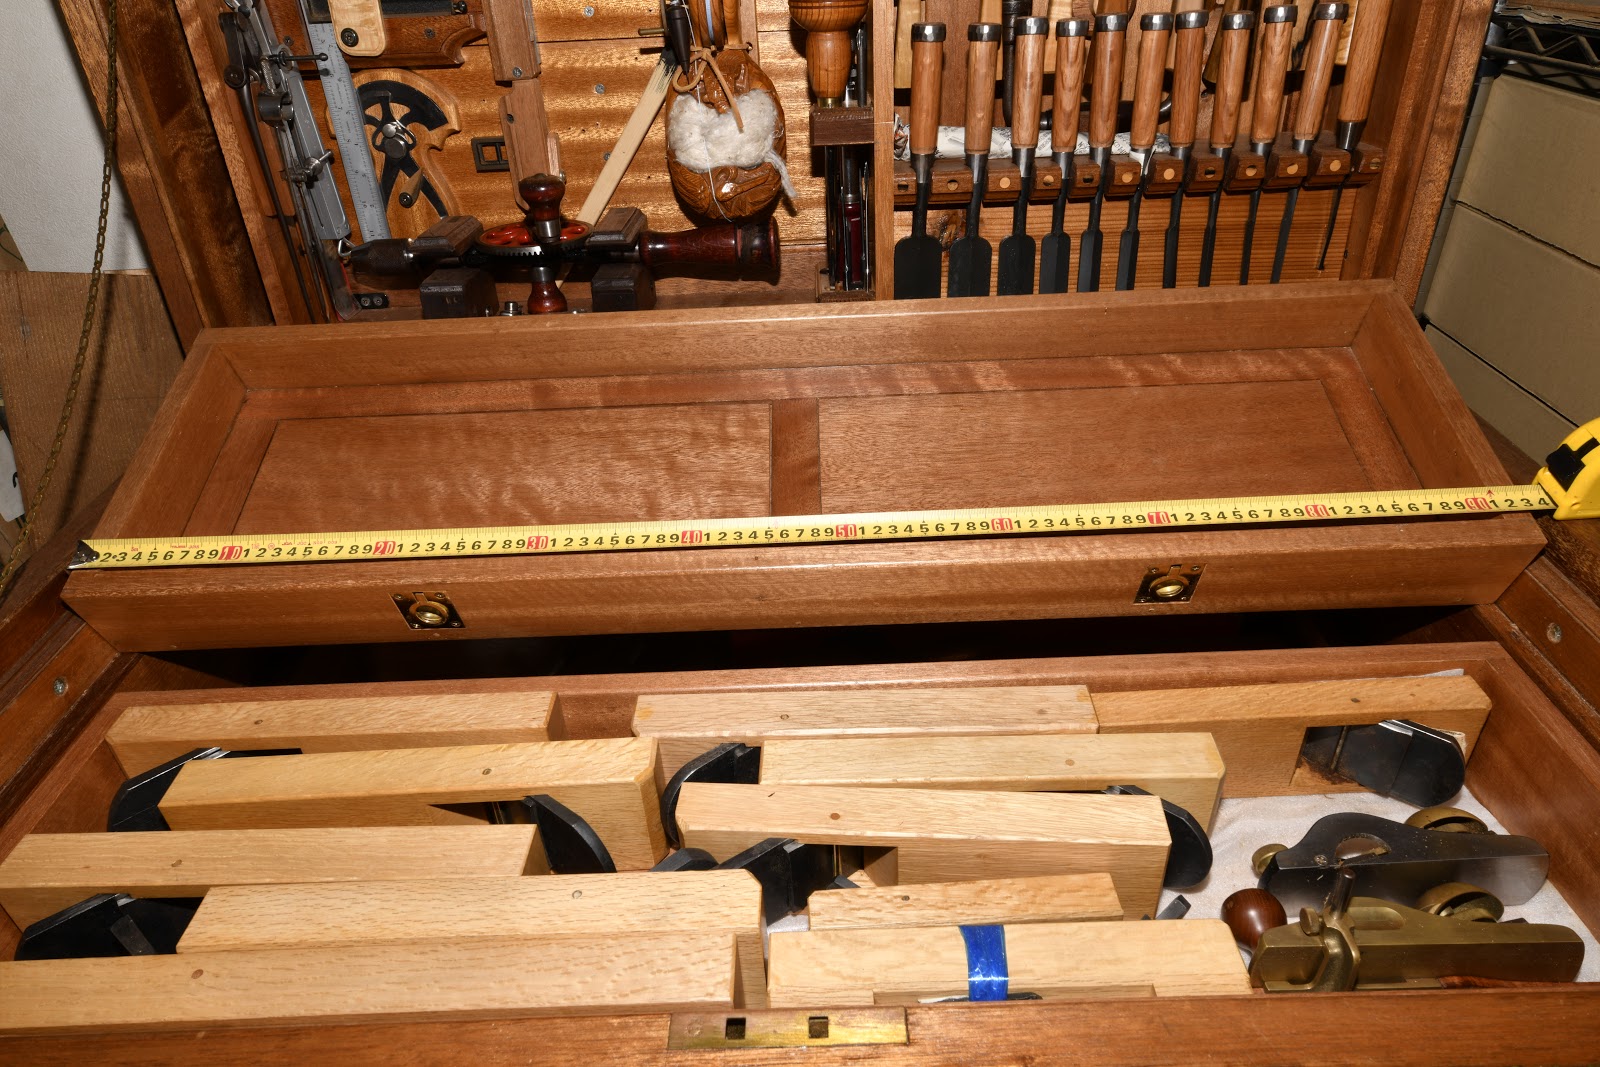
Overall Dimensions

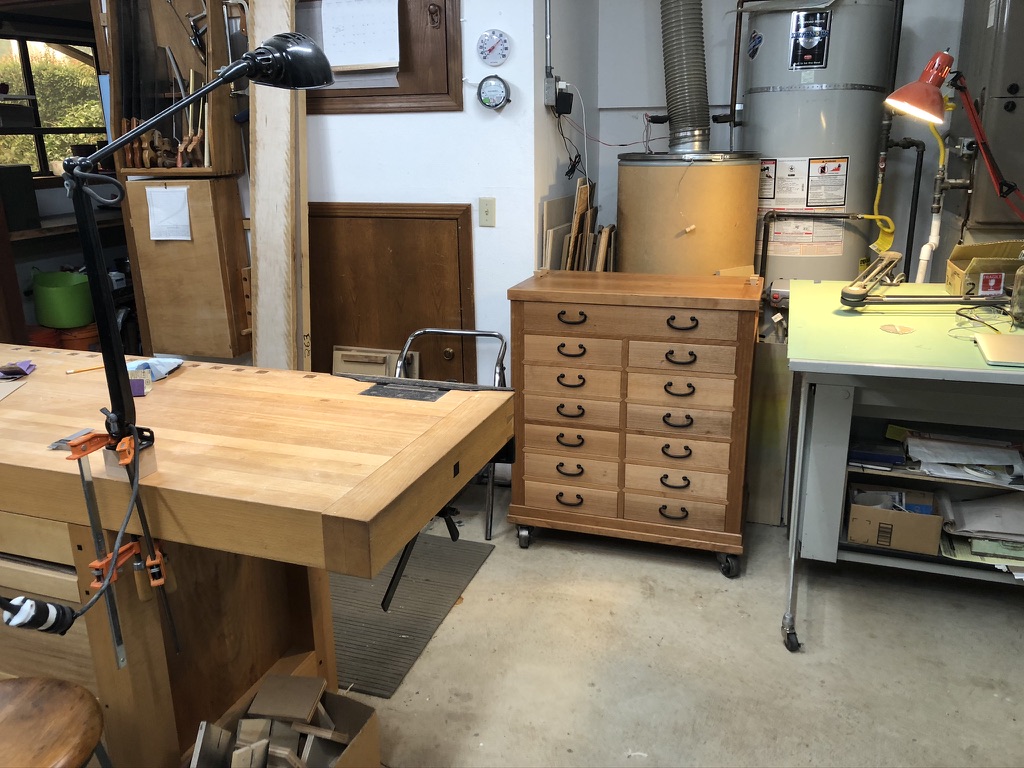
I wanted my tool cabinet to hold the hand tools and other items I use frequently at the bench. It had to fit behind my workbench and in front of a dust collector bin, restrictions that defined the cabinet’s dimensions, which for the chest discussed in this article are roughly 37 inches tall (including the casters) by 18 inches deep, by 32” wide. The upper cabinet will be about 48 inches tall, 60 inches wide with the doors open, and 12 inches deep.

Mobility

This chest had to be mobile because I occasionally need to empty the dust collector bin behind it and access both some closet storage near it and a hatch to the garage attic above it.

Durability & Tool Protection

It also had to be sturdy, durable, modifiable, and repairable. I made modest efforts to protect against dust. I was not concerned about protecting my tools from humidity swings or security since the cabinet will stay in a secure, conditioned space where the relative humidity is between 40% and 60% year round. 

Figure 2: A conceptual sketch of the entire cabinet as it will appear when completed, including the chest of drawers supporting a cabinet with doors, shown where it will reside in my shop,
Figure 3: The completed chest of drawers in its native environment.

Research & Planning

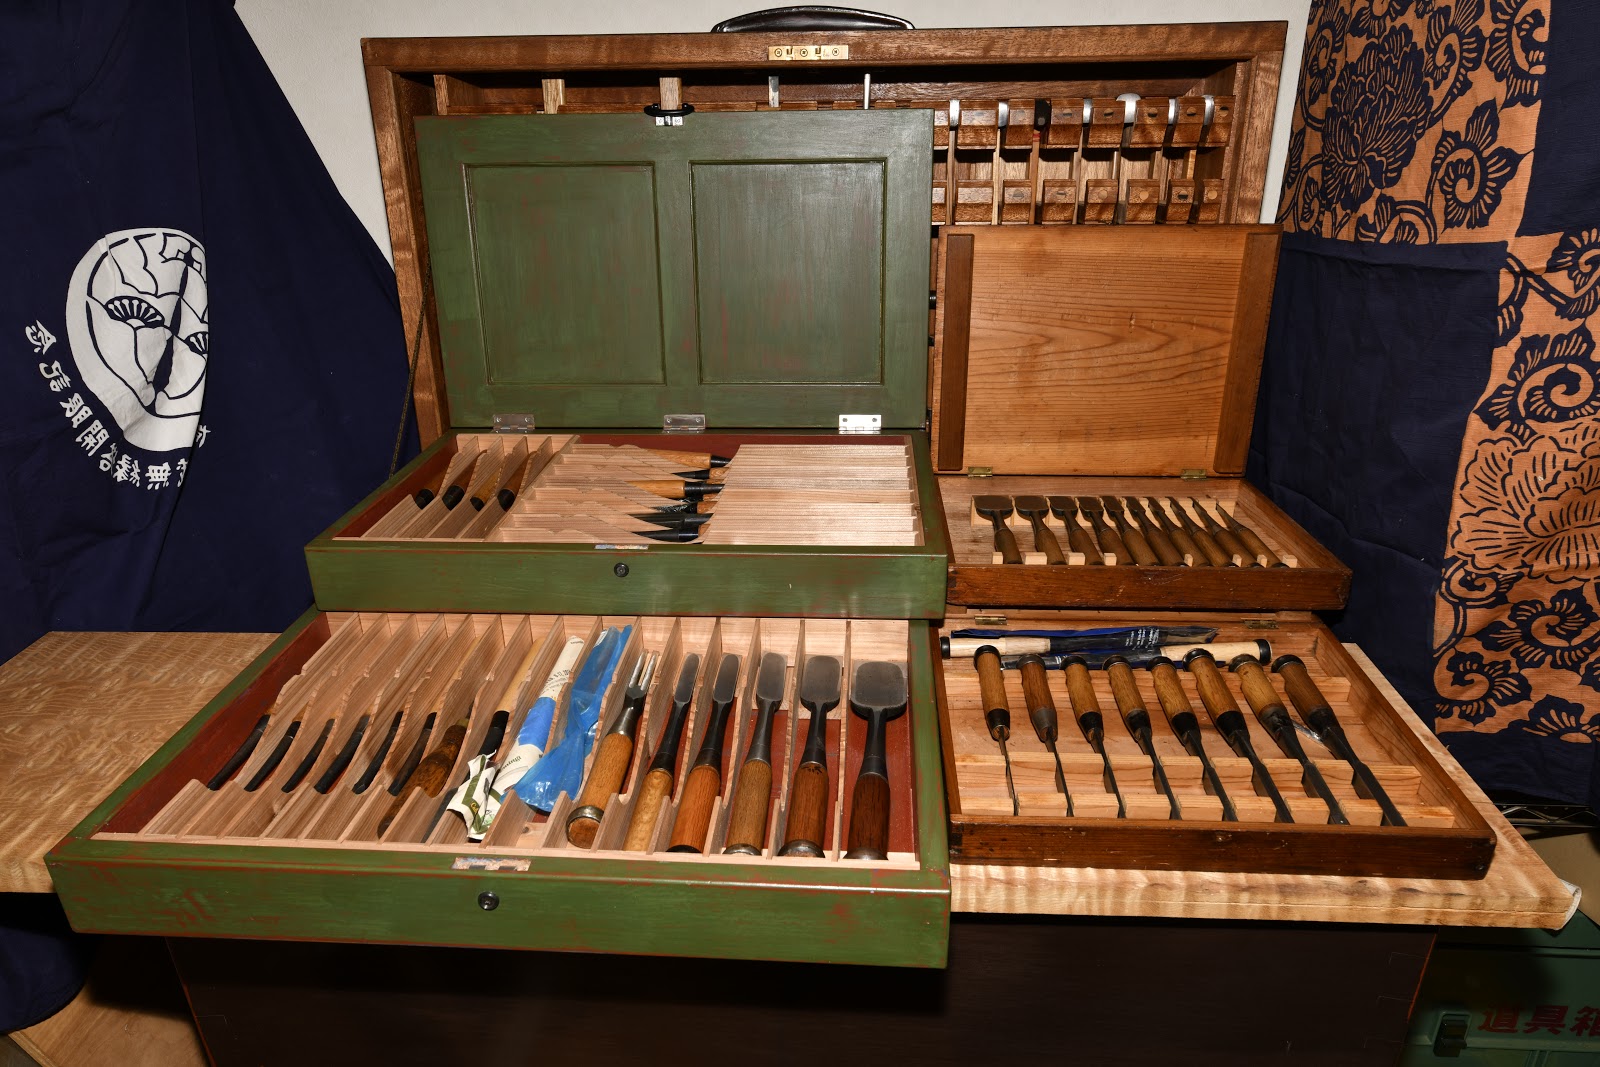
Visually, I wanted the chest to appear, in Stan’s words, “Workmanlike…with some subtle decorative details.” I also wanted it to have a Japanese aesthetic without being a reproduction of a Japanese tansu.

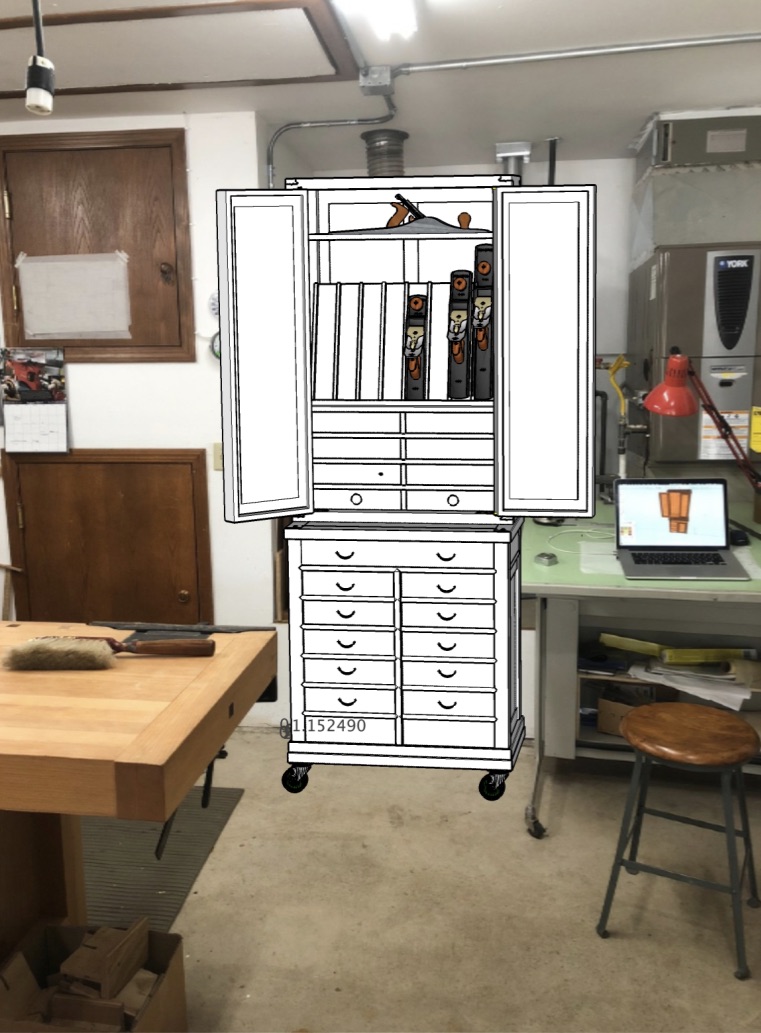
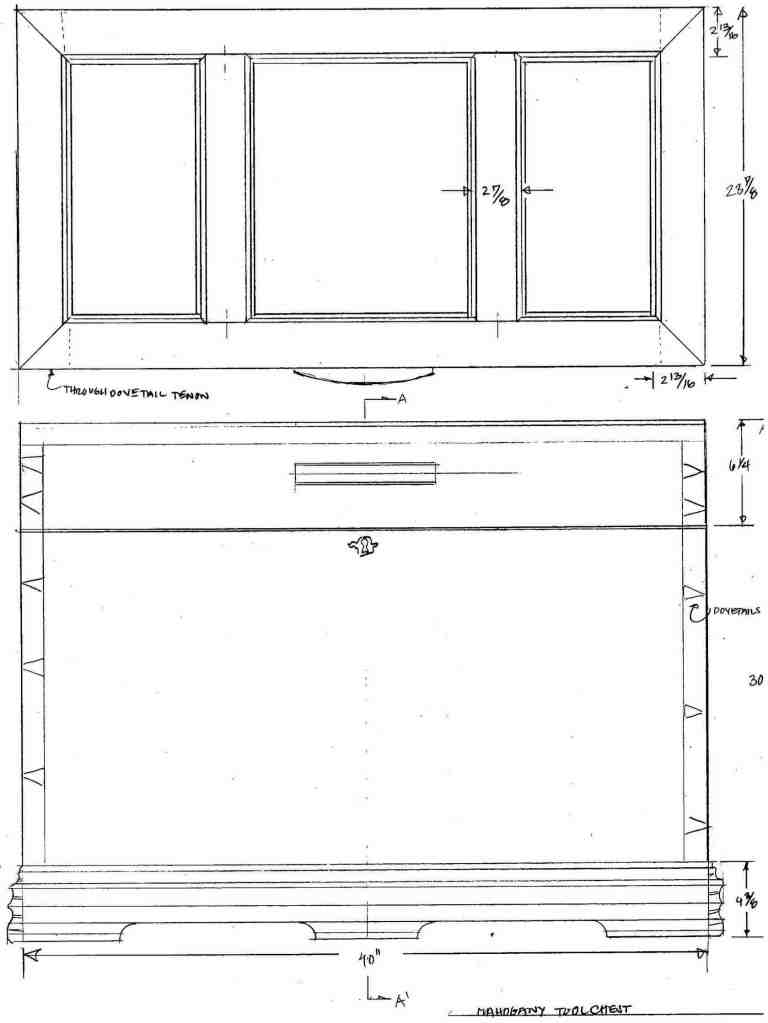
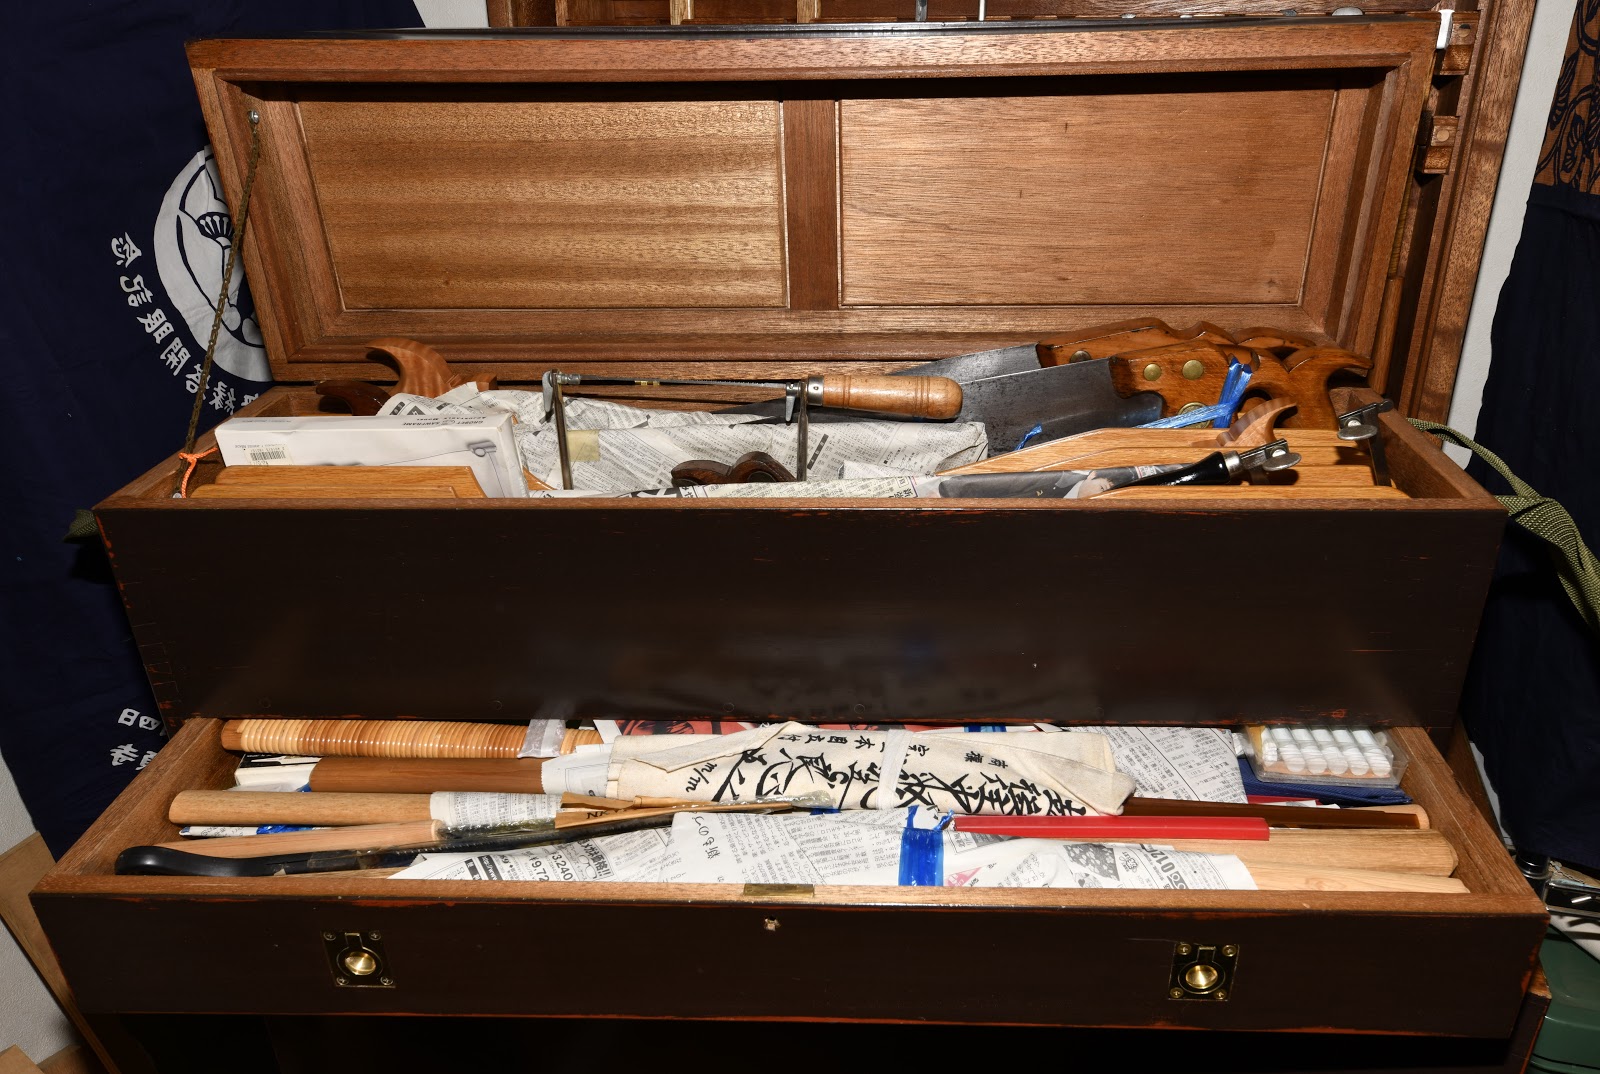
After researching different tool cabinet designs that might fit my criteria — Jim Tolpin’s Toolbox Book was particularly helpful — I started sketching a preliminary design. I decided to combine two kinds of storage: a chest of drawers for smaller items below, and a cabinet with doors above for longer and larger tools.

Initially I drew the chest with full-width drawers to hold larger items, but potential sagging became a concern and I didn’t much like their appearance in my planning sketches. I compromised by having one wide drawer on top and two banks of narrower drawers below supported in the center by a stile.

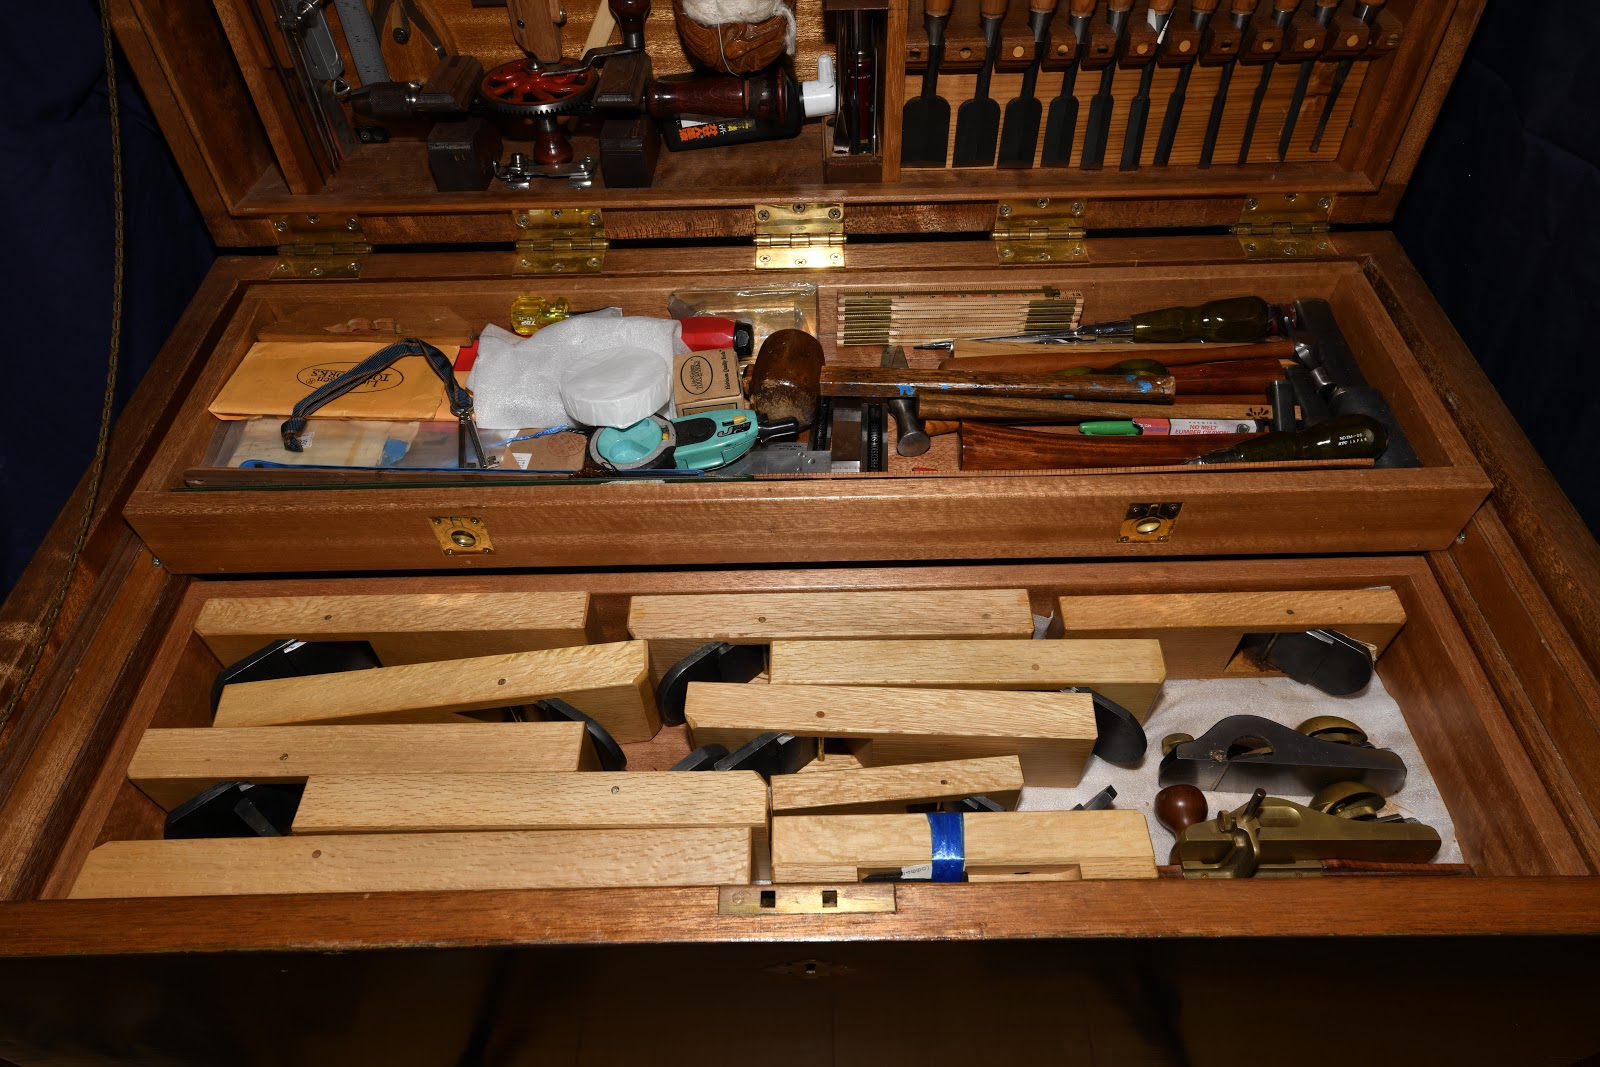
The upper cabinet design is still in progress. The sketch in Figure 2 above shows planes resting on a slanted surface, but I have decided to store them horizontally to maximize space instead.

One goal I had for the chest was to use mostly interlocking mechanical joints rather than conventional glued/screwed case construction. Joining it mechanically was both an intellectual and design challenge as well as an opportunity to learn new joinery skills. My “tutor” in this effort was Chris Hall, who explored and described this kind of construction in his blog The Carpentry Way, and in several self-published monographs and tutorials. Sadly, Chris passed away in April of 2020. While I am not the craftsman he was, I’m pleased to have a made piece that reflects his approach to woodworking.

 I quickly realized that the build would be complicated enough that using a CAD program would help me draw and visualize the interlocking joints. I took a few weeks to learn enough Sketchup to ensure I didn’t miss any critical dimensions.

Wood Selection

I chose to build the chest from black cherry (Prunus serotina) because this wood is readily available at a reasonable price in my area, is excellent for joinery, and ages nicely.

For the interior I used quarter-sawn sycamore (Platanus occidentalis) because it is relatively hard and stable—and I had recently purchased 100 board feet of it for almost nothing.

I used quarter-sawn Oregon white oak (Quercus garryana) for the drawer sides because it is hard, abrasion resistant, and I can get it locally from a friend whose family runs a sustainable forest and sawmill.

Mobile Base & Joinery

Casters

I considered wheels made from plain iron and with rubber, neoprene, or urethane treads, but selected cast iron, industrial-quality casters for their durability and for the look of iron. I also wanted them to swivel.

I spec’d them to accommodate at least twice the combined weight of the lower chest and upper cabinet when fully loaded.

I decided to use vintage hardware, and I eventually found a set of used Bassick brand cast iron swivel casters with hardened steel carriages, needle roller bearings, and grease fittings. Bassick has been making industrial casters since the late 1800’s. These are probably from the early to mid-1900’s but are still in good shape. I could not find their load rating but similar modern casters have load ratings several times the ultimate weight of the cabinet. They should last a long time. I cleaned them up and attached them with stainless steel screws.

Figure 4: Vintage Bassick model 361 casters

These old casters are noisy rolling over my concrete shop floor, but it’s a noise I like. 

Mobile Base Joinery

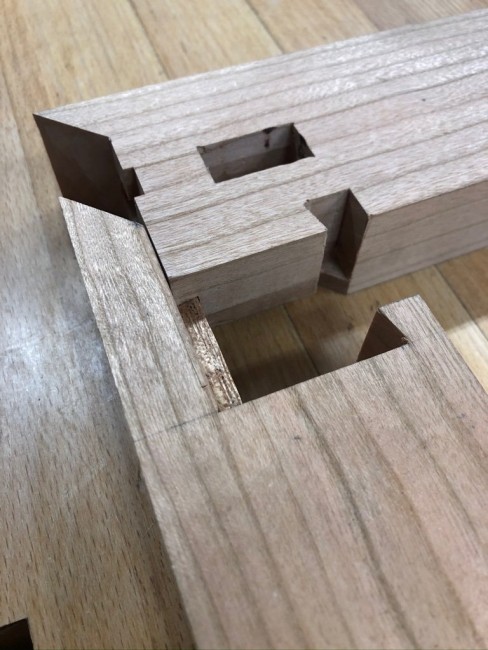
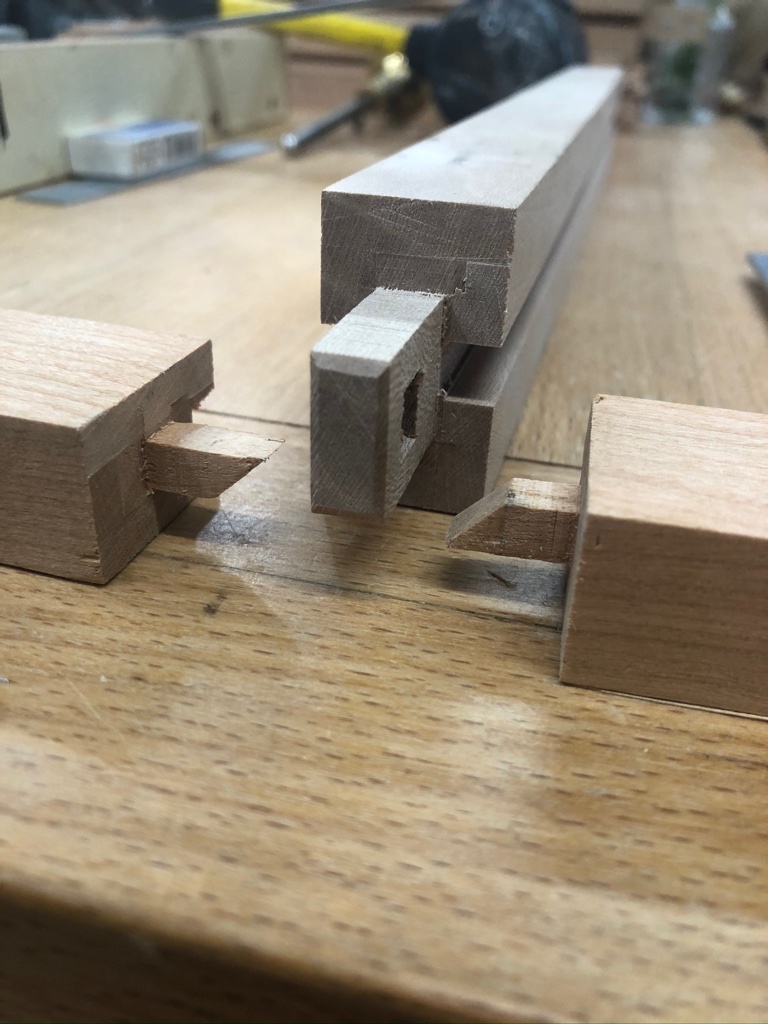
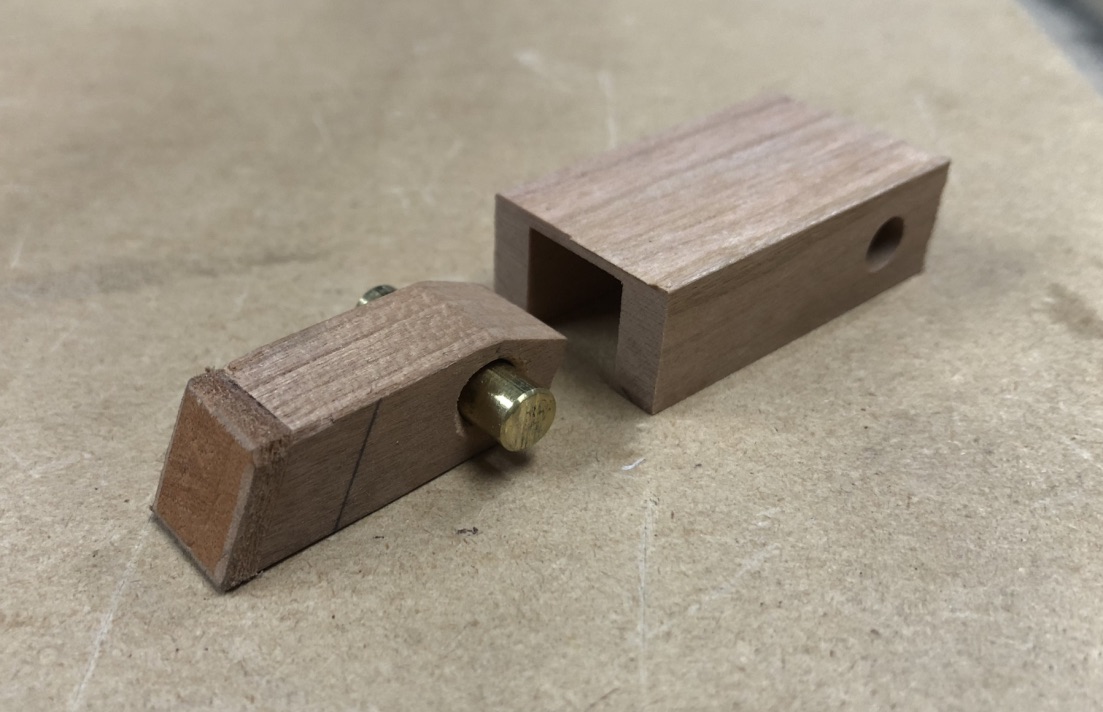
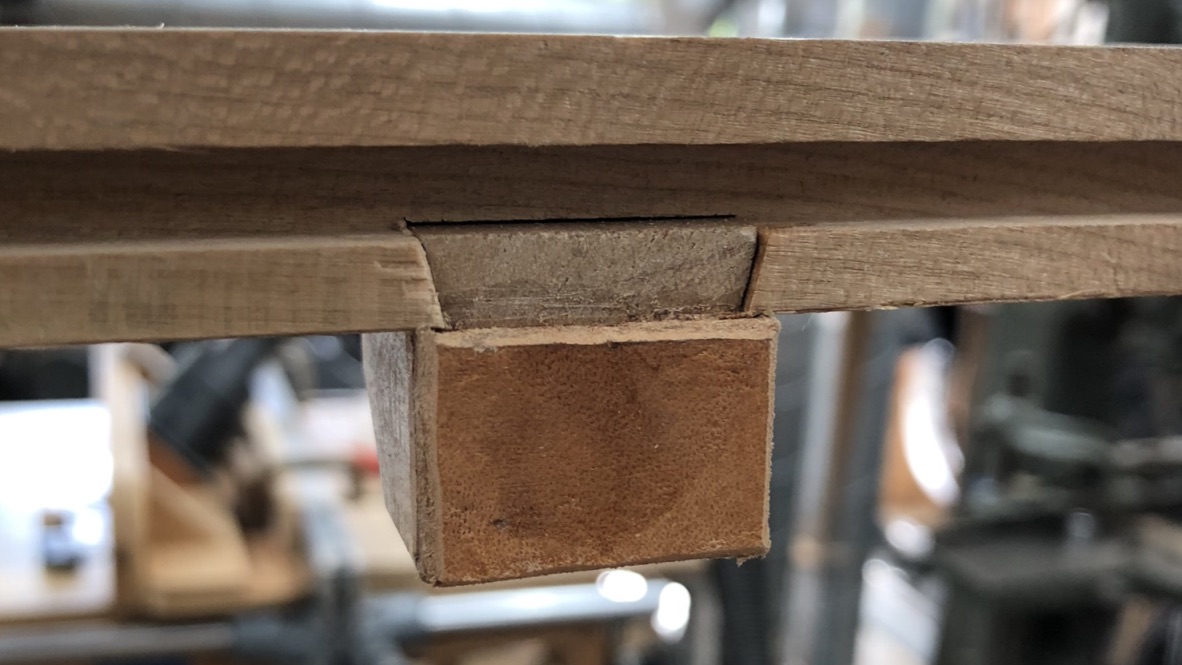
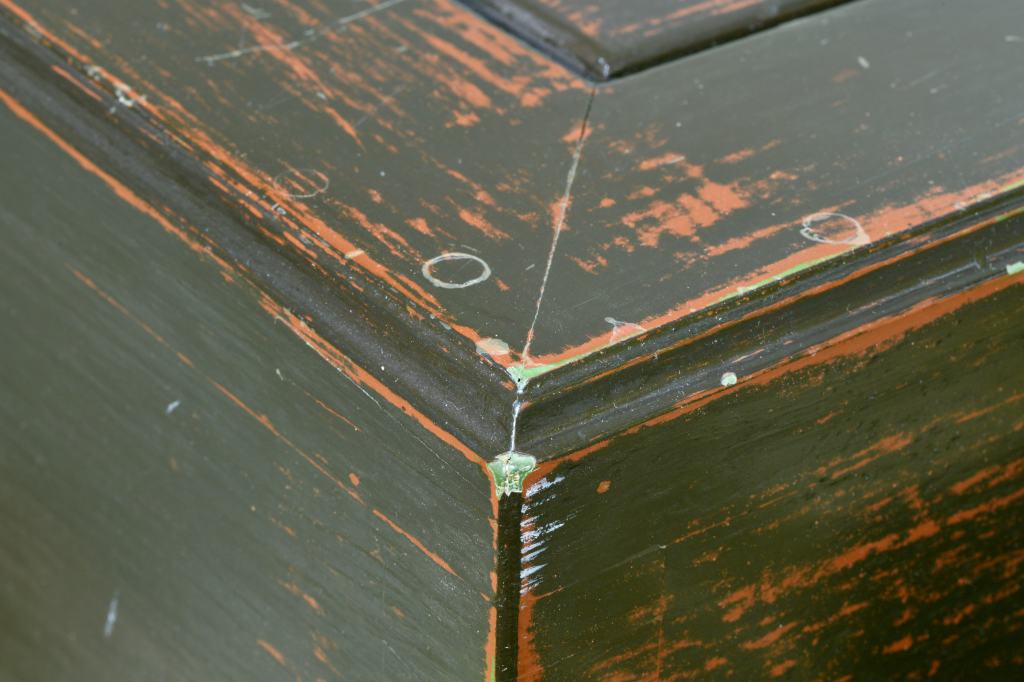
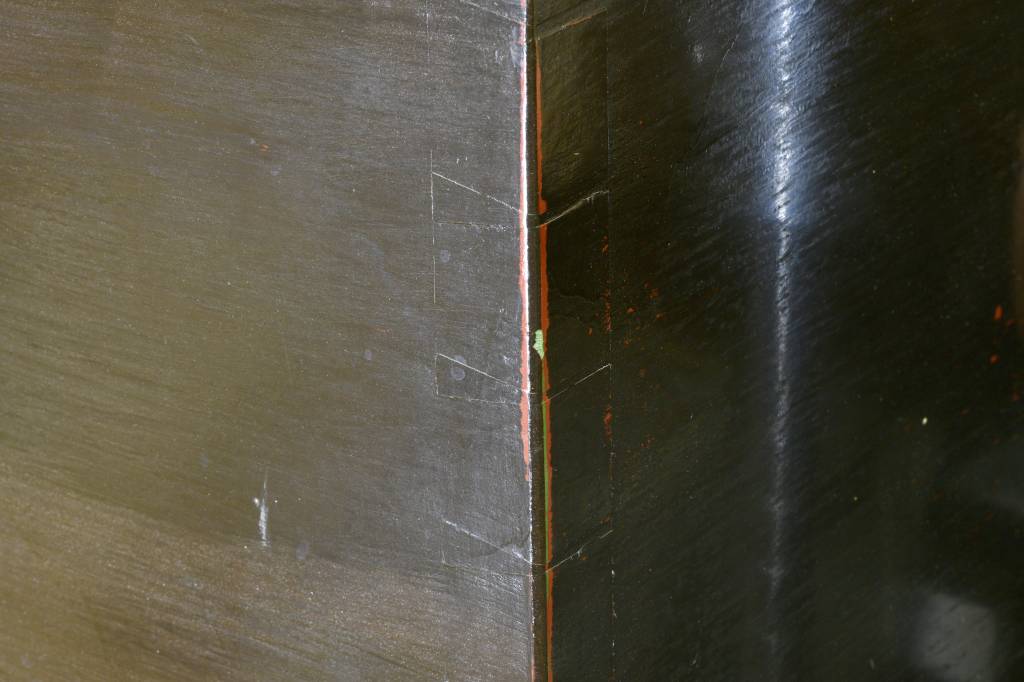
I began the construction process with the mobile base. Its key feature is the three-way corner joint shown below. Chris Hall called it a sanpō-zashi Tsugi no Henka (三方差し継手の変化). I followed his step-by-step construction tutorial

Figure 5: Sketchup drawing of the mobile base corner joint

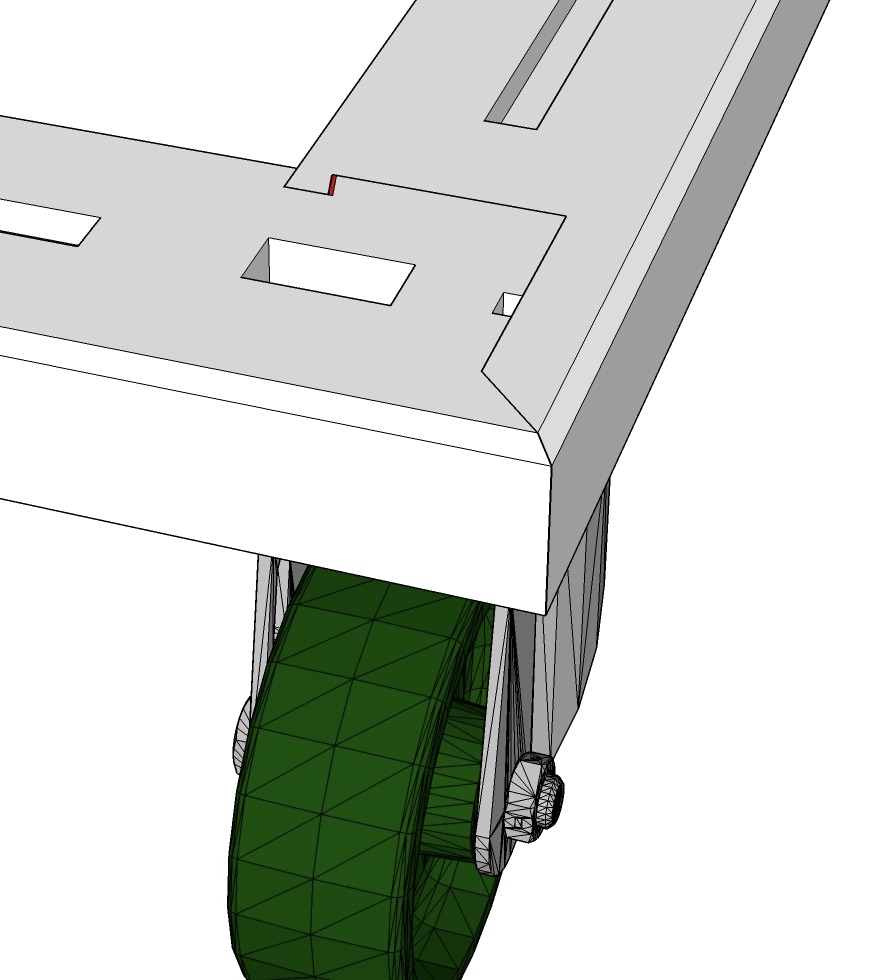
This joint has a mitered corner to hide end grain, an internal sliding dovetail, a half dovetail, a stub tenon, and two locking keys. The larger through mortise is to receive a tenon in the corner post of the chest of drawers that also passes through the chest sill.

The grooves in the upper surface of the mobile base seen in Figures 5 and 8 are to receive loose splines to connect the base to the chest of drawers, and to reduce stresses on the tenons when moving the assembly around the shop. 

Figure 5: The two halves of the three way corner joint

The two keys shown in Figure 8 lock the joint together strongly without glue. The keys cannot work themselves out because they are restrained from above by the corner posts of the the chest of drawers. 

Figure 7: The mobile base corner joint partly assembled
Figure 8: The corner joint with keys inserted but not yet cut flush

The Chest’s Frame

The sill and header are constructed with the same joinery as the mobile base but with slightly different dimensions and other small differences. The sill has grooves cut to accept two plywood dust panels. The header is grooved to accept a solid wood top panel.

Figure 9: Corner post connection to sill showing through tenon with flanking stub tenons.

Center posts help support the drawers. The top drawer is full width. I mortised the posts and stiles to receive tenons on the drawer rails and drawer frames. 

Figure 10: Mobile base, sill, posts, and header.

Drawer Frames and Guides

Figure 11: Quarter-sawn sycamore for rails and drawer guides

The drawer frame sides and guides are quarter-sawn sycamore. Gorgeous, but since these are internal parts, no one will ever see the ray fleck figure unless they remove the drawers and peer inside the chest. I like that. 

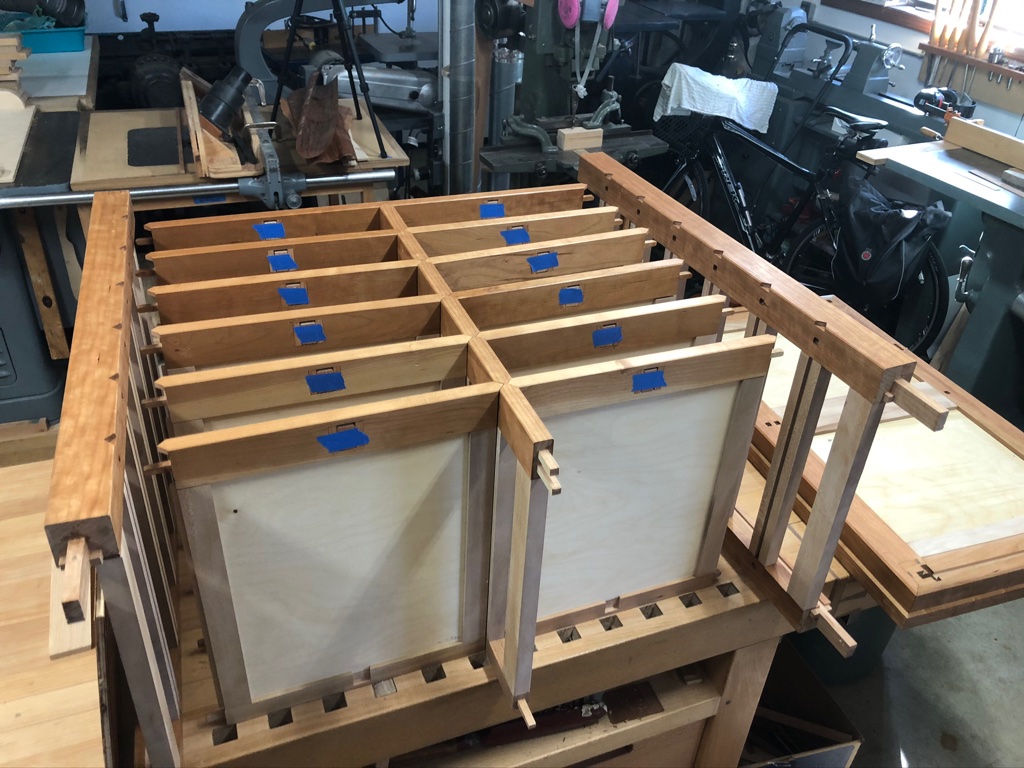
The drawer frames that support the drawers have cherry front and back rails and sycamore sides. Front rails for the drawer frames are tenoned into the posts with mitered spear points on the show surface. The spear point is partly structural in that it has a larger bearing surface to resist racking better than a typical plain shoulder. It is also a subtle decorative detail that I  like a lot. It was challenging to get them all to fit. I was more or less successful but not perfect. I included dust panels of ¼ inch birch plywood in the drawer frames to help limit dust in the drawers. This picture is of a test fit before assembly. The blue tape covers drawer stops that are detailed below. 

Fig 12: Chest frame and drawer frames assembly test fit

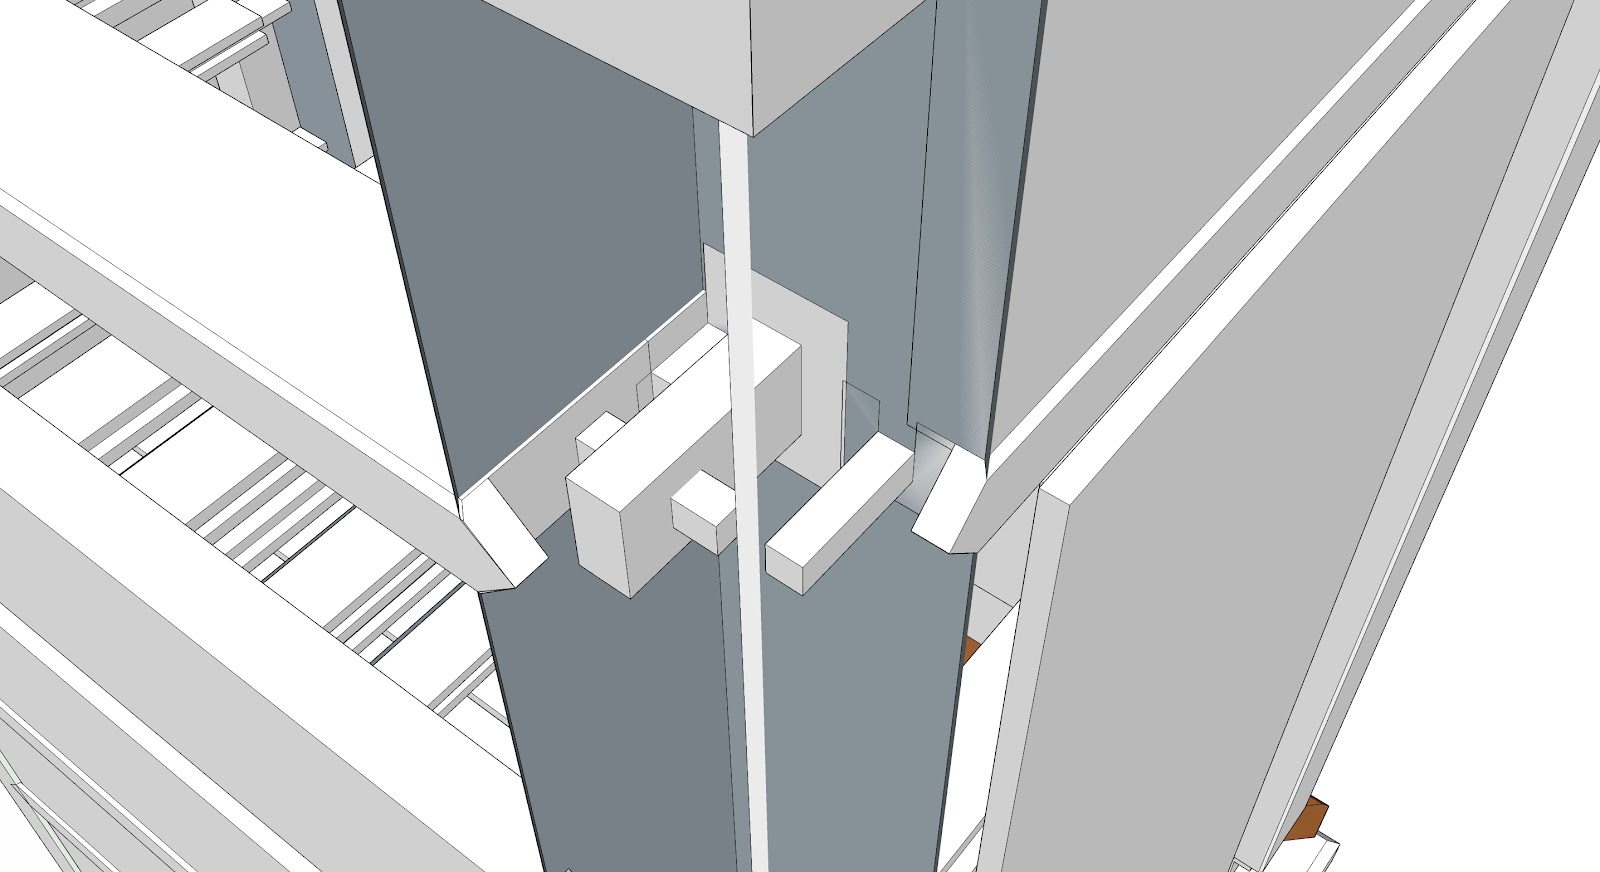
I tenoned the side rails of the drawer frames into the front rails and also tongue and grooved the side rails into the side guides for extra support for the drawers. Further, the tenons on the front rails also intersect and pass through the tenons on the side guides, locking the side guides in place. The post and side guide “ladder” is extremely rigid to resist racking front to back. 

This complicated joinery is difficult to describe and photograph. Here is a Sketchup view of what the drawer rail and side guides to post connection looks like inside the post. A similar joinery locks the drawer rails and drawer guides at the center posts.

Figure 13: Sketchup X-ray view of rail and side guide to post joinery
Figure 14: Joinery of back drawer frame to center drawer guide and back post
Figure 15: Assembled view of joinery of back drawer frame to center drawer guide and back post.

Drawer Stops

I wanted both cushioned pull-out stops and cushioned push-in stops to prevent accidentally dumping a drawer full of heavy and sharp tools onto the floor or my feet. I also wanted the stops to be replaceable and adjustable for wear over the years.

For the pull-out stops I found a compact design by Australian woodworker Neil Erasmus that I like. These fit into the underside of the front rail and fall into place by gravity when the drawer is pushed in. When you pull the drawer out, the inside of the drawer back hits the leather padded face of the stop. They lift out of the way with a finger if you want to remove the drawer.

I secured these in-place with hide glue so that they can be replaced if they break after a few decades of banging. The leather cushion is from an old belt of mine that has mysteriously shrunk in length over the years.. 

Figure 16: Pull-out stop.
Figure 17: The pull-out stop mortised into a rail

The back stops are my own design. They are dovetailed into the lower surface of the back drawer frame rail. They can be adjusted by adding or removing slivers from the back of the stop, and are easily  replaceable.

I will have to use them for a while to determine if these are a good idea or not. A friend suggested that stops that hit the end grain of the sides would be better than one that hits the center of the more flexible back. I suspect he is right but this is what I have for now and I can re-do the back stop later if I need to. 

Figure 18: Back stop

Side Panels

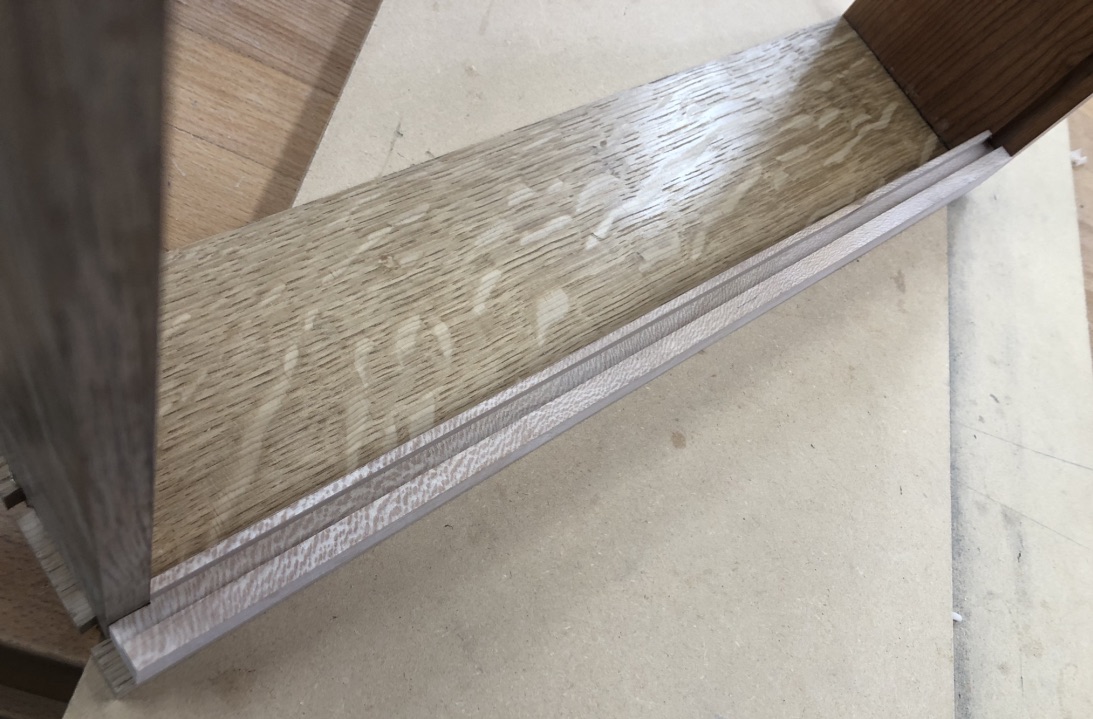
The chest’s side panels are book matched, hammer veneered cherry on birch plywood cores, friction fit into grooves on the posts to further help resist racking front to back. I added the small, spear pointed rail there to carry the theme seen on the front drawer rails around to the sides and also help resist racking. 

Figure 19: Side panels

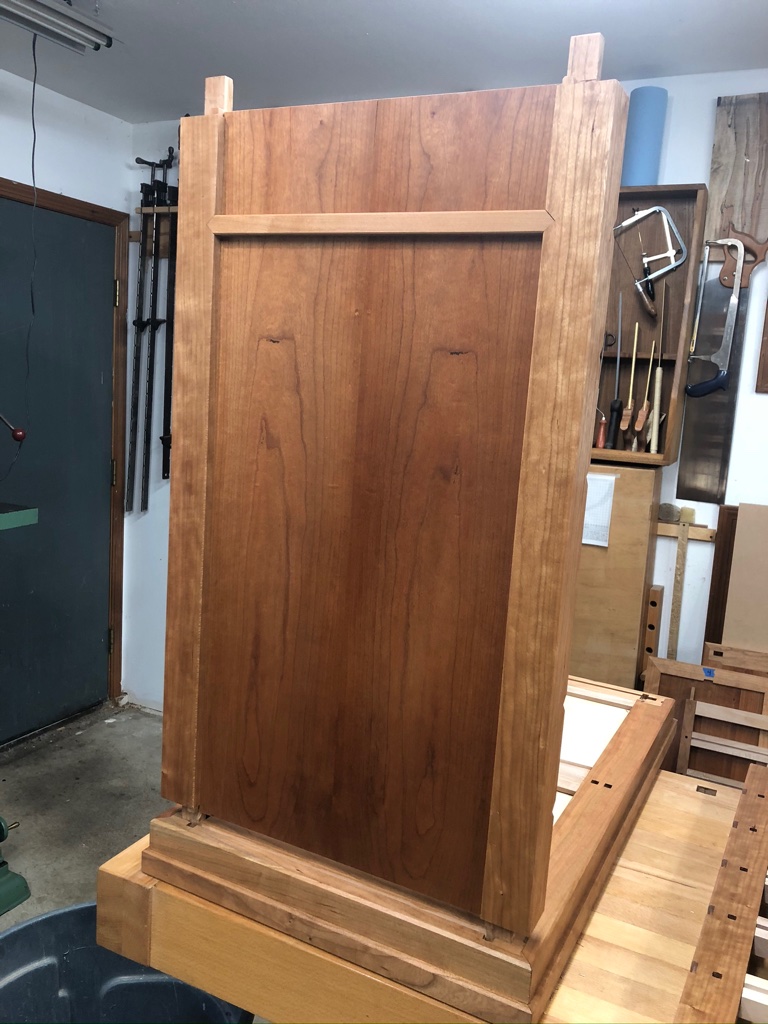
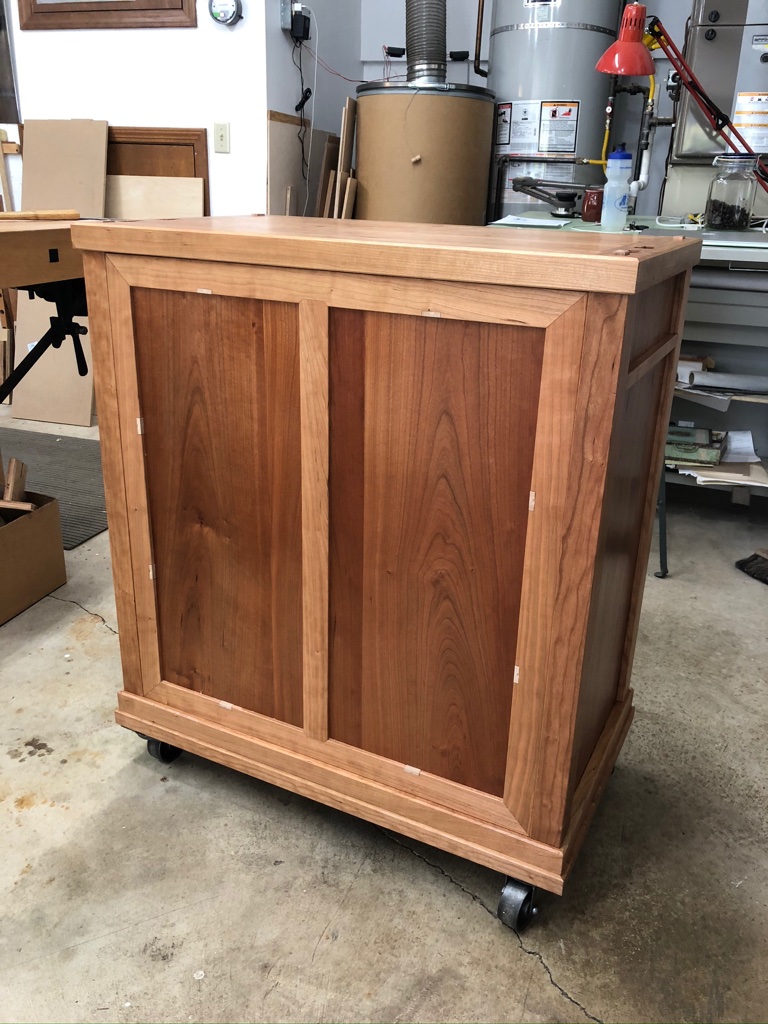
The Frame & Panel Back

The back of the chest is frame & panel construction with mitered and through-tenoned corners. The panels are cherry veneer, hammer-veneered with hide glue onto birch plywood cores.

I friction fit the panels into the frames, and friction fit the back into rabbets in the posts to help resist racking from side to side. These veneered panels give the chest a finished look from the back as well as the other three sides.

The weight of the back helps counterbalances the weight of an open drawer.

The eight odd white bits seen in Figure 20 are loose, removable sycamore tenons that pass through mortises in the back frame and down into mortises in the sill, laterally into the posts, and up into the header, attaching the back. One might use screws to accomplish the same thing, but I liked this idea, again from Chris Hall, who adopted it from a Chinese Ming Dynasty cabinet. 

Figure 20: View of Frame & Panel back showing 8 sycamore wood tenons that secure the back panel.

Header

The header frame is grooved to accept a solid wood panel fitted tightly at the front and sides to eliminate any gaps that would collect dust and grit. To accommodate seasonal movement I glued the panel’s front edge into the groove and left a gap at the back, which will be covered by the upper cabinet, so the panel can float.

Figure 21: Header with solid wood panel inset in-place

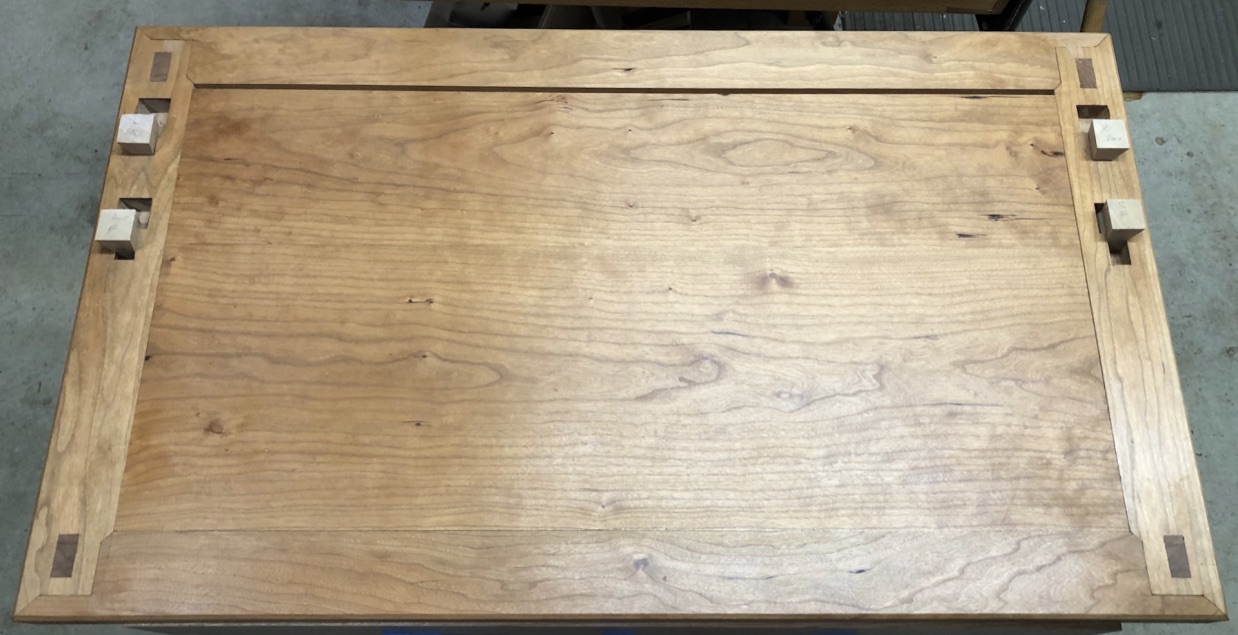
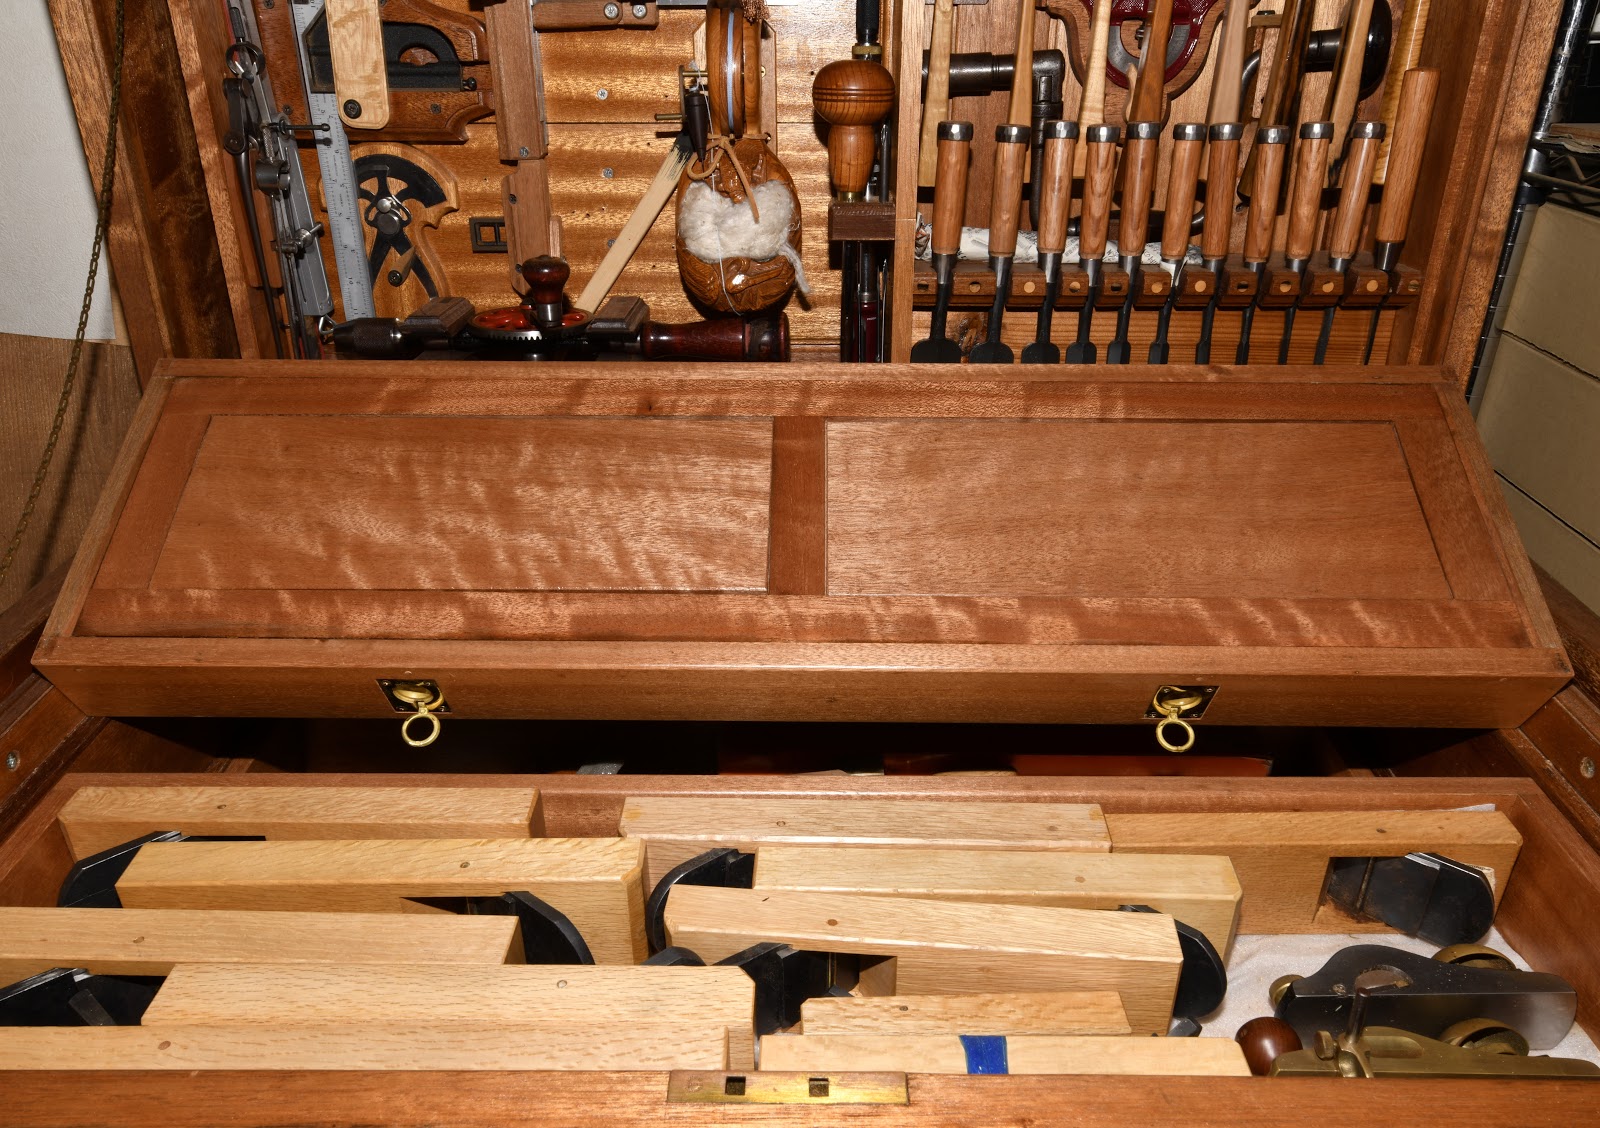
The odd looking projections seen in Figure 21 are twin sliding dovetail keys that will anchor the future upper cabinet. There will be mating mortises on the underside of the top cabinet. The cabinet will drop onto the keys and slide forward, locking the two pieces together. The upper cabinet will be approximately 12 inches deep, leaving 6 inches of the chest top free. 

Drawers

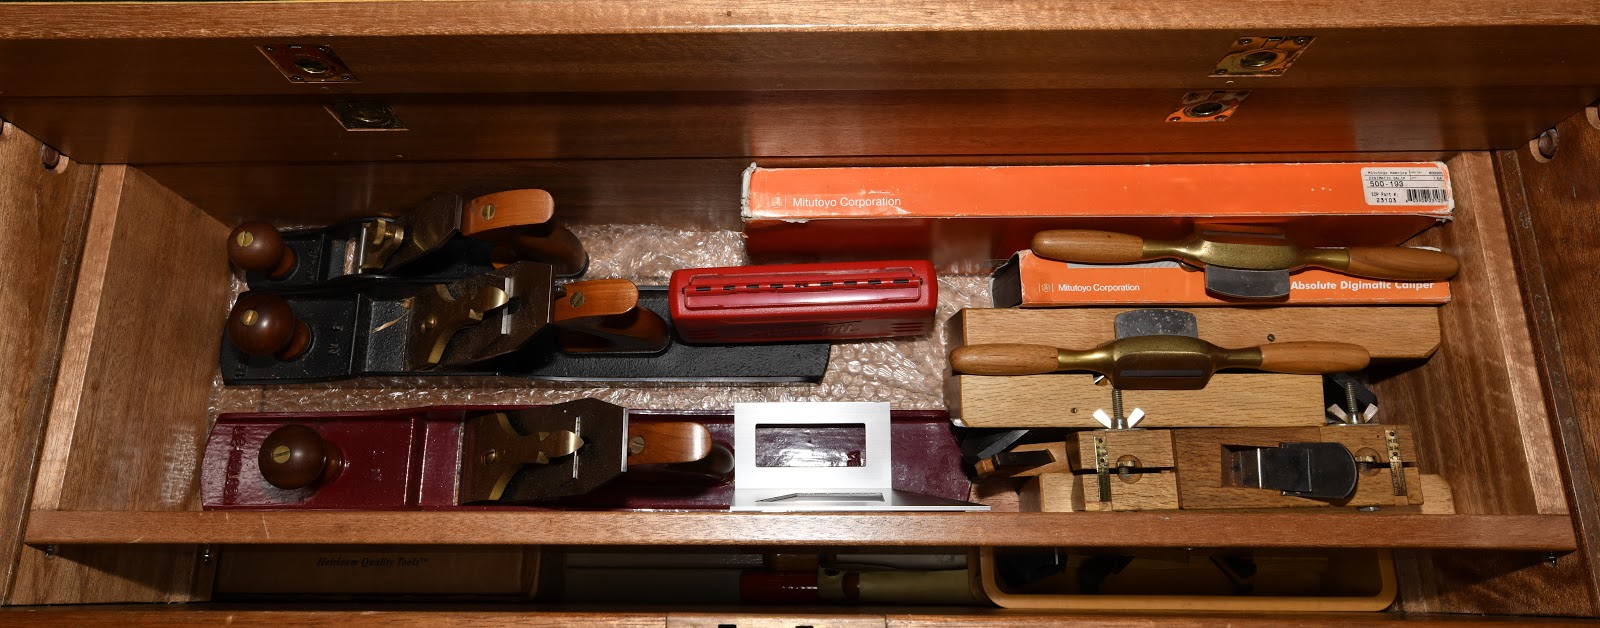
I put extra work into the drawers since they will actually hold the tools. The rest of the chest is just there to keep the drawers off the floor.

I decided early to avoid metal drawer slides because I find side-mounted slides ugly and believe under-mounted slides sacrifice too much drawer depth. 

Figure 22: A drawer

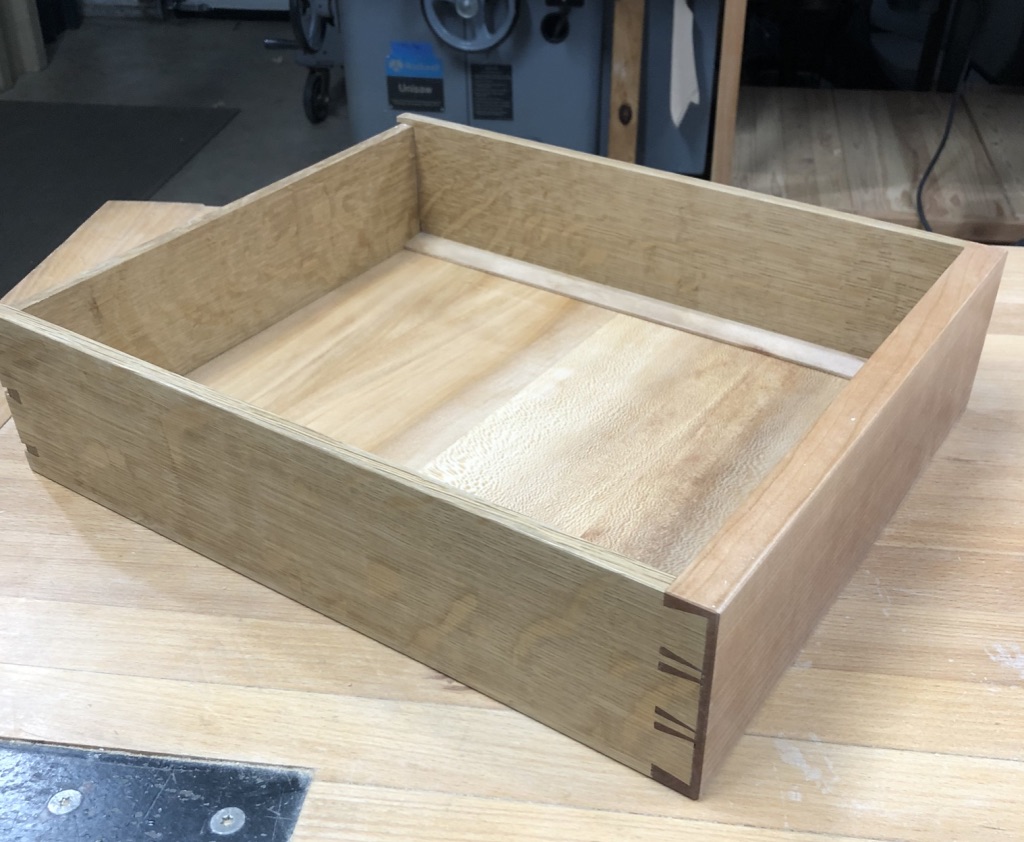
Drawers fronts are attached with half-blind dovetails, and backs with through- dovetail joints. The cherry drawer fronts are cut from a single clear and straight grained 12/4 board that I resawed to match figure and color vertically and horizontally. 

For the sides I resawed 4/4 oak stock and hand planed it to  ⅜” thick. I chose relatively thin sides both to save material and weight and because I like the look of thinner sides. But they don’t leave much room for a typical ¼” groove for the drawer bottom. To correct for that thinness, I glued on drawer slips of quarter sawn sycamore. Oak would have worked, too.

Drawer slips are, from what I have read, probably a French invention, adopted and most widely used by the British in the 1700’s and 1800’s for finer work but not commonly used in America. Besides providing more “meat” for supporting a groove for the bottom, the slip adds more bearing surface for the drawer. Distributing the drawer weight helps slow the drawer sides from wearing grooves in the runners.

I made the drawer bottoms of sycamore. I slotted the back end of the bottom and screwed to the drawer back to allow seasonal movement.

I’ve also since covered each bottom with a thin sheet of rubberized cork to protect the bottoms from sharp tools and to protect sharp tools from the bottoms. 

Figure 23: A drawer slip

The design of the half-blind dovetail joints was for my own amusement. I wanted a Japanese look for the drawers if possible. A friend sent me a poster of Japanese dovetail styles for inspiration, shown below.

Figure 24: Japanese dovetail poster

I chose the design in the middle at the top with the split pins. They remind me somewhat of Torii gates. 

Torii gates mark sacred ground at Japan's holy sites | MNN - Mother Nature Network
Figure 25: Torii Gate in the sea at Itsukushima Shrine near Hiroshima
Figure 26: Half-lapped dovetails with split pins

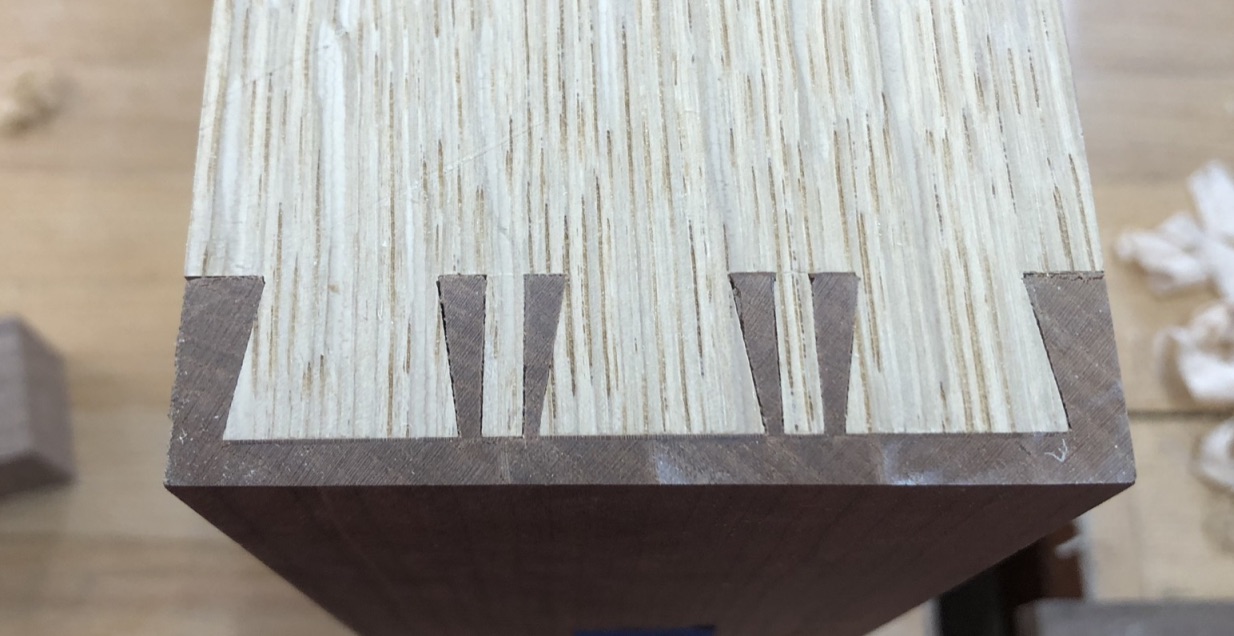
This is one of those “subtle decorative details” that is also structurally sound. It actually adds some extra glue surface compared with a standard dovetail, without looking like I was trying too hard just to be different. It also is not visible until the drawer is opened, another hidden feature of the chest that I like. 

Drawer Pulls

The only hardware parts on the chest beside the casters are the drawer pulls. I wanted these to be both durable and aesthetically compatible with the design. 

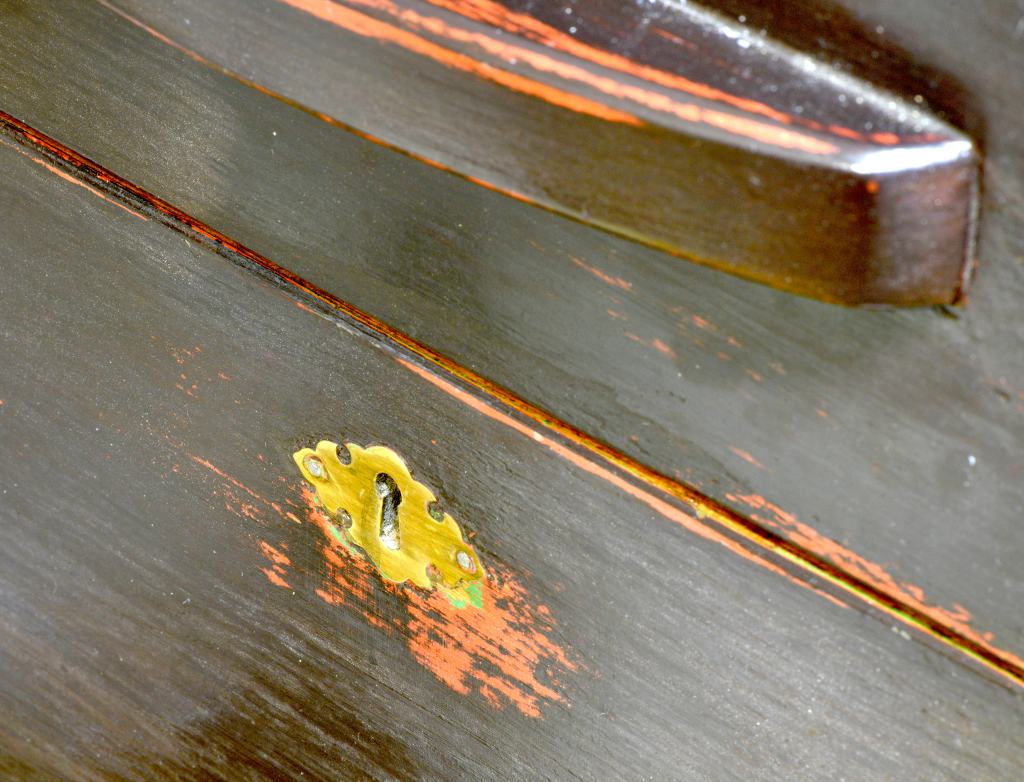
There are thousands of commercial drawer pull designs and an infinite number if you make your own. To narrow the field, I started by thinking of Japanese tansu hardware. Chris Hall’s website came through with a compendium of styles.

Thinking these had possibilities I started looking for vendors. In the USA, I found three: Hida Tool, which sells iron pulls hand forged in Japan. Eastern Classics, which sells antique iron pulls I think are recycled from defunct tansu. I bought a sample from both suppliers. And Whitechapel, who is superb for European hardware and also had a few tansu pulls but not a large selection of styles and sizes.

Stan recommended I consider pulls made by Nishikawa-Shouten in Japan, which has two large catalogs of traditional and modern tansu hardware. They offer dozens of styles, a few in iron, most in brass, and some in zinc pot metal, with various finishes. It is delightful to look through the catalogs to see what is there. But they are a manufacturer and wholesaler, and their catalog text is in Japanese. After a bit of searching for a retailer I found Morikuni Cabinet Hardware, a Japanese retailer that sells retail — in English — to the US market. Their web store has only a tiny portion of the Nishikawa-Shouten items but they can get others if you ask. 

I settled on a simple traditional Japanese warabi style pull, and also bought samples in iron from Hida Tool and Eastern Classics.  

Figure 27: Eastern Classic’s recycled warabi-style pull

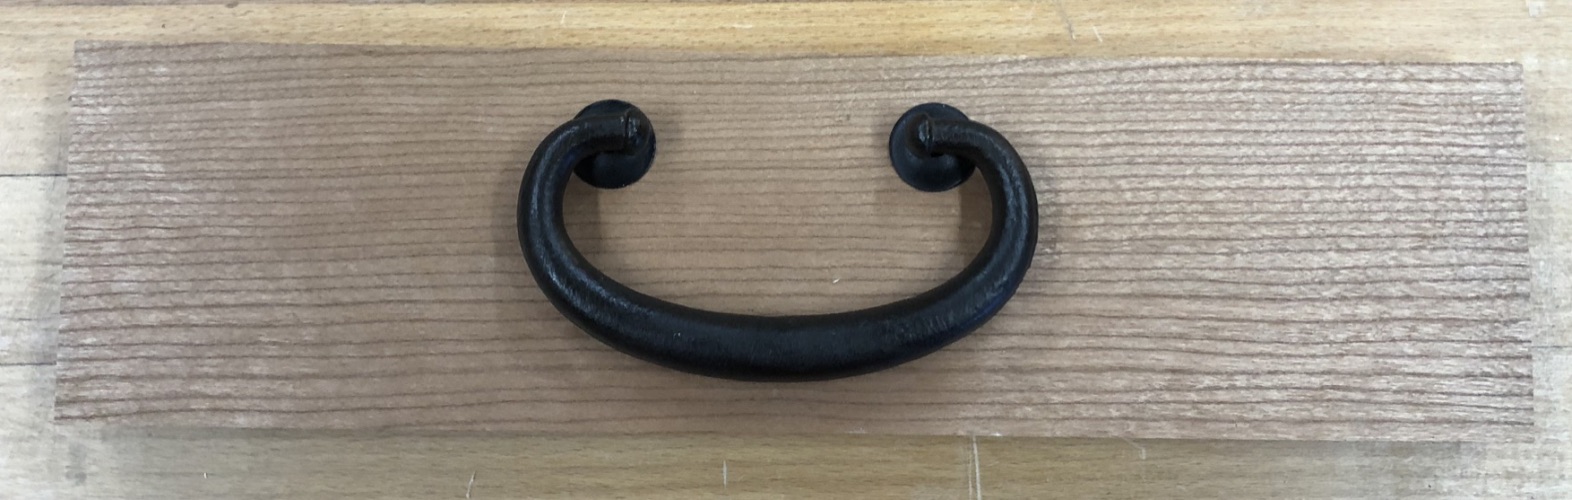
And this more refined contemporary version from Hida Tool, which I liked much better.

Figure 28: Hida Tool’s modern hand forged warabi-style pull

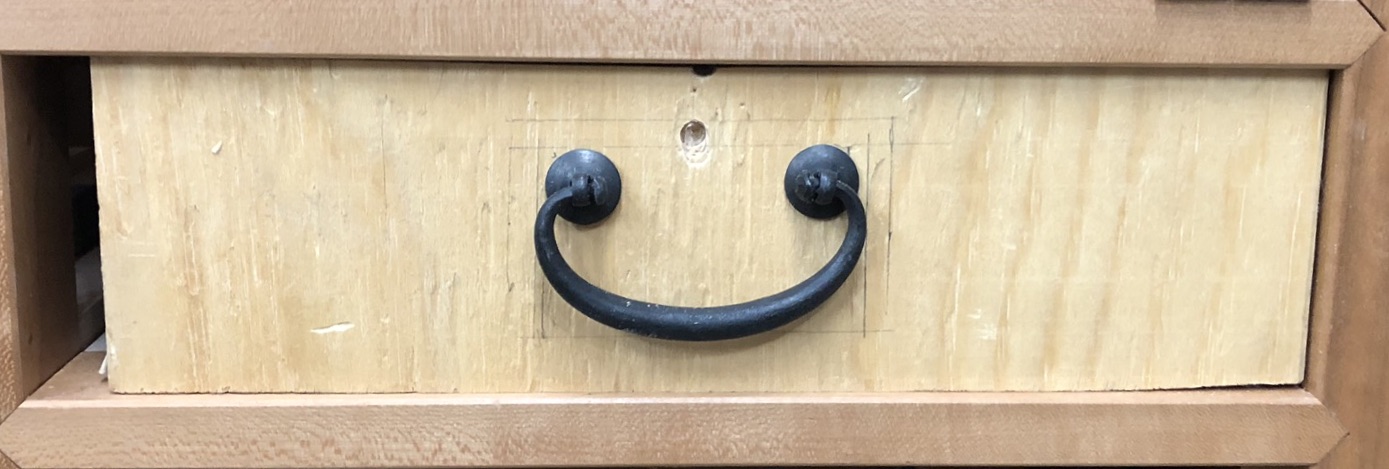
But I needed 14 of them, and neither was available in that quantity. Also, both the Hida Tools and Eastern Classic’s pulls attach with cotter pins, and after consulting with Stan I agreed that the modern pulls with screw-post attachment available from Nishikawa Shouten would be more secure long-term. They also were available in quantity so I purchased a set.

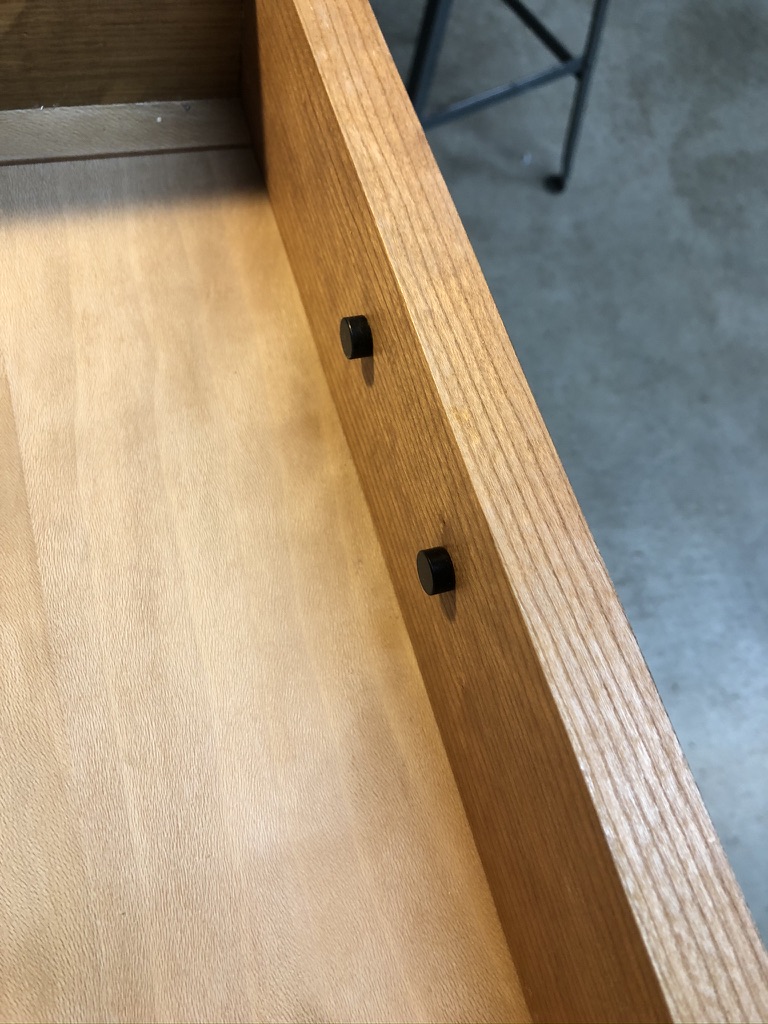
This hardware came with beige/ivory-colored plastic covers to hide the threaded post and its nut inside of the drawer. I liked the low profile and finished look but neither the color nor that it was plastic. I wanted something more durable in metal with a black finish to match the outside. Stan suggested a mirror screw cap, and I found one in brass and stainless steel. I spray painted the caps with a satin black enamel.

Fig 29: Nishikawa-Shouten’s Warabi-style pull with substituted post caps

Finishing Touches

I hate finishing. The scraping, the sanding, the multiple thin coats, the waiting for drying times is maddening. I’m not going to invest in sprayers, either. Not for me. I especially hate sanding. So I go minimalist. I have settled on a couple of simple to apply finishes that are also readily renewable. For my laziness and impatience I sacrifice hardness and durability, but I’m OK with that. 

I hand-planed the exterior surfaces of the chest, then finished it with two coats of 1 pound cut shellac to seal the surface and reduce blotching and then lightly sanded to remove nubs. Then I applied three coats of Waterlox satin, which is an old school tung oil/linseed oil/resin that you wipe on and wipe off. It dries in two or three hours and fully cures in a few days. Refreshing coats can be applied at any time. 

I also hand-planed the drawer frames and guides, lightly sanded them 400 grit, and then just finished them with wax. Before assembly I pre-finished he interior surfaces of the drawers with two coats of shellac and wax. After assembly, I shellacked the outside surfaces. The outside bearing surfaces I then sanded lightly to 400 grit and waxed for smooth running. The drawer fronts also got two coats of Waterlox to match the rest of the outside of the chest. 

Final Comments

Fig 30: Completed chest with drawers open
Fig 31: Drawer with rubberized cork mat and two planes

The chest took me about 2 months to design and about 1000 hours (guessing) for construction. Now I have a proper place to put my tools for the work ahead. 

Gary

If you have questions or would like to learn more about our tools, please use the “Contact Us” form located immediately below. Please share your insights and comments with everyone in the form located further below labeled “Leave a Reply.” We aren’t evil Google, incompetent facebook, or crooked twitter and so won’t sell, share, or profitably “misplace” your information.

Toolchests Part 14 – Repairability

https://freaktography.com/wp-content/uploads/2020/04/abandoned-indigenous-church-2020-19.jpg
A wet grand piano. Dave, Freaktography.com

The time to repair the roof is when the sun is shining.

John F. Kennedy

This article is based primarily on an online discussion with Gary, a truly Beloved Customer, regarding his wise observation about the need to make a toolchest easily repairable, especially if one intends it to be useful for 200 years. I preached about durability, longevity and the joys of bubble-wrap in previous articles in this series but failed to address the subject of repairability, so in this article I will try to clarify a few points relevant to this subject.

Categories of Repairability

There are several types of repairs that a faithful toolchest may require during it’s lifetime if it is to remain useful, but I think the two main categories are (1) cosmetic and (2) mechanical.

So what did your humble servant do to facilitate Moby Dick’s “repairability,” and what would I change to improve it in this regard? Perhaps you may learn from, or at least giggle at, my mistakes. Soft giggles only, please.

Planning Repairability

It’s just a wooden box, but it would be wasteful to make it quickly and cheaply, get it out the door, receive payment, and hope cheap materials, crappy hinges, sloppy tolerances and loose joints won’t matter because, with a target useful lifespan of 200 years, “Poor Quality Equals Miserable Failure.”

In my experienced professional opinion the most effective way to ensure quality is to actively plan for it during the design phase, but I admit I did not give this subject special consideration at the time.

Cosmetic Repairability

This is one aspect of my toolchest that caused the pooch to walk funny for a few days because I screwed it good. But wait, there’s more to this tale of shame. When I realized my mistake and tried to remediate it some years later, I only compounded it. Poor sore Poochie!

You, Gentle Reader, have of course never suffered this sort of humiliation, but in the interest of sad and abused toolchests everywhere, I bow my shiny bald head, place my hand over my heart (it’s rattling around here in my chest somewhere, although my wife frequently disagrees) and humbly confess all. One or two teardrops fall, …

When new, my toolchest was striking in appearance, with highly figured solid mahogany wood panels (not veneer) exposed on the lid surfaces and a clear, high-gloss, rubbed-out catalyzed varnish finish. It was a thing of beauty, but not a joy forever because, after several years of use in drafty, dusty, pixie-infested garage shops combined with several long-distance moves and more than a few months of exposure to wind and sun it was scratched, dinged and crazed.

In my foolish vanity I repaired it using what I thought were sound techniques and quality materials, but which eventually proved to be inadequate.

I’m a highly-edumacated fella, you know, and during my studies at the University of Stoopid, School of Hard Knocks (Lower Outhouse Campus) where I earned an MD degree (Master Dipstick, Summa Cum Loudly) I learned that catalyzed varnish was not tough enough. Out of an abundance of well-earned humility I don’t display my UoS graduation certificate on my “I Love Me Wall,” so please don’t ask to see it.

Drawing upon my training at UoS, I next refinished the toolchest with a brushed-on spar-varnish finish. Not as pretty, but it was more flexible and more resistant to scratches and UV rays. But ultimately, it too failed. Poochie wept!

As the wise Nigerian Prince Musa Adebayo once told me (in exchange for a small wire transfer to his bank in Abuja, of course), “ Time destroys all things.” This eternal truth definitely applies to woodwork finishes, but I didn’t realize at the time the Prince was talking about credit ratings!

A decade or so later the toolchest (aka “Moby Dick”) was as scratched and gouged on the outside as its fishy-smelling namesake such that no translucent finish could conceal the repairs, forcing me to seek a more practical solution, one that would spare long-suffering Poochie further indignity.

On that bright day I said to myself: “Self,” (of course, I don’t address myself as “Mr. Covington” when deliberating with myself, because that would be insane), “Would you wear a bespoke tuxedo with handmade alligator skin dress-shoes to a muddy jobsite to perform a foundation rebar inspection?” I had to think about it for a while because, as you know, fashion is my life, but with a sigh of resignation I eventually answered myself, because that’s the only polite thing to do. The response was a resounding “No.”

In my supervisory role, I’m obligated to perform periodic construction jobsite inspections as part of quality control measures to ensure compliance with plans and regulations, but I wouldn’t wear a black tuxedo and delicate loafers to a jobsite any more than I would wear board-shorts and flip-flops. Instead I dress in tougher clothes that protect my legs and don’t instantly tear if they get hung-up on a rebar cage, and that won’t look filthy if they get a little muddy. And when the paparazzi’s cameras aren’t rolling (they seem to follow me everywhere, donchano (ツ)) I prefer sturdy leather boots that actually protect the tasteful glitter-varnish finish decorating my fuzzy pink toes.

With greater age and experience I finally concluded that, in the vanity of youth, I had erred by trying to make a toolbox look like pretty furniture. Feel free to mock the fool if you must but no tossing of rotten eggs, please!

So, determined to not make the same mistake a third time, I conducted more research on finishes that might get the job done. In the end I rejected the extremely tough but expensive and difficult-to-repair industrial solutions such as Imron and Polane and settled on a cheaper, friendlier and easier-to-repair solution; I sanded my toolchest down to bare wood and refinished the exterior with distressed milkpaint per Mr. Dunbar’s recommendations, as discussed in a previous post, and shellac on the inside.

When cured, milkpaint contains oodles of hard mineral solids with few volatiles to evaporate over the years to cause shrinkage and cracking (unless you want it to craze). It is not as flexible as latex paint but much tougher long-term than any clear finish. UV protection is absolute.

Like a Tabasco Sauce stain on camo pants, repairs are nearly invisible, indeed they even improve the chest’s character. With a bit of primer, milkpaint completely concealed the bondo I used to repair the cuts, scratches, and dings incurred during international moves, the ravages of rabid forklift attacks, and even injuries received from the slings and arrows of outrageous fortune (yes, here at C&S Tools we quote literary giants such as Shakespeare and Red Green). Latex paint works too, but milkpaint looks better and it’s far tougher.

But Gentle Reader you are no doubt wondering what this rambling has to do with “repairability.” The point is that repairs to a distressed milkpaint finish are easily accomplished and don’t look like repairs even when made to localized spots, they just give the overall finish more “character” making it look more interesting. No other finish I am aware of looks better with age and wear. Now that’s true repairability.

I only regret it took so long to stumble upon this excellent solution. So does Poochie.

Mechanical Repairability: Hinges & Screws

Hinges always wear out. The historical record shows that artistic iron hinges secured with small steel screws, while inexpensive and “historically correct,” always fail, usually sooner than later, as Murphy dictates. And when they fail, Murphy also ensures that they cause interference and maximize secondary damage.

Would you use flimsy sheet-metal cabinet hinges to attach the tailgate of your pickup truck knowing that one day you may see that same tailgate in your rear-view mirror scattering festive sparks as it skates over the highway behind you? Why, then, would you put them on your toolchest?

Being in the construction industry I know the solution to hinge durability is to use more, bigger, corrosion-proof hinges because larger internal bearing/wear surfaces free of abrasive iron oxide wear slower and keep things tighter. Think stainless-steel or brass door hinges. Commercial ball bearing door hinges are good too, but the thrust bearings are oriented for an axial load, not a side load, so the cost-benefit analysis of bearings in this application is weak.

But I digress. How does one plan for repairability in the case of hinges? The answer is simple: “R&R,” as in “remove and replace.” Let’s look at “replacement” first.

Unless you or your descendants (assuming the chest stays in the family, which it should) intend to have replacement hinges custom-made when the original set wears out (funded by the generous cash inheritance you will no doubt bequeath them and the voracious tax maggots will graciously leave un-spoiled) I recommend you plan for the original hinges to be quality products matching industry-standard specifications that will be easy to procure even in a century or so. Consider the wisdom of using custom-forged hinges that look “antiquey” but that aren’t a standard dimension for which replacements are easily purchased. I double-dog dare you. A toolchest ain’t a little jewelry box, after all.

I recommend you use door hinges in standard sizes so they can be easily replaced without hiring a blacksmith when the time comes, a day that certainly will not fall within your lifetime if you heed the advice in the previous paragraphs. This is the essence of the “replace” aspect of “R&R” as it applies to hinges, IMO.

Moving on to the “remove” aspect of R&R, what else can go wrong with hinges? That’s right, those pesky screws.

If you use the skinny, short screws that are packaged with store-bought hinges, sure as eggses is eggses they will begin to dance the reverse macarena after a decade or four. I promise you that when that inevitable day comes, replacing them and their worn-out holes will be a pain in the shorts. And what happens to the wobbly lid before you or your great-grandkids get around to fixing those idiot screws?

But wait, it gets worse (stay away Poochie, stay far away!). What happens when the hinges wear-out or fail but you can’t remove the blasted screws to replace them because they have broken-off in their screwholes during the removal attempt? That’s right, weeping, wailing and gnashing of teeth will ensue because a clean replacement will be difficult, and perhaps never happen, turning a measly two-hinge chest into a lop-sided one-hinge chest. Why would you give Murphy the satisfaction?

The best way to improve the “remove” factor in R&R therefore is to use oversized, extra-long, stainless steel grade 18-8 screws actually made in American, Europe, or Japan.

“Oversized” because strength improves durability.

“Extra-long” because the deeper a strong screw is embedded in the wood, the more resistant to the reverse macarena it will be.

“Grade 18-8” because this is an industrial specification that tells you something about the screw’s quality, reducing doubt. They cost more, but are worth it when you consider what would happen if a cheaper screw, one made to no quality specifications, breaks off in the hole when it comes time to remove/replace it.

“Stainless steel” because brass is too weak and a rusty carbon-steel screw will become a loose screw every frickin time.

Made in America, Europe or Japan because, while Chinese-made screws are cheap (often sold under false pretenses as “quality fasteners”) one must assume they are ALWAYS defective and will SURELY break. Indeed, it’s not a matter of “ if” they’ll break but only “when.“ Murphy won’t need to lift a finger.

If an inexpensive stainless-steel screw is sold at a big-box retailer, even if it’s represented to be Grade 18-8, assume it’s made by Godless, bait-n-switch commies. No, not the gangsters that burned down Portland, Seattle, Kenosha and Minneapolis, nor the ones that govern the coastal hell holes between Mexico and Oregon, but those in Beijing.

Reputable marine supply stores may be the best source for quality stainless steel screws.

I also encourage you to prep the screw holes in the hinge plates by countersinking them to the right depth and angle for solid, maximum contact between screwheads and plates.

Prep the screw holes in the wood too. Drill pilot holes the right size and right depth, and put epoxy or glue in the holes just before inserting the screws to penetrate the wood and reinforce the threads the screws cut into the wood.

And if a screw becomes loose, figure out why and repair it instead of just screwing it in tighter and tighter until it strips out.

Remember: History always calls an optimist who didn’t prepare for the worst eventuality a careless nitwit.

Mechanical Repairs: Tray Sliding Surfaces

Besides hinges the other things in a toolchest that always wear out and need repair are the surfaces that support the trays and on which they slide. This normal wear is easily remedied by planing the old, worn surfaces flat and gluing in durable hardwood wear strips. The lower the coefficient of friction the better. I have installed six replacement sliding surfaces to the ledges of my toolchest. In retrospect, it would have been better to rabbet and glue these strips in-place when new so they would be easier to remove & replace when necessary.

Knowing these surfaces would wear and need replacement, however, your humble servant had the foresight to use screws to fasten the ledges that support the trays to the chest’s sides so they could be removed and easily worked on with handplanes instead of gluing/doweling them in-place. I highly recommend this design detail.

Adhesives

The subject of “reversible adhesives” such as hide glue or starch glue is interesting, and relevant to repairability because such adhesives make non-destructive disassembly of wood joints possible. Unfortunately I have no experience with hide glue and so cannot comment.

A renowned master joiner taught me his philosophy on the subject of glue, however, and it has stuck with me (pun intended). He held that it’s the craftsman’s job to make his work as precise and durable as possible when new, therefore obligating him to use the strongest, most durable glue available to him and reasonably practicable to ensure that, if repairs are necessary, it won’t be because the glue failed.

He learned the trade when the only available woodworking adhesives were “nikawa” hide glue, or starch glues made from rice, so he knew all about reversible adhesives. But when I knew him, he used PVA glue.

When I once mentioned I had read that rice glue should be used for fine joinery work to make repairs easier, he looked at me like there was a wriggling cockroach’s leg hanging out of my mouth, and turned away in disgust. Nuff said.

Conclusion

Thank you for reading this series of posts about toolchests. I hope you found it interesting, or at least amusing.

I would like to conclude with a Japanese saying relevant to the subject of this article: 「石橋を叩いて渡る」pronounced “ishibash wo tataite, wataru.” A direct translation of this idiom is “Strike a stone bridge before crossing,” meaning to “take every precaution.” I have a similar saying that goes “Belt, suspenders, safety harness.” I encourage Gentle Readers to consider this principle when designing and constructing toolchests for their personal use.

YMHOS

A sturdy old stone bridge. Best to wack it a few time to makes sure it won’t fall down while crossing. After all, you never know…

If you have questions or would like to learn more about our tools, please click the “Pricelist” link here or at the top of the page and use the “Contact Us” form located immediately below.

Please share your insights and comments with everyone in the form located further below labeled “Leave a Reply.” We aren’t evil Google, fascist facebook, thuggish Twitter or the Congressional IT department of the Democrat Party and so won’t sell, share, or profitably “misplace” your information. If I lie may my belt break, my suspenders snap, and my safety harness become wrapped around my stupid neck as I dangle from a stone bridge.

Leave a comment

Toolchests Part 13 – Finishes

Whatever it takes to finish things, finish. You will learn more from a glorious failure than you ever will from something you never finished.

Neil Gaiman

In this post I will briefly summarize the finishes used, mistakes made, and latest improvements to “Moby-Dick; or, The Toolchest.”

The Original Finish – A Tale of Woe

More than 26 years ago when this toolchest was new, your humble servant applied a rubbed-out catalyzed lacquer finish inside and out which showed the grain pattern and color of the wood nicely, but proved to be less-durable than I had anticipated. I refinished the chest once, but after years of rough use, many moves over many years, and painful encounters with trucks, shipping containers, forklifts, and one-legged meth-head moving company employees, the finish was in poor condition. I concluded that lacquer, varnish and even polyurethane do not really qualify as durable finishes for a piece of working casework with a target useful lifespan of 200 years, at least if it’s not to be pampered like a baby grand piano in grandma’s drawing room.

Exterior Refinish

While living on the Pacific island of Guam in 2011 and with free time on my hands due to international political corruption (difficult to imagine huh (ツ)), I gazed upon my toolchest and despaired for, yea verily, it was in bad shape, cosmetically that is, covered with scratches, dings and gouges topped off with yellowed, crazed and crumbling varnish. It had been a good and faithful servant for many years and deserved better so I girded up my loins, scraped and sanded off the old finish, leveled the scratches, dings and gouges with auto body filler, and refinished it.

Mr. Michael Dunbar and those sexy knees.

When considering how to refinish my toolchest in a way that would provide improved UV and abrasion resistance while also concealing past external cosmetic damage, I was intrigued by an article in a woodworking magazine by Mr. Michael Dunbar about milkpaint. Mr. Dunbar is a wise and retired professional Windsor chairmaker, not just a scribbler, so I take what he writes seriously.

I removed the old varnish finish inside and out and, following Mr. Dunbar’s recommendation, applied multiple coats of red, green, and dark, almost black, burgundy-colored milkpaint to the bare exterior wood surfaces. I then sanded and distressed the paint to expose the various color layers, and applied one coat of thinned clear Epifanes flat polyurethane as a protective topcoat. This was a 2 week process.

This milkpaint finish has proved effective not only in concealing past cosmetic damage and the Bondo used to repair it, but at the time these photographs were taken it had endured one international move by ship, two local moves inside Japan by truck, and months banging around inside hot humid shipping containers and dank warehouses since it was applied. It has only improved with age and abuse. Thank you Mr. Dunbar.

View of the lid’s frame & panel joints
View of the lid’s top, warts and all. Often used as a working surface, it has endured a lot of abuse, but the distressed areas with exposed red and green milkpaint are original to this finish. You can, however, see areas where the clear polyurethane top coat is failing. Again, so much for clear coats.
The right front corner of the skirt/base joined with through dovetails. These corners take the most abuse and are especially tough. The skirt is attached to the sides by glue and white-oak dowels.
The lockplate. The burgundy-color top coat of milkpaint as well as the green and red undercoats, and even a little bare wood, are visible.
The top front corner of the lid, joined with through dovetails. The perimeter frame of the frame & panel top is connected to the sides with dowels, which have pushed out round spots in the clear Epifanes polyurethane top coat as the frame has shrunk around them over the years since the toolchest was refinished in constantly high-humidity Guam, an unavoidable reality in wooden casework. Someday I will need to shave these flush and refinish the round spots, but since the finish is milkpaint, the repairs will disappear entirely.
The front right corner of the lower case. What were once flush through-dovetails joining the sides have become visible as the wood has shrunk in thickness due to the relatively lower humidity of Tokyo. No joints have been repaired and all are still tight as a drum.
Front-view of the sawtill. The through-dovetails joining the corners, as well as evidence of the dowels connecting the horizontal F&P divider panel above the drawer have become visible as the wood has shrunk in the drier Tokyo humidity. Nosireebob those are not plugs concealing screws. Removing and replacing prickly saws has been hard on this little chest, but doesn’t look any worse now than when newly refinished, and will only improve in appearance with future wear and tear.

Milkpaint is an interesting material. It is non-toxic, which is nice when applying it. It doesn’t out-gas toxic compounds into the air either which is even nicer.

It has a water carrier with mostly mineral solids instead of volatile resins, so when cured it forms a hard, abrasion-resistant, non-shrink, no-peel surface unaffected by UV light, unlike latex, lacquer, varnish, and polyurethane.

The user can mix most any color they want using the available powders providing an endless palette.

It’s easy to use, forgiving and doesn’t take special tools to mix and apply, just glass jam jars, stirring sticks, strainers, paintbrushes, sandpaper, an old blender, and paper shopping bags.

Milk paint makes possible an easily-applied, inexpensive, tough, UV resistant, non-toxic surface finish with an antiquish, unique appearance that not only resists damage but even improves with time and abuse. What more could you possibly want? Egg in your beer?

Interior Refinish

I refinished the toolchest’s interior surfaces with shellac to eliminate the stink of curing resins. Time will tell how well it holds up, but so far so good.

Conclusion

My toolchest is far from perfect, but it meets all my performance criteria and works pretty darn good for me.

If I were to do it over again, I’m not sure I would change the current design or finishes, other than the way tools are mounted inside the lid. Compared to the original design, the current arrangement is more functional, but there is always room for improvement.

I think the most important thing this series of articles about toolchests has to offer is not the design itself but rather the performance criteria developed and the decision process that led to the design and ultimate construction.

As I mentioned in Part 5 of this series, there are many decisions that must be made when planning a tool storage system. I hope you, Gentle Reader, got my point that you can either take the time and make the effort to plan, or neglect to do so and let the decisions be made through default and happenstance whirling down and around the porcelain scrying bowl of chance. Either way, the decisions will be made.

Perhaps reading the performance criteria and seeing the design and execution of this toolchest will stimulate your planning. Many of your requirements will be the same as mine, but others will be different, so the solutions and design details you employ will be different too. At the very least you now have a detailed, practical example to reference when planning storage solutions for your valuable tools.

I hope Gentle Reader also noticed how tradition can provide solutions to universal challenges of tool storage, but that through careful consideration you can improve on tradition to best meet your specific needs.

In the next and final post in this series I will explain how “repairability” was incorporated (or not) into the design.

YMHOS

If you have questions or would like to learn more about our tools, please click the “Pricelist” link here or at the top of the page and use the “Contact Us” form located immediately below.

Please share your insights and comments with everyone in the form located further below labeled “Leave a Reply.” We aren’t evil Google, fascist facebook, thuggish Twitter or the Congressional IT department of the Democrat Party and so won’t sell, share, or profitably “misplace” your information. If I lie may every piece of paint I touch turn to lead, curl and crumble.

Leave a comment

Other Posts in this Series:

Toolchests Part 12 – The Sawtill

A view of the Sawtill’s lid nested into the opening in front of the trays.

I am but mad north-north-west. When the wind is southerly, I know a hawk from a handsaw.

William Shakespeare – Hamlet

Every woodworker worth his salt uses handsaws. Your most humble and obedient servant doesn’t mean to impugn those who use machines exclusively to perform all sawing activities, I am sure they are all fine folk; I wish them health, happiness, and hundreds of fat children, but they are more machine operators than craftsmen in wood, in my un-exalted opinion.

Saws are important tools deserving of protection, but which we need to access quickly, betimes a difficult performance criteria to satisfy. Saws have wide metal “plates” that collect dust and condensation and develop rust. And sharp teeth, shorter but much like those of the frumious bandersnatch of literary fame, that catch, cut and scratch things, and that are easily damaged in turn through contact with other metal tools. How best to store this prickly fellow in a chest filled with other burbling tools?

In this post we will examine the challenges involved in storing saws, and the solution I learned from an dusty old book hidden in a Japanese university library far back in the mists of time.

Saw Storage Performance Criteria

High-carbon steel is without doubt the best material for handsaws, but it rusts. Rust produces a rougher surface increasing friction, and if it progresses will cause deep pitting, damaging the teeth forever and permanently impairing cutting efficiency

We can apply oil to the plate and teeth to prevent/reduce rust, but oil attracts dust which often contains hard particles that dull teeth, not to mention chemicals that accelerate rust. Therefore, a good storage solution must protect saws not only from dings, but from dust and temperature swings that invite condensation and rust.

Clearly the exposed saw rack published in woodworking magazines ad nauseam as DIY projects for amateurs is easy to access and great for displaying handsaws for worship and veneration (especially grand are those with twin candlestick holders (ツ)), but they are not a good long-term storage solution because, while the saws are in plain view convenient for daily worship, they are also exposed to dust and temperature swings that encourage condensation corrosion.

One traditional solution is to mount saws to the underside of a toolchest’s lid. I have tried this method before but long ago concluded it takes up too much real estate I need for other tools. And the saws still collect some dust in this location anyway.

I especially dislike one traditional solution, namely nailing a sawtill in the bottom of the toolchest up against the front wall, because it makes the saws difficult to see, a pain to retrieve, and more importantly, limits the travel distance and ultimately the width of the all-important trays. Codswallop!

Some may insist that the internal sawtill is the only valid “traditional” method. To all the self-appointed Time Lords and Holy Arbiters of Everything Traditional that look down their patrician noses at the solution I selected I respond that there are other traditional designs they may have not seen before. Perhaps they need to… I dunno… do something crazy like… put down their congac snifters and visit different libraries?

After months of deliberation I decided I needed a sawtill that is an enclosed, sealed, insulated space in itself, one that can be removed to serve as an independent toolchest most of the time but will still fit inside the toolchest when necessary, will contain many saws, not just five or six, and is at a convenient height where I can clearly see and easily retrieve/replace them. These criteria are what attracted me to this extremely intelligent design illustrated in copperplate in an old bug-chewed British book in the University of Tokyo Library. I modified the design considerably, especially the lid and the drawer, but there is nothing new under the sun.

The Execution

My sawtill nests inside the toolchest, as you can see from the photo above. In this location the lid can be closed without interference. Saws in the top compartment can be accessed, but not the saws in the bottom drawer. Tools in the top tray and those mounted inside the lid are also easily accessible, but those in the 2nd and 3rd tray and in the dungeon are not accessible without removing either the sawtill or the trays. This may seem to be a serious flaw, but au contraire, mes amis!

When the toolchest is at home in my workshop, the sawtill spends no time inside the toolchest. Instead I take advantage of its greatest virtue, set it off to the side, and use it as an independent toolchest dedicated to saws. In my current workshop it sits on the ledge of a bay window located 1 foot from the mothership. In other workshops I rested it on sawhorses. It is a very intelligent and flexible solution.

Do I need candlesticks? They would be nice….

The sawtill resting on the toolchest’s walls. The top and drawers are closed. The drawer has recessed brass pulls and a brass lock. Nylon straps attached to each end of the sawtill make it easy to lift out of the toolchest’s interior.

Like the toolchest proper, the sawtill is made from solid medium-density Honduras mahogany joined with dovetails. The lid, central horizontal divider, and bottom are all solid-wood frame-and-panel construction. Like the toolchest, the sawtill’s lid has deep vertical sides to add stiffness and prevent warping, but unlike the toolchest, nothing is mounted inside the lid. A wooden lip projects down from the lid aligning it to the base and sealing it tightly when closed.

When open, the saw handles in the top compartment protrude above the sawtill’s sides making them easy to see, remove, and replace without fiddling around. This is supremely important.

Due to this construction, neither drawer nor lid have ever warped or become sticky.

The sawtill with the lid and drawer open. The top opening is filled primarily with Western saws and larger Japanese saws (e.g. bukkiri gagari), while the drawer is stuffed full of thinner Japanese saws as well as sharpening files, chalk and a sawset. I tend to store many of my saws wrapped in newspaper because the out-gassing of the ink is a good corrosion preventative, at least when the newspaper is new. Strange but true. It has the side benefit of providing the saws reading material.

The top compartment is sized to house 8-26” Disston No.12 saws, or a mixture of Western and larger Japanese saws. The drawer underneath will hold a dozen Japanese saws along with files and other saw-related tools. 

The sawtill’s width is a hair narrower than Moby Dick’s sliding trays, and its overall height with lid closed is the same as the combined height of the three trays so it rests neatly on the bottom tray’s ledge and nestled inside the space created when the three trays are slid to the back. The toolchest’s lid can be closed with the sawtill in this position securely locking it in place.

Dividers

When this saw till was new I installed two thin boards in the top compartment, one across each end, with the classic slits & slots cut into them to retain saws, but I soon found this arrangement to be sub-optimal. I later them with the five lengthwise plywood dividers visible in the photo above creating individual compartments for saws. These compartments provide more storage options, make it quicker to access/replace saws without banging and sawing each other, and make it possible to wrap the saws in anti-corrosion cloth or paper for additional protection during long-term storage and transit. I would never go back to slits & slots.

Although it may have compromised the sawtill’s elegance and violated the eternal tenets of beauty exemplified by the Wonderful Liberace, I didn’t mount candelabra to it. Pray tell, an unforgivable omission?

In the next post in this series we will examine the finishes used. I think you will find this especially interesting. Until then, I have the honor to remain

YMHOS

If you have questions or would like to learn more about our tools, please click the “Pricelist” link here or at the top of the page and use the “Contact Us” form located immediately below.

Please share your insights and comments with everyone in the form located further below labeled “Leave a Reply.” We aren’t evil Google, fascist facebook, or trashy Tik-Tok and so won’t sell, share, or profitably “misplace” your information, not even if Joe Biden and his bloody-handed buddies in the Chinese Communist Party ask nicely. If I lie may my mattress be as prickly as sawteeth.

Leave a comment

Other Posts in this Series:

Toolchests Part 11 – The Bottom

A famous bottom painted by Jean-Auguste-Dominique Ingres, La Grande Odalisque, 1814, Oil on canvas, 36″ x 63″ (91 x 162 cm), (Musée du Louvre, Paris)

When I’ve painted a woman’s bottom so that I want to touch it, then [the painting] is finished.

Pierre-Auguste Renoir

A worthy toolchest’s bottom should be like that of an elegant woman: well-formed, seldom seen, and never heard. Not that your most humble and obedient servant has an obsession with bottoms, mind you, it’s just that my goal of a 200 year useful lifespan for my toolchest compelled me to give this obscure, oft-neglected component bottomless thought. If you expect your toolchest to endure eight generations, you too may want to give it some fundamental consideration too (ツ).

The Historical Record

A strong, rot-resistant bottom panel that shuts out moisture, dust, insects, and vermin is a critical component in any workman-like toolchest in your humble servant’s opinion.

You may think these are easily satisfied common-sense performance criteria, but the historical record shows that such is not the case. Indeed, a problem commonly seen in antique casework is rotted-out, bughole-weakened, rodent-nibbled bottom panels. One cause of this damage is that, during much of their lives, the bottoms of many old chests rested directly on damp floors or even the bare ground, absorbing moisture and creating a damp, woody environment for bacteria to run riot for decades on end, with no air circulation to remove dampness, and no exposure to sunlight to either dry the bottom or retard fungal growth. And don’t forget that yummy unprotected, unsealed softwood just begging to be munched on by bugs (betimes with a drop o’ Tabasco sauce, no doubt).

The bottom panel of my toolchest. Solid Honduras Mahogany with floating frame and panel construction, treated with CCA and painted with high-quality exterior-grade washable latex paint. The ledges that trays slide on are visible at the chest’s sides. Keruing strips are glued to to them to compensate for wear over the years.

Indeed, damaged bottoms were so common in casework in past centuries that it appears to have been standard practice to make them easy to replace. Or perhaps they rotted because they were less visible, excusing the use of cheaper, less-durable, unfinished secondary woods attached using nails instead of more expensive and durable woods, finishes and joinery techniques, with easy replacement being just an unintended side-benefit of cheaper construction. 

I will let the preservationists and historians argue this chicken-or-egg problem, but being a belt-and-suspenders-and-safety harness kind of guy, I’ll have nothing to do with a flawed chicken even if it was hatched from a traditional egg.

Frame & Panel Construction

There are a number of ways to build a toolchest’s bottom panel. Perhaps the most convenient but worst material to use is MDF, or as I like to call it, “garbage.”

Marine-grade plywood is a much better choice, but it too will delaminate and rot given enough time, moisture, and persistent micro-organisms.

Of course, in order avoid the failings common to most casework thereby ensuring the chest will provide useful service for 200 years, I selected time-proven frame-and-panel (F&P) construction in solid wood for my toolchest’s well-formed bottom.

Solid wood is not perfect, but it is better than either garbage or plywood on condition that the F&P assembly is built correctly, and some of the measures listed below are employed.

Some general principles of proper F&P construction follow:

  1. Properly Acclimated Wood: All the wood used must be well dried and its moisture content be in approximate equilibrium with the local environment at the time you make the assembly. Neglecting this condition is a common cause of eventual failure;
  2. Properly Sized Frame Members: The width of the frame members must not be too wide or the corner joints will fail and/or the frame may push the casework apart when it expands, or leave gaps when it shrinks, due to seasonal humidity changes;
  3. Properly Sized Panels: Panel width and the dimensions of the tongues and grooves that connect panel to frame must be sized so that seasonal humidity changes do not cause the panel to swell enough to break or warp the F&P assembly, or shrink enough to leave gaps between the panel and frame members;
  4. Unconstrained Movement: A very important consideration is related to number 3 above, namely that the movement (expansion/contraction/sliding) of panels must be unconstrained. A common failing in F&P assemblies is glue squeeze-out or finishing materials inadvertently gluing the panel’s tongues inside the frame’s grooves resulting in broken assemblies, and more frequently, cracked/split panels. The solution is of course to use the right amount of glue and be careful when finishing, but since Murphy is a cunning bugger adept at concealing glue squeeze-out and finish infiltration until it’s too late to detect (and pixies), I always coat the panel’s tongues and the inside of grooves with wax to prevent glue/finish adhesion. Please also be careful that nails/screws/dowels used to secure F&P assemblies into the casework do not prevent your panels from moving freely.

Isolation

With a lifespan performance criteria of 200 years in mind, the first solution I employed to maximize the bottom’s longevity was to make it nearly impossible to place the bottom in direct contact with the floor or ground by leaving an “air-gap.” I did this by dropping the skirt below the chest’s bottom panel so the chest rests on the perimeter skirt instead of its bottom reducing the potential for moisture absorption through direct contact with the ground/floor. Better-quality casework in past centuries often incorporated this design detail because it works.

Ventilation

The second design detail I employed was to scallop the base/skirt to allow air to circulate underneath the toolchest from all four sides, and to facilitate cleaning. This too is a traditional detail superior to simpler modern designs.

Better Woodworking Through Chemistry

The third rot-prevention measure I employed is more or less modern. I saturated the frames and panels of the chest’s bottom as well as the skirt in CCA (chromated copper arsenic) wood preservative using plastic bags and a vacuum pump, then let the wood dry thoroughly. I also primed/painted the bottom panel with high-quality latex paint to keep out water and seal in the nastiness of CCA.  

CCA is a very effective chemical that was not available before the mid 1930’s. Its use is restricted in the USA in some places, and is no longer available for retail sale in a few States, but despite what the coke-snorting enviro-despot lying lawyers in North Venezuela (the coastal badlands nestled between Mexico and Oregon) opine, it is quite safe if used properly. The key is to not ingest it. Please everyone recite the wood finisher’s pledge along with me now: “I will not drink wood preservatives, use CCA impregnated toothpicks, nor wash my face with oven cleaner.” Don’t you feel safer now?

Wood treated with CCA has a greenish color. No doubt you have seen construction lumber pressure-treated with this chemical. Copper is the active ingredient which prevents the growth of bacteria and fungi. Arsenic is the primary insecticide. The chromium component has little if any direct preservative effect but serves to fix the copper and arsenic to the wood. We don’t want it leaching out, of course.

So far, the bottom is holding up perfectly even after spending years resting directly on the concrete slab-on-grade floor of a non-air-conditioned garage on the very humid (80~95% RH year-round) and horrifically termite-infested Pacific island of Guam, but the final verdict won’t be in for another 175 years. I’ll let you know how that goes.

In the next exciting chapter in this tale of high adventure I would like to present the most unique feature of my toolchest, the sawtill. Trust me, you have not seen one like it before.

YMHOS

A well-considered bottom

Other Posts in this Series:

If you have questions or would like to learn more about our tools, please click the “Pricelist” link here or at the top of the page and use the “Contact Us” form located immediately below.

Please share your insights and comments with everyone in the form located further below labeled “Leave a Reply.” We aren’t evil Google, fascist facebook, thuggish Twitter or the Congressional IT department of the Democrat Party and so won’t sell, share, or profitably “misplace” your information. If I lie may my toothpaste taste like oven cleaner.

Leave a comment

Toolchests Part 10 – The Dungeon

Welcome to the Dungeon. Please relax, take off your shoes, pull up a chair and sit on a spike.

Far over the misty mountains cold
To dungeons deep and caverns old
We must away ere break of day
To seek the pale enchanted gold.

JRR Tolkien – The Hobbit

In the previous post your humble and obedient servant described the three sliding trays in my toolchest. In this post we will descend beneath those trays into the lowest depths, a lonely space I call “the Dungeon.” So light your torches, unsling your axes, and let’s meet what lurks in the dark. Don’t worry about me, Gentle Reader, I’ll be right behind you!

Chisel Storage

Many things suffer durance vile in the toolchest, but by far the largest number of denizens are chisels. They are sharp, dangerous tools and difficult to both store securely and access safely.

As mentioned in previous posts in this series I have a handy dandy 10-pc set of chisels mounted in the lid. This is a high-quality set of hand-forged shinogi oirenomi but they are not my best chisels; Those are stored in four wooden chisel boxes kept in the dungeon.

One chisel box contains a 10pc oirenomi set, another a 10-pc mukomachinomi (mortise chisel) set, the third and fourth boxes contain various usunomi, kotenomi, atsunomi, and other specialty chisels. Approximately 38 Kiyotada-brand chisels reside in these boxes, mostly custom-forged.

The Toolchest’s Dungeon with its residents. Neither gold nor gems nor dragons are to be found here, but there are plenty of pokey things. Two well-used hinoki-wood green wooden boxes are stacked atop each other, the one on top contains mostly paring chisels; The identical box underneath it contains mostly atsunomi and kotenomi. Not seen, because they are shy, are two old re-purposed cryptomeria (akita sugi) wood chisel boxes, one containing a 10-pc set of mortise chisels and the other a 10-pc set of oiirenomi chisels. These boxes were originally made to house precision measuring tools in the Tokyo Imperial College’s artillery department. Pre-WWII, of course. The 2 brown plastic boxes on top contain mostly plow planes. The canvas rolls contain handmade files and rasps. The black and white thing in the front is a box containing a traditional Japanese tool for checking plane soles called an “Awase Jogi,” the first tool I made during my training in joinery, and one which may or may not be the subject of a future post. The Lie-Nielson box contains a router plane, a tool not available in Japan.

l have, and use, too many chisels to store in trays, so my work philosophy is to store them, sorted more or less by types, in wooden boxes which protect them thoroughly even outside the toolchest. I can remove my box of mortise chisels, for example, along with my box of usunomi paring chisels from the dungeon and set them either on or under my workbench and have quick access to all widths without wasting time digging around in the toolchest. When I am done with a chisel for a time, I wipe it down, oil it with my oilpot and return it to its place in its box keeping my workbench uncluttered and my valuable chisels protected.

Removing these four chisel boxes is as easy as sliding the 3 trays to the rear and reaching down into the dungeon which, along with the trays is designed specifically to provide adequate clearance for easy removal.

When I need to grab an oiirenomi chisel for a quick job, however, the 10-pc set mounted in the lid is handiest.

Four chisel boxes have been temporarily released from the dungeon and opened for your perusal.

Other Implements of Torture

You will also notice two tan-colored plastic containers holding plow planes of various widths and a moisture meter. To avoid noise and dust problems I don’t have any electrical routers with me here in Tokyo, so while not as efficient, these rather old-fashioned and sometimes cantankerous tools are the best alternative.

Also visible in the photo are several canvas tool rolls containing mostly handmade rasps and files, as well as a cardboard box containing a router plane, another essential tool for the unplugged shop.

Besides chisels and planes I can also store a hewing hatchet, an adze, and a large Japanese “bukkiri gagari” rip saw on top of the chisel boxes, but I usually remove them, wrap them up, and hang them on my adjacent wire shelf when the toolbox is in residence.

In the Dungeon’s far left-hand corner one American framing square and two Japanese kanejaku squares, one in centimeter scale and the other in traditional shaku/sun scale, can be seen resting against the back wall. They were sleeping quietly at the time of the photo probably because of a late night. Judging by the ruckus they made at the time and the dead soldiers they left laying about in the morning, they must have spent the entire evening drinking, playing dice on the chisel boxes and arguing loudly about the superiority of the Japanese “Shaku” measuring system vs. the metric system vs. the imperial system. Fortunately, while squares have both tongues and blades, they lack arms and legs, so their drunken deliberations never become more violent than rattling. I don’t allow them any stogies, however; One must draw the line somewhere, I’m sure you’ll agree.

This arrangement keeps everything ship-shape and Bristol fashion, an idiom especially suitable to a toolchest with so many tools mounted in the lid even if it is not subject to the tides.

In the next post in this we will examine the toolchest’s bottom panel. Not as sexy as you might imagine, but more important than you may realize.

Hmmm, now where did I put that darn ootsukinomi?

YMHOS

If you have questions or would like to learn more about our tools, please click the “Pricelist” link here or at the top of the page and use the “Contact Us” form located immediately below.

Please share your insights and comments with everyone in the form located further below labeled “Leave a Reply.” We aren’t evil Google, fascist facebook, thuggish Twitter or the Congressional IT department of the Democrat Party and so won’t sell, share, or profitably “misplace” your information. If I lie may I spend every Thursday night dicing in the dungeon with argumentative squares.

Leave a comment

Other Posts in this Series:

Toolchests Part 9 – Trays

The top 2 trays. Each tray has 4 brass flush ring-pulls (2 on the front and 2 on the back) installed to help move the trays forward and backwards.

It’s the job that’s never started as takes longest to finish.

J.R.R. Tolkien, The Lord of the Rings

In the previous post in this series we looked at the the lid of your humble servant’s toolchest, and the tools mounted inside it. In this post I intend to liven things up with an exciting discussion about trays! Be still my heart!

The Trays

Item No. 4 in the Performance Criteria list in Part 5 of this series is as follows:

“Tool Access: Tools used regularly are to be easily and quickly accessible without bending over or moving trays around.”

This was a critical factor in my mind, but one traditional toolchest designs often do not satisfy, so I had to get creative: always a dangerous thing.

The logic for this criteria is simple: Bending down and pawing through a jumbled toolchest is both unpleasant, inefficient, and distracting at a time when concentration is important. Shifting trays hither and thither every time a tool is needed is irritating and wasteful too. In addition, knees and backs do not last forever, no matter what we imagine when we are young, so a lot of bending is not acceptable. Therefore, contrary to some toolchest doctrine promulgated nowadays, the solution I struck on was for the tools I use regularly to be either mounted in plain view in the lid, or contained in exposed trays as wide as the chest’s internal dimensions would permit.

With the lid open, the top tray positioned to the rear, and the second tray positioned to the front as shown in the photo above, the tools I use most are all positioned front and center so I can quickly locate, extract and replace most of them one-handed without bending over, shuffling trays, or digging around. Maximizing the width of the trays and visibility of their contents was therefore of prime importance. Tool access is faster than any other “tool storage system” I have used besides exposed pegboard and open shelves, inefficient storage methods that do not provide adequate protection for my tools without a climate controlled environment.

A rough cross-section sketch of the toolchest. Skirt and rolling base are not shown. Dimensions are only approximate.

The design includes three trays each dimensioned to half the chest’s internal width. All three trays differ in depth to accommodate specific tools and to leave adequate space in the lower dungeon for larger tools and chisel boxes.

The four corners are dovetailed and bottoms are twin frame-and-panel construction. Three panels might be better, and would certainly be luckier, being an odd number of course, but two is OK. Just where did my lucky fuzzy dice run off to….?

Unlike many traditional toolchests, but true to the British design that inspired it, I did not mount saws, chisels, screwdrivers or anything at all to the inside of the toolchest’s front wall, so the trays are the maximum width possible with nothing obstructing travel backwards or forwards.

This decision came from my strong dislike, for the three reasons listed in the previous post in this series, of storing sharp or pointy tools in a situation where I might cut myself on them while trying to dig out another tool. Run your wrist over the edge of a chisel or your knuckles along the edge of a saw just once and you will understand. The current mounting system places these tools in plain view with edges protected. I also find mounting tools to the front wall of the carcass to be an inefficient use of space. You will need to do the math yourself, but whatever you decide, please don’t let your chisels bite you!

The Top Tray

This image has an empty alt attribute; its file name is fSTwgaY60cjUsj6lktEF7KBfvPYdJaF4yLt16c4IujHS88rexvo9z-96vKQyan21jbQPsAn_IIAMYOrjAmYLlK_D58CoSKLMUTwRVPboq4huNHxIUGSR9UbxXL3aShGNNV6LoAU
In this photo the top tray is in the rearward position and the second tray in the forward position. All the tools in both trays and inside the lid are easily and quickly accessible with one hand and without bending over.

The top tray contains more of the tools I use all the time, including precision straightedges, layout tools, more hammers, inkpot, scrapers, jigs, odds and sods. The shallow depth of this tray is intentional.

Despite appearances, it is not a rat’s nest: I know exactly where every single tool is located. I believe excessive tidiness to be a mental illness people of intelligence should vigorously eschew.

“If a cluttered desk is a sign of a cluttered mind, of what, then, is an empty desk a sign?” – Albert Einstein
View of the empty top tray angled forward, showing the frame & panel bottom. The middle tray is pulled forward. The plane in the foreground with the blue belt is a special kiwaganna rabbit plane with fence and nicker blade I use a lot.

Middle Tray

View of the top tray’s frame and panel bottom. Gravity has caused the brass flush ring-pulls to flop out of their rest position. Each tray has four such ring pulls installed. The second tray is in the forward position and stuffed with 13 planes.

With the sawtill removed and placed nearby to serve as an independent toolchest dedicated to saws, the second tray normally resides in the forward position so I can see and access all the tools in the lid, the first tray, and this middle tray without moving anything. I will present the sawtill to you in a future post

As you can see, this tray contains 13 planes, (I like planes and use them a lot), including a 48mm mame plane, 60mm, 65mm, and 70mm hiraganna, LN rabbet block plane w/nicker, and an LN skewed rabbet plane. Molding planes are stored in a separate chest of drawers.

Japanese planes are more compact than their Western counterparts, as Gentle Reader no doubt observed. I haven’t calculated the necessary volume, but it is certain 13 Bailey-style planes would not fit in the same space, and the weight would be triple.

Third Tray

The third and lowest tray is deeper than the other two, and contains heavier and larger tools I don’t use as often, or tools I remove once at the beginning of a woodworking session and leave out all day.

You can see a Lie-Nielson No.6 and No.7, and scrub plane. I also have twist drill bits, two digital vernier calipers, spokeshaves, various jigs, a precision bevel square, two 80mm planes, shoulder planes, two kiwaganna planes (skewed rabbet planes), an adjustable 45° chamfer plane, etc. stored in this tray.

Thank you for your patience so far with this lengthy show-and-tell. In the next post we’ll peek into the toolchest’s dungeon to see what shall see. Rusty chains and moldy bones, perhaps? Please stay tuned.

YMHOS

If you have questions or would like to learn more about our tools, please click the see the “Pricelist” link here or at the top of the page and use the “Contact Us” form located immediately below.

Please share your insights and comments with everyone in the form located further below labeled “Leave a Reply.” We aren’t evil Google, fascist facebook, or thuggish Twitter and so won’t sell, share, or profitably “misplace” your information. If I lie may my chisels make me leak sticky red stuff.

Toolchests Part 8 – Under the Lid

Even the smallest person can change the course of history.

Lady Galadriel – The Lord of the Rings

In previous posts in this series about toolchests, and your humble servant’s toolchest in particular, we looked at how the design was guided by performance criteria such as portability, tie-down and lifting, and pixie infestation prevention. In this post we will examine one solution to another performance criteria. Perhaps the solutions in this article will help you solidify your storage requirements.

Inside the Lid

Key Performance Criteria No.4 defined in Part 5 of this series is as follows:

Tool Access: Tools used frequently to be quick to locate and easy to remove and replace without bending, kneeling, or shifting trays around.

The solution I selected was to mount many of the tools I use most frequently inside the lid where they are in clear view and quickly accessible. This technique is one seen in historical examples, but as always, I wanted to do things a little bigger, a little better.

Alas, unbeknownst to me I had fallen prey to a sophistry that has afflicted many, indeed one that has destroyed entire civilizations and can be summarized as: “ if a little bit is good then too much must be excellent.”

I began the planning of this space with visions of Mr. Studley’s famous toolchest dancing in my head. The image in my mind was mahvelous dahling, simply mahvelous, but the conceptual drawing was only good. While I was distracted by my dreams, reality snuck up behind me, shot me in the head and dumped my virtual body in the river. The water was cold!

After a refreshing swim I realized my plan was too dense, too inflexible, too expensive, and most importantly, violated the unwritten performance criteria common to most human endeavors: “It must be finished in my lifetime.”

The compromise I arrived at is shown in this post. It is not perfect. You should not emulate it. But it is the fruit of trial and lots of error over many years and it works reliably.

A view of the inside of the toolchest’s lid with all the tools in residence. Please also notice the 5 heavy brass butt hinges, the sealing lip around the inside edge of the lid, and the brass chain to keep the lid from flopping open. The unusual wooden tool mounted nearly in the center is an unused, hand-carved Japanese inkpot called a “sumitsubo,” an excellent tool for snapping straight lines on wood. Its purpose here is purely decorative. My daily-use sumitsubo is the blue plastic widget located below the wooden sumitsubo; far more practical but not as traditional, sculptural or as propitious.

An obvious problem with mounting tools inside a lid is their rebellious desire to drop to the bottom of the chest when the lid is closed, especially if the petty pernicious pixies that sometimes skulk in the shadows of my workshop lend a claw.

To deal with this mischievous propensity, each tool’s mounting mechanism must retain the tool securely in place while the lid is opened, closed, and even while the toolchest is being moved around. At the same time, the mounting mechanism must be simple and quick to operate. This combination of security and speed is not as easy to accomplish as Gentle Reader might imagine because, well, tools can be naughty, and gravity is not our friend when the lid is closed. And pixies.

In the center of the picture is a favorite old Japanese screwdriver with a bulbous handle made from keyaki (zelkova wood). Behind it are mounted two Yankee screwdrivers of different lengths along with driver and Japanese-style gimlet bits. To the left, most of the wooden sumitsubo, secured to its mounting board by a leather thong, is visible. Under it you can see the fire-damaged end of the handle of a Millers Falls eggbeater. To the right is a set of expensive but dismal-quality oiirenomi (since replaced) and the handles of gennou hammers. Bits for the brace mounted behind the hammer handles are stored in the space behind the chisel blades. The sealing lip attached to the inside of the lid is visible just above the brass butt hinge. This is simply nailed in place to be easily replaced if damaged, but that has not been necessary yet.

So let’s examine the tools mounted inside the lid and how they are secured.

The upper third of the lid is dominated by two full-width parallel boards secured to both sides of the lid. These two boards have edge lips and matching notches. The left side holds 7 marking gauges of various lengths and types. Four of them are dual-blade mortise gauges (kamakebiki) made by Kinshiro. After placing a marking gauge in its designated set of slots, it is secured by extending the tool’s beam or blade upwards and locking it in place with its own adjusting screw. This mounting method has been entirely successful.

The right hand side of these parallel boards holds 8 hammers (gennou). The back-side of each notch and the surrounding lip is shaped to fit a specific hammer, and super-magnets help hold each hammer’s steel head in place.

The handles of the chisels mounted below also help to retain the hammers, as you can see from the photo. This is not a perfect solution, but it has not let me down so far.

The tools stored in the lid’s right-hand side spread out for your inspection. The 11 chisels are not shown.

The 11 chisels on the right side are held in place by friction between the chisel’s cone-shaped ferrules and the closely-fitted wood notches, and stay in place even when the lid is closed. But vibration can become a problem if I need to move the chest over a rough surface with the lid closed, so I wrap a rubber bungee cord around the chisel’s handles to keep them in their slots during jiggly transport.

The chisel’s cutting edges are oriented downward when the lid is open, close to the lid’s side (below) so that there is little danger of snagging a finger or wrist on the extremely sharp edges. I strongly dislike getting red sticky stuff all over my tools, and accordingly I disdain any storage system that leaves sharp cutting edges exposed.

Whatever chisel storage solution selected, I strongly urge Gentle Reader to ensure there is no opportunity for chisels to express their peckish nature for three reasons: First, 10 fingers are better than 9 (just ask Frodo); Second, red sticky stuff promotes rust; and Third, Murphy always has the last laugh. I promise you won’t like whatever gives that bloody bastard the giggles when chisels are involved.

A 10-pc set of Kiyohisa oiirenomi with white oak handles mounted inside the lid. I was deeply dissatisfied with the poor quality of these expensive chisels and have since replaced them with the higher-quality but much less expensive set with red oak handles shown in the next photo. A sokozarai chisel with a red oak handle is mounted to the far right of the row. An antique brace with rosewood fittings, as well as an old Starrett protractor head are mounted behind the chisels and gennou hammer handles

Behind the chisel and hammer handles, you can see my Starrett protractor head, and my father’s old Stanley brace with rosewood fittings. Bits are placed in tool wraps and stored in a compartment behind the chisel blades. Not easy to get at. I have thought about combining the chisel rack into a drawer to hold the bits, but have not done anything yet because I’m not sure it would be an improvement.

The tools mounted in the lid’s left-hand side are removed and displayed for your inspection. The zelkova wood sumitsubo hand-carved in the lucky turtle and stork pattern can be seen in profile with its ebony karuko needle and bamboo sumisashi marking stick below. The black plastic bottle with the blue and white lid at the far right contains ink for the sumitsubo.

On the left side, a Starrett 92 divider and two spring dividers are secured by a block screwed to the far left sidewall. Chastely closing the divider’s legs together pinches a screw head locking them securely in place. If you don’t already own a Starrett 92, you need to get one.

In this photo the sumitsubo is front and center. The tails of 6 marking gauges, 4 of which are dual-blade units by Kinshiro, can be seen in the rack above.

Behind the dividers, there are several steel rulers and a bevel gauge secured by a hook on top and retained by the Starrett 92’s arm. In the center are mounted 3 Matsui Precision stainless steel squares, a Starrett combo square, a Starrett adjustable mini square, and a thickness caliper.

I also mounted an unused hand-carved Zelkova-wood Japanese inkline/inkpot (墨壷 sumitsubo) with silk wadding in a central position of honor. While this is a practical tool, I mounted it there just as decoration and for good luck, as you can tell because the line is still blue and the silk wadding is still white. I have a more convenient sealed Shinwa-brand plastic sumitsubo stored in the top tray I use when I need to snap a line.

At the bottom of the lid I mounted an old Millers Falls eggbeater drill. I don’t recall the model number, but I purchased it used in Delaware, Ohio many moons ago. The cap on the handle was damaged by fire sometime before I bought it. It’s a handy a little guy, but nothing special.

On the left side of the center vertical divider are mounted 2 Yankee spiral screwdrivers, bits and gimlet blades, as well as an antique Japanese screwdriver with a polished steel shaft and a bulbous Zelkova wood handle. I am irrationally fond of this old tool.

I have tried different arrangements for mounting tools inside the lid over the years, and I will continue to improve it because I am confident the solution shown is not the best possible arrangement. It’s a difficult planning problem for two reasons. First, the tools in the lid are the most easily accessible and therefore must be ones I need all the time. Assigning priority and ease of access seems as easy as falling off a greasy log, but it isn’t. The Studley solutions to storing tools are amazing, but not really practical. Second, I need to be able to remove and store these tools quickly, but at the same time, they can’t be so heavy or so difficult to secure they fall out when the lid closes or opens. Once again, the conflict between safety and security is tricky to resolve.

Regarding priority, marking gauges and other layout tools see the highest frequency of use, followed by chisels, hammers, drills and screwdrivers. This priority is reflected in their location inside the lid, as you can see.

I don’t use the protractor head, brace or bits very often, so they are assigned a lower priority and reside behind the hammers and chisels. It takes time to remove them, but on the other hand, they would always be in the way if placed in the trays, which is more valuable real estate, so this is their home.

To hold the lid open and keep it from flopping back, I installed a brass toilet tank chain on the left side, and boxed out a space so it doesn’t hang up on tools. When the lid is closed, it automatically lays alongside the top tray. This chain was inexpensive, it’s strong, it will never rust, and it has never caused me a second of grief.

Well, that’s all for this post. Next time we’ll look at the trays. There will be planes. Oh joy!

YMHOS

If you have questions or would like to learn more about our tools, please click the “Pricelist” link here or at the top of the page and use the “Contact Us” form located immediately below.

Please share your insights and comments with everyone in the form located further below labeled “Leave a Reply.” We aren’t evil Google, fascist facebook, or thuggish Twitter and so won’t sell, share, or profitably “misplace” your information. If I lie may my toilet chain break and the lid crush my stupid head.

Toolchests Part 7 – Key Performance Criteria Solutions 2: Sealing, Insulation, Security, Portability & Tiedown

Bernini’s David, completed in 1624. I have seen all three of the famous David sculptures in-person, but this is my favorite because David is not depicted as a static, obviously posed, formulaic study-in-marble or bronze of the human form as he is by the other masters. Instead, Bernini used his chisel to tell a dynamic story of a young man staring intently into his huge, deadly enemy’s eyes as he winds up to deliver a sling stone to his fuzzy forehead, a single, unlikely rock that changed world history forever. Although Bernini portrayed the face of a shepherd boy risking all in front of two opposing armies, this determined visage could just as well be that of a surgeon, a baseball pitcher, or a woodworker, of course.

Three things are needed for success in painting and sculpture: to see beauty when young and accustom oneself to it, to work hard, and to obtain good advice.                        

Gian Lorenzo Bernini

In the previous post in this series about toolchests we examined solutions to two of the Key Performance Criteria your most humble and obedient servant established when planning this toolchest, namely durability and longevity. In this post we will examine the solutions to three more performance criteria: Sealing, Insulation, and Security. It may be long, but I hope Gentle Reader will at least find it diverting.

Sealing & Insulation

Sealing the toolchest tightly and insulating it are important factors to consider when planning a toolchest, as mentioned in previous posts in this series, because a leaky chest can allow cold air, dust, excess humidity, and insects access to the tools stored inside it, potentially soiling, corroding, and damaging them. There are several details one can include in a toolchest design to minimize this problem. Some of the measures I employed are explained below.

The Lid

Front elevation of the toolchest. Please notice the depth of the lid, and the 3 raised floating panels in the frame & panel lid. Odd numbers are considered more fortuitous in Japan than even numbers. The chest rests on a wheeled torsion-box base, but it is not affixed to it. Please also notice the simple, old-fashioned half-inlet chest lock, easily defeated but easily repaired.

The criticality of a toolchest’s lid in sealing and insulating it over many years cannot be overstated. Unfortunately, many historical examples eventually failed miserably either through poor design or poor execution. Your humble servant was determined to avoid those failures.

As I mentioned in previous posts, chests in museum exhibits and books all look great, many having been at least partially restored, but if Gentle Readers want to get a sense of how chests fail, they should also inspect the busted examples collecting dust in antique stores and restoration shops.

While my investigation was not exhaustive, the first common failure inspecting antique chests revealed was a poor seal at the lid. This is almost universal. In the chests I examined it frequently stemmed from a poorly-fitting lid, one that probably fit nice and tight when new but warped over time.

In other cases, the lid had cracked and split like the seaman’s chest in the photo at the end of Part 2 of this series.

Another common problem was due to what could only be an intentional gap on the hinge side of the lid. And then there were the gaps caused by thin, narrow and weak iron hinges secured by short wood screws bending, wearing and/or loosening. So how to avoid these problems?

Let’s consider wood first. A policy that has served me well over the years is to always assume that a solid board of more than a few inches in length will eventually warp if left to its own devices. Of course, in the real world this is not always the case, but I’m a belt & suspenders & safety harness kinda guy. Besides, remember the 200 year useful life-cycle objective.

I also assume that a board more than a few inches wide will eventually split, or cause damage to another board in the assembly, if overly constrained from responding to both normal seasonal changes in humidity and the unnaturally dry conditions created by air conditioning systems inside modern buildings. Am I overly cautious? Perhaps more so than the optimistic captain Edward Smith of the RMS Titanic was on a cold night in April 1912.

The historical record represented in the museums and antique stores I visited support these assumptions in the long-term, especially when one considers the effects of AC and central heating systems lacking expensive humidity controls. Therefore I designed and constructed the lid so it included no constrained boards more than 2-13/16″ inches in width. In addition I also reinforced the lid from warping as a unit to prevent it from self-destructing during the planned 200 year useful lifespan. Not that hard to achieve with a little thought and a few sharp saws, chisels and planes.

Strength, Durability, and Rigidity of the Lid

As will be revealed in Part 8 of this series, a large number of tools are mounted inside the lid, the cumulative weight of which would cause a simpler, lighter lid to flex, twist and fail rather quickly, I fear. To provide the strength, durability and resistance to torsion needed, I went with a more complicated design.

Instead of having a simple flat board lid or one using F&P construction, this one is comprised of two sub-assemblies: A horizontal top F&P panel joined to the lid’s vertical side assembly.

Frame and panel (F&P) construction is a technique which allows the craftsman to build wide, stable surfaces using a joined framework of narrower pieces of wood with free-floating panels set in between. The framing pieces are narrow enough to accommodate cross-grain construction at the joints safely. The larger inset panels are too wide to permit cross-grain construction without their eventually failing, so they are not glued to the frame members, but are free-floating in grooves so they can expand/contract with humidity changes without cracking, splitting or breaking the frame. Gentle Readers who have never done F&P work before should learn how, for it is a skill every self-respecting maker of solid-wood casework or joinery must have.

Side view of the toolchest. Once again, please notice the frame & panel construction of the top and depth of the lid, a detail which provides great strength and stability to the normally failure-prone lid. A hardened steel lifting/tie-down ring through-bolted to the sidewall is also visible, as is the end view of the torsion-box base with urethane wheels which makes it possible to move the toolchest over level surfaces and up loading ramps when full of tools without damaging floor finishes.

The top panel’s frame consists of 6 pieces of wood 30mm (1-3/16″) thick by 70mm (2-13/16″) wide. Four perimeter pieces are joined at the corners using pinned (wooden dowels) dovetailed bridle joints to form a rectangular frame 1,015mm (39-15/16″) x 595mm (23-7/16″). Two pieces of the frame divide the long dimension of this rectangle into 3 equal-sized spaces filled with 21mm (13/16″) thick free-floating raised panels contained by tongue and groove joints. Both tongues and grooves are coated with Briwax (beesewax and naptha) to prevent glue squeeze-out and paint from gluing the panels into their grooves, something that happens frequently and almost always causes the panels to crack and even split.

I just hope that future generations are wise enough to not refinish the chest by glooping paint on these joints effectively gluing the panels in-place eventually destroying the lid. Much excellent antique woodwork has been destroyed by careless painting.

Given the thickness of the frame, the sturdiness of the corner joints, and the quality of the wood, the lid is an extremely stable construction all by itself, one that has not warped or cracked in 25+ years. Good enough, perhaps. But wait, were are my suspenders?!

This flat top panel is attached by glue and wooden pins to a four-piece vertical perimeter framework that extends downwards an additional 130mm (5-1/8″) making the total external depth of the lid 160mm (6-5/16″). The four vertical boards of the side assembly are also 30mm (1-3/16″) thick, joined at each of their four corners by 7 pinned through-dovetails. Even if the glue fails someday, the pins will keep the dovetails locked in-place. This construction makes the lid assembly extremely rigid and resistant to wracking preventing the top and sides from warping. This lid assembly has never cracked, warped, stuck, bound or even squeaked. Not once.

Besides providing stability and a gap and crack-free seal, this construction creates the space I required to house many heavy tools inside the lid as well as the structural strength to handle this heavy load without noticeably flexing or twisting. This is directly related to Performance Criteria No. 4: Accessibility.

But this is a lot of weight to deal with so I was concerned that, like many antique chests, the forces required to open and close the lid would eventually cause the lid to fail, or at least make the top panel to separate from the side assembly over decades of use, ruining the lid’s functionality.

Opening the Lid

The solution I selected was to design the lid so that the only way to open it is to use the wooden handle secured to the front board of the side assembly by tenons, glue and heavy screws from the inside. In this way, the forces acting on the lid will always keep the top panel and side assembly together instead of tending to separate them.

To ensure using the handle is the only way to open the lid, I intentionally did not design a projecting lip at the perimeter of the top panel. This was a difficult decision because the addition of such a lip would appear more classically graceful in the Western tradition. But the temptation to use the lip to open the lid would be overpowering to future generations, eventually weakening and even destroying the lid. This too is something I observed in antique chests.

While these design details made the chest extremely strong and durable, they do give the chest a bob-tail appearance, such that it looks more like a box than a typical Western chest. Being a belt, suspenders and full safety harness kind guy I believe the improved performance more than justifies the compromise in aesthetics.

Iron Mongery

A wide, bold surface like this lid with exposed joints just begs for the addition of engraved metal plates and hand-forged straps of the sort easily obtainable in Japan. I freely admit that decorative hardware would really look cool, but I managed to avoid the temptation because history shows that, if firmly affixed to the wood, metal plates and straps tend to constrain the wood’s natural expansion and contraction often eventually opening joints and cracking the wood totally defeating the purpose of the elegant frame and panel construction. None of that nonsense for me, you wascally wabbit.

Front and top view sketches of the toolchest with minimal dimensions. All the drawings will be available for free download in a future post.

The Seal Between Lid and Case

Chests made in the tradition of Western countries often have an interlocking lip between lid and base which more or less seals three sides, but which leaves a gap at the hinge side where dust, humidity, cold air, fungi, insects and pixies can enter. That’s nonsense. But what are the realistic options?

One well-published toolchest intelligently overcomes this sealing problem by using hinges supported on corbels attached to the exterior back wall of the chest. I think this is a clever solution, and one I long considered, but ultimately rejected because it increases the toolchest’s overall width by the corbel dimension without increasing internal storage space.

I also considered rubber gaskets, and even magnetic refrigerator gaskets. Either would have sealed well at least until the unavoidable day of reckoning when the rubber and plastic oxidized, cracked and crumbled. They won’t last 200 years anymore than Cher’s beauty will. Oops, too late.

The solution I eventually settled on was a detail common to Japanese casework, namely a vertical lip applied to the inside of the lid where it meets the lower case. While not quite airtight, this lip does ensure the lid and case are precisely aligned when closed, that there is no gap at the hinge side, and that very little cold air, dust, fungi, bugs, or even anorexic pixies can infiltrate the toolchest once closed. I used a tough, fibrous, exotic hardwood for this lip that has held up well. The seal is so good that, even with 25 pounds of tools mounted inside the lid, I can drop the lid from full-open and the air-pressure created by this tight seal will make the lid close slowly without a sound. I have not had to replace it in 25+ years, but it would be easy to do if necessary.

This simple detail, combined with the natural thermal properties of the 30mm thick wooden sidewalls and lid, satisfied the criteria for insulation too.

Hinges

We discussed a few methods involving wood to prevent drafty lids above. Next let’s examine metal hinges.

Another failing of antique chests common to all the traditions I was able to investigate was inadequate and/or poor-quality hinges. When hinges are lose and sloppy when new, or become loose and sloppy over time due to wear and/or corrosion, or when the tiny, often poor-quality nails, staples or screws used to attach most hinges loosen and become “idiots,” as they say in Japan, the lid won’t align with the case and/or a gap develops between lid and case. Secondary damage results. Dirt, air, bugs and pugilistic pixies penetrate. It’s the beginning of the end.

This image has an empty alt attribute; its file name is Pandora_by_Arthur_Rackham.jpg
Another look at that horrendous pixie infestation in a toolchest with a leaky lid located in a clothing-optional workshop. Bad hinges, no doubt. How embarrassing!

Traditional blacksmith-forged iron or steel hinges with decorative engraving or hammer marks are extremely attractive, but they just don’t meet my performance criteria. To begin with, iron/steel always rusts, with the corroded steel expanding in volume, becoming abrasive, and destroying tolerances, a nasty cycle. Handmade hinges look cool, but tolerances are poor. And most importantly, traditional hinge pins are short and small in diameter with tiny bearing surfaces that wear quickly, and since their ends are peened, they cannot be removed easily. That would never do.

Instead of installing pretty traditional hinges or the cheap hardware-store hinges most people use for chests, I chose to use five solid-brass commercial door hinges with removable steel pins, made possible by the 30mm thickness of the case walls. I give them a dab of oil every couple of years. There is a reason modern door butt hinges can endure a lot of wear and abuse, and it has nothing to do with historical accuracy, I assure you.

I inset both leaves of these hinges and fastened them using 2″ long grade 18-8 stainless steel screws (made in the USA not China) after dripping glue into the holes. They have not loosened or even developed a squeak in 25+ years.

The long strap hinges used on American and British chests may look sexy, but they often cause the lid to crack and split. Think about it.

Security

More often than not, quality chests have historically had locks of one sort or another installed. If you, Gentle Reader, decide your toolchest needs a lock, you should develop a security strategy early in the design process. Here’s mine.

As part of my day job planning restricted-access facilities for Clients that have a lot to lose if their corporate secrets are stolen, I’ve talked with many building security experts. I’m not suggesting you need 10-lb locks with biometrics, multiple layers of 1/2″ hardened plate steel doors, contact switches, keypads, video cameras backed-up live in Colorado, or armed guards. But I can share with you something I have learned applicable to cabinetry.

A lock on a wooden cabinet or chest won’t dissuade a determined thief with a crowbar for even a minute, but it may help keep an honest man honest.

But thieves are not all we need to worry about.

Ever have one of your adoring children or your loving spouse (yes, the one that thinks you have too many tools already and should buy new kitchen counters instead) borrow a tool, or even worse, lend it to a friend or neighbor without telling you? How often did that tool find its way back to its proper place in your toolbox or workshop?

How often has one of your precious, carefully-sharpened chisels ended up being used as a combined paint can opener and stirring stick only to spend the following months or years smeared with paint, humiliated, alone, forgotten, sadly weeping behind old paint cans in your neighbor’s garage? Besides the indignity of paint spots (chisels are often vain, you know), imagine the emotional trauma the poor thing suffered. Not to be borne….

To help preclude this trauma, Gentle Reader has three choices when it comes to casework locks. The first is to use standard locking hardware that requires a modern keyed lock with a tumbler or a combination lock. These work pretty well, but most look ugly in handmade casework. Appearance aside, the most serious problem with such locks is that, given time and privacy, and lacking lock-picking skills, a determined thief will simply break wooden casework with a crowbar. We see this sort of damage in modern cabinets frequently. It’s expensive to repair.

The second choice is to use heavy bars, locks and chains. I use this technique when I ship my toolchest by first padding the chest with plywood and blankets and then running a 10mm hardened-steel chain (chain-hoist chain) around the chest through the hardened-steel lifting eyes on both ends crossing underneath and on top of the case. This I secure with a heavy, high-security padlock underneath the rolling base. Hand-powered bolt cutters won’t cut the locks or chain, but a largish hydraulic bolt cutter could. Likewise, an angle grinder could get through given some time, noise and sparks. This is a lot of trouble both for me and the thief, but it will absolutely stop a pilferer with a crowbar. 30mm thick sides and lid, remember. But it is not at all practical for routine access to the tools inside.

A half-mortise chest lock. A classic.

The third method is to install a lock that is convenient to use but easily defeated so a determined thief won’t destroy the chest in the process of bypassing it. A strange approach, I know, but it is logical and practical. The locking system I selected is a simple, old-fashioned brass half-mortise chest lock. You could pick it with a hairpin if you know how, or pop it open with a claw hammer. It’s quick and easy to lock and unlock, and it deters rugrats, wives, casual pilferers and even pernicious pixies, all while looking classic and unobtrusive. If a determined thief has the opportunity, he can easily break the lock and get in. The upsides are that he can do it without destroying the chest, and you will know he did it. Not ideal, but nothing ever is.

Portability

The portability criteria I established during the planning phase required the toolchest be light enough in weight to be carried up stairs by two men when empty. It had to also be easily moved over flat surfaces by one man with a full complement of tools inside.

Gentle Readers may recall the following image of a Japanese kuruma dansu from Part 2 in this series. This tradition served as inspiration for my design.

アンティーク家具 古民具 骨董 江戸時代 味の良い車長持ち(時代箪笥)

In Japan this type of chest is called a “kuruma dansu 車箪笥,” which translates to “wheeled chest.”

You may wonder why anyone would need wheels on a piece of casework intended for interior use. The reason is simple practicality: Japan has a long history of urban fires that destroyed entire cities on a regular basis, but the addition of wheels to casework made it possible to quickly roll them out before the house burnt down, thereby saving valuables. Try doing that with a wall cabinet! Or try doing it over unpaved streets with tiny fragile casters screwed to the base of a loaded chest.

Wooden wheels are cool and mecha retro, but I rejected them for two reasons. First, they have solid axles, and if rolled around much both the wheels and the floor will be damaged, a lot, especially once grit and small stones become embedded in the wood. Not practical.

The second reason is more complicated. To begin with I wanted to be able to remove the wheels at times to comply with the maximum height criteria I had established in order to move the chest up narrow Asian stairs. Even with the current design, I need to remove the lid to get it up some stairs, including the house I currently live in.

The wheels in a kuruma dansu not only add a lot of fixed additional height, but that height is volume I would prefer to have inside the chest for tool storage instead of being occupied by an integral undercarriage, wheels and axles. But by using a detachable torsion box base with modern extra-heavy-duty lockable industrial casters with urethane tires, ball-bearings, and crazy pivots (free to rotate around a vertical axis), I was able to raise the chest further above the floor to improve access, satisfy the maximum height and portability criteria, and secure more interior space. If the casters go bad, I can replace them easily without impacting the chest in any way, unlike some examples where the casters are screwed directly to the bottom of the chest.

Besides, there have been a few years when the toolchest spent time in state (in full view) in our living rooms, and while my wife is Japanese, she simply doesn’t like the appearance of kuruma dansu. Go figure. During those periods, I simply removed the wheeled torsion box and rested the chest directly on the floor. My wife placed a colorful cloth noren over the chest with a flower vase on top. Some of her lady friends from church who visit occasionally liked it enough to ask if I would make chests for them.

Tie-down & Lifting

The performance criteria for tie-down and lifting were as follows: “Can be secured to the walls or floor of a shipping container or moving truck, and lifted by crane quickly and easily and without employing complicated rigging or straps touching the wooden surfaces.”

As seen in the picture above, a hardened steel ring is through-bolted to each endwall of the toolchest. These are not reproductions or homemade rings, but industrial load-rated hardware made from hardened steel that serves three purposes. First, they make it easy to secure the toolchest to the side or floor of a container or truck. This capability is very important in the case of a toolchest that must make international moves frequently. If you think it would be easier to just have the movers throw blankets over the chest and strap it down, you’re absolutely right. The problem is that the likelihood of the conscientious, patient, gentle, sober professionals that load conex boxes and trucks properly positioning the toolchest so it won’t shift, and then tightening the straps or ropes (if they even bother to use straps or ropes) so they don’t loosen, or scratch and abrade the toolchest, are slim and none, and Murphy always goes out drinking with Slim on moving day. I’ve seen them share a doobie afterwards.

The second purpose of these rings is to make it easy for two men to carry the (empty) chest by looping straps through each ring and over a 2×4 passed over the chest and placed on each man’s shoulder. This too is a traditional Japanese method of transporting heavy boxes, and is directly related to the “Portability” criteria discussed above.

And third, if I need to chain the chest closed to prevent pilfering, as I do when it is stored in a warehouse, I can pass a hardened chain through the rings, over the top and secure it with a padlock under the base without fear of the chain being slipped off, as described above under “Security.”

Sorry this article was so long. Perhaps these scribbles will suggest some solutions to Gentle Reader’s tool storage systems.

In the next post in our tale of supernatural beings and nekid workers in workshops we will take another look at hinges and examine the tools mounted inside the lid.

YMHOS

Keep your frikin sticky fingers out of my toolchest!

If you have questions or would like to learn more about our tools, please click the “Pricelist” link here or at the top of the page and use the “Contact Us” form located immediately below.

Please share your insights and comments with everyone in the form located further below labeled “Leave a Reply.” We aren’t evil Google, fascist facebook, or thuggish Twitter and so won’t sell, share, or profitably “misplace” your information. If I lie may the screws in my hinges all dance the reverse macarena.

Leave a comment

Toolchests Part 6 – Key Performance Criteria Solutions 1: Durability and Longevity

Thar she blows!!

It is not down on any map; true places never are.

Herman Melville, Moby-Dick or, the Whale

In this article in our continuing series about wooden toolchests, your humble servant would like to discuss the Performance Criteria of Durability and Longevity and present some potential solutions.

Durability

A toolchest should be tough as a whale because a fragile one endangers the tools we trust it to protect. Those Gentle Readers for whom durability is not a high priority should stop reading now and get back to the important task of popping bubble wrap.

When I was researching this performance criteria, I bought books and visited libraries reading everything I could find on the subject. I visited museums and was told to get up off the floor and “move along now,” by security guards more than once. I just wanted to see underneath….

I visited antique stores and the workshops of professional antique restorers and grilled them about what materials and construction details withstood the tests of time best, learning much that wasn’t written in the books.

I incorporated some of the things I learned through this investigative process into the design and construction of this toolchest, so let’s examine a few related to durability and longevity.

Wood Selection

I grew up making cabinetry and casework with my father from readily available commercial materials such as 3/4″ plywood. We would mill solid wood parts to match this standard dimension even though trees don’t grow in quarter inch increments. While the material of choice has shifted from plywood to MDF in recent years, this is still standard procedure in commercial situations. However, since my toolchest was not to be a commercial product for a Client with no understanding of quality casework beyond external appearance, but rather custom casework for my personal use, I tossed those standard procedures out the window and started with a blank page.

My examination of the available literature, museum exhibits and antiques available to me at the time combined with some structural analysis revealed that durability is heavily influenced by the mass and strength of the wood. This seems like a common-sense conclusion, but it flies in the face of conventional toolchest design, as you will see.

Many advocate making chests from lightweight, inexpensive woods such as sugar pine, poplar, cedar or cypress, and to dimension the walls thin to minimize cost and weight, and to maximize interior volume. This is the traditional approach for chests used by common folk, but anticipating the abuse my toolchest was likely to experience, and considering my longevity goals and the fact that I would never need to carry it far by shank’s mare or mule, I eschewed this philosophy and decided to use stronger more durable wood and thicker, with weight assigned a lesser priority.

One of the so-called “Genuine Mahoganies,” Honduras Mahogany is very resistant to rot and termites although some beetles will eat it if they can find it. We will look more at the sensory capabilities of bugs in a later post in this series.

HM is strong, not too heavy, easily worked, glues exceptionally well, and is phenomenally stable. Along with Cuban Mahogany, it has been the most desirable wood for luxury furniture in the Americas and Europe for centuries. 

This wood is difficult to obtain in the United States nowadays because of import restrictions prompted by environmental destruction through over-harvesting, but at the time, it was readily available as S2S clear lumber in the People’s Socialist Republic of Northern California. 

HM’s coloration varies from tree to tree. The coloration of the HM I purchased was not the most desireable dark red, but the less-expensive, less-dense orangish variety. However, I splurged and used feather-crotch boards for the lid’s floating panels and ribbon-figured HM for the tray sides.

I used no “secondary woods” except for the 5mm plywood non-structural loose dividers in the sawtill. No need to be a cheapskate.

Wood Thickness

One purpose of my research was to gain an understanding of the typical failure modes of chests. You don’t see busted, water-damaged, bug-infested, rotted-out examples exhibited in museums, listed in inventory catalogues, or written about in books, but there are lots of old broken-down chests in antique stores, and restorers are always working on them; I therefore strongly encourage you to venture away from the internet into the dark and foreboding world of reality to examine them with your own eyes and hands to determine their reactions to the challenges they faced during their lifetimes.

One very common failure mode is ruptured corner joints resulting from what appeared to be drops and impacts. Another common failure mode is cracks, gaps and warped lids resulting from differential expansion/contraction inherent in wood.

In a dovetailed chest, impact forces from drops frequently cause corner joints to fail, so the solution I employed was to use plenty of dovetails, and to make the side wall material thick enough to provide adequate surface area for glue to bond and impact energy to be safely dissipated without causing the carcass to rupture.

Obviously (or maybe it is not obvious to some) thicker walls increase the amount of long-grain to long-grain contact area at a dovetail or fingerjoint corner joint by more than the square of the thickness. A simple calculation showed the sides had to be much thicker than 5/8” to achieve the impact resistance and glue strength I needed, so I went with 1-3/16” (30mm) thick sides. And instead of using a lightweight softwood like pine, a weak but delicious wood upon which bugs and fungi dine with gusto, I went with the much stronger and more rot/bug resistant Honduras Mahogany in a medium density as noted above. This proved to be a wise decision as evidenced by the results of multiple drops and several forklift encounters during my travels. And due to its dedicated wheeled platform, the additional mass has not been a problem so far. This was never intended to be a truck-bed toolbox.

Of course, most drops and forklift kisses impact the base first, so if the bottom corner connections at the base fail all is lost. I made the base (skirt) of tough 40mm thick high-density mahogany, dovetailed the corners, and pinned/glued it to the chest’s sides. These four pieces and the assembly they comprise is the densest, toughest component of the chest. It is scratched and dinged but this is only cosmetic damage, so I feel the base has done everything I needed it to do, at least so far.

I doubt 3/4″ sugar pine sides or a 5/8” ~ 7/8” thick poplar base would have survived the first drop from a moving truck bed, let alone that incident in Bangkok when what must have been a deranged peg-legged forklift driver pushed the tool chest into the conex box with his fork tips while shrieking “From Hell’s heart I stab at theeee!” The madman damaged the toolchest but neither pierced nor cracked it. After that, I rechristened it “Moby Dick. “ Harpoon sockets and grog were not involved.

Related image
“…to the last I grapple with thee; from hell’s heart I stab at thee; for hate’s sake I spit my last breath at thee.” – Herman Melville

Differential Expansion & Contraction

Changes in humidity make wood expand and contract. You can ignore this natural force, as the plastic puppet people that love MDF do, or even fight it if you enjoy the tangy flavor of humiliation, but given enough time either approach will make you look the fool. Better to plan for it if your longevity goals are 200 years. If, however, longevity is not important to you, please stop reading this article immediately and get back to the important task of popping that bubble wrap.

Avoiding damage caused by differential expansion and contraction of wood is a problem humanity resolved centuries ago using well-known, but oft-ignored solutions. Some of those techniques are to use mechanical connections (e.g. dovetails, mortise and tenon joints, etc.) without relying solely on glue, avoidance of wire nails, avoidance of wide cross-grain joints, avoiding steel straps hard-connected cross-grain, and using frame-and-panel construction when wide cross-grain joints would otherwise be impossible to avoid, to name some primary solutions.

My design uses few metal fasteners, just stainless-steel screws to attach the lid’s hinges and tray shelves, brass screws to attach the brass lock and recessed tray pulls, and 4 steel bolts to attach the lifting eyes. No metal straps are used.

My toolchest employs a floating frame-and-panel lid with deep dovetailed sides made from solid 30mm Honduras Mahogany. I’ll go into this detail more in future posts.

The chest’s bottom is also frame and panel construction in solid mahogany. Frame and panel construction was used for all tray and drawer bottoms. No engineered wood materials such as plywood, MDF, LVL, OSB or veneer were used.

All glued joints in my toolchest are dovetails or pinned dovetail mortise and tenon joints, and trenails. If the glue fails, which it eventually will in some places sure as God made little green apples, the mechanical joints will still hold together. I did not use nails, screws, staples, biscuits, splines or loose tenons as structural fasteners.

Fungus, Insects and Rodents

As noted above and in Part 3 in this series, wood as a material may be economical, easy to work, have decent insulation performance, and make our collective hearts go pitter-patter, but we cannot safely ignore the fact that some fungi and insects love to eat wood, and rats and mice will chew holes in it. How can we adapt our toolchest design to deal with “the crud,” creepy crawlies, and critters? A few possible solutions are listed below:

  1. Select a wood that is naturally unpleasant to chew without using toxic levels of hot sauce. God made some woods yummy, and others noxious. The later typically lasts longer;
  2. Use thicker wood to make the toolchest strong and tough. This will also make it more difficult for rodents to chew holes in it.
  3. Make the wood unpleasant for fungus and bugs to eat and rats to chew through the miracle of modern chemistry available in either commercial or homemade wood preservatives;
  4. Seal all raw wood surfaces, both inside and outside the toolchest, so fungus spores will find it difficult to take root, and insects will be less likely to detect the savory smells of yummy wood (that is how they find it, you know);
  5. Elevate the bottom of the chest above the ground/floor so there is an “air gap” preventing direct moisture transfer from below thereby keeping the wood’s moisture content at levels less than those preferred by fungus and bugs;
  6. Design the base details so some air circulation underneath the chest is possible to reduce fungus growth and make cleaning possible:
  7. Place vaporized fungus and insect repellent (e.g. moth balls or toilet cakes) inside the toolchest further minimizing delicious woody smells that attract insects while at the same time creating an uninviting or even hostile environment for their kiddies;
  8. Combine all seven of the solutions listed above, which is what I did. You know me: Belt, suspenders, and safety harness.

We will talk about these solutions and other factors that informed the design of the toolchest in future posts.

I encourage you to give similar consideration to the design of the furniture and casework you build for your own use, at least if, like me, durability means more to you than the ecstasy of popping bubble wrap.

In the next post in this series about my toolchest, we will consider some potential solutions to the remaining Key Performance Criteria you may want to consider when designing your toolchest.

Call me Ishmael.

“Talk not to me of blasphemy, man; I’d strike the sun if it insulted me.”

If you have questions or would like to learn more about our tools, please click the see the “Pricelist” link here or at the top of the page and use the “Contact Us” form located immediately below.

Please share your insights and comments with everyone in the form located further below labeled “Leave a Reply.” We aren’t evil Google, fascist facebook, or thuggish Twitter and so won’t sell, share, or profitably “misplace” your information. If I lie may rabid forklifts chase me nightly in my dreams.