Sharpening Part 17 – Gear

Do what you can, with what you have, where you are.

Theodore Roosevelt

Sharpening can be a stuff-intensive process, and since portability is always a factor in your humble servant’s case, I strive to reduce the number of accouterments to the barest minimum. The following is a list of some gear, besides sharpening stones, that I am confident will prove useful whether in Beloved Customer’s workshop or the jobsite.

I will first list the gear needed for general sharpening either in the workshop or the field. At the end of this article that I have listed a minimal set of gear for use specifically in the field where space and weight might make it inconvenient to carry the heavier/bulkier general set of sharpening gear.

A General Set of Sharpening Gear

The following is a list of tools and equipment I think are indispensable for sharpening Japanese woodworking tools in general and in many, but not all, circumstances. I have not included some tools that may be necessary for doing “uradashi,” i.e. “tapping out” the hollow-ground urasuki of Japanese plane blades. So here we go.

  1. Sharpening Stones
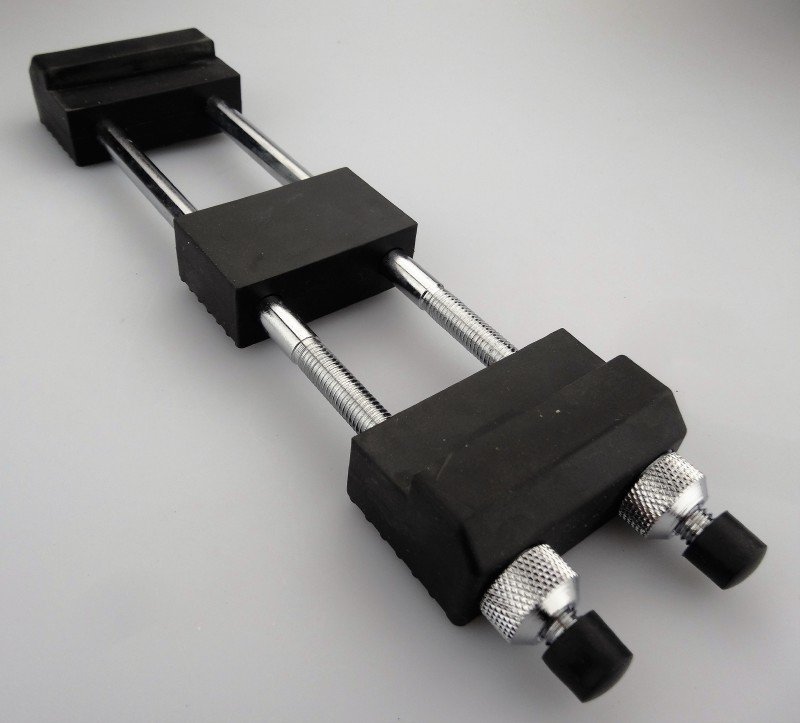
  2. Stone Base or Holder: A wooden base with a wedge to secure stones is the old standby for supporting sharpening stones above the benchtop or ground, but repeated wetting and drying and the resulting expansion and contraction may compromise a wooden base over time. For my synthetic stones I have come to prefer the commercial bases with twin metal rods and rubber feet. They are unromantic, but are durable, stable, non-slip, grip the stone tightly without breaking it, and work well anywhere. If you decide to make and use a wooden base, I highly recommend Ipe wood because it is stable, unaffected by water, won’t rot, and bugs hate it.
Washing powder storage square plastic buckets in 2L 5L 8L 10L 15L 18L 20L

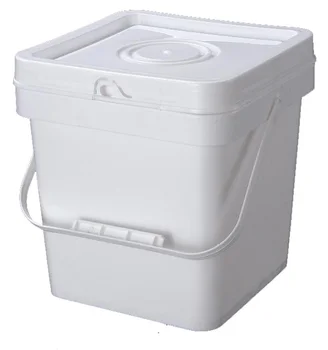
2. Soaking bucket for stones: A medium size plastic or steel mop bucket (not the heavy industrial unit with rollers) is best for soaking stones because they are durable, and their more or less square/rectangular shape is superior to round buckets for leaning stones on end against the inside walls. You don’t want to stack the stones on top of each other if you can avoid it. Any durable bucket that doesn’t leak will work, but a tightly-fitting lid is a big advantage. You will need to soak all but your diamond plate and finishing stones in this bucket before each use. 

Related image

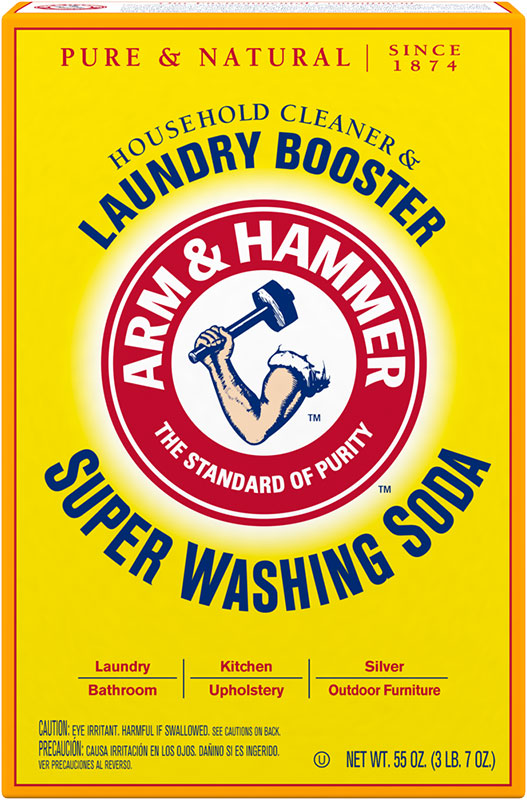
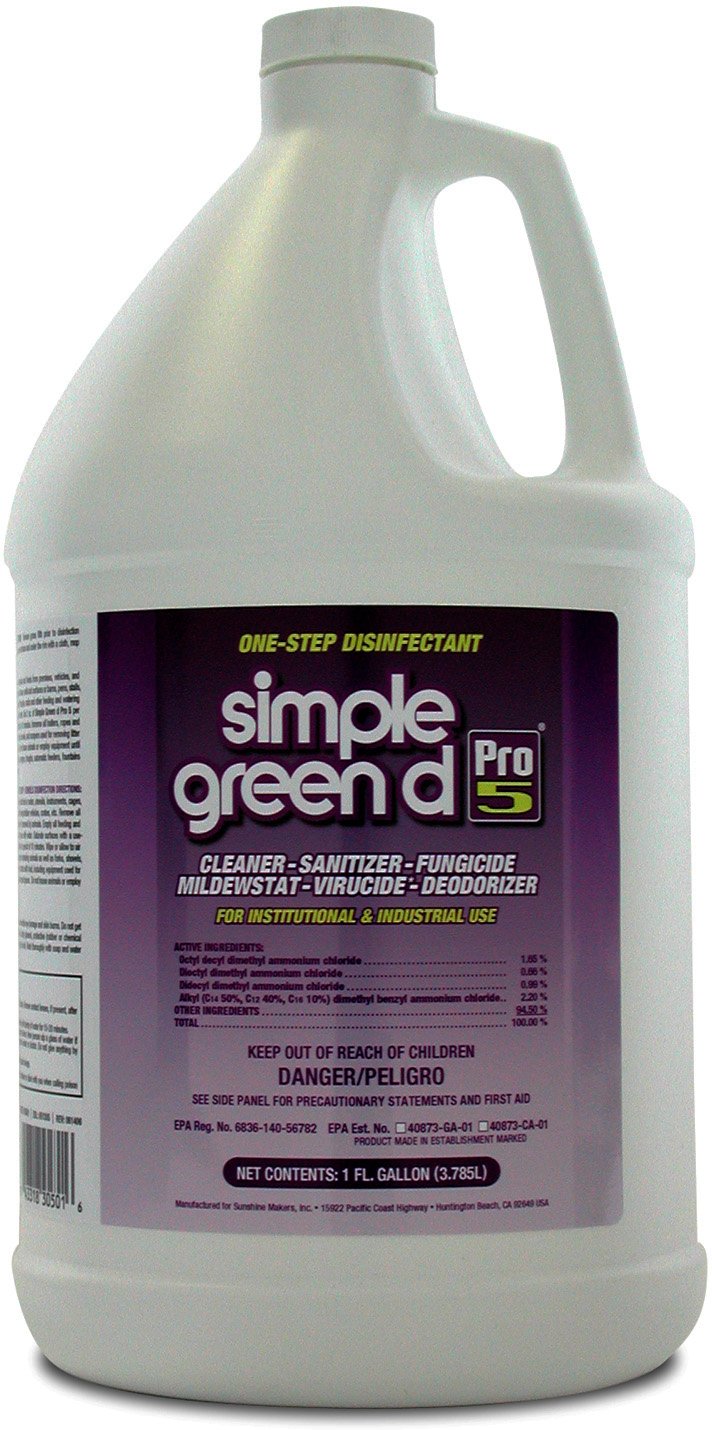
I soak my synthetic stones 365 days a year. I close the lid to prevent evaporation and to keep out mosquitoes and woke zombies, and add either washing soda, borax or a few drops of Simple Green ProD5 concentrate to the water to prevent bugs and algae from growing when I won’t be using the stones for a while. Simple Green is a better bug/algae killer, but Borax has the advantage of making the water slightly alkali which helps prevent rust in my blades during sharpening.

Some stones use a magnesium-based binder that can dissolve and weaken them if left soaking for long periods of time. Please refer to the manufacturer’s instructions.

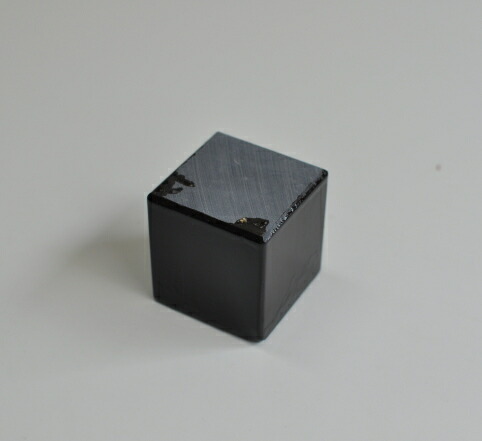
3. Glass Plate: 9mm~12mm thick piece of float glass. This is used to true the faces of waterstones when they become distorted through use. The piece I use is 60mm x 30mm x 10mm. This plate can be used for many other purposes including checking the fettle of your plane’s soles. I leave this in my workshop. We will discuss how to use this in future posts in this series, God willing and the creek don’t rise.

4. Working Surface: If working outside, a Japanese craftsman will place his stone holder directly on the ground or concrete slab. A craftsman that works inside a shop will often have a wooden or plastic box with a board spanning the narrowest dimension forming a bridge. The stone rests on this bridge, often with a wet towel between board and stone to prevent slipping. This box, called a pond, catches water and mud dripping from the stones. The ideal situation is a board spanning a sink with a faucet of running water. When away from the workshop, I prefer to place a piece of fiberglass-reinforced rubber (EPDM) roofing membrane on a truck’s tailgate or stack of boards or gypboard at a jobsite. I can roll-up this lightweight, tough, and absolutely waterproof mat and stuff it into my toolbox for easy transport. In my workshop, I use a large plastic cutting mat placed on my workbench, but any waterproof non-slip surface will work. No need to get fancy. My stones and sharpening gear are stored under my workbench close at hand. 

5. Water Source: While sharpening, you will frequently need water to wet your stones and rinse blades. If you work at a sink, use the faucet. If you work outside, a garden hose works great. Some people, mostly knife sharpeners who seldom use stones finer than medium grit, will scoop water from their pond or bucket to wet their stones. However, since stone slurry drips into the pond, this water will always contaminate stones with the grit from rougher stones, making it difficult to remove all the scratches left by the previous stone. To avoid this contamination, always use clean water for wetting and rinsing. 

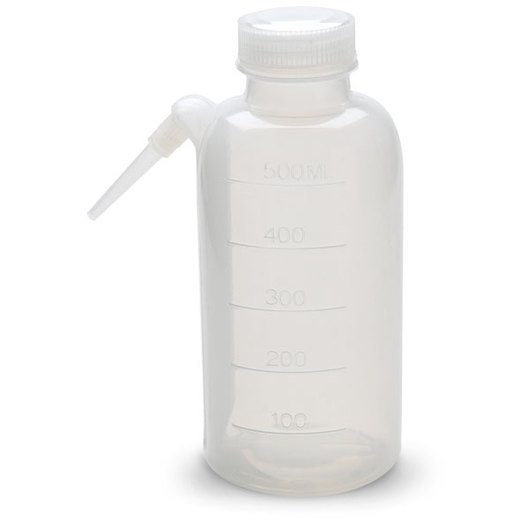
Some people prefer a spray bottle to add water, but spray bottles wet things I prefer to keep dry, so a better choice, in my humble opinion, is a plastic bottle such as a dishwashing soap bottle or a plastic lab wash bottle with a bent tube coming out the top. Almost any plastic squeeze bottle will work.

Tap water contains chlorine in all but backward countries, and chlorine accumulates and accelerates rust, so I use distilled water in my wash bottle, and add washing soda or borax to adjust the water’s PH, a technique I learned from sword sharpeners. 

Some people add just a bit of liquid lye to their water to adjust the PH. This chemical can be purchased from industrial cleaning supply companies. Too much will damage your skin, so be careful. Also good for keeping Iron Pixies in the shadows.

6. Sharpening Station and/or Sharpening Pond: I don’t use a sharpening pond, and don’t believe them to be essential, but several practical options are illustrated below.

余暇のある時や休日だけに出現するものであるにせよ、専用の研ぎ場があるというのは工作をするものにとって幸せなことです。自分なりに工夫を重ねながら研究を深めてゆくのは、何よりも楽しみを感じさせてくれるでしょう。
A bridge placed over a sink forms the ideal sharpening station. Professional workshops frequently use this classic arrangement. Flush the drain well. You may need to remove the sink’s P trap and clean sharpening stone mud out of it annually.
Plastic boxes placed inside a wooden box make a portable sharpening pond and stone storage box. There are dozens of variations on this theme possible.
Related image
Perhaps the best solution in my experience (short of a dedicated sink) is a plastic box to catch water, with another plastic box nested inside containing sharpening accoutrements such as a wash bottle, brush, abrasive powders, an oiler, and nagura stone. This equipment, along with the sharpening stones, 2 bases and stainless steel straightedge pictured, can be stored inside the box and the lid closed for ease of transport and to keep out pixie dust. This is an inexpensive and extremely practical solution, but be sure to use a quality box made of high-impact plastic.
Image result for straightedge

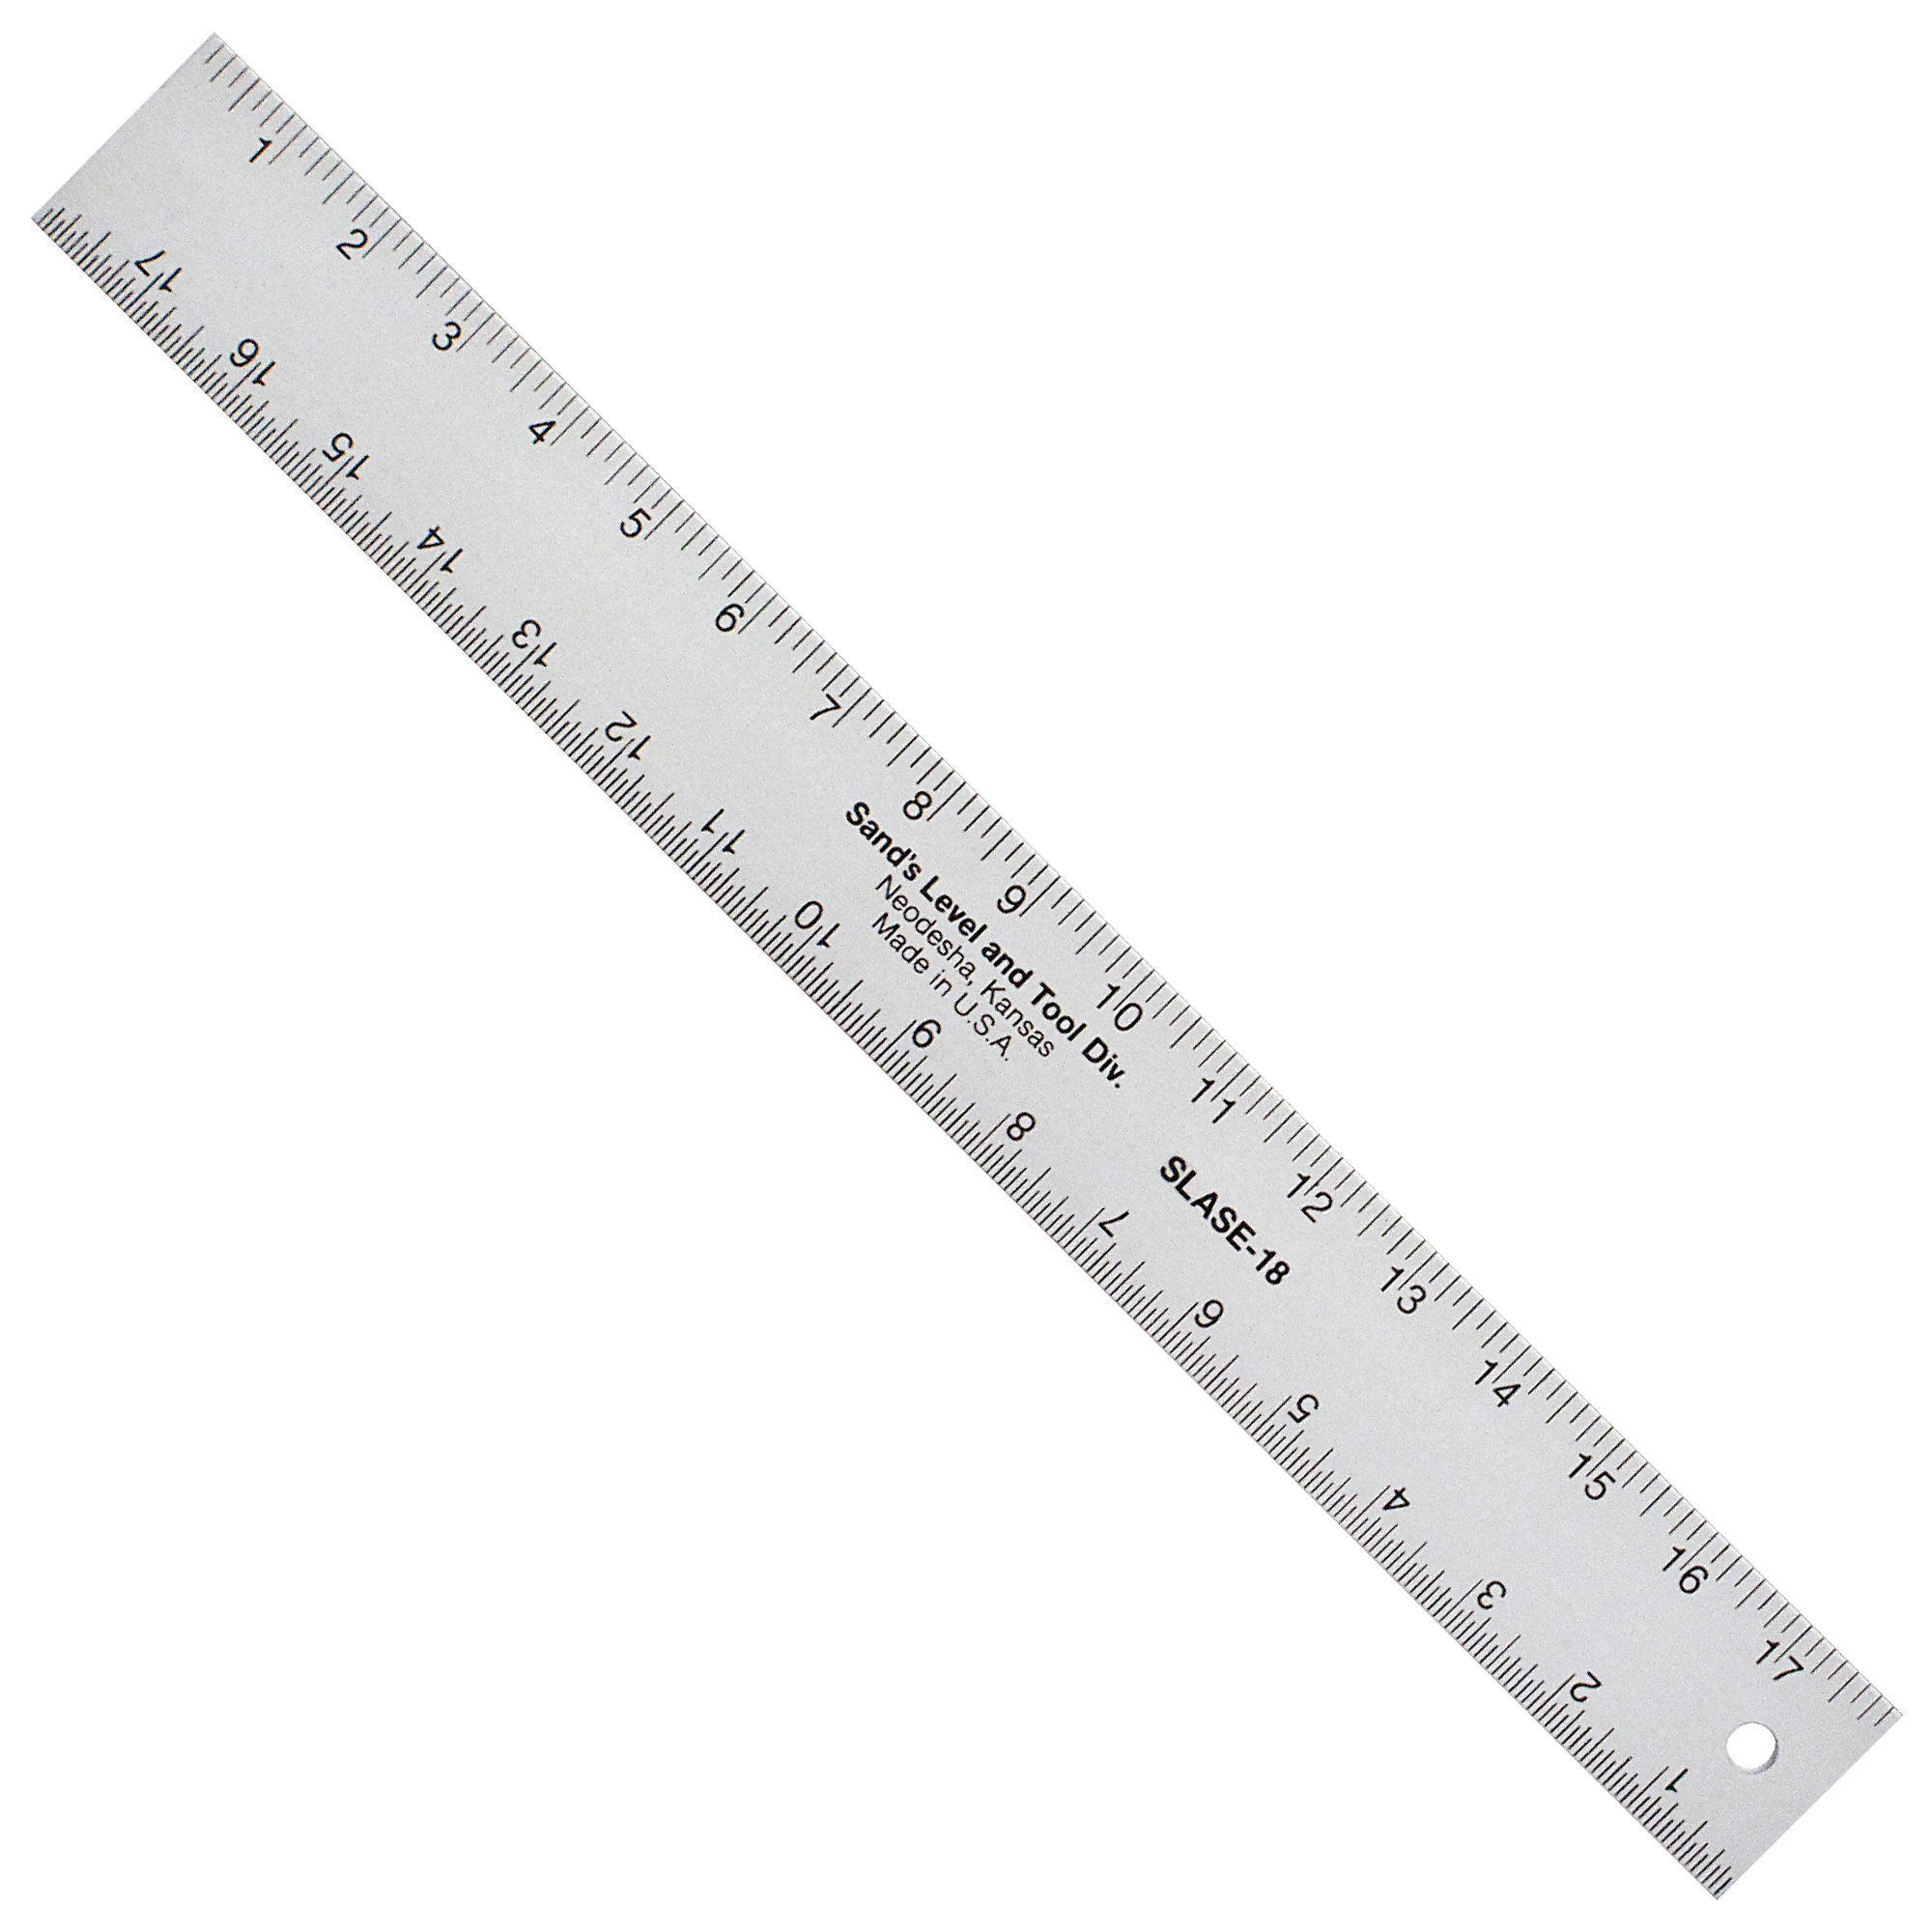
7. Stainless steel straightedge: Use this to check stones for flatness and wind, and cutting edges for straightness. Don’t use a plain steel one unless you want to give the iron pixies skulking under your workbench great joy. The thinner the better. The thick blades used in combo squares are difficult to use in less than ideal light

8. Wiping materials: You will need something to clean and dry your blades during sharpening sessions. Rags work well for wiping and drying blades, and can be washed and reused, but be careful to avoid cross-contamination. Paper towels are most effective and convenient in my experience, but they cost money and make garbage. Decisions, decisions…

The classic Japanese “Baby Turtle” brush with palm-fibre bristles.

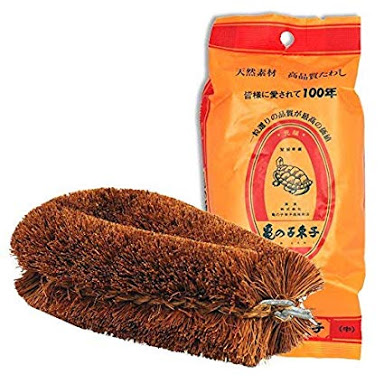
9. Scrub brush: A clean stone is a happy stone, as are bases, buckets and glass plates, all of which have grooves and scratches and holes where grit can hide. Scrub brushes are great for digging out this contaminating grit. Palm fiber brushes are ideal because the bristles are fine and grit does not get embedded into the bristles as much as plastic brushes.

The Lie-Nielson Honing Guide. An excellent if expensive tool.

10. Honing Guide: This tool is optional. I hesitate to recommend these jigs because they can easily become a crutch preventing Beloved Customer from becoming proficient at freehand sharpening. However, these types of jigs make it much easier and quicker to shape blades to the desired angle on rough stones, especially when correcting a double-bevel or bulging bevel to a more useful single, flat bevel. Eclipse-style honing guides work well. The die-cast versions are inexpensive. Lie-Nielson makes a terribly expensive version machined from stainless steel that I am fond of. Jigs won’t work for all blades, but it is worth having one.

tzushimanagura8_4
A Tsushima Nagura Stone

11. Nagura Stone: More details will be included in next post in this series.

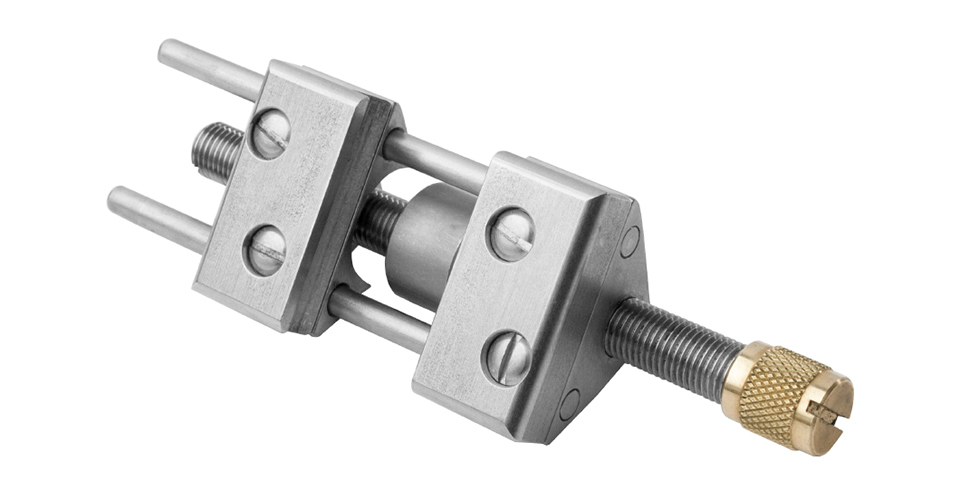
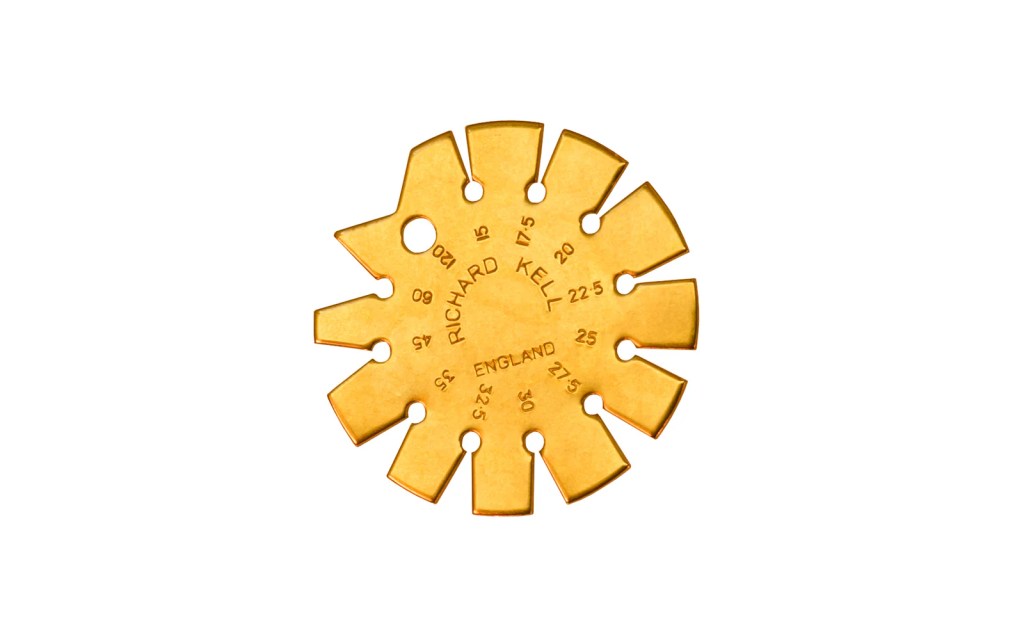
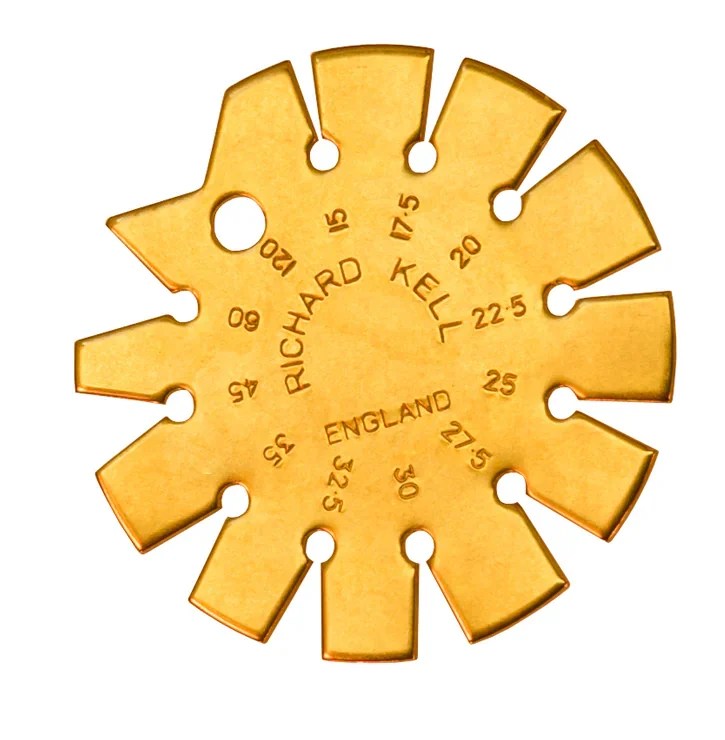
12. Bevel Angle Gauge: I’ve mentioned this tool in previous articles in this series, but list it here because it is critical. Use it to check the bevel angles of your chisels and planes during every sharpening session to ensure they don’t become too low weakening your cutting edges and inviting premature chipping. It can be made of any material that resists corrosion such as plastic, aluminum, stainless steel, or brass, my favorite because brass repels pernicious pixies.

Richard Kell bevel gauge
A compact and effective brass bevel angle gauge by Richard Kell

Minimal Set of Sharpening Gear

Sometimes, especially when working at remote jobsites, weight and/or space may impose physical limits on the tools we can carry with us. The following is a list of the minimal set of sharpening tools I bring in these situations.

1. Sharpening Stones

2. Stone Base: At the jobsite the stability this tool provides becomes more critical than ever, but if an ultra-light set of tools is needed, then it can be eliminated by placing the stone directly on a rubber sheet.

3. Soaking Container: There are many potential solutions for soaking stones in a minimalist or ultra-light situation, but I will describe just a few here. If clean water is available at the jobsite (water coming from a newly-installed pre-flush plumbing system may not be clean, and immediately post-flush it may contain lots of chlorine used to sterilize the pipes and fittings), then the minimalist solution I employ is to use a dry plastic bucket to carry tools, including sharpening gear, to and from the jobsite. I then add water to one bucket in the morning. Another option is to scrounge a joint compound bucket or paint bucket and leave it at the jobsite. But unless I have a gang box or other trustworthy tool lockup available at the jobsite, I still may need to transport at least one wet sharpening stone to and from the jobsite each day. The ultra-light solution I sometimes employ is to carry my waterstone(s) in a durable plastic container with a watertight lid, such as the thinner (6cm) rectangular containers by Tupperware. Water can be added at the jobsite to keep the stone(s) soaked and ready to rock-n-roll. And with the lid closed, dirt and dust can’t get in. An even lighter option is a heavy plastic bag. I place the stone(s) in the bag and carry it in my tool bag. At the jobsite, I can add water and close the bag with a thick rubber band to soak the stone(s). But be forewarned that these bags will not protect the stones, and the stones will make holes in the bag at the worst possible time.

4. Working Surface: I use the fiberglass-reinforced rubber roofing membrane described above. Tough and absolutely waterproof, it also works great for sitting on and even spreading out one’s lunch at the jobsite when more refined facilities and servants are unavailable (ツ).

5. Water Source: Clean water is necessary even in the field to wet the stones and to wash mud off tools. To save space, I use a small plastic squeeze bottle with a tightly closing lid that originally contained ketchup. If clean water is available at the jobsite, I carry it in my toolbag empty.

6. Stainless Steel Straightedge: See Item 7 above. I use a thin, flexible, lightweight one in the field.

7. Wiping Materials: A clean cotton rag and a some folded paper towels work well.

8. Scrub Brush: I always bring my “Baby Turtle” scrub brush. It’s lighter in weight than a plastic brush and comes in handy for tasks beyond sharpening too.

9. Nagura Stone: Just in case I need to get an extra-fine finish.

10. Brass Bevel Angle Gauge (on a red string around my neck)

The selection of stones I use at the jobsite will depend on the work planned for that particular day, but the minimal set is a 400 grit diamond plate/stone, a 1,000 grit synthetic waterstone, and a 6,000 or 8,000 grit synthetic finishing stone. If I anticipate a lot of sharpening, and if weight is not critical, I will bring two 1,000 grit stones to ensure I have 4 flat sharpening surfaces ready to rock-n-roll first thing thereby reducing the need to spend time flattening stones at work. I can also use them to flatten each other. If I need to do some fine finish planing, such as when doing door modifications/installations, I will bring a 10,000 grit synthetic waterstone. And of course I always carry a Tsushima Black Nagura stone.

In the next post in this romantic series of adventures in sharpening will focus on the important Nagura stone. Stay tuned for muscled thews and busted bodices!

YMHOS

If you have questions or would like to learn more about our tools, please click the “Pricelist” link here or at the top of the page and use the “Contact Us” form located immediately below.

Please share your insights and comments with everyone in the form located further below labeled “Leave a Reply.” We aren’t evil Google, fascist Facebook, or thuggish Twitter and so won’t sell, share, or profitably “misplace” your information. If I lie may the fleas of a thousand camels infest my armpits.

Leave a comment

The Value of Handtools

Dad’s Tools

The bitterness of poor quality remains long after the sweetness of low price is forgotten.

Benjamin Franklin

A wise man once said that every tool with a cord or a battery ends up in the landfill. I don’t know where my electrical woodchucks will end up, but I doubt any will find their way into museums.

The second I open a pretty powertool’s box, its value plummets to the basement never to recover. Was it a good investment? Perhaps it would be if I still made a living with them, but not so much now.

And sure as eggses is eggses, a year or so after opening that darn box a new and improved version of my little electronic piggy will be on the market wearing high-heels, a short skirt, and too much makeup. They tell me that’s progress….

Image result for image of dewalt drill
Bound for the trashbin?

Buying a power tool feels to me like bringing a shiny-eyed puppy with a furiously waggling tale home knowing I will abandon it later. It doesn’t seem right anymore.

And then there’s the financial and environmental aspects. While necessary for many jobs, power tools often cost more to have professionally repaired than to buy a new replacement. What’s with that? And the replacement batteries for those cordless beasties are not only ridiculously overpriced, the chemicals in them are poisonous forever.

Necessary? Perhaps. Long-term value? Not so much.

But handtools are different, IMHO. The quality ones are useful for generations. Many are even beautiful. Perhaps their resale value will not rise, but over time the good ones hold their monetary value. Especially the handmade ones. And I like to believe their intrinsic value will increase many times.

A Minimum set of hand-forged planes for the professional workshop : L to R 65mm jointer (nagadai), 1-80mm finish, 2-70mm finish, 65mm + 60mm arashiko, 55mm shorty. These planes have all seen a lot of use, but their blade’s heads are neither beat to hell, nor are the bodies splintered or stained. Stay tuned for future posts on Stan’s Secrets for Japanese Planes

Ever think about how much money you spend on things that give you pleasure? Steak? Coffee? Beer? Donuts (mmm…. donuts)? Vacations? Big-screen TV’s? By comparison, quality tools are cheap, last a long time, are practical, promote healthy activity and productivity, and don’t make us fat, sick, dull, send us into a ditch, or raise our insurance rates.

A chisel may nick me now and then, but I will never fly my plane into a mountain.

~~===(ツ)===~~

And speaking of planes, remember when you were finish planing that piece of pine? The sharp blade; the sole tuned to perfection; the tight mouth. Whispy, translucent shavings boiled out of the plane’s body releasing a sweet evergreen smell and leaving a shimmering surface on the board.

The sound of a sharp blade making shavings and the sweet smell of freshly-planed pine. A simple pleasure of inestimable value.

And do you remember cutting those dovetails in cherry? Your favorite saw followed the layout line without hesitation, stopping the cut at the perfect depth. Something magical about that saw…

And how about your favorite paring chisel? Do you remember what it felt like shaping that mahogany neck, and the sight of the slowly emerging elegant shapes the sharp slender darling cut so effortlessly? Remember how it felt more like a part of your hand than an inanimate thing of metal and wood? Now that’s a blade!

Quality tools give me a tremendous amount of pleasure and satisfaction. How bout you?

Sadly, not all is blue bunnies and fairy farts. She Who Must Be Obeyed relentlessly counts the cost but sternly rejects the value of the woodworking tools I love. Her feminine mind can rationalize spending a fortune on cloth and thread and needles and the latest, greatest computer-controlled Swiss-made sewing machine with a 4-dimensional laser-guided unobtanium armature and smoothie blender attachment, but her eye narrows, turns sickly yellow, and dribbles poison at the sight of my latest plane or chisel.

Estrogen poisoning, I fear. Need to get that checked…

Will the things we buy now, use for a span of days, and leave behind when we go to the big woodpile in the sky be valued by our grandkids, or will they be sold to buy video games?

The bones are rolling.

I just know that I cherish my father’s old tools, and they still work pretty darn good.

Cheap at twice the price, says I.

YMHOS

If you have questions or would like to learn more about our tools, please use the questions form located immediately below. Please share your insights and comments with everyone in the form located further below labeled “Leave a Reply.” We aren’t evil Google, facist facebook or treacherous TikTok and so won’t sell, share, or conveniently and profitably “misplace” your information. Please share your insights and comments with everyone in the form located further below labeled “Leave a Reply.”

Leave a comment

Sharpening Part 16 – Pixie Dust

Related image

Ashes to ashes, dust to dust, if the women don’t get you then the whiskey must.

Carl Sandburg

In the previous article in this series of articles about sharpening the blades of Japanese woodworking tools we examined sharpening stones, the minimum set your humble servant recommends, those I typically use, and the most important stone in any set.

In this edition we will shift our focus to things that can go wrong when sharpening, including supernatural influences.

Dust Contamination

As I mentioned in the previous post in this series I almost never take a 10,000+ grit synthetic finishing stone or natural finishing stone to jobsites. This decision is based on personal observation under practical conditions: Jobsites are rough and dirty places, and stones are fragile. 

Iron Pixies are rabid fans of Lingerie Football. Don’t hang posters or watch games in your workshop if you want to avoid crowds of the tiny beer-guzzling fiends.

Even if Murphy is drunk and the resident Iron Pixies are distracted watching Lingerie Football on the boob tube (pun intended), airborne dust at the jobsite will always instantly degrade an expensive 12,000 grit rated stone to an effective 4,000 grit or less, making a fragile, expensive, ultra fine-grit stone pointless. How clean is your workplace? Something to think about. Seriously.

This is not just a theory that sprouted from my overactive imagination like a dandelion on a dung pile, but is scientifically verifiable. Give it try.

Get out your microscope or high-power loupe. Place a clean glass slide near where you will be sharpening. 120 minutes later, examine the slide and count the dust specks. How did they get there? Dust is in the air quite naturally, but vehicular and foot traffic kick up lots more.

Most of those dust specs are larger and some are just as hard as the grit that makes up your finishing stone. Imagine what happens to your blade when those pieces of relatively large, hard grit get mixed into the stone slurry, or become embedded into the stone’s surface. Not a pleasant thought.

Related image

Dust contamination even has historical precedence. Japanese sword sharpeners traditionally do their best work during the rainy season when there is less dust in the air to contaminate their stones. 

Professionals that polish pianos, stone, glass and jewels are also sticklers for eliminating dust contamination.

Just design and build a few cleanrooms for picky customers with SEMs (scanning electron microscopes), or with lens coating equipment, or who make pharmaceuticals and you will get an education about dust and the problems it creates quickly.

What dust do we find at construction job sites or workshops? First, assuming we are working at a building project, there are exterior sources of dust. Unlike a house, the doors and windows are usually open to gain maximum circulation, even when dusty landscaping operations are ongoing and trucks carrying materials and garbage are running everywhere kicking up clouds of dust.

Second, unless you have the jobsite entirely to yourself, there are usually other trades inside the building grinding, sanding, cutting and walking around kicking dust up into the air too. The most pernicious dust on the jobsite is drywall and joint compound. This white fluffy dust appears harmless, but it contains tiny granite silica particles harder than steel, and even bits of glass fiber, that float around and settle on everything. They are a health hazard that has put more than one person in the hospital with respiratory problems. They will contaminate your sharpening stones sure as eggses is eggses.

Sandpaper, sanding discs, grinders and angle grinders in operation also spray millions of tiny hard particles everywhere, many of which float in the air and can travel some distance before settling, especially inside an enclosed building or workshop.

Does your business or home workshop have a large door facing a public road with cars and trucks going back and forth near it? Do people with muddy boots come in and out? Are dirty pallets with piles of dirt hidden on the bottom boards offloaded inside? Do you use sanders or grinders in your workshop?

If you are sharpening outside, or at a dusty jobsite, or inside a dusty workshop, and especially if you regularly use sanders and grinders there, I recommend the following procedures before you use fine-grit stones:

  1. Try to locate your sharpening area away from foot traffic, grinding and sanding operations, and dusty areas;
  2. Sweep and vacuum the surrounding floors well, since it is the movement of feet that billows settled dust back up into the air in indoor spaces, and wait at least 15 minutes after sweeping for the dust to settle before sharpening;
  3. Wet the surrounding ground or floor with water to keep the dust down (this makes a big difference);
  4. Wrap a clean cloth or a sheet of clean newspaper around your fine stone when you are not using it for more than a couple of minutes to prevent airborne dust from settling on it;
  5. Scrub your fine stone under running water with dishwashing soap (neutral PH) and a clean natural-bristle brush before each use to remove dust and embedded grit.
Richard Kell bevel gauge
A compact and effective brass bevel angle gauge & talisman by Richard Kell

And for heaven sake, even if you can’t take your benchdogs with you everywhere, at least have a brass bevel angle gauge in your toolkit, and use it every time you sharpen because, not only will it help you do a better job of sharpening but it will keep the pernicious pixies at bay. In fact, whenever I undertake a serious sharpening job I hang my Richard Kell Solid Brass Bevel Angle Gauge around my neck from a red string as a talisman; brass because it contains no iron for pixies to covet, and the zinc & copper alloy that is brass tastes bad and gives them terrible wind; and a red string because all tribes of the fae strongly dislike that color.

The following are few references regarding silica and construction dust: Silica-Safe.org Center for Disease Control. Makes you want to wear a respirator in bed.

YMHOS

The legal team hard at work digging up dirt. Everyone of the buggers is a Harvard graduate, of course.

If you have questions or would like to learn more about our tools, please click the “Pricelist” link here or at the top of the page and use the “Contact Us” form located immediately below.

Please share your insights and comments with everyone in the form located further below labeled “Leave a Reply.” We aren’t evil Google, fascist facebook, or thuggish Twitter and so won’t sell, share, or profitably “misplace” your information. If I lie may the fleas of a thousand camels infest my armpits.

Leave a comment

Sharpening Part 15 – The Most Important Stone

Orders are nobody can see the Great Oz! Not nobody, not nohow! 

Gatekeeper, Emerald City

Many people high-center on this question: “What is the best way to sharpen my tools?”

Your humble, unworthy servant was hesitant to publish this series of articles about sharpening because, beginning with this one, I must write about tools and techniques that are blasphemous to many people’s sharpening religion. Some of those people will doubtless become emotional. As Benny Franklin once famously said: “Ça ira, ça ira.”

The objective of this article is to help our Beloved Customers properly maintain, sharpen and use the blades they purchase from us. But it isn’t a sharpening tutorial; that will be a future post.

We will examine the process of sharpening woodworking tools using mostly waterstones. We will touch on the motivations, goals and priorities related to sharpening you should consider, the minimum set of sharpening stones your humble servant recommends, and my suggestion for the most important stone in your arsenal, one you must be proficient in using.

Motivations

You might have noticed from my previous posts that I like to understand motivations. Am I cynical? Perhaps, but where there are smoke and lights in evidence and money to be made, there is almost always someone behind the curtains spinning dials and pumping pedals. Oooh, pretty lights!

Anyone who does anything has a motive for doing it, and knowing that motive can help us evaluate the validity, and sometimes even the honesty, of what they do, say and write on a particular subject. How can we best ascertain the motivations of those advocating various sharpening methods and related accoutrements? Here are some simple questions you might want to ask: Are the promotions or promoters touting sharpening stones or other stuff they might profit from? Are they selling books on sharpening? Do they teach classes on sharpening? Do they have “sponsors” or “patrons” that supply them, at no cost or with large discounts, stones, diamond paste, sandpaper, sharpening machinery, and/or honing contraptions in exchange for promoting those goods? Are they “influencers” (yes, that’s a real vocation in the NoobTube World) who are compensated for clicks? Do they publish reviews on products they receive for free? You see the pattern.

Regardless of their business model or motivations, many people give good advice, but many are shills, while some are pretenders, and their advice will be colored accordingly. Caveat emptor, Skippy.

And then there is the most obvious motivation. After all, it doesn’t cost even $20 to make a Mechaultrasuperfine Ninja-purple Gold-dust-infused Musashi Walk-on-Waterstone that retails for $650. And have you calculated the long-term equivalent cost of diamond paste and abrasive films? Somebody’s making serious cash.

Just once I’d like to cross the road without having my motives questioned…

Whatever stones you select, I urge you to find a good balance of performance vs cost vs time vs sustainability, with sustainability referring to both the amount of landfill-stuffing the selected process creates as well as its long-term effect for good or ill on your blades. This 4-variable calculus depends not only on the characteristics of the stones and blades you use, but on your sharpening skills too, so it may take years to find the inflection points if you take a scientific approach. The quadratic formula does not yield useful results, sorry to say.

At one time or another I have tried and tested many popular sharpening “systems” including those that rely on jigs, machinery, sandpaper, plastic films, stick, liquid, paste, and powdered abrasives, buffers, strops and even superflat ceramic plates. I enjoy the adventure of learning new things. They all get the job done, and all have serious merits, but to reduce the time and brain damage involved in this calculus, a wise man will learn from no-nonsense professionals, people who have been down the road before and actually use tools to feed their families, and who have no conflict of interest, be it stones, books, or clicks. That’s what I finally did, long before there was a publicly-accessible internet, and I think it worked out well. But I need to issue a disclaimer before we go further.

Disclaimer

Here it is in red letters.

I say what I believe and believe what I say, even if it offends the “gurus” of sharpening. I buy their books and DVDs, watch their YouTube videos, and try their sharpening techniques and even the “tricks” they recommend, so I like to think I am not a “frog in a well,” as the Japanese saying goes. If I don’t know something, I will say so. I am not a liberal college kid to be offended if you disagree with me, but I ask you to not become orcish.

Please note that we do not now and have never received goods, discounts, or financial compensation of any kind from anyone in exchange for modifying our opinion about sharpening tools and techniques.

I have personally taught many people how to sharpen tools over the years, but have never received a red cent for my time and haven’t used those training sessions as an excuse to sell stuff.

I have never done a product review.

I have never written a book or magazine article or even a blog post with advertiser support.

Please note that the document you are currently reading cost you nothing, was written and paid for by C&S Tools alone, and that there are no banners, commercials, or outside links on any of the pages in this blog. No SEO strategy at all. If Evil Google brought you here, it was not at our bidding.

We want to help our Beloved Customers, mostly professional woodworkers who already possess a certain level of skill, to level-up those skills. C&S Tools has no commercial incentive to mislead, and will not do so. But we do have a profit motive.

Remember, we have a 100% guarantee on the materials and workmanship of the tools we sell, so our sole financial motivation, and the very reason for this blog, is to help our Beloved Customers understand the tools we sell, and to become proficient in sharpening, maintaining, and using them so they won’t mistake a lack of skill and/or experience on their part as a problem with the tool. All most professionals really need is a little guidance. We want skillful, ecstatic customers because they become repeat customers. And we do hate to disappoint.

This image has an empty alt attribute; its file name is tenor.gif
The Marketing Department

Goals, Objectives and Priorities

I mentioned 4 variable calculus above. Actually, it’s more like 5 variable calculus, the fifth variable being your goals and objectives for sharpening. Let’s examine those in more detail.

If satisfying curiosity are among your goals, then by all means try all the stones, sandpaper, films, pastes, jigs, contraptions, and machines available and methodically test them until they wear away to dust. It simplifies the calculus, but the cost and time required to reach a final conclusion may become a heavy burden.

If beautiful blades, zen-like sharpening experiences, and improved hand-soul coordination are high among your objectives (they’re included in mine), then you will want to try natural finishing stones. I heartily recommend them to those who have reached a certain level of skill with synthetic stones and are willing to roll the bones. The ante may be costly.

The performance of the sharpening system you select, including the following factors, are things you should include in your calculations:

  • Time efficiency: How long does it take you to produce an adequately sharp edge starting from a dull/chipped one? How fiddly is the process? For this calculation you will need to determine how much your time is worth. Remember, while you may enjoy sharpening, from the professional’s viewpoint, time spent sharpening is non-productive time because, during the period you are working on tools, your hands, eyes, and mind cannot work on the stuff you contracted to deliver to your Customer;
  • Cost efficiency: How many billable hours and expensive supplies/tools/equipment must you expend to obtain an adequate cutting edge? For this calculation you will need to determine the cost of time, consumables (stones, sandpaper, film, paste, powder, beer, Prozac) and equipment (grinders, jigs, plates, widgets, etc.) expended in producing an adequate cutting edge long-term. Even if you are not getting paid for your woodworking, your time still has value. And don’t forget to depreciate the cost of stuff. This is where synthetic waterstones shine in comparison to the many other sharpening systems out there, IMHO.
  • Cutting efficiency: How well and how long does the sharpened blade cut? For this calculation you need to determine what defines an “adequate cutting edge” for you. For instance, given the same abrasives and expending the same amount of time to sharpen two blades, the blade with a rounded bevel, or even multiple bevels, is seldom as sharp as the blade with a simple flat bevel, as can be readily confirmed using a powerful loupe or microscope to examine the last few microns of the blade’s effective cutting edge (more on this subject in Part 21 of this series). Does the sharpening system you are testing tolerate or even promote bulging bevels or multiple bevels? Get out your loupe before your inner troll makes you say things you will regret.

If curiosity, pleasure and beauty are lower priority than practical performance in your list of objectives, then I suggest you focus on synthetic waterstones and the bedrock basics, at least for now:

  1. Obtain a minimum set of basic synthetic stones, or adapt what you already have;
  2. Learn how to use them skillfully;
  3. Practice those skills until they seep into your bones.

It is not an expensive process, but neither is it the instant short-term sort of thing the Gurus of Sharpening offer in their books and DVDs and classes through their tricks and gimmicks. It takes real skills that will serve you and your tools well for your entire life. And it all starts with the minimum set of stones.

The Goldilocks Set

Oh my goodness, just look at the time! I really must be going.

Sharpening stones are expensive consumables that disappear a little with every stroke. If you need more than 5 minutes to sharpen a plane or chisel blade that was not chipped or damaged, then you may be spending too long, and wasting your time and stones, so it’s important to determine the bare minimum set of stones that work best for you.

The Goldilocks set I recommend includes the following 4~5 stones/plates:

  1. A Rough Stone: 400~800 grit rough diamond plate/stone or two carborundum stones;
  2. Medium Stones: Two 1,000 grit waterstones (I will get into the reasons for having two stones of the same grit in another post);
  3. A Finish Stone: 6,000~8,000 grit waterstone.

Please also note that, while I use them in my workshop, I don’t consider 10,000+ grit synthetic finishing stones or natural fine-finishing stones essential tools, nor do I take them to jobsites. This decision is based on simple practical experience: Jobsites are rough and dirty places, and stones are fragile. 

The sharpening stones I normally use in the shop include a few beyond the minimum set described above. This set includes more stones, but the idea is that this finer gradation creates a better-quality cutting edge while consuming less of my expensive finishing stones. Useful natural stones can be pricey:

  1. One 400~800# diamond plate or two rough carborundum stones (only occasionally necessary);
  2. Two 1000# Waterstones (usually necessary, but sometimes I skip it);
  3. Two 2000# Waterstones;
  4. One 6000# stone (fine enough for quickly finishing chisels and most planes);
  5. Two natural stones for finish planes and push chisels, or just for fun (a 10,000# synthetic stone works just as well).

Which Brand of Synthetic Stone?

I have had good luck with the Imanishi “Bester” brand waterstones. Imanishi seems to be inactive so I have been forced to research other brands. The best alternative I have found so far is the “Hibiki” brand waterstones by Naniwa, but I have no doubt there are others that work just as well.

Naniwa also makes an interesting and effective diamond stone they call their “Shrimp Brand,” and which is mistakenly (?) translated as “Lobster Brand” in the US and Europe. Not a “diamond plate,” mind you, but a diamond-impregnated sintered product that works much better than the usual plates with diamond particles electronically attached to steel plates. This diamond stone is comprised of a 1mm layer of diamond grit in a vitrified (baked) matrix affixed to an aluminum plate. The sintered layer is quite hard and won’t dish out easily. More importantly, these plates cut faster, smoother and longer than the diamond plates your humble servant has previously experienced.

It is especially useful for uraoshi of plane blades.

The important thing is to keep it wet in-use. If it becomes clogged with metal swarth, use a nagura stone to clean the surface and get back to work.

The Most Important Stone

Everyone focuses like a laser on the finishing stone, the final stone in the process, but when sharpening a particular blade, the most important stone is really the first stone you use in the series, be it a 400 grit diamond stone or a 2,000 grit waterstone. 

A conventional diamond plate

You may find this whole discussion passing strange, so I will explain. The roughest stone (or diamond stone, depending on the amount of steel that must be wasted and your available time and budget) you begin the sharpening process with builds the foundation of your cutting edge by performing the following two critical tasks:

  1. Removing damage at the cutting edge; and
  2. Shaping/flattening the bevel at the cutting edge.

Only a rough stone (400~1000 grit) can accomplish the first task efficiently. If the truth of this statement is not self-evident, I won’t even try to convince you. Do the comparisons yourself: count strokes, time, and cost, measure angles, and peep at scratches through a high-power loupe. An opinion based on anything less is just hot air and is less convincing than a Southern California politician’s protestation of not routinely receiving bribes from the many drug cartels that ship product through that hell-hole.

In addition, your roughest stone is also the most efficient tool for shaping the bevel and cutting edge, if it needs to be adjusted. Until these two critical tasks are completed, none of the subsequent finer stones can accomplish anything efficiently, and the faster and more precisely these two tasks are accomplished the sooner one can stop sharpening and get back to making wood chips and shavings.

The role of all the finer stones in the sharpening sequence is simply to replace the deeper scratches left by the preceding rougher stone with progressively finer scratches. And since this work is done using more expensive, less-abrasive and slower-working stones, it is most cost/time-efficient to accomplish this task as quickly as possible.

If you knock out the two foundational tasks listed above using your rough stone/plate well, then you can accomplish the subsequent polishing work at minimum cost and maximum speed. Screw it up and your stones will prematurely turn to mud and your blades will hate you.

Please be sure you understand the meaning of the previous five paragraphs. They are the heart of this article, and should be the foundation of your sharpening process.

So how does this work in real life? If the blade is chipped, dinged, or needs shaping, then I start repairing and reshaping the cutting edge’s foundation with my diamond stone. A 400~800 grit carborundum stone, if very flat and kept flat, will work too, but remember that many carborundum stones, especially those permeable by water, can become dished-out quickly.

If my blade is only dull, but not damaged, and the bevel is in good shape, I start with a flat 1,000 grit synthetic stone.

If the blade is starting to lose its edge, but is not damaged and still cuts, I start the process with a flat 2,000 grit stone. Notice the word “flat” is used a lot in this article, and not by accident.

The objective, again, is to create an adequately sharp edge in the minimum amount of time and cost by starting the sharpening process with the cheapest, most aggressive stone appropriate to the blade’s condition for the heavy wasting and shaping jobs thereby creating a bevel and cutting edge which you can then quickly polish to the final cutting edge using the more expensive, finer-grit stones. Wow, that’s a mouthful!

I want to make one thing perfectly clear before ending this post. Except for a few special situations, I don’t recommend using secondary bevels or micro-bevels except in special circumstances because, like training wheels on a bicycle, they are not an efficient long-term solution. In fact, they are a short-cut that has stunted many people’s sharpening skills.

We will return to this subject later, but in the meantime, I have the honor to remain,

YMHOS

The Great and Powerful Oz has spoken!

If you have questions or would like to learn more about our tools, please click the “Pricelist” link here or at the top of the page and use the “Contact Us” form located immediately below.

Please share your insights and comments with everyone in the form located further below labeled “Leave a Reply.” We aren’t evil Google, fascist facebook, or thuggish Twitter and so won’t sell, share, or profitably “misplace” your information. If I lie may my only companions be fleas and biting flies