Sharpening Japanese Tools Part 30 : Uradashi & Uraoshi

And now at last it comes. You will give me the Ring freely! In place of the Dark Lord you will set up a Queen. And I shall not be dark, but beautiful and terrible as the Morning and the Night! Fair as the Sea and the Sun and the Snow upon the Mountain! Dreadful as the Storm and the Lightning! Stronger than the foundations of the earth. All shall love me and despair!

J. R. R. Tolkien

This article is a continuation of, and probably the conclusion to, our “Sharpening Japanese Tools” series. The last article was one year ago and gave an example of how to employ the lessons taught in the previous 29 posts. At that time, your humble servant promised to discuss the subjects of this article at a later date. It’s later.

Why the delay? Simply because I am an excessively compassionate sumbitch who wanted Beloved Customers who hadn’t already figured out plane blade sharpening on their own to become proficient at regular sharpening operations before worrying about something as bizarre as wacking hard steel blades with hard steel hammers. After all, in the words of Miss Benatar, it’s sometimes a heartbreaker.

But now with the blog teetering on the loose and crumbly edge of the rabbit hole that is the Japanese handplane, we have the choice of either gliding gracefully into its depths or clumsily tumbling down ass over tea kettle (oh my!). Alas, we can tarry balanced in this precarious position no longer.

With his article we will begin our graceful swan-like journey by studying a matched set of operations Beloved Customers need to master to become proficient at maintaining Japanese woodworking blades: one called “Uradashi,” and a related operation called “Uraoshi. If you already have these skills, accept my highest praise. The target audience for this post, however, is those that don’t have experience with uradashi and uraoshi as well as those that want to review and improve the skills they already have.

So spread your wings and fly, my brave cygnets!

Definitions

Beloved Customers should already be aware of the hollow-ground “uratsuki,” typical to Japanese chisel and plane blades. If not, please review the article at this link.

Uradashi is pronounced oo/rah/dah/she and written 浦出し in the Chinese characters as they are used in Japan. These characters translate directly to “push-out the ura.”

Uraoshi is pronounced oo/rah/oh/she and written 浦押しwhich translates directly to “press the ura.”

These two maintenance operations are performed to restore the blade’s cutting edge to useful condition when the thin land at the cutting edge is almost worn out. We will discuss the why and how below.

Long-term Strategy

Before we start pecking on steel, let’s consider our sharpening strategy.

Professional-grade blades are not only expensive, they are difficult to make, hard to find, and require an investment of time and effort from the user if they are to deliver high-performance results over many years. To minimize the required expenditure of time and effort, and to maximize the benefits achieved we need more than just technique, we need a maintenance strategy.

In previous posts in this series we have discussed multiple strategies, some physical, some psychological, and even a few supernatural ones. The following is one I strongly urge Beloved Customers to adopt:

  1. Get the ura in good fettle, and then;
  2. Avoid working the ura on anything but one’s finest-grit sharpening stone thereafter, (with the exception of uraoshi following uradashi, of course).

Simple, no?

The ura is formed by grinding the lamination of extra-hard high-carbon steel to form a hollow area. Because hard steel is time-consuming to abrade, a wise craftsman will work to keep the ura as deep as possible, and the flat lands surrounding the hollow-ground ura as narrow as possible, for as long as possible, thereby minimizing the area of hard steel that must be abraded with each sharpening.

But no matter how careful we are to preserve the ura, sharpening the bevel makes the blade incrementally shorter, so the day will come, at least in the case of plane blades, when the land at the ura immediately behind the cutting edge, called the “itoura,” (pronounced ee/toh/oo/rah, meaning “ thread ura” ) becomes as thin as a thread. Once it disappears, the blade will no longer function. This is the only drawback to the Japanese ura feature, and can only be solved by drastic methods.

Bending Hard Steel

The goal of uradashi is to cause the lamination of hard steel at the cutting edge to bend towards the ura so that when we subsequently abrade the bent portion of the ura the itoura land will be restored.

Now if you think about this for a second you will realize that trying to bend a thin plate of steel hardened to Rc65~66 without snapping it is a fool’s errand. In the case of Japanese blades it is possible to accomplish but only because of the thicker, supporting layer of soft low-carbon/no-carbon iron, called the “jigane,” to which the hard steel layer is laminated.

Your humble servant struggled at first with uradashi, in part because every explanation I read about the process in both English and Japanese was written by people who either didn’t really know what they were talking about, or were too lazy to explain it well. Some years, several broken blades, and much heartbreak later I finally figured it out. Better information is available nowadays, but there is still plenty of BS out there to shovel.

Despite the title of this section, the first key point to understand and always remember is that uradashi is not about using a hammer to bend the hard steel layer; Never ever ever never touch this steel with your hammer! I forbid it on pain of 20 lashes with a wet noodle.

Instead, the goal is to peck on the soft iron jigane layer of the laminated blade at the bevel, as described below, deforming it and causing it to expand.

The jigane would normally just deform away from the hammer’s impact point, but the hard steel hagane lamination on the ura side of the blade restrains it causing the entire blade at the cutting bevel to curve in the direction of the ura without snapping or cracking. This is another aspect of the blacksmith’s magic unique to the Japanese plane blade.

The second key point you need to grasp around the neck with both hands and dig your Jimmy Choos deep into is that it is indeed a fool’s errand to try to bend the soft iron lamination by the power of your mighty arm, Oh Lord of Thunder. No, we must be as clever as Loki.

So, how do we cleverly do this job, and what tools should we use?

The 60mm blade used in this example forged by Mr. Uchihashi Keisuke from Swedish K-120 steel. The brand name is “Keisaburo.” An excellent blade and still functional, but the itoura is getting a little skinny.

Tools

You will need the following tools to properly perform uradashi and uraoshi on a blade:

  1. A small hammer. Great force is neither necessary nor useful; Indeed you must be able to control this hammer very precisely, so the lighter it is the better. One with a pointy end like a funate or a Yamakichi, or a corner of the thin end of a Warrington hammer or tack hammer is ideal because it focuses maximum pressure on a small area, deforming the jigane efficiently. A small, pointy hammer also makes it easier to guide and control the hammer to ensure precise impacts. And control matters a lot because if you miss and strike the hard steel at the cutting edge it will be damaged and bitter tears will flow. Consider yourself duly warned, Oh Might Thor;
  2. An anvil of sorts. This can be any piece of steel with some mass and with a rounded-over corner. A piece of railroad track is great. I use the face of a small sledge-hammer clamped in my vise. A sharp corner is not good, so round a corner by grinding or filing and then smoothing it. A piece of thin postcard material glued to this rounded corner help keeps the blade from slipping;
  3. A small square or straightedge;
  4. A marking pen or scribe to mark the “target area” on the bevel;
  5. A rough diamond plate/stone or a mild-steel kanaban plate + carborundum powder;
  6. Parking pen or Dykem for coloring the ura’s lands;
  7. Regular sharpening tools (stones, water, etc.).
A small sledge hammer used as an anvil by clamping it in a vise with another clamp as a stabilizer.

Target Area Layout

Let’s begin by laying out the target area on the soft iron jigane at the blade’s bevel with a marking pen. Or you can scratch lines into the jigane with a metal scribe. This target area will indicate the area you will peck with your little hammer producing many small dents. You must not strike outside this target area even if tempted with donuts. Not even if they sparkly sprinkles on top.

The striking area marked with marking pen.

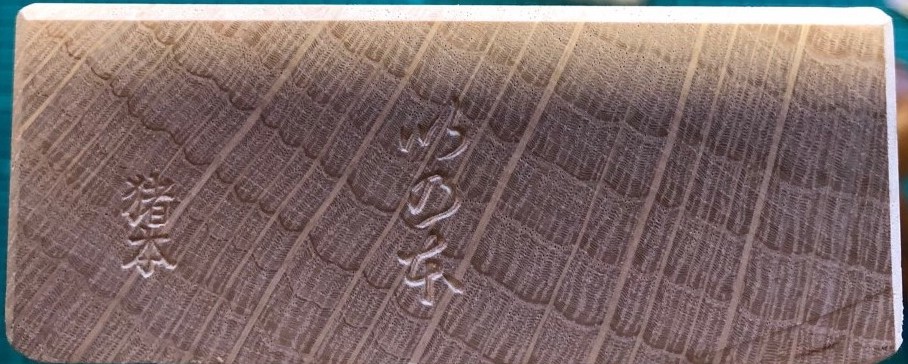
The dents you will make with your little hammer need to be limited to a band on the jigane parallel to the cutting edge and beginning 2~3mm from where the jigane lamination begins extending to the end of the jigane lamination at the blade’s back, in the case of plane blades, or the face where the brandname is engraved in the case of chisel blades.

Make a line with your scribe or marking pen the full width of the bevel at this distance from and parallel to the cutting edge. Everything above this line in the direction of the blade’s back, in the case of plane blades, or the face where the brandname is engraved in the case of chisels and knives, is the primary target area. Make sure you get this right.

The dents need to extend across the full width of the jigane layer, except where the corners (ears) have been ground to a bevel at the right and left end of the blade, so the right and left limits of the target area are delineated by the ears.

Although we need to tap the full width of the blade to avoid stress concentrations, there is nothing to be gained by trying to bend the far right and left corners of the blade, so we want to focus approximately 2/3rds of our hammer impacts and the resulting dents near the center 1/3 of the blade’s width. Mark the right and left limits of this central area on your blade with a marking pen or scribe.

The Grip

If you are right handed, hold the blade in your left hand with your index finger extended and pressed against the ura parallel with the cutting edge, and about 5~10mm away from it. Press down with your thumb on the blade’s back clamping the blade between your thumb and the side of your index finger. Your other fingers should support the blade from the ura side.

This photo shows how to hold the blade against the anvil.

Your index finger will be the fence that keeps the blade in proper alignment during the tapping-out process.

Next, we need to figure out how to align and move the blade on the anvil, as well as where to place hammer blows in relation to the blade and anvil.

This photo shows the grip without the blade in the way. Notice how the index finger is touching the anvil. The blade is shifted right and left using the index finger as a fence to keep blade and hammer in precise alignment and under tight control.

Manipulating the Blade on the Anvil

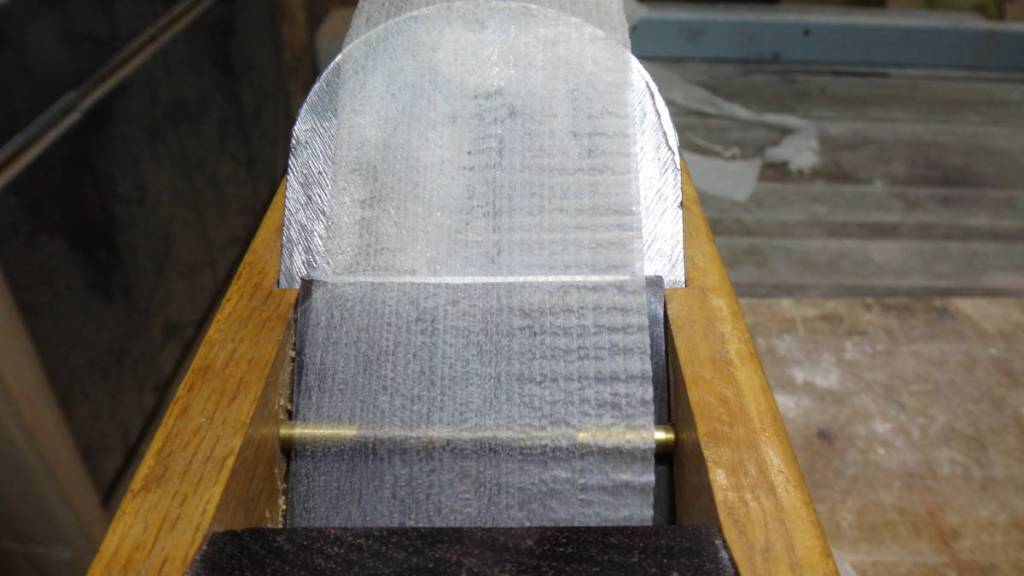
Place the blade’s ura on the rounded corner of your anvil. You may want to tape or glue a piece of thin cardboard, postcard, or manila file folder to the anvil’s corner, not so much as a cushion, but to help prevent the blade from slipping, but this is not mandatory.

Adjust the distance between your extended index finger and the cutting edge as necessary so your finger is touching the anvil stabilizing its position, and so you can slide the blade to the left and right indexing off your finger to keep the target area in proper alignment.

Next, while still in position facing your anvil and with hammer in hand, move the blade aside and tap the rounded corner of your anvil with your hammer lightly. Memorize this location and your position because every tap from now on must be aimed at this same exact spot on the anvil.

The Tap Dance

The time has come to begin the dance.

Reposition the blade on the anvil and use your little hammer to tap the soft jigane layer at the bevel (only the jigane!) in the target area you marked earlier making a row of small dents in it.

These small dents don’t need to be pretty or uniform. Be patient because you may need to make hundreds of pecks, each one quite precisely.

Here is the key point to understand: You want each little dent to cause the jigane to deform and expand in length and width a tiny bit, gradually, until a significant degree of deformation accumulates. The hard steel layer, however, will constrain the jigane layer from expanding, causing the blade to bend, and causing the hard steel layer to deflect and curve towards the ura, bending it without breaking it. It doesn’t seem possible at first, but I promise it will happen, so please be patient.

The trick then is to use the grip described above with your forefinger indexing the blade against the anvil while moving your hand, along with the blade, a tiny bit right or left with each strike, with the each point of impact firmly supported on the anvil, in-line with the hammer blow, thereby squishing the jigane between hammer and anvil. In this way, since the hammer is always aimed at the same exact point on the anvil, you don’t need to worry about realigning it with each blow, removing several difficult-to-control variables from the tap dance at once.

Remember, keep the hammer and anvil precisely aligned, and move the blade left and right, not the hammer. It helps to touch the inside of the elbow of the arm using the hammer against your side in a fixed location to help maintain a consistent hammer swing and distance. Until you have mastered consistency, speed is risky.

Another key point to understand is that, if the point of impact of your little hammer is not directly in-line with the point where the ura on the opposite side of the blade is touching the anvil, the force of the hammer’s impact will tend to cause the blade to jump and wiggle around instead of deforming the jigane. This wastes time and energy and makes it difficult to make precise taps.

Here’s a video of Eleanor Powell tapping away with great control, and with the aid of her faithful Fido. I don’t recommend including a benchdog in your tapping-out routine other than as a deterrent to any pernicious pixies lurking in your workshop eager to cause you to miss with your hammer and chip your blade. Evil pixies!

Here’s a video of Sarah Reich tap dancing with every strike landing precisely in the target area. I need to get a pair of shiny red lycra pants like her to go with my most excellent aluminum foil hat with the curly copper wires and red fringe. Do you think they would make my butt look huge?

Remember, force is neither necessary nor useful. The goals is to make many precisely aligned tiny taps producing many small deformations in the target area, with no impacts on the hard steel layer.

Dent Removal

We talked about “dents” above. If you are using a round-faced hammer, those dents will be little crescents. If you use a hammer with a tiny striking face on one end like a Yamakichi or Funate, that tiny face will dig into the metal making ugly little peck marks instead of pretty little crescents. I have used all varieties of hammers but prefer the ones with pointy ends because they impact face is small and, it seems to me, easier to control. Six of one half-dozen of the other.

But remember that we will abrade away all those dents/craters after a few sharpening sessions, so appearance is of zero importance.

The Goldilocks Itoura

The goal, of course, is to bend the blade at the ura land just behind the cutting edge enough to create a useful, flat ura. But how wide should the itoura be when the process is complete? Among plane connoisseurs a narrow itoura is, like a willowy super model, considered a thing of beauty. By narrow I mean some where around 0.50~1.0mm.

A narrow itoura does indeed look sexy, so much so that fashion-conscious plane blade blacksmiths make a skinny ura a point of pride. And, in fact, a bulimic itoura makes it easier and quicker to sharpen the blade because the square millimeters of hard steel one must abrade/polish is minimal compared to a wider itoura.

The downside to the super-skinny itoura is that it wears out sooner, making it high maintenance. Now, I’m not suggesting that if your plane blade has a slender itoura it will demand weekly spa visits, twice monthly trips on a G700 jet to the Vienna Opera, annual ski holidays in Verbier, and bi-annual boob jobs, but there is no doubt you will need to do the uradashi tap-dance more often. Shiny lycra pants are optional, but ooh sooo sexy! (シ)

On the other hand, a wider itoura of 3~4mm has some advantages too. It’s easier to fit the chipbreaker (uragane), and you don’t need to do uradashi/uraoshi as often. Much wider than this, however, and I find it can be difficult to get a screaming-sharp edge at times. Moderation in all things, I guess.

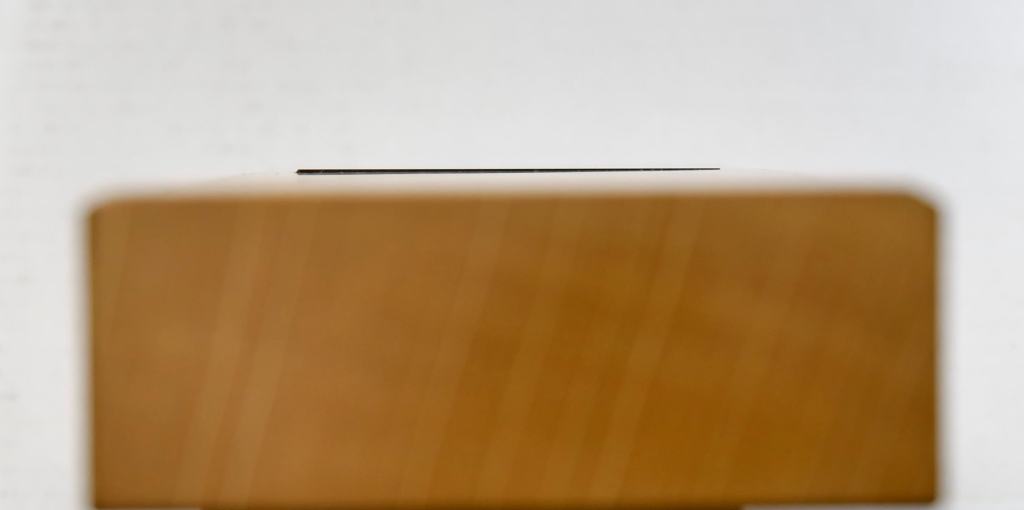
I don’t know how to describe when to stop tapping-out the ura to obtain a good width for your itorura because every blade is a little different, but after doing it a few times you will develop a sense of when enough is enough. However, to develop that sense you should make frequent checks on your tapping-out progress by placing your handy dandy straightedge or square right on the itoura parallel to the cutting edge and sighting between the blade and the straightedge/square with a strong light shining at the gap. You will be able to see the itoura gradually bulge upwards at the center. Even a little bit of a bulge will give you a useful itoura, so don’t get carried away.

Uraoshi

Once the tap dance is done, we need to grind down the ura to form a new itoura, a process called “ uraoshi” (ooh/rah/oh/she)

The traditional method is to use the mild steel kanaban lapping plate mentioned above, although any true lapping plate will work. One sprinkles a small amount of carborundum powder on the plate along with a little water, and works the ura side to side grinding down the bulged area to make a flat.

The problem with using lapping plates and carborundum powder is that not only is it a messy process, but unless you are careful to keep the right amount of wet grit on the plate, the results tend to be a tad irregular. I recommend using diamond plates or diamond stones (like those made by Naniwa) because they produce more consistent results quicker.

Whether you use a kanaban lapping plate or a diamond plate/stone, it is important to focus pressure on the thin area where you need the itoura to develop. Pressure anywhere else is not helpful, but only wears out the itoura prematurely.

Here is wisdom: When they first attempt uraoshi most people try to stabilize the blade by applying uniform pressure across the back of the blade. This seems to makes perfect sense, but it always results in grinding a nasty little trench in the ura where it touches the extreme edge of the kanaban or diamond plate. Remember, the uraoshi process tapped out a bit of metal right at the cutting edge, and mostly at its center. This is what you need to abrade, NOT the right and left lands of the ura, and certainly no more than 3~4mm from the cutting edge. So carefully focus the pressure you apply during uraoshi only on the thin area where you need to restore the uraoshi.

Some people like to apply a thin strip of paste wax, perhaps 3~4mm wide, on the edge of their kanaban or diamond plate to prevent it from digging ugly trenches in their beautiful and delicate side lands. Others like to apply a thin strip of mylar tape at the same place for the same reason. These techniques all work, but professional sharpeners don’t use them because they know how to apply pressure correctly.

A quick touch of the blade on the diamond plate shows where the black marking pen ink has been removed along with the highest spots on the bent itoura.

After the itoura has been restored (perfection is not necessary), polish the blade using your normal sharpening routine.

The restored itoura. Please notice the lack of trenches.
The bevel after working it on the diamond plate and stones. The remaining peck marks will disappear entirely after a few sharpening sessions. Notice how your unworthy servant has focused his abrasion efforts nearest the cutting edge. Good boy.

Chisel Blades Versus Plane Blades

Uraoshi and uradashi are operations typically, but not exclusively, performed on plane blades. About the only time chisels need to have uradashi performed is to restore the itoura after the blade receives major damage, like a big chip, a sad event all users of Japanese tools experience from time to time

There is a structural difference between plane blades and chisel blades Beloved Customer must understand when considering performing uradashi on a chisel blade.

Plane blades have a steel lamination that is more-or-less uniform in thickness because that’s all that’s necessary. Chisel blades, on the other hand, are subject to much higher bending stresses than plane blades, so to prevent yielding and failure, traditional chisels are forge-laminated with the steel lamination wrapped up the right and left sides of the blade, forming something akin to a structural steel U-channel, producing a higher moment of inertia, and therefore greater strength and rigidity,

Because of this additional strength, chisel blades are more difficult to bend at the right and left sides using uradashi techniques compared to plane blades. Indeed, they may break if you try.

Since you can hope to safely bend the steel lamination only in areas away from the more rigid sides, uradashi operations on narrow chisel blades will go as smoothly as throwing a cat through a screen door. I wouldn’t even try it on any chisel narrower than 18mm. Beloved Customers have been warned.

If you feel compelled to attempt uradashi on a chisel blade, my only advice is don’t peck within 3mm of the right and left sides.

With this article, our Sharpening Japanese Tools Series is complete (probably). Your humble servant hopes it has been informative. If Beloved Customer had the patience to read it all, and the clairvoyant ability needed to understand most of it, then you know a heck of a lot more on the subject of sharpening than I did when I started the journey. At least you have received some great ideas for sexy new additions to your simply mahvelous woodworking wardrobe!

YMHOS

If you have questions or would like to learn more about our tools, please click the “Pricelist” link here or at the top of the page and use the “Contact Us” form located immediately below.

Please share your insights and comments with everyone in the form located further below labeled “Leave a Reply.” We aren’t evil Google, fascist facebook, or thuggish Twitter and so won’t sell, share, or profitably “misplace” your information. If I lie may Iron Pixies pass gas in my cornflakes every morning.

Leave a comment

Other Relevant Articles

The Challenges of Professional-grade Japanese Chisels

The Forgotten Sumitsubo 忘れ物の墨壺

The Forgotten Sumitsubo

Remember me when I am gone away,
Gone far away into the silent land;
When you can no more hold me by the hand,
Nor I half turn to go yet turning stay …

Christina Rossetti

The tool pictured above is a very old “split-tail” variety of “sumitsubo” inkpot.

Versions of this tool are used in many trades worldwide to mark a straight layout line on material being worked. In the West, the line is coated in chalk to produce a “chalkline” when snapped, but in Japan a silk line wound on the spool near the tail of the tool is soaked in ink as it passes through the “pond” near the pointy front of the tool to produce the same sort of layout line when snapped.

This particular tool is unusual not only because it is one of the best-preserved examples of Japanese sumitsubo in existence, but also because it was discovered during restoration work on the 27m tall Nandaimon gate of Todaiji temple in Nara Japan in 1879. Since its discovery it has become famous as the so-called “Forgotten Sumitsubo.”

The reason for the unusual name, indeed the very reason it has survived in such a good state of preservation, is that Todaiji Temple’s Nandaimon gatehouse where this sumitsubo was found perched peacefully on top of a beam high in the structure that was built in the year 1199, so it is likely this sumitsubo had remained there undisturbed for around 680 years, a long time for a wooden tool.

Was it really forgotten? I like to think some carpenter left it there on purpose to look after his work. But that’s just me…

Related image
Front elevation of the Nandaimon gate of Todaiji temple, Nara, Japan. The deer of Nara are like pigeons. The stall to the left is selling “deer crackers” for tourists to feed them.
The eaves of Nandaimon Gate
Related image
Looking up into the structure of Todaiji’s Nandaimon Gatehouse
Cross-section sketch of Todaiji’s Nadaimon Gate

So, if you ever misplace a tool at a jobsite, instead of fretting about it, just imagine that someone, someday, will find it hidden inside the building 700 years later and reverently put it in a museum. Certainly more romantic than any other more likely option. (ツ)

YMHOS

If you have questions or would like to learn more about our tools, please click the “Pricelist” link here or at the top of the page and use the “Contact Us” form located immediately below.

Please share your insights and comments with everyone in the form located further below labeled “Leave a Reply.” We aren’t evil Google, fascist facebook, or thuggish Twitter and so won’t sell, share, or profitably “misplace” your information. If I lie may the two guardian kings above refuse to let me shower alone.

Leave a comment

Other Posts in Japanese Sumitsubo Inkpot Series

Japanese Handplanes Part 2 : Blade Adjustment

I warn you, if you bore me, I shall take my revenge.

J.R.R. Tolkein

Your most humble and obedient servant has received many requests over the years for explanations about how to setup, adjust, maintain and use Japanese planes. It’s a big subject, enough to fill volumes and volumes, and an important one to woodworkers, but I will try to explain in enough generality that new guys can follow, but with enough detail that professionals may glean something useful.

In this series we will discuss how to adjust a Japanese plane so it works well, how to tune it to increase performance, how to treat the body to reduce warpage and keep it looking good, how to deal with normal wear and tear, how to periodically tap out and dress the ura during sharpening, and of course how to use a Japanese plane.

This last subject is extremely simple but one many amateur users of Japanese planes and most users overseas get wrong. It happens so frequently that I am confident the improvement in Beloved Customer’s personal performance with Japanese planes will improve dramatically from this last subject alone.

The problem with Japanese planes is that, while they are simple tools, they are more sophisticated than appearances suggests. Dealing with these subtle details without properly understanding how they interact with each other leaves many as confused as a ball of yarn among a dozen big-eyed kittens, so to avoid having too many strands running all over the place, let’s start with the basics, namely how to adjust them. For purposes of this discussion, we will assume our plane is in good fettle to begin with.

Preparing the Body

Although this is not an issue in the case of the planes C&S Tools purveys, Beloved Customer will want to inspect their plane, and perhaps make a few modifications to the body before playing with the blade too much.

Striking Chamfer

When removing the blade or reducing the cutting edge’s projection through the mouth, we need to strike the body on the 90˚ intersection between the flat end of the plane’s body and its top surface. Accordingly we need to cut a chamfer at this corner to prevent damage to the body. How wide? 3~5mm is a good range. What angle? Cut the striking chamfer approximately square (90˚) to the long axis of the blade.

While you are at it, cut off the corners formed at the right and left sides of this chamfer.

This is a one-time operation.

Sole Chamfers

You also need to cut chamfers on the two edges at the right and left sides (long direction) of your plane’s sole. These chamfers have two purposes. First, to prevent the edges of the sole from chipping. Second, to make a small gap for your fingers to grip when lifting up the plane.

As the sole wears, Beloved Customers will need to be refresh the chamfers at the sole from time to time, so further explanation is necessary.

Some people like big honkin 45˚ chamfers at these locations. Your humble servant has even seen country bumpkins cut these wide chamfers and then carve unsightly grooves resembling a shark’s grin leading from the sides of the mouth to these chamfers for shavings to escape into. Codswallop!

Why is this a problem, you ask? Because the thinnest, weakest portion of any wooden plane’s body is the sidewalls right at the mouth. This is also where most warpage originates, so please don’t weaken it more than is absolutely necessary by cutting unnecessarily-wide chamfers or smiley faces.

In addition, wood removed from the sole by cutting overly-large chamfers reduces the bearing area of wood on the surface being planed accelerating wear on the sole. Keep these chamfers narrow at 2~4mm and a max angle measured from the sole of 25~29˚ More than this is unnecessary and possibly harmful.

A chamfer is not necessary at the trailing end of the sole so long as you have the self control to not strike the sole with your mallet.

Do not cut a chamfer at the leading edge of the sole as it will guide sawdust and shavings between the sole and the surface you are planing. Pas bien.

Top Chamfers

Apply a small chamfer on the front and side edges of the top surface, just enough to prevent chipping. 45˚ chamfers are fine, but a roundover (bozumen 坊主面 which translates to “Priest’s edge,” probably in reference to the bald head of Buddhist priests in Japan) is a friendlier, more elegant edge treatment, IMHO. Your choice.

Hammer or Mallet

In order to use a plane of any kind, one must remove the blade to sharpen it, and then re-install the blade and adjust its projection from the body’s mouth to produce a wood shaving of the desired thickness.

Like most wooden-bodied planes, one adjusts a Japanese plane by striking it with a hammer or mallet. To drive the blade further into the wooden body (called a “dai” 台 in Japanese) when installing the blade or when increasing the depth of cut, one taps the head of the blade down into the wooden body. Pretty straightforward. But like most things in life, there are both clever and stupid ways to get even simple jobs done. Let’s consider some of the clever ones, shall we?

You can use either a metallic hammer or a mallet made of wood, plastic or even rawhide to tap the blade or dai during these operations. They all work just fine, but there are long-term consequences to this selection you need to be aware of.

In Japan a steel hammer is traditionally used by carpenters to adjust planes. Without a doubt it’s convenient and effective, but there are some serious downsides to using a steel hammer you may not realize. Those include:

  1. A steel hammer always mushrooms the blade’s head, without exception;
  2. A steel hammer always dings the blade’s pretty face when adjusting the chipbreaker, and most critically;
  3. After many strikes, the focused, high impact forces steel hammers impart will often crack and even split the wooden body (dai). Ouch!

A deformed and ugly blade may not be a tragedy, but a split body is an expensive and time-wasting catastrophe, especially if you are a professional that needs his planes to keep cutting.

What did this brightly-polished plane blade do to deserve such barbaric abuse?
All the worst consequences of using a steel hammer on a plane are condensed in this one photo. Notice the mushroomed head of the plane which the owner has probably already ground down several times. We can’t see the blade’s face, but notice how the chipbreaker’s face is all dinged up. And I guarantee you the blade is even more damaged. And of course, the split dai. Tragic! What did this poor innocent little plane do to deserve such barbaric treatment?! And how much of this plane’s useful life did the owner squander?

There are Beloved Customers who will say: “But I’ve seen Japanese craftsmen using steel hammers to adjust their planes, so it can’t be wrong.” The first part of this observation may be true, but the last bit isn’t. The undeniable truth is that steel hammers have dinged, deformed, mushroomed and made hideous many innocent blades, and cracked and splintered many sinless dai entirely unnecessarily. Young carpenters often learn standard methods to fix their plane bodies once they crack them, with results that resemble some of Dr. Frankenstein’s experiments. But I assure you, not all Japanese craftsmen are so wasteful and inured to the suffering of their tools.

C&S Tool’s planes don’t deserve such violent abuse, so we recommend Beloved Customers use a wooden mallet to adjust them. Without exception. A plastic or rawhide mallet with a wooden handle will work just as well.

Removing the Blade and Chipbreaker

Both the blade and chipbreaker are removed by tapping the chamfered corner of the block behind the blade with a mallet. We discussed this chamfer above.

It is of course possible to loosen the blade by tapping on the flat tail end of the block, but there is a risk of striking the bottom edge and deforming or even chipping the sole. Best avoided altogether.

The physics work best when the mallet impacts are applied in a vector more or less parallel with the blade’s long axis.

The chipbreaker (uragane) must be removed before the blade, but you need to be careful to prevent two unfortunate things from occurring during this process. The first thing to avoid is the chipbreaker jumping out of the block in an uncontrolled manner providing Murphy the opportunity for gleeful mischief.

The second thing to avoid is the blade backing out of the body further/faster than the chipbreaker causing the chipbreaker to ride over the blade’s extreme cutting edge dulling it. This point is one newbies often overlook until they wonder why the pretty cutting edge they just sharpened is dinged even before they begin cutting.

How does one keep blade and chipbreaker under control? Your humble servant recommends pressing a forefinger onto the chipbreaker as shown the photo below and applying pressure upwards when removing it to encourage the chipbreaker to shift upwards ahead of the blade and in a controlled manner. Do the same on the face of the blade when its turn comes.

When removing the chipbreaker, apply pressure towards the blade and upwards with your index finger to monitor its movement and help maintain control. It is critical that the chipbreaker precedes the blade up and out of the dai to prevent the chipbreaker from contacting the sharp cutting edge dulling/damaging it.
While applying upward pressure with the index finger on the chipbreaker, tap the chamfer behind the blade to cause the chipbreaker to move up and out of the body’s mouth. BTW, please make it a habit to not strike the center of the chamfer, but instead alternate strikes between the right and left sides of the chamfer to ensure the body will provide long service.

Once the chipbreaker is loose, remove it and go back to tapping the body to loosen the blade further. Continue to apply light pressure to the blade’s face to better monitor the blade’s movement, and to prevent it from jumping out of the body.

The plane shown in this example is an extra-wide 80mm finish plane with a blade forged by Yokosaka Masato. This wider blade can finish-plane boards a little more efficiently than a 70mm (sunpachi) blade. The oasaebo steel rod which retains the chipbreaker in-use can be seen installed across the mouth. This is typically never removed over the life of the plane. In the center are the blade and the chipbreaker (uragane). A very nice blade hand-forged from Shirogami No.1 high-carbon steel. To the right is the mallet your humble servant uses for plane adjustments. This plane has seen extensive use but Beloved Customers and Gentle Readers will notice the head of the blade is not mushroomed, its pretty face as well as that of the chipbreaker are entirely free of unsightly dents and dings, and the body is free of the dents, cracks and splits that always result from using steel hammers. Also, despite your humble servant’s skin consistently causing Japanese white oak to turn a dirty grey color, the applied London Finish has prevented such “patinazation.”

Adjusting the Chipbreaker (Uragane)

The chipbreaker is a recent addition to the Japanese plane. In earlier centuries, they had only a single-blade. Unlike the Western Bailey-pattern planes that incorporate the chipbreaker into the linkage necessary to adjust the blade, hiraganna planes work just fine without the chipbreaker. Indeed the chipbreaker’s only role is to reduce tearout, so when tearout is not a concern, removing the chipbreaker will reduce the force necessary to motivate the plane and may even produce a smoother cut.

The chipbreaker of a new plane often needs to be fitted to the blade and body using files and stones, but that is a subject for a future article, so to keep things simple, we will assume the chipbreaker is in good shape and is happily wedded and bedded to its blade.

Gentle Reader is no doubt wondering how to adjust the chipbreaker with the large head of a mallet. The answer is to use the butt of the handle as shown in the photo below. Just hold the mallet’s handle in a fist with the head upward and bring the handle’s butt down on the chipbreaker. Easy as lalling off a dog, as my dear departed father would say. The connection between the mallet’s head and handle must be quite solid, of course. These mallets are easily made.

Using this technique, your plane blades will remain beautiful for their entire lifetime, and your dai will give you many years of reliable service. And although they only have tiny mouths with just a single, shiny, silver tooth, if you look carefully you may see their sharp little smiles.

Using the end of the mallet’s handle to adjust the chipbreaker. Notice that, once again, the index finger is used to monitor the chipbreaker’s movement and to keep it under careful control. To ensure the chipbreaker will do its job, its edge should ultimately be adjusted to be in very close proximity to the cutting edge (>0.002″ (0.05mm). This distance will vary with your plane and the wood being cut, and will require experimentation and fiddling to get right, but with practice, this process will become automatic and intuitive. Be careful to prevent the chipbreaker passing over the cutting edge as this may dull the blade causing Beloved Customer to say undignified things and Murphy to howl with glee.

To remove or back-out the chipbreaker, one strikes the dai as if loosening the blade, but with a finger on the chipbreaker to keep it from dragging over and perhaps dulling the blade’s cutting edge.

When adjusting the chipbreaker, sometimes the blade will shift position too, so a back and forth adjustment of blade-chipbreaker-blade is sometimes necessary. The tighter the fit of the blade and chipbreaker in the body, the more fiddling is required, so craftsmen such as joiners, sashimonoshi and cabinetmakers that routinely make fine, precise cuts and sharpen frequently tend to prefer thinner blades that fit into the body with less force and are easier to adjust than do carpenters who perform less refined work.

We will delve into this aspect of handplane setup in our journey ass over teakettle down the rabbit hole in a future post.

Adjusting the Blade

In order to take a clean, full-width cut, the blade must project from the mouth the appropriate amount, and evenly across its width. In other words, it must project neither too far, nor too little, and one corner of the blade must not project more than the opposite corner.

To evaluate the blade’s projection through the plane’s mouth, hold the plane upside down to a light-colored uniform background and look along the plane’s sole. The correct projection will be a thin line of uniform height across the width of the sole. If one side of the blade is projecting more than the opposite side, the blade is either skewed in the body, or the cutting edge is shaped skewed.

If the blade projecting through the body’s mouth is skewed, tap the shoulder of blade to the right or left with the mallet. If, however, a few taps fail to make the projection uniform, please check the blade for a skewed cutting edge, a problem frequently resulting from lack of attention when sharpening. Don’t worry, everyone does it occasionally, but careful attention is best. If cutting edge has become skewed through sharpening, it must be reshaped, not a difficult task difficult but a wasteful pain in the tuckus.

A word of caution: Continued and heavy lateral pounding on the blade’s shoulders will not improve the situation and may damage the wooden body.

Most planes allow a little bit of wiggle room for the blade, but sometimes, especially if the body shrinks in width due to reduced ambient humidity, the notches in the side of the mouth may need to be pared slightly deeper, or the blade ground narrower, to provide this right/left wiggle space. Be very careful, however, to avoid paring these grooves more than a thin shaving or two wider because, as mentioned above, removing wood at the grooves directly and irrevocably weakens the most tender point in the wooden body.

When looking down the sole to ascertain the blade’s projection, a black line will be visible above the sole as in this photo. A light-colored, uniform background is helpful for this evaluation. In this case, two adjustments are necessary. The first problem is that the blade is projecting too far. This is easily resolved by tapping the chamfer on the body behind the blade, something that, with practice, can be done while the plane is held upside-down in this position. The second problem that must be resolved is the skew evidenced by the blade’s projection being much greater on the left side of the photograph.
Adjusting a skewed blade by tapping the blade’s head laterally. If a few taps will not correct a skewed blade, it probably needs to be reshaped to correct a skew that developed during sharpening.
A much smaller, useful projection with just a tiny bit of residual skew to correct. When taking extremely fine finish cuts, the ability to determine the blade’s projection sometimes seems more clairvoyant than simply optical.

To test the projection of the blade, and ensure skew has been removed, hold a short, narrow piece of softwood such as pine or cedar in your hand and run it over the cutting edge, first on one side of the blade, then the opposite side, and finally the center, and observe the shavings (if any) produced. They will tell you the truth. Be careful not to shave your fingers unless they have become too fuzzy (ツ).

Even experienced craftsmen betimes become gutted, gobsmacked, and guragura upon discovering their otherwise perfect plane blade has become skewed and is projecting too far on one side to be adjusted for a good cut without resharpening it. Of course, the culprit is almost always pernicious pixies, but a wise Beloved Customer (inconceivable that there could be any other kind) will be careful to follow Petruchio’s example and tame the skew. And don’t forget to use a hardened stainless steel straightedge to check the blade for square when sharpening.

Striking the Body of the Plane

Your humble servant does not want to seem repetitious, but just so there is no confusion, I feel compelled to review a point or two before we end this discussion.

When backing out or removing the blade, make it a habit to strike the chamfered edge of the dai (body) behind the blade alternating between the right and left sides instead of dead-center.

Also, angle your strikes so they are more or less parallel to the long axis of the blade. With a little practice this will become second nature. The reason for this action is simply that it is both more effective and at the same time helps to keep the dai in one piece.

Please, avoid striking the flat tail end of the plane’s body flat-on, but instead the chamfered top edge behind the blade. Too many people who strike the flat end of the tail get carried away and end up damaging the sole.

If you examine your plane you will notice that there is actually very little wood holding the plane’s body together in the mouth area. Indeed the only continuous wood is at the sides, and it is only as thick as the distance between the bottom of the blade grooves and the exterior sides of the body. Not a lot of meat.

If we strike the body’s tail in the center, the body, being relatively unsupported in this area, must flex creating stresses, sometimes enough to crack it, sometimes even enough to split it. This sort of damage is commonly seen, but almost entirely avoidable because, if we strike the right and left extremes of chamfered edge behind the blade, forces will be directed through the stronger sides of the mouth opening reducing the chances of cracking and/or splitting the tail. You can feel and even hear the difference if you pay attention.

If you don’t care how your plane looks, and prefer replacing or fixing their wooden bodies instead of using them, by all means scrupulously disregard this suggestion, in which case you might want to get some extra bubble wrap to keep yourself entertained while the bolt and epoxy repair to your plane’s broken body cures.

Damage to the body or blades of C&S Tool’s planes caused by the incorrect use of metal hammers will void the tool’s warranty.

Plane Storage

When you purchase a plane, the blade is already installed in the body, although the cutting edge is usually recessed inside the mouth to protect it. The first step, therefore, is to remove the blade and examine it.

If you live in a low humidity area such as Nevada, Arizona or Southern Californication in the USA and purchase a plane from a part of the world with high-humidity at times, such as Japan, it is wise to remove the blade and set the plane aside in the area where it will spend most of its time for a few days to let the body become acclimatized, especially if you plan to use the plane in a space with central heating and cooling which may cause the wooden body to shrink in width.

If you plan to store your plane for several years in a dry climate, or in a space with central heating and cooling, we recommend you remove the blade and chipbreaker, oil them, wrap them in aluminum foil, and store the body and blades together but without being installed in the body to prevent the blades from restraining the body’s shrinkage causing it to crack. Just to be safe.

In the next post in this adventure we will discuss how to modify a Japanese plane’s body to make it easier to use.

And please remember the wise words of the Sage of Possum Lake: “Remember I’m pullin’ for ya–we’re all in this together.

YMHOS

The end view of an amazing nagadai plane body by Inomoto-san made from a piece of Japanese White Oak combining “Oimasa” grain orientation and the highly-desireable ripple grain. In oimasa orientation a high ratio of the dense, tough, light-colored medullary rays are intersecting the sole, making the sole wear slower. Using plain-sawn wood will direct even more of these rays to intersect the sole further reducing wear, but at the same time will increase the tendency of the sole to warp. On the other hand, orienting the annual rings vertically in a “quartersawn” configuration would maximize the body’s stability, but at the same time would cause the sole to wear quicker while making the body less resistant to cracking and splitting. The oimasa orientation shown in this photo is a compromise intended to reduce warping without reducing strength while improving the sole’s wear resistance. Ripple-grain white oak is not only more beautiful, it exposes more of the harder winter wood at the sole making it both more wear-resistant and more stable than ordinary white oak. A thing of beauty.

If you have questions or would like to learn more about our tools, please click the “Pricelist” link here or at the top of the page and use the “Contact Us” form located immediately below.

Please share your insights and comments with everyone in the form located further below labeled “Leave a Reply.” We aren’t evil Google, fascist facebook, or thuggish Twitter and so won’t sell, share, or profitably “misplace” your information. May my plane blade be forever skewed if I lie.

Leave a comment

Other Posts in the Japanese Handplane Series:

Four Habits and Three Mysteries

The carpenter dresses his plank, the tongue of his foreplane whistles its wild ascending lisp

Walt Whitman, “Song of Myself,” Leaves of Grass

The efficient woodworker must continue accurately cutting or shaving wood just as long as possible without stopping to sharpen his blades too frequently because time spent sharpening is time the primary job isn’t getting done. He must therefore develop unconscious habits to help him constantly monitor the condition of his blades and the quality of the work being performed.

The Four Habits

As the saying goes, “timing is everything.”

If Beloved Customer pays attention, you will discover there is a point where a woodworking tool’s blade still cuts, but its cutting performance begins to drop off. Sensing this transition point is critical because if you continue cutting wood much past it, three things are likely to result.

  1. The energy needed to motivate the blade will increase dramatically;
  2. The quality of the cut will quickly deteriorate;
  3. The time and stone expenditure necessary to resharpen the blade will increase.

That’s three variables that could be expressed in a pretty graph if one was so inclined, a graph that would have at least one inflection point. Which variable is most important to you?

Most woodworkers fail to consider these efficiency variables; They simply keep cutting away until the tool either becomes too difficult to motivate, or the results resemble canine cuisine, then stop work, curse the poor innocent tool (often hurting its feelings) and resharpen the blade. But the wise woodworker will focus on minimizing the total time and total cost required to maintain his tools even if it means he must pause work to resharpen his blade well before its performance deteriorates badly.

This sharpening inflection point will vary from blade to blade and job to job because every blade, every piece of wood and and every user are unique. Simply counting strokes is not enough. It takes attention and practice to sense when a blade has reached this point.

The following are some things you should pay attention to, and habits you should develop, to help you identify the sharpening inflection point.

Habit No.1: Sense Resistance Forces: As you use a tool such as a plane, chisel, or saw, tune your senses to detect the point at which the blade becomes more difficult to motivate. As the blade dulls, the force that you must apply to the tool to keep it cutting will gradually increase. This is especially noticeable when planing and sawing. Develop the habit of paying attention to this force so you can determine when it is time to resharpen.

Your humble servant recommends you regularly use an oilpot to ensure any increased resistance is actually due to a dulled blade and not just increased friction between the tool and the wood (or pixie predations (ツ)).

Habit No.2: Listen to the Music: Pay attention to the tool’s song. That’s right, turn off the radio and CD player, shush that jabbering little 3 year old rolling around in plane shavings under your bench, and listen to the music your blades make instead. If you do, you will notice that each tool sings its own song, one that varies with the wood, the cut, and the condition of the blade. Is the blade singing, lisping, or croaking as it chews wood? Is it a saw with a basso profundo voice, or a mortise chisel with vibrant tenor tones, or perhaps a soprano finishing plane singing a woody aria? A sharp blade makes a clearer, happier sound when cutting or shaving wood than a dull one does. Learn the bright song it sings when it’s sharp and the sad noise it makes when it’s dull, and all the tones in between. If you have ears to hear, it will tell you what kind of job it is doing and when the time has come to resharpen it.

Habit No.3: Eyeball Your Cuts: Watch the tool and the wood it has cut. Is your chisel cutting cleanly, or is it crushing the wood cells? A sharp chisel blade cuts cleaner than a dull one. You can feel and hear the difference. And you can see the difference in both the shavings or chips and the surfaces the tool leaves behind. Don’t be a wood butcher: develop the habit of frequently checking the quality of your cuts. It doesn’t take extra time, and your tools will wiggle with happiness at the attention you give their efforts.

Habit No. 4: Feel the Surface of the Wood: Is your plane shaving the wood cleanly, or are the surfaces it leaves behind rough with tearout? Develop the habit of running your fingertips along the path your plane just cut to sense surface quality. If you detect roughness or tearout, the plane may be out of adjustment, or more likely, the blade is becoming dull. Or maybe you need to skew the blade, change the direction of the cut, or moisten the wood’s surface with a rag dampened with planing fluid (I use industrial-grade busthead whiskey, or unicorn wee wee when I can get it).

Next, run your fingertips across the path of the cut your plane just made to detect ridges that may have been created by irregularities or chips in your blade’s cutting edge. Every one of those ridges indicates a small waste of your time and energy and a flaw created in the wood. Don’t forget that the tops of those ridges contain compressed cells (kigoroshi) that may swell back to their original position and become even more pronounced with time. These tasks are easily accomplished in passing with a few swipes of the fingertips along and across the wood between cuts without spending any extra time.

These techniques are not rocket surgery. They don’t take extra time. They can be applied to any cutting tool all the time. The key is to pay attention; To listen to one’s tools; To watch their work; To feel their work.

Let’s next shift our attention to three of the Mysteries of Woodworking, their potential impacts on mental health, and how to avoid unfortunate wardrobe decisions.

The Mystery of the Tilting Board

To discuss this Mystery, we will call on the services of my old buddy Richard W. (Woody) Woodward. You may remember him from a mystery story in a previous article. Yes, it was a near thing, but he has fully recovered from alcohol poisoning after chugging a 5th of tequila in an emotionally-charged bout of drama over a brittle blade.

Anyway, this mystery goes something like this. Woody is planing a board about the same width as his plane’s blade down to a specific thickness, but for some unfathomable reason, the board ends up thinner on one side of its width than the other. He checks the blade’s projection from the plane’s mouth, but it is absolutely uniform. In fact, to plane the board to the correct thickness he ends up having to tilt the blade to take less of a cut on one side of the board than the other.

Most everyone has experienced this curious and wasteful phenomenon, but because it is not consistent, many never solve the mystery of the tilting board, blaming it on Murphy’s ministrations or pixie perfidiousness. But never fear, because the solution is elementary, Dear Watson.

In Habit No.4 listed above, your humble servant mentioned residual “ridges.” Please be aware that these ridges are not only unsightly and may damage applied finishes later, but they can actually keep your plane from cutting shavings of uniform thickness. Think about it.

Let’s assume you are planing a board the same width as your plane blade, but the blade has a tiny chip near the right end of the blade that leaves behind a .0005″ high ridge on the board’s surface. With each subsequent cut using this same blade with the same defect the right side of the plane’s body and likewise its blade will be elevated above the board’s surface by .0005″, while the left hand side, which doesn’t have any ridges for the plane’s sole to ride on, is shaved the normal amount. The difference in the amount of wood shaved from the right and left sides with each individual cut is minute, of course, but it accumulates with each pass sure as eggses is eggses

Assuming you checked that the blade is projecting from the plane’s mouth the same distance across its entire width, with each pass the surface of the board becomes tilted, a little high on the right side and a little low on the left, so that instead of a flat surface square to the board’s sides, you have produced a flat surface that is thinner on the left side and thicker on the right. Muy malo, amigo.

If, while performing the checks listed above, you detect ridges on a freshly-planed surface, immediately check the blade’s cutting edge by running a fingernail along it’s width. Don’t worry, it won’t dull the blade unless you are also a bricklayer. Your nail will feel the catch and grab of defects too small for your eye to see. A few small ones may make no difference, but on the other hand, they might make a big difference.

Often these ridges will show up as lines of thicker wood in your plane shavings. You do occasionally examine your shavings, right?

With this, the Mystery of the Tilting Board, one that has driven many a woodworker to distraction, too often leading to regrettable fashion decisions involving stiff, canvas jackets with long sleeves connected to straps and buckles that fasten behind the barking woodworker’s back and even pass under the crotch (decidedly uncomfortable, I assure you), has been solved. Rest assured, only the Beloved Customers and Gentle Readers of the C&S Tools Blog can be certain of avoiding this undignified state of dress.

The Mystery of the Missing Plan

Here is another mystery of woodworking, one that especially vexes those tender souls new to the calorie-burning fun of dimensioning boards by hand.

Let’s say Woody needs to turn a bunch of twisty, banana-shaped boards into flat, square, precisely dimensioned and cleanly-surfaced drawer fronts to make 24 piston-fit drawers. Let’s also assume the wood he uses for each drawer-front is unique in both appearance and warpage. It’s a heck of a lot of wood to cut with no time to waste, so our erstwhile wood butcher gets out his trusty handplane, sharpens it up, adjusts the blade and chipbreaker, gives it a kiss for luck, and send wood shavings fly through the air with gleeful abandon!

But wait just one frikin minute! No matter how much Woody planes, he just can’t seem to make some of the surfaces flat, free of wind and the sides square to the faces. It’s like some kinda moving target! Indeed, eventually he is dismayed to discover some of the board’s edges are getting too thin. What to do, what to do!?

Drama queens like dear Woody typically begin interesting antics at this point, but not so our Beloved Customers who, unlike Woody, are stoic, laconic, intelligent and of course, sharply-dressed, and therefore pause their physical efforts to focus their mental powers on solving this mystery.

At this point the resident benchdog may perk up his ears, tucks in his tail and beetle away in fear of the smoke and humming sound emanating from BC’s ears; Master Benchcat arches his backs, hisses like a goose, and flees the workshop as if his tail is on fire; And the resident pixies frantically hide in the lumberpile to avoid being disrupted by the power they sense radiating from BC’s mighty brain!

Of course, the culprit is operator error.

Don’t forget to clean up the cat urine because it’s toxic to tools. Seriously.

Too few people really pay attention when using their tools, focusing like a badger after a squirrel on making as many chips or shavings as quickly as possible without a plan. For example, a failure common to many woodworkers is to start planing without first identifying and marking the high spots that must be cut down first, and then areas to be cut down next. In other words, they fail to plan the sequence of the work. The result is that time, steel and sweat is wasted cutting wood that didn’t need to be cut while ignoring wood that should have been cut first. And all for lack of a plan measured with a straightedge or dryline and marked on the board with a few strokes or circles of a lumber crayon or carpenter pencil

This mystery too has been known to increase profits of the mental health industry and even (heaven forfend!) fashion decisions involving poorly-tailored canvas jackets with crotch straps. Simply not to be borne!

Remember, when the goal is to make a board flat efficiently, always begin the job by identifying high spots and low spots and marking them. Then, always begin by planing down the high spots while avoiding the low spots. One mystery solved!

The Mystery of the Sounding Board

Lastly, we come to perhaps the most frustrating and least-understood of the Mysteries of Woodworking. Not to say there are no other mysteries, because there is always that most ancient of riddles that baffled even the enigmatic Sphinx, one which has tortured men since before Pharaoh wore papyrus nappies, namely that of honestly answering one’s wife when she asks him if her new pair of jeans makes her bottom look “simply humongous.” Sadly, this is one mystery upon which your humble servant is unable to shed light because even I “never could find no sign on a woman’s heart.”

But I digress. This Mystery is one that torments those badly befuddled souls like friend Woody who, lacking a plan to follow, eyes that see, hands that feel and ears that hear, unwisely assume the board they are planing is stable simply because it doesn’t walk away. Perhaps it is the malevolent influence of pernicious pixies that causes him to ignore that the downward deflection the pressure of the plane unavoidably induces in a warped, unevenly supported board, or in a board being planed on a flimsy or crooked workbench.

This unintentional, indeed unnoticed deflection too often causes the board to escape the cutting blade resulting in hills being raised and valleys remaining low where flat surfaces were required. Of course, this leaves the handplane bitterly dissatisfied.

But this waste of wood, steel, sweat and goodwill can be avoided because, even if the board isn’t rocking like Zepplin and dear Woody can’t feel the board deflecting away from his plane’s cutting edge, he could detect the change in his plane’s song when it is cutting an unsupported area of a board if he only listened because the piece of wood he is shaping is also a “sounding board.”

Think of all the money saved that Woody would otherwise spend on lithium, Prozac, and small hotel rooms with padded walls to ease his mental anguish if only he had the foresight to make a plan, train his hands and eyes to confirm his tool’s performance, and his ears to listen to what his plane tries to tell him.

Here is wisdom: The experienced professional will investigate each board, make a plan for his work, mark the plan on the wood, shim the board so it is evenly supported on a flat workbench surface, and sharpen his blade if necessary before making a single cut. Then instead of cutting randomly like a paintbrush-wielding modern monkey artiste, he will make each cut intentionally, purposefully, in accordance with his plan to make the work go as efficiently as possible.

He will also pay attention to the reaction of the wood and feedback from his tools during each cut. He will use the four habits discussed above, and maybe even a drop or two of unicorn wee wee to limit tearout if his budget allows.

If Beloved Customer doesn’t have a master to give you a dirty look or to box your ears when you impatiently err, you must train yourself. Slow down. Make a plan. Execute the plan. Pay attention, use your senses, and spend the time needed to evaluate progress against the plan. Consider carefully why the work is going well or why it is not.

This process will slow the work down at first, but over time it will sharpen your instincts, tune your senses, and help you develop good habits that eventually accelerate your work while improving the quality of the end product.

It will guide you along the path to becoming a master craftsman.

May the gods of handsaws smile upon you always.

Until we meet again, I have the honor to remain,

YMHOS

If you have questions or would like to learn more about our tools, please click the see the “Pricelist” link here or at the top of the page and use the “Contact Us” form located immediately below.

Please share your insights and comments with everyone in the form located further below labeled “Leave a Reply.” We aren’t evil Google, fascist facebook, or thuggish Twitter and so won’t sell, share, or profitably “misplace” your information. If I lie may my straight-jacket straps dig infected furrows into my crotch.