The Varieties of Japanese Chisels Part 17 – The Sokozarai Chisel

底さらえ鑿の一分五厘 : 日々の製作と研ぎの記録 ~木工 藤原次朗のブログ~

Quality is not an act, it is a habit.

Aristotle, 384–322 BC

In this article your humble servant will introduce a standard woodworking tool which I believe to be unique to Japan, although I have no doubt individual craftsmen around the world have produced versions of it for their own use for hundreds, maybe thousands, of years.

I will explain the jobs this tool is used for, how it is used, how to fettle it, and how to sharpen it. I will also share some first-hand business insight regarding why Japanese women make this tool essential to the joiner in both performing traditional joinery in Japan, as well as the sometimes challenging task of getting paid for his work.

Mr. Spock will also make a brief contribution to the discussion.

Definition & Pronunciation

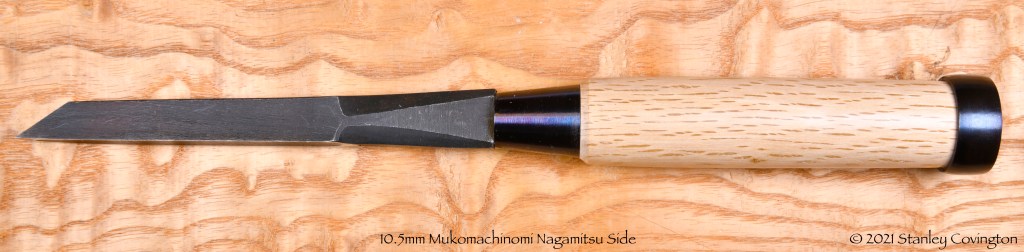
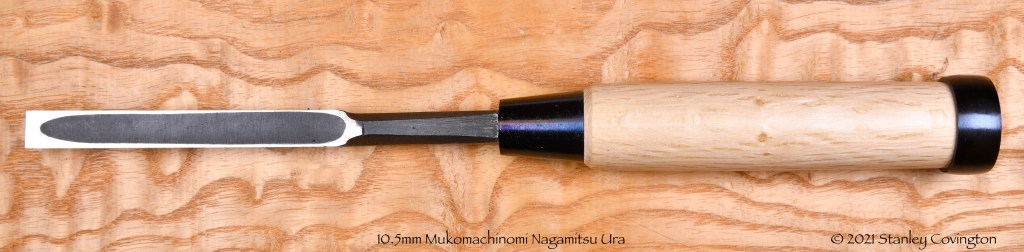
The Sokozarai Nomi (pronounced Soh/koh/zah/rahi noh/me and written 底浚い鑿 ) translates to “bottom-cleaning chisel.”

It is a simple tool consisting of a differentially-hardened steel shaft, with a small, short, sharp foot formed at the end, attached via a tang to a wooden handle, and secured by a conical ferrule.

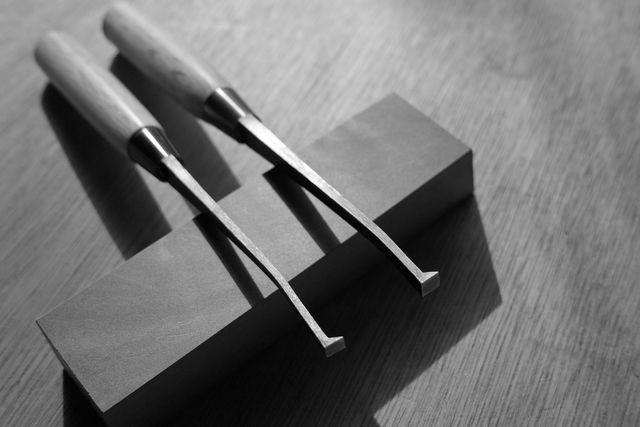
The Sokozarai chisel is one of three specialized chisels used specifically for joinery work. Cabinetmakers and furniture makers use it too. Two other specialty joiner chisels are the “Mori Nomi,” which translates to “harpoon chisel,” and “Kama nomi,” which translates to “sickle chisel.” Perhaps we will discuss these in a future article.

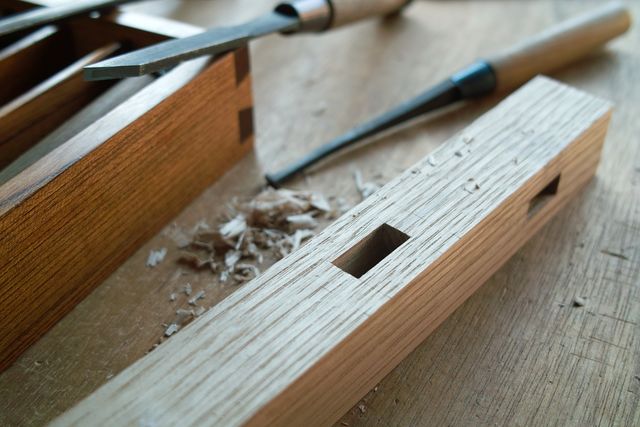
A larger version of the sokozarai chisel is used for cleaning the bottom of the larger mortises commonly cut in timber frames.

The Role of the Sokozarai Chisel

The sokozarai chisel is used for two purposes. The first is loosening and removing chips from inside mortises. One simply hooks the offending waste with the chisel’s toe and flips it out. 

The second role of the sokozarai chisel is to flatten and even plane mortise bottoms. When set up correctly, it will cut shavings from the bottom of mortises cut in softwood planing them flat and clean.

Indeed, in advanced joinery work, a skillful joiner will plan and execute his joints such that the material left remaining at the bottom of a mortise cut into a stile intended to receive the tenon from a rail is less than 1mm thick, thin enough to allow light to pass through. The ability to routinely cut joints like this, without cutting all the way through, is a mandatory skill of the professional joiner.

I suspect that about now Gentle Reader is forming his elegant eyebrow into an artistic and skeptical arc as he ponders why one would go to the trouble of making clean and pretty the bottom of a hole upon which no one will ever gaze, leaving a paper-thin wall of uniform thickness at the bottom admitting light into a space no one will ever see. Can there possibly be method to this madness? Welcome to traditional Japanese joinery.

Consider that a rough, bumpy floor in a mortise prevents the tenon from seating the last few millimeters, but by planing it flat with a sokozarai chisel, those last few millimeters can be converted to useful space to house maximum-length tenons ensuring maximum resistance to withdrawal and bending forces resulting in strong, slender but durable joinery without adding extra weight. This is a big deal in the case of the slim, flexible frame members found in operable traditional Japanese joinery such as shoji, itado and tsuitate screens, joinery that must satisfy the severe eye and meet the high standards of fit and finish expected by many Japanese women, the most unforgiving consumers in the world.

I don’t know when this detail entered common use, but as Gentle Reader is no doubt aware, the older and more common type of mortise and tenon joint found in joinery worldwide is the through single or double tenon with the tenon’s end exposed at the rail where it is often wedged, a technique that is undoubtedly stronger.

On the other hand, the fully-housed tenon made easier to fabricate using the sokozarai chisel has two advantages over its older, less-refined brother the through-wedged tenon. First, it simply looks better and more elegant when new, and is therefore better able to survive the strict final inspection by the lady of the house thereby more reliably earning the reward of final payment. Hallelujah, pass the bottle brother!

Second, it simply looks better to the eye and feels better in the hand as time goes by because, as the stile shrinks during drier months, the once flush end of the through-tenon won’t project past the surface of the stile creating an unslightly, uncomfortable bump, and during the wetter months it won’t recede back into the mortise leaving an indentation in the stile and an uneven appearance.

These details are not based on esoteric imaginings about quality, but are make or break business decisions essential to avoiding complaints from the same unforgiving Japanese women. And of course, in a country where advertising and representations are routinely and intentionally false (sad but true), word of mouth among sharp-eyed quick-tongued women is critical to a craftsman’s success. Please note that I say this as someone who has has been married to a Japanese woman for 45 years, has lived and worked in Japan for over 32 years, and during those years has had plenty of direct commercial experience working with Japanese women as both customers and team members.

Next time we are sharing a cup of hot cocoa around the evening fire, remind me to tell you the story about two stressful days spent inspecting Thassos marble slabs for a new building’s lobby walls in the company of three Japanese women: an Architect, a Quantity Surveyor, and a Project Manager. All the story lacks is a Rabbi and a Priest to make a gut-splitting joke (ツ)。

A 4.5mm differentially-hardened sokozarai chisel with red oak handle

Using the Sokozarai Chisel

To use the Sokozarai chisel, and assuming you are right-handed, hold the handle in a fist in your right hand with the blade projecting from the bottom of the fist. Lay the back of the fingers of your left hand on top of and crosswise to the long direction of the mortise. Insert the blade of the chisel into the previously cut mortise hole and press the back of the blade’s neck (opposite the cutting edge of the foot) against the outside edge of your forefinger. Then pinch the blade’s neck between your thumb and forefinger. This is the grip.

To remove loose waste, insert the sokozarai chisel into the mortise hole and move it around gathering chips on the chisel’s toe. Then pull the chisel up and out of the mortise quickly to pop chips out.

To cut loose chips still attached in the mortise hole, press the chisel’s foot to the bottom, move it forward until it snags on irregularities, then rotate the handle towards your body using the forefinger of your left hand as a fulcrum to lever waste out.

To shave the bottom, simply move both hands forward with the bottom of the foot parallel with the intended bottom of the mortise. Developing a sense of the chisel’s action will take practice. Shining a flashlight into the mortise frequently at first will help develop these senses.

To check the depth of the mortise, a specialist kamakebiki, essentially a small router plane, is ideal. But you can make a simple depth gauge by sharpening the edges of the head of a nail or drywall screw, driving or screwing it into a small block of wood, then cutting off and filing the point to avoid ouchies. Using this, you will be able to detect bumps and irregularities remaining on the bottom. Indeed, it too can be used to shave the bottom, but it won’t clean all the way into corners unless you grind the head square or rectangular.

For advanced work, make a slightly undersized test stub tenon with shoulders from hardwood the depth of the finished mortise, and anoint the end with cheap dark lipstick or Vaseline with black oil pigment mixed in. High spots remaining at the bottom of the mortise will be highlighted. With practice, you won’t need this test tenon, but you will still definitely need a sokozarai that is sharp enough to plane the bottom.

Next, let’s consider how to prepare a new sokozarai chisel.

Fettling the Sokozarai Chisel

Unlike most other Japanese chisels, the Sokozari chisel is not laminated construction, but is formed of one piece of differentially-hardened high-carbon steel. Differentially-hardened in this case means that the foot and lower 1/4 of the leg’s length are hardest, becoming progressively softer going up the leg until it is dead soft at the tang. This means the cutting blade, (what your humble servant calls the “foot”) of this chisel will become sharp and stay sharp, but the neck is left softer so it will not snap off, and can even be bent a little to adjust the angle of the foot if necessary.

Low-quality sokozarai have both soft shafts and feet.

Flatten and Polish the Foot’s Bottom

The bottom of the foot needs to be flat and polished, but because of this surface’s narrow width and short length, it can be challenging to accomplish without rounding it over or skewing it.

It often helps to grind a hollow into the foot’s bottom the thickness of a nat’s eyebrow to help speed up the flattening and polishing process. If you use a grinder, be very careful to avoid overheating. It should take no more than one or two brief touches to the wheel.

When flattening and polishing the foot’s bottom surface on diamond plates and stones, it also helps to make a guide block. Cut a slot in the side of a small block of hardwood to house the bent shaft with the bottom of the foot located flush with the block’s bottom surface. Lock the shaft into the guide block with a wedge or a clamp to stabilize it. 

The jig in the photos above was made by a Most Beloved Customer who does exceptional high-quality joinery work.

An alternate sharpening jig can made by cutting a crosswise groove, similar to the one shown in the photo below, into the top surface of a stick of scrap wood, perhaps 50mm wide, 200mm long and 20mm thick. The bottom surface of the foot should be almost, but not quite flush with the stick’s edge, projecting the thickness of a piece of paper. Secure this jig to your workbench with a clamp or in a vise, press down on the blade with one hand, and move a sharpening stone along the side of the jig over the foot.

This guide block rides directly on the stone as you flatten and polish the foot’s bottom. Don’t let the foot’s bottom get skewed or rounded over. Work slowly and check constantly. This is a one-time operation.

Once the bottom is flat and polished, you should only need to polish the bottom of the foot on your finishing stone.

Adjust and Polish the Cutting Edge’s Bevel

The bottom of the foot is now flat and pretty, but the angle of the cutting edge is usually still far too steep, and the bevel’s surface is rough. This must be corrected.

Modify the cutting edge’s angle by grinding the bevel on a diamond plate. The final angle you chose for the cutting edge will depend on your preferences and the wood you will be cutting. Steeper angles are more durable. Shallower angles cut better, but dull quicker. 20~24 degrees is usually OK. When I was a young man, I knew professionals who took the bevel angle down to 15 degrees. 

You may want to make another narrower guide-block clamping 90 degrees across the the shaft to help hold/stabilize the blade during this operation. When you have adjusted the angle to where you want it to be, then polish it on your sharpening stones. Be careful to avoid skewing it or rounding it over. You want sharp, clean corners.

To routinely sharpen/polish the bevel, hold the chisel in one hand with the bevel face-down on the long side of your sharpening stone. While stabilizing the blade and applying pressure on the bottom of the foot with a fingertip, move the sokozarai chisel back and forth in small strokes being careful to avoid rocking it and rounding it over.

Adjust the Foot’s Length

This step is unnecessary for most applications, but I will touch on it just to be thorough.

The length of the foot is fine as-is for most furniture mortises, but for very tiny mortises as in screens, light fixtures, and small casework, the foot may need to be made shorter. It is not unusual for a tategushi or sashimonoshi to own multiple sokozarai nomi with feet and shafts of different widths and lengths and bevel angles to clean the mortises he makes the most.

Please note that the mortise holes for kumiko members installed in shoji screen and most other types of latticework are shallow and do not require the strength of long tenons, so the mortises are usually cut using mori nomi (harpoon chisels) with a hook on the end to pull out waste quickly, and the bottoms are left rougher.

Conclusion

Beloved Customers that have purchased our chisels, and diligent Gentle Readers that have read this blog, are aware that your humble servant insists our chisels not be used to scrape or lever waste out of joints. The reasons for this are my desire for Beloved Customer’s most excellent chisels to remain as sharp as possible as long as possible, and to avoid chipping the cutting edge. They are, after all, refined cutting tools with sensitive feelings, neither thuggish prybars nor pot-metal screwdrivers.

The Sokozarai chisel was invented specifically as a partner to chisels used for cutting the clean mortises essential to Japanese joinery, and to protect the super-sharp cutting edges of those chisels from damage resulting from barbaric treatment. I encourage you to level-up your joinery skills by procuring and using one. You will be glad you did.

And so I wave farewell until the evening we share a cup of hot cocoa around the irori fire. In the meantime, I am humbly grateful for the honor to remain,

YMHOS

Adieu for now, Gentle Reader!

If you have questions or would like to learn more about our tools, please click the “Pricelist” link here or at the top of the page and use the “Contact Us” form located immediately below.

Please share your insights and comments with everyone by using the form located further below labeled “Leave a Reply.” We aren’t evil Google, fascist facebook, or thuggish Twitter and so won’t sell, share, or profitably “misplace” your information. If I lie may my sokozarai chisels get athletes feet!

The Care and Feeding of the Wild Mortise Chisel – Part 2

By concentrating on precision, one arrives at technique, but by concentrating on technique one does not arrive at precision.

Bruno Walter

As mentioned in the previous post in this series, in Japan the mortise chisel is called the “Joiner’s Chisel,” because it is specifically designed for precisely and quickly cutting the many small mortises craftsmen in the joiners trade use in making doors, windows, shoji, screens, furniture and cabinetry.

Why must it cut mortises quickly? Simply because a few seconds of time wasted on each of many mortises cut during the workday by an uncooperative chisel will quickly add up to hours of lost productivity.

Why must it cut mortises precisely? Simply because defects hidden inside mortises with poor internal tolerances tend to accumulate and too often turn what would otherwise be a well-made piece of furniture or joinery into a rickety old Chinese lawnchair.

In this post we will discuss what to look for in a mortise chisel, and how to correct some typical problems. Most of the concepts discussed in this post are applicable to oiirenomi and atsunomi used for cutting mortises as well, although such chisels lack the same shape advantages.

Klipstein’s Law of Thermodynamics

Just in case Gentle Reader didn’t notice, your humble servant has strong opinions about mortise chisels, partly because I was trained by no-nonsense professionals to routinely cut hundreds of mortises in a single sitting, and partly because bitter experience has taught me the truth that sloppy mortises result in both sloppy products and crushing headaches. Nothing like a bunch of tiny errors when making a series of latticework doors to painfully confirm the validity of Klipstein’s Law of Thermodynamics: “Tolerances inevitably accumulate unidirectionally toward maximum difficulty to assemble.”

Because of this hard-earned experience we have given our blacksmiths specific dimensional tolerance criteria for the mortise chisels they make for us. My hearing isn’t what it once was, so I’m not sure what they are muttering in response to my pointed insistence, but it sounds something like “frikin prissy pink princess expects too much of a damned chisel.”

Your most humble and obedient servant, however, is much too dignified and polite to respond in so many words, but at such times I think they are stubborn old farts that have never used a mortise chisel. In any case, those who use our mortise chisels benefit from the princess impulse in your humble servant.

What to Look For

Mortise chisels are used routinely by only the most skilled craftsmen. Despite their simple appearance, mortise chisels are required to cut to tighter tolerances than other type of chisel, but because our’s are handmade in the traditional manner without the use of CNC machinery, and because perfection is unattainable in mortal endeavors, they are seldom perfect when new, so Beloved Customer should plan on tuning your mortise chisels before doing serious high-volume work.

Indeed, it has long been standard practice among Japanese joiners to modify their chisels and planes to their preferences, and correcting the dimensional imperfections of mortise chisels is at the top of the list, not because they tend to have more imperfections than other chisels, but because more precise work is expected of them.

If you recall some of the mortises you have cut before now you may have noticed that despite your best efforts and forehead-splitting concentration, the sides ended up out-of-square with the workpiece’s top surface, or the side walls were raggedly gouged, or even undercut. While of course unacceptable, these defects are not unusual, and may be due to perfidious pixies, your technique, or perhaps a combination of both, but my money’s on the chisel being the culprit.

If you’re experiencing such problems, please examine your mortise chisel. If it does not meet the ideal standards in the list below (and it won’t), you should make corrections. You’ll be glad you did. There is a link to a document below that illustrates the ideal mortise chisel as well as some typical problems that may prove useful.

  1. The plane formed by the flat lands surrounding the hollow-ground ura depression should be truly flat and without twist over its entire length from cutting edge to shoulder.
  2. The blade’s width should be consistent over its entire length. Alternately, it is acceptable if the blade’s width becomes just slightly and gradually narrower moving from cutting edge to neck. But not too much. On the other hand, a blade that widens towards the neck is an abomination to be avoided like the spotty-bottom footpads at the California Franchise Tax Board.
  3. The blade’s sides should be flat, planar, free of twist, square to the ura, and square to the blade’s top face. Accordingly, a cross-section taken anywhere across the width of the blade should be rectangular anywhere along its length, with all corners 90°. Picky details, but they can make a big difference in the quality of the finished mortise.
  4. The top face (surface where the brand is stamped) need not be planar along its length, but it must be square to the sides (and therefore parallel with the ura) at all points along the blade’s length.

Make no mistake, this is a tall order in a hand-forged tool that has never seen a milling machine, planer, or CNC grinder. Few handmade mortise chisels can meet these standards when new, but these details can make all the difference.

Let’s begin the examination part of this job. You will need a 6~12″ straightedge, a small precision square like the Matsui Precision products we carry, and a precision caliper, whether vernier, dial or digital it matters not.

Record Your Observations

Too often the number of dimensional irregularities that require attention are complicated enough to create confusion. This can result in even experienced people making one irregularity worse, or even generating new problems, while attempting to resolve the initial irregularity, like inadvertently creating more knots while trying to untangle a snarled mess of string.

To avoid confusion, I recommend  you make a simple orthogonal hand sketch of your chisel to record irregularities. This sketch should show at least four views of the blade including left and right sides, its face (opposite the hollow-ground ura), and an end view looking towards the cutting edge’s bevel. You may also need to make a few cross-section sketches

Record the results of your examination as annotations and red lines on these sketches to help you plan and execute the work of correcting any problems you may find. There are always a few, and you will need to keep track of each one, and its relationship with the others.

Examine and True the Ura

The first step is to check the ura, the polished lands (flat surfaces) surrounding the hollow-ground depression on the chisel’s back. These must be flat and in the same plane (coplanar). This detail is very important.

A straightedge is good enough for a quick examination, but a more reliable method is to use a granite surface plate. A less expensive and handier option is a simple piece of ⅜” or thicker float glass. 

To use a glass surface plate, apply marking pen ink or Dykem to the ura’s lands. Smear a tiny amount of finishing stone mud around on the glass plate. With the entire blade resting on the plate, and finger pressure straight down in the middle of the blade’s face, move it in a oval pattern through the sharpening stone mud. The ink or Dykem at the high spots will be rubbed off, but will remain at the low spots. This will show you where and how much material must be removed to flatten the ura’s lands

Then, true the ura using a diamond plate, diamond stone, sharpening stones, and/or the glass surface plate. This step is not so important in the case of other types of chisels, but a mortise chisel must have a reasonably flat ura. Without a planar ura, the rest of your examination may be inaccurate. The article at this LINK contains a more detailed discussion with pretty pictures.

Do this work carefully, for if you heavy-handedly remove too much steel, the useful life of the chisel will be significantly reduced. Note that this is a one-time operation in the life of most chisels.

Examine the Blade’s Width and Taper

Next, check the width of your mortise chisel measured across the ura using a caliper, micrometer or other reliable gauge. Relative width is what you need to check, not absolute inches or millimeters, unless you expect your chisel to cut precisely-dimensioned mortises, something that is seldom necessary in the real world.

Measure the blade’s width at five or six locations along the cutting edge, in the middle, and near the neck before it narrows. Make a sketch of the blade and annotate these dimensions on it

Use the glass surface plate at this time to check the sides for flatness. The black oxide surface skin will be worn away by the sharpening stone mud marking the high points, but don’t let the change in cosmetic appearance bother you.

Ideally, the blade will be the same width its full length. However, it is usually acceptable for the blade to be slightly wider at the cutting edge than near the shoulder. But if it is wider at the shoulder than the cutting end, it will bind in the cut, tend to split the mortise, and the finished mortise will be skiwampus. This must be remedied by grinding the blade on diamond plates and polishing on sharpening stones.

But don’t do anything yet since there are more details you need to examine first. Just make a note on your little sketch.

Examine the Blade’s Sides

Straight Sides

Use a good straight-edge to check both of the blade’s sides. They must be straight. If they curve in or out it will be difficult to convince it to cut a clean straight mortise. If the blade is banana-shaped, it can’t cut a straight mortise anymore than a politician can tell the truth while his heart beats (it’s rumored that some have hearts).

If the blade’s sides are not straight, they must be corrected by carefully grinding and polishing them. But hold your horses there Hoss, don’t do anything drastic yet, just make a note on your little drawing: there’s still more to check first.

Flat Sides

Next check the sides of the blade across their width. They must be either flat (best) or hollow ground (acceptable). But if they bulge outwards the blade will bind and can never cut a clean precise mortise, so corrections are absolutely necessary.

Mark any irregularities on your sketch.

Right Angled Sides

Sides angled with respect to the ura Slightly less than 90˚ may be acceptable (but less than ideal) on condition that both sides are the same angle. If, however, one side is 90˚, for instance, and the opposite side measures 80˚, well that is not good and may require correction.

The sides of the blade should be at right angles (90°) to the ura lands. If not, the chisel will skew left or right during each cut, a common problem with most chisels. Beloved Customer has no doubt experienced this.

For now, just mark any irregularities on your sketch.

Examine the Blade’s Face

Next, examine the chisel’s face (the surface with the brand stamped into it).

This oft-ignored surface need not be straight along its length. It doesn’t even need to be flat across its width. Indeed, it can even be be hollow or bulging to a minor degree without causing trouble. But you do need to pay attention to two key details.

First, if it is hollow or bulging, the curvature of the bulge or hollow across the blade’s width must be uniform. If not, you should grind it to be more uniform.

The second thing to check for is that a line between and touching the corners where the surface of the face meets the blade’s sides must be parallel with the ura. In other words, if you draw a line 90˚ across the width of the face, that line should be parallel with the ura. If it isn’t corrections are necessary.

Why does the relationship of these two surfaces with each other matter? Two reasons. First, if they are not properly aligned, and assuming the ura is flat, it means the blade is thicker in cross-section at either the right side or left side. There is a strong tendency for the bevel to become skewed during sharpening, with the result that the cutting edge is not square to the center line of the blade’s long axis.

Of course a skewed cutting edge will push the blade to the right or left in the cut, and cannot cut a flat bottom, a serious defect in advanced mortise and tenon work. This deformity can be compensated for with careful attention during sharpening, but you should not have to work so hard. Better to correct the problem now and get it over with once and for all, I promise.

The second and most important problem created by a skewed bevel is that it will cause the blade to dive to the right or left when cutting a mortise ruining precision and gouging the mortise’s walls. This is different from the problem noted in the previous paragraph, although it may seem to be the same. It’s a serious defect in a mortise chisel, one that causes the most self-doubt among craftsmen.

Even the very best blacksmiths frequently fail to give this surface proper attention. You are hereby warned: Do not underestimate the importance your chisel’s face.

Examine the Blade’s Corners

Finally, examine the two lines formed by the 90° intersection of the sides and the ura. Are they clean and sharp, or are they ragged, radiused or chamfered? These corner edges serve an important function in dimensioning and shaving the mortise’s side walls. They must be clean and almost acute enough to cut your fingers, but please don’t.

If they are not up to snuff you can make corrections now or a little bit at a time during subsequent sharpening sessions. The important thing is to be aware of any defects so you can make corrections, so make a note on your little sketch.

The Plan

You should now have a sketch describing those areas that need to be corrected. Use it to make a plan. A rough sketch showing how a mortise should should be and common problems is linked to below.

Beloved Customer should keep two important factors in mind in mind when planning and executing corrections to mortise chisels.

First, you should strive to achieve the corrections with the minimum expenditure of time, effort and stone/diamond plate, and while wasting the minimum amount of steel. I am not saying work hard or work fast, but rather to work efficiently.

Second, you should work carefully to avoid creating new problems while attempting to fix existing ones. This is why you need a plan, one that will vary a little with each chisel, to guide you in working efficiently and carefully. Remember, double work takes more than twice the effort and time, and often wastes a lot more expensive steel.

Correction Guidelines

The procedures your humble servant recommends for correcting a mortise chisel (or any chisel used for cutting mortises), based of course on the sketch you prepared, are as follows:

  1. As mentioned above, the first step is to true the ura so it is planar. It need not be perfect at first; Close is good.
  2. After the ura is more-or less planar, grind the right and left side of the blade, whichever is in better shape, straight along its length, flat (or sightly hollow) across its width, and perpendicular to the planar ura. If the angle between the ura and the sides is less than 90°, that’s OK too, so long as the angle of both right and left sides to the ura is the same. An angle here greater than 90° will cause problems and must be corrected. Diamond plates or diamond stones work well for these corrections. Electrical grinders and sanders can be used, but there is a real risk of ruining the temper if you allow the steel to get hotter than is comfortable to touch with your bare finger (seriously), so great caution is necessary. This means working slow and using lots of water.
  3. When one side of the blade is true (perfection is not necessary), grind the opposite side straight along its length, flat (or sightly hollow) across its width, and perpendicular to the planar ura using diamond plates (if necessary). It will be at the same angle with the respect to the ura as the opposite side, of course, because the plane of the ura is the surface against which all others should be measured. Here is where more caution is necessary: pay close attention when grinding this side to make it parallel with the opposite side. If the blade width measured across the ura is slightly wider at the cutting edge than the neck, that’s fine too.. On the other hand, a blade narrower at the cutting edge than near the shoulders is useless for cutting mortises and must be corrected.
  4. Finally, grind the face of the blade (the upper surface with the brand) so that any point along its length is parallel with the ura. It need not be straight or even perfectly flat over its entire length, just parallel with the ura to guide the chisel straight in the cut.

Beloved Customer has no doubt observed that it is entirely possible to succeed in executing one of the corrections in this list while making another worse. Please pay attention. This is why you made the drawing and a plan.

At the conclusion of the steps described in this article, your mortise chisel should now have an ura with all the lands surrounding the hollow-ground swamp forming a single flat plane.

Blade Color

The process of truing the blade’s face will remove some of the black oxide skin. If this changed appearance bothers you, use a chemical bluing/blacking solution such as Birchwood Casey products or those sold by Brownells should work well if used properly. The color may not perfectly match the black oxide finish fresh from the forge, and it won’t be as durable, but it should be less glaring than bright metal.

Blade Hardness

New chisels are often a bit more brittle than the specified hardness at the extreme edge, and may exhibit small fractures and/or chipping. This is a result of the cutting edge cooling quicker than the rest of the blade during heat treat and tempering. 

This is not necessarily a bad thing, but to the contrary is often a sign of a well-made blade. A new chisel that is too hard at the extreme cutting edge when new may well improve after a few sharpenings, but one that is too soft and rolls an edge, or develops a burr, or, heaven forfend, dents in use will almost always be junk forever, unless it was burnt (lost its temper) during grinding, in which case it too may improve with a few sharpenings. I shared the story of Woody and the difficulties he experienced in the “Mystery of the Brittle Blade.” (soon to be out on NetFlix and starring Benedict Cumberbatch (ツ)】

Often the blacksmith or wholesaler will subcontract sharpening job out to a specialist. This practice allows the blacksmith to focus his attention on what he does best, which is a fine thing. But if the sharpener is careless or gets in a frikin hurry and burns the edges while grinding them, without exception the blacksmith gets blamed, resulting not only in an immediate financial loss and wasted time dealing with defective product claims, but a degradation of his valuable reputation. Having experienced this entirely avoidable damage, some blacksmiths, including our honorable plane blacksmith Mr. Nakano, insist on doing their own sharpening, or require the sharpener to work under their eye in their smithy, as does Konobu, to avoid this problem.

Bevel Angle

Bevel angle is critical to cutting edge durability. I recommend maintaining a bevel angle of at least 27.5°. 35° is even better when cutting harder woods.

You should use a bevel angle gauge of some sort to check the angle during each sharpening session.

You may be surprised how the angle will become gradually smaller with each sharpening if you don’t do this check. Even professionals frequently allow the angle to wander by mistake or through supernatural influences. There are several useful gauges commercially available for this purpose, or you can easily make one from scrap brass or aluminum.

In future articles we will consider the feeding of the Wild Mortise Chisel. They are fastidious diners, after all.

Until then, I have the honor to remain,

YMHOS

A formal procession of frogs mocking the feudal lords of medieval Japan. I bet you haven’t seen many frogs walking around with swords. Such work was a rare opportunity for artists and the common people to mock the rich and powerful nobles that ruled the many little feudal nations of the Japanese islands at the time with a despotic fist.

If you have questions or would like to learn more about our tools, please click the see the “Pricelist” link here or at the top of the page and use the “Contact Us” form located immediately below.

Please share your insights and comments with everyone in the form located further below labeled “Leave a Reply.” We aren’t evil Google, fascist facebook, or thuggish Twitter and so won’t sell, share, or profitably “misplace” your information. If I lie may my mortise chisels all turn to glass.


The Care and Feeding of the Wild Mortise Chisel – Part 1

Sukezane brand 9mm mortise chisel (mukomachinomi) side view

It is well with me only when I have a chisel in my hand

Michelangelo 1475-1564

This is the first in a series of articles about the Mortise Chisel, especially the Japanese version called the “mukomachi nomi.”

Also called the “Joiner’s Chisel” in Japan, this is a specialized chisel used by specialist craftsmen to cut precise, smallish mortise & tenon joints when making furniture, cabinetry and joinery. Carpenters don’t use it, and few in that august trade have even seen one.

In this article your humble servant will introduce a tiny bit of the terribly long history of the mortise and tenon joint, and give a description of this tool.

In future articles in this series of international intrigue we will consider how to evaluate, adjust and even how to use the Mortise Chisel in general and the Japanese Mortise Chisel in particular. We will also touch on bevel angles and blade hardness problems, what to look for in a good mortise chisel, and how to examine it with an eye to increasing its performance. This is something most users of chisels never consider, but it can make a big difference in the case of mortise chisels. Indeed, I daresay most Gentle Readers and even a few Beloved Customers will mutter the equivalent of “Bless us and splash us” when they read it.

Of course we must not neglect to discuss how to effectively correct irregularities in our mortise chisel that negatively impact performance, irregularities most people never notice.

After our Mortise Chisel is properly fettled (they almost always have some problems) we will take our racing chisel out for a few laps, but prior to that we will consider how to effectively use it. Too few receive proper training nowadays in chisel work, but here are C&S Tools we feel it our duty to help our Beloved Customers maximize their skills.

We will conclude this series by taking the “Old Master’s Test,” just to make sure both our Mortise Chisel and our skills are improving.

While focused on the Japanese Mortise Chisel, the principles and improvements discussed in this series of articles are applicable to any chisel used to cut mortises.

While all Gentle Readers with eyes to see, ears to hear, and hands that love wood are welcome to share this hard-earned knowledge, it is intended primarily for our Beloved Customers, especially those who use chisels professionally to keep body and soul in close proximity.

Some Background

Your humble servant drafted this series of posts years ago, and has shared bits of it with friends and Beloved Customers from time to time when requested, but the information has not always been well-received for a number of reasons.

There is an old Japanese saying, one which probably originated in China, written 「馬の耳に念仏」and pronounced “Uma no mimi ni nenbutsu,” which translates to “Prayers in a horse’s ear.” Why are Buddhist prayers relevant you ask? Good question. You see, some of the principles your humble servant will present in this series directly contradict doctrine profitably expounded by some of the Popes & Professors of Woodworking in the West, and may offend their disciples. But like vespers to a beast of burden, wisdom is wasted on the willfully, woefully ignorant (wow, that sounds almost like iambic pentameter!).

But our Beloved Customers are neither angels nor asses but shockingly intelligent mortal humans with whom your humble servant is convinced the time has come to share the gospel of the Mortise Chisel as it was taught to me by Masters who have since abandoned this impure world to sort boards in the big lumberyard in the sky.

This series of posts is equivalent to a graduate school course in chisels, something like “Mortise Chisels 701.” And just like a course in advanced differential equations, most Gentle Readers will never need it. But never let it be said that your humble servant didn’t do his best to improve both the skills and the tools of our Beloved Customers.

Some History of the Mortise & Tenon Joint

Mortise chisels are used for cutting rectangular holes in wood usually intended to receive matching tenons to form a structural connection called the “mortise and tenon joint” between pieces of wood.

No one knows how long humans have been using the mortise and tenon joint, but it’s a technique older than nails, although modern humans with their lithium battery-powered, made in China, landfill-bound, multicolored plastic and rubber screwdrivers may find it difficult to imagine.

So let’s begin the journey by briefly examining just two well-documented extant physical examples that may provide motivation for using this enduring joint.

The oldest known wooden structure is a neolithic well liner discovered near Leipzig Germany, constructed from oak timbers shaped by stone adze and joined at the corners with half-lap joints and pinned tusk-tenons at through-mortises. Tests indicate the trees these timbers were split from were felled between the years 5206 and 5098 BC, making the assembly at least 7200 years old.

Next, let’s look at a less soggy but more recent, more complicated and elegant example.

The oldest existing wooden building in the world is a Buddhist Temple named Horyuji located in Nara Japan. Originally constructed around 600 A.D. and rebuilt around 700 A.D. after a fire, this huge 1300 year-old temple and pagoda complex was reconstructed using hundreds of thousands of hand-cut mortise and tenon joints, testifying to the longevity of wooden structural systems and the value of this universal connection technique.

Horyuji  is far more than just a temple to Buddhism, it is a temple to woodworking. If you haven’t yet visited it, you’re truly missing something. 

I mention these two examples to illustrate the universality, strength, and durability of the mortise and tenon joint. Anyone serious about woodworking must master this most ancient and essential connection.

The mortise chisel is the best handtool for the job of cutting mortises less than 15mm in width. For wider mortises, well-fettled oiirenomi or atsunomi are more efficient.

Japanese Mortise Chisels

12mm mortise chisel (mukomachinomi) Face (top) View
12mm mortise chisel (mukomachinomi) Side View
View of ura (flat) of the same 12mm mortise chisel
12mm mortise chisel (mukomachinomi). Please notice the rectangular cross-section precise right angles, and straight, clean sides. This is the most precise of the Japanese chisels. The apparent tan-colored stains on the shoulder are not rust but easily-removed sharpening stone residue left by the professional sharpener who prepared the blade.

In the Japanese language mortise chisels are called “mukomachi nomi” (向待鑿), with “nomi” meaning “chisel.” Don’t ask me the origin of the rest of the word because I don’t have a clue, and have heard few plausible explanations. There is another post linked to here that contains more information about this chisel.

I will use the term mortise chisel in this article to refer to the mukomachi nomi.

For our Gentle Readers interested in the Japanese language, there are several combinations of Chinese characters used to write mukomachi, none of which make much sense or seem related in any way to either tools or woodworking. The most common characters used are “向待” with the first character meaning “there” or “direction,” and the second character meaning “wait.” Combined, they seem to mean “Waiting over there,” or something like that.

I assume the name was originally phonetic and somebody decided to use these kanji because their pronunciation matched the phonetic name. This sort of linguistic contortion is seen frequently in Japan, and has been a source of confusion for all and sundry for many centuries. I blame it on elitist Buddhist priests going back and forth between Japan and China over the centuries, but it is typical of the Japanese people in general and priests in particular to take a perverse pleasure in intentionally making and using terms others can’t figure out.

This confusing practice is not unique to bald priests. When I was an engineering student, I recall the professors insisting we never attempt to simplify or too clearly explain the technical jargon of the trade to non-professionals because it was essential to job security for them to never quite understand it.

If you are familiar with Japanese architecture, you have seen the wooden lattice work that defines it in doors, windows, dividers, shoji, fusuma, koshido, glass doors, ceilings, and even fences, all items made by “tategushi” or “joiners” in Japan. Each piece of any lattice needs two tenons and two matching mortises to stay in-place, so a single piece of traditional Japanese joinery may contain literally hundreds of small, highly precise mortises, indeed thousands in the more complicated pieces. The Japanese mortise chisel was developed specifically at the request of joiners for this type of work. Therefore, it is also known as the “Tategu Nomi” which translates to “joinery chisel.” Few carpenters use this chisel.

Nora Brand 6mm Mortise Chisel (Mukomachinomi) Side View. Although it appears to be a simple, unsophisticated tool, nothing could be further from the truth. Based on the Kiyotada pattern, this is an especially beautiful example to those with eyes to see.
Nora Brand 6mm Mortise Chisel (Mukomachinomi) Ura View
Nora Brand 6mm Mortise Chisel (Mukomachinomi) Shoulder View. Exceptional shaping and filework .

Japanese mortise chisels are similar to other Japanese chisels in having a laminated steel structure with a hollow-ground ura (flat), an integral tang, wooden handle, and steel ferrule and hoop. Unlike most other chisels it has a rectangular cross-section with sides usually oriented 90˚square to the hollow-ground ura, and either flat or just slightly hollow-ground to better keep the blade aligned in the cut and to dimension and smooth the mortise’s walls.

Western mortise chisels do not typically share this detail, although unusually intelligent and observant Western woodworkers of course modify their chisels to gain similar benefits.

If speed and precision are important to you, then the sides of the chisel being oriented at 90° to the ura absolutely provide a serious advantage when cutting most mortises because the sides, and especially the two sharpish corners where these three planes meet, will effectively shave and precisely dimension the mortise’s side walls as the mortise is being cut without the need to pare them later.

Unlike most mortise joints cut with oiirenomi or atsunomi, so long as the mortise is the same width as the mortise chisel, and the user has the ability to maintain the chisel at the right angle while striking it with a hammer, the width of mortises cut with this chisel are usually quite precise and seldom if ever need be cleaned with a paring chisel. This functionality means that you can cut mortises, and especially small ones, both precisely and quickly with great confidence. It’s not called the “joiner’s chisel” for nothing.

The mukomachi chisel does not work as well in wider widths because of the increased friction between the chisel’s sides and the mortise’s walls. For joints wider than 15mm, please use a trued oiirenomi or atsunomi. And don’t forget to use your oilpot.

Conclusion

In the next class in our graduate course on the care and feeding of the wild mortise chisel, we will examine the various details to look for in an effective mukomachi nomi, most of which are applicable to other chisels such as oiirenomi and atsunomi too, indeed any chisel intended to be used to cut mortises including Western mortise chisels.

But wait a minute! Before ya’ll run out of the classroom like a caravan of crazy stoats chasing a pixie, please pick up your homework assignments from the table by the exit doors. And please, don’t leave your empties behind on the floor. Paper coffee cups are one thing, but discarded aluminum beer cans attract out-of-work divorce lawyers and other slavering vermin.

See you next time.

YMHOS

Your most humble and obedient servant’s set of well-used mortise chisels. The 8 older pieces on the right are by Kiyotada (1.5mm~15mm). The two 2 newer chisels on the far left are by Nora. Over the years I have used these tools both professionally and as a hobbyist more than any other of my chisels, as you can perhaps tell from the differing blade and handle lengths which have become shorter with use. A stoic tool, they gossip among themselves less than most other chisels. They are good friends and reliable workmates that worked hard for many years to pay rent, tuition and to buy food for the wife and babies.

If you have questions or would like to learn more about our tools, please click the see the “Pricelist” link here or at the top of the page and use the “Contact Us” form located immediately below.

Please share your insights and comments with everyone in the form located further below labeled “Leave a Reply.” We aren’t evil Google, fascist facebook, or thuggish Twitter and so won’t sell, share, or profitably “misplace” your information. If I lie may Mama Shishi bite my head off.

YMHOS