Toolchests Part 13 – Finishes

Whatever it takes to finish things, finish. You will learn more from a glorious failure than you ever will from something you never finished.

Neil Gaiman

In this post I will briefly summarize the finishes used, mistakes made, and latest improvements to “Moby-Dick; or, The Toolchest.”

The Original Finish – A Tale of Woe

More than 26 years ago when this toolchest was new, your humble servant applied a rubbed-out catalyzed lacquer finish inside and out which showed the grain pattern and color of the wood nicely, but proved to be less-durable than I had anticipated. I refinished the chest once, but after years of rough use, many moves over many years, and painful encounters with trucks, shipping containers, forklifts, and one-legged meth-head moving company employees, the finish was in poor condition. I concluded that lacquer, varnish and even polyurethane do not really qualify as durable finishes for a piece of working casework with a target useful lifespan of 200 years, at least if it’s not to be pampered like a baby grand piano in grandma’s drawing room.

Exterior Refinish

While living on the Pacific island of Guam in 2011 and with free time on my hands due to international political corruption (difficult to imagine huh (ツ)), I gazed upon my toolchest and despaired for, yea verily, it was in bad shape, cosmetically that is, covered with scratches, dings and gouges topped off with yellowed, crazed and crumbling varnish. It had been a good and faithful servant for many years and deserved better so I girded up my loins, scraped and sanded off the old finish, leveled the scratches, dings and gouges with auto body filler, and refinished it.

Mr. Michael Dunbar and those sexy knees.

When considering how to refinish my toolchest in a way that would provide improved UV and abrasion resistance while also concealing past external cosmetic damage, I was intrigued by an article in a woodworking magazine by Mr. Michael Dunbar about milkpaint. Mr. Dunbar is a wise and retired professional Windsor chairmaker, not just a scribbler, so I take what he writes seriously.

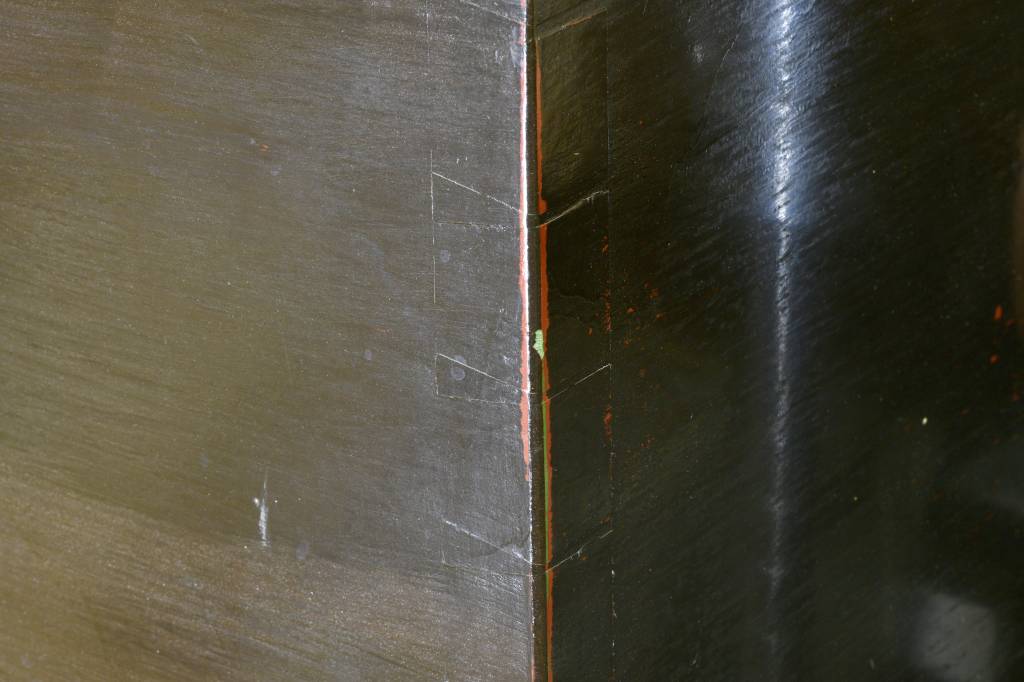
I removed the old varnish finish inside and out and, following Mr. Dunbar’s recommendation, applied multiple coats of red, green, and dark, almost black, burgundy-colored milkpaint to the bare exterior wood surfaces. I then sanded and distressed the paint to expose the various color layers, and applied one coat of thinned clear Epifanes flat polyurethane as a protective topcoat. This was a 2 week process.

This milkpaint finish has proved effective not only in concealing past cosmetic damage and the Bondo used to repair it, but at the time these photographs were taken it had endured one international move by ship, two local moves inside Japan by truck, and months banging around inside hot humid shipping containers and dank warehouses since it was applied. It has only improved with age and abuse. Thank you Mr. Dunbar.

View of the lid’s frame & panel joints
View of the lid’s top, warts and all. Often used as a working surface, it has endured a lot of abuse, but the distressed areas with exposed red and green milkpaint are original to this finish. You can, however, see areas where the clear polyurethane top coat is failing. Again, so much for clear coats.
The right front corner of the skirt/base joined with through dovetails. These corners take the most abuse and are especially tough. The skirt is attached to the sides by glue and white-oak dowels.
The lockplate. The burgundy-color top coat of milkpaint as well as the green and red undercoats, and even a little bare wood, are visible.
The top front corner of the lid, joined with through dovetails. The perimeter frame of the frame & panel top is connected to the sides with dowels, which have pushed out round spots in the clear Epifanes polyurethane top coat as the frame has shrunk around them over the years since the toolchest was refinished in constantly high-humidity Guam, an unavoidable reality in wooden casework. Someday I will need to shave these flush and refinish the round spots, but since the finish is milkpaint, the repairs will disappear entirely.
The front right corner of the lower case. What were once flush through-dovetails joining the sides have become visible as the wood has shrunk in thickness due to the relatively lower humidity of Tokyo. No joints have been repaired and all are still tight as a drum.
Front-view of the sawtill. The through-dovetails joining the corners, as well as evidence of the dowels connecting the horizontal F&P divider panel above the drawer have become visible as the wood has shrunk in the drier Tokyo humidity. Nosireebob those are not plugs concealing screws. Removing and replacing prickly saws has been hard on this little chest, but doesn’t look any worse now than when newly refinished, and will only improve in appearance with future wear and tear.

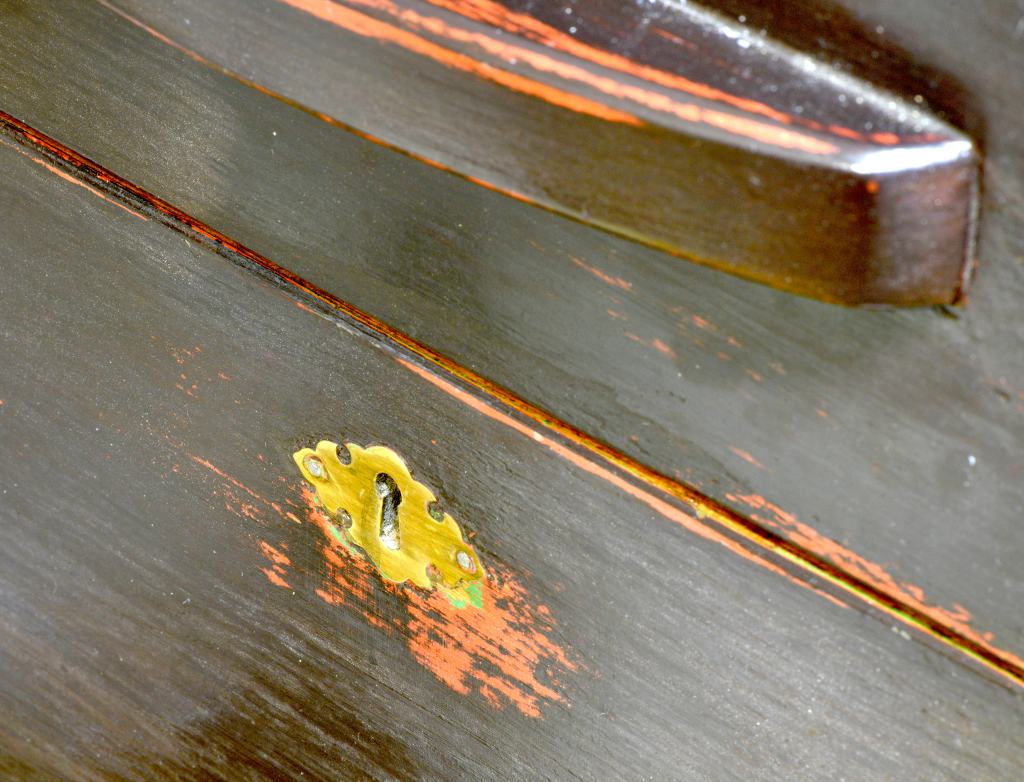
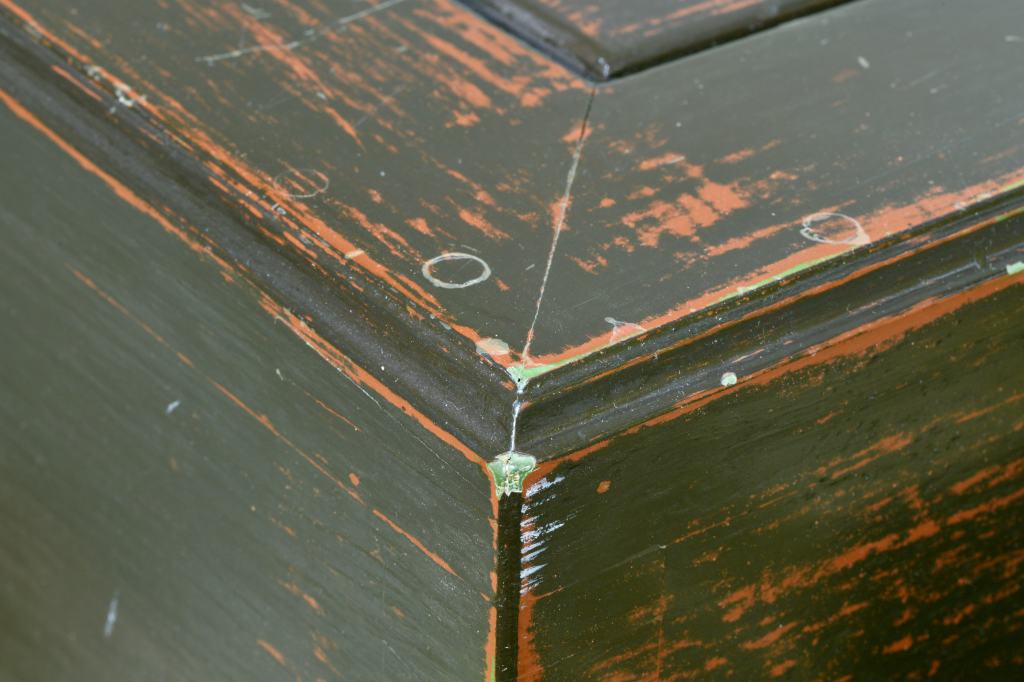
Milkpaint is an interesting material. It is non-toxic, which is nice when applying it. It doesn’t out-gas toxic compounds into the air either which is even nicer.

It has a water carrier with mostly mineral solids instead of volatile resins, so when cured it forms a hard, abrasion-resistant, non-shrink, no-peel surface unaffected by UV light, unlike latex, lacquer, varnish, and polyurethane.

The user can mix most any color they want using the available powders providing an endless palette.

It’s easy to use, forgiving and doesn’t take special tools to mix and apply, just glass jam jars, stirring sticks, strainers, paintbrushes, sandpaper, an old blender, and paper shopping bags.

Milk paint makes possible an easily-applied, inexpensive, tough, UV resistant, non-toxic surface finish with an antiquish, unique appearance that not only resists damage but even improves with time and abuse. What more could you possibly want? Egg in your beer?
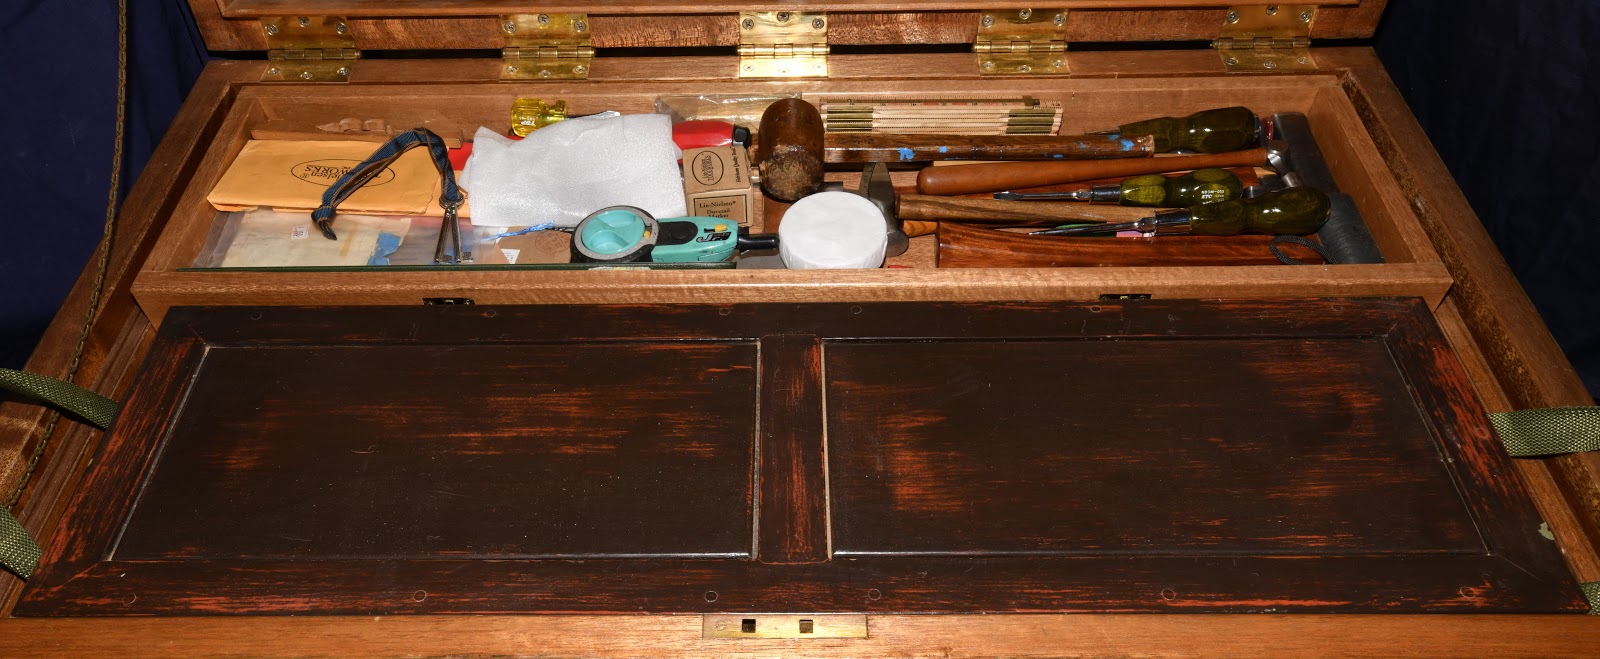
Interior Refinish

I refinished the toolchest’s interior surfaces with shellac to eliminate the stink of curing resins. Time will tell how well it holds up, but so far so good.

Conclusion

My toolchest is far from perfect, but it meets all my performance criteria and works pretty darn good for me.

If I were to do it over again, I’m not sure I would change the current design or finishes, other than the way tools are mounted inside the lid. Compared to the original design, the current arrangement is more functional, but there is always room for improvement.

I think the most important thing this series of articles about toolchests has to offer is not the design itself but rather the performance criteria developed and the decision process that led to the design and ultimate construction.

As I mentioned in Part 5 of this series, there are many decisions that must be made when planning a tool storage system. I hope you, Gentle Reader, got my point that you can either take the time and make the effort to plan, or neglect to do so and let the decisions be made through default and happenstance whirling down and around the porcelain scrying bowl of chance. Either way, the decisions will be made.

Perhaps reading the performance criteria and seeing the design and execution of this toolchest will stimulate your planning. Many of your requirements will be the same as mine, but others will be different, so the solutions and design details you employ will be different too. At the very least you now have a detailed, practical example to reference when planning storage solutions for your valuable tools.

I hope Gentle Reader also noticed how tradition can provide solutions to universal challenges of tool storage, but that through careful consideration you can improve on tradition to best meet your specific needs.

In the next and final post in this series I will explain how “repairability” was incorporated (or not) into the design.

YMHOS

If you have questions or would like to learn more about our tools, please click the “Pricelist” link here or at the top of the page and use the “Contact Us” form located immediately below.

Please share your insights and comments with everyone in the form located further below labeled “Leave a Reply.” We aren’t evil Google, fascist facebook, thuggish Twitter or the Congressional IT department of the Democrat Party and so won’t sell, share, or profitably “misplace” your information. If I lie may every piece of paint I touch turn to lead, curl and crumble.

Leave a comment

Other Posts in this Series:

The Japanese Gennou & Handle Part 13 – The Drawing Part 2/6

This gennou’s handle has a pronounced curvature, a design detail that is neither artistic or whimsical but is based on sound engineering principles employed to achieve specific functional objectives.

In the previous post about designing a handle for your gennou hammer on paper we discussed the reasons for making a drawing and a few of the details. In this post we will begin by representing the head and its key lines in our drawing.

But first, a disclaimer. Some Gentle Readers may find the idea of making a drawing in preparation for fabricating something as apparently simple as a handle from a single stick of wood nonsense. Indeed, I felt the same way once, but I was wrong. That is not, heaven forefend, to imply that our Gentle Readers could ever possibly be wrong in anything they undertake, or less than towering intellectual giants, only that the gennou handle is not as simple as it appears.

You may recall your humble servant mentioned the two points listed below in a previous post. They remain valid principles that should guide your eye and hand when making a drawing. Or, if wood costs you nothing and your time is worth even less, feel free to ignore them.

The first point goes like this: “When making some things, past a certain point there is simply no room for either improvisation or trial & error without starting all over again.”

The second point is a little longer, but no less valid: “The principle of “less is more” absolutely applies, but achieving an elegant and functionally superior “Less” is neither accidental nor serendipitous, but can only be consistently realized through “More” thought, planning, and eyeball time, things difficult to do without a drawing.”

A Sample Drawing

The drawing below is an actual drawing your humble servant prepared for one of his gennou incorporating a 375gm (100monme) classical-style head forged by Kosaburo. Although it’s a simple drawing made entirely by hand, it includes all the critical details other than the species of wood and flow of the grain. Please notice that it consists of a top view, side view, end view (butt) and 2 sections, all combined in a one-sheet, compact drawing.

You will want to make a similar drawing incorporating all the lines shown but adapted to your gennou head, your body’s dimensions, and your preferences.

You can download this drawing in jpeg format by clicking the link below.

Draw the Key Lines for the Side-view

The gennou that resulted from the drawing above. This handle has a distinctive curve that is neither a result of warpage nor evidence of your humble servant’s advancing senility, but an intentional design feature we will discuss in the next post. I’m supposed to take these Gingko pills, but I forget why…

You can make your drawing on paper or wood, with wood being the more durable medium since ancient times because it does double duty as both parchment and drafting board, and can be erased entirely with a handplane. Moreover, the combined drawing and drafting board can be hung on a nail on the wall for future reference without fear of deterioration. But paper is easier to use.

Begin by making one horizontal parallel line across the sheet of paper. In the drawing above, this is the horizontal line touching the flat face of the hammer labeled “Striking Face.”

When orienting your head on the drawing, the flat striking face must be touching this line.

Gennou heads usually have a maker’s brand stamped into the steel adjacent the flat striking face. Please orient this brand closest to the “Striking Face” line.

You can of course orient the brand facing either the butt end or the tenon end of the handle. In Japan the standard convention is the butt, making the brand a little less visible. Some Westerners prefer the opposite orientation because, I assume, they want the brand to be immediately visible. This is understandable and entirely practical, but from the viewpoint of the Japanese craftsman it is akin to using underwear as headgear. To each his own.

Draw a vertical line, of course perpendicular to the Striking Face Line you just drew, and to the left of the page through the centerline of the gennou head. We will call this the “Vertical Centerline.”

Next, draw a horizontal line parallel with the Striking Face line, through the perfect center of the head’s eye (the mortise hole in the gennou head). To do this, you will need to first mark the center of the eye on the Vertical Centerline.

Begin by measuring the distance from the actual head’s striking face to the endwall of the eye closest to the striking face, and transfer this distance onto the Vertical Centerline starting from the Striking Face line using either a vernier caliper or a sharp compass.. Then measure the interior length of the eye, and add this distance to the measurement you just made. Now you have the location of both endwalls of the eye located on the drawing. Divide this line in half using your calipers or compass, and you now have located the center-point of the eye.

Be sure to precisely measure and mark these distances because if you get it wrong, problems will result.

Then draw a “Horizontal Centerline” through the center-point of the eye across the sheet, of course perfectly parallel with the Striking Face line.

Next draw two more horizontal lines from the top and bottom endwalls of the eye across the page. The width of these two lines is labeled “Eye” on the side-view drawing above.

Place the head on the drawing, with its flat face perfectly flush with the Striking Face line. You may want to lay/clamp a piece of wood along the Striking Face line make sure you get the head oriented properly centered on the vertical and horizontal centerlines you drew earlier. Then draw the outline of the head on the drawing.

Insert the wooden layout tenon you made previously into the eye, place the head back on the drawing as before, and transfer the layout tenon’s outline onto the drawing. If the eye is perfectly perpendicular to the head’s centerline then the layout tenon may not be necessary, but using the layout tenon helps to ensure the eye’s angle is accurately represented in the drawing to avoid unpleasant surprises.

Draw the Key Lines for the Top-view

Moving onto the Top View, make another horizontal line 5~6 inches above the Horizontal Centerline across the page. This line will be the centerline through the head and handle seen from above. Measure the width of the eye (the narrowest dimension), divide it in half, and transfer it to the drawing. Draw two horizontal lines from the location of the eye’s endwalls across the page. These lines are labeled “Eye” on the Top View.

Place the gennou head on the drawing and trace the outline of the striking face.

The butt of the gennou shown at the top of this article. Notice it is domed. Once again, not a sign of senility, but an intentional and entirely functional feature, the lack of which could result in the destruction of the handle during installation (seriously). Notice also how the top edge of the butt is nearly flat, while the lower edge (leading edge) is a uniform radius. These two details are neither artistic nor whimsical but have distinct functional purposes.

The head, it’s striking face and profile, the width, length and angle of the eye, the centerline of the handle in both side view and top view are all now accurately represented on the drawing. 

In the next post in this series we will measure your body and add those details to the drawing. You don’t need a Savile Row tailor for this task, but if you have one just lounging around on your couch, hogging the remote control, drinking your beer and smoking your cigs, go ahead and put the bum to work! (ツ)

A Dandy leaving Saville Row in a sharp morning coat. The extra hand is that of his out-of-frame bride and not a birth defect. Please notice that his head covering does not resemble underwear.

YMHOS

The following link is to a folder containing pricelists and photos of most of our products. If you have questions or would like to learn more, please use the form located immediately below titled “Contact Us.”

Please share your insights and comments with everyone by using the form located further below labeled “Leave a Reply.” We aren’t evil Google, fascist facebook, thuggish Twitter, or a US Congressman’s Chinese girlfriend and so won’t sell, share, or profitably “misplace” your information. May I swallow a thousand needles if I lie.

Previous Posts in The Japanese Gennou & Handle Series

Japanese Saws: The Hozohiki Saw

Nakaya Takijiro’s forge. Set into the floor of his workshop, it was originally used for forging swords for many decades.

“I see,” said the blind man as he picked up his hammer and saw

Anon

In this post we will look at a relatively unknown but extremely precise and useful rip saw called the Hozohiki saw. It is an essential tool for the more precise styles of advanced joinery work in Japan.

We will begin by discussing the general attributes of this saw, and then delve into the primary specifications by category. The saw under consideration is one recently developed by C&S Tools with, and produced by, Mr. Takijiro Nakaya, a famous master Japanese sawsmith in the old tradition.

The Hozohiki Saw

The C&S 210mm Hozohiki saw

The name of this saw is pronounced ho/zoh/hee/kee, written 枘挽き鋸 in Chinese characters, with “hozo” 枘 meaning “tenon,” and “hiki” 挽き meaning to “cut with a saw.” In other words a “tenon saw.”

The hozohiki saw is almost, but not quite, the twin of its better-known sister the Dozuki with a thin blade and a steel back, but instead of crosscut teeth it has fine rip teeth.

As the name suggests, the Hozohiki saw excels at making the rip cuts that shape the cheeks of tenons. In addition, it excels at making precise rip cuts for joints in joinery, cabinets, and furniture.

The Blacksmith

Nakaya Takijiro at his forge shaping a saw tang

The saw this post references is made by Nakaya Takijiro, a fifth-generation sawsmith who operates a one-man smithy located in Kawagoe, Japan. The traditional sawsmiths of his caliber still producing in Japan can be counted on the fingers of one damaged hand.

The Nakaya Takijiro line of blacksmiths were originally swordsmiths that shifted their production to saws after the Haito Edict of 1876 made it illegal to wear swords in public greatly reducing demand. The advanced skills of the swordsmith inherited by the current Takijiro make his products superior.

The front of Takijiro’s tiny smithy.
Saws temporarily residing in Takijiro’s forge waiting sharpening, repairs or pickup.
More saws wrapped in newspaper.

The Steel

Takijiro hand-forges the blades from Hitachi Metal’s Yasuki Shirogami No.2 steel, an unusually pure, simple high-carbon steel entirely devoid of alloys such as chrome, nickle, molybdenum, tungsten or vanadium. When hand-forged and properly heat-treated, this steel will form a crystalline structure of unsurpassed quality, from a handtool perspective, incorporating fine, evenly distributed carbide particles typical of the “fine-grain steel” coveted for cutting tools and weapons for millennia.

Some may wonder why Shirogami No.1 steel is not used. The answer is simply that the only difference between Shirogami No.1 and No.2 is that No.2 has less carbon, making the teeth a little less brittle.

A blade made from this steel by a master like Takijiro will hold a sharp edge a relatively long-time, but at the same time will be relatively tough, important properties in a fine-toothed professional joinery saw.

Double-tapered Blade

After forging, shaping and heat-treating the blade, Takijiro double-tapers it by hand using a two-handed scraper called a “sen.” The tapers are not flat, but curved to be narrowest at the toe (end opposite the handle) and near the steel back, increasing in width approaching the tang for proper “spring,” and of consistent thickness along the teeth. He does not use grinding equipment to achieve these tapers.

A properly tapered saw will cut straighter and bind in the cut much less than one with a blade of uniform thickness.

Takijiro’s sen scrapers, all handmade by himself.
The pile of sen shavings at Takijiro’s tapering/truing station.

Hammer-tensioned blade

In addition, Takijiro “tensions” the blade using a hammer, essentially creating points of plastic deformation with precisely-placed hammer blows in a long oval pattern above the teeth to create internal compressive stresses that tend to stretch the blade in length, placing the teeth in “tension,” thereby significantly stiffening the thin blade and its teeth.

Besides stiffening the blade, hammer-tensioning greatly reduces the tendency of the blade to warp, oil-can and buckle as it heats-up in-use. The result is a blade that is stiffer, straighter, and cuts smoother than a flat un-tensioned blade even after it heats up.

True Saw Plate

The saw plate of a high-quality handmade dozuki or hozobiki saw will not be flat, because it is double tapered, but it will be true, meaning it will be free of problematic bumps, dents, waves, and oil-canning.

Dreaded oil-canning is a form of localized buckling caused by stress concentrations. This phenomenon is named for the buckling commonly seen in the tops and bottoms of metal oil cans. Besides saws, steel drums, metal tanks, metal roofing and metal siding routinely exhibit oil-canning. Oil-canning is easy to produce but difficult to eliminate. It increases the friction forces acting on a sawblade while cutting and reduces accuracy.

Oil-canning exists but is not as obvious in modern Western saws due to the extra-thickness of the blade. The degree of this buckling will vary with changes in the steel’s temperature making it a serious problem.

Because high-quality dozuki and hozohiki sawblades are so thin and are forged from warpage-prone high-carbon steel, and because they and are subjected to multiple heats and thousands of hammer blows, warpage and oil-canning are a serious problem the sawsmith must correct many times during fabrication. Indeed, this is the most difficult task he must perform, and the one with the most significant benefits.

A hand-tapered, hammer-tensioned sawplate without the defects listed above will track true, cut easily, and create less friction. The difference is night and day.

The Teeth

The teeth and hand-filed back of the C&S Hozohiki saw. Please note the “sen” scraper left marks left by Takijiro as he shaped and trued the plate. The pile of thin metal shavings in the photo above are the result of his work with a sen. The plate has not been planed, ground or sanded. The scraper marks are straight and aligned quite precisely despite being handwork. The best saws look like this.

Takijiro hand-punches the teeth and then sharpens them by hand using tiny sawfiles hand-made for him in Hiroshima. He prefers to use newly made fresh files because he is convinced that within a few months of manufacture the cutting edges of files lose a significant degree of sharpness. I’ll take his word for it.

The Hozohiki saw Takijiro makes for C&S Tools has 7 teeth/cm (17.8teeth/in). To help get cuts started, the teeth at the last few centimeters nearest the handle have zero rake. The rip teeth to the far left in the image below are the style of tooth used.

The shape and size of the teeth are critical to the performance of a saw, and must be designed to work best for both the type of wood the user will cut, and the joints he intends to make. The style of teeth is the same as those at the far left in the sketch below. The teeth of the hozohiki saw we carry are designed, cut and sharpened specifically to cut hardwoods like maple, oak and cherry.

The saw has minimal set to ensure smooth, precise cuts in hardwoods.

The Back

A closeup of the Takijiro’s hand-engraved signature, and the saw’s back, “jaw,” and teeth. Takijiro produces this coloration by heating the steel back quite hot and then wiping it with raw silk causing the protein to stick and oxidize forming a black skin. An elegant finish indeed.

The saw’s back is relatively thin, and curved as it should be for a fine Hozohiki saw. Takijiro has also hand-filed the steel back leaving file marks, and blackened it using burnt silk as is traditional in the best hand-forged saws. Beware a saw with a steel spine that exhibits the marks/ distortion of being bent by machine. This one is very sexy!

Using the Hozohiki Saw for Crosscutting

Here is a trick used by advanced Japanese craftsmen.

In especially hard wood such as ebony and rosewood, a fine-toothed Hozohiki saw such as the C&S Tools saw, despite having rip teeth, will often cut smoother and faster than a crosscut Dozuki saw making it an especially useful tool.

Do you doubt it? Make sure you have a camera on hand to take a selfie the first time you try this because the result will be a big goofy smile you will want to remember.

The Normal Commissioning Process

The old part of Kawagoe City lined with original “Kura” buildings, most designated as historically important structures. It is said that Tokyo looked much like this in past centuries, but without the asphalt, electric lights, and ice-cream banners. Kawagoe is known for its annual festivals, in which Takijiro usually performs the Chinese Lion “Shishi” dance in a costume he made himself.

When ordering a saw from Takijiro, as I have done several times when seeking excellent saws for my own toolchest, a craftsman (few amateurs are given this opportunity) makes an appointment to visit his forge for an informal interview to discuss his preferences for the desired saw as well as the products and types of cuts he intends to make with it. Takijiro also insists the craftsman provide a small sample of the wood he will cut most often.

As a result of this interview and his hands-on tests cutting the sample, Takijiro is able to make a saw that suits the craftsman’s needs as perfectly as he understands them: a custom saw for a specific craftsman for a specific type of work.

A handmade hozohiki saw of this quality is normally available only by custom order, taking 6 months to fabricate, and costing approximately ¥60,000. Takijiro-san was kind enough to accept a special limited order at a reduced price.

Specifications

When developing any product, and especially tools, it is important to establish the product’s specifications and the performance criteria of the end-user. The ideal way to determine these specifications and criteria is the face-to-face meeting between the craftsman and sawsmith mentioned above. In this case, however, in order to save time and reduce costs, we worked with Takijiro to develop standard specifications and performance criteria preferred by our international customers. Entirely by coincidence, those specifications are closely aligned to those Takijiro’s luthier customers demand, especially those who routinely make extremely precise, almost invisible sliding joints in unforgiving and expensive hardwoods such as rosewood and ebony for shamisen stringed instruments.

FYI, the shamisen is a traditional three-stringed Japanese musical instrument that can be disassembled into its component parts without tools. In this YouTube video the owner of a shamisen shop instructs his customers how to properly disassemble their shamisen in preparation for sending it in for repairs or a new skin. In this video you can see a luthier actually making a shamisen. Notice the precision of the mating surfaces of the sliding joints. I think you can sense the skill of the luthier with his hozohiki and dozuki saws.

The logic behind this choice of specifications is that Western craftsmen who perform high-precision hand work use more hardwoods than many of their Japanese counterparts, and so need sharp but tough teeth, without the additional set necessitated by sticky, hairy softwoods. In addition, we assume these craftsmen are willing to sacrifice some speed in exchange for increased precision and tougher teeth.

Another criteria was that starting cuts be as easy as possible, a problem for most people when cutting hardwoods with rip saws. To satisfy this criteria, the first few centimeters from the heel of the blade have zero rake, as mentioned previously.

Everything humans do entails compromise, but based on experience, we feel this saw is best suited to Western woodworkers in general.

My advice to our Gentle Readers and Beloved Customers is to not judge a saw by its handle, but by its performance. That is, after all, the professional way.

We will describe how to make a handle for Japanese saws in a future article.

Why Should You Own a Hozohiki Saw?

If you are tired of the inaccuracy and fat, wandering kerfs of Western rip joinery saws; if you want to do more precise work than the throw-away kaeba saws can achieve; if you need a saw that will easily cut extremely precise joints in all woods smoothly and quickly, but will not spray teeth all over when cutting hardwoods; if you want to taste the performance of a high-quality professional-grade hozohiki saw hand-made by one of the very last remaining Japanese master sawsmiths, but without the months of waiting and high cost of a custom saw, then this is your chance. Perhaps your only chance.

If you would like to learn more about this saw, please contact us using the form below.

YMHOS

Relevant Articles

Shamisen Girls Ki&Ki performing with their shamisen, no doubt handmade made from rosewood using a Hozohiki saw. Here’s another video if the same shamisen song fans of Zatoichi will know.

If you have questions or would like to learn more about our tools, please use the questions form located immediately below. Please share your insights and comments with everyone in the form located further below labeled “Leave a Reply.” We aren’t evil Google, incompetent facebook, or gossipy twitter and so won’t sell, share, or profitably “misplace” your information. Promise.

Leave a comment

Toolchests Part 12 – The Sawtill

A view of the Sawtill’s lid nested into the opening in front of the trays.

I am but mad north-north-west. When the wind is southerly, I know a hawk from a handsaw.

William Shakespeare – Hamlet

Every woodworker worth his salt uses handsaws. Your most humble and obedient servant doesn’t mean to impugn those who use machines exclusively to perform all sawing activities, I am sure they are all fine folk; I wish them health, happiness, and hundreds of fat children, but they are more machine operators than craftsmen in wood, in my un-exalted opinion.

Saws are important tools deserving of protection, but which we need to access quickly, betimes a difficult performance criteria to satisfy. Saws have wide metal “plates” that collect dust and condensation and develop rust. And sharp teeth, shorter but much like those of the frumious bandersnatch of literary fame, that catch, cut and scratch things, and that are easily damaged in turn through contact with other metal tools. How best to store this prickly fellow in a chest filled with other burbling tools?

In this post we will examine the challenges involved in storing saws, and the solution I learned from an dusty old book hidden in a Japanese university library far back in the mists of time.

Saw Storage Performance Criteria

High-carbon steel is without doubt the best material for handsaws, but it rusts. Rust produces a rougher surface increasing friction, and if it progresses will cause deep pitting, damaging the teeth forever and permanently impairing cutting efficiency

We can apply oil to the plate and teeth to prevent/reduce rust, but oil attracts dust which often contains hard particles that dull teeth, not to mention chemicals that accelerate rust. Therefore, a good storage solution must protect saws not only from dings, but from dust and temperature swings that invite condensation and rust.

Clearly the exposed saw rack published in woodworking magazines ad nauseam as DIY projects for amateurs is easy to access and great for displaying handsaws for worship and veneration (especially grand are those with twin candlestick holders (ツ)), but they are not a good long-term storage solution because, while the saws are in plain view convenient for daily worship, they are also exposed to dust and temperature swings that encourage condensation corrosion.

One traditional solution is to mount saws to the underside of a toolchest’s lid. I have tried this method before but long ago concluded it takes up too much real estate I need for other tools. And the saws still collect some dust in this location anyway.

I especially dislike one traditional solution, namely nailing a sawtill in the bottom of the toolchest up against the front wall, because it makes the saws difficult to see, a pain to retrieve, and more importantly, limits the travel distance and ultimately the width of the all-important trays. Codswallop!

Some may insist that the internal sawtill is the only valid “traditional” method. To all the self-appointed Time Lords and Holy Arbiters of Everything Traditional that look down their patrician noses at the solution I selected I respond that there are other traditional designs they may have not seen before. Perhaps they need to… I dunno… do something crazy like… put down their congac snifters and visit different libraries?

After months of deliberation I decided I needed a sawtill that is an enclosed, sealed, insulated space in itself, one that can be removed to serve as an independent toolchest most of the time but will still fit inside the toolchest when necessary, will contain many saws, not just five or six, and is at a convenient height where I can clearly see and easily retrieve/replace them. These criteria are what attracted me to this extremely intelligent design illustrated in copperplate in an old bug-chewed British book in the University of Tokyo Library. I modified the design considerably, especially the lid and the drawer, but there is nothing new under the sun.

The Execution

My sawtill nests inside the toolchest, as you can see from the photo above. In this location the lid can be closed without interference. Saws in the top compartment can be accessed, but not the saws in the bottom drawer. Tools in the top tray and those mounted inside the lid are also easily accessible, but those in the 2nd and 3rd tray and in the dungeon are not accessible without removing either the sawtill or the trays. This may seem to be a serious flaw, but au contraire, mes amis!

When the toolchest is at home in my workshop, the sawtill spends no time inside the toolchest. Instead I take advantage of its greatest virtue, set it off to the side, and use it as an independent toolchest dedicated to saws. In my current workshop it sits on the ledge of a bay window located 1 foot from the mothership. In other workshops I rested it on sawhorses. It is a very intelligent and flexible solution.

Do I need candlesticks? They would be nice….

The sawtill resting on the toolchest’s walls. The top and drawers are closed. The drawer has recessed brass pulls and a brass lock. Nylon straps attached to each end of the sawtill make it easy to lift out of the toolchest’s interior.

Like the toolchest proper, the sawtill is made from solid medium-density Honduras mahogany joined with dovetails. The lid, central horizontal divider, and bottom are all solid-wood frame-and-panel construction. Like the toolchest, the sawtill’s lid has deep vertical sides to add stiffness and prevent warping, but unlike the toolchest, nothing is mounted inside the lid. A wooden lip projects down from the lid aligning it to the base and sealing it tightly when closed.

When open, the saw handles in the top compartment protrude above the sawtill’s sides making them easy to see, remove, and replace without fiddling around. This is supremely important.

Due to this construction, neither drawer nor lid have ever warped or become sticky.

The sawtill with the lid and drawer open. The top opening is filled primarily with Western saws and larger Japanese saws (e.g. bukkiri gagari), while the drawer is stuffed full of thinner Japanese saws as well as sharpening files, chalk and a sawset. I tend to store many of my saws wrapped in newspaper because the out-gassing of the ink is a good corrosion preventative, at least when the newspaper is new. Strange but true. It has the side benefit of providing the saws reading material.

The top compartment is sized to house 8-26” Disston No.12 saws, or a mixture of Western and larger Japanese saws. The drawer underneath will hold a dozen Japanese saws along with files and other saw-related tools. 

The sawtill’s width is a hair narrower than Moby Dick’s sliding trays, and its overall height with lid closed is the same as the combined height of the three trays so it rests neatly on the bottom tray’s ledge and nestled inside the space created when the three trays are slid to the back. The toolchest’s lid can be closed with the sawtill in this position securely locking it in place.

Dividers

When this saw till was new I installed two thin boards in the top compartment, one across each end, with the classic slits & slots cut into them to retain saws, but I soon found this arrangement to be sub-optimal. I later them with the five lengthwise plywood dividers visible in the photo above creating individual compartments for saws. These compartments provide more storage options, make it quicker to access/replace saws without banging and sawing each other, and make it possible to wrap the saws in anti-corrosion cloth or paper for additional protection during long-term storage and transit. I would never go back to slits & slots.

Although it may have compromised the sawtill’s elegance and violated the eternal tenets of beauty exemplified by the Wonderful Liberace, I didn’t mount candelabra to it. Pray tell, an unforgivable omission?

In the next post in this series we will examine the finishes used. I think you will find this especially interesting. Until then, I have the honor to remain

YMHOS

If you have questions or would like to learn more about our tools, please click the “Pricelist” link here or at the top of the page and use the “Contact Us” form located immediately below.

Please share your insights and comments with everyone in the form located further below labeled “Leave a Reply.” We aren’t evil Google, fascist facebook, or trashy Tik-Tok and so won’t sell, share, or profitably “misplace” your information, not even if Joe Biden and his bloody-handed buddies in the Chinese Communist Party ask nicely. If I lie may my mattress be as prickly as sawteeth.

Leave a comment

Other Posts in this Series:

The Japanese Gennou & Handle Part 12 – The Drawing Part 1/6

A gennou with a modern-style 180monme head (700gm/25oz) by Kosaburo and a black persimmon handle.

A drawing is simply a line going for a walk. 

Paul Klee

This is the first of six posts in a sub-series describing why and how to make a full-scale drawing in preparation for making your gennou handle. 

Please note that the principles described in these posts on Japanese gennou handles apply to all varieties of hammer and axe handles, and can be adapted to Western tools with great success.

Why Bother Making a Full-scale Drawing?

The greatest fun in working wood as a hobby for your humble servant is watching an object evolve in my hands, sometimes magically becoming better than what I had imagined it would be. Many Gentle Readers have the same experience.

My day job in Japan’s construction industry is not so spontaneous or fancy free: I spend too many hours each day planning, discussing, reviewing/marking-up, and writing about complicated drawings, so drafting a drawing to make something from just a single stick of wood feels kinda sorta silly on the one hand and too much like real work on the other. But despite these conflicting emotions, please understand I am dead serious about the importance of a drawing, and you should be too.

So why am I recommending you make a drawing? There are 3 reasons: 

Record & Combine Ergonomic Parameters

A gennou design must begin with the fixed parameters of your gennou head, but there are several ergonomic measurements from your own body you will need to incorporate into your handle design and meld with the specific details of the head you select. This isn’t difficult to do, but because every head, every body, and therefore every handle is different, and because there are a surprising number of details that must be combined, it can be difficult to get everything right without a drawing, especially the first few times.

Develop an Elegant Minimalistic Design

The second reason for making a drawing before you make sawdust is that the gennou I am teaching you how to make is in every way a minimalist object comprised of only two simple components the details of which require thoughtful planning to get right. 

Allow me to share a couple of points about minimalism I learned from observing the successes and failures of world-class architects and designers in New York, San Francisco, London, Hong Kong and Tokyo: When making some things, past a certain point there is simply no room for either improvisation or trial & error without starting all over again. Assuming one is not so fatuous or deluded as to accept a monkey’s scribbling as high-art, you can imagine the resulting potential for wasted time and money and brain cells.

The famous architect Frank Loyd Wright once said: “An architect’s most useful tools are an eraser at the drafting board, and a wrecking bar at the site.” When used with skill, which of these tools do you think is the most cost and time effective?

Here is wisdom: The principle of “less is more” absolutely applies, but what most people not involved professionally in the design and fabrication of expensive minimalist physical objects do not realize is that achieving an elegant and functionally superior “Less” is neither accidental nor serendipitous, but can only be consistently achieved through “ More” thought, planning, and eyeball time, something difficult to do without a drawing.

How does this apply to making a simple gennou handle, you ask? Excellent question; You really are paying attention, I see. Once you have cut or shaved away too much wood (even a single shaving can easily be too much), there can be no more thinking, planning or eyeball time without starting over, wasting much of your valuable time and wood. Best to avoid that nonsense if possible, don’t you agree?

Take a Mulligan

The third reason for making a drawing is related to the first and based on the unfortunate likelihood that your first attempt is unlikely to produce ideal results. But don’t be discouraged because your second attempt will be much better. If you begin with a drawing, by the third attempt you will have figured out precisely what works best for you, knowledge that will serve you well your entire life. I promise.

In order to accomplish the goal of the perfect handle in just two or three iterations you will need to record the measurements, assumptions and changes you made each time so you can effectively fine tune them without having to start from scratch each time. A drawing is the best tool for this purpose.

A drawing will also help you avoid repeated errros. A drawing will also help you avoid repeated errros.

What to Include in the Drawing

I recommend you make a full-scale drawing of the handle viewed from the side, the top (back) edge, and the butt for a total of 3 viewpoints on a single piece of paper. You should also make cross sections at several locations at the handle inside the side view.

It is also useful include general dimensions, such as overall length, width at the eye and width at the butt to help you select a suitable piece of wood.

Developing Drawing Skills

Many have no experience making drawings. That’s perfectly OK. The only way to become competent at making simple drawings using orthographic projection is to do it.

The basic idea of orthographic projection is to represent a 3-D object in 2-D drawings, usually a side view(s), top/bottom view, and end view(s), but for the purpose of drawing a simple gennou handle without power windows and tuned exhaust, a side view, top view, end view and a few simple sections are plenty.

The drawing below is one I made for one of my gennou showing just top and side views. As you can tell, it starts with the head. Sorry, no sections. I will provide more drawings beginning with the next post.

A handmade drawing for gennou hammer made to fit the author with an 85monme Kosaburo head. You can download this drawing for your reference by clicking the button below.

If you are serious about making quality objects in wood long-term, the ability to make a simple drawing is a skill you should develop. The drawing doesn’t need to be pretty, it doesn’t even need to be detailed if you are making it for your own use, but it should represent and record things like dimensions, straight line/curves, and the locations of features.

“Why can’t I just do it in my head?” you ask? Of course that is an option; There are times when we all shape wood as we imagine it, the instant we imagine it.

But a drawing lets you combine and adjust details, wait some time to grow “fresh eyes,” and reexamine the product. A drawing makes it easy to make fine adjustments to a minimalist object. It lets you share the design with others and get their opinion. It lets you record your successful designs for future use. It is a powerful tool, one that will improve your woodworking skills.

And with practice, the act of making drawings refines your eye and your imagination, improving not only your design ability on-paper, but your ability to create an object in your head and examine it from different angles. Just ask any second-year architecture student.

Tools for Drawing

I will go into more details about drafting tools every woodworker should own and become proficient with in a future post, but in preparation for producing the drawing we will begin in the next post, and assuming you will make the drawing on paper instead of a board, you should gather the following minimal tools:

  1. Drawing board: A plain wooden board with four straight sides and square corners at least a little bigger than the finished gennou. Any smooth, flat board will suffice;
  2. Paper: Better quality drafting paper, vellum, or mylar is best, but any smooth, white paper will suffice;
  3. Masking tape: To secure paper to board (drafting tape will damage the drawing least);
  4. Straightedge: 12″ or longer (must be truly straight);
  5. Mechanical pencil with lead;
  6. Eraser: A good quality one that won’t leave smudges;
  7. Square: A clean framing square without burred edges will suffice;
  8. Drafting Triangle: A 45° plastic or steel drafting triangle, with minimum 8″ legs (cheap is OK);
  9. Compass: With pencil;
  10. Divider: With sharp points;
  11. Vernier caliper (not mandatory but helpful);
  12. Eraser shield (not mandatory but helpful).

The Gennou Head

So far in this series we’ve looked at a lot of gennou heads of many different varieties and weights made by different blacksmiths. Now that we are on the brink of making a design drawing, however, the time for talking is over. If you don’t have a good gennou head in-hand, please get one. The design of your handle simply cannot begin without it.

In the next installment in this story of love and longing we will begin our drawing. Please sharpen your pencils and get your eraser ready.

YMHOS

Can I eat your eraser? Pleeeeeease?

The following link is to a folder containing pricelists and photos of most of our products. If you have questions or would like to learn more, please use the form located immediately below titled “Contact Us.”

Please share your insights and comments with everyone by using the form located further below labeled “Leave a Reply.” We aren’t evil Google, facist facebook, thuggish Twitter, or a US Congressman’s Chinese girlfriend and so won’t sell, share, or profitably “misplace” your information. May I swallow a thousand needles if I lie.

Previous Posts in The Japanese Gennou & Handle Series

Toolchests Part 11 – The Bottom

A famous bottom painted by Jean-Auguste-Dominique Ingres, La Grande Odalisque, 1814, Oil on canvas, 36″ x 63″ (91 x 162 cm), (Musée du Louvre, Paris)

When I’ve painted a woman’s bottom so that I want to touch it, then [the painting] is finished.

Pierre-Auguste Renoir

A worthy toolchest’s bottom should be like that of an elegant woman: well-formed, seldom seen, and never heard. Not that your most humble and obedient servant has an obsession with bottoms, mind you, it’s just that my goal of a 200 year useful lifespan for my toolchest compelled me to give this obscure, oft-neglected component bottomless thought. If you expect your toolchest to endure eight generations, you too may want to give it some fundamental consideration too (ツ).

The Historical Record

A strong, rot-resistant bottom panel that shuts out moisture, dust, insects, and vermin is a critical component in any workman-like toolchest in your humble servant’s opinion.

You may think these are easily satisfied common-sense performance criteria, but the historical record shows that such is not the case. Indeed, a problem commonly seen in antique casework is rotted-out, bughole-weakened, rodent-nibbled bottom panels. One cause of this damage is that, during much of their lives, the bottoms of many old chests rested directly on damp floors or even the bare ground, absorbing moisture and creating a damp, woody environment for bacteria to run riot for decades on end, with no air circulation to remove dampness, and no exposure to sunlight to either dry the bottom or retard fungal growth. And don’t forget that yummy unprotected, unsealed softwood just begging to be munched on by bugs (betimes with a drop o’ Tabasco sauce, no doubt).

The bottom panel of my toolchest. Solid Honduras Mahogany with floating frame and panel construction, treated with CCA and painted with high-quality exterior-grade washable latex paint. The ledges that trays slide on are visible at the chest’s sides. Keruing strips are glued to to them to compensate for wear over the years.

Indeed, damaged bottoms were so common in casework in past centuries that it appears to have been standard practice to make them easy to replace. Or perhaps they rotted because they were less visible, excusing the use of cheaper, less-durable, unfinished secondary woods attached using nails instead of more expensive and durable woods, finishes and joinery techniques, with easy replacement being just an unintended side-benefit of cheaper construction. 

I will let the preservationists and historians argue this chicken-or-egg problem, but being a belt-and-suspenders-and-safety harness kind of guy, I’ll have nothing to do with a flawed chicken even if it was hatched from a traditional egg.

Frame & Panel Construction

There are a number of ways to build a toolchest’s bottom panel. Perhaps the most convenient but worst material to use is MDF, or as I like to call it, “garbage.”

Marine-grade plywood is a much better choice, but it too will delaminate and rot given enough time, moisture, and persistent micro-organisms.

Of course, in order avoid the failings common to most casework thereby ensuring the chest will provide useful service for 200 years, I selected time-proven frame-and-panel (F&P) construction in solid wood for my toolchest’s well-formed bottom.

Solid wood is not perfect, but it is better than either garbage or plywood on condition that the F&P assembly is built correctly, and some of the measures listed below are employed.

Some general principles of proper F&P construction follow:

  1. Properly Acclimated Wood: All the wood used must be well dried and its moisture content be in approximate equilibrium with the local environment at the time you make the assembly. Neglecting this condition is a common cause of eventual failure;
  2. Properly Sized Frame Members: The width of the frame members must not be too wide or the corner joints will fail and/or the frame may push the casework apart when it expands, or leave gaps when it shrinks, due to seasonal humidity changes;
  3. Properly Sized Panels: Panel width and the dimensions of the tongues and grooves that connect panel to frame must be sized so that seasonal humidity changes do not cause the panel to swell enough to break or warp the F&P assembly, or shrink enough to leave gaps between the panel and frame members;
  4. Unconstrained Movement: A very important consideration is related to number 3 above, namely that the movement (expansion/contraction/sliding) of panels must be unconstrained. A common failing in F&P assemblies is glue squeeze-out or finishing materials inadvertently gluing the panel’s tongues inside the frame’s grooves resulting in broken assemblies, and more frequently, cracked/split panels. The solution is of course to use the right amount of glue and be careful when finishing, but since Murphy is a cunning bugger adept at concealing glue squeeze-out and finish infiltration until it’s too late to detect (and pixies), I always coat the panel’s tongues and the inside of grooves with wax to prevent glue/finish adhesion. Please also be careful that nails/screws/dowels used to secure F&P assemblies into the casework do not prevent your panels from moving freely.

Isolation

With a lifespan performance criteria of 200 years in mind, the first solution I employed to maximize the bottom’s longevity was to make it nearly impossible to place the bottom in direct contact with the floor or ground by leaving an “air-gap.” I did this by dropping the skirt below the chest’s bottom panel so the chest rests on the perimeter skirt instead of its bottom reducing the potential for moisture absorption through direct contact with the ground/floor. Better-quality casework in past centuries often incorporated this design detail because it works.

Ventilation

The second design detail I employed was to scallop the base/skirt to allow air to circulate underneath the toolchest from all four sides, and to facilitate cleaning. This too is a traditional detail superior to simpler modern designs.

Better Woodworking Through Chemistry

The third rot-prevention measure I employed is more or less modern. I saturated the frames and panels of the chest’s bottom as well as the skirt in CCA (chromated copper arsenic) wood preservative using plastic bags and a vacuum pump, then let the wood dry thoroughly. I also primed/painted the bottom panel with high-quality latex paint to keep out water and seal in the nastiness of CCA.  

CCA is a very effective chemical that was not available before the mid 1930’s. Its use is restricted in the USA in some places, and is no longer available for retail sale in a few States, but despite what the coke-snorting enviro-despot lying lawyers in North Venezuela (the coastal badlands nestled between Mexico and Oregon) opine, it is quite safe if used properly. The key is to not ingest it. Please everyone recite the wood finisher’s pledge along with me now: “I will not drink wood preservatives, use CCA impregnated toothpicks, nor wash my face with oven cleaner.” Don’t you feel safer now?

Wood treated with CCA has a greenish color. No doubt you have seen construction lumber pressure-treated with this chemical. Copper is the active ingredient which prevents the growth of bacteria and fungi. Arsenic is the primary insecticide. The chromium component has little if any direct preservative effect but serves to fix the copper and arsenic to the wood. We don’t want it leaching out, of course.

So far, the bottom is holding up perfectly even after spending years resting directly on the concrete slab-on-grade floor of a non-air-conditioned garage on the very humid (80~95% RH year-round) and horrifically termite-infested Pacific island of Guam, but the final verdict won’t be in for another 175 years. I’ll let you know how that goes.

In the next exciting chapter in this tale of high adventure I would like to present the most unique feature of my toolchest, the sawtill. Trust me, you have not seen one like it before.

YMHOS

A well-considered bottom

Other Posts in this Series:

If you have questions or would like to learn more about our tools, please click the “Pricelist” link here or at the top of the page and use the “Contact Us” form located immediately below.

Please share your insights and comments with everyone in the form located further below labeled “Leave a Reply.” We aren’t evil Google, fascist facebook, thuggish Twitter or the Congressional IT department of the Democrat Party and so won’t sell, share, or profitably “misplace” your information. If I lie may my toothpaste taste like oven cleaner.

Leave a comment