In previous articles in this frightfully sexually-charged series, Beloved Customer produced a design drawing for your gennou handle based on the parameters of your actual gennou head and your body. You should have also selected, or at least rolled out of bed onto the floor, bumped your head, partially opened one sticky eye, and seriously considered selecting, an appropriate stick of wood. Assuming you’ve procured said stick, let’s get to the layout.
Tools
There are as many ways to layout a hammer handle as Carter has pills, so I won’t insist you do it my way, nor will I dictate what tools you use, but after making dozens of gennou, hammer, axe and adze handles for myself and customers, I’m confident in recommending the following minimum set of tools:
Divider with sharp points (for finding centers and transferring dimensions and lines from drawing to stick;
Sharp pencil;
Small try square;
Marking gauges (Titemark and kama kebiki for quickly laying out centerlines and other details);
Marking knife;
Calipers (vernier, dial, or digital. For measuring internal dimensions of the eye, and precisely laying out the tenon)
Handplanes (for dimensioning purposes).
Dominic Campbell’s atedai workbench (in-progress) and his tools, including his gennou with classical-style Kosaburo head and beechwood handle
Preparing the Stick
You need to prepare the stick or board you selected after bumping your head to have 6 flat, parallel, square sides. As far as dimensions go, we need it to be a little oversized, e.g. longer, wider and thicker than the maximum final dimensions shown in the drawing.
You can prep this board or stick using electrical tools, but if you can’t do it with handtools alone, I strongly encourage you to work on your basic skills. Not as flashy as a halfgainer with a twist of lemon while falling from the bed, but surprisingly few have these skills nowadays.
Looking back on the old texts, one of the first tasks assigned trainees in cabinetmaking technical schools and apprenticeships was making a number of sticks or boards with six precisely dimensioned, flat, wind-free, parallel, 90˚ sides just like this because this simple job combines many of the essential woodworking skills, readily makes mistakes apparent to encourage improvement of basic skills, and helps one’s develop an understanding of the material.
Your humble, bumbling servant too was once required to make several boards and sticks just like this using handsaws, handplanes, a trysquare and marking gauge in front of others before I was permitted to be taught more advanced skills. Powertools are fine, but if you haven’t done this before, now is the time to perfect your technique.
Layout
The following layout steps assume the stick has already been dimensioned as described above.
Begin your layout by selecting and marking a flat and wind-free side of the selected board corresponding to a profile view on the drawing to be the “reference face.” You can write “RF” on it to avoid confusion. I just draw two quick lines in pencil at an angle across the board’s surface at both ends. Don’t forget to label this critical surface somehow so there will be no confusion moving forward.
Plane the surface of the board that will form the handle’s back edge (seen from above in plan view) flat and perpendicular to this reference face. All further layout will be indexed from these two faces.
Mark the maximum thickness of the handle on the surface opposite the reference face, as determined by the widest dimension of the butt, using a marking gauge against the reference face.
Plane all the surfaces flat, free of wind, and where appropriate, planar. This needs to be done pretty precisely.
Use a marking gauge to draw the appropriate centerlines on both sides, edges, ends of the board/stick.
Use dividers to measure and layout the width of the eye, plus a little extra, centered on the centerline you just marked, and spin this around the eye, butt, back edge and front edge.
Make paper, cardboard, or wood patterns based on your design drawing of the handle’s elevation and profile views. Paying close attention to minimize grain runout, especially in the tenon and neck area, position the patterns and mark the board accordingly.
Using these cardboard patterns, carefully layout all the tenon’s dimensions on the board, measured from the reference face and back edge. Be sure to make the tenon a half-sheet of copy paper too large in width and thickness. This can be trimmed down later if the fit is too tight. Layout of the tenon is critical so don’t f* it up.
Adjust the lines of the handle design to meet your requirements for beauty.
In the next post in this series we will begin making sawdust. Oh joy!
Two Trolls by John Bauer, 1909. Not wanting to pay the construction costs of the bread oven with its gracefully artistic hinges your humble servant has just installed, exceedingly parsimonious Granny Troll is trying to convince me to climb inside the hot oven and do a closeup inspection. Will I fit? More importantly, do you like my fetching new safety shoes?
If you have questions or would like to learn more about our tools, please use the questions form located immediately below. To see a list of our tools and their pricing, or to contact us, please click the “Pricelist” link here or at the top of this page, or email us at Covingtonandsons@gmail.com.
Please share your insights and comments with all Gentle Readers in the form located further below labeled “Leave a Reply.”
We see data miners and their bots as dastardly sneak thieves and so promise to never share, sell or profitably “misplace” your information for any reason. If I lie may the heads of all my hammers fly away to Valinor!
No doubt Gentle Reader will agree that the sights, smells and other sensations of working wood are wonderful. And of course we all appreciate owning beautiful, enduring, useful objects made from wood with our own hands and tools, but how best to obtain this supremely sustainable environmentally-friendly material for our projects?
For purposes of this article I am assuming Gentle Reader does not use fully-milled S4S (surfaced four sides) boards exclusively, nor that you start each project from standing trees or even logs, but rather begins your projects with rough-sawn lumber of the sort pictured above and sold not at home centers but at lumber yards.
If this assumption is correct I encourage you to build a relationship with small sawmills, often located far from the beaten track, who are willing to sell directly to craftsmen at their yard. This may take some hunting and travel. And you will need to build mutually-beneficial, respectful relationships with the owners of these small businesses. To that end, I encourage keeping a few things in mind and acting accordingly.
Remember that, while sawmills are small businesses, Sawyers aren’t shop keepers, waiting by a register at Home Despot with nothing to do but play Candy Crush Saga on their iPhone until you arrive. They are always busy, their profit margins are thin, and their time is money, so if you want to do business with them, you would be wise to not waste their time. This requires forethought, planning, preparation and action as outlined below.
Planning
Your humble servant is fond of making a good plan, and then working that plan, while remaining flexible and responsive to reality. In commercial situations, a good plan for woodworking must include complete drawings with dimensions and clear details, materials specifications, a cost estimate, a time schedule and a reasonable contract to be reviewed and approved by all parties involved before work begins. And shop drawings too must be produced and approved, of course.
But in the case of personal woodworking for pleasure, I like to leave the details of the plan a little looser, a little more flexible to allow me to better adapt to time, cost and material constraints and to permit interesting improvisation. My tools love improvisation. What about yours?
When it comes time to procure wood, we need at least an initial plan that lists approximately how much wood we need, its species, length, width and thickness. This plan must take into consideration the limitations of the tools (e.g. jointer, planer, bandsaw etc.) we have at our disposal to mill the wood after we purchase it. With this in hand, and assuming a realistic fudge factor of 13~20%, we’re ready to go hunting for wood.
Seeking a Source of Wood
Home centers and lumber yards are convenient to purchase wood from, but the cost may be relatively high and selection may be poor and/or boring. Given the option, and the ability to transport the wood (or to have it delivered), I prefer to purchase directly from small sawmills instead.
When I was residing in the USA, locating sawmills was not easy. I ended up purchasing hardwood mostly from Amish sawmills in Central and Eastern Ohio, and both hardwoods and softwoods from mills in the mountains of Northern California and Southern Oregon. But nowadays the internet appears to make sourcing much easier.
Father and son surfacing boards in an Amish sawmill
I enjoyed purchasing wood from Amish mills. No frills, no BS, just honest wood sold by honest men. They’re not as convenient as Home Despot. They don’t advertise, don’t have websites, may not have telephones, won’t do email, and they’re always closed on Sunday, but if you drive into Amish country and ask around at local stores and gas stations you can usually find them. They are deeply religious and absolutely family-oriented folk, so watch your language, be polite and respectful, and be sure any women accompanying you dress modestly.
I don’t trust evil Google anymore, but a quick search on DuckDuckGo just now listed dozens of sawmills selling lumber to end-users around the US. A local Chamber of Commerce might be able to direct you too.
Other sources of information about sawmills I’ve had good luck with are cabinet shops, stair shops, custom door shops, millwork contractors, and interior contractors, all businesses that buy a lot of roughsawn wood. Better to drop by and ask in person than to just telephone or email.
A diesel-powered Amish bandsaw mill
If there’s a woodworking club or guild in your area they’ll know the local suppliers for sure and for certain.
Storage
Before you select and purchase your wood you should make sure you have space to store it unless, that is, you plan to cut it all up in a day or two after purchase. Be sure you don’t buy more than you can conveniently and safely store.
Improperly storing lumber so it’s not supported correctly will cause it to warp. If it’s exposed to rain and snow the resulting differential moisture content will always cause warpage. And of course, your boards may become dirty, or bugs may infest it. I hate wasting good wood.
If your ceilings are high enough, you can stack boards vertically, leaning against the wall in a corner of your apartment, house or garage. Be sure to stack it carefully so it won’t warp. Most importantly, tie it off securely so it can’t fall over and crush your kiddies. Notice I wrote “can’t” not just “won’t.” This deliberate choice of language is evidence of my deep confidence in Murphy’s active inclination for malicious harm. Indeed, here in Japan, most lumber is stored vertically, and many injuries and even deaths have resulted from toppling lumber.
A Gentle Reader pointed out that storing lumber this way with the board’s end resting directly on soil may invite termite infestation. Of course this is absolutely true, assuming the ground touching the board is infested with termites and the moisture content of the soil and wood are inviting to such insects, conditions that are often easily met. Best to elevate the boards above the soil by resting on concrete, bricks or cinder blocks, or on the floor of your apartment, house or garage, as noted above.
A Japanese lumber warehouse with vertically-stored product.
The best and safest way to store lumber, IMHO, is to place some stickers (three minimum) on a level floor, in a place protected from the weather, and to neatly stack your lumber on them. 2×4’s placed on edge are usually good, but you may want to skew them a bit for improved stability in the long direction of the lumber they will support. Be sure these stickers are all the same width and that once placed the top edges of all your stickers are situated level and planar (in the same plane). Don’t assume for a second that the floor or ground are level. If your check confirms it isn’t, shim the stickers so they are level and planar.
Use a spirit level to confirm the top edges of your stickers are level, and a stringline (aka “dryline”) to confirm the top edges are all planar.
Place thin stickers of uniform thickness between each layer of your lumber, so it will continue to dry without warping.
It’s easy to store lumber outside under the eaves of a building, but since it will be more exposed to rain, snow, weather, dust and critters, a few extra precautions may be called for. Once again, place your stickers properly and lay plastic sheeting on top of them. Then stack your lumber on top of the plastic, and wrap the plastic over the top of the stack so rain and snow can’t wet the wood, but leave the ends loose and tented so air can circulate. It may be best to place a few sheets of plywood or roofing material over the stack, well-weighted down so it won’t blow away during a storm.
Once your lumber is stacked, place newspaper or other paper on top to protect your beautiful wood from airborne dust and grit. Plastic is OK if the stack might be exposed to rain, but be aware it may slow the wood’s drying and/or cause the growth of discoloring mildew, so you may want to plan for some air circulation.
Another storage option is to attach steel or wooden brackets high on the wall of a garage, barn or outbuilding that can safely bear the weight. The top edge of these brackets needs to be level and planar to prevent the wood from warping. Don’t place your lumber directly touching these steel brackets, however, but lay down plastic or wood under your lumber to prevent dark lines of iron corrosion from developing in the wood.
Again, place newspaper on top of the stack to protect it from dust accumulation. Getting wood safely onto and down from these high brackets may be challenging, so be careful.
Preparation & Action
Once you’ve formulated a plan, located some potential sawmills or sources, and arranged safe storage, it’s time to take action. I recommend the following preparations and actions.
Call ahead or visit and make introductions, describe your needs in some detail, and arrange a time to select wood. Make sure the proprietor understands that, after an initial perusal, and on condition he has the wood you need, you will conclude your purchase immediately with hard cashy money and without any tedious paperwork. The Amish, for instance, accept only cash.
Know what variety, and approximately how much wood you need before calling the sawmill. For instance, you need to be ready to say something like “I need 200 board ft of 8-quarter (2” thick) maple, 10’ long 10” wide. ” He may not have that species wood, with that figure, in that size, in that quantity in-stock. Even if he doesn’t have exactly what you need, he may be able to suggest alternatives, or point you to other suppliers.
Be sure to ask if the wood he can supply has been kiln-dried or air-dried and how close he thinks it might be to equilibrium moisture content. He may not know, and that’s alright too. On the other hand, if he says everything he has in-stock is freshly milled and sopping wet, you may want to look elsewhere unless you’re prepared to wait for a couple of years for the wood to dry in storage.
Learn how to evaluate lumber grades and how to calculate board-feet.
Ask the following questions:
“Do you have a minimum sales volume or dollar amount?” He’s not a Home Despot focused entirely on high-volume retail sales in small quantities, after all.
“How late are you open?” Sawyers tend to start work early, so you need to be done with your selection and complete payment well before he locks the gate at the end of his workday.
“Can I bring my truck into the yard to load, or must I park out front?” and “Where should I park my truck so it’s out of the way?” Customers parking willy-nilly and blocking traffic are a frequent problem for most lumberyards. If he won’t let you bring your truck into the yard, you’ll need to bring/borrow a cart or be willing to hand-carry your boards to your truck.
“Are there any varieties of wood or stacks not for sale?” Sawyers often receive orders from regular commercial customers months in advance and keep partially-filled orders set off to the side, so while it may appear he has plenty of the wood you want, it may not be for sale, or he may be unwilling to break down a stack for the few pieces you intend to purchase. If he does have such reserved stacks, find out which ones they are, don’t touch them, and don’t pester him about them.
“What are your safety rules in your yard?” As mentioned above, the Sawyer may require you to use full PPE (personal protection equipment) including safety shoes, hardhat, safety vest, safety glasses, ear protection, and cut-resistant gloves, or he may be OK with your usual business-casual attire of frayed jeans shorts and flip-flops. Fashion statements aside, it’s just professional to be prepared and learn the rules beforehand.
When you visit the mill, bring all the safety equipment the yard rules require. Even if they are not required, please have the sense to wear certified safety shoes, an orange or yellow reflective safety vest (very important in a lumberyard where vehicle and foot traffic meet in tight quarters), and to have cut-resistant safety gloves tucked into your belt. It is also wise to bring safety glasses, ear protection, and a certified hardhat just in case. You may think you don’t need this PPE, and perhaps you won’t, but the Sawyer’s yard safety policy and/or insurance may require it. Best to be the prepared professional.
Bring a tape measure and moisture meter with you to check the actual moisture content of the actual wood yourself before you purchase it because, if it’s too wet, you will need to sticker/store it while it dries. Be sure you understand the acceptable range of moisture content you buy. 12% is pretty good for lumber stored outside, and 18% may be just fine, but 30% MC will be too high. High moisture content may not be a problem if you know how, and are prepared, to deal with it, but even then please don’t pay full-price for lumber you’ll need to dry for a year or so before it’s useful.
Be prepared to attach at least one red or orange safety flag to any lumber you purchase if it projects out past the end of your truck’s bed much (6′).
Bring enough rope and/or ratcheting safety tie-downs to keep the lumber you purchase from shifting in the bed of your truck while underway. Watching your newly-purchased pretty boards spread artistically all over the freeway in your rear-view mirror may be exciting for you, but I guarantee you folks in the vehicles following will not thank you.
Be prepared to do all your own grunt work, including sorting, lifting, carrying and loading. Don’t expect the sawyer to do more than use his forklift to move stacks around for you, even if you’re accustomed to other retailers accommodating your bad back. Bring a helper if necessary. Bored sons and young boys are useful for this and can benefit from the experience, at least that was my father’s viewpoint, and in retrospect, I heartily agree. Be sure any young folk that accompany you are cautious, respectful and follow the sawmill’s rules, as will you. Provide cut-resistant gloves so their mothers won’t berate you for any cuts or slivers they manage to collect. Modern mothers are irrational about that sort of thing. And hi-viz safety vests can prevent crushed kiddies.
The Dude Abides
In the Lumberyard
Dealing with retail customers that purchase in small quantities is a pain for all businesses, so if you want to develop a reliable source for good wood without buying by the trailerload, make of yourself a mellow, good customer. The following tips will help.
Jimmy Choo’s Safety Shoes from his new “Prostate Exam” Collection
Leave Fido, your pet goat, your mother-in-law, and all small children at home where they’ll be safely out of the way. I grew up in lumberyards, so I know how dangerous they can be with trucks and forklifts operated by tweaker teenagers zooming around, teetering stacks of wood aching for a chance to topple, and sharp slivers, nails and bloodthirsty staples sticking out everywhere. If you bring a teenager to help, be sure he too wears the required PPE.
Most Sawyers are not setup for efficient retail sales, and few can process credit cards or online payments. Of course, checks from people they don’t know well are never welcome. In fact, he may not agree over the phone or by email to sell to you directly at all, but once you are face to face, cash in hand, and you flash your best Brad Pitt smile, everything should be fine. In any case, it’s important you help make the selection and payment processes go as quickly and smoothly as possible, so unless you have an account with the Sawyer, be prepared to pay the exact amount in cash, without requiring change for big bills.
If you need to park your truck in spaces between stacks, leave your keys in the ignition when you step away for a bit so the Sawyer can move it to allow large trucks or loads of wood to pass.
When sorting through lumber stacks, set some stickers (at least three 2×4’s on-edge) on the ground nearby (out of the way of passing trucks and forklifts) to temporarily place the lumber you’ve removed from the stack and to keep it off the ground and clean.
Never place a board directly on the ground or pavement until you’ve paid for it. And don’t ever be so rude as to toss boards you haven’t paid for.
Never step on wood until you’ve actually paid for it. It isn’t yet yours to mark with your pretty pink boots from Manolo Blahnik’s Ironworker Collection.
Never place the end of a board into dirt or gravel until you’ve paid for it.
Keep a running count of the board feet and approximate grade of the boards you have selected to purchase. Tell the Sawyer your final count, and show him your calculations, but be prepared to defer to his count if it differs, at least until you become a large-volume customer.
Lumber dealers, and especially those who are accustomed to selling in volume to commercial accounts, dislike customers who “cherry-pick” their stacks taking only the best boards and leaving mediocre boards behind. More despised are those rude, lazy souls destined to roast for eternity spitted and rotating over Satan’s tar-fired barbecue pit who leave stacks a disorganized jumble inducing the remaining lumber to warp. Please firmly control your inner penny-pinching Scrooge (excruciatingly difficult for many) and select a mix of boards, not just the best ones. They’ll all come in useful. If the only boards you can find are hopelessly useless, discuss the problem with the Sawyer using a non-belligerent, even apologetic, tone of voice. If it’s your first time visiting this sawmill, consider buying some sub-standard lumber just to get off on the right foot. Hopefully he’ll make it up to you next time.
After sorting through a stack of lumber, if reasonably possible, be sure to expend the time and effort to fix or realign the stickers so their top edges are level and parallel (a spirit level and a stringline are handy for this task) and always neatly restack the boards you’ve moved but won’t be purchasing so the stack looks better, is more orderly, and more stable when you leave than before you touched it. This is supremely important. Besides looking tidy and saving the Sawyer work, this minimum human courtesy (vs. arrogant, pigish rudeness) will help preserve the value of the lumber you leave behind, it will show respect to the Sawyer, and will earn you respect in turn so you’ll be welcomed back again. Sawmills often give slightly better rates to return customers with such professional manners who make less work for them. The inverse is also true.
Bring something to share with the guys at the lumberyard and office they can enjoy and that will cement your cherubic face in their memories. For example, personally hand each one a cold beverage, or a couple of your wife’s award-winning double-death-by-chocolate chip cookies. It helps to make friends.
I hope this little article has been a little useful.
YMHOS
Just where the heck is that stack of 8/4 zelkova wood he mentioned?
If you have questions or would like to learn more about our tools, please click the “Pricelist” link here or at the top of the page and use the “Contact Us” form located immediately below.
Please share your insights and comments with everyone in the form located below labeled “Leave a Reply.” We aren’t evil Google, fascist facebook, or thieving Instagram and so won’t sell, share, or profitably “misplace” your information. If I lie may slivers infest my bed.
An antique craftsman-made sumitsubo with shishi lion and peony perched on the lip of the “pond.”
A good tool improves the way you work. A great tool improves the way you think.
– Jeff Duntemann
Over the years your most humble and obedient servant has received many inquiries from Gentle Readers new to woodworking about what tools they should procure at the very beginning of their adventure. The internet is chock-a-block with both confounding confusion and beaucoup BS on this subject, some dribbling from amateurs and even more sprayed by marketing pukes and clickbait sages. Heretofore I haven’t really scribbled anything on the subject in this blog.
But now, at this fork in the crossroads, beginning with this article your penitent servant will share some thoughts about what tools a beginner needs to perform a lifetime of excellent woodworking, with minimum wasted time and funds, and the recommended priority for obtaining them.
Reluctant Advice
From this point forward I will be so bold as to make some suggestions about the the tools I recommend.
But first allow me to explain my viewpoint on the subject to help you gauge how much saltpeter and sulfur to mix with your charcoal, if you follow the allusion. You see, I enjoy giving Beloved Customers excellent choices in tools, but I’m allergic to giving casual advice. Why? Because even advice given honestly, with the best of intentions, and without profit motive often yields bad consequences. And sneezing.
In Proverbs 12:15 it’s recorded that Solomon the Wise (and disobedient) taught the following: “The way of a fool is right in his own eyes; But he who heeds counsel is wise.” Sounds good, I suppose, but does this mean that the man who’s convinced his honest decisions are correct, even after much study and experience, must still be a fool? Are only those who rely on counsel wise? What if the counselor he relies on is a blasted fool or a greedy, lazy influencer? Is all counsel equal in value?
King Solomon’s most famous descendant once said “Ye shall know them by their fruits.” Sounds like reasonable evidence-based judgment to me. So what were the fruits of Solomon’s advice? The record tells us that he thought his judgement so wise that he frequently ignored it on an epically immoral scale and with tragic, destructive results.
While less decisive than Proverbs but equally concise, I think Professor Tolkien’s insight on the subject may be even wiser, and so I have taken it to heart. In the Lord of the Rings he wrote “Advice is a dangerous gift, even from the wise to the wise, and all courses may run ill.”
Solomon’s fabulous famous folly aside, your humble servant has seen first-hand ostensibly wise advice purchased from reputedly wise “experts” at unjustifiably high cost run horribly ill too many times, so I dislike giving advice. And there’s the sneezing thing too, of course.
But since advice is what’s required, in this series of articles I will climb far out on a skinny tree limb to offer the following advice on two conditions. First, I insist Gentle Reader accept the value of this advice as worth no more than what you pay for it (nothing), and second, that any consequences that spring from your acting on this advice are entirely yours. Accordingly, I won’t be offended if, like Solomon the Wise, you decide to ignore it entirely and get yourself another hundred foreign girlfriends instead.
Anyway, back to the subject at hand.
Tool Categories
The following are the four basic categories, by function, of the tools I believe a beginner needs to possess to get started in a lifetime of woodworking, whether as a career or hobby. You’ll most likely need all the tools listed here eventually, but you won’t need them all at once to make excellent things from wood. The categories are as follows:
Measuring, Marking and Layout Tools:
Sawing Tools
Chiseling Tools
Planing Tools
Of course, depending on your projects, you’ll need tools that don’t fit neatly into these four categories, such as those used for processing trees and making lumber, nailing, boring/drilling, screwing, gluing, clamping, laminating, sanding, edge treatment, assembly, and finishing. When it comes to these other categories of tools, I can only encourage Gentle Reader to rely on your prodigious innate common sense.
Each list is divided into two tiers. The first tier includes absolutely necessary tools. The second tier lists essential tools you will eventually need, but can get by without until later.
So let’s begin by examining the minimum measuring, marking and layout tools every beginner needs. I will deal with the other categories in future posts. If I’ve forgotten anything critical, please let me know in the comments form below.
Essential Measuring Tools (Tier 1)
While chopping, sawing, carving, joining and planing get all the attention, final results in woodworking (and all physical trades for that matter) can never be better than one’s skills at measuring, marking and layout, so woodworkers and builders need to own the related tools and master them.
By no means sexy jobs, both ancient and modern history provides endless examples of poorly performed measuring, marking and layout work buggering cost, schedule and quality goals with a barge pole wrapped in barbed wire. No wonder these jobs have historically been assigned to the most experienced and intelligent craftsmen. The simple tools included in this category will serve you well in any handwork activity, not just woodworking.
One caveat. I have listed a few tools below that are modern precision tools beginners should own and learn to use skillfully, but I know a few purists who find such tools violently repulsive. The truth is that the more experience one obtains, the less one tends to rely on absolute measurements in millimeters, inches, or cubits, and more on relative precision. But possessing the tools to perform precise measurement is nonetheless necessary if you plan to do quality work.
Necessary Measuring Tools (Tier 1)
You’ll need the following essential measuring tools from day one.
1. Quality Tape Measure with an accurate sliding hook (check to make sure it’s not sloppy). Size will depend on the projects you plan to undertake, but 2-4 meters is a minimum useful length for cabinetry, furniture making and joinery. Get a reputable name brand, with a warranty. Avoid like an Asian giant hornet with flaming hemorrhoids any cheapo crap made in China, India or Vietnam. Tape measures are a bit delicate and don’t last forever, so treat yours gently and check it frequently against your precision straightedge for accuracy and damage. Do not rely on it for great precision. Since ancient times the folding scale has been thought superior, a sentiment with which I agree in the case of some jobs. But in general nothing beats a quality steel tape measure for most quick and dirty measuring tasks.
2. Precision Straightedge (12”/300mm long) with accurately, deeply etched graduations. This is a precision measuring and layout tool. Good quality graduations are useful for precisely indexing and guiding layout tools such as pencils, pens, divider points, and a marking knife. Hardened stainless steel is ideal for durability. Best if it’s made to high quality standards (JIS, etc.). You’ll use it not only for measuring and checking the accuracy of your other tools, but more frequently for checking that surfaces are flat and free of wind (twist). If treated with respect, it will serve you well for a lifetime.
3. Try-square (see item 2 below). The handy dandy try square has many uses as a measuring tool, but rather than making numerical measurements, its most important job is checking that right angles of components, tools and assemblies are indeed 90˚ , a check one must make constantly and quickly when planing/machining the components of furniture, joinery and cabinetry and casework not to mention setting up portable and stationary power tools. Most try-squares sold nowadays are poor quality Chinese or Indian junk that are out-of-tolerance when new. I too like pretty tools and realize that a plain stainless steel square doesn’t look as cool as more traditional squares with rosewood stocks and brass fittings, but the blade and the stock should both be made of stainless steel and should be solidly welded to each other, not glued or pinned. Best if the blade is hardened. Graduations are not necessary. Get this essential tool wrong and all is lost.
Necessary Measuring Tools (Tier 2)
4. 1-meter stainless steel precision straightedge. This tool needs to be certified by a reputable standards organization, such as Japan Industrial Standards Committee (JIS), NIST: National Institute of Standards and Technology (USA); UKAS United Kingdom Accreditation Service (UK); DIN (Deutsches Institut für Normung), etc.. Why does certification matter, and why is it worth the extra cost? Fraud and deceptive marketing are more common now than ever, with many well-known manufacturers taking a page from Chinese Best Industrial Practices of bait, lie, mislable & switch. In the case of a tool certified by an organization such as NIST, JIS, DIN etc. with a valuable reputation to lose, you are much less likely to be fleeced by quality crooks. Indeed, this tool, along with the 12″/300mm straightedge and try square listed above must be accurate enough to serve as one of your own in-house “standards.” It must not only be extremely straight when new and stress-relieved, to avoid future warping, but it must have deeply, uniformly, precisely-etched graduations. It’s OK if it spends most of its life hanging from a nail on the workshop wall, because there will be times when it will be critical for quickly for checking surfaces for flatness and wind, layout, assembly, dimensioning boards and fettling handplanes.
5. Caliper Gauge: This gauge can be of the vernier, dial or digital variety, whichever type you like and can afford. Once again, buy a certified product. This tool is useful for precisely and quickly measuring, comparing and laying out distances and dimensions. Some are sold with carbide tips convenient for directly scratching layout arcs/lines/points in harder materials such as metal or stone. Will you use it constantly? No, but for those tasks where it’s needed, nothing works as well or as quickly. Quality vernier calipers cost much less than the dial or digital variants, and are not as delicate, but take more time and concentration to use well. Once again, nothing made in China, India, Vietnam, Cambodia, etc. When in doubt, I buy Mitsutoyo.
Necessary Layout & Marking Tools
Try Square (same as see item 3 above). This tool is absolutely indispensable for layout and marking of joinery, cabinetry, and furniture work. 100-150mm is a handy size for furniture work. Even if your workshop has been thoroughly purged of pernicious pixies this tool will be dropped, and will wear out in-use, so a useful one will have a welded (not just pinned) connection between the thinner blade (aka beam or tongue) and the stock. And, this is important, the blade will be made of hardened stainless steel. Graduations are totally unnecessary. Used for marking 90˚ lines and checking for squareness. Matsui Precision makes the best one I am aware of after much searching and hands-on experience in the field.
7. Framing/Carpenter’s/Builder’s Square.
Essential for checking lumber, laying-out and marking of larger joints, casework, checking square of larger joints and assemblies, working with doors, panels, and plywood, and many other tasks. Regarding materials, carbon steel squares are heavy and always turn red and go away, so I don’t recommend them if you have a choice. Stainless steel is more durable, but still heavy and costlier. Aluminum will suffice. You may need to true it, but this is easily done with a hammer, punch and file. Just ask me how when you think it’s necessary. This is a tool with a long history you should be proud to own. In all nations more than a few centuries old, the carpenter’s square has been associated with stability, honesty, righteousness and order, all traits a craftsman should seek to foster in himself, his family and his crew. In Japan, this tool was traditionally extremely expensive and was considered the craftsman’s “spirit” in the same way the sword was revered as the warrior’s spirit by the warrior caste. Indeed, in past centuries, stepping over a carpenter’s square resting on the floor or even ground was seen as a mortal offense resulting in bloodshed at times. Such emotional sentiments did not extend to other carpentry tools. The Japanese version of this tool goes by several names written several ways including “kanejaku,” “magarijaku”(written 曲尺or 矩尺), “sashigane”指矩, and several other names. Don’t ask me why. Unlike the Western square of uniform thickness, the better Japanese kanejaku have a variable cross section for less weight/greater rigidity. Being thinner, smaller, more flexible, and much lighter in weight, the Japanese square is handier to transport and use in the field. Of course, it has a couple of disadvantages such as not handling longer/wider boards as well, and being more difficult to control because it’s more flexible. Horses for courses, of course, so I own and use both types.
8. 45˚ Stainless Steel Layout Tool or quality speed square for laying-out miters. An accurate combination square will work too, but such tools are relatively expensive and quite fragile. The Shinwa tool shown below is cheaper, much tougher and absolutely reliable.
9. Marking Gauge: There are many types of marking gauges, most of which the craftsman can make himself without special tools or machinery. Perhaps this will be the subject of future articles. In any case, you will need at least 2 types of gauges.
The venerable old Stanley No.65 marking gauge.
The classic type has a single pin or blade to cut/scratch a single line with each stroke and has been around since Moses wore gator skin loafers. You can make versions from scrap wood, nails, or scrap steel easily yourself.
An excellent kamakebiki mortise gauge by Kinshiro
The second marking gauge you should have is called a “mortise gauge.” This tool has two pins or blades to make 2 parallel lines, at a set distance from each other, with a single stroke. It’s especially suited for quickly and precisely marking mortises and tenons and installing hardware. I prefer the Japanese version of the mortise gauge called the “kamakebiki” (sickle mortise gauge shown above) which has two L-shaped steel blades, easily adjusted and easily resharpened. A handy tool indeed.
Having multiple marking gauges on-hand will help to minimize the time you must spend resetting/adjusting the pins/cutters, a principle key to performing precise work consistently because every time a gauge is reset, error creeps in, sure as pigs are made from bacon. Marking gauges are simple tools easily mastered, but don’t underestimate the importance of owning a few and mastering them completely.
TheTite-Mark marking gauge
The Titemark gauge is an excellent tool, not only because it cuts consistent lines, but because it can be quickly and precisely set using a single hand and no tools. The only downside is the depth of cut is shallow and the cutter is easily damaged.
10. Carpenter’s Pencil. Useful for the same marking jobs as a plain pencil, but if one sharpens its wider lead to a chisel edge, it will be more durable (won’t break as easily) and last much longer than a standard pencil.
11. Divider/Compass. An essential tool for layout used to quickly and accurately transfer distances from straightedge or layout stick etc. to a workpiece. Of course, it can perform all the classical geometrical tasks that have made this tool essential to skilled craftsmen, architects and engineers worldwide for millennia. A spring divider is adequate, but finances permitting, Starrett 92-6 or 92-9 dividers shown below are worth every penny. I always have at least two on-hand to minimize the lost time and inaccuracy frequent resetting entails.
12. Ballpoint Pens:Not often thought of as a precision layout tool, inexpensive ballpoint pens are more durable than pencils and can make a permanent mark or line of consistent width without needing to be resharpened. Too wide for accurate layout, you say? Practice perfectly sawing in half the centerline of a line drawn with a pen and you’ll change your tune.
13. Marking Knife and/or Scriber. Instead of leaving a line of ink, chalk or graphite on the surface of a board, these tools cut or scratch a permanent line into the surface of material being worked into which divider points and the blades of cutting tools such as chisels, saws and even planes can be indexed quickly, reliably and without the need for expending much attention, greatly increasing speed and confidence in one’s layout. Essential tools. Here’s a Link to an article on the subject.
A Japanese-style marking knife, a simple but surprisingly sophisticated tool.
14. Inkpot and/or Chalkline: For making long straight lines on wood, concrete, steel, gypsum board, etc. The article at this LINK contains more details
15. Colored Marking Pens or Lumber Crayons: Marks made with colored marking pens or lumber crayons, while not precise, are helpful for speedily marking/identifying the orientation and/or relative position of parts, pieces and components in an assembly. For instance, a blue stripe, or two parallel black lines on the end of a part or tenon, might be drawn to indicate right-hand, or North, or front direction in an assembly. I sometimes draw an arrow to orient the front of the assembly or to indicated the direction/location of a reference surface or part, etc. Of course, drawing the cabinetmaker’s pyramid is essential for joinery and casework. The marking convention you choose is, of course, up to Gentle Reader, but having one and using it will help your work go faster and with less confusion, especially if you must set the part aside for a few days or even months. Lumber crayons are especially useful for marking lumber for dimensioning and planing.
Storage, Transportation & Protection
With the exception of the 1-meter long straightedge, and that only because it’s inconveniently long and I want to protect it from dents and dings, I always keep these measuring, layout and marking tools located in the handiest place in my toolchest when I’m in my workshop, or in my portable toolbox and/or toolbag when I’m working in the field.
If you carry these tools outside the workshop, and intend them to be lifetime tools, I recommend you make a simple case for each tool, of cardboard perhaps, to cushion them in your toolbox to help retain precision, to keep them from dinging each other, and help to them last longer. Only then can you reasonably expect a long, mutually profitable relationship with these good friends.
In the next installment in this swashbuckling adventure we will consider the next category of tools the beginner needs: Saws.
YMHOS
I salute you! Woof!
If you have questions or would like to learn more about our tools, please click the “Pricelist” link here or at the top of the page and use the “Contact Us” form located immediately below.
Please share your insights and comments with everyone in the form located below labeled “Leave a Reply.” We aren’t evil Google, fascist facebook, or thievin Tik-Tok and so won’t sell, share, or profitably “misplace” your information. If I lie may pug pirates make me walk the plank!
[This article was written by the energetic Doctor Antone Martinho-Truswell, a Most Beloved Customer and Dean at St Paul’s College, University of Sydney. While not as scholarly as his fascinating and romantic earlier guest post titled Permanence, in this article Antone has graciously shared an aspect of his woodworking experience that will resonate with many Gentle Readers. Please enjoy.]
A few weeks ago, I was putting the final touches on my most recently finished, and largest, woodworking project to date. Over the past 18 months, interspersed with dozens of smaller and more pressing projects, I’ve constructed this tea-house styled cubby house for my daughters, complete with engawa, shoji screens (already torn and patched), Aussie-style “tin roof”, and tiny roofed reading nook overlooking Australia’s Blue Mountains National Park. My daughters made the paper garland to celebrate the opening of their new palace.
Engawa view
With this project I set myself the challenge of making the entire structure using only handtools (save a cordless drill for the roofing screws), and to use primarily reclaimed timbers. The timber frame, floors, and inside surfaces of the wooden walls were all hand-planed with a kanna, and all of the joints hand-cut. This involved cutting some 300 joints, and an almighty amount of handplaning.
But it was the ripping that did me in. Or rather, did in my tools. Between the wall panels, floorboards, shoji frames, and the joints themselves, this involved a tremendous length of rip cuts in very hard Australian woods. As I celebrated the completion of the project with a glass of vintage Château Thames Embankment while gazing across the verdant valley, I considered the small collection of exhausted Japanese rip saws the project had left in its wake.
I had been using modern, disposable-blade, induction-hardened Japanese saws on this project, and two, in particular, gave the ultimate sacrifice in the process.
One saw was a rip single-edged kataba already fairly used up on other projects, the other a fresh but inexpensive ryouba that I dedicated to this project in particular. As Stan has noted before, these induction-hardened and mass-produced Japanese saws are excellent tools – sharp, effective, and long-lasting. Moreover, I had been putting them to more punishing work than usual – “in the field” rather than the workshop, cutting reclaimed timber replete with grit, dirt, and other dulling faeries that grinded away their cutting edges.
I am normally meticulous in following Stan’s advice to clean one’s timber and remove dirty, gritty surfaces with dedicated roughing tools before putting quality blades to work, but this project called for a different approach – there was too much timber to efficiently clean before working it, and the inexpensive saw was purchased and dedicated to the project in order to prevent needless back-and-forth while assembling the structure in the garden, so it served as both roughing and finishing tool.
Later, while enjoying a refreshing beaker of Château Fleet Street, I realized two things. First, that my much older furniture-making ryouba had also been dulled by local faeries; and second, that I needed to replace my other workhorse handsaws.
Naturally, this meant contacting Dear Old Stan, the only solution when tools that work are wanted. (Stan, I’m waiving my copywriting fees for that tagline.)
After some back-and-forth with our reliable proprietor, I settled on three saws to renew the capabilities of my saw-box. Our discussion covered a few considerations:
I have no shortage of fine-tooth saws like dozukis and hozohikis, all of which are working fine and providing good service.
I am up for the challenge of re-sharpening rip teeth, but am wary of the time investment versus benefit of trying to sharpen the complex shape of Japanese crosscut teeth.
These new saws would be used for sawing stock to rough dimensions. I frequently make furniture from locally-sawn slabs, and so need to make long rips and crosscuts to efficiently break these down into smaller components.
I wanted saws that are nicer, more real, and more meaningful than mass-produced tools, if possible.
Gentle Reader will not be surprised to learn that Stan delivered all I needed and then some.
The firstcab off the rank was an antique 300mm ryouba labeled as being made of Tougou steel – a now rare tool steel produced by Andrews Steel of Britain. This is a stiff bladed, large ryouba, and a very handsome saw. Stan offered, and I enthusiastically agreed, to have this saw tuned, sharpened, and teeth re-profiled for hardwood by his saw-smith, Takijiro.
Takijiro trued and tensioned the blade, leaving behind the telltale henpecks seen on the sides of the blades.
This new saw’s first challenge was crosscutting a slab of camphor laurel planned for a coffee-table top, about 650mm wide and 40mm thick (after giving the slab a good scrub with a wire brush first). It took me about 2 minutes to complete this cut, and it was exceptionally easy to keep straight. I followed this with a 1200mm long rip cut through the same in about 4 minutes and equally satisfying. The cut surfaces were exceptional – very smooth and very straight, even with my paltry skills.
I could not have been happier with this saw, which came from Stan’s “miscellaneous ryouba” selection, and the decision to have the blade tuned and the original teeth replaced with dedicated hardwood teeth is something entirely to be recommended to all potential purchasers.
But one is never enough. And after years of reading Stan’s enthusiastic praise of them, I also wanted my own bukiri gagari, a much rarer and more specialized saw. Here, Stan was able to provide this beautiful 330mm blade made by Takijiro, again, sharpened, trued, tensioned, with hardwood teeth, and with a beautiful natural wooden handle to boot.
Nakaya Takijiro Masayuki, sawsmith extraordinaire
This saw is a joy to use. It’s much bigger than its 330mm size might suggest on first read. It feels like a much bigger, more substantial tool than the 300mm ryouba, despite the blades being notionally similar in size.
I soon became accustomed to using a pull saw with a “pistol grip” handle (aka “shumoku” handle), and sure enough it delivered a straight cut and quickly. I put this saw to the task of making the matching 1200mm rip cut on the other side of the slab, and the results were, as expected, fantastic.
I can’t overstate how much easier it was to make quality cuts with these quality tools. I’m not a professional carpenter, but neither am I a turnip, and can usually make a fist of accurate work even with subpar tools. And while I have some higher-end dozukis and other fine-toothed saws, I had kept my ryoubas and rough work kataba saws cheap and cheerful to this point. These saws were, if not quite like the light that shone round Saul on the road to Damascus, at least a bit like scales falling from my eyes.
The third saw I ordered from Stan was a mass-produced and induction-hardened crosscut ryouba, with an exchangeable 300mm blade – larger than is easily found here in Australia. The reason for this choice was explicitly related to one of my purchasing criteria above, namely that I suspect that I will not be attempting much crosscut saw sharpening any time soon.
The aforementioned ryouba and bukkiri gagari saws are both traditional, handmade saws with teeth that will require regular sharpening.
Stan kindly included in his package a tiny specialized saw file to accomplish this task. But I will be babying the crosscut teeth on the ryouba out of my own hesitancy to try to sharpen them. As such, I thought it wise to make use of the best of modern technology in this affordable, induction-hardened saw to be used whenever extensive rough cross-cutting, sometimes through less than immaculate timber, is required. It cuts very well indeed, and quickly, if without some of the romance and spirit of the handmade saws.
These saws are already the new front-benchers in my workshop, and doing excellent work. The only thing I recommend more strongly than Stan’s tools are his advice and counsel in selecting, using, and caring for them.
There are many people selling tools. But the world will never see the likes of dear old Stan.
As we say in Australia, here’s wishing you a Ripper Christmas! May the greatest of all carpenters be a light unto you and your loved ones.
Antone
Christ in the House of His Parents, oil on canvas by John Everett Millais (1849-1850), at the time a controversial painting much criticized by the likes of Charles Dickens because of its realistic depiction of a country carpentry workshop, especially the dirt, sawdust and shavings on the floor. But surely this is what a poor carpenter’s workshop in rural Nazareth would have looked like when Jesus was a small boy. Joseph is shown working on a simple battened door joined with nails, a standard carpenter’s job in all places at all times, but he’s stopped work to examine an injury on Jesus’s hand, perhaps caused by one of those nasty nails, foreshadowing future wounds, while Mary comforts her boy with a kiss. By no coincidence, a drop or two of blood has dripped onto the child’s foot further hinting of unpleasantness to come. In the background grandmother Anne takes over the job the injured child had been doing prior to the accident of clipping clinched nails, while young cousin John on the right (later known as John the Baptist) brings water to cleanse the wound, another ominous foreshadowing indeed. The apprentice shown on the left is said to represent Jesus’s future apostles while the sheep seen gawking through the open workshop door are said to represent the flock of Christianity. The ladder and the dove resting on it are also symbolic.
If you have questions or would like to learn more about our tools, please click the “Pricelist” link here or at the top of the page and use the “Contact Us” form located immediately below.
Please share your insights and comments with everyone in the form located further below labeled “Leave a Reply.” We aren’t evil Google, fascist facebook, or the Chinese Communist Party’s coordinator for blackmail, and so won’t sell, share, or profitably “misplace” your information. If I lie, may the tang of my bukkiri gagari saw break off.
There was no such thing as luck. Luck was a word idiots used to explain the consequences of their own rashness, and selfishness, and stupidity. More often than not bad luck meant bad plans.”
― Joe Abercrombie,Before They Are Hanged
n this article we will consider how to use the Japanese “hiraganna” plane to prepare boards, sticks, beams and posts for woodworking projects. For those earnestly focused on becoming proficient with the hiraganna, and desirous of avoiding most of the confusion and difficulties those without a kind mentor whispering guidance in their shell-like, and wacking them upside the head with a memory mallet to correct their mistakes, this article will have special value.
Let’s begin this adventure through fields of daisies by breaking down the work of the hiraganna handplane into two primary activities, namely dimensioning and finishing.
What is Dimensioning?
I apologize if this first part seems tedious to those Beloved Customers already well-versed in using handplanes, but as I’ve written many times before, the Gentle Readers of this blog include newbies, professionals, and many in-between, so a few extra words to aid the comprehension of less-experienced persons will not go amiss. Your excellency’s indulgence is humbly requested.
“Dimensioning” in this case means to reduce the thickness, width and/or length of a wooden log, board, stick, beam or post to predetermined dimensions using axes, adzes, froes, drawknives, spokeshaves, saws, handplanes, files and even electrical equipment. It’s a part of a larger job called “material preparation.”
Depending on the starting sizes of the lumber you’re using, dimensioning material can consume a lot of time and energy, which is why electrical equipment such as bandsaws, tablesaws, circular saws, jointers and thickness planers are so popular. But such equipment, especially if it has the capacity to mill thick, wide lumber, can be expensive, take up a lot of space, generate ear-damaging racket and belch veritable clouds of lung-clogging sawdust. And all of them are eager to nibble on yummy fingers with or without hot sauce.
But in the smaller shop in the hands of an energetic, skilled craftsman keen on doing a higher grade of work in a calmer, more creative and healthier environment, the ancient handplane reigns tranquilly supreme.
Planes used for dimensioning must be designed and setup to accomplish the goal of removing material quickly and precisely yielding straight, flat, square surfaces free of wind on the faces, sides and edges and ends of the target board, stick beam or post.
On the other hand (the one with six fingers) planes used for “finishing” tasks are setup and tuned with different goals in mind. We will examine these two types of planes in more detail below.
It’s important to understand that, at the conclusion of the dimensioning stage in the process of material prep, the surface left by the plane need not be perfectly smooth much less shiny, just the right size, flat, free of twist and with square edges.
For this job the Arashiko and Nagadai planes are the tools of choice in Japan.
The Arashiko Plane
The Arashiko (荒仕子鉋) plane is more-or-less equivalent to the benchplane or jackplane in the Anglo-American tradition, typically a general-purpose plane suited to quick, hard work.
While the arashiko plane can, of course, take long, continuous shavings beginning and ending at the board’s perimeter edges, the job of efficiently flattening and truing boards requires more planning and technique than most woodworkers imagine.
Being shorter than, for instance the nagadai jointer plane, the arashiko plane is easier to control and therefore excels at work requiring shorter cuts including those started and/or stopped inside the perimeter of the surface being planed, to shave down high spots and ridges while avoiding valleys and ditches in accordance with a sequenced plan the craftsman formulates for his work, a technique not commonly taught to newbies, but one Beloved Customer would be wise to master.
Despite what many imagine, to use an arashiko efficiently the craftsman needs to have a plan in his head for working each board, as described above, along with trained eyes and physical skills sufficient to effectively and efficiently execute that plan instead of just thoughtlessly pulling his plane around like a goat dragging around a tin can snagged on the hair of its tail.
The Nagadai Plane
The nagadai (長台) plane is the other variety of plane typically used for dimensioning. It performs more-or-less the same role as the Bailey-pattern foreplane or jointer plane.
With a jig length longer than the arashiko, it’s especially suited to flattening bigger surfaces using longer strokes, and shooting straight, square edges, but it usually does its best work when employed after the arashiko has quickly and efficiently conquered more problematic areas on the board. It too can be used for “stopped cuts,” but not as deftly as the arashiko.
Horses for courses, as it were.
What is Finish Planing?
After a board is dimensioned, whether by hand or electricity, its surfaces, especially if they are wider than the craftsman’s plane, will often display steps left by the corners of the arashiko and nagadai plane’s blades, or shallow ditches and ridges left by start/stop cuts, or striations and ripple marks left by the circular cutters of electrical saws, planers and jointers.
The finish plane specializes in taking thin shavings to remove these residual defects producing a uniform, smooth, and even shiny surface ready for joining. And because it takes thin shavings, it does so without significantly changing the thickness or width of the board or stick. However, this is only true if one limits the number of passes with the finish plane, ergo the importance of having a plan for one’s arashiko and nagadai planes and working that plan.
The well-tuned, expertly-manipulated finish plane, therefore, is the perfect compliment to the electrical jointer and thickness planer, which explains it’s continued popularity in a world under the brutal dominion of noisy pig-tailed tools.
Although it can produce flat, planar surfaces, the sole of the finish plane is setup different from, and will typically not work as efficiently at dimensioning as, the arashiko and/or nagadai planes. More details can be found in Part 6 in this series.
In short, the finish plane, or “shiage ganna,” (仕上げ鉋) must be setup and fettled to closely follow the contours of the surface it is cutting, rather than bridging over small defects and undulations, with the goal of taking thin, uninterrupted shavings of uniform width and thickness.
Please note that the first few passes made with this plane following the ministrations of the arashiko/nagadai planes will not typically produce uniform shavings because of the thinness of the shavings it takes compared to the depth of defects left by planes and equipment during the dimensioning phase of material prep. However, two or three passes will usually remove these last few defects and get the job done, depending of course on the skill of the craftsman or goat motivating it and the nature of the wood.
We neither need nor want the finish plane to take thick shavings which would substantially change the dimensions of the board already achieved. Please be sure you understand this point and its ramifications
Next, prior to making shavings, let’s do some housekeeping.
Clean the Wood.
Before you touch any piece of wood with your valuable, noble planes, please evaluate the wood’s condition and clean it if necessary.
Please do not dismiss this admonition unless, that is, you despise your edged tools, revel in wasting money, love to see your sharpening stones pointlessly turned to mud, and feel joy at spending extra time resharpening unnecessarily dulled and damaged blades. How brutish!
Let’s next consider how to make and execute a plan for planing.
Planing Plan
Most people, including me for a long time, allow their planes to wander wherever their goat pulls them without much control, happy so long as they’re cutting wood. Why? I think it’s because most people never think to make a real plan for planing. Of course, many simply get carried away with making shavings imagining that shavings equal progress. And without a real plan they end up planing areas out of proper sequence, so instead of efficiently flattening the board, they waste much energy, time and steel digging valleys and trenches deeper. While natural and satisfying, this is decidedly not professional technique.
Miyamoto Musashi depicted in one of his famous duels. He was unique among sword masters for not only winning 62 duels beginning at age 13, some against multiple opponents at the same time, but for using improvised wooden items such as carved boat oars as weapons during these challenges instead of his swords. The power of wood is not to be disdained.
Beloved Customer may recall the words of Japan’s most famous sword saint Miyamoto Musashi In his book titled “The Book of Five Rings,” (ca 1645) quoted at the top of Part 6 of this series: “First lay his plans with true measure and then perform his work according to plan.”
With these words Master Miyamoto instructed the craftsman to do 3 things:
Formulate a work plan;
Delineate that plan with accurate dimensions;
Execute the work in accordance with that work plan.
I believe these to be wise words even if they were written by a brutal killer of men. But how do they apply to using a plane?
The first step in formulating a plan for planing is to evaluate the condition of the board, stick, beam or post to be planed and identify problems by sighting down the sides and edges of the board from a low angle so that any deviations from straight/flat are apparent. It often helps to have a low-angle light source shining on the surface you’re evaluating to make defects and problems easier to spot.
Don’t forget to identify and mark any problem areas that will prevent the board from resting flat and stable on your workbench, or that might cause it to deflect, twist or wiggle lewdly when subjected to the pressure of planing.
Next, check the board carefully with a straightedge, lengthwise, crosswise, and diagonally too.
But the job doesn’t end with eyeballs and flashlights. As you identify them, mark bows, hollows, humps, high spots, low spots and twist with a carpenters pencil or lumber crayon using any marking convention you find convenient so there will be no confusion about the location and nature of any areas that need to be shaved.
The next step is to formulate the sequencing of the job.
With problem areas marked and tasks identified, at least in your mind, you can formulate sequencing based on the condition of the board and your priorities for executing the tasks.
When using handplanes to dimension lumber, your first priority must be to cut down any high spots before removing a single shaving from low spots. The marks you make will guide your work to minimize wasted time and effort.
It may sound like a lot of work, but with practice most boards can be evaluated, marked, and the requisite sequencing established in a few seconds without incurring permanent brain damage.
This completes step two of Master Miyomoto’s directions.
Preparation for Planing
Statues commemorating the famous duel between Miyamoto Musashi and the handsome, well-dressed Sasaki Kojiro. Musashi, depicted on the right, showed up to the duel very late in a small boat from the sea. Without waiting for the small boat to be beached, Musashi jumped into the surf and attacked Sasaki with an oar he had modified on the boat with his short wakizashi sword. The battle was over in a few seconds. Guess who won.
When you are ready to begin planing, make sure the board is supported on a flat, stable, rigid surface free of wind. This is important.
A workbench, atedai, or planing beam is the conventional working surface, but it need not be pretty.
When planing the first side of a board or stick, if necessary (and it usually is), position slips of wood or cardboard to fill gaps between the board’s off-side and your workbench’s surface to prevent the board from deflecting downwards (away from your blade) excessively, twisting and/or wiggling, movement which will mess up your pretty plan. It makes a difference.
Depending on the condition of the board and its grain, planing it flat and true may require many changes in the plane’s direction of movement and many “stopped cuts,” so tighten the razor-wire choker around the neck of your inner badger and patiently and thoughtfully work the plan. Speed will come with practice. Remember the moto of emperors Augustus and Titus, and the Medicis: “Festina Lente.”
Plan to frequently use your straightedge to check the board’s length, width and its diagonals.
Its OK to plane one side (the off-side) of the board roughly flat and then switch to the other side so the shimming material previously placed can be removed soonest. Then switch back to the first side and finish it.
Let’s next examine how to best to hold and motivate the Japanese handplane in a professional manner.
Teamwork
Let’s consider some basic teamwork techniques for operating Japanese handplanes, none of which involve goats, thankee kindly.
Imagine if you will a halcyon day under blue skies when Beloved Customer used a short shovel, perhaps as a carefree, optimistic youth, to move heavy mud or push wet concrete around on a farming, construction or cleanup project. You will recall it was hard work, but that the job went faster and easier when both hands, joined together by the shovel handle, worked together as a team transmitting the motivating power of shoulders, back and legs into the tool. It’s the same with handplanes, except for the yucky mud and concrete.
But whether shovel or plane, such teamwork doesn’t develop automatically for most people. Indeed, more often than not a human team in the real world either doesn’t really form or it breaks down quickly. C’est la vie, mon chéri? But when a team comes together working with a single mind to a common purpose, well now, that’s a beautiful thing!
It’s a simple thing for hands and body to work in harmony, but there will be failures at first, so let’s consider a common breakdown mode to make detection and remediation easier.
For example, instead of both hands working in concert with the wooden body of the eager handplane, frequently one hand/arm does most of the work while the other hand/arm just tags along, pretending it’s working hard but actually just freeloading. Of course, seeing this, the shoulders, back, hips and legs become disgusted and end up sitting in the shade dozing and drinking beer instead of helping in the teamwork. Do you have a brother-in-law like that?
The point is, please make sure both hands and your entire body are working together and not shirking.
So with that bad example behind us, let’s assemble our effective team by assigning each hand a specific role.
But first, please carefully examine the craftsman’s hands in the photo below.
The Right Hand’s Job
Assuming (1) you are right-handed, and; (2) you will be pulling the plane towards you along your right side, the right hand’s job is to press straight downon the plane focusing pressure primarily on the contact strip in front of the mouth.
It’s a fundamental trait of right-handed people (not goats) to want to use their right hand to apply heavy pushing or pulling forces on a tool, and their left hand to control its direction, so the division of labor your humble servant is proposing may seem clumsy at first, but if you focus the teamwork will become second nature quickly, I assure you.
I know I’m being irritatingly repetitive, but for good reason, so please remember that your right hand’s job is NOT to pull the plane, not even a little, but rather to apply downward pressure on the plane’s body causing the contact strip in front of the mouth to firmly press on the board in turn while keeping the plane’s body level.
Next let’s look at how the right hand should grip the plane’s body.
With the blade’s face (the side with the brand) and chipbreaker facing you, place the tip of your right thumb on the left hand side of the plane’s body aligned with the mouth and about 3/4 down the side.
Place the tip of your right hand’s middle finger in the same position on the opposite side of the body. You may need to adjust your finger’s positions somewhat, but if placed correctly a well-made plane should balance nicely between just these two fingertips when you lift it. This is an intentional design feature, BTW, and one reason why standard finishing planes are seldom wider than 70-80mm.
With your fingertips positioned thusly, lower your palm so it rests on the upper surface of the body, touch the tip of your index finger against the blade’s face or the chipbreaker, and press your ring and pinkie finger on the right side of the body.
Using this grip the plane should be absolutely stable in one hand, even when held in the air or upside down, assuming your hands aren’t small or weak.
If you can’t control the plane with this grip, you may be doing it wrong, or the plane may be extra long, or extra short, or the plane’s body may be too wide for your hand. Please adjust your grip as necessary.
The Left Hand’s Job
A woodblock print of the duel between Miyamoto Musashi and Sasaki Kojiro. Musashi performed many of his duels against famous teachers of the sword, many the proud heads of kendo schools with many students and disciples that would attempt to ambush him before his battles against their teachers, and gang up on him in retribution at the conclusion. To deal with these sneak attacks and ambushes by multiple skilled opponents, Musashi became adept at using two swords at the same time, one in each hand, all while dudes in sandals were trying to fillet him. Teamwork, Gentle Reader, teamwork extraordinaire.
The job of your left hand is NOT to press down on the plane but only to PULL it towards you. This division of labor between left and right hand is important.
Place the pad of your left thumb on the blade’s face. It doesn’t need to be centered.
Place your index finger either on top of the blade’s head, or wrap it behind the blade. Depending on where you placed your index finger, your middle finger can either stretch behind the blade and rest on the wooden body with your remaining fingers press against the flat end of the body, or you can position your middle, ring and pinkie finger all pressing on the tail end of the body. Use whatever position feels most comfortable and pull the plane in a straight line.
Moving a plane using only the left hand is pretty much the opposite of how Western planes with their tote handle and knob are used. But once your body learns this division of labor your effectiveness and efficiency using Japanese handplanes will skyrocket, I promise.
Combining the Right Hand and Left Hand
Now that we’ve assigned different but complimentary jobs to each hand, we must next put them to work as an harmonious team like the draft horses and plowman in the photo above.
This will feel unnatural at first, and indeed, until muscle memory is developed, most people quickly forget these principles and revert to the careless techniques their pet goat taught them. You will too. But when your plane stops behaving, review the words in this series, wack yourself in the forehead with your wooden “memory mallet” as if you were a green apprentice back in olden times, and get back to work. The pain will feel so good!
Now that we have our grip, the division of labor and our team figured out, let’s bring the rest of our body into the dance.
The Handplane Shuffle
Using a Japanese hiraganna handplane can involve many stances, some standing. some walking, some sitting, and even laying down occasionally. Interesting footwork is sometimes necessary.
When sitting or standing while planing shorter boards or sticks, no special footwork is necessary unless you get an irrepressible urge to boogie down, baby. Indeed there simply isn’t enough space in this humble, unworthy blog to go into the subject in exhaustive detail, but there is one standing technique I would be remiss to neglect, one that has never seen the footlights of the Soul Train stage, one that your humble servant calls the “hiraganna shuffle.”
Unfortunately, C&S Tools’ IMAX video studio is closed for renovation and our photography crew, lighting and sound technicians, makeup artists, drapers and choreographers are currently all on a well-deserved vacation, probably enjoying prodigious quantities of neon-colored adult beverages containing colorful fruit and little umbrellas right about now, so we won’t be producing a video about the hiraganna shuffle starring hip hop hamsters and hipper combat robots anytime soon. Sorry about that. But I will try to explain the technique.
A good example of a carpenter using a finish plane on both solid wood and glulams with joints cut by CNC machinery can be seen in this video.
Obviously this scene of good old Shoyan the carpenter at work wasn’t staged, nor was a professional makeup artist involved in this serious example of the hiraganna shuffle. And unlike the photo at the top of this article, it’s not narrowly-focused kezuroukai stuff, but typical of 90% of high-quality classical architectural structural woodwork.
It’s worthwhile noting that the beams he’s working, even the glulam, are made of well-behaved, easily-planed softwood, probably hinoki cypress. I wish all woods were so pleasant to work.
If I may be allowed to digress for a moment, this carpenter (he has many practical videos on youtube, BTW) makes two comments Beloved Customer may find interesting.
One of his comments is that the shine produced by a handplane will vary with the direction of the cut, so it behooves one to pay attention and vary the planing direction accordingly. Obviously a pro of the first water.
His second comment is that the final planed surface will not only have a shine, but will repel both water and dirt making the beam last a long time even when exposed to the elements. This is an important and true observation supported by scholarly research at top Japanese Universities. Just one more reason the finish plane reigns supreme and why so many wooden Japanese temples and shrines have lasted centuries without stain, paint or varnish.
Anyway, so just what are the steps in the hiraganna shuffle, and can it be done in steel-toe safety shoes?
Stand on the left side of the board facing the end where you intend to begin the shaving.
Place the plane on the end of the board with its mouth just off the edge.
While gripping the plane as you prefer, lean forward over the board while extending your arms, and take a half-step back. At the same time extend your right leg back and keep your left leg under you. Most of your weight should now be on your left foot and your right hand, with little weight on your right foot and no weight on your left hand. Don’t move the plane during this step.
To initiate the cut move your hips along with your body’s center of gravity backwards while directing the forces of this movement of your legs and hips through your left hand into the plane while applying downward pressure with your right hand. Don’t try to use the devastating power of they mighty arms, Oh Lord of Thunder, but just the momentum produced by your legs, hips and back.
Have faith and pull through the stroke with a positive attitude. The speed you generate will depend on the wood and your urgency, but it’s your mind that will get the job done, so long as your plane is sharp, so pull through the stroke without hesitating.
Depending on how long the board and the stroke you intend to take are, as your hips and hands shift backwards you will reach a point where the weight is gone from your left foot and you will begin you lose the leverage needed to keep pulling the plane. Just before you reach that point, however, stop the plane’s movement briefly, shift/shuffle your left foot back and your center of gravity with it, and then move your right foot back and extend your leg, while once again moving your hips back while extending your arms.
With practice, the pause in the plane’s movement in step 6 can be eliminated, but it’s sometimes difficult to do smoothly when making heavy cuts. In any case, try to keep the pause brief so you don’t lose much momentum, and most importantly, don’t lift the plane or allow the blade to shift to or fro, side to side or up and down during this pause because any shift of the blade will result in a discontinuity in the cut and perhaps even a step. Yikes!
When making fine finishing cuts in well-behaved wood, the cut can be kept continuous by taking tiny backward steps as this guy is doing.
Execution
As in most things, a good start is the key when planing. Once the cut is started with confidence, just keep your hands working as a team, connected by the plane, and confidently pull through the cut like a draft horse pulling a plow, all while keeping the plane’s body level.
As an example of how its done, let’s feed my favorite 80mm (2-sun) finish plane a snack. It’s a happy tool with a wide body but slender mouth and only one big, very sharp tooth. It always beams a silvery smiles and sings a little song of steel and oak as it munches on yummy wood.
I’ll take a single, uninterrupted shaving from one end of this board to the other. Even though most cuts with a handplane are not this boring, it will illustrate some important techniques Beloved Customer will need to master.
I’ll start the cut with the plane’s mouth resting just off the far edge of the board, the tail end hanging entirely off the board, the contact strip in front of the mouth and the contact strip at the leading edge of the plane’s sole firmly resting on the board. In this position, so long as I don’t apply any downward force with my left hand, there won’t be any downward force trying to tilt the plane out of level.
While gripping the plane’s body and pressing down with my right hand, and pulling the plane towards me with my left hand, a shaving will begin to flow out of its mouth, assuming the board is fairly flat, the blade and sole are in good fettle, and the blade is adjusted for a nice cut.
The plane is moving along smoothly now, but just guess what will happen if I carelessly apply downward pressure with my left hand about now? If the plane is an arashiko or nagadai specialized in making flat, straight surfaces, nothing tragic will occur except perhaps the cut will wobble a bit. But since it’s my finish plane, the setup of the sole will cause the blade to be levered entirely out of the cut depositing rotten egg on my face. I hate it when that happens, so I’ll do my best to not press down with my left hand. Daijoubuka?
The plane continues it’s run and before you can say bobsurnunkel, the contact strip at the leading edge of the plane’s sole runs off the end of the board and the blade stops cutting, even though the plane’s motion continues. Because I am a highly intelligent craftsmen (or was it a wild and crazy guy?), I’ve been thinking ahead, and shifted the downward pressure of my right hand so it acts just on the contact strip in front of the mouth, relieving pressure on the sole everywhere else. As the plane’s mouth goes off the end of the board (did I just hear a little scream of fright from my gentle plane?) I hold onto the plane with both hands to keep its body level and prevent a Peter Pan performance, then follow-through for perhaps half a plane length, ending this pass.
Repeat as necessary.
Please note that this requires one to actually manipulate and intelligently control the plane using one’s hands rather than just thoughtlessly pulling it around like the aforementioned goat does his tin can.
Final Tips
Prevent Deflection
As mentioned above, in order to plane truly, the board or stick you are working must be firmly supported on a relatively rigid surface.
You also need to prevent the downward force your plane applies when in motion from deflecting the board or stick downward away from the cutting edge because the plane can’t cut a surface that deflects away from it, and therefore cannot make it flat. If such a support condition is left uncorrected, your plane’s best efforts will be as productive as a goat.
To resolve this extremely common problem, you may need to roughly plane the off-face of the board or stick oriented downwards, and/or shim the board to prevent excessive deflection/twisting. Remember, you located and marked areas on the board likely to deflect like this during your planning efforts.
Many will studiously ignore this advice. To those I am prepared to offer a wonderful deal on a huge parcel of shovel-ready resort hotel property located on the banks of a majestic chrome-plating settlement pond in North Korea. Great fishing!
Keep the Body of Your Plane Level
Please observe that these techniques don’t rely on fancy hand movements, psychic abilities or a masters degree in wood butchery, but rather on always focusing pressure on the contact strip in front to the mouth, and instead of simply pressing down on your plane like it’s an iron to make your pleated pink apron pretty (say that 10 times fast), you must use your hands as a team to keep the plane’s body flat on the board you’re planing, and level as it leaves the end of the board.
Imagine that, real hand skills!
Use Your Whole Body
Remember to not rely on just the strength of your arms, oh might Thor, but rather on the strength of your shoulders, back, hips, and legs. They will add a lot more momentum-retaining mass and provide better control too.
Cut Confidently
Start cuts with confidence and pull through the cut. Any hesitation and your plane will giggle at you through its narrow little mouth.
Perform Timely Dental Hygiene
Sometimes the mouth of your noble plane will become clogged with shavings, but frequently allowing the mouth to develop a tightly-compacted clog will damage it, so if you feel a clog starting, stop work immediately and give it a dental exam to figure out why. Depth of cut too deep? Blade setting wrong? Chipbreaker getting in the way or not functioning properly? Slivers of wood, pixie toenail clippings or fragments of divorce lawyer’s hearts jamming the mouth? The only way to know for sure and prevent more clogging is to check.
Clear the clog by either removing the blade and chipbreaker, or using a splinter of wood to pick the mouth.
Keep It Lubed
Oil the chipbreaker’s edge, the blade and the surface in your plane’s mouth opposite the chipbreaker’s bevel whenever you remove the blade to help shavings flow freely and to reduce clogging. You do have the essential oilpot on-hand right?
Clean the Wood
Before planing use a steel brush to scrub and clean the surface of wood that has been exposed to dust and/or grit. You must get any embedded dirt/soil/sand out of the wood first or your tools will be damaged and your time wasted like tax money in California.
Cut 1/8″ from each end of each board, stick, beam or post, or at least use a block plane or drawknife to chamfer the ends before planing to remove the most stubborn, deeply-embedded and well-hidden grit. This is really important because the grit will always be there even if you can’t see it, I promise.
Conclusion
In my experience, many of the Westerners who receive these instructions without benefit of a mentor or memory mallet close at-hand immediately and meticulously ignore the critical points, and then, when their results prove inconsistent, assume the instructions are crapola smothered in piquant marinara sauce. I strongly urge you, Beloved Customer, to do better, please, because if you internalize these instructions and develop the correct muscle memory, for the rest of your life you will find Japanese handplanes to be joyful and efficient tools for working wood. Thus it was with your unworthy servant.
This article is by no means exhaustive or comprehensive, but it should be enough for a good start. It’s far more than I had for many years.
YMHOS
If you have questions or would like to learn more about our tools, please click the “Pricelist” link here or at the top of the page and use the “Contact Us” form located immediately below.
Please share your insights and comments with everyone in the form located further below labeled “Leave a Reply.” We aren’t evil Google, fascist facebook, thuggish Twitter or the Chinese Communist Party’s coordinator of funding and blackmail for US elections, and so won’t sell, share, or profitably “misplace” your information. If I lie, may my goat eat all my socks.
A 60mm plane blade with its chipbreaker resting on the ura as when installed into the wooden body. Please note that there are no screws connecting these two parts making it a simple and reliable system.
There are three things extremely hard: steel, a diamond, and to know one’s self.
Benjamin Franklin
n this fifth post in our series about the Japanese handplane, we will discuss a single one of its component parts, the chipbreaker.
Professional woodworkers that use handplanes daily usually have this simple widget thoroughly figured out, but your humble servant has been asked to clarify why the chipbreaker is necessary and how to make it work so many times recently that I can no longer gracefully avoid publishing a more complete, BS-free explanation for the benefit of our Beloved Customers, may the hair on their toes ever grow long.
As always, this post is intended to provide a bit of insight, or at least a different viewpoint, to our Beloved Customers, many of whom are professional woodworkers and Luthiers.
This is a longish article. If your humble servant was a lazy man I would simply state stand-alone conclusions as have so many with half-baked knowledge of handplanes, and leave it up to Beloved Customer to figure out the why of things on your own, but that would be boorish behavior.
Even if you already know everything there is know about the chipbreaker, you may still find a new crunchy, scrumptious tidbit or two in this scribbling if you look.
Factors Critical to Controlling Tearout
The sole purpose of the chipbreaker is to control and, whenever possible, completely prevent the unsightly and wasteful tearout that often occurs when using a handplane to surface wood. We will examine the causes of and some solutions to tearout below, but let’s begin this discussion by examining factors critical to controlling/eliminating tearout that are more important than the chipbreaker. Your efforts to control tearout should always begin with these factors. But first allow me to share a story.
Back when the world was younger and all heads turned my way, I learned advanced techniques for setting up and using Japanese handplanes at the feet of a master joiner of some renown named Honda-san. When I finally progressed to the point where he was satisfied with my proficiency with high-quality commercial planes, he surprised me with a new homework assignment to make a single-blade plane (台 body) from scratch.
FYI, while it’s counterintuitive, single-blade planes, which don’t have a chipbreaker, are more difficult to make successfully than a “double-blade” plane with a chipbreaker. But when done well, they are magical sweethearts.
So I purchased a 70mm blade by Yokosaka-san (this was well before he became famous), and a piece of well-seasoned white oak, and cut a block with “oimasa” grain orientation.
I later learned that this is a task Japanese masters always assign their apprentices, at least back then, and one they must accomplish to be recognized.
It was an educational effort, one that I magnificently failed twice before finally getting it right, but it taught me the three most important factors in reducing tearout in handplanes, whether with wooden or steel body, with chipbreaker or without. Beloved Customer too must master them if you aim to be proficient with the handplane.
Factor 1: The blade must be sharp. This factor depends on the quality of the blade and the skill of the person who sharpens it. We have a series of 30 posts about sharpening Japanese woodworking blades Beloved Customers may find beneficial. The series starts with this LINK.
Factor 2: The mouth opening (gap between the sole and the cutting edge) must be as tight as practically possible and still pass shavings. Please make an effort to truly understand what this means, because it is not always easily accomplished. Of course, the mouth opening of a super finishing plane intended to take transparent shavings will of necessity be narrower than that of a plane intended to dimension boards by taking thicker shavings; Horses for courses.
Factor 3: Prepare and maintain a strip, perhaps 3~10mm wide located directly in front of the mouth opening across the entire width of the sole of the plane, that is true and flat and applies even pressure on the board being planed. This is critical! Much else can be out of wack but if this is right the plane will usually cut well.
There are of course other variables worthy of consideration, but why are these three factors critical to mastering the handplane?
To begin with, a dull blade won’t sever fibers cleanly but will tend to tear contrary fibers up and out of the board’s surface, the very definition of “tear out.” Can’t have that, ergo, Factor 1.
Since the soles of handplanes wear and consequently the width of mouth openings change with that wear, Factors 2 & 3 are dependent on the team of craftsmen that originally made the handplane as well as the craftsman/owner that uses and maintains the handplane over its lifetime. That’s you, Beloved Customer, so please pay attention, learn the lessons and develop the necessary skills.
Indeed, Factors 2 & 3 act in unison to control the movement of contrary fibers immediately before and after they contact the blade directing them into the cutting edge to be cleanly severed by the sharp blade (Factor 1), while at the same time serving to bend, buckle and weaken those fibers preventing them from developing a lever arm that would cause them to lift up and tear out below the surface of the board.
If this doesn’t make sense to you, please give it careful thought because you must figure it out if you intend to become proficient with handplanes.
These three factors are bedrock essential to controlling tearout regardless of the type of handplane in question and whether it has a chipbreaker or not. Few new planes, whether made of wood or steel, satisfy these conditions. And after regular use, resharpening and adjustments become necessary, so Beloved Customers are strongly encouraged to understand how to evaluate these three factors in your handplanes and learn how fettle them. We will address the necessary techniques in future posts, but it will take more than just reading, so consider it an assignment. Indeed, expect to screw it up royally at first and learn from your mistakes, just as everyone does.
The Chipbreaker & Historical Lumber Processing Techniques
To better understand the chipbreaker, Beloved Customer may find it useful to understand a few historical factors about the wood they are shaving and some background about the tool making those shavings.
Before the proliferation of the large rip saw, and especially the water-powered sawmill, the only practical method of producing boards and beams from logs was to “rive” (split) them out using wedges, mallets and axes. This was the same worldwide.
Riven wood has two convenient advantages. The first one is that, because the grain of the lumber is relatively straight and continuous, grain runout is reduced, making it somewhat stronger structurally. And second, the occurrence of tearout when surfacing riven lumber is often less than what typically occurs in sawn lumber.
The thing about logs is that not all of them have grain straight enough to produce useful lumber when riven. Large, long, straight, old-growth trees are most efficiently processed, but as nearby old-growth primeval forests with large, straight trees were cut down and premium-quality logs became harder to come by, much construction and shipbuilding came to rely on more economical beams, posts and boards sawed from logs with wonky grain.
A beam sawn from a log to make an exposed structural member in a traditional Japanese house. Instead of trying to square it off, the carpenters have taken advantage of the natural curvature of the tree trunk to add strength as well as an interesting appearance. Please note, however, that being sawn, much contrary grain has been exposed that would have made riving such a log to this shape impossible, with the result that tearout is unavoidable. Also, and while this has nothing to do with tearout, the knots exposed at the bottom beam are in the worst possible location seriously weakening the integrity of this member in bending.
Unlike a team using axes and wedges, large rip saws in the hands of sawyers made practical through the proliferation of inexpensive, reliable steel, and especially the water-driven sawmill, could more easily and quickly cut long, straight boards and beams out of most any log regardless of grain direction. Consequently, logs that would have been rejected before the days of the sawmill can now be readily processed reducing the man-hours/cost of producing lumber significantly, at least that was the case until environmentalist grifters gained sway.
On the other hand, the grain direction of lumber produced using large saws and sawmills tends to wander everywhere increasing runout and making the job of cleanly surfacing the boards more difficult for subsequent craftsmen. This is the situation we face now.
We don’t know when or where the chipbreaker was invented, or how the concept spread around the world, but it’s a safe bet to assume its ability to calm the wild grain of sawn lumber during surfacing was one reason for its popularity. At least, that’s how it went in Japan. And wood is wood no matter where you are.
Two carpenters selecting a curved log to use a roof beam
Naturally-shaped logs used as roof beams in the restoration of a historically-significant building in Japan
Why Does Tearout Occur?
Let’s next examine some basic causes of tearout.
Please recall that wood is comprised of various types of cells, each with a job to do, but most of those that eventually become lumber specialize in exposing green leaves to the sunlight, transporting water from the ground up to the leaves, and nutrients formed in the leaves to the rest of the tree.
Transporting literally tons of water daily from the roots far up into the sky is the job of groups of cells that form what are effectively continuous waterpipes connecting the roots to the stomata in the leaves. In a living tree these pipes have semi-flexible cell walls, and while they mostly grow parallel with roots, limbs and trunk, their shape is influenced by wind, rain, snowload, shifting soil, microbes, bugs and ever-changing exposure to the sun over the life of the tree, so they are seldom perfectly straight. Indeed, once dried, it’s partly the changes in direction of these tubular cells, often called fibers, that gives harvested lumber its beautiful grain patterns and shimmering chatoyance.
The blade on the left is cutting with the grain and is unlikely to produce tearout, while the blade on right is cutting against the grain and is more likely to produce tearout.
When planing with the grain (the blade on the left in the illustration above), the blade severs fibers which are oriented either parallel with or sloping up to the board’s surface and angled in the plane’s direction of travel producing pretty shavings comprised of relatively short, flexible segments of fiber.
But when planing against the grain (blade on the right), the blade must sever fibers that are diving down into the board. Instead of consenting to being cleanly severed, often these longer, more rigid fibers tend to ride up the face of the blade, bridging and avoiding the cutting edge.
When this happens, instead of severing them cleanly, the blade tends to lever these longer fibers up out of the board’s surface until they suddenly break off below the surface of the board leaving a rough uneven surface. This damage is called “tear-out” in English and Sakame (sah/kah/meh 逆目) in Japanese, which translates directly to “reverse grain.”
How Does the Chipbreaker Work?
Whether the handplane in question be Western or Japanese in design, the chipbreaker, aka “uragane” 裏金 (oo/rah/gah/neh) as it is called in Japan, seems at first glance to provide little benefit in exchange for the added weight and complication. Indeed, if all the cuts you make when planing wood are in the direction of the grain (id est fibers either oriented parallel with, or rising up to, the surface of the board and angled away from the direction of the cut), the chipbreaker will be about as useful as a frilly lace brassier on a boar. But wood grain is seldom so cooperative, donchano.
With the addition of the chipbreaker, and in combination with the three factors listed above, those contrary fibers that try to bridge and ride up the face of the blade without being severed immediately run smack dab into the abrupt face of the chipbreaker thereby bending and buckling them and preventing them from bridging and developing the lever arm necessary to break them off below the surface of the board.
At the same time the collision with the chipbreaker redirects many of these mischievous fibers into the cutting edge to be severed, thereby preventing, or at least reducing, nasty tearout.
Bless us and splash us, preciousss! What a wonderful counterintuitive thing!
To better understand how the chipbreaker works, I highly recommend Beloved Customers devour, like starving little piggies, the video titled “Influence of the Cap-iron on Hand Plane,” Created by Professor Yasunori Kawai and Honorary Professor Chutaro Kato, Faculty of Education, Art and Science, Yamagata University (with subtitles). Much will come into focus after watching this.
Downsides to the Chipbreaker
While your humble servant has written glowing things about the chipbreaker, I am not so foolish as to suggest all is blue bunnies and fairy farts because the chipbreaker has some downsides:
The chipbreaker adds weight, complication and cost;
The impact of wood fibers on the chipbreaker produces friction heat and consumes energy whether cutting with or against the grain. This energy loss is not insignificant;
When cutting with the grain, the chipbreaker adds little benefit while tending to reduce the luster of the planed surface;
To be effective, the chipbreaker must be setup, tuned, installed and maintained properly, requiring the user to have adequate knowledge and to put forth effort periodically.
Despite these downsides, your humble servant believes, as have millions of craftsmen over untold centuries, that the chipbreaker is a component worth mastering.
Alternatives to the Chipbreak
In light of the gains and losses associated with the chipbreaker, it would be short-sighted, indeed amateurish, to assume it is always necessary, and just as short-sighted and amateurish to assume it is never necessary. So let’s examine some alternatives next.
Alternative 1: No Chipbreaker
The first alternative to the chipbreaker we must consider is, of course, no chipbreaker at all. Indeed, if you always plane with the grain of the wood, and your plane has a sharp blade and tight mouth, as mentioned above the chipbreaker adds no value while only wasting energy. Indeed it may even reduce the quality of the finished surface’s appearance.
In the case of the Bailey pattern plane or other styles with cap irons and the chipbreaker and blade attached to each other by screws, using the plane without the chipbreaker is inconvenient. But in the case of Japanese plane, the chipbreaker can be easily and speedily removed without influencing the cutter. The resulting finish created by the plane may or may not be improved, but the force required to motivate the tool will absolutely decrease. Sadly, such cooperative wood can be elusive.
This is an excellent solution, one I highly recommend to Beloved Customers.
Alternative 2: High Bedding Angle Without a Chipbreaker
Another option with a long history worldwide is to install the cutting blade in the plane’s body at a higher bedding angle, perhaps 50~55˚+. Combined with a sharp blade, tight mouth and solid uniform contact/pressure between the board being planed and the area of the sole directly in front of the mouth opening, the more abrupt change in direction forced on shavings by this high-angle blade will then tend to buckle the long contrary fibers on its own without a chipbreaker. But no guarantees.
While a high bedding angle does indeed tend to reduce tearout, adding a chipbreaker is a more reliable way to further reduce tearout in woods with contrary grain even more.
The one undeniable downside to a high bedding angle is the extra energy one must always expend to motivate the plane.
Alternative 3: Bevel-up Handplanes Without a Chipbreaker
Another alternative is the “bevel-up” planes that have become popular in recent years. This style of plane is not a new solution. I own some and have used them, but other than the block plane versions, I regret falling prey to specious marketing claims spouted by shills. Losing all credibility sucks.
Amateurs like BU planes because parts are fewer, maintenance is easier, and the necessary skills one must acquire are fewer.
One gentleman boldly informed me that he believes bevel-up planes to be superior to all others because he would rather spend the time it takes to master the chipbreaker on making wooden objects instead. My mind boggled like a weasel binging on crystal meth….
Bevel-up planes work in exactly the same way high bedding-angle planes described in Alternative 2 above do by presenting a steeper angle for contrary fibers to climb causing them to either be severed or to buckle instead of bridging and tearing-out. This assumes, of course, that the blade is sharp, the mouth is tight and contact between the board being planed and the area of the sole directly in front of the mouth opening is uniform.
Sadly, the efficacy of this action is no more consistent than the high-angle blade without a chipbreaker discussed above.
The downside to the bevel-up plane is that the additional, more-consistent results afforded by a well-tuned chipbreaker are, like heaven’s pearly gates to a Shat Francisco politician, forever unattainable.
Alternative 4: Back-bevels
Another alternative is the quick and dirty back bevel applied to the ura or face side of the cutting edge, as discussed in a previous post. This works for the same reason the high-angle blade does, but it is not an effective long-term solution, and certainly qualifies as tool abuse in the case of Japanese handplanes IMHO. Consider yourself well and truly warned.
I highly recommend Beloved Customers use planes with chipbreakers and learn how to sharpen, properly setup, maintain, and adjust them for maximum results. It’s the way advanced professional woodworkers with real skills get the job done.
Keys to Making Chipbreakers Work Effectively
A naturally curved log shaped as a “Nijibari” rainbow beam at the main entrance to a Buddhist temple.
The following is a condensed list of tasks Beloved Customer needs to accomplish to get consistently good results from their chipbreakers. We will discuss all these items in greater detail in future articles in this series. I strongly encourage you to invest in yourself by developing the requisite skills:
Fit the chipbreaker to the blade as lovey dovey as two newlyweds and so there is no gap between the cutting blade and extreme edge of the chipbreaker. This is not difficult to achieve, but the fit must be nearly perfect to prevent naughty shavings from being forced in between the blade and chipbreaker, because if they do get jammed in there, back-pressure will increase and the finished surface will look like poached crap on toast. We will discuss this more in the next post in this series;
Fit the chipbreaker to both the plane’s body and retention rod so the chipbreaker will remain in-place;
Grind a 70˚~80˚ striking bevel at the cutting edge of the chipbreaker to effectively buckle shavings. It doesn’t need to be a perfect bevel, and if it is rounded, that’s OK too. Yes, I know this seems ridiculously steep; If you don’t like it by all means experiment until your little pink heart sings, but after you’ve wasted a few months on hit-and-miss research, please remember that YMHOS toldjahso;
Polish the chipbreaker’s striking bevel to reduce friction and prevent wood sap from building up on it too quickly. Re-polish it as necessary. If you pay attention to the condition of this abrupt bevel you will notice that it may actually become pitted from the heat and friction of the wood shavings, especially when planing wood containing hardish minerals. Total neglect will harm efficiency;
Clean accumulated wood sap from the striking face regularly and oil it occasionally with your oilpot to reduce friction;
If shavings tend to become stuck in the mouth, check to see that the chipbreaker is not so thick as to obstruct their smooth passage. If necessary, grind the chipbreaker thinner near the mouth and polish it to improve the flow of shavings;
When you deem the chipbreaker to be necessary, install it as close as practical to the cutting edge. The ideal distance will depend on your plane, the wood you are cutting, and the depth of cut, but 0.5~0.8mm is usually a good place to start. I highly recommend you actively experiment to find the best distance. With practice it will become second nature. While it is not applicable to Japanese handplanes, Rhett Fulkerson of Nice Planes in Frankfort, Ky., has an intelligent technique for systematically setting chipbreakers and cap irons I find useful. LAP has an article about it here.
Conclusions
The chip breaker has been around a long time only because it consistently works.
In Japan, where the single-blade plane was the standard for hundreds of years, with the shift from riven lumber to more economical sawn lumber, the chipbreaker was added to the handplane, perhaps 150+ years ago, and remains in-use even today, solely because it consistently works.
The chip breaker won’t solve all your tearout problems, but it will definitely help on condition that you set it up and maintain it properly. It isn’t difficult and the results of doing so set the professional apart from the amateur.
In the next post in this swashbuckling tale of bare-chested Scottish warriors riding feather-footed war horses over the highlands to rescue buxom lassies clad in flowing gowns from evil leering Lords, we will describe in detail how to setup and maintain the awesome chip breaker. Don’t forget your kilt and claymore!
YMHOS
If you have questions or would like to learn more about our tools, please click the “Pricelist” link here or at the top of the page and use the “Contact Us” form located immediately below.
Please share your insights and comments with everyone in the form located further below labeled “Leave a Reply.” We aren’t evil Google, fascist facebook, or a manager of the Democrat Congressional IT team and so won’t sell, share, or profitably “misplace” your information. If I lie, may all my chipbreakers chip and fail.
The carpenter dresses his plank, the tongue of his foreplane whistles its wild ascending lisp
Walt Whitman, “Song of Myself,” Leaves of Grass
The efficient woodworker must continue accurately cutting or shaving wood just as long as possible without stopping to sharpen his blades too frequently because time spent sharpening is time the primary job isn’t getting done. He must therefore develop unconscious habits to help him constantly monitor the condition of his blades and the quality of the work being performed.
The Four Habits
As the saying goes, “timing is everything.”
If Beloved Customer pays attention, you will discover there is a point where a woodworking tool’s blade still cuts, but its cutting performance begins to drop off. Sensing this transition point is critical because if you continue cutting wood much past it, three things are likely to result.
The energy needed to motivate the blade will increase dramatically;
The quality of the cut will quickly deteriorate;
The time and stone expenditure necessary to resharpen the blade will increase.
That’s three variables that could be expressed in a pretty graph if one was so inclined, a graph that would have at least one inflection point. Which variable is most important to you?
Most woodworkers fail to consider these efficiency variables; They simply keep cutting away until the tool either becomes too difficult to motivate, or the results resemble canine cuisine, then stop work, curse the poor innocent tool (often hurting its feelings) and resharpen the blade. But the wise woodworker will focus on minimizing the total time and total cost required to maintain his tools even if it means he must pause work to resharpen his blade well before its performance deteriorates badly.
This sharpening inflection point will vary from blade to blade and job to job because every blade, every piece of wood and and every user are unique. Simply counting strokes is not enough. It takes attention and practice to sense when a blade has reached this point.
The following are some things you should pay attention to, and habits you should develop, to help you identify the sharpening inflection point.
Habit No.1: Sense Resistance Forces: As you use a tool such as a plane, chisel, or saw, tune your senses to detect the point at which the blade becomes more difficult to motivate. As the blade dulls, the force that you must apply to the tool to keep it cutting will gradually increase. This is especially noticeable when planing and sawing. Develop the habit of paying attention to this force so you can determine when it is time to resharpen.
Your humble servant recommends you regularly use an oilpot to ensure any increased resistance is actually due to a dulled blade and not just increased friction between the tool and the wood (or pixie predations (ツ)).
Habit No.2: Listen to the Music: Pay attention to the tool’s song. That’s right, turn off the radio and CD player, shush that jabbering little 3 year old rolling around in plane shavings under your bench, and listen to the music your blades make instead. If you do, you will notice that each tool sings its own song, one that varies with the wood, the cut, and the condition of the blade. Is the blade singing, lisping, or croaking as it chews wood? Is it a saw with a basso profundo voice, or a mortise chisel with vibrant tenor tones, or perhaps a soprano finishing plane singing a woody aria? A sharp blade makes a clearer, happier sound when cutting or shaving wood than a dull one does. Learn the bright song it sings when it’s sharp and the sad noise it makes when it’s dull, and all the tones in between. If you have ears to hear, it will tell you what kind of job it is doing and when the time has come to resharpen it.
Habit No.3: Eyeball Your Cuts: Watch the tool and the wood it has cut. Is your chisel cutting cleanly, or is it crushing the wood cells? A sharp chisel blade cuts cleaner than a dull one. You can feel and hear the difference. And you can see the difference in both the shavings or chips and the surfaces the tool leaves behind. Don’t be a wood butcher: develop the habit of frequently checking the quality of your cuts. It doesn’t take extra time, and your tools will wiggle with happiness at the attention you give their efforts.
Habit No. 4: Feel the Surface of the Wood:Is your plane shaving the wood cleanly, or are the surfaces it leaves behind rough with tearout? Develop the habit of running your fingertips along the path your plane just cut to sense surface quality. If you detect roughness or tearout, the plane may be out of adjustment, or more likely, the blade is becoming dull. Or maybe you need to skew the blade, change the direction of the cut, or moisten the wood’s surface with a rag dampened with planing fluid (I use industrial-grade busthead whiskey, or unicorn wee wee when I can get it).
Next, run your fingertips across the path of the cut your plane just made to detect ridges that may have been created by irregularities or chips in your blade’s cutting edge. Every one of those ridges indicates a small waste of your time and energy and a flaw created in the wood. Don’t forget that the tops of those ridges contain compressed wood cells (kigoroshi) that may swell back to their original volume becoming even more pronounced with time.
These tasks are easily accomplished in passing with a few swipes of the fingertips along and across the wood between cuts without spending any extra time.
These techniques are not rocket surgery. They don’t take extra time. They can be applied to any cutting tool all the time. The key is to pay attention; To listen to one’s tools; To watch their work; To feel their work.
Let’s next shift our attention to three of the Mysteries of Woodworking, their potential impacts on mental health, and how to avoid unfortunate wardrobe decisions.
The Mystery of the Tilting Board
To discuss this Mystery, we will call on the services of my old buddy Richard W. (Woody) Woodward. You may remember him from a mystery story in a previous article. Yes, it was a near thing, but he has fully recovered from alcohol poisoning after chugging a 5th of tequila in an emotionally-charged bout of drama over a brittle blade.
Anyway, this mystery goes something like this. Woody is planing a board about the same width as his plane’s blade down to a specific thickness, but for some unfathomable reason, the board ends up thinner on one side of its width than the other. He checks the blade’s projection from the plane’s mouth, but it is absolutely uniform. In fact, to plane the board to the correct thickness he ends up having to tilt the blade to take less of a cut on one side of the board than the other.
Most everyone has experienced this curious and wasteful phenomenon, but because it is not consistent, many never solve the mystery of the tilting board, blaming it on Murphy’s ministrations or pixie perfidiousness. But never fear, because the solution is elementary, Dear Watson.
In Habit No.4 listed above, your humble servant mentioned residual “ridges.” Please be aware that these ridges are not only unsightly and may damage applied finishes later, but they can actually keep your plane from cutting shavings of uniform thickness. Think about it.
Let’s assume you are planing a board the same width as your plane blade, but the blade has a tiny chip near the right end of the blade that leaves behind a .0005″ high ridge on the board’s surface. With each subsequent cut using this same blade with the same defect the right side of the plane’s body and likewise its blade will be elevated above the board’s surface by .0005″, while the left hand side, which doesn’t have any ridges for the plane’s sole to ride on, is shaved the normal amount. The difference in the amount of wood shaved from the right and left sides with each individual cut is minute, of course, but it accumulates with each pass sure as eggses is eggses
Assuming you checked that the blade is projecting from the plane’s mouth the same distance across its entire width, with each pass the surface of the board becomes tilted, a little high on the right side and a little low on the left, so that instead of a flat surface square to the board’s sides, you have produced a flat surface that is thinner on the left side and thicker on the right. Muy malo, amigo.
If, while performing the checks listed above, you detect ridges on a freshly-planed surface, immediately check the blade’s cutting edge by running a fingernail along it’s width. Don’t worry, it won’t dull the blade unless you are also a bricklayer. Your nail will feel the catch and grab of defects too small for your eye to see. A few small ones may make no difference, but on the other hand, they might make a big difference.
Often these ridges will show up as lines of thicker wood in your plane shavings. You do occasionally examine your shavings, right?
With this, the Mystery of the Tilting Board, one that has driven many a woodworker to distraction, too often leading to regrettable fashion decisions involving stiff, canvas jackets with long sleeves connected to straps and buckles that fasten behind the barking woodworker’s back and even pass under the crotch (decidedly uncomfortable, I assure you), has been solved. Rest assured, only the Beloved Customers and Gentle Readers of the C&S Tools Blog can be certain of avoiding this undignified state of dress.
The Mystery of the Missing Plan
Here is another mystery of woodworking, one that especially vexes those tender souls new to the calorie-burning fun of dimensioning boards by hand.
Let’s say Woody needs to turn a bunch of twisty, banana-shaped boards into flat, square, precisely dimensioned and cleanly-surfaced drawer fronts to make 24 piston-fit drawers. Let’s also assume the wood he uses for each drawer-front is unique in both appearance and warpage. It’s a heck of a lot of wood to cut with no time to waste, so our erstwhile wood butcher gets out his trusty handplane, sharpens it up, adjusts the blade and chipbreaker, gives it a kiss for luck, and proceeds to send wood shavings flying through the air with gleeful abandon!
But wait just one frikin minute! No matter how much Woody planes, he just can’t seem to make some of the surfaces flat, free of wind and the sides square to the faces. It’s like some kinda moving target! Indeed, eventually he is dismayed to discover some of the board’s edges are getting too thin. What to do, what to do!?
Drama queens like dear Woody typically begin interesting antics at this point, but not so our Beloved Customers who, unlike Woody, are stoic, laconic, intelligent and of course, sharply-dressed, and therefore pause their physical efforts to focus their mental powers on solving this mystery.
At this point the resident benchdog may perk up his ears, tucks in his tail and beetle away in fear of the smoke and humming sound emanating from BC’s ears; Master Benchcat arches his backs, hisses like a goose, and flees the workshop as if his tail is on fire; And the resident pixies frantically hide in the lumberpile to avoid being disrupted by the power they sense radiating from BC’s mighty brain!
Of course, the culprit is simply operator error.
Don’t forget to clean up the cat pee because it’s toxic to tools. Seriously.
Too few people really pay attention when using their tools, focusing like a badger digging out a tasty squirrel on making as many chips or shavings as quickly as possible, all without a plan.
For example, a failure common to many woodworkers is to start planing without first identifying and marking the high spots that must be cut down first, and then areas to be cut down next. In other words, they fail to plan the sequence of the work. The result is that time, steel and sweat is wasted cutting wood that didn’t need to be cut while ignoring wood that should have been cut first. And all for lack of a plan measured with a straightedge or dryline and marked on the board with a few strokes or circles of a lumber crayon or carpenter pencil. Too sad to bear stoically or to describe laconically even if one’s wardrobe is perfection.
This mystery too has been known to increase profits of the mental health industry and even (heaven forfend!) fashion decisions involving poorly-tailored canvas jackets with itchy crotch straps. Simply not to be borne!
Remember, when the goal is to make a board flat efficiently, always begin the job by identifying high spots and low spots and marking them. Then, always begin planing by shaving down the high spots while avoiding the low spots. One mystery solved!
The Mystery of the Sounding Board
Lastly, we come to perhaps the most frustrating and least-understood of the Mysteries of Woodworking. Not to say there are no other mysteries, because there is always that most ancient of riddles that baffled even the enigmatic Sphinx, one which has tortured men since before Pharaoh wore papyrus nappies, namely that of how best to answer one’s wife when she asks if her new pair of jeans makes her bottom look “simply humongous.”
Sadly, this is one mystery upon which your humble servant is unable to shed light because even I “never could find no sign on a woman’s heart.”
But I digress. This Mystery is one that torments those badly befuddled souls like friend Woody who, lacking a plan to follow, eyes that see, hands that feel and ears that hear, unwisely assume the board they are planing is stable simply because it doesn’t walk away to get a beer from the shop’s mini fridge.
Perhaps it is the malevolent influence of pernicious pixies that causes him to ignore that the downward deflection the pressure of the plane unavoidably induces in a warped, unevenly supported board, or in a board being planed on a flimsy or crooked workbench.
This unintentional, indeed unnoticed deflection too often causes the board to escape the cutting blade resulting in hills being raised and valleys remaining low where flat surfaces were required. Of course, such evasive behavior leaves the handplane bitterly dissatisfied.
But this waste of wood, steel, sweat and goodwill can be avoided because, even if the board isn’t rocking like Zepplin and dear Woody can’t feel the board deflecting away from his plane’s cutting edge, he could detect the change in his plane’s song when it is cutting an unsupported area of a board if he only listened because the piece of wood he is shaping is also a “sounding board.”
Think of all the money saved that Woody would otherwise spend on lithium, Prozac, and small hotel rooms with padded walls to ease his mental anguish if only he had the foresight to make a plan, train his hands and eyes to confirm his tool’s performance, and his ears to listen to what his plane tries to tell him.
Here is wisdom: The experienced professional will investigate each board, make a plan for his work, mark the plan on the wood, shim the still un-planed off face of the board so it is evenly supported on a flat workbench surface to prevent it from rocking and deflecting downward too much, and sharpen his blade if necessary before making a single cut. Then instead of moving his plane randomly like a simian Picasso with a paintbrush, will make each cut intentionally, purposefully, in accordance with his plan to make the work go as efficiently as possible.
He will also pay attention to the reaction of the wood and feedback from his tools during each cut. He will use the four habits discussed above, and maybe even a drop or two of unicorn wee wee to limit tearout if his budget allows.
If Beloved Customer doesn’t have a master to give you a dirty look or to box your ears when you impatiently err, you must train yourself. Slow down. Make a plan. Execute the plan. Pay attention, use your senses, and spend the time needed to evaluate progress against the plan. Consider carefully why the work is going well or why it is not.
This process will slow the work down at first, but over time it will sharpen your instincts, tune your senses, and help you develop good habits that eventually accelerate your work while improving the quality of the end product.
It will guide you along the path to becoming a master craftsman.
May the gods of handsaws smile upon you always.
Until we meet again, I have the honor to remain,
YMHOS
If you have questions or would like to learn more about our tools, please click the see the “Pricelist” link here or at the top of the page and use the “Contact Us” form located immediately below.
Please share your insights and comments with everyone in the form located further below labeled “Leave a Reply.” We aren’t evil Google, fascist facebook, or thuggish Twitter and so won’t sell, share, or profitably “misplace” your information. If I lie may inch-long purple maggots infest the gouges in my crotch made by my straight-jacket straps.
The wiser a man is, the more he stands ready to be educated.”
Joe Abercrombie, A Little Hatred
In this post your humble servant will offer some advice that, if followed, will save Gentle Readers time, money, and wear and tear on their valuable woodworking tools. These are not original techniques; I stole them long ago from professional woodworkers in Japan. Wise Gentle Readers will be as bold.
But first we must solve another mystery, so prepare to enlist the help of your inner Agatha Christy.
As with the other mysteries we have examined, this one involves no dark and foreboding alleys shrouded by ominous mist and concealing footpads with rubber knives, or bottles of vintage Tabasco Sauce spiked with arsenic. Indeed, nothing so mundane.
Investigating the Scene of the Crime
Last December your humble servant received an ordinary Christmas Card from an old friend, probably a “re-gift.” It was unusual in that it contained brick dust. The sender of the card was my old friend Woody, a charming fellow, diligent woodworker, amateur thespian, and possible alcoholic. Gentle Reader may recall this gentleman from a previous adventure I wrote about called The Mystery of the Brittle Blade. Wait a minute! Now that I think about it, you went with me to visit Woody at that time and actually helped solve his little mystery. Thanks for your help!
BTW, the screenplay for that story is currently being reviewed by top producers and directors in Hollywood, at least that’s what the movie promoter I met at Krispy Creme Donuts here in Tokyo promised (ツ). He seemed like a reliable guy so I paid for his donuts and coffee.
Obviously, Woody’s dusty Christmas Card was a subtle cry for help so I went to visit him in his rickety, leaning workshop during my international travels last January. When I got onto the airplane I was shocked to find myself only one of approximately sixty travelers on a commercial flight that normally carries 350+ passengers, so I reclined across the center aisle of seats in cattle-class and slept like Nero after a night on the town.
Gentle Reader may recall Woody’s shop from the visit we made there together. Yes, it’s, still cold and dark and filled with the pungent funk of his faithful mutt Stinky.
Upon entering his shop I found Woody collapsed on the floor, an empty tequila bottle in one hand and a shiny bronze No.4 smoothing plane by Lie-Nielson in the other blubbering like a fool and muttering something like “Death, a necessary end, will come when it will come.” Woody ain’t much of a scholar but he has a romantic soul that sees every difficulty in life as Shakespearean in nature.
Seeing that my friend would be of no help in solving this mystery, I left him on the floor to practice his lines while I began my investigation of what, judging from the source material he was reciting, could only have been caused by something akin to Brutus’s betrayal.
The obvious first clue was his No.4 smoother, so I pried it out of his paws, dried the tears he had dribbled all over it, and observed a series of deep, uneven scratches on its sole, more or less in line with its the long direction. Whereupon, I twirled my white mustaches like an older, more handsome Hercule Poroit, and asked myself the following questions:
Question 1: What could have possibly created these scratches? Had iron pixies been using Woody’s beautiful plane to shave bricks?
A quick investigation of the workshop revealed several suspect bricks, but no signs of iron pixies at play. I remembered seeing Woody use these same bricks to brace the legs of his combination router table and barbecue betimes (he makes wonderful barbecued pork ribs, marinated in a whiskey sauce, BTW). I concluded it unlikely that either Woody or pesky pixies would have used this valuable plane to shave bricks at the unthinkable risk of disturbing a delicate combination tool (router table/barbecue) of such importance.
As I considered the wood Woody had been working, another question popped out of my brain like an egg from a hen:
Question 2: Is there anything that grows naturally inside a tree that is harder than a handplane’s sole and large enough to have caused such deep scratches? And if they do exist, could these particles have been maliciously concealed inside the growing tree by compadres of the shambling horde of 6-armed, green-skinned, Fanta-guzzling aliens that follow me everywhere? BTW, If you have seen these aliens, please send photos!
I next removed the plane’s blade, which was made of a tough and difficult to sharpen metal called A2, developed for making dies and other industrial components, and checked its condition. As suspected, the edge was not just deadly dull, but exhibited dents perfectly in-line with the deepest scratches in the plane’s sole. Egads! The thlot pickens!
Of course, Gentle Reader is aware that many varieties of wood contain hard silica particles that can wear out tools and quickly dull cutters, but they are seldom large enough to create deep scratches of the kind I saw on Woody’s plane’s sole. Hmmm.
Question 3: If these hideously-hard particles did not grow inside the tree, and were not concealed inside the tree by aliens, exactly how did the infernal particles that made these scratches come into contact with Woody’s pretty plane?
To make a closer visual inspection possible, I recovered my magnifying glass and deerstalker hat from my truck parked in Woody’s beer can-cluttered driveway.
Could the damage have been caused by nails, screws or staples left in the wood? Perhaps, but the appearance of the damage to the blade would have been different.
Pixie toenail clippings? Happens more often than we realize.
A tiny fragment from a divorce lawyer’s heart? Certainly any piece of such an organ would be harder than stellite, but being a fragment of a microscopic organ, such particles are harder to find than an honest politician in Shat Francisco.
“No,” I confidently declared; The culprit was harder than all these substances, more insidious than even Murphy’s pointy purple pecker, a substance all around us, one we often ignore. Rejoice Woody, for the mystery is solved!
Dust & Grit
Logging Redwoods in Humbolt County California, 1905
Politics and journalism aside, we live in a dusty, dirty world, and although the steel in your tool blades is very hard, ordinary dust and dirt contain plenty of particles much harder. I guaran-frikin-tee you that collision with even a small particle of mineral grit embedded in the surface of a piece of wood can and will damage a blade’s cutting edge.
You may believe the damage is minimal and of little concern, but every time your blade becomes dull, you must resharpen it. Every sharpening session costs you time pushing the blade around on stones, time not spent cutting wood. And sharpening turns expensive blades and stones into mud. This is time and money lost forever.
And the abrasive action of dirt and grit embedded in wood is not hard on just chisel blades, plane blades and the soles of steel planes, but is even harder on sawteeth and wooden planes.
And the damage is not limited to just your handtools either. Take a closer look at the steel tables of your stationary equipment such as your jointer or tablesaw. Unless they are new, you will find scratches. Has that purple pervert Murphy been smokin dope and humpin sumpin on your jointer’s bed when you weren’t lookin?
Nay, Gentle Reader, supernatural causes aside, and unless you have been dismembering the bodies of divorce lawyers in your workshop, these scratches are clear evidence that the wood you’ve been working is neither as clean as it looks, nor as clean as it should be. You’ve gotta do something about that.
Ruba Dub Dub
So what can you do about damaging dust and grit? Strange as it may seem, the simplest and surest way to get rid of dirt and grit is to follow your mother’s instructions about cleaning the bathtub: Simply wash it with soap, water and a wire brush, followed by a rinse.
Bet you never thought of washing wood before have you?
The idea is to wet, scrub with a wire brush, and quickly rinse the dirt and grit off the wood, not to make the wood soaking wet, so none of that “rinse and repeat” nonsense, and don’t get carried away with the water hose. A bit of dishwashing soap or washing soda mixed in the water bucket will help lift out dirt and grit.
Don’t forget to pat each board down immediately afterwards with clean rags to remove surface water. Then separate each board, rest it on stickers on-edge out of direct sunlight, and allow time and circulating air to dry it.
Remember to wet both sides of each board to minimize warping. And don’t soak a lot of water into the ends.
Disclaimer: Rubba-dub-dub is not well suited for thin material or laminated wood products that might easily warp, or delaminate, or if you are in a hurry, or if you lack adequate space to properly air-dry the wood.
Whether you wash the wood with water or not, be sure to do at least the following two steps on every board before you process it with your valuable tools.
Scrub Scrub Scrub
If you can’t wash the boards, use a steel wire brush to dry-scrub all the board’s faces both with and across the grain. Yes, I know it makes the surface rougher. Tough pixie toenails. Scrubbing with a stiff steel brush is extremely effective at removing dust, dirt, embedded particles of grit, and even small stones from long grain. Give it a try and you will both see and smell the dirt and particles expelled. Pretty nasty stuff sometimes.
Saw Saw Saw
Second, and this is supremely important, before planing a board either by hand or using powertools, saw 2~3mm off both ends. This is why you have that circular saw with the carbide-tipped blade. If you can’t do that, at least use a steel block plane, drawknife, or other tool to chamfer all eight corners of the board’s ends to remove both surface dirt and the worst of the embedded grit thereby saving your planes, planer and/or jointer blades from scratches.
This step is critical because grit and even small stones frequently become so deeply embedded in endgrain that even a steel brush can’t dig them out. But sure as God made little green apples, Murphy will place them directly in the path of your plane blade.
If you do these things, I promise your tools will thank you over many years with abundant chips, shiny shavings and cheerful little songs.
Well, until either Woody sobers up or we meet again, I have the honor to remain,
YMHOS
Yosemite Valley California, 1865
If you have questions or would like to learn more about our tools, please click the “Pricelist” link here or at the top of the page and use the “Contact Us” form located immediately below.
Please share your insights and comments with all Gentle Readers using the form located further below labeled “Leave a Reply.” We aren’t evil Google, fascist facebook, thuggish Twitter, nor a US Senator’s Communist Chinese girlfriend and so won’t sell, share, or profitably “misplace” your information. May Murphy poke me with his pointy purple pecker if I lie (say that ten times fast!) (ツ).


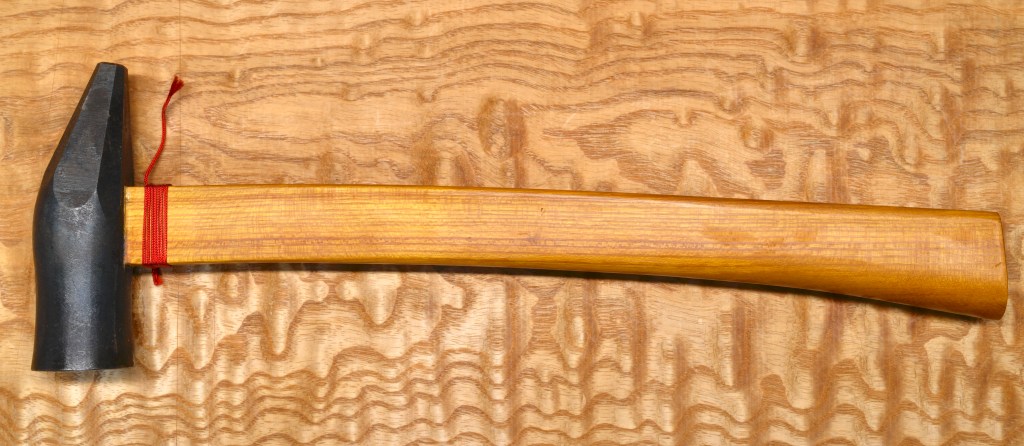


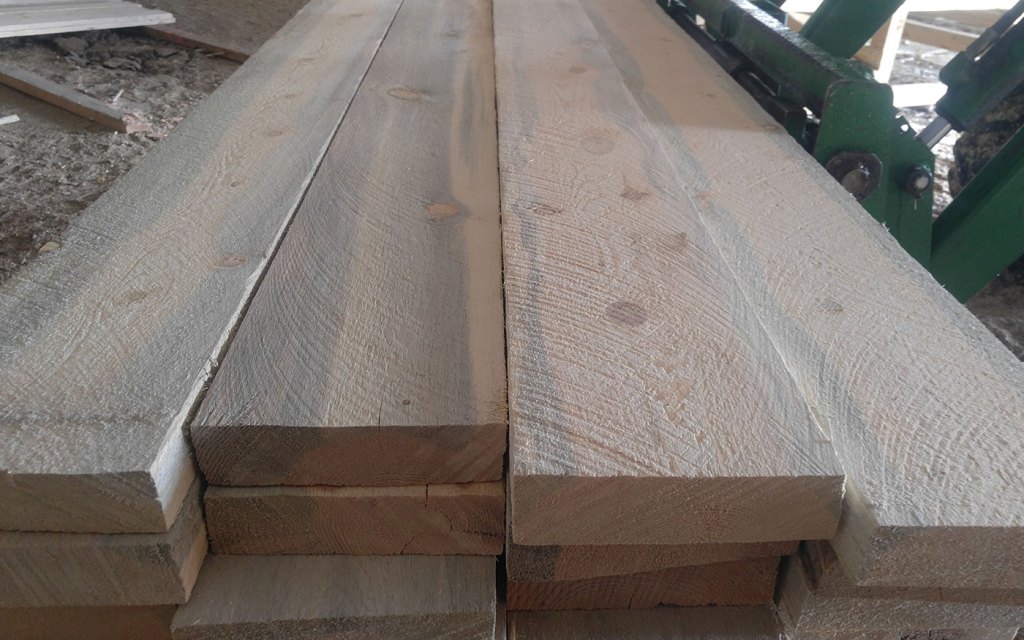


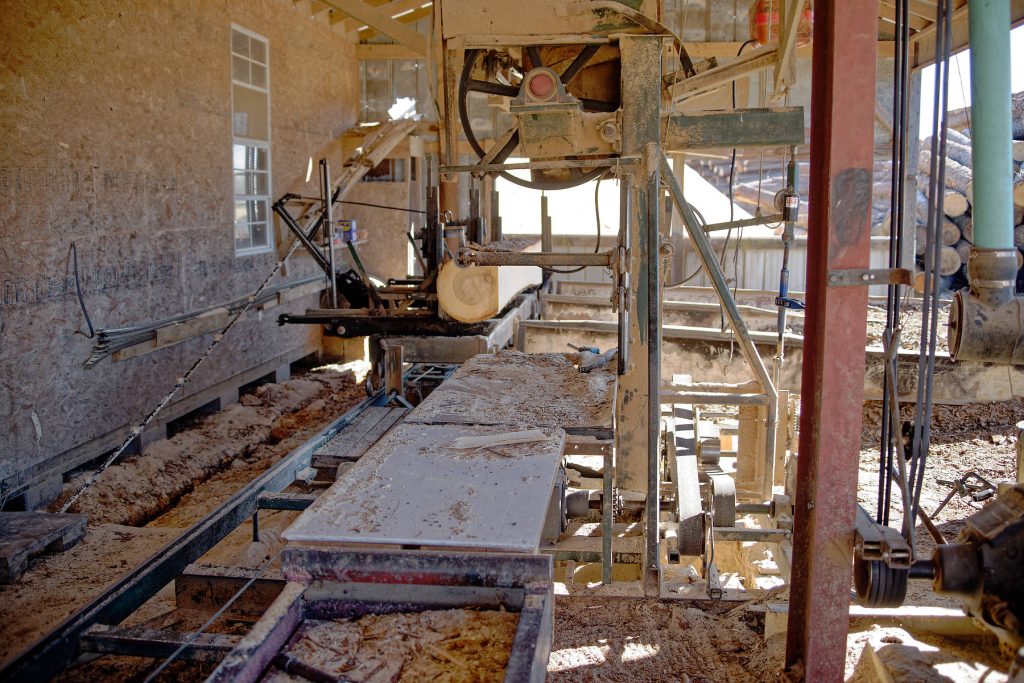


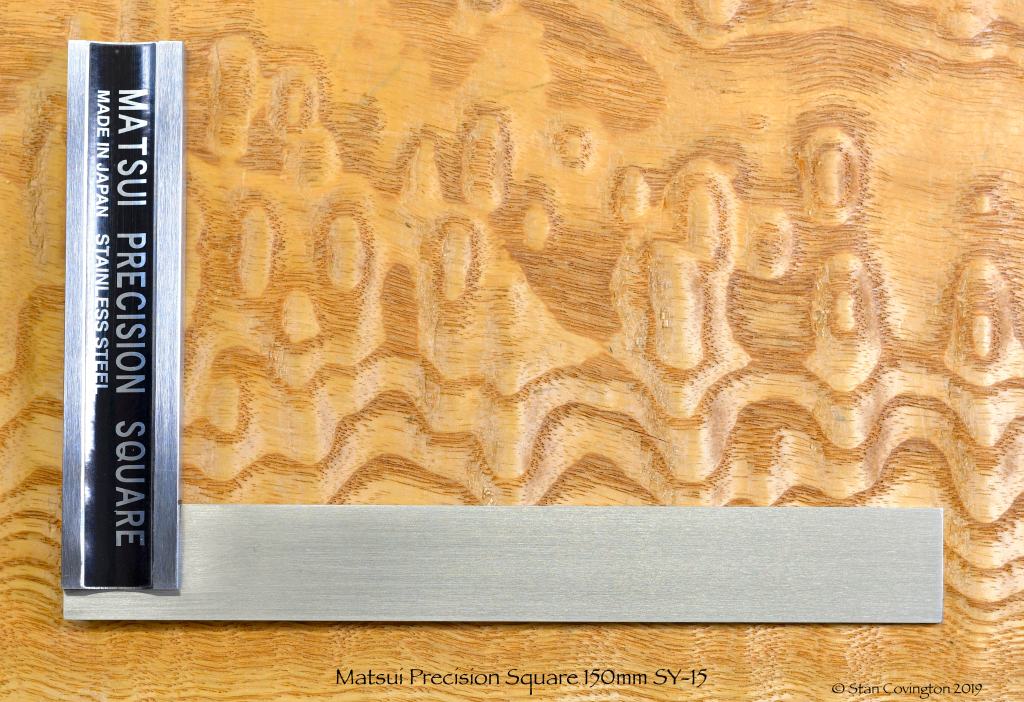
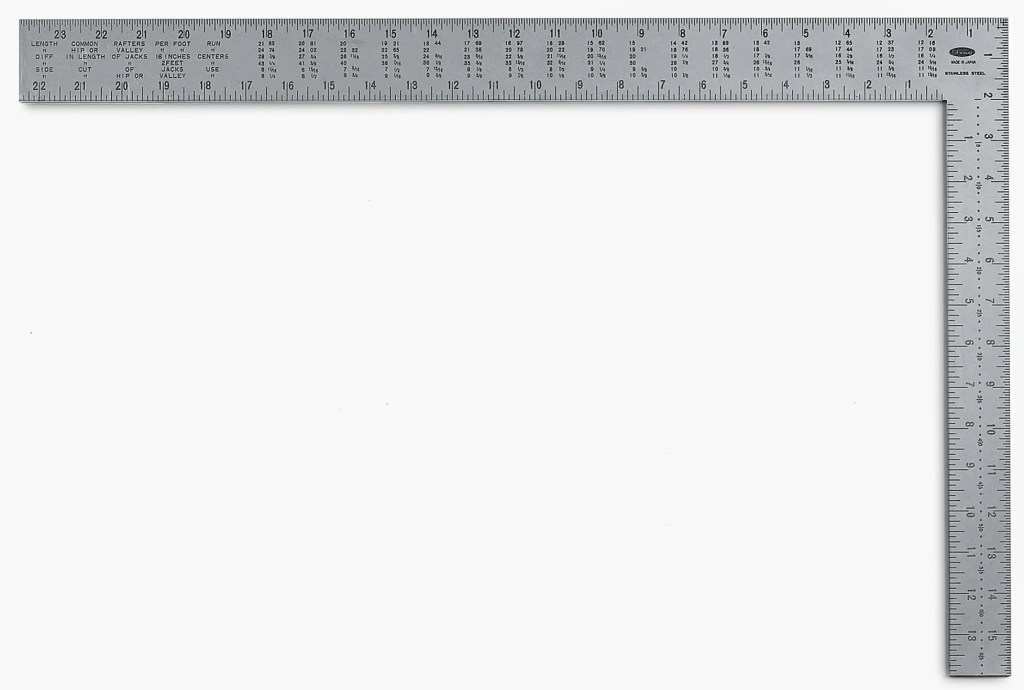
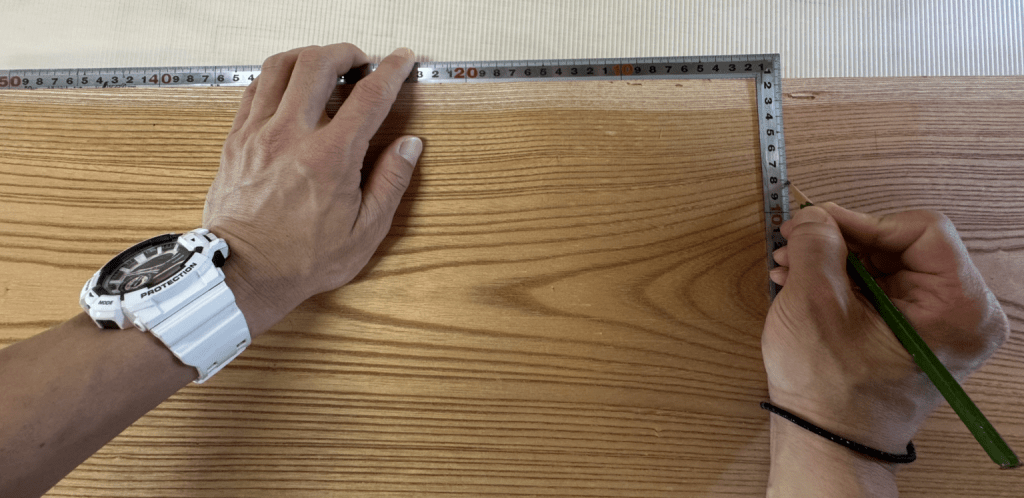

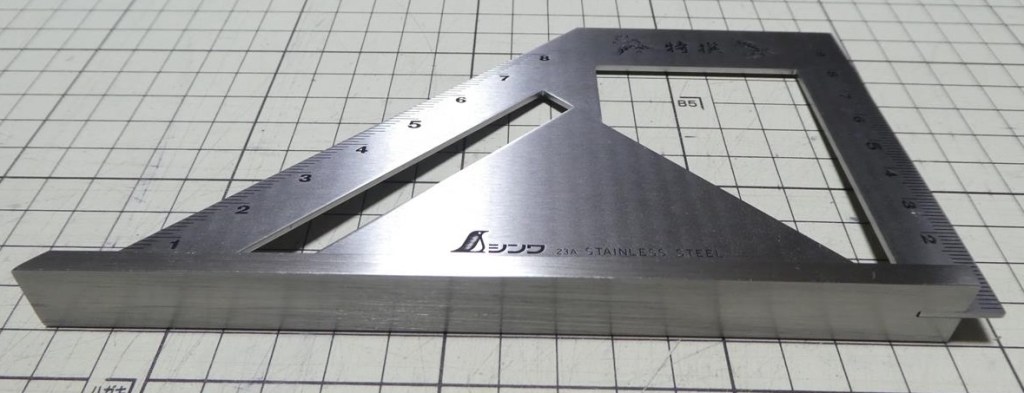


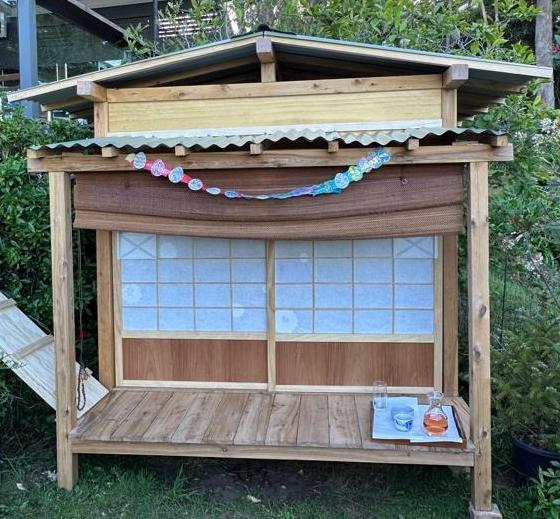


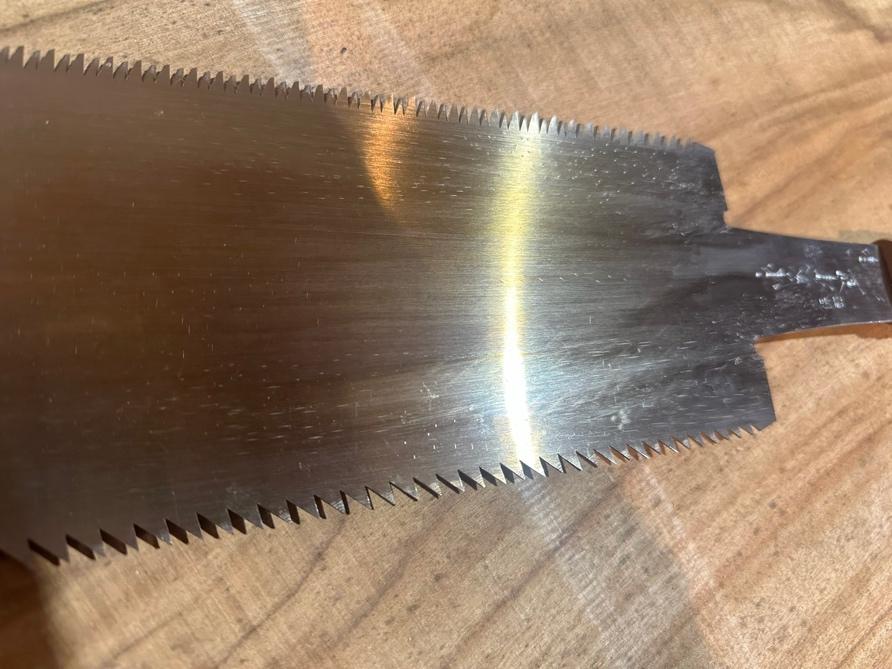
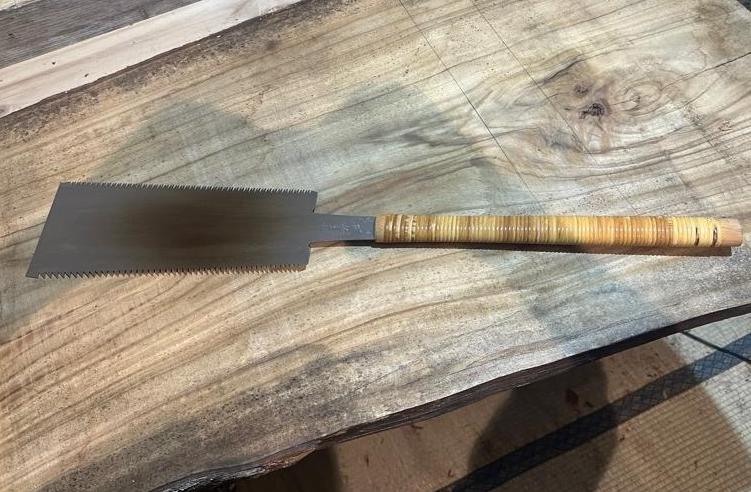


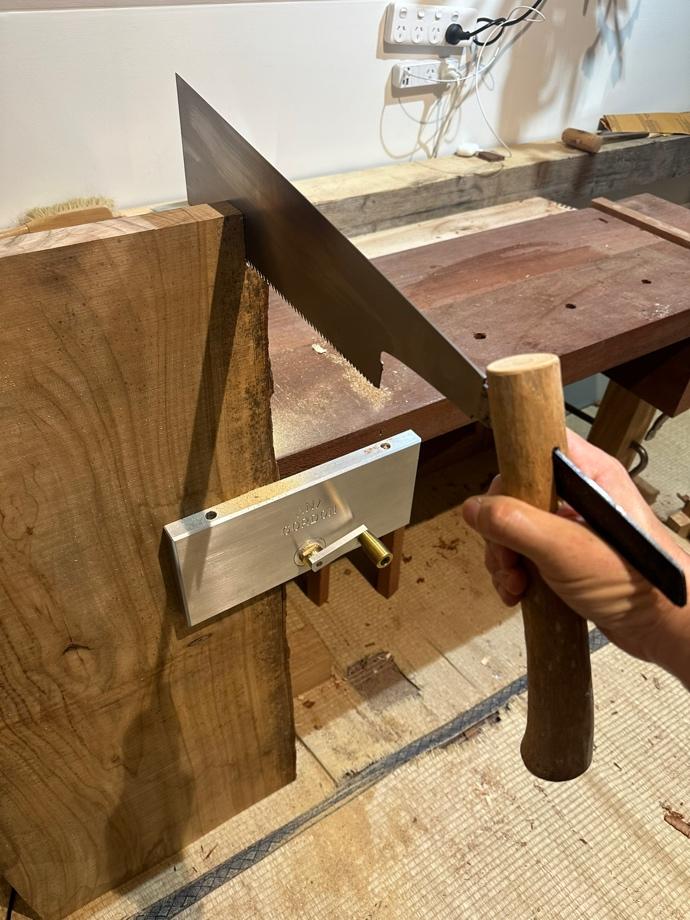
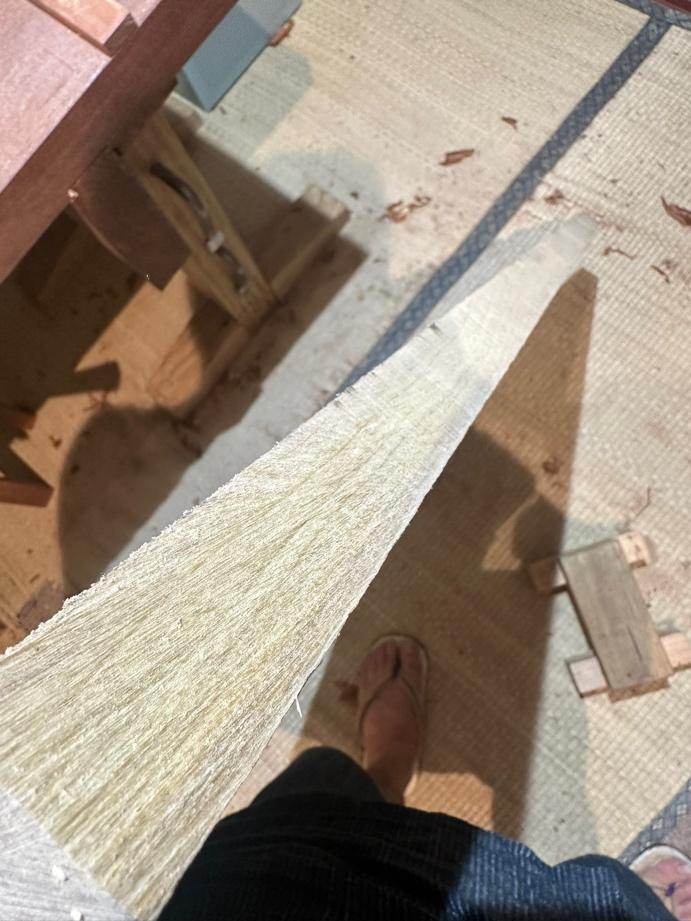


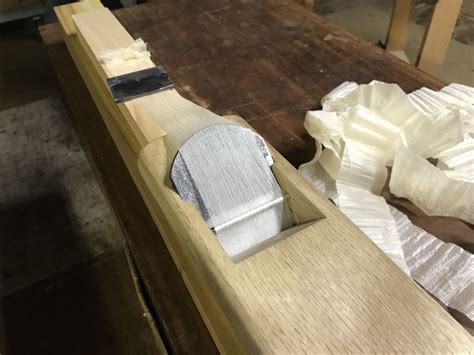


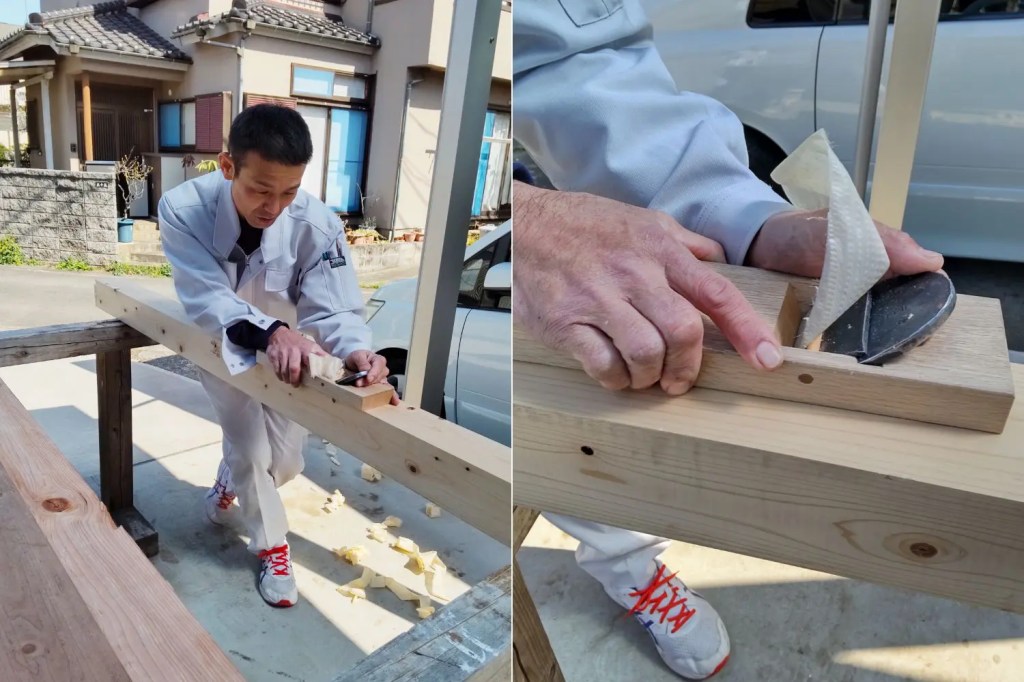


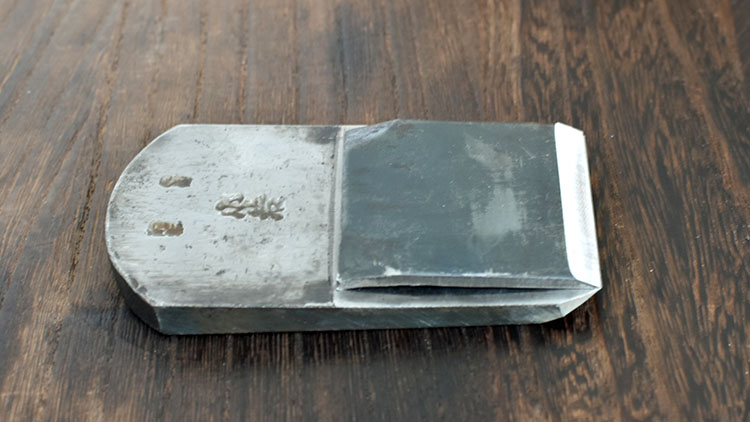


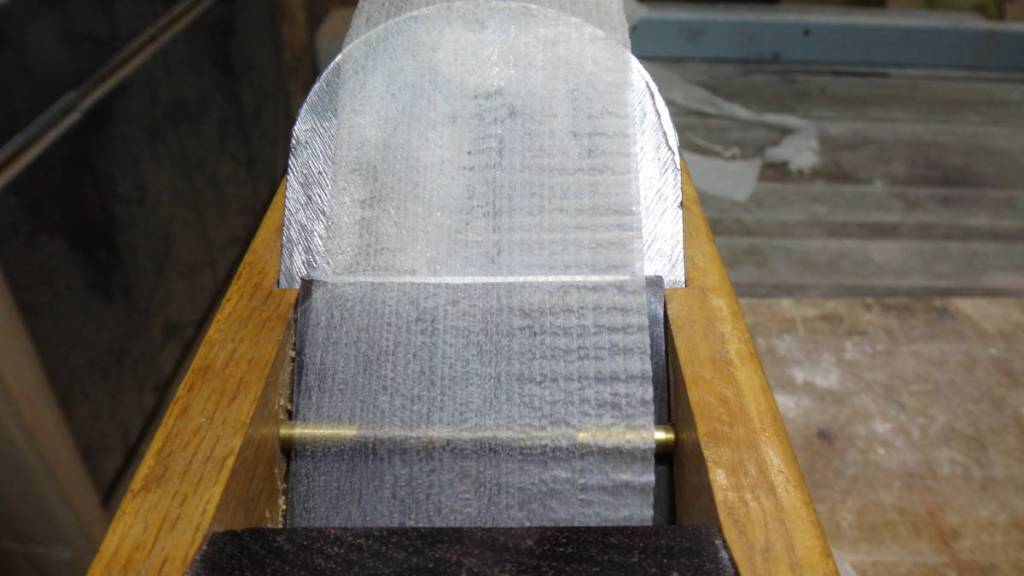


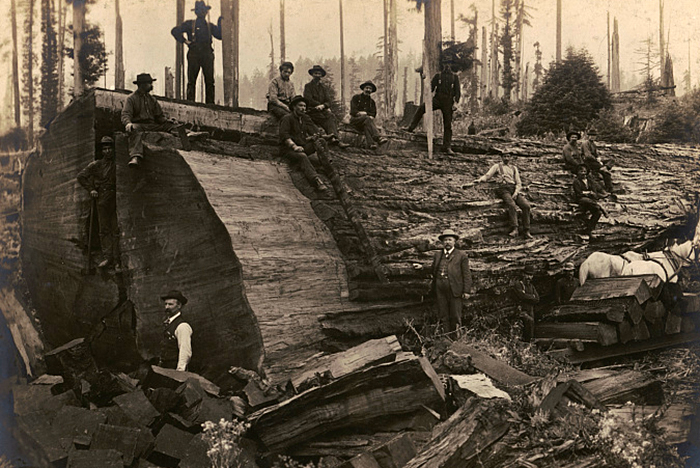


Please Leave a Reply