Even the smallest person can change the course of history.
Lady Galadriel – The Lord of the Rings
In previous posts in this series about toolchests, and your humble servant’s toolchest in particular, we looked at how the design was guided by performance criteria such as portability, tie-down and lifting, and pixie infestation prevention. In this post we will examine one solution to another performance criteria. Perhaps the solutions in this article will help you solidify your storage requirements.
Inside the Lid
Key Performance Criteria No.4 defined in Part 5 of this series is as follows:
Tool Access: Tools used frequently to be quick to locate and easy to remove and replace without bending, kneeling, or shifting trays around.
The solution I selected was to mount many of the tools I use most frequently inside the lid where they are in clear view and quickly accessible. This technique is one seen in historical examples, but as always, I wanted to do things a little bigger, a little better.
Alas, unbeknownst to me I had fallen prey to a sophistry that has afflicted many, indeed one that has destroyed entire civilizations and can be summarized as: “ if a little bit is good then too much must be excellent.”
I began the planning of this space with visions of Mr. Studley’s famous toolchest dancing in my head. The image in my mind was mahvelous dahling, simply mahvelous, but the conceptual drawing was only good. While I was distracted by my dreams, reality snuck up behind me, shot me in the head and dumped my virtual body in the river. The water was cold!
After a refreshing swim I realized my plan was too dense, too inflexible, too expensive, and most importantly, violated the unwritten performance criteria common to most human endeavors: “It must be finished in my lifetime.”
The compromise I arrived at is shown in this post. It is not perfect. You should not emulate it. But it is the fruit of trial and lots of error over many years and it works reliably.
A view of the inside of the toolchest’s lid with all the tools in residence. Please also notice the 5 heavy brass butt hinges, the sealing lip around the inside edge of the lid, and the brass chain to keep the lid from flopping open. The unusual wooden tool mounted nearly in the center is an unused, hand-carved Japanese inkpot called a “sumitsubo,” an excellent tool for snapping straight lines on wood. Its purpose here is purely decorative. My daily-use sumitsubo is the blue plastic widget located below the wooden sumitsubo; far more practical but not as traditional, sculptural or as propitious.
An obvious problem with mounting tools inside a lid is their rebellious desire to drop to the bottom of the chest when the lid is closed, especially if the petty pernicious pixies that sometimes skulk in the shadows of my workshop lend a claw.
To deal with this mischievous propensity, each tool’s mounting mechanism must retain the tool securely in place while the lid is opened, closed, and even while the toolchest is being moved around. At the same time, the mounting mechanism must be simple and quick to operate. This combination of security and speed is not as easy to accomplish as Gentle Reader might imagine because, well, tools can be naughty, and gravity is not our friend when the lid is closed. And pixies.
In the center of the picture is a favorite old Japanese screwdriver with a bulbous handle made from keyaki (zelkova wood). Behind it are mounted two Yankee screwdrivers of different lengths along with driver and Japanese-style gimlet bits. To the left, most of the wooden sumitsubo, secured to its mounting board by a leather thong, is visible. Under it you can see the fire-damaged end of the handle of a Millers Falls eggbeater. To the right is a set of expensive but dismal-quality oiirenomi (since replaced) and the handles of gennou hammers. Bits for the brace mounted behind the hammer handles are stored in the space behind the chisel blades. The sealing lip attached to the inside of the lid is visible just above the brass butt hinge. This is simply nailed in place to be easily replaced if damaged, but that has not been necessary yet.
So let’s examine the tools mounted inside the lid and how they are secured.
The upper third of the lid is dominated by two full-width parallel boards secured to both sides of the lid. These two boards have edge lips and matching notches. The left side holds 7 marking gauges of various lengths and types. Four of them are dual-blade mortise gauges (kamakebiki) made by Kinshiro. After placing a marking gauge in its designated set of slots, it is secured by extending the tool’s beam or blade upwards and locking it in place with its own adjusting screw. This mounting method has been entirely successful.
The right hand side of these parallel boards holds 8 hammers (gennou). The back-side of each notch and the surrounding lip is shaped to fit a specific hammer, and super-magnets help hold each hammer’s steel head in place.
The handles of the chisels mounted below also help to retain the hammers, as you can see from the photo. This is not a perfect solution, but it has not let me down so far.
The tools stored in the lid’s right-hand side spread out for your inspection. The 11 chisels are not shown.
The 11 chisels on the right side are held in place by friction between the chisel’s cone-shaped ferrules and the closely-fitted wood notches, and stay in place even when the lid is closed. But vibration can become a problem if I need to move the chest over a rough surface with the lid closed, so I wrap a rubber bungee cord around the chisel’s handles to keep them in their slots during jiggly transport.
The chisel’s cutting edges are oriented downward when the lid is open, close to the lid’s side (below) so that there is little danger of snagging a finger or wrist on the extremely sharp edges. I strongly dislike getting red sticky stuff all over my tools, and accordingly I disdain any storage system that leaves sharp cutting edges exposed.
Whatever chisel storage solution selected, I strongly urge Gentle Reader to ensure there is no opportunity for chisels to express their peckish nature for three reasons: First, 10 fingers are better than 9 (just ask Frodo); Second, red sticky stuff promotes rust; and Third, Murphy always has the last laugh. I promise you won’t like whatever gives that bloody bastard the giggles when chisels are involved.
A 10-pc set of Kiyohisa oiirenomi with white oak handles mounted inside the lid. I was deeply dissatisfied with the poor quality of these expensive chisels and have since replaced them with the higher-quality but much less expensive set with red oak handles shown in the next photo. A sokozarai chisel with a red oak handle is mounted to the far right of the row. An antique brace with rosewood fittings, as well as an old Starrett protractor head are mounted behind the chisels and gennou hammer handles
Behind the chisel and hammer handles, you can see my Starrett protractor head, and my father’s old Stanley brace with rosewood fittings. Bits are placed in tool wraps and stored in a compartment behind the chisel blades. Not easy to get at. I have thought about combining the chisel rack into a drawer to hold the bits, but have not done anything yet because I’m not sure it would be an improvement.
The tools mounted in the lid’s left-hand side are removed and displayed for your inspection. The zelkova wood sumitsubo hand-carved in the lucky turtle and stork pattern can be seen in profile with its ebony karuko needle and bamboo sumisashi marking stick below. The black plastic bottle with the blue and white lid at the far right contains ink for the sumitsubo.
On the left side, a Starrett 92 divider and two spring dividers are secured by a block screwed to the far left sidewall. Chastely closing the divider’s legs together pinches a screw head locking them securely in place. If you don’t already own a Starrett 92, you need to get one.
In this photo the sumitsubo is front and center. The tails of 6 marking gauges, 4 of which are dual-blade units by Kinshiro, can be seen in the rack above.
Behind the dividers, there are several steel rulers and a bevel gauge secured by a hook on top and retained by the Starrett 92’s arm. In the center are mounted 3 Matsui Precision stainless steel squares, a Starrett combo square, a Starrett adjustable mini square, and a thickness caliper.
I also mounted an unused hand-carved Zelkova-wood Japanese inkline/inkpot (墨壷 sumitsubo) with silk wadding in a central position of honor. While this is a practical tool, I mounted it there just as decoration and for good luck, as you can tell because the line is still blue and the silk wadding is still white. I have a more convenient sealed Shinwa-brand plastic sumitsubo stored in the top tray I use when I need to snap a line.
At the bottom of the lid I mounted an old Millers Falls eggbeater drill. I don’t recall the model number, but I purchased it used in Delaware, Ohio many moons ago. The cap on the handle was damaged by fire sometime before I bought it. It’s a handy a little guy, but nothing special.
On the left side of the center vertical divider are mounted 2 Yankee spiral screwdrivers, bits and gimlet blades, as well as an antique Japanese screwdriver with a polished steel shaft and a bulbous Zelkova wood handle. I am irrationally fond of this old tool.
I have tried different arrangements for mounting tools inside the lid over the years, and I will continue to improve it because I am confident the solution shown is not the best possible arrangement. It’s a difficult planning problem for two reasons. First, the tools in the lid are the most easily accessible and therefore must be ones I need all the time. Assigning priority and ease of access seems as easy as falling off a greasy log, but it isn’t. The Studley solutions to storing tools are amazing, but not really practical. Second, I need to be able to remove and store these tools quickly, but at the same time, they can’t be so heavy or so difficult to secure they fall out when the lid closes or opens. Once again, the conflict between safety and security is tricky to resolve.
Regarding priority, marking gauges and other layout tools see the highest frequency of use, followed by chisels, hammers, drills and screwdrivers. This priority is reflected in their location inside the lid, as you can see.
I don’t use the protractor head, brace or bits very often, so they are assigned a lower priority and reside behind the hammers and chisels. It takes time to remove them, but on the other hand, they would always be in the way if placed in the trays, which is more valuable real estate, so this is their home.
To hold the lid open and keep it from flopping back, I installed a brass toilet tank chain on the left side, and boxed out a space so it doesn’t hang up on tools. When the lid is closed, it automatically lays alongside the top tray. This chain was inexpensive, it’s strong, it will never rust, and it has never caused me a second of grief.
Well, that’s all for this post. Next time we’ll look at the trays. There will be planes. Oh joy!
YMHOS
If you have questions or would like to learn more about our tools, please click the “Pricelist” link here or at the top of the page and use the “Contact Us” form located immediately below.
Please share your insights and comments with everyone in the form located further below labeled “Leave a Reply.” We aren’t evil Google, fascist facebook, or thuggish Twitter and so won’t sell, share, or profitably “misplace” your information. If I lie may my toilet chain break and the lid crush my stupid head.
Good hip and knee flexibility is needed when working on the floor, but tabi socks are optional! Credit: D.Campbell
When a work lifts your spirits and inspires bold and noble thoughts in you, do not look for any other standard to judge by: the work is good, the product of a master craftsman.
Jean de la Bruyere
Introduction
Gentle Reader, welcome to this second installment in my series of articles about the Japanese floor workbench called the “Atedai.” In Part 1 we looked at some of the design considerations and construction techniques involved in making this tool. In this presentation we will get to the fun part of putting it to use.
These workbenches, as I hope you will see, are incredibly versatile tools that can be used in endless ways. My objective in this article is to show you a number of those methods, some traditional and some less so, and inspire you to maybe give it a go yourself.
I will use examples from my own work, as well as examples from master craftsmen (including a few National Living Treasures of Japan) who have completed rigorous apprenticeships and used atedai professionally much longer than I ever will.
I have not received any direct training in this method of working but have ‘stolen’ many ideas and methods (lit. “Gijutsu wo nusumu” 技術を盗む) through observation and practice of their techniques.
This is the way traditional apprenticeships run in Japan – the master seldom gives direct instructions and entertains few questions, yet the apprentice is expected to learn everything – through observation and practice – and is thus said to “steal” his master’s techniques. Only in my case, my teachers are Stan, books, the internet, and videos!
I will use a fair number of pictures and video links in this blog, as they will show much more nuance than words can about how master craftsmen use their Atedai.
Disclaimer
If you live in a ‘chair culture’ and are just starting to work lower to the ground, then this may be the first time you have sat cross-legged on the floor since school. Take it easy! Go slow, improve your flexibility gradually and your knees will thank you. This style of woodworking is physical, and you must orient your whole body with the work to be efficient, and safe, which at first can cause some aches and pains. Bear with it – the results will be worth a little suffering!
If the floor is out of the question, don’t despair! There are a number of ways to use an Atedai either sitting on a stool or standing, which we will explore in this article as well.
With that said, let’s begin!
When placed low on the floor, an atedai workbench is much, much bigger and more stable than a standard table-style workbench. Using a woven-reed goza mat, or other soft floor covering, you can convert any reasonable space into an efficient work area in a couple of minutes. The goza makes it easy to spread your tools around you within easy reach to keep the work going quickly. It also makes cleanup of woodchips, shavings and sawdust easy. And of course there’s no worry about tools being damaged by rolling off the workbench. Win-Win. Credit: D. Campbell
Sawing
Sawing using an atedai falls mainly into two categories – rough sawing for stock preparation, and precision sawing for finer work/joinery.
Rough sawing doesn’t differ much from using low sawhorses… you lay your work flat on the bench, making sure to hang it over the side, or off the far end of the bench, and use your foot to stabilize the board while your hands work the saw. This is very quick and accurate methodology, one that doesn’t require the large, bulky, difficult-to-store sawhorses typically used in the Western woodworking tradition, but it is dependent on using Japanese saws.
Cross-cutting lumber using a Japanese pull-saw and an atedai. The craftsman in these videos is a well known “sashimono-shi” named Kimura Tadashi. Credit: Kotaro Tanaka
The process of rough sawing is the same, more or less, as when using low sawhorses. Using one’s feet to stabilize the workpiece helps significantly. You can also stand with both feet on the stock, which can be very useful when making big rip cuts in large stock.
Fine sawing can be slightly ‘fussier’ in getting the work where it needs to be, and can depend on the kind of joint you are cutting. That said, it often helps to prop the work up somehow, particularly when ripping. This can be accomplished by leaning it vertically against the end of the Atedai, or laying the work flat on the bench (a clamp can help here) and propping up the end of the Atedai – experiment and see what works for you. I have seen craftsmen using plane blocks to prop up the near end of the bench – an ingenious and elegant solution, yet maybe not as quick as just leaning it on the end…
Another famous sashimono-shi, Mogami Toyojirou, leaning the work vertically into the end of the atedai to raise it off the bench to saw hidden mitred dovetails, a classical joint. Credit: Kotaro Tanaka
Note the size of the stops on Mr. Mogami’s atedai are much smaller than my own, and very much in the sashimono tradition.
Any cross cut, like the cutting of tenon shoulders, can be made off to the side of the bench or, if your stops are low enough, in the middle of the bench itself. I prefer to saw to one side, giving my arm room to move back and forward without having to shift position too much. You can also use shorter Western joinery saws here, by pushing the work into the stops, almost like a bench hook.
Planing
Planing at the Atedai is accomplished in only one or two positions… sitting down crossed legged, sometimes with one leg extended, or while on both knees. Give it a try and see what works best for you in your work.
You hold your plane in both hands, reach and pull. Simple.
In my experience, I have found that kneeling on both knees works best for powerful roughing strokes, because I can make use my upper body weight to press down on the workpiece while making powerful, controlled cutting strokes with the plane. Alternately, planing while sitting with one leg extended works best for me for finish planing. YMMV – experiment and find what works for you.
For really long stock you can, in theory, lunge forward with one leg and rock back with the planing stroke, but that still has a length limit (not to mention the need for very strong leg and back muscles) and standing up really has all the advantage in this situation. Traditionally, craftspeople such as Tategu-shi, joiners who specialize in doors and shoji, have a dedicated planing beam or bench on legs set up in their workshop, used standing, for longer stock preparation, and use their Atedai used for mortising and other smaller tasks.
Ono Showasai planing on both knees. Credit: 木工芸-大野昭和齋の指物わざ
Mr. Mogami planing with one leg extended. Credit:Kotaro Tanaka
“What about my Baileys?!” I hear you cry.
Fear not, Gentle Reader, for you can still use Western planes… both on the normal push stroke, as well as the pull… by adopting this work style. I often use No.5 and No.7 planes for initial rough stock preparation, and both can be used well low-down, although it must be said not quite as well as Japanese planes. To push I often kneel to the side, or sit on the work and push towards the stops. Maybe not elegant, but still good enough for me – either way, no one is watching, except maybe Master Sprocket, the neighbor’s cat, who meticulously supervises every step of my work!
Yes, you can use western planes on the floor. It’s maybe not as efficient without the use of your legs, but I have flattened tabletops on the floor with the help of a no. 5 and no. 7 plane. Have you tried pulling a western plane? It works surprisingly well! Just grab the knob with your left or right hand and place your other hand on the handle. Credit: D. CampbellThe honorable Master Sprocket come by for his daily inspection. He is a tough, but fair, task master that doesn’t judge my use of push planes at the low bench too harshly, so long as the work is completed on-time. Also instrumental in keeping the workshop pixies at bay. Credit: D. Campbell
Another way to use push planes is to stand the atedai on its side and clamp the workpiece to its face, which allows you to plane standing up… this can also be useful with Japanese planes when planing longer boards or when you just need to stretch your legs and rest your back.
By standing the atedai on its side, you can use push planes with ease. Remember to place the atedai on the side you don’t use to shoot with, in my case the left side. Credit: D. Campbell
Jigs for any number of planing tasks are used as much in the Japanese tradition as they are in the West for 45° and 90° angles and, except for being designed for the pull stroke, do not really differ. One jig, however that may be new to you is a rather simple, but incredibly effective, device helping to shoot long edges. It is simply a flat board with a stop, which elevates the board above the surface of the bench, allowing your plane to shoot the edge of a board. This is one of the reasons you will often see 2 stops rather than 1 long stop on the Atedai. One stop braces the shooting board and workpiece while the gap between the two stops allows the plane to pass through and finish the stroke.
Mr. Mogami planing the edge of this board with the help of a simple, but very useful, jig not often seen in Western woodworking. From the video linked to above. Credit:Kotaro Tanaka
Chisel Work
Just as when planing, there are a number of ways, and many more besides, to use chisels at an Atedai depending on the task at hand.
For mortising, and other similar tasks, a great way to hold the work is with your derrière. Yes, finally we come to the famous bum clamp. Sitting on your stock (while potentially uncomfortable on narrow or high stock) is one of the best ways to keep the work steady and both hands free for using tools while positioning yourself for efficient and safe work with your eye directly over the mortise to help ensure the chisel stays plumb. As we will see, this is also very effective while at a standing bench too.
The veritable bum clamp displayed here by Mr. Toshio Odate. Note the cushion – a long day mortising without it isn’t much fun – and the nihon mukoumachi nomi in his hand, a specialized dual-blade chisel for cutting double mortices. Credit: Popular Woodworking
Hollowing work, like that used in kurimono carving, is often performed while sitting to the side of the bench directing all the force into the stop, and keeping the work steady. Be warned here, keep a mental note of where your left knee is in relation to your chisel! In this position it’s easy to make powerful horizontal hammer blows, and the last thing you want is a chisel jumping out of the cut into your knee.
In this photo I am sitting at the side of the bench performing the heavy chisel work of hollowing. Impact forces are directed towards the stops, which is why I installed larger than average stops on my bench. In my previous post, I mentioned leaving the underside of my bench untouched – you can see the irregular thickness where the leg is dovetailed into the top. Credit: D. CampbellAkira Murayama hollowing a tray made of keyaki wood (zelkova). Any similarity to my own work is purely coincidental! 😉 Note – in all these pictures, and videos to follow, you will see the oil pot is never far away. This is, IMHO, the most important tool you can own – I implore you to make one!
The final ‘standard’ chiselling position is at the end of the Atedai, often using your foot to stabilize the work piece, although clamps may also be used. This allows for quick repositioning of the workpiece, if needed, and holds the work solidly enough for the work at hand (foot?). As you tend to chisel more or less vertically in this position, your foot isn’t in much danger, but it still pays to be cognizant of the potential risk at all times.
Mr. Nakadai Zuishin using his foot to steady the workpiece. Note, you will often see the use of tightly-woven cotton tabi socks by craftsmen of all trades in Japan. While traditional, I also use them because normal cotton socks are like sawdust magnets, and my wife is fed up with hoovering the house! It also helps keep the stock clean, especially important in the finishing stages.
This is number 3 in a 9 video series of Mr. Nakadai, designated one of Japan’s National Living Treasures, making a beautiful serving bowl for the tea ceremony from pauwlonia wood. You can view the entire playlist on YouTube at this link.
Standing & Sitting
So far, we have looked at using the Atedai while it is resting on the floor, but there are a number of other ways to use it if your knees say “no”, or if you just prefer to work while standing up.
A great way to integrate the planing bench into your normal workflow is to have a slightly smaller Atedai for use on top of your normal workbench. This can be a great option if you use a mixture of western and Japanese planes, and can give you the best of both worlds. If you dimension it so you can place the Atedai under your table workbench when not in use, you can quickly and easily pull it out when needed.
A smaller atedai placed on top of a table workbenchj for planing while standing. Although smaller in dimensions, construction is the same. Note the slight angle towards the stopped end, which some prefer. Credit: Kiyoto Tanaka, a superb luthier https://www.youtube.com/watch?v=PQVqu3GRbQ0
By placing the Atedai on sawhorses, you will have a versatile, and mobile workbench which, with some practice, will do everything you ask of it. Carpenters in the field will often use a bench similar to this, made with materials on site, although they can sometimes be rather quick and dirty affairs.
In the photo above, Mr. Makoto Imai, a highly skilled carpenter, is using a similar set up, which was immortalised in ‘The Workbench Book’ by Scott Landis. The stop here is just a screw, which is all you need for most planing operations – although care must be taken if you don’t want to mark the end grain. I love the simplicity of this set up, and find Makoto’s work truly inspiring. Credit: Daiku Dojo http://www.daikudojo.org/Archive/20070414_tfgwc_asilomar_makoto_imai_demo/
While easier on the body in some respects, the lack of vises (Editor’s note: “virtually free of sin”) still means these workbenches require good flexibility and the use of body clamps. There is no escaping the fact that Japanese woodworking can be very physical. With that said, due to the need to lift your knee/leg up to, or to sit on, this kind of bench I have found the work surface needs to be slightly lower than your normal Western bench – for me about the height of my downward facing palm, with my arm by my side.
The traditional knee clamp holding the workpiece in place while mortising. This may look ungainly, but is surprisingly comfortable, and is a really quick and efficient way to work. This was my previous ‘workbench’, which I used a lot before I got started in kurimono carving, and needed something more stable under heavy horizontal chiselling. Credit: D. CampbellUsing your bench, to build your bench. This picture was taken as I was making the Atedai… with no stops and no feet I could still make the stops, cut out the sliding dovetails, and make the legs. No vise? No problem! That is the beauty of Japanese tools, for me. A heavy beam will stay put under its own weight, but legs, dowels, or similar, underneath will definitely stop it from shifting. The addition of a diagonal brace between sawhorses creates an incredibly stable working surface. Credit: D. Campbell
Miscellaneous
As you have no doubt seen, the potential ways to use the Atedai are incredibly varied. In this section I will outline some interesting techniques and ideas that may help show you just what is possible with these benches, or at least give some food for thought.
Firstly, using low sawhorses of the same height as your Atedai is a great way to extend the length or width of the work surface, and is a great solution for things like doors or shoji frames. It can also be incredibly useful if combined with, for example, a chop saw set at the same height.
Combined with low sawhorses of the same height, you can extend the workbench surface lengthwise or sideways. A great solution when working with things like doors, or longer sections of stock. Credit: D. Campbell
Next, in a real blurring of east and west, you can put dog holes in your workbench – similarly spaced as you would on a normal workbench, for use of bench dogs, and hold fasts (Veritas make a lovely version which you can hand tighten). This can really add some versatility to your bench.
These holes will also give you an alternative to the ‘foot clamp’. By making a piece of wood with a hole drilled about ⅓ of the way in from one end, and a bolt passing through it into a dog hole (no need to attach a nut to the other end), you can create a foot-operated lever to press a workpiece into your stop, holding it very securely. The picture below shows Mr. Inomoto using this ingenious tool with his atedai
So, there you have it, a whistle stop tour of how to use an atedai. As you can see, the atedai is hugely versatile, and can offer all woodworkers, especially users of Japanese tools, a great way of working.
Low workbenches of various styles are used by a huge range of specific crafts within woodworking (as well as an equally large number of crafts outside of woodworking). I hope to have sparked some ideas that will be useful in your own work. Even if you continue using a Western bench, I hope you got a hint just what can be achieved with a couple of stops and your body…
While this way of working initially may appear quite simple, this simplicity belies the huge degree of nuance required to get the most out of it… from construction details to actual use. Often it’s not what the bench brings to you, but what you can bring to the Atedai, that determines the benefit it can provide.
You will also have seen that the benches themselves, as well as the methods of using them, are as unique as the craftsman employing them, so if something works for you, and is safe, crack on. There is no ‘one way’ to work with an Atedai, and I would love to see you at work with one of your own.
The best way to get a real sense of these benches in use is to view a range of craftspeople, including some of Japan’s “Living National Treasures,” actually using them, and so I wanted to leave a list of links for you to ‘steal’ some ideas of your own.
A comparison of two styles of hand-forged gennou heads. Top: A Yamakichi gennou head by Hiroki. Bottom: A classical ryouguchi head by Kosaburo with the antique “swollen eye.” Both handles are made from American Osage Orange, an excellent wood for hammer handles. The top handle still exhibits the neon yellow color typical of OO, while the bottom handle has been exposed to sunlight for a few weeks and turned a nice but unusual brown color.
Better a bald head than no head at all.
Seamus MacManus
In the previous post in this series about Japanese hammers we examined a feature found in all modern hammer heads: the essential, unblinking, unseeing eye. In this post we will touch on the style of heads recommend for using with Japanese chisels. We discussed this subject in this postas well.
Gennou Head Shapes
The most popular head shapes commonly available in Japan nowadays are: ryoguchi, daruma, funate, yamakichi and various hybrids thereof.
Ryouguchi
Ryouguch is the most common style of head, at least in Eastern Japan. It has two faces: A flat one for striking chisels and nails, and a slightly domed opposing face for kigoroshi and setting nails below the surface of boards.
While a simple design, this style of head has a relatively high moment of inertia, making it is more stable than other styles and therefore less likely to twist out of alignment during the swing, or twitch upon impact, a positive thing if you are a card-carrying member of NBA (Nail Benders Anonymous). (ツ)
Face designs in this style vary widely including round, oval, square, rectangular (usually with corners removed for a more octagonal shape) true octagonal, and the “Ichimonji” style with roundish sides and a flat top and bottom. We prefer the rectangular shape with cut corners best, but one style is no better than another. We don’t recommend, however, faces with 90 degree corners as the corners are counter-productive during kigoroshi operations and are structurally weaker.
If you are worried about pulling nails, we encourage you to use a nail bar to reduce the number of broken hammer handles wandering the world sad and lonely as a cloud.
A 200monme/ 750gram/ 26oz Modern-style ryouguchi gennou by Kosaburo. Notice the symmetrical shape, slightly flared ends, and the polished “hachimaki” band near each striking face.A 200monme/ 750gram/ 26oz Modern-style ryouguchi gennou by Hiroki. Compared to Kosaburo’s products, Hiroki’s standard ryouguchi gennou heads tend to have straighter lines, with less flare and no hachimaki. Notice also the different black-oxide skin born in the forge.
The Daruma
The enlightened Bodhisattva Dharma meditating like a house afire
The Daruma (pronounced dah/rhu/mah) gennou head takes its name from a famous Buddhist priest of oval stature who lost both arms and legs through excessive meditation, a blessed state doubtless achieved by many of our enlightened Beloved Customers (spiritual enlightenment that is, not quadriplegia). This gennou head is a stubbier version of the ryouguchi gennou, and always has a round face.
It’s more popular outside of Japan than domestically, for reasons your most humble servant fails to understand. From a physics viewpoint, at a given weight and because of its lower moment of inertia, it is less stable than other styles of gennou, but because it has a bigger face, and is intended to be used at constantly differing angles such that stability is less critical, this style is preferred by carvers. Joiners like it too for cutting repetitive mortise and tenon joints, but it is not favored by most other trades and may invite remarks at jobsites from other workers about the owner being unable to find his derriere with a mirror on a stick and a GPS. That said, your humble servant frequently uses daruma heads for cutting precise mortise joints in joinery.
An 80monme/ 300gm/ 11oz daruma head with an rock maple handle.
An 80monme/ 300gm/ 11oz daruma head. Notice the symmetrical shape, round face, precisely-formed eye, and black-oxide forge skin typical of Hiroki’s excellent daruma heads
The Funate
A funate gennou with bubinga handle.The tail of a funate gennou. This point can be sharpened for creating pilot holes for nails when shipbuilding, or left as a rectangle of starting and setting nails. The face is slightly domed, but still flat enough for striking chisels. A good multi-purpose head that favors nails more than chisels.
The funate gennou is closer in appearance to Western hammers with a skinnier neck behind the striking face, but without the split-tail “piano chisel” a foreman from my misspent youth named Jack Frost called the claw on his 28oz waffle-face framing hammer.
The funate gennou is more commonly seen in the Western Japan than Eastern Japan where I learned Japanese woodworking. It’s useful for finish work involving nails and for tapping-out plane blades, but less useful for wacking chisels.
The Yamakichi
Yamakichi was the name of a gennou blacksmith working in Fukuoka on Kyushu Island that originated this style of head and gave it his name. Kosaburo introduced this style to Tokyo in response to customer demand and with Yamakichi’s permission, we are told, improved the design somewhat.
This style is a heavy-duty stubbier version of the funate with a slightly domed face and a kinda sorta pointy tail, perhaps better suited to starting/setting nails than the ryouguchi head, but certainly better for striking chisels than the funate style.
Better with nails than the ryouguchi style, this head makes an excellent all-round hammer for working in the field, and can even handle tapping-out tasks.
The design has a unique and interesting appearance which reminds this humble scribbler of a 1956 Ford F100 truck in that, while neither sleek nor smooth, it has a sculptural quality not seen in the other styles that “grows on you.” It feels good in the hand too.
There are other in-between head shapes, but these are the four basic styles generally available for woodworking today.
Another view of the Yamakichi gennou pictured at the top of this article after the color has mellowed through exposure to sunlight. This is 300monme/375gram/ 11oz head by Hiroki has an American Osage Orange handle. (The decorative twine was added at the tool’s request. It has a thing for the color red).
Weight
The subject of gennou head weight was examined at some length in a previous post.
Regardless of the type of gennou head you select, weight is a critical factor that will depend on what you plan to hit, your height above the thing you are hitting, how hard you need to hit it, and how precisely you need to hit it. Your own practical experience is the best basis for selecting the genno weight for a particular job, but some guidelines can be suggested.
To begin, the traditional measure used for gennou in Japan is the “monme,” with 100 monme equaling 375 grams or 13.2 ounces (1 ounce = 28.35 grams).
The standard middle-of-the-road weight for gennou used by carpenters in Japan ranges from around 100monme (375grams/ 13.2 ounces) to 120monme (16oz). The most common hammer used for finish carpentry in the United States weighs 16oz. So if you are going to buy your first gennou, and you intend to use it for general finish carpentry or furniture making, a 100 or 120 monme head is a good place to start.
For finer work, 50-80 monme (7~11 oz) is a good choice. If you intend to make furniture or joinery, one in this weight range is a must-have.
For cutting deep mortises in heavy timbers with large chisels, as in timber framing or boat work, a 200monme (26oz) hammer is frequently used, but 250 (33oz) and even 300monme (40oz) heads are available. I own and use them when necessary.
Some factors to consider when selecting a heavy gennou are that with greater weight comes greater impact force, and greater penetration, but heavier gennou are more tiring to swing and harder to control precisely, especially depth of cut.
Other factors to consider are the weight of chisels to be used, the width of their blades, and the hardness of the wood to be cut because a heavier chisel with a wider blade cutting white oak requires more force to cut to a given depth than, for instance, a 3mm oiirenomi (bench chisel) cutting sassafras. Only experience can instruct Gentle Reader what weight will work best in a given situation. Just be aware that, unlike athletic socks and gubmint health care (aka medical fraud collusion), there is no such thing as one-size-fits-all.
Conclusion
We hope this article has answered some of Gentle Reader’s questions on the subject of selecting a gennou head. If you have additional questions or need clarification, please use the “Leave a Reply” form below.
In the next article in our ongoing quest for spiritual enlightenment and metaphysical stability we will discuss the differences between mass-produced and hand-forged gennou heads. We will also consider the necessary attributes of woods suitable for making handles along with more design details in future posts, I promise. Until then, I have the honor to remain,
Please share your insights and comments with everyone by using the form located further below labeled “Leave a Reply.” We aren’t evil Google, facist facebook, thuggish X, or a US Congressman’s Chinese girlfriend and so won’t sell, share, or profitably “misplace” your information. May my toes all grow black, stinky mushrooms if I lie.
A properly setup and hard-used set of excellent mukomachi mortise chisels by Kiyotada. Guess which ones have seen the hardest use over the years and benefited most from proper setup. The blades and handles are all shorter than when new, but without proper setup it is unlikely some of these tools, all of which are at least 30 years old, would still have their original handles, which they do.
Honesty and transparency make you vulnerable. Be honest and transparent anyway.
Mother Teresa
Introduction
Since your most humble and obedient servant wrote the tutorial (located here) describing the advanced procedures we recommend for setting up Japanese chisels ten years or so ago, I have frequently received questions from Beloved Customers about the fact that the chisel setup procedures described therein differ in important ways from those taught by most retailers of Japanese tools in the USA and Europe, as well as those expounded in videos on NoobTube, or posted on the woodworking internet forums.
In response to these questions, I recently added a few paragraphs at the end of the tutorial in question which I am including in this post to dispel confusion among those that have not had the opportunity to read the article.
The Question
The most common question is: “Why does your description of how to setup Japanese chisels vary so much from those given in online videos and the woodworking forums?”
A knee-jerk response to this question might be that the questioner should take a big, heaping spoonful of that online advice, then hold their nose and swallow it down, yes, all the way down, …. keep swallowing now, then judge for themselves after 5 years or so if it is sugar or BS. As the saying goes: “the proof is in the pudding,” or was it “laughter is the best medicine?” We forget. In any case, while such a hasty reply would be entertaining, it would also be crude and unrefined, and since your most humble and obedient servant is nothing if not always elegant, I will instead try to provide a more palatable explanation.
The Long Answer
Yes, Virginia, we have seen the various online videos about setting-up Japanese chisels. The creators of most of them are simply parroting instructions that some long-gone employee of a Japanese wholesaler, someone who had never used a chisel professionally, heard from another guy working at a chisel factory assembling thousands of chisels everyday as quickly as possible from cheap parts, some of which may have been imported from China.
About now, some Gentle Reader may be saying to themselves: “Wait just one frickin minute there! What do you mean, “made in China!?” Please, take a deep breath, smell the napalm, and realize that many of the components assembled into products in advanced countries are actually made in China at low cost. Poor quality is the natural consequence of procurement policies aiming to maximize profits above all else. The components used in C&S Tools’s chisels, however, are all made in Japan of quality materials and to reasonable tolerances.
Here’s the problem: Imagine a chisel handle and/or crown manufactured to such careless tolerances that one must beat the heck out of the handle with a hammer (kigoroshi) to crush and break the wood cells to reduce the handle’s diameter enough so the poorly-matched crown will fit. With this still percolating in your head ask yourself two questions: (1) What sort of attention is being paid to quality control that these two simple parts aren’t manufactured to better tolerances? And (2), will crushing the hardwood handle’s cells improve or harm its durability and/or longevity?
Or imagine, if you possibly can (difficult, we know), a handle and its crown or ferrule so poorly matched that one must swell the wood with water to get the crown or ferrule to stay attached long enough to ship the chisel overseas. Is your mind boggled yet?
Do you suppose poor tolerances or ham-handed setup techniques make for a better chisel, one that will provide good long-term service in the real world? Sadly, this is the grade of chisel with which the PooTube “Creators” and the so-called “experts” on the orc-infested forums have hands-on experience.
The manufacturers of these hardware store-grade tools provide zero warranties. Their products disappear into anonymous overseas markets where consumers are accustomed to being deceived as a matter of course, and the quality of most of their competitor’s products in the local markets, essentially sharpened Chinese-made screwdrivers, are of even poorer quality, so there is no backlash, only profits.
If any of this sounds to you like proper quality control or good value for the consumer, then there’s some swamp land located next to an abandoned chrome plating plant in North Korea, shovel-ready for resort development, that’s for sale at an amazingly low price. We read about it on an internet forum, so it must be true. All you have to do is send US$3,000 in small bills via FedEx to Prince Musa Adebayo at P.O. Box 4, Wassamatayu, Abuja, Nigeria. It’s a limited time-offer, so you’d better hurry. ( ͡° ͜ʖ ͡°)
Most of our Beloved Customers are not new to Japanese tools. They have bought the sizzle before, found it rancid, and come to us for honest handmade tools that meet the rigorous demands of advanced Japanese professional woodworkers.
The Short Answer
Let’s wrap this up by concisely answering the original question.
First, the setup techniques we recommend are different because the tools our Beloved Customers need to setup are different from those to which the “Creators” on SpewTube and the trolls on the internet forums are accustomed. They are made by true craftsmen, not unskilled factory workers using mass-produced components, much less mass-produced Chinese components. Our craftsmen are Japanese gentlemen living and working in Japan using crowns, ferrules, and handles made by them to reasonable tolerances, and the highest-quality hand-forged blades, also made by real Japanese blacksmiths working in their own smithies. Kigoroshi and water soaks are not necessary to setup these chisels, and will not improve them.
Second, because our Beloved Customers selected C&S Tools, we assume they are more advanced than the easily-deceived amateurs that typically buy hardware store-grade mass-produced chisels, and therefore actually want to do initial setup in accordance with the highest standards, not the lowest. It’s their choice, of course, but it would be grossly irresponsible of us to advocate lesser techniques like those of the GooberLube posers or the slimy denizens of the troll pits in the internet forums.
And third, unlike the wholesalers and distributors that peddle hardware store-grade tools overseas at inflated prices, we take our warranty seriously, and therefore actually care about the performance and longevity of the tools we sell. Accordingly, we need our Beloved Customers to set them up properly using the advanced techniques in our tutorial because we have a reputation to protect and a direct financial interest in customer satisfaction.
Five Potential Solutions
We hope the foregoing explanation clears up the original question. In addition, the following list describes five potential solutions to the other problems we touched on above. Sorry, but you’re on your own in the case of Prince Musa:
Purchase only high-quality tools made to reasonable tolerances from quality materials by genuine professional craftsmen and blacksmiths that have long-term relationships and reputations that might be damaged by shoddy quality, not factories;
Buy chisels and other edged handtools only from retailers (like C&S Tools) that not only offer but actually honor a full international warranty on materials and workmanship, one that doesn’t require you to expend additional funds to benefit from. Good luck finding anyone else;
Beware the often well-intentioned posers on Yoogle’s GooTube (or is it Toogle’s YouGube? We forget) who specialize in spinning an ounce of BS into 7 minutes of visual entertainment, all without any responsibility for the accuracy, completeness or honesty of their representations;
Beware the chittering of the pustulous trolls and grunts of the execrable orcs scuttling about in the fetid darkness of the internet forums;
And last but not least, always remember the most reliable litmus test for veracity: Money Talks and BS Walks (see point 2 listed above).
Or, you can always try the spoon test described above: Bitter lessons teach surest. (ツ)
YMHOS
A properly setup and hard-used 10-piece set of oiirenomi chisels by Kiyotada. Guess which ones have seen the most use? All the handles and most of the blades are significantly shorter than when new, but the handles are entirely undamaged, proof that proper setup pays dividends. I need to tap-out some of the blades again.
If you have questions or would like to learn more about our tools, please click the “Pricelist” link here or at the top of the page and use the “Contact Us” form located immediately below.
Please share your insights and comments with everyone in the form located further below labeled “Leave a Reply.” We aren’t evil Google, fascist facebook, or thuggish Twitter and so won’t sell, share, or profitably “misplace” your information. If I lie may trolls eat my toes.
Bernini’s David, completed in 1624. I have seen all three of the famous David sculptures in-person, but this is my favorite because David is not depicted as a static, obviously posed, formulaic study-in-marble or bronze of the human form as he is by the other masters. Instead, Bernini used his chisel to tell a dynamic story of a young man staring intently into his huge, deadly enemy’s eyes as he winds up to deliver a sling stone to his fuzzy forehead, a single, unlikely rock that changed world history forever. Although Bernini portrayed the face of a shepherd boy risking all in front of two opposing armies, this determined visage could just as well be that of a surgeon, a baseball pitcher, or a woodworker, of course.
Three things are needed for success in painting and sculpture: to see beauty when young and accustom oneself to it, to work hard, and to obtain good advice.
Gian Lorenzo Bernini
In the previous post in this series about toolchests we examined solutions to two of the Key Performance Criteria your most humble and obedient servant established when planning this toolchest, namely durability and longevity. In this post we will examine the solutions to three more performance criteria: Sealing, Insulation, and Security. It may be long, but I hope Gentle Reader will at least find it diverting.
Sealing & Insulation
Sealing the toolchest tightly and insulating it are important factors to consider when planning a toolchest, as mentioned in previous posts in this series, because a leaky chest can allow cold air, dust, excess humidity, and insects access to the tools stored inside it, potentially soiling, corroding, and damaging them. There are several details one can include in a toolchest design to minimize this problem. Some of the measures I employed are explained below.
The Lid
Front elevation of the toolchest. Please notice the depth of the lid, and the 3 raised floating panels in the frame & panel lid. Odd numbers are considered more fortuitous in Japan than even numbers. The chest rests on a wheeled torsion-box base, but it is not affixed to it. Please also notice the simple, old-fashioned half-inlet chest lock, easily defeated but easily repaired.
The criticality of a toolchest’s lid in sealing and insulating it over many years cannot be overstated. Unfortunately, many historical examples eventually failed miserably either through poor design or poor execution. Your humble servant was determined to avoid those failures.
As I mentioned in previous posts, chests in museum exhibits and books all look great, many having been at least partially restored, but if Gentle Readers want to get a sense of how chests fail, they should also inspect the busted examples collecting dust in antique stores and restoration shops.
While my investigation was not exhaustive, the first common failure inspecting antique chests revealed was a poor seal at the lid. This is almost universal. In the chests I examined it frequently stemmed from a poorly-fitting lid, one that probably fit nice and tight when new but warped over time.
In other cases, the lid had cracked and split like the seaman’s chest in the photo at the end of Part 2 of this series.
Another common problem was due to what could only be an intentional gap on the hinge side of the lid. And then there were the gaps caused by thin, narrow and weak iron hinges secured by short wood screws bending, wearing and/or loosening. So how to avoid these problems?
Let’s consider wood first. A policy that has served me well over the years is to always assume that a solid board of more than a few inches in length will eventually warp if left to its own devices. Of course, in the real world this is not always the case, but I’m a belt & suspenders & safety harness kinda guy. Besides, remember the 200 year useful life-cycle objective.
I also assume that a board more than a few inches wide will eventually split, or cause damage to another board in the assembly, if overly constrained from responding to both normal seasonal changes in humidity and the unnaturally dry conditions created by air conditioning systems inside modern buildings. Am I overly cautious? Perhaps more so than the optimistic captain Edward Smith of the RMS Titanic was on a cold night in April 1912.
The historical record represented in the museums and antique stores I visited support these assumptions in the long-term, especially when one considers the effects of AC and central heating systems lacking expensive humidity controls. Therefore I designed and constructed the lid so it included no constrained boards more than 2-13/16″ inches in width. In addition I also reinforced the lid from warping as a unit to prevent it from self-destructing during the planned 200 year useful lifespan. Not that hard to achieve with a little thought and a few sharp saws, chisels and planes.
Strength, Durability, and Rigidity of the Lid
As will be revealed in Part 8 of this series, a large number of tools are mounted inside the lid, the cumulative weight of which would cause a simpler, lighter lid to flex, twist and fail rather quickly, I fear. To provide the strength, durability and resistance to torsion needed, I went with a more complicated design.
Instead of having a simple flat board lid or one using F&P construction, this one is comprised of two sub-assemblies: A horizontal top F&P panel joined to the lid’s vertical side assembly.
Frame and panel (F&P) construction is a technique which allows the craftsman to build wide, stable surfaces using a joined framework of narrower pieces of wood with free-floating panels set in between. The framing pieces are narrow enough to accommodate cross-grain construction at the joints safely. The larger inset panels are too wide to permit cross-grain construction without their eventually failing, so they are not glued to the frame members, but are free-floating in grooves so they can expand/contract with humidity changes without cracking, splitting or breaking the frame. Gentle Readers who have never done F&P work before should learn how, for it is a skill every self-respecting maker of solid-wood casework or joinery must have.
Side view of the toolchest. Once again, please notice the frame & panel construction of the top and depth of the lid, a detail which provides great strength and stability to the normally failure-prone lid. A hardened steel lifting/tie-down ring through-bolted to the sidewall is also visible, as is the end view of the torsion-box base with urethane wheels which makes it possible to move the toolchest over level surfaces and up loading ramps when full of tools without damaging floor finishes.
The top panel’s frame consists of 6 pieces of wood 30mm (1-3/16″) thick by 70mm (2-13/16″) wide. Four perimeter pieces are joined at the corners using pinned (wooden dowels) dovetailed bridle joints to form a rectangular frame 1,015mm (39-15/16″) x 595mm (23-7/16″). Two pieces of the frame divide the long dimension of this rectangle into 3 equal-sized spaces filled with 21mm (13/16″) thick free-floating raised panels contained by tongue and groove joints. Both tongues and grooves are coated with Briwax (beesewax and naptha) to prevent glue squeeze-out and paint from gluing the panels into their grooves, something that happens frequently and almost always causes the panels to crack and even split.
I just hope that future generations are wise enough to not refinish the chest by glooping paint on these joints effectively gluing the panels in-place eventually destroying the lid. Much excellent antique woodwork has been destroyed by careless painting.
Given the thickness of the frame, the sturdiness of the corner joints, and the quality of the wood, the lid is an extremely stable construction all by itself, one that has not warped or cracked in 25+ years. Good enough, perhaps. But wait, were are my suspenders?!
This flat top panel is attached by glue and wooden pins to a four-piece vertical perimeter framework that extends downwards an additional 130mm (5-1/8″) making the total external depth of the lid 160mm (6-5/16″). The four vertical boards of the side assembly are also 30mm (1-3/16″) thick, joined at each of their four corners by 7 pinned through-dovetails. Even if the glue fails someday, the pins will keep the dovetails locked in-place. This construction makes the lid assembly extremely rigid and resistant to wracking preventing the top and sides from warping. This lid assembly has never cracked, warped, stuck, bound or even squeaked. Not once.
Besides providing stability and a gap and crack-free seal, this construction creates the space I required to house many heavy tools inside the lid as well as the structural strength to handle this heavy load without noticeably flexing or twisting. This is directly related to Performance Criteria No. 4: Accessibility.
But this is a lot of weight to deal with so I was concerned that, like many antique chests, the forces required to open and close the lid would eventually cause the lid to fail, or at least make the top panel to separate from the side assembly over decades of use, ruining the lid’s functionality.
Opening the Lid
The solution I selected was to design the lid so that the only way to open it is to use the wooden handle secured to the front board of the side assembly by tenons, glue and heavy screws from the inside. In this way, the forces acting on the lid will always keep the top panel and side assembly together instead of tending to separate them.
To ensure using the handle is the only way to open the lid, I intentionally did not design a projecting lip at the perimeter of the top panel. This was a difficult decision because the addition of such a lip would appear more classically graceful in the Western tradition. But the temptation to use the lip to open the lid would be overpowering to future generations, eventually weakening and even destroying the lid. This too is a mode of failure I’d observed in antique chests.
While these design details made the chest extremely strong and durable, they do give the chest a bob-tail appearance, such that it looks more like a box than a typical Western chest. Being a belt, suspenders and full safety harness kind guy I believe the improved performance more than justifies the compromise in aesthetics.
Iron Mongery
A wide, bold surface like this lid with exposed joints just begs for the addition of engraved metal plates and hand-forged straps of the sort easily obtainable in Japan. I freely admit that decorative hardware would really look cool, and I went so far as to procure some beautiful pieces intended for Japanese tansu, but I managed to avoid the temptation to install them because, after study and reflection, I realized that history shows that, if firmly affixed to the wood, metal plates and straps tend to constrain the wood’s natural expansion and contraction often eventually opening joints and cracking the wood totally defeating the purpose of the elegant frame and panel construction. None of that nonsense for me, you wascally wabbit.
Front and top view sketches of the toolchest with minimal dimensions. All the drawings will be available for free download in a future post.
The Seal Between Lid and Case
Chests made in the tradition of Western countries often have an interlocking lip between lid and base which more or less seals three sides, but which leaves a gap at the hinge side where dust, humidity, cold air, fungi, insects and pixies can enter. That’s nonsense. But what are the realistic options?
One well-published toolchest intelligently overcomes this sealing problem by using hinges supported on corbels attached to the exterior back wall of the chest making the installation of a lip around all four sides of the case workable. I think this is a clever solution, and one I long considered, but ultimately rejected because it increases the toolchest’s overall width by the corbel dimension without increasing internal storage space one whit.
I also considered rubber gaskets, and even magnetic refrigerator gaskets. Either would have sealed excellently, at least until the unavoidable day of reckoning when the rubber and plastic oxidized, cracked and crumbled. They wouldn’t have lasted 200 years anymore than Cher’s beauty will. Oops, too late…
The solution I eventually settled on was a detail common to Japanese casework, namely a vertical lip applied to the inside of the lid where it meets the lower case. While not quite airtight, this lip does ensure the lid and case are precisely aligned when closed, that there is no gap at the hinge side, and that very little cold air, dust, fungi, bugs, or even anorexic pixies can infiltrate the toolchest once closed. I used a tough, fibrous, exotic hardwood for this lip that has held up well. The seal is so good that, even with 25 pounds of tools mounted inside the lid, I can drop the lid from full-open and the air-pressure created by this tight seal will make the lid close slowly without a sound. I have not had to replace it in 25+ years, but it would be easy to do if necessary.
This simple detail, combined with the natural thermal properties of the 30mm thick wooden sidewalls and lid, satisfied the criteria for insulation too.
Hinges
We discussed a few methods involving wood to prevent drafty lids above. Next let’s examine metal hinges.
Another failing of antique chests common to all the traditions I was able to investigate was inadequate and/or poor-quality hinges. When hinges are flimsy and sloppy when new, or become sloppy over time due to wear and/or corrosion, or when the tiny, often poor-quality nails, staples or screws used to attach most hinges loosen and become “idiots,” as they say in Japan, the lid won’t align with the case and/or a gap develops between lid and case. Secondary damage results. Dirt, air, bugs and pugilistic pixies penetrate. It’s the beginning of the end.
Another look at that horrendous pixie infestation in a toolchest with a leaky lid located in a clothing-optional workshop. Bad hinges, no doubt. How embarrassing!
Traditional blacksmith-forged iron or steel hinges with decorative engraving or hammer marks are extremely attractive, but they just don’t meet my performance criteria. To begin with, iron/steel always rusts, with the corroded steel expanding in volume, becoming abrasive, and destroying tolerances, a nasty cycle. Handmade hinges look cool, but tolerances are always poor. And most importantly, traditional hinge pins are short and small in diameter with tiny bearing surfaces that wear quickly, and since their ends are peened, they cannot be removed easily. That would never do.
Instead of installing pretty traditional hinges or the cheap hardware-store hinges most people use for chests, I chose to use five solid-brass commercial door hinges with removable steel pins, made possible by the 30mm thickness of the case walls. I give them a dab of oil every couple of years. There is a reason modern door butt hinges can endure a lot of wear and abuse, and it has nothing to do with historical accuracy, I assure you.
I inset both leaves of these hinges and fastened them using 2″ long grade 18-8 stainless steel screws (made in the USA not China) after dripping glue into the holes. They have not loosened or even developed a squeak in 25+ years.
The long strap hinges used on American and British chests may look sexy, but they often cause the lid to crack and split. Think about it.
Security
More often than not, quality chests have historically had locks of one sort or another installed. If you, Gentle Reader, decide your toolchest needs a lock, you should develop a security strategy early in the design process. Here’s mine.
As part of my day job planning restricted-access facilities for Clients that have a lot to lose if their corporate secrets are stolen, I’ve talked with many building security experts. I’m not suggesting you need 10-lb locks with biometrics, multiple layers of 1/2″ hardened plate steel doors, contact switches, keypads, video cameras backed-up live in vaults in the mountains of Colorado, or armed guards. But I can share with you a philosophy regarding security locks applicable to cabinetry.
A lock on a wooden cabinet or chest won’t dissuade a determined thief with a crowbar for even a minute, but it may help keep an honest man honest. How does this old saying apply to the real world? Simply put, unless you are willing to go all-out to construct a locking container that outwardly appears entirely impenetrable, is in fact practically impenetrable, and that cannot be carried away, the next best option is to build one that will prevent quick and easy pilfering, will not be destroyed by a thief’s efforts to penetrate it, and at the same time, will make any attempt to break-in obvious.
But slimy thieves are not all we need to worry about.
Ever have one of your adoring children or your loving spouse (yes, the one that thinks you have too many tools already and should buy new kitchen counters instead) borrow a tool, or even worse, lend it to a friend or neighbor without telling you? How often did that tool find its way back to its proper place in your toolbox or workshop?
How often has one of your precious, carefully-sharpened chisels ended up being used as a combined paint can opener and stirring stick only to spend the following months or years smeared with paint, humiliated, alone, forgotten, sadly weeping behind old paint cans in your neighbor’s garage? Besides the indignity of paint spots (chisels are often vain, you know), imagine the emotional trauma the poor thing suffered. Not to be borne….
To help preclude this trauma, Gentle Reader has three choices when it comes to casework locks. The first is to use standard locking hardware that requires a modern keyed lock with a tumbler or a combination lock. These work pretty well, but most look ugly in handmade casework. Appearance aside, the most serious problem with such locks is that, given time and privacy, and lacking lock-picking skills, a determined thief will simply break wooden casework with a crowbar. We see this sort of damage in modern cabinets frequently. It’s expensive to repair.
The second choice is to use heavy bars, locks and chains. I use this technique when I ship my toolchest by first padding the chest with plywood and blankets and then running a 10mm hardened-steel chain (chain-hoist chain) around the chest through the hardened-steel lifting eyes on both ends crossing underneath and on top of the case. This I secure with a heavy, high-security padlock underneath the rolling base. Hand-powered bolt cutters won’t cut the locks or chain, but a largish hydraulic bolt cutter could. Likewise, an angle grinder could get through given some time, noise and sparks. This is a lot of trouble both for me and the thief, but it will absolutely stop a pilferer with a crowbar. 30mm thick sides and lid, remember. But it is not at all practical for routine access to the tools inside.
A half-mortise chest lock. A classic.
The third method is to install a lock that is convenient to use but easily defeated so a determined thief won’t destroy the chest in the process of bypassing it. A strange approach, I know, but it is logical and practical. The locking system I selected is a simple, old-fashioned brass half-mortise chest lock. You could pick it with a hairpin if you know how, or pop it open with a claw hammer. It’s quick and easy to lock and unlock, and it deters rugrats, wives, casual pilferers and even pernicious pixies, all while looking classic and unobtrusive. If a determined thief has the opportunity, he can easily break the lock and get in. The upsides are that he can do it without destroying the chest, and you will know he did it. Not ideal, but nothing ever is.
Portability
The portability criteria I established during the planning phase required the toolchest be light enough in weight to be carried up stairs by two men when empty. It had to also be easily moved over flat surfaces by one man with a full complement of tools inside.
Gentle Readers may recall the following image of a Japanese kuruma dansu from Part 2 in this series. This tradition served as inspiration for my design.
In Japan this type of chest is called a “kuruma dansu 車箪笥,” which translates to “wheeled chest.”
You may wonder why anyone would need wheels on a piece of casework intended for interior use. The reason is simple practicality: Japan has a long history of urban fires that destroyed entire cities on a regular basis, but the addition of wheels to casework made it possible to quickly roll them out before the house burnt down, thereby saving valuables. Try doing that with a wall cabinet! Or try doing it over unpaved streets with tiny fragile casters screwed to the base of a loaded chest.
Wooden wheels are cool and mecha retro, but I rejected them for two reasons. First, they have solid axles, and if rolled around much both the wheels and the floor will be damaged, a lot, especially once grit and small stones become embedded in the wood. Not practical.
The second reason is more complicated. To begin with I wanted to be able to remove the wheels at times to comply with the maximum height criteria I had established in order to move the chest up narrow Asian stairs. Even with the current design, I need to remove the lid to get it up some stairs, including the house I currently live in.
The wheels in a kuruma dansu not only add a lot of fixed additional height, but that height is volume I would prefer to have inside the chest for tool storage instead of being occupied by an integral undercarriage, wheels and axles. But by using a detachable torsion box base with modern extra-heavy-duty lockable industrial casters with urethane tires, ball-bearings, and crazy pivots (free to rotate around a vertical axis), I was able to raise the chest further above the floor to improve access, satisfy the maximum height and portability criteria, and secure more interior space. If the casters go bad, I can replace them easily without impacting the chest in any way, unlike some examples where the casters are screwed directly to the bottom of the chest.
Besides, there have been a few years when the toolchest spent time in state (in full view) in our living rooms, and while my wife is Japanese, she simply doesn’t like the appearance of kuruma dansu. Go figure. During those periods, I simply removed the wheeled torsion box and rested the chest directly on the floor. My wife placed a colorful cloth noren over the chest with a flower vase on top. Some of her lady friends from church who visit occasionally liked it enough to ask if I would make chests for them.
Tie-down & Lifting
The performance criteria for tie-down and lifting were as follows: “Can be secured to the walls or floor of a shipping container or moving truck, and lifted by crane quickly and easily and without employing complicated rigging or straps touching the wooden surfaces.”
As seen in the picture above, a hardened steel ring is through-bolted to each endwall of the toolchest. These are not reproductions or homemade rings, but industrial load-rated hardware made from hardened steel that serves three purposes. First, they make it easy to secure the toolchest to the side or floor of a container or truck. This capability is very important in the case of a toolchest that must make international moves frequently. If you think it would be easier to just have the movers throw blankets over the chest and strap it down, you’re absolutely right. The problem is that the likelihood of the conscientious, patient, gentle, sober professionals that load conex boxes and trucks properly positioning the toolchest so it won’t shift, and then tightening the straps or ropes (if they even bother to use straps or ropes) so they don’t loosen, or scratch and abrade the toolchest, are slim and none, and Murphy always goes out drinking with Slim on moving day. I’ve seen them share a doobie afterwards.
The second purpose of these rings is to make it easy for two men to carry the (empty) chest by looping straps through each ring and over a 2×4 passed over the chest and placed on each man’s shoulder. This too is a traditional Japanese method of transporting heavy boxes, and is directly related to the “Portability” criteria discussed above.
And third, if I need to chain the chest closed to prevent pilfering, as I do when it is stored in a warehouse, I can pass a hardened chain through the rings, over the top and secure it with a padlock under the base without fear of the chain being slipped off, as described above under “Security.”
Sorry this article was so long. Perhaps these scribbles will suggest some solutions to Gentle Reader’s tool storage systems.
In the next post in our tale of supernatural beings and nekid workers in workshops we will take another look at hinges and examine the tools mounted inside the lid.
YMHOS
Keep your frikin sticky fingers out of my toolchest!
If you have questions or would like to learn more about our tools, please click the “Pricelist” link here or at the top of the page and use the “Contact Us” form located immediately below.
Please share your insights and comments with everyone in the form located further below labeled “Leave a Reply.” We aren’t evil Google, fascist facebook, or thuggish Twitter and so won’t sell, share, or profitably “misplace” your information. If I lie may the screws in my hinges all dance the reverse macarena.
Tempo is all, perfection unattainable, As at the top of the swing… …there’s a hesitation, a little nod to the gods, that he is fallible. That perfection is unattainable.
“The Golf Swing” by Roy McAvoy
The Japanese gennou is outwardly the simplest of hammers comprised of just a differentially-hardened steel head attached to a wooden handle without wedges, pins, epoxy or rubber. But as simple as it is, there are several factors that drive this tool’s performance. One critical factor is its “eye.”
The Unblinking Eye
Since ancient times, hammer handles have ended in a “tenon” designed to fit inside a rectangular or circular through-mortise hole in the hammer’s head called the “eye,” in English, and “hitsu” in Japanese.
As a matter of fact, the ancient armies of Egypt used a stone mace with an eye cut into the head. Goofy hats were optional, I suppose.
In both Western hammers and the majority of Japanese hammers the interior walls of the eye are angled so that a wedge driven into the end of the handle will splay the handle’s tenon keeping it from slipping out of the eye. This connection works as well as can be expected, if the eye is deep and tolerances are acceptable, but Japanese gennou heads are not wide and their eyes are not deep, so a better solution was called for.
The huge downside to securing the head with a wedged tenon is that the wedge acts so as to split the tenon, an action that, once started may not end, and which will frequently cause the handle to split over time weakening it considerably. We’ve all seen old, abused hammers like this.
Also, a wedged connection seldom has uniform contact and pressure inside the eye and may therefore loosen as the wood wears from vibrations produced by impact forces.
In addition, uneven pressure between tenon and eye may induce unpleasant vibrations in the handle, a phenomenon you have not doubt experienced without realizing it, like an itch on the back of the neck felt long after that damned mosquito’s smash and grab.
A tight, high-friction, uniform-pressure fit between the eye’s walls and the tenon keeps the quality Japanese gennou head in place and working efficiently. Straight, parallel, square, clean walls of the sort an accomplished blacksmith can forge if he really tries (sadly so few bother anymore), are therefore critical.
Inexpensive mass-produced gennou and hammers typically have eyes with poor tolerances hidden by the handle tenon and sometimes concealed under resin caps. The heads and handles of such hammers and gennou seldom remain securely attached if used heavily long-term. Experienced Japanese professionals, therefore, have traditionally preferred to buy just the head without a handle so they can inspect the quality of the eye before laying down any cashy money. They then make the handle themselves.
This approach is consistent with the frugal craftsman ideology once common throughout the civilized world wherein the craftsman would make as many of his own tools as possible, often in imitation of his master’s tools and using metal components forged by the local blacksmith, all to be completed by the conclusion of his apprenticeship and graduation to “journeyman.”
This explains the demand in Japan for high-quality relatively expensive heads such as those hand-forged by Kosaburo or Hiroki. Not only are they properly shaped and consistently heat treated, but they have precisely dimensioned eyes that will not only hold onto the tenon a long time and reduce unwanted vibrations, but will save the owner a ton of effort both truing the eye and replacing failed handles later. And since the gennou is a lifetime, heirloom tool, the extra cost of such a head is not wasted.
Four hand-forged gennou heads: L~R 375gm Kosaburo Classic (with the traditional polished “hachimaki” band at each end); 100gm Hiroki Modern; 338gm Hiroki; 300gm Hiroki; 25gm Hiroki. All differentially hardened. All made entirely by only power-hammer, forge, and grinder by hand. Dies, presses, mills, CNC equipment, EDM equipment were not used to shape these heads or form these eyes.Mr. Aida studied under Kosaburo. Although their styles are different, most notably the lack of a polished “hachimaki” headband in Hiroki’s products and the very different oxidized forge skin, both blacksmiths made/make precise eyes.
Since so much relies on the connection between the handle’s tenon and unseeing eye, let’s examine it and correct any deficiencies revealed.
Examining the Eye
This section contains hard-earned but subtle wisdom for those with eyes to see. Please open them.
‘Tis human nature to pay closest attention to the outward appearance, size, weight, texture, color, smell, and cost of physical objects while neglecting those things difficult to see or inconvenient to “try.” Accordingly, most folk never think to check the void that is the unseeing eye. Fie, nay, not thee, Beloved Customer. Prithee first inspect the eye for if ought is amiss, then the head will not only be the very devil to hang a handle for, but will be unstable during the swing and wiggle like an ell on a fishhook hook on impact, intolerable failings in a tool we need to use with speed and precision unconsciously.
How to do this examination? Just sight down the length of the head’s body with the eye in view. A flashlight/torch will be helpful in this process.
What to look for? The eye should be of uniform width over its entire length, and the sides parallel, of course. It should also be centered in the body and not skewed. The narrow end surfaces of the eye should also be straight and square to the sides.
Mass-produced gennou heads typically fail this examination to some degree, and even some expensive handmade heads will too, sorry to say. Be sure to inspect they eye this way on both sides of the head.
560gm Kosaburo Classic-style gennou head. Old-stock with surface patina. This is how all Japanese gennou were shaped prior to around 1890. The swollen area around the eye was created by the pressure of the mandrel being hammered into the yellow-hot metal to form the eye. This bulge was also once common in European, Roman and even American hammers.
560gm Kosaburo Classic-style gennou head (slightly rusty).
Next you need to inspect inside the eye. Use a flashlight to check the interior walls are straight, parallel, square, free of twist, and without significant bumps, bulges or gouges. You may need to make a tiny square from wood or metal to perform these checks. There are special machinists squares and depth gauges that are ideal for this purpose. An accurate caliper (vernier, dial or digital) will prove useful.
Ofttimes the eye’s walls are intentionally sloped inwards from both ends so the center of the eye is narrower than either opening. This geometry is intended to compress the tenon as it is driven through the constriction locking the tenon into the eye. The crushed tenon is then supposed to expand afterwards, essentially relying on kigoroshi to bind the tenon in the eye. This geometry does work, kinda sorta, if a wedge is driven into a sawkerf cut into the tenon. Gennou heads with this style of eye are much easier to produce and are intended for mass-produced beaters. Such head/handle combinations may exhibit strange harmonic vibration, which you may or may not be able to detect, and since pressure on the wooden tenon is not uniform, swelling/shrinking of the tenon with seasonal humidity changes will always cause the head to loosen over time.
If a gennou head is secured to the handle with wedges, it may be because the eye is sloppily made, or just because that is what amateurs are accustomed to seeing, but a quality gennou head fitted to a proper handle does not need wedges to secure it no matter what Fat Max says.
Correcting the Eye
As the philosopher and erstwhile golf poet Tin Cup taught the World: “Perfection is Unattainable,” so I caution against an OCD attack over a hammer, but if you are patient, have abundant time, tough fingers, and a collection of needle files you can try to true the unseeing eye. This is a tedious job because only small files can be used, and that within a narrow space both difficult to see into and with little room to develop leverage. Sorta like removing corruption from the US Senate.
Kevin Costner as Tin Cup testing various apparatus to correct his golf swing which he laments “feels like an unfolding lawn chair.” Woodworkers too are susceptible to the allure of commercial mechanical fixes such as honing jigs and sawing jigs despite the solution being in themselves.
And as when rooting out evil politicians and bribe-swilling public employees, please be careful when filing to avoid making things worse. Remember, flat, parallel walls free of twist with clean sharp corners are the goal. Once you have trued one poor quality eye you will understand the value of a high-quality premium gennou, which has nothing to do with finish or decoration.
If your gennou head has a constricted eye, please file all four walls straight.
Whatever you do, don’t leave the walls curved outwards so that the eye is wider at any point inside than at its openings, because the handle can never be properly fitted to such an eye and will always work loose.
Make a Layout Tenon
Once the eye of your gennou is true, cut and plane a piece of softwood that perfectly slip-fits into and through the eye with 3 or 4 inches protruding out both sides. Draw lines on the stick where it projects from both ends of the eye. We will call this stick the “layout tenon.” Save it to use later in the handle-making process.
In the next post in this series on making a handle for the Japanese gennou hammer we will look at selecting a gennou head.
YMHOS
A 750gm Kosaburo Modern-style head with a Japanese black-persimmon handle. This was the first Kosaburo head I purchased over 30 years ago. A good friend and a lifetime tool.
Please share your insights and comments with everyone by using the form located further below labeled “Leave a Reply.” We aren’t evil Google, fascist facebook, or a US Congressman’s Chinese girlfriend and so won’t sell, share, or profitably “misplace” your information. May scorpions nest in my shoes if I lie.
In this article in our continuing series about wooden toolchests, your humble servant would like to discuss the Performance Criteria of Durability and Longevity and present some potential solutions.
Durability
A toolchest should be tough as a whale because a fragile one endangers the tools we trust it to protect. Those Gentle Readers for whom durability is not a high priority should stop reading now and get back to the important task of popping bubble wrap.
When I was researching this performance criteria, I bought books and visited libraries reading everything I could find on the subject. I visited museums and was told to get up off the floor and “move along now,” by security guards more than once. I just wanted to see underneath….
I visited antique stores and the workshops of professional antique restorers and grilled them about what materials and construction details withstood the tests of time best, learning much that wasn’t written in the books.
I incorporated some of the things I learned through this investigative process into the design and construction of this toolchest, so let’s examine a few related to durability and longevity.
Wood Selection
I grew up making cabinetry and casework with my father from readily available commercial materials such as 3/4″ plywood. We would mill solid wood parts to match this standard dimension even though trees don’t grow in quarter inch increments. While the material of choice has shifted from plywood to MDF in recent years, this is still standard procedure in commercial situations. However, since my toolchest was not to be a commercial product for a Client with no understanding of quality casework beyond external appearance, but rather custom casework for my personal use, I tossed those standard procedures out the window and started with a blank page.
My examination of the available literature, museum exhibits and antiques available to me at the time combined with some structural analysis revealed that durability is heavily influenced by the mass and strength of the wood. This seems like a common-sense conclusion, but it flies in the face of conventional toolchest design, as you will see.
Many advocate making chests from lightweight, inexpensive woods such as sugar pine, poplar, cedar or cypress, and to dimension the walls thin to minimize cost and weight, and to maximize interior volume. This is the traditional approach for chests used by common folk, but anticipating the abuse my toolchest was likely to experience, and considering my longevity goals and the fact that I would never need to carry it far by shank’s mare or mule, I eschewed this philosophy and decided to use stronger more durable wood and thicker, with weight assigned a lesser priority.
One of the so-called “Genuine Mahoganies,” Honduras Mahogany is very resistant to rot and termites although some beetles will eat it if they can find it. We will look more at the sensory capabilities of bugs in a later post in this series.
HM is strong, not too heavy, easily worked, glues exceptionally well, and is phenomenally stable. Along with Cuban Mahogany, it has been the most desirable wood for luxury furniture in the Americas and Europe for centuries.
This wood is difficult to obtain in the United States nowadays because of import restrictions prompted by environmental destruction through over-harvesting, but at the time, it was readily available as S2S clear lumber in the People’s Socialist Republic of Northern California.
HM’s coloration varies from tree to tree. The coloration of the HM I purchased was not the most desireable dark red, but the less-expensive, less-dense orangish variety. However, I splurged and used feather-crotch boards for the lid’s floating panels and ribbon-figured HM for the tray sides.
I used no “secondary woods” except for the 5mm plywood non-structural loose dividers in the sawtill. No need to be a cheapskate.
Wood Thickness
One purpose of my research was to gain an understanding of the typical failure modes of chests. You don’t see busted, water-damaged, bug-infested, rotted-out examples exhibited in museums, listed in inventory catalogues, or written about in books, but there are lots of old broken-down chests in antique stores, and restorers are always working on them; I therefore strongly encourage you to venture away from the internet into the dark and foreboding world of reality to examine them with your own eyes and hands to determine their reactions to the challenges they faced during their lifetimes.
One very common failure mode is ruptured corner joints resulting from what appeared to be drops and impacts. Another common failure mode is cracks, gaps and warped lids resulting from differential expansion/contraction inherent in wood.
In a dovetailed chest, impact forces from drops frequently cause corner joints to fail, so the solution I employed was to use plenty of dovetails, and to make the side wall material thick enough to provide adequate surface area for glue to bond and impact energy to be safely dissipated without causing the carcass to rupture.
Obviously (or maybe it is not obvious to some) thicker walls increase the amount of long-grain to long-grain contact area at a dovetail or fingerjoint corner joint by more than the square of the thickness. A simple calculation showed the sides had to be much thicker than 5/8” to achieve the impact resistance and glue strength I needed, so I went with 1-3/16” (30mm) thick sides. And instead of using a lightweight softwood like pine, a weak but delicious wood upon which bugs and fungi dine with gusto, I went with the much stronger and more rot/bug resistant Honduras Mahogany in a medium density as noted above. This proved to be a wise decision as evidenced by the results of multiple drops and several forklift encounters during my travels. And due to its dedicated wheeled platform, the additional mass has not been a problem so far. This was never intended to be a truck-bed toolbox.
Of course, most drops and forklift kisses impact the base first, so if the bottom corner connections at the base fail all is lost. I made the base (skirt) of tough 40mm thick high-density mahogany, dovetailed the corners, and pinned/glued it to the chest’s sides. These four pieces and the assembly they comprise is the densest, toughest component of the chest. It is scratched and dinged but this is only cosmetic damage, so I feel the base has done everything I needed it to do, at least so far.
I doubt 3/4″ sugar pine sides or a 5/8” ~ 7/8” thick poplar base would have survived the first drop from a moving truck bed, let alone that incident in Bangkok when what must have been a deranged peg-legged forklift driver pushed the tool chest into the conex box with his fork tips while shrieking “From Hell’s heart I stab at theeee!” The madman damaged the toolchest but neither pierced nor cracked it. After that, I rechristened it “Moby Dick. “ Harpoon sockets and grog were not involved.
“…to the last I grapple with thee; from hell’s heart I stab at thee; for hate’s sake I spit my last breath at thee.” – Herman Melville
Differential Expansion & Contraction
Changes in humidity make wood expand and contract. You can ignore this natural force, as the plastic puppet people that love MDF do, or even fight it if you enjoy the tangy flavor of humiliation, but given enough time either approach will make you look the fool. Better to plan for it if your longevity goals are 200 years. If, however, longevity is not important to you, please stop reading this article immediately and get back to the important task of popping that bubble wrap.
Avoiding damage caused by differential expansion and contraction of wood is a problem humanity resolved centuries ago using well-known, but oft-ignored solutions. Some of those techniques are to use mechanical connections (e.g. dovetails, mortise and tenon joints, etc.) without relying solely on glue, avoidance of wire nails, avoidance of wide cross-grain joints, avoiding steel straps hard-connected cross-grain, and using frame-and-panel construction when wide cross-grain joints would otherwise be impossible to avoid, to name some primary solutions.
My design uses few metal fasteners, just stainless-steel screws to attach the lid’s hinges and tray shelves, brass screws to attach the brass lock and recessed tray pulls, and 4 steel bolts to attach the lifting eyes. No metal straps are used.
My toolchest employs a floating frame-and-panel lid with deep dovetailed sides made from solid 30mm Honduras Mahogany. I’ll go into this detail more in future posts.
The chest’s bottom is also frame and panel construction in solid mahogany. Frame and panel construction was used for all tray and drawer bottoms. No engineered wood materials such as plywood, MDF, LVL, OSB or veneer were used.
All glued joints in my toolchest are dovetails or pinned dovetail mortise and tenon joints, and trenails. If the glue fails, which it eventually will in some places sure as God made little green apples, the mechanical joints will still hold together. I did not use nails, screws, staples, biscuits, splines or loose tenons as structural fasteners.
Fungus, Insects and Rodents
As noted above and in Part 3 in this series, wood as a material may be economical, easy to work, have decent insulation performance, and make our collective hearts go pitter-patter, but we cannot safely ignore the fact that some fungi and insects love to eat wood, and rats and mice will chew holes in it. How can we adapt our toolchest design to deal with “the crud,” creepy crawlies, and critters? A few possible solutions are listed below:
Select a wood that is naturally unpleasant to chew without using toxic levels of hot sauce. God made some woods yummy, and others noxious. The later typically lasts longer;
Use thicker wood to make the toolchest strong and tough. This will also make it more difficult for rodents to chew holes in it.
Make the wood unpleasant for fungus and bugs to eat and rats to chew through the miracle of modern chemistry available in either commercial or homemade wood preservatives;
Seal all raw wood surfaces, both inside and outside the toolchest, so fungus spores will find it difficult to take root, and insects will be less likely to detect the savory smells of yummy wood (that is how they find it, you know);
Elevate the bottom of the chest above the ground/floor so there is an “air gap” preventing direct moisture transfer from below thereby keeping the wood’s moisture content at levels less than those preferred by fungus and bugs;
Design the base details so some air circulation underneath the chest is possible to reduce fungus growth and make cleaning possible:
Place vaporized fungus and insect repellent (e.g. moth balls or toilet cakes) inside the toolchest further minimizing delicious woody smells that attract insects while at the same time creating an uninviting or even hostile environment for their kiddies;
Combine all seven of the solutions listed above, which is what I did. You know me: Belt, suspenders, and safety harness.
We will talk about these solutions and other factors that informed the design of the toolchest in future posts.
I encourage you to give similar consideration to the design of the furniture and casework you build for your own use, at least if, like me, durability means more to you than the ecstasy of popping bubble wrap.
In the next post in this series about my toolchest, we will consider some potential solutions to the remaining Key Performance Criteria you may want to consider when designing your toolchest.
Call me Ishmael.
“Talk not to me of blasphemy, man; I’d strike the sun if it insulted me.”
If you have questions or would like to learn more about our tools, please click the see the “Pricelist” link here or at the top of the page and use the “Contact Us” form located immediately below.
Please share your insights and comments with everyone in the form located further below labeled “Leave a Reply.” We aren’t evil Google, fascist facebook, or thuggish Twitter and so won’t sell, share, or profitably “misplace” your information. If I lie may rabid forklifts chase me nightly in my dreams.
‘Be careful you don’t cut yourself. The edges are sharp enough to shave with.’ ‘Girls don’t shave’, Arya said. ‘Maybe they should. Have you ever seen the septa’s legs?”
George R.R. Martin, A Game of Thrones
I mentioned in a previous article my belief that a love of sharp tools is embedded in the Japanese people’s DNA. I am convinced this is by no means limited to the people of these mountainous green islands for it is deep in mine too, and it may be in yours.
Whether they were made of bone, flint, copper, bronze or iron, humans of all races and all locations worked with axe and adze, chisel and scythe, sword and dagger to keep body and soul in close proximity for many thousands of years before written language was invented or the first Microsoft product crashed and burned. Our reliance on and love of sharp tools is still part of our DNA, to one degree or another, and for good reasons.
The words we humans make and use give insight into our deeper natures, so a very brief lesson regarding a single word in the Japanese language, one that is an intentional, defining characteristic of our tools, and one you will not find in any textbooks, may be illustrative of this point.
Cutting Flavor
The word your most humble and obedient servant has in mind is “kireaji” 切れ味 pronounced “ki/reh/ah/jee. This word is comprised of two Chinese characters. The first of the two ideograms being 切 , which is pronounced in its un-conjugated form as “setsu” or “kiru,” meaning “cut.” This is an interesting character. People who study these things say it is an ancient combination of two characters. The small one on the left looks like the character for the number seven 七, but actually it represents a vertical and crosswise cut in the shape of a plus sign 十. The character to the right, 刀 , is pronounced “to” or “katana” and means “sword.” So “kiru” means to cut with a sword or blade.
The second character in the word is “Aji,” 味 meaning “flavor.” Combined, these two characters mean “cutting flavor,” but the resulting word has nothing to do with the human sense of taste and everything to do with the feeling transmitted to the user when a blade is cutting. This word is used in reference to all cutting tools from axes to swords to razors, and certainly for knives, chisels, and planes.
In the English language, the closest word we have is “feeling of sharpness,” I suppose, but it isn’t the same. The act of cutting, in the Japanese tradition, is a sensory experience, one that can be pleasant, in the case of a well-designed sharp blade, or unpleasant in the case of a clumsy dull blade. I think you now have a sense of what the word kireaji means, and how how it feels, but do you understand why it is an important word when talking about tools?
When we speak with our blacksmiths and sharpeners about the tools they produce, the kireaji we expect of their products is always part of the discussion. A blade can have a good kireaji (良い切れ味), an indifferent kireaji (どうでもいい切れ味)or a “distasteful” kireaji (不味い切れ味). It can be “brittle” (切れ味が脆い)or it can even be “sweet” (切れ味が甘い)meaning soft as a spoiled child. We always insist the first meaning be applicable because anything less is failure. Even if some of our customer’s tastes may not be refined enough to discern the difference, ours are.
We work closely with our blacksmiths and sharpeners to make sure they understand our requirements for sharpness. And just to be sure, we constantly test their blades to ensure compliance. If you buy a tool from us that has an especially sharp edge and looks like it may have been used lightly, please understand this is part of our QC efforts and not a return or a reworked reject.
If you know of other languages that have a similar idiom, please let us know in the comments section below.
Like the flavor of fine wine, rich chocolate or gourmet donuts (mmm… donuts), the kireaji of cutting tools varies with materials, blacksmiths, and specifications. At C&S Tools we are not satisfied with outward appearance only, but take our products to a different level by making kireaji the very highest priority. This makes C&S Tools almost unique among retailers of edged tools.
Does kireaji matter to you?
Bon appetite!
YMHOS
If you have questions or would like to learn more about our tools, please click the “Pricelist” link here or at the top of the page and use the “Contact Us” form located immediately below.
Please share your insights and comments with everyone in the form located further below labeled “Leave a Reply.” We aren’t evil Google, fascist facebook, or thuggish Twitter and so won’t sell, share, or profitably “misplace” your information. If I lie, may all my blades taste like a mountain troll’s nose-wiping rag.
In the previous four parts in this series about toolchests we examined some aspects of the history of toolchests, as well as the goals, objectives, pros and cons that informed the design and construction of your humble servant’s toolchest, and which any effective design should at least consider.
In this post we will examine some of the design criteria your humble servant arrived at after several years of cogitation, and some pitfalls common to the design process you may want to avoid. I hope this discussion will be helpful when you, Gentle Reader, are planning your tool storage solutions.
Background
The subject of this series of posts is a toolchest I made by hand over 26 years ago when living in San Mateo, California.
The basic idea for my toolchest was born many years ago when I found an old British book on woodworking with drawings for a unique toolchest while browsing the darker reaches of the University of Tokyo’s library.
My profession has taken me to many locations around the globe, but even if I don’t use my tools to earn a living anymore, I still need them nearby for the sake of my mental health. I take this toolchest with me when I am working away from home, sometimes in foreign countries and for years at a time. It contains most of the tools I need when working wood by hand. Therefore, the design was heavily influenced by logistical and environmental factors.
It has English roots, as do I, but it is neither a reproduction of a historical toolchest, nor a slavish imitation of someone else’s. It’s not a haphazard conglomeration of details cherry-picked from books and the internet because they look cool or some internet guru (this was before the internet) did a video on NoobToob. It took me literally years to research, refine, and complete the design, and although it is based on an old British source, I incorporated details from Japanese casework I felt would help me achieve my performance objectives.
Avoiding the Porcelain Whirlpool of Indecision
Anything of any difficulty worth doing well requires a plan, but a beautiful plan does not spring forth from the mind perfectly shaped. It typically begins with just a framework, or more often, pieces of a framework, to which we attach, over time and through deliberation, the decisions that culminate in a plan. Experience matters during this process, but research and careful deliberation can often compensate for a lack thereof. Let us consider a few aspects of planning in the real world that should influence a toolchest design.
In my day job I manage the planning, design and construction of new commercial buildings and interior fitouts (tenant improvements) in Japan, and while the dollar value of a toolchest is much less than a building, I believe the same planning principles can be applied.
Every building project must have a plan, sometimes called a “program” or “design brief,” that describes in writing what the Client requires the completed construction project to accomplish. This document does not include project-specific design drawings, because those aren’t necessary or even useful at first, but it still drives the architectural, structural and MEP (mechanical, electrical, plumbing) design. Architects, engineers, consultants and I can help a Client develop this planning document, but ultimately the Client pays the money and lives with the results so the decisions are his to make. This aspect of planning can be difficult for anyone, but most especially for those that are inexperienced, insecure, or too proud to admit they don’t know it all.
What many inexperienced Clients don’t realize is that, even though they may not be able to get their minds around the hundreds of decisions that must be made, and frequently fail to make them at all, abandoned decisions will still be made, but by default or happenstance instead of intelligent choice. Sometimes the default decisions are justified as “tradition.” How convenient. How slothful. I call this “design by neglect.”
If a reasonable person manages to struggle through a project, that experience will typically improve his decision-making capabilities greatly. However, occasionally a Client suffers from a mental defect I call “Spiral Decision Neglect Syndrome.”
A sufferer of SDNS may imitate but cannot learn. He will not only fail to make critical decisions, but he will become angry when he discovers he lacks the ability and/or the courage to make them, always a sure sign of shame. To conceal his poor ability and protect his pride, this person will remove those capable people around him that could have helped and replace them with yes-men. From that instant the design process will follow an inescapable spiral path into the slimy depths of the porcelain scrying bowl to the fate that awaits all turds. I’m sure you have known people like this and seen the stinky whirlpool of failure that surrounds them as they rise in the corporate world. But I digress.
The wise person will acknowledge they don’t have all the answers at first (no one does), but will be diligent enough to work for the answers, having faith they will find them. They will also document the criteria that will drive the decisions that must be made so the design does not veer off into the weeds. I call this process “Defining Performance Criteria.” Please note that Performance Criteria typically describe what a thing must do or not do, not so much what it will look like.
Planning Techniques
But what if you don’t have experience, or lack confidence in your planning and/or design abilities? Welcome to the club that includes most of humanity: “Admission is free, please pay at the door. Pull up a chair and sit on the floor.” Here are my suggestions:
Do research, including reading accounts of both traditional and modern solutions, and personally inspect as many physical examples as possible. Antiques can be very educational. Modern cabinetry can be enlightening;
At the time you begin your research, buy a quality, dedicated paper notebook or artist’s sketchbook and fill it with notes of your research and observations, along with hand-sketches, clippings and photographs of your research. Let it ramble. Allow time for all this to percolate in your mind. It’s fine to transcribe this notebook to digital format and store the text along with photographs on your computer or cloud, but don’t abandon the paper notebook: it’s the roadmap that traces your progress;
Determine your Key Performance Criteria (“KPC,” more on this below);
Make a sketch of your tool storage system on paper in pencil. Not in Sketchup or AutoCad because you don’t want it to be pretty and finished-looking too early, but rather organic and flexible. Ugly is OK too, as my mother always told me as a child (ツ). Too many “CAD Monkeys” deceive themselves with perfect-looking digital drawings early in a design process; Just ask any architect or commercial contractor over 60 years old and they will confirm what I mean;
Determine internal and external dimensions. Get tolerances and clearance matters resolved concretely;
Rework the drawing until it meets your KPC, or rework your KPC to match reality. Perhaps a cardboard mock-up will be helpful if you have difficulty converting lines on paper into a 3-D image in your mind, as many do. This is a skill that can be learned and is worth developing, BTW, and mock-ups can help, a lot;
Get the opinions of independent third parties you trust;
Repeat steps 6 and 7 until you are satisfied, allowing time between each iteration for your brain and eyes to reset. Perfection is unattainable;
Make a final drawing by hand or in digital format. Perfection is unattainable;
Buy wood and hardware and start making sawdust. Don’t worry about getting it wrong, just get it made. Perfection is unattainable.
Don’t give a thought to appearance until after Step 7. It is human nature to focus on appearance when beginning a design, but that is counter-productive. To the contrary, a wise man will formulate his Key Performance Criteria (Step 3) long before focusing heavily on the project’s appearance, because the KPC comprise the key supports in his planning framework. He can then do research and formulate possible solutions in harmony with them, and in due course, after careful consideration, make the myriad necessary decisions before the onset of “design by neglect.”
If the process seems overwhelming, break it into little pieces that are not, and knock them off one-by-one.
Part of the planning process must include a thorough understanding of both historical needs and traditional solutions, but with a sharp eye to avoiding past mistakes, while at the same time seeking solutions that meet your specific needs instead of the traditional needs of others. Monkey see monkey do may work for monkeyshines, but tis a piss-poor plan for bespoke casework, in other words.
How do I know this process works? I learned it from world-class architects. Spend a few million dollars of other people’s money on architects and designers over 30 years and you too will be convinced. But don’t take my word for it, look at history: the process described above is older than the pyramids of Giza; It helps you think; It makes you think. If you do it, your design capabilities will dramatically improve.
Key Performance Criteria
The following are some of the Key Performance Criteria I developed when designing the toolchest in question. If you are thinking about making a tool storage system, be it cabinet, toolchest, or pegboard, you will need similar criteria, whether you realize it now or not. Please observe that most of the items in the list below do not describe how the toolchest will look but rather what it must accomplish, so function dictates form. Notice also that, while it includes no concrete dimensions other than the maximum length of handsaws, it could well include actual overall dimensions, but those can be determined later.
Internal Dimensions: Long enough to house a self-contained sawtill with several 26” Disston No.12 handsaws stored inside along with other essential hand-powered woodworking tools (no powertools), and as wide as practically possible;
External Dimensions: Narrow and short enough to fit through Asian residential doors and up narrow stairways;
Depth Dimension: Deep enough to contain three sliding trays in the upper portion of the interior, all dimensioned to accommodate specific tools, and two chisel boxes stacked on top of each other in the lower portion below the sliding tills (the “dungeon”). And not so deep one can’t easily reach to the farthest, deepest corners without having a 14 year-old girl’s flexible joints;
Tool Access: Tools used frequently to be quick to locate and easy to remove and replace without bending, kneeling, or shifting trays around;
Durability: Tough enough to survive international moves, loading and unloading from trucks, ships, and containers by drunk, one-eyed tweakers using malevolent Cyberdyne Systems forklifts and predacious pallet jacks without being punctured, racked, or spilling the contents. Short-term toughness and strength, in other words.
Longevity: Must last for many generations of constant use (minimum 200 years) in indoor situations without experiencing warping, structural degradation, rust, rot, or damage from insects and vermin. This criteria depends on the durability criteria listed above, but instead of just surviving short-term knocks and dings, it includes surviving long-term damage from within due to design failures and/or long-term infestation;
Sealing, Insulation & Security: Seal tightly in all temperatures and humidity without relying on petroleum-based seals, and without the lid racking, warping, gaping, cracking, or binding, all the while protecting the contents from temperature swings, condensation, dust, bugs, rats, sticky-fingered pixies, and Darwinian shrinkage (pilfering);
Portability: Light enough to be carried up stairs by two men when empty. Easily moved over flat surfaces by one man with a full complement of tools inside, and without marking or degrading interior floor finishes;
Tie-down and Lifting: Can be secured to the walls or floor of a shipping container or moving truck, and lifted by crane quickly and easily and without employing complicated rigging or straps touching the wooden surfaces (straps and ropes tear things up);
Appearance: Attractive and workmanlike in appearance with some subtle decorative details. No inlay, carving, intricate molding or other extravagances.
When planning your tool storage system, you will either develop your own key performance criteria, or fall into the trap of “Design by Default.” Hopefully you will avoid the slimy whirpool of SDNS.
The criteria you decide on will be different from mine, but similar, just as your tools are different from mine but similar. However, I hasten to add that it would be a mistake to design a toolchest solely around the tools you own and use right now since those tools will change over the years. As someone who has plenty of “planning experience” (also read “made lots of mistakes”) I assure you that “Future-proofing,” meaning to provide “flexibility” and “adaptability” to deal with future changes in the tools you will store and the way you will use them, is always superior to a tidy but inflexible storage plan. For instance, while it is necessary to design rigid provisions for tools stored inside the lid to keep them from falling out, in most cases French-fitted trays are not an efficient long-term solution IMO.
While I have tremendous respect for successful ancient designs, the concept of imitating traditional details and features just for the sake of “historical correctness” was never a consideration for me because, like outhouses, straw roofs, blood-letting and ducking stools, some modern alternatives are superior to tradition.
German postcard depicting a ducking-stool being used to punish a baker accused of making his loaves too small. Would that such public persuasion could be dealt to every politician caught lying or public employee that takes bribes. I think the world’s lakes and rivers would be overcrowded with ducking chairs greatly improving society.
In the next post in this series we will examine the durability and longevity criteria and the solutions I employed. We will also take a stab at the other criteria listed above in future posts.
YMHOS
If you have questions or would like to learn more about our tools, please click the “Pricelist” link here or at the top of the page and use the “Contact Us” form located immediately below.
Please share your insights and comments with everyone in the form located further below labeled “Leave a Reply.” We aren’t evil Google, fascist facebook, or thuggish Twitter and so won’t sell, share, or profitably “misplace” your information. If I lie may I disappear forever into the whirlpool of indecision.
The chisels, knives, and planes we sell are all hand-forged by ancient smiths. There may or may not be dwarvish ancestry in one or two cases, but without exception our blacksmiths make blades with unsurpassed crystalline structure that cut like Satan’s own scalping knife.
The Psychology of Steel
It’s important for those of us who use such sharp handtools to understand how they think. Allow me to put on my metallurgical psychologist’s hat for just a moment to expound. FYI this is a highly-polished brass skullcap engraved with runes of power and decorated with multiple rings of tiny silver bells suspended from stubby brass rods attached to the cap that tinkle prettily when I walk; Glitzier but more dignified than the aluminum-foil cap with projecting curly copper wires I wear daily to protect my mind from the brain-rays of alien used-car salesmen. But I digress.
High-quality blades are especially single-minded and simply live to cut wood. If you don’t believe me, just ask them. If you listen carefully you will hear the chirping and tapping sounds they make when they are happy. And the shavings and chips that fly from their misty silver edges will attest to the fun they are having. They love cutting wood best of all, but the problem is they will try their darndest to cut anything they can latch onto. It’s just their nature; something we must understand and deal with if we are to prevent the servant from becoming the bloody master in the blink of an eye.
Safety Priorities in the Real World
I am not hasty. I have had much time to think. I am not hasty.” – Treebeard
Not only does “haste makes waste,” but when dealing with sharp tools, haste can be relied on to produce leakage of copious quantities of red sticky stuff.
What do I mean by “haste” in this case? Well, beginning work without a plan is frightfully hasty. A plan can only be produced through thought, over time, illuminated by the light of experience. So please slow down when working, especially when it’s the first time performing some operation and plan to work safely.
Saying “slow down” is easy but isn’t it it boring and unproductive? Perhaps it is, but “slow” is relative, and need only be temporary until you’ve resolved all safety matters. More importantly, slow is less boring and more productive than dealing with hospitals and doctors. My recommendation is to save time and improve productivity by analyzing safety risks and planning solution first thing so hospitals and doctors never become necessary. “Festina Lente” is an ancient idiom worth knowing.
Not that long ago, it was common, even acceptable, for serious injury and deaths to occur on construction projects, in factories and in workshops. Indeed, hundreds of deaths on a single major construction project were common throughout most of human history; This was just accepted as the cost of getting the job done.
When I was a young man working construction projects, most such injuries and even deaths were assumed to be the price the injured/deceased workman paid for failing to “pay attention,” or “not being careful.” Fortunately, attitudes have changed.
When I was still a schoolboy, my father (RIP), was a construction superintendent in Las Vegas undertaking a pre-cast concrete parking garage project. Due to a stupid and entirely-avoidable error at the pre-cast concrete plant in Arizona, haunches on the reinforced-concrete columns failed and 5 floors collapsed like dominoes killing three workmen and disabling several others. This was not their fault anymore than it was my father’s, but men died, families were destroyed and he was made an emotional wreck for a year afterwards. No jobsite safety rules could have prevented or even mitigated this disaster.
More recently, I was peripherally involved in a project here in Tokyo where a combination of events, including a clear violation of well-established safety rules, resulted in a basement fire killing two workmen and three fire fighters. In this case, safety rules related to “hot-work” were in-place and compliance required by law, so that careful adherence should have prevented this tragic loss of life. It appears they were not followed, however. But the number of dead and injured could have been much higher if not for other safety rules and procedures that were followed.
Nowadays everyone says “Safety First.” Your humble servant finds this slogan irritating, however, because in the real world, safety is never first priority. If it was, no one would ever undertake any potentially dangerous work; No one would swim, drive cars, ride buses, bicycles, motorcycles, snowmobiles, or even walk outside; Staircases and bathtubs would be banned, and we would all huddle in grass huts wearing helmets and full body armor. And no hot sauce!
No, in the real world we all set priorities, and except for our small children, safety is never number one. So how do we deal with safety risks? We put on our boots, stride out into the world, analyze the risks we are aware of and find ways to either avoid them entirely or to mitigate their negative impacts. But we place getting the job done, and thereby feeding, clothing and housing our families, as first priority. At least that’s how responsible fathers live. Do you disagree?
What we must never allow to happen is the rationalization of avoidable injuries against profits, schedule, hubris or stupidity. Too much of that in politics. And as much as the conflicted lawyers may disagree, we must each take some responsibility for both our safety and of those we live and work alongside. Therefore, the wise man with aspirations to become an old wise man will study safety unceasingly throughout his entire life, and share the lessons he learns with others.
Since caveman days the first reaction by the members of a tribe to an accident went something like “how did Bubba manage to get stepped on by a woolly mammoth?!”!? Perhaps the second reaction, usually from a brother-in-law, was “He’s so stupid it was bound to happen.” Whatever the reason, whenever we hear of the serious injury or death of someone we know, our DNA pushes us to learn from their misfortune. This is your humble servant’s ghoulish effort to share (シ)。.
Safety Rules vs. Safely Habits
As a natural (and often irritating) extension of the observations in the previous paragraphs, everywhere we look nowadays there are layers and layers of redundant rules with busybodies busily enforcing them and lawyers greedily profiting from them. They don’t call it the “nanny state” for nuttin.
Safety rules are helpful but don’t do us any real good unless we turn them into those unconscious actions commonly called habits. Like never using an electric toaster while taking a bath, or never pointing the barrel of a rifle at anyone anytime even by accident, or always putting on the car’s brakes before the vehicle crashes through the storefront, the potential consequences are just too severe to leave them as empty rules.
I don’t want to sound like a safety nazi, but as someone who has made one, perhaps even two stupid mistakes in his lifetime (difficult to believe, I know (ツ)), I feel compelled to point out one rule and a few wise safety habits worth developing especially to those of our Beloved Customers that purchase our chisels and knives and want to continue to have more than just an emotional attachment to their fingers, hands, toes and feet.
The most important cutting-tool safety rule you need to follow is this: Don’t let them bite you! This is a common-sense, obvious rule, one ignored constantly so I am reminding you politely… for now.
Sharp wide blades can cut a lot of useful stuff inside you in the blink of an eye. Even a deep injury won’t even be painful if your blades are sharp, at least at first, but the damage may be impossible to repair fully and too often is life-changing, never in a good way. So the application of this rule is to simply never give cutting tools an opportunity to do mischief.
OK, now that the big safety rule is on the table, let’s break it down into three basic safety habits.
Safety Habit Number One: Never Cut Towards Yourself or Anyone Else.
The first habit your humble servant begs Beloved Customer to embed deep into your soul is to never ever ever never cut towards yourself or anyone else.
An example: A universal mistake everyone, without exception, makes at least once is to hold down a piece of wood in one hand while cutting it with a chisel or knife motivated by the other hand towards the hand holding down the wood. They slip, or the chisel or knife jumps out of the cut, or the chisel or knife is dull and they lose control, or they apply too much force, or don’t allow enough distance to slow the tool down after the cut should end, or pixies distract them, or Murphy starts rockin like zeppelin. Whatever the cause, in the next instant the wood quickly changes a pretty crimson color, and one hand feels strange.
So please, never ever ever never allow your hands to get in this situation. Assume I’ve now yelled this warning into your ears 50 times while showering your face in fragrant spittle and wacked you in the forehead with a wooden mallet with each cockroach-killing screech to make the lesson sink in. It’s that important.
Safety Habit Number Two: Reject All Distractions While You Have a Cutting Tool in Your Hand
Another common mistake everyone makes from time to time is to allow a distraction to affect them while holding a chisel, knife or axe. For instance, trying to juggle a can of beer and a chisel in the same hand at the same time may place one’s nose or eyeball at risk (alcohol is such an uplifting beverage). Or scrambling to answer a call on a mobile phone without setting a super-sharp carving knife down first may result in the sudden appearance of an inconveniently leaking red nick in one’s neck that doesn’t quite compliment one’s intended fashion statement in hand-embroidered woodworking robes.
Case in point: Many moons ago, when I was a poor, self-employed student lacking my current elegant white beard and with much less dignity around the waist, I was cutting mortises for a custom door with a sharp chisel at my workbench setup on an apartment balcony, using the time-honored butt clamp, of course, when a yellow-jacket wasp (of which I have an uncontrollable phobia ever since a frantic encounter as a small child with a hornet’s nest in Grandma’s attic), landed on my leg. In a blind panic I swiped the wasp off my left thigh with my left hand, which by total coincidence was also holding the chisel. 40 years later I still have that big unsightly scar that ended my promising career as a bikini model before it really got started, tragically robbing the world of great beauty (ツ)。
Professional woodcarvers all know somebody with deep, crippling injuries to nerves and tendons in hands, arms or legs from using carving tools improperly or while distracted. Not a few have lost whole hands. The wise ones wear kevlar or steel mesh gloves when they must secure work by hand while using chisels or knives. While I don’t condone it, professional woodcarvers must sometimes violate the rules just to get the job done. These safety gloves are good for preventing slicing cuts, and help to reduce the severity of injuries in all cases, but may not stop a knife or chisel from stabbing you if it is motivated, so please don’t violate the first rule just because you’re wearing fancy gloves.
A stainless steel safety glove (right), kevlar safety glove (center), and a good reason to use a safety glove when carving
The solution? Set your knives and chisels aside in a safe manner and location before you do anything other than cutting wood. In other words, have the self control and situational awareness to reject all distractions.
Oh yea, and please don’t drink and drive knives, chisels, axes or adzes.
Safety Habit Number Three: Always Set Your Tools Aside in a Safe Place and So They Can’t Move
This final safety habit is related to number two above in that distractions often cause us to violate it. In this case the hazard is a chisel or knife falling from a work surface, at which point Murphy rolls up his sleeves, licks his eyeball with his long purple tongue, and painstakingly guides the tool cutting-edge first towards ankles, feet and toes. In Japan where work has traditionally been performed while sitting on the floor, a common problem is accidentally stepping-on or kicking a chisel. Of course, the chisel doesn’t appreciate such boorish behavior and bites back.
I don’t know about you, but I don’t wear thick leather steel-toed work boots in my workshop. I prefer flip-flops or crocs without the heavy and dreadfully unfashionable iron mongery. The problem is that flip-flops are not tough enough to prevent a 200gram atsunomi falling cutting-edge-first from a height of 70cm from severing a toe, so I am careful to not give Murphy the opportunity to place his bomb sight on my “little piggies.” I encourage you to always be aware of Murphy and bench kitties and never put yourself at their mercy.
The solution? Be careful of where and how you set your tools down and make good practices a cast-iron habit.
Don’t leave them hanging over the edge of your workbench, or balanced on top of other tools where a bump from a passing bench kitty or vibration from a hammer impact might knock them off. If you have several chisels or knives on your workbench at the same time, use a chisel box. Another effective solution is to make a tool rest by cutting some notches in a stick of wood, place it in a safe location on your work surface and rest the tool’s blades in those notches to keep them organized, to protect their cutting edges from dings, and most importantly, to prevent perfidious pixies and felonious felines from pushing or rolling tools off your workbench and Murphy from dive-bombing your wiggly pigglies. This is especially important if children have access to your workplace or you have imperious felines swanning around demanding snacks, ear-rubs and freshly laundered, fluffy warm cushions as is their due as the master race.
How to Develop Good Safety Habits
Everything we have discussed so far is only hot air and electrons unless you manage to actually ingrain wise safety habits into your soul. I don’t know how it works for you, but the steps below work for me. Whatever it takes please embed safety habits into your work procedures.
Step 1: In the construction industry of more and more countries, wise contractors have established procedures related to safety they perform when planning the work. There are multiple steps involved, but the essence is to analyze the work BEFORE it begins, write down the plan and list every serious risk imaginable, and have both management and workers review and comment. All of us are smarter than each of us, you see.
A satisfactory solution must be developed and documented either eliminating or mitigating each risk. The risky work is not allowed to begin until everyone involved understands the safety plan and agrees to comply. Supervisors must observe and enforce them. There must be consequences to encourage workers to comply. This process is irritating and seems wasteful at first, but the importance becomes clear once an avoidable accident occurs. Your humble servant has seen it save lives and limbs multiple times.
In the case of a single person working alone you may not need to write things down, but I encourage you to analyze the risks of pushing that chisel or swinging that axe, develop safety solutions, and employ them each time you perform that operation. This will limit sticky red messes.
Step 2: When you have an accident (and you will), stop working and figure out how it happened, and what you could have done to avoid it. Hopefully it won’t be while waiting for X-ray results after an iron worker drops a bunch of jagged cutoffs of corrugated steel decking on you from 14 stories above (that lesson in gravity cost me a tendon in my hand, scars on forearm, back and shoulders, lost days at work (back when no compensation was provided for such incidents), and destroyed a perfectly good hardhat). On the plus side, I instantly discovered a hidden talent for entertaining curse words!
Step 3: Every time you find yourself in a similar situation, stop and consider if the same bloody thing could happen again, and what you should do differently. For instance, figuring out a clamping arrangement that keeps your left hand out of the path of travel of a bloodthirsty carving chisel is something worth taking a few seconds to do. Remember, prevention beats Prozac.
Step 4: Remember the pain and embarrassment of the original accident, and use the solutions you developed every time. In this way Murphy is thwarted and a good habit is born.
I can also share a personal superstition with you. Everyone nicks themselves occasionally when using sharp tools. I know I do. When this happens, I place a tiny smudge of the red stuff on the tool that bit me, and on any other cutting tools that have yet to nick me, and let it dry. This heathenish action seems to quash their curiosity about how I taste in advance. At least I’m pretty sure that’s what I hear them murmuring when I’m wearing my brightly tinkling metallurgical psychologist’s hat (ツ)。
There is one thing I can promise Gentle Reader from personal experience: you will find a severed tendon or damaged nerves in a hand or foot to be more than just inconvenient. And if, like me, fashion is your life, scars may tragically preclude your picture from ever appearing in the Swimsuit Issue of Sports Illustrated. Such a loss!
Be careful. Keep safety a high priority. Plan safety. Develop good habits and make them automatic. And don’t let your tools bite you or anyone else, even if they beg with those big puppy-dog eyes.
If you have questions or would like to learn more about our tools, please click the “Pricelist” link here or at the top of the page and use the “Contact Us” form located immediately below.
Please share your insights and comments with everyone in the form located further below labeled “Leave a Reply.” We aren’t evil Google, fascist facebook, or thuggish Twitter and so won’t sell, share, or profitably “misplace” your information. May all my chisels seek my blood if I lie.
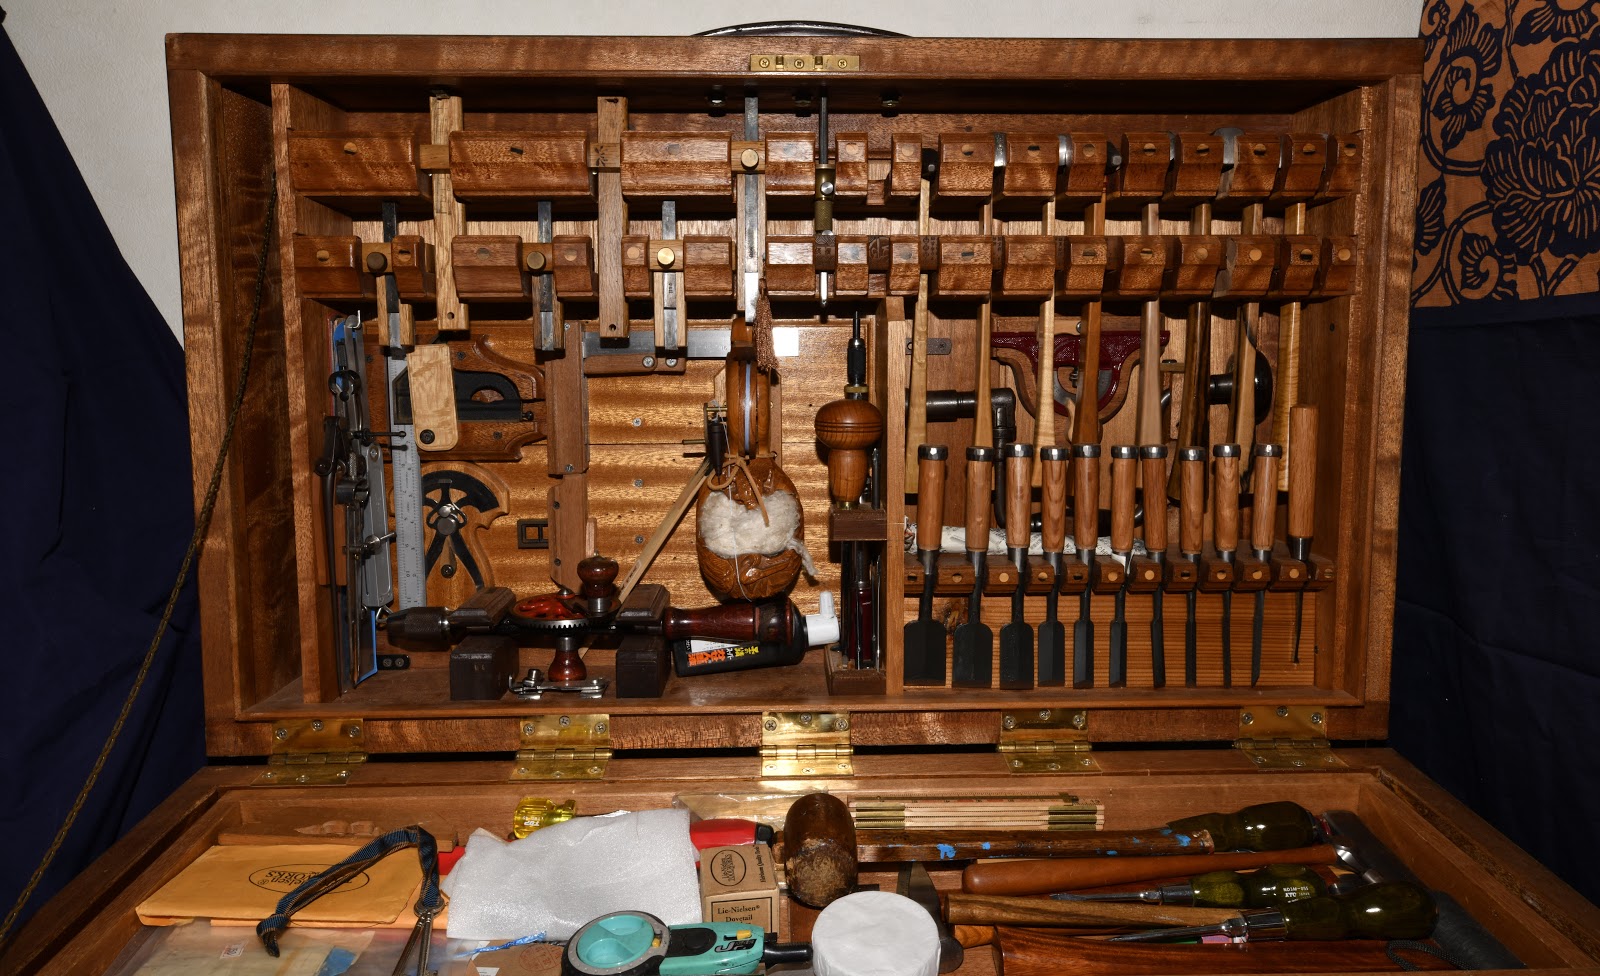


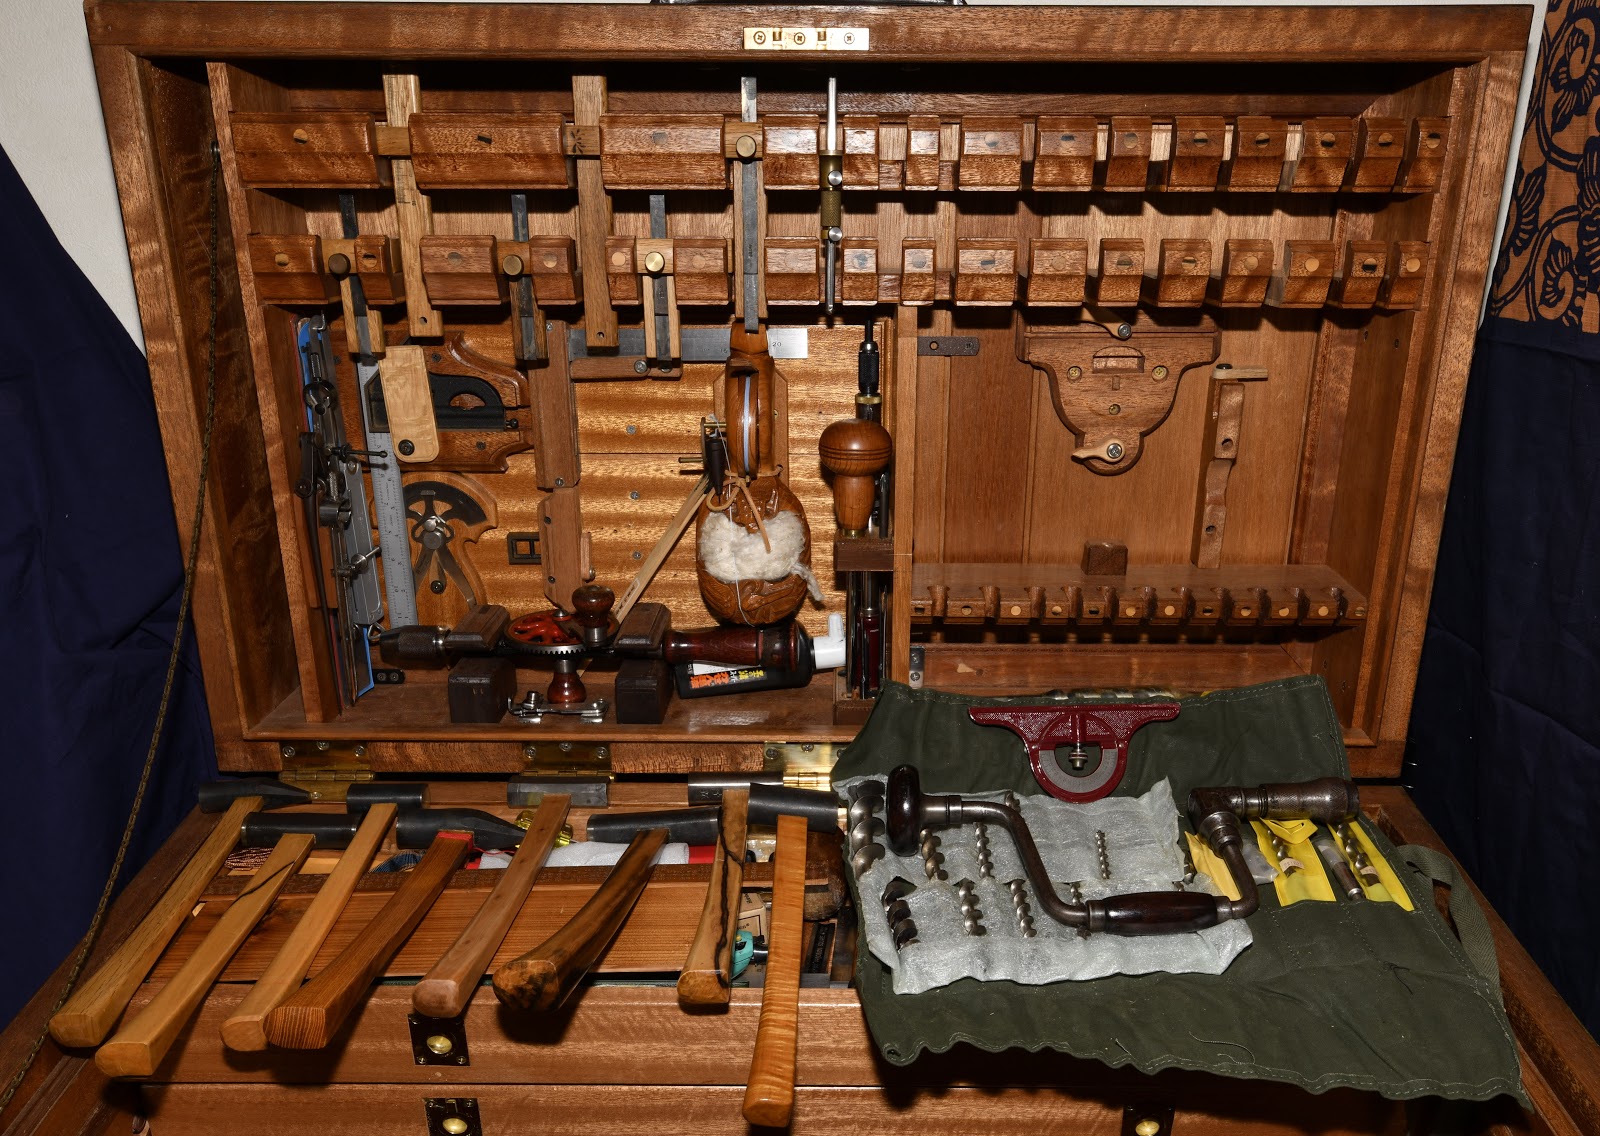

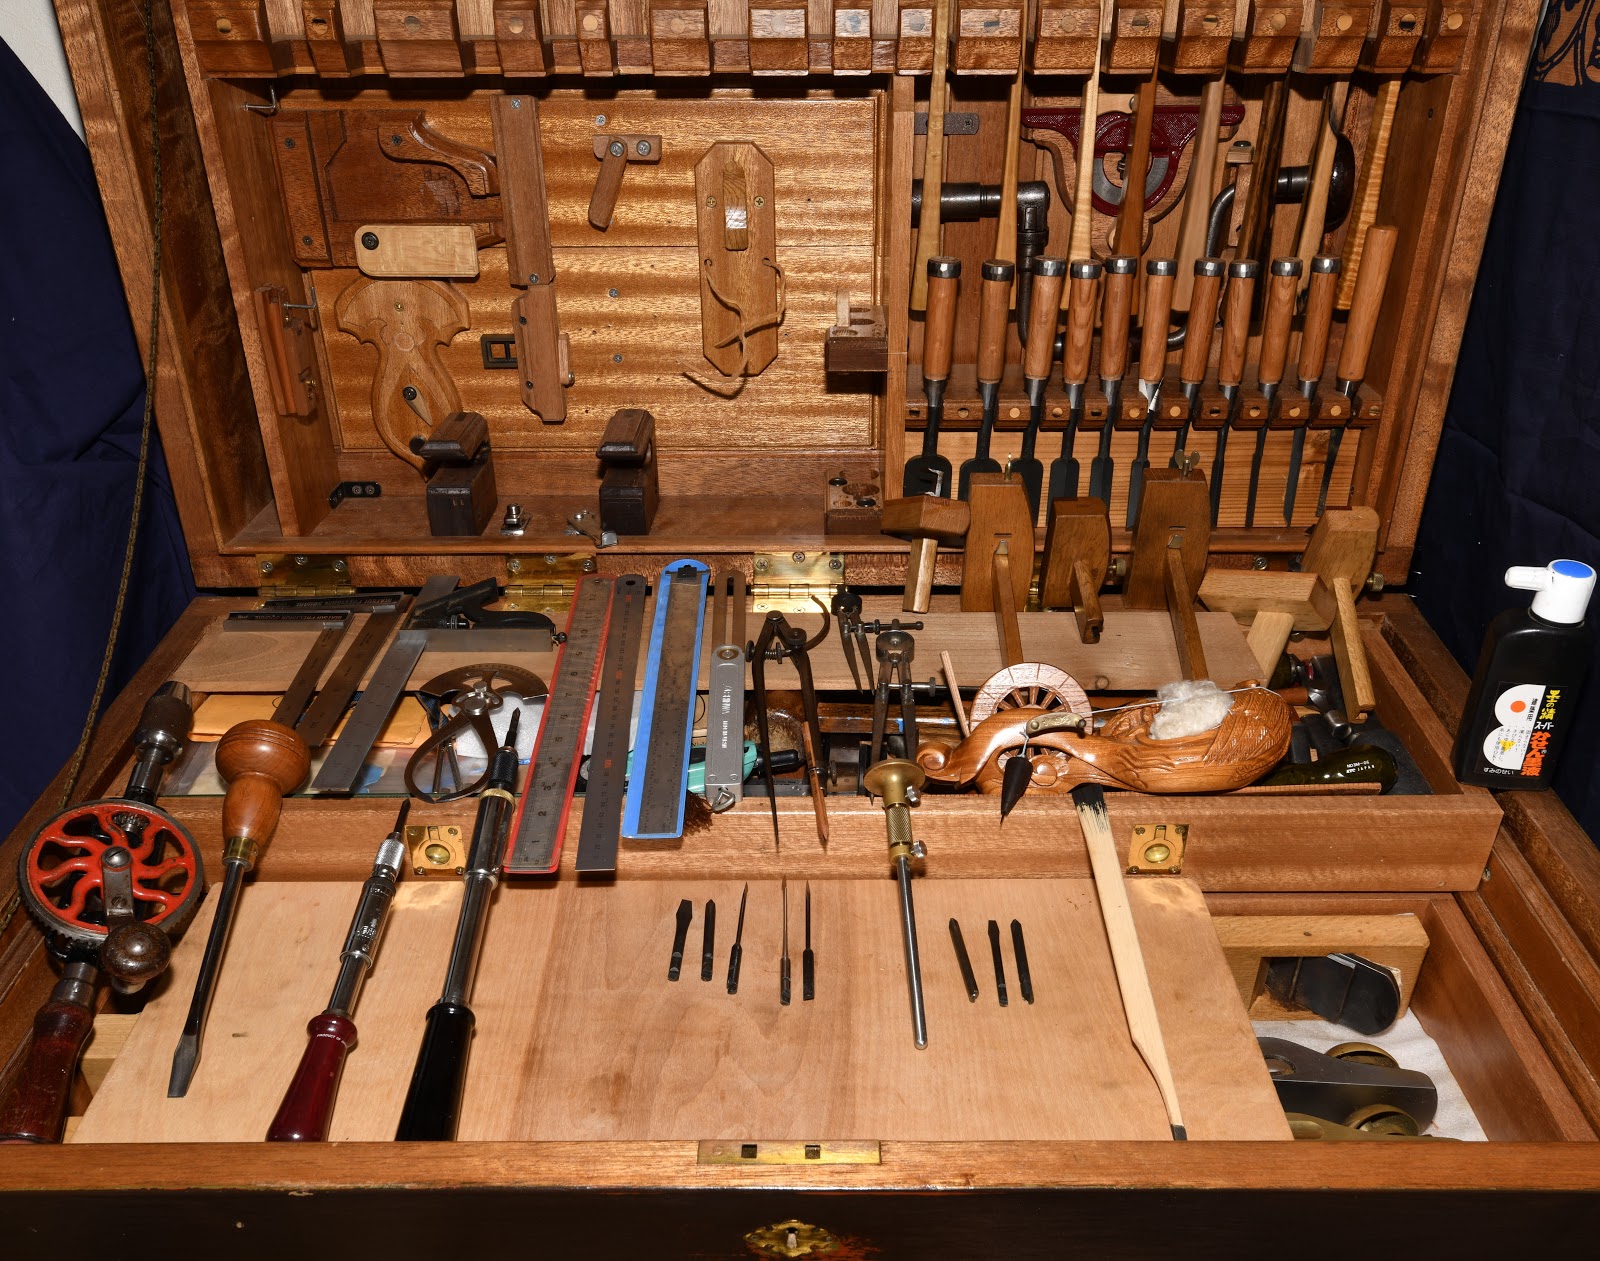


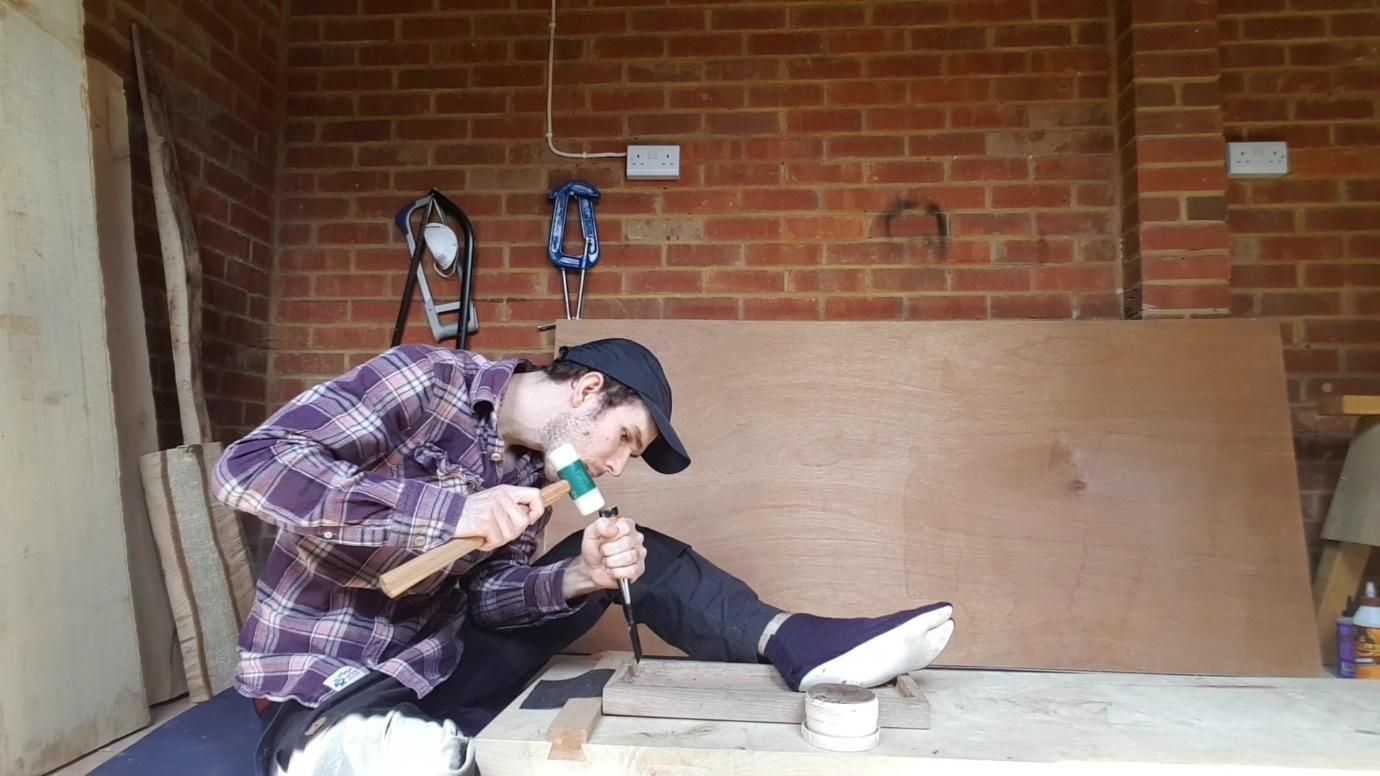
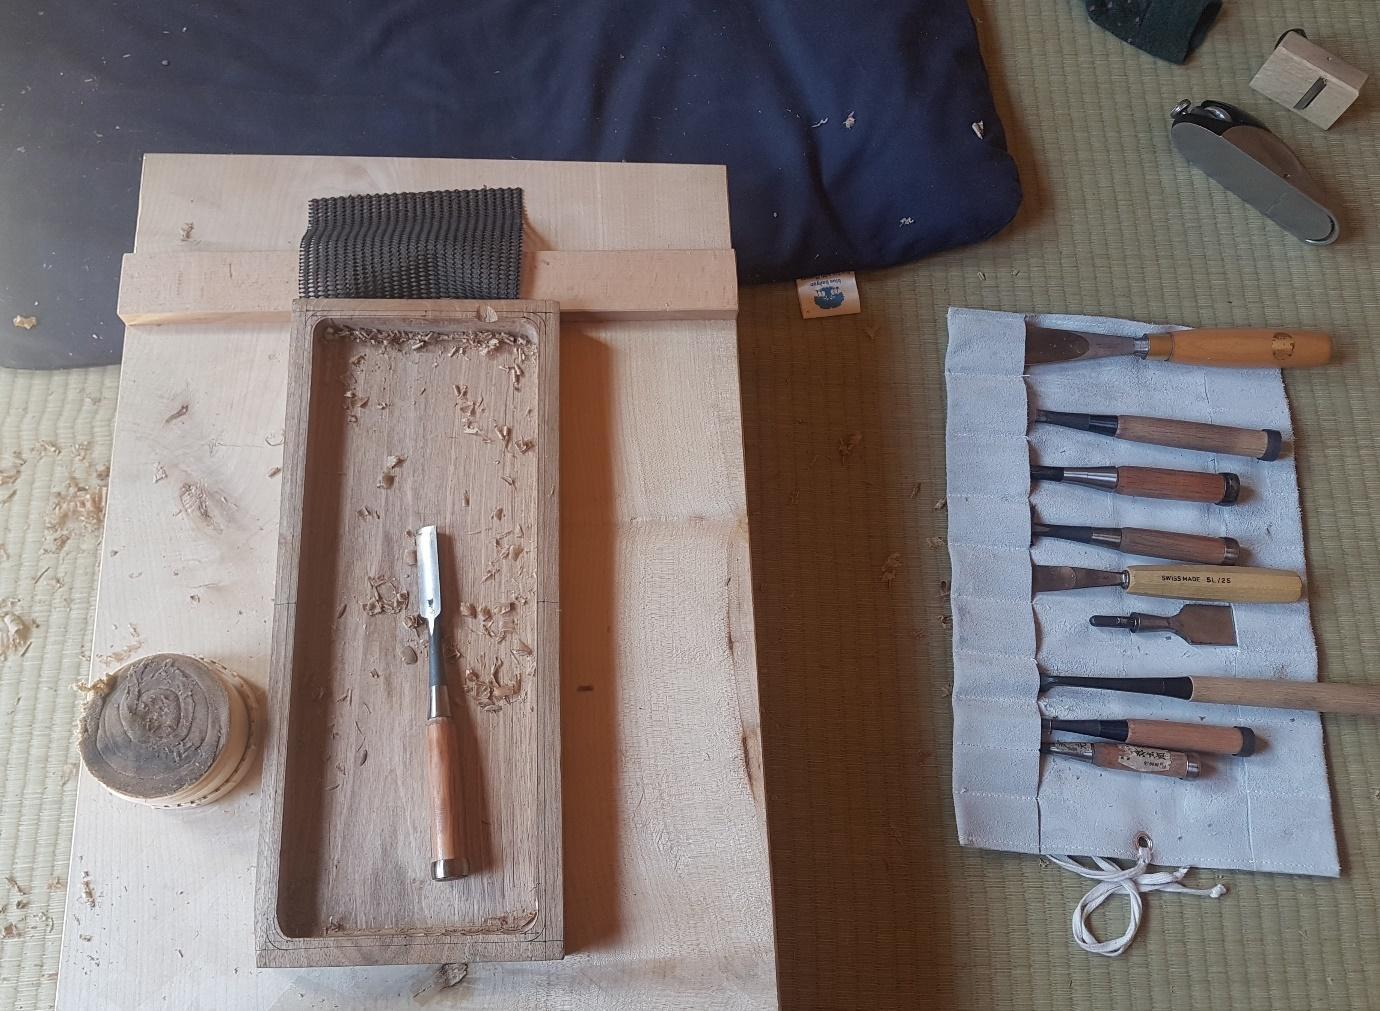
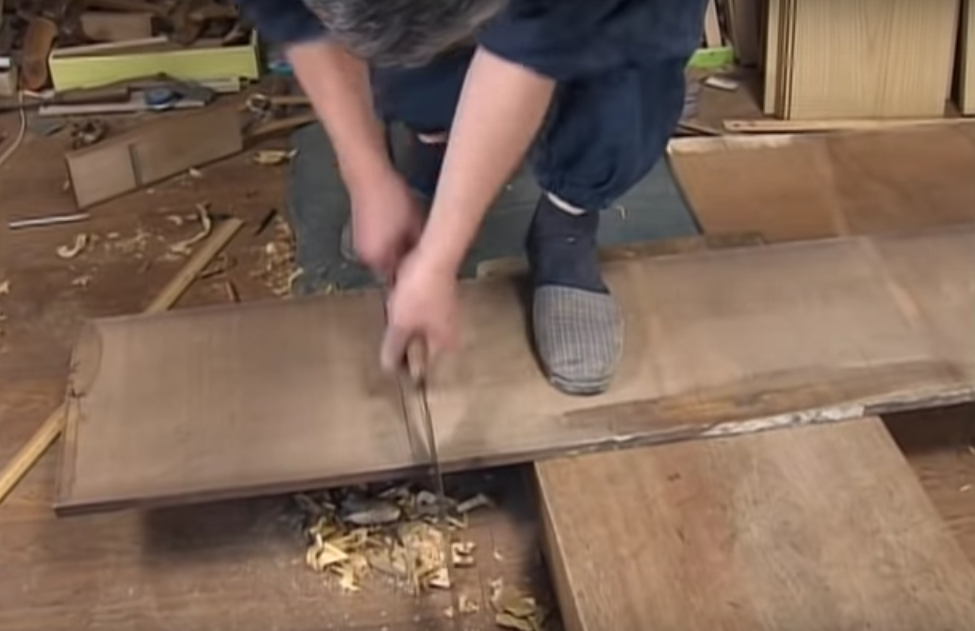
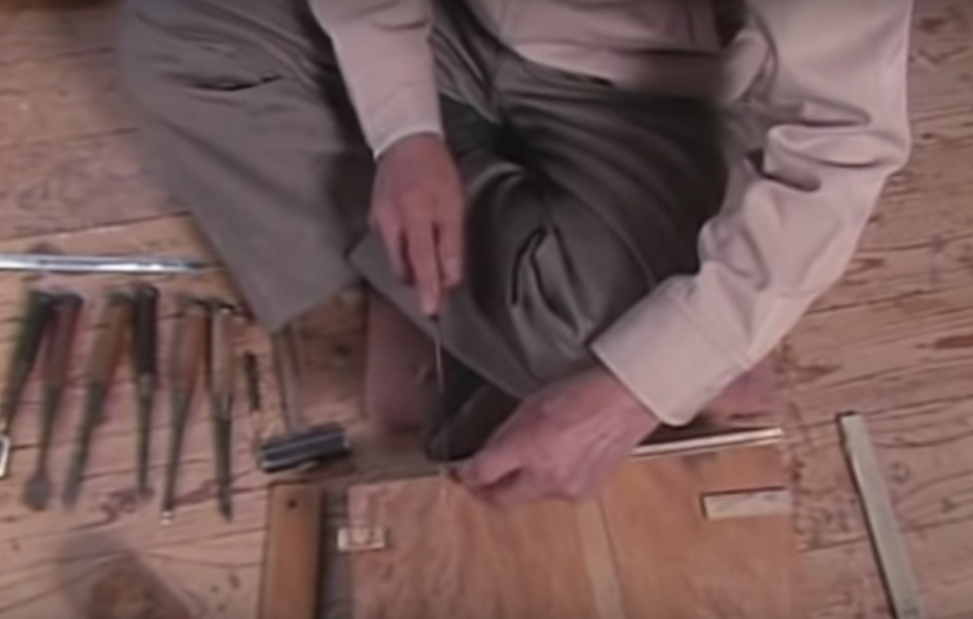

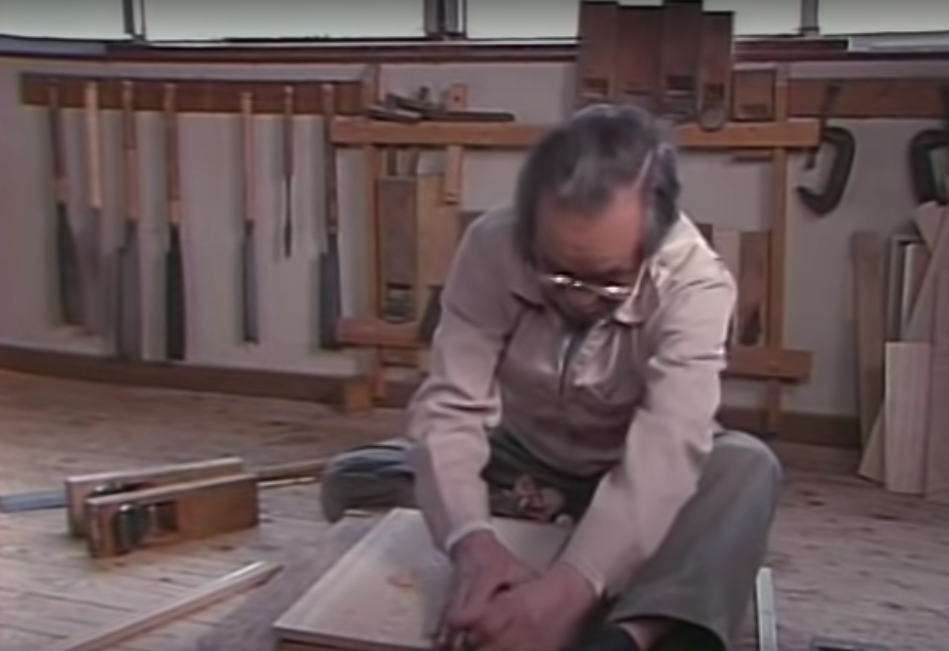
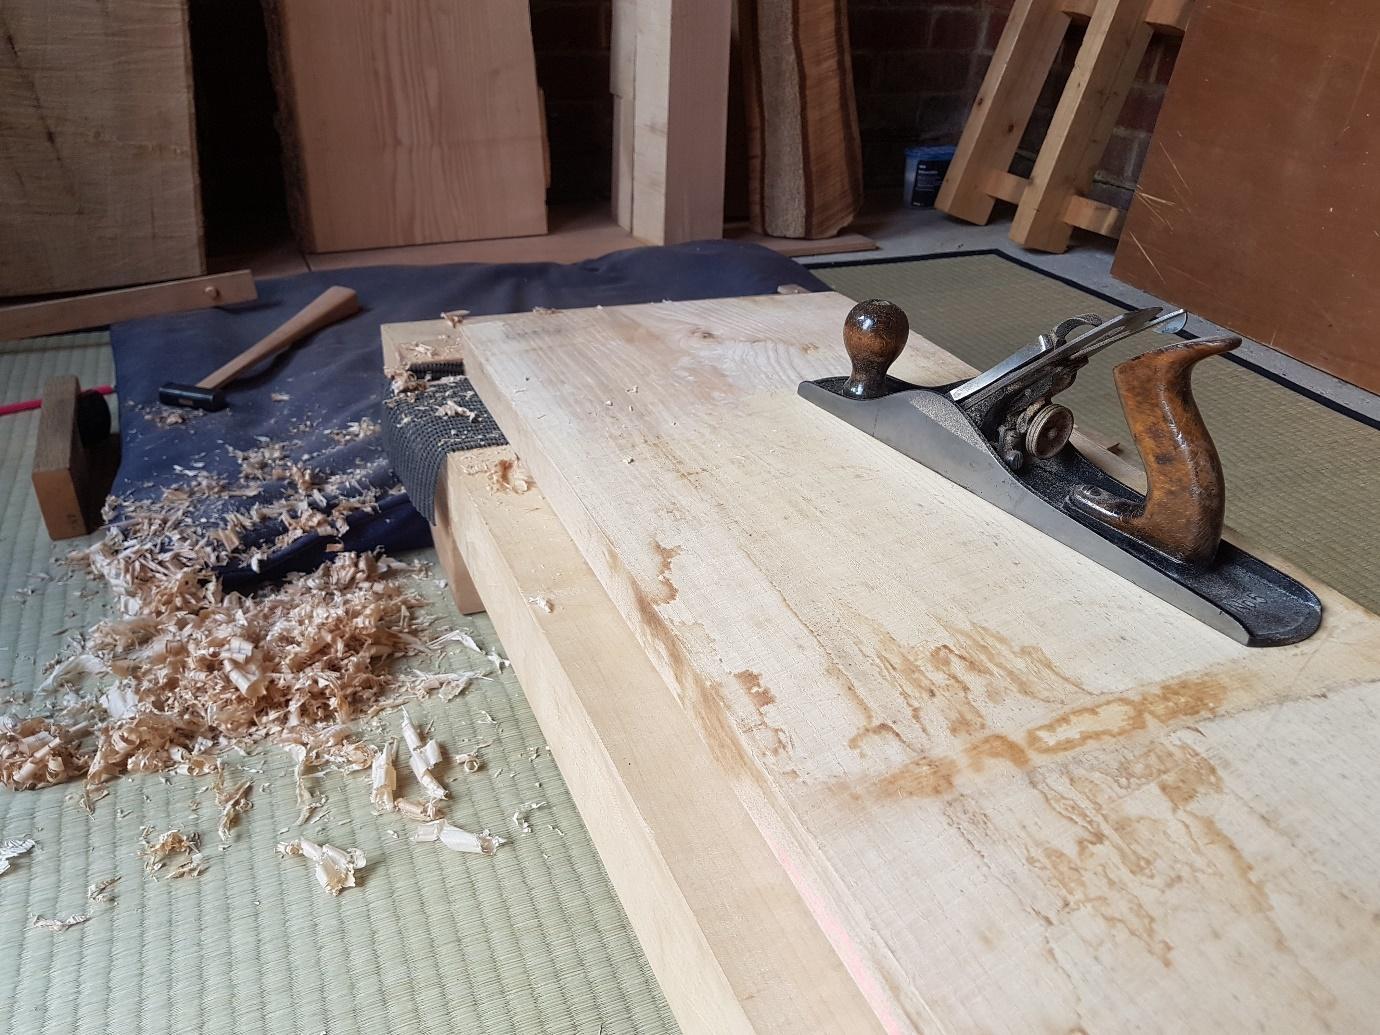

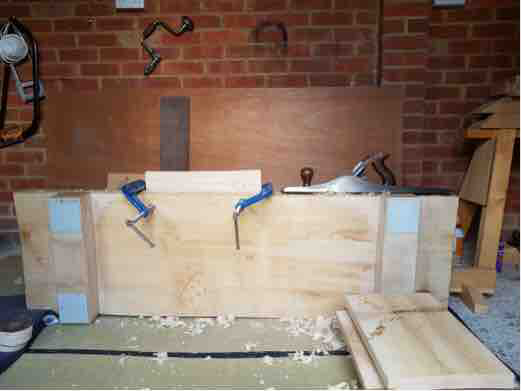
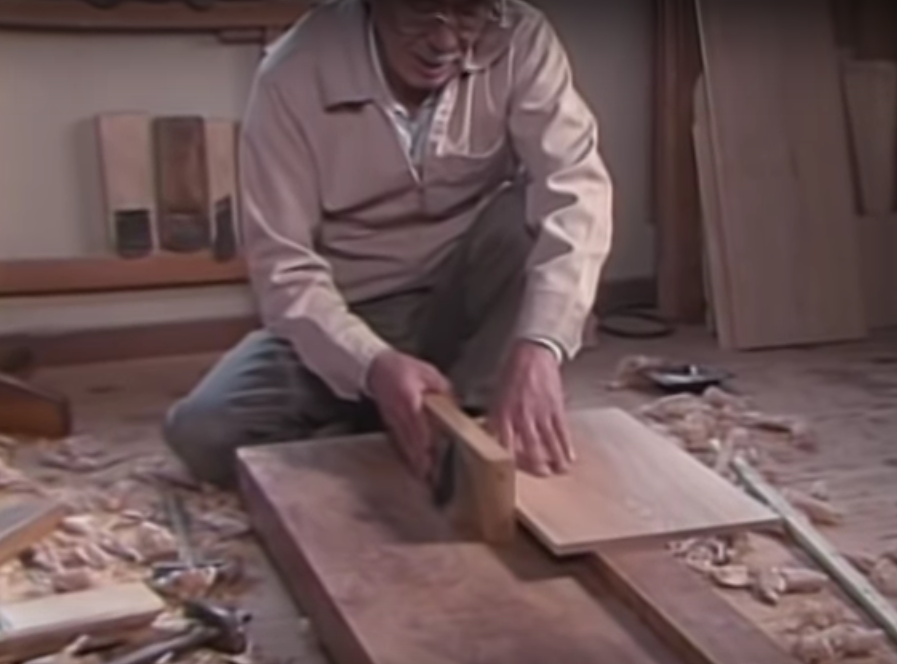
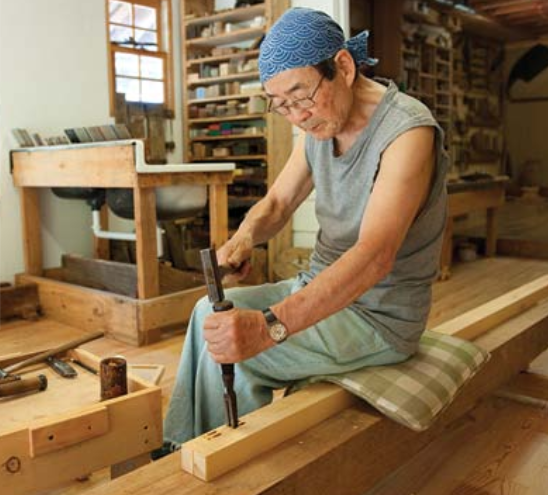
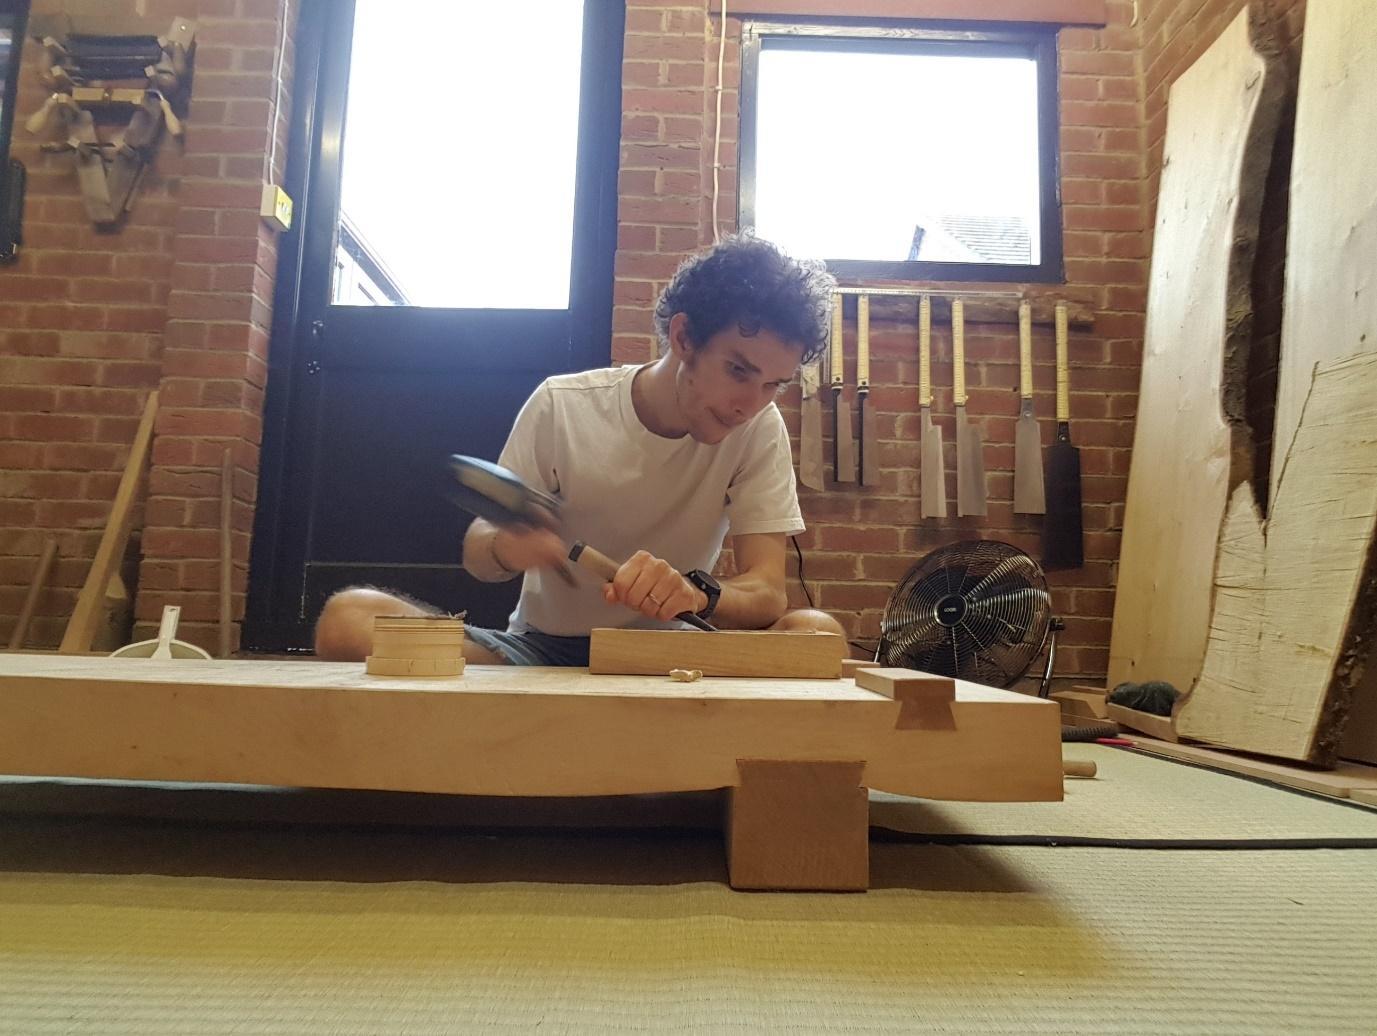
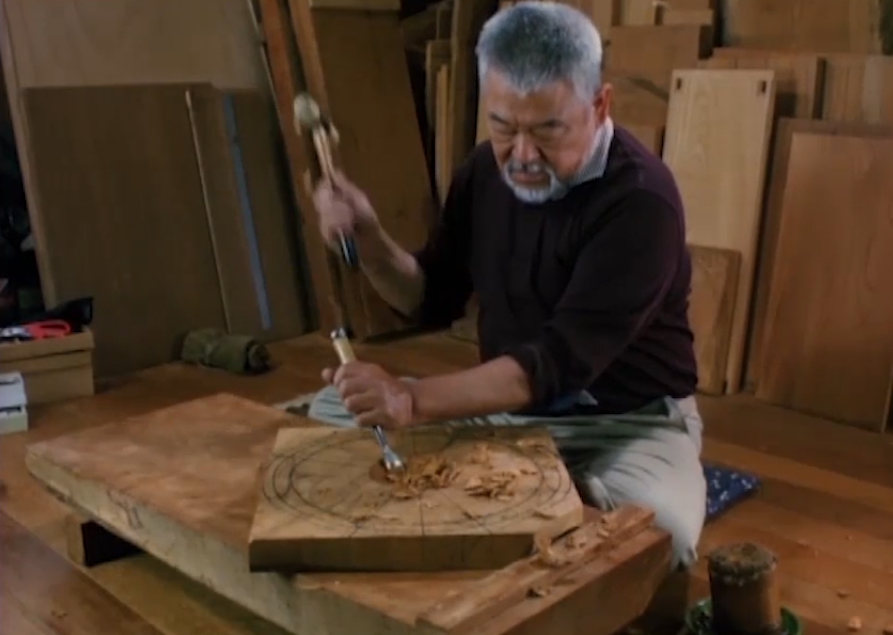
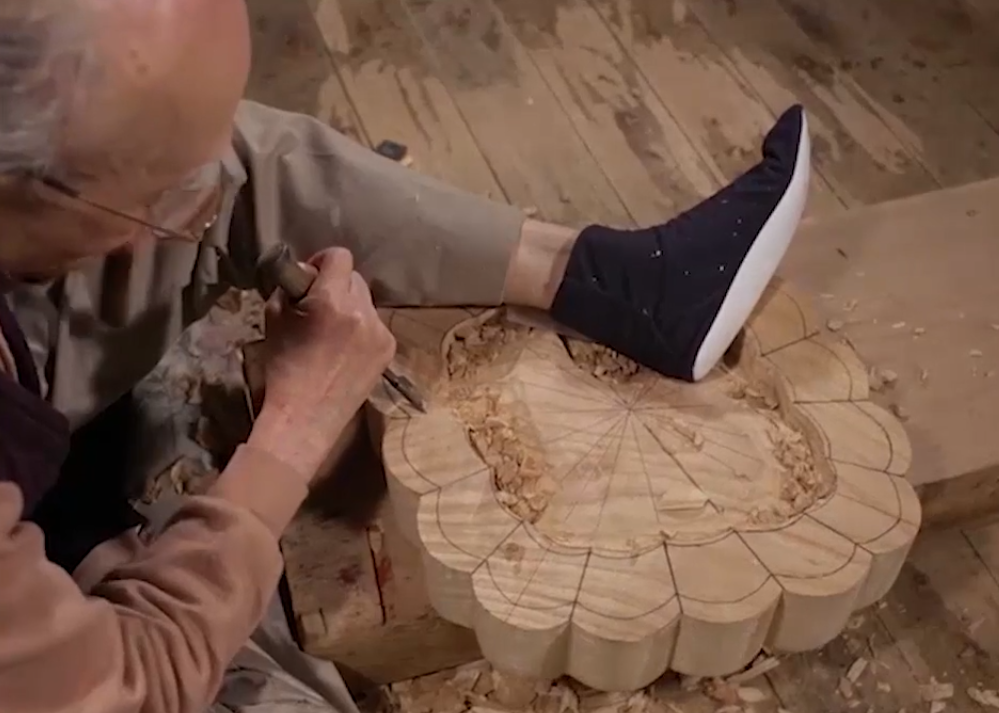
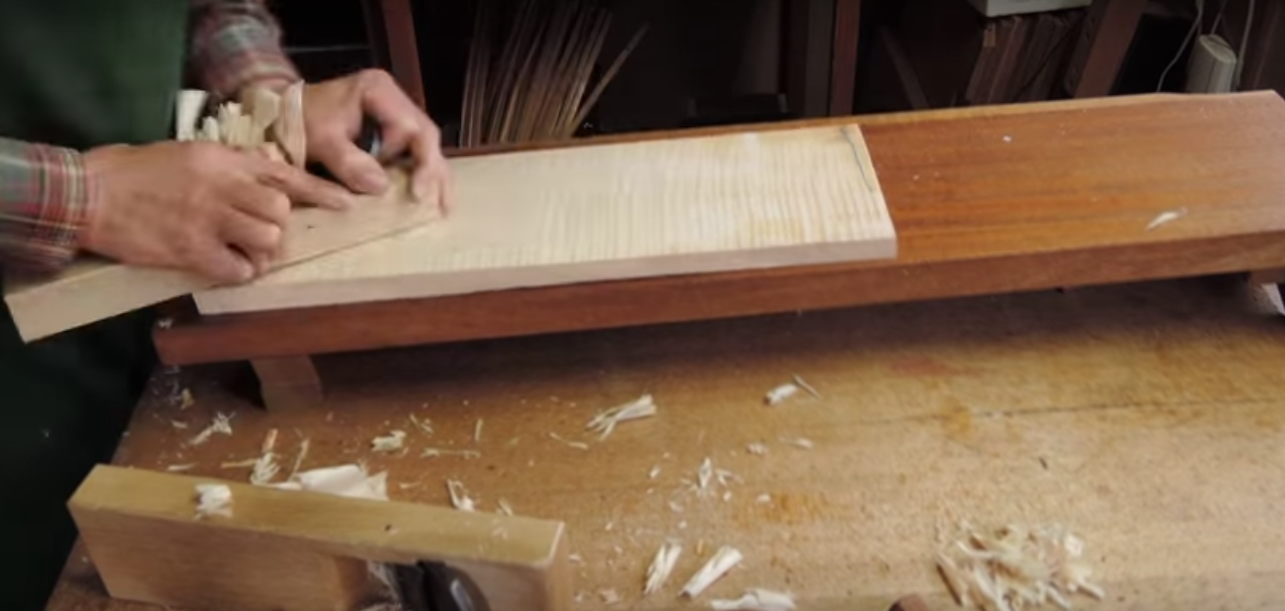
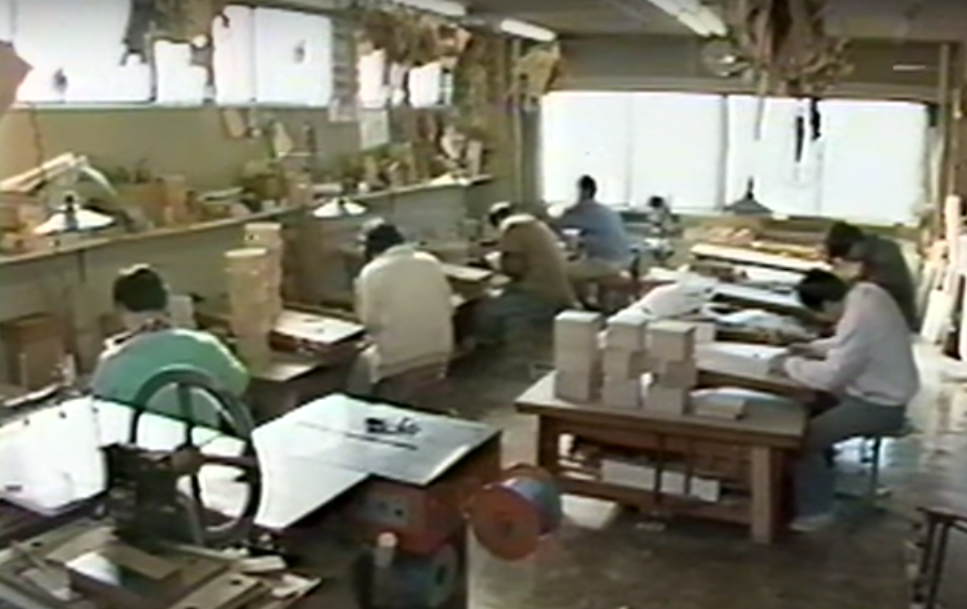
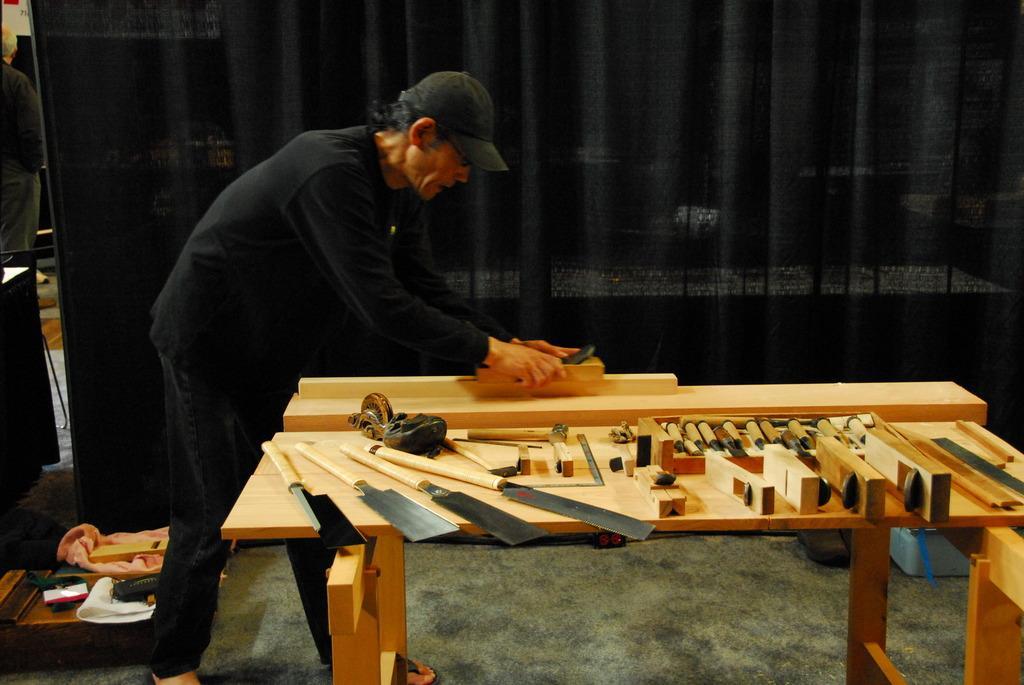
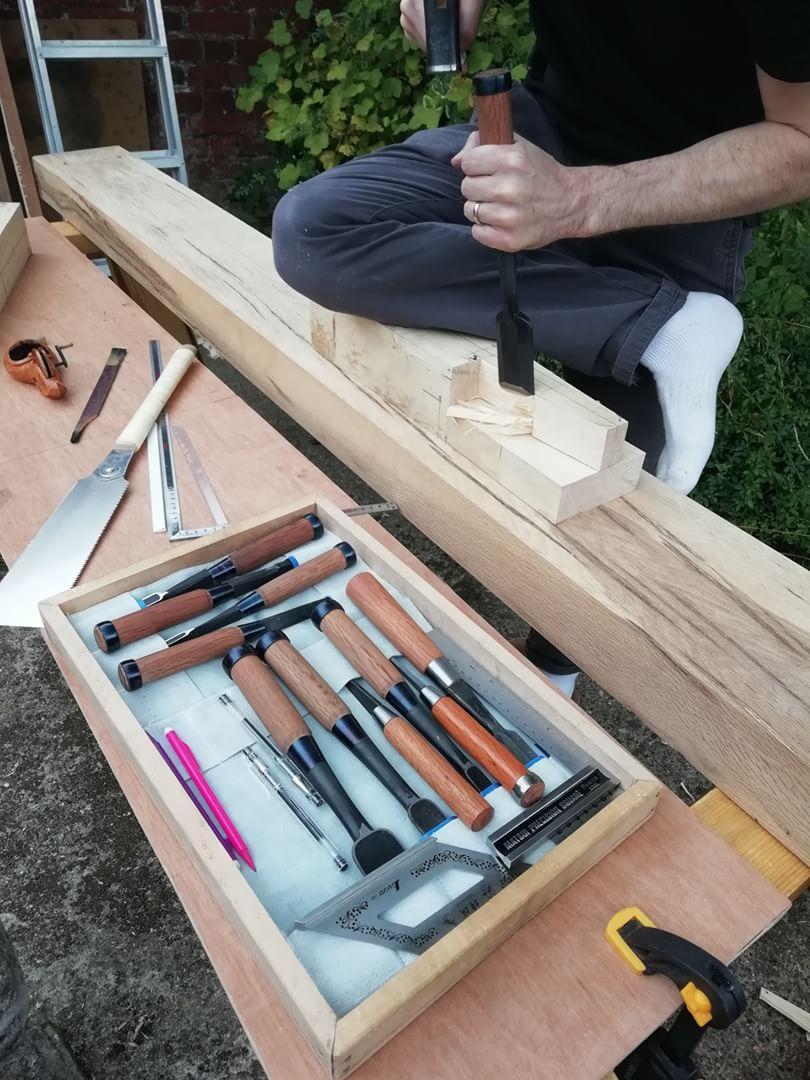

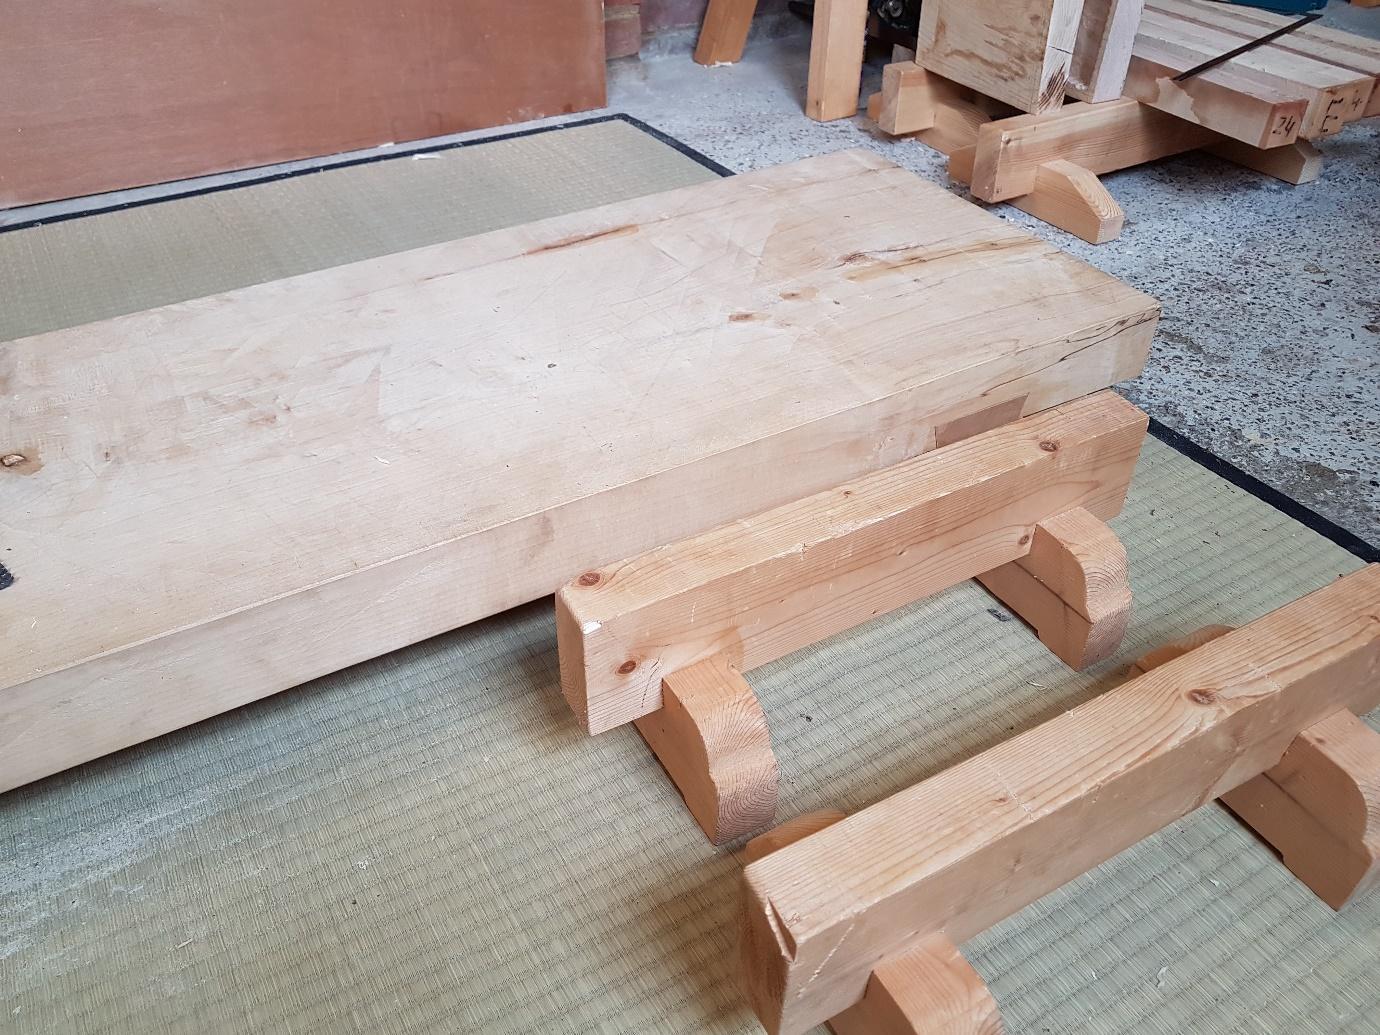
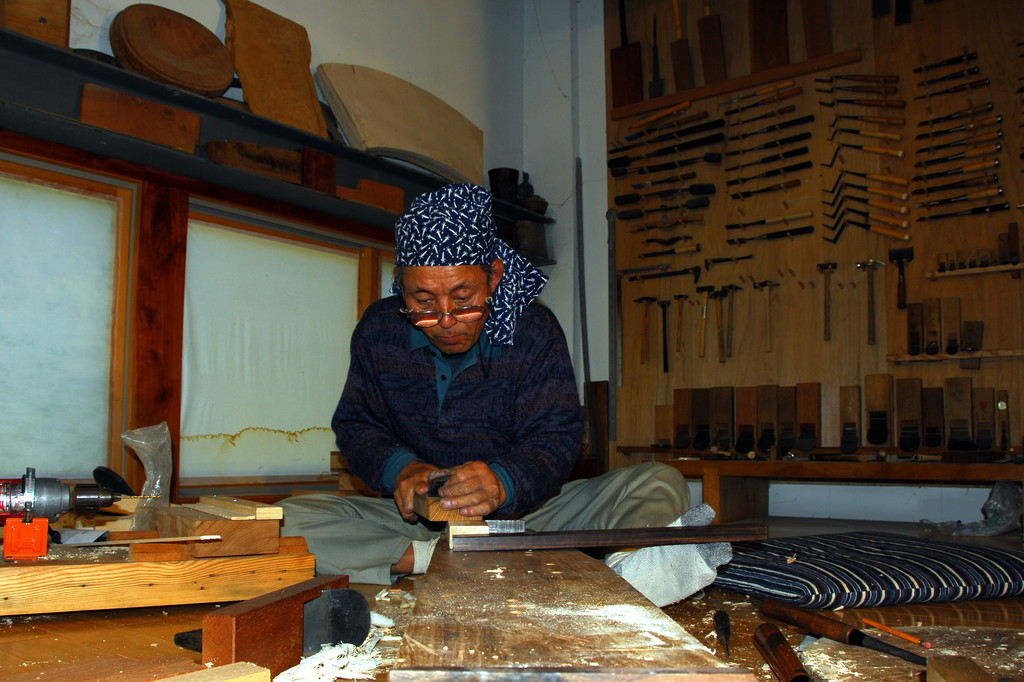


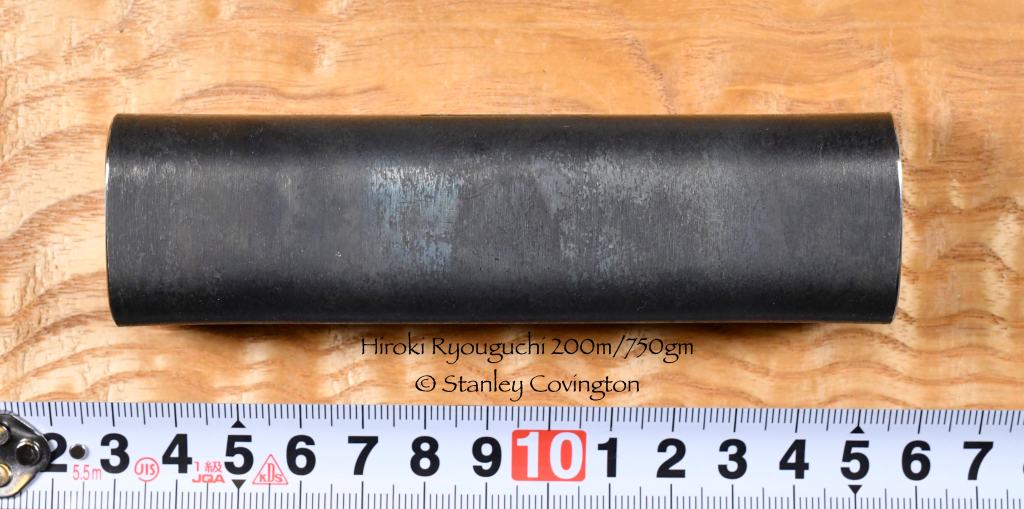


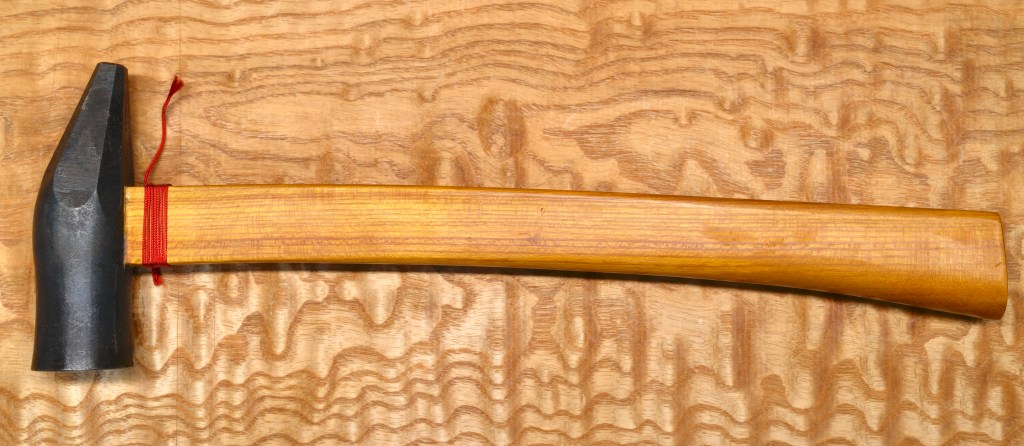


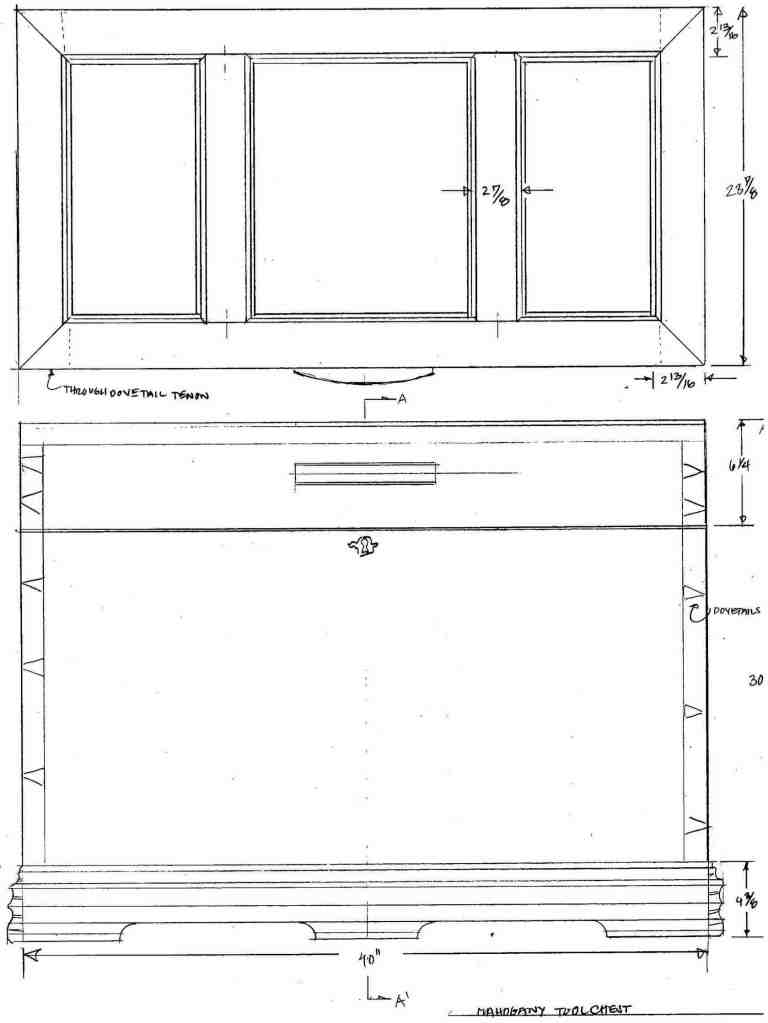


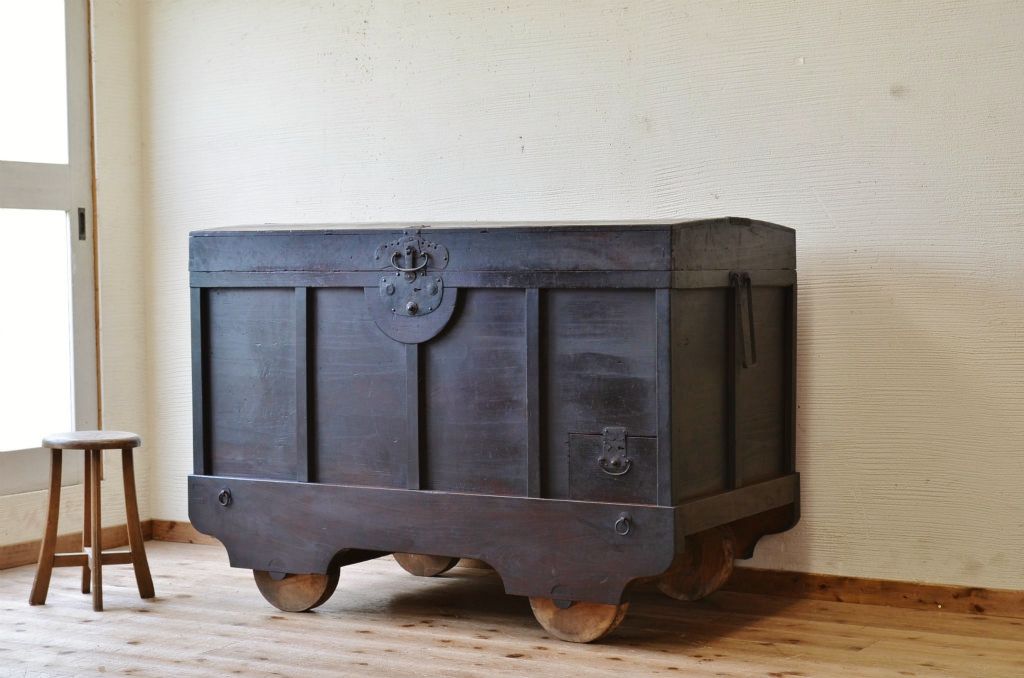


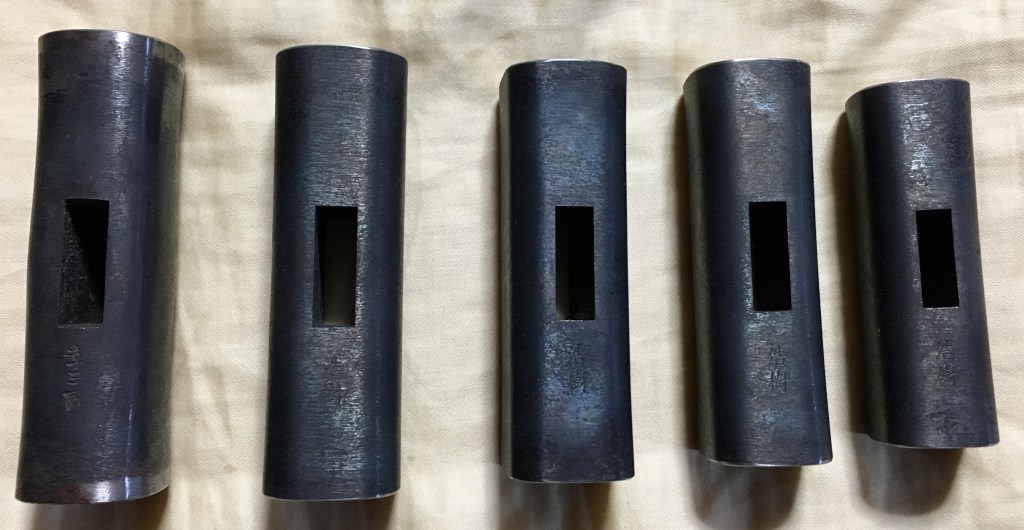
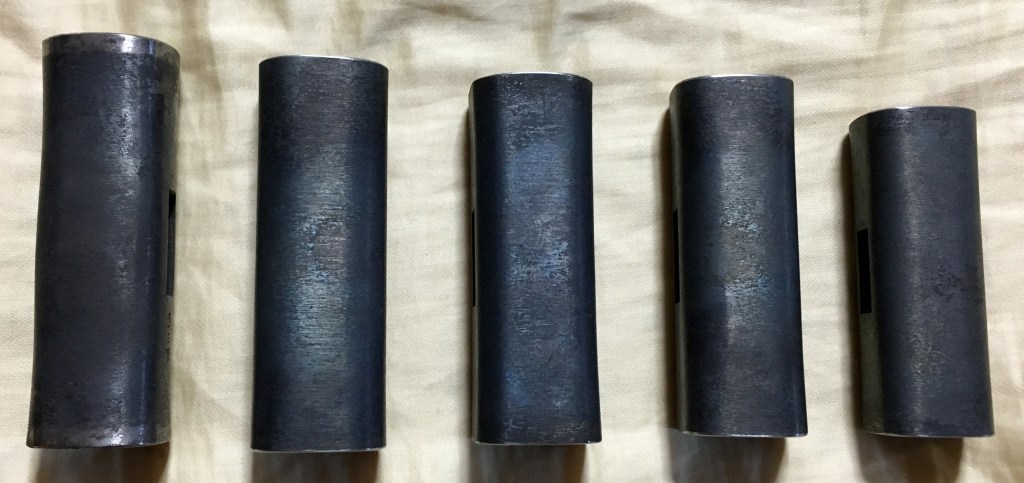
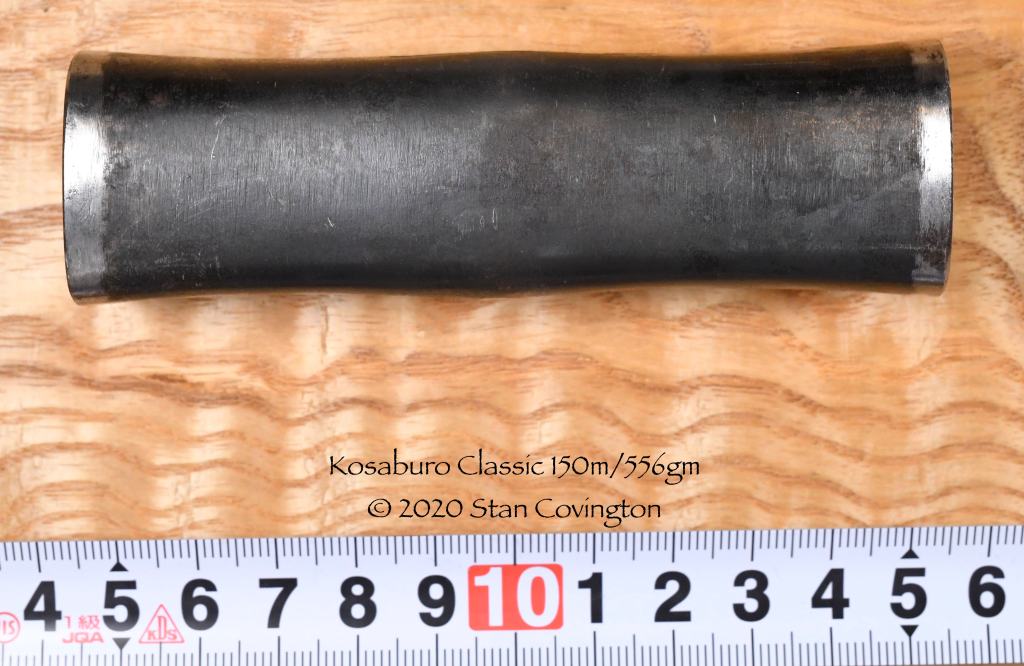

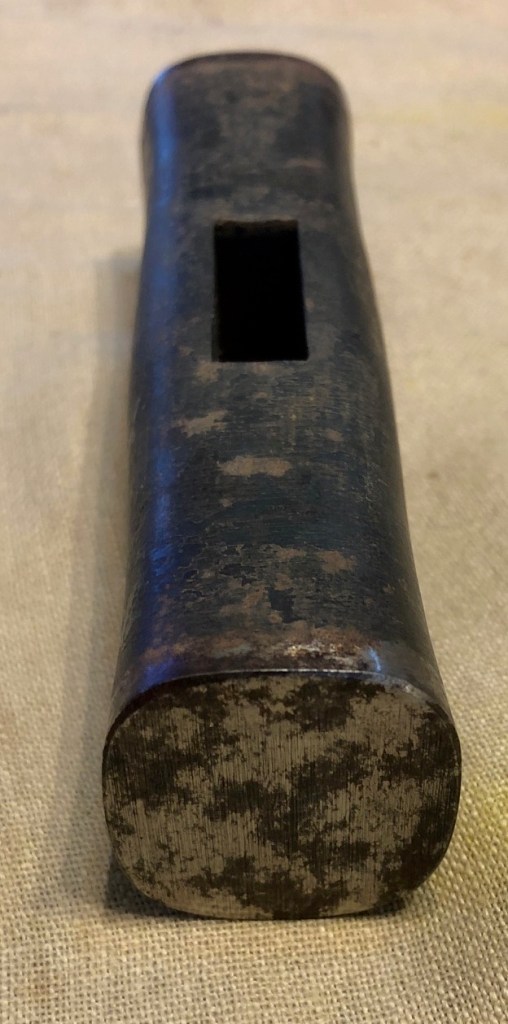


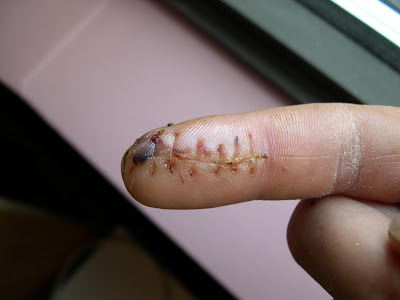
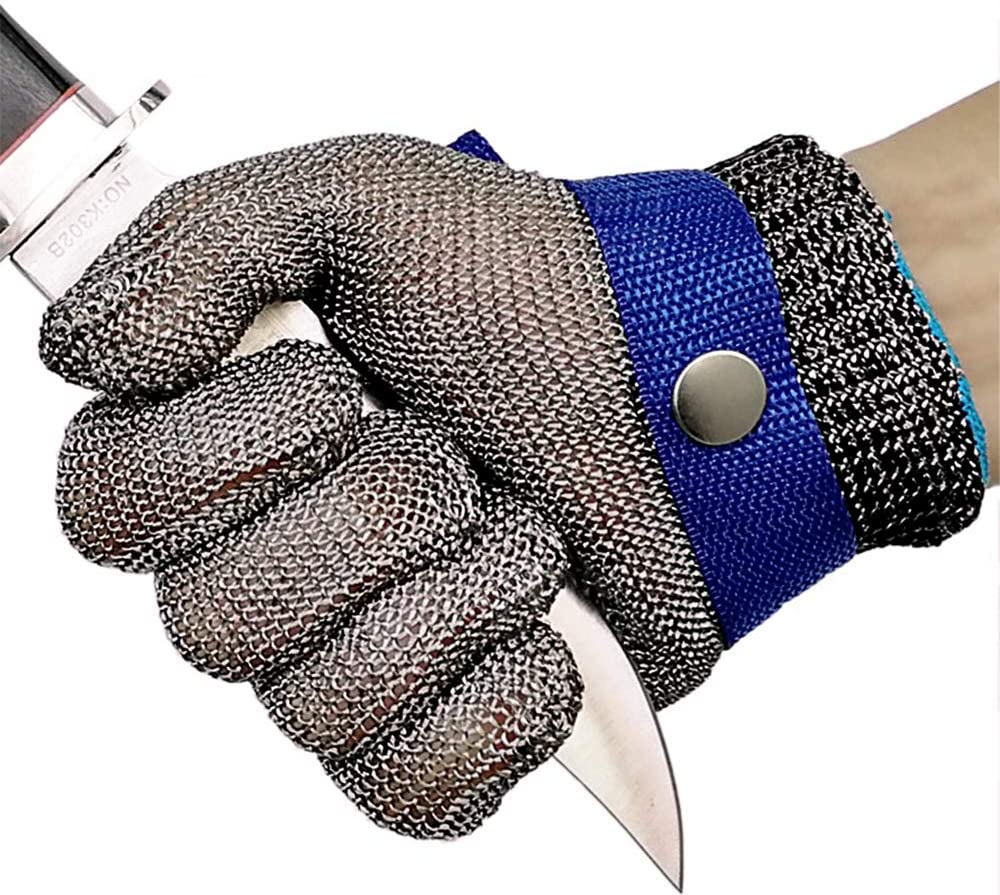


Leave a comment