
True perfection is unattainable, but if you chase perfection you will catch excellence!
Vince Lombardi
In previous articles in this series about a craftsman-made gennou hammer handle, we discussed how to design and make a handle to fit Beloved Customer’s body and way of working. This article assumes you’ve mostly completed your handle, attached the head, and are now ready to test it. So let’s get started.
Why Testing Matters
I don’t know about you, but after all the research, design and fabrication work we’ve invested in your gennou handle, I need to see how it performs and determine if its performance is superior to a Minion impaled on a stick. Being a Beloved Customer and therefore highly intelligent, you’ve asked yourself the following three indubitably perspicacious questions about testing.
- What can I learn from testing?
- Against what performance standards should I compare my most excellent new hammer handle (besides to a Minion on a stick)?
- How should I conduct that evaluation?
To perfect your hammer, you will need the answers to these questions and more. You can get them over years of use, or get many of them now by testing it in a methodical manner and paying attention, but one way or another, you must get answers, bro.
Desired Testing Results
We can learn several things from testing our gennou with its new handle, but I encourage you to do your best to ascertain the following two things at minimum.
The first thing, of course, is whether or not the hammer with its new handle is comfortable and stable to use, and if possible, what needs to be improved to make it more stable and comfortable. This may entail many small details depending on your requirements and powers of perception.
Whether it’s comfortable in-use or not is subjective and entirely up to you, but you can probably identify problems easily through this testing process. Pain, soreness and blisters and the lack thereof are solid indicators (ツ).
Whether or not it’s stable in use is another important thing to determine early. Does it tend to track straight on the downstroke, or does it want to twist off your intended path of travel striking chisel handle or nail head erratically? When it hits the chisel or nail, does it convey its energy into the target smoothly, or does it wiggle like an eel on a hook on impact?
An unstable head and handle combination may perform well for one or two consecutive strikes, but because Murphy’s Law of Buttered Toast irrevocably dictates that small errors accumulate to maximize damage, an unstable head will often wiggle off-line enough for the third swing to hit weakly, even miss entirely, ruining your rhythm, damaging your confidence, and eliciting snide looks from resident bench cats. Oh, the shame…
A second thing you need to learn is whether or not the face of the hammer is striking the chisel/nail squarely and if the center of mass of the head is aligned with the vertical axis of the chisel handle or nail. Please make sure you understand the meaning of the previous sentence.
With this experience and the answers to these questions under your belt, you will be in a position to adjust the handle to perform its best for you and the way you work.
Testing Procedures
Out of an abundance of well-deserved humility combined with a strong desire to avoid looking even more the fool, your humble servant will refrain from suggesting any specific objective tests, or urge you to use quantifiable standards, or seek concrete empirical results because that would be too silly to even contemplate. Unless, of course, Beloved Customer will conduct these tests in your super-secret laboratory, possibly located at the heart of a dormant volcano on an uncharted South Pacific island, maybe covered by coconut palms with cold beer taps, probably surrounded by hundreds of horny bikini babes, likely frolicking in crystal surf. BTW, if you do have such a lab, please text me the address!
In this super-secret lab you will probably have access to equipment and software suited to more scientific, empirical, replicable methods of comparison, such as those developed for analyzing and improving the apparent performance, marketability and profitability of mass-produced sports equipment such as baseball bats, golf clubs, and green dildos (シ). Sadly, while your humble servant does not possess such equipment, most (but not all) humans own and operate one of the world’s most refined super-computers and sensor networks: our bodies and brains. I therefore propose you focus these formidable tools on this analysis. (brains and bodies, that is, not dildos).
Below are four absolutely subjective tests only you can perform, the results of which only you can evaluate.
Incorporating Test Results
To thwart the confusion promulgated by Murphy and his multitudinous malevolent minions, I strongly recommend you use the results of your analysis to guide you in making incremental improvements to your handle over time rather than large changes immediately, so to that end, please plan to remake your handle, once, twice or even thrice, improving it a little each time. Such is the true path of the craftsman.
Please update your handle drawing each time to record the improvements you’ve made and ensure no “increments” are misplaced.
In scobe veritas. (“In sawdust, truth”).
The Grip
As you are aware, for any testing other than drinking beer or women choosing wall paint color to be meaningful, some basic techniques must be established and followed to reduce variables to a manageable degree. How you hold the gennou handle to be tested is just such a basic technique.
The handle design presented in this series of scribbles is intended to work best when gripped in a particular way, so when performing the following tests, it’s important that you grip the hammer correctly thereby removing one huge, often-problematic variable.
Of course, I’m describing a particular grip here as being “correct,” but that’s just my well-informed opinion. In any case, I promise your hammer will work more efficiently if you abandon the so-called “hammer grip” (what I call the “Hobbit-killer” grip with the handle grasped in your fist) right away and switch to this more advanced grip.
I didn’t invent this grip, BTW, but observed and consulted with craftsman I respected in the USA and Japan who used it for many decades, all of whom are now working overtime in the big lumberyard in the sky. I later came to call it the “Sam Snead grip,” after the extremely successful pro-golfer of the same name who made it famous, and him rich, in tournaments and in dozens of books he wrote on the subject of using golf clubs skillfully.
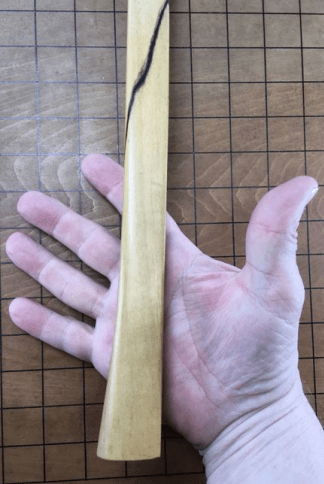
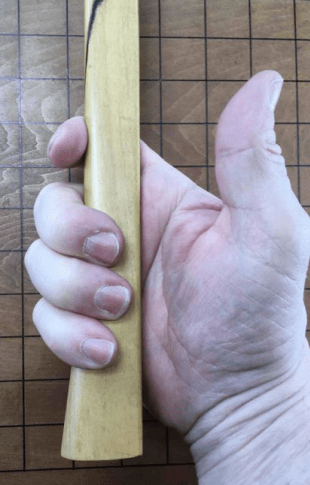
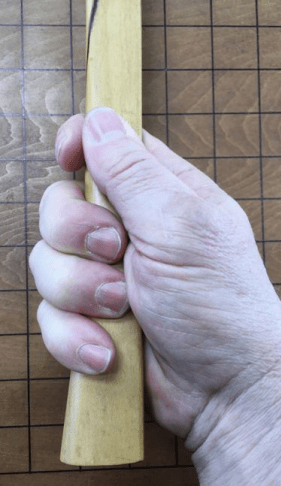
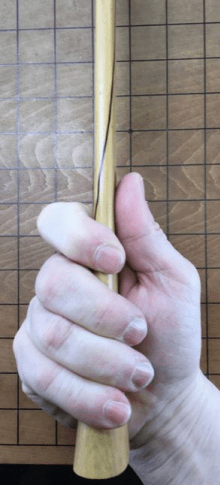
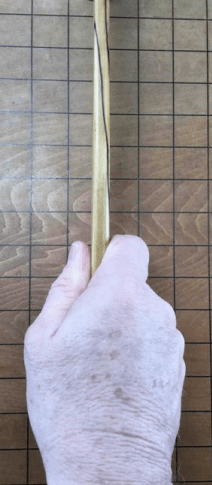
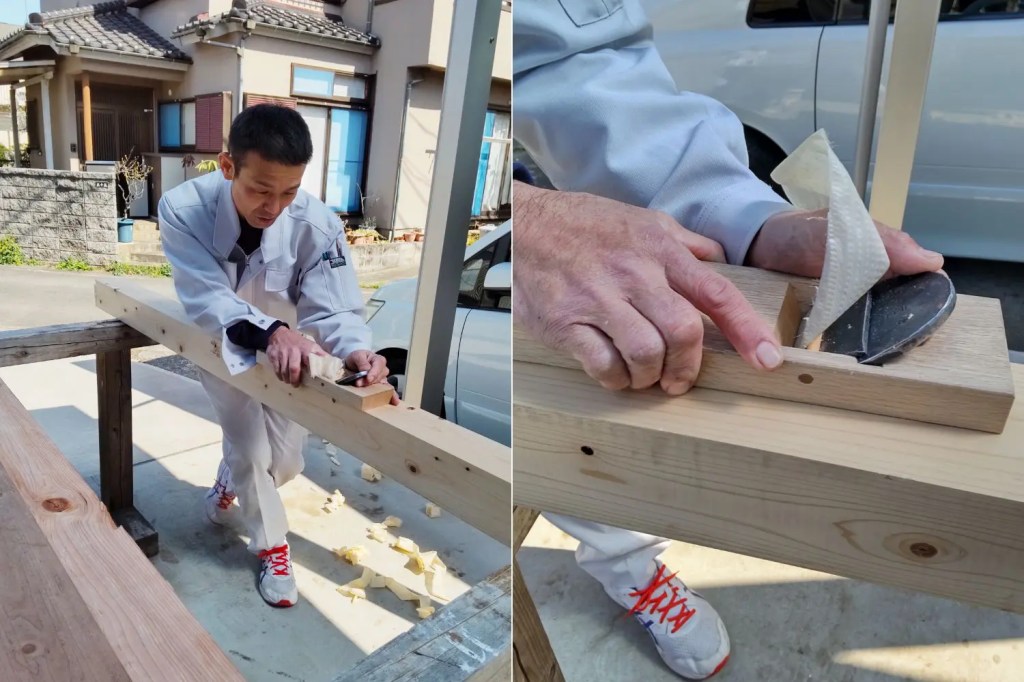
We’ve talked about this grip in some detail in Part 13 of this series, but please review the photos below to confirm your understanding.
The first photo labeled “Bridging the Palm” shows how the hammer’s handle is NOT held in a fist, but is angled diagonally across the palm, supported on the first joint in the index finger, as well as the heel of the palm.
You can see how the index finger wraps around the handle while the thumb is pressed against the side so that the handle is strongly clamped between index finger and thumb, but can still pivot the handle if the operator so desires. This grip affords the joints of the forefinger and thumb, digits accustomed to fine motor control (unlike the fist), absolute control over three critical surfaces of the handle.
This grip also provides better control, more power, and greater reach without forcing the wrist to do the strange, unnatural contortions the Hobbit Killer grip does.
The Three Tests
Following are three tests to help you ascertain how well your new gennou and its handle suits your body and your work style.
Before attempting these tests, however, it is important to use your new handle for a time to establish a connection between it, your hand, and your eye (using the proper grip, of course).
Besides moral virtue and a sense of humor, you will need a few things.
- A wood chisel suitable for cutting a mortise hole, around 24mm.
- A piece of light-colored scrap wood for cutting a test mortise hole;
- A stick of light-colored wood approximately the size and shape of the handle of the chisel you would normally use for cutting mortise holes:
- An ink pad, wide-tip marking pen, or Dykem.
- A lab assistant. I recommend a buxom, young lass with a cute giggle wearing a sexy lycra lab uniform (Warning: bad stuff may happen if you let She Who Must Be Obeyed meet, or even see, this assistant!)
So, now that we have our supercomputer and its sensor suite warmed up and focused, our tools laid out, and a bubbly lab assistant standing by, sound the trumpets and let the testing begin! We who are about to dye salute you!
Test No. 1: The Blind Retrieval Test
After you have used your gennou with its new handle for a few weeks such that your hand has become accustomed to it, please give your bench dogs a few treats, shoo away any arrogant bench cats, set it on your de-cluttered bench, step back a few steps, close your eyes and turn in-place once or twice like a ballerina with hairy legs. Now, have your lab assistant, perhaps a child, a friend, a neighbor, your girlfriend, or wife, or even a clever bench dog (but never your neighbor’s girlfriend’s wife’s cat!) change the gennou’s orientation on your benchtop by turning it over, switching it end for end a few times, spinning it, or whatever. Random orientation is what’s needed.
Next, with your eyes still closed, grab the gennou with your hammer hand in a correct grip ready to rock-n-roll. Notice how easy or difficult it is to grip the handle correctly, without fumbling and without opening your eyes. If it’s not easy to do, however, you need to know it now. It may be simply that you’re not accustomed to your hammer, or that the geometry or details are out-of-wack.
By “correctly” in the previous paragraph, I mean (1) the flat striking face of the head is facing away from you and toward the chisel or nail; (2) the handle and head are aligned straight in your hand, and not twisted, (3) the heel of your hand is pressing against the flat spot on the back edge of the handle adjacent the butt; (4) the distance from the center point of the face to the heel of your hand is located precisely the distance shown in your design drawing.

BTW, whether you picked up the habit from your daddy or some internet guru, choking-up on the grip is an inefficiency you should discard simply because it’s counterproductive and silly, like a powerful cane corso dog wearing flower brocade.
If the grip area of your handle is shaped as shown in the drawing with a flat back edge and sides perpendicular to it, a radiused front edge, and flared toward the butt, it should be easy to instantly grip the handle in precisely the proper place, with the intended striking face oriented properly, without opening your eyes and without any fumbling whatsoever.
If, on the other hand (the one with six fingers (ツ)), your hammer doesn’t leap into your hand in perfect alignment without argument or eyeball action, some adjustments to the handle are called for.
For example, a frequent cause of confusion between handle and hand is the leading edge of the grip being square instead of rounded. Or the sides and butt of the handle being angled wrong. These details can all be adjusted once you know they need to be adjusted
A gennou that naturally orients itself in your hand with the striking face in the right direction, the same distance from the striking face first time every time without your having to look at it, will provide you a tremendous advantage in speed, efficiency and confidence. It will become a good friend and companion.
BTW, just for gits and shiggles, try this test with any name-brand one-size-fits nobody nail bender you have laying around. The virtues of your new handle will become immediately apparent.
Test No. 2: The Blind Swing Test
This test will teach you something about handle length and other details.
Once again, perform this test after you have used the gennou with its new handle for some time and have become accustomed to it. A sexy lab assistant (one who doesn’t talk too much) in slinky woodworking togs is optional (ツ).
Grip the gennou properly in one hand and the stick shaped like your chisel handle in the other just as you would an actual chisel. But instead of placing the end of the stick against something as if you might cut it, please keep the stick in the air without butting it against anything. Now, with your eyes still closed, swing the gennou at the end of the stick of wood.
You should be able to strike the stick with the flat end of the gennou solidly and squarely on the first, or perhaps second try. Success in this test is common.
If your hammer misses the stick consistently, it may be because you aren’t yet accustomed to the handle, or it may be that you are choking-up up on the grip, or it may be you need to make it shorter or longer, or the grip shape needs to be adjusted. Or it may be that Murphy keeps distracting you by sending dickpics. It’s absolutely worth figuring out.
Once again, if you consistently miss the target, pay attention to why and where you are missing. Is the handle too long? Is it too short? Are you missing off to the side? Make notes recording the results and your observations on the design drawings to incorporate into your Mark II handle.
If accuracy can be improved by shortening the handle or modifying the grip, go ahead and make the necessary changes a little at a time. It’s easy to shorten the handle, but lengthening one requires an ACME Wood Stretcher Mark 2. I can lend you mine if you don’t have one (ツ)
Test No. 3: The Ink Test
Never fear: this test has nothing to do with gossip screeds or Rorschach drawings. It will help you determine if the handle of your gennou is the right length, if it is cocked at the most effective angle, and whether or not it should be canted to the left or right, and all without pulping an innocent tree.
This test works best if preformed after the Blind Retrieval Test and Blind Swing Test.
Begin by coloring the striking face of your gennou with an ink pad or by applying dark marking pen ink or Dykem to the gennou’s striking face (the flat face). Clean or sand the end of your chisel’s handle to produce a clean, white surface. Then cut a mortise using this gennou in the same posture you assume when cutting most of your mortises.
For instance, if you mostly cut mortises in wood located at a constant height on your workbench, such as drawers and furniture parts, you should employ that position. Or, if you tend to cut mortises in timbers while sitting on or straddling them using the venerable butt-clamp, please assume that position.
The impact with the chisel’s handle will wipe ink off the face of hammer and deposit it on the end of the chisel’s handle at the same time. This ink transfer will print the story you need to read. Check the ink on the gennou’s face and the end of the chisel every two strikes.
This is a time-tested technique professional golfers use to select/design golf clubs, BTW.
If the ink at the center of the striking face is scrubbed clean first, and the center of the chisel handle becomes inked first, then you have made your handle the right length with the head angled correctly. If not, you should make notes describing the results in the handle drawing you made earlier, and adjust the design of your next handle accordingly.
Again, you may find it enlightening to perform this same test with conventional hammer with a standard handle.
When your done testing, be sure to record your conclusions. Either erase and adjust the drawing, or trace over it to make and date a new drawing with your revised details. Tracing paper is our friend.
In either case, be sure to add a date and/or revision number to the drawing to ensure you don’t confuse it with older, superseded drawings. Don’t put this off but do it right away before you forget. This applies to all the tests described herein.
Adjustments to Your Handle
You should use the results of these tests to make small, incremental adjustments to your handle, as you deem necessary, rather than big, drastic changes.
For instance, you may need to shorten the handle. This is easily done if your handle is a little long and you’ve made the neck as I recommended. Worst case, make notes, adjust the drawing and remake the handle with as few changes as possible to avoid confusing over-complication.
A common correction you may want to try is, after becoming accustomed to using the hammer, to reshape the grip area to distribute pressure more evenly over the hand, and to reduce stresses induced in skin, muscle, tendons and bones by easing edges and corners while maintaining control and indexing. Most importantly, you should shape the handle so it doesn’t twist in your hand stretching your skin in uncomfortable ways, a common cause of blisters, especially in plastic-handled one-size-fits-nobody hardware store hammers.
If I may share an example from my experience, every new hammer handle I make tends to produce a blister on the first joint of my right hand index finger. Obviously a lot of pressure focus on this location on my hand. So I know to smooth the transition from back edge to the side just where this joint bears to avoid blisters.
This modification creates an obvious dent in the smooth lines of my handles, but your humble servant is resigned to sacrificing beauty for performance when necessary. Just look at the sorry state of my career as a fashion supermodel if you doubt my dedication to performance.
Another less-common problem is the hammer’s face striking the chisel handle or nail head at an angle instead of being centered on, and at a 90˚ angle to, the long axis of the chisel handle. The ink test will reveal such impish behavior.
This tendency usually improves with practice, but you can adjust for it by making a new handle with the head skewed to the left or right as necessary.
As a way to determine how much skew is required, you can plane down the sides of your test handle, glue on slips of wood, shape them as you see fit, and test the results. Once you’ve determined how much total correction is necessary, you can remake your final working handle accordingly.
Once again, work patiently to achieve small, incremental improvements, and be sure to record the results on your drawings.
Don’t hesitate to methodically scrape, shave and experiment with this first handle.
The design of this handle, and the process your humble servant has described for making it, is suited not just for Japanese gennou hammers but for all short-handled hammers and axes. Give it a try and you’ll see what I mean.
In the next article of this series we’ll apply a protective, and maybe even tastefully elegant, finish. Please remind me to call Ramon and beg him cater the unveiling party! I simply love his cheesy shrimps on crackers, don’t you?
YMHOS
A list of our gennou heads: C&S Tools – Gennou Hammer Head Pricelists & Photos
If you have questions or would like to learn more about our tools, please use the questions form located immediately below. To see a list of our tools and their pricing, please click the “Pricelist” link here or at the top of this page. To contact us please use the Contact form below or email us directly at Covingtonandsons@gmail.com.
Please share your insights and comments with all Gentle Readers in the form located further below labeled “Leave a Reply.”
We see data miners and their bilious bots as dastardly sneak thieves and so promise to never share, sell or profitably “misplace” your information for any reason. If I lie may the heads of all my hammers fly away to Valinor!


Previous Posts in The Japanese Gennou & Handle Series
- Part 1 – Introduction
- Part 2 – Ergonomics
- Part 3 – What is a Gennou?
- Part 4 – The Varieties of Gennou: Kataguchi, Ryoguchi & Daruma
- Part 5 – Kigoroshi
- Part 6 – The Ergonomic Anaya
- Part 7 – The Unblinking Eye
- Part 8 – Head Style & Weight
- Part 9 – Factory vs. Hand-forged Gennou Heads
- Part 10 – Laminated Gennou Heads
- Part 11 – Decorative Gennou Heads
- Part 12 – The Drawing: Part 1/6
- Part 13 – The Drawing: Part 2/6
- Part 14 – The Drawing: Part 3/6
- Part 15 – The Drawing: Part 4/6
- Part 16 – The Drawing: Part 5/6
- Part 17 – The Drawing: Part 6/6
- Part 18 – Wood Selection
- Part 19 – Laying-out the Handle
- Part 20 – Making Sawdust
- Part 21 – Installing the Head
- Part 22 – Tasting the Pudding
- Part 23 – Finishing the Job


Leave a comment