

A Bruise Is A Lesson… And Each Lesson Makes Us Better.
George R.R. Martin, Syrio Forel, Game of Thrones,
In this the fourth article in our series about the Japanese hiraganna handplane, we will discuss how to fit the plane’s wooden body to the blade thereby improving the tool’s performance.
As is the case for most of the articles in this blog, this one too is intended primarily for the information and entertainment of our Beloved Customers, but all well-behaved Gentle Readers are welcome to partake. Bon apetit.
Why Fit Body to Blade?
Beloved Customers may wonder why your most humble and obedient servant is inflicting the digital world with another pointless article about Japanese planes, especially since the handplanes purveyed by C&S Tools are advertised as “ready to use” when new. Please allow me to address this absolutely valid concern herein.
As mentioned in the Part 3 of the Japanese Handplane Series, Mr. Inomoto, the daiuchi shokunin that cuts the bodies of our planes from Japanese White Oak to fit the blades forged and sharpened by Mr. Nakano, does indeed do more than just cut a gap for a blade to slot into, but fits the body to the blade so each plane is able to produce a decent shaving before it leaves his workshop. However, due to cost considerations and practical limitations to his prodigious prophetic talents and clairvoyant insights regarding who will eventually own each plane, and their preferences for the blade-body marriage, he fits the blade on the tight side, assuming the end-user will fettle the body to best suit his own purposes. Ergo the paragraph titled “Plane Philosophy” in Part 3.
I suspect relatively few Beloved Customers have given the subject serious thought, but it is nonetheless true that each owner of a Japanese plane must develop their own philosophy regarding the relationship between blade and body, and if they deem it necessary, adjust their plane body accordingly.
This article assumes Beloved Customer has decided to refine the fit between blade and body, and instructs in how to achieve those refinements. Are they absolutely necessary? Nah. Will they make a difference? Yes, but the degree of improvement achieved will vary from plane to plane and person to person.
Nonetheless, your humble servant recommends Beloved Customers, especially those interested in obtaining professional-level plane maintenance and usage skills, to perform the operations described in this and future articles in this series. You’ll be glad you did even if it may take some years for the benefits obtained to become evident. At the very least you may be fortunate enough to avoid the stupid mistakes YMHOS made when he was green.
So with that out of the way, let’s assemble the tools we will need to make some righteous sawdust.
Tools
The following is a list of tools I recommend for this job.
- Wooden, plastic or rawhide mallet for striking the blade and body;
- Carpenter’s pencil and/or marking pen;
- Masking tape to protect the wooden body from oily/graphity fingerprints;
- Caliper (vernier, dial or digital) and/or divider for measuring and comparing;
- Various chisels (e.g. 3mm, 6mm, 9mm usunomi paring chisels). Although it may seem strange, wider chisels are typically not necessary for this task.
- Metal file (to be modified) or a 15~18mm wide chisel (to be modified).

Regarding the modified file or chisel listed above, this is a push scraper, a truly ancient tool once commonly used for precision metalwork. Your humble servant uses it to shave the bed to fit the blade. You can make this tool as wide as you wish, but please note that if the blade of either file or chisel is too wide, your shaving efforts may not produce smooth results.
You can easily make this scraping tool from a chisel or an old file by grinding a flat on the end of the file or cutting edge of the chisel square to the centerline of the blade and at an 80~90˚bevel angle. Then hone this square cutting edge and at least one of the two adjoining surfaces to 1000 grit. Voila.
If you adapt a file to make this tool you will want to attach a handle to its tang to avoid getting red sticky stuff on your pretty wood.
If you prefer to use a regular chisel, that’s OK too, but you will find this scraper does a cleaner job with less effort.
Blade Preparation
This explanation assumes the blade is sharp and the ura is in good shape. If not, please sharpen the blade because it will of course affect the fit of blade to body.
While you are at it, check that the side edges of the blade are free of burrs or rough grinder marks which might abrade the grooves after some use. Some grinder marks may be unavoidable, but if the sides feel rough and abrasive to the back of your hand, smooth the edges a little using a sander and/or sharpening stones.
In addition, please make sure the right and left clipped corners of the blade’s cutting edge, called “ears,” are properly trimmed, meaning that they are ground large enough to reduce the width of the sharp cutting edge so the cutting edge fills the width of the plane’s mouth but does not extend into the grooves, because if it does get into the grooves, shavings will become jammed between the blade and groove wasting your energy and leaving nasty scuff marks and sometimes even tracks on the planed surface. それは困る.
When sharpening a plane blade, therefore, it is important to check and trim these ears periodically. A few passes on a diamond plate or rough stone will do the job; It doesn’t need to be pretty, and the ears don’t need to be sharpened because they will never touch the surfaces to be planed.

Checking & Tuning the Mouth
Beloved Customers won’t need to worry about this, but Gentle Readers fettling plane bodies made by themselves or others should be careful the first time they adjust the blade’s cutting edge to project through the mouth to ensure there is adequate clearance because if the mouth isn’t wide enough to allow the cutting edge to pass through cleanly with a little clearance to spare, the blade may chip out the sole.
If there is any question about the adequacy of your plane’s mouth/blade clearance, the first time you extend the blade through the mouth press the plane sole-down on a piece of clean wood while tapping the head of the blade with your mallet to make a zero clearance cut at the mouth. The supporting board will prevent the mouth from chipping. This is also standard practice when opening the mouth of a new plane body.
Hold the plane up to a light and peer through the mouth to observe the gap between cutting edge and body. The width of this gap must be greater than zero, and it should be constant the full width of the blade, but how wide it needs to be will depend on the thickness of the shaving you intend to cut.
Ugly tear-out can be minimized and the polish of the planed surface increased by having a tight mouth. Indeed, the tightness of the mouth and the area of the sole directly in front of the mouth applying uniform pressure on the wooden surface being planed up to the last .001 millimeter in front of the mouth is critical for exceptionally fine tearout-free cuts. On the other hand a mouth gap that is too narrow to pass the intended thickness of shaving will jamb every time, so the user must balance the width of the mouth, the desired shaving thickness, and blade projection to obtain good results.
Here is wisdom: allowing shavings to repeatedly become tightly jammed in the mouth is not only hard on the blade, but it will damage the mouth, so before this happens too many times, you want to either adjust the mouth or your expectations for shaving thickness.
To open up or adjust the mouth, cut a hardwood guide block to use with a chisel to pare the mouth opening, and clamp it to the sole. The angle of the block will vary with the angle of the blade.
Then, using an exceptionally sharp paring chisel and this guide block, take minute shavings at the mouth using skewed strokes. A paring chisel with a three-hollow mitsuura ura is ideal for this task, but any sharp chisel with a longish blade will do the job.
Body Protection
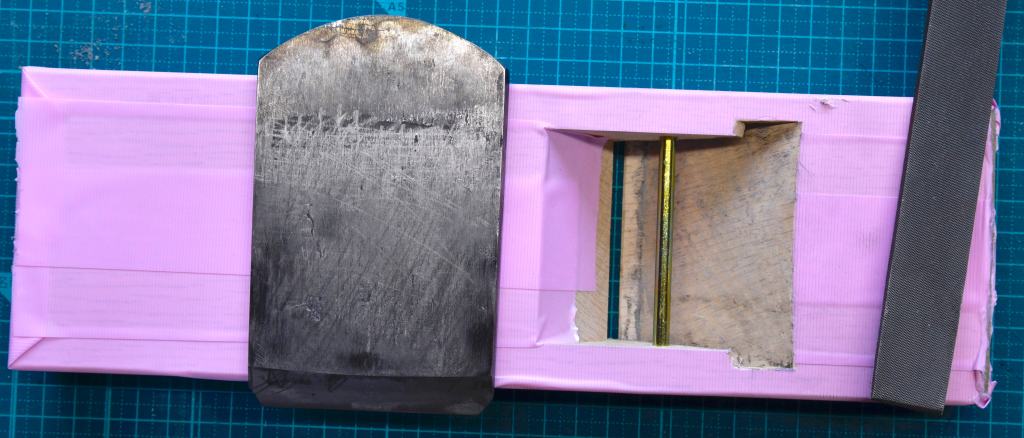
This process will involve graphite pencils, marking pen ink and fingers, so to keep the wooden body from looking dirty, please cover the top and sides with a low-tack masking tape. In this example, I used a pretty pink tape.
Adjusting the Blade to the Mouth
As mentioned above, the blade fits into and is clamped in-place in the wooden body by the two tapered grooves cut into the body. Sometimes the fit between the side edges of the blade and the bottom of these grooves is too tight. This can occur in a new plane if the body was improperly cut to begin with, but the most common cause is shrinkage of the body due to humidity changes.
Of course, the wooden body will change dimensions with changes in ambient humidity, while the blade won’t. If a plane is shipped from a highly humid climate like Japan (at some times of the year) to a dry climate like the Mojave Desert (all times of the year), for example, the body may shrink in width developing tremendous pressure on the side edges of the blade, sometimes enough to crack or split the body. Therefore, if you are located in a dry climate and acquire a plane from a wetter climate, it may be wise to remove the blade and let the body acclimatize for a week or so.
As mentioned above, the blade is tapered in width, being wider at the head and narrowest near the cutting edge. This is intentional. Ideally, you want the side edges of the blade to just kiss the bottom of the grooves where they exit the top surface of the body, and not touch the bottom of the grooves anywhere else. This type of fit will make it easy to make minute right or left adjustments to the cutting edge’s projection by tapping the shoulders of the blade right or left.
Obviously (and this is an important point to understand), if both of the blade’s side edges are in close contact with the bottom of the grooves their full-length, this important method of adjustment will be no bueno.
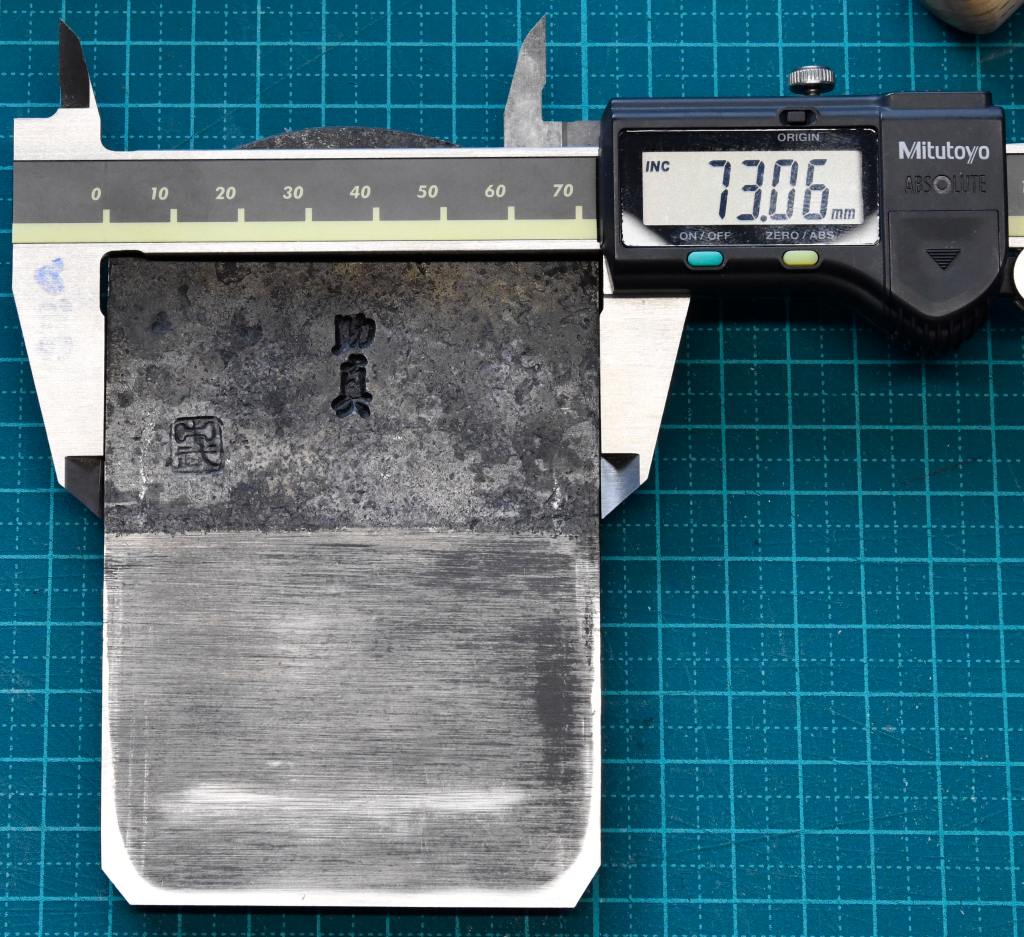

Use your vernier, dial or digital caliper or mechanical divider to check that the blade does indeed become narrower in width from the point where it exits the grooves at the top surface of the body and the point where the cutting bevel begins. If it doesn’t, you will need to grind in some taper. How much? Mr. Nakano’s blades typically taper the amounts shown in the photos above, but they are handmade and each one is little different.

In any case, please ensure the body provides adequate clearance to just accommodate the blade’s width. Mark-1 Eyeball is often good enough for this task, but a divider is better and a caliper is ideal for this task.
Make a final check by applying marking pen ink to the sides of the blade 1cm down from where the blade would normally exit the grooves at the top surface of the body. More ink is not necessary.
If some paring of the grooves is necessary to provide adequate clearance, please remove no more wood than is absolutely necessary.
Remember that we want just a little clearance between the blade’s sides and the top of the grooves, as shown in the photos above, and more clearance at the bottom of the grooves to make it easy to adjust the blade’s projection from the mouth.
Groove Maintenance
A common problem we see with old planes is cracked and split bodies caused by the tapered blade becoming shorter over the years due to repeated sharpenings, and therefore the edges of the blade exerting excessive pressure on the bottom of the grooves when a careless user mercilessly pounds the blade into the body. This sort of damage is entirely avoidable by humans, but some gorillas advocate paring the bottom of the grooves of new planes to create a gap of 2~2.5mm between the groove and blade to accommodate all the reduction in length the blade may experience over many years of service at once. To this practice, your most humble and obedient servant can only respond “Poppycock!”
Why do I object to what seems to be a logical solution? Glad you asked.
If you chisel out a big gap between the side edges of the blade and bottom of the groove, not only will you unnecessarily weaken the body by severing continuous wood fibers at the narrowest, weakest, most critical point of the body (think about it real frikin hard), but the pivoting action required to adjust the blade’s projection right and left by tapping the head right and left will become more difficult, while at the same time the blade will become less stable in the body.
I write this based on bitter experience obtained from following bad advice received before I knew better, and later being mocked by more experienced craftsmen who noticed my silly error. An embarrassing episode indeed, one I was ashamed of for many years.
Beloved Customers will of course have purchased a high-quality plane from C&S Tools, with a blade hand-forged by Mr. Nakano Takeo and a Japanese White Oak body cut by Mr. Inomoto Isao, but just in case you are working on a lower-grade tool, here are some things you need to check.
The way to avoid body damage due to shrinkage of body or increase in blade width blade is simple: (1) Pay attention to the fit of the blade in the grooves; (2) Adjust the clearance when appropriate by either shaving the bottom of the blade retention grooves or grinding the blade’s side edges, and; (3) Avoid excessive use of recreational mushrooms which may dull the senses and cause chronic tool neglect.
In other words, when you notice the blade becoming tight in the grooves, simply grind/hone the blade a little narrower, or pare the bottom of the grooves a nat’s mustache hair deeper. Don’t get carried away because a little contact is a good thing!
Our 6mm and 3mm usunomi paring chisels are ideal for this job. but standard oiirenomi chisels can accomplish the task too.
Beloved Customer has the choice of learning from your humble servant’s stupid mistakes or from your own. Of course, I suppose there’s always the default option too many lost and wandering souls select through default of neglecting to learn anything at all…
Fitting the Bed to the Blade’s Back
Assuming Beloved Customer has completed the checks and adjustments in the previous sections, the general steps for fitting the bed to the blade are as follows:
- Begin by rubbing the back of the blade from where the cutting bevel begins to the end of the steel lamination with your carpenter’s pencil giving it a light coat of graphite. Marking pen ink or Dykem works too.
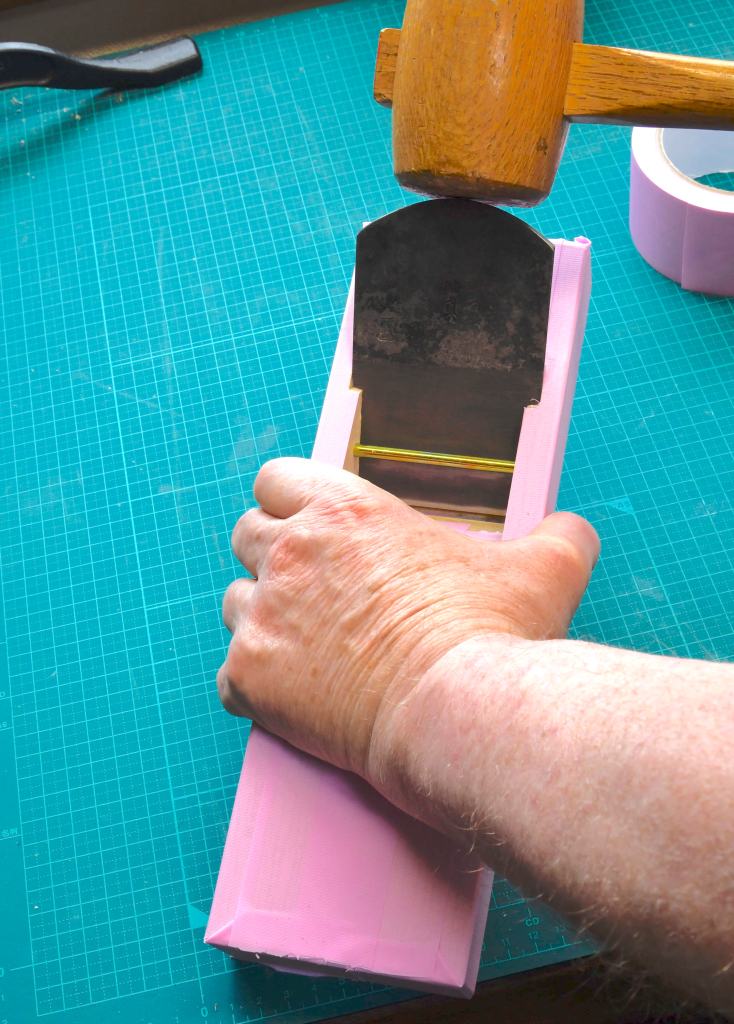
- Insert the blade into the grooves and tap it with your wood, plastic or rawhide metal mallet (egads, not a metal hammer!) until the cutting edge is nearly projecting from the mouth. You may need to really wack the blade hard 5~10 times to accomplish this the first time.
- Next remove the blade by holding the plane in your hand and alternating strikes on the right and left sides of the chamfer on the body behind the blade’s head. Don’t strike the flat end of the body! The blade should wiggle out after some less-than-gentle persuasion. If your plane doesn’t already have a pretty 6~8mm wide chamfer cut on this edge, please make one.
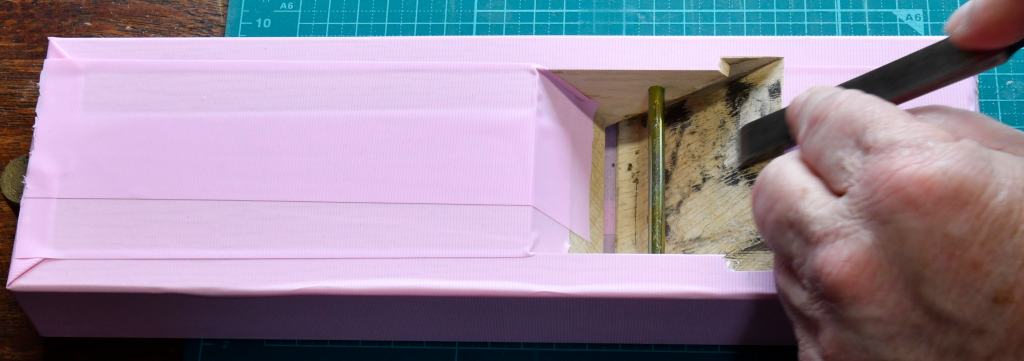
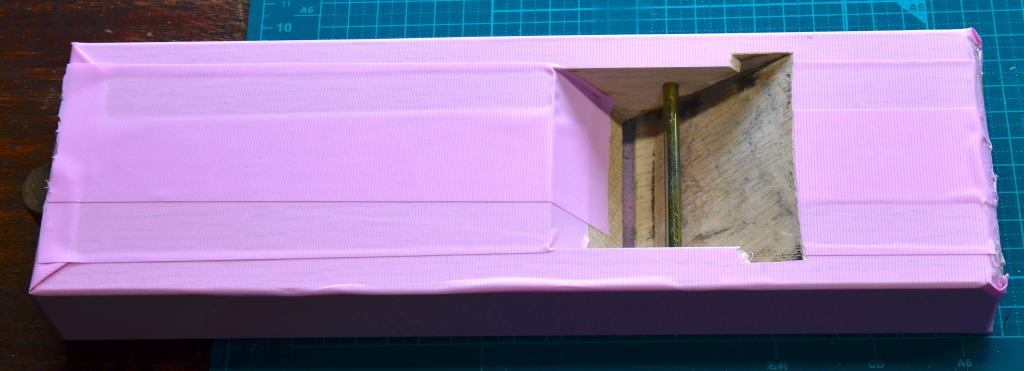
- Examine the bed. You will notice how areas in contact with the blade are now marked with graphite. We need to pare or scrape down these contact points to achieve a more uniform contact. Don’t fiddle with the grooves yet.
- Use your chisel or scraper tool to carefully shave down the high spots marked with graphite. Cut/scrape only those areas marked with graphite. Before you begin making sawdust, however, please be careful to not remove any wood from any of the three surfaces inside each side groove (blade retention groove) for now. You need to sneak up on the final shape of the bed like a kitten stalking a grasshopper, with eyes wide open, gently and a little bit at a time. Be careful not to twitch your tail! It would be a serious mistake to try to make a perfect fit after only a few passes.
- Repeat steps 2~5. You may need to do this kitten stalk 10 times to get it right. You won’t need to apply more graphite each time, just rub the back with a piece of cloth to redistribute the graphite. Or you can use your carpenter’s pencil again. With each iteration, the graphite marks left on the bed will increase in number and become larger. You want to be able to seat the plane blade with only three or four medium strikes with your mallet, and make fine adjustments with just a few more. At no time should your plane squeal a complaint.
- When the blade can be easily seated with 3 or four medium wacks of your mallet, use a metal file to lightly smooth out the rest of the bed. Perfection is neither attainable nor should it be sought.


The Peppermint Twist
Now that the bed is fitted to the blade, we need to return our attention to the grooves.
If one groove is pinching the blade significantly more than the other, the blade will want to twist out of alignment. This can be very irritating.
The surfaces inside the grooves touching the ura and back of the blade should be clean and straight. In any case, unless it causes a serious performance problem, it’s best to leave these surfaces alone for a while because after inserting and removing the blade several times the fit may improve automatically.
If the blade continues to twist out of alignment, however, determine where the high points are on the surface of the groove touching the blade’s ura. You can do this by peering into and through the mouth while shining a light into the groove.
Once you have identified the high spot(s) glue a piece of fine sandpaper to a thin stick of wood and sand it down a little bit at a time between inserting and removing the blade frequently to check the fit.
Don’t sand down the surface inside the groove which contacts the blade’s back unless absolutely necessary because this will effectively open up the mouth, something we want to avoid for as long as possible.
With this, your plane’s hard, sharp blade and soft wooden body should fit together like hand in glove. It may sound like a lot of work, but it usually isn’t. In fact, besides prepping the blade, the whole process can usually be completed in less time than it takes to read about it.
So far in this series your humble servant has provided a lot more detail and explanation than I have ever seen in writing elsewhere. It took me many years of fumbling in the dark, much consultation with older, more experienced craftsmen, no few curses and ungentle slaps to the back of the head, and numerous expensive mistakes to learn these things. I hope Beloved Customer profits from them.
In the next post in this ongoing adventure towards the perfect Japanese handplane we will shift our attention to marrying the chipbreaker (uragane 裏金) to the blade.
Y’all come back now, y’hear.
YMHOS

If you have questions or would like to learn more about our tools, please click the “Pricelist” link here or at the top of the page and use the “Contact Us” form located immediately below.
Please share your insights and comments with everyone in the form located further below labeled “Leave a Reply.” We aren’t evil Google, fascist facebook, or thuggish Twitter and so won’t sell, share, or profitably “misplace” your information. If I lie, may the ears of all my plane blades become clogged with wax.


Other Posts in the Japanese Handplane Series:
- Handplanes Part 1 : East vs. West
- Handplanes Part 2: Blade Adjustment
- Handplanes Part 3: The Blade
- Handplanes Part 4: Fitting Blade and Body
- Handplanes Part 5: The Chipbreaker
- Handplanes Part 6: Setting-up and Maintaining the Sole
- Handplanes Part 7: Bedding the Blade – Correcting Some Common Misunderstandings
- Handplanes Part 8: Operator’s Manual

Please Leave a Reply