

I warn you, if you bore me, I shall take my revenge.
J.R.R. Tolkein
Your most humble and obedient servant has received many requests over the years for explanations about how to setup, adjust, maintain and use Japanese planes. To those of our Beloved Customers with aspirations of professional-level skills with this most ancient and essential tool it’s an important subject, one that would require a veritable mountain of electrons to properly document, an overwhelming challenge for this broken and bedraggled blog. Nevertheless in this series of articles about the Japanese handplane I will try to summarize the subject in enough generality that new guys can follow, but with enough detail that professionals may glean something useful.
In this series we will discuss how to adjust a Japanese plane so it works well, how to tune it to increase performance, how to treat the body to reduce warpage and keep it looking good, how to deal with normal wear and tear, how to periodically tap out and dress the ura during sharpening, and of course how to use a Japanese plane.
This last subject is extremely simple but one many amateur users of Japanese planes and most users overseas get wrong. It happens so frequently that I am confident the improvement in Beloved Customer’s personal performance with Japanese planes will improve dramatically from this last subject alone.
The problem with Japanese planes is that, while they are exceedingly simple tools, their appearance belies their sophistication. Dealing with these subtle details without properly understanding how they interact with each other leaves many as confused as a ball of yarn among a dozen big-eyed kittens, so to avoid having too many strands running all over the place, let’s start with the basics, namely how to adjust them. Planes that is, not kittens or balls of yarn. For purposes of this discussion, we will assume our plane is in good fettle to begin with.
Preparing the Body
Although not an issue in the case of the planes C&S Tools purveys, Beloved Customer will want to inspect their plane, and perhaps make a few modifications to the body before strenuous use.
Striking Chamfer
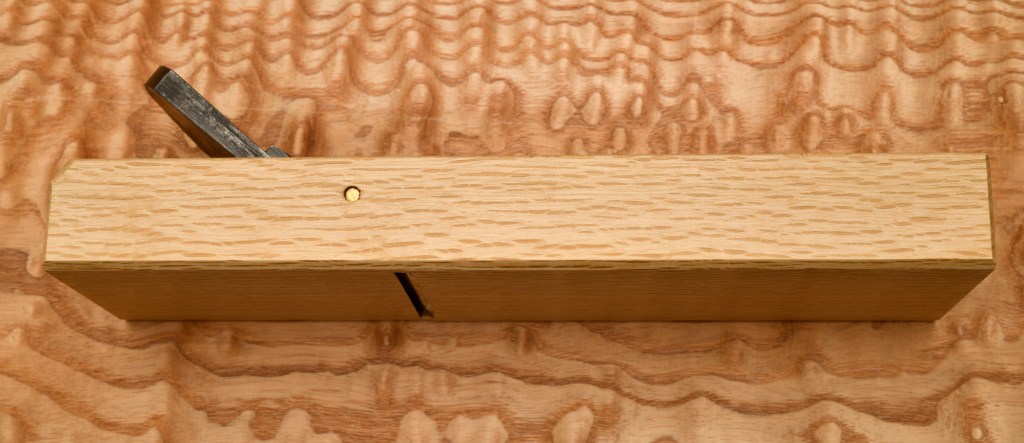
When removing the blade or reducing the cutting edge’s projection through the mouth, we need to strike the white oak body on the 90˚ intersection between the flat end of the plane’s body and its top surface. Accordingly we need to cut a chamfer at this edge to prevent damage to the body. How wide? 3~5mm is a good range. What angle? Cut the striking chamfer approximately square (90˚) to the long axis of the blade.
While you are at it, cut off the corners formed at the right and left corners of this chamfer.
This is a one-time operation.
Sole Chamfers
If your plane doesn’t already have them, you will need to cut chamfers on the two edges at the right and left sides (long direction) of your plane’s sole. These chamfers have two purposes. First, to prevent the edges of the sole from chipping. Second, to make a small gap for your fingers to grip when lifting up the plane.
As the sole wears, Beloved Customers will need to be refresh these chamfers at the sole from time to time, so further explanation is necessary.
Some people like big, wide, honkin 45˚ chamfers at these locations. Your humble servant has even seen country bumpkins cut these wide chamfers and then carve unsightly grooves resembling a shark’s grin leading from the sides of the mouth to these chamfers for shavings to escape into. Codswallop!
Why is this a problem, you ask? Because the thinnest, weakest portion of any wooden plane’s body is the sidewalls right at the mouth. This is also where most warpage originates, so please don’t weaken it more than is absolutely necessary by cutting unnecessarily-wide chamfers or smiley faces.
In addition, wood removed from the sole by cutting overly-large chamfers reduces the bearing area of wood on the surface being planed accelerating wear on the sole. Keep these chamfers narrow at 2~4mm and a max angle measured from the sole of 25~29˚ More than this is unnecessary and possibly harmful.
A chamfer is not necessary at the trailing end of the sole so long as you have the self control to not strike the sole with your mallet.
Do not cut a chamfer at the leading edge of the sole as it will guide sawdust and shavings between the sole and the surface you are planing. Pas bien.
Top Chamfers
Apply a small chamfer on the front and side edges of the top surface, just enough to prevent chipping. 45˚ chamfers are fine, but a roundover (bozumen 坊主面 which translates to “Priest’s edge,” probably in reference to the bald head of Buddhist priests in Japan) is a friendlier, more elegant edge treatment, IMHO. Your choice.
Hammer or Mallet
In order to use a plane of any kind, one must remove the blade to sharpen it, and then re-install the blade and adjust its projection from the body’s mouth to produce a wood shaving of the desired thickness.
Like most wooden-bodied planes, one adjusts a Japanese plane by striking it with either a hammer or mallet. To drive the blade further into the wooden body (called a “dai” 台 in Japanese) when installing the blade or when increasing the depth of cut, one taps the head of the blade down into the wooden body. Pretty straightforward. But like most things in life, there are both clever and stupid ways to get even simple jobs done. Shall we try a clever technique first?
You can use either a metallic hammer or a mallet made of wood, plastic or even rawhide to tap the blade or body (dai 台) during these operations. They all work just fine, but there are long-term consequences to this selection to consider.
In Japan a steel hammer is traditionally used by carpenters to adjust planes. Without a doubt it’s convenient and effective, but there are some serious downsides to using a steel hammer you may not realize. Those include:
- A steel hammer always mushrooms the blade’s head, without exception;
- A steel hammer always dings the blade’s pretty face when adjusting the chipbreaker, and most critically;
- After many strikes, the focused, high impact forces steel hammers impart will often crack and even split the wooden body. Ouch!
Although your humble servant believes such abuse reflects poorly on the perpetrator, a deformed and ugly blade is not a great tragedy. But there can be no doubt a split and splintered body is an expensive and time-wasting catastrophe, especially to the professional that needs his planes to keep cutting.


There are Beloved Customers who will say: “But I’ve seen Japanese craftsmen using steel hammers to adjust their planes, so it can’t be wrong.” The first part of this observation may be true, but the last bit isn’t. The undeniable truth is that steel hammers have dinged, deformed, mushroomed and made hideous many innocent blades, and cracked and splintered many sinless dai entirely unnecessarily.
Young carpenters often learn standard methods to fix the split bodies of hand-me-down planes using bolts, glue and even epoxy that after much time and effort yield results resembling some of Dr. Frankenstein’s experiments. But I assure you, not all Japanese craftsmen are so willfully wasteful and inured to the suffering of their tools.
C&S Tool’s planes don’t deserve such violent abuse, so we recommend Beloved Customers use a wooden mallet to adjust them. Without exception. A nylon, plastic or rawhide mallet with a wooden handle will work just as well.
Removing the Blade and Chipbreaker
Both the blade and chipbreaker are removed by tapping the chamfered corner of the block behind the blade with a mallet. We discussed this chamfer above.
It is of course possible to loosen the blade by tapping flat on the flat tail end of the block, but there is a risk of striking the bottom edge and deforming or even chipping the sole. Best avoided altogether.
The physics work best when the mallet impacts are applied in a vector more or less parallel with the blade’s long axis.
The chipbreaker (uragane) must be removed before the blade, but pay heed to prevent two unfortunate accidents that frequently occur during this process. The first accident is the chipbreaker jumping out of the block in an uncontrolled manner providing Murphy many yucks!
The second accident is the blade backing out of the body further/faster than the chipbreaker causing the chipbreaker to ride over the blade’s cutting edge dulling it and causing Murphy to squirt into his pants. This point is one newbies often overlook until they wonder why the pretty cutting edge they just sharpened is dinged even before they begin cutting.
How best to keep blade and chipbreaker under control? Your humble servant recommends pressing a forefinger onto the chipbreaker as shown the photo below and applying pressure upwards when removing it to encourage the chipbreaker to shift upwards ahead of the blade and in a controlled manner. Do the same on the face of the blade when its turn comes.


Once the chipbreaker is loose, remove it and go back to tapping the body to loosen the blade further. Continue to apply light pressure to the blade’s face to better monitor the blade’s movement, and to prevent it from jumping out of the body.

Adjusting the Chipbreaker (Uragane)
The chipbreaker is a recent addition to the Japanese plane. In earlier centuries, they had only a single-blade. Unlike the Western Bailey-pattern planes that incorporate the chipbreaker into the linkage necessary to adjust the blade, hiraganna planes work just fine without the chipbreaker, thankee kindly. Indeed the chipbreaker’s only role is to reduce tearout, so when tearout is not a concern, removing the chipbreaker will reduce the force necessary to motivate the plane and may even produce a smoother cut.
The chipbreaker of a new plane often needs to be fitted to the blade and body using files and stones, but that is a subject for a future article, so to keep things simple, we will assume the chipbreaker is in good shape and is happily wedded and bedded to its blade.
Gentle Reader is no doubt wondering how to adjust the chipbreaker with the large head of a mallet. The answer is to use the butt of the handle as shown in the photo below. Just hold the mallet’s handle in a fist with the head upward and bring the handle’s butt down on the chipbreaker. Easy as falling off a dog, as me dear departed father would say. The connection between the mallet’s head and handle must be quite solid, of course. These mallets are easily made.
Using this technique, your plane blades will remain beautiful for their entire lifetime, and your dai will give you many years of reliable service. And although they only have tiny mouths with just a single, shiny tooth, if you look carefully you may see their sharp little smiles.

To remove or back-out the chipbreaker, one strikes the dai as if loosening the blade, but with a finger on the chipbreaker to keep it from dragging over and perhaps dulling the blade’s cutting edge.
When adjusting the chipbreaker, sometimes the blade will shift position too, so a back and forth adjustment of blade-chipbreaker-blade is sometimes necessary.
The tighter the fit of the blade and chipbreaker in the body, the more fiddling is required, so craftsmen such as joiners, sashimonoshi and cabinetmakers that routinely make fine, precise cuts and sharpen frequently tend to prefer thinner blades that fit into the body with less force and are easier to adjust than do carpenters who perform less refined work or work in rougher conditions.
We will delve into this aspect of handplane setup in our journey spinning ass over teakettle down the rabbit hole in a future post.
Adjusting the Blade
In order to take a clean, full-width cut, the blade must project from the mouth the appropriate amount, and evenly across its width. In other words, it must project neither too far, nor too little, and one corner of the blade must not project more than the opposite corner.
It’s important to note that if the blade does not project through the mouth evenly, the shavings it cuts will be thicker on one side than the other. Why does this matter? If your aim is to hog vast quantities of wood it doesn’t matter much, but if the same poorly-adjusted plane is used to take multiple shavings on the same board, the accumulation of shavings thicker on one side will naturally make the board thinner on one edge than the other. Many have spent hours trying to flatten a board only to find their poorly-adjusted plane blade is making things worse, thereby wasting valuable wood and slowing progress. And because they don’t realize the cause of this devilish behavior, their self-confidence is ultimately damaged.
With experience, one can simply see and feel the shavings their plane makes to determine if it is making cuts of uniform thickness. But a caliper, either vernier, dial or digital, used to measure and compare the thickness of shavings at their right and left sides, can provide useful insight.
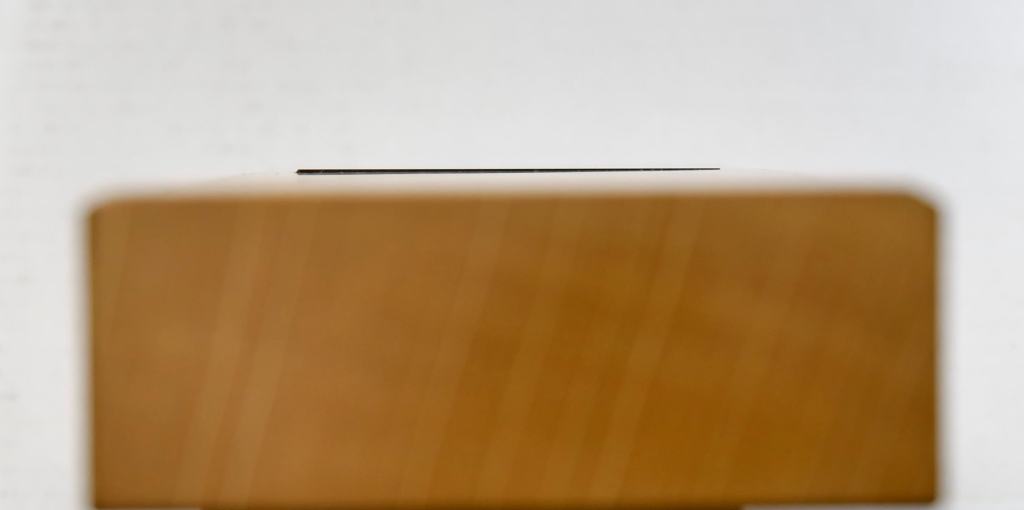
To evaluate the blade’s projection through the plane’s mouth, hold the plane upside down to a light-colored uniform background and peer along the plane’s sole. The correct projection will be a thin dark line of uniform height across the width of the sole. Assuming the plane’s sole is true, if one side of the blade is projecting more than the opposite side, the blade is either skewed in the body, or the cutting edge is shaped skewed.
If the line of the blade’s cutting edge projecting through the body’s mouth is skewed, tap the shoulder of blade to the right or left with the mallet. If, however, a few taps fail to make the projection uniform, please check the blade for a skewed cutting edge, a problem frequently resulting from lack of attention when sharpening. Don’t worry, everyone does it occasionally, but careful attention is best. If the cutting edge has become skewed through improper sharpening, it must be reshaped, not a difficult task but a wasteful pain in the tuckus.
A word of caution: Continued and heavy lateral pounding on the blade’s shoulders will not improve the situation and may damage the wooden body.
Most planes allow a little bit of wiggle room for the blade, but sometimes, especially if the body shrinks in width due to reduced ambient humidity, the bottoms of the retention grooves in the side walls of the mouth may need to be pared slightly deeper, or the blade ground narrower, to provide this right/left wiggle space. Be very careful, however, to avoid paring these grooves more than a thin shaving or two wider because, as mentioned above, removing wood at the grooves directly and irrevocably weakens the most tender point in the wooden body. We will discuss this subject in Part 4: Fitting Blade & Body.
Remember, the ideal is for the right and left sides of the blade where they exit the grooves at the top surface of the body to be in intimate contact with the bottom of the retention grooves. At the same time, some space between the grooves and the sides of the blade is necessary moving towards the sole. This is natural because a quality plane blade will intentionally be shaped narrower in width near the cutting edge than the head. Because of this clever shape, the blade will pivot in a controlled manner in the retention grooves when you tap its shoulders. If the fit in the grooves is sloppy, however, the blade will wiggle too much during this dance and seem uncooperative, because it is.


To test the projection of the blade, and ensure skew has been removed, hold a short, narrow piece of softwood such as pine or cedar in your hand and run it over the cutting edge, first on one side of the blade, then the opposite side, and finally the center, and observe the shavings (if any) produced. They will tell you the truth. Be careful not to shave your fingers unless they have become too fuzzy (ツ).
Even experienced craftsmen betimes become gutted, gobsmacked, and guragura upon discovering their otherwise perfect plane blade has become skewed and is projecting too far on one side to be adjusted for a good cut without resharpening it. Of course, the culprit is almost always pernicious pixies, but a wise Beloved Customer (inconceivable that there could be any other kind) will be careful to follow Petruchio’s example and tame the skew. And don’t forget to use a hardened stainless steel straightedge to check the blade for square when sharpening.
Striking the Body of the Plane
Your humble servant does not want to seem repetitious, but just so there is no confusion, I feel compelled to review a point or two before we end this discussion.
When backing out or removing the blade, make it a habit to strike the chamfered edge of the dai (body) behind the blade alternating between the right and left sides instead of dead-center.
Also, angle your strikes so they are more or less parallel to the long axis of the blade. With a little practice this will become second nature. The reason for this action is simply that it is both more effective and at the same time helps to keep the dai in one piece.
Please, avoid striking the flat tail-end of the plane’s body flat-on, but instead strike the chamfered top edge behind the blade. Too many people who strike the flat butt get carried away and end up damaging the sole.
If you examine your plane you will notice that there is actually very little wood holding the plane’s body together in the mouth area. Indeed the only continuous wood is at the sides, and it is only as thick as the distance between the bottom of the blade grooves and the exterior sides of the body. Not a lotta meat.
If we strike the center of the butt, the body, being relatively unsupported in this area, must flex creating stresses, sometimes enough to crack it, sometimes even enough to split it as evidenced in the photo above. This sort of damage is commonly seen, but is almost entirely avoidable because, if we strike the right and left extremes of chamfered edge behind the blade, forces will be directed through the stronger sides of the mouth opening reducing the chances of cracking and/or splitting the tail. You can feel and even hear the difference if you pay attention.
If you have money dribbling out of your ears, don’t care how nasty your plane looks, don’t mind sending the message to everyone who sees it that you are ham-handed wood butcher, and prefer replacing or fixing your planes instead of using them, by all means scrupulously disregard this suggestion, in which case you might want to get some extra bubble wrap to keep yourself entertained while the bolt and epoxy repair to your poor plane’s broken body cures.
BTW, damage to the body or blades of C&S Tool’s planes caused by the incorrect use of metal hammers will void the tool’s warranty.
Plane Storage
When you purchase a plane, the blade is already installed in the body, although the cutting edge is usually recessed inside the mouth to protect it. The first step, therefore, is to remove the blade and examine it.
If you live in a low humidity area such as Nevada, Arizona or Southern Calipornia in the USA and purchase a plane from a part of the world with high-humidity at times, such as Japan, it is wise to remove the blade and set the plane aside in the area where it will spend most of its time for a few days to let the body become acclimatized, especially if you plan to use the plane in a space with central heating and cooling which may cause the wooden body to shrink in width.
If you plan to store your plane for several years in a dry climate, or in a space with central heating and cooling, we recommend you remove the blade and chipbreaker, oil them, wrap them in aluminum foil, and store the body and blades together but without being installed in the body to prevent the blades from restraining the body’s shrinkage causing it to crack. Just to be safe.
In the next post in this adventure we will discuss how to modify a Japanese plane’s body to make it easier to use.
And please remember the wise words of the Sage of Possum Lake: “Remember I’m pullin’ for ya–we’re all in this together.“
YMHOS
If you have questions or would like to learn more about our tools, please click the “Pricelist” link here or at the top of the page and use the “Contact Us” form located immediately below.
Please share your insights and comments with everyone in the form located further below labeled “Leave a Reply.” We aren’t evil Google, fascist facebook, or thuggish Twitter and so won’t sell, share, or profitably “misplace” your information. May my plane blade be forever skewed if I lie.


Other Posts in the Japanese Handplane Series:
- Handplanes Part 1 : East vs. West
- Handplanes Part 2: Blade Adjustment
- Handplanes Part 3: The Blade
- Handplanes Part 4: Fitting Blade and Body
- Handplanes Part 5: The Chipbreaker
- Handplanes Part 6: Setting-up and Maintaining the Sole
- Handplanes Part 7: Bedding the Blade – Correcting Some Common Misunderstandings
- Handplanes Part 8: Operator’s Manual

Please Leave a Reply