

I made myself a snowball
Shel Silverstein
As perfect as could be.
I thought I’d keep it as a pet
And let it sleep with me.
I made it some pajamas
And a pillow for its head.
Then last night it ran away,
But first it wet the bed.
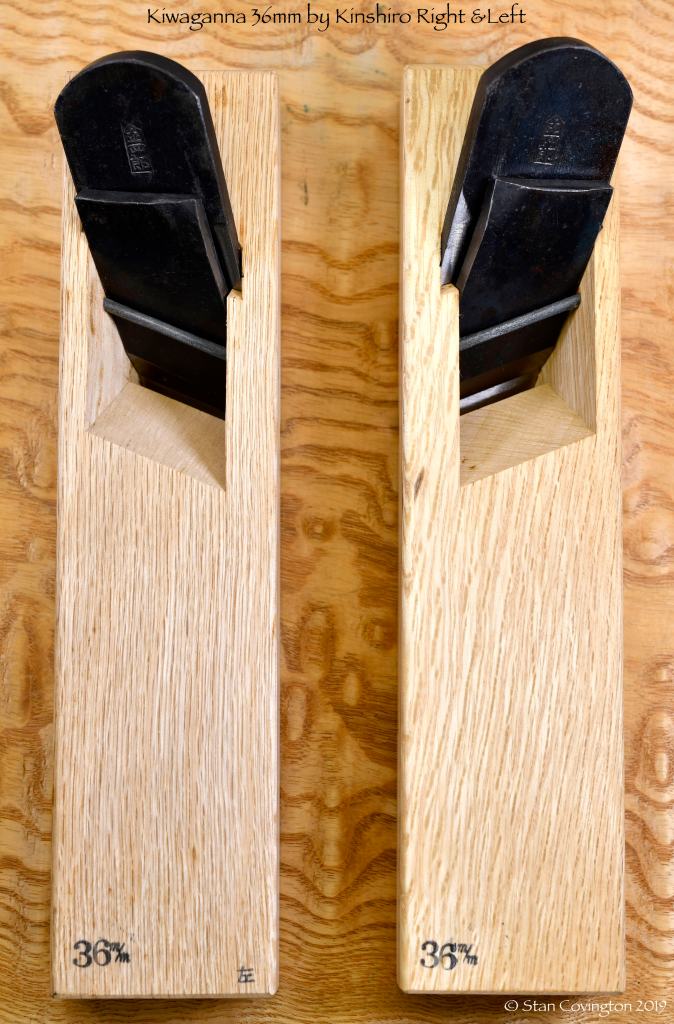
In this article your humble servant will introduce a Japanese plane called the Kiwaganna, meaning “skewed rabbet plane.”
This is an important handplane in common use in Japan, and one we sell, although it’s not well known in the West. So for the benefit our Beloved Customers, I will explain of some of the solutions learned over the years from senior Japanese craftsmen, and acquired during many decades of brutal study at the University of Stoopid, School of Hard Knocks (Lower Outhouse Campus), which may prove useful.
What is the Kiwaganna Handplane?
The Japanese Kiwaganna is written 際鉋 in Chinese characters, and pronounced kee/wha/gah/nah. “Kiwa” means “edge” or “verge,” and “ganna” means handplane.
While the design of the Japanese version of this handplane is unique, as far as your humble servant is aware many other versions exist around the globe. The Japanese version has a wooden body, a laminated blade, and is significantly lighter in weight and smaller in volume than its counterparts. It is a superior tool, IMHO, but it can be quirky.
This plane can handle a number of tasks, but it specializes in planing a straight-sided groove or rabbet right up to an edge or line with a clean 90˚ inside corner. A few common applications include planing the tongue around the perimeter of a board to make the bottom of a drawer, and raising a panel in frame and panel construction. In construction work it is frequently used to pare and clean tenons in timbers, especially those cut with circular saws which tend to leave a step, and to fit finish woodwork, among many other tasks.
This plane is of course used by joiners, cabinetmakers, sashimonoshi, and furniture makers but you would be surprised at how popular it is with carpenters and timber framers for cleaning the 90˚ inside corners of joints such as tenons.
Craftsmen who use kiwaganna typically own a two-piece set comprised of a right-hand and left-hand version to deal with tight access and changing grain direction. But the right-hand version is the most popular by far.
Advantages of the Kiwaganna Plane
In general, a skewed blade in a rabbet plane provides two benefits. The first is that the reaction forces pushing back on the blade include a vector that tends to push the plane towards the line, edge, inside corner or verge being planed to, making the plane more stable in the cut, an important factor where precision is necessary.
The second and perhaps most important benefit of the skewed blade, however, is the smoother cut and reduced tearout it makes possible, especially important when planing cross-grain.
Another benefit the skewed blade provides in the case of the Japanese kiwaganna is the point of the skewed blade penetrating the body of the plane and ending flush with the side of the body, making possible a zero-clearance cut to a line without the extra weight and cost of complicated mechanisms and reinforcing plates. It’s a deceptively simple but clever design.

Points to Keep In Mind
While a simple tool, the kiwaganna often proves frustrating to first-timers. Indeed, your humble servant struggled with kiwaganna for an embarrassing long time before I figured them out. To avoid similar damage to brain and ego, Beloved Customers that wish to become proficient in using this elegant tool will find it useful to understand and master the following nine points. The articles linked to below, while not written specifically about the kiwaganna, are nonetheless relevant and may prove helpful
1. First, a brief inspection of the body and the cuts made to receive the blade will make it clear that kiwaganna dai (body) are more fragile than that of regular hiraganna planes, so to avoid damage when adjusting the blade, please use a wooden, plastic or rawhide mallet, not a steel hammer.
2. When removing the blade, strike the dai at the approximately the same angle as the blade is inlet into the dai to reduce unnecessary stresses. This means you will hit the top corner of the dai on the side opposite where the blade’s point exits the dai. Clip off and round over this corner of the dai with a knife or chisel to prevent your mallet from chipping the dai. Be forewarned: striking the opposite corner may yield unfortunate results.
3. The first step in truing/adjusting the blade of a kiwaganna plane is to sharpen and polish the blade and uragane (chipbreaker) well, make sure they fit each other tightly without a gap near the cutting edge, and check that there is adequate and uniform clearance at the mouth so that shavings flow smoothly without clogging. The skewed nature of the blade and chipbreaker make this difficult to judge, so exercise caution. In many cases, the plane will work just fine, and maybe even better, without its uragane chipbreaker. The uragane has a bevel ground into its pointy corner. Make sure this is not touching the dai when inserted properly. Keep in mind that you will need to periodically grind this bevel down after sharpening the blade every few times or it will touch the dai creating a restriction where shavings will become jammed. When you sharpen the blade, you will also need to resharpen the uragane too to ensure they mate with each other tightly. Not every time, but once in a while. A lot of people fail to maintain the uragane and then suffer emotional anguish when their plane mysteriously stops working. Mystery solved.
4. The right and left side edges of the blade must fit the retention grooves tightly where they exit the top surface of the dai. If the fit is too loose, you will find it difficult to keep the blade aligned properly, but if the fit is too tight the blade may crack the dai during seasonal shrinkage. Older dai are usually safe, but a plane shipped from a wet Tokyo summer to a hellishly dry Arizona may experience problems. This article provides more details about fitting the body to the blade.
If it becomes necessary to shave or file the grooves in order to improve the fit of the blade in the dai, work very slowly and carefully. Color the blade’s side edges with pencil lead, marking pen ink or Dykem. Insert it into the grooves and note the areas where color has transferred from the blade. These areas areas might benefit from some minor shaving or filing. Shave these down just a tiny tiny bit with a very sharp chisel, or a metal file, then insert the blade and check for tightness and color transfer again. Repeat as necessary. Don’t create a big gap between the walls of the groove and the sides of the blade (versus face and underside of the blade which must be tightly pinched in the grooves), just make sure the width of the blade is not wedged tightly between the grooves.
5. Check that the “ear” of the blade (the chamfered corner at the cutting edge opposite the pointy corner) is ground back enough so it does not terminate inside the groove, because if it does, sure as politicians lie, shavings will become jammed. Don’t forget that, with each sharpening, the sharp portion of the blade will become a little wider and this chamfer a little smaller. If it becomes too small, shavings will become jammed between the blade and retention groove, I promise you, so please grind this chamfer back after every few sharpenings.
6. Here is wisdom: Contact between the back of the blade and the block should not be too high-pressure, otherwise the area on the sole behind the mouth may be pushed out making the plane misbehave, an extremely common problem with this plane. You want uniform pressure where possible to ensure the blade is stable, but remember that it is the grooves pinching the the upper and lower surfaces of blade that keep it in place, not pressure on its back. This is important: If you find your plane stops cutting, it may be because the portion of the dai at the sole behind the mouth is being pushed out as the blade becomes shorter/thicker. The surest way to check this is to use a notched straightedge like the 400mm Matsui Precision product we carry. If the sole behind the mouth is pushed out such that it contacts the straightedge, use a scraper or whatever to pare/shave/scrape excess material away. Indeed, a gap at this area is better than contact. As the blade becomes gradually shorter after much use, its wedging action on the dai may increase pushing the sole behind the mouth out, lifting the cutting edge away from the surface of the wood you need to plane thereby preventing it from cutting consistently, if at all, so check for proper clearance occasionally.

7. With the blade fitted to the grooves and most of the pressure relieved from its back, insert the blade. Check that it projects evenly from the mouth its full width. This is very important. If it projects further on one side than the other, resharpen/reshape the cutting edge so it projects perfectly uniformly. Uneven projection is almost always the result of the user unintentionally and gradually changing the angle of the skew over multiple sharpening sessions, and it always causes problems. Besides projecting uniformly from the mouth (when the sole directly in front of the mouth is perfectly flat), the point of the blade must penetrate the dai (body) and be flush with the outside surface of the sidewall. Heed these words: Failure to get these two subtle details right is the most common cause of failure to perform in the kiwaganna plane.
8. The mouth opening, in other words the gap between the blade and the sole of the dai where it exits the dai, must be narrow, and even in width, but not closed or skewed, otherwise shavings will jamb in the mouth, another common problem with kiwaganna. If the mouth is not even, use an adjustable steel protractor to match the angle of the blade measured from the side of the dai where the point of the blade exits. Remove the blade and mark the mouth with a sharp marking knife so the mouth is exactly the same angle as the blade. When doing this layout, be extremely careful to make the mouth opening of uniform width to match the cutting edge, but keep the mouth as narrow as possible. Use a sharp chisel to cut to this line making the mouth perfectly uniform. Insert a thin knife blade (or sharpened utility knife blade) into the mouth to shave and clean it after chiseling.
9. There is nothing wrong with leaving the sole perfectly flat instead of having the hollowed-out areas typically added to standard hiraganna planes. Just make sure it is truly perfectly flat. I have no problem with using sandpaper on float glass to true the sole of a kiwaganna, but a card scraper is a better tool for the job.

Juggling Blades
Although we addressed them above, let’s review the two critical factors you must juggle to keep a kiwaganna working well. I’m repeating these points not because I doubt Beloved Customer’s intelligence, but only because repetition improves understanding.
First, maintain the angle of the blade’s cutting edge so that it projects a uniform distance from the mouth (with the mouth/sole flat and true). To do this you must pay more attention when sharpening the blade than is normally necessary. If you get this wrong, nothing will go right.
Second, as mentioned above, to cut into the corner of the rabbet cleanly, the point of the sharpened blade must penetrate the sidewall of the dai and be perfectly flush with the sidewall but without projecting out past the sidewall when the blade is projecting the right amount from the mouth and uniformly across its width. If the skew of the blade is wrong, or the dai is warped or worn, this point will end up being either recessed inside the sidewall or projecting outside it. It needs to be flush with the sidewall. If it’s recessed, the plane can’t possibly cut a clean step in a rabbet because the step in the rabbet will push the plane away from the inside corner with each cut.
On the other hand, if the blade’s point projects out through the side wall of the plane and is not flush with it, the rabbet will be raggedy and a 90˚ inside corner will be difficult to produce. Either of these problems will eventually occur if Gentle Reader uses kiwaganna, sure as Murphy loves optimists.
If the point of the blade is not flush with the outside wall of the dai, you may need to either shave material from the side of the plane (not recommended) or grind down the side of the blade near the point, a drastic measure. This is seldom necessary, and when it is, the reason is almost always a badly warped dai.
As you can see, this is a juggling act, but so long as you focus on these two points, are careful when sharpening to maintain the proper skew angle, all the blades will remain gleefully spinning in the air as you grin from ear to ear (knock on wood).
YMHOS

If you have questions or would like to learn more about our tools, please click the “Pricelist” link here or at the top of the page and use the “Contact Us” form located immediately below.
Please share your insights and comments with everyone in the form located further below labeled “Leave a Reply.” We aren’t evil Google, fascist facebook, thuggish Twitter or a US government IT consultant and so won’t sell, share, or profitably “misplace” your information. If I lie may my kiwaganna planes all warp to resemble mushy bananas.


Relevant Articles:
- Handplanes Part 1: East vs. West
- Handplanes Part 2: Blade Adjustment
- Handplanes Part 3: The Blade
- Handplanes Part 4: Fitting Blade and Body
- Handplanes Part 5: The Chipbreaker
- Handplanes Part 6: Setting-up and Maintaining the Sole
- Handplanes Part 7: Bedding the Blade – Correcting Some Common Misunderstandings
- Handplanes Part 8: Operator’s Manual
- The Kiwaganna Skewed Rabbet Plane

Please Leave a Reply