Never discourage anyone who continually makes progress, no matter how slow. – Plato
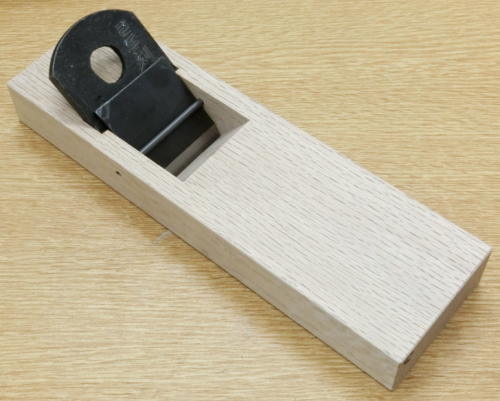
In this article your humble servant would like to introduce a Japanese version of a most mundane tool, one especially useful to the woodworker: the Little Turtle scrub brush.
Your slovenly servant is not a neat freak, nor do I have a cleaning fetish, much as my long-suffering mother tried to stop me eating leftover dog food off the floor as a toddler. But there is one area of human endeavor where maintaining cleanliness in an otherwise dirty world is important to me, namely sharpening woodworking tools.
This is the story of a lowly brush, not a tool we typically sell at C&S Tools, but one we often provide as a service to Beloved Customers who purchase sharpening products from us. I don’t believe it can be purchased outside Japan, but the purpose of this article is to help Beloved Customer better understand an indispensible accoutrement for sharpening your woodworking tools. So with your kind indulgence I’ll try to present this subject in a sanitary manner.
Why a Scrub Brush?
As described in our previously published series about sharpening, a basic, effective set of stones for sharpening chisels and plane blades should include a rough stone or diamond stone of 400~800 grit, a medium stone 1000~2000 grit, and a finish stone 6,000~8,000 grit. The list can be found at this link.
A nagura stone is also extremely useful IMO for cleaning and flattening sharpening stones and reducing the time required to get them operating effectively.
As mentioned above, these stones are almost always used in series, with the nagura dressing them all.
A couple of extremely common problems we face when sharpening is dust and other hard particles, many of which are airborne, contaminating our precious stones and reducing their effective grit. For instance, an 8,000 grit stone contaminated with a bit of silica-based dust will be unable to produce scratches finer than, let’s say, a 1,000 grit stone, resulting in poor results, wasted time, money and steel, and dashed expectations. I’ve written on this subject elsewhere. Link
There are few tools mankind uses that are routinely made as sharp or sharpened as often as high-quality woodworking tools, a process that, when done efficiently requires 2-4 sharpening stones to accomplish, usually used in series. And high-quality sharpening stones, be they synthetic or natural, are pricey, so the wise woodworker who needs excellent results will seek maximum performance at minimum cost and time expenditure.
How do we prevent nature from effectively turning our expensive stones to bricks? Four ways.
First, when not in use keep stones covered to reduce the dirt and dust that falls on them. Wrapping them in a clean rags or clean, ordinary newspaper works fine. I like newspaper best.
Second, before using a stone and/or nagura, scrub its faces, sides and ends with a clean bristle brush and rinse to remove contaminating grit.
Third, before using your fine-grit stones, especially if there is any doubt about their being free of embedded contaminants, work their faces with a nagura stone to dig out contaminants, then rinse off the mud produced along with any contaminants thus exorcised with clean water.
Fourth, before sharpening, use a brush and clean water to remove dust and grit from the tools that will spend time frolicking on the stones.
And finally, during sharpening use a dedicated source of absolutely clean, chlorine-free water to wash tools and stones and to re-wet them. What’s wrong with tap water? Depends. I use distilled water to eliminate chlorine with a bit of borax powder added to adjust the PH to reduce the potential for corrosion. In my workshop I store this water in a plastic laboratory wash bottle with a bent tube. In the field I carry a smaller volume in a plastic mustard or ketchup bottle. Whatever floats your boat, as the saying goes.
So exactly why do I say you need a scrub brush in your sharpening kit? Because if they do their job, the bristles of a quality brush are more effective at digging dirt and contaminating grit out of sharpening stones and the nooks and crannies of plane blades and chisels than any other tool including water faucets, hoses, chemical sprays, micro-fiber cloths or even kitten tongues (シ). Or did you imagine a simple wash in water or a wipe with a wet rag had stripped away all those nasty particles away just because you didn’t notice them anymore? Please restrict your optimism to reasonable limits.
The Scrub Brush
This is the smallest of the kamenoko brushes. A handy size for a field sharpening kit.
But isn’t one scrub brush much the same as any other? Nay, Beloved Customer, nay.
In the case of sharpening stones, we need to thoroughly clean our stones and tools without transferring contaminating dirt and grit from one stone to the next. I have found that the hard grit of sharpening stones becomes permanently embedded in the plastic and nylon bristles of every such brush I have examined, and even if I thought I had cleaned the brush thoroughly, hard grit particles remained and were transferred to the next stone by the brush.
How to avoid this? The solution is simply to avoid scrub brushes with nylon or plastic bristles. In my experience natural bristle brushes, and especially the Kamenoko (Little Turtle) brand brushes, simply last much longer than plastic and nylon bristle brushes, are more easily cleaned of sharpening stone grit, and tend to transfer less of it from one sharpening stone to another. These three points are the crux of this article.
Japanese tawashi brushes are made from the fibers of coconut husks. As Beloved Customer is no doubt aware, in his eternal wisdom the design team the Good Lord assigned to coconut palms provided them fibrous husks to protect and float their seeds long distances over wide, soggy oceans for years at a time. To accomplish this Homeric feat, the fibers of these husks are caused to grow tough but resilient and resistant to degradation from long-term exposure to water, microbes and even detergents.
It’s a traditional product that’s been around a long time in Japan with one company producing them for over 100 years. Here’s a video of tawashi brushes being made in Japan, and another video of production in Sri Lanka.
These brushes are also good for cleaning dirty, greasy hands, scrubbing pots and pans, cleaning car tires and wheels, and getting mud off boots with very little scratching.
If they have one downside, it’s that, being made of natural and recyclable fibers, and despite not becoming mushy when wetted for long periods of time and drying quicker than plastic brushes, they still take a bit of time time to dry and can develop mold if neglected. There’s a stainless steel wire binding the fibers together with a loop on one end that can used with a string to hang them for drying. Problem solved.
I’ve been using one Kamenoko Tawashi brush for cleaning tools and sharpening stones for over 20 years. I don’t say they’ll last that many years in the kitchen or garage, but they still last 5 times longer than plastic or nylon brushes and are therefore much more cost effective.
Most importantly, they help me keep my stones cleaner and ensure they sharpen to spec.
YMHOS
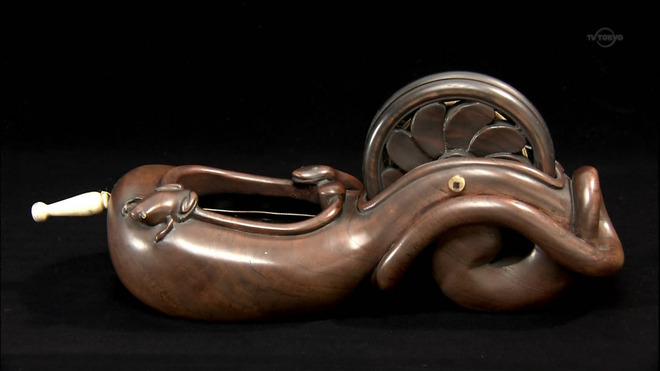
A museum-quality antique sumitsubo ink-pot depicting a snake hunting a frog around the ink pond. Mr. snake’s tail wraps around the wheel.
If you have questions or would like to learn more about our tools, please click the “Pricelist” link here or at the top of the page and use the “Contact Us” form located immediately below.
Please share your insights and comments with everyone in the form located further below labeled “Leave a Reply.” We aren’t evil Google, fascist Facebook, or thuggish Twitter and so won’t sell, share, or profitably “misplace” your information. If I lie may all my little turtles sunbathe on the freeway.
Envy was once considered to be one of the seven deadly sins before it became one of the most admired virtues under its new name, ‘social justice’.
Thomas Sowell
We’ve recently received a long-awaited (and we feared long-forgotten) order of two-handed Ootsukinomi paring chisels from our blacksmith. This post is a simple show and tell.
Your humble servant has scribbled about this tool in this article in our series about the varieties of Japanese chisels
Ootsukino, pronounced oh/tsuki/noh/mee, are large, long-handled paring chisels, the equivalent to the “slick” in the US woodworking tradition, a standard tool for timber framing. It is a rare chisel nowadays, and difficult to make.
This chisel is never struck with a hammer, but is pushed two-handed to pare surfaces and joints in wood to final dimensions. The long handle provides much greater angular control and precision than a standard paring chisel, while the ability to grasp it firmly in two hands makes it possible to effectively employ the greater power of one’s back and legs.
We also carry Mr. Usui’s Sukemaru-brand ootsukinomi, but after looking for a less-expensive option for our Beloved Customers, we ordered these from our Nagamitsu blacksmith over five years ago. Soon after placing the order we despaired of them ever being completed due to the difficulty of forging and shaping them in his advanced years, and did not want to pressure him. But we were surprised to learn recently, indeed after he had retired, that he had actually made significant progress on nine 2-piece sets, lacking only sharpening and handles, and so arranged for them to be completed. At long last they have been delivered.
Yes, this variety of chisel can be procured individually, and Mr. Usui of Sukemaru fame has been kind enough to fill many special orders to meet specific requirements of our Beloved Customer. But the standard way to purchase these in Japan is a 2-piece set, one chisel in 42~54mm blade width and the other in 24mm. We had these forged in the most common 48mm and 24mm boxed sets.
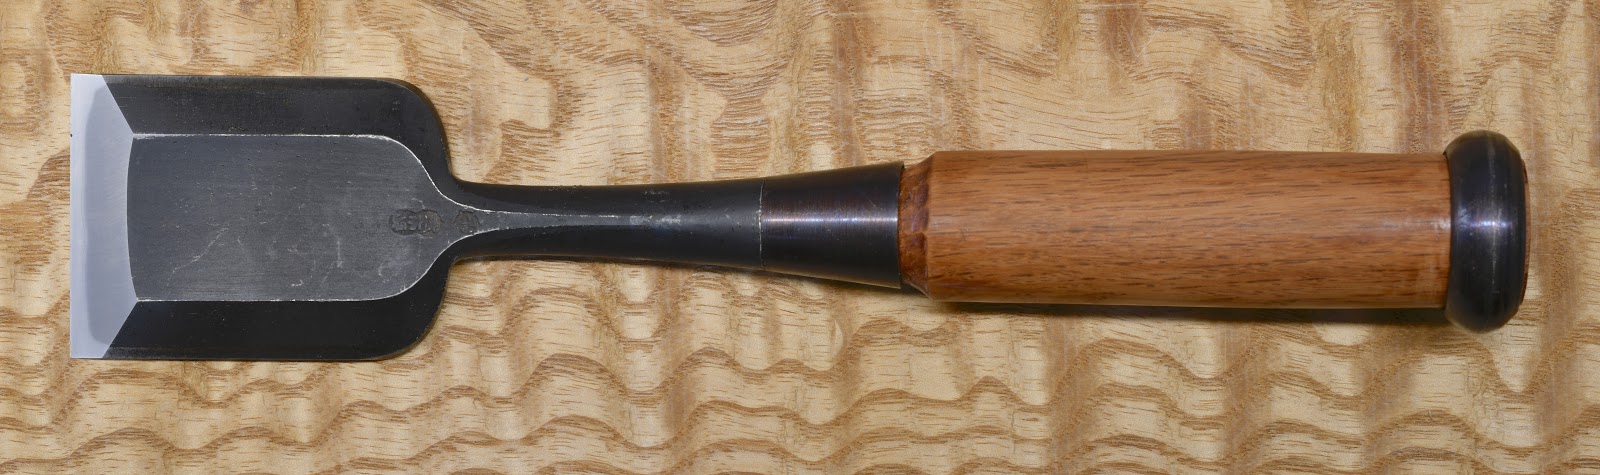
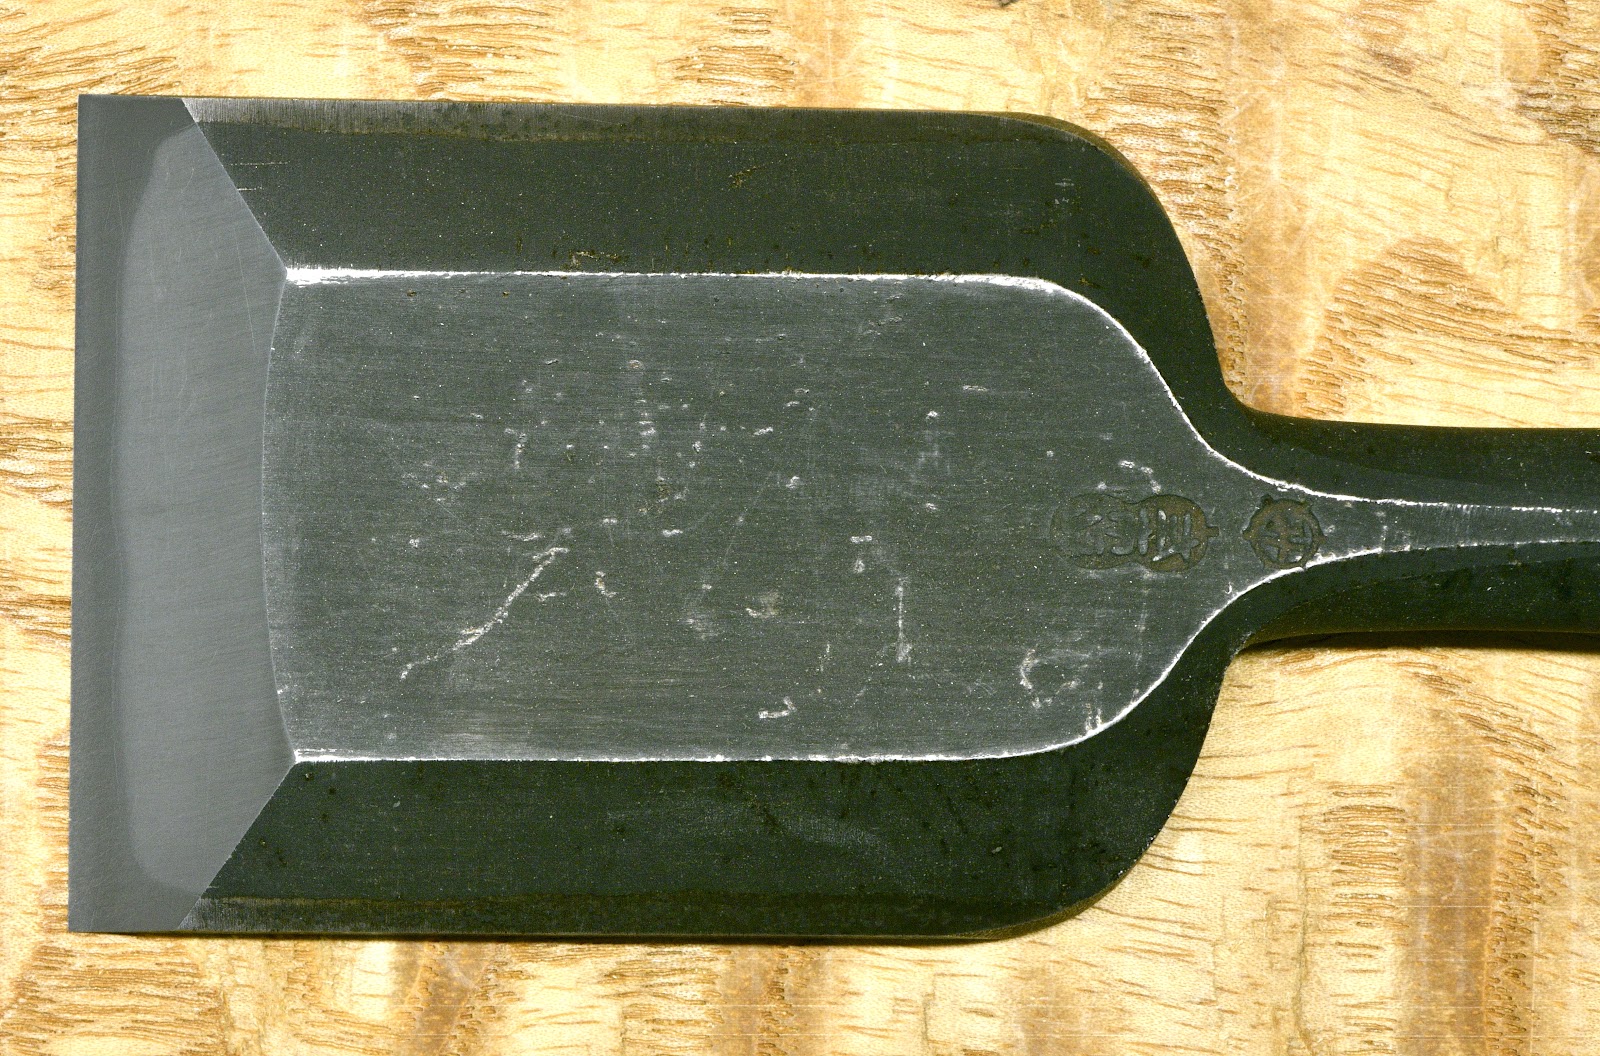
The overall length of both chisels is approximately 640mm (25-13/16″) with a 140mm (5-1/2″) long blade, 160mm (6 -19/64″) neck, and a 340mm (13-25/64″) handle made of an attractive grade of dark-red Japanese red oak. Both chisels have a standard, nicely-formed single ura with the hardened steel lamination properly wrapped up the blade’s sides for the extra toughness and rigidity essential to this tool.
A triple-ura on the 48mm chisel is a useful feature, and we have had Mr. Usui forge his chisels with this detail, but it would have added quite a bit to the cost and so is not available in this more economical brand.
The 48mm chisel is used for paring wider joint surfaces, the cheeks of tenons, and the interior side walls of mortises. It’s the standard mentori beveled-side design seen in our mentori oiirenomi, hantatakinomi and atsunomi.
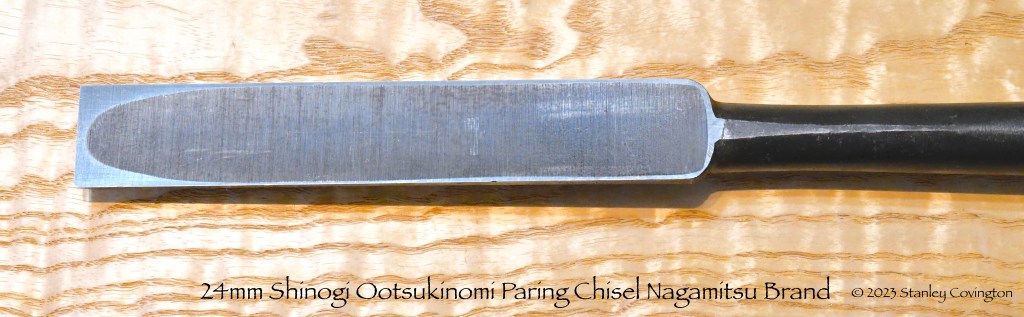
The 24mm chisel is forged in the shinogi style with a more triangular cross-section to provide clearance for the blade in tight places to pare the many dovetail joints used to attach beams, purlins and bottom-plate (土台) timbers, as well as the end walls of the many 24mm mortises commonly found in traditional timber framing work.
These are not mass-produced tools but hand-forged in Japan from beginning to end by a highly-experienced blacksmith in his one-man smithy using Hitachi Metal’s Yasugi Shirogami No.1 high-carbon steel (White Label No.1 steel), famous for its superior sharpness, ease of sharpening, and sharpness retention performance for the cutting layer, forge-laminated to a softer low-carbon steel body and neck for toughness, typical of all our Nagamitsu-brand products.
These are nicely shaped and finished, top-quality, serious chisels for serious work, but are not suited to everyone. While joiners that make large doors and panels often have a set in their workshop, most cabinetmakers and furniture makers will seldom need such large chisels. But they are one of those tools that when you need them, nothing else will do. Indeed they are indispensable for cutting precise joints in large timbers and joinery, even when those joints are hogged-out using electrical equipment.
At this reduced price, We only have a few sets looking for new masters who will feed them lots of yummy wood, so if you are interested, please contact us using the form below.
YMHOS
SONY DSC
If you have questions or would like to learn more about our tools, please click the “Pricelist” link here or at the top of the page and use the “Contact Us” form located immediately below.
Please share your insights and comments with everyone in the form located further below labeled “Leave a Reply.” We aren’t evil Google, fascist facebook, or thuggish Twitter and so won’t sell, share, or profitably “misplace” your information. If I lie may every spoonful of burgundy cherry ice cream I ever eat taste like dirty truck tires.
Very nice, Stan. I have a couple of similarly sized ootsukinomi. Besides large joinery, I find that picking one up and waving it around is useful for chasing people out of the shop. It gets their attention.
I have a question about sharpening these. I know that it is easier to remove the handle for sharpening the blade. But after a few rounds of this the handles have become too loose. I have added paper shims inside the mortise for the tang, but that seems a short term solution. Is there a better long term solution, or should I just continue to add shims?
Thanks for your comment, Gary! I have never waved an ootsukinomi at, or used one to chase away, people, politicians or even pixies (descending order of humanity), but it sounds like a fun time was had by all. Please send link to video! (ツ) An ootsukinomi with a loose handle is extremely irritating, and if it becomes loose enough for the blade to separate from the handle on it’s own at an importune time that pervert Murphy may have a wonderful time dancing naked in puddles of red sticky stuff (sorry, no video). So while I don’t recommend routinely removing the handle after the initial sharpening, I do recommend using a honing jig to help maintain the proper bevel angle on the stones. Most people use a large block of hardwood cut at an angle and inlet to fit the chisel’s face for stability. When the wood becomes worn and the angle skewampus it can be refreshed with a thin angle-cut on a table saw, or maybe a pass or two on a jointer. I suppose the commercially-available jigs like the Lie-Nielson widget (perhaps with jaw extensions?) would work too and last longer, but whatever method used, it requires more physical effort and concentration than a shorter chisel does. Looking forward to the video! Stan
Thanks, Stan. I have a little sharpening widget that fits the blades but the long handle makes using it awkwardly unbalanced. I’ll go with a shop made hardwood fixture. And I’ll work on that video.
You’re right of course about how awkward and over-balanced the handle makes the process. Two options for the block. The first is moving the block/chisel on the stationary stone, and the second is to clamp the chisel/block down and move the stone over the blade’s bevel. The latter takes gear and time to setup, but perhaps yields better results with less risk. 2 drachma.
To your humble servant from another humble servant. Let’s not argue our spiritual merits! I enclose a couple of photos of a chisel I sadly only use occasionally. I’m too ignorant to identify its origins but it feels good in the hand when working or not. You might enjoy! Yours Bruce Milburn (convictions in darkness)
I’d like your opinion on this brand of Japanese waterstone, Ikeda, which has 10 000 grit. Is it all the vendor has made it out to be? I’m thinking of switching from a strop to a 10,000 grit stone . There are several reasons why I desire to change. The most accurate response is that I’ve always been interested in higher grit stones and am eager to compare them to strops.
Thanks for your quick response. The costs for everything is too high, but it’s on special $150 down from 200. Basically, it’s down to what it was originally priced a year or so ago. On average, the 10k grit stone irrespective of the brand is priced around $150-200
A piece of hot high-carbon steel, which will become the cutting edge, has been placed on the orange-hot low-carbon steel body of a knife as part of the “forge-welding” process. An acidic flux powder has been placed in-between and on the metals in preparation for laminating them together into a single blade.
Men are like steel. When they lose their temper, they lose their worth.
Chuck Norris
While Beloved Customers are of course familiar with the features of the high-quality woodworking blades we purvey, some Gentle Readers may have little knowledge of the important details essential to Japanese woodworking tools. So in this article we will try to remedy that by examining some simple historical points common to woodworking blades around the world, as well as some details that make Japanese blades unique.
Your humble servant believes an understanding of these basic facts will aid Beloved Customer’s sharpening efforts, or will at least tickle Gentle Reader’s interest in Japanese blades. Please comment and let me know your thoughts.
Laminated Bi-Metal Construction
As discussed in previous articles in this series, before technological advances in the 1850’s, steel was difficult to make and expensive. Consequently, it was standard practice not only in Japan but everywhere, including Europe and the United States, to reduce production costs by minimizing the amount of precious steel used in producing all types of edged tools including axes, scythes, handplanes and chisels etc.. This was achieved by laminating smallish pieces of high-carbon steel to softer and much cheaper wrought-iron bodies through a process called “forge welding.” The photo at the top of this article shows the blacksmith placing the piece of high-carbon steel on the softer iron body of a blade prior to beating the hell out of it as part of the forge-welding process.
Most chisel and plane blade blacksmiths in Japan continue to employ this lamination technique even today, not because of some navel-gazing infatuation with the archaic, but because it has serious advantages.
The best Japanese plane and chisel blades are generally comprised of a layer of very hard high-carbon steel called “hagane” (鋼) in Japanese, forge-welded to a softer low-carbon/no-carbon iron body called “jigane” (地金). We discussed both of these metals in the previous two articles in the series hereand here.
Here is the key point to understand: When a blade made from a lamination of high-carbon steel and iron (or low-carbon steel) is quenched, the sudden temperature change causes the high-carbon steel layer to become hard, even brittle, while the softer low/no carbon layer is unaffected and remains soft.
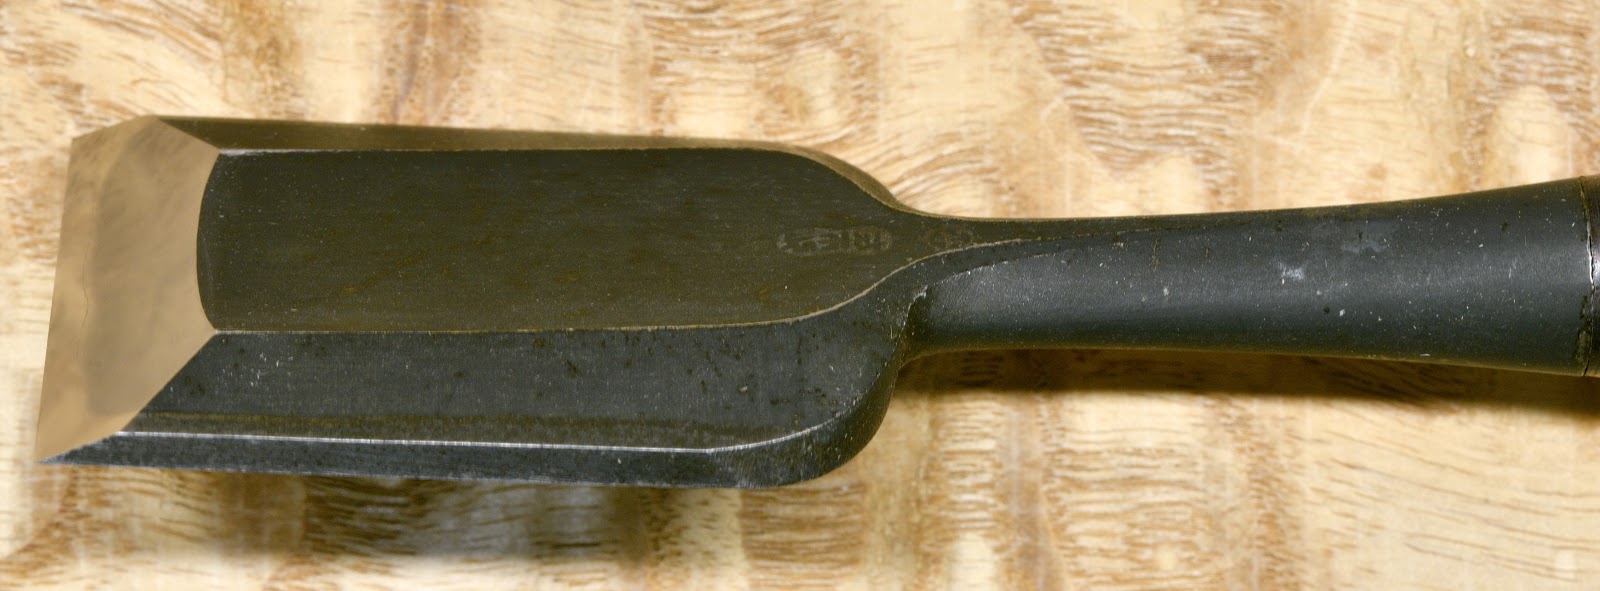
A 30mm Hidarino Ichihiro Atsunomi, approximately 12″ OAL.
Why go to so much trouble? One advantage of this construction is that it allows the cutting edge to be made much harder than is possible in the case of an non-laminated blade therefore staying sharper longer in use than can be expected of a softer blade. But why does lamination make this possible? Consider the absolute fact that a chisel blade made of uniform material heat-treated to a uniform hardness of, say, HRC65 might cut very well, and stay sharp a long time, but it will always break in use. Not just chip, but actually break in half. The softer low/no carbon jigane layer supports and protects the hard high-carbon steel layer preventing it from rupturing. Such durability is a huge advantage.
Another benefit of laminated construction is ease of sharpening. Remember, the harder a piece of steel is, and the larger its area, the more work it takes to abrade it. But in the case of a laminated blade, the amount of hard-steel exposed at the bevel the user must abrade is just the relatively thin strip of shiny metal seen in the chisel photos above and below. Please also recall that the grey low/no carbon jigane layer is relatively soft and melts away on the sharpening stones without much effort.
So the laminated construction of hard hagane to soft jigane produces a blade that is tough but at the same time hard, one that will become very sharp and stay sharp a relatively long time thereby improving work quality and productivity while at the same time needing less time, effort, and stone to sharpen.
BTW, this is not a blacksmithing technique that was discovered only in Japan. Indeed it was once standard procedure for making high-quality cutting tools worldwide, but it has been discarded and forgotten over the last 100 years almost everywhere else because it costs more to accomplish, it requires real trained blacksmiths to perform (not just factory workers), and because most consumers can’t tell the difference, fools that they are.
A relatively few, highly-skilled Japanese blacksmiths continue to employ this ancient and clearly superior technique despite the difficulty and decreased profitability, but only because their professional Japanese woodworking customers demand it. At least, that is, for a little while longer. A word to the wise.
A 42mm Hidarino Ichihiro Oiirenomi
Laminated Blades in the West
If you have examined antique plane blades with wooden bodies you may have noticed many have blades stamped ” Warranted Cast Steel”
Despite being designated “cast steel” in England and America in past centuries, unlike Conan’s Daddy’s sword, or the orc blades made in the bowels of Isengard, plane, chisel and saw blades with this mark were not “cast” by pouring molten metal into a mold to form a blade. Rather the process to make the steel involved melting iron ore in a crucible and pouring it into molds “casting” a strip, bar, or ingot of high-carbon steel which was then forged to make the blade, hence the name.
This became possible only when the technology required to reliably and fully melt steel to a more-or-less liquid state on an industrial scale was developed. Such steel was also called “Crucible Steel” after the crucible container used to melt iron ore.
This technology was widely used in the United States and Europe through the 1870’s. In fact, one steel mill is said to have been producing crucible steel until the 1960’s. Toolmanbloghas an interesting summary on cast steel.
With few exceptions, these European plane blades have a thin piece of high-carbon steel forge-welded to a soft wrought iron body, very similar to Japanese plane blades. I have reused a couple of these antique blades to make Krenovian-style planes and testify of their excellent cutting ability.
Chisels were also once made in Europe using this same lamination technique, although fewer examples remain extant.
Axes, hatchets, and many farming implements were also mass-produced up until the 1920’s in the US using a variation of this same technique with a “bit” of steel forming the cutting edge laminated to or sandwiched inside a body of low-carbon steel or wrought iron. Axes are still made this way in Japan. It’s a proven technique with a lot of advantages, but it does require a skilled blacksmith to pull off successfully, and customers that appreciate the improved performance.
The point I am trying to make is that blades made using forge-welded laminated technology were the very best available in Europe and the United States for many centuries.
Here is a link to a blog post by Paul Sellers where he praises the old chisels and laments the new.
U-Channel Construction
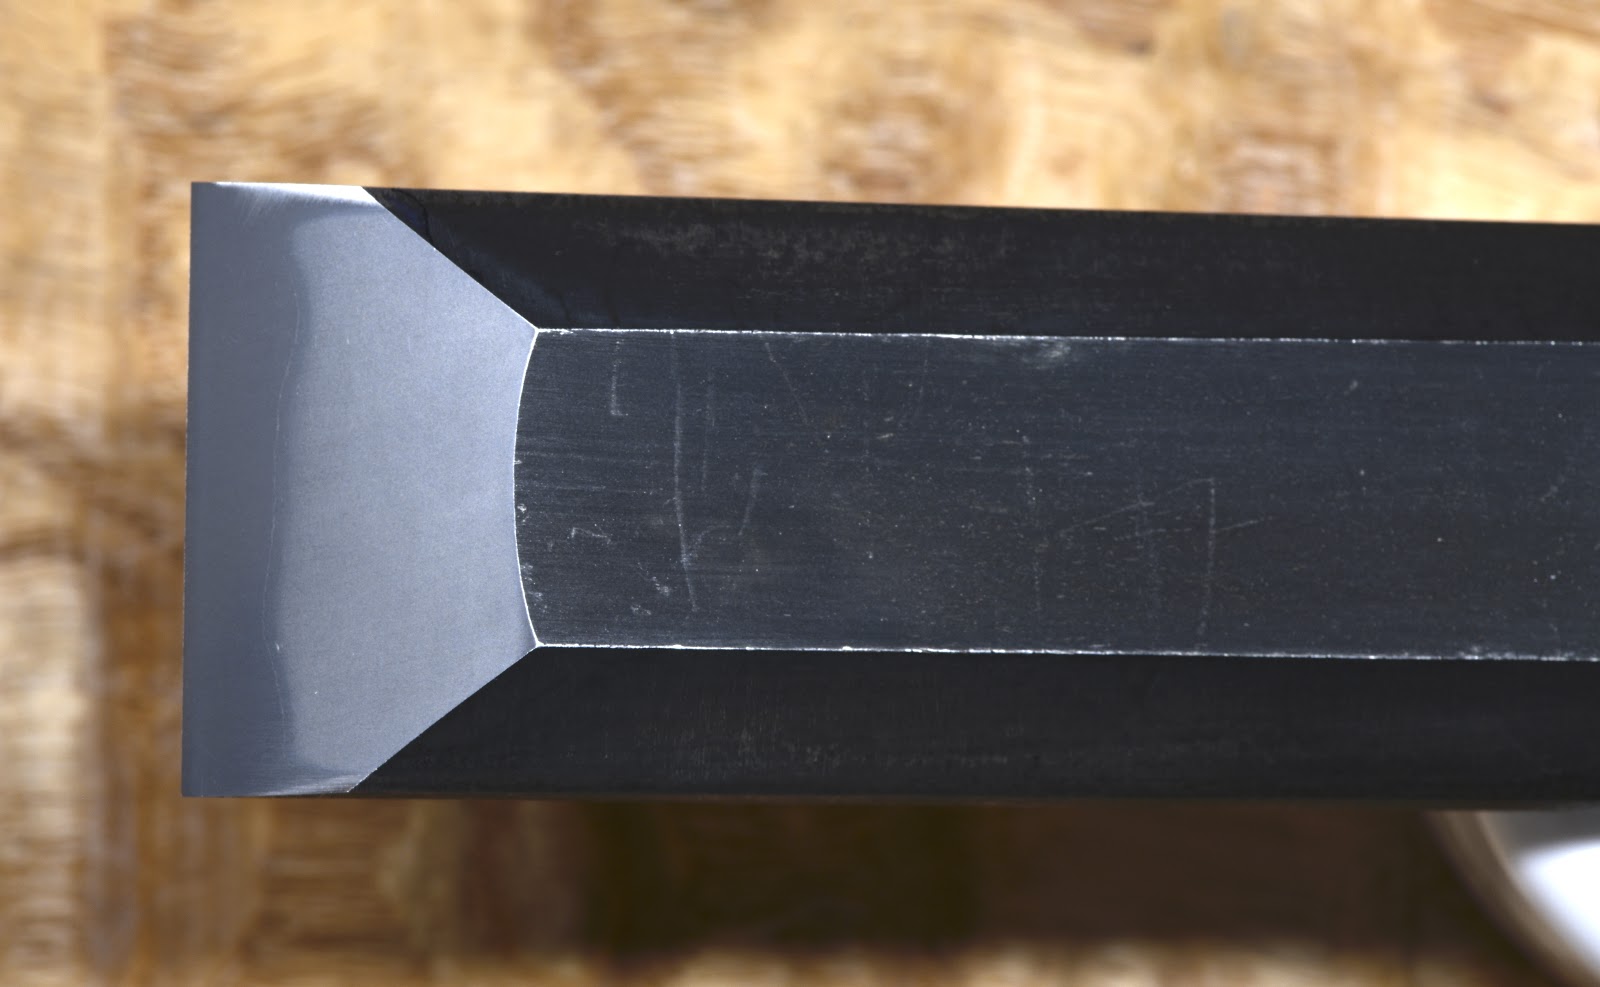
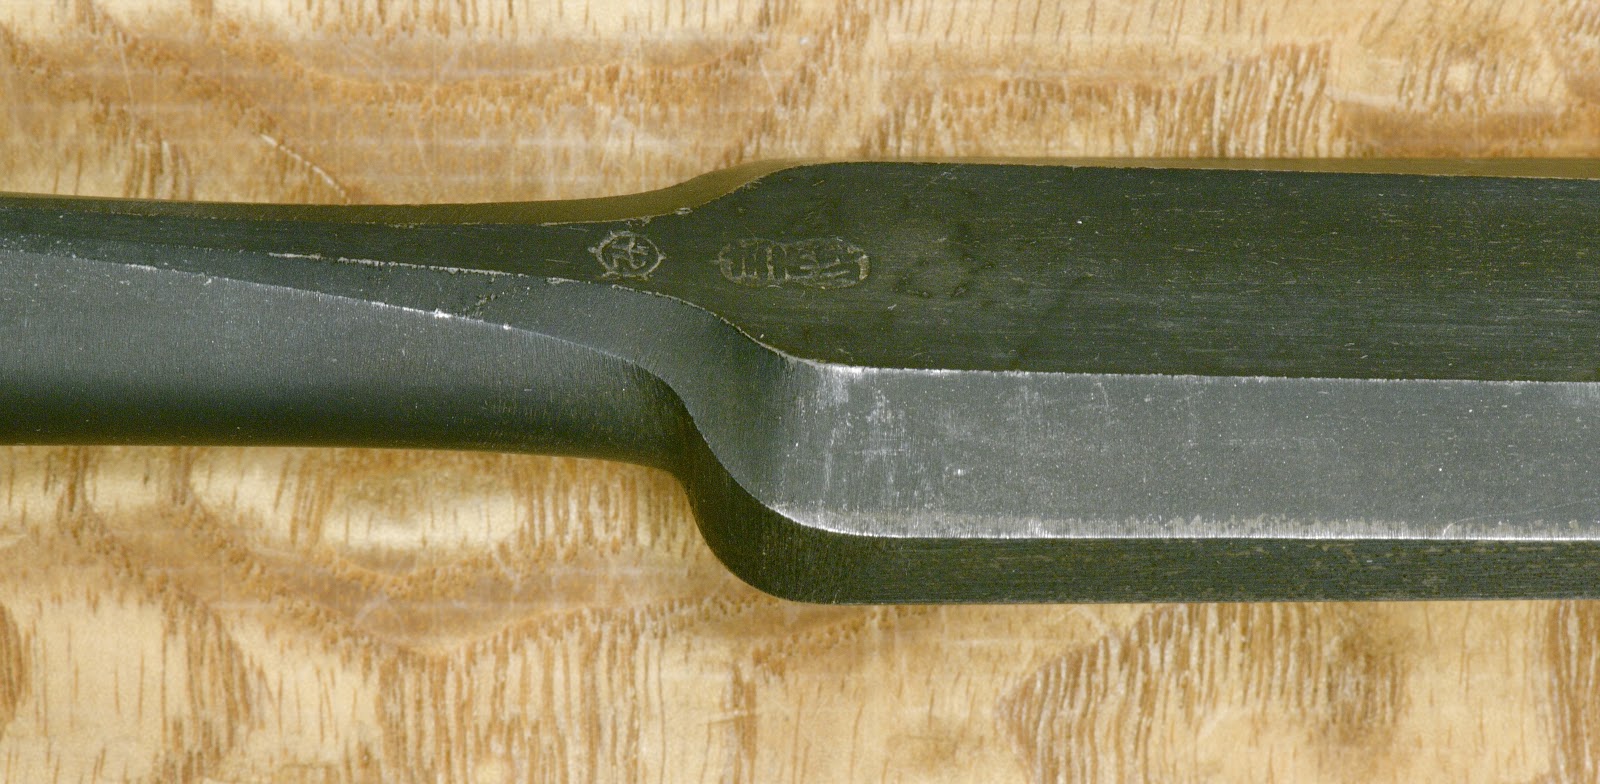
A closeup of the 42mm Hidarino Ichihiro Oiirenomi showing the lamination line between the steel cutting layer and low-carbon steel body of the bladeThe same 42mm Hidarino Ichihiro Oiirenomi. Notice the hard-steel lamination wrapped up the blade’s sides to add rigidity.A 30mm Hidarino Ichihiro Atsunomi, approximately 12″ OAL. Notice the hard steel lamination forming the cutting edge at the bevel. This is a beautiful lamination.A beautiful hand-filed (not sanded) shoulder detail typical of Yamazaki-san’s work
The shape of the hard steel cutting layer laminated to the softer low-carbon steel (or wrought iron) body of chisels was historically a simple flat plate in Western blades. This is still the case for Japanese plane blades, axes, and farming implements. But if you imagine Japanese blacksmiths would be satisfied with such a simple design for all applications, you don’t know them well.
If Beloved Customer will carefully consider the blades pictured in the four photographs above, you will notice the lighter-colored hard steel lamination wrapped up the chisel’s sides forming a “U channel” of hardened steel adding necessary rigidity and strength. This is a critical detail for Japanese chisels intended to be struck with a hammer. Interestingly, Japanese carving chisels are not typically made this way, and are consequently structurally weaker.
Plane blades are not subjected to the high loads chisels experience and so would not benefit from this structural detail.
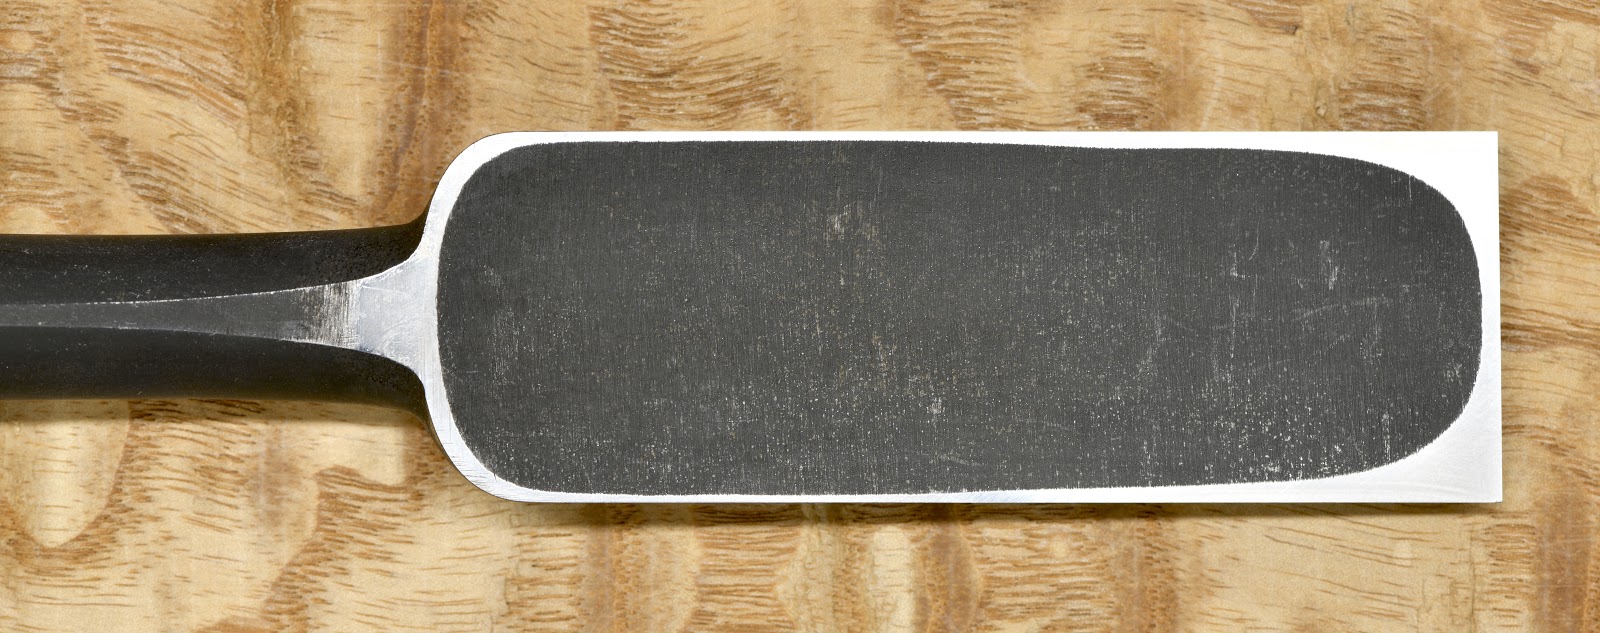
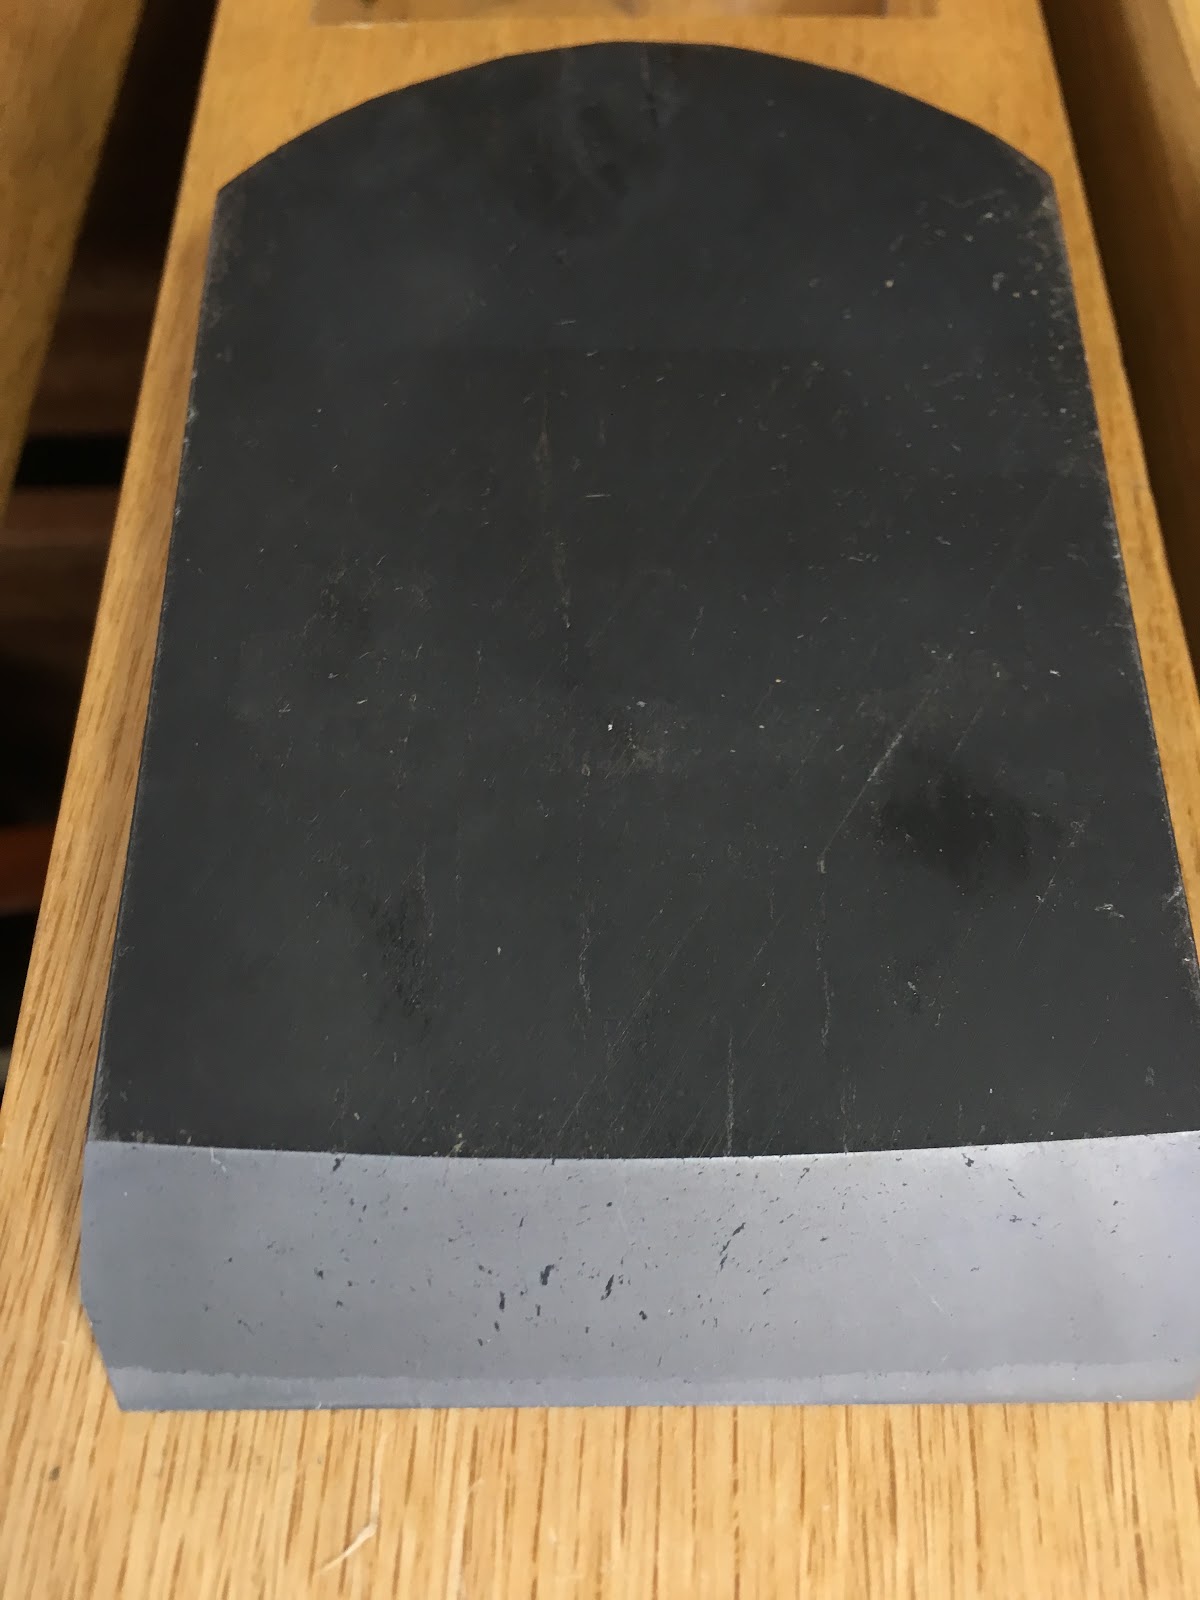
The Ura
A view of the ura face of an atsunomi chisel. Just to be clear, the entire surface, including the full width of the blade from the cutting edge to where the neck begins, is called the “ura.” The black area in the center is made of hard, high-carbon steel, but is hollow-ground forming a depressed area called the “uratsuki.” The four shiny areas at the perimeter form a single plane. I call these “lands.” The longish lands to each side of the uratsuki (located at top and bottom in this photo) are called “ashi,” meaning legs, but I will call them “side lands.” The land right up against the cutting edge is the most important of the four because it forms one-half of the cutting edge. It’s called the “itoura,” meaning “thread-land.”
Japanese chisel and plane blades, among others, typically have a hollow-ground depression called the “Ura” (pronounced “ooh/rah”) which translates to “ocean” or “bay,” located at what is called the “flat” on Western blades. Notice the polished hard steel lamination extending from the cutting edge to several millimeters up the neck. The black area encompassed by these shiny lands is the same hard metal, but it has been hollow-ground to form the swamped “uratsuki.”
This clever and effective design detail is unique to Japanese tools to the best of your humble servant’s knowledge. We will look at this design detail more in the next article in this series.
The Point
What does any of this have to do with sharpening? These design details cleverly turn potential disadvantages into distinct advantages you need to understand when sharpening Japanese woodworking blades.
For instance, the layer of high-carbon steel laminated into our chisels and planes is usually 65~66 HRc in hardness. Western blades are made of a single uniform piece of steel heat-treated to approximately 50~55 HRc to make the tool softer/tougher thereby limiting breakage while sacrificing the longevity of a blade’s sharp edge, the most important performance criteria in a quality cutting tool, IMHO. The extra hardness of the Japanese blade helps it stay sharper longer, an important benefit if your time is worth anything. This is good.
But if the entire blade were made of a solid piece of this extra-hard steel, it would a royal pain in the tukus to sharpen, I guarantee you. It would also break. Oh my, that would be bad.
The softer low-carbon/no-carbon steel or iron jigane body, however, is much softer and easily abraded making it possible to keep the hard steel layer thin, and therefore easily abraded, while protecting it from breaking. This is good.
Unlike the blade’s bevel, however, the ura (or “flat” as it is called in Western chisels) is all one-piece of hard steel. Without the hollow-ground uratsuki depression, you would need to abrade all that hard steel at one time to initially flatten and regularly sharpen the blade, a necessity I guarantee would ruin your mellow mood even if you consumed massive quantities of controlled substances with the fervor Beldar and Prymaat exhibit when sucking down triple-ply toilet tissue. But with the addition of the ura detail, we only need to abrade the perimeter planar lands (the shiny areas in the photos above) surrounding the ura. This is exceedingly good.
The ura with its lands surrounding the “uratsuki” depression makes it easier and quicker to not only sharpen the blade, but also to keep the “flat” planar (in a single plane). Without the ura, such a hard blade would be difficult to maintain planar and frustrating to sharpen. With the addition of the ura, however, the blade is genius.
An important skill to learn when sharpening Japanese blades is how to maintain the lamination and ura effectively. We will discuss this subject more in future posts, including the final article in this series.
Conclusion
If you didn’t learn at least three new things from this post then you are either very smart or weren’t paying attention. ¯\_(ツ)_/¯
In the next installment in this bodice-ripping tale of romance and derring-do we will examine the hollow-ground “Ura” in more detail. It’s important enough to deserve a special post.
YMHOS
It is not my intention to be fulsome, but I confess that I covet your skull.” ― SirArthur Conan Doyle, The Hound of the Baskervilles
If you have questions or would like to learn more about our tools, please click the “Pricelist” link here or at the top of the page and use the “Contact Us” form located immediately below.
Please share your insights and comments with everyone in the form located further below labeled “Leave a Reply.” We aren’t evil Google, fascist facebook, or thuggish Twitter and so won’t sell, share, or profitably “misplace” your information. If I lie may I cough up a hairball during every meal.
The fissured and cracked jigane of a 70mm plane blade forged by Usui Kengo, another Niigata blacksmith (RIP). Notice the rod which retains the chipbreaker is non-existent, replaced by two short stubs. An elegant detail in this plane body by Ito-san (Soh 宗).
If you can’t explain it to a six year old, you don’t understand it yourself.
Albert Einstein
In the previous article about sharpening Japanese woodworking tool blades we looked primarily at the nature of the hard high-carbon steel used in making woodworking blades. In this post your humble servant will try to dispel some of the confusion that surrounds the other metal used in making most Japanese knives, axes and woodworking blades, namely the soft low-carbon/no-carbon steel called “Jigane” (地金). I hope this brief explanation will improve Beloved Customer’s understanding of some Japanese tools and aid your sharpening efforts.
Sources of Jigane
Most Japanese woodworking blades, and many knives, are comprised of a thin piece of hard high-carbon steel, discussed in your humble servant’s previous article in this series, forge-weld laminated to a larger and thicker piece of softer low-carbon steel or wrought iron called “Jigane” (jee/gah/neh 地金) in Japanese, which translates directly to “ground metal.”
We will discuss this bi-metal lamination more in the next post in this series, but for now take my word that it is essential to the performance of many types of Japanese cutting tools nowadays, and for many centuries was also critical to manufacturing cutting tools in America and Europe as well.
The best jigane material for plane blades is said to be scrap iron salvaged from the boilers of old trains, boats, and factories, etc. having been subjected to thousands of heating and cooling cycles during their decades of service driving out most of the carbon, indeed making the iron very soft to the point of weakness.
The most desirable jigane for plane blades is therefore called “tired” iron, named so because it is not only soft, but because it looks weak and exhibits a visible grain along with cracks and imperfections which those well-versed in Japanese plane blades covet.
A pile of jigane, probably old salvaged structural steel. Looks like boards of old wood, but it ain’t.
Wrought Iron Production
Nowadays, this very low-carbon steel, also known as “ wrought iron,” is not produced in any volume for several reasons. First, demand is just too low to make it worthwhile to manufacture. Hand-forged ornamental iron is the only commercial usage besides Japanese tools of which your humble servant is aware, relatively microscopic markets. In fact, a constant complaint from ornamental iron producers is the difficulty of working the relatively hard material available to them nowadays.
The second reason is that steel production processes have changed drastically in the last 150 years. For instance, it used to be that steel began as iron ore, basically rocks, which were crushed, melted and refined into wrought iron, an intermediate product of steel production. Indeed, at the time this low-carbon product was much less expensive to produce than high-carbon steel and so was used for everything from the boilers, bridges, trains, ships and anchor chains mentioned above to axes, chisels, farming implements, machinery, what’s called “miscellaneous metals” in the construction industry, and of course plane blades. There are still a few surviving structures around that were made using this weaker material.
Nowadays, things are different. With high temperatures more easily attainable than they were prior to the 1850’s, manufacturing techniques have advanced to the point that carbon is incorporated into the steel automatically entirely eliminating the low-carbon wrought iron intermediate product.
Also, scrap metal has become critical to steel manufacturing processes nowadays. Remember what happened to steel prices worldwide when bloody-handed China was buying up huge volumes of scrap metal worldwide for its Olympic infrastructure building projects?
I think we can agree that this energy-efficient cost-reducing recycling of natural materials is a very good thing. But it does have a tiny downside, namely that most commercial scrap metal available in any useful volume today has been cycled through the modern steel-manufacturing process many times and already contains not only high levels of carbon, relatively speaking, but alloys such as chrome, molybdenum, and nickel from previous melting pots. Indeed, undesirable chemicals such as phosphorus, sulfur and silica tend to be high in typical scrap metal, not much of a problem for use in the construction, automotive, and shipping industries but a serious problem for tool steels.
In summary, wrought iron simply isn’t made anymore because it is neither an intermediate product nor a profitable one.
Japanese blacksmiths making high-quality plane blades nowadays mostly use wrought iron recycled from old anchor chains, old iron bridges, or other recycled structural components. If you see a hole in a plane blade, like the extra-wide plane blade pictured below, it once housed a rivet. Yes, structural steel was once connected with hot rivets instead of bolts. Hi-tensile modern bolts are decidedly better if less romantic.
A plane blade with an old rivet hole in its face, probably from an old iron bridge that once stood in Yokohama and which was recycled many years ago.
Plane Blades
A plane blade by Ogata-san in his “Nami no Hana” series using a special version of Swedish Asaab K-120 steel. Notice not only the fissures and defects, but also the striations and grain typical of soft, tired “wrought iron.”
Mr. Takeo Nakano (see his photo below) makes our plane blades. He is a kind, unassuming man in the best tradition of Japanese craftsmen with the outward appearance of a sedentary grandfather, but when using hammer and tongs at his forge within his dark and smoky smithy, his posture and visage resemble that of an intense Vulcan reinforcing the steel gates barricading the world of light against a demon onslaught. Oh my!
Like nearly all the plane blacksmiths in Niigata, he uses scrap iron obtained in a single lot many years ago from an iron bridge that was dismantled in Yokohama Japan.
Mr. Nakano at home
I am told that most of the jigane used for plane blades in Hyogo Prefecture is old recycled anchor chains from a ship knacker.
The back of the same Usui plane blade. Notice the cracks and voids visible in this excellent jigane exposed at the polished bevel. Very wabi-sabi. This jigane was once part of an iron bridge in the city of Yokohama, Japan.
In the case of plane blades, structural strength is not critical, so laminating a thin layer of high-carbon steel forming the cutting edge to a soft iron body is adequate. Indeed, the thicker the hard steel layer, the more time and effort it takes to sharpen the blade, so in a high-quality blade the thicknesses of the high-carbon steel layer and the soft jigane body will be carefully balanced to ensure the blade’s bevel rides the sharpening stones nicely and can be quickly abraded.
More inexpensive plane blades are forged using the same strip jigane used for chisels, a material harder than the ideal for plane blades.
Chisel Blades
In the case of chisels, while ease of sharpening is still important, the body and neck must be harder/stiffer to prevent them from bending, so a different, stiffer variety of jigane with a higher carbon content and fewer defects is used, and the steel layer is typically made thicker.
The jigane used by our chisel blacksmiths is a commercial product not produced anymore (thank goodness they have stockpiles) called “gokunantetsu” 極軟鉄 which translates directly to “extremely soft iron.” With a carbon content of 0.04~0.07%, a better description would be “very low carbon steel.” When heated and quenched, it doesn’t harden significantly.
The adventure will continue in the next exciting episode where we will bring it all together into a blade. Don’t forget to have popcorn and jujubes on-hand!
YMHOS
If you have questions or would like to learn more about our tools, please click the “Pricelist” link here or at the top of the page and use the “Contact Us” form located immediately below.
Please share your insights and comments with everyone in the form located further below labeled “Leave a Reply.” We aren’t evil Google, fascist facebook, or thuggish Twitter and so won’t sell, share, or profitably “misplace” your information. If I lie may the fleas of a thousand camels infest my crotch.
A few weeks ago I posted an article about seismic dampers used on a high-rise building currently under construction near my office in Marunouchi Tokyo (a 3 minute walk from Tokyo Station). I pass this same jobsite on foot several times a week and take the occasional snapshot. I have other construction sites ongoing, but no high-rise buildings right now, and none that non-disclosure agreements will allow me to share with you. So this is a good opportunity to introduce you to some lesser-known details about major construction work in Tokyo as seen from the sidewalk without risk of offending any clients.
Please notice the gentleman in the orange uniform and big boots in the picture above. I have never met him before, but judging by the color of his uniform, he’s an employee with Obayashi Corporation, one of Japan’s largest and arguably most competent general contractors. I have done a lot of work with this company and respect it a great deal.
Sir Norman Foster, a famous British architect and the designer of Apple’s Campus 2 in Cupertino, California once said that Obayashi Corp is the world’s best general contractor. I tend to agree. And I say this as someone that used to work for two of Obayashi’s competitors in Japan, and who has also worked with many other contractors around the world. If you have visited the Boulder Dam near Las Vegas, Nevada recently, you probably drove over Obayashi’s bridge spanning the gorge.
Anyway, please notice that this erstwhile young man is wearing what looks like a thick coat all puffed up like a marshmallow on a sunny day in mid-August in 37℃ (98°F) temperatures in the shade and 76% relative humidity? Is he loco, Cisco?
Setting aside the somewhat inelegant safety boots (something glittery by Jimmy Choo would suit better methinks) and rolled trouser cuffs that do not help the fashion statement his ensemble is making, you will notice a round white grill on his coat near his elbow. There is an identical grill on the opposite side of the coat you can’t see.
If you haven’t already guessed, the two round grills are actually battery-powered fans pulling outside air into the coat and pushing it out at his collar and wrists cooling our young contractor as he labors diligently in the heat.
A maintenance dude sporting a two-fan cool coat
These “fan coats” are very popular in Japan. They can make a big difference so long as one can perspire adequately. Indeed, these battery-powered garments are credited with saving many construction workers from heat stroke and even death in hot months.
They also come in kiddie sizes and many colors.
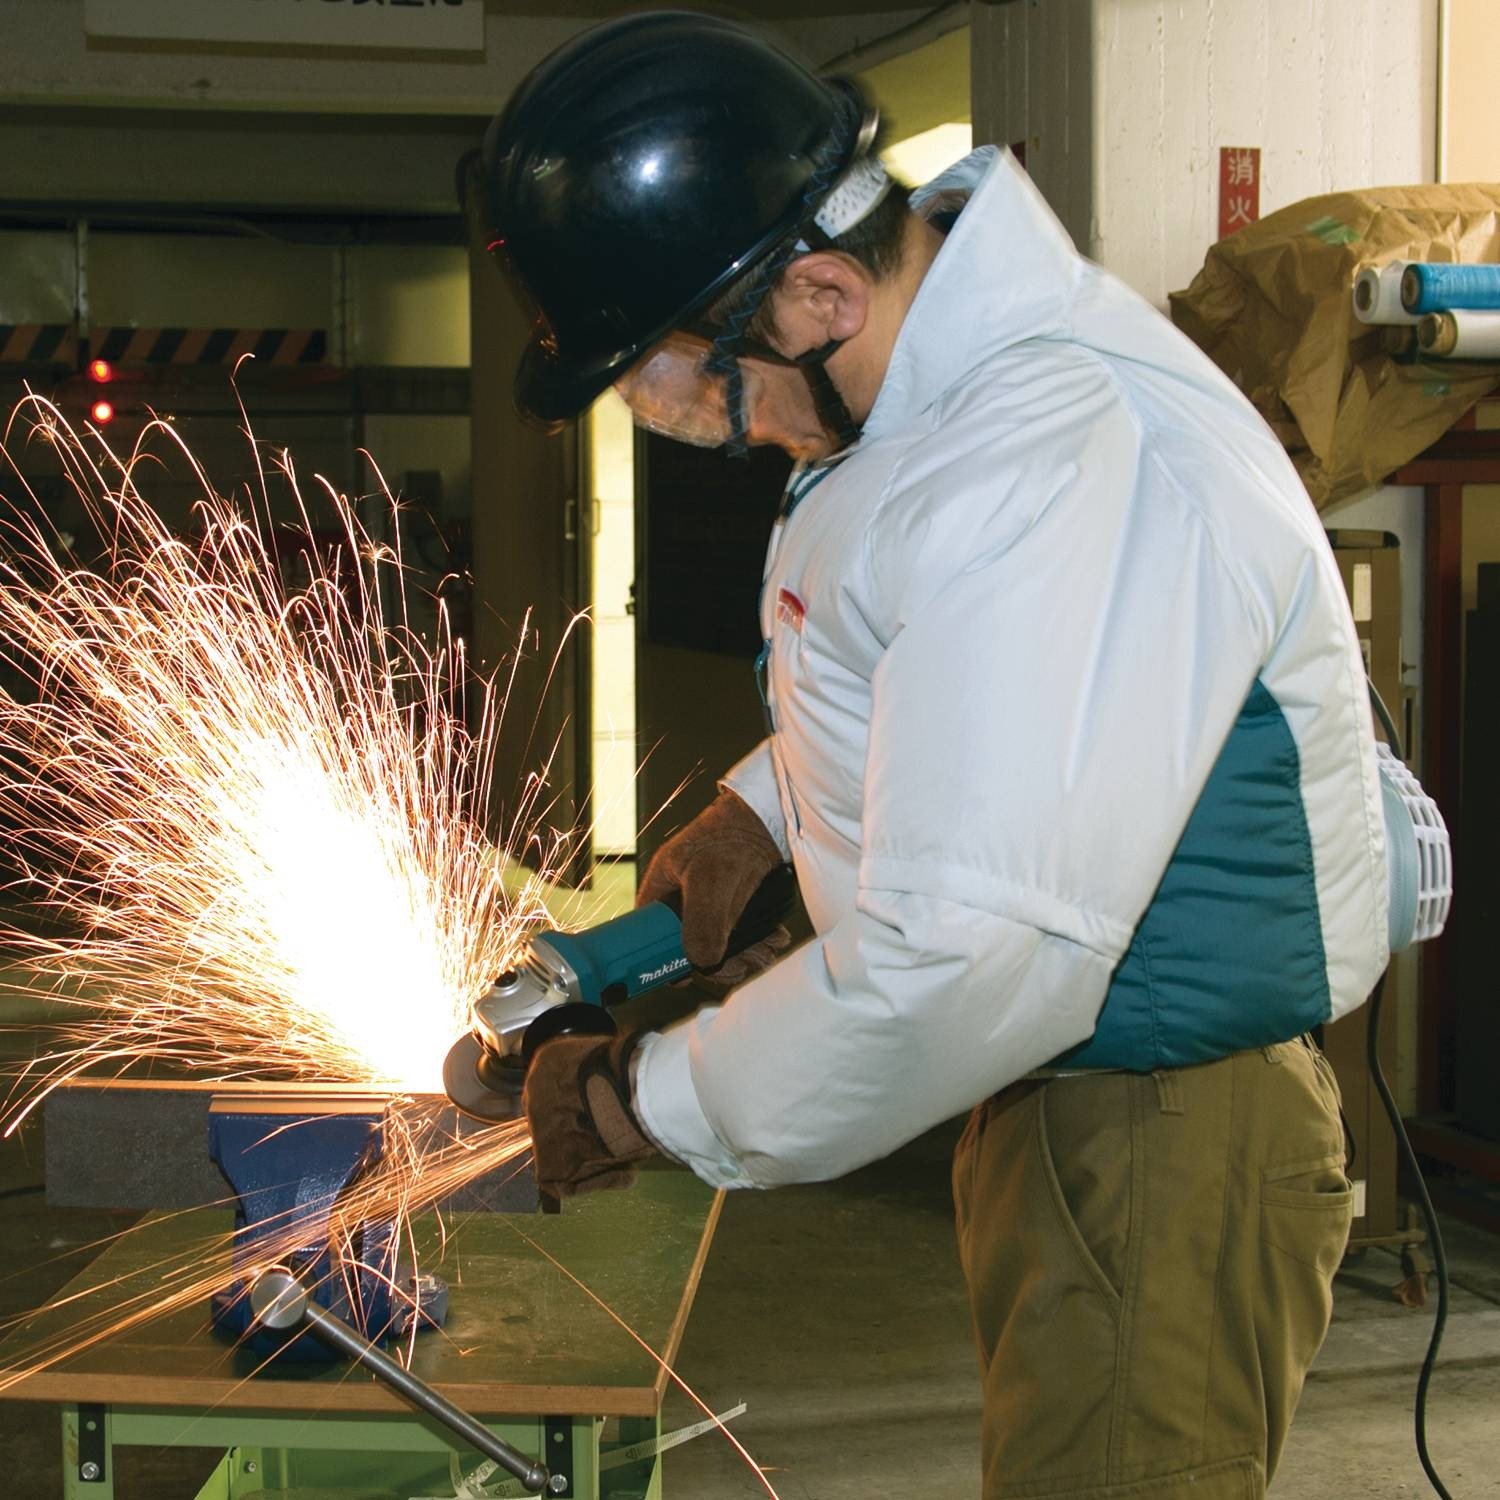
Makita makes a “Cordless Fan Jacket” that is sold on Amazon overseas for a lot more than it costs in Japan. Instead of two fans, it has a single fan at the back. I have not used the Makita product and can’t endorse it.
The Makita Cordless Fan Jacket. Notice the high, stiff collar directing moving air over his neck for better cooling, and the fan unit at his back. The cord is leading to the angle grinder he is using, not to the fan.
I hope the weather in your neck of the woods is always balmy with cool breezes in summer so a coat like this is never useful. In the meantime, I’m just waiting for someone to develop sexy-looking steel-toed boots with cooling fans. I wonder what Jimmy Choo will be offering later this year (ツ)
YMHOS
If you have questions or would like to learn more about our tools, please use the questions form located immediately below. Please share your insights and comments with everyone in the form located further below labeled “Leave a Reply.” Your information will remain confidential (we’re not evil Google or incompetent facebook).
And this is from my heart Which is deep inside my body: It’s better to look good Than to feel good
Fernando
This article is a little longer and more roundabout than your most humble and obedient servant’s previous posts, but I wanted to share with you some of Japan’s history, and examples of this country’s most fabulous practical art as produced by its blacksmiths and professional sharpeners as insight into the Japanese mindset regarding sharpening. But before I get into that, I would like to share some relevant words of wisdom from Hollywood’s wisest man.
The handsome gentleman in the picture above is Fernando (actually Billy Crystal). He is neither a blacksmith nor a sharpener of tools or weapons, but his insight into physical beauty and words of wisdom about happiness are pertinent to sharpening, as we shall see below. If you are not familiar with ‘Nando, I suggest you google him or view a video or two on NoobTube.
So what does this dapper Latin lover have to do with sharpening? And swords? Read on kind sir.
As ‘Nando taught the world, a wise person will not equate looking good with feeling good. Likewise, you would be wise to not confuse a blade’s appearance with its performance. Indeed, a blade that looks as sharp as the skinny end of nothing may not actually cut well in some applications. A good example is Japanese swords. Let me tell you a true story to illustrate my point.
When I was a university student in Japan, I was privileged to be entrusted with a number of swords that belonged at the time to the late Dr. Walter Compton, Chairman of Miles Laboratories and the inventor of Alka-Seltzer. He was a wealthy man who had a huge collection of swords obtained while an officer for the US military in Japan immediately after the war when Allied forces required the defeated Japanese people, on pain of death, to surrender all swords, civilian and military. Of course, many valuable and rare family heirlooms were surrendered or forcefully confiscated. Supposedly they all went to the bottom of Tokyo Bay in bunches, or were melted for scrap. But we know better, don’t we.
Towards the end of his life, Dr. Compton put a lot of money into having his better swords professionally sharpened, new shirasaya scabbards and furniture made, and formally evaluated in preparation for donating them to the Boston Museum of Art, where many of them reside in obscurity today. Sadly, due to progressive dementia, some of his most valuable swords were auctioned off without his permission. “The feckless sons of wealthy men” is the operative phrase in this case, I fear.
I assisted Dr. Compton’s representative by transporting over 70 of these swords to and from Japan and performing the necessary legwork to accomplish these goals inside Japan. During those years I held in my hands and feasted my eyes on rare and beautiful blades of great historical value several of which would have easily been designated National Treasures if they had been intended to remain in Japan (“National Treasures” may not leave Japan).
During those years I spent a lot of time meeting, questioning, and requesting services of the best sword sharpeners in Japan, learning much about swords, stones, and sharpening. Dr. Compton’s reputation was such, and his swords were of such rarity and high quality, that I had no difficulty persuading the very best craftsmen to work on them and speak with me, including a famous sword polisher named Mr. Okisato Fujishiro.
Interestingly, in Japan such craftsmen are called “Togishi” (研師), an unambiguous word that can only be translated as “sharpener.” However, in the West these same Japanese craftsmen are called “ Sword Polishers.” In the post-war context, this actually may be more accurate than the Japanese term. In a post-war world it’s certainly more politic.
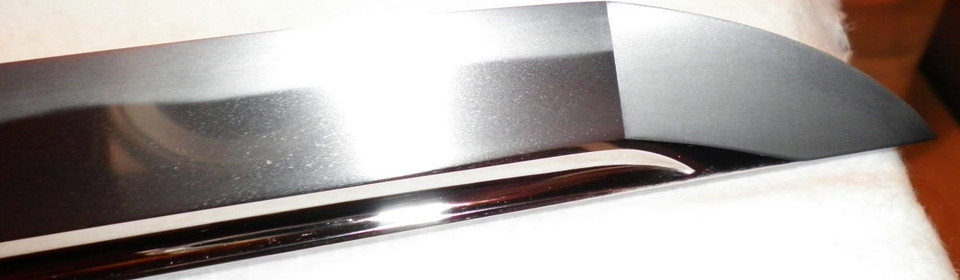
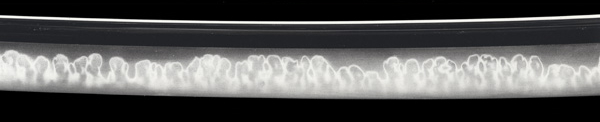
A very subtle, high quality sword tip brought to life by the arts of the Sword Sharpener. Notice the peaceful elegant hamon (wavy milky pattern at the cutting edge oriented towards the top of the photograph), the grain of the steel just below the hamon, and the burnished polish surrounding the fuller. Notice also the clean delineation where the blade tip, the “boshi,” begins. Very nice work.
Before the elimination of the caste system Japanese society had 4 main divisions labeled “Shi No Ko Sho,” meaning, in descending order, Warrior (samurai), Farmer, Craftsman, and Merchant at the bottom. The Emperor, Court Nobles, and Shoguns were above these strata, although of the three, only the Shogun possessed any actual power because the man with the sword makes the rules, and those without weapons do as they are told and quickly, or they go away permanently. Thus it has always been because both fool and wise man leak red sticky stuff.
Blacksmiths and sword sharpeners were both in the craftsman caste, but curiously the sword sharpener was above the swordsmith in rank. Depending on their support among the warrior caste, and with the generous application of yellow metallic lubricant, both swordsmiths and sword sharpeners occasionally obtained noble rank, an honor to which few craftsmen, farmers, and merchants could aspire. My point is that sword sharpeners, while of relatively lower caste, often had a perceived rank higher than their craftsman position would suggest.
Why was the Japanese sword sharpener of higher effective rank than the swordsmith? I haven’t seen documentation from back in the day confirming it, but I suspect it is because the sharpener turns the swordsmith’s plain steel blade into a thing of jewel-like sculptural beauty that almost seems alive. One only has to see a sword blade fresh from the swordsmith’s shop and compare it with the same sword after the sharpener’s ministrations to understand.
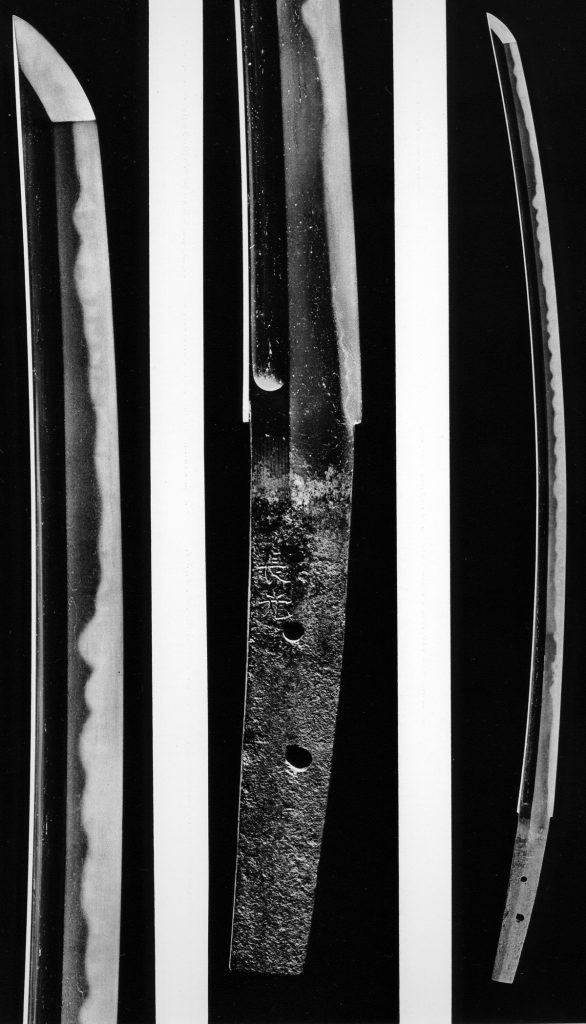
The Nikko Sukezane sword, a designated National Treasure of JapanThis sword is known as the “Nikko Sukezane,” Nikko for the temple commemorating the Shogun Tokugawa Ieyasu (徳川家康, January 31, 1543 – June 1, 1616) where it is stored, and Sukezane (助真 meaning “Aid the Truth) for the name of the smith who forged it for the Kamakura Shogunate (1185~1333). The blade’s shape and crystalline pattern above the hamon are characteristic of Sukezane’s work. This sword’s brother was in my care for about 2 years while it was being polished and appraised in Tokyo.This sword is another of Japan’s National Treasures. It was forged by a swordsmith name Nagamitsu (長光)during the same time period as the Sukezane above. The tang (nakago) is corroded by exposure to bare hands over a period of around 700 years. Multiple holes were drilled in the tang to accommodate a variety of hilts during its lifetime. I also had a sword by this same smith and of very similar appearance in my care for about one year, although it was not owned by Dr. Compton.A different Nagamitsu sword, also listed as a National Treasure. An unusually healthy example.
I have even witnessed a skilled sword sharpener create a beautiful hamon (a pattern formed on the edge of a sword by the steel’s crystalline structure) on a sword forged by a famous smith that had lost the crystalline structure necessary to form an actual hamon. While a deception of sorts, the intention was not to deceive for profit (the sword was donated to a museum), but to return an unusual and historically important sword to its former beauty, a glory that would have been lost but for the sword polisher’s exceptional skills.
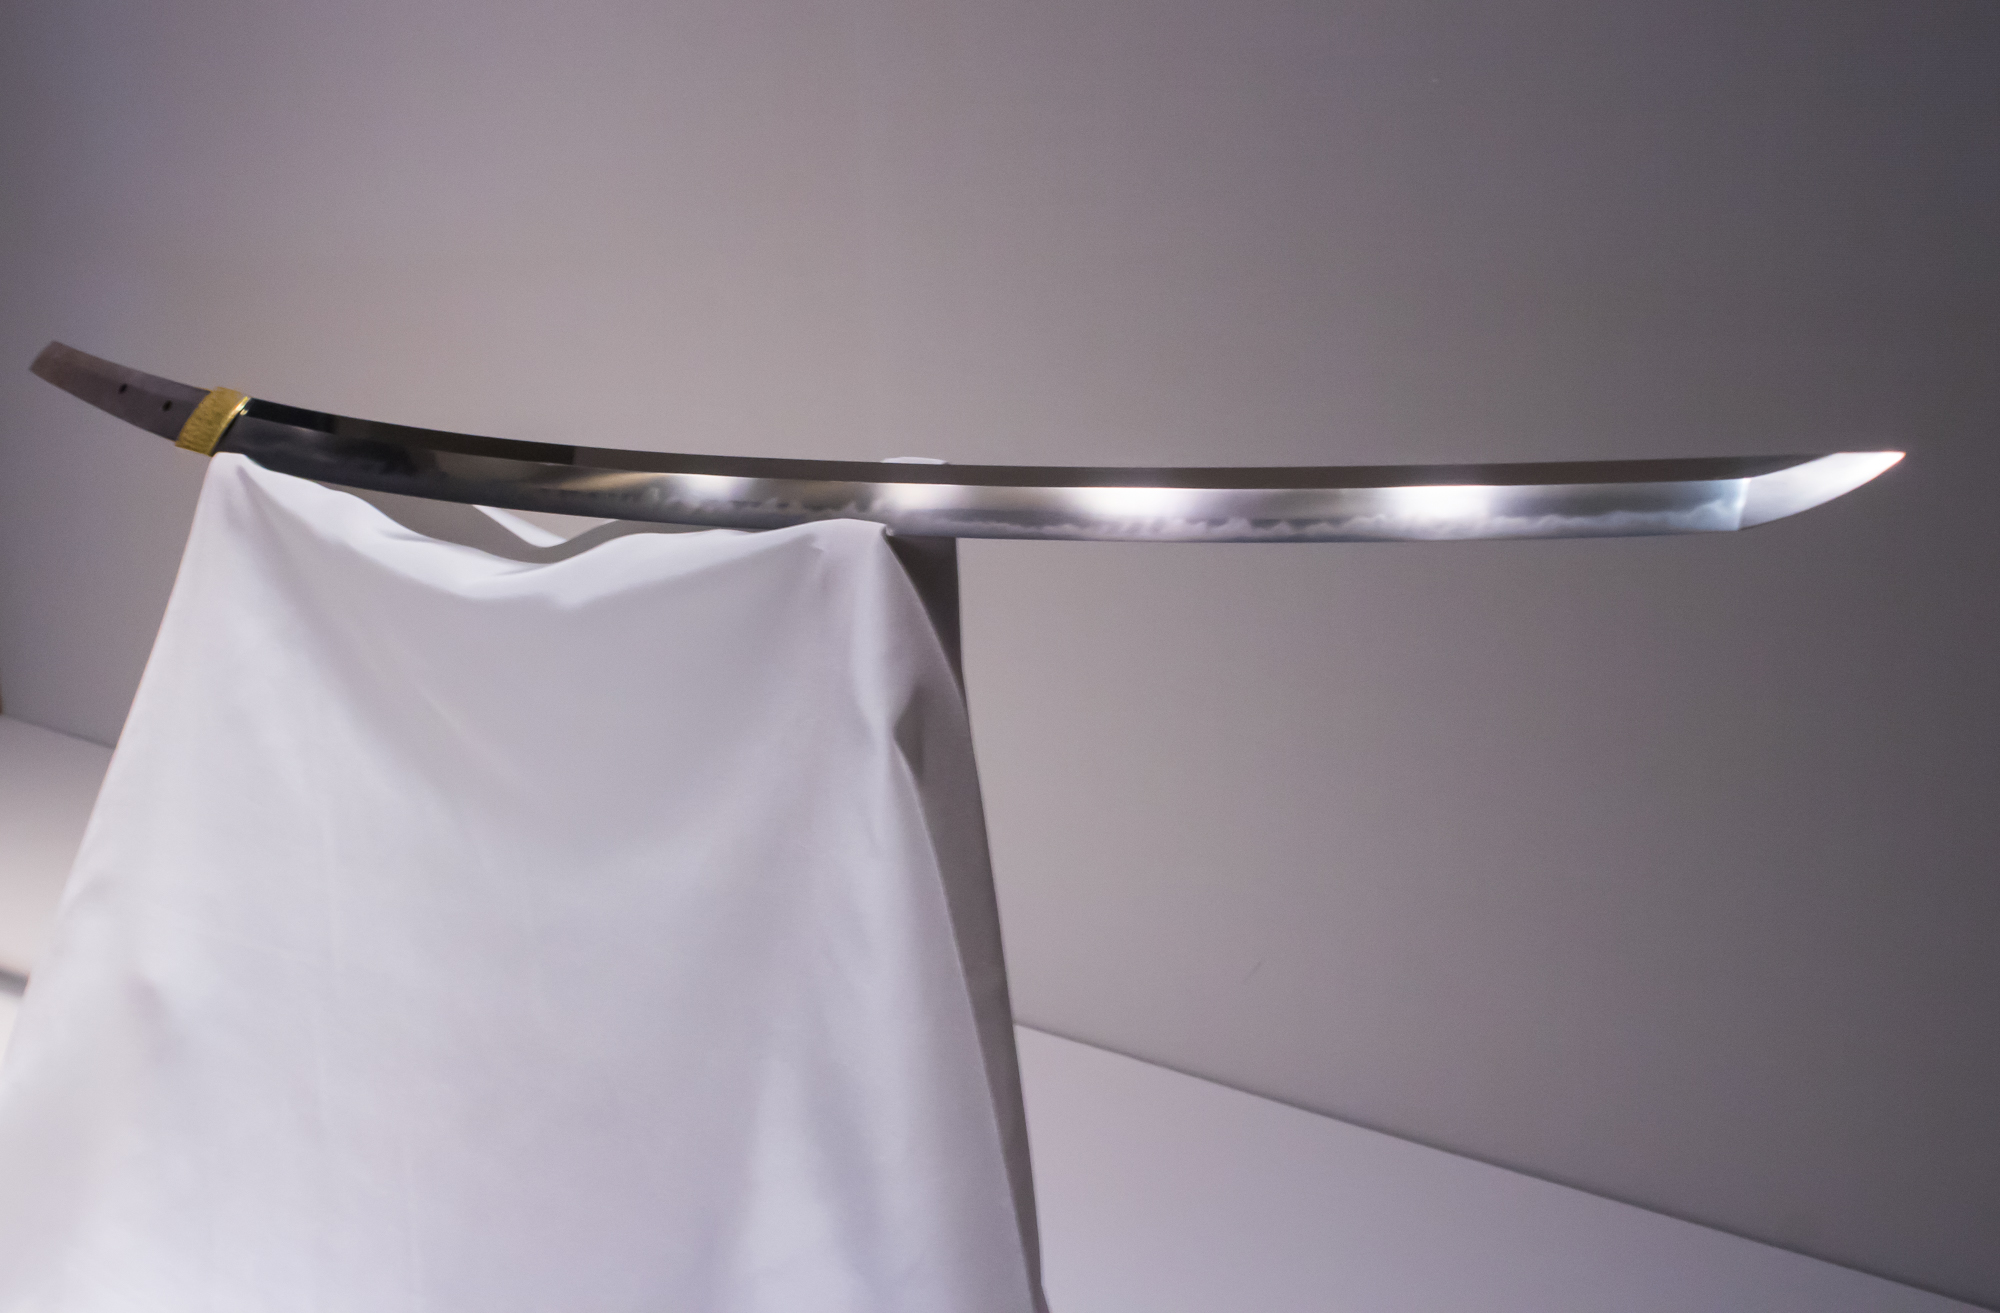
A dramatic chouji midare hamon in a modern sword. The pattern exists not because of a lamination or some silly pattern welding but because of the changing crystalline structure of the blade that results from the differential heat treatment process performed by the blacksmith. It only exists because of the swordsmith’s skill, but it is only visible and beautiful because of the sword sharpener’s stones and his skill with them. Is the blade sharp? Don’t judge a blade’s performance by its polish.
If we liken the swordsmith with his forge and hammer to the quarry worker cutting marble from the mountain, then the sword sharpener is Michelangelo cutting the Pietà with his chisels and files. Both craftsmen work on the marble and blade respectively, and both are essential. The sculptor uses steel to bring stone to life, while the sword sharpener uses stone to bring steel to life.
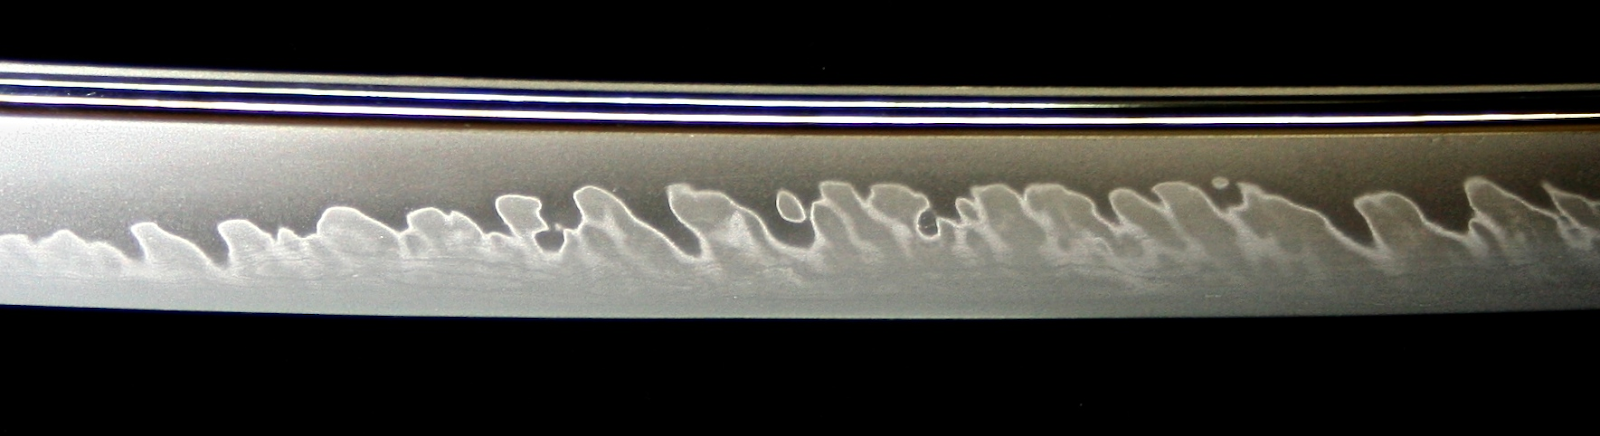
Another dramatic hamon in a modern sword. This pattern is a surface manifestation of the steel’s crystalline structure as created by the swordsmith, but revealed and made glorious by the polisher
But despite these artistic abilities, modern “Sword Polishers” have no interest in and put forth no effort to actually make a sword blade cut well. Indeed, in some cases, they actually intentionally dull the blade so it can’t cut, thereby making it safer. This intentional vandalism is called “habiki.”
A different style of hamon pattern on a blade with a different grain pattern. Notice the different colors and lines inside the hamon. All these crystalline details are categorized, have names, and are studied intensely by aficionados. All things equal, this sort of pattern and color is considered to be more elegant and desirable than the two more dramatic hamon pictured above. An extremely deep rabbit hole, I assure you. Please watch your step!
The Key Point
Here’s the key point your humble servant wants Beloved Customers and Gentle Readers to grasp: Despite the long years of apprenticeship, advanced skills learned, and gallons of red sticky stuff unintentionally leaked by sword sharpeners, the frank sword sharpeners I have spoken with all admitted that, of all the craftsmen in Japan that used edged tools, woodworkers like carpenters, cabinetmakers, and joiners routinely create sharper blades despite those blades not appearing to be as sharp as swords. This is consistent with my direct experience of handling over 70 swords before and after being worked on by sword sharpeners.
While there is great pleasure to be found in polishing a plane or chisel or knife blade to levels of great beauty, do not make the mistake of equating appearance with performance.
Appearance aside, and looking strictly at cutting performance, will a chisel or plane or knife blade skillfully sharpened on a 15,000 grit stone cut better and longer than if sharpened on an 8,000 grit stone? In the case of woodworking blades and kitchen knives, no it won’t. In fact, due to higher levels of friction the higher degree of polish produces in the cut, it will certainly not cut wood as well. More on this subject later.
An oiirenomi chisel by Hidarino Ichihiro. The hazy silver of the hard steel hagane lamination and the cloudy grey of the softer iron jigane lamination, combined with the shape and upward curvature of the corners of the lamination are indicative of excellent craftsmanship by the blacksmith, superior skills of the sharpener, and wonderful stones. Such details are considered sublimely beautiful to tool connoisseurs. But will the edge cut well? We can’t tell from this photo.
Keep in mind that the stones used to apply the beautiful polish and accentuate the hamon on Japanese swords are different from those used to sharpen woodworking tools. For instance, the uchigumori stones sword polishers use are small slices of soft stone glued to paper using urushi lacquer adhesive, and are only 3,000~5,000 grit. These small slips of stone are rubbed on the sword blade using thumb and fingertips.
Here is a link to a blog showing Mr. Fujishiro, son of one of the sword sharpeners I employed back in the day, making and using these thin slices of stone.
Tools are designed to perform specific tasks. Although it could do the job, more or less, you wouldn’t use a crescent wrench to stir spaghetti sauce on the stovetop would you? A longish spoon just might work better.
Does a sword’s edge need to be extremely sharp to cut the enemy effectively? No, it doesn’t because the sword’s geometry, blade orientation, speed, impact force, and the swordman’s technique drive its cutting effectiveness much more than simple sharpness. So sword sharpeners in Japan, and probably most of the world too, have always been more focused on edge durability, resistance to chipping, and appearance than absolute sharpness. In modern times, when swords are almost never used to cut living flesh outside of Saudi Arabia, the blade’s appearance may be critical, but sharpness is not a practical concern.
Another example is food preparation knives. A chef’s knife looks terribly sharp, and as it slices tomatoes and fillets fish we can see that it cuts well. But how sharp is it really? In comparison with a joiner’s plane blade, not really that sharp. But both tools are exactly suited to the job assigned them.
The “willow-leaf” yanagiba chef’s knife shown above is most effectively used in slicing or drawing motions, much as expert swordsmen use their weapons against enemies. In this style of cut, a smooth and uniform cutting edge does not perform as well as a more ragged, serrated edge as seen at the microscopic level. Therefore, there is little if any practical benefit (assuming beauty is not practical) to be obtained by sharpening a kitchen knife beyond 1,000~3,000 grit. In fact, at least in Japan, these are the upper-limit of stones in daily use by professional chefs of all varieties. Yes, and that includes sushi chefs.
But don’t misunderstand my point: In the case of both swords and yanagiba hocho knives, the bevel angle must be correct for both the blade being used and the material being cut, and the microscopic edge must be a clean intersection of planes. If you get these two factors wrong, a crescent wrench might work just as well.
The other point I want to make is that, while I enjoy using high-level skills to give a beautiful appearance to extremely sharp blades, such a blade will not perform better than an identical blade of equal sharpness but with a less polished appearance, and the extra time and money spent on improving outward appearance is wasted on bread and butter work.
Since easily-deceived, morally-challenged Hollywood celebrities have the answers to all the world’s problems (at the cost of other people’s money, labor and freedom, of course) perhaps our quest for the sharp edge can benefit from the wisdom of the famous Latin lover ‘Nando, Tinseltown’s most elegant star. ‘Nando once shared his father’s advice that it is “better to look good than to feel good.” Accordingly, perhaps we should all go crazy nuts and polish our blades like beautiful but dull museum swords and wear waistcoats and cravats as we cut sliding dovetails and plane door stiles. After all, one must be ready for every photo op. In this way, our woodworking blades may be worthy of ‘Nando’s highest praise: “You, dahling, you look mahvelous, absolutely mahvelous!”
Fernando Lamas in “The Merry Widow.” The crease in his pant leg could slice bacon.
No, on second thought, while there is much one can learn from Fernando’s elegant philosophy, his standards of beauty and suffering are too high for me. I would rather be a simple joiner or cabinetmaker in stained work clothes that has the ability to make a blade exceptionally beautiful but chooses not to expend the time and cost required to do so most of the time, rather than someone who doesn’t because they can’t.
Although Fernando has a pressing appointment for a tango lesson (discretion prevents me from naming the young lady he will be pressing) and won’t be providing further insight today, our adventures in sharpening Japanese woodworking tools will continue in Part 5 of this series.
Let’s meet at Tsukiji for sushi afterwards. Until then, I have the honor to remain,
YMHOS
If you have questions or would like to learn more about our tools, please click the “Pricelist” link here or at the top of the page and use the “Contact Us” form located immediately below.
Please share your insights and comments with everyone in the form located further below labeled “Leave a Reply.” We aren’t evil Google, fascist facebook, or treacherous TikTok and so won’t sell, share, or profitably “misplace” your information. If I lie may all my dance steps turn to stumbles.
“A wild boar was sharpening his tusks upon the trunk of a tree in the forest when a fox came by and asked, Why are you doing that, pray? The huntsmen are not out today and there are no other dangers at hand that I can see. True, my friend, replied the Boar, but the instant my life is in danger, I shall need to use my tusks. There will be no time to sharpen them then.”
Aesop (621~565 BC)
It’s nice to have a philosophy on a subject because it helps one distill random thoughts down to the essentials.
Allow your humble servant to explain his philosophy about sharpening woodworking tools, not because it is charming and unique, and not because you should emulate it, but because it will provide insight into the things written in this blog and elsewhere. Use it to calibrate your BS meter. It’s often nose-deep when people talk about sharpening.
My philosophy regarding sharpening was shaped by my experience as a carpenter, contractor, commercial cabinetmaker, and joiner working under pressure, against a clock, sometimes with a boss watching with eagle eye, and often in front of customers, not as a hobbyist fiddling around in a garage workshop. Married young with a growing family to support, I quickly discovered that children eat constantly and in ever-increasing quantities, so efficiency was and is important to me.
Efficiency was also important to the Clients who hired me. Sharpening and maintaining tools is, of course, part of the job, but from the viewpoint of Client or employer it’s wasted time, so it’s important to minimize time spent fiddling with tools during the work day. Accordingly, I followed the example of craftsmen I respected and started the day with sharp tools in good working order, and kept spare planes and chisels sharpened and ready to go as backup.
Self-employment hammered into me the monetary value of time. It also taught me that quality sharpening stones and tools are expensive and wear out, and that to feed wife and babies every day I had to work efficiently to minimize time and money expended on maintaining tools, while maximizing the amount of work I accomplished between sharpening sessions.
I developed a strong dislike, nay hatred, for blades that fail to perform, refuse to become extremely sharp, that dull quickly, or take too much time and effort to sharpen. I loathe them not just because they are irritating, but because they waste my time and money. Even considering the higher initial cash outlay, the cost-effectiveness of handmade, professional-grade tools in helping my mind and hands do good work and feed the family became as obvious as a burning road flare on a midnight highway.
You, Beloved Customer, may not feel the time and financial pressures that professionals do, but owning professional-grade cutting tools and learning how to sharpen them in an efficient and professional manner will make woodworking less frustrating, more profitable, and more enjoyable.
What is your philosophy?
The journey will continue in Part 4 with wisdom from a celebrity and pictures of pretty swords. Until then, I have the honor of remaining,
YMHOS
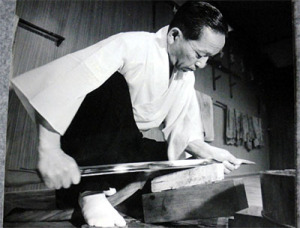
Sharpening a plane blade at the jobsite, then back to work, jiggity-jog.
YMHOS
If you have questions or would like to learn more about our tools, please click the “Pricelist” link here or at the top of the page and use the “Contact Us” form located immediately below.
Please share your insights and comments with everyone in the form located further below labeled “Leave a Reply.” We aren’t evil Google, fascist facebook, or thuggish Twitter and so won’t sell, share, or profitably “misplace” your information. If I lie may I never finish the journey.
“You can complain because roses have thorns, or you can rejoice because thorns have roses.”
Tom Wilson
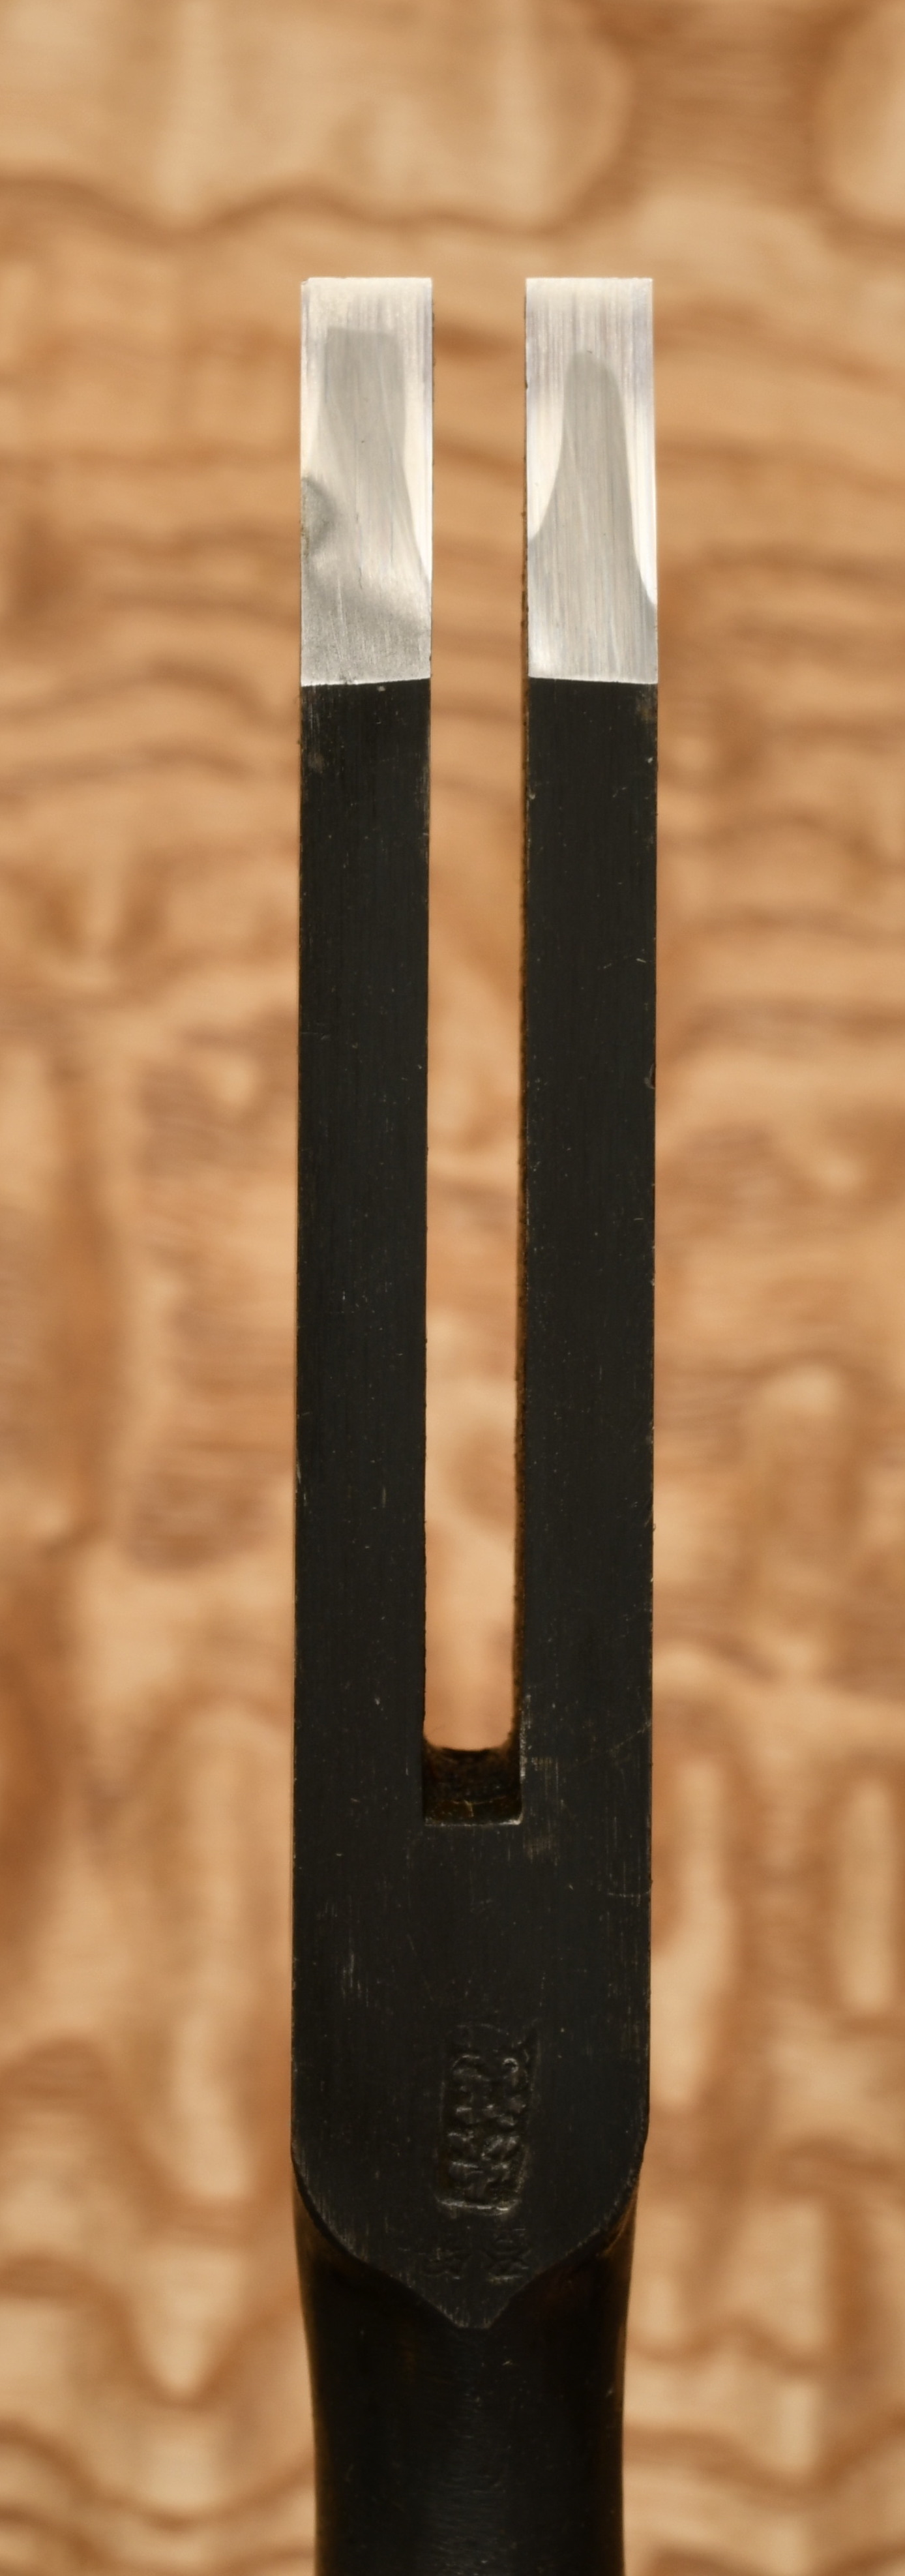
Nihon Mukomachinomi. Definitely in the Miki City style
This tool is a specialty mortise chisel with two blades for cutting twin mortises at the same time. It was developed specifically for cutting mortise joints in wooden stiles and rails for doors, shoji, cabinets and other joinery.
DESCRIPTION
Interestingly, double or twin tenons are not called ” nihon hozo” (hozo means ” tenon”) but “ nimai hozo “ (二枚ほぞ) with “ni “ meaning 2. In this case the number is combined with the counter “mai “ used to count flat things like a sheet of paper or tenons. Japanese is almost as messy as English… Your humble servant blames those pesky Buddhist priests for the complications involved in reading and writing Japanese, but I’m not sure who to blame for English.
The name is a variation of the name of the standard mortise chisel ” mukomachi nomi” in my previous post, and no, I still don’t know what it has to do with ” waiting over there.” In front of this is added ”nihon” (二本) with ” ni” meaning ”2” and ” hon” being a counter for longish things, like pencils or trees, or in this case, blades. The word is pronounced ” knee hone.”
Allow me to wander off the path a bit and talk about the Japanese language since you might find a few details interesting. If you don’t feel international today, please feel free to jump over the next few paragraphs.
The nation of Japan is called “Nihon” or “Nippon “ in the Japanese language and is written with the two characters “Ni “ 日 and ”Hon” 本 sometimes pronounced “pon.” Yes, the same pronunciation and one of the same characters used in nihon mukomachi nomi. Besides being a counter for pencils and trees and longish things, it also means ” book” and ” source. ” The word for the nation of Japan means “The source of the sun,” a jab by the Japanese at an arrogant Chinese emporer some millenia ago.
Spoken Japanese is not that difficult for English speakers to figure out, but the reading and writing are crazy difficult because of the vast quantity of Kanji, the multiple pronunciations possible for most of them, and the multiple meanings attached to many.
Elementary children are required to learn 1,006 kanji characters along with the various meanings and pronunciations. In total, a minimum of 4,272 characters are used in newspapers and magazines and must be learned before graduating middle school. Most educated people in Japan can read well over 6,000 of the over 13,000 registered kanji in Japan. Universal literacy requires a lot of study and memorization at a young age. This should give you an idea why education is so highly valued in Japan.
When I was a young missionary in Japan in the 1970’s, I spent several months stationed to Ehime prefecture in rural areas of the island of Shikoku, back when many farmhouses in that locale still had thatched roofs, no glass windows, and no electricty. Many of the older residents had spent their entire lives on their little farms and could not read or write, and had never seen a brown-haired blue-eyed foreigner before.
But the children in these mountain villages were always excited to see a foreigner and would swarm around and ask us where we were from. My standard response to this somewhat rude but innocent question was to point down at each of my legs and count them saying ”One leg, two legs. I’m a Nihonjin.” The “nihon” I was was jokingly referring to was the same as the mortise chisel which is the subject of this post, not Japanese Nationality which is pronounced identically.
Now you know a stupid pun in Japanese, so never say you didn’t get your money’s worth at this blog!
The twin-blade mortise chisel is exceptionally difficult to make, and even new ones require the owner to perform a significant amount of tuning to convince them to perform well. They have never been common, and I am not aware of anyone forging them now.
APPLICATIONS
The twin tenons this chisel specializes in cutting are almost twice as strong as a larger single tenon, and are the preferred joint for high-stress wooden connections worldwide, especially joints in doors and windows. If you haven’t tried them before, you should. They look pretty cool as through tenons too.
Twin tenons have three advantages that justify the extra work. First, while they may have the same or even less cross-sectional area, they have more surface area than a single tenon in the same space, creating greater friction when assembled, if properly cut, creating a joint that is much more likely to stay assembled when stressed.
Second, this larger surface area also means a larger glue area, a big advantage with the right glue.
And finally, twin tenons are much more resistant to twisting, an huge advantage for highly stressed joints in operable doors and windows. This is their biggest advantage and is nothing to sneeze at. If you want a door to last, always use twin tenons, at least at the bottom rail.
Sokozarai chisel used to clean and shave the bottom of mortises
I purchased one of these chisels many years ago. They are difficult to tune. But even after all that work, the gentleman I learned tategu work from many years ago was not impressed with my clever tool insisting that a regular mortise chisel does a better job. There is an obscure structural reason why this makes sense, which I will not delve into here, but I did not ask Mr. Honda at the time for an explanation because it would have been improper to question a master who had been a professional joiner at his level for 60 years.
I can’t get these chisels made anymore, and know of no blacksmith that makes them nowadays. The time is not far away when handmade tools will not be available except as collectors items.
YMHOS
If you have questions or would like to learn more about our tools, please click the see the “Pricelist” link here or at the top of the page and use the “Contact Us” form located immediately below.
Please share your insights and comments with everyone in the form located further below labeled “Leave a Reply.” We aren’t evil Google, fascist facebook, or thuggish Twitter and so won’t sell, share, or profitably “misplace” your information. If I lie may my mortise chisel split asunder!
Japanese mortise chisels are called “Mukomachi Nomi” 向待鑿. I am unsure of the origin of the name, but the Chinese characters can be read as meaning “wait over there.” A curious name, it may refer to the shape of the transition from blade to neck, called a “machi” which is unique in Japanese chisels. Your humble servant will simply call them “mortise chisels.”
DESCRIPTION
12mm Mortise Chisel – Sukezane (Ura View)
Mortise chisels are single-purpose tools for cutting rectangular holes in wood for mortise and tenon joints, the oldest recorded wood joint known.
Unlike other Japanese chisels, and even Western mortise chisels, the sides of the Japanese mortise chisel are shaped square to the “flat” instead of being angled slightly less than 90 degrees. The surfaces of the sides are of course straight along their length, but are either flat or slightly hollow across their width.
Other varieties of chisels have sides angled inwards to prevent the chisel from binding in the cut. This is less than ideal, however, when cutting small mortises because it allows the chisel to twist inside the mortise scoring the sides and reducing precision. The Japanese philosophy is that the blade’s sides should shave and clean the mortise at the same time it is cutting it so the sides don’t require additional cleanup with a paring chisel. Its a matter of precision and efficiency.
The straight flat sides of the mortise chisel have a relatively larger surface area that can create a lot of friction in the cut making extraction difficult in some cases, so the standard maximum width is 15mm.
Many advocate using double bevel cutting edges for Western mortise chisels. I have no problem with double bevels for atsunomi used to cut wide, deep mortises because the double bevel tends to kick more waste out of the mortise hole than a single flat bevel, although double bevels are more trouble to sharpen. But in the case of the standard Japanese mortise chisel, I recommend using a simple flat bevel for two reasons:
The first reason is that, since sharpness is critical for precise work, and a flat bevel is quicker and easier to sharpen, a flat bevel is more precise.
The second reason is that a flat bevel tends to stabilize the chisel in the cut more than a double bevel blade can, keeping it from twisting out of alignment and gouging the sides.
The mortise chisel is a specialist chisel for joinery, cabinetmaking and furniture work. It is not generally used by carpenters. Craftsmen that routinely use mortise chisels work to much tighter tolerances than most woodworkers, so a professional-grade mortise chisel must be forged and shaped to tighter tolerances than other chisels.
I only have one blacksmith with the skills and attention to detail required to make mortise chisels to my specifications. He thinks I’m a prissy pink princess. I think he’s a stubborn old fart. We’re like an old married couple(ツ).
If you need to cut lots of precise mortise holes quickly, then this tool will definitely improve your results and increase your satisfaction. It may not be the most handsome chisel in your toolchest, but you will come to rely on it more than any other for quality joinery work.
Standard widths for mortise chisels are 3mm, 4.5mm, 6mm, 7.5mm, 9mm, 12mm, and 15mm, but Sukezane won’t make 15mm mortise chisels for me anymore, dagnabit.
More than any other, mortise chisels are subtle, intelligent beasties, or at least they can be. I will talk more about what to look for in a good mortise chisel, as well as how to realize their Einstein-like focus to help you do better work, in future posts.
If you have questions or would like to learn more about our tools, please click the see the “Pricelist” link here or at the top of the page and use the “Contact Us” form located immediately below.
Please share your insights and comments with everyone in the form located further below labeled “Leave a Reply.” We aren’t evil Google, fascist facebook, or thuggish Twitter and so won’t sell, share, or profitably “misplace” your information. If I lie may mortise chisels all turn to rubber.


Please Leave a Reply