When the show starts, I am in my SpongeBob stance, and I walk like SpongeBob, and the first step that I take, I am SpongeBob.
Ethan Slater
In this post in our series about sharpening Japanese woodworking blades, your humble servant will propose some useful stances and grips to employ when sharpening. I hope we can do a better job than Mr. Squarepants, at least.
Stances
There are several practical stances for sharpening, including standing, sitting on a bucket, a bench or a chair, squatting, kneeling on the floor, or sitting on the floor. With practice, all these stances can be made to work well.
When starting out, however, I think most people benefit from using a standing position with the stones placed on a workbench or table, or on a board spanning a sink.
Whichever stance you choose, locate and be conscious of your center of gravity, (usually just below your belly button), and try to keep it at the same elevation above the floor while moving the blade forward and back.
Flex your knee joints, and loosen your elbow joints and wrists, because locking up your wrists and elbows will make it impossible to avoid rocking the blade. This is important: You must actively concentrate on allowing your wrists to rotate so as to keep the blade’s bevel flat on the stone’s face, because it won’t happen by accident, or because Jesus loves you.
In the case of a normal resharpening job, instead of a major repair, remember the goal that craftsmen have endlessly sought for thousands of years: to abrade and polish the last few microns of steel at the extreme cutting edge, using the flat bevel as an alignment jig.
But don’t let yourself get lost in the weeds; Focus on abrading and polishing the entire bevel. If you do so, the last few microns, which the human eye can’t see, will be in good shape.
Focus the majority of your finger’s pressure on the extreme cutting edge, and less on the rear of the bevel, but without lifting the rear of the bevel off the stone. In the case of Japanese blades, the rear of the bevel is all soft jigane iron and will take care of itself. Yes, it is a balancing act. Yes, it takes focus. Yes, you will make mistakes, overbalance, gouge the stone and mess up the cutting edge a time or two. Everyone since the day the first caveman tried to grind his stone axe on another stone has made that mistake, so don’t worry about it. Remember, you fell off your bicycle the first few tries, scraped your knees and elbows, survived, and now ride like the wind! Yiiiiiihah!
Get a Grip
The way you hold your plane or chisel blade when sharpening it will influence the quality of the results and the stress on your hands and wrists, so it is worth paying attention to.
There are as many was to hold a plane or chisel blade when sharpening as Baskin Robbins has ice cream flavors. And like ice cream, none are right or wrong, except Burgundy Cherry, which of course is superior to all others (ツ)。 In the interest of brevity, we’ll only consider three grip methods here. If you are not using them now, give each a try over a couple of sharpening sessions to see if they are an improvement or not. Feel free to adapt these or develop your own.
The Gorilla Grip
First, let’s examine what I call the “Gorilla Grip.” With the plane blade resting ura facing up, the blade’s long axis pointing at 11:00, and the cutting edge furthest away from you, grip the blade’s sides with your right-hand’s thumb on the left side, ring finger and pinkie on the right, the tip of the middle finger resting on the right corner directly behind the cutting edge, and index finger extended alongside the middle finger. Then lift the blade and roll your ring and pinkie under it.
Rest the tip of the ring finger of your left hand on the left corner directly behind the cutting edge, with your middle finger and index fingers extended and their tips resting adjacent.
Extend your left palm over your right thumb’s last joint, and wrap your left thumb under the blade. You are now ready to rock-n-roll, without the rocking and rolling motion
The advantage to this grip is that it is very strong, ergo “ gorilla.” The downside is the blade tends to end up skewed on the stone because the right wrist must be twisted to keep the blade straight. Also, because the wrist joints are at very different angles with respect to the blade, and it is easy to apply a lot of force, extra care is necessary to keep the wrists firm but loose and rotating in harmony.


The Three-finger Grip
The other grip is one I call “three-finger,”(指三本) after the most proper way of bowing in Japan when seated directly on the floor (preferably tatami mat) in the “seiza” posture with legs folded underneath the body, both hands touching side by side with the pads of three fingers of each hand extended and touching the floor in front of the knees, and the thumbs and pinkies tucked out of sight. Very proper, especially for elegant ladies.
In the case of the three-finger grip, the blade is oriented directly in front of and on the body’s centerline with cutting edge located furthest away. The hands hold the blade in a more symmetrical fashion than the gorilla grip, with the middle and index fingers pressing down on the blade’s corners closest the cutting edge (depending on the space available), with the thumbs curled under the blade’s head (end opposite the cutting edge), and either the ring fingers or pinkies touching the blade’s sides to assist in lifting it.
The advantages to this grip are less tendency to skew the blade, looser wrists, and better control of bevel angle. The disadvantage is slightly less power because it is harder to get the shoulders over the blade. This is the burgundy cherry version, in your humble servant’s opinion.
The Three-finger Monkey Grip
A hybrid of these two methods is one I call the “three-finger monkey.” Place the right-hand thumb alongside the blade’s left side, instead of under the head forming a combination of the gorilla grip and three-finger grip. This method provides a little more power than the three-finger grip, and less skew than the gorilla grip.
Is one of these grips best? It’s like riding a bike: None are wrong, but some work better than others.
In all three of these grips, most of the pressure will tend to focus at the blade’s corners which can create uneven wear on the ura and a rounded cutting edge. While this may be unavoidable, especially in the case of narrow blades, try to counteract this tendency by focusing the majority of pressure on the centerline of the cutting edge. It seems insignificant, but if left uncorrected, the resulting unbalanced pressure will cause the blade to wear quicker at the corners and become curved. Yes the blade is iron and steel and does not flex much, but it is a verifiable fact that the points where your fingers apply direct pressure will be abraded quicker.
There is a saying in Japan which is quite appropriate when talking about sharpening that says “Dripping water wears away stone.” In this case, just a little differential pressure from your fingertips will shape the blade over many weeks and many passes over the stone, wearing away both stone and steel in ways that can be either useful or not, depending on whether you are the sharp-eyed master of the process or the grunting badger. Please remain aware of this potential.
Chisel Grip
The grip I use on chisels is very similar to the grip for planes, and varies with width.
Like the famous Mexican weather babe Yanet Garcia, the chisel’s long handle shifts its center of gravity towards the butt making it a bit more difficult to manage, so a grip method that is absolutely stable in a single hand is advantageous.
Most solutions involve holding the chisel in the palm secured by middle finger, ring finger, and pinkie, with the index finger extended and centered right behind the cutting edge.
The index and middle fingers of the other hand can also be pressed near the edge and the thumb wrapped underneath the handle.
Polishing the Ura

When polishing the ura of a blade, be it plane or chisel, make sure the stone is flat. If it isn’t, you will regret it later without realizing why.
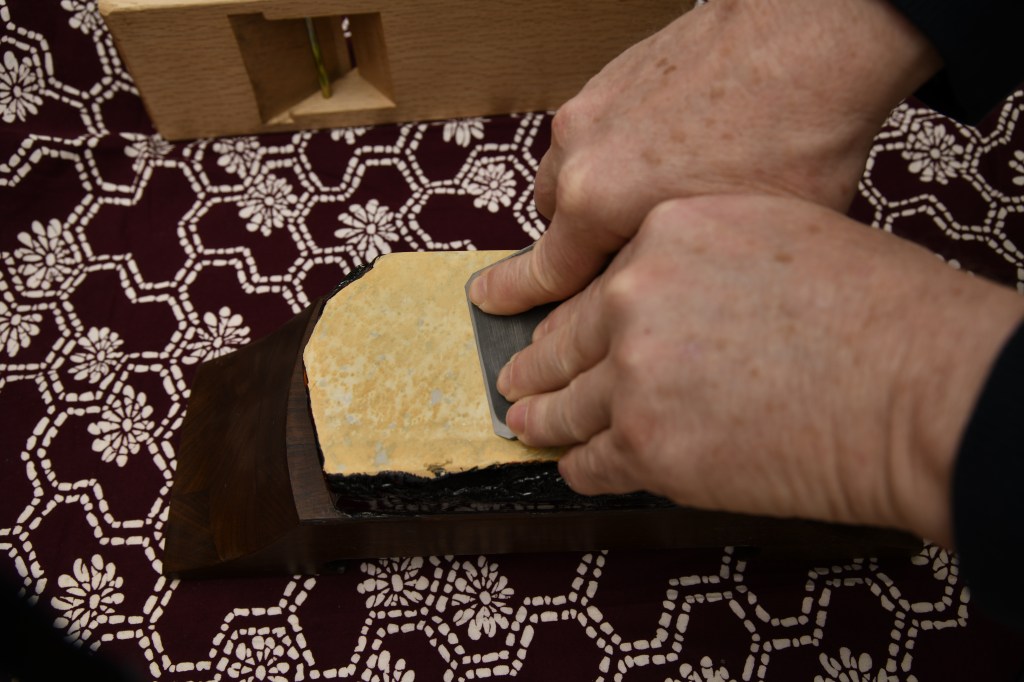
Let’s look at a plane blade first. Notice in the photo above how my right hand is curled under the blade’s head supporting it while my thumb presses down on the bevel close to the cutting edge, a grip that makes it easy to apply a lot of pressure precisely while maintaining control of the blade.
Two fingertips of my left hand are pressing down on the bevel for a total of three pressure points. The thumb can press down as light or hard as you feel is necessary, but it typically applies the highest amount of pressure. It’s important the left hand fingertips apply equal downward pressure to avoid creating uneven wear (unless one corner of the blade specifically needs more pressure applied).
Try to remove nearly all the weight of the blade’s head from the stone so that all but a tiny amount of applied pressure is focused on the “itoura” cutting land at the blade’s extreme cutting edge. This too requires zen-like focus and strict control over one’s inner badger to avoid wearing notches into the ura’s side lands.
Move the blade in two directions at the same time: Mostly to and fro in line with the cutting edge; but also on and off the stone’s edge perpendicular to the cutting edge. This will help avoid wearing notches into the side lands, and produce a stronger cutting edge (IMO).
Keep the stone flat and reverse it frequently to ensure even wear and less wasted stone.
Concentrate your senses and develop hand-soul coordination : You are a leaf on the wind; Watch how you soar (Hoban “Wash” Washburne in Serenity). I hope you have better luck than Wash did…
In the case of chisels, I hold the handle in the palm of my right hand and place thumb and forefinger on opposite sides of the neck/shoulders pinching it between them. I place the tips of the fingers of my left hand on the bevel, and move right and left hand together. And as in the case of plane blades, I move the blade both forward and backwards and left to right at the same time.
Give it a try. What do you have to loose?
In the next post in this series on sharpening, we will look at which direction to sharpen. Few give this matter any thought, but most should.
YMHOS

If you have questions or would like to learn more about our tools, please click the “Pricelist” link here or at the top of the page and use the “Contact Us” form located immediately below.
Please share your insights and comments with everyone in the form located further below labeled “Leave a Reply.” We aren’t evil Google, fascist facebook, or thuggish Twitter and so won’t sell, share, or profitably “misplace” your information. If I lie may I grow a lucky third nose.


Previous Posts in the Sharpening Series
- Sharpening Part 1
- Sharpening Part 2 – The Journey
- Sharpening Part 3 – Philosophy
- Sharpening Part 4 – ‘Nando and the Sword Sharpener
- Sharpening Part 5 – The Sharp Edge
- Sharpening Part 6 – The Mystery of Steel
- Sharpening Part 7 – The Alchemy of Hard Steel 鋼
- Sharpening Part 8 – Soft Iron 地金
- Sharpening Part 9 – Hard Steel & Soft Iron 鍛接
- Sharpening Part 10 – The Ura 浦
- Sharpening Part 11 – Supernatural Bevel Angles
- Sharpening Part 12 – Skewampus Blades, Curved Cutting Edges, and Monkeyshines
- Sharpening Part 13 – Nitty Gritty
- Sharpening Part 14 – Natural Sharpening Stones
- Sharpening Part 15 – The Most Important Stone
- Sharpening Part 16 – Pixie Dust
- Sharpening Part 17 – Gear
- Sharpening Part 18 – The Nagura Stone
- Sharpening Part 19 – Maintaining Sharpening Stones
- Sharpening Part 20 – Flattening and Polishing the Ura
- Sharpening Part 21 – The Bulging Bevel
- Sharpening Part 22 – The Double-bevel Blues
- Sharpening Part 23 – Stance & Grip
- Sharpening Part 24 – Sharpening Direction
- Sharpening Part 25 – Short Strokes
- Sharpening Part 26 – The Taming of the Skew
- Sharpening Part 27 – The Entire Face
- Sharpening Part 28 – The Minuscule Burr
- Sharpening Part 29 – An Example
- Sharpening Part 30 – Uradashi & Uraoshi
Please Leave a Reply