
Do the difficult things while they are easy and do the great things while they are small.
Lao Tzu
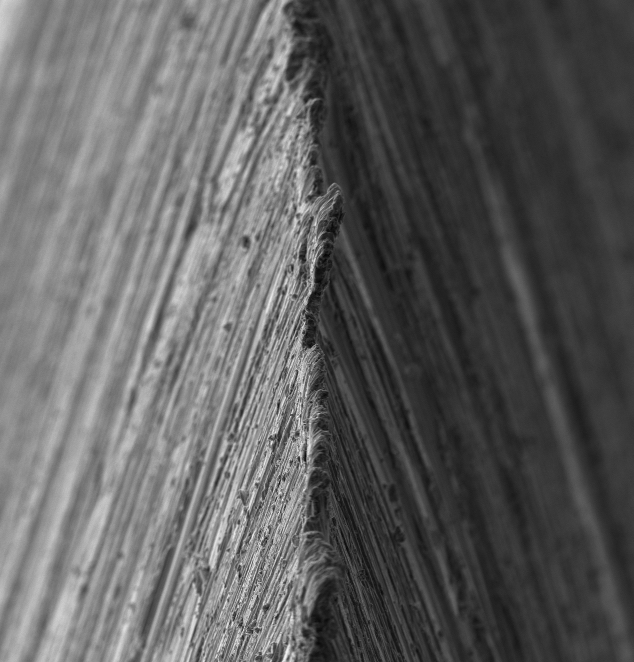
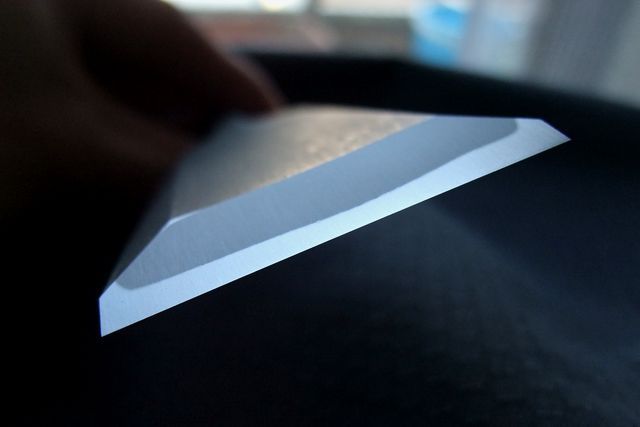
A key milestone Beloved Customer should aim for when sharpening a blade is the production of a “burr” at the edge when abrading the bevel (not the ura) using the first rough stone in the series. The formation of the burr indicates that the extreme edge of the bevel side of the blade has probably been abraded enough.
In this post in the Sharpening Japanese Tools Series, we will examine how to raise this burr and why it is important to do so, how to use the burr to test the condition of the cutting edge as you are sharpening, and how to transition from one stone to the next finest stone in the series
Raise a Burr
Japanese plane and chisel blades tend to have harder steel at their cutting edges than Western chisel and planes, and consequently, their steel does not exhibit the plastic deformation necessary to readily produce large burrs, or “wires” as some people call them, when being sharpened. In fact, “burrs” on professional-grade Japanese chisel and plane blades may be difficult to detect.
The key point to remember is that the formation of a burr is only a milestone in the sharpening process, not a goal. A clean, uniform, smooth burr signals the elimination of all major defects, chips, and dents at the cutting edge. Indeed, if we seek an efficient cutting edge, we must remove through abrasion enough metal to also remove the deepest defect in the cutting edge. But regardless of the ductility of the steel, a large, loopy burr or “wire” is not desirable because it will tend to break off prematurely leaving a jagged, ragged edge that will actually set back the sharpening process.
The milestone we need to pass in the sharpening process as soon as possible is the creation of a barely-detectable, tiny and clean burr. My advice is to produce it by abrading only the bevel side of the cutting edge on your roughest stone, although you may not be able to test if it is clean until after a few strokes on the medium-grit stone (1000 grit).
As we discussed in a previous post in this series, the way to keep the size of the burr minimal and the blade’s bevel flat is to focus the pressure of abrasion as close to the extreme cutting edge as possible, but without overbalancing and gouging the stone and dulling the edge. This is the most essential skill in freehand sharpening.
Now that we have a burr, let’s test it.
Testing the Burr
As you are working to produce the burr, you will need to frequently and quickly test its progress, but that can be difficult, if not impossible, to do by eye alone.
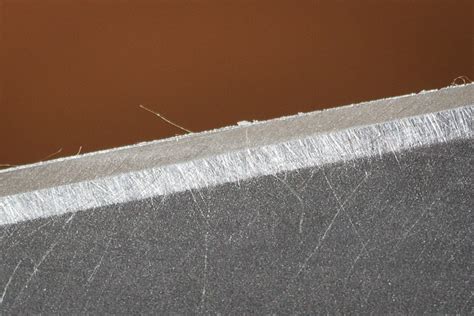
To make this process easier and quicker, rub the pad of your thumb or finger over the ura’s edge, away from the cutting edge, thank you very much, when using your rough stones. Your fingerprint ridges will snag on the burr long before you can see it. If the edge is chipped or damaged, the burr will not be consistent but will be interrupted at each defect. There is nothing at all to be gained and much to lose by allowing the burr to become larger than absolutely necessary, so pay attention.
Once you have produced a small burr the full width of the cutting edge, and confirmed its existence with your fingertips, you then need to test it for defects. If you run your fingernail along the burr’s length (the width of the blade), your fingernail will snag on nicks and defects in the burr, something your nerves can sense long before your naked eye can detect them. Keep working the blade’s bevel on the rough stone until the edge and/or burr is consistent across the full width of the blade, and free of nicks, dents and chips.
In the case where you need to remove serious damage to the cutting edge, you may want to use a loupe to ensure the defect has been transferred entirely to the burr and no longer remains in the cutting edge.
In the case of quality Japanese woodworking blades, if you are careful to focus the abrasive effect of the stones on the extreme cutting edge instead of the rear of the bevel, the burr created before moving onto the medium grit stones should be barely detectable or even non-existent. Once again, except in the case of removing large nicks, chips or other severe damage, creating a big burr is not only a waste of time, stones and steel, but if, heaven forfend, the large burr is torn off during sharpening, it will leave behind a tragic amount of damage that must be repaired by once again abrading the edge and raising a new burr. Don’t start chasing that tail.
Best to create just enough of a burr to confirm that damage has been removed and then encourage it to evaporate.
Don’t forget to check the angle of the bevel with your hand-dandy bevel gauge. See the section on Pixie Predation Prevention & Pacification in Part 11 of this series.
After the burr is in good shape, polish the bevel on the medium and then fine stones. The burr will be polished away evaporating without special effort.
Finally, polish the ura side of the blade on the finest stone you intend to use. Feel the burr with your fingerprints and check it with your fingernail. Then polish the bevel on the fine stone. Repeat this front and back polishing process until the burr is polished away entirely.
Assuming the ura is already polished on your finest finishing stone, you shouldn’t need to touch the blade’s ura again on any stone until the final finishing stone.
Transitioning From One Stone to the Next
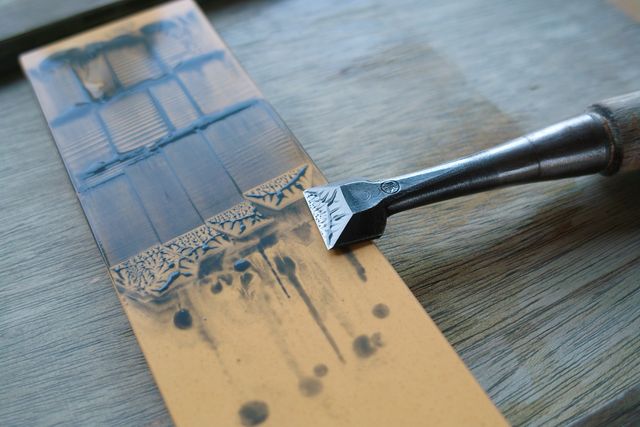
Recall that the purpose of each stone used after the roughest stone in the series is simply to replace the deeper scratches left by the preceding stone with finer scratches. In fact, there is nothing to be gained and much to lose by moving onto a finer stone before all the scratches from the previous stone have been replaced, so please check that all the scratches from the previous stone have been polished out before moving to the next.
This is not always easy to confirm without magnification, so to make it easier and surer, I suggest you skew the blade’s bevel on all stones but the final finishing stone for the last 3 or 4 strokes creating new diagonal scratch marks on it.
These skewed scratches will be at a different angle than those produced by the next stone, of course, and will be easy to differentiate from the new scratches with the nekid eye. When the next finest stone removes them entirely, you will know you have probably spent enough time on that stone, and can go to the next. But don’t forget to skew the blade again before going to the next stone.
Of course, there is no need to skew the blade on the final finishing stone.
Summary
We have discussed three important sharpening techniques in this article which you must master if you have not already:
- Raise a burr by abrading the blade’s bevel on your rough stones using your skillful technique;
- Test the burr for size and completeness using your fingertip ridges, and for defects using your fingernails. If the burr is incomplete or has detectable defects, continue to work the blade on the rough stones on the bevel side only until the burr is good.
- Skew the blade during the last 3~4 strokes on each stone (except the final finishing stone, of course) to create diagonal scratches. When all those diagonal lines are polished off by the succeeding stone, you will know it is probably OK to move onto the next finest stone in the series.
You now have powerful tools at your disposal that can sense the state of a steel blade as thin as the edge of nothing, and without using your eyes, tools you’ve always had and which didn’t cost you a thing. How’s that for value? (ツ)
Be forewarned, however, that if you use these techniques you may be forced to choose between a glamorous career as an international professional fingernail model or the quiet life of an expert woodworker. What to do, what to do…..
In the next and final post in this series we will use all the aspects of the sharpening process discussed previously to sharpen a blade step-by-step. Be there or be square.
YMHOS

If you have questions or would like to learn more about our tools, please click the “Pricelist” link here or at the top of the page and use the “Contact Us” form located immediately below.
Please share your insights and comments with everyone in the form located further below labeled “Leave a Reply.” We aren’t evil Google, fascist facebook, or thuggish Twitter and so won’t sell, share, or profitably “misplace” your information. If I lie may my eyebrows grow 10 inches everyday.


Other Posts in the Sharpening Series
- Sharpening Japanese Woodworking Tools Part 1
- Sharpening Part 2 – The Journey
- Sharpening Part 3 – Philosophy
- Sharpening Part 4 – ‘Nando and the Sword Sharpener
- Sharpening Part 5 – The Sharp Edge
- Sharpening Part 6 – The Mystery of Steel
- Sharpening Part 7 – The Alchemy of Hard Steel 鋼
- Sharpening Part 8 – Soft Iron 地金
- Sharpening Part 9 – Hard Steel & Soft Iron 鍛接
- Sharpening Part 10 – The Ura 浦
- Sharpening Part 11 – Supernatural Bevel Angles
- Sharpening Part 12 – Skewampus Blades, Curved Cutting Edges, and Monkeyshines
- Sharpening Part 13 – Nitty Gritty
- Sharpening Part 14 – Natural Sharpening Stones
- Sharpening Part 15 – The Most Important Stone
- Sharpening Part 16 – Pixie Dust
- Sharpening Part 17 – Gear
- Sharpening Part 18 – The Nagura Stone
- Sharpening Part 19 – Maintaining Sharpening Stones
- Sharpening Part 20 – Flattening and Polishing the Ura
- Sharpening Part 21 – The Bulging Bevel
- Sharpening Part 22 – The Double-bevel Blues
- Sharpening Part 23 – Stance & Grip
- Sharpening Part 24 – Sharpening Direction
- Sharpening Part 25 – Short Strokes
- Sharpening Part 26 – The Taming of the Skew
- Sharpening Part 27 – The Entire Face
- Sharpening Part 28 – The Minuscule Burr
- Sharpening Part 29 – An Example
- Sharpening Part 30 – Uradashi & Uraoshi


Please Leave a Reply