Japanese Handplanes Part 9 – Maintenance & Storage

Preventive Maintenance: Don’t start today by doing yesterday’s work.

– Deniece Schofield

High-quality handplanes are not cheap, and when you have a good one in good fettle, the time and effort it takes to maintain it ready to rock and roll immediately is never wasted. Indeed, it’s a solid investment that pays higher dividends than General Electric stock ever will, I promise you, on condition that the maintenance is done right, and your handplanes are stored and transported properly. On this subject as in many others, knowledge is power, so let’s get some.

Maintenance

There are several items to consider when maintaining your handplane. We’ve discussed how to set-up and fettle a Japanese hiraganna handplane in previous articles, all listed at the end of this article. In this article we’ll examine how to maintain it while we’re using it, and how to store it when we aren’t.

Sharpening

A dull plane may make excellent firewood, but it’s as useful as a screen door in a submarine, so the first step in keeping it useful is sharpening it. The true value of the high-quality-forged blade in your plane is that it’s easily and quickly made extremely sharp, and it will retain that sharp edge a long time, reducing the time, trouble and cost of maintaining it. Does your time have value?

For detailed directions about sharpening, please read the series of 30 articles linked at the end of this article. They will explain the what and why of the blade of a high-quality plane. And of course, there are supernatural aspects worthy of review (ツ).

Maintaining and Storing a Handplane While In-use

The following is a list of maintenance items you should consider performing and the specific conditions under which I think they’re applicable. These are suggestions not rules, of course, but unlike most of the woodworking gurus on the internet, I didn’t steal them from noobtube, nor suggest them because they’re good clickbait, or fish them out of my fundament because they smell like lilacs, or because I think they’ll sell tools or books to the gullible. They are simple and they work, but it’s important to understand the applicable conditions. Each item assumes that the blade is sharp, but if isn’t, sharpening it should be first priority.

  1. Condition 1 – Overnight Storage: The plane is working fine, its blade is still sharp, and you intend to use the plane in the same place for the same jobs tomorrow, but just need to set aside on your workbench for a few hours, perhaps overnight. You may want to take the following actions:
    • Don’t remove the blade and chipbreaker, but simply wipe the body with a clean, dry rag and clear dust and shavings out of the blade opening with a clean, dry brush. Purpose: To prevent wood resin from accumulating and gumming things up (depends on the wood), and to prevent corrosion (yes, sawdust can cause rust).
    • Oil the cutting edge at the sole using your trusty, ever-faithful oilpot.
  2. Condition 2 – Short-term Relocation & Storage: The plane is working fine and the blade is sharp, but you need to relocate it to another location for a short time. In this case, you may want to take the following actions.
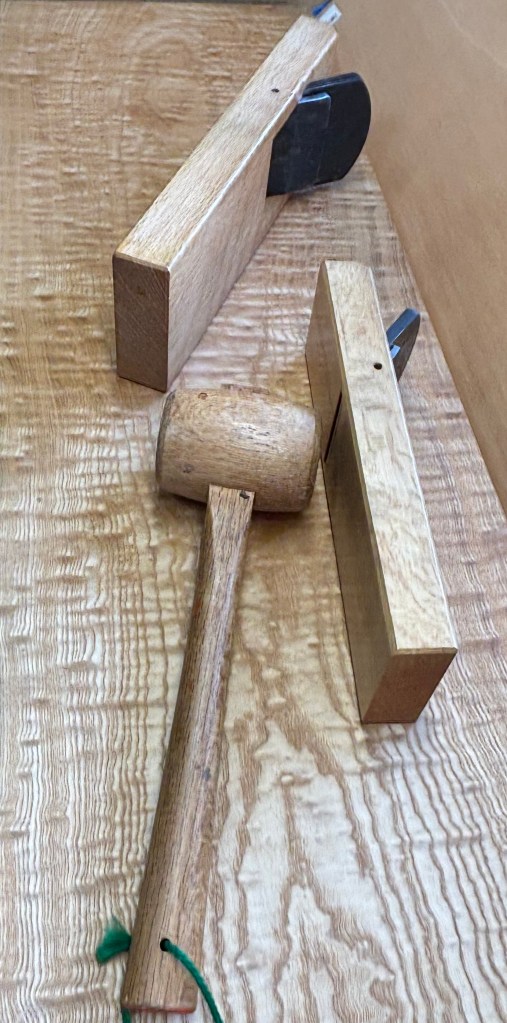
    • Safe the blade by retracting it into the body using your wood, plastic or leather mallet so it doesn’t become damaged, or damage other tools while lounging in your tool box or tool bag during the relocation.
    • Remove dust and shavings from the plane, especially the mouth opening, because they will make the toolbox or tool bag dirty.
  3. Condition 3 – Short-term Storage: The plane is working fine, the blade is sharp but we need to store it out of the way short-term.
    • Remove blade and chipbreaker entirely (see previous article)
    • Clean the blade and chipbreaker of sawdust and wood resin. Resin may have accumulated on the blade and chipbreaker which, if not removed in a timely manner, can harden over time increasing friction. Use you oilpot and a clean rag and/or a small stick of wood to scrape-off built-up resin resin. If that doesn’t work, use acetone or lacquer thinner.
    • Clean dust and shavings from blade opening and mouth with brush/rag.
    • Wipe down the plane’s body with a clean rag.
    • If the body is dirty with oil, sharpening stone mud or fingerprints, clean it all over with your oilpot and wipe. If that doesn’t make it clean, dampen a clean rag along with drop or two of dishwashing liquid (neutral PH), then wring it out as hard as you can. Scrub the body clean with this nearly-dry rag. Caution: We need the soap and water to remove oil and dirt, but making the body wet may cause it too warp. When you’re done, make absolutely sure the body is perfectly dry.
    • Oil the blade and chipbreaker.
    • Reassemble the plane but leave the blade’s cutting edge retracted up inside the mouth opening. How tight should you fit the blade/chipbreaker? Tight enough to firmly retain blade and chipbreaker so they won’t rattle out, but no more.
  4. Condition 4: Long-term Storage:
    • Remove the blade and its chipbreaker entirely.
    • Clean the blade and chipbreaker removing sawdust and all accumulated wood resin as described above.
    • Apply a protective coating of a paraffin wax-based corrosion prevention product such as CRC 3-36. For longer storage under more difficult conditions, CRC SP-350 or CRC SP-400 are even better.
    • After the carrier has evaporated to some degree, wrap the blade and chipbreaker in aluminum foil and store them together with the wooden body so they won’t become separated. Don’t assemble the parts!
    • Clean the wooden body removing all dust, shavings, dirt and fingerprints.
    • Place a mothball in the body’s mouth and wrap the body, along with the blade and chipbreaker, in newspaper, or place it in a plane bag. This will be good for a number of years in any condition except underwater.

Plane Storage on the Workbench, Atedai or Planing Beam

There is some disagreement about how to set down one’s handplanes when they aren’t being used. I won’t consider all the possible options, but will simply present the one that I was taught and use.

The old boys who trained me insisted that it is improper set down a plane with its sole touching the workbench, atedai, tatami mat, carpet or ground for any length of time, but one must instead rest it on its side. After many years of using handplanes, I feel this is a good habit to develop for both Japanese and Western handplanes.

Since I’m right handed, this results in the plane resting on its right side with the cutting edge oriented towards towards the left side as shown in the photo below. This position takes up less space on the workbench, and protects the cutting edge and sole of my plane from contacting anything but air.

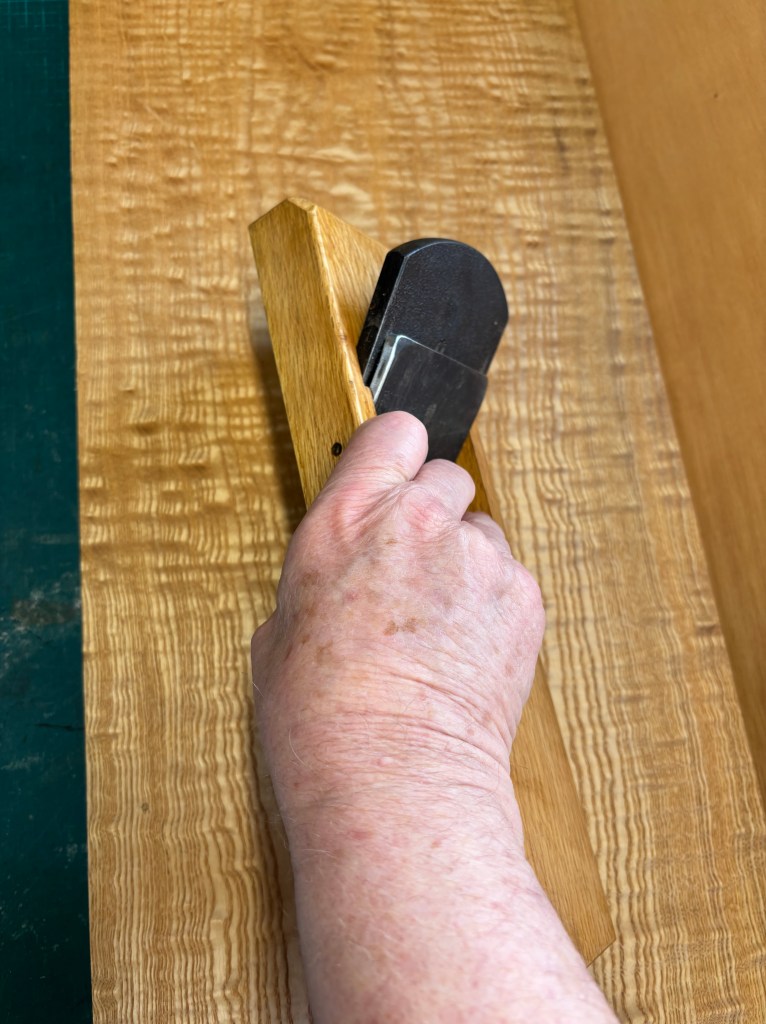
This position is also makes it quick and easy to pick the plane up and get it back into battery without fumbling.

Is it rude to rest the plane sole-down, or will it damage it? Probably not, but seeing a handplane with it’s cutting edge oriented up or down instead of to the side bothers me like a bug crawling on my neck. OCD?

I also rest my planes on their sides when placing them in boxes, toolboxes or toolbags even for long-term storage.

A Japanese carpenter back in the day with his hair done up in the traditional”chonmage” haircut, wearing his employer’s “happi” jacket, and carrying his open-topped wooden toolbox on this shoulder

One can place a plane on any stable surface it’s willing to sit on, and where it won’t be kicked or fall from, even a chair, bench, board, carpet, floor tile, or other flooring material, but never directly on gritty surfaces such as bricks, paving, concrete, or heaven forfend, the naked ground. You see, carelessly allowing hard grit to become embedded in the sole of one’s wooden-bodied handplane is an act that will surely invite harsh judgement in the Great Lumberyard in the Sky.

Place the plane resting mouth-down only when the plane is actively being used or it’s wrapped in cloth or newspaper.

Do all Japanese craftsmen follow this rule? Heck no. Why do I recommend these habits? Well, first of all, because this habit shows proper respect to my tools, to the craftsmen that made my tools, and to those who taught me how to use them. Second, because these habits help my tools last longer with less damage. Thirdly, because it helps to keep my workplace better organized. And don’t forget judgement day!

Until we meet again, I have the honor to remain,

YMHOS

Please Leave a Reply

← Back

Thank you for your response. ✨

Other Articles in the Japanese Handplane Series:

Links to Articles in the Sharpening Series:

The Essential Oilpot

Little strokes fell great oaks.

Ben Franklin

f set up and maintained properly, the blades of quality chisels and planes will endure many decades of hard daily use. In this article your most humble and obedient servant will describe a useful tool Beloved Customer can make yourself, one that will not only make maintenance easier and more efficient, but will make your tools perform better and last longer.

Historical Precedence

Versions of the oilpot have been used in all nations since ancient times. Indeed, we know from the archaeological record that tallow, simply rendered animal fat, was commonly placed in open grease pots to use as a tool lubricant in Europe and America from pre-Roman times right up until petroleum products, including petroleum-based waxes, became widely available in the 1920’s. I am told that the black crust found on many antique plane bodies (wood planes not airplanes) and workbenches is a remnant of this tallow, albeit oxidized, hardened, and combined with dirt.

Indeed, I can recall my father, uncles, and grandfather using sticks of paraffin caning wax for the exact same purpose when I was a child, and before that my English ancestors probably used tallow candle stubs.

Vegetable oil was more commonly used in Asia, and probably in Europe as well.

I haven’t tried soft tallow as a lubricant and probably never will since rancid fat has even less appeal to me than rancid vegetable oil, but I’m confident you will find the solution described below a serious improvement over these ancient methods.

Corrosion Protection

It’s a sad truth that the blades of woodworking tools often receive more damage while they impatiently wait to be used than when they are actually being used. Thankfully, microscopic pitting at the cutting edges of steel tools this sort of neglectful corrosion produces can be easily avoided.

When not in use, please store your chisels, planes and handsaws where they will be protected from dings, dust and large temperature swings. And oil your blades after every use to limit their exposure to oxygen, moisture, and chemicals that might persuade your expensive blades to “turn red and go away.”

A speedy and convenient way to apply good oil to your blades is to use an oilpot, or aburatsubo (ah/boo/rah/tsu/boh 油壺) as it is called in Japan, similar to the one in the photo above. This is an effective, inexpensive, and time-proven tool for this purpose, certainly better than bottles and more economical than spray cans.

Friction Reduction

Oil pots are useful not only for keeping corrosion at bay, they also help minimize the friction your chisels, saws, planes, and knives generate when cutting wood, as well as the energy you need to expend in cutting. By using an oilpot to reduce friction as your blade cuts wood, that same wood, and especially the “hairy” fibers that project into the kerfs of sawcuts, will not deflect the blade away from your intended line of cut as easily, noticeably increasing the precision of your work. Do you doubt me? Give it a try and prepared to be pleasantly surprised

Making the Essential Oilpot

In Japan, an oilpot is traditionally made by cutting a joint of well-dried, large-diameter bamboo into a cup 3 to 4 inches deep. If you don’t have access to bamboo where you live, a hollowed-out piece of some close-grained wood suitable for making water-tight barrels, such as white oak, or a plastic mug, or even a segment of capped PVC pipe will work just as well. The important thing is that the container not be made of metal, glass, ceramic or any other material approaching the hardness of a chisel blade. While convenient and sized right, tin-plated steel cans are risky.

Shape the bottom or foot of the cup so it will rest on a more-or-less flat surface with a few irregularities. Some people scallop the bottom and foot so it rests on only three or four spots at the foot’s perimeter thereby making it more stable on irregular surfaces. And a piece of sandpaper glued to the bottom of the container will prevent your planes from dragging it around when you pass their soles over the wick.

If you use bamboo or wood, be sure to prime and paint both the inside of the cup, and underside of the foot, with a high-solids urethane or polyurethane paint. I used a natural urethane extracted from the cashew tree called “Cashew” on the bamboo joint in these photos. The gaudy orange color is not a fashion statement, but makes it easy to differentiate my oilpot from others on a jobsite

If you make your oilpot from bamboo or wood, after painting it be sure to line the inside of the cup with an unbroken sheet of aluminum foil to prevent the oil from soaking through. The paint alone will slow down the oil’s movement through the wood’s fibers, but sure as hogs are made of bacon, without an impermeable liner of some sort, it will eventually seep out making a mess. An aluminum foil liner will fix this.

Next you will need some clean, white, cotton T-shirt fabric. Used clothing is fine. White because you want to be able to tell how dirty the fabric is at any time. T-shirt fabric because it’s knitted, not woven, and sheds the least fibers, unlike flannel. Clean because pixies hate it. If you don’t believe me, just ask them.

Roll the cloth up very tightly into a wick just a hair smaller in diameter than the inside of your container and bind it tightly with string or thread. You should be able to force this dense cloth wick tightly into the cup with approximately ½” projecting above the lip. It must be a tight enough fit to prevent the wick from falling or pulling out accidentally, but not so tight it breaks the container. It will take several tries to judge just the right amount of fabric, so be patient and keep at it until you get it right.

Add Oil

Now that the oilpot is made and wick installed you need to add some oil. Just soak the cloth wick with your favorite lubricant and you’ll be ready to rock-n’-roll like Zeppelin. It will take some time for the oil to saturate the dense wick, so be patient or it may overflow without saturating the wick. I get impatient and spill a little oil sometimes (ツ).

In Japan, I was taught to use vegetable oil and change the wick when it became rancid, which it always did. But I recommend Beloved Customer be smarter than I was back in the days when dinosaurs roamed the earth and use a non-organic oil from the start. Stinky wicks are not only unpleasant, but more importantly, rancid oil encourages corrosion.

Some people prefer to use straight mineral oil or scented furniture oil, which is just perfumed, industrial-grade mineral oil. The lemony smell of furniture oil is nice. But please avoid any furniture polishes or oils that contain insidious silicon because it will weaken glue bonds.

Please also be especially careful to avoid linseed oil. A wick loaded with such oil is inviting spontaneous combustion, a dangerous inconvenience in a woodshop.

Some people prefer to use camellia oil, an organic product with a long history of usage as a lubricant, cosmetic and hair oil in Japan. But beware that the so-called camellia oil sold for rust protection nowadays is actually just mineral oil with a bit of yellow dye and some fragrance added, sold at an inflated price, much like commercial furniture oil. Caveat emptor, baby.

Mineral oil is a petroleum distillate sold as lubricant laxative in pharmacies. It’s not only cheaper than the fake “tsubaki abura,” or “sword tsubaki” sold as tool oil, but is higher quality and performs better than genuine camellia oil because it will not become rancid and gummy.

While it sounds strange, the best lubricant by far in my experience is a lightweight, light-colored 100% synthetic motor oil such as Mobile-1 (5W). I have tried regular motor oil too, but the synthetic variety smells better, lasts longer and seems to perform better. And while I like to flatter myself that I’m a “high-volume guy,” my chisels never get hot enough nor rev high enough to justify the zinc, organic sulfur, or chlorine compounds added to high-performance motor oils. Your mileage my differ. (ツ)

Oilpot Storage

Store your oilpot in a metal or plastic container with a lid when not in use to prevent abrasive dust from contaminating it. Some people make a container from a segment of PVC pipe with a flat end-cap glued on one end to form the bottom of their oil pot and a domed cap slipped on the other end to serve as a lid. I use a tin can with a slip-on lid to store my bamboo oilpot.

Place a pad of newspaper in the bottom of your container to absorb any oil seepage and cushion the pot from rattling around.

Even a plastic bag will do until you find something better.

Using the Essential Oilpot

This is the most important part of this article.

When you are cutting a mortise with your chisel, make it a habit to occasionally jab its cutting edge into your oil pot’s wick, and even wipe the sides and ura (flat) on the wick to lubricate the blade. You will be pleasantly surprised to find that this bit of oil will make your chisel work not only go faster, but more precisely and with cleaner results. Don’t worry, mon ami, the oil will not weaken glue bonds, so long as it doesn’t contain silicon, I promise.

Likewise, when using a handplane, occasionally swipe its sole over your oil pot’s wick, or rub the wick over the plane’s sole. This little bit of oil will greatly reduce friction, reduce wear on your planes’ soles, and give you more control. But, if you value your public dignity, be forewarned that the first few cuts you make after doing this will make you grin like a lunatic! (ツ)

The same benefits of reduced friction and increased precision can be found in the case of handsaws too, although the difference may not be as noticeable.

Before you store your tools away for the day, a dab of oil from your ever-present oil pot will prevent rust and frustrate corrosive iron pixies.

Maintaining the Essential Oilpot

During use, the cloth wick will naturally become frazzled, coated with sawdust and wood chips, and will discolor accordingly. Not a problem!

If, heaven forfend, you drop the oilpot and it hits the ground, Murphy’s Law of Buttered Toast dictates it will land oily-cloth down contaminating it with abrasive grit (unless you work in a cleanroom). If ignored, frikin Murphy will smugly use your oilpot to damage your tools and ruin your work. But never fear: simply brush the wick vigorously with a steel-wire brush and all the sawdust, wood chips, dust, grit and pixie golf balls will be gone. The sound you will hear while doing this will be Murphy gnashing his teeth in frustration.

Of course you always have a steel-wire brush close at hand to remove embedded grit from boards before planing them, right?

When the wick becomes too dirty for the steel wire brush to clean (difficult to imagine though that may be) you can either cut off a few millimeters to expose uncontaminated cloth, or replace the cloth wick to present a clean surface.

As the cloth wears, the wick will shorten and stop projecting from the oilpot’s mouth. When this happens, simply remove the wick and place some clean rags in the bottom to elevate it thereby restoring the necessary projection.

The oilpot is an ancient, dirt-cheap tool you will find to be an invaluable addition to your woodworking tool kit. I promise it will make you grin when using handplanes!

YMHOS

© 2023 Stanley Covington All Rights Reserved

Related Articles:

Tool Maintenance – Corrosion Prevention

If you have questions or would like to learn more about our tools, please click the see the “Pricelist” link here or at the top of the page and use the “Contact Us” form located immediately below.

Please share your insights and comments with everyone in the form located further below labeled “Leave a Reply.” We aren’t evil Google, fascist facebook, or a Director of the CIA and so won’t sell, share, or profitably “misplace” your information. If I lie may ticks, fleas and biting flies be my only friends.

← Back

Thank you for your response. ✨

Please Leave a Reply