If a craftsman wants to do good work, he must first sharpen his tools.
Confucius, The Analects
We talked about the Ura in the previous article in this series (Part 9).
It is a defining detail in most Japanese woodworking blades, and one we must understand if we are to efficiently sharpen them, so in this post we will examine this important feature in more detail.
What is the Ura?
Japanese plane and chisel blades have a unique and intelligent design feature at what is called the “flat” on Western plane and chisel blades, and is called the “Ura” (pronounced oo-rah) in Japan.

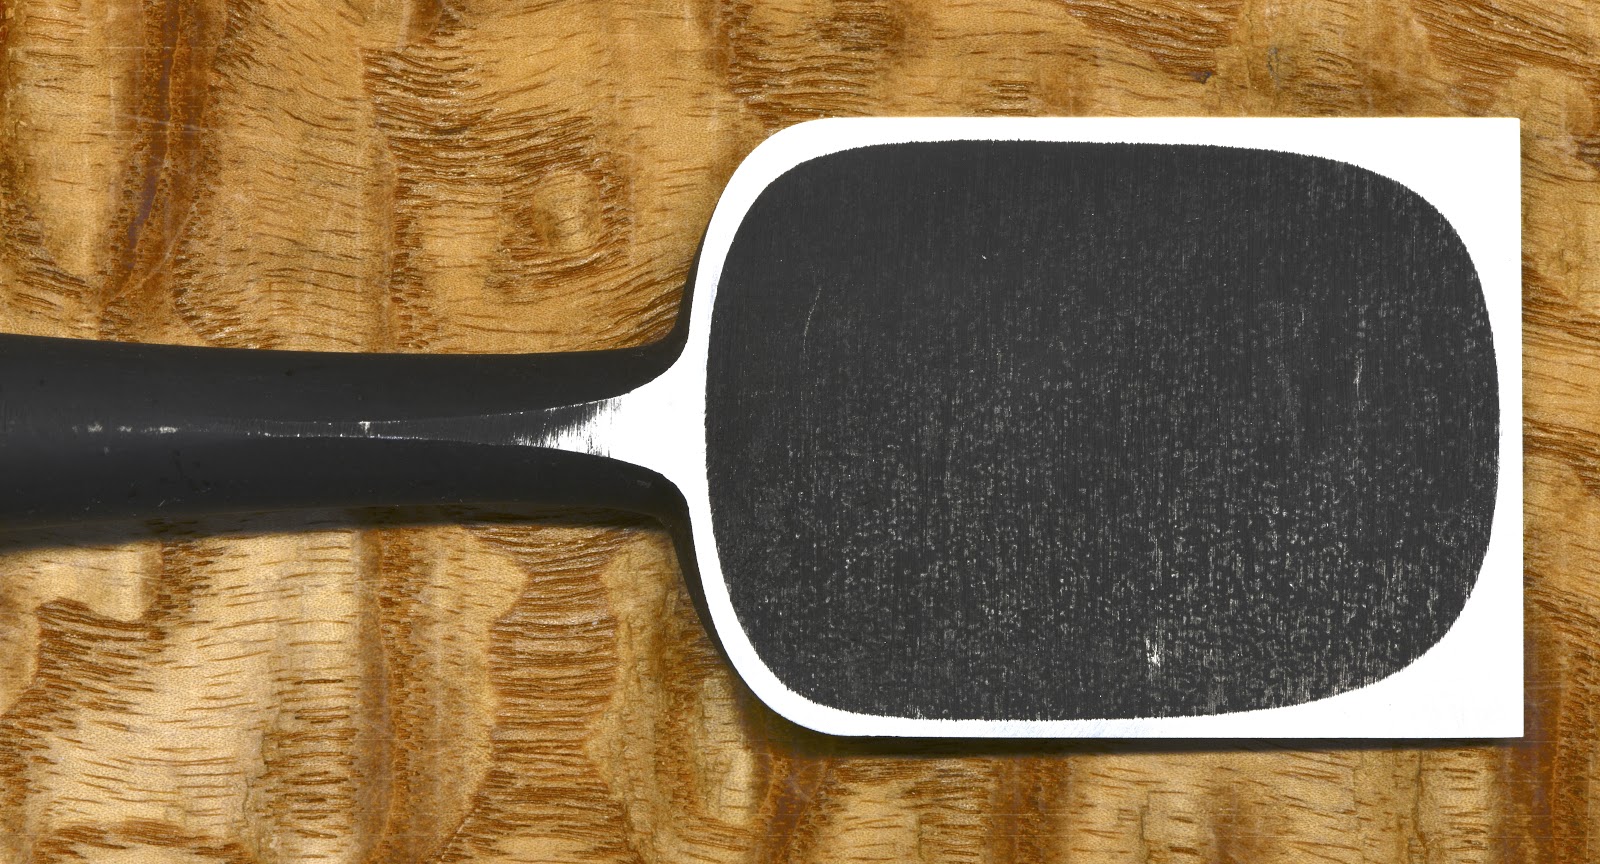
Ura translates into the English language as “bay,” as in a protected area where the sea meets the shore. At the center of the ura is a hollow-ground, depressed area in the hard steel hagane layer called the “uratsuki,” meaning the ura hollow.
In the photos on this page the uratsuki is left black from the forge, but some prefer this to be polished bright. Your humble servant prefers the natural, old-fashioned, black oxide finish, not because of my exquisite fashion sense (fashion is my life, after all!), but because the unpolished, oxidized surface can tell us much about what the blade experienced during the quenching process, and perhaps even the quality of the blacksmith’s work.
On the other hand, while a polished ura is by no means a hallmark of shoddy workmanship, it’s an undeniable fact that polishing the uratsuki polished ura hides all this information.
The ura is neither an accident nor a fashion statement, but serves two distinct purposes.
The first purpose of this design is to make that it easier and quicker to keep the four bright steel lands on this face of the blade planar. But why is that a matter of concern? If you pay attention when sharpening your wide Western chisel and plane blades lacking the details of the Japanese uraura, you will notice that, after many sharpening sessions, the blade’s flat, which was once planar, tends to become convex with a high point at the flat’s center making it difficult to keep the extreme cutting edge, especially the corners of the blade, in close contact with the sharpening stone. Yikes!
This doesn’t occur because you don’t know how to sharpen your blades, or because of pernicious pranks by pesky Pixies, but simply because your sharpening stones/platens/paper tend to abrade the blade’s perimeter more aggressively than the center. The resulting curvature makes it more difficult and time consuming to accurately polish, and thereby sharpen, the flat’s extreme cutting edge. Major buzzkill.
Because of the most excellent ura, Japanese woodworking blades are quickly fettled initially and tend to stay planar without a second thought for many years of hard use, an important benefit if you count your time worth anything.
The second purpose of the ura is to reduce the square inches or square millimeters of hard steel you must polish during each sharpening session. As you can see from the photo above, the four shiny perimeter lands are all that touches the sharpening stone. Compare this with the central black area which doesn’t touch the stone at all. That’s a lot of hard steel you don’t have to deal with.
Besides making the job easier, this detail saves a lot of time when sharpening and helps one’s expensive sharpening stones last longer. Time is money and stones ain’t cheap, as my old foreman scolded me many times (lovingly, I’m sure).
Even if you don’t use your tools to make a living, you should at least recognize that time spent sharpening is time making wooden objects lost.
The Downside Of the Ura

Despite my poetic praise, the ura detail is not all blue bunnies and fairy farts, because it does have one unavoidable downside: Over many sharpening sessions the Ura unavoidably becomes gradually shallower, and the lands surrounding the Ura on four sides become correspondingly wider. Nothing lasts forever except regrets and taxes.
It is not uncommon to see old chisels and plane blades with the hollow-ground area of the ura almost disappeared. You can postpone this day by sharpening your blades wisely. However, in the worst case where the ura disappears entirely, you will still be left with an entirely usable Western-style flat, so not all is lost.
In future articles in this series we’ll consider how to keep our lands as skinny as possible as long as possible, and how best to keep uratsuki as deep as possible as long as possible.
In the case of plane blades, unless the plane’s ura is subjected to a brutal sharpening regime, the land that forms the cutting edge (called the “ito ura” meaning “strand” as in a flat area on a riverside, in Japanese) tends to gradually become narrower, and even disappear entirely after numerous sharpenings. Of course, when this happens, the blade loses its cutting edge, and the land must be restored by “uradashi” (oo-rah-dah-she) aka “tapping out” or bending the cutting edge towards the ura side, and then grinding it flat to form a new ito-ura land. Tapping out a blade requires some caution, but is not difficult. We will discuss the how-to of this aspect of blade maintenance in a later article in this series.
In the case of chisels, which have smaller and shallower ura compared to wider plane blades, the land at the cutting edge does not typically require tapping out, although it’s certainly possible to tap out wider chisel blades. Narrow chisel blades, on the other hand, are difficult to tap out without damaging them due to the rigidity produced by the hard steel layer (detailed in the previous post in this series) wrapped up the blade’s sides.
Mitsuura Chisels


Some chisels are made with multiple ura, typically called “mitsuura” meaning “triple ura.” Mitsuura chisels are more difficult to sharpen than chisels with a single ura because the total area of hardened steel that must be polished is comparatively larger. The ura of mitsuura chisels also tend to wear-out quicker than single-ura chisels because each individual uratsuki is shallower in depth than standard uratsuki. They look cool, but I am not a fan of multiple ura except in a few specific applications.
In the next stage of our journey into the mist-shrouded world of sharpening hard steel blades, we will wander through the metaphysical realms of the “Fae.” A word of caution: Be sure to have a brass bench dog in your pocket when you leave the well-lighted pathways and accept neither food nor drink from anyone’s hand until we return, not even a cheeseburger with fries. ☜ (◉▂◉ )
YMHOS

If you have questions or would like to learn more about our tools, please click the “Pricelist” link here or at the top of the page and use the “Contact Us” form located immediately below.
Please share your insights and comments with everyone in the form located further below labeled “Leave a Reply.” We aren’t evil Google, fascist facebook, or the CCP and so won’t sell, share, or profitably “misplace” your information. If I lie may I drown in my own uratsuki.


Links to Other Posts in the “Sharpening” Series
- Sharpening Japanese Woodworking Tools Part 1
- Sharpening Part 2 – The Journey
- Sharpening Part 3 – Philosophy
- Sharpening Part 4 – ‘Nando and the Sword Sharpener
- Sharpening Part 5 – The Sharp Edge
- Sharpening Part 6 – The Mystery of Steel
- Sharpening Part 7 – The Alchemy of Hard Steel 鋼
- Sharpening Part 8 – Soft Iron 地金
- Sharpening Part 9 – Hard Steel & Soft Iron 鍛接
- Sharpening Part 10 – The Ura 浦
- Sharpening Part 11 – Supernatural Bevel Angles
- Sharpening Part 12 – Skewampus Blades, Curved Cutting Edges, and Monkeyshines
- Sharpening Part 13 – Nitty Gritty
- Sharpening Part 14 – Natural Sharpening Stones
- Sharpening Part 15 – The Most Important Stone
- Sharpening Part 16 – Pixie Dust
- Sharpening Part 17 – Gear
- Sharpening Part 18 – The Nagura Stone
- Sharpening Part 19 – Maintaining Sharpening Stones
- Sharpening Part 20 – Flattening and Polishing the Ura
- Sharpening Part 21 – The Bulging Bevel
- Sharpening Part 22 – The Double-bevel Blues
- Sharpening Part 23 – Stance & Grip
- Sharpening Part 24 – Sharpening Direction
- Sharpening Part 25 – Short Strokes
- Sharpening Part 26 – The Taming of the Skew
- Sharpening Part 27 – The Entire Face
- Sharpening Part 28 – The Minuscule Burr
- Sharpening Part 29 – An Example
- Sharpening Part 30 – Uradashi & Uraoshi

Leave a comment