Beginning Tools – Part 1 Measuring, Marking and Layout

An antique craftsman-made sumitsubo with shishi lion and peony perched on the lip of the “pond.”

A good tool improves the way you work. A great tool improves the way you think.

– Jeff Duntemann

Over the years your most humble and obedient servant has received many inquiries from Gentle Readers new to woodworking about what tools they should procure at the very beginning of their adventure. The internet is chock-a-block with both confounding confusion and beaucoup BS on this subject, some dribbling from amateurs and even more sprayed by marketing pukes and clickbait sages. Heretofore I haven’t really scribbled anything on the subject in this blog.

But now, at this fork in the crossroads, beginning with this article your penitent servant will share some thoughts about what tools a beginner needs to perform a lifetime of excellent woodworking, with minimum wasted time and funds, and the recommended priority for obtaining them.

Reluctant Advice

From this point forward I will be so bold as to make some suggestions about the the tools I recommend.

But first allow me to explain my viewpoint on the subject to help you gauge how much saltpeter and sulfur to mix with your charcoal, if you follow the allusion. You see, I enjoy giving Beloved Customers excellent choices in tools, but I’m allergic to giving casual advice. Why? Because even advice given honestly, with the best of intentions, and without profit motive often yields bad consequences. And sneezing.

In Proverbs 12:15 it’s recorded that Solomon the Wise (and disobedient) taught the following: “The way of a fool is right in his own eyes; But he who heeds counsel is wise.” Sounds good, I suppose, but does this mean that the man who’s convinced his honest decisions are correct, even after much study and experience, must still be a fool? Are only those who rely on counsel wise? What if the counselor he relies on is a blasted fool or a greedy, lazy influencer? Is all counsel equal in value?

King Solomon’s most famous descendant once said “Ye shall know them by their fruits.” Sounds like reasonable evidence-based judgment to me. So what were the fruits of Solomon’s advice? The record tells us that he thought his judgement so wise that he frequently ignored it on an epically immoral scale and with tragic, destructive results.

While less decisive than Proverbs but equally concise, I think Professor Tolkien’s insight on the subject may be even wiser, and so I have taken it to heart. In the Lord of the Rings he wrote “Advice is a dangerous gift, even from the wise to the wise, and all courses may run ill.”

Solomon’s fabulous famous folly aside, your humble servant has seen first-hand ostensibly wise advice purchased from reputedly wise “experts” at unjustifiably high cost run horribly ill too many times, so I dislike giving advice. And there’s the sneezing thing too, of course.

But since advice is what’s required, in this series of articles I will climb far out on a skinny tree limb to offer the following advice on two conditions. First, I insist Gentle Reader accept the value of this advice as worth no more than what you pay for it (nothing), and second, that any consequences that spring from your acting on this advice are entirely yours. Accordingly, I won’t be offended if, like Solomon the Wise, you decide to ignore it entirely and get yourself another hundred foreign girlfriends instead.

Anyway, back to the subject at hand.

Tool Categories

The following are the four basic categories, by function, of the tools I believe a beginner needs to possess to get started in a lifetime of woodworking, whether as a career or hobby. You’ll most likely need all the tools listed here eventually, but you won’t need them all at once to make excellent things from wood. The categories are as follows:

  1. Measuring, Marking and Layout Tools: 
  2. Sawing Tools
  3. Chiseling Tools
  4. Planing Tools

Of course, depending on your projects, you’ll need tools that don’t fit neatly into these four categories, such as those used for processing trees and making lumber, nailing, boring/drilling, screwing, gluing, clamping, laminating, sanding, edge treatment, assembly, and finishing. When it comes to these other categories of tools, I can only encourage Gentle Reader to rely on your prodigious innate common sense.

Each list is divided into two tiers. The first tier includes absolutely necessary tools. The second tier lists essential tools you will eventually need, but can get by without until later.

So let’s begin by examining the minimum measuring, marking and layout tools every beginner needs. I will deal with the other categories in future posts. If I’ve forgotten anything critical, please let me know in the comments form below.

Essential Measuring Tools (Tier 1)

While chopping, sawing, carving, joining and planing get all the attention, final results in woodworking (and all physical trades for that matter) can never be better than one’s skills at measuring, marking and layout, so woodworkers and builders need to own the related tools and master them.

By no means sexy jobs, both ancient and modern history provides endless examples of poorly performed measuring, marking and layout work buggering cost, schedule and quality goals with a barge pole wrapped in barbed wire. No wonder these jobs have historically been assigned to the most experienced and intelligent craftsmen. The simple tools included in this category will serve you well in any handwork activity, not just woodworking.

One caveat. I have listed a few tools below that are modern precision tools beginners should own and learn to use skillfully, but I know a few purists who find such tools violently repulsive. The truth is that the more experience one obtains, the less one tends to rely on absolute measurements in millimeters, inches, or cubits, and more on relative precision. But possessing the tools to perform precise measurement is nonetheless necessary if you plan to do quality work.

Necessary Measuring Tools (Tier 1)

You’ll need the following essential measuring tools from day one.

1. Quality Tape Measure with an accurate sliding hook (check to make sure it’s not sloppy). Size will depend on the projects you plan to undertake, but 2-4 meters is a minimum useful length for cabinetry, furniture making and joinery. Get a reputable name brand, with a warranty. Avoid like an Asian giant hornet with flaming hemorrhoids any cheapo crap made in China, India or Vietnam. Tape measures are a bit delicate and don’t last forever, so treat yours gently and check it frequently against your precision straightedge for accuracy and damage. Do not rely on it for great precision. Since ancient times the folding scale has been thought superior, a sentiment with which I agree in the case of some jobs. But in general nothing beats a quality steel tape measure for most quick and dirty measuring tasks.

2. Precision Straightedge (12”/300mm long) with accurately, deeply etched graduations. This is a precision measuring and layout tool. Good quality graduations are useful for precisely indexing and guiding layout tools such as pencils, pens, divider points, and a marking knife. Hardened stainless steel is ideal for durability. Best if it’s made to high quality standards (JIS, etc.). You’ll use it not only for measuring and checking the accuracy of your other tools, but more frequently for checking that surfaces are flat and free of wind (twist). If treated with respect, it will serve you well for a lifetime. 

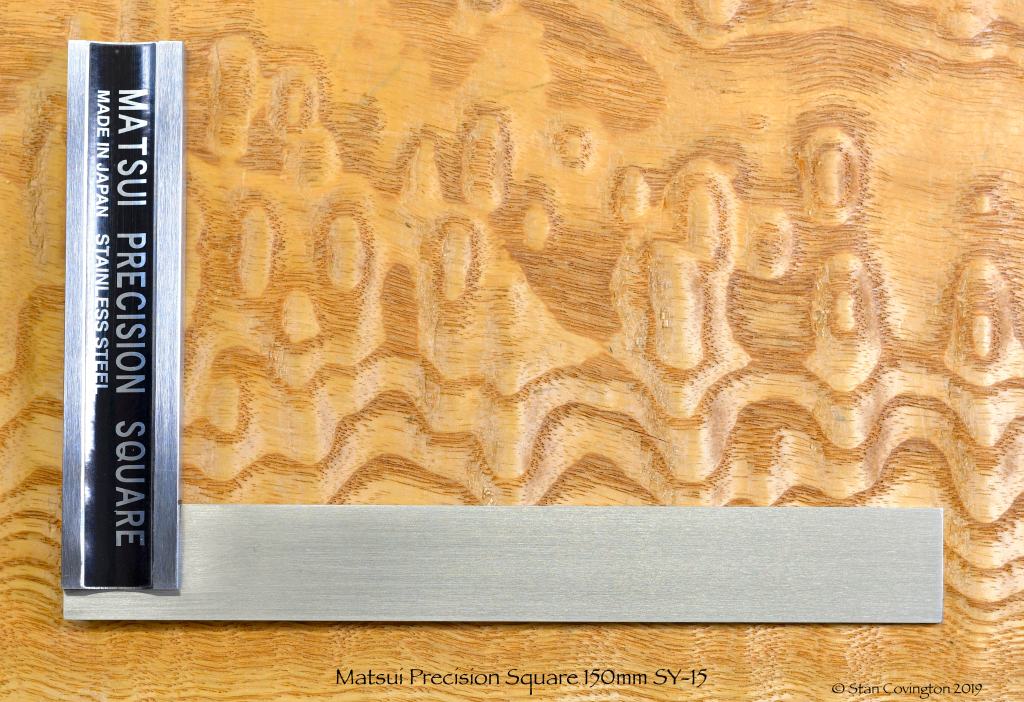
3. Try-square (see item 2 below). The handy dandy try square has many uses as a measuring tool, but rather than making numerical measurements, its most important job is checking that right angles of components, tools and assemblies are indeed 90˚ , a check one must make constantly and quickly when planing/machining the components of furniture, joinery and cabinetry and casework not to mention setting up portable and stationary power tools. Most try-squares sold nowadays are poor quality Chinese or Indian junk that are out-of-tolerance when new. I too like pretty tools and realize that a plain stainless steel square doesn’t look as cool as more traditional squares with rosewood stocks and brass fittings, but the blade and the stock should both be made of stainless steel and should be solidly welded to each other, not glued or pinned. Best if the blade is hardened. Graduations are not necessary. Get this essential tool wrong and all is lost.

Necessary Measuring Tools (Tier 2)

4. 1-meter stainless steel precision straightedge. This tool needs to be certified by a reputable standards organization, such as Japan Industrial Standards Committee (JIS), NIST: National Institute of Standards and Technology (USA); UKAS United Kingdom Accreditation Service (UK); DIN (Deutsches Institut für Normung), etc.. Why does certification matter, and why is it worth the extra cost? Fraud and deceptive marketing are more common now than ever, with many well-known manufacturers taking a page from Chinese Best Industrial Practices of bait, lie, mislable & switch. In the case of a tool certified by an organization such as NIST, JIS, DIN etc. with a valuable reputation to lose, you are much less likely to be fleeced by quality crooks. Indeed, this tool, along with the 12″/300mm straightedge and try square listed above must be accurate enough to serve as one of your own in-house “standards.” It must not only be extremely straight when new and stress-relieved, to avoid future warping, but it must have deeply, uniformly, precisely-etched graduations. It’s OK if it spends most of its life hanging from a nail on the workshop wall, because there will be times when it will be critical for quickly for checking surfaces for flatness and wind, layout, assembly, dimensioning boards and fettling handplanes.

5. Caliper Gauge: This gauge can be of the vernier, dial or digital variety, whichever type you like and can afford. Once again, buy a certified product. This tool is useful for precisely and quickly measuring, comparing and laying out distances and dimensions. Some are sold with carbide tips convenient for directly scratching layout arcs/lines/points in harder materials such as metal or stone. Will you use it constantly? No, but for those tasks where it’s needed, nothing works as well or as quickly. Quality vernier calipers cost much less than the dial or digital variants, and are not as delicate, but take more time and concentration to use well. Once again, nothing made in China, India, Vietnam, Cambodia, etc. When in doubt, I buy Mitsutoyo.

Necessary Layout & Marking Tools

Try Square (same as see item 3 above). This tool is absolutely indispensable for layout and marking of joinery, cabinetry, and furniture work. 100-150mm is a handy size for furniture work. Even if your workshop has been thoroughly purged of pernicious pixies this tool will be dropped, and will wear out in-use, so a useful one will have a welded (not just pinned) connection between the thinner blade (aka beam or tongue) and the stock. And, this is important, the blade will be made of hardened stainless steel. Graduations are totally unnecessary. Used for marking 90˚ lines and checking for squareness. Matsui Precision makes the best one I am aware of after much searching and hands-on experience in the field.

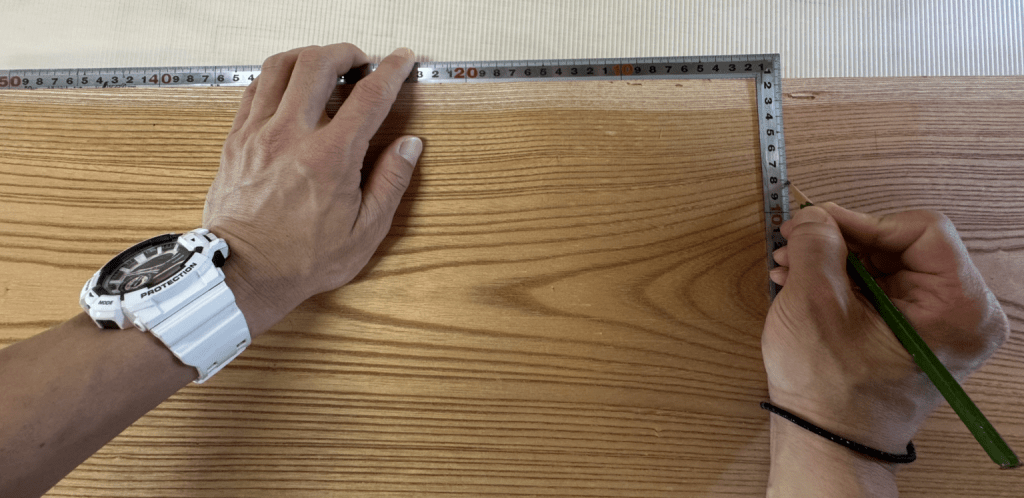
7. Framing/Carpenter’s/Builder’s Square.

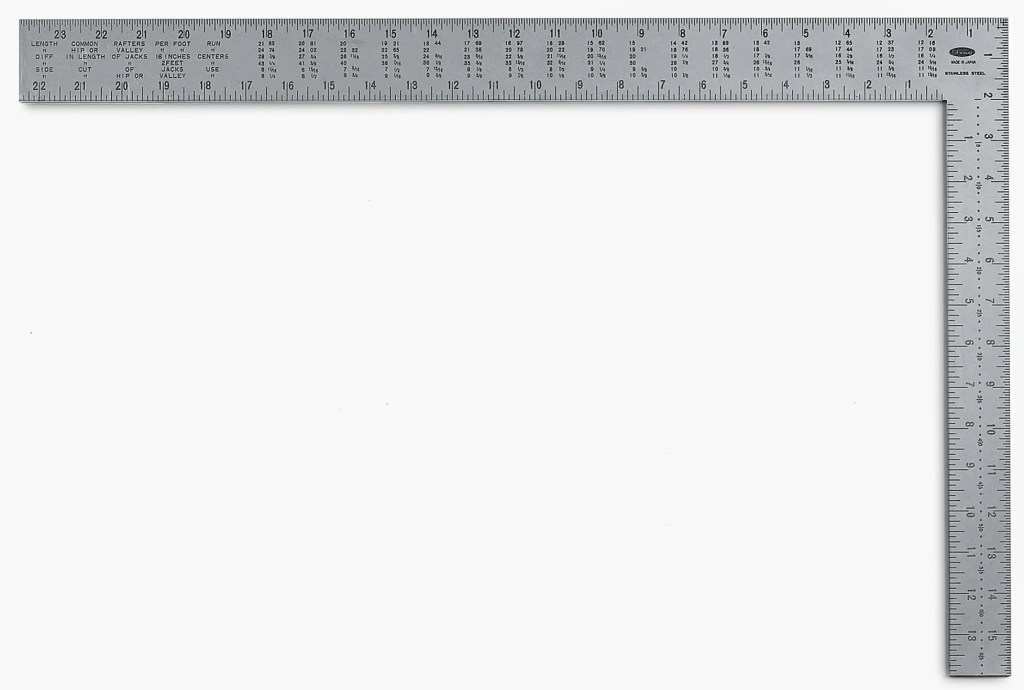
Essential for checking lumber, laying-out and marking of larger joints, casework, checking square of larger joints and assemblies, working with doors, panels, and plywood, and many other tasks. Regarding materials, carbon steel squares are heavy and always turn red and go away, so I don’t recommend them if you have a choice. Stainless steel is more durable, but still heavy and costlier. Aluminum will suffice. You may need to true it, but this is easily done with a hammer, punch and file. Just ask me how when you think it’s necessary. This is a tool with a long history you should be proud to own. In all nations more than a few centuries old, the carpenter’s square has been associated with stability, honesty, righteousness and order, all traits a craftsman should seek to foster in himself, his family and his crew. In Japan, this tool was traditionally extremely expensive and was considered the craftsman’s “spirit” in the same way the sword was revered as the warrior’s spirit by the warrior caste. Indeed, in past centuries, stepping over a carpenter’s square resting on the floor or even ground was seen as a mortal offense resulting in bloodshed at times. Such emotional sentiments did not extend to other carpentry tools. The Japanese version of this tool goes by several names written several ways including “kanejaku,” “magarijaku”(written 曲尺or 矩尺), “sashigane”指矩, and several other names. Don’t ask me why. Unlike the Western square of uniform thickness, the better Japanese kanejaku have a variable cross section for less weight/greater rigidity. Being thinner, smaller, more flexible, and much lighter in weight, the Japanese square is handier to transport and use in the field. Of course, it has a couple of disadvantages such as not handling longer/wider boards as well, and being more difficult to control because it’s more flexible. Horses for courses, of course, so I own and use both types.

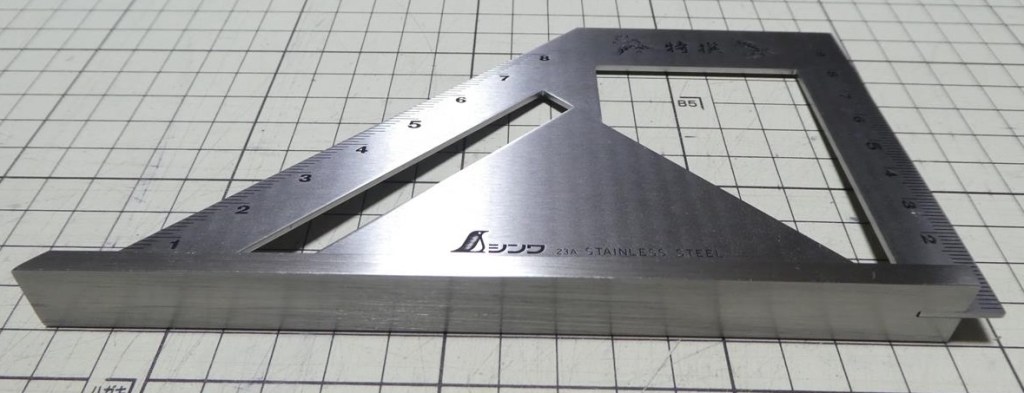
8. 45˚ Stainless Steel Layout Tool or quality speed square for laying-out miters. An accurate combination square will work too, but such tools are relatively expensive and quite fragile. The Shinwa tool shown below is cheaper, much tougher and absolutely reliable.

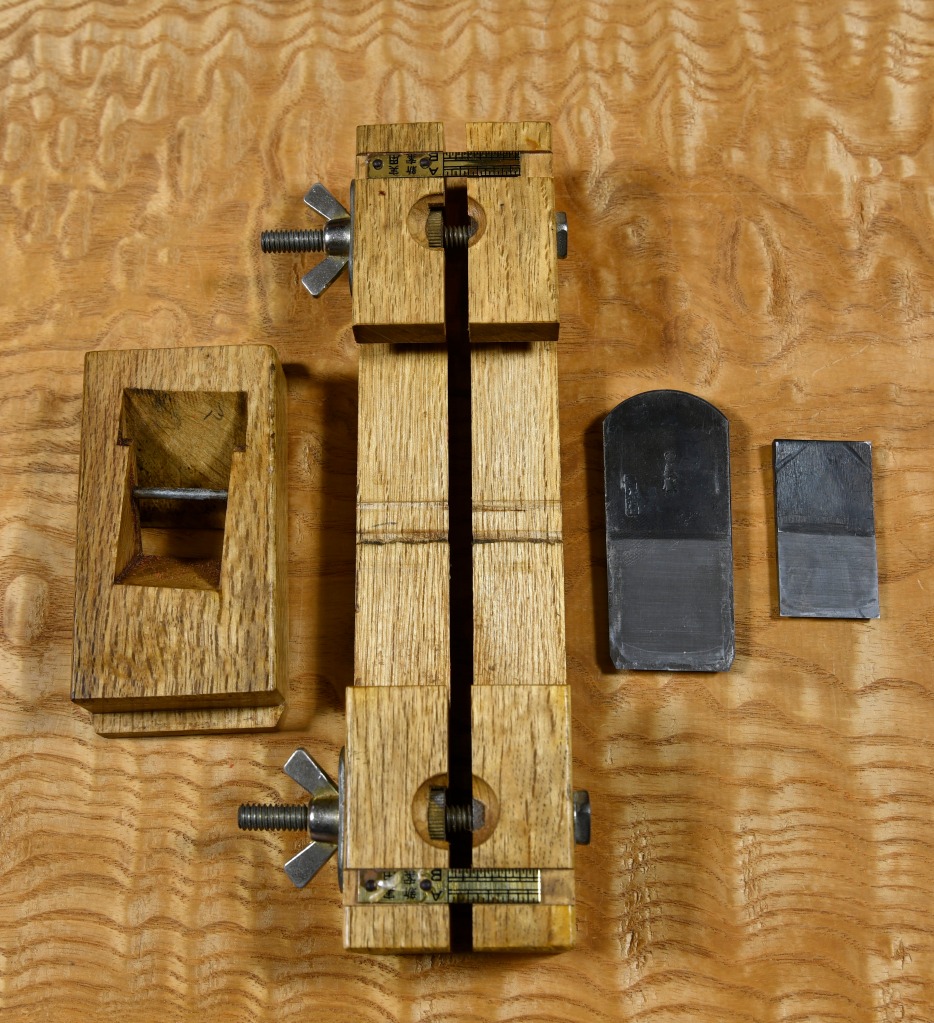
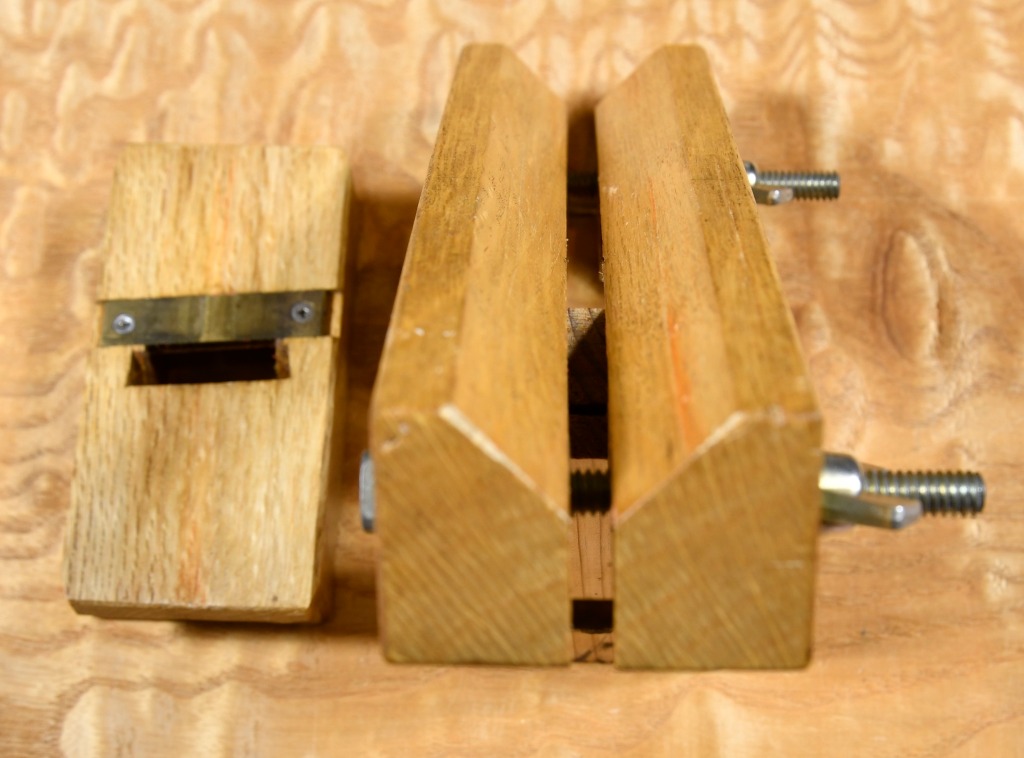
9. Marking Gauge: There are many types of marking gauges, most of which the craftsman can make himself without special tools or machinery. Perhaps this will be the subject of future articles. In any case, you will need at least 2 types of gauges.

The venerable old Stanley No.65 marking gauge.

The classic type has a single pin or blade to cut/scratch a single line with each stroke and has been around since Moses wore gator skin loafers. You can make versions from scrap wood, nails, or scrap steel easily yourself.

An excellent kamakebiki mortise gauge by Kinshiro

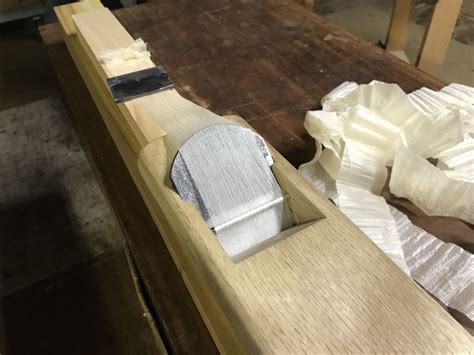
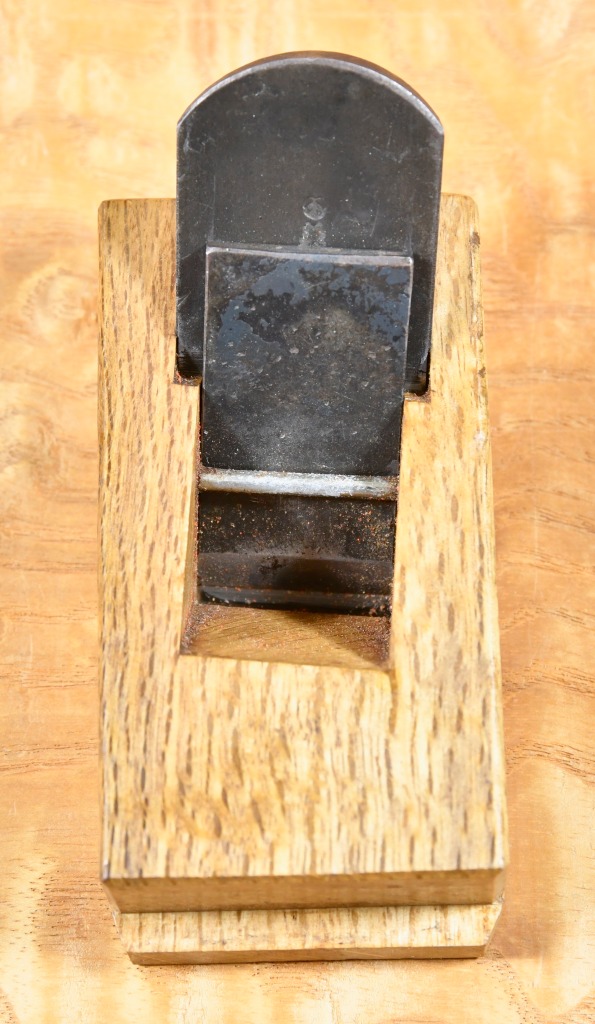
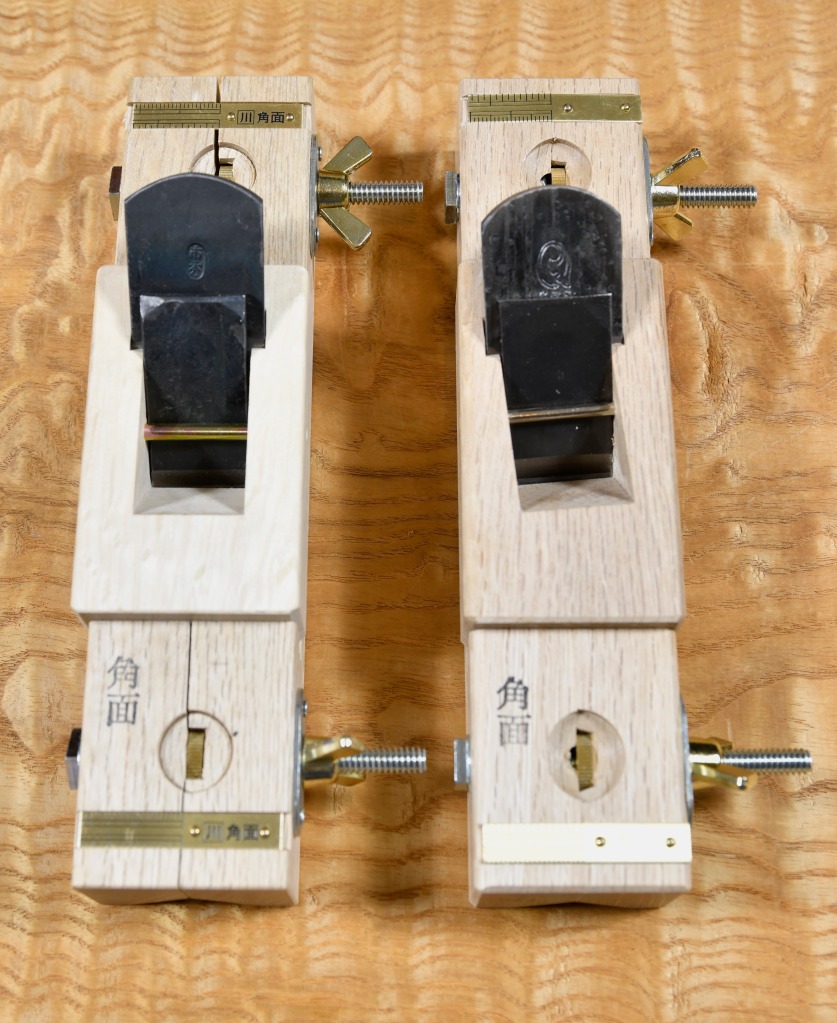
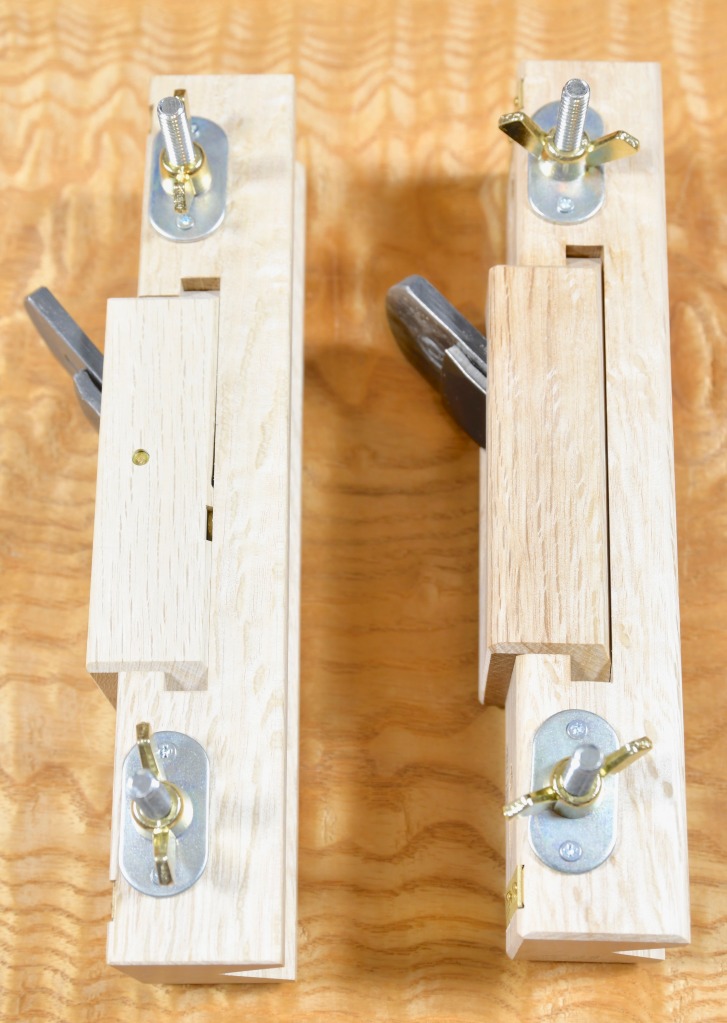
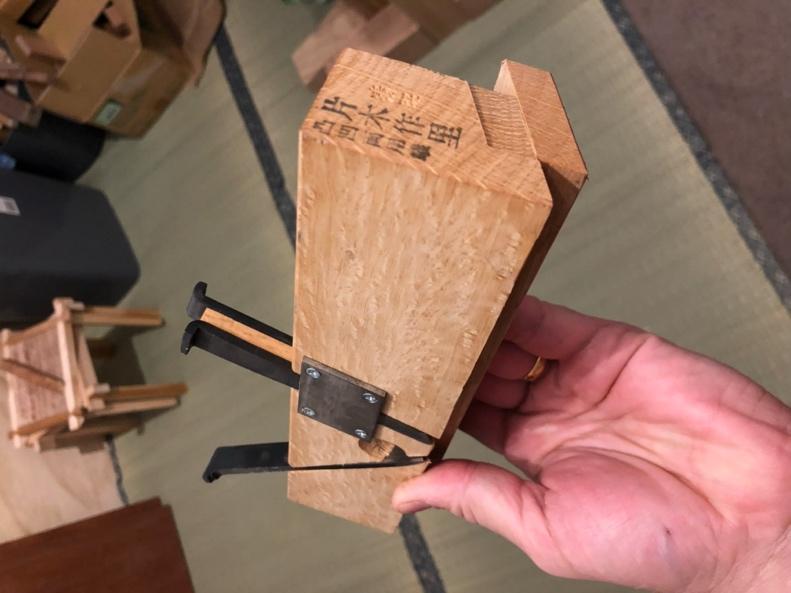
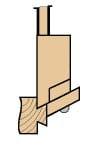
The second marking gauge you should have is called a “mortise gauge.” This tool has two pins or blades to make 2 parallel lines, at a set distance from each other, with a single stroke. It’s especially suited for quickly and precisely marking mortises and tenons and installing hardware. I prefer the Japanese version of the mortise gauge called the “kamakebiki” (sickle mortise gauge shown above) which has two L-shaped steel blades, easily adjusted and easily resharpened. A handy tool indeed.

Having multiple marking gauges on-hand will help to minimize the time you must spend resetting/adjusting the pins/cutters, a principle key to performing precise work consistently because every time a gauge is reset, error creeps in, sure as pigs are made from bacon. Marking gauges are simple tools easily mastered, but don’t underestimate the importance of owning a few and mastering them completely.

TheTite-Mark marking gauge

The Titemark gauge is an excellent tool, not only because it cuts consistent lines, but because it can be quickly and precisely set using a single hand and no tools. The only downside is the depth of cut is shallow and the cutter is easily damaged.

10. Carpenter’s Pencil. Useful for the same marking jobs as a plain pencil, but if one sharpens its wider lead to a chisel edge, it will be more durable (won’t break as easily) and last much longer than a standard pencil.

11. Divider/Compass. An essential tool for layout used to quickly and accurately transfer distances from straightedge or layout stick etc. to a workpiece. Of course, it can perform all the classical geometrical tasks that have made this tool essential to skilled craftsmen, architects and engineers worldwide for millennia. A spring divider is adequate, but finances permitting, Starrett 92-6 or 92-9 dividers shown below are worth every penny. I always have at least two on-hand to minimize the lost time and inaccuracy frequent resetting entails.

12. Ballpoint Pens: Not often thought of as a precision layout tool, inexpensive ballpoint pens are more durable than pencils and can make a permanent mark or line of consistent width without needing to be resharpened. Too wide for accurate layout, you say? Practice perfectly sawing in half the centerline of a line drawn with a pen and you’ll change your tune.

13. Marking Knife and/or Scriber. Instead of leaving a line of ink, chalk or graphite on the surface of a board, these tools cut or scratch a permanent line into the surface of material being worked into which divider points and the blades of cutting tools such as chisels, saws and even planes can be indexed quickly, reliably and without the need for expending much attention, greatly increasing speed and confidence in one’s layout. Essential tools. Here’s a Link to an article on the subject.

A Japanese-style marking knife, a simple but surprisingly sophisticated tool.

14. Inkpot and/or Chalkline: For making long straight lines on wood, concrete, steel, gypsum board, etc. The article at this LINK contains more details

15. Colored Marking Pens or Lumber Crayons: Marks made with colored marking pens or lumber crayons, while not precise, are helpful for speedily marking/identifying the orientation and/or relative position of parts, pieces and components in an assembly. For instance, a blue stripe, or two parallel black lines on the end of a part or tenon, might be drawn to indicate right-hand, or North, or front direction in an assembly. I sometimes draw an arrow to orient the front of the assembly or to indicated the direction/location of a reference surface or part, etc. Of course, drawing the cabinetmaker’s pyramid is essential for joinery and casework. The marking convention you choose is, of course, up to Gentle Reader, but having one and using it will help your work go faster and with less confusion, especially if you must set the part aside for a few days or even months. Lumber crayons are especially useful for marking lumber for dimensioning and planing.

Storage, Transportation & Protection

With the exception of the 1-meter long straightedge, and that only because it’s inconveniently long and I want to protect it from dents and dings, I always keep these measuring, layout and marking tools located in the handiest place in my toolchest when I’m in my workshop, or in my portable toolbox and/or toolbag when I’m working in the field.

If you carry these tools outside the workshop, and intend them to be lifetime tools, I recommend you make a simple case for each tool, of cardboard perhaps, to cushion them in your toolbox to help retain precision, to keep them from dinging each other, and help to them last longer. Only then can you reasonably expect a long, mutually profitable relationship with these good friends.

In the next installment in this swashbuckling adventure we will consider the next category of tools the beginner needs: Saws.

YMHOS

I salute you! Woof!

If you have questions or would like to learn more about our tools, please click the “Pricelist” link here or at the top of the page and use the “Contact Us” form located immediately below.

Please share your insights and comments with everyone in the form located below labeled “Leave a Reply.” We aren’t evil Google, fascist facebook, or thievin Tik-Tok and so won’t sell, share, or profitably “misplace” your information. If I lie may pug pirates make me walk the plank!

Leave a comment

Go back

Your message has been sent

Warning
Warning
Warning
Warning.

We Wish You a Ripper Christmas: A Guest Reviews 3 Handsaws

by Antone Martinho-Truswell

[This article was written by the energetic Doctor Antone Martinho-Truswell, a Most Beloved Customer and Dean at St Paul’s College, University of Sydney. While not as scholarly as his fascinating and romantic earlier guest post titled Permanence, in this article Antone has graciously shared an aspect of his woodworking experience that will resonate with many Gentle Readers. Please enjoy.]

“Arise and be merry

And sing out while you can

The world will never see the likes 

Of dear old Stan.”

From “Dear Old Stan”, by the Dreadnoughts, concerning a different Stan, equally worthy of your meticulous study.

A few weeks ago, I was putting the final touches on my most recently finished, and largest, woodworking project to date. Over the past 18 months, interspersed with dozens of smaller and more pressing projects, I’ve constructed this tea-house styled cubby house for my daughters, complete with engawa, shoji screens (already torn and patched), Aussie-style “tin roof”, and tiny roofed reading nook overlooking Australia’s Blue Mountains National Park. My daughters made the paper garland to celebrate the opening of their new palace.

With this project I set myself the challenge of making the entire structure using only handtools (save a cordless drill for the roofing screws), and to use primarily reclaimed timbers. The timber frame, floors, and inside surfaces of the wooden walls were all hand-planed with a kanna, and all of the joints hand-cut. This involved cutting some 300 joints, and an almighty amount of handplaning.

But it was the ripping that did me in. Or rather, did in my tools. Between the wall panels, floorboards, shoji frames, and the joints themselves, this involved a tremendous length of rip cuts in very hard Australian woods. As I celebrated the completion of the project with a glass of vintage Château Thames Embankment while gazing across the verdant valley, I considered the small collection of exhausted Japanese rip saws the project had left in its wake.

 I had been using modern, disposable-blade, induction-hardened Japanese saws on this project, and two, in particular, gave the ultimate sacrifice in the process.

One saw was a rip single-edged kataba already fairly used up on other projects, the other a fresh but inexpensive ryouba that I dedicated to this project in particular. As Stan has noted before, these induction-hardened and mass-produced Japanese saws are excellent tools – sharp, effective, and long-lasting. Moreover, I had been putting them to more punishing work than usual – “in the field” rather than the workshop, cutting reclaimed timber replete with grit, dirt, and other dulling faeries that grinded away their cutting edges.

I am normally meticulous in following Stan’s advice to clean one’s timber and remove dirty, gritty surfaces with dedicated roughing tools before putting quality blades to work, but this project called for a different approach – there was too much timber to efficiently clean before working it, and the inexpensive saw was purchased and dedicated to the project in order to prevent needless back-and-forth while assembling the structure in the garden, so it served as both roughing and finishing tool.

Later, while enjoying a refreshing beaker of Château Fleet Street, I realized two things. First, that my much older furniture-making ryouba had also been dulled by local faeries; and second, that I needed to replace my other workhorse handsaws.

Naturally, this meant contacting Dear Old Stan, the only solution when tools that work are wanted. (Stan, I’m waiving my copywriting fees for that tagline.)

After some back-and-forth with our reliable proprietor, I settled on three saws to renew the capabilities of my saw-box. Our discussion covered a few considerations:

  1. I have no shortage of fine-tooth saws like dozukis and hozohikis, all of which are working fine and providing good service.
  2. I am up for the challenge of re-sharpening rip teeth, but am wary of the time investment versus benefit of trying to sharpen the complex shape of Japanese crosscut teeth.
  3. These new saws would be used for sawing stock to rough dimensions. I frequently make furniture from locally-sawn slabs, and so need to make long rips and crosscuts to efficiently break these down into smaller components.
  4. I wanted saws that are nicer, more real, and more meaningful than mass-produced tools, if possible.

Gentle Reader will not be surprised to learn that Stan delivered all I needed and then some. 

The first cab off the rank was an antique 300mm ryouba labeled as being made of Tougou steel – a now rare tool steel produced by Andrews Steel of Britain. This is a stiff bladed, large ryouba, and a very handsome saw. Stan offered, and I enthusiastically agreed, to have this saw tuned, sharpened, and teeth re-profiled for hardwood by his saw-smith, Takijiro.

Takijiro trued and tensioned the blade, leaving behind the telltale henpecks seen on the sides of the blades.

This new saw’s first challenge was crosscutting a slab of camphor laurel planned for a coffee-table top, about 650mm wide and 40mm thick (after giving the slab a good scrub with a wire brush first). It took me about 2 minutes to complete this cut, and it was exceptionally easy to keep straight. I followed this with a 1200mm long rip cut through the same in about 4 minutes and equally satisfying. The cut surfaces were exceptional – very smooth and very straight, even with my paltry skills.

I could not have been happier with this saw, which came from Stan’s “miscellaneous ryouba” selection, and the decision to have the blade tuned and the original teeth replaced with dedicated hardwood teeth is something entirely to be recommended to all potential purchasers.

But one is never enough. And after years of reading Stan’s enthusiastic praise of them, I also wanted my own bukiri gagari, a much rarer and more specialized saw. Here, Stan was able to provide this beautiful 330mm blade made by Takijiro, again, sharpened, trued, tensioned, with hardwood teeth, and with a beautiful natural wooden handle to boot. 

Nakaya Takijiro Masayuki, sawsmith extraordinaire

This saw is a joy to use. It’s much bigger than its 330mm size might suggest on first read. It feels like a much bigger, more substantial tool than the 300mm ryouba, despite the blades being notionally similar in size.

I soon became accustomed to using a pull saw with a “pistol grip” handle (aka “shumoku” handle), and sure enough it delivered a straight cut and quickly. I put this saw to the task of making the matching 1200mm rip cut on the other side of the slab, and the results were, as expected, fantastic.

I can’t overstate how much easier it was to make quality cuts with these quality tools. I’m not a professional carpenter, but neither am I a turnip, and can usually make a fist of accurate work even with subpar tools. And while I have some higher-end dozukis and other fine-toothed saws, I had kept my ryoubas and rough work kataba saws cheap and cheerful to this point. These saws were, if not quite like the light that shone round Saul on the road to Damascus, at least a bit like scales falling from my eyes.

The third saw I ordered from Stan was a mass-produced and induction-hardened crosscut ryouba, with an exchangeable 300mm blade – larger than is easily found here in Australia. The reason for this choice was explicitly related to one of my purchasing criteria above, namely that I suspect that I will not be attempting much crosscut saw sharpening any time soon.

The aforementioned ryouba and bukkiri gagari saws are both traditional, handmade saws with teeth that will require regular sharpening.

Stan kindly included in his package a tiny specialized saw file to accomplish this task. But I will be babying the crosscut teeth on the ryouba out of my own hesitancy to try to sharpen them. As such, I thought it wise to make use of the best of modern technology in this affordable, induction-hardened saw to be used whenever extensive rough cross-cutting, sometimes through less than immaculate timber, is required. It cuts very well indeed, and quickly, if without some of the romance and spirit of the handmade saws.

These saws are already the new front-benchers in my workshop, and doing excellent work. The only thing I recommend more strongly than Stan’s tools are his advice and counsel in selecting, using, and caring for them.

There are many people selling tools. But the world will never see the likes of dear old Stan.

As we say in Australia, here’s wishing you a Ripper Christmas! May the greatest of all carpenters be a light unto you and your loved ones.

Antone

Christ in the House of His Parents, oil on canvas by John Everett Millais (1849-1850), at the time a controversial painting much criticized by the likes of Charles Dickens because of its realistic depiction of a country carpentry workshop, especially the dirt, sawdust and shavings on the floor. But surely this is what a poor carpenter’s workshop in rural Nazareth would have looked like when Jesus was a small boy. Joseph is shown working on a simple battened door joined with nails, a standard carpenter’s job in all places at all times, but he’s stopped work to examine an injury on Jesus’s hand, perhaps caused by one of those nasty nails, foreshadowing future wounds, while Mary comforts her boy with a kiss. By no coincidence, a drop or two of blood has dripped onto the child’s foot further hinting of unpleasantness to come. In the background grandmother Anne takes over the job the injured child had been doing prior to the accident of clipping clinched nails, while young cousin John on the right (later known as John the Baptist) brings water to cleanse the wound, another ominous foreshadowing indeed. The apprentice shown on the left is said to represent Jesus’s future apostles while the sheep seen gawking through the open workshop door are said to represent the flock of Christianity. The ladder and the dove resting on it are also symbolic.

If you have questions or would like to learn more about our tools, please click the “Pricelist” link here or at the top of the page and use the “Contact Us” form located immediately below.

Please share your insights and comments with everyone in the form located further below labeled “Leave a Reply.” We aren’t evil Google, fascist facebook, or the Chinese Communist Party’s coordinator for blackmail, and so won’t sell, share, or profitably “misplace” your information. If I lie, may the tang of my bukkiri gagari saw break off.

Go back

Your message has been sent

Warning
Warning
Warning
Warning.

Leave a comment

Relevant Articles

Japanese Handplanes Part 8: Operator’s Manual

There was no such thing as luck. Luck was a word idiots used to explain the consequences of their own rashness, and selfishness, and stupidity. More often than not bad luck meant bad plans.”

Joe Abercrombie, Before They Are Hanged

n this article we will consider how to use the Japanese “hiraganna” plane to prepare boards, sticks, beams and posts for woodworking projects. For those earnestly focused on becoming proficient with the hiraganna, and desirous of avoiding most of the confusion and difficulties those without a kind mentor whispering guidance in their shell-like, and wacking them upside the head with a memory mallet to correct their mistakes, this article will have special value.

Let’s begin this adventure through fields of daisies by breaking down the work of the hiraganna handplane into two primary activities, namely dimensioning and finishing.

What is Dimensioning?

I apologize if this first part seems tedious to those Beloved Customers already well-versed in using handplanes, but as I’ve written many times before, the Gentle Readers of this blog include newbies, professionals, and many in-between, so a few extra words to aid the comprehension of less-experienced persons will not go amiss. Your excellency’s indulgence is humbly requested.

“Dimensioning” in this case means to reduce the thickness, width and/or length of a wooden log, board, stick, beam or post to predetermined dimensions using axes, adzes, froes, drawknives, spokeshaves, saws, handplanes, files and even electrical equipment. It’s a part of a larger job called “material preparation.”

Depending on the starting sizes of the lumber you’re using, dimensioning material can consume a lot of time and energy, which is why electrical equipment such as bandsaws, tablesaws, circular saws, jointers and thickness planers are so popular. But such equipment, especially if it has the capacity to mill thick, wide lumber, can be expensive, take up a lot of space, generate ear-damaging racket and belch veritable clouds of lung-clogging sawdust. And all of them are eager to nibble on yummy fingers with or without hot sauce.

But in the smaller shop in the hands of an energetic, skilled craftsman keen on doing a higher grade of work in a calmer, more creative and healthier environment, the ancient handplane reigns tranquilly supreme.

Planes used for dimensioning must be designed and setup to accomplish the goal of removing material quickly and precisely yielding straight, flat, square surfaces free of wind on the faces, sides and edges and ends of the target board, stick beam or post.

On the other hand (the one with six fingers) planes used for “finishing” tasks are setup and tuned with different goals in mind. We will examine these two types of planes in more detail below.

It’s important to understand that, at the conclusion of the dimensioning stage in the process of material prep, the surface left by the plane need not be perfectly smooth much less shiny, just the right size, flat, free of twist and with square edges.

For this job the Arashiko and Nagadai planes are the tools of choice in Japan.

The Arashiko Plane

The Arashiko (荒仕子鉋) plane is more-or-less equivalent to the benchplane or jackplane in the Anglo-American tradition, typically a general-purpose plane suited to quick, hard work.

While the arashiko plane can, of course, take long, continuous shavings beginning and ending at the board’s perimeter edges, the job of efficiently flattening and truing boards requires more planning and technique than most woodworkers imagine.

Being shorter than, for instance the nagadai jointer plane, the arashiko plane is easier to control and therefore excels at work requiring shorter cuts including those started and/or stopped inside the perimeter of the surface being planed, to shave down high spots and ridges while avoiding valleys and ditches in accordance with a sequenced plan the craftsman formulates for his work, a technique not commonly taught to newbies, but one Beloved Customer would be wise to master.

Despite what many imagine, to use an arashiko efficiently the craftsman needs to have a plan in his head for working each board, as described above, along with trained eyes and physical skills sufficient to effectively and efficiently execute that plan instead of just thoughtlessly pulling his plane around like a goat dragging around a tin can snagged on the hair of its tail.

The Nagadai Plane

The nagadai (長台) plane is the other variety of plane typically used for dimensioning. It performs more-or-less the same role as the Bailey-pattern foreplane or jointer plane.

With a jig length longer than the arashiko, it’s especially suited to flattening bigger surfaces using longer strokes, and shooting straight, square edges, but it usually does its best work when employed after the arashiko has quickly and efficiently conquered more problematic areas on the board. It too can be used for “stopped cuts,” but not as deftly as the arashiko.

Horses for courses, as it were.

What is Finish Planing?

After a board is dimensioned, whether by hand or electricity, its surfaces, especially if they are wider than the craftsman’s plane, will often display steps left by the corners of the arashiko and nagadai plane’s blades, or shallow ditches and ridges left by start/stop cuts, or striations and ripple marks left by the circular cutters of electrical saws, planers and jointers.

The finish plane specializes in taking thin shavings to remove these residual defects producing a uniform, smooth, and even shiny surface ready for joining. And because it takes thin shavings, it does so without significantly changing the thickness or width of the board or stick. However, this is only true if one limits the number of passes with the finish plane, ergo the importance of having a plan for one’s arashiko and nagadai planes and working that plan.

The well-tuned, expertly-manipulated finish plane, therefore, is the perfect compliment to the electrical jointer and thickness planer, which explains it’s continued popularity in a world under the brutal dominion of noisy pig-tailed tools.

Although it can produce flat, planar surfaces, the sole of the finish plane is setup different from, and will typically not work as efficiently at dimensioning as, the arashiko and/or nagadai planes. More details can be found in Part 6 in this series.

In short, the finish plane, or “shiage ganna,” (仕上げ鉋) must be setup and fettled to closely follow the contours of the surface it is cutting, rather than bridging over small defects and undulations, with the goal of taking thin, uninterrupted shavings of uniform width and thickness.

Please note that the first few passes made with this plane following the ministrations of the arashiko/nagadai planes will not typically produce uniform shavings because of the thinness of the shavings it takes compared to the depth of defects left by planes and equipment during the dimensioning phase of material prep. However, two or three passes will usually remove these last few defects and get the job done, depending of course on the skill of the craftsman or goat motivating it and the nature of the wood.

We neither need nor want the finish plane to take thick shavings which would substantially change the dimensions of the board already achieved. Please be sure you understand this point and its ramifications

Next, prior to making shavings, let’s do some housekeeping.

Clean the Wood.

Before you touch any piece of wood with your valuable, noble planes, please evaluate the wood’s condition and clean it if necessary.

Please do not dismiss this admonition unless, that is, you despise your edged tools, revel in wasting money, love to see your sharpening stones pointlessly turned to mud, and feel joy at spending extra time resharpening unnecessarily dulled and damaged blades. How brutish!

The answers to “The Mystery of the Scratched Blade may provide some useful insight.

Let’s next consider how to make and execute a plan for planing.

Planing Plan

Most people, including me for a long time, allow their planes to wander wherever their goat pulls them without much control, happy so long as they’re cutting wood. Why? I think it’s because most people never think to make a real plan for planing. Of course, many simply get carried away with making shavings imagining that shavings equal progress. And without a real plan they end up planing areas out of proper sequence, so instead of efficiently flattening the board, they waste much energy, time and steel digging valleys and trenches deeper. While natural and satisfying, this is decidedly not professional technique.

Miyamoto Musashi depicted in one of his famous duels. He was unique among sword masters for not only winning 62 duels beginning at age 13, some against multiple opponents at the same time, but for using improvised wooden items such as carved boat oars as weapons during these challenges instead of his swords. The power of wood is not to be disdained.

Beloved Customer may recall the words of Japan’s most famous sword saint Miyamoto Musashi In his book titled “The Book of Five Rings,” (ca 1645) quoted at the top of Part 6 of this series: “First lay his plans with true measure and then perform his work according to plan.”

With these words Master Miyamoto instructed the craftsman to do 3 things:

  1. Formulate a work plan;
  2. Delineate that plan with accurate dimensions;
  3. Execute the work in accordance with that work plan.

I believe these to be wise words even if they were written by a brutal killer of men. But how do they apply to using a plane?

The first step in formulating a plan for planing is to evaluate the condition of the board, stick, beam or post to be planed and identify problems by sighting down the sides and edges of the board from a low angle so that any deviations from straight/flat are apparent. It often helps to have a low-angle light source shining on the surface you’re evaluating to make defects and problems easier to spot.

Don’t forget to identify and mark any problem areas that will prevent the board from resting flat and stable on your workbench, or that might cause it to deflect, twist or wiggle lewdly when subjected to the pressure of planing.

Next, check the board carefully with a straightedge, lengthwise, crosswise, and diagonally too.

But the job doesn’t end with eyeballs and flashlights. As you identify them, mark bows, hollows, humps, high spots, low spots and twist with a carpenters pencil or lumber crayon using any marking convention you find convenient so there will be no confusion about the location and nature of any areas that need to be shaved.

The next step is to formulate the sequencing of the job.

With problem areas marked and tasks identified, at least in your mind, you can formulate sequencing based on the condition of the board and your priorities for executing the tasks.

When using handplanes to dimension lumber, your first priority must be to cut down any high spots before removing a single shaving from low spots. The marks you make will guide your work to minimize wasted time and effort.

It may sound like a lot of work, but with practice most boards can be evaluated, marked, and the requisite sequencing established in a few seconds without incurring permanent brain damage.

This completes step two of Master Miyomoto’s directions.

Preparation for Planing

Statues commemorating the famous duel between Miyamoto Musashi and the handsome, well-dressed Sasaki Kojiro. Musashi, depicted on the right, showed up to the duel very late in a small boat from the sea. Without waiting for the small boat to be beached, Musashi jumped into the surf and attacked Sasaki with an oar he had modified on the boat with his short wakizashi sword. The battle was over in a few seconds. Guess who won.

When you are ready to begin planing, make sure the board is supported on a flat, stable, rigid surface free of wind. This is important.

A workbench, atedai, or planing beam is the conventional working surface, but it need not be pretty.

When planing the first side of a board or stick, if necessary (and it usually is), position slips of wood or cardboard to fill gaps between the board’s off-side and your workbench’s surface to prevent the board from deflecting downwards (away from your blade) excessively, twisting and/or wiggling, movement which will mess up your pretty plan. It makes a difference.

Depending on the condition of the board and its grain, planing it flat and true may require many changes in the plane’s direction of movement and many “stopped cuts,” so tighten the razor-wire choker around the neck of your inner badger and patiently and thoughtfully work the plan. Speed will come with practice. Remember the moto of emperors Augustus and Titus, and the Medicis: “Festina Lente.”

Plan to frequently use your straightedge to check the board’s length, width and its diagonals.

Its OK to plane one side (the off-side) of the board roughly flat and then switch to the other side so the shimming material previously placed can be removed soonest. Then switch back to the first side and finish it.

Let’s next examine how to best to hold and motivate the Japanese handplane in a professional manner.

Teamwork

Let’s consider some basic teamwork techniques for operating Japanese handplanes, none of which involve goats, thankee kindly.

Imagine if you will a halcyon day under blue skies when Beloved Customer used a short shovel, perhaps as a carefree, optimistic youth, to move heavy mud or push wet concrete around on a farming, construction or cleanup project. You will recall it was hard work, but that the job went faster and easier when both hands, joined together by the shovel handle, worked together as a team transmitting the motivating power of shoulders, back and legs into the tool. It’s the same with handplanes, except for the yucky mud and concrete.

But whether shovel or plane, such teamwork doesn’t develop automatically for most people. Indeed, more often than not a human team in the real world either doesn’t really form or it breaks down quickly. C’est la vie, mon chéri? But when a team comes together working with a single mind to a common purpose, well now, that’s a beautiful thing!

It’s a simple thing for hands and body to work in harmony, but there will be failures at first, so let’s consider a common breakdown mode to make detection and remediation easier.

For example, instead of both hands working in concert with the wooden body of the eager handplane, frequently one hand/arm does most of the work while the other hand/arm just tags along, pretending it’s working hard but actually just freeloading. Of course, seeing this, the shoulders, back, hips and legs become disgusted and end up sitting in the shade dozing and drinking beer instead of helping in the teamwork. Do you have a brother-in-law like that?

The point is, please make sure both hands and your entire body are working together and not shirking.

So with that bad example behind us, let’s assemble our effective team by assigning each hand a specific role.

But first, please carefully examine the craftsman’s hands in the photo below.

The Right Hand’s Job

Assuming (1) you are right-handed, and; (2) you will be pulling the plane towards you along your right side, the right hand’s job is to press straight down on the plane focusing pressure primarily on the contact strip in front of the mouth.

It’s a fundamental trait of right-handed people (not goats) to want to use their right hand to apply heavy pushing or pulling forces on a tool, and their left hand to control its direction, so the division of labor your humble servant is proposing may seem clumsy at first, but if you focus the teamwork will become second nature quickly, I assure you.

I know I’m being irritatingly repetitive, but for good reason, so please remember that your right hand’s job is NOT to pull the plane, not even a little, but rather to apply downward pressure on the plane’s body causing the contact strip in front of the mouth to firmly press on the board in turn while keeping the plane’s body level.

Next let’s look at how the right hand should grip the plane’s body.

With the blade’s face (the side with the brand) and chipbreaker facing you, place the tip of your right thumb on the left hand side of the plane’s body aligned with the mouth and about 3/4 down the side.

Place the tip of your right hand’s middle finger in the same position on the opposite side of the body. You may need to adjust your finger’s positions somewhat, but if placed correctly a well-made plane should balance nicely between just these two fingertips when you lift it. This is an intentional design feature, BTW, and one reason why standard finishing planes are seldom wider than 70-80mm.

With your fingertips positioned thusly, lower your palm so it rests on the upper surface of the body, touch the tip of your index finger against the blade’s face or the chipbreaker, and press your ring and pinkie finger on the right side of the body.

Using this grip the plane should be absolutely stable in one hand, even when held in the air or upside down, assuming your hands aren’t small or weak.

If you can’t control the plane with this grip, you may be doing it wrong, or the plane may be extra long, or extra short, or the plane’s body may be too wide for your hand. Please adjust your grip as necessary.

The Left Hand’s Job

A woodblock print of the duel between Miyamoto Musashi and Sasaki Kojiro. Musashi performed many of his duels against famous teachers of the sword, many the proud heads of kendo schools with many students and disciples that would attempt to ambush him before his battles against their teachers, and gang up on him in retribution at the conclusion. To deal with these sneak attacks and ambushes by multiple skilled opponents, Musashi became adept at using two swords at the same time, one in each hand, all while dudes in sandals were trying to fillet him. Teamwork, Gentle Reader, teamwork extraordinaire.

The job of your left hand is NOT to press down on the plane but only to PULL it towards you. This division of labor between left and right hand is important.

Place the pad of your left thumb on the blade’s face. It doesn’t need to be centered.

Place your index finger either on top of the blade’s head, or wrap it behind the blade. Depending on where you placed your index finger, your middle finger can either stretch behind the blade and rest on the wooden body with your remaining fingers press against the flat end of the body, or you can position your middle, ring and pinkie finger all pressing on the tail end of the body. Use whatever position feels most comfortable and pull the plane in a straight line.

Moving a plane using only the left hand is pretty much the opposite of how Western planes with their tote handle and knob are used. But once your body learns this division of labor your effectiveness and efficiency using Japanese handplanes will skyrocket, I promise.

Combining the Right Hand and Left Hand

Now that we’ve assigned different but complimentary jobs to each hand, we must next put them to work as an harmonious team like the draft horses and plowman in the photo above.

This will feel unnatural at first, and indeed, until muscle memory is developed, most people quickly forget these principles and revert to the careless techniques their pet goat taught them. You will too. But when your plane stops behaving, review the words in this series, wack yourself in the forehead with your wooden “memory mallet” as if you were a green apprentice back in olden times, and get back to work. The pain will feel so good!

Now that we have our grip, the division of labor and our team figured out, let’s bring the rest of our body into the dance.

The Handplane Shuffle

Using a Japanese hiraganna handplane can involve many stances, some standing. some walking, some sitting, and even laying down occasionally. Interesting footwork is sometimes necessary.

When sitting or standing while planing shorter boards or sticks, no special footwork is necessary unless you get an irrepressible urge to boogie down, baby. Indeed there simply isn’t enough space in this humble, unworthy blog to go into the subject in exhaustive detail, but there is one standing technique I would be remiss to neglect, one that has never seen the footlights of the Soul Train stage, one that your humble servant calls the “hiraganna shuffle.”

Unfortunately, C&S Tools’ IMAX video studio is closed for renovation and our photography crew, lighting and sound technicians, makeup artists, drapers and choreographers are currently all on a well-deserved vacation, probably enjoying prodigious quantities of neon-colored adult beverages containing colorful fruit and little umbrellas right about now, so we won’t be producing a video about the hiraganna shuffle starring hip hop hamsters and hipper combat robots anytime soon. Sorry about that. But I will try to explain the technique.

A good example of a carpenter using a finish plane on both solid wood and glulams with joints cut by CNC machinery can be seen in this video.

Obviously this scene of good old Shoyan the carpenter at work wasn’t staged, nor was a professional makeup artist involved in this serious example of the hiraganna shuffle. And unlike the photo at the top of this article, it’s not narrowly-focused kezuroukai stuff, but typical of 90% of high-quality classical architectural structural woodwork.

It’s worthwhile noting that the beams he’s working, even the glulam, are made of well-behaved, easily-planed softwood, probably hinoki cypress. I wish all woods were so pleasant to work.

If I may be allowed to digress for a moment, this carpenter (he has many practical videos on youtube, BTW) makes two comments Beloved Customer may find interesting.

One of his comments is that the shine produced by a handplane will vary with the direction of the cut, so it behooves one to pay attention and vary the planing direction accordingly. Obviously a pro of the first water.

His second comment is that the final planed surface will not only have a shine, but will repel both water and dirt making the beam last a long time even when exposed to the elements. This is an important and true observation supported by scholarly research at top Japanese Universities. Just one more reason the finish plane reigns supreme and why so many wooden Japanese temples and shrines have lasted centuries without stain, paint or varnish.

Anyway, so just what are the steps in the hiraganna shuffle, and can it be done in steel-toe safety shoes?

  1. Stand on the left side of the board facing the end where you intend to begin the shaving.
  2. Place the plane on the end of the board with its mouth just off the edge.
  3. While gripping the plane as you prefer, lean forward over the board while extending your arms, and take a half-step back. At the same time extend your right leg back and keep your left leg under you. Most of your weight should now be on your left foot and your right hand, with little weight on your right foot and no weight on your left hand. Don’t move the plane during this step.
  4. To initiate the cut move your hips along with your body’s center of gravity backwards while directing the forces of this movement of your legs and hips through your left hand into the plane while applying downward pressure with your right hand. Don’t try to use the devastating power of they mighty arms, Oh Lord of Thunder, but just the momentum produced by your legs, hips and back.
  5. Have faith and pull through the stroke with a positive attitude. The speed you generate will depend on the wood and your urgency, but it’s your mind that will get the job done, so long as your plane is sharp, so pull through the stroke without hesitating.
  6. Depending on how long the board and the stroke you intend to take are, as your hips and hands shift backwards you will reach a point where the weight is gone from your left foot and you will begin you lose the leverage needed to keep pulling the plane. Just before you reach that point, however, stop the plane’s movement briefly, shift/shuffle your left foot back and your center of gravity with it, and then move your right foot back and extend your leg, while once again moving your hips back while extending your arms.

With practice, the pause in the plane’s movement in step 6 can be eliminated, but it’s sometimes difficult to do smoothly when making heavy cuts. In any case, try to keep the pause brief so you don’t lose much momentum, and most importantly, don’t lift the plane or allow the blade to shift to or fro, side to side or up and down during this pause because any shift of the blade will result in a discontinuity in the cut and perhaps even a step. Yikes!

When making fine finishing cuts in well-behaved wood, the cut can be kept continuous by taking tiny backward steps as this guy is doing.

Execution

As in most things, a good start is the key when planing. Once the cut is started with confidence, just keep your hands working as a team, connected by the plane, and confidently pull through the cut like a draft horse pulling a plow, all while keeping the plane’s body level.

As an example of how its done, let’s feed my favorite 80mm (2-sun) finish plane a snack. It’s a happy tool with a wide body but slender mouth and only one big, very sharp tooth. It always beams a silvery smiles and sings a little song of steel and oak as it munches on yummy wood.

I’ll take a single, uninterrupted shaving from one end of this board to the other. Even though most cuts with a handplane are not this boring, it will illustrate some important techniques Beloved Customer will need to master.

I’ll start the cut with the plane’s mouth resting just off the far edge of the board, the tail end hanging entirely off the board, the contact strip in front of the mouth and the contact strip at the leading edge of the plane’s sole firmly resting on the board. In this position, so long as I don’t apply any downward force with my left hand, there won’t be any downward force trying to tilt the plane out of level.

While gripping the plane’s body and pressing down with my right hand, and pulling the plane towards me with my left hand, a shaving will begin to flow out of its mouth, assuming the board is fairly flat, the blade and sole are in good fettle, and the blade is adjusted for a nice cut.

The plane is moving along smoothly now, but just guess what will happen if I carelessly apply downward pressure with my left hand about now? If the plane is an arashiko or nagadai specialized in making flat, straight surfaces, nothing tragic will occur except perhaps the cut will wobble a bit. But since it’s my finish plane, the setup of the sole will cause the blade to be levered entirely out of the cut depositing rotten egg on my face. I hate it when that happens, so I’ll do my best to not press down with my left hand. Daijoubuka?

The plane continues it’s run and before you can say bobsurnunkel, the contact strip at the leading edge of the plane’s sole runs off the end of the board and the blade stops cutting, even though the plane’s motion continues. Because I am a highly intelligent craftsmen (or was it a wild and crazy guy?), I’ve been thinking ahead, and shifted the downward pressure of my right hand so it acts just on the contact strip in front of the mouth, relieving pressure on the sole everywhere else. As the plane’s mouth goes off the end of the board (did I just hear a little scream of fright from my gentle plane?) I hold onto the plane with both hands to keep its body level and prevent a Peter Pan performance, then follow-through for perhaps half a plane length, ending this pass.

Repeat as necessary.

Please note that this requires one to actually manipulate and intelligently control the plane using one’s hands rather than just thoughtlessly pulling it around like the aforementioned goat does his tin can.

Final Tips

Prevent Deflection

As mentioned above, in order to plane truly, the board or stick you are working must be firmly supported on a relatively rigid surface.

You also need to prevent the downward force your plane applies when in motion from deflecting the board or stick downward away from the cutting edge because the plane can’t cut a surface that deflects away from it, and therefore cannot make it flat. If such a support condition is left uncorrected, your plane’s best efforts will be as productive as a goat.

To resolve this extremely common problem, you may need to roughly plane the off-face of the board or stick oriented downwards, and/or shim the board to prevent excessive deflection/twisting. Remember, you located and marked areas on the board likely to deflect like this during your planning efforts.

Many will studiously ignore this advice. To those I am prepared to offer a wonderful deal on a huge parcel of shovel-ready resort hotel property located on the banks of a majestic chrome-plating settlement pond in North Korea. Great fishing!

Keep the Body of Your Plane Level

Please observe that these techniques don’t rely on fancy hand movements, psychic abilities or a masters degree in wood butchery, but rather on always focusing pressure on the contact strip in front to the mouth, and instead of simply pressing down on your plane like it’s an iron to make your pleated pink apron pretty (say that 10 times fast), you must use your hands as a team to keep the plane’s body flat on the board you’re planing, and level as it leaves the end of the board.

Imagine that, real hand skills!

Use Your Whole Body

Remember to not rely on just the strength of your arms, oh might Thor, but rather on the strength of your shoulders, back, hips, and legs. They will add a lot more momentum-retaining mass and provide better control too.

Cut Confidently

Start cuts with confidence and pull through the cut. Any hesitation and your plane will giggle at you through its narrow little mouth.

Perform Timely Dental Hygiene

Sometimes the mouth of your noble plane will become clogged with shavings, but frequently allowing the mouth to develop a tightly-compacted clog will damage it, so if you feel a clog starting, stop work immediately and give it a dental exam to figure out why. Depth of cut too deep? Blade setting wrong? Chipbreaker getting in the way or not functioning properly? Slivers of wood, pixie toenail clippings or fragments of divorce lawyer’s hearts jamming the mouth? The only way to know for sure and prevent more clogging is to check.

Clear the clog by either removing the blade and chipbreaker, or using a splinter of wood to pick the mouth.

Keep It Lubed

Oil the chipbreaker’s edge, the blade and the surface in your plane’s mouth opposite the chipbreaker’s bevel whenever you remove the blade to help shavings flow freely and to reduce clogging. You do have the essential oilpot on-hand right?

Clean the Wood

Before planing use a steel brush to scrub and clean the surface of wood that has been exposed to dust and/or grit. You must get any embedded dirt/soil/sand out of the wood first or your tools will be damaged and your time wasted like tax money in California.

Cut 1/8″ from each end of each board, stick, beam or post, or at least use a block plane or drawknife to chamfer the ends before planing to remove the most stubborn, deeply-embedded and well-hidden grit. This is really important because the grit will always be there even if you can’t see it, I promise.

Conclusion

In my experience, many of the Westerners who receive these instructions without benefit of a mentor or memory mallet close at-hand immediately and meticulously ignore the critical points, and then, when their results prove inconsistent, assume the instructions are crapola smothered in piquant marinara sauce. I strongly urge you, Beloved Customer, to do better, please, because if you internalize these instructions and develop the correct muscle memory, for the rest of your life you will find Japanese handplanes to be joyful and efficient tools for working wood. Thus it was with your unworthy servant.

This article is by no means exhaustive or comprehensive, but it should be enough for a good start. It’s far more than I had for many years.

YMHOS

If you have questions or would like to learn more about our tools, please click the “Pricelist” link here or at the top of the page and use the “Contact Us” form located immediately below.

Please share your insights and comments with everyone in the form located further below labeled “Leave a Reply.” We aren’t evil Google, fascist facebook, thuggish Twitter or the Chinese Communist Party’s coordinator of funding and blackmail for US elections, and so won’t sell, share, or profitably “misplace” your information. If I lie, may my goat eat all my socks.

Go back

Your message has been sent

Warning
Warning
Warning
Warning.

Leave a comment

Little Turtle Scrub Brush

Kamenoko Tawashi scrub brush

Never discourage anyone who continually makes progress, no matter how slow.
– Plato

In this article your humble servant would like to introduce a Japanese version of a most mundane tool, one especially useful to the woodworker: the Little Turtle scrub brush.

Your slovenly servant is not a neat freak, nor do I have a cleaning fetish, much as my long-suffering mother tried to stop me eating leftover dog food off the floor as a toddler. But there is one area of human endeavor where maintaining cleanliness in an otherwise dirty world is important to me, namely sharpening woodworking tools.

This is the story of a lowly brush, not a tool we typically sell at C&S Tools, but one we often provide as a service to Beloved Customers who purchase sharpening products from us. I don’t believe it can be purchased outside Japan, but the purpose of this article is to help Beloved Customer better understand an indispensible accoutrement for sharpening your woodworking tools. So with your kind indulgence I’ll try to present this subject in a sanitary manner.

Why a Scrub Brush?

As described in our previously published series about sharpening, a basic, effective set of stones for sharpening chisels and plane blades should include a rough stone or diamond stone of 400~800 grit, a medium stone 1000~2000 grit, and a finish stone 6,000~8,000 grit. The list can be found at this link.

A nagura stone is also extremely useful IMO for cleaning and flattening sharpening stones and reducing the time required to get them operating effectively.

As mentioned above, these stones are almost always used in series, with the nagura dressing them all.

A couple of extremely common problems we face when sharpening is dust and other hard particles, many of which are airborne, contaminating our precious stones and reducing their effective grit. For instance, an 8,000 grit stone contaminated with a bit of silica-based dust will be unable to produce scratches finer than, let’s say, a 1,000 grit stone, resulting in poor results, wasted time, money and steel, and dashed expectations. I’ve written on this subject elsewhere. Link

There are few tools mankind uses that are routinely made as sharp or sharpened as often as high-quality woodworking tools, a process that, when done efficiently requires 2-4 sharpening stones to accomplish, usually used in series. And high-quality sharpening stones, be they synthetic or natural, are pricey, so the wise woodworker who needs excellent results will seek maximum performance at minimum cost and time expenditure.

How do we prevent nature from effectively turning our expensive stones to bricks? Four ways.

  1. First, when not in use keep stones covered to reduce the dirt and dust that falls on them. Wrapping them in a clean rags or clean, ordinary newspaper works fine. I like newspaper best.
  2. Second, before using a stone and/or nagura, scrub its faces, sides and ends with a clean bristle brush and rinse to remove contaminating grit.
  3. Third, before using your fine-grit stones, especially if there is any doubt about their being free of embedded contaminants, work their faces with a nagura stone to dig out contaminants, then rinse off the mud produced along with any contaminants thus exorcised with clean water.
  4. Fourth, before sharpening, use a brush and clean water to remove dust and grit from the tools that will spend time frolicking on the stones.
  5. And finally, during sharpening use a dedicated source of absolutely clean, chlorine-free water to wash tools and stones and to re-wet them. What’s wrong with tap water? Depends. I use distilled water to eliminate chlorine with a bit of borax powder added to adjust the PH to reduce the potential for corrosion. In my workshop I store this water in a plastic laboratory wash bottle with a bent tube. In the field I carry a smaller volume in a plastic mustard or ketchup bottle. Whatever floats your boat, as the saying goes.

So exactly why do I say you need a scrub brush in your sharpening kit? Because if they do their job, the bristles of a quality brush are more effective at digging dirt and contaminating grit out of sharpening stones and the nooks and crannies of plane blades and chisels than any other tool including water faucets, hoses, chemical sprays, micro-fiber cloths or even kitten tongues (シ). Or did you imagine a simple wash in water or a wipe with a wet rag had stripped away all those nasty particles away just because you didn’t notice them anymore? Please restrict your optimism to reasonable limits.

The Scrub Brush

This is the smallest of the kamenoko brushes. A handy size for a field sharpening kit.

But isn’t one scrub brush much the same as any other? Nay, Beloved Customer, nay.

In the case of sharpening stones, we need to thoroughly clean our stones and tools without transferring contaminating dirt and grit from one stone to the next. I have found that the hard grit of sharpening stones becomes permanently embedded in the plastic and nylon bristles of every such brush I have examined, and even if I thought I had cleaned the brush thoroughly, hard grit particles remained and were transferred to the next stone by the brush.

How to avoid this? The solution is simply to avoid scrub brushes with nylon or plastic bristles. In my experience natural bristle brushes, and especially the Kamenoko (Little Turtle) brand brushes, simply last much longer than plastic and nylon bristle brushes, are more easily cleaned of sharpening stone grit, and tend to transfer less of it from one sharpening stone to another. These three points are the crux of this article.

Japanese tawashi brushes are made from the fibers of coconut husks. As Beloved Customer is no doubt aware, in his eternal wisdom the design team the Good Lord assigned to coconut palms provided them fibrous husks to protect and float their seeds long distances over wide, soggy oceans for years at a time. To accomplish this Homeric feat, the fibers of these husks are caused to grow tough but resilient and resistant to degradation from long-term exposure to water, microbes and even detergents.

It’s a traditional product that’s been around a long time in Japan with one company producing them for over 100 years. Here’s a video of tawashi brushes being made in Japan, and another video of production in Sri Lanka.

These brushes are also good for cleaning dirty, greasy hands, scrubbing pots and pans, cleaning car tires and wheels, and getting mud off boots with very little scratching.

If they have one downside, it’s that, being made of natural and recyclable fibers, and despite not becoming mushy when wetted for long periods of time and drying quicker than plastic brushes, they still take a bit of time time to dry and can develop mold if neglected. There’s a stainless steel wire binding the fibers together with a loop on one end that can used with a string to hang them for drying. Problem solved.

I’ve been using one Kamenoko Tawashi brush for cleaning tools and sharpening stones for over 20 years. I don’t say they’ll last that many years in the kitchen or garage, but they still last 5 times longer than plastic or nylon brushes and are therefore much more cost effective.

Most importantly, they help me keep my stones cleaner and ensure they sharpen to spec.

YMHOS

A museum-quality antique sumitsubo ink-pot depicting a snake hunting a frog around the ink pond. Mr. snake’s tail wraps around the wheel.

If you have questions or would like to learn more about our tools, please click the “Pricelist” link here or at the top of the page and use the “Contact Us” form located immediately below.

Please share your insights and comments with everyone in the form located further below labeled “Leave a Reply.” We aren’t evil Google, fascist Facebook, or thuggish Twitter and so won’t sell, share, or profitably “misplace” your information. If I lie may all my little turtles sunbathe on the freeway.

Go back

Your message has been sent

Warning
Warning
Warning
Warning.

Leave a comment

Japanese Handplanes: The Adjustable Chamfer Plane

An old-fashioned adjustable chamfer plane. It lacks the convenient screw adjusters of the modern version, but it does a fine job nonetheless.

The edge separates the average from the exceptional.

Anon

In this installment in our series of articles about Japanese handplanes, your most humble and obedient servant would like to present one of the most useful woodworking tools of Japan, the adjustable chamfer plane.

Terminology

In Japanese this handplane is called a kadomenganna, written 角面鉋 in Chinese characters. “角Kado” means “corner,” “面 men” means “surface,” and “鉋 ganna” is a tweaked pronunciation of “kanna” which means “handplane.” Since it’s mainly used to cut 45˚chamfers on the 90˚ corners and edges of wooden objects, and being fully adjustable, I choose to call it an “adjustable chamfer plane” in English. I beg Gentle Reader’s kind undulgence.

Side view of a standard kakumenganna chamfer plane.
Top view of a new kakumenganna chamfer plane. Of course, the 2 Chinese characters stamped on its leg read, top to bottom, “kadomen.” This version has a slightly skewed blade to reduce tearout. The blade and chipbreaker are mounted in a movable block connected to the right and left legs by a tongue and groove joint forming what I call a “carriage.” These two legs serve as fences which can can be opened or closed, using the bolts and nuts seen, to adjust the gap which determines the width of the chamfer to be cut. You can see two graduated brass bars inlet into the legs to help with alignment and in judging the gap.

Components

Your humble servant’s old and well-used chamfer plane. The block which houses the blade is located to the left of the image with two fences I call legs in the middle. Together these form a “carriage.” The horizontal line in the center of both legs was cut by the blade as I shifted the carriage right and left.
A side view of the block (left), the underside of the legs (center), and back of the blade (lower right). The cedar block (upper right) is used to adjust the block and remove the blade in combination with a smallish wooden mallet.
You can see the brass mouth reinforcement inlet into the sole of the block. This is very important for a chamfer plane that will see heavy use shaping various materials. Although it has become dim over the years, the line drawn across the legs indicate the position of the blade, an important point to watch for when starting and stopping some cuts.
I’m sharing these photos of my old plane as a practical example. When new, the edge of the blade’s head had a sharp burr which I filed down for comfort. This is a type of plane that does not take ham-handed abuse from fools well. Please note that, unlike most such planes used by less knowledgeable folk, the head of the blade is not mushroomed and the blade’s face is not dinged. Why? I have never struck this plane, purchased in 2009, with a steel hammer, not even once. For the same reason the wooden parts, while discolored and less-than-perfect through much use, exhibit none of the deformation, cracking, splitting, chipping and denting planes adjusted using steel hammers always do. This is the fruit of wisdom shared with me by an ancient plane maker on Shikoku island far back in the mists of time (ツ). Rejoice! You and your planes are now free of the chains of ignorance.

The modern Japanese chamfer plane, which is the only type we currently carry, is comprised of a small block of white oak housing a relatively narrow laminated steel blade as well as a chipbreaker.

This block (aka “dai” 台 in Japanese) fits into a “carriage” comprised of two sticks of white oak joined by steel and brass nuts and bolts held in place by captured wing nuts. The block fits tightly into grooves cut into the carriage so the user can shift the block and its blade right or left as necessary to either accommodate the required width of cut, or to expose a sharp portion of the blade when one portion becomes dull.

The width of cut can be quickly adjusted from zero to 24mm wide by rotating the two wing nuts smoothly opening or closing the gap between the two legs of the carriage. Eazy peazy Japaneezy.

The most common variety of chamfer plane has a blade inlet into the block with its mouth oriented 90˚ to the direction of travel. The next most common variety has a blade that is slightly skewed to produce a smoother cut with less tearout. We carry both types.

Standard chamfer plane (left) and skewed chamfer plane (right).

Uses for the Chamfer Plane

Japanese chamfer planes are essentially molding planes with two mutually adjustable fences used to produce chamfered edge treatments on wooden objects. Molding handplanes typically have blades ground to specific profiles intended to plane the edges and corners of wooden objects. Some produce purely decorative, curved shapes such as the Roman ogee, while others produce functional and/or structural edges such as tongue and groove joints.

But 45˚chamfer planes have a simple straight blade intended to produce a flat surface at 45˚ to the adjacent faces of the board. However, some varieties are used to cut chamfered surfaces at various angles.

The ancient, attractive and functional lambs tongue chamfer stop use in wood, stone and ivory.

Once cut this 45˚ chamfer is often left as-is in many projects and especially structural wood members as a finished surface. It tends to make make the board, beam or column look more refined. It also prevents the corners from being easily chipped or torn off, a safety feature in some cases. A hard 90˚ corner in exposed wood is seldom durable and given time and abuse often becomes ouchy.

Nowadays the electric router has sadly replaced practically all molding planes, and although I haven’t used an electric router in 15 years or so, I won’t deny they are very useful tools even if they are ultimately more expensive, destroy the user’s inner peace along with their hearing, fills their lungs with dust, chews their fingers, leaves unsightly ripple marks on the wood, and goes through expensive bits like Homer Simpson does donuts… mmmm donuts.

But routers are not all evil, for they do have the advantage of being able to treat the inside surfaces of curved edge whereas the plane under consideration can only do straight edges and outside curved surfaces. Of course, it’s possible to make chamfer planes that cut inside curved surfaces like those used by coopers (barrel makers).

The Joinery Chamfer Plane

An old but unused chamfer plane for kumiko and cabinet sash with wooden adjustment screws.

As mentioned above there are a very few varieties of specialty chamfer planes long used in joinery to produce different angles. Why angles other than 45˚ you say? Ah, perspicacious as always. Well, a simple 45˚ chamfer sheds dust and water well, but in the case of windows, doors and shoji, for example, it removes too much wood weakening mullions and kumiko to the point of structural frailty, and often appears less refined to boot. Sadly, these are no longer being made and are hard to find.

Advantages

As I suggested above, the chamfer plane produces lots of of fragrant shavings but little unhealthy dust. It won’t make your fingers bleed, and won’t grab your clothes.

Indeed, I can still remember the night I was working late on a custom door using a 15amp 1/2″ collet electrical plunge router with a long 3/4″ Ø carbide bit to cut deep mortises. This was before the days of automatic mechanisms to stop the spinning mass of copper and steel that is the armature when the power switch is released. Suddenly, out of pure evil malice, the howling beast grabbed my loose soccer jersey nearly chewing a hole in my chest! Ah, good times!

The chamfer plane works slower than a router, but it won’t gouge your work if you loose concentration for a second, it won’t make burn marks on your boards, or cause She Who Must Be Obeyed to lob complaints about racket and dust at you like barbed arrows smeared with toxic tree frog goop. To the contrary, it’s an efficient, well-behaved, forgiving, even gentle tool, one that produces a flat, sometimes even shiny surface with perfectly crisp edges on wood instead of the burnt and pounded washboard surfaces violent routers often inflict.

Another advantage to the Japanese chamfer plane is its relative light weight and small bulk, compared to the bulky, clunky, mind-numbing electrical equivalent. Much easier to store in the toolbox or work apron. And of course, being a simpler and more honest tool, it’s much less likely to be commandeered by Murphy’s painful pointy purple pecker to wreak death and destruction.

And of course, while its blade does need to be sharpened occasionally, the chamfer plane will provide many decades of continuous service without having to purchase a single nasty spinning bit from the CCP.

While it incorporates a couple of bolts, it has no cord and needs neither piggish chargers, nor poisonous batteries. It is a tool in total denial of the principles of planned obsolescence, predetermined service life, corporate profitability and hidden environmental destruction advocated by the high priests of profit at the Harvard School of Business and Monkey Butts. One might even say it’s a pragmatically contrarian tool. But whatever you choose to call it, I call mine a faithful servant, indeed, a friend.

How to Adjust

Adjusting the width of the chamfer is accomplished by first loosening the two wing nuts on the bolts. If increasing the width of cut, continue to spin the wingnuts out. Then once the gap between the legs is the right width, set the locknuts to the right position, check that the legs are parallel either by using a caliper to measure the distance between the legs at the front and rear of the carriage, and lock the legs in place using the wingnuts.

These planes have graduated brass indicators inlaid across the front legs and another across the rear sides of the carriage that are useful for rough use, but should not be relied on for precise settings.

Alternately, you can rest the plane on the corner of the board and examine the gap between the legs and board. If a significant gap exists, simple adjust the wing nuts until it closes.

When considering the purchase of a chamfer plane, be sure it has a brass plate inlaid in front of the mouth to prevent wear at this high-pressure area.

When you receive your chamfer plane, the block should fit tightly into it’s carriage. This will loosen with use, or applying a bit of oil or wax on the tongues of the block will help. Worse case, use a metal file and a bit of 220grit sandpaper to lightly adjust the width of the tongue.

When removing the block from the carriage, please do not use a steel hammer to strike the block. A wooden mallet works well, but holding a small block of softwood, like the one shown in the photo above, as a cushion between hammer/mallet and plane is best.

A Professional Technique

Quite frequently we need to cut a stopped chamfer, whether it’s for a lambs tongue chamfer detail or where stile meets rail in joinery. In any case, when we need to judge exactly where the blade of our planes starts and stops a cut, it helps to make marks on the chamfer plane’s legs indicating the location of the cutting edge, and corresponding pencil marks on the workpiece, to help with starting and stopping chamfer cuts in the right place.

Summary

The Japanese kakumenganna 45˚chamfer plane is a lightweight, compact, safe, healthy, cost efficient, environmentally sustainable and pleasant tool for quickly cutting chamfers in wood without leaving ugly ripples or burn marks on the wood, or ruining our hearing, or filling our lungs with sawdust. I couldn’t work without mine.

YMHOS

Link to Pricelist and pics of the Japanese Adjustable Chamfer Plane

Other Posts in the Japanese Handplane Series:

If you have questions or would like to learn more about our tools, please click the “Pricelist” link here or at the top of the page and use the “Contact Us” form located immediately below.

Please share your insights and comments with everyone in the form located further below labeled “Leave a Reply.” We aren’t evil Google, fascist facebook, or or the IT manager for HRC’s bathroom server farm, and so won’t sell, share, or profitably “misplace” your information. If I lie may all my chamfers chip and become slivers in my fundament

Go back

Your message has been sent

Warning
Warning
Warning
Warning.

Leave a comment

Japanese Exchangeable Blade Handsaws Part 2 – Pros, Cons & User Improvements

If you want to know what a man’s like, take a good look at how he treats his inferiors, not his equals.

J.K. Rowling, Harry Potter and the Goblet of Fire

Introduction

This is the second in a two part series about Japanese exchangeable-blades handsaws (“kaeba saws”).

In Part 1 we examined the history of how these saws came to be, how they are manufactured, and the market forces that made them so popular in Japan and even overseas. In this conclusion we will consider their advantages and disadvantages compared to traditional fixed-blade saws, and explain a few simple techniques Gentle Reader can employ to improve the performance of one variety.

I think all who have used them will agree that exchangeable-blade handsaws (“kaeba saws”) are effective and convenient products. However, Gentle Reader may be pondering, no doubt with exquisite grace and dignity, the question: “Do kaeba handsaws exhibit performance superior to well-made traditional handsaws?” The simple answer is unequivocal: sometimes yes, sometimes no. The Okey Dokey list below summarizes the reasons supporting your humble servant’s decisive answer.

But to avoid too much confusion, let’s briefly review the materials and techniques used in making the kaeba handsaw before attempting to navigate Okey & Dokey.

Review of Materials and Production

You will recall from Part 1 that kaeba saw blades are manufactured in automated CNC production lines using pre-hardened, pre-sanded, sheet steel of uniform thickness purchased from rolling mills. The sawmaker’s machinery cuts out the blade blanks, deburrs them, punches the teeth, shapes and polishes them with automated precision grinders, adds set to the teeth, and sometimes tensions the blades between rollers. The teeth of some blades are also instantaneously induction heat-treated (what some manufacturers call “impulse hardened) producing teeth harder than a sawfile.

Unlike the blades of traditional, high-quality saws, however, kaeba saw blades are not differentially hardened, taper-ground, trued or hammer-tensioned, nor are their teeth professionally sharpened, tuned or quality inspected. And of course, the backs of backsaws like dozuki are not carefully fitted. These are big, decisive differences not apparent to the untrained eye.

So with these physical differences in mind, let us next consider the pros and cons.

The Okey Dokey List

Some Advantages of Kaeba Handsaws Compared to Traditional Handsaws

  1. Lower Initial Cost: The initial cost of kaeba saws is less than traditional hand-forged saws. This is to be expected as they are mass-produced on automated machinery involving zero handwork by craftsmen.
  2. Greater Convenience: Dull or damaged blades can be quickly replaced with new, sharp blades improving convenience and obviating the need to carry entire bulky spare saws, and to have their teeth resharpened.
  3. Greater Durability: Kaeba sawblades with induction-hardened teeth (aka impulse-hardened teeth) are more durable and remain sharper longer than traditional fixed-blade handsaws, especially when cutting EWP (engineered wood products) such as plywood, MDF, OSB, LVL, glulams, etc. which contain hard adhesives and abrasive sandpaper grit. This is not the case for all kaeba sawblades, of course. From the craftsman’s viewpoint, this is perhaps their most significant performance advantage, and is nothing to sneeze at.
  4. Disposable: Like cat litter, plastic beverage bottles, and modern marriage, kaeba saws are a “use and toss” product that need not be repaired, only replaced. Fortunately, unlike marriage and cat depositions, lawyers don’t get involved much.

Disadvantages of Kaeba Handsaws Compared to Traditional Handsaws

  1. Less Economical Long-term: While cheaper when new, and although some kaeba saw blades can be resharpened (except those with induction-hardened teeth), the cost of a new replacement blade is typically more expensive than the direct cost of a professional sharpening job, another profit motive for planned obsolescence
  2. Limited Blade & Tooth Options: While popular blade and tooth shapes/quantities are readily available, the specialist blade shapes/teeth required for woodworking trades and tasks other than carpentry (e.g. luthier, fine interior joinery, kumiko zaiku, large rip and crosscut work, smooth cutting of hard woods, etc.) are simply not available as kaeba saws often leaving craftsmen who rely solely on kaeba saws bereft of adequate tools. Case in point: most kaeba saw blades are designed to cut the varieties of softwood commonly used in housing construction quickly and efficiently but are not well suited to cutting most hardwoods smoothly or precisely. On the other hand, some craftsmen and certainly professional saw sharpeners can readily modify the teeth of a traditional saw to satisfy specific job requirements. Younger craftsmen that grew up using only kaeba saws do not even realize this sad state of affairs. I encourage Gentle Reader to learn how to sharpen your own noble saws.
  3. Unknown Materials & Quality: As mentioned above, kaeba saw blades are made from pre-hardened, pre-sanded sheet steel (chemical content undisclosed) of uniform thickness supplied by rolling mills (nation of origin undisclosed). When your humble servant first inspected a kaeba saw maker’s plant around 2010, they were using high-quality, clearly-identifiable steel of known chemical composition produced by a reputable Swedish mill (specs and QC marks etched on the surface of the steel), but now that kaeba sawmakers have effectively conquered the handsaw market in Japan, the “bait and switch” principles taught by Harvard Business School and exemplified by McDonalds hamburglers have been fully implemented. Not unlike BS, B&S is an extremely profitable business management tool, one considered wise by some short-sighted business executives and those who can’t count past 20 without dropping their pants. Caveat emptor, my dear.
  4. Differential Heat Treatment: Although some Gentle Readers may be unaware of the importance of differential heat treatment in an excellent sawblade, much less the pros and cons thereof, kaeba sawblades lack the advantages of the differentially hardened plate found in quality, traditional Japanese (and Western) handsaws resulting in:
    1. Decreased toughness of the plate
    2. Increased springiness and resonant vibration in-use often harming precision;
  5. Taper Grinding: Being made of uniform-thickness sheet steel, the kaeba sawblade is not taper-ground resulting in:
    1. Increased binding and kinking in use. A kinked sawblade, of course, is irritating and destroys precision. It’s also less than worthless because it interrupts the user’s work as he replaces it, an inconvenience and expense the uninformed user typically blames on himself even though the true culprit is the inferior sawblade.
    2. Greater set is required to avoid binding and kinking, which equates to more energy and time expended to create more sawdust, a positive factor for weight loss, but not so much for efficient work.
    3. Greater tendency of the blade to wander in the cut increasing irritation while reducing precision.
  6. Sketchy/No Hammer Tensioning: Although some kaeba blades are tensioned between steel rollers in the same way circular sawblades are, the tensioned area in kaeba saws is a band across the length of the blade, and not the ideal oval shape sawsmiths typically produce by hand resulting in greater susceptibility to warpage/buckling as the blade heats up in use resulting in increased friction in the cut, reduced work efficiency, increased irritation to the user, and more damaged blades requiring replacement thereby increasing the profits of sawblade manufacturers, distributors and retailers. Another of Baldrick’s cunning plans?
  7. Less Precision: The precision achievable using kaeba backsaws such as dozuki is significantly less than that of high-quality hand-forged traditional dozuki backsaws for the following reasons:
    1. The back may not be straight;
    2. The back is not secured to the blade as securely permitting more slop;
    3. The plate has never been trued and may not track as precisely.
    4. The set of kaeba saw blades is decidedly excessive for precise joinery work.
  8. Rougher Cuts: Kaeba blades typically have greater set compared to traditional sawblades necessitated by their lack of taper grinding, making the saw cut less smoothly. In addition, uneven left-right set often encourages the sawcut to wander into the weeds.
  9. Landfill Stuffing: As mentioned in Advantage 4 above, like cat litter, plastic beverage bottles, and modern marriage, kaeba saws, are “use and toss” products, veritable landfill stuffing in-waiting. I will leave it to Gentle Reader to decide if this is good or not, but I am convinced kaeba saws find the transition from valued tool to rubbish lonely and emotionally damaging, which explains the increased demand for board certified metallurgical psychologists such as ton modeste serviteur.

Only Gentle Reader can answer the question of which type of saw is superior, but despite my sometimes negative observations listed above, I freely admit to liking and using both types in the context of “horses for courses.”

User Improvements to the Kaeba Dozuki Saw

Many moons ago I associated with a group of young, energetic and extremely pragmatic carpenters in Tokyo intent on finding solutions to deficiencies in modern tools anyone could put into effect. For instance, one item they studied to death was how to get the most from synthetic waterstones, a highly-successful bit of research IMHO.

Another tool they researched was the kaeba dozuki. While they didn’t propose any new, earth-shattering innovations, some of their techniques are worth employing.

Improvement No. 1: Side-jointing the Teeth

This first tuning technique is one that works on all handsaws and can especially help your kaeba dozuki saw cut straighter and more precisely, leaving a narrower kerf and smoother surfaces. This is traditionally performed using a file in the case of standard sawblades, but in the case of a kaeba dozuki saw with induction-hardened teeth, we need to use a harder tool and with more precision; Enter the Arkansas stone stage right.

You will need a new kaeba dozuki blade, a hard (not soft), flat Arkansas whetstone (novaculite) dimensioned approximately 8″x3″ (larger is OK but much smaller won’t work well), a piece of white copy paper, a can of light-weight spray lube such as WD-40, CRC5-56 (not PTFE), or brake cleaner, a relatively clean toothbrush, and a clean cotton rag. Please note that India stones, carborundum stones, waterstones, diamond plates won’t get the job done.

  1. Lay the paper down on a flat, stable, wooden board or workbench. Place the sawblade on top.
  2. Give the blade a light spray of lube.
  3. Gingerly place the hard Arkansas stone lengthwise on the blade parallel to the cutting edge, with one end hanging approximately 25mm (1″) off the toe end of the blade, one long edge resting on the blade, and the opposite long edge hanging off the blade about 6mm (1/4″) past teeth.
  4. Without placing any downward pressure on the stone, pull it towards the heel (handle end) of the blade, parallel to the tooth line, in a single smooth stroke until the end of the stone is hanging about 6mm off the heel of the blade. Slow or fast, it makes no difference, but I prefer slow. Just one stroke, mind you. The goal is for the stone to lightly abrade the sides of the tips of the teeth essentially “jointing” and bringing them all into line. In addition, and perhaps more importantly, even if your sawblade has perfectly uniform teeth, kaeba dozuki blades almost always have too much set, which this technique will reduce, improving the smoothness and precision of the cuts it makes.
  5. Turn the sawblade over and repeat steps 1~4. With this the stone will have made a single pass over both sides of the tips of all the blade’s teeth. In the case of blades with induction-hardened teeth, you may need to make 2 passes of the stone per side, but be aware that every pass reduces the useful life of the blade significantly. Also (and this is very important if you value your sanity), be sure to make the same number of strokes in the same manner to both sides of the blade.
  6. Take the blade outside and blast it with your can of spray lube to remove any particles of stone and metal left in the teeth. You may not be able to see this swarth (mixture of stone, steel and lube residue), but it is there, and if not removed, it will dull the blade during the first stroke in wood sure as eggses is eggses.
  7. Use the toothbrush and more spray lube to scrub the teeth to remove any remaining swarth residue.
  8. Spray the blade with lube or brake cleaner from both sides with the teeth pointing downward flushing any remaining swarth out of the teeth.
  9. Wipe the blade with the cotton rag from the blade’s back over its teeth. You don’t want the teeth to cut the cloth, or the cloth to catch on the teeth. If you observe any swarth residue on the cloth, repeat steps 6, 7 & 8. Do not use the saw until all the swarth is gone.

Tasting the Pudding

Now that the sawblade’s teeth have been side jointed, let’s test them to see if they need further persuasion.

You’ll need a piece of flat, knot-free softwood like pine with one straight/square edge, perhaps 150mm (6″) wide and 19mm (3/4″) thick. Use your marking knife and hardened square to mark a line on the wide face perpendicular to the straight edge. Clamp this board to your supporting bench or sawhorse with the line you just made hanging off the side.

With the saw’s edge angled about 30˚from the horizontal plane (surface of the board), begin a cut from the far end of the line. use a light touch and let the saw cut where it wants to cut. Does the saw cut a straight line, or does it tend to wander to the left or right?

You may not be able to tell from this initial test, but pay attention when using the saw to see if it tends to wander from the line. If it does, the teeth on the side of the blade it tends to drift towards may have too much set, in which case use the same stone and lube to joint the teeth on the offending side. Be very gentle because there’s a risk of making it worse.

Again, be aware that side jointing the teeth means you will have to joint the top of the teeth more than usual next time you sharpen them reducing their length and the overall lifespan of the blade that much more. This is not a big loss for kaeba saws, but will reduce their lifespan.

Improvement No. 2: Tuning The Back

Straightening a kinked and/or twisty saw can be a little like wrestling the carp in the wood block print above. I don’t know the story depicted here, but I’m pretty sure it’s a scene in a kabuki play. The guy in middle with the sword is an actor named Onoe Tamizo playing a carpenter named Rokusa. The guy on the right with the ugly scowl is played by Banto Hikosaburo (no sword visible). The lady (?) on the right with the short sword is played by Onoe Eizaburo. These are all male names because men play the female roles in kabuki plays, and acting troupes then were often related as they are now.

Dozuki saws have steel backs used to stabilize the thin blade and protect it from buckling. In the traditional saw this is a folded strip of steel that clamps over and tightly grips the back of the blade, much like Western backsaws. In the case of kaeba dozuki saws, however, the back cannot tightly grip the blade too tightly or it will be impossible to replace the blade, reducing the money, money, money, money, mo-ney the manufacturer needs Gentle Reader to contribute towards his purchase of that new Italian sportscar and the Greek vacation he promised two of his girlfriends (at the same time?).

The problem is that this necessary “tolerance” (aka “slop”) often allows the blade to wander more than is necessary. But what to do? I propose three useful techniques below for Gentle Reader’s kind consideration.

Deburring the Slot

The first item we need to check for is burrs inside the slot in the back. This is not a frequent problem, but it does occur.

Begin by removing the blade from handle/back, reversing it, inserting the nose or tail of the blade in the slot, and without cutting your hand, running it back and forth in the slot. This should give you a good idea if there any big burrs or restrictions in the slot. If you find any, mark the location on the back with a marking pen.

Next, and while it may imperil your extravagant income and glamorous lifestyle as an international hand model, run your fingernail inside the slot checking for burrs that might tend to tweak the blade this way and that.

If you detect any burrs, a skinny deburring tool might get rid of them. Be careful that bits of metal don’t fall inside the slot.

Or, you can fold a piece of wet/dry sandpaper (220 grit?) in half and run it back and forth in the slot where the burrs are hiding removing/smoothing them. Some of that spray lube might help. When doing this, once again be careful to prevent large pieces of metal from falling inside the slot. When done, thoroughly flush out any swarth and bits of metal with a few squirts from your can of spray lube or brake cleaner while swinging the handle like a helicopter rotor blade. I guarantee The Mistress of the Blue Horizons will neither understand the importance of this manly ritual nor appreciate the artistic spots it may leave on her walls and ceilings, so I suggest you perform it outside, with style and grace of course.

Straighten the Back

With the slot safely deburred, let’s next consider the back’s straightness. Obviously, if a saw’s back isn’t straight, the blade won’t be either, and the cut it makes will tend to wander. So you need to check the back, and if you determine it’s out of wack, correct it.

The back, being made of folded sheet metal, is not a precision-milled component, so please don’t expect perfection, and firmly quash any OCD persnicketiness.

With the blade installed, use a precision straightedge held against the sides of the back with a lightsource to check for bow and gaps. Be sure to check both sides. A steel straightedge like that of a combination square will work, but a thinnish beveled-edge straightedge like our 400mm stainless steel straightedge by Matsui Precision works best.

A feeler gauge may be helpful in evaluating any gaps.

Straightening the back is not something readily done with a hammer for a number of reasons, but we can bend it straight if we are careful. To do this, lay the saw, with blade attached (this is important), on a flat workbench top or board with the cupped surface facing up. Place a stick of wood under and perpendicular to the back at the lowest point of the cup. The thickness of this stick is key and will take some trial and error.

Place one hand pressing down on the end of the back where it joins the handle, and the other hand on the far end. Press down slowly and carefully, bending the back without taking it past the yield point where the back will permanently bend. The back should rebound when you remove pressure, returning to its original shape without permanent deflection. Repeat this until you develop a sense of the pressure required to reach, but not exceed, the “plastic limit” of the back. You may need to add to the thickness of the stick used to spring the back.

When you have a good sense of the pressure required to just reach the plastic limit, press down on the back again with a little bit of extra pressure causing the back to permanently bend just a tiny bit. No pro-wrestling moves, please. Check the back with your straightedge to determine any improvement in straightness.

The same bending action can be achieved by placing the back, with blade attached to keep the slot from closing up, in a vise with padded jaws. Don’t clamp the saw in the vise tightly, but leave a little gap, and press on the back where it joins the handle, not the handle itself. This technique works well, but since it’s a bit more difficult to feel the plastic deformation of the back, and to control the point of flexure, it requires more self control. Please keep that darned inner badger under tight control.

If the back is snaking this way and that (very unusual), you can try the same technique in various directions.

Check progress with your beveled straightedge frequently.

If this doesn’t work, and your dozuki still refuses to make high-precision cuts, bite the bullet and replace it.

Tuning the Slot

Now that the blade slot is deburred and the back is fairly true, the next step is to determine if we need to improve the gripping pressure of the back on the blade.

This is a difficult job because we need the back to apply enough pressure on the blade to hold it in place without wiggling, but too much pressure will make it difficult to remove and replace the blade without damaging it. So begin by checking the fit of the blade in its slot.

Insert the blade and, while holding it under a strong light, push it right and left paying attention to any gaps that may open between blade and back.

If you discover any significant gaps, mark the locations on the back with a marking pen. A feeler gauge may be helpful. You will need to judge if the blade wiggle caused by these gaps is enough to warrant an attempt to close the gaps.

There are two ways to close any gaps; Both are risky. The first is to use a small hammer to tap tap tap on the back. The second is to use a vise or a C clamp to close the slot. Either way, be sure the blade is in the slot when you execute.

This concludes our tome about handsaw history, advanced business management techniques, rodent cuisine and modern marriage. I hope you found it informative.

YMHOS

If you have questions or would like to learn more about our tools, please click the “Pricelist” link here or at the top of the page and use the “Contact Us” form located immediately below.

Please share your insights and comments with everyone by using the form located further below labeled “Leave a Reply.” We aren’t evil Google, fascist facebook, commie TikTok, or the crackhead son of a US President and so won’t sell, share, or profitably “misplace” your information. If I lie may my dozuki saw do sneaky snakey stuff.

Relevant Articles

Go back

Your message has been sent

Warning
Warning
Warning
Warning.

Leave a comment

Japanese Exchangeable-blade Handsaws Part 1 – History & Varieties

When God means to punish a man He sends him stupid friends and clever enemies.

Joe Abercrombie, Best Served Cold

Introduction

Gentle Readers are probably familiar with the modern mass-produced mass-marketed exchangeable-blade handsaws made in Japan. In this first part of a two part series we will briefly examine the history of how these saws came to be, how they are manufactured, and the market forces that made them so popular in Japan and even overseas.

In Part 2, to be published later, your most humble and obedient servant will list pros and cons and share some techniques for improving their performance.

Gentle Reader may already be aware of these saws and even own and use them at work daily, but in this article your humble servant will share details about them not available elsewhere. I pray it proves informative, or at least entertaining.

Terminology

In the Japanese language the type of consumer-grade handsaw I mentioned above with blades that can be removed and reattached to a handle mechanism are called “kaeba nokogiri” (kah/eh/bah nokogiri 替刃鋸) meaning, of course, “exchangeable-blade saw.” From this point forward I will call them “kaeba saws” for brevity. They have entirely replaced traditional forged handsaws in Japan for good and valid reasons, and indeed are popular throughout Asia as well as Western countries too.

So let’s begin this adventure by considering the history of this new version of an old tool that shook the handsaw world like a terrier does a rat.

Historical Background

In the late 1970’s the kaeba handsaw appeared in the Japanese market changing everything.

I’m not sure who first developed the concept, but there’s no doubt it was inspired by the convenient and highly-profitable bits and blades used with powertools. The first automated equipment for making these sawblades was developed by a 150 year old company located in Sanjo, Japan that shifted their traditional saw sharpening business to producing and selling CNC saw sharpening machines. Later, inspired by automated circular-saw blade production techniques, they went on to develop CNC machinery to fabricate handsaw blades in an automated production line.

Production Methods

The manufacturing process begins with materials, of course. The primary material is pre-hardened sheet steel sanded to uniform thickness in rolling mills, and delivered to the blade manufacturer in large, heavy rolls. This product means the blade manufacturer doesn’t have to sort, forge, heat-treat, stress-relieve, or taper-grind the steel. In fact, he couldn’t even if he wanted to.

As this roll of sheet steel is unspooled into the production line, CNC machines cut and deburr the blade blanks, punch the teeth, and shape and sharpen them with special abrasives, after which set is applied by machine. And unlike traditional hand-forged fixed-blade saws, the plates are not forged, taper-ground or heat treated by the saw manufacturer at all. This is an important distinction to those who know saws from shinola.

Some but by no means all such blades are tensioned between two steel rollers in imitation of the techniques used during the manufacture of circular saw blades.

Most kaeba manufacturers induction-harden just the tips of the teeth of some blades for extra durability as the blades are fed between, and instantaneously heated red hot by, electrically-charged copper blocks, then immediately quenched in coolant spray after exiting the induction blocks leaving them a darker oxidized color. These blades cannot be sharpened by hand as the teeth are harder than files.

Handles

Kaeba saw’s handles are sometimes made of wood, sometimes of plastic, and sometimes of rubber over plastic. The blade is secured to the handle by metal mechanical widgets and sometimes screws integral to the handle. The blades can be quickly and easily changed encouraging consumers to do so frequently, but each manufacturer’s blades will fit only their proprietary handle locking the consumer into buying proprietary replacement blades, much like printers and ink/toner cartridges, because as the O’Jays sang on Soul Train, it’s the blade that makes the money, money, money, money, mo-ney, but it’s the handle that drives market share.

And with labor costs to produce such a handsaw a single digit percentage of what’s required for a traditional handsaw, the few manufacturers of kaeba saws find it difficult betimes to wade through the mountains of mad stacks laying about.

With the production technology perfected, compatible materials available, and CNC machinery in the hands of a few manufacturers, it was only a hop skip and a jump to widespread sales of kaeba handsaws, and if I may paraphrase my old carpenter foreman Uglúk, it looks like rats are back on the menu, boys.

Some prefer their rodent roasted on rye with horseradish sauce, but I prefer mine sauteed with a drop o’ Tabasco Sauce, or as Bert suggested, maybe even a floater for delicately piquant flavor! What about you?

The Societal Impacts of Kaeba Handsaws 替刃鋸の波及

I mentioned above that this new type of saw changed everything. Of course, that’s a bit of an exaggeration because babies still love boobies and politicians graft, but indeed some things changed drastically in Japan.

The first big change the kaeba handsaw wrought was putting nearly all the traditional sawsmiths in Japan out of work in a matter of a few decades. Indeed, the number of sawsmiths still forging traditional saws full-time nowadays can be numbered on the fingers of one hand after a manicure using a tablesaw.

The second domino was the near destruction of the saw handle industry. As the demand for exchangeable-blade handsaws ramped up, the production of traditional handsaws, along with the need for traditional handles, crashed.

You see, exchangeable-blade saws have patented brand-specific wooden handles with integral metal mounting plates/screws/clips to which the specific blade-maker’s replacement blade is attached. The maker of each brand of exchangeable-blade handsaw subcontracts the production of their handle to specific suppliers, and since the producers of handsaws are now few, so are the handle suppliers. Sadly, your humble servant is aware of only one, and occasionally two producers of traditional handles still operating. I believe they still have all their fingers but I’m concerned one gentleman’s liver has seen better days.

Just when it looked like things couldn’t get worse, the third domino fell-over and crushed the saw sharpening trade. While many kaeba saws can be resharpened, some cannot be economically resharpened at all because their teeth are induction-heat-treated to be harder than sawfiles. In fact, while it’s usually a little cheaper to have even a kaeba sawblade professionally sharpened rather than purchasing a replacement, buying a new sawblade and tossing the old one is quicker, more convenient and obviates the need to carry spare saws to a jobsite because thin, lightweight replacement sawblades will suffice. In any case the jobs of saw sharpeners (metateshi meh/tah/teh/she 目立て師), like those of sawsmiths, handlemakers, wheelwrights, and honest climate scientists have been practically eliminated.

The one overarching societal lesson one can take away from this is that technological advances always have and always will engender painful changes in every industry in the world, and the case of the Japanese handsaw industry only confirms that one can either ride the train of technology sipping tea and eating pringles in comfort as it rolls along, or grease the tracks as it runs one over. Just ask the once mighty Eastman Kodak company of camera and film fame if ‘taint so.

A similar progression occurred within the saw manufacturing industry in the West, but instead of the changes stemming from product innovation, the causes were quality adulteration, active neglect of customers needs, and abandonment of unparalled tradition. Welcome to the Harvard School of Business Management’s model of “profit through disruption” in action. I hear they’re looking for a new university president.

An American Handsaw Maker

To this point we’ve taken a shallow look at Japanese handsaws, especially the impact of the kaeba variety on Japanese markets, but highly intelligent Gentle Readers (could there possibly be any other kind? absolutely not!) may wonder how in heck these strange Japanese products managed to make such profound inroads into Western markets, so a few points about a well-known American saw manufacturer may prove instructive.

Gentle Reader may recall that the famous American handsaw manufacturer Henry Disston (1819–1878) was born in England the son of a designer and manufacturer of lace-making machines and immigrated to the USA in 1833 along with his father and sister. His father died three days after stepping off the boat. Tough luck.

Being a determined and diligent young man, Henry apprenticed himself to a saw company in Philadelphia, Pennsylvania. In 1840 he went independent, and after some lean years building a reputation for quality, he founded the Keystone Saw Works there in 1850. After the American civil war his son Hamilton joined the business and Henry changed the company’s name to Disston & Son, and later to Disston & Sons. At its peak Disston & Sons was the largest and most productive saw manufacturer in the world with 8,000 direct employees working on 300 acres.

At the time he established the Keystone Saw Works, nearly all tool steel used in North America was imported from Great Britain. This was a serious impediment to growth so Henry established the first crucible steel mill of consequence in the Americas to supply steel for his products and to support the war effort, and although other more famous, ruthless individuals falsely took credit for developing steel production in America, they were originally only Henry’s customers. For the next 25 years, the Disstons were among the largest producers of quality tool steel in the world outside England.

Interestingly, American consumers at the time were absolutely convinced that only Birmingham, England could make quality tool steel, so while other American sawmakers imported their steel from England, D&S used their own steel, avoiding the high import tariffs of the time. But to avoid the stigma of being seen as a “colonial product,” for many decades the acid-etched engraving on Disston & Sons’ sawblades included variations of the words “London Spring Steel” intimating that more prestigious British steel was used. Interestingly modern chemical analysis suggests that D&S’s tool steel was at least as high-quality as that imported from Britain at the time.

The first handsaw I owned as a young man was an antique and terribly rusty D&S D-8 thumbhole rip saw missing a handle (but with partial screws) I found languishing in a joint compound bucket in the back of a Las Vegas pawnshop. My penny-pinching carpenter father said it could be restored to be a better saw than I could buy new, and at $3 and a lot of elbow grease, the price was right and so was he. After derusting the blade, making a handle from a piece of scrap walnut, and reworking the teeth several times until I got the nack, that antique D-8 became an excellent handsaw, far superior to the new Disston saws still available at the time. My son owns it now.

A classic 28″ Disston D-8 swayback rip saw with a 2 hand thumbhole stock. Not my rescue saw but close.

The first point I want to make in this section is that by the time I was old enough to want to own a handsaw, the circular saw ruled the construction industry in the West (but not yet in Japan) and most younger carpenters neither owned a decent handsaw nor could care less. As a result of these market changes, the production and sale of handsaws became less profitable, the quality of those available became shamefully degraded, and instead of increasing production efficiency, and/or innovating like Japanese saw companies did, D&S did a double doodoo on quality, then lay down to be eaten by vultures. Other than a few tiny, recently-established boutique backsaw makers, the once-mighty American handsaw industry is now as dead as decency.

My second point is that this shameful degradation and subsequent abandonment of a once huge and profitable American industry fomented despair among Western woodworkers who needed quality handsaws but couldn’t procure them new anymore forcing many, like your humble servant, to haunt flea markets, pawnshops, and later Ebay for old handsaws (including Disston & Sons products) and to even purchase tools imported from Japan back when Japan’s reputation for quality was not as shiny as it is now. These forsaken and “disrupted” woodworkers, hungry for better tools, were the primary reason medium-quality but very sharp Japanese crosscut handsaws first became so popular in the USA. And when Japanese kaeba saws became available later, overseas markets snapped them up like the proverbial duck on a June bug.

FYI, the Disstonian Institute website has some interesting information about Disston & Sons those interested in history may enjoy.

As an aside, I noticed that Disston, now the Chinese holesaw maker, is offering a newer version of the D-8 26″ swayback rip/crosscut handsaw exclusively on Amazon. It looks shiny! The country of manufacture and local content is not listed anywhere, but probably not the USA and definitely not Philly. The video on their website almost made your unworthy servant spew chunky chunks. Consider yourself warned.

Let us next shift our attention back to the kaeba saw and consider the first and most popular such handsaw, as well as some other popular varieties.

Dozuki Kaeba Handsaw

The dozuki handsaw was the first Japanese kaeba saw to become popular overseas, perhaps initially attracting attention because it vaguely resembles the petite “gents” back saws once popular with amateurs. The dozuki is a thin crosscut backsaw (a single-edged handsaw with a steel or brass stiffener attached to its back) that cuts on the pull stroke.

The name is pronounced dough/zoo/key and is comprised of two Chinese characters: “胴” pronounced “dough” meaning “trunk” as in the trunk of a tree or the human torso, and 付き pronounced “zookey,” a verb meaning “to attach or make.” To the best of your humble servant’s understanding most Western woodworkers are unaware of the name’s meaning or the saw’s specialized purpose but nonetheless they use them for everything but spreading jam on toast (marmalade gums up the teeth terribly). The name refers to the job of cross-cutting the shoulders of tenons, but not the cheeks, which is a job for the specialized “ hozohiki” rip saw.

A 210mm dozuki crosscut saw with fine teeth for precision work. The manufacturer calls it a “kumiko” saw after the narrow slats found in traditional decorative joinery such as shoji and ranma. The teeth are not induction hardened. The fit between back and blade is pretty darn good and it makes excellent cuts, but the teeth have too much set for the highest-quality work.

In the case of joinery, furniture, cabinetry, and fine architectural woodwork, well-made mortise and tenon joints are essential to the appearance and even the strength of the finished product. And since the shoulder is the only visible part of most mortise and tenon joints, shoulder appearance is important.

Cutting tenon shoulders in a craftsman-like manner in the Japanese tradition demands not only a good eye, a good saw, and a skilled hand but speed, because the craftsman is expected to saw deftly, precisely and cleanly to the layout line the first time every time, all day long. This differs from the inefficient, amateurish methodology for cutting tenons in cabinetry and joinery as taught by the Holy Masters of Woodworking in the West who lack adequate saws and/or skills and shamefully advocate cutting wide of the layout line and sneaking up on it with chisels and planes. How embarrassing.

A quality dozuki saw is extremely effective at making these cuts. To do so it must be able to make a straight, precise, smooth cut right to a final layout line every time without wandering off into the weeds and without having to use a paring chisel or shoulder plane to obtain a clean, square, straight shoulder. Accordingly, it must have a thin, true plate that won’t produce excess friction, nor buckle, oil-can, or bind as it heats up, and fine, uniform teeth with minimum practical set. It must also have a lightweight but rigid steel back that effectively keeps the blade’s plate true, protects it from buckling, and discourages it from weedy adventures.

Kaeba dozuki saws come in various lengths ranging from 150mm to 240mm. TPI varies with maker. Zetsaw by Okada Industries is my favorite kaeba brand and makes some with induction-hardened teeth that can be made extremely useful with the modifications I will share in Part 2. FYI, your humble servant does not sell Z-saws and has never received free (or even discounted) samples, nor been wined, dined laid or paid to promote them.

Interestingly, even before the development of the exchangeable-blade kaeba saw, the Japanese dozuki saw was used in the West for cutting dovetails, a job which requires occasional crosscuts but frequent rip cuts, something the hozohiki saw does much better. In any case, that Western woodworkers ended up preferring the Japanese dozuki saw for even rip cuts may give Gentle Reader an idea about the comparatively adulterated performance of readily-available Western dovetail saws from the 1970’s onward.

The kaeba concept has been expanded to include useful saws of many shapes and sizes, some of which your humble servant owns and uses, especially when there is a risk of damaging one of his professional-grade fixed-blade handsaws.

Let’s next consider some popular varieties of kaeba saws other than the dozuki and hozohiki.

Kaeba Crosscut/Rip Saws

The best selling Japanese handsaw both domestically and internationally is the standard single-edged (“kataba”) carpenter’s crosscut saw. These come in various lengths, shapes, and with various types of teeth. They are handy in the shop, and I always have one or two of these on hand when working in the field, especially when cutting EWP (engineered wood products) which I refuse to allow my hand-forged saws to even touch no matter how much they wiggle and whine. If you need to cut plywood or other EWP, these saws are a must-have IMHO. More on this subject in Part 2.

A 265mm kataba crosscut saw with hardened teeth by Zeton owned by your humble servant. The blade has seen a lot of abuse and neglect. It has a paulownia wood handle still wrapped in plastic with the pricetag still attached.
A 7sun (210mm) crosscut saw by Zeton missing a couple of its induction-hardened teeth. It has a soft paulownia wood handle that has seen better days. Hinoki would have been a better wood in this case.

But the usefulness of kaeba saws is not limited to woodworking and sandwich making only, oh no. I carry a 333mm (13″) kaeba formwork saw with a lightweight plastic pistol-grip handle when hunting because no other tool I know of is so light, so compact, and can cut so much wood so quickly.

A special-use kaeba saw I am fond of, with two of its blades shown. The handle (a Zeton product) is made of fairly lightweight but tough plastic, but its most valuable feature IMO is its short length which makes it fit nicely inside toolbags and backpacks. The 300mm blade, handle, and a wooden scabbard I made to fit, goes in the toolbag I take to jobsites. I have a plastic scabbard for the 333mm saw which I strap to my backpack when camping and hunting. Much lighter and more compact than an axe.

The Silky brand arborist’s saw blades are excellent for this purpose too if you ditch the heavy rubber handle and gaudy scabbard.

Ryouba Double-edged Kaeba Saws

This style of kaeba saw combines a rip saw and a crosscut saw in one exchangeable blade. I own one 270mm kaeba ryouba saw with induction-hardened teeth I like well enough, but I still prefer fixed-blade ryouba saws. I daresay most people can’t tell the difference.

A 270mm ryouba double-edged saw with hardened teeth by Fujiwara intended for interior installation work. The blade retention bar can be seen projecting from the center line of the handle. I’m unsure if this saw is still being produced
The same 270mm ryouba saw disassembled showing handle, blade, and wire retention clip. The two bent tabs at the end of the sprung retention bar fit into the two slots in the blade when assembled.
The same 270mm ryouba kaeba saw showing the wire retention clip used to secure the two tabs that lock the blade in-place. Notice the blue-black discoloration of the sawteeth tips typical of induction-hardening.

Saws retailers here in Tokyo tell me that sales of kaeba ryouba saws have dropped off dramatically the last few years probably due to increased prefabrication and LGS metal studs replacing wood and LVL (laminated veneer lumber) framing for interiors such that rip cuts in wood in the field are seldom necessary. I believe this increase in the use of pre-manufactured components is in part due to three inter-related factors: (1) Rising construction costs; and (2) High demand in the construction industry; and (3) An aging workforce resulting in a decrease in available manpower in the construction industry making it difficult to meet customer demand. I fear the current attitude of Japanese women about bearing and raising children will prove disastrous for the nation soon as you can say “Bob’s not your uncle.”

Teflon Coated Blades

Zetsaw sells some of its blades with a PTFE teflon coating which I have found to be very effective in reducing friction and preventing sap from accumulating when cutting some softwoods. Makes a great egg turner too.

An 8sun (235mm) rip saw with hardened teeth and teflon coating by Zeton. This is an exceptionally useful saw.

The Adventure Continues

In the next installment in this operatic series about the funky love of money, fine dining and handsaws we will examine the advantages and disadvantages of kaeba saws compared to traditional fixed-blade saws, and explain simple techniques Gentle Reader can employ to supercharge your kaeba saws.

But in the meantime, since the IMF, EU and UN are on the verge of outlawing backyard vegetable gardens at the same time they are taking by force and sacrificing the land of European farmers on the alter of the religion of “Climate Change,” (how did that work out for Sri Lanka?) all while increasing pressure on others (regular people, but not the bureaucrats/elite) to substitute bugs for meat (I kid thee not), I would appreciate Gentle Reader sharing any tasty recipes you may have for crispy, crunchy low-fat rodent dishes in the comments below. I need to broaden my culinary repertoire in preparation for more societal “disruption,” you see.

YMHOS

I ain’t gonna eat no bugs!

If you have questions or would like to learn more about our tools, please click the “Pricelist” link here or at the top of the page and use the “Contact Us” form located immediately below.

Please share your insights and comments with everyone by using the form located further below labeled “Leave a Reply.” We aren’t evil Google, fascist facebook, thuggish Twitter, or the son of a President and so won’t sell, share, or profitably “misplace” your information. If I lie may my dozuki saw wander like a clowder of kittens.

Go back

Your message has been sent

Warning
Warning
Warning
Warning.

Leave a comment

Related Articles

Permanence

A Huon Pine, native only to the Island of Tasmania

Serit arbores quae alteri seculo prosint – “He that plants trees labours for future generations.”

Caecilius Statius, quoted by Cicero. Motto of John Quincy Adams and his family, among others

This is a guest post by Dr. Antone Martinho-Truswell regarding a highly unusual tree, his adventures working its wood, and his thoughts about permanence. Enjoy.

What Does It Mean to Build Permanence?

Woodworkers – and especially we odder, curmudgeonly, hand tool woodworkers – have a vexed relationship with permanence. 

On the one hand, spend any time reading, listening, or talking to a woodworker of any integrity (not least our distinguished host, Mr. Covington), and you will inevitably hear about building things that last, creating furniture or structures that will outlive the creator. Or else you might hear lamentation of the impermanent, throw-away culture represented by particle board, OSB, melamine, wire nails, and so forth and so on. Stan writes regularly here about building for future generations, about tool chests that preserve and workshop stools that endure. When we chop a mortice or fit a dovetail, the idea is that the end product is permanent – the strength and durability of the outcome justifying the labour-intensive process of creating it

And yet: wood. We are not stonemasons. We are not goldsmiths. We work with a biological material, one subject to biological processes such as mold, rot, borers, gnawing things, weather, sunlight, fire and friction which eat and wear away at wood until it’s gone. Japan’s venerable old wooden structures, record holders across all human construction efforts, pale in age compared to those made of stone. Wood perishes as do all living things (at least since Valinor was sundered from the sphere of the Earth).

This is the story of a permanent wood. A wood as magnificent as it is rare, a wood that is itself a lesson in permanence, and my attempts to make beautiful things for now and the future.

Old and Young Places

I like to think about old things. I was born and grew up in Southern California, where almost everything is new, even the old things. I remember as a child a small water tower near my elementary school, proudly fronted by a sign announcing that it was the oldest building in the area – an august 25 years old. The tower is older now and so am I, but there were old trees around even then. Up north, there are sequoias and redwoods, and of course, the oldest of all, bristlecone pines. I was young then, and didn’t think too much about wood or lumber, but I knew the trees were old. 

As a young man, I moved to England for graduate school, and the world was much older. There was a sense of permanence, in the material things at least: old buildings and old furniture and old books and old wood. Oaken chapel pews and blanket chests and linenfold panelling – the sorts of adornments that, in the USA, are the enviable preserve of grand old institutions in grand old East coast cities, but in the UK, found in all manner of great and humble places. But the trees weren’t so old. England’s ‘green and pleasant land’ is green with farms and fens, but not so much old forest anymore. Like much of Europe, over aeons humans have harvested so much timber that little old-growth forest remains, only secondary growth, coppices and managed woodland. The trees in England are fairly young because the culture is relatively old. I was not yet a woodworker, and I did’nt think much on trees and timber at the time, but I knew the culture was old.

As a married man, I moved to Australia, and here I remain. The prevailing culture – that of the settlers rather than the indigenous people of Australia – is young, and so are the trees. Mostly.

Australia’s frequent natural fires mean that most of the trees that grow here are adapted to grow fast and big, but not long. Generations of forest turn over quickly – in ecological terms that is – with bushfires killing off adult trees and causing their scattered seeds to germinate and grow a generation of newer, younger trees. What’s more, as in America, the brash, youthful settler culture did not have a good track record as stewards of the natural gifts of the island continent, and the few old hardwood forests that once existed have been over-exploited. 

Perhaps with age comes wisdom, but now I am both a father and a woodworker, and I ponder permanence, and wood, a great deal, and what all this youthful forest means for woodworking here in the sunburnt country. 

Hard, Stringy Wood

If you know anything about Australian woods, you know they have a well-deserved reputation for being really, really hard.

The vast majority of our forests and the trees that grow in them are the various and many species of eucalyptus and its near relatives, with two qualities that make them a mixed blessing to woodworkers.

First, they are fast growing, so as to quickly repopulate the land after fire, and second, they are extremely hard – the softest commercially available eucalyptus wood is called “Victorian Ash” (or “Tasmanian Oak” – same wood, different source) in the timber trade with a hardness similar to white oak or rock maple. The hardness of other varieties can easily range up into ipe and ebony territory.

Rainbow Eucalyptus

The result is an abundance of eucalyptus wood great for things like flooring and fenceposts, but fast growth makes it especially stringy, which together with phenomenal hardness makes it difficult to work with handtools. That same Victorian ash, the most common of all hardwoods in commercial use here, is among the best behaved, and a straight grained piece can take a nice glassy finish from a hand-plane, but we have nothing commonly available with the smooth texture of a maple or beech. Victorian ash works like oak at best. The other good furniture eucalypt is Jarrah, which is a lovely orange-brown colour and less splintery than most, but it’s expensive and a good bit harder than maple, so still a challenge. Moreover, it comes from Western Australia, which, along with Victoria, banned all native forestry at the start of 2024, so it is likely to recede to only niche use in the future. 

There are many other beautiful, softer, easier working, and often fragrant Australian hardwoods, but for one reason or another all of them are scarce and hard to track down.

There are few species under plantation production here, and the fast-growing eucalypts crowd out most other species in our forests, so the best cabinetry timbers, like acacias and mahogany relatives, are rare. If you find these timbers for sale, it’s usually from a small-time operation that harvested a fallen tree – so you have to wait around for luck to smile on you. I try to snap up Australian Rosewood priced reasonably. The vast tracts of cabinet timber we once had – the famed Australian Red Cedar, which is actually a mahogany cousin, for example – were all irresponsibly exploited down to commercial extinction decades ago. A permanent culture of wood use requires a forestry industry with an eye toward permanence, which we didn’t have for a long time, and many argue we still don’t – hence the aforementioned bans and the limited selection of commercial wood. 

A few government agencies and private companies are trying to improve sustainable forestry in Australia focusing on Australian blackwood (Acacia melanoxylon). This species should not be confused with the African blackwood of oboe, clarinet and bagpipe fame. Australian blackwood is a dead ringer for Hawaiian koa, and is its closest living relative. It has a rich, deep, brown colour with the same gleaming chatoyancy of koa, but its name comes not from the colour of the seasoned wood, but rather the black color the sap turns sawyers’ hands.

It’s a breathtaking timber deserving of widespread admiration, and one of the few beautiful cabinet timbers down here that weren’t over-exploited to near extinction in the last century. The blackwood timber industry is apparently a bit wiser than their forebears, and so harvests less and charges more to promote sustainability. It’s the nicest timber that can be bought here straightforwardly, and is priced accordingly.

The Ships that Took Our Trees

Clipper Ship, City of Adelaide, 1000 tons

Of particular interest to users of Japanese tools and Japanese woodworking methods and mindsets are softwoods, and this is where Australia is confusing. There are no true pines native to any part of the Southern Hemisphere – but settlers insisted on naming all the fascinating and unusual softwoods down here “pines” – and then importing a northern hemisphere species for most of our plantation wood.

Norfolk Island Pine

Norfolk Island Pine

When Britain established the first penal colony at Sydney in 1787, the site was chosen partly because it was thought to offer a good strategic back-up to the British claims on Norfolk Island – a speck 900 miles out into the Pacific. The trees covering this island – Norfolk Island pines – were thought to be particularly valuable to the Royal Navy, as they tended to produce ramrod-straight single trunks, almost as if replacement masts had been conjured up from the Earth. However, the timber proved too flexible for masts, and the idea was abandoned, though the Norfolk pines got their second act as a popular ornamental plant (including a few all the way back in my home town in California).

Hoop Pine

Much more useful is hoop pine, a near cousin of the norfolk pine that grows on the Australian mainland, and is our only plantation-grown native conifer. I’ve made shoji from hoop pine; it has nice straight grain producing a good shine when hand-planed. The only other commercially available native softwood is Australian white cypress which has a beautiful smell and is famously insect resistant, but unlike most softwoods it’s harder than American oaks. It also doesn’t grow very big, so is mostly used for knotty, sapwood-sapwood edged fence posts, or equally knotty floorboards and decking. I understand that it is not a sustainably managed species, and conservationists often recommend against its use. 

Monterey Pine

The Australian construction industry relies on plantation grown monterey pine (also called radiata or pinus radiata) for all of its general purpose lumber. This is an import from California, now very rare in its natural habitat but grown all over the Southern Hemisphere to compensate for a dearth of native pine species. It is a particular pet-hate of Australian woodworkers, in online forums and general conversation, who lament its often crumbly texture and poor strength. I don’t hate it though – it can take a lovely plane finish and the wide grain does make for beautiful patterns on clear, flat sawn boards.

Huon Pine

Like all Australian trees, huon pine is misnamed. It isn’t a pine at all but rather the only member of its genus – more akin to a cypress than anything else, yet still not a cypress, a thing of its own. 

Fans of Tolkien’s works may lament that its name is Huon and not Huorn, but no tree was ever more deserving of association with Tolkien’s tree-herding Ents, that ancient race of sentient defenders of the forest.

Huon pines grow only in Tasmania, and only in the wet and mountainous western regions protected from fires. Provided they have that protection, they may achieve something most Australian trees do not – great age. Huon pines grow incredibly slowly, barely thickening as century after century wash over them, living at least 2000-3000 years, with some thought to be even older. This is best evidenced in the astonishing tightness of their annual growth rings. It is not uncommon to see specimens with annual growth less than half a millimetre – or to put it another way, the trees gain less than two inches of trunk radius per century. While immensely slow, these trees can still grow immensely large when given that precious critical thing – time. They are probably the longest-lived trees in the Southern hemisphere, and certainly in Australia.

There are lots of small huon pines growing now, though few big ones. They should be huge, but they are not, because the great ones were all mostly cut down to build boats – a vast fleet of huon pine watercraft were constructed in Tasmania, using up most of the big trees. The promise of the perfect tree for shipbuilding that had fallen flat on Norfolk Island paid off big time in Tasmania with the huon pine. The reason for the single-minded use of these ancient trees for shipbuilding will become obvious, but as a result of this hasty zeal, they are now the single most protected species of tree in Australia, both to allow the forest, with Ent-like patience, to recover, and to preserve the few very old and very large specimens that remain. 

Beyond the Grey Rain-curtain

These trees are old, though their lives are but the beginning, and death, as Gandalf once taught young Peregrin Took before a fateful battle, is just another path beyond which the journey does not end. This is, cynically, true of all wood that gets put to human purpose, but it is true in a special way for huon pines because of a unique chemical in their wood. Not unlike other fragrant cypress-like softwoods – including Japanese hinoki – huon pines contain great amounts of oil, in this case, an oil called methyl eugenol that protects them from insects and other wood-hungry nasties. Methyl eugenol is, as it happens, the ticket to eternity for wood. 

For whatever reason, methyl eugenol, in the very high concentrations in which it is found in huon pine, is astonishingly successful at preserving timber. Huon pine timber is highly prized for shipbuilding because it’s easy to bend and work, completely impervious to insects and fungus, and readily survives the rigors of the aquatic environment. All that ever seems to happen to huon pine is that the surface turns grey in the sun – much like teak. And then it simply endures. 

And I mean it endures. The 3,000-year age of living huon pines is one thing, but researchers have found fallen huon pine logs on the floor of the forest that have lain there, unmolested by decay, for as much as 38,000 years! Not petrified, not fossilized, just oily wood under a weathered surface, simply enduring. 

These characteristics are also why we still have a bit of precious huon pine timber available nowadays, reclaimed from time to time from old boats and old furniture, as durable and enduring as ever. Moreover, the foresight that was missing when the trees were mostly cut down a century ago was not blind when hydroelectric dams came to Tasmania. In the 1970s, with two valleys set to be flooded, the Tasmanian government allowed loggers to go into the valleys and cut down the pines – but not to take them. The loggers, working in tall boots even as the dam waters were rising, would leave the logs where they fell, to float up to the surface of the new lake as the waters rose. 

That was 50 years ago – the logs are still there, floating on the lake. The outer layer turns grey to about 1-2mm in, and then, inside, the creamy golden wood, as perfect as the day it was felled, endures. The decades afloat harms it not at all, and every year a tiny portion is licensed to be taken for restoration and preservation jobs.

This is all the unreclaimed huon pine that there is or ever will be for woodworkers to use, and they estimate they have about 50 years’ worth left at current extraction rates. But with the wood so impervious and eternal, what is already in cabinets and drawers and tables and ships will continue to circulate and be reused. It is a wood with true permanence.

An Unexpected Responsibility

At this point I will enter the story to share the most harrowing and rewarding of my experiences as a woodworker.

By chance, I had the opportunity to acquire three large slabs of huon pine, cut and dried in ages past but never used. Compared to the tiny crafting boards and turning blanks that are generally available (at great price), this was a bit of a windfall. I could have, with all cynicism, listed each one for sale for several hundred dollars, pocketed the profits, and went on to buy more quotidian woods. I did not do this for two reasons.

First, and perhaps most pointedly, with visions of epoxy pours and hairpin legs plaguing my dreams, I was overcome with a sense of responsibility to “protect” this precious wood – whatever that means. I wish to acknowledge, in self-reflection and humility, that I am an amateur woodworker. A reasonably experienced and meticulous one – but an amateur nonetheless, albeit one who works with hand tools and has the hand tool mindset. My work is fine but not perfect. But I suppose I like to think that the tool marks I leave here and there, occasional tear-out, and other mistakes that remain have a certain honesty and worthiness to them, becoming of a slab of great age. Vanity of vanities, all is vanity…

More than that though, I saw in these slabs of huon pine, and in the legends of these trees, an opportunity for permanence. Here were three great hulking slabs of a tree older than the nation-state it was felled in (I counted 800 growth rings on one of the slabs – and it wasn’t even a centre slab), thick and strong, and made of the closest wood comes to being an imperishable material. Here was the opportunity, if it was ever going to exist, for a piece of furniture that might outlive the memory of my name. 

It had to be a table. Only a table could use to best effect the wide expanses of precious wood – laying them out on full display for all who saw them to admire. No matter how perfectly I might make a cabinet or chest, it would not do justice to the material. And, as history, archaeology, and literature show, only a table is so intimately connected to life and family and holiness by its proximity to hungry mouths, little hands, and eager minds as they first do their colouring and then their maths homework, and then their college applications. Only a table is ever so truly loved by generations as to be worthy of wood older than all those generations combined. I simply couldn’t bear cutting the beautiful slabs into small pieces. So for months I fretted; and worried; and stressed about the crushing responsibility of making the first cuts. 

The Weight of History

I am an apartment woodworker. My family home is a house in the mountains west of Sydney, but I work as Dean of a university college and we live most of the time in the Dean’s residence, an apartment on campus. I am blessed with a very patient and indulgent wife and an apartment that happens to have a sort of wide corridor I use as a tiny woodshop. Space is still limited, though, and I try not to stockpile wood (in the interest of stockpiling tools – ahem). So, three slabs, two metres long and the best part of a metre wide, mocked me each time I had to shuffle past them. And still, I fretted. 

I eventually decided upon a refectory table so that no matter how many chairs are crammed around it, none clash with the legs. And with a strong stretcher tusk-tenoned into each leg to allow it to knock down, so that I could make it big but still fit it through doorways. Most importantly, I needed to keep the two 800mm wide boards that made the tabletop flat – so sliding dovetails across the bottom to counteract any cupping. And those sliding dovetails would be a perfect place to pin the top to the legs, with removable dowels, again so it could be knocked down to move. Drawbored mortise and tenon joints to hold the I-shaped legs together without glue (since all that wonderful oil makes gluing troublesome anyway). A kanna-shiage (handplane finished) top for beauty and touch, with just a light coat of oil and hard wax, so that the wood itself can be appreciated. A magnificent vision. Complex and well-chosen joinery. Perfection worthy of the tree. Entirely beyond my experience or skills…

I had to start by getting to know the wood. Before any cutting or marking or anything, I realized I could not confront the massive task I had set myself without first knowing what it was to get huon pine under saw and plane, to see, feel it, and smell it.

.


I hoisted one of the slabs onto my sawhorses, and with a few strokes of the little aogami roughing plane on the left, and a few more of the shirogami finishing plane on the right, I had my first look at the slab, and my first curls of huon pine shavings. (No, Stan, I don’t London finish my plane bodies. They are dirty, it’s patina.)

The smell – oh the smell. The smell of huon pine is unlike anything I have ever experienced. It is sweet and rich and almost creamy, but without even a hint of sugariness or caramel, nor any of the medicinal notes of cedars or cypress. I suppose the aroma is a little like gardenia flowers, but different. And it’s persistent. I saved bags of little offcuts that are no less fragrant now than a year ago. 

The scent was such that I almost did not notice the figure at first. From some angles, nothing more than a very tightly grained, golden softwood, with rippling grain caused by the irregular growth of the tree’s surface over the centuries is visible. But when the light strikes the surface of the top at the right angle, a shimmering sea of lamellar rays cutting across the grain pop out, almost obscuring the grain with its gleam. Beautiful but subtle – much like the scent. This image and this aroma is now linked with permanence in my senses.

With the feel, smell and appearance of the wood now embedded in my mind I began to feel more confident about beginning my table project. One serious concern remained, however, namely: tear-out.

Layout That Fills the Workshop

I started in with trepidation, hoisting the two closest matched slabs onto my horses and getting to work. In my little shop, I have no room for a great big assembly table, so the slab was my workbench, and took up the whole shop. Here you can see my cramped little shop, replete with little atedai against the wall, assorted tat taped and hung on the walls (including my Palm Sunday palm, awaiting the coming Ash Wednesday), my tool chest brusquely stolen from Stan’s design, and a lovely old tansu filled with bric-a-brac.

Layout was painstaking, although not because the joinery was especially complex. Before shaping, the two “I” shaped legs were six simple boards and the stretcher would resemble nothing so much as a 2×4. The only complexity to the initial layout arose from the graceful radius I had planned for the long edges of the two top slabs. I could have cut them with straight edges and cut the curved edges later but that problem would have been unnecessarily wasteful. 

One simply cannot waste this wood. If you have any respect or regard for the trees that support our craft, it repulses the conscience to even put plane shavings into shop bins. Moreover, I absolutely refused to cut these slabs in anything but the most efficient, offcut-preserving way. As a result, layout took days (or, rather, nights. Amateur, remember?).

The two surfaces of the slabs I used for the top each had unique flaws and virtues. In the end, curving the tabletop’s edges to accommodate the natural edges and features of the slabs proved effective in maximizing the tabletop’s size while minimizing waste of this rare and valuable wood. For example, in the photo above you can see where the near right corner of the slab narrows towards the end, an inconsistency my layout had to accommodate. This layout was also necessary because two of the slabs were contiguous in the bole and one was not, such that the two contiguous, matched slabs had to be used for the top even though one was somewhat larger than the other.

Dealing with the constraints that imposed this layout taught me important lessons in collaborating and compromising with the wood. In line with Japanese tradition, I knew I wanted the “outside” surface of the board to be oriented upwards in the table, and so my layout prioritized that side. As a result, both slabs ended up with prominent natural flaws on the underside – like greyed areas, bark incursions, and even one gash that looked as though the tree had been struck with a red hot poker.

There is a school of thought in modern, machine assisted, YouTube recorded woodworking that cannot tolerate such defects, no matter how small or natural, in any piece of furniture, demanding they be either removed entirely or filled with colored epoxy. The first approach I reject because wood is natural and I believe it should feel natural. I enjoy the fragrance of the wood, and the feel of running my hand along the underside of the table, sensing the evidence of the tree’s story, together with the tool marks I intentionally left. The latter approach I reject because epoxy is plastic, and I work with wood. The table bears the scars it earned in life, but only reveals them to those with enough appreciation and humility to get down on their hands and knees to gaze upon them. 

Putting Blade to Wood   

I do not now, and suspect I never will, own a table saw. Someday I might own a bandsaw, but I’m not convinced. In any case, I won’t have any of these things in the house whilst my daughters are young, as much to spare my family’s lungs from dust as to avoid injuries, however unlikely. 

So that meant I had to figure out a way to accurately break down these slabs along my layout lines with hand saws, in a room that barely contained the slabs. 

I couldn’t do it on the sawhorses – that would require me to stand on the slabs to make the long rip cuts, which seemed risky to their integrity without a supporting table underneath, especially when sawing the narrower pieces. And the slabs were too long and too heavy to comfortably use the Japanese low horse and foot-clamp method, which I am normally fond of for long rips.

The solution I selected was to support the slabs horizontally on one long edge using my 6-inch thick planing beam, with the other long edge supported on low horses with extra boards taped to them to make up the difference in height. This provided enough vertical clearance under the slab for a kataba saw. This arrangement had other advantages too. As I ripped from one end of the slab to the other, I could stand on the slab directly above the supporting planing beam, which was in turn resting on the floor, preventing the slab from shifting position while avoiding downward deflection of the ever-narrowing slabs.

My back did not love this hunched sawing position, but it was more comfortable than you might expect, and in two long sessions of rip-sawing, I had everything broken down to pieces: two wide top planks, each tapered on one edge, two vertical leg pieces, four feet and aprons for the I-shaped legs, and one long stretcher. As it happened (and as you can see below) the offcut from the third slab was almost a perfect extra stretcher. I still have it and will use it for something someday. It is the world’s most magnificent (and I suspect valuable) pine 2×4. The two venerable katabas, one rip and one crosscut, may be seen taking a well-deserved rest after rendering magnificent service. 

With designing, planning, layout and rough cutting done the project shifted to the shaping and joining phase requiring greater attention, so I put down the camera, and did not pick it up again until the job was done. Sadly, I don’t have photos of gorgeous shavings rippling off planes, or of the massive Anaya-nomi I used to cut the mortises for the stretcher to pass through the legs, or of the nakin-kanna rounding off edges. 

This work was more-or-less conventional furniture-making; taking the neatly rectangular pieces of wood I made in the rip-fest above and shaping them into components using good steel and keen eye. I didn’t follow a borrowed or historic pattern for any of this, but worked out my own take on the refectory style of dining table with two I-shaped legs and a single stretcher.

I made a pattern of a single asymmetric curve using a bit of sturdy brown paper shopping bag, leaving the carry handle attached to hang it on my shop wall throughout the process so it was always to hand. I used this same curved pattern throughout to define all the curves in the project, starting with the concave slope from the mortise in the feet to their toes, the tapers from centre to ends on the vertical legs, and again as the most important curve in the project – the gentle swell of the tabletop’s long edges from one end to the middle and then tapering back to the opposite end again. 

Once the base was completed, the conventional woodworking ended and the real gauntlet began – the top. 

The top was made with the two long, wide boards shown with my kataba saws in the photo above. At almost 400mm wide each, they were a challenge to handle, a bigger challenge to plane, and an even bigger challenge to keep flat. 

The work of planing the wood went alright. The swirly grain of huon pine is not terribly prone to tearout, and like all quality softwoods, is a joy to plane in the direction to which it agrees, producing shimmery, breathtaking surfaces. The trouble is that each 400mm board contained 800 years of growth rings with grain direction changing within each board many times due to storms, cool summers, and a lightning strike or two as empires rose and fell. And with such tight grain an entire century of growth, along with the changes in the tree’s environment that impacted that growth, ended up recorded within a mere five centimetres of width – narrower than the thickness of a standard 70mm kanna – and often without apparent visual clues. As a result, seemingly neat, fine ribbons of shavings pulled end to end would be followed by tiny but significant tearout here and there across the board. 

Reader, this took days – days of sharpening by very best white #1, fine mouthed, perfectly (amateur-perfect, mind you) tuned kanna. Days of shaving just exactly to this specific point, in just this direction, just so, to clear up a spot of tear out, then switching sides and going the other way, hoping and praying and watching that I didn’t overstep the boundary and have to start over – which I did, many times. And all the while, awkwardly walking around the massive slab, leaning over it to plane the far side, getting half up onto it like a billiards player, and then doing it all over again on the other slab. There is still some tear out in the surface, especially around the teardrop-shaped bark inclusion that gracefully adorns one corner of the tabletop. But it’s pretty close.

Keeping it Flat

An important aspect of the project was ensuring the wide, solid-wood tabletop remained permanently flat through changes in temperature, humidity, loading and coverings. In the case of such wide slabs, there was only one realistic solution – sliding dovetailed battens on the underside. This design detail had the advantage of providing two level, perpendicular surfaces to connect the legs to the tabletop.

Of course, a hard cross-grain connection between the battens and the tabletop using glue and screws would end in tears after just a few years, so I cut two blind sliding dovetail slots in each half of the tabletop beginning at centre joint of the toward to about 8-10cm of the edges, then cut dovetails into the battens to fit. The two planks hold the battens captive between them once installed, and the friction in the sliding dovetails locks the two slabs together without glue, dowels or hardware.

To use glue anywhere in this project seemed wrong. In any case, the oils in huon pine don’t play nicely with glue, and the joinery connections were the better plan. 

I cut the dovetails in the battens and tabletop planks using my cleverest of all Japanese planes – the male and female dovetail plane, a rare beast indeed.

With the battens installed I cut 10cm wide shallow bevels on all four lower edges of the top, tapering the top to create the illusion of a tabletop only 20mm thick from a slab about 40mm thick in the centre. This involved a lot of plane work.

I left the underside a bit more rustic, even allowing large areas of “live” bark to remain as a lagniappe to the worshipful person who surveys the underside. You might think that leaving bark on the underside meant that I contravened the usual practice of Japanese woodworkers of using the outside surface of a plank as the show surface, but no – though not Japanese, I cleave to this principle invariably, but in this case, the history of the tree involved so many twists and turns that the bark inclusion was exposed on the inner surface of the board.

For clarity, allow me to explain what may not be obvious from the photos. The two legs are connected by mortise and tenon joints to horizontal feet at their lower ends and horizontal beams at their upper ends. In turn, the trestle leg beams are connected to the two battens by four dowels, two at each batten, that pass through the beams and battens at an upwards angle. After exiting the batten, the end of each dowel presses tightly against the underside of the tabletop, slightly bending and binding it in place. 

To disassemble the table in preparation for relocating it to our home in the mountains outside Sydney, I just need to knock out these four dowels and slide the battens out of their dovetail slots, and knock out the two wedges in the ends of the tusk tenons securing the spreader beam connecting the legs. This design has worked well, and the dowels are strong enough that the table can be lifted and carried by the top alone.

The Finish

Now, a great part of me wanted to leave the wood unfinished, both to enjoy the raw kanna-shiage surface, and to ensure the magnificent smell would not be diminished. But, to provide some protection and give a bit of extra visibility to the lovely grain, I gave the wood a couple of coats of thinned pure natural tung oil, and then rubbed on and buffed out several coats of carnauba wax creating a surface hard enough to help protect the relatively soft wood from dings and scratches. Also, my wife liked the colour better oiled than unfinished, a very important consideration for all of my woodworking efforts.

And that was the job done, and here it is, in its home on the covered veranda of my house:

As you can see, the finish turned the feet, which I cut from a discontiguous slab, a darker color than the rest of the table, but it’s an effect I rather like. The clouded figure of the top shimmers beautifully in the morning light from the East, and the little imperfections quietly witness to handwork, something for me to fret over in my quietude at meals around the table. The horizontal beams at the top of each leg that mate with the battens, not visible in the photos, are identical to the feet, except of course inverted.

I do not think I am testing the permanent nature of this table by using it outdoors  – though I may move it inside for a different practical reason: it is now the largest table we have, and has already made a couple of trips inside for big family gatherings. Rather, faced with a true forever wood that can endure against the elements, it seems only right that it should experience them and demonstrate its aplomb. I am glad in the end that I did not glue the centre joint of the top surface because it allows the two slabs to move and stretch a bit on humid days without cracking or busting the seam, and while this does mean they become un-flush for a day or two, they settle back in becoming flush once again when the weather dries out. The table can breathe. 

I will inevitably make little corrections as the table and I get used to each other. I remain unsatisfied with the very rectangular shape of the stretcher, and when the time comes to break down and refinish the table I will add some curvature to the stretcher. I will also probably resurface the top perhaps once a decade, as it ages and my skill with a kanna (hopefully) improves. Part of the joy of using a wood that should outlive my bloodline to make a table of great permanence that can be disassembled and reassembled as needed is the anticipation of ongoing minor improvements, and the relationship I and future generations will have with it. 

In the end, I still do not quite deserve this wood, because no one does. It is right and just that the Tasmanian government has banned the felling of any more of these trees, and it is right and just that the remaining wood is hard to come by and cherished. I am happy for the opportunity to make something permanent with this magnificently permanent and beautiful material. 

Antone Martinho-Truswell is a professional zoologist and amateur woodworker. His work can be found on Instagram at @stjosephwoodworks, where he posts his projects, experiments, and failures, and takes the odd commission. If you enjoy his writing and want to learn more about his day job, his book, The Parrot in the Mirror, is available from booksellers online and worldwide.

To learn more about and to peruse our tools, please click the “Pricelist” link here or at the top of the page. To ask questions, please the “Contact Us” form located immediately below. You won’t be ignored.

Please share your insights and comments with everyone in the form located further below labeled “Leave a Reply.” We aren’t evil Google, fascist facebook, treacherous X, Harvard University, or H. Clinton’s IT dude and so won’t sell, share, or profitably “misplace” your information. If I lie may someone bukkiri my neck.

Go back

Your message has been sent

Warning
Warning
Warning
Warning.

Leave a comment

Japanese Handsaws: The Bukkiri Gagari

A 320mm (“shakuni”) bukkiri gagari handsaw with a kiri wood handle resting on your humble and obedient servant’s atedai workbench

Socialism is the philosophy of failure, the creed of ignorance, and the gospel of envy.

Winston Churchill

The goal of socialism is communism.

Vladimir Lenin

Thank you for visiting the C&S Tools Blog! This article will be a show and tell about a couple of unusual saws of a type not well know outside Japan. For that matter, they are no longer common inside Japan.

The Bukkiri Gagari Saw

The three saws pictured in this article are of a type of Japanese handsaw called a “bukkiri gagari.”

Terminology

Let’s begin with the second word in the name, “Gagari,” (gah/gah/rhi) which refers to a larger rip saw intended for rougher work. Usually forged heavier and stiffer than standard handsaws, these were once standard tools in every Japanese carpenter’s toolbox, used for ripping boards and cutting joints in timber frames. The teeth are made large to quickly eat lots of wood, but when properly sharpened, given the right set, and used correctly, they will make smooth cuts indeed.

Your humble servant has only seen the word gagari written using phonetic “hiragana” characters which are derived from Chinese characters but do not have any inherent or historic meaning, so while I can’t guess where the word came from, in exchange for a delicious chocolate chip cookie (with a glass of cold milk, please) I might be so bold as to suggest it came from the rough sound large rip saws make when ripping thinner boards.

Likewise, I’ve never seen the modifying first word, “bukkiri” (book/kee/reeh), written using other than hiragana, but even without a cookie bribe I can guess that “bukkiri” is a modification of the word “bukkiru,” which means to “chop off” something, for instance the head of a fish or an especially-corrupt politician. In this case, I believe it refers to the pointed tang having been chopped off short. So a bukkiri gagari is a larger rip saw with a shortened tang and an angled “shumoku” handle.

The Shumoku Handle

A shumoku mallet for striking small bells

The handle is especially unusual so let’s consider it next. The skewed handles in the photos in this article are called a “shumoku” (shoo/moh/kuh) 撞木 handle.

Shumoku is an interesting word. The Chinese character “Shu” 撞 means bell, while “Moku” 木means wood. In other words, a shumoku is a piece of wood for ringing bells. The image to the right is of a wooden mallet used to strike small tabletop bells during Buddhist ceremonies.

The shumoku in the video at this LINK is a tad larger, being motivated by a group of 17 jolly monks in a bell-ringing ceremony at Chion-in Temple (知恩院, Monastery of Gratitude, Jodoshu-sect) in Kyoto. Said to be the largest bronze bell in Japan, it seems to take a lot of work to make it sing!

I have no clue why this word is used for a saw handle, and those in the industry I’ve asked didn’t either. A mystery. Based on my long years of experience reading and writing in the Japanese language, it seems likely that the woodworkers that made and used this style of handle back in the mists of time gave it a name with a pronunciation similar to shumoku back in the days when few commoners could read or write, and centuries later when the came time to write the word using Chinese characters, someone decided to use the “bell wood” characters just to poke fun at the monks in their funny dresses (ツ).

Despite what those who like to portray the Japanese language as highly cultural and absolutely logical suggest, I can assure Gentle Reader it contains many instances of such strange “assignments,” just another reason why the written language is too often confusing.

Long, straight handles with oval cross-sections are more common in Japan, and certainly better known outside Japan. And the straight handle makes accurate cuts easier because one can readily sense if the blade wanders from a straight line in the cut. But, in some cases, the straight handle has three disadvantages. First, the handle’s length sometimes gets in the way when making long strokes in the tight spaces where carpenters are sometimes required to work, whereas a saw with a shumoku handle is shorter, and is easier to use from various angles, for example, when cutting a tenon or a housed dovetail from under a beam. Second, the straight handle depends on a high-friction grip by both hands to motivate powerfully, whereas the shumoku handle does not. And third, it’s more difficult to use as powerfully as the shumoku handle due to the angle of the user’s hands in-use.

Here’s are a Link to a video of a guitar luthier using a bukkiri gagari saw.

Two Examples of Bukkiri Gagari

The photo above shows two saws: the antique 320mm shakuni (1.2 shaku) bukkiri gagari as well as a longer 355mm “shakusan” (1.3 shaku) bukkiri gagari saw hand-forged and hand-sharpened for your humble servant by Nakaya Takijiro Masayuki, with teeth especially shaped for ripping hardwoods. A most excellent saw.

The shorter saw is over 150 years old, and according to the blacksmith’s hand engraving on the tang, was forged from “Tougo Reigo” steel, aka “Togo steel,” a British product made by the Andrews Steel Works and first imported into Japan by an officer who once served under Admiral Togo in the Japanese Imperial Navy and who borrowed the name of the famous military leader.

Admiral Togo was a small man who became a national hero for commanding the Imperial Japanese Navy’s forces when they kicked Imperial Russia’s butt. Job well done.

It’s a great saw, one your most humble and obedient servant has used frequently since purchasing it at a flea market in IIdabashi Tokyo many decades ago. I like the color it presents, the control it provides, and the compact size, but the teeth are little on the hard side as evidenced by a crack in one tooth. Togo reigo steel is well-known for being on the brittle side.

The shumoku handle attached to the Togo reigo steel saw is one your humble servant made from kiri wood with mulberry wood inserts and a black persimmon retaining wedge. These inserts are not standard, but an improvement I added to prevent the tang from wearing out the soft kiri wood. The wedge makes it easier to remove the handle for transport. It’s fancier than necessary, but I had fun making it. Another way to secure a shumoku handle is with a dovetail wedge inserted from the side, but I don’t like the weaker nature of this style, nor the feel of the wedge in the hand.

Gentle Reader will notice that the straight tang of the shorter saw has been cut off (“bukkiri”) square by the original owner long ago, and that the back of the blade curves away from the cutting edge. This curvature is standard for some rip saws.

The longer 355mm saw, by comparison, has a shumoku handle I made from tougher Japanese white oak with a more-or-less rectangular cross-section and is secured by friction alone.

The blade of the Takijiro saw is more-or-less straight, lacking the curve towards the end, and instead of the tang being straight it’s curved downwards in the direction of the teeth. This is not a standard blade converted into a gagari by chopping the tang short, but was planned to accept a shumoku handle from the time it was just a spark glowing in Takijiro’s forge, making it a dedicated, professional rip saw. Takijiro shaped this saw for me after one his master forged for a temple carpenter many decades ago, a craftsman I met at his workshop, and who gave me the opportunity to use, and fall in love with, his saw.

Please don’t tell my other saws I said this because they tend to be anthropomorphically jealous, and while saw cuts seldom make hearts bleed, they can make fingers fly.

Converting a Rip Saw to a Bukkiri Gagari

Gentle Reader can readily convert a standard Japanese rip saw into a bukkiri gagari by simply cutting the tang short and making a shumoku handle, as is the case of the shorter saw in this article, and making a simple handle to fit. The longer style saw is not available new, although Takijiro has forged a number of them over the years for our Most Beloved & Patient Customers.

While this article has been about dedicated rip saws, some craftsmen convert crosscut saws in the same way.

A safety warning is called for here, however, after all, they don’t call it the “nanny state” for nuttin. If you add a shumoku handle to a standard saw blade, be sure to at least cut off the pointy end of the tang. Otherwise, you’re likely to find your chest and/or arm leaking red sticky stuff compromising your color-coordinated woodworking togs, a simply devastating fashion faux pas. Herewith you’ve been duly warned.

Until we meet again, I have the honor to remain,

YMHOS

A bukkiri gagari rip saw This is one of a matched set of rip/crosscut saws custom-forged by Choujiro (Azuma-san) for a temple carpenter 30 or 40 years ago who never picked them up from the store where he placed the order. Notice the curved back peaking towards the end, the golden temper discoloration typical of handsaws made in Eastern Japan, and the old-fashioned forge-welded iron tang. With a toothline length of 330mm and progressive teeth (smaller towards the tang), this is a serious saw for serious work.

To learn more about and to peruse our tools, please click the “Pricelist” link here or at the top of the page. To ask questions, please the “Contact Us” form located immediately below. You won’t be ignored.

Please share your insights and comments with everyone in the form located further below labeled “Leave a Reply.” We aren’t evil Google, fascist facebook, treacherous X, Harvard University, or H. Clinton’s IT dude and so won’t sell, share, or profitably “misplace” your information. If I lie may the toothy gods of handsaws bukkiri my neck.

Relevant Articles

Go back

Your message has been sent

Warning
Warning
Warning
Warning.

Leave a comment

Sanity Retention Implements

This is how your humble servant often feels at the end of the day. I need my chisels, I need my planes!

To achieve great things, two things are needed: a plan and not quite enough time.

Leonard Bernstein

Does Gentle Reader ever feel tired, restless, or achy after a difficult experience? Do these symptoms ever progress to insomnia, headache, neck pain, backache, chest pain or even (heaven forfend, I need a fire extinguisher) untimely spontaneous human combustion? And do any of these symptoms persist even after the pressures that precipitated them are gone? If so, you may be a human, perhaps even one of those with a brain and a soul connected to your body.

In this article, your most humble and obedient servant will, as Tim the Toolman Taylor often did, dare to diverge just a step or two from the beaten path of tool talk to consider how tools and woodworking may help us mitigate the dangerous stress most modern humans experience daily. So hi ho neighbor, let’s have a conversation over the fence.

A Tale of Stupidity

I promise you nothing is as chaotic as it seems. Nothing is worth diminishing your health. Nothing is worth poisoning yourself into stress, anxiety, and fear.”

Steve Maraboli

Allow me to begin with a true story, one of stupidity and toxic stress, just another fun day at the office.

Many years ago when the world was bubbling with promise, my head was fuzzier, my beard was darker and my waist was slimmer I was employed by a mid-sized Midwest construction company doing a design/ build factory for a Japanese precision parts manufacturer. Besides the construction of the factory expansion, the work included installing foundations for carburizing ovens used to create a hard skin on the steel parts they manufactured. I was tasked with marking out a concrete slab for core-drilling a series of pier foundations to support these ovens.

Everything went well, my layout drawing was approved, the slab was cored and piers were cast on-time. But when the equipment supplier’s salesman came to inspect the foundations he informed my boss they were spaced incorrectly. A disaster!

BTW, I was never told why my layout was wrong, but once the ovens arrived it was as obvious as the bill on a duck’s face that the manufacturer’s drawings didn’t match. In any case, at the time I was certain the foundations would need to be reworked, delaying installation of the ovens, and consequently the Owner’s production start, so I was sick with embarrassment at probably having delayed the project, and felt obligated to repay my employer the cost of remediating my apparent mistake. So between personal shame, the fear of potential schedule delays, and the thought of paying thousands of dollars out of my own pocket to make things right I was seriously stressed for about a week. Headaches, stomach aches and chest pains ensued forthwith.

My boss was a steady guy named Jim who heard out my profound apology while squinting at me like Blondie frequently did at Tuco the Rat, then snorted and called me an “ijit.”

Jim explained that if everyone who worked on a construction project were to be held personally financially responsible for minor unintentional mistakes, no one would do anything. And even if they were held responsible for their screwups, the construction company would then be obligated to pay them for everything they did right as a percentage of the project’s profits. And that wasn’t the arrangement.

Although Jim was gruff, even insulting, the results of his impromptu jobsite trailer therapy session were undeniable, providing me with necessary perspective, quickly dissolving the emotional stress that was crushing me, even relieving the physical symptoms I was suffering. And all without a couch! We all need someone like Jim.

When the crew that came to install the carburizing ovens entirely ignored the footings we had installed, but bolted steel “I ” beams to the slab instead, and then mounted the ovens on them I was shocked, even a little angry! They explained that’s how they always installed their equipment. And yes, all my self-recrimination and stress had been silly.

No doubt many Gentle Readers have learned similar lessons, but there’s a quote I’m fond of by Winston Churchill, the Prime Minister of England during WWII, a former soldier and fearless leader who bravely persevered as bombs and missiles rained down around him, the nation’s cowardly bureaucrats and politicians hid like rats in rubbish piles, civilian women and children were being murdered, and his nation was about to be invaded by a brutal enemy, to be apropos to most (but not all) stressful situations:

When I look back on all these worries, I remember the story of the old man who said on his deathbed that he had had a lot trouble in his life, most of which had never happened.

Winston S. Churchill
An iconic photo by Yousuf Karsh of Winston Churchill taken at the Hotel Château Laurier in Ottawa, Canada. Known as The Roaring Lion, it was stolen from the hotel’s Reading Room sometime after 2019, but it still has wide circulation as the image on the Bank of England’s £5 note. The story goes that Churchill did not want to be photographed, but permitted Karsh a single shot. To make the photograph more interesting, Karsh suddenly plucked Churchill’s ever-present lit cigar from his lips just before triggering the shutter prompting the glowering visage.

Herding Cats

Since those halcyon days my philosophy towards life and work has changed.

I once vainly believed I could control the people around me, or at least those I was responsible for, but with experience came the realization that attempting to control people is like pushing cats towards a goal with a small broom while demanding they knit sweaters along the way. The truth is that I have never been in control, that I can never successfully make anyone do anything, and that whenever I try to, all semblance of goodwill and cooperation is lost as everyone scatters and stress levels skyrocket.

One can never successfully “herd” cats, but at best only “lead” them (and sometimes even people) to go where you want them to go, or to do what you want them to do, with fish in hand, an even tone of voice and frequent ear rubbing, if you know what I mean.

While I don’t push people nowadays, I frequently have Clients, mostly inexperienced, egotistical, mid-management types who don’t have a clue but are frantic to climb the corporate ladder, consequences be damned, who expect such counter-productive foolishness of me on their employer’s behalf. Without appearing to refuse or contradict, of course, I always try to find other solutions, but when this is not possible and the Client stubbornly insists on Marxist measures, I separate myself from such projects because I know they will not only fail, but will yield unpleasant consequences for everybody involved, including tons of shame and crushing stress for me.

Don’t get me wrong, construction projects involve coordinating the efforts of a lot people, and sometimes stern measures are necessary, but nowadays while I still plan, lead, encourage, monitor, track and report progress, remind, sound alarms, send warnings, chide, reward, and even contractually penalize when necessary, I don’t push.

So here’s your unworthy servant’s current philosophy about life and stress in a nutshell:

  1. Thoroughly understand your goals, objectives and responsibilities, plan how to accomplish them, be diligent in achieving them, and never blame others for your mistakes;
  2. Without exception, everyone makes mistakes, constantly, so be as kind and understanding as reasonably possible. If you’re lucky, they might just return the favor, but even if they don’t, it will help to decrease stress levels all around. They’re just cats after all;
  3. Don’t accept responsibility for anything for which you are not truly responsible;
  4. Although senior executives in both the private and public sectors frequently secure their high pay and lofty station by abusing the goodwill of others, no matter how cleverly or coercively they present it, don’t allow anyone to foist either their responsibilities, or their mistakes, off onto you (unless you agree to it in advance and they pay you oodles of money for the resulting stress);
  5. As taught by those Great Philosophers Lord Buddha of India and Red Green of Possum Lodge, always remember that life is suffering, all the time, and accept that Murphy will carnally poke you with his pointy purple pecker often and painfully, so don’t expect an easy time, and prepare Vaseline and bandages accordingly.

One last philosophical concept that I have found useful. In the West there’s the saying that goes “water off a duck’s back,” meaning “nothing bothers you.” In Japan they have a more colorful saying, one that many small boys have enacted, that goes “piss in a frog’s face.” To the duck it’s just another wet day in a wet place. To the frog, it’s just a warm shower. Since killing stress originates in the mind, the expectations of the duck and the frog are worth emulating. Seriously.

I believe that internalizing the 5 points listed above, perhaps urinating on frogs 𓆏 occasionally, and employing small remedies frequently rather than making big corrections too late, can minimize the need for Dr. Alonzo’s Pretty Purple Pills, those dreadfully unfashionable and scratchy canvas jackets with straps and buckles that chafe the crotch something fierce, and/or heart surgery.

Setting amphibian abuse, chest incisions and uncomfortable fashion aside for now, let us next consider one such small remedy.

Stress Reduction Measures

The criminal pharmaceutical companies and their well-paid “scientists” (aka “shills”) in the medical profession will happily sell you heaping pallets of pills to cure what ails you, but honest doctors frequently recommend less profitable, but no doubt more effective measures, including exercise, more sleep, vacations, music, reading, spending time with friends and family (even though they are frequently a cause of high stress), and hobbies. Some of these may work for you. I’ll touch on hobbies more below.

Many people like to imbibe a drop of grog at times to relieve accumulated stress. This is certainly the case here in Japan where people generally love demon rum but become inebriated easily due to a common genetic enzyme deficiency. But as someone who is frequently forced to spend time in the company of drinkers in business situations, I’ve concluded adult beverages don’t actually relieve stress but only make the drinker forget his problems for a few minutes as they worsen, turn him into a useless fool for a few hours, and destroy his liver forever. And don’t forget the injuries, traffic deaths, fights, jail time, divorce, poverty, suicides and murders cork-pulling always produces. Such an uplifting beverage.

One of the disadvantages of wine is that it makes a man mistake words for thoughts.

Samuel Johnson

A less addictive and more reliable method I have found effective for relieving the stress that originates inside my head and heart is to do selfless service for others, service that I will not be rewarded for, and ideally, service I will not receive recognition for. Are there lonely, stranded, hungry, poor, sick, handicapped or damaged people in the neighborhood? Can I help by picking up stuff for them up at the grocery store or pharmacy? Can I give them a ride to a doctor’s appointment? Are their doors, windows, locks, cabinets, furniture, water heater, car brakes or roof giving them grief? Do they need help paying a bill? Do they just need someone to talk with? To share a burden is to halve it. To carry a friend or neighbor’s burden is to lighten my own narcissistic burdens (everyone has them), at least partially. Serving others without expectation of reward or recognition is powerful medicine in so many ways.

Another method I know that works is meditation, as in spending time alone in a quiet setting, without distractions, pondering simple questions internally without seeking actual answers. No, you don’t need to be a navel-gazing monk or smelly swami to do it, but you do need privacy and quiet, conditions often difficult to secure at home, especially since, regardless of her age, the female of the human species congenitally cannot tolerate the sight of a man being content while doing nothing, and upon seeing such a pitiful fellow, cannot stop herself from insisting he get busy following her orders. Thus it has always been.

But there’s another form of meditation your humble servant has found to reliably relieve stress, performed not in a hidden Shaolin temple or in a secluded grove, but still in a private, if perhaps dusty, environment.

The Holy Workshop

A beautiful 54mm Otsukinomi Paring Chisel by Nora.

Although I once worked wood professionally, it’s only my hobby now. But I find that, when done correctly, even meditatively, it can be highly effective at relieving stress. To do it correctly, however, a simple workshop is necessary, one without email, telephones or other distractions.

Big or small, light or dark, warm or cold, the design doesn’t matter so long as it has a door, even if it’s an imaginary one like that of the renowned radio News Director and anchorman Les Nessman (5 time winner of the coveted Buckey News Hawk Award, donchano). Once I close this door, no one but me is allowed to enter its sacred precincts or fiddle with the sanity retention implements (tools) housed therein. And that includes bench dogs and cats. But for it to be a serene, meditative, healing space, She Who Must be Obeyed and “The Spawn” must be ruthlessly conditioned to quiver at the very thought of removing my tools, and dread the consequences of chucking junk into or storing stuff in the holy workshop.

When I am in my workshop, I accept no demands to do this or do that. I don’t respond to email or the telephone, unannounced visitors ringing the doorbell, calls to dinner, much less demands to take out the garbage. It’s not that the holy workshop makes me rude and/or unresponsive, it’s simply that these distractions are lower priority than my health for a short time, and the restorative balm must be allowed to soak in, you see.

In this private space I work on my projects, usually simple woodworking or tool maintenance, using the woods I love in the company of the undemanding, sharp friends that reside, play dice and drink beer in the evenings in my toolchest. No schedules. No one to criticize or complain, no one to seek approval or payment from, and no one to please but myself. And while the fruits of my time here mostly go to others, in this bubble environment I only make what I want to make, when I want to make it, using the materials I want to use and tools that willingly link my mind and soul to the wood I am shaping.

But lo, one more thing is essential to the effectiveness of the holy workshop: When people ask me what I make in there, I always answer “wood shavings and sawdust,” for you see almost any other answer invites prying questions and ultimately stirs up invasions by curious people with too much time on their hands who will invariably request woodworking-related “favors,” responding to which will induce more stress into my ragged life. Oh, and when children ask me what I plan to give them for birthdays or Christmas, I pretend to sort through my tattered memory and then respond in a serious tone: “Do you prefer wood shavings or sawdust?”

In past years, this temple to woodworking has been a piece of old carpet laid for a few hours on a concrete slab in front of a dingy apartment for my shorty sawhorses and atedai to cavort upon. At other times, it has been a reed mat spread under quaking aspen or pine trees in a mountain glade. Most often it has been half or all of a garage with a workbench. Lately it has been a spare bedroom on the second floor of a small single-family house in Tokyo. Whatever shape it takes or amenities it may have, my workshop is for just me, my wood, and my tools.

Conclusion

Although it’s hardly worth the effort, perhaps Gentle Reader now understands the method to my madness when I call my beautiful, faithful, hand-forged tools “sanity retention implements.” I am convinced the time we spend together has, like water from a duck’s back, shed much deadly stress from my life, making my little workshop and simple handtools cheaper than therapy, tastier than Dr. Alonzo’s Pretty Purple Pills, and certainly more pleasant than heart surgery. I no longer use my tools to feed my family, but I’m convinced they “cure what ails me.” Cheap at twice the price, say I!

Let’s conclude this merry tale of mental illness with a final quote about Winston that Gentle Reader may find inspirational.

He was one of the finest orators of all time. And some of the phrases he used still resonate with us today, such as “Finest hour,” “Never surrender,’ and of course, “We shall fight them bitches.”

Philomena Cunk para-quoting Winston Churchill

YMHOS

Master carpenter Rokuza in Olde Edo with his plane and gennou hammer in hand, thinking about his lady instead of work. Some things never change.

To learn more about and to peruse our tools, please click the “Pricelist” link here or at the top of the page. To ask questions, please the “Contact Us” form located immediately below. You won’t be ignored.

Please share your insights and comments with everyone in the form located further below labeled “Leave a Reply.” We aren’t evil Google, fascist facebook or treacherous TikTok and so won’t sell, share, or profitably “misplace” your information. If I lie may frogs pee in my face.

Go back

Your message has been sent

Warning
Warning
Warning
Warning.

Leave a comment