
“Make sure that you always have the right tools for the job. It’s no use trying to eat a steak with a teaspoon and a straw.”
Anthony T. Hincks
There are many varieties of marking knives used for woodworking around the world. In this article your humble servant would like to discuss the Japanese version.
Let’s will begin with some definitions, followed by an explanation of the design details and structure of the tool.
We’ll save the best for last by presenting two subtle but effective professional modifications to improve the tool’s performance and possibly even the quality of the results produced Beloved Customer might deign to employ.
Definitions
The Japanese marking knife is called a “shiragaki” or sometimes “shirabiki” in the Japanese language. Don’t bother looking it up in a dictionary, though. The characters used vary, but can translate directly to “white pull” (白引き), which makes some sense, or “white persimmon” (白柿), which makes little sense, so I suppose the persimmon character is used as a phonetic substitute for “kaki” (書き) which means to write. I choose to write the word as 白書 so the Kanji translate directly to “white writing.” That makes more sense to me.
Such confusing substitutions are all too common in the Japanese language in the case of words with purely phonetic origins. The fact is that, much like psychologists, lawyers, and priests, the Japanese people almost perversely enjoy confusing terminology. It’s an ancient habit that probably won’t change soon. I say this as someone that has been reading, writing and speaking the Japanese language at graduate school level for 45 years, been a resident of, attended school and worked in Japan for 30+ years, and been married to a Japanese woman and had Japanese relatives for 44 years. I can get into serious trouble in the Japanese language.
Now that we are done with the Japanese language lesson, I will simply call this tool a “marking knife.”
Purpose of the Marking Knife
Precise and speedy layout is an essential aspect of executing quality woodworking. “Layout” in this case refers to the task of making lines in the material being worked, whether it be wood, steel, glass, stone, concrete, asphalt or even dirt, indicating where items such as walls or foundations are to be constructed, cuts are to be made, and joints between components are to be aligned. It often, but not always, involves transferring dimensions and intersections of lines shown in drawings, or existing in the craftsman’s head, to the material to be worked. The quality of the final product depends heavily on the quality of the craftsman’s efforts in layout, which is why the job of layout was historically assigned to the most experienced craftsmen worldwide.
In Japanese this process is called “sumitsuke” 墨付け, which translates to “marking with ink,” a term more easily understood than “layout” IMHO. The term springs no doubt from the Asian tradition of using black/red ink and inklines to mark layout. This article will focus on the marking knife used in laying-out joints in wood.
The Japanese marking knife is a bladed tool made of iron and steel used to cut thin, precise layout lines in a board’s surface, most often but not always at a 90 ° angle to the direction of the wood grain.
Every woodworking tradition I am aware of includes the marking knife, and regardless of their preferred style, anyone serious about woodworking will own at least one, and know how to use it.
Advantages of the Marking Knife
The marking knife has distinct advantages over other methods of marking a line more-or-less perpendicular to the direction of the wood grain. Here are a few:
- The line it makes can be as thin as the edge of nothing, achieving precision unapproachable by pencils, pens, scribes, sumisashi, inklines, chalklines, laser-sights, or even wishful thinking for layout in wood in the case of lines at more-or-less 90˚ to the direction of the grain. The line it makes, however, is not as easy to see as an ink or even pencil line, so it is not always useful for rough layout work;
- The layout line cut by a marking knife penetrates the wood’s surface providing a physical place into which the woodworker can index the edge of his chisel, or nicker of his plow plane or rabbet plane, or the teeth of his saw, or points of his divider quickly, precisely and confidently without relying heavily on Mark-1 Eyeball, improving the efficiency and quality of both his layout and fabrication efforts. The resulting time savings, improvement in accuracy, and reduced eye strain this indexing effect provides are absolutely huge.
- When making layout lines perpendicular to the grain of the wood on the faces of a member, such as a table apron, for instance, after making one line on the reference face, the remaining three lines can be indexed and extended from each other with a marking knife, confirming the accuracy of the member’s dimensions and ensuring the tenon shoulders will be sawed accurately creating an excellent tenon, assuming the craftsman knows how to use a saw properly, of course. This is a subtle but powerful technique.
- The line cut by a marking knife severs the fibers near the board’s surface helping to prevent fibers from being torn out of the board by the blades of saws, chisels or the even router bits leaving ragged, chipped edges.
Are you convinced yet?
Design & Materials
There are many styles of marking knives used around the world, and your humble servant has tried most of them at one time or another, but none that I am aware of are as simple as, or functionally superior to, the Japanese version.
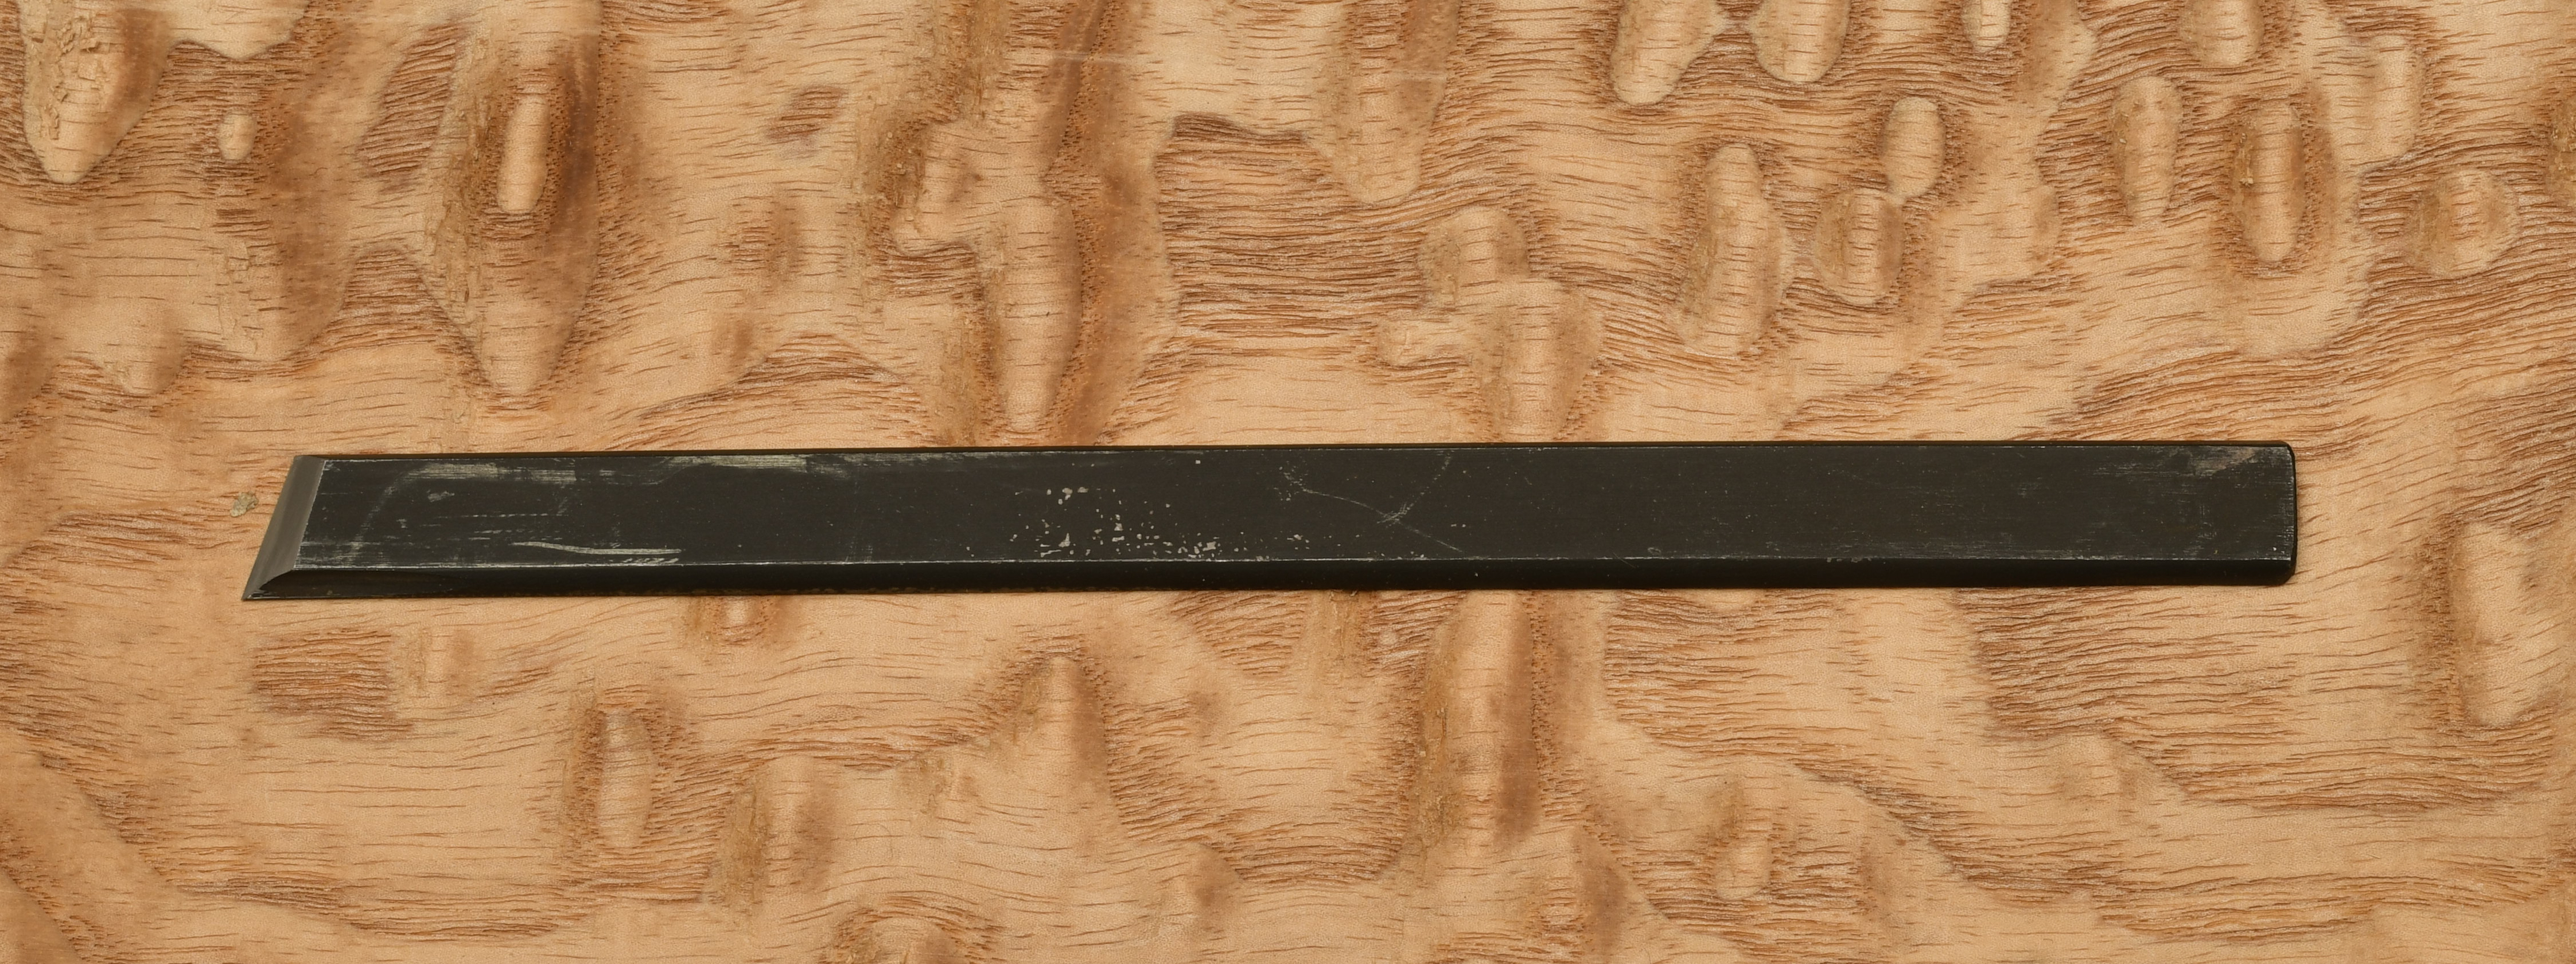
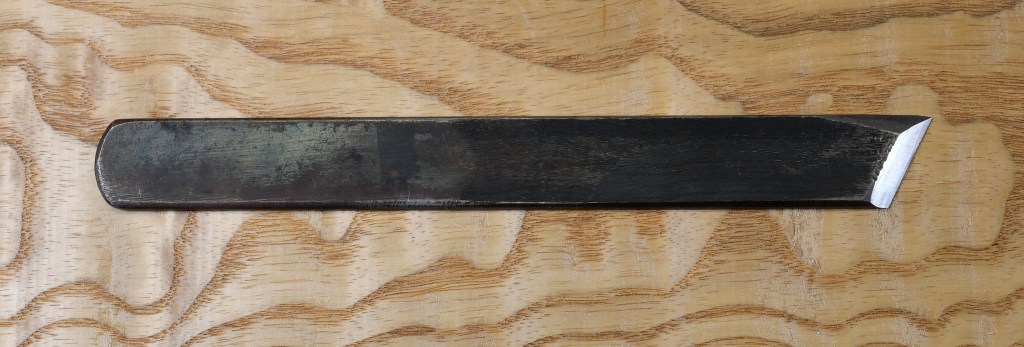
Lacking a pretty, turned handle and looking more like a blackened steel popsicle stick than a precision tool, the Japanese marking knife appears unfinished, even barbaric. But despite its stark appearance, it has a sophisticated design that employs superior metallurgical and blacksmithing techniques.
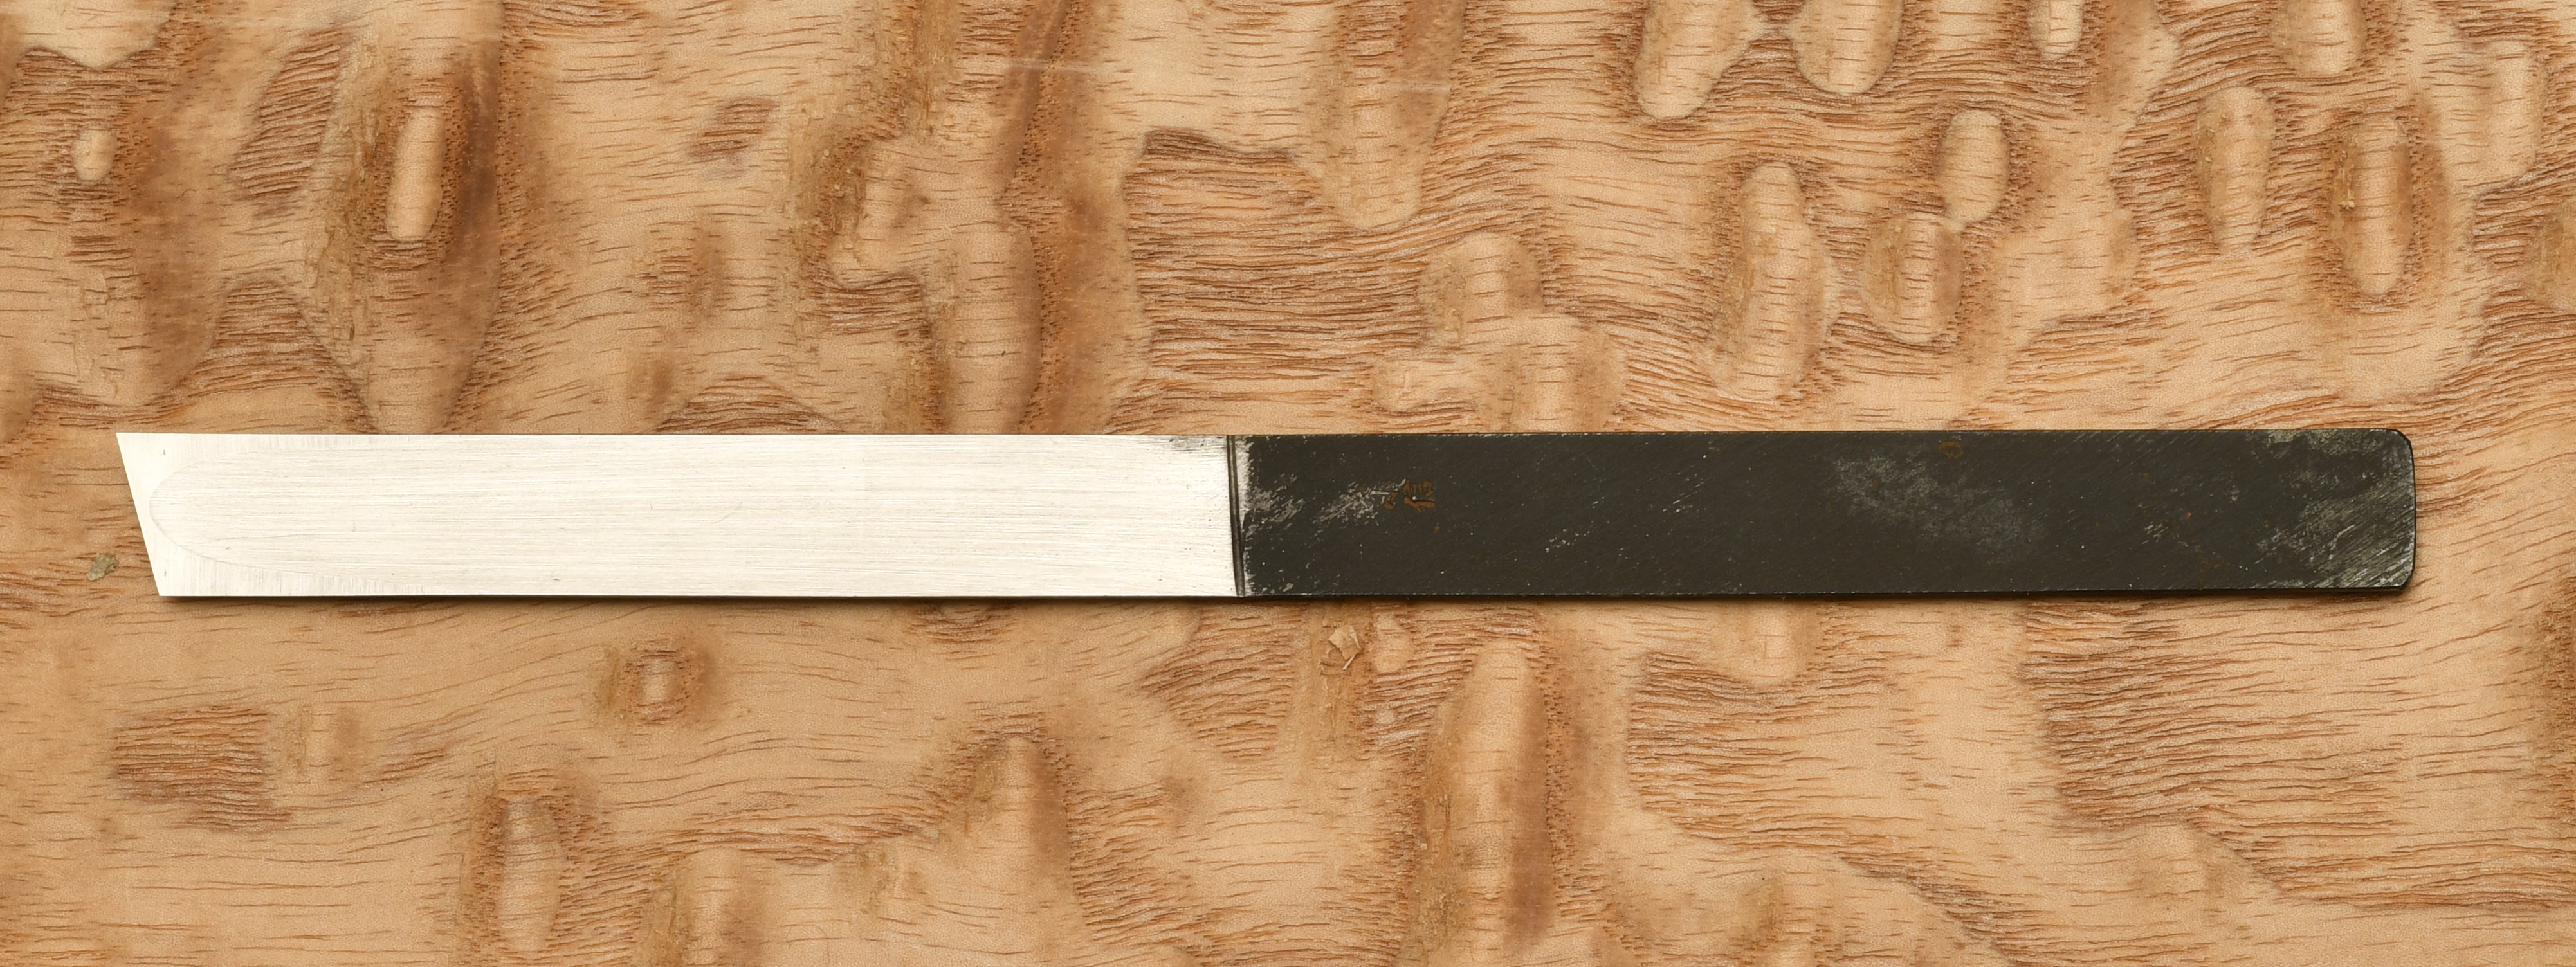
Like many Japanese woodworking tools, the professional-grade marking knife is made with a layer of hard high-carbon steel forming the cutting edge which is forge-welded to a softer layer of low-carbon steel comprising the body of the tool.
They are almost always flat, generally thin, and not especially wide tools. Perhaps 1/2 the length of one side is ground flat and bright. This surface is called the “ura.” A hollow-ground depression called the “uratsuki” is ground into the ura. The opposite side is plain and includes the cutting edge’s bevel.
Some marking knives, such as the photo at the top of this article, have a spear point or “kensaki” (剣先)meaning “sword point” which is convenient because the same knife can be used either left-handed or right-handed. It’s a logical and attractive feature that some people prefer, but in my experience it has limited usefulness. To each his own.
The demands on the marking knife in terms of sharpness, durability, and edge-holding capability are not as severe as for chisel and plane blades. The better-quality ones are hand-forged of high-carbon steel and quality jigane, properly shaped and filed, and carefully heat-treated.
Because of their thinness, marking knives tend to warp badly during heat treat, and consequently demand either a blacksmith with better than average skills or the use of high-alloy steels that warp little. Even experienced blacksmiths end up with a few rejects due to cracking and excess warpage, which perhaps explains the relatively high cost of handmade ones. It has mostly been a tool made by specialist blacksmiths, which is the case for those carried by C&S Tools.
For this reason, and because the performance demands on the cutting edge are not severe, Blue Label steel is entirely acceptable IMO. But ours are hand-forged from White Label Steel No.1.
The Ura
I mentioned the “ura” above, but let’s examine it a bit more. Ura is a Japanese word written using the Chinese character 浦. It means a bay or inlet from a lake or ocean, usually without rocks, and often with a sandy or gravelly shore. This word also means “depression,” as in a low area in a field, not the feeling your humble servant experiences when he sees his head in the mirror in the morning and remembers his once energetic head of hair in an afro do (ツ)。You can imagine why this word was employed to describe the hollow-ground depression in many Japanese woodworking blades.
In North America, similar curved surfaces and depressions were once said to be “swamped” even though they were made in metal. This term is obsolete nowadays.
The ura is what makes the Japanese marking knife superior to its Western counterparts for two reasons. The first reason is that the ura makes it easier to keep the hard layer of steel at the reference side of the blade flat, an important feature when using a knife for layout using a steel straightedge or square. Second, the ura makes it much quicker to accurately sharpen the blade and especially the extremely hard layer of high-carbon steel that forms the cutting edge.
Without the ura, the hard steel would be time consuming to sharpen and would tend to become rounded instead of remaining a flat reference face to index against a steel square or straightedge. It’s a subtle and clever design more sophisticated than its simple appearance suggests.
In use, the flat ura side is pressed lightly against the leg of a steel square with the point cutting lightly into the wood and the heel floating above. The blade is then pulled toward the user to cut a straight layout line.
Lubrication
I recommend Beloved Customer use an oilpot to lubricate the marking knife’s blade to reduce friction and wear between the blade and the straightedge or square, as well as friction between the cutting point and the wood. Not only will your square last longer, but your layout lines will be more accurate. Don’t believe me? Give it a try.
Recommended Modifications
Marking knives are simple tools for a simple job, but there are a couple of subtle improvements some advanced Japanese craftsmen, especially joiners, make that Beloved Customer may want to consider.
1. Habiki
This first improvement is intended to minimize one downside of the marking knife, namely its tendency to shave metal from the square or straightedge used to guide it, shortening their useful lifespan and reducing their accuracy.
In Japanese this modification is called ” habiki “ 刃引き which translates directly to “blade pulling, ” as in pulling the blade’s cutting edge over a stone to intentionally dull it. It is a term borrowed from the Japanese sword world.
The steps to accomplish this modification are as follows:
- First, sharpen the blade;
- Then, with the tool’s ura side facing towards you, stand the blade vertically on the face of a medium grit waterstone, diamond stone, diamond plate or oilstone with its cutting edge resting on the stone. Adjust the position of the cutting edge on the stone so the last 2~3 millimeters of the blade, measured from the tip, hang off the stone’s side so the tip does not contact the stone;
- Finally, drag the blade towards you creating a flat on the cutting edge, while leaving 2~3mm of the blade’s tip sharp. A single light stroke will usually suffice. Voila.
The dulled portion of the cutting edge will now be less likely to shave your square or straightedge, while the sharp tip will cut the wood and make a pretty, accurate layout line, assuming you do your job, of course.
I know that the idea of sharpening a good blade and then intentionally dulling part of the cutting edge sounds gaga. In fact, when Honda-san showed it to me, I thought the old guy was pulling my leg, even though he didn’t ask for a nickle (ツ) or pass wind. But Honda-san was a nationally-recognized master among masters, a man in his 80’s who had been making extremely high-end custom joinery since he was 17 years old, one who took his tools extremely seriously, so although I was skeptical I wisely gave him the benefit of the doubt. In addition, he let me try his knife so I was quickly convinced.
Honda-san’s habiki technique works, so gather up your courage and give it a try before allowing your inner-troll to embarrass you. I promise you’ll like the results and your square will thank you.
2. Tip Bevel
The second modification is also one Honda-san taught me. There are several ways of doing it, but the essence is to grind an angled flat 15~18mm long on the top edge of the blade’s side angled away from the ura, ending at the cutting edge’s point. The goal is to create a sharp “clipped” point at the meeting point of three surfaces or planes.
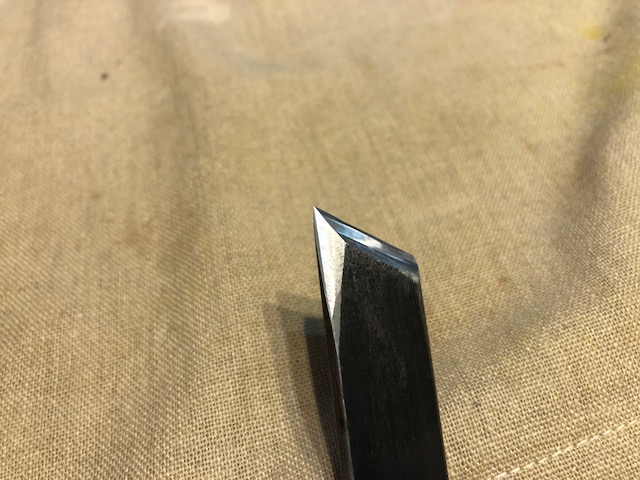
This angled flat has three purposes: First, it removes metal that would otherwise get in the way of your clearly seeing the knife’s cutting tip. This is important because often a marking knife must be indexed off a tiny mark left by a divider’s leg or a previous layout line, for instance when marking the shoulders of a tenon on four sides of a stick of wood. Removing this unnecessary metal will make it easier to both see and index the knife’s point, and begin the layout mark exactly where it is needed. The positive impact of this small modification on accuracy and speed cannot be overstated.
The second purpose is to reduce the friction between blade and wood when cutting a layout line, thereby improving control, like racing tires on a fast car.
And third, it provides a convenient place to rest your fingertip to better control the knife.
If you imagine this modification can’t make much of a difference, then your lack of experience is showing. How embarrassing >~(ツ)~<
Squares to Use With Marking Knives
Some prefer to use a wooden square for layout work, and others brass squares. Both work just fine with a marking knife until they don’t. A steel square is a big improvement over these two options, but Gentle Reader would be wise to consider using a hardened steel square, or better yet, a precision hardened stainless steel square with your Japanese marking knife. Anyone with eyes who has used a steel marking knife for layout for a period of time has observed that their layout square tends to become worn and lose precision with use as the marking knife gradually shaves metal from the square’s blade changing its shape. A hardened steel square will simply resist this wear longer. And a stainless steel square will resist rust from salty sweat better than plain steel.
There are hardened carbon steel and hardened stainless steel combination squares and die maker squares available on the market, but I think they are too bulky, clumsy and too costly for making simple 90° layout lines on wood, especially for furniture and joinery work.
Matsui Precision produces a series of excellent hardened stainless steel squares that are popular in Japan and which we carry. They are well worth the cost. I have been using them for years. Send me a note if you are interested.
The Japanese marking knife is a great tool. Once you use one, especially after making the modifications described herein, your confidence in your layout efforts as well as the precision of your joints will increase. Indeed, I daresay you will wonder how you ever got decent layout work done without one.
You can see the marking knife we carry at the link below.
YMHOS

If you have questions or would like to learn more about our tools, please click the “Pricelist” link here or at the top of the page and use the “Contact Us” form located immediately below.
Please share your insights and comments with everyone in the form located further below labeled “Leave a Reply.” We aren’t evil Google or fascist facebook and so won’t sell, share, or profitably “misplace” your information. May my square warp and wiggle if I lie.


Please Leave a Reply