

The fool doth think he is wise, but the wise man knows himself to be a fool.
William Shakespeare, As You Like It
In the previous post in this series about sharpening Japanese tools, we looked at philosophical points such as making tools a long-term investment, as well as the upsides, downsides and causes of the beastly bulging bevel. In this part of the series, your humble servant will touch on a subject that will make thoughtful people think and unfuddle befuddled folks: The Double Bevel.

The Double-Bevel
Some people advocate creating double-bevels (primary and secondary bevels), or what is sometimes called “micro-bevels” on plane and chisel blades. Multiple bevels have three useful applications in your most humble and obedient servant’s opinion:
- The first useful application is to repair a tool’s blade in the field when there is not enough time to do a proper sharpening job. For instance, if a blade dulls or chips in the course of a job, we can quickly add a secondary bevel at a steeper angle to the blade’s primary bevel in a few seconds and get right back to work, but never forget there will be a price to pay later over many sharpening sessions to restore the proper bevel, so it is only a temporary solution at best, and certainly not a useful long-term solution;
- The second application is to quickly adjust a plane blade’s angle to reduce tearout immediately when proper sharpening is not possible. Once again, a lot of remedial sharpening becomes necessary afterwards. This application is usually restricted to the primary bevel, but we will look at a more esoteric and risky application below.
- The third application is to efficiently restore a blade’s bevel to the correct angle in the case where pixies or our inattention has made the blade angle too shallow.
Case 3 above often goes like this: A blade that had cut well suddenly starts dulling quickly, maybe even chipping. Whiskey tango foxtrot!?!
When this happens, our Beloved Customers, being of exceptionally high intelligence, use the bevel angle gauge described in Part 11 of this series to check the bevel angle. They may discover the bevel angle has become too shallow for the wood it is being asked to cut.
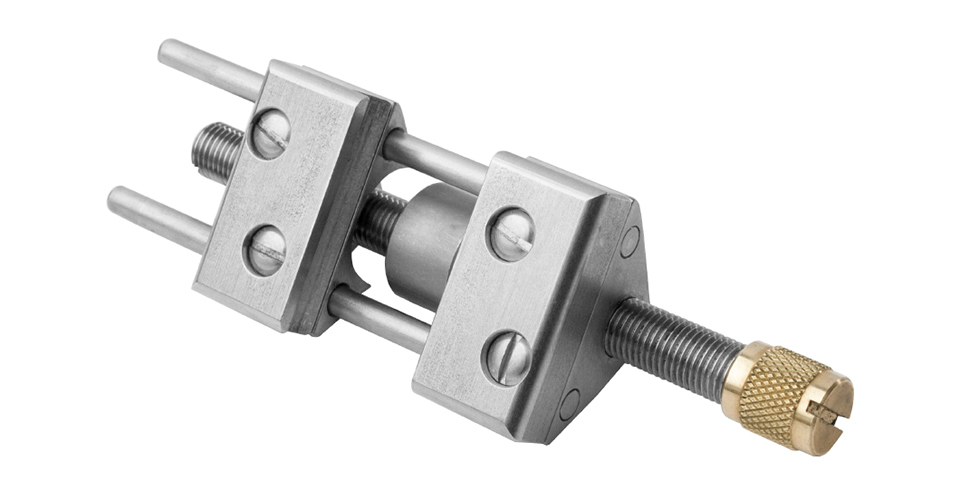
We could increase the bevel angle by welding metal to the bevel and regrinding it, but such barbaric behavior would ruin the blade, so the most expedient way to correct the bevel is to add a steeper secondary bevel at the desired angle. We can grind this new bevel by hand, or by using a honing jig like the Lie-Nielson widget. I find I can apply more downward pressure using this jig to get the job done sooner and more precisely.
Honing jigs are undeniably useful, but they too often become an impediment to learning professional sharpening skills, and they are more time-consuming to use than freehand sharpening. Jigs can certainly make the sneaky snake of multiple bevels manageable, but please don’t ignore the inescapable fact that if one uses a jig properly, over multiple sharpening sessions the result will be… let me think about it…. wait a second while I make a little sketch here…. oh yea, a flat bevel. Hmmm….
Hey, I’ve got a crazy idea: When performing routine sharpening (not the 3 cases listed above), instead of taking shortcuts and adding micro-bevels which turn into secondary bevels and maybe even bulging bevels, why not start with a flat bevel and keep it flat? And then just maybe we could take advantage of the natural indexing properties of that flat bevel to sharpen freehand and save a lot of time NOT setting up honing jigs, or polishing skinny secondary bevels or fat bulging bevels? You know what, it just might work!
A honing jig is very helpful for making big angle corrections. I own several, but the Lie-Nielson model is my favorite: I use it every third blue moon. If you decide to use one, however, reserve it for emergency or drastic measures. Don’t let it become training wheels, kiddies.
The Nano-bevel
In this and previous posts we discussed bulging bevels, which are convex bevels on plane or chisel blades; secondary bevels and double bevels, which are additional bevels; and micro-bevels, which are a tiny secondary bevel. But there is another type of secondary bevel a clever Beloved Customer called a “nano-bevel.” I like this term and so will use it, but I caution you that, like all secondary bevels, you should employ this bevel judiciously.
We will go into freehand sharpening techniques in greater detail in future posts, but to avoid confusion when discussing the nano-bevel, we need to touch on some of those techniques now.
You may have noticed that, when sharpening freehand on every stone but the finish stone, most, but not all people do a better job by applying downward pressure on the blade only on either the push stroke away from their body or the pull stroke back towards their body, but not in both directions. This is because placing downward pressure in both directions tends to make the blade rock resulting in a less-than-flat bevel, or Saints preserve us, the barbaric bulging bevel. As you can imagine, if this rocking motion gets out of hand on the rougher stones the bevel angle can get out of control quickly resulting in unsightly bulges even the best elastic girdle can’t conceal.
However, on the finish stone, it is most efficient to apply light downward pressure in both directions. The advantage is that a teeny tiny bit of rocking helps to ensure the last few microns of the blade’s cutting edge are thoroughly polished. And because the abrasive power of a finish stone is so small, there is no danger the bevel will become rounded, at least if you don’t get carried away. From the wood-shaving’s eye view, this creates a tiny bevel at the last few microns of the cutting edge. This is one example of a “nano-bevel.” Stropping produces the same result on a larger scale.
There is also another type of nano-bevel for emergency use.
When using a finish plane on wood with twisty grain you have no doubt experienced frustrating tearout. The usual litany of solutions is to reduce the blade’s projection for finer depth of cut, skew the plane, oil and adjust the chipbreaker, resharpen the blade, adjust the plane’s sole and mouth, or even slightly dampen the wood with a planing fluid such as water, whiskey, or unicorn wee wee. All these methods can help.
Emergency Nano-bevel Modification
Another classic solution to reduce tearout of course is to use a plane with a steeper blade bedding angle, but what to do if you don’t have a high-angle plane handy?
A traditional, jobsite-expedient solution used by Japanese woodworkers is to create a nano-bevel on the ura side of the blade. This is accomplished during sharpening while polishing the ura on the finishing stone by lifting the head of the blade just a itsy bitsy teeny weeny nat’s buttfuzz thickness during the final stroke, pulling the blade towards you, of course, creating a “nano-bevel” on the last few microns of the cutting edge at the ura, effectively changing the approach angle of the blade.
Be forewarned that this is only for emergency use, and that if you overdo it, or do it too often, the nano-bevel will become a microbevel in a bad location, your blade will be damaged, efficient sharpening will become impossible, the chipbreaker will cease to function, and the gods of handsaws may curse you so all your hair falls out and your dog barfs on your shoes! Or is it your dog’s hair will fall out and you will barf up shoes? I forget.
Now where did I put that jar of planing fluid….?
Planing Fluid
Allow me to explain what “planing fluid” is and why I use it. This term refers to moisture applied to the surface of the wood to reduce tearout when planing by either hand or machine.
The good Lord designed trees to move water from the ground into the sky, so wood loves water. When a tree is cut down it immediately begins to loose cell water making the wood lighter in weight and much harder and stiffer structurally. But it still loves water.
If we apply a little moisture to the surface of a board the wood’s fibers become slightly softer, more flexible and less likely to develop tearout when planed, at least temporarily. The moisture is usually applied with a damp rag. Not too much, now!
Regarding the moisture source, water works well and is priced right, but it may dry slowly and produce inconvenient side effects. Unicorn products are dreadfully expensive nowadays, even on Amazon, so I prefer a smooth, inexpensive, industrial-grade busthead. Please ask Ken Hatch for a demonstration and recommendations for a good planing fluid next time he invites you over to his house for his world-famous tacos.
Please note that I don’t drink any planing fluid other than water. Of course unicorn wee wee is more addictive than OxyContin and drives mortals quite mad. And alcohol is yeast pee pee and deadly, but I prefer whiskey for a number of reasons.
Whiskey has a good water/alcohol ratio that wets the wood about the right amount and then evaporates cleanly. Too wet and it penetrates too deeply and can discolor the wood. Too dry and it evaporates too quickly.
I used Isopropyl alcohol when living in the US where it is dirt cheap, but it is considered a pharmaceutical in Japan and so is very expensive, another convenient case of collusion between manufacturers, retailers and government to fix prices. As with other alcohol products not intended for internal consumption, it contains actual poisonous additives demanded by greedy governments for the sole purpose of maximizing tax revenues. I don’t need those poisons touching my tools or my skin. Cheap whiskey, however, doesn’t contain such poisons (other than alcohol, of course), it’s cheaper and smells better.
Conclusion
A wise man will seek to avoid shortcuts that save a bit of time short-term only to waste more of his time and money long-term. If you simply make the effort to invest in basic sharpening skills, pay attention, and keep the bevel flat, time, steel, and stone-wasting monkeyshines such as double bevels will be unnecessary.
We have talked about the cutting edge’s proper shape. Beginning with the next post in this series, we will examine how to use sharpening stones to make it that way.
YMHOS

If you have questions or would like to learn more about our tools, please click the “Pricelist” link here or at the top of the page and use the “Contact Us” form located immediately below.
Please share your insights and comments with everyone in the form located further below labeled “Leave a Reply.” We aren’t evil Google, fascist facebook, or thuggish Twitter and so won’t sell, share, or profitably “misplace” your information. If I lie may my blade bevels multiply exponentially.


Sharpening Japanese Woodworking Tools Part 1
- Sharpening Part 2 – The Journey
- Sharpening Part 3 – Philosophy
- Sharpening Part 4 – ‘Nando and the Sword Sharpener
- Sharpening Part 5 – The Sharp Edge
- Sharpening Part 6 – The Mystery of Steel
- Sharpening Part 7 – The Alchemy of Hard Steel 鋼
- Sharpening Part 8 – Soft Iron 地金
- Sharpening Part 9 – Hard Steel & Soft Iron 鍛接
- Sharpening Part 10 – The Ura 浦
- Sharpening Part 11 – Supernatural Bevel Angles
- Sharpening Part 12 – Skewampus Blades, Curved Cutting Edges, and Monkeyshines
- Sharpening Part 13 – Nitty Gritty
- Sharpening Part 14 – Natural Sharpening Stones
- Sharpening Part 15 – The Most Important Stone
- Sharpening Part 16 – Pixie Dust
- Sharpening Part 17 – Gear
- Sharpening Part 18 – The Nagura Stone
- Sharpening Part 19 – Maintaining Sharpening Stones
- Sharpening Part 20 – Flattening and Polishing the Ura
- Sharpening Part 21 – The Bulging Bevel
- Sharpening Part 22 – The Double-bevel Blues
- Sharpening Part 23 – Stance & Grip
- Sharpening Part 24 – Sharpening Direction
- Sharpening Part 25 – Short Strokes
- Sharpening Part 26 – The Taming of the Skew
- Sharpening Part 27 – The Entire Face
- Sharpening Part 28 – The Minuscule Burr
- Sharpening Part 29 – An Example
- Sharpening Part 30 – Uradashi & Uraoshi


Please Leave a Reply