Ashes to ashes, dust to dust, if the women don’t get you then the whiskey must.
Carl Sandburg
In the previous article in this series of articles about sharpening woodworking tools we examined sharpening stones, the minimum set your humble servant recommends, those I typically use, and the most important stone in any set.
In this edition we will shift our focus to things that can go wrong when sharpening, including supernatural influences.
Dust Contamination
As I mentioned in the previous post in this series I almost never take a 10,000+ grit synthetic finishing stone or natural finishing stone to jobsites. This decision is based on personal observation under practical conditions: Jobsites are rough and dirty places, and stones are fragile.
Iron Pixies are rabid fans of Lingerie Football. Don’t hang posters or watch games in your workshop if you want to avoid crowds of the tiny beer-guzzling fiends.
Even if Murphy is drunk and the resident Iron Pixies are distracted watching Lingerie Football on the boob tube (pun intended), airborne dust at the jobsite will always instantly degrade an expensive 12,000 grit rated stone to an effective 4,000 grit or less, making a fragile, expensive, ultra fine-grit stone pointless. How clean is your workplace? Something to think about. Seriously.
This is not just a theory that sprouted from my overactive imagination like a dandelion on a dung pile, but is scientifically verifiable. Give it try.
Get out your microscope or high-power loupe. Place a clean glass slide near where you will be sharpening. 120 minutes later, examine the slide and count the dust specks. How did they get there? Dust is in the air quite naturally, but vehicular and foot traffic kick up lots more.
Most of those dust specs are larger and some are just as hard as the grit that makes up your finishing stone. Imagine what happens to your blade when those pieces of relatively large, hard grit get mixed into the stone slurry, or become embedded into the stone’s surface. Not a pleasant thought.
Dust contamination even has historical precedence. Japanese sword sharpeners traditionally do their best work during the rainy season when there is less dust in the air to contaminate their stones.
Professionals that polish pianos, stone, glass and jewels are also sticklers for eliminating dust contamination.
Just design and build a few cleanrooms for picky customers with SEMs (scanning electron microscopes), or with lens coating equipment, or who make pharmaceuticals and you will get an education about dust and the problems it creates quickly.
What dust do we find at construction job sites or workshops? First, assuming we are working at a building project, there are exterior sources of dust. Unlike a house, the doors and windows are usually open to gain maximum circulation, even when dusty landscaping operations are ongoing and trucks carrying materials and garbage are running everywhere kicking up clouds of dust.
Second, unless you have the jobsite entirely to yourself, there are usually other trades inside the building grinding, sanding, cutting and walking around kicking dust up into the air too. The most pernicious dust on the jobsite is drywall and joint compound. This white fluffy dust appears harmless, but it contains tiny granite silica particles harder than steel, and even bits of glass fiber, that float around and settle on everything. They are a health hazard that has put more than one person in the hospital with respiratory problems. They will contaminate your sharpening stones sure as eggses is eggses.
Sandpaper, sanding discs, grinders and angle grinders in operation also spray millions of tiny hard particles everywhere, many of which float in the air and can travel some distance before settling, especially inside an enclosed building or workshop.
Does your business or home workshop have a large door facing a public road with cars and trucks going back and forth near it? Do people with muddy boots come in and out? Are dirty pallets with piles of dirt hidden on the bottom boards offloaded inside? Do you use sanders or grinders in your workshop?
If you are sharpening outside, or at a dusty jobsite, or inside a dusty workshop, and especially if you regularly use sanders and grinders there, I recommend the following procedures before you use fine-grit stones:
Try to locate your sharpening area away from foot traffic, grinding and sanding operations, and dusty areas;
Sweep and vacuum the surrounding floors well, since it is the movement of feet that billows settled dust back up into the air in indoor spaces, and wait at least 15 minutes after sweeping for the dust to settle before sharpening;
Wet the surrounding ground or floor with water to keep the dust down (this makes a big difference);
Wrap a clean cloth or a sheet of clean newspaper around your fine stone when you are not using it for more than a couple of minutes to prevent airborne dust from settling on it;
Scrub your fine stone under running water with dishwashing soap (neutral PH) and a clean natural-bristle brush before each use to remove dust and embedded grit.
A compact and effective brass bevel angle gauge & talisman by Richard Kell
And for heaven sake, even if you can’t take your benchdogs with you everywhere, at least have a brass bevel angle gauge in your toolkit, and use it every time you sharpen because, not only will it help you do a better job of sharpening but it will keep the pernicious pixies at bay. In fact, whenever I undertake a serious sharpening job I hang my Richard Kell Solid Brass Bevel Angle Gauge around my neck from a red string as a talisman; brass because it contains no iron for pixies to covet, and the zinc & copper alloy that is brass tastes bad and gives them terrible wind; and a red string because all tribes of the fae strongly dislike that color.
The legal team hard at work digging up dirt. Everyone of the buggers is a Harvard graduate, of course.
If you have questions or would like to learn more about our tools, please click the “Pricelist” link here or at the top of the page and use the “Contact Us” form located immediately below.
Please share your insights and comments with everyone in the form located further below labeled “Leave a Reply.” We aren’t evil Google, fascist facebook, or thuggish Twitter and so won’t sell, share, or profitably “misplace” your information. If I lie may the fleas of a thousand camels infest my armpits.
Orders are nobody can see the Great Oz! Not nobody, not nohow!
Gatekeeper, Emerald City
Many people high-center on this question: “What is the best way to sharpen my tools?”
Your humble, unworthy servant was hesitant to publish this series of articles about sharpening because, beginning with this one, I must write about tools and techniques that are blasphemous to many people’s sharpening religion. Some of those people will doubtless become emotional. As Benny Franklin once famously said: “Ça ira, ça ira.”
The objective of this article is to help our Beloved Customers properly maintain, sharpen and use the blades they purchase from us. But it isn’t a sharpening tutorial; that will be a future post.
We will examine the process of sharpening woodworking tools using mostly waterstones. We will touch on the motivations, goals and priorities related to sharpening you should consider, the minimum set of sharpening stones your humble servant recommends, and my suggestion for the most important stone in your arsenal, one you must be proficient in using.
Motivations
You might have noticed from previous articles in this series that I like to understand motivations. Am I cynical? Perhaps, but where there are smoke and lights in evidence and money to be made, there is almost always someone behind the curtains pushing levers and pumping pedals. Oooh, pretty lights!
Anyone who does anything has a motive for doing it, and knowing that motive can help us evaluate the validity, and sometimes even the honesty, of what they do, say and write on a particular subject. How can we best ascertain the motivations of those advocating various sharpening methods and related accoutrements? Here are some simple questions you might want to ask: Are the promotions or promoters touting sharpening stones or other stuff they might profit from? Are they selling books on sharpening? Do they teach classes on sharpening? Do they have “sponsors” or “patrons” that supply them, at no cost or with large discounts, stones, diamond paste, sandpaper, sharpening machinery, and/or honing contraptions in exchange for promoting those goods? Are they “influencers” (yes, that’s a real vocation in the NoobTube World) who are compensated for clicks? Do they publish reviews on products they receive for free? You see the pattern.
Regardless of their business model or motivations, many people give good advice, many are shills, while some are pretenders, and their advice will be colored accordingly. Caveat emptor, Skippy.
Just once I’d like to cross the road without having my motives questioned…
And then there is the most obvious motivation. After all, it doesn’t cost even $20 to make a Mechaultrasuperfine Ninja-purple Gold-dust-infused Musashi Walk-on-Waterstone that retails for $650. And have you calculated the long-term equivalent cost of diamond paste and abrasive films? Somebody’s making serious cash.
Whatever stones you select, I urge you to find a good balance of performance vs cost vs time vs sustainability, with sustainability referring to both the amount of landfill-stuffing the selected process creates as well as its long-term effect for good or ill on your blades. This 4-variable calculus depends not only on the characteristics of the stones and blades you use, but on your sharpening skills too, so it may take years to find the inflection points if you take a scientific approach. The quadratic formula does not yield useful results, sorry to say.
At one time or another I have tried and tested many popular sharpening “systems” including those that rely on jigs, machinery, sandpaper, plastic films, stick, liquid, paste, and powdered abrasives, buffers, strops and even superflat ceramic plates because I enjoy the adventure of learning new techniques.
In your humble servant’s experience all these techniques get the job done, and all have serious merits, but to reduce the time and brain damage involved in this calculus, I believe a wise man will learn from no-nonsense professionals, people who have been down the road before and actually use tools to feed their families, and who have no conflict of interest, be it stones, books, or clicks. That’s what I finally did, long before there was a publicly-accessible internet, and I think it worked out well. But I need to issue a disclaimer before we go further.
Disclaimer
Here it is in red letters.
I say what I believe and believe what I say, even if it offends the “gurus” of sharpening. I buy their books and DVDs, watch their YouTube videos, and try their sharpening techniques and even the “tricks” they recommend, so I like to think I am not a “frog in a well,” as the Japanese saying goes. If I don’t know something, I will say so. I am not a liberal college kid to be offended if you disagree with me, but I ask you to not become orcish.
Please note that we do not now and have never received goods, discounts, or financial compensation of any kind from anyone in exchange for modifying our opinion about sharpening tools and techniques.
I have personally taught many people how to sharpen tools over the years, but have never received a red cent for my time and haven’t used those training sessions as an excuse to sell stuff.
I have never done a product review.
I have never written a book or magazine article or even a blog post with advertiser support.
Please note that the document you are currently reading cost you nothing, was written and paid for by C&S Tools alone, and that there are no banners, commercials, or outside links on any of the pages in this blog. No SEO strategy at all. If Evil Google brought you here, it was not at our bidding.
We want to help our Beloved Customers, mostly professional woodworkers who already possess a certain level of skill, to level-up those skills. C&S Tools has no commercial incentive to mislead, and will not do so. But we do have a profit motive.
Remember, we have a 100% guarantee on the materials and workmanship of the tools we sell, so our sole financial motivation, and the very reason for this blog, is to help our Beloved Customers understand the tools we sell, and to become proficient in sharpening, maintaining, and using them so they won’t mistake a lack of skill and/or experience on their part as a problem with the tool. All most professionals really need is a little guidance. We want skillful, ecstatic customers because they become repeat customers. And we do hate to disappoint.
The Marketing Department
Goals, Objectives and Priorities
I mentioned 4 variable calculus above. Actually, it’s more like 5 variable calculus, the fifth variable being your goals and objectives for sharpening. Let’s examine those in more detail.
If satisfying curiosity are among your goals, then by all means try all the stones, sandpaper, films, pastes, jigs, contraptions, and machines available and methodically test them until they wear away to dust. It simplifies the calculus, but the cost and time required to reach a final conclusion may become a heavy burden.
If beautiful blades, zen-like sharpening experiences, and improved hand-soul coordination are high among your objectives (they’re included in mine), then you will want to try natural finishing stones after you have achieved a certain level of skill in sharpening using synthetic stones. I heartily recommend them to those who are willing to roll the bones. The ante may be costly.
The performance of the sharpening system you select, including the following factors, are things you should include in your calculations:
Time efficiency: How long does it take you to produce an adequately sharp edge starting from a dull/chipped one? How fiddly is the process? For this calculation you will need to determine how much your time is worth. Remember, while you may enjoy sharpening, from the professional’s viewpoint, time spent sharpening is non-productive time because, during the period you are working on tools, your hands, eyes, and mind cannot work on the stuff you contracted to deliver to your Customer;
Cost efficiency: How many billable hours and expensive supplies/tools/equipment must you expend to obtain an adequate cutting edge? For this calculation you will need to determine the cost of time, consumables (stones, sandpaper, film, paste, powder, beer, Prozac) and equipment (grinders, jigs, plates, widgets, etc.) expended in producing an adequate cutting edge long-term. Even if you are not getting paid for your woodworking, your time still has value. And don’t forget to depreciate the cost of stuff. This is where synthetic waterstones shine in comparison to the many other sharpening systems out there, IMHO.
Cutting efficiency: How well and how long does the sharpened blade cut? For this calculation you need to determine what defines an “adequate cutting edge” for you. For instance, given the same abrasives and expending the same amount of time to sharpen two blades, the blade with a rounded bevel, or even multiple bevels, is seldom as sharp as the blade with a simple flat bevel, as can be readily confirmed using a powerful loupe or microscope to examine the last few microns of the blade’s effective cutting edge (more on this subject in Part 21 of this series). Does the sharpening system you are testing tolerate or even promote bulging bevels or multiple bevels? Get out your loupe before your inner troll makes you say things you will regret.
If curiosity, pleasure and beauty are lower priority than practical performance in your list of objectives, then I suggest you focus on synthetic waterstones and the bedrock basics, at least for now:
Obtain a minimum set of basic synthetic stones, or adapt what you already have;
Learn how to use them skillfully;
Practice those skills until they seep into your bones.
It is not an expensive process, but neither is it the instant results the Gurus of Sharpening promise in the books and videos they profit from, the classes they teach, and the tricks and gimmicks the promote. It takes real skills that will serve you and your tools well for your entire life. And it all starts with the minimum set of stones.
The Goldilocks Set
Oh my goodness, just look at the time! I really must be going.
Sharpening stones are expensive consumables that disappear a little with every stroke. If you need more than 5 minutes to sharpen a plane or chisel blade that was not chipped or damaged, then you may be spending too long, and wasting your time and stones, so it’s important to determine the bare minimum set of stones that work best for you.
The Goldilocks set I recommend includes the following 4~5 stones/plates:
A Rough Stone: 400~800 grit rough diamond plate/stone or two carborundum stones;
Medium Stones: Two 1,000 grit synthetic waterstones (I will get into the reasons for having two stones of the same grit in another post);
A Finish Stone: 6,000~8,000 grit synthetic waterstone.
Please also note that, while I use them in my workshop, I don’t consider 10,000+ grit synthetic finishing stones or natural fine-finishing stones essential tools, nor do I take them to jobsites. This decision is based on simple practical experience: Jobsites are rough and dirty places, and fine-grit stones are fragile.
The sharpening stones I normally use in the shop include a few beyond the minimum set described above, but the idea is that this finer gradation creates a better-quality cutting edge while consuming less of my expensive finishing stones. Useful natural stones can be pricey:
One 400~800# diamond plate or two rough carborundum stones (only occasionally necessary);
Two 1000# Waterstones (usually necessary, but sometimes I skip it);
Two 2000# Waterstones;
One 6000# stone (fine enough for quickly finishing chisels and most planes);
Two natural stones for finish planes and push chisels, or just for fun (a 10,000# synthetic stone works just as well).
Which Brand of Synthetic Stone?
I have had good luck with the Imanishi “Bester” brand waterstones. Imanishi seems to be inactive so I have been forced to research other brands. The best alternative I have found so far is the “Hibiki” brand waterstones by Naniwa, but I have no doubt there are others that work just as well.
Naniwa also makes an interesting and effective diamond stone they call their “Shrimp Brand,” and which is mistakenly (?) translated as “Lobster Brand” in the US and Europe. Not a “diamond plate,” mind you, but a diamond-impregnated sintered product that works much better than the usual plates with diamond particles electronically attached to steel plates. This diamond stone is comprised of a 1mm layer of diamond grit in a vitrified (baked until it melds) ceramic matrix affixed to an aluminum plate. The sintered layer is quite hard and won’t dish out easily. More importantly, these plates cut faster, smoother and longer than the diamond plates your humble servant has previously experienced.
It is especially useful for uraoshi of plane blades.
The important thing is to keep it wet in-use. If it becomes clogged with metal swarth, use a nagura stone to clean the surface and get back to work.
The Most Important Stone
Everyone focuses like a laser on the finishing stone, the final stone in the process, but when sharpening a particular blade, the most important stone is really the first stone you use in the series, be it a 400 grit diamond stone or a 2,000 grit waterstone.
A conventional diamond plate
You may find this whole discussion passing strange, so I will explain. The stone (or diamond stone, depending on the amount of steel that must be wasted and your available time and budget) you begin the sharpening process with builds the foundation of your cutting edge by performing the following two critical tasks:
Removing damage from the cutting edge; and
Shaping/flattening the bevel at the cutting edge.
Only a rough stone (400~1000 grit) can accomplish the first task efficiently. If the truth of this statement is not self-evident, I won’t even try to convince you. Do the comparisons yourself: count strokes, time, and cost, measure angles, and peep at scratches through a high-power loupe. A contradictory opinion based on anything less is just hot air and is less convincing than a Southern California politician’s protestation of not routinely receiving bribes from the many drug cartels that ship product through that hell-hole.
In addition, the roughest stone you use in the series is also the most efficient tool for shaping the bevel and cutting edge, if it needs to be adjusted. Until these two critical tasks are completed, none of the subsequent finer stones can accomplish anything efficiently, and the faster and more precisely these two tasks are accomplished the sooner one can stop sharpening and get back to making wood chips and shavings.
The role of all the finer stones in the sharpening sequence is simply to replace the deep scratches left in the blade by the preceding rougher stone with progressively finer scratches. And since this polishing work is done using more expensive, less-abrasive and slower-working stones, it is most cost/time-efficient to accomplish this task as quickly as possible.
If you knock out the two foundational tasks listed above using the roughest stone stone/plate in the series quickly and precisely, then you can accomplish the subsequent polishing work at minimum cost and maximum speed. Screw it up and your time and money will be wasted, your stones will prematurely turn to mud, and your blades will hate you.
Please be sure you understand the meaning of the previous five paragraphs. They are the heart of this article, and should be the foundation of your sharpening process.
So how does this work in real life? If the blade is chipped, dinged, or needs shaping, then I start repairing and reshaping the cutting edge’s foundation with my diamond stone. A 400~800 grit carborundum stone, if very flat and kept flat, will work too, but remember that many carborundum stones, especially those permeable by water, can become dished-out in two shakes of a lamb’s tail, and if such a distorted stone is used used on a blade, it can quickly create a mess resembling a Chinese restaurant’s garbage dumpster.
If my blade is only dull, but not damaged, and the bevel is in good shape, I start with a flat 1,000 grit synthetic stone.
If the blade is starting to lose its edge, but is not damaged and still cuts, I start the process with a flat 2,000 grit stone. Notice the word “flat” is used a lot in this article, and not by accident.
The objective, again, is to create an adequately sharp edge in the minimum amount of time and cost by starting the sharpening process with the cheapest, most aggressive stone appropriate to the blade’s condition for the heavy wasting and shaping jobs thereby creating a bevel and cutting edge which you can then quickly polish to the final cutting edge using the more expensive, finer-grit stones. Wow, that’s a mouthful!
I want to make one thing perfectly clear before ending this post. Except for a few special situations, I don’t recommend making secondary bevels or micro-bevels because, like training wheels on a bicycle, they are not an efficient long-term solution. In fact, they are a short-cut that has stunted many people’s sharpening skills.
We will return to this subject later, but in the meantime, I have the honor to remain,
YMHOS
The Great and Powerful Oz has spoken!
If you have questions or would like to learn more about our tools, please click the “Pricelist” link here or at the top of the page and use the “Contact Us” form located immediately below.
Please share your insights and comments with everyone in the form located further below labeled “Leave a Reply.” We aren’t evil Google, fascist facebook, or a political consultant and so won’t sell, share, or profitably “misplace” your information. If I lie may my only companions be fleas and biting flies
The finest, softest natural stone your humble servant routinely uses. Black Cashew natural urethane paint (made from cashew nuts) has been applied to the bottom and sides to retard water infiltration and prevent de-lamination in this sedimentary stone. It is a joy to use, and all my blades simply wriggle with joy when it’s their turn for a ride.
Advice is a dangerous gift, even from the wise to the wise, and all courses may run ill.
J.R.R. Tolkien
We receive a lot of inquiries about natural finishing stones, so your humble servant wanted to share some accumulated thoughts and experiences about them with Beloved Customer. Perhaps they will be useful.
To begin with, natural Japanese stones are a lot of fun, and can create a beautiful, cloudy finish on a blade’s bevel. They truly make my heart sing, wild thing.
I believe that blades finished with a natural stone tend to stay sharper a little longer compared to synthetic stones, but can’t prove it. All the professional sharpeners of swords and tools that I have hired over the years, as well as all the blacksmiths who make tools for C&S Tools and who sharpen their own blades use natural stones for finishing. I always ask them why. To date none have provided scientificish data, but all agree that natural stones are more effective. BTW, these are old boys who have sharpened thousands of blades professionally for 30 to 50 years.
Despite my fondness for them, I want to make it clear that natural stones are not magic, and are not critical to doing good work.
It is interesting to note, however, that while top-quality natural stones are expensive, if judged by the amount of steel they can sharpen, they are actually no more costly than the better synthetic stones. But (baby needs a new pair of shoes!) they can be more of a gamble.
Geologists believe (they weren’t around at the time to witness the event, although they like to pretend they were) that natural sharpening stones typical to Japan were created when particles of volcanic dust fell from the sky, were sorted and sifted by winds and waves, and settled onto the sea floor eventually becoming sedimentary stone. Sounds likely.
Being natural, they carry the inherent and potentially expensive risk of internal defects, such as weakness between sedimentation layers, cracks, and contamination such as hard particles of sand concealed inside. Even if you find one that seems perfect in every way, the bones never stop rolling because you never know what lurks inside.
This stone is a medium hardness natural finishing stone I regularly use. The stone is epoxied to a base made of Ipe wood. The purpose of this exceptionally hard and rigid base is to: (1) Protect the stone from dings; (2) Reinforce the stone against cracking; (3) Provide a longer, more stable footing in-use; and (4) To span irregularities on the surface being used for sharpening, which often includes the ground in the Japanese tradition. The stone’s sides are coated with a natural urethane called Cashew, a product of the cashew nut tree, to prevent water from soaking into the stone’s sides potentially causing cracks and delamination. The bright orange color is to ensure pesky pixies do not talk the stone into sprouting legs and walking away when outside the workshop. They can be persuasive when talking to stones, donchano.
Your foolish servant erred with his first purchase of a natural stone, one recommended by a hardware store owner in Sendai many years ago. I fear he intentionally foisted a low-quality stone on me that a person more experienced with natural sharpening stones would have rejected. This stone “drags” steel, a phenomenon where the stone deposits hard clumps on the blade that then gouge the stone’s surface and leaves rough spots on the blade. It’s impossible, BTW, to judge a stone’s propensity for this pixieish behavior by eyeball alone.
I learned a bitter and expensive lesson about both natural stones and salesmen that day. I still use that stone for sharpening axes and gardening tools and as a door prop, but the real reason I keep it around is as a reminder of my foolishness.
After that disastrous adventure, I became more careful. I now pay less attention to what people say or even write on the subject of natural sharpening stones, and distrust salemen like thin ice over a rushing river. Consequently, I don’t give a rodent’s ruddy fundament about most people’s opinions on the subject of sharpening stones. Nearly all who claim expertise talk and write about things they only partially understand. Many have a conflict of interest. Still others seek justification of their poor decisions.
Nor I do care about the region or mountain or mine a stone came from, or its designation or color. A word to the wise a stone seller near Kyoto whispered into my shell-like some years ago: Even the best mines produce mostly waste.
And because of the impossibility of evaluating stones long-distance, and considering Gildor’s wise words quoted above, I am hesitant to give advice about what stones to buy or where to buy them. But I will tell you what I do when buying a stone:
I examine the stone for cracks and signs of irregularities and impending separation at its sides (not all defects are fatal);
I flip it with my fingertips and listen to the sound it makes. Yes, a good stone sounds different from a bad stone;
I take the stone in my hand, close my eyes, and feel it with my ki 気. Does it feel sound and happy?;
I touch my fingertip to my tongue, wet the stone just a bit, and smell it. Does the moisture soak into the stone quickly, or is the stone too dense? Is the smell produced clean or muddy?
I touch the stone to my teeth (an ancient scientific technique for detecting the fineness and consistency of a stone’s abrasive qualities);
I put a plane blade I know well to the stone, take a few strokes, and like a bow on violin strings, I feel the friction and listen to the music it makes;
I examine the scratches the stone leaves on the blade’s jigane and hagane using a loupe.
None of these critical tests can be conducted long-distance. BTW, if you think any of them are pointless, then I know where you can get a good deal on some swamp land in North Korea with its own lake perfect for a condo development. Well, actually its a settlement pond for a chrome plating factory, but the effluent discharge was recently brought up to 1876 standards so there is no pesky vegetation, or endangered fish or wildlife to deal with, and the price is right!
I have two natural stones I use regularly nowadays. One is of medium hardness suitable for most every straight blade. The other, pictured below, is very soft, and easily damaged, but creates a beautiful foggy finish on the steel.
I love my natural finishing stones, the feel of using them, their smell, the music they make and the pretty finish they produce on my blades. They are part of the romance unique to Japanese blades. I believe the stones I use now and their sisters worn to slivers in past decades were worth every penny I paid for them, but I recognize this is an emotional rather than practical viewpoint, and difficult to defend economically.
Don’t misunderstand: your humble servant is not suggesting you should not try natural sharpening stones, only that you carefully evaluate them in-person beforehand, and buy from a reputable dealer that offers a reliable warranty (please don’t ask for recommendations). And just to prove I am neither troll nor curmudgeon, I will give you the same advice about purchasing natural sharpening stones that a wise old man shared with me a long time ago, advice that has passed Gildor’s test.
Rule 1: Don’t trust your eyes alone when judging a stone’s origin, designation, appearance, or performance (see the five tests listed above): always try a blade on the stone before purchasing it to make sure it works for you and your blade;
Rule 2: Don’t buy a stone from someone you don’t trust and who won’t give you a reliable 30 day warranty to provide time to check the stone carefully for suitability and defects. Remember, the combination of stone and blade is much like a marriage where the softer (but actually granularly harder) stone smooths and polishes the harder blade. If the two don’t work well together, then even lawyers can’t make it right, but a warranty may help reduce the damage;
Rule 3: Don’t whine if the stone disappoints: roll the dice and smile at the spots they show you. Besides, hoes, axes, and hedge shears need sharpening love too.
On the other hand, if you have the stomach for Rule 3 and don’t mind risking your money, then the first two Rules can perhaps be ignored. I grew up in Sin City and know that can be fun too. You pays your money and you takes your chances; Smile on me now, Lady Luck!
Finally, if and when you find the perfect natural sharpening stone, I advise you to protect that lovely thing from damage to ensure it serves you long and reliably. The link below is to an article on this very subject: Protecting Natural Sharpening Stones
YMHOS
Ancient Roman or Norse dice in a pose worthy of gambling.
If you have questions or would like to learn more about our tools, please click the “Pricelist” link here or at the top of the page and use the “Contact Us” form located immediately below.
Please share your insights and comments with everyone in the form located further below labeled “Leave a Reply.” We aren’t evil Google, fascist facebook, or raunchy Reddit and so won’t sell, share, or profitably “misplace” your information. If I lie may I always roll snake eyes.
A Kiyotada 24mm atsunomi, the first truly professional-grade chisel I purchased over 33 years ago. It’s an elegant tool with awesome performance. I got it at a discount because of some cosmetic defects I polished out, which is why the finish is bright and the neck is slightly rusted.
“End? No, the journey doesn’t end here. Death is just another path, one that we all must take. The grey rain-curtain of this world rolls back, and all turns to silver glass, and then you see it. White shores, and beyond, a far green country under a swift sunrise.”
J.R.R. Tolkien, The Lord of the Rings”
The story of C&S Tools is not one of a business looking for products to sell, or of a manufacturer looking for buyers, but of craftsmen looking for better tools.
Your humble servant has lived and worked in Japan for many years, and learned about Japanese woodworking and Japanese tools from serious professional craftsmen called “shokunin.” They included primarily carpenters and joiners, gentlemen that were obsessed with the quality of the products they produced, their production efficiency, and the performance of their tools.
These gentlemen influenced me to seek out the best handmade woodworking tools available, including chisels, planes and saws because better tools help one perform better work more productively while making the job more pleasant. I am still absolutely convinced that is true.
I bought many different brands of tools back in the 1980’s and tested them. I asked craftsmen who’s skill and work impressed me what brands of chisels and planes and saws they used. After years of trying various brands, in the end, I concluded that Kiyotada and Ichihiro made the best chisels and Yokozaka Masato made the best plane blades available at the time. Over the next ten years, I disposed of my other chisels and planes and built up sets of chisels and planes by these blacksmiths.
My work has required me to move many times. In 2009 I was transferred back to Tokyo from Southern California, but the moving company mistakenly placed all of my chisels and planes in storage in the US instead of shipping them with me to Tokyo, so for several years I did not have access to them.
I no longer use my tools to feed the family, but still enjoy woodworking as both hobby and therapy to help maintain my sanity, so life in Tokyo without my tools was lacking something important.
I tried to purchase a few of my favorite tools by Kiyotada, Ichihiro, and Yokozaka but found they were no longer available, and because of the Kezuroukai effect, even used ones had doubled in price. Only Yokozaka-san was still alive, but once again, the Kezuroukai effect resulted in long waiting lists and inflated prices for his planes.
I eventually purchased a 10pc set of oiirenomi bench chisels from a retailer I trusted under the brandname Kiyohisa because, while the retailer warned that Kiyohisa’s products were nowhere near as good as Kiyotada or Ichihiro, he insisted that the Kiyohisa brand was as good “as it gets” anymore. They were shockingly expensive.
Sadly, I discovered the Kiyohisa chisels to be not only inferior to Kiyotada’s products, but of poor quality even when compared to cheapo tools, with some blades chipping unduly, others rolling their edges, and still others with poorly-performing differentially-hardened cutting edges. Absolutely hopeless. I was irate.
I took them back to the retailer and demanded a refund, but he responded that Kiyohisa products did not have a warranty. I since learned that this blacksmith does not warrant any of this products. As you can imagine I lost faith in that retailer’s opinion and the products they sell. You can probably imagine my opinion of Kiyohisa too, so I won’t inflict you with the rant.
At this point I was thoroughly frustrated and so procured many different famous brandname chisels and tested them to destruction. The standard against which I compared them all was the excellent Kiyotada products forged by Shimamura Kosaburo, a blacksmith who was at one time lauded by metallurgists as being the best chisel blacksmith in Japan. I have yet to find a better chisel, but I tried. The testing criteria were initial sharpness, durability (resistance to cracking and chipping) and edge retention ability.
The testing process I employed was to sharpen each 24mm chisel’s blade to 10,000 grit, and cut mortises with it in a Japanese hardwood called Keyaki (zelkova wood). I would abuse each chisel to determine how tough it was, and examine the edge after cutting each mortise. If the edge rolled or dented (and many did), then I knew it was too soft and rejected it. But if it chipped, broke, or performed well, I took it to the next step where I re-sharpened it and continued to cut mortises until the edge chipped or dulled. I rejected those chisels that readily chipped or quickly dulled. Most of the newly-produced chisels sold under famous brand names, and all the chisels produced in Miki, which were too soft, failed these comparative tests utterly.
It was an expensive process but I learned an important lesson, namely, that brandname has nothing to do with quality or performance; The true source of quality and performance in edged tools is rather the blacksmith himself, his experience, skill, and rock-solid dedication to quality. Sadly, this common-sense logic is not applicable to mass-produced products.
The key point I want Beloved Customers and Gentle Readers to take away from this story is the fact that most “brandnames” are owned by by wholesalers and retailers and are marks stamped onto products sold to faceless “markets” that have no direct voice, whereas blacksmiths sell to “customers” that give them direct feedback.
Right about now astute Beloved Customers and Gentle Readers are no doubt saying to themselves “Aha! But the wholesalers and retailers are still customers. Forsooth! Is their opinion of no worth?”
As always, our Beloved Customers have hit on an important difference to which I am compelled to provide a distinction. To whit, wholesalers and retailers are, with few exceptions, shopkeepers to whom a hard day’s work entails packaging boxes and writing labels, not producing timber frames, cabinets, or furniture. Most have never used a tool in the field or workshop professionally. Accordingly, while many talk a good game, their only source of feedback is the volume of sales and product defects complaints received from their customers. Their focus, therefore, is on moving volume at the highest possible profit margin, not making sawdust. In short, lacking hands-on experience and motivation from a demanding foreman or Clients, their ability to differentiate quality and performance from one brand to another is like the proverbial fundament and elbow.
I digress. Back to the point of the story.
Wholesalers and retailers don’t care about feedback so long as product keeps moving. If a particular brandname stops selling, they change the brandname and dress the product up in a different color miniskirt and sequined hooker heels and send it back out to the street corner, so to speak. Thus it has always been.
But the blacksmith has only his reputation, a precious thing that, once lost, cannot be recovered with a fashion remake and a new hairdo.
Accordingly, the quality and performance of a blacksmith’s products directly impact his personal reputation, self-respect, and long-term income, as illustrated by the example mentioned above, whereas most wholesalers and retailers have little at stake.
If a tool wholesaler’s primary market is amateurs located in far-flung countries outside of Japan, then the fluid reputation of his brandnames, inflated by marketing, have much greater influence on his profits than blade quality. Indeed, few amateurs in any country know how to properly use and maintain professional-grade chisels.
Even in Japan, amateurs carelessly damage blades blaming their failure on the blacksmith. Therefore, when marketing exclusively to inexperienced amateurs either domestically or internationally, the wholesaler’s surest path to profitability is to sell mass-produced blades with a high profit margin that are softer and more resistant to damage than blades intended exclusively for professional woodworkers. Therefore, blades sold primarily to amateurs overseas do not need to be hand-forged from the best materials but can be mass-produced using less-expensive steel at lower cost resulting in higher profits. And since the brandname is fluid and can be repaired through marketing, quality is of little consequence.
That is the Miki way of doing business, very much in the style of MacDonalds. Do you like kangaroo meat?
I had learned an expensive lesson during this first phase of buying chisels and planes and destroying their blades. And so putting it to good use, I next went looking for real live blacksmiths instead of famous brand-names.
I focused on traditional blacksmiths unaffiliated with the large wholesalers, working in small smithies who continued to produce chisels and planes for professionals using traditional blacksmithing techniques, and did not stoop to mass-production. I had set myself a time consuming challenge that couldn’t be accomplished using the internet or telephone alone. Indeed, these craftsmen don’t even own computers or mobile phones.
During the next phase I bought more chisels and damaged more blades. I spent weekends on trains going all over Japan visiting woodworkers and blacksmiths, inspecting forges, and checking QC techniques and steel stockpiles. At last I found 3 chisel blacksmiths and one plane blacksmith that consistently produced only the professional-grade tools I wanted with real-world performance approaching that of Kiyotada, Ichihiro, and Yokozaka.
I should add that Kiyotada, Ichihiro, and Yokozaka’s tools were expensive even when they were alive and producing daily. But since the tools I was seeking were to be secondary, perhaps temporary tools, I was willing to sacrifice appearance for lower cost on condition that the tools satisfied my performance goals. The blacksmiths I found did not make the prettiest blades, but they all cut like crazy and kept cutting a long time without dulling or chipping.
During this process I was in communication with professional woodworker friends in the US that know how to use and maintain Japanese planes and chisels. I told them of my adventures and even sent them some of the tools I found to try. After testing the tools they too wanted some. Word of mouth spread and one thing lead to another.
I have a day job, so C&S Tools is not focused on maximizing profits. We sell our tools for the standard retail price in Japan plus PayPal fees of 4.1%, without a gaijin or export markup. It’s more of an excuse for me to spend time with the Japanese blacksmiths and other honest craftsmen I respect.
Unfortunately, our blacksmiths are not getting younger. All are in their late 70’s and 80’s. Production will not continue much longer, so if you are looking for professional-grade chisels and planes at a reasonable price, as I was, then don’t wait too long. No one knows when the “grey rain-curtain of this world will roll back and all will turn to silver glass,” as the old wizard put it.
Stan Covington, Your Most Humble and Obedient Servant.
A 24mm Sukemaru brand atsunomi
If you have questions or would like to learn more about our tools, please click the “Pricelist” link here or at the top of the page and use the “Contact Us” form located immediately below.
Please share your insights and comments with everyone using the form located further below labeled “Leave a Reply.” We aren’t evil Google, fascist facebook, or thuggish Twitter and so won’t sell, share, or profitably “misplace” your information. If I lie, may my chisels chip and my plane blades chatter and gossip unceasingly!
All times are good for those who know how to work and have the tools to do so.
Carlos Slim
The Ootsuki nomi is the largest of the Japanese chisels. It is essentially a scaled-up tsukinomi paring chisel, equivalent to what is called a “slick” in the West.
Definitions
The name is written 大突鑿 using Chinese characters. The first character 大 means “large,” or “ big.” Besides “Oo “ this character can also be pronounced “dai.” You may notice it looks like a man with his legs spread and arms extended, as if he is describing to his buddies the size of the fish that got away. At least that’s how I remembered the meaning when I was a young man in Japan many moons ago.
The second character 突 means to “push against.” And the last character 鑿 , pronounced “nomi” means chisel. It is a very complicated character the origin of which is a mystery to me and everyone I have asked.
So the name translates directly to “large push chisel.”
Applications
If you have never done timber framing, a brief explanation may be helpful.
When doing production work (versus hobby stuff) one cuts the pieces and parts of most open joints using electrical circular saws. Chainsaws kinda work too, but with much less precision.
Handsaws are also necessary for some cuts, but for most situations a circular saw is much quicker and less tiring. There’s a lot of wood that needs cutting after all and only so many hours of sunlight in a day.
Mortises are typically cut with portable electric hollow-chisel machines. There are other options such as portable chainsaw mortisers, stationary router machines, or the amazing German Hundegger machines. http://hundeggerusa.com
I once worked for a Japanese company that cut entire wooden structural frames using CAD driven CNC machines in a factory. In that situation however, the CNC machinery, while very precise and very quick, was so expensive and so inflexible that the building had to be designed around the repertoire of joints and sizes the machinery could cut rather than the joints required to make the best building. And it could not handle significant dimensional irregularities in the timbers used, so only machined glulams were suitable. A very limiting endeavor indeed. I left that job after 2 years.
In any case, hand-operated powertools tend to be less-precise than large CNC machines, leaving rougher surfaces and tolerances that often need fine adjustment without messing around. This is where the ootsukinomi excels because, with the combination of its sharp blade, long handle, and the power of the user’s back and legs, it can quickly gouge out large swaths of wood when cutting joints. But make no mistake, for it is not a brutish tool like an axe or adze, but can deftly pare fine shavings to achieve precise dimensions for tight fitting joints and smooth finished surfaces due to the angular control the longer blade, neck and handle afford the accomplished craftsman.
Sharp tools guided by human hands, controlled by human minds with years of experience are indispensable in the final analysis.
Paring a saddleParing a splice joint with a 48mm chiselParing a housed semi-half-lap notch where two beams will cross over and under each other
Indeed, handtools like axes, adzes, chisels and handsaws are necessary especially when doing “ round work” in logs or when the design calls for irregular-shaped timbers. Paring chisels are also needed to achieve the relatively precise tolerances and smooth surfaces such work demands.
Ootsuki nomi are relatively heavier than other Japanese paring chisel with larger diameter and longer handles. They are built to resist the large bending moment forces created by a large man gripping the handle with both hands and pushing like a plow horse to pare wood. This is the task this chisel excels at.
Most Japanese carpenters that use this tool buy them in sets of two: a wide 48~54mm wide one for paring open joints and the sides of mortises, and a narrower 24mm chisel in shinogi profile for paring the housed dovetail joints to house beams and purlins commonly used in Japan, although other sizes are available. I have owned a custom 2-pc set hand-forged for me by Mr. Shimamura (Kiyotada) many years ago, one with a 60mm blade and an extra-large handle intended for working especially large North American timbers.
As mentioned above, the 24mm chisel is used for paring standard rectangular mortise, dovetail mortises and dovetail tenons, besides a hundred other tasks. In cross section, it is essentially a large shinogi usunomi chisel to help it get into tight places.
A carpenter paring the end walls of a mortise with a 24mm ootsukinomi chisel
Mitsuura
When paring large surfaces with the wider ootuskinomi chisel the hollow ground ura may allow bumps in the wood to slide up into the hollow-ground ura unseen escaping paring, requiring multiple passes to knock them down. This sneaky behavior is easy to overcome with practice, but some people prefer an ura with not a single, but multiple grinds with lands between each hollow-ground area to help index the blade and shave these bumps the first time.
I believe this is one of the few situations where these multiple ura, called mistuura or “triple-ura” are useful.
Kensaki (swordpoint) Ura by Sukemaru. A very unique style of mitsuura cut with EDM equipment. Pretty cool, huh. Sadly, Mr. Usui no longer does this detail no matter how much I beg and grovel.
Some people like the unusual appearance of mitsuura. I must admit they look sexy in wide blades, but they have some downsides. The first downside is that, because there is more hard steel in contact with the stone, mitsuura blades can take a little longer to sharpen.
Second, they can be a little harder to keep flat. Neither of these are difficult problems to overcome. But the third downside is more problematic.
A worn-out mitsuura oiirenomi
Because the three hollow-ground areas are shallower and have less total volume than a single ura, they tend to wear out and disappear sooner. This is not a serious deficiency unless you use and sharpen a mitsuura chisel a lot, or have a heavy hand when sharpening the ura. The negative impacts are minor in most cases.
Beloved Customers need to be aware of these peculiarities and to be gentle when sharpening mitsuura blades.
C&S’s 24mm Ootsukinomi. Notice the shinogi shape
These are not chisels most people will ever have need of but as long as humans are doing timber framing, there will always be a demand for this unique tool.
If you have questions or would like to learn more about our tools, please click the see the “Pricelist” link here or at the top of the page and use the “Contact Us” form located immediately below.
Please share your insights and comments with everyone by using the form located further below labeled “Leave a Reply.” We aren’t evil Google, fascist facebook, or thuggish Twitter and so won’t sell, share, or profitably “misplace” your information. If I lie may the bird of paradise poop on my face.
Those who hammer their guns into plows, will plow for those who do not.
Thomas Jefferson
Hand forging is an ancient blacksmithing technique that, from the viewpoint of cutting tool performance, has been almost entirely replaced in modern times, but never surpassed. Understanding a little bit about this technique and its history is helpful in understanding what a good blade should be.
Before motor-powered machinery and gas-fired forges, steel was very expensive. It took a lot of expertise, fuel, manpower and endless hammering over long periods of time to turn rocks into useable pieces of steel, an economical reality that shaped civilization for millenia. International economics aside, all steel was of necessity hand-forged back then.
This is not an efficient process compared to drop forging or press shaping. It consumes more time and fuel, and requires more labor, skill and experience. It is contrary to modern mass-production methodology. It’s a job for a trained blacksmith who demands a fair wage, not a seasonal factory worker in Bümfüq Guangzhou intent on earning enough cash to put a new corrugated sheetmetal roof on his family hovel in the countryside.
In the final analysis, hand-forging is both unprofitable for corporations and too expensive for consumers who actively value low cost and appearance above performance. No wonder it’s as Dead as Disco.
You may recall people talking about how they prefer to use hand-forged antique chisels and planes because they are superior. Those old tools certainly don’t look superior to modern tools, and they aren’t cheap. But are they superior? And if so, why?
The essence of hand forging is using hammer, tongs, anvil and forge (charcoal/gas fired) to violently shape the metal during a series of heating and cooling cycles. The combination of hammer impacts and repeated heat cycles (heating, cooling, reheating) breaks the relatively isolated, large clumps of carbide crystals into uncountable small crystals, distributing them more evenly throughout the steel’s matrix, producing the sharper, more durable, and most desirable “fine-grained” steel.
The properties of this steel are what make it valuable.
A “Tatara” furnace in Japan used to create a “bloom” of “Tamahagane” steel from “satetsu” which translates to “sand iron.” This is the traditional steel that was used throughout Japanese history prior to the importation of Western steel from England in the 1860’sA clump of Tamahagane (“Jewel Steel”) as it is sold from the bloom furnace. It contains lots of voids and impurities that make this material entirely unusable in modern tool-manufacturing processes.A clump of Tamahagane early in the forging process. Most of this material will be lost as waste before a useful piece of steel is born.After the Blacksmith hammers the raw clumps of Tamahagane hundreds of times, he then forms it into numerous small flat steel patties, which he breaks into the pieces shown in this photo in preparation for forge-welding them into a single larger piece of steel that he can then forge into a blade.
Let’s examine some of these coveted properties. The first is is that it is tougher than steel of lesser quality, meaning it is less likely to fracture due to crystalline defects. In the case of swords or knives it means the blade can cut and chop without breaking when subjected to stresses that would destroy a blade made of lower-quality steel.
The second and third ways fine-grained steel is superior is related to the first. The consistent crystalline structure with its finer carbide crystals distributed more uniformly throughout the matrix results in a cutting edge that can be made sharper, and that will retain that sharpness longer than steel of lesser quality. Of course, realizing this performance depends on the quality of the materials employed, and the skill and diligence of the blacksmith.
Many antique tools were made during a time when steel was expensive, and hand-forging was the only way to shape it. In fact, in the case of critical tools such as swords, this process included forging and reforging clumps of impure iron, folding and refolding the resulting mass into itself hundreds of times to remove impurities and adjust the carbon content, typically resulting in the a loss of 75+% of the original material’s mass. That’s a lot of material and manpower tossed onto the ash pile.
I call these tools critical not just because of their important functions but because of the implied warranty that went with them. For instance, if such a blade failed in battle, the blacksmith’s implied warranty went beyond financial compensation and involved the loss of his body parts at the hands of his vindictive customer’s surviving family members. How’s that for an “extended warranty?”
But any decent steel cutting tool was time consuming and expensive to produce. Until quite recently, blacksmiths did not have tools such as infrared temperature gauges, oxygen sensors, or hardness testers. All they had were their hands and Mark 1 Eyeball, so it took many years of training under a master for a blacksmith to learn how to make a good blade and survive.
Quality control was a big problem back then, but the blacksmiths in Scheffield, Philly, Solingen, Fukuoka and elsewhere still managed to make excellent blades of all varieties with fine-grain steel as the customer demanded. Most of those surviving blades are superior to what is manufactured in the West today. Certainly better than anything made in Chinese factories.
Drop-hammer forging parts in China
Unfortunately, it is impossible to judge a piece of steel’s crystalline structure with the naked eye, a fact mass producers exploit nowadays to make huge profits selling low-quality tools made from scrap at relatively high profits based solely on the tool’s appearance as it hangs on the hardware store wall encased in its impermeable armor of clear plastic. Lower-quality tools became widely acceptable once a generation or two of consumers that knew the value of cutting tools hand-forged from high-carbon steel left for the big lumberyard in the sky to be replaced by more urbanized generations that valued low cost and appearance more than performance.
Sadly, while the quality, consistency, and workability of steel as a material has greatly improved, the ancient technique of hand-forging has been abandoned throughout most of the world, skilled blacksmiths are almost extinct, and blade performance has suffered as a direct result.
Hand forging is still practiced by some blacksmiths in Japan, where the greater quality and performance this technique provides are still highly appreciated by craftsman obsessed with performance. Accordingly, our chisel and plane blades are made from modern high-quality high-purity steel produced by Hitachi metals instead of the much more expensive and difficult to work traditional Tamahagane. However, our blacksmiths hand-forge every single blade in their one-man forges through a minimum of three heats to form a fine-grain steel with the characteristics noted above that Japanese professional woodworkers demand.
A composite photo of Nakano Takeo forging a plane blade.
YMHOS
If you have questions or would like to learn more about our tools, please click the “Pricelist” link here or at the top of the page and use the “Contact Us” form located immediately below.
Please share your insights and comments with everyone in the form located further below labeled “Leave a Reply.” We aren’t evil Google, fascist facebook, or thuggish Twitter and so won’t sell, share, or profitably “misplace” your information. If I lie may a baku caress me with his toes
“The true mystery of the world is the visible, not the invisible.”
Oscar Wilde
In this post we will dig into a few important nitty gritty points about sharpening stones everyone needs to know. Perhaps Beloved Customer already knows all these points, but please ready your shovel anyway because there may be at least one buried surprise to unearth.
A Wood Shavings-Eye View
When seen under high-magnification, the surface of a sharpening stone looks like millions of densely-packed stones embedded in a flat field. The smaller the stones, the finer the grit.
As the blade is pushed and pulled over these stones, they scratch and tear metal from the blade’s surface leaving behind scratches corresponding to the size of these small stones. This violence needs to continue until the blade’s ura and bevel form a clean intersection of two planes.
A view of a blade sharpened with 1200 grit diamond plate showing the furrows left by individual pieces of grit
Seen under high-magnification, the cutting edge is jagged where these furrow-like scratches terminate at the cutting edge. To some degree, it may even look like a serrated sawblade. Some blades, like kitchen knives and swords used in a slicing motion to cut soft materials like meat and vegetables and enemy arms, benefit from a serrated cutting edge more than a highly-polished edge, and so do not need to be highly polished on fine-grit sharpening stones.
Plane and chisel blades, however, are used to cut wood, a material typically harder than foodstuffs, mostly in a straight-on approach, not in a slicing motion. In this situation, a rough, serrated cutting edge is weaker than a highly polished edge because the jagged edges are projecting out into space like the teeth of a handsaw blade. Being relatively unsupported, the pointy parts of this serrated edge are more easily damaged than a highly-polished blade with smaller, more uniform scratches terminating more cleanly at the cutting edge.
Therefore, in order to produce a sharp durable blade, we must make the microscopic cutting edge smoother and more uniform by using progressively finer grit stones to produce shallower and narrower scratches, and a thin, uniform cutting edge.
But how fine is fine enough? There is a curious phenomenon related to friction that is applicable to cutting edges, and is useful to understand.
The Friction Paradox
Imagine a cube of heavy, polished stone with its downward flat face resting on the level, flat surface of a larger slab of similar stone. Let’s say it takes some specific measure of force pushing horizontally on the top stone cube to overcome the static force of friction between the two stone surfaces in order to get the cube moving.
If we gradually increase the degree of polish between the two contact faces and measure the force required to start the top cube moving at each progressively higher level of polish, we will find the force decreases with each increment of increased polish, at least for a time. This is at least partially because the irregularities between the two surfaces (asperities) do not interlock as deeply when the surfaces become more polished.
However, at some point, more polishing brings the surfaces of the two stones into such intimate contact that the molecular attraction between them, and therefore the force necessary to move the cube, actually increases.
The same phenomenon occurs with tool blades. If you sharpen and polish your blades past a particular point, the friction and heat produced during the cut between blade and wood will increase, as will the energy that must be expended, while the resulting quality of the cut and durability of the cutting edge will not improve significantly. Of course, the money invested in stones and time spent sharpening past this point will be mostly wasted.
The Inflection Point
The inflection point where additional polishing yields increased friction with little improvement in cut quality will depend on your tool and the wood you are cutting, but you can get a pretty good idea of where it is if you pay attention over time. While the sharpening stone manufacturers turn red in the face and salesmen froth at the mouth and spray spittle in anger when I say it, in my well-informed opinion there is little practical gain, beyond self-satisfaction, to be had from sharpening chisels or planes past 6,000~8,000 grit, making this range of grit an inflection point in my mind. What about you?
Conclusion
I encourage Beloved Customer to conduct your own experiments to determine the practical inflection point in the case of your planes and wood you cut. Many who figure this out save themselves significant amounts of time and money sharpening over the long-term.
To those Gentle Readers that love sharpening more than woodworking, and enjoy putting money in the pockets of sharpening stone manufacturers more than keeping it for themselves, I apologize for pointing out the icky floater in the punch bowl. But you probably would have it noticed it eventually anyway, if only from the taste difference.
I will touch more on this important point in the next exciting installment in this scientificish adventure.
YMHOS
The Repentant Mary Magdalene by Canova
If you have questions or would like to learn more about our tools, please click the “Pricelist” link here or at the top of the page and use the “Contact Us” form located immediately below.
Please share your insights and comments with everyone in the form located further below labeled “Leave a Reply.” We aren’t evil Google, fascist facebook, or thuggish Twitter and so won’t sell, share, or profitably “misplace” your information. If I lie may frogs infest my boots.
A famous wood carving of 3 monkeys located at Nikko Toshogu Shrine post re-construction that illustrates a famous saying originating in China that also works as a pun in the Japanese language. From right to left: See no evil; Speak no evil; Hear no evil (見えざる、聞かざる、言わざる).
Even monkeys fall from trees (猿も木から落ちる)
Japanese saying
Ideally, a tool blade will have absolutely uniform dimensions: the right thickness and taper, perfect cross-sections, uniform curvature, straight edges and flat surfaces. However, professional grade Japanese tools are not made on CNC machines, but are hand forged and so may include some dimensional imperfections. Indeed, imperfections are part and parcel of all human endeavors. Most imperfections don’t matter; sometimes they make the tool better, sometimes they need to be remedied.
At sometime in Beloved Customer’s woodworking career you may experience one of your blades producing less than ideal, “skewampus” results. These poor results may reflect the influence of predacious, pernicious or perhaps even perfidious pixies. Perhaps you don’t acknowledge the existence of supernatural pests and instead blame the trouble on your technique in using the tool, or even on the irregular grain of the wood you are working. But if not pixies, please consider that the real culprit may be the shape of the blade’s cross-section, or perhaps your unintentionally sharpening the blade with a skew. We will examine some of these problems in this installment in our series on romance and monkeyshines.
We will also look at the curved or “cambered” cutting edge profile in plane blades, the benefits and undesirable results it can produce, and how to incorporate this blade profile intelligently into your woodworking repertoire.
Many people, like monkeys in trees, learn bad habits from their friends and teachers. We hope this article will help you understand what’s going on with your woodworking blades, and how to better shape and sharpen them intelligently instead of just monkeying around. Please be sure to BYOB (bring your own bananas).
A serious craftsman doing Fine Woodworking in a pixie-free, clothing-optional workshop (notice the strategically-placed boots).
Dealing With SkewampusBlades
Skewampus is an interesting word I learned from my mother. I am told it is a combination of the word “Cattywampus” meaning “in disarray,” and “askew.” I think it is the perfect word for describing the ailments some blades suffer.
While less than ideal, it is not unusual for the thickness of a chisel blade’s cross section to vary slightly across its width, with one side being thicker than the other, forming an irregular quadrilateral cross section. This irregularity is frequently found in plane blades too. Since there is more steel on the thicker side of such a blade, unless care is taken, it will abrade differentially during sharpening and tend to develop a skew.
As discussed in previous articles in this series, Japanese plane and chisel blades are formed by laminating a layer of hard steel to a much softer body made of low-carbon steel or iron. If the lamination exposed at the cutting edge is not uniform, all else equal, the area of the blade with more hard steel touching the sharpening stone will abrade slower than areas with less exposed hard steel such that the cutting edge will tend to become skewed during sharpening. Perfection is neither attainable nor necessary, but the uniformity of the lamination is an important detail to observe when purchasing and sharpening Japanese tools.
Likewise, plane and chisel blades that are not uniformly heat-treated but that exhibit differential hardening across the bevel’s width will tend to become skewed during sharpening as one side of the bevel abrades quicker than the other. This problem is more common than you might imagine, especially in the case of inexpensive tools where appearance and low price are given priority over quality control.
Anyone that has experienced bidding high-dollar construction projects will understand the adage “the most profitable job may be the one you lose.” Cheap tools are much the same way: that low-cost chisel or plane you buy on PeeBay may look good in online photos and even during the unboxing ceremony, but if you count your time worth anything, if you dislike headaches, and if real-world performance matters to your bottom line, then such tools are often prove disastrous. Caveat emptor, Skippy.
A chisel or plane blade that has an irregular cross section or a skewed cutting edge often works just fine for many cutting operations. However, when cutting mortises, a chisel blade with a skewed cutting edge or irregular cross section will tend to drift to the side gouging the mortise’s walls and ruining tolerances. If you find that your mortise walls are gouged, or that tolerances are poor, check your chisel blade’s shape, and correct any deformities. It usually isn’t difficult to do.
Like all human work spaces, Japan’s smithies are not immune from pixie infestation despite annual blessings by Shinto priests and periodic offerings of salt, rice, and wine to the spirits. I will refer you to this previous post and another wherein we discussed supernatural predators and described some antidotes for the pixie pox. But the deformities we are examining in this post are more often the natural result of the human eye misreading temperature gauges, or the hand misjudging hammer blows or the non-judicious use of grinder wheels rather than precocious pixies at play.
If your blade’s deformity is not excessive, you can often correct or compensate by applying a little extra pressure on the blade’s thicker side while sharpening it.
It’s interesting how a little off-center pressure on a blade being sharpened over many strokes can change its shape. Many people unintentionally deform their cutting edges by not paying attention to the amount and location of the pressure their fingers apply, or by skewing the blade on their stones. A word to the wise.
On the other hand, purposefully skewing one’s blade in relation to the direction of travel when sharpening the bevel can be useful in gradually and economically correcting a skewed cutting edge. This works because the leading corner of a blade held in a skewed orientation on the sharpening stones is abraded quicker than the trailing corner. But once again, inattention causes many people to skew their blades when moving them around on their sharpening stones unintentionally creating, instead of intentionally correcting, skewed cutting edges. BTW, there’s nothing wrong with skewing the blade when sharpening so long as you are aware of the distortion this practice can produce and compensate accordingly. Another word to the wise.
If these methods don’t mitigate adequately, you may want to grind and lap a chisel blade to a more uniform cross-sectional shape. A chemical bluing solution used afterwards will help conceal the shiny metal exposed by this operation if your chisel objects to shiny spots. Some of them can be quite vain, you know.
A chisel with a nicely uniform lamination and cross-section, and pretty polish produced using a natural finishing stone.
Cutting Edge Profiles
Many people have access to electrical jointers and planers, but relatively few have industrial equipment with the capacity to dimension wide boards such as tabletops. And of course architectural beams and columns are typically too long and heavy to dimension with most stationary electrical equipment.
The choices available to most people for dimensioning such materials therefore are either handheld electrical power planers and/or sanders, or axes, adzes and hand planes. Powerplaners, sanders, axes and adzes are beyond the scope of this article, but let’s consider hand planes.
I need more than one plane? You can’t be serious!
Although the very idea gives some woodworkers vapors (I don’t mean gas), an efficient craftsman will have multiple planes with cutting edges honed to profiles matched to specific operations. It doesn’t take many but it does take more than one, unless results don’t matter.
Everyone that dimensions larger pieces of lumber by hand needs a plane with a wide mouth and a curved or “cambered,” cutting edge called a “scrub plane” in the West, and “arashiko kanna” in Japan.
This variety of plane excels at hogging a lot of wood quickly when the craftsman needs to significantly reduce the thickness or width of his lumber. If the blade is narrow, curvature is deep, and the mouth is wide this plane will hog wood quickly, but it will often leave a deeply rippled surface, often with bad tearout.
One might also have a second arashiko, essentially a jack plane with a wider blade with a shallower curvature for the next steps in the dimensioning process. Such a plane will not hog wood as quickly, but it will produce a surface that is closer to flat and smoother with less tearout. You can see the advantage of having two arashiko planes, or a scrub plane and a jack plane, with different cutting edge profiles when dimensioning lumber.
Many Beloved Customers use electrical-powered planes to dimension lumber before turning it into furniture, doors, chairs, or sawdust, etc. and are aware that planers always leave tiny ripple-like scalloped cuts on the wood’s surface, often with some tearout, that is unacceptable as a final surface. A hand-planed finish is far superior, but it doesn’t make sense to remove more than the bare minimum of wood necessary to remove this washboard.
A finish plane, in fact, is the perfect tool for removing these ripples and producing a smooth, uniform, even shiny surface on condition that the plane is sharp, it has a fine mouth, its set to a fine cut, its chipbreaker is tuned and set properly, the blade profile is appropriate for the width of the wood to be finished, and the wood does not have too many large knots. In one or two passes such a plane can easily remove all the ripples and leave the wood clean and shiny without changing its thickness much at all.
Assuming the wood is cooperative and one knows how to sharpen and setup their plane properly, blade profile frequently remains a key factor many fail to grasp. Obviously, the curved cutting edge of a scrub plane cannot produce the perfectly flat surfaces required for joining two pieces of wood together, nor a smooth surface. On the other hand, the corners of a perfectly straight blade will leave clearly visible steps or unsightly tracks on the surface of a board wider than the blade, which is not a problem when rough-dimensioning a board, but is not ideal for joined surfaces and painful to look at if the board’s surface is to be left with just a planed finish.
So how do we solve this conundrum? When finish planing, the professional approach is to use two finish planes each with a different cutting edge profile.
The first type of finish plane has a perfectly straight cutting edge used to plane pieces narrower than the blade’s width. Since the blade’s corners are not riding on the wood but are straddling either side of the board while cutting, they won’t leave tracks or ridges, and the finished surface will be truly flat, perfect for joinery.
The second type of finish plane found in the professional’s toolchest has a curved cutting edge, or more correctly, curved just at the right and left corners to prevent it from leaving tracks and ridges when planing boards wider than the blade. Nearly all the cutting edge is left straight, but creating this tiny amount of curvature at the right and left corners causes them to smoothly disappear into the plane’s mouth so no tracks are made and any ridges are nearly impossible to see or feel. In other words, the corners of the cutting edge never touch the surface of the board, and so don’t leave discernible tracks or ridges. The finer the cut made the smaller any ridges created will be. Indeed, where a high-quality surface is required, the final cut with the finish plane will produce shavings thin enough to see one’s fingerprints through.
You may want to reread the previous two paragraphs to make sure you understand what these two cutting edge profiles are and what they can accomplish before you read further.
Naturally, a professional doing high-quality work needs at least two finish planes, one with a straight cutting edge used to produce flat, precisely-dimensioned surfaces on wood narrower than the blade’s width, and another finish plane with a cutting edge very slightly curved at the corners used to finish surfaces wider than the plane blade.
There are those that advocate using a curved blade, sometimes dramatically “cambered,” as some call this shape, for all applications. Those who advocate this sloppy technique twist themselves into knots justifying tricks to approximate flat surfaces using such blades. I have no doubt this is an ancient technique, but I suspect it is a sad practice that sprung from the carelessness of some craftsmen in flattening their sharpening stones, and with time this bad habit became a tradition in some quarters. I strongly suspect fans of this strange way of doing business habitually sand all visible surfaces anyway so tracks and ridges are not a problem for them. But the fact remains that perfectly flat, track/ridge-free surfaces work best for joinery.
Tradition and “monkey see monkey do” are a useful place to start, but as his skill level increases, the thoughtful craftsman will eventually seek to confirm the validity of the traditions he has been taught. I urge Beloved Customer to get started early.
Sadly, too many people never notice the strange instruction label pasted to their boot’s sole, nor that smelly stuff sloshing around inside.(ツ)
Mommy monkey teaching baby monkey bad habits. Will they ever learn?
Conclusion
As we come to the end of this article allow your humble servant to leave Beloved Customer with a word or two of advice about two bedrock basic skills you should master.
First, learn how to keep your sharpening stones flat. This will save you much grief.
And second, learn how to sharpen your blades to have a straight cutting edge. Everything else will flow naturally from these skills. Your blades deserve it. We will talk more about these subjects in the future.
In this article, we have discussed 12 serious points about plane and chisel blades and how to use and improve them all but a few woodworkers in the West are unaware of, or ignore, but which are common knowledge among professional Japanese woodworkers in advanced trades. While condensed, it is enough information to fill a book. But in return for this river of knowledge all your humble servant requests is the bananas you have in your back pocketses right now (BYOB, remember?). You didn’t sit on them did you?
The next installment in this simian soap opera of sharpening will focus less on monkeyshines, and more on stones and techniques. Please stay tuned. Until then, I have the honor to remain,
YMHOS
Oh my! I can’t wait to read more!!
If you have questions or would like to learn more about our tools, please click the “Pricelist” link here or at the top of the page and use the “Contact Us” form located immediately below.
Please share your insights and comments with everyone in the form located further below labeled “Leave a Reply.” We aren’t evil Google, fascist facebook, or a Minnesota congresswoman and so won’t sell, share, or profitably “misplace” your information. If I lie may icky boils burst forth on my nose daily.
Warning: This is a special Halloween post, but it may not be suitable for children.
In keeping with the Halloween season, I want to share this story about an unfortunate woman on the way back home.
The Japanese people have loved scary stories of all kinds for as far back as we know. Judging by the increasing popularity of horror movies in the USA, this is not a unique tendency.
True to form, this story includes themes common to many Japanese horror stories, such as lonely places and good food, helpless women and ropes, and a sad ending, indeed everything a scary Japanese folk tale needs.
As you read it, imagine you are a little boy or girl in a dark and drafty room in an old farmhouse tight against a bamboo forest. Big smoke-blackened wooden beams twist through the space overhead. It’s dark outside and chilly; the wind is softly blowing outside making the bamboo and paper-covered shoji doors rattle, and the few remaining dry leaves rustle. Mother has just finished cleaning up after the simple evening meal. You’re still a little hungry, but it was enough. A small fire is burning in the square sand-filled irori in the center of the room where Mother and Grandmother cooked dinner. The family is relaxing around the fire, and you are leaning against your mother or father as Grandmother tells this old story. I won’t insist you enjoy it, but I hope you can grasp the atmosphere of rural Japan in past centuries.
An irori with a fire heating an iron cauldron for the evening meal. Woven rush mats are placed around the sand-filled depression in the floor for the family to sit together as they eat the evening meal. Maybe after dinner Granny will tell us some stories…
Long ago and far away there was a woman named Osei. She was 25 years old.
She had traveled from her home to visit her parents in a different village for several days. It was a half-day journey for a woman, normally one her husband or younger brother would have accompanied her on, but they were both too busy to travel with her this time.
Anyway, let’s walk along with Osei on her lonely path through a dim bamboo thicket at twilight.
Suddenly a man appeared by the side of the path, as if he had been waiting for her. Osei screamed in surprise.
The path through the bamboo forest
The bad guy
The man was huge and looked just like you would imagine a bandit would be with a long, unkempt beard and wearing a dirty sleeveless kimono. He grabbed Osei’s slender arm violently and dragged her in among the thick bamboo stalks. Osei screamed like a banshee on fire but the thick silent forest swallowed the sound without an echo. Only a fox and the mice he was hunting nearby heard Osei’s calls for help.
Osei struggled frantically to free herself from his iron grip, but without stopping the man just looked back at her admonishingly and said “Calm down, I’m not going to eat you! I just want you to be my wife.”
The large, dirty man held tightly to one of Osei’s arms, while Osei’s feet and free hand scrambled in the fallen leaves on the forest floor trying to get back to the path. Hearing his words, she managed to gasp out “Wait, wait! I can’t be your wife, I already have a husband and two small children waiting for me at home! Please let me go!”
Without releasing her the man stopped and with a puzzled expression said “Think about it. There is only endless drudgery waiting for you at your husband’s leaky hovel. And the best you will have to eat is rough barley rice and pickled greens, right?” “But if you come with me your life will be easy. You can relax indoors all day and eat delicious foods. That’s a lot better than your life now, I wager.” He made other strange arguments about nice clothes and servants, but Osei didn’t hear a single word, she just continued to scream and struggle.
Giving up on trying to convince Osei with words, the man tied her up, threw her over his shoulder, and strode purposefully away into the bamboo forest. After a while, the forest opened up to a clearing with a single house. The house was large and well made, like a Governor’s mansion.
The mansion in the woods
The man carried her into the house and lowered her onto the floor. Looking steadily into her eyes he firmly said “You are now the woman of this house. Your life here will be easy, so long as you don’t go outside. You will have delicious things to eat and a new silk kimono to wear everyday. Then you will understand that what I have said is true. Even if you think I am lying, stay here for just one month anyway, and after that you will be free to go. So stop all this hysterical wailing.”
Osei continued to cry, but after a while dinner appeared. It was everything the scruffy bandit said it would be.
Just a light snack
Osei grew up on a farm and was a poor farmer’s wife so she had never even seen such luxurious food before. But thoughts of her husband and children made it impossible to eat a morsel, so she just sat in a corner of the room and cried in despair.
But humans are calculating creatures unable to live on affection alone. After three days she became so hungry she finally relented and ate a mouthful of food.
There were foods from both the sea and the mountains, wonderful dishes she had never seen before much less tasted. She didn’t forget her husband or children for even a second, but rationalized that the separation would only be for a month. As the days passed she began to eat regularly a little at a time.
Four meals a day, nice clothes, servants to cook and clean, and no work. What more could a woman possibly want? Answer: She’s a woman so will find something to complain about.
Osei enjoying a picture book between meals
Osei spent each day alone in her room simply eating and reading picture books the man brought to her, so she was not especially bored.
Most importantly, the man did not pressure her for physical relations, so the tension between them gradually relaxed.
Eventually, however, Osei had read every picture book several times and was left with nothing to do. She was bored.
One day as the smelly bandit was taking his usual afternoon nap she snuck out of the house as quiet as a mouse wearing fuzzy pink slippers. She slipped from the veranda into a large garden with a big white kura warehouse off to the side. She heard voices from inside the warehouse, and what sounded like rain dripping from a leaky roof. Osei was curious and peeked into the warehouse’s open doors. What she saw inside shocked her so badly she had to kneel to keep from falling over.
Japanese “Kura” (蔵) or “Dozo” (土蔵) are a type of warehouse building with a wooden structure and thick walls and ceiling of adobe plaster. The mass of the adobe moderates interior temperature changes helping to preserve foodstuffs and goods. More importantly, a well-built Kura will withstand a serious fire protecting the people and valuables inside, a tremendous benefit in light of the terrible fires that have historically and frequently ravaged Japan’s cities. Owning a Kura was not only a sign of wealth but was important to creating and protecting wealth.Dozo, being made of adobe, essentially clayey mud and straw, are vulnerable to damage from water and impacts. Two methods of protection traditionally employed were a fired-clay tile roof, interim eaves also with roof tiles, and a tall wainscot of fired-clay tiles, or even stone tiles as in this photo. Notice how thick the adobe walls are, and how all flammable building materials are protected behind adobe and plaster. The thick shutters too are filled and wrapped with adobe and a white plaster coat and have stepped edges that interlock to seal out smoke, fire, insects, rodents and thieves. I suspect the metal flashing on top of the shutters is a modern addition.The entry doors are also adobe and plaster over a wooden frame, often with metal panels to add further stiffness and security. The outer fireproof doors are left open during the day while the lighter and more easily-operated inner wooden doors are kept closed to keep out insects, rodents, and pilfering hands. At night, or during a fire, the heavy insulated doors are closed and locked. A well-made Kura will not only protect a family’s or business’s wealth, but is the perfect emergency refuge during fire or flood.
What Osei saw in the kura was dozens of bound women hanging upside down from the ceiling beams by ropes around their ankles as naked as the day they were born. Every single one of them was plump and sweating a yellowish liquid from their hair follicles and face which fell into a clay pot placed on the floor below each woman making a “drip, drip, drip” sound.
Osei was deeply ashamed at her indolence while these women had been suffering so close by. She began to cry at the sight. One of the women noticed Osei and whispered “Run! Hurry run away! If you don’t escape you too will end up hanging here with us while he steals your body’s oil!” With that all the hanging women looked at Osei pitifully and said as one “Run and bring us help!”
Osei was so shocked at first she couldn’t respond to the women’s pleas, but after a few minutes she did manage to stand and run away like a scared rabbit as fast as she could. As she fled through the forest and thickets daylight failed and she became even more fearful, but she continued running until at last she saw a light in the distance. It was an old farmhouse. She ran to the door and banged on it loudly until an old snaggle-toothed white-haired woman slid open the door.
A traditional country farmhouse with a straw-thatched roof and smoke hole above the kitchen located towards the building’s right side. Notice that the right third of the building, including what would serve as the kitchen, is not raised. This area has an earthen floor and serves as workshop, storage shed, or even animal shed, depending on the farm’s needs. No glass windows, of course, just paper shoji doors and sliding wooden shutter doors at the perimeter.
“What’s the matter; why are you so panicked?” the old woman asked Osei. Reassured by the old woman’s concern Osei quickly explained what had happened.
“Well, come inside dear. I had no idea such a scary ruffian was skulking around these mountains,” said the old woman. “Oh no, I hear someone coming!” she suddenly barked, and pulled Osei inside sliding the door closed with a loud “clack!” Osei peeked through a crack at the doorframe and indeed saw a large figure running through the dark bamboo forest towards the house. “That’s him! That’s the man! He’s coming!” she gibbered in a low panicked voice.
The old woman guided Osei to a ladder going up to the house’s attic. “Quickly now, climb this ladder and hide above. There is a pile of hemp bags in the corner. Climb inside one of them and stay very very quiet until I get rid of that animal. I will hide the ladder so he won’t find you.”
The roof structure of the farmhouse.
The corner of the farmhouse attic where Osei hid.
Osei climbed the ladder, found the pile of bags, and curled up inside one as small and quietly as a potato bug. She could hear someone banging on the door below, and the old woman saying “I’m coming, I’m coming! Wait a second!” As the door slid open she heard the large man’s voice saying “A woman just came here, didn’t she!”
The old woman responded “No one but you has come here today.” The man’s voice said “Don’t lie, I saw her!”
“How could you see anything in this darkness?” said the old woman.
“You have an oil lamp burning inside. I saw her shadow at this very door when you opened it just now!”
“You must have seen my shadow twice,“ the old woman argued.
The man was angry now and spit out “I’m no fool! No way I would mistake an old hag like you for a young woman even in the dark.” “You’re trying to steal the woman I was preparing!”
The old woman lowered her voice, but Osei could still hear her response “Haven’t you got enough women already? Couldn’t you share just one with your old mother?”
The man continued to argue with the old woman, but eventually he calmed down and spit out “ Just this once, then, mother.” “Where have you hidden her?”
“In the attic,” responded the snaggle-toothed old woman pointing upwards with a finger and grinning. “Inside one of the bags. And while your at it, would you be a good boy and hang a new rope for me?”
“You know, you’re a lot of trouble for such an ugly old hag!” responded the man’s voice.
Hearing this Osei tried to escape from the bag, but before she could get away the bag was lifted into the air. The bag was suddenly and powerfully torn open and she was pulled out, only to be tied with a thick, rough rope around her ankles and suspended through a hole cut in the ceiling above the hallway below. Clearly, the rope and hole had been prepared well in advance and used before.
Osei looked around and saw the ruffian and his mother looking back at her. Of course, they appeared to be upside down. Looking at the floor below, Osei noticed a large clay pot placed directly below her with what appeared to be some yellow oil in the bottom.
Before long, a slow drip, drip, drip, … of oily sweat fell from Osei into the pot.
A sad ending to an all too common story of suffering.
The End
(A folktale from the island of Kikaijima, located between Kyushu and Okinawa)
Happy Halloween from your friends at C&S Tools!
YMHOS
If you have questions or would like to learn mor
If you have questions or would like to learn more about our tools, please click the “Pricelist” link here or at the top of the page and use the “Contact Us” form located immediately below.
Please share your insights and comments with everyone in the form located further below labeled “Leave a Reply.” We aren’t evil Google, fascist facebook, or thuggish Twitter and so won’t sell, share, or profitably “misplace” your information. If I lie may I be hung by the toes for a week.
You cannot mandate productivity, you must provide the tools to let people become their best.
Steve Jobs
This post will diverge a little from the pattern of previous articles in this series in several ways. First, because although your humble servant loves this tool, it has become difficult to procuring them anymore, so this is more of a show and tell. And second, because I have a couple of stories to tell about the blacksmith that made it, and the store that sold it to me.
The Kotenomi
The kote nomi is written 鏝鑿 in Chinese characters meaning ” trowel chisel.” It is not an elegant name, but is accurately descriptive. It is essentially the same as the Western ” cranked-neck chisel. ” It is used to pare grooves, dadoes, sliding dovetails, rabbits and mortises, anywhere the handle of a regular paring chisel would get in the way.
The sides have a steeper bevel than regular chisels, much like a shinogi usunomi, to help it get into tight places and cut right up against the sides of sliding dovetail groves, dadoes, etc..
These are not easy chisels to sharpen because of both the offset, and the tendency for the neck to get in the way.
This is one of those chisels that you may not need often, but when you do need it, you need it badly.
The shape of the two Kiyotada kotenomi shown in the 10 photographs on this page is graceful, elegant and minimalist. The filework is very nice. The black oxide skin is consistent, indicative of a perfect heat treat. The blade, made of Shirogami No.1 steel (aka “White Steel 1”) is, unsurpassed by anything I have experienced. It is one of those rare tools that clears the mind as it cuts wood.
Background
The kotenomi in the pictures above have an interesting back story. It was forged by a famous and exceptionally skillful blacksmith named Kosaburo Shimamura (島村幸三郎)using the brand ”Kiyotada” (清忠). It is not the standard Japanese kotenomi in terms of design, appearance or performance, but is based on those forged by an even more famous blacksmith named Hiroshi Kato (加藤廣1874-1957) under the name of Chiyozuru Korehide (千代鶴貞秀), one of Japan’s greatest tool designers and blacksmiths. Much of his work is seen as great works of art in Japan.
As Mr. Ichiro Tsuchida told the story to me, he lent one or more of his collection of Chiyozuru Korehide kotenomi to Mr. Shimamura and asked him to forge some just like it to sell in his tool store Sangenjaya in Tokyo. After much trial and error, Mr Shimamura succeeded in approximating the Chiyozuru design in the chisels shown here.
As you can see from the pictures, the blade’s sides are sloped inwards from ura to face, a detail that provides clearance when cutting sliding dovetails, a joint this tool excels at making.
I use it, as well as my other Kiyotada kotenomi, for making dadoes, rabbets, and inletting swamped rifle barrels in reproduction flintlock barrels (sadly, I can’t pursue that activity here in Japan).
Kiyotada Kotenomi 9mm (Face View)Kiyotada Kotenomi 9mm (Ura View)Kiyotada Kotenomi 9mm (Right Side Neck View)Kiyotada Kotenomi 9mm (Left Side View)Kiyotada Kotenomi 9mm (Left Face View)
The following are pictures of the standard garden-variety kotenomi.
As you can see, the standard kotenomi are very clunky in appearance and crudely finished compared to Shimamura’s chisel, with a more abrupt, angular transition between neck and blade, whereas the handle in the Kiyotada design approaches the neck at more of an angle, a detail that stiffens the neck, reduces the bending moment on the neck/blade junction, and helps force flow into the blade more smoothly.
The standard model works just fine, but a comparison of their the appearance and tactile qualities would be like a Lear jet and Cessna 172: both vehicles will get you there, but the speed, comfort and style will vary.
Standard kotenomi chisel (face view)Standard kotenomi chisel (Right shoulder view). Please observe the rougher finish and the less-sculptural shape.
The Kiyotada Brandname
A bit if trivia some may find interesting. The Kiyotada brandname was registered by, and remains the property of, a tool store in Tokyo called ” Suiheiya” (水平屋).
Suiheiya means ”level store,” probably named for the bubble-level tool imported from the West and which is so critical to construction and other trades. This store is old and was once the largest tool retailer in Japan. Last time I visited it was still large and packed to the concrete rafters with planes and chisels.
I first visited Suiheiya when I was a student in Tokyo in the ‘80’s when the premises was a 2-story wooden structure probably built right after the end of WWII. The proprietor was an old sourpuss who had no patience with foreigners and treated me like a shoplifter-in-training with a turd perched on my head. For some reason I can’t put my finger on I didn’t visit the store frequently, but I did buy this and other tools from him.
But I digress. Shimamura San made chisels and knives for Suiheiya his entire career and marked those tools with Suiheiya’s own Kiyotada brand. I suppose it would have seemed silly, or at least confusing, to mark a chisel or knife with a brand that could only be read as ”bubble level.”
I’m unsure how it happened, but as his products became more famous Shimamura-san made chisels for other retailers using the same Kiyotada brand. I was told by the owner of Suiheiya that Shimamura-san used the Kiyotada brand for all his products with Suiheiya’s permission.
By the way, although Shimamura-san has gone to the big lumber yard in the sky, Suiheiya continues to sell planes and chisels with the Kiyotada brand, although they are not made by Shimamura-san, who is busy with more important matters nowadays.
Sadly, my blacksmiths won’t make kotenomi for me anymore. I tend to be picky about quality, and with Kiyotada’s kotenomi as the standard, you can see why customer satisfaction in my case is difficult to achieve.
YMHOS
If you have questions or would like to learn more about our tools, please click the see the “Pricelist” link here or at the top of the page and use the “Contact Us” form located immediately below.
Please share your insights and comments with everyone by using the form located further below labeled “Leave a Reply.” We aren’t evil Google, fascist facebook, or thuggish Twitter and so won’t sell, share, or profitably “misplace” your information. If I lie may the bird of paradise poop on my face.


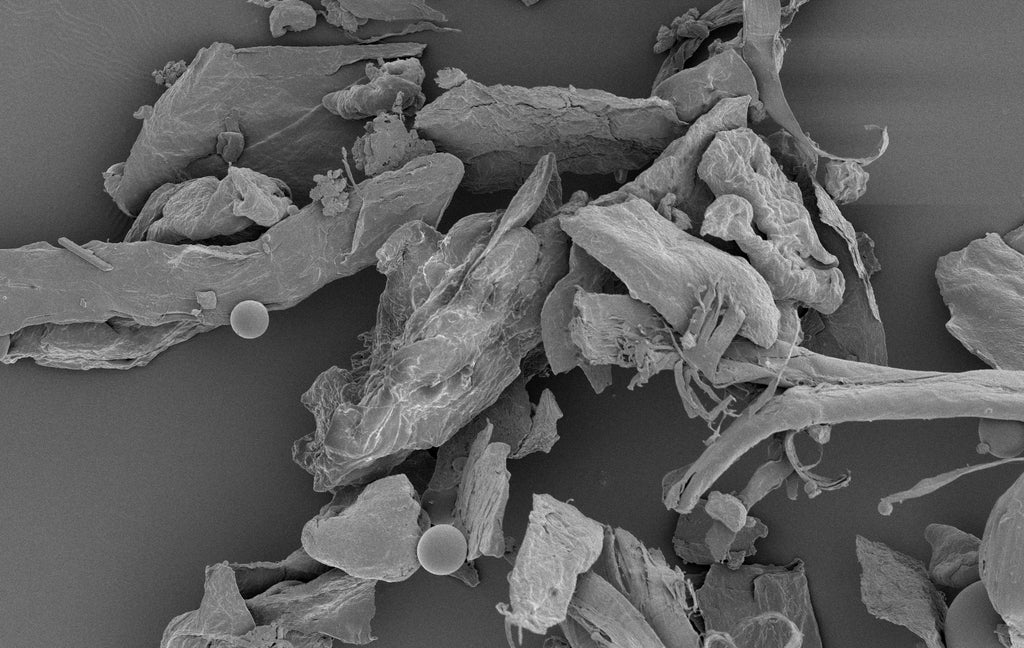
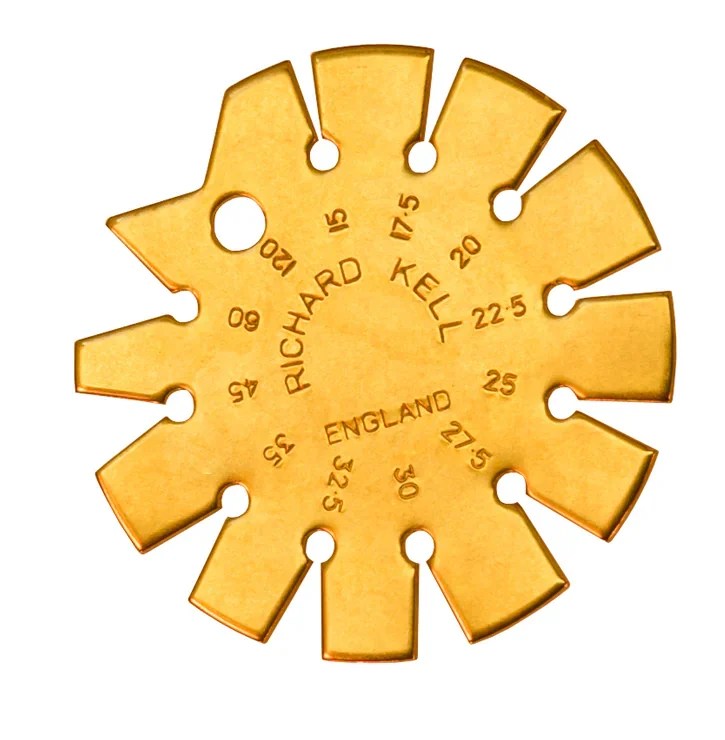


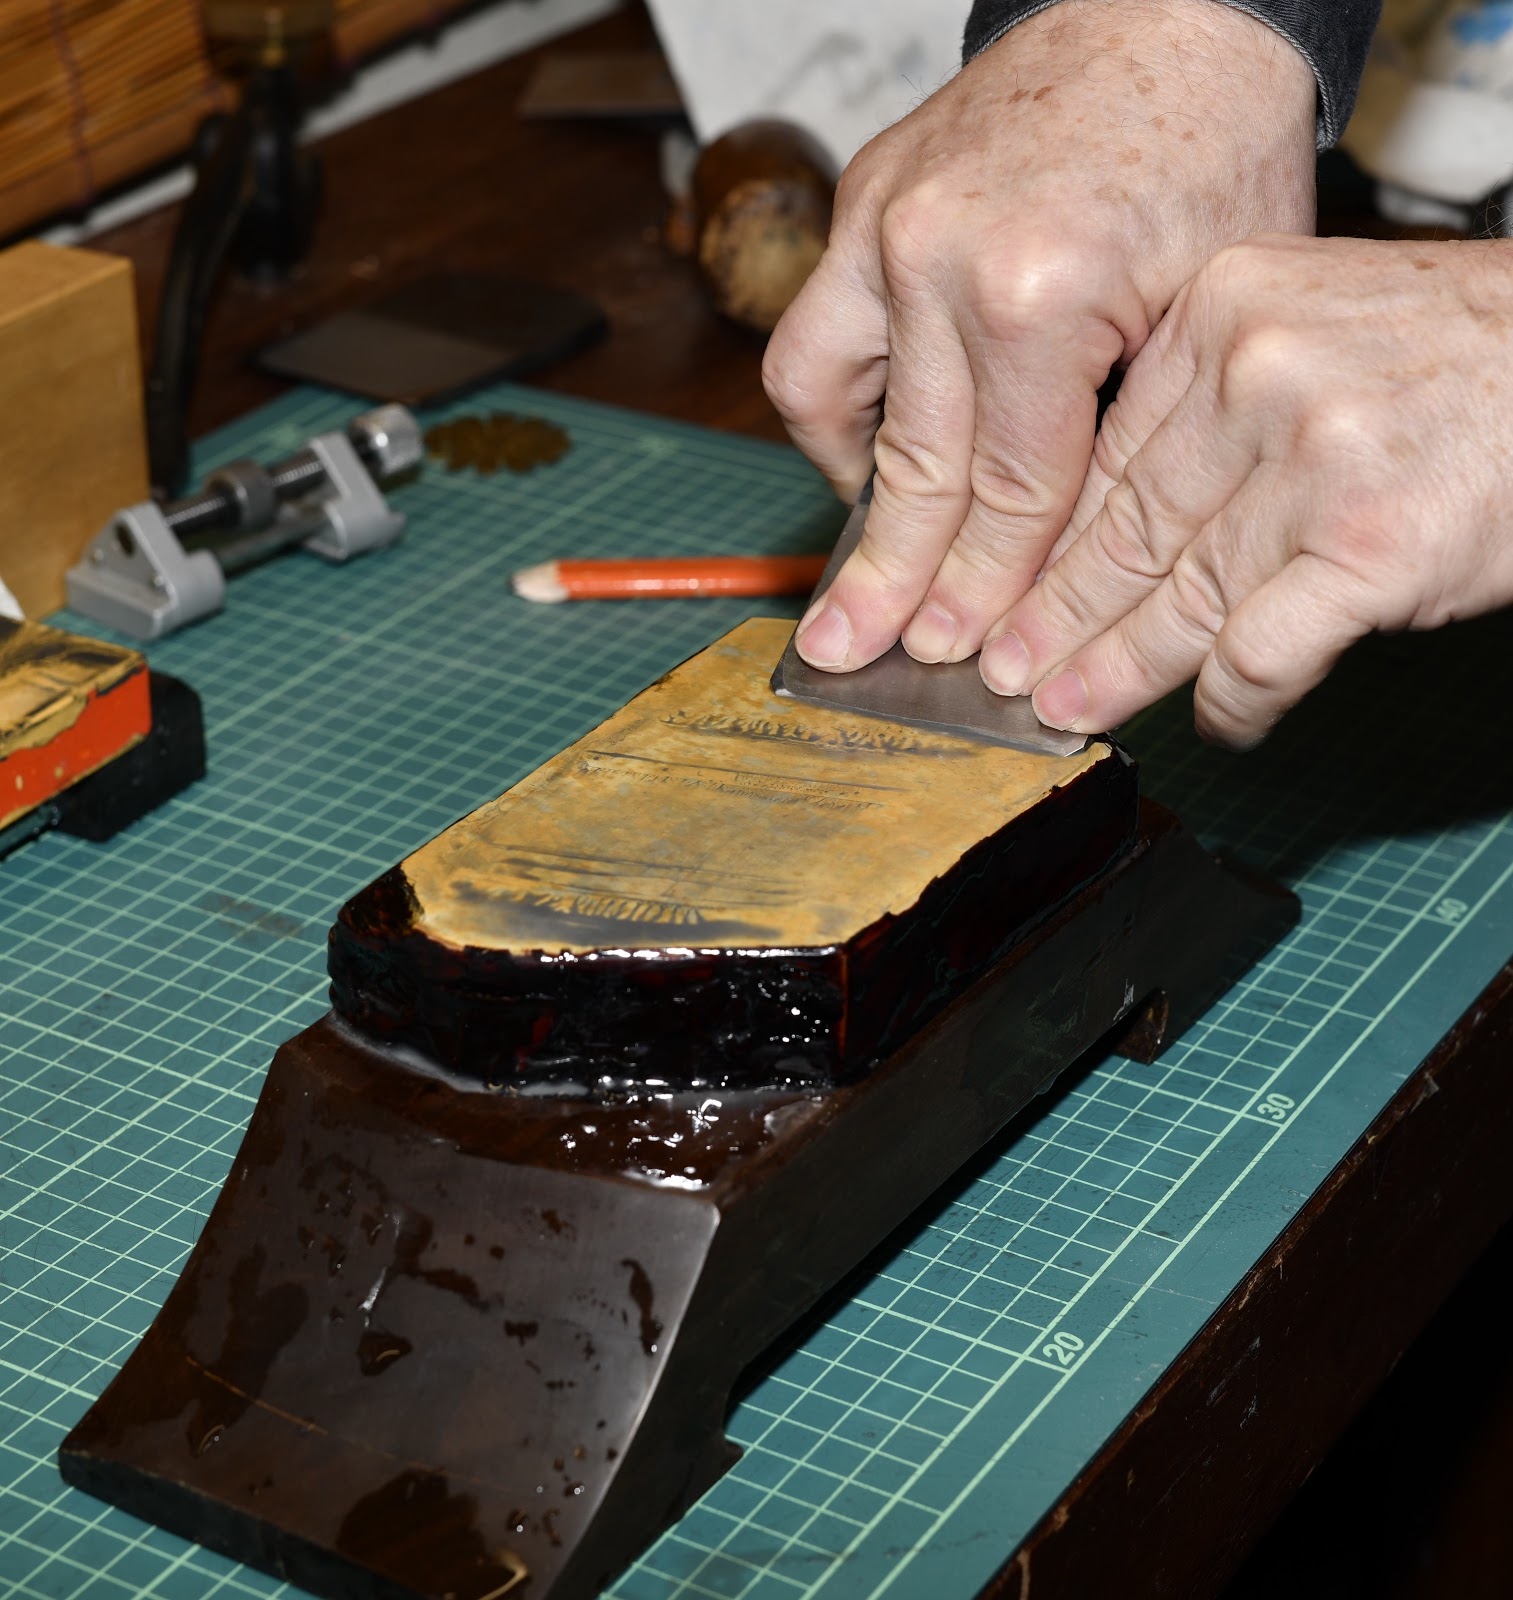


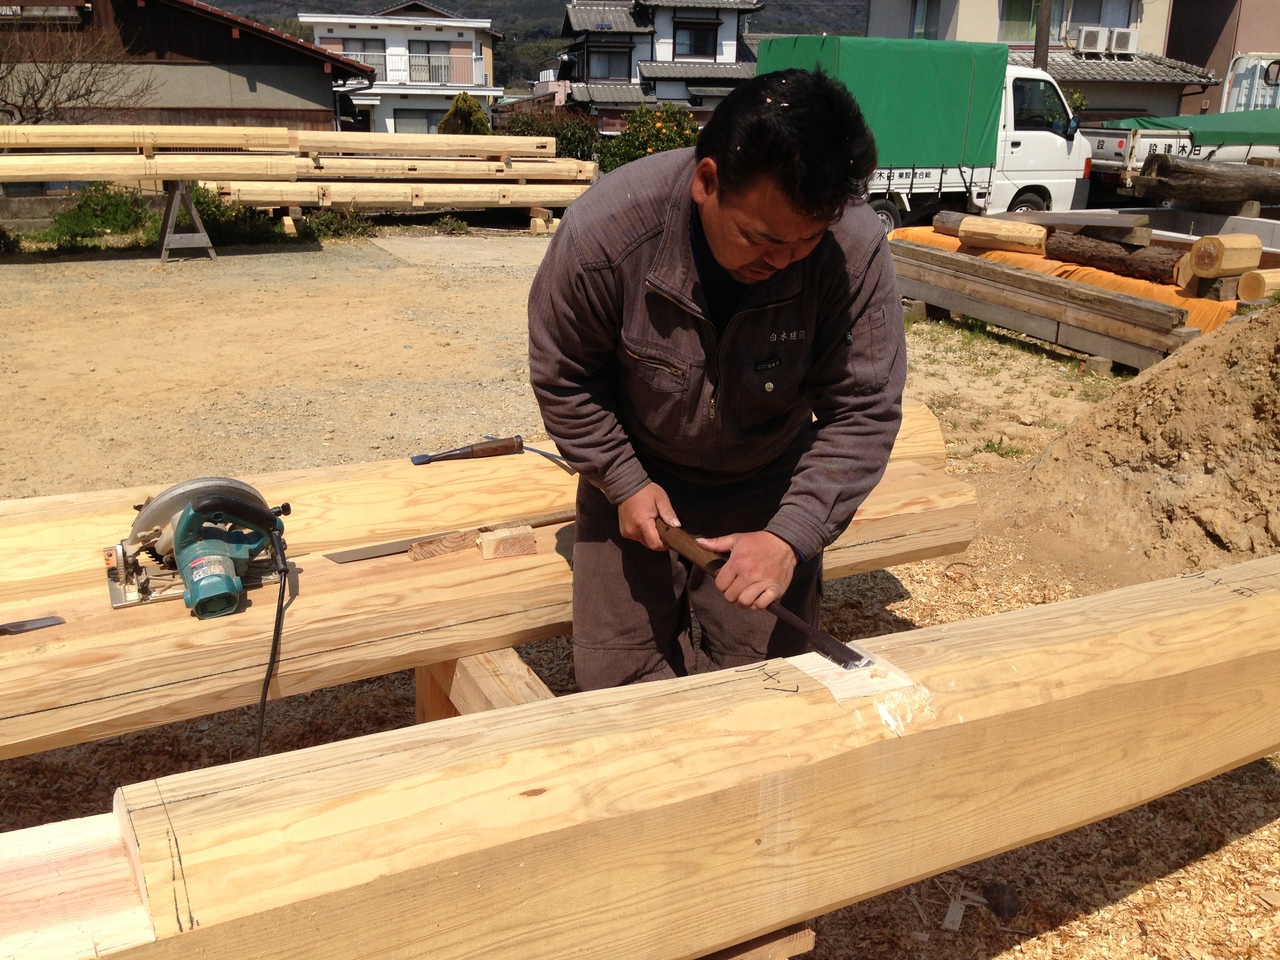
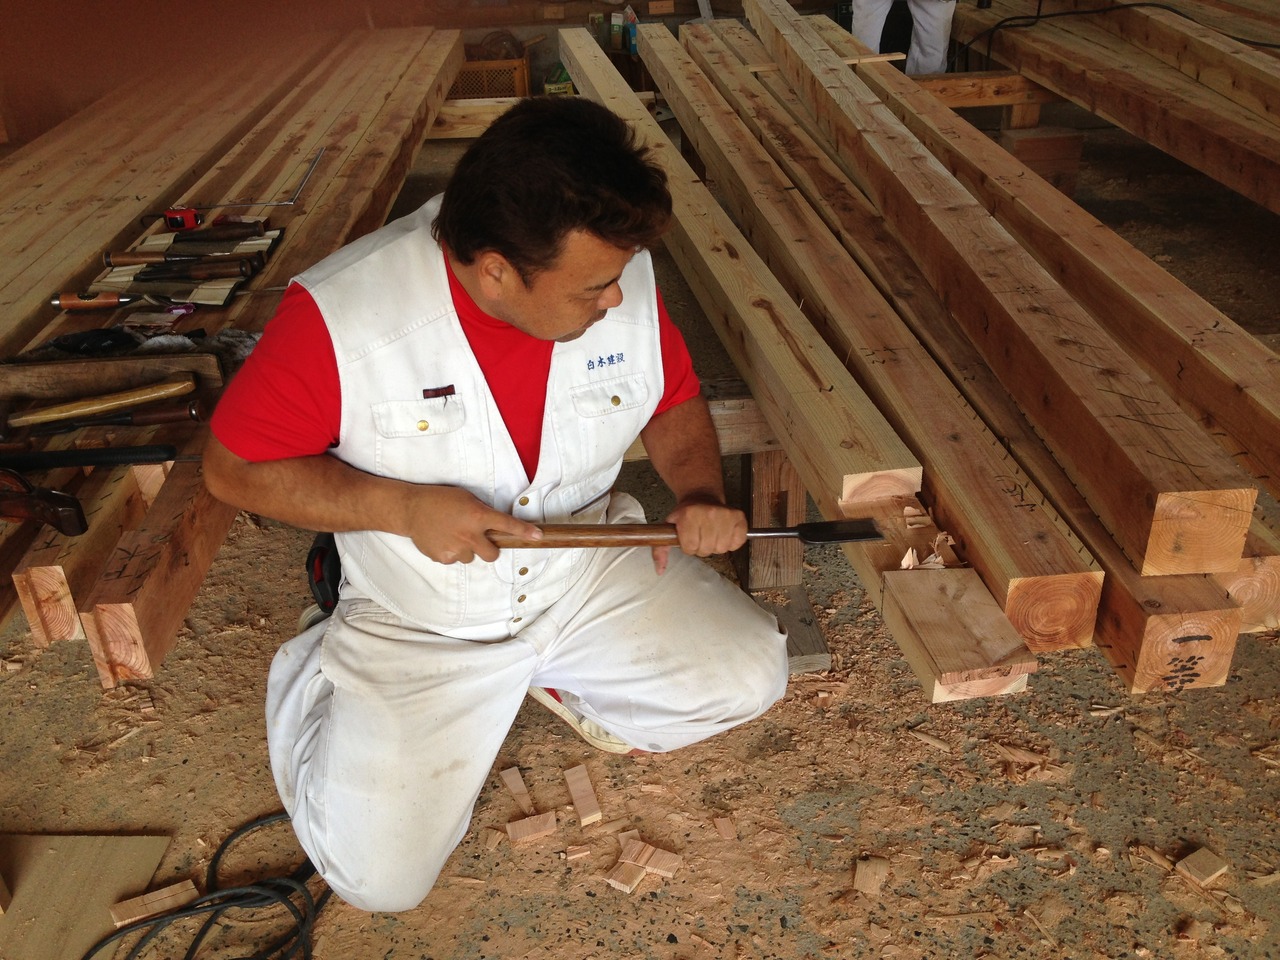
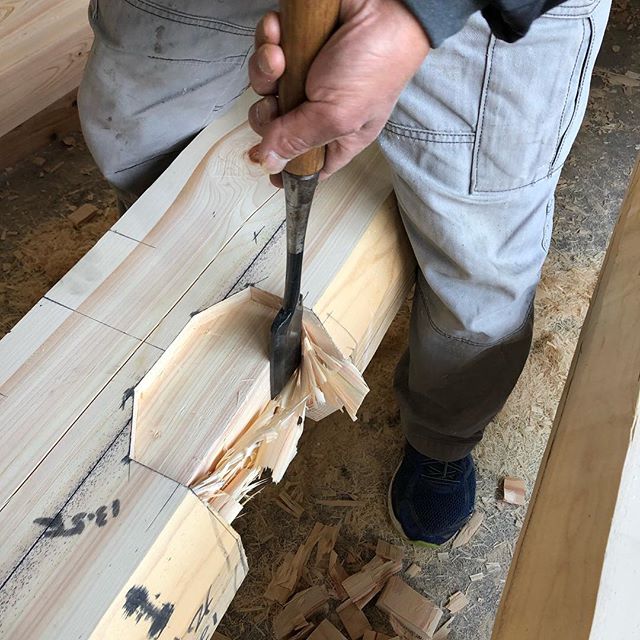
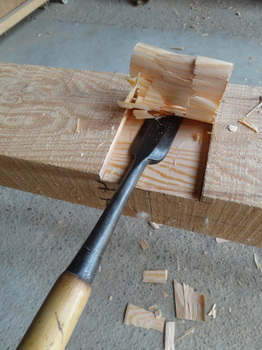
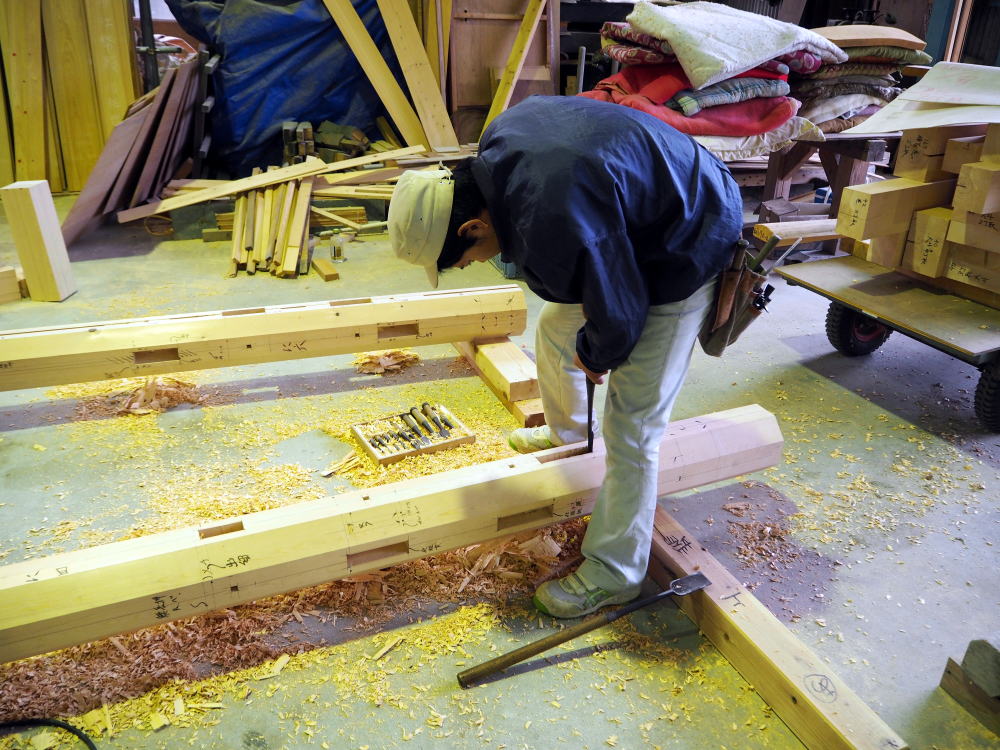
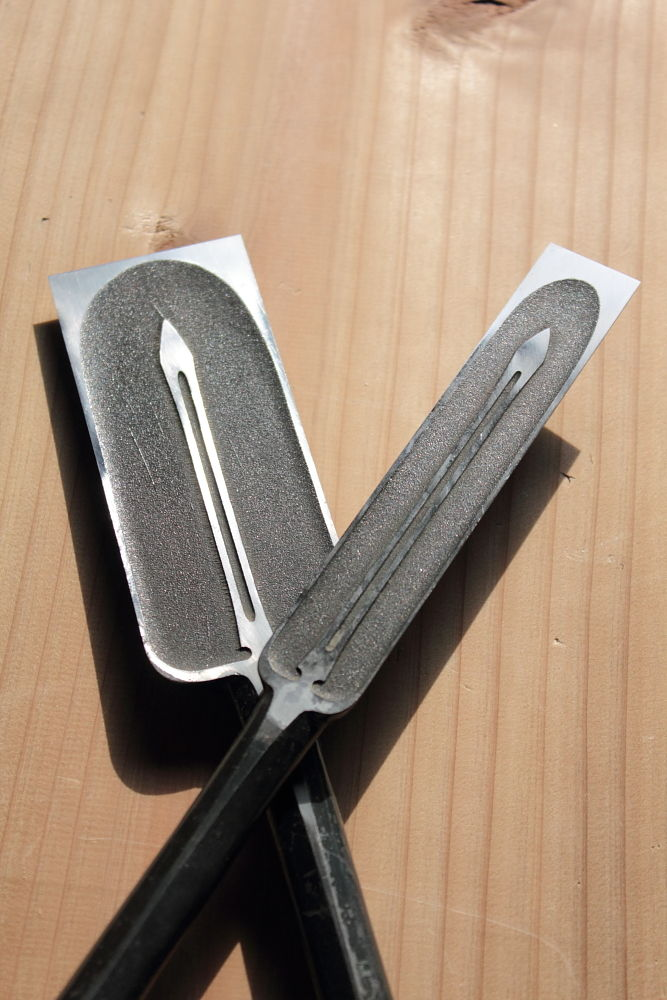
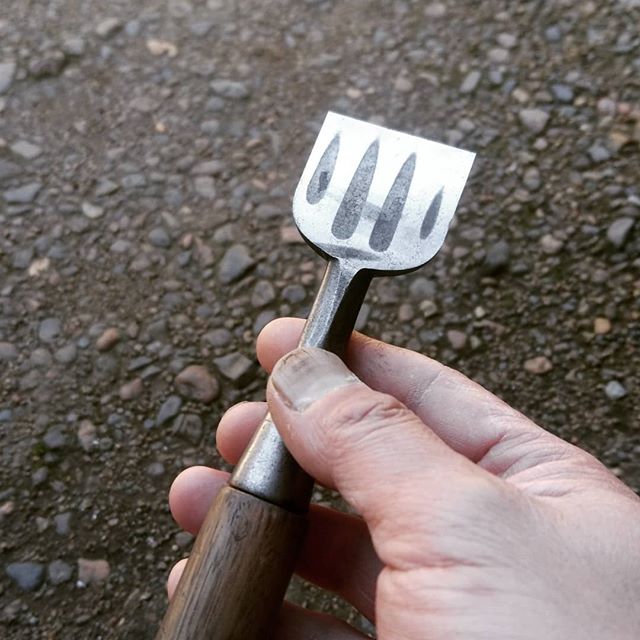
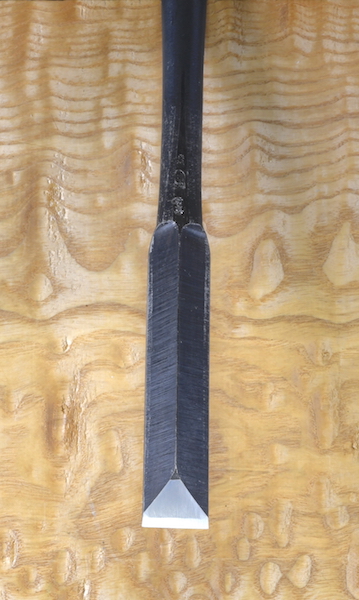
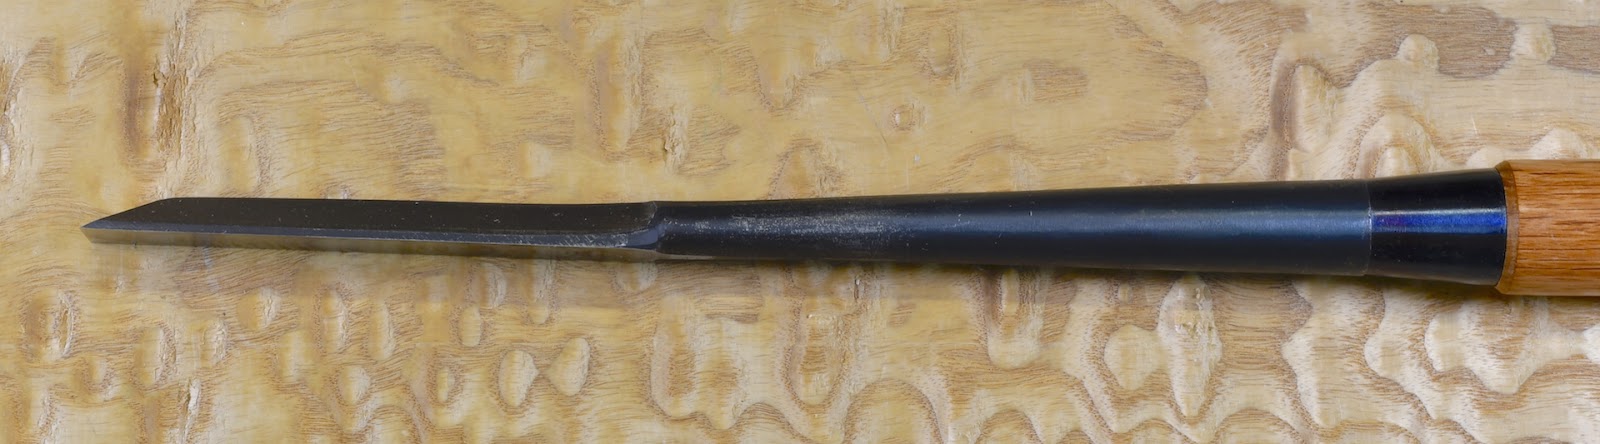


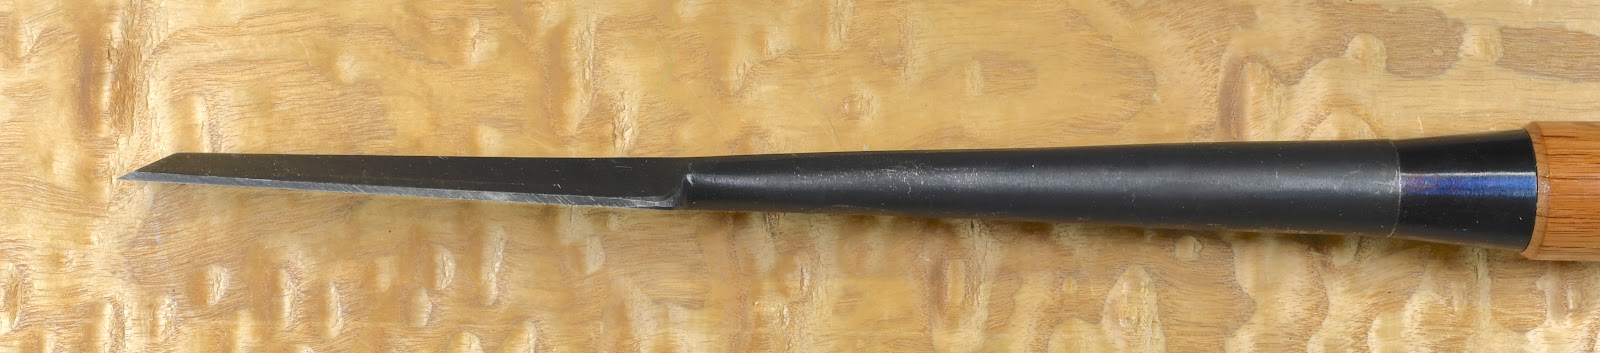
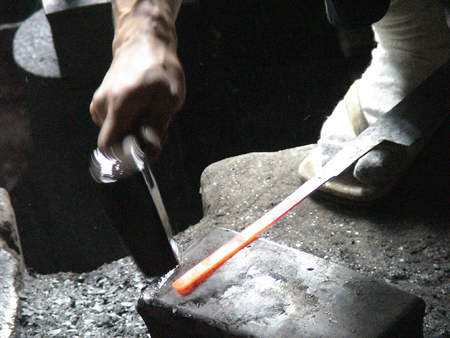
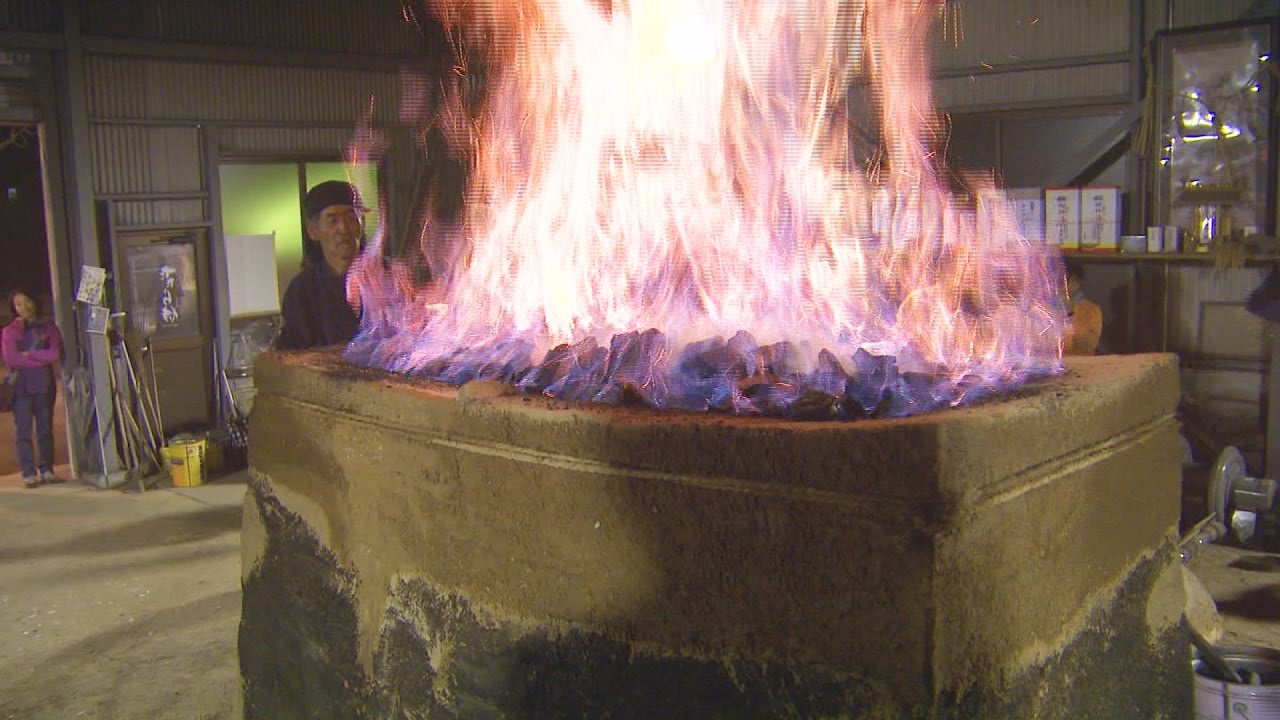


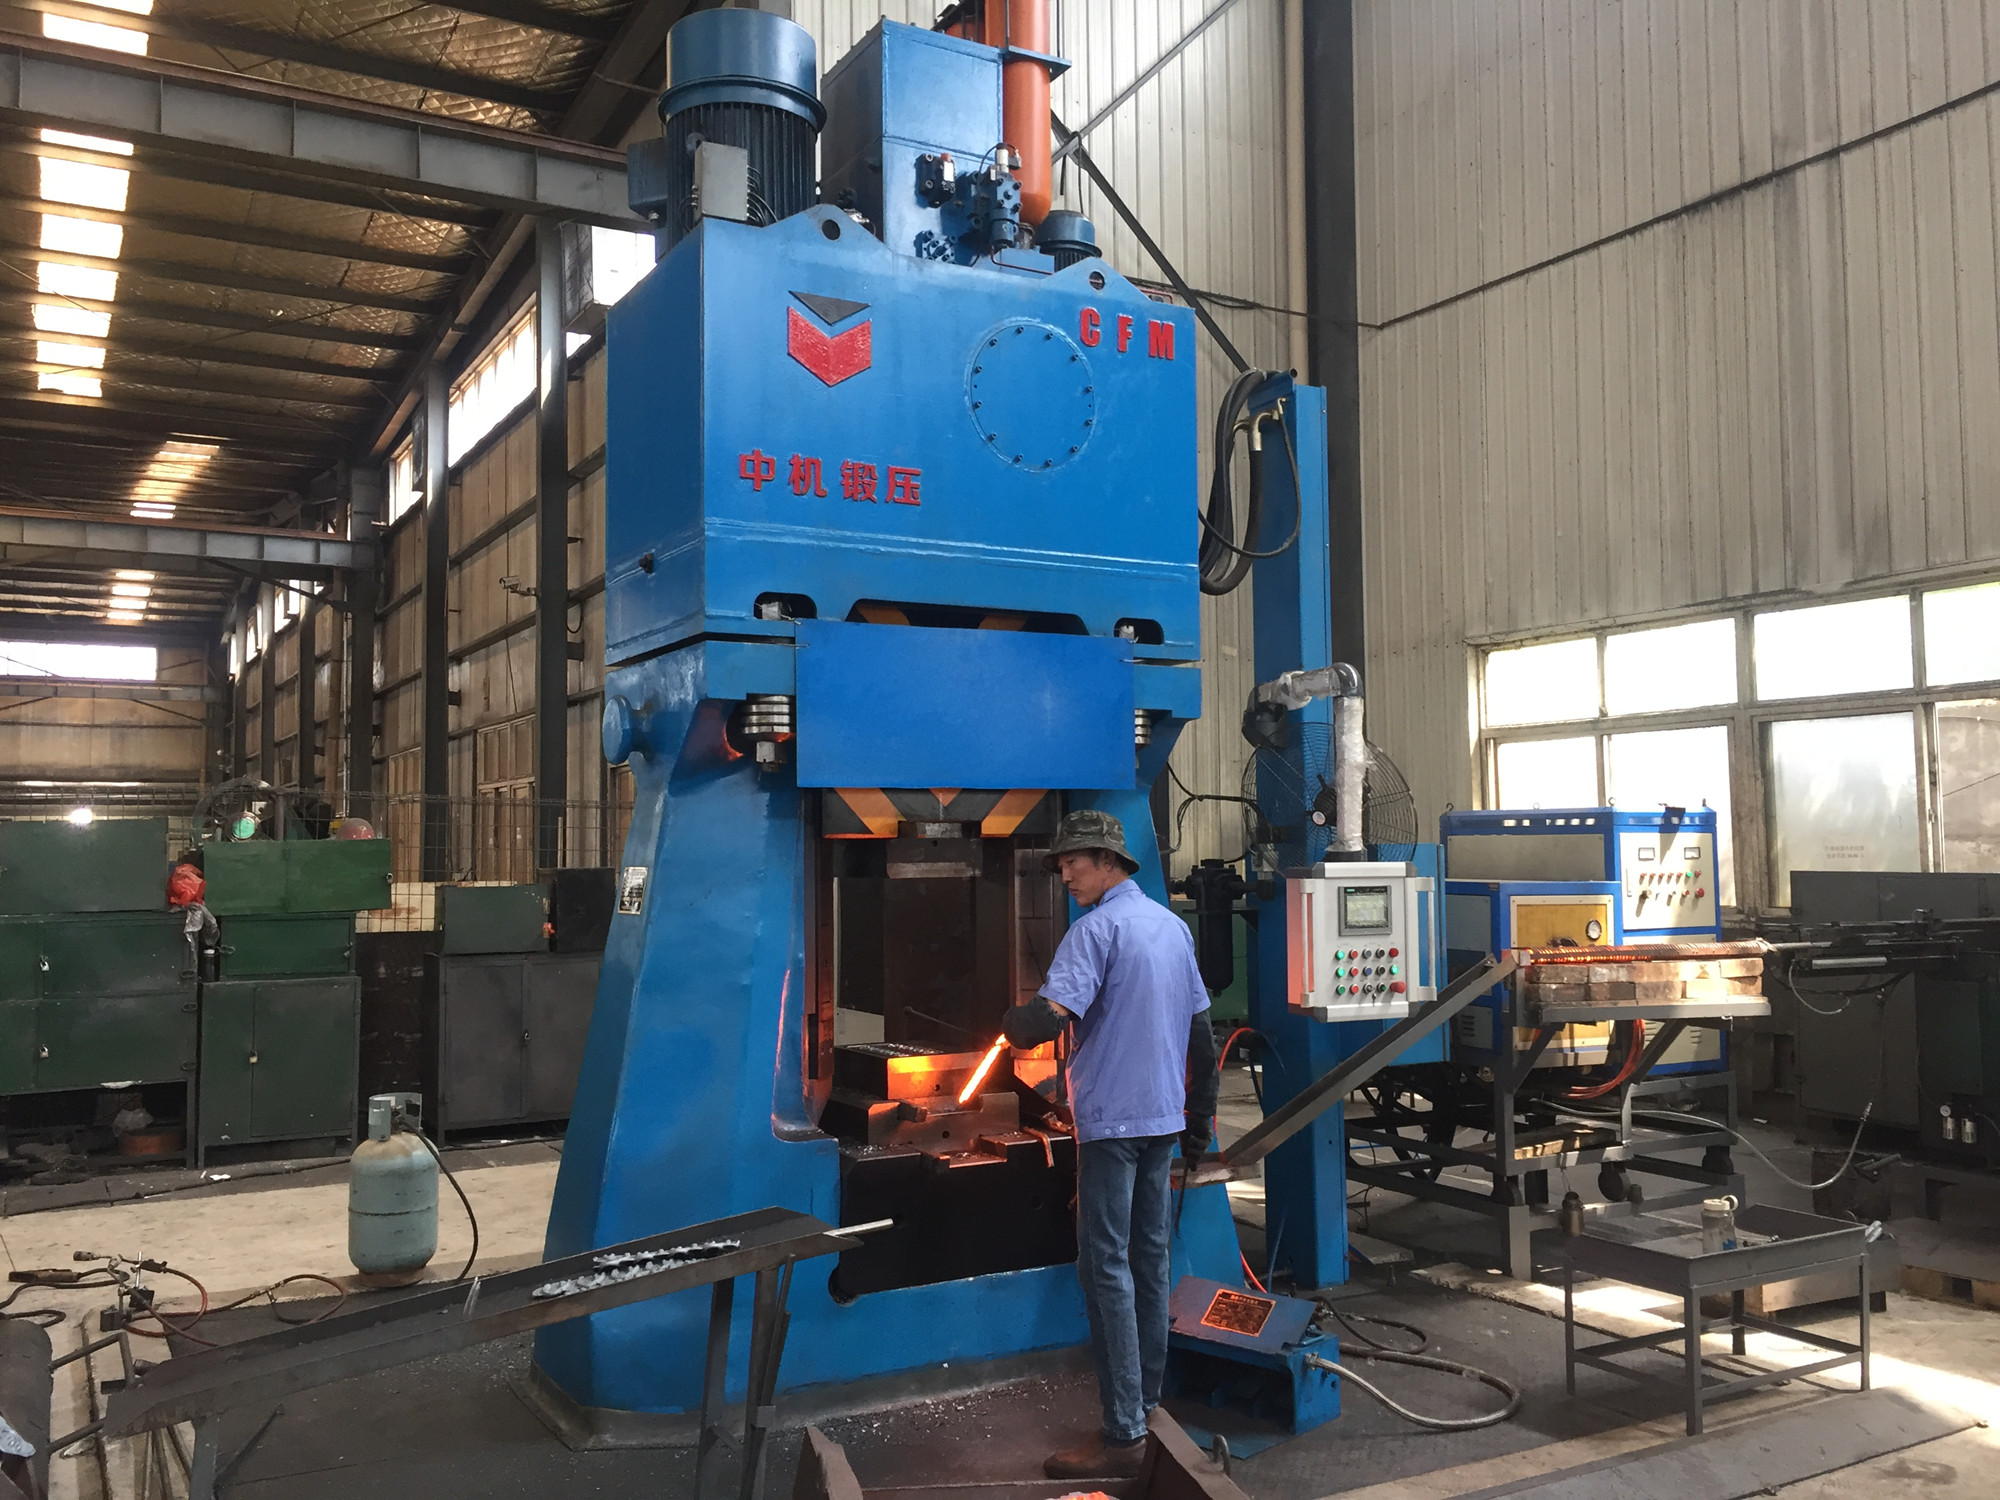


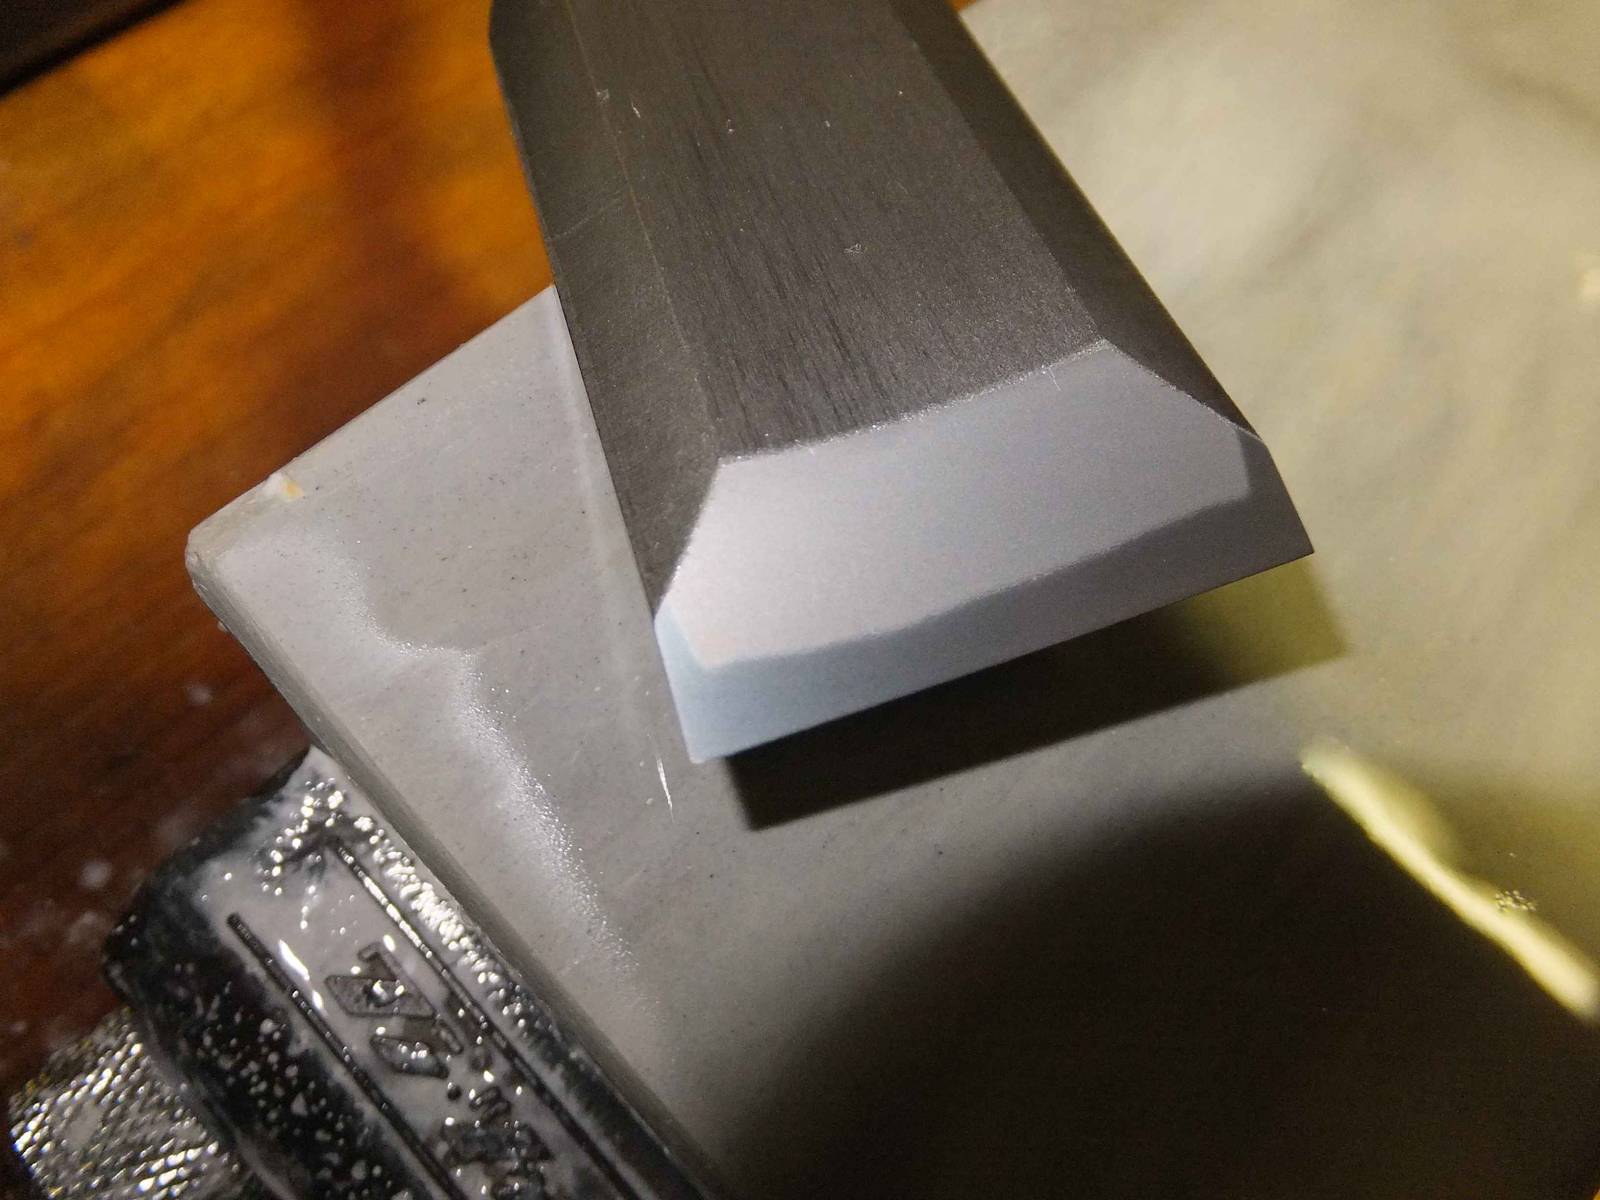


Leave a comment