Japanese Handplanes: The Adjustable Chamfer Plane

An old-fashioned adjustable chamfer plane. It lacks the convenient screw adjusters of the modern version, but it does a fine job nonetheless.

The edge separates the average from the exceptional.

Anon

In this installment in our series of articles about Japanese handplanes, your most humble and obedient servant would like to present one of the most useful woodworking tools of Japan, the adjustable chamfer plane.

Terminology

In Japanese this handplane is called a kadomenganna, written 角面鉋 in Chinese characters. “角Kado” means “corner,” “面 men” means “surface,” and “鉋 ganna” is a tweaked pronunciation of “kanna” which means “handplane.” Since it’s mainly used to cut 45˚chamfers on the 90˚ corners and edges of wooden objects, and being fully adjustable, I choose to call it an “adjustable chamfer plane” in English. I beg Gentle Reader’s kind undulgence.

Side view of a standard kakumenganna chamfer plane.
Top view of a new kakumenganna chamfer plane. Of course, the 2 Chinese characters stamped on its leg read, top to bottom, “kadomen.” This version has a slightly skewed blade to reduce tearout. The blade and chipbreaker are mounted in a movable block connected to the right and left legs by a tongue and groove joint forming what I call a “carriage.” These two legs serve as fences which can can be opened or closed, using the bolts and nuts seen, to adjust the gap which determines the width of the chamfer to be cut. You can see two graduated brass bars inlet into the legs to help with alignment and in judging the gap.

Components

Your humble servant’s old and well-used chamfer plane. The block which houses the blade is located to the left of the image with two fences I call legs in the middle. Together these form a “carriage.” The horizontal line in the center of both legs was cut by the blade as I shifted the carriage right and left.
A side view of the block (left), the underside of the legs (center), and back of the blade (lower right). The cedar block (upper right) is used to adjust the block and remove the blade in combination with a smallish wooden mallet.
You can see the brass mouth reinforcement inlet into the sole of the block. This is very important for a chamfer plane that will see heavy use shaping various materials. Although it has become dim over the years, the line drawn across the legs indicate the position of the blade, an important point to watch for when starting and stopping some cuts.
I’m sharing these photos of my old plane as a practical example. When new, the edge of the blade’s head had a sharp burr which I filed down for comfort. This is a type of plane that does not take ham-handed abuse from fools well. Please note that, unlike most such planes used by less knowledgeable folk, the head of the blade is not mushroomed and the blade’s face is not dinged. Why? I have never struck this plane, purchased in 2009, with a steel hammer, not even once. For the same reason the wooden parts, while discolored and less-than-perfect through much use, exhibit none of the deformation, cracking, splitting, chipping and denting planes adjusted using steel hammers always do. This is the fruit of wisdom shared with me by an ancient plane maker on Shikoku island far back in the mists of time (ツ). Rejoice! You and your planes are now free of the chains of ignorance.

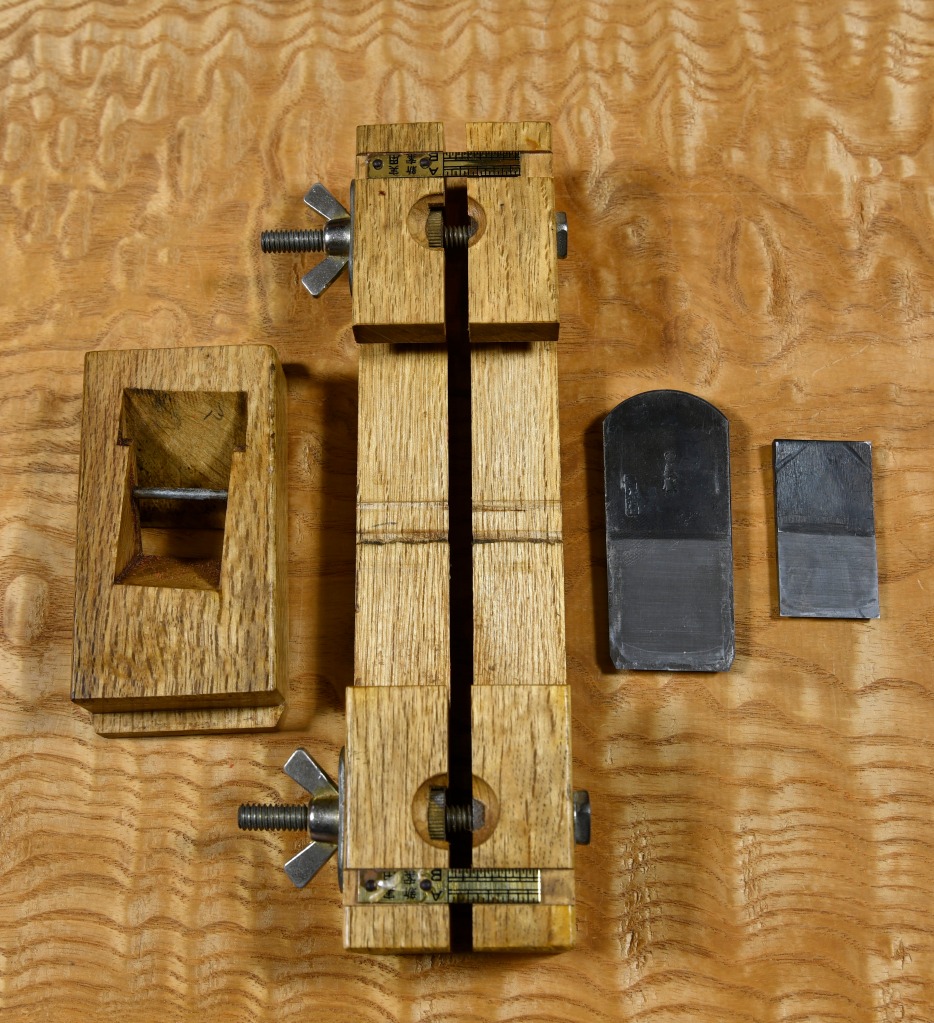
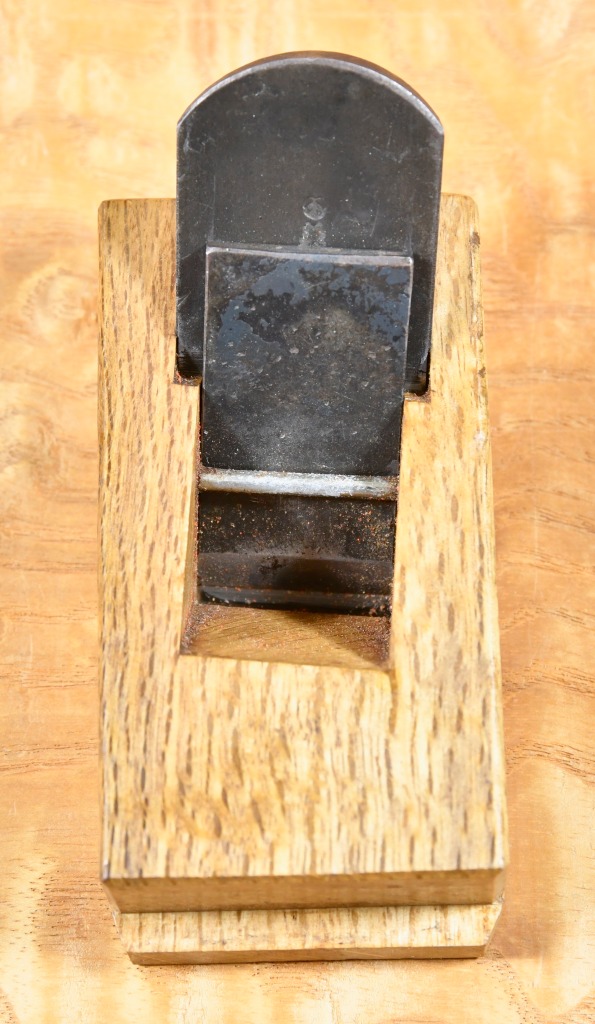
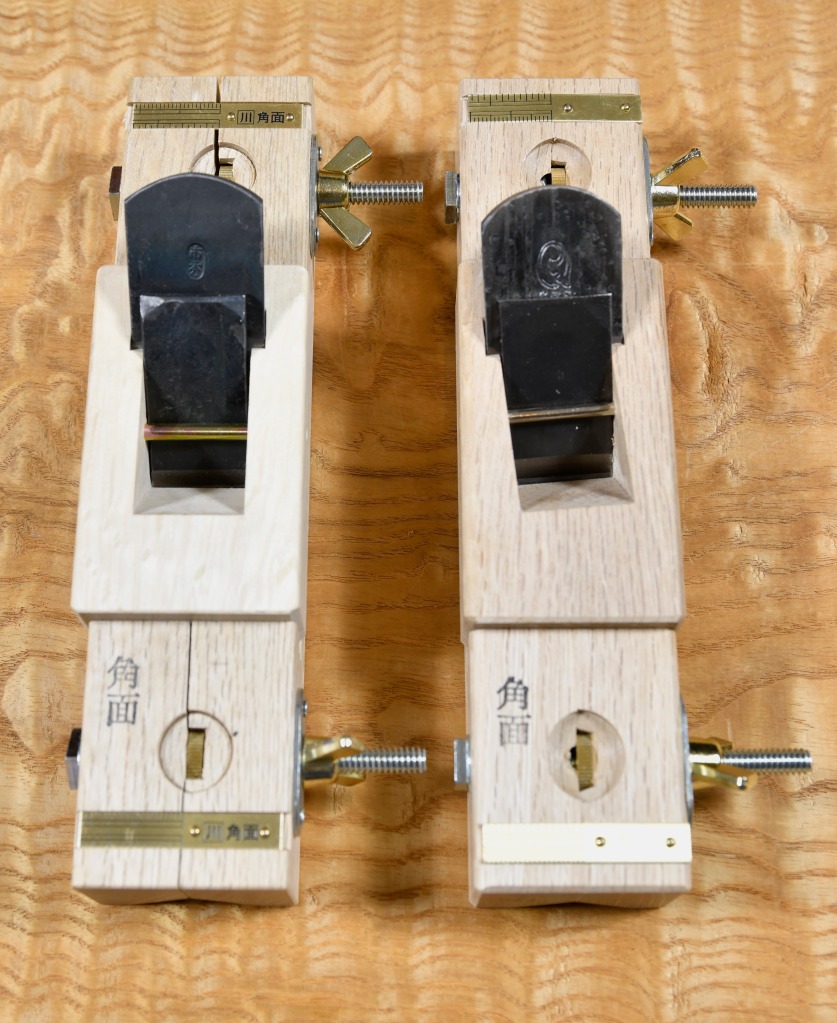
The modern Japanese chamfer plane, which is the only type we currently carry, is comprised of a small block of white oak housing a relatively narrow laminated steel blade as well as a chipbreaker.

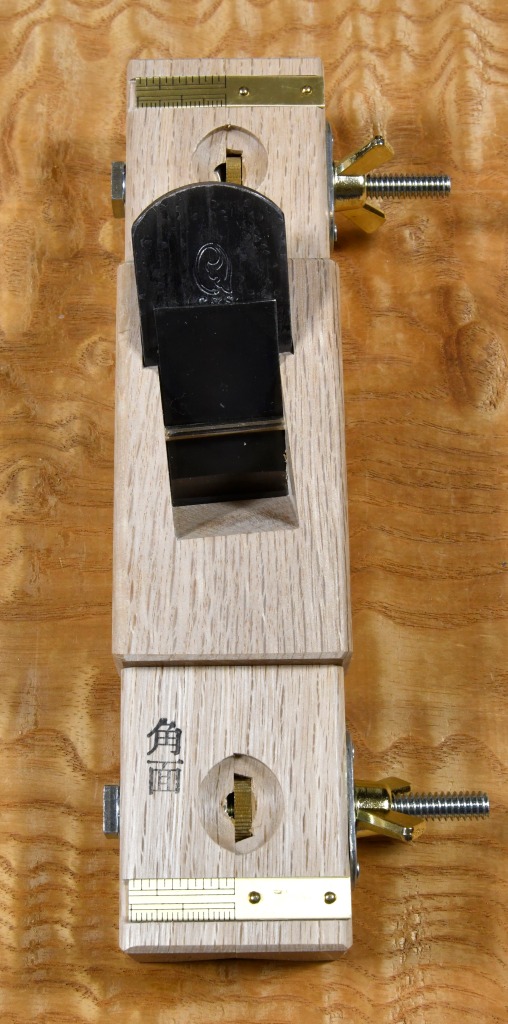
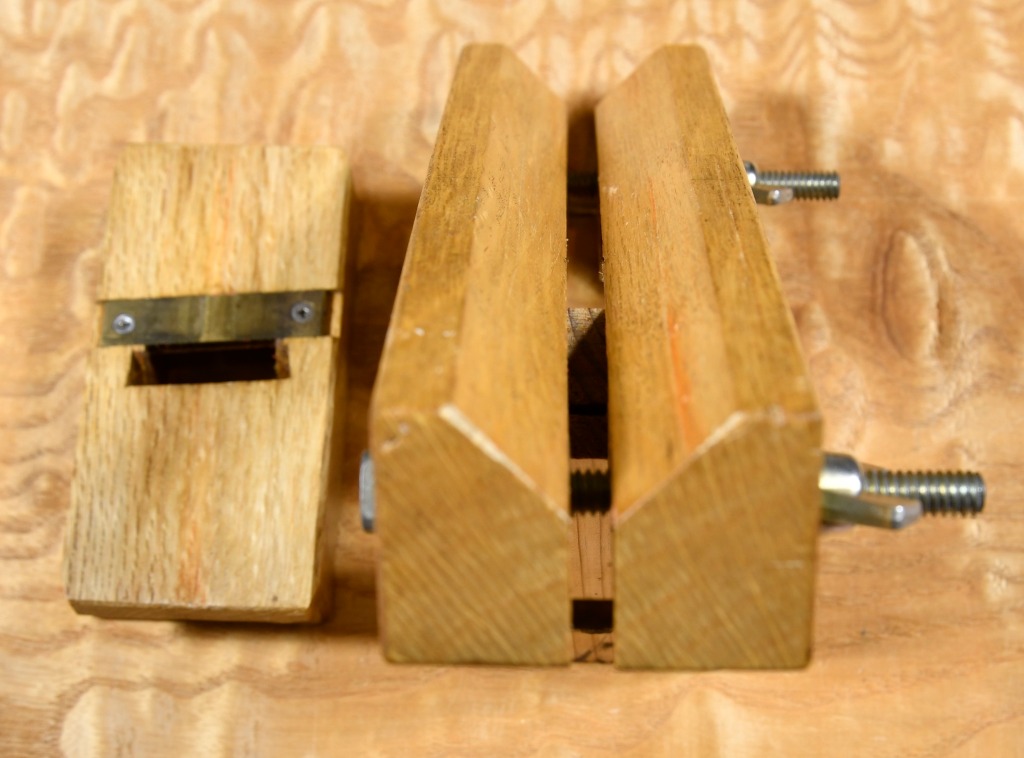
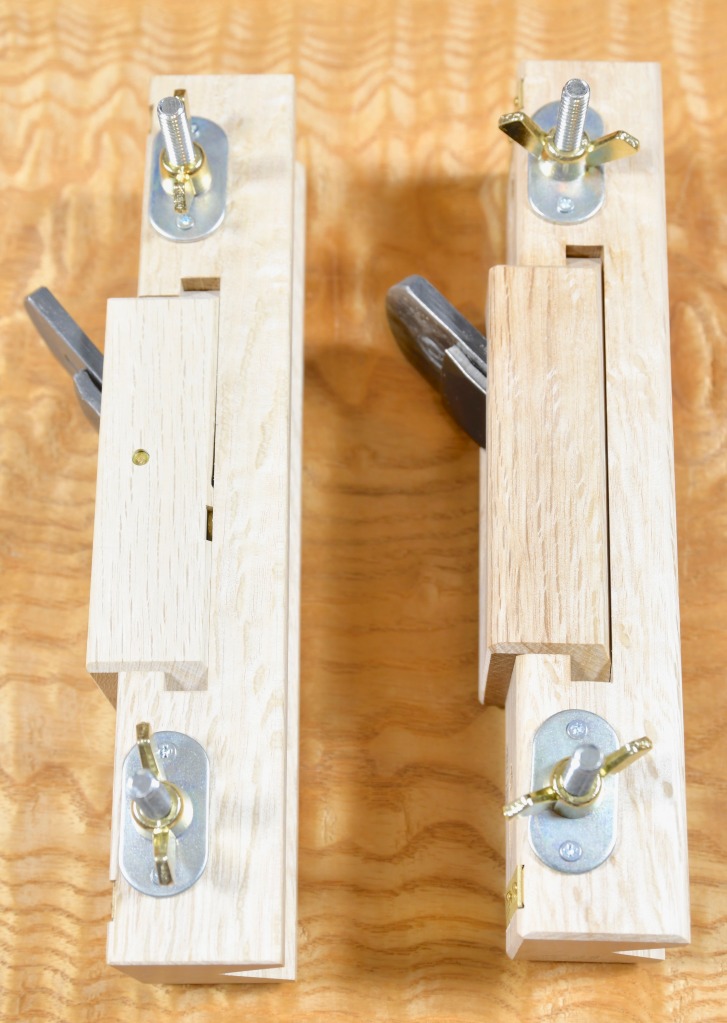
This block (aka “dai” 台 in Japanese) fits into a “carriage” comprised of two sticks of white oak joined by steel and brass nuts and bolts held in place by captured wing nuts. The block fits tightly into grooves cut into the carriage so the user can shift the block and its blade right or left as necessary to either accommodate the required width of cut, or to expose a sharp portion of the blade when one portion becomes dull.

The width of cut can be quickly adjusted from zero to 24mm wide by rotating the two wing nuts smoothly opening or closing the gap between the two legs of the carriage. Eazy peazy Japaneezy.

The most common variety of chamfer plane has a blade inlet into the block with its mouth oriented 90˚ to the direction of travel. The next most common variety has a blade that is slightly skewed to produce a smoother cut with less tearout. We carry both types.

Standard chamfer plane (left) and skewed chamfer plane (right).

Uses for the Chamfer Plane

Japanese chamfer planes are essentially molding planes with two mutually adjustable fences used to produce chamfered edge treatments on wooden objects. Molding handplanes typically have blades ground to specific profiles intended to plane the edges and corners of wooden objects. Some produce purely decorative, curved shapes such as the Roman ogee, while others produce functional and/or structural edges such as tongue and groove joints.

But 45˚chamfer planes have a simple straight blade intended to produce a flat surface at 45˚ to the adjacent faces of the board. However, some varieties are used to cut chamfered surfaces at various angles.

The ancient, attractive and functional lambs tongue chamfer stop use in wood, stone and ivory.

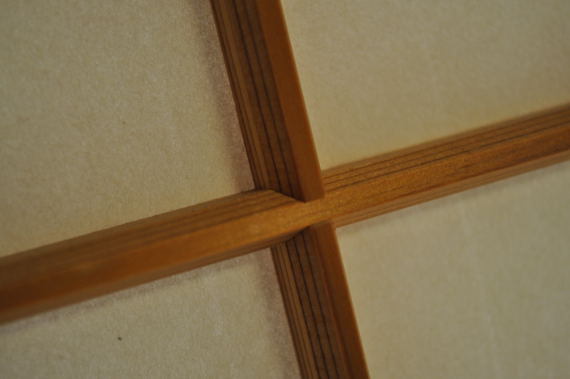
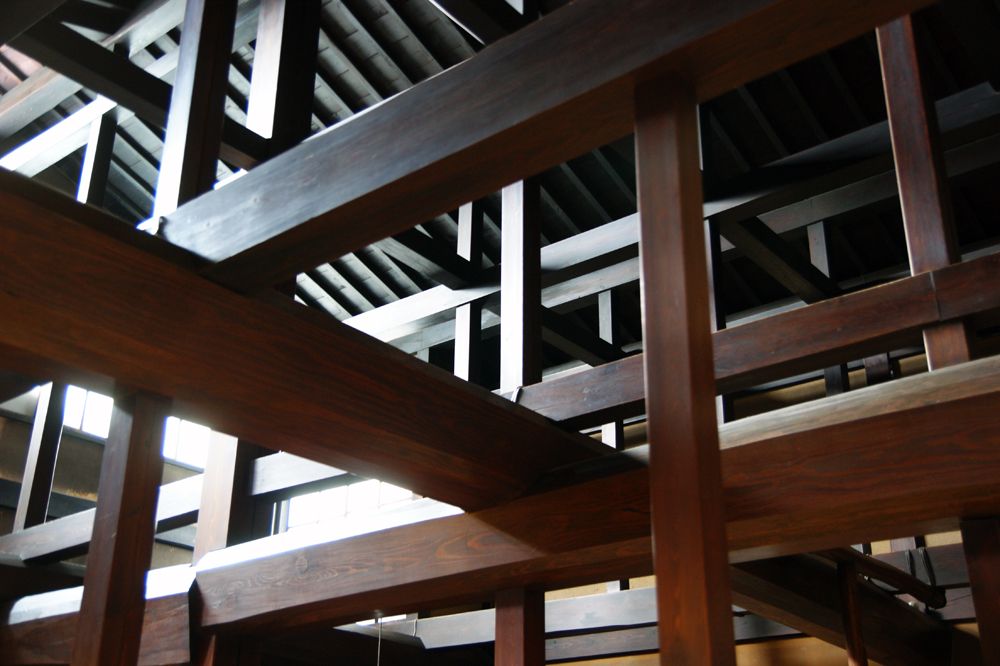
Once cut this 45˚ chamfer is often left as-is in many projects and especially structural wood members as a finished surface. It tends to make make the board, beam or column look more refined. It also prevents the corners from being easily chipped or torn off, a safety feature in some cases. A hard 90˚ corner in exposed wood is seldom durable and given time and abuse often becomes ouchy.

Nowadays the electric router has sadly replaced practically all molding planes, and although I haven’t used an electric router in 15 years or so, I won’t deny they are very useful tools even if they are ultimately more expensive, destroy the user’s inner peace along with their hearing, fills their lungs with dust, chews their fingers, leaves unsightly ripple marks on the wood, and goes through expensive bits like Homer Simpson does donuts… mmmm donuts.

But routers are not all evil, for they do have the advantage of being able to treat the inside surfaces of curved edge whereas the plane under consideration can only do straight edges and outside curved surfaces. Of course, it’s possible to make chamfer planes that cut inside curved surfaces like those used by coopers (barrel makers).

The Joinery Chamfer Plane

An old but unused chamfer plane for kumiko and cabinet sash with wooden adjustment screws.

As mentioned above there are a very few varieties of specialty chamfer planes long used in joinery to produce different angles. Why angles other than 45˚ you say? Ah, perspicacious as always. Well, a simple 45˚ chamfer sheds dust and water well, but in the case of windows, doors and shoji, for example, it removes too much wood weakening mullions and kumiko to the point of structural frailty, and often appears less refined to boot. Sadly, these are no longer being made and are hard to find.

Advantages

As I suggested above, the chamfer plane produces lots of of fragrant shavings but little unhealthy dust. It won’t make your fingers bleed, and won’t grab your clothes.

Indeed, I can still remember the night I was working late on a custom door using a 15amp 1/2″ collet electrical plunge router with a long 3/4″ Ø carbide bit to cut deep mortises. This was before the days of automatic mechanisms to stop the spinning mass of copper and steel that is the armature when the power switch is released. Suddenly, out of pure evil malice, the howling beast grabbed my loose soccer jersey nearly chewing a hole in my chest! Ah, good times!

The chamfer plane works slower than a router, but it won’t gouge your work if you loose concentration for a second, it won’t make burn marks on your boards, or cause She Who Must Be Obeyed to lob complaints about racket and dust at you like barbed arrows smeared with toxic tree frog goop. To the contrary, it’s an efficient, well-behaved, forgiving, even gentle tool, one that produces a flat, sometimes even shiny surface with perfectly crisp edges on wood instead of the burnt and pounded washboard surfaces violent routers often inflict.

Another advantage to the Japanese chamfer plane is its relative light weight and small bulk, compared to the bulky, clunky, mind-numbing electrical equivalent. Much easier to store in the toolbox or work apron. And of course, being a simpler and more honest tool, it’s much less likely to be commandeered by Murphy’s painful pointy purple pecker to wreak death and destruction.

And of course, while its blade does need to be sharpened occasionally, the chamfer plane will provide many decades of continuous service without having to purchase a single nasty spinning bit from the CCP.

While it incorporates a couple of bolts, it has no cord and needs neither piggish chargers, nor poisonous batteries. It is a tool in total denial of the principles of planned obsolescence, predetermined service life, corporate profitability and hidden environmental destruction advocated by the high priests of profit at the Harvard School of Business and Monkey Butts. One might even say it’s a pragmatically contrarian tool. But whatever you choose to call it, I call mine a faithful servant, indeed, a friend.

How to Adjust

Adjusting the width of the chamfer is accomplished by first loosening the two wing nuts on the bolts. If increasing the width of cut, continue to spin the wingnuts out. Then once the gap between the legs is the right width, set the locknuts to the right position, check that the legs are parallel either by using a caliper to measure the distance between the legs at the front and rear of the carriage, and lock the legs in place using the wingnuts.

These planes have graduated brass indicators inlaid across the front legs and another across the rear sides of the carriage that are useful for rough use, but should not be relied on for precise settings.

Alternately, you can rest the plane on the corner of the board and examine the gap between the legs and board. If a significant gap exists, simple adjust the wing nuts until it closes.

When considering the purchase of a chamfer plane, be sure it has a brass plate inlaid in front of the mouth to prevent wear at this high-pressure area.

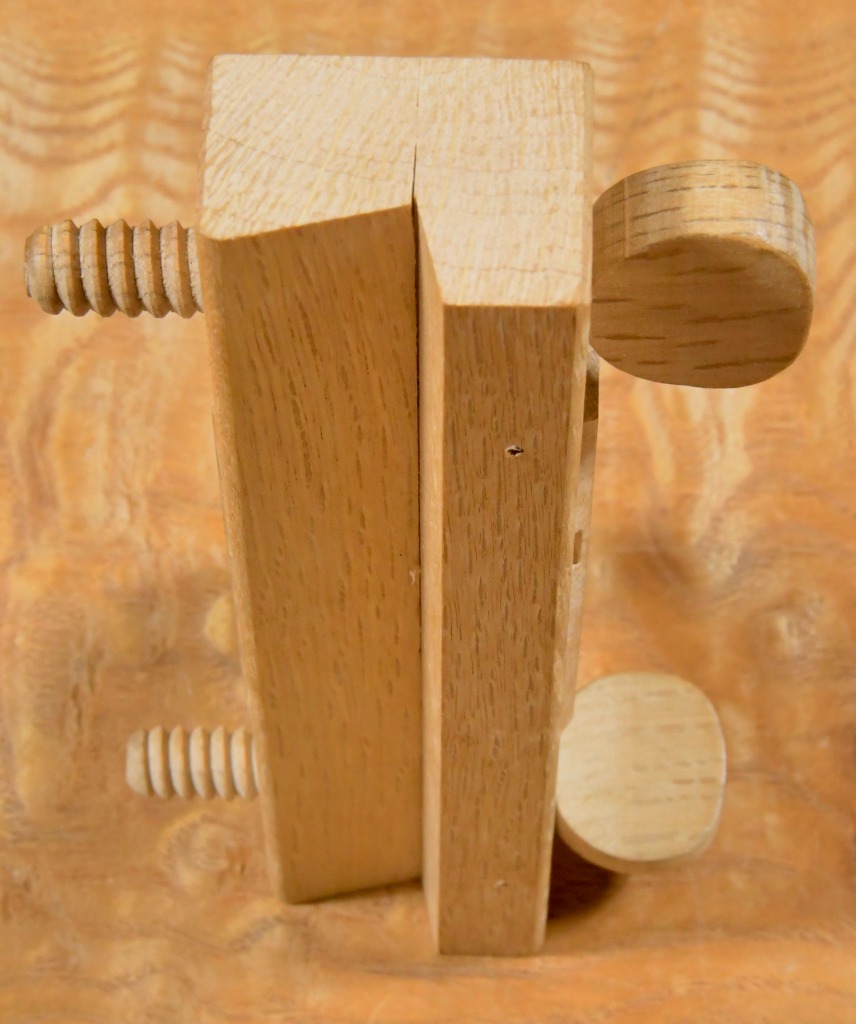
When you receive your chamfer plane, the block should fit tightly into it’s carriage. This will loosen with use, or applying a bit of oil or wax on the tongues of the block will help. Worse case, use a metal file and a bit of 220grit sandpaper to lightly adjust the width of the tongue.

When removing the block from the carriage, please do not use a steel hammer to strike the block. A wooden mallet works well, but holding a small block of softwood, like the one shown in the photo above, as a cushion between hammer/mallet and plane is best.

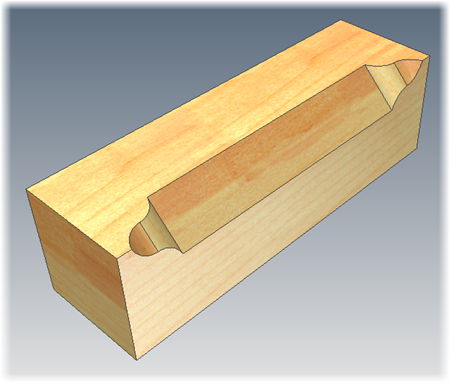
A Professional Technique

Quite frequently we need to cut a stopped chamfer, whether it’s for a lambs tongue chamfer detail or where stile meets rail in joinery. In any case, when we need to judge exactly where the blade of our planes starts and stops a cut, it helps to make marks on the chamfer plane’s legs indicating the location of the cutting edge, and corresponding pencil marks on the workpiece, to help with starting and stopping chamfer cuts in the right place.

Summary

The Japanese kakumenganna 45˚chamfer plane is a lightweight, compact, safe, healthy, cost efficient, environmentally sustainable and pleasant tool for quickly cutting chamfers in wood without leaving ugly ripples or burn marks on the wood, or ruining our hearing, or filling our lungs with sawdust. I couldn’t work without mine.

YMHOS

Link to Pricelist and pics of the Japanese Adjustable Chamfer Plane

Other Posts in the Japanese Handplane Series:

If you have questions or would like to learn more about our tools, please click the “Pricelist” link here or at the top of the page and use the “Contact Us” form located immediately below.

Please share your insights and comments with everyone in the form located further below labeled “Leave a Reply.” We aren’t evil Google, fascist facebook, or or the IT manager for HRC’s bathroom server farm, and so won’t sell, share, or profitably “misplace” your information. If I lie may all my chamfers chip and become slivers in my fundament

Go back

Your message has been sent

Warning
Warning
Warning
Warning.

Leave a comment

Sharpening Part 2 – The Journey

You don’t have a soul, Doctor. You are a soul. You have a body, temporarily.” 

Walter M. Miller Jr., A Canticle for Leibowitz

Life is neither a dead-end course nor a race, but a hard journey along many paths all leading to a single gateway. Without exception, all the physical things, possessions, financial wealth, qualifications, status, accomplishments and accolades we value and struggle like fevered demons to obtain and preserve in this life, even our own bodies, will all return to shadows and dust. What truly matters are the friends and family that journey with us, the kind deeds we do, the joy we share, the things we experience and learn along the way, and most importantly, the quality of our souls at the journey’s end, for these are all that will pass through that last gateway into eternity with us; Nothing else matters a handful of beans.

Woodworking can be a wonderful diversion and even a source of joy during this journey, one that can make our lives and the lives of those around us more pleasant. For many it is a way to keep body and soul connected. For those that rely on their tools to feed their families, the efficiency of that work, and the joy they find in doing it are not trivial matters.

Thoughtful woodworkers on this path learn early that dull tools are an impediment to making excellent wooden products regardless of the skill of the hand and eye that manipulates them, because, being an extension of the user’s mind and hands, a dull tool will often darken the mind and leaden the hand of even an accomplished woodworker.

Sharpening has always been the most important woodworking skill. It is no coincidence that for millennia the first thing apprentices were taught once they were permitted to handle valuable tools was how to sharpen them properly.

In our time the prevalence of machinery with built-in precision and spinning cutters driven by motors and sharpened by others has made it possible for those lacking even basic sharpening skills to represent themselves as craftsmen. Although they may be skilled, I believe such individuals are less craftsmen in wood and more machinery operators.

Those thoughtful souls who aspire to become accomplished woodworkers, and not just machine operators, need minimal sharpening skills. Untold thousands of years of human history verify the truth that all other woodworking accomplishments flow from this bedrock skill.

I believe, perhaps because the men I learned from and respected also believed, that free-hand sharpening is the way a skilled craftsman maintains his tools. My experience and observations over many years have confirmed the efficiency of this technique. It is consistent with my work-driven philosophy about sharpening which I will explain in more detail in the next post in this series.

Sharpening a blade free-hand is a zen-like activity. It requires observation. It requires muscle memory. It requires consistency. It requires composure. It requires meditative focus. And at the pinnacle, it requires one to feel and hear work being done in a place one cannot see, a place where destruction creates order; where nothing becomes something.

Some will disagree with my beliefs about free-hand sharpening, especially the machinist-types, the scribblers and gurus promising instant results in a few hours for the price of a book, DVD, or class, and the purveyors of sharpening jigs disinclined to work without “training wheels.” No mystery there, so I won’t even try to please everyone, just professional woodworkers.

When professional woodworkers gather in the presence of edged tools, they often talk about sharpening techniques and rare stones, and they are always curious about the quality of other men’s tools. In Japan, it is considered rude to pick up another’s tools and examine the edges, or even to look at them too hard, but the desire is always there nonetheless because it is human nature to compare oneself to one’s peers. 

Indeed, much can be learned about a man’s quality standards and his skills from his blades. Perhaps the condition of one’s tools gives a tiny glimpse into the owner’s character.

What do your tools say about you? Some are terrible gossips, you know. (ツ)

The journey will continue in Part 3.

Allow me to end this article with a quote from the best-selling book of fiction in human history:

End? No, the journey doesn’t end here. Death is just another path. One that we all must take.

J.R.R. Tolkien, The Return of the King

YMHOS

Tianmen Gate, China. 999 steps to the natural gateway above.

If you have questions or would like to learn more about our tools, please click the “Pricelist” link here or at the top of the page and use the “Contact Us” form located immediately below.

Please share your insights and comments with everyone in the form located further below labeled “Leave a Reply.” We aren’t evil Google or fascist facebook and so won’t sell, share, or profitably “misplace” your information. If I lie may I never finish the journey.

Go back

Your message has been sent

Warning
Warning
Warning
Warning
Warning.

Leave a comment

The Essential Oilpot

Little strokes fell great oaks.

Ben Franklin

f set up and maintained properly, the blades of quality chisels and planes will endure many decades of hard daily use. In this article your most humble and obedient servant will describe a useful tool Beloved Customer can make yourself, one that will not only make maintenance easier and more efficient, but will make your tools perform better and last longer.

Historical Precedence

Versions of the oilpot have been used in all nations since ancient times. Indeed, we know from the archaeological record that tallow, simply rendered animal fat, was commonly placed in open grease pots to use as a tool lubricant in Europe and America from pre-Roman times right up until petroleum products, including petroleum-based waxes, became widely available in the 1920’s. I am told that the black crust found on many antique plane bodies (wood planes not airplanes) and workbenches is a remnant of this tallow oxidized, hardened, and combined with dirt.

Indeed, I can recall my father, uncles, and grandfather using sticks of paraffin caning wax for the exact same purpose when I was a child, and before that my English ancestors probably used candle stubs of tallow or beeswax.

Vegetable oil was more commonly used in Asia, and probably in Europe as well.

I haven’t tried soft tallow as a lubricant and probably never will since rancid fat has even less appeal to me than rancid vegetable oil, but I’m confident you will find the solution described below a serious improvement over these ancient methods.

Corrosion Protection

It’s a sad truth that the blades of woodworking tools often receive more damage while they are waiting to be used than when they are actually being used. Thankfully, neglectful corrosion of the sort that creates microscopic pits at the cutting edge can be easily avoided.

When not in use, store your chisels and planes where they will be protected from dings, dust and large temperature swings. And oil your blades after every use to keep away oxygen, moisture, and chemicals that might persuade your expensive blades to “turn red and go away.”

A convenient way to apply good oil to your blades is to use an oilpot, or aburatsubo (ah/boo/rah/tsu/boh 油壺) as it is called in Japan, similar to the one in the photo above. This is an effective, inexpensive, and time-proven tool for this purpose, certainly better than bottles or spray cans.

Friction Reduction

Oil pots are useful not only for keeping corrosion at bay, they also help minimize the friction your chisels, saws, planes, and knives generate when cutting wood, as well as the energy you need to expend in cutting. By using an oilpot to reduce friction as your blade cuts wood, that same wood, and especially the “hairy” fibers that project into the kerf, will not deflect the blade away from your intended line of cut as easily, noticeably increasing the precision of your work. Do you doubt me? Give it a try and prepared to be pleasantly surprised

Making the Essential Oilpot

In Japan, an oilpot is traditionally made by cutting a joint of well-dried, large-diameter bamboo into a cup 3 to 4 inches deep. If you don’t have access to bamboo where you live, a hollowed-out piece of some close-grained wood suitable for making water-tight barrels, such as white oak, or a plastic mug, or even a segment of capped PVC pipe will work just as well. The important thing is that the container not be made of metal, glass, ceramic or any other material approaching the hardness of a chisel blade.

Shape the bottom or foot of the cup so it will rest on a more-or-less flat surface with a few irregularities. Some people scallop the bottom so it rests on only three or four spots at the foot’s perimeter thereby making it more stable on irregular surfaces. And a piece of sandpaper glued to the bottom of the container will prevent your planes from dragging it around when you pass their soles over the wick.

If you use bamboo or wood, be sure to prime and paint both the inside of the cup, and underside of the foot, with a high-solids urethane or polyurethane paint. I used a natural urethane extracted from the cashew tree called “Cashew” on the bamboo joint in these photos. The gaudy orange color makes it easy to differentiate my oilpot from others on a jobsite

If you make your oilpot from bamboo or wood, after painting it be sure to line the inside of the cup with an unbroken sheet of aluminum foil to prevent the oil from soaking through. The paint alone will slow down the oil’s movement through the wood’s fibers, but sure as hogs are made of bacon, without an impermeable liner of some sort, it will eventually seep out making a mess. An aluminum foil liner will fix this.

Next you will need some clean, white, cotton T-shirt fabric. Used clothing is fine. White because you want to be able to tell how dirty the fabric is at any time. T-shirt fabric because it’s knitted, not woven, and sheds the least fibers. Clean because pixies hate it. If you don’t believe me, just ask them.

Roll the cloth up very tightly into a wick just a hair smaller in diameter than the inside of your container and bind it tightly with string or thread. You should be able to force this dense cloth wick tightly into the cup with approximately ½” projecting above the lip. It must be a tight enough fit to prevent the wick from falling or pulling out accidentally, but not so tight it breaks the container. It will take several tries to judge just the right amount of fabric, so be patient and keep at it until you get it right.

Add Oil

Now that the oilpot is made and wick installed you need to add some oil. Just soak the cloth wick with your favorite lubricant and you’ll be ready to rock-n’-roll like Zeppelin. It will take some time for the oil to saturate the dense wick, so be patient or it may overflow without saturating the wick. I get impatient and spill a little oil sometimes (ツ).

In Japan, I was taught to use vegetable oil and change the wick when it became rancid, which it always did. But I recommend Beloved Customer be smarter than I was back in the days when dinosaurs roamed the earth and use a non-organic oil from the start. Stinky wicks are not only unpleasant, but more importantly, rancid oil does not protect steel at all.

Some people prefer to use straight mineral oil or scented furniture oil, which is just perfumed, industrial-grade mineral oil. The lemony smell of furniture oil is nice. But please avoid any furniture polishes or oils that contain insidious silicon because it will weaken glue bonds.

Please also especially be careful to avoid linseed oil. A wick loaded with such oil is inviting spontaneous combustion, a dangerous inconvenience in a woodshop.

Some people prefer to use camellia oil, an organic product with a long history of usage as a lubricant, cosmetic and hair oil in Japan. But beware that the so-called camellia oil available commercially for rust protection is actually just mineral oil with a bit of yellow dye and some fragrance added, sold at an inflated price, much like commercial furniture oil. Caveat emptor, baby.

Mineral oil is a petroleum distillate sold as lubricant laxative in pharmacies. It’s not only cheaper than the fake “tsubaki abura” sold as tool oil, but is higher quality and performs better than genuine camellia oil because it will not become rancid and gummy.

While it sounds strange, the best lubricant by far in my experience is a lightweight, light-colored 100% synthetic motor oil such as Mobile-1 (5W). I have tried regular motor oil too, but the synthetic variety smells better, lasts longer and seems to perform better. And while I like to flatter myself that I am a “high-volume guy,” my chisels never get hot enough nor rev high enough to justify the zinc, organic sulfur, or chlorine compounds added to high-performance motor oils. Your mileage my differ. (ツ)

Oilpot Storage

Store your oilpot in a metal or plastic container with a lid when not in use to prevent abrasive dust from contaminating it. Some people make a container from a segment of PVC pipe with a flat end-cap glued on one end to form the bottom of their oil pot and place a domed cap on the other end as a lid. I use a tin can with a slip-on lid to store my bamboo oilpot.

Place a pad of newspaper in the bottom of your container to absorb loose oil and cushion the pot from rattling around.

Even a plastic bag will do until you find something better.

Using the Essential Oilpot

This is the most important part of this article.

When you are cutting a mortise with your chisel, make it a habit to occasionally jab its cutting edge into the oil pot, and even wipe the sides and ura (flat) on the wick to lubricate the blade. You will be pleasantly surprised to find that this bit of oil will make your chisel work not only go faster, but more precisely and with cleaner results. The oil will not weaken glue bonds, so long as it does not contain silicon, I promise.

Likewise, when using a handplane, occasionally swipe its sole over your oil pot’s wick. This little bit of oil will greatly reduce friction, reduce wear on your planes’ soles, and give you more control. But, if you value your public dignity, be forewarned that the first few cuts you make after doing this will make you grin like a lunatic! (ツ)

The same benefits of reduced friction and increased precision can be found in the case of handsaws too, although the difference may not be as noticeable.

Before you store your tools away for the day, a dab of oil from your ever-present oil pot will prevent rust and frustrate corrosive pixies.

Maintaining the Essential Oilpot

During use, the cloth wick will naturally become frazzled, coated with sawdust and wood chips, and will discolor accordingly. No problemo.

If, heaven forfend, you drop the oilpot and it hits the ground, Murphy’s Law of Buttered Toast dictates it will land oily-cloth down contaminating it with abrasive grit (unless you work in a cleanroom). If ignored, frikin Murphy will smugly use your oilpot to damage your tools and ruin your work. But never fear: simply brush the wick vigorously with a steel-wire brush and all the sawdust, wood chips, dust, grit and pixie golf balls will be gone. The sound you will hear while doing this will be Murphy gnashing his teeth in frustration.

Of course you always have a steel-wire brush close at hand to remove embedded grit from boards before planing them, right?

When the wick becomes too dirty for the steel wire brush to clean (difficult to imagine though that may be) you can either cut off a few millimeters to expose uncontaminated cloth, or replace the cloth wick to present a clean surface.

As the cloth wears, the wick will shorten and stop projecting from the oilpot’s mouth. When this happens, simply remove the wick and place some clean rags in the bottom to elevate it thereby restoring the necessary projection of the wick.

The oilpot is an ancient, dirt-cheap tool you will find to be an invaluable addition to your woodworking tool kit. I promise it will make you grin when using handplanes!

YMHOS

© 2023 Stanley Covington All Rights Reserved

Related Articles:

Tool Maintenance – Corrosion Prevention

If you have questions or would like to learn more about our tools, please click the see the “Pricelist” link here or at the top of the page and use the “Contact Us” form located immediately below.

Please share your insights and comments with everyone in the form located further below labeled “Leave a Reply.” We aren’t evil Google, fascist facebook, or a Director of the CIA and so won’t sell, share, or profitably “misplace” your information. If I lie may ticks, fleas and biting flies be my only friends.

Go back

Your message has been sent

Warning
Warning
Warning
Warning
Warning.

Leave a comment