The Japanese Gennou & Handle Part 17 – The Drawing Part 6/6

Dom Campbell’s in-progress atedai, and a few of the tools he used, including a most excellent gennou with a Kosaburo head and a handle he made himself.

Used to be that bats had thick handles and a big barrel. Then they found it’s not the size of the bat that gets the home run – it’s the speed with which you can swing it.

Stan Musial

In the previous five posts in this sub-series about making a drawing for a high-performance custom gennou handle, we measured various dimensions and incorporated them into our drawing. In this post we will bring everything together, and then discuss some of the strange features of this design, including a physics equation that drives it.

During this phase of the handle-making process you will have another opportunity to express the minimalist artiste lounging stylishly within your soul, probably wearing a cravat and sipping espresso languidly. C’est Magnifique!

The Sides

Let’s start work by drawing the butt’s width, determined in the previous post, on the plan view (upper half of the drawing above) centered on the handle’s centerline.

Next, once again in the plan view (upper half of the drawing above), draw two lines from where the tenon exits the eye to the butt.

Beginning at the grip area, draw curves from these two lines to to the right and left sides of the butt in a smooth transition, gradually expanding in width. The curvature/flair you produce will depend on the size of your grip, the width of the butt, and your sense of what makes a beautiful line. Feeling artistic yet? More espresso please.

Whither the Bulge?

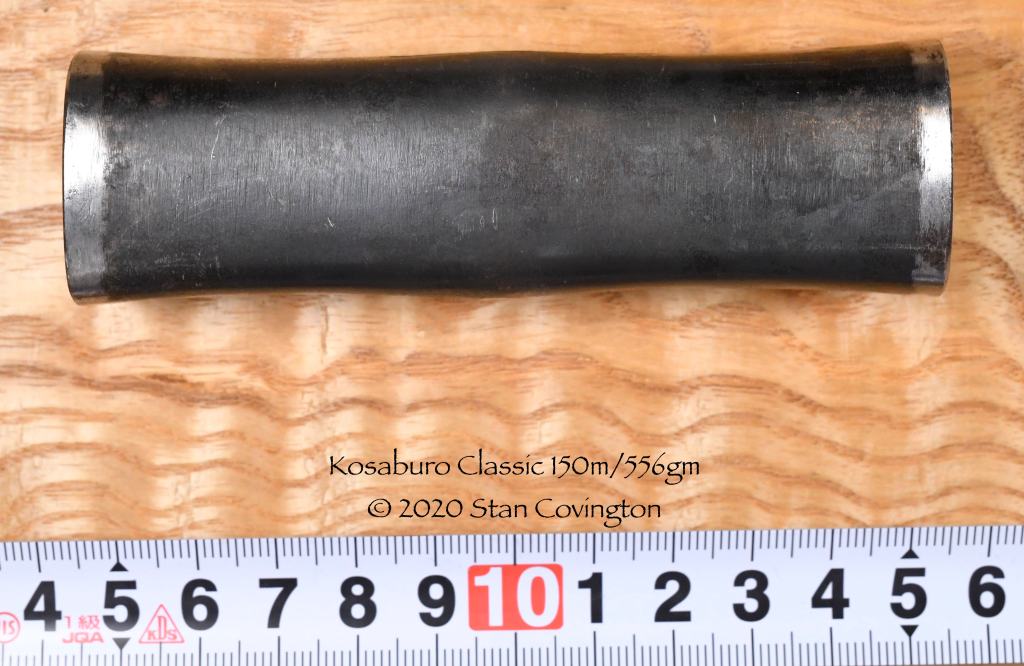
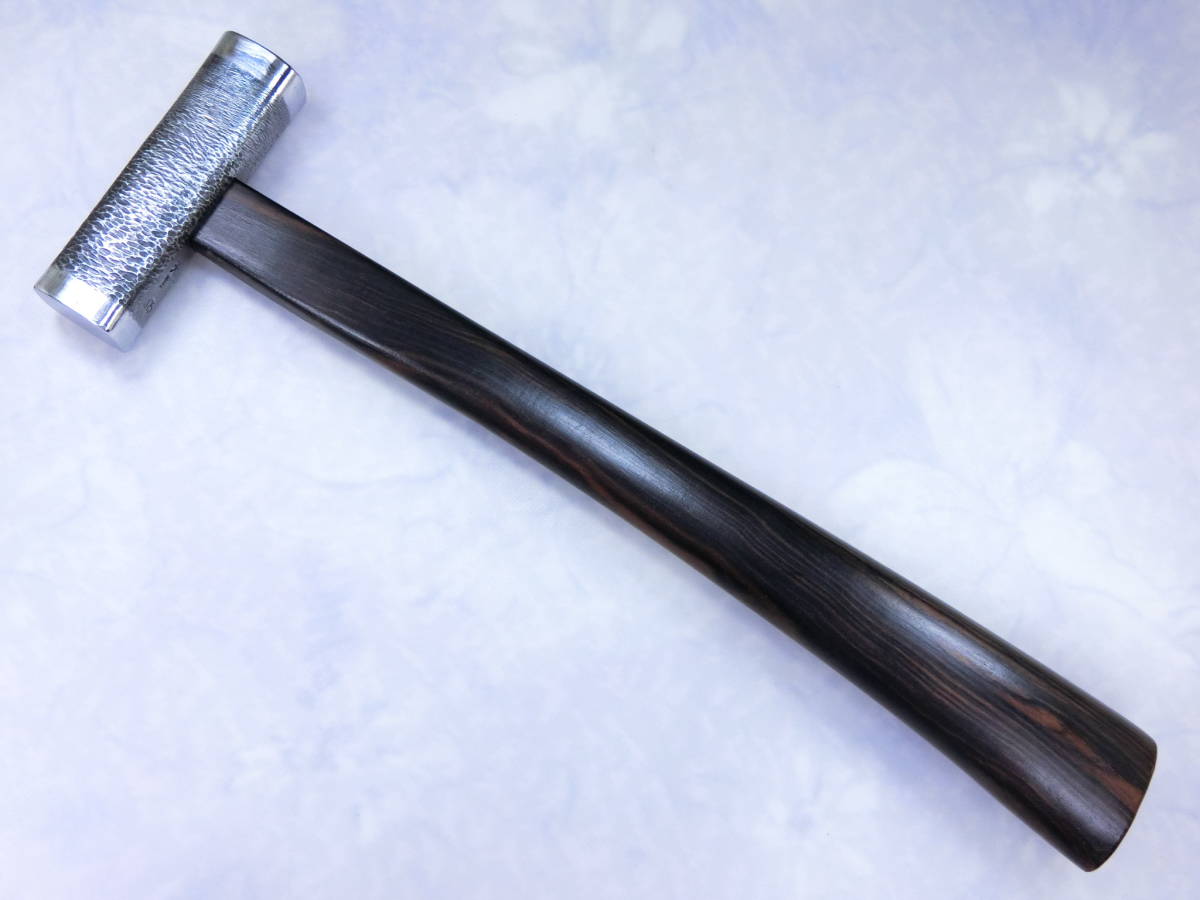
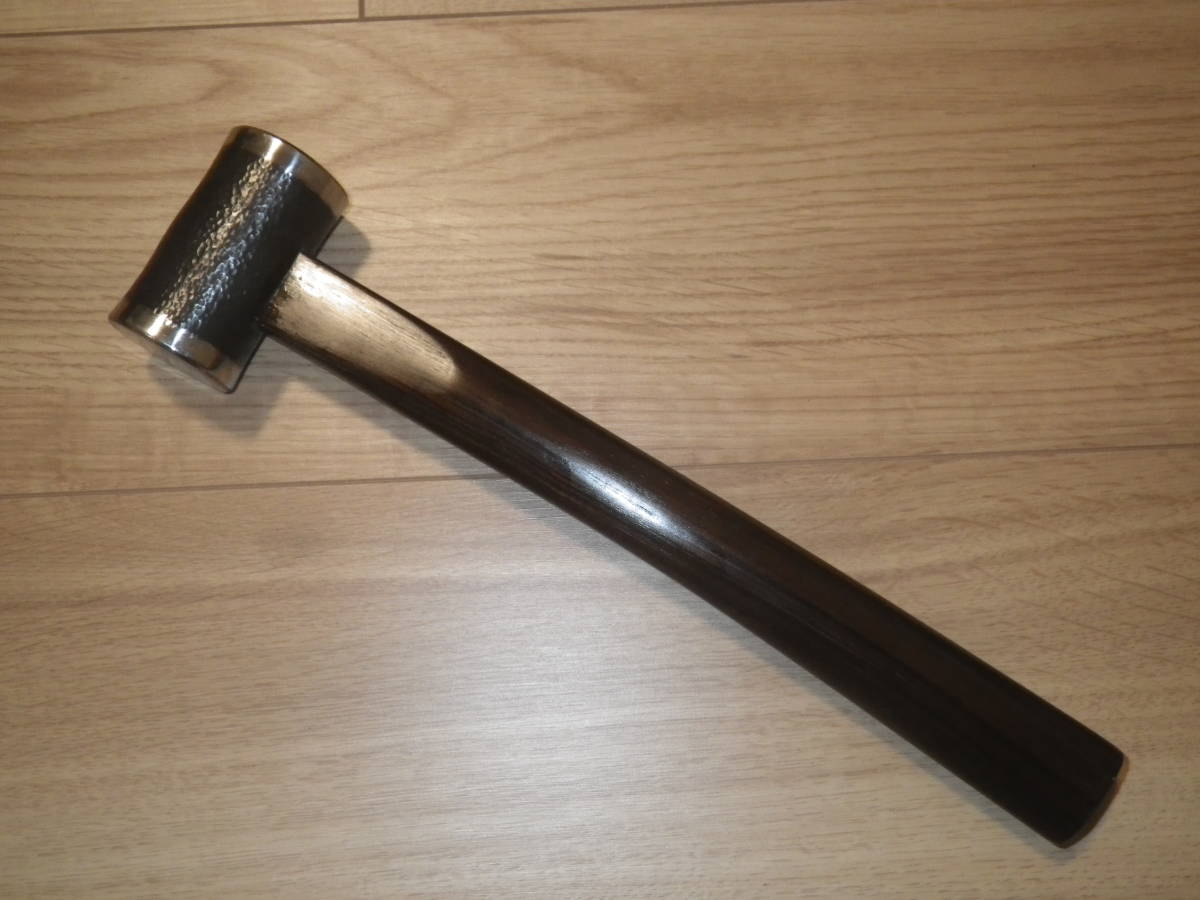
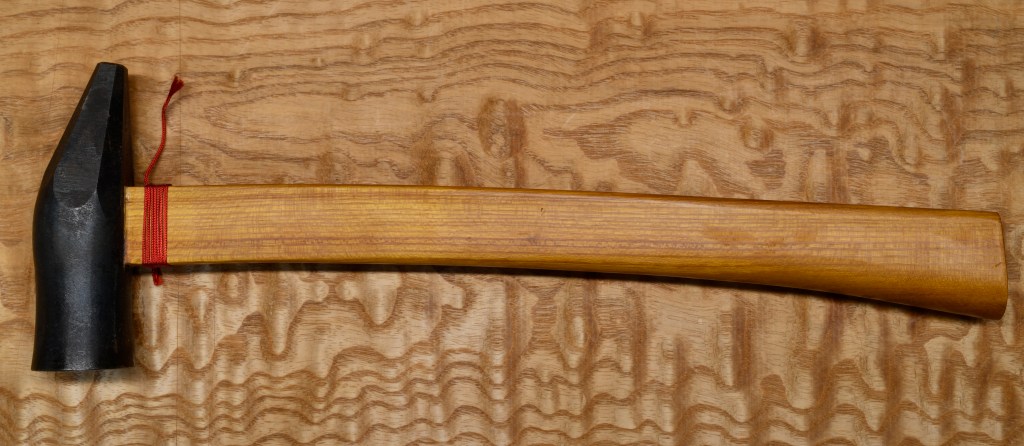
Gentle Readers will have noticed from the drawings and photographs seen in this series so far that, unlike commercial handles, the handle we are designing does NOT exhibit a cancerous swell just below the eye. Make no mistake, this is not an error of omission nor the would-be supermodel in me seeking skinny expression! Remember, we are making a lean, mean, racing machine, not a nail bender with a sloppy eye and mass-produced tenon that needs wedges to hold it together.

This shape, with its narrow neck, flare towards the butt, and lack of the typical bulge below the eye strikes most people as strange, so an explanation may be useful.

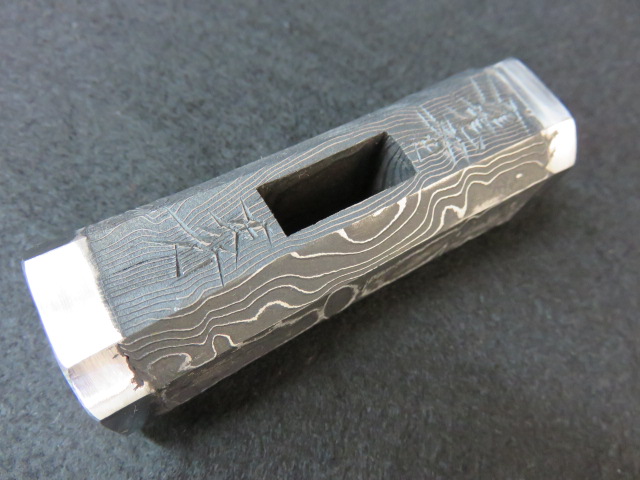
To begin with, Japanese gennou heads of the quality assumed in this article are not secured with wedges, but by an extremely tight fit between the wooden tenon of the handle and the surfaces inside the precision-forged eye. Indeed, the fit should be so tight that, if by accident or some terrible oversight, one attempts to drive the tenon of a handle made from a wood too weak for the job into the head’s eye, the handle and/or tenon will fracture. Your humble servant has done this several times. Such a tight fit does not occur by accident. Wedges could only weaken the tenon and handle causing early failure.

To ensure this fit is indeed tight and secure, Gentle Readers must prepare the eye if the head is of lessor quality than the Hiroki or Kosaburo heads we carry, as described in previous posts in this series. If that work was necessary, we will assume it has already been completed.

Gentle Readers must use a strong, tough wood suitable to the task. The selection of wood will be the subject of the next chapter in this series.

They will also need to create a properly sized tenon on the handle’s end. These are critical points.

Because it is a craftsman’s hammer, not a wood butcher’s maul, there are no wedges to split the handle, and therefore no need for a tumor below the eye to both reinforce the sloppily-made handle and to keep the wedge from pushing the head down the handle.

Indeed, without the cancerous bulge, if the handle loosens sometime in the future, tapping the handle further into the eye will tighten it up, something a bulge would make impossible. Best to eliminate unsightly, unnecessary bulges entirely.

Air Resistance

Your humble servant has previously suggested that the handle we are designing will be a “high-performance tool,” indeed a “racing machine.” While not in the same class as a Formula-1 race car, air resistance is definitely a factor affecting performance, one impeded by an unnecessarily large hammer face, a thick, obese handle, and a bulge below the eye as is typical for commercial handles.

Why is air resistance an issue, you say? Of all the hand tools used in woodworking, aside from the long-handled axe, the hammer is the one that moves the fastest, and since air resistance varies with the square of the object’s velocity, hammers and axes are impacted by air resistance more than any other hand tools. Remember, we are talking about energy created by your body that is wasted by pushing air around unnecessarily.

For those Gentle Readers that enjoy math, the formula for calculating air resistance includes the area of the object, a drag coefficient specific to the object’s shape, and the object’s velocity squared. 

F = Force due to air resistance, or drag (N)

k = A constant that combines the effects of density, drag, and area (kg/m)

v = The velocity of the moving object (m/s)

ρ = The density of the air the object moves through (kg/m3)

CD = The drag coefficient, includes hard-to-measure effects (unit-less)

A = The area of the object the air presses on (m2)

We can’t control air density.

The total CD drag coefficient is a combination of the CDhead of the head and the CDhandle of the handle. We can reduce this combined Total CD by using a more aerodynamic steel hammer head instead of a huge, silly mallet, and by reducing the area of the handle pushing the air aside during the swing. I haven’t made the calculations, but the energy squandered by the excess drag of an obese handle over thousands of swings during a day’s work is not insignificant.
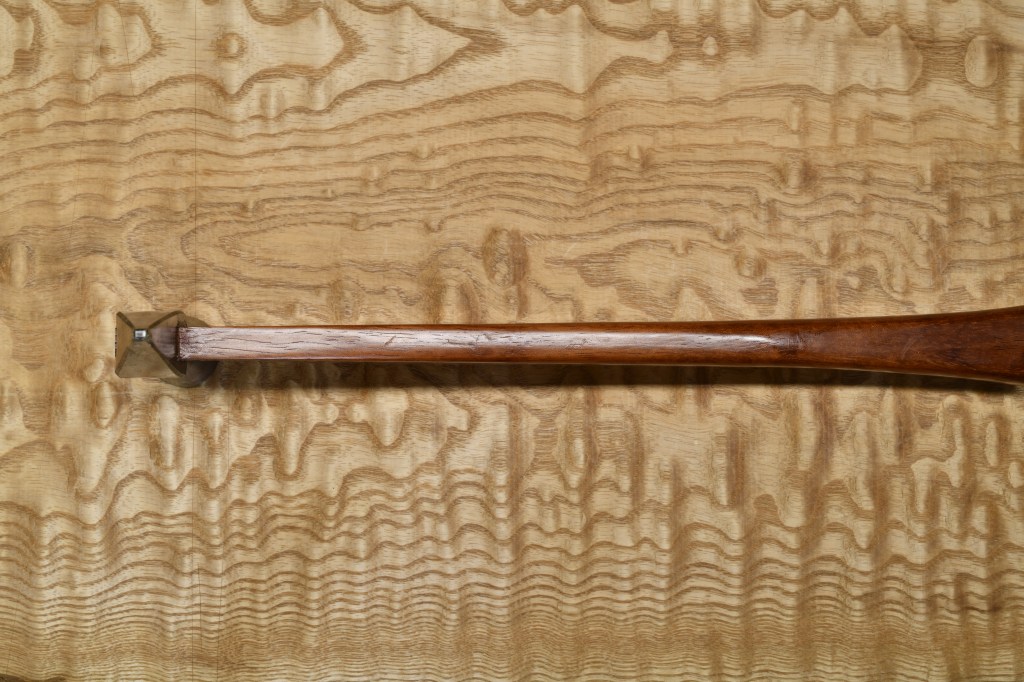
Another advantage of a slender neck on a hammer handle is the surprising reduction in vibration transmitted to the user’s hand, saving wear and tear on joints. This alone makes it a worthwhile improvement in my experience.

But all is not blue bunnies and fairy farts, I fear, for there are two downsides to a skinny super-model neck on a handle. First, if you tend to miss a lot when driving nails, errant nail heads may chew up the handle in an area where there is not much material to spare. Gentle Readers would be fully justified in blaming this damage on the malfeasance of malicious pixies, or the luck of Murphy, but my advice is: don’t miss.

The second downside to a slender neck in a gennou handle is that it’s inconvenient for choking-up on. But on second thought, that’s not a disadvantage to anyone except mountain trolls and grannies, bless their fluffy-white souls. The solution? Don’t choke up on the handle; The grip is the grip.

All Choked Up

Commercial hammer handles are a one-size-fits-nobody design, intended to accommodate many grip styles, apparently by many species, along most of the handle’s length. Holding the hammer like a hungry troll tenderizing a dwarf for the stewpot (perhaps with a delicate sprinkle of sage or a more bold glob of “floater” spice), and choking up on the grip like a near-sighted grandmother is the lowest-common-denominator design standard for commercial hammers, a crude detail simply not to be borne by C&S Tool’s Beloved Customers and the exceedingly refined Gentle Readers of this blog.

“They should be grilled and sautéed with a sprinkle of sage”

The ultimate goal of this exercise is to produce a hammer that fits Gentle Reader’s body perfectly, not every Tom, Burt or William that staggers into The Home Despot from the Ettenmoors. It will fit your arm, and your hand, and your grip without choking-up on it.

What’s wrong with choking up on the handle? What’s that? Did I just hear you say: “If it’s good enough for Granny it’s good enough for me?” If so we may need to procure more of the salve Mifune Toshiro lamented not having.

Choking up on the handle is inefficient for two reasons. First, because it changes the balance of the hammer and your working rhythm (pendulum physics). This is bad.

Second, when you choke up on the handle, for at least a couple of strikes you lose the sense of the distance from your hand to the striking face’s center, reducing both your precision and confidence, and the energy imparted to the chisel or nail. Reestablishing the correct distance in your mind requires a glance at the hammer, an adjustment in your head, and an interruption in your hammering rhythm. All this nonsense is easily avoided by gripping the handle in the same location every time.

You have basically designed most of the grip’s details when you set the butt’s shape and dimensions, and the location of your palm’s heel, index finger, and pinkie finger. I suggest you leave well-enough alone for now, and, assuming this is your first custom handle, make it a tad oversized at first, and then whittle, shave, and sand it as you use it until it fits you perfectly.

In the next post in this series we will select a piece of wood from which to make our craftsman’s gennou handle. Soon we will be making sawdust… how exciting!

YMHOS

If you have questions or would like to learn more about our tools, please see the “Pricelist” link at the top of the page and use the “Contact Us” form located immediately below.

Please share your insights and comments with everyone in the form located further below labeled “Leave a Reply.” We aren’t evil Google, facist facebook, or thuggish Twitter and so won’t sell, share, or profitably “misplace” your information. If I lie may the heads fly off all my hammers and each break window!

Previous Posts in The Japanese Gennou & Handle Series

The Japanese Gennou & Handle 
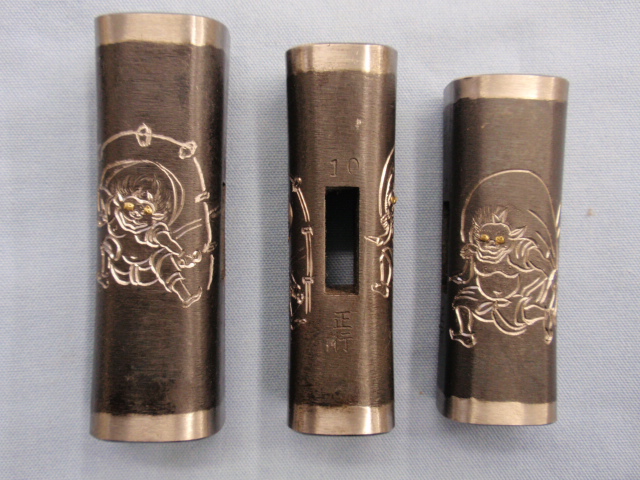
Part 11 – Decorative Gennou Heads

Simplicity is the ultimate sophistication.

Leonardo Da Vinci

In the previous post in this series about the Japanese gennou hammer we looked at an old-fashioned laminated gennou with some simple surface decoration and discussed its construction and benefits.

In this post we will take a gander at some other styles of expensive heads with decoration for the sake of being decorative.

Decorative Gennou Heads

A chemically-blackened square head by Masayuki with his name engraved in red characters

For a higher price, more decorative gennou can be had. Some of these have various surface textures and applied finishes, while others have designs etched into their surfaces, with the more expensive varieties even have designs of dragons, tigers, zodiac and religious figures deeply hand-engraved into their surfaces.

A “suminagashi” pattern-laminated octagonal head by Masayuki
Hand engraved images of the gods of wind and lightning. Despite the polished hachimaki strip, these are not laminated heads.

One of my favorite gennou is an 80monme square head with the figure of a monkey acid-etched on one side and some Chinese characters on the other referring to the patron god of those born in the Year of the Monkey, which I am. Sorry, I don’t have the hammer with me here in Tokyo, so no pictures. It was a gift from my Japanese Mother-in-Law (RIP) and so I value it highly although I don’t use it anymore.

She had it blessed by a Shinto Priest at the same time he came to perform the annual blessing of their book-binding factory in Sendai, so I consider it more of a good-luck charm than a working tool. It has not aged gracefully.

BTW, it’s not at all unusual for carpenters, construction companies and factories to have Shinto Priests perform similar ceremonies at least once a year to purify their tools and equipment and to bless their workplaces for safety purposes. Both of the large construction companies I worked for in Japan had Shinto “Kamidana” shrines in their offices and smaller ones installed at their major jobsites to encourage deities and local spirits to protect the jobsite, people and tools, and to drive off malevolent spirits that might cause harm.

Construction companies in Japan are especially old-fashioned this way. One large construction company I worked for in Japan was established 147 years ago, just a youngster by Japanese standards. Perhaps the oldest construction company in Japan is Kongo Gumi Co., Ltd. established in the year 578 AD. Other large and old Japanese construction companies include Kajima Corporation, established in 1840, Shimizu Corporation, established in 1804, and Takenaka Corporation, established in 1610. Long memories and deep traditions.

A typical kamidana shrine in an office.

Of course, decorating a gennou head adds nothing to its functionality while significantly increasing cost, so highly-decorated heads are probably more suitable for ceremonial purposes, for displaying in a collection, or as gifts rather than practical tools. In fact, the older generation of Japanese craftsmen I learned from, now all either in their late 80’s and retired, or passed on to the big lumberyard in the sky, considered such decorated tools frippery beneath the dignity of a respectable “shokunin” (a wabi sabi sorta thing) and would mercilessly rib someone who brought a gaudy tool to the jobsite or workshop.

Aging Gracefully

If you are considering purchasing a decorative gennou head, one factor you should seriously consider is the appearance of the head after many years of use. After all, a quality gennou head should be a lifetime investment and an heirloom tool. It may look as beautiful as Raquel in her fur bikini when new but will it look better than my scratched and rusty etched zodiac monkey head after 20 years of use?

A “suminagashi” pattern-laminated square head by Masayuki

Some heads pictured in this article show a pattern-welded structure known as “Damascus” in the West, or “Suminagashi,” meaning “ flowing ink” in Japan. This structure is not the famous Damascus steel developed in the Levant centuries ago and made famous by swordsmiths. It is simply a mix of at least two different types of steel, one of which resists oxidation/discoloration when exposed to an acid wash, creating the difference in color. Theoretically, this construction neither improves nor harms the performance of the steel so long as the deferential hardening process is handled properly, but personally, while it looks fun, I distrust this material for gennou heads and blades that must do real work.

Hand-engraved dragon

Other heads have received fancy decorative surface treatments that neither harm nor improve a hammer’s performance. However, being decorative, one should consider the durability of such treatments. Chrome, nickel or copper plating, for instance, will not remain unchanged long in the case of a hammer used frequently on the jobsite or if laid on the concrete floor of a workshop frequently. Color case hardening, pickled finishes, paint, and even most bluing will look nasty and may rust before too long.

Perhaps the most durable surface finish is the black oxide that forms naturally on the steel surface during the heat-treatment process because it is reasonably rust resistant and naturally harder than the steel/iron it covers. It’s my favorite, but for some reason doesn’t seem to attract the ladies. Bummer. Decisions, decisions…

YMHOS

Raquel Welsh wearing her iconic fuzzy bikini in the 1966 film that made her an international sex symbol “One Million Years B.C.

The following link is to a folder containing pricelists and photos of most of our products. If you have questions or would like to learn more, please use the form located immediately below titled “Contact Us.”

Please share your insights and comments with everyone by using the form located further below labeled “Leave a Reply.” We aren’t evil Google, facist facebook, thuggish Twitter, or a US Congressman’s Chinese girlfriend and so won’t sell, share, or profitably “misplace” your information. May the bird of paradise fly up my nose if I lie.

Previous Posts in The Japanese Gennou & Handle Series

The Japanese Gennou & Handle Part 10 – Laminated Gennou Heads

Fast is fine, but accuracy is everything.     

Wyatt Earp
This image has an empty alt attribute; its file name is kosaburotansetsugennou.jpg
This image has an empty alt attribute; its file name is kosaburotansetsumei.jpeg
A modern-style (post 1890’s) gennou with high-carbon steel faces forge-welded to a soft jigane (low-carbon/no-carbon) iron body. You can see the difference in color between the soft jigane body and the hard high-carbon steel faces. This laminated construction was commonly used in Japan before cheap imported steel from the West became available. The finish is hand-filed, and the blacksmith’s name, “Kosaburo,” meaning the “happy third son,” is hand-engraved. A high-quality gennou head is truly a lifetime tool. In fact, I have used this head hard as a professional and hobbyist for over 35 years, as you can tell from the dings and light corrosion. The handle is made from Japanese kurogaki wood (black persimmon, ebony genus), a rare variety valued for high-end cabinetry and casework in Japan. Kosaburo’s eyes are always as close to perfect as a man can forge them by hand, and better than all but a few expensive machines can manage.

In the previous post in this series we talked about the difference between mass-produced and hand-forged gennou heads. In this post we will take a look at a more antique style of gennou head.

A Laminated Gennou Head

Prior to the advent of cheap imported steel from Europe, gennou had bodies forged of soft low/no-carbon steel with wafers of hard, high-carbon steel forge-welded to each face. The shiny strips called “Hachimaki,” meaning “ headband,” polished onto the sides of the ends of genno heads sold nowadays, while purely decorative, are vestiges of this old-timey method.

The photos above are of a laminated gennou head hand-forged by Kosaburo which came to me long ago as payment for a debt. Laminated gennou heads made this way are still available today at exorbitant prices. I understand Hiroki occasionally makes a few.

Some believe the combination of hard face and soft body produces a softer impact and less vibration making the gennou less tiring to use. Others prefer the slightly different sound a laminated gennou head makes. I have used this laminated Kosaburo head for many years, and while I am very fond of it, I cannot detect any advantage to its laminated construction.

While laminated gennou are much more expensive, the blacksmiths I have spoken with have told me that they are significantly easier to make than one-piece high-carbon steel gennou since they do not require the more difficult differential hardening process. And they all agree that laminated construction provides no practical advantage to the end user. A curio in other words.

If you are just getting started in woodworking, or are on a tight budget, a quality mass-produced gennou head will do the job if you clean up the eye and replace the handle with one that fits your body.

Better yet, buy a hand-forged head by Hiroki or Kosaburo and make your own handle in the best craftsman tradition, and take pride in a custom tool of the highest possible quality that will serve you well for your entire life.

However, if you have the budget and enjoy collecting traditional tools, then by all means try a laminated gennou head. They are not easy to find nowadays.

YMHOS

The following link is to a folder containing pricelists and photos of most of our products. If you have questions or would like to learn more, please use the form located immediately below titled “Contact Us.”

Please share your insights and comments with everyone by using the form located further below labeled “Leave a Reply.” We aren’t evil Google, fascist facebook, thuggish Twitter, or a US Congressman’s Chinese girlfriend and so won’t sell, share, or profitably “misplace” your information. May ice cream forever taste like burnt rubber if I lie.

The Japanese Gennou & Handle Part 9 – Mass-produced Head vs. Hand-forged Head

The gentle reader will never, never know what a consummate ass he can become until he goes abroad. I speak now, of course, in the supposition that the gentle reader has not been abroad, and therefore is not already a consummate ass. If the case be otherwise, I beg his pardon and extend to him the cordial hand of fellowship and call him brother. I shall always delight to meet an ass after my own heart when I have finished my travels.

Mark Twain, The Innocents Abroad

In the previous post in this series we discussed the various styles of gennou heads you might consider when planning a custom-made gennou that fits your body perfectly, as well as the range of weights for each application.

While one has few options besides either using a mass-produced head or making one yourself nowadays, in Japan there are still a few blacksmiths that specialize in hand-forging high-quality gennou hammer heads. In this post we will compare mass-produced heads and hand-forged heads to help you make an informed decision.

Comparing Mass-produced Heads to High-quality Hand-forged Heads

When selecting a gennou head you have the choice of a mass-produced gennou (usually with a handle attached) or a handmade gennou head without a handle, if you can find one. Lets examine the differences.

Mass-produced genno are readily available, relatively inexpensive and for the most part, entirely useable. However, as with any product, it is wise to inspect a gennou carefully before purchasing it, as discussed in a previous post in this series, or to at least buy from a retailer with a solid return policy. When purchasing any gennou, check to make sure the eye is centered in the head and not skewed.

The practical advantages of a hand-forged gennou hammer head over a mass-produced factory head are as follows:

  1. Proper differential hardness;
  2. Precise eye placement;
  3. Uniform interior dimensions of the eye, resulting in time saved and aggravation avoided when fitting/refitting a handle;
  4. Faces are square with the long axis of the head;
  5. Improved Performance due to more uniform distribution of mass providing improved stability during the swing with fewer wiggles, more solid strikes, and fewer off-center hits.
  6. Unique appearance and pride of ownership.

Let’s examine these points in more detail next.

Heat Treatment

Most Gentle Readers will have never given this matter any thought, but the quality of the heat treatment matters… a lot. This is a chemical/crystalline property impossible to confirm long-distance, so we must rely on the manufacturer, be it factory or blacksmith, to get right. Therefore, the manufacturer’s QC reputation as well as the retailer’s guarantee also matters.

A good head will be hard at the faces, becoming gradually softer towards the the eye, certainly softer than a file, to make the head “tougher,” using the materials engineering term, and to reduce resonant harmonic vibrations. If you have used hammers with uniformly hard heads and integral steel handles you have felt this tiring vibration before.

The faces must be hard, around 50~55Rc, to prevent deformation, but not so hard the hammer will chip or crack. You may think that wooden chisel handles could not deform a steel hammer face, but if the striking faces are not properly hardened, they will mushroom sure as eggses is eggses, something your humble servant learned when he made a gennou head for himself from unhardened octagonal steel bar stock back when dinosaurs roamed the earth.

It’s interesting to note that the handle I made in days of yore was straight, unlike the handles your humble servant currently advocates, and that lower 1/3rd of the face (closest to the hand) mushroomed, while the upper 2/3rds did not deform at all. Curious…. This was the first time I really noticed that the head of hammer with a straight handle attached perpendicular to the head’s centerline tends to hit the chisel/nail cocked and not in-line with the long axis of the chisel/nail. I also realized that the direction of flow of this steel indicated a lot of energy was being wasted by my straight handle. I hope you can see why the solution the anaya carpenters of Japan developed so long ago resonated with me so strongly.

But what happens if the heat treatment results in a head that is too hard? In this case, while the head and faces may not deform, the face may chip and the entire head may fracture, sometimes even causing embarrassing leakage of sticky red stuff (or at least that’s what the product liability lawyers assert).

A word to the wise: always use properly heat-treated hammers and wear safety glasses when pounding nails, mixing acid, or writing your name on your forehead with ballpoint pen after losing a tequila shot contest.

Precision of the Eye

Gentle Readers may think it passing strange that your most humble and obedient servant is seemingly fixated on the precision of something as boring as the hole in a hammer’s head. Rest assured, this concern is not a fever dream resulting from an obsessive/compulsive over-analysis of negative space, but was born of bitter experience. My new therapist concurs.

Of all handtools, the hammer is one of the simplest. But is also the one that moves the fastest and is most influenced by dynamic physics. Things like concentricity, center of gravity, and moment of inertia make a difference to an object moving this quickly, then suddenly slowed by an impact with a chisel or nail, and then returned to battery for another blow faster than you can say “ouch.” Negative spaces like holes influence the physics, and therefore the stability, of hammer heads. Don’t make me inflict you with differential equations, just take my word the hole needs to be centered, not skewed, and of uniform size or the hammer will be skittish resulting in twisted mortise holes, bent nails, and maybe even smashed thumbs.

Another advantage of a well-made gennou head is that its eye will have uniform interior dimensions. We talked about this in an earlier post. In summary, all four walls will be straight, clean, flat, free of wind, parallel and square to each other. This matters because a sloppy eye will not apply uniform pressure on the handle’s tenon, ensuring it will come loose sooner than later. In addition, this uneven pressure may also induce unwanted vibrations in the handle.

If a gennou head has a sloppy eye, it needs to be trued, a task that is difficult to accomplish using files. Depending on the degree of error, correcting the inside walls of that tiny hole in a steel head with skinny files can be frustrating work and may even help your own therapist buy that new bimini top he wants for his fishing boat. You see, most people make the problems worse the first time they try to correct them. I know I did. If you count your time worth anything, the extra cost of a precision eye is money well spent, and certainly cheaper than a Rolex for your therapist’s girlfriend.

This image has an empty alt attribute; its file name is kosaburotansetsugennou.jpg
A “Modern”style hand-forged gennou head by Hasegawa Kosaburo. This head is of antique construction with high-carbon steel wafers forge-welded to both striking faces of the softish iron body. Prior to the importation from Europe of cheap steel to Japan, all gennou had this laminated construction. I have been using this head for over 35 years. I think this is its third handle.
This image has an empty alt attribute; its file name is gennou.jpg
A standard hardware store mass-produced gennou made by a large corporation and sold everywhere in Japan. The eye is sloppy, so the head is secured with steel wedges. The handle is tapered towards the eye to compensate for and conceal dimensional irregularities. Of course, this hammer can hit stuff just fine, but it will never feel right, the head will loosen much sooner than later, and it will be impossible to adequately repair. A decidedly unprofessional, disposable tool.

Precision of the Face

Let’s move on to item 4 “Faces are square with the long axis of the head.” The striking faces of mass-produced hammer heads are often not square with the head’s axis (i.e. manufactured 90˚ to to the head’s longitudinal axis) resulting most obviously in bent nails, but the less obvious consequence is that energy we intended to transmit directly to the chisel and into the workpiece ends up being wasted as heat and violent movement of the chisel out of alignment. It also wastes time and undermines the user’s confidence, once again providing a windfall to head doctors everywhere. A precisely manufactured face square to the tool’s centerline will yield better static performance and more precise chisel work and nail bashing than a mass-produced head.

The hammer that is stable during the swing and makes a solid impact exactly where you aimed it without producing strange vibrations or wasting energy will help you make every strike with confidence and greater control, and will make your woodworking more enjoyable and profitable. Not insignificant benefits.

Improved Dynamic Performance

In addition to the advantages described in the previous paragraph, a hand-forged head, if made correctly, will be more stable during the swing, and wiggle less upon impact because its mass is more uniformly distributed. This means fewer misses and more energy transmission on impact. And that’s the whole purpose of a hammer, right?

A hammer made using a good head and a handle made to fit both that head and your body will perform better than any tool you have experienced before. You won’t need to look when you pick it up to tell which face (or claw/vs face) is oriented towards the nail/chisel because your fingers will know instantly. The handle will fit your hand perfectly without slipping or causing blisters or needing to be “choked-up on.” You will be able to sense beforehand exactly where the center of the hammer’s face will strike, and will be able to hit the target dead-center and squarely even with your eyes closed.

Appearance and Pride of Ownership

And finally, let’s examine the more ephemeral item 5: “Unique appearance and pride of ownership.” I have mentioned it elsewhere before, but it is a fact that, no matter how much they may deny it, humans are competitive beasties in all endeavors.

As a day job your humble servant manages construction projects in Japan and spends a lot of time inspecting jobsites, meeting with construction companies and speaking with craftsmen. Indeed, there was a time when I was labor instead of management on construction jobsites, so I have enough experience to know that, while some professional woodworkers may not read fashion magazines with titles like “Amazing New Toolbag Design that Will Lift and Shape Your Butt” during coffee breaks, or wear sleek, handmade calf-skin steel-toe Italian footwear during the workday, they are conscious of their personal performance, and the performance of their tools, in comparison to those of their peers. It’s a guy thing, something women think they understand because they have similar tendencies in other areas, but rarely do. This performance is difficult to ascertain unless one is working side by side with one’s peers, so it is human nature to make indirect judgements about performance by observing the quality and condition of a fellow worker’s tools.

Of course, one casually notices the brand of chisel or plane a fellow craftsman is using. Next, if it can be done without being rude (sometimes a difficult thing to accomplish), one examines the fellow workman’s tool’s cutting edge and its sharpness because this tells much about his character and skill (chisels are terrible gossips, you see). Such a close examination may not be possible, but one can usually examine the finish left by his plane and crispness and precision of his chisel cuts.

But more than plane or chisel, the tool that is always visible to others during the workday is the craftsman’s hammer comprised of the head forged by the blacksmith, and the handle made by the craftsman himself. The quality of this combination tells Japanese craftsmen much about the man that owns and uses the tool. A hand-forged head by Kosaburo or Hiroki with a graceful, professional-grade handle made by the owner, even if it is dinged through years of hard use, will be noticed by those with eyes to see for decades, even generations.

Among the Japanese professional woodworkers your humble servant knows well, most of whom ceased getting older long ago, a highly-decorated expensive gennou head is thought to be a gaudy, obvious plea for attention, and in poor taste, like wearing a purple sequined silk suit and Jimmy Choo 8″ gold lame stilettos to the hardware store (best saved for the New Years party anyway, you sexy beast). A plain head by Hiroki or Kosaburo, on the other hand, is understated tasteful evidence of a serious craftsman that appreciates tradition and places quality first. Very much a wabi sabi kinda thing.

And finally, a quality hand-forged head is a lifetime tool, one that won’t wear out or break. The handle may be damaged and wear out over time and need to be replaced, but such wear and tear is unavoidable if the tool is actually used, like a good pair of workboots. But the handle made for a quality head will last longer and be much much easier and quicker to replace. To the professional focused on turning his time into money, this is not an insignificant consideration.

A mass-produced factory head, by comparison, simply won’t work as well. It is of course neither high-quality, unique, nor a lifetime heirloom tool. It isn’t pleasing to the owner’s eye nor impressive to his fellow workers. It is a consumable, expedient tool, the sort of thing a craftsman does not want himself to become.

Conclusion

A high-quality head combined with a handle that fits your body will accomplish more work more precisely with less mental concentration and physical effort. It will become a lifetime friend and a source of satisfaction boosting your confidence. It will be relatively easy to make replacement handles for during your lifetime, and those handles will stay tighter longer. It will tell those who see it that you are serious, no-nonsense craftsman who understands true quality and prefers understated elegance.

If you take pride in your tools, appreciate heirloom value, don’t want to waste time trying to rework sow’s ears into silk purses that smell piggy, and are not inclined to invite psychiatrists to rummage around in your head, then a hand-forged gennou head is worth owning, in the opinion of your most humble and obedient servant.

In the next post in this swashbuckling adventure on the high seas we will try to dispel some rumors about laminated gennou heads.

YMHOS

My newest safety shoes. I must say they go really well with my dual-reel safety harness! What do you think about the steel-toe safety shoes below? Too severe?

The following link is to a folder containing pricelists and photos of most of our products. If you have questions or would like to learn more, please use the form located immediately below titled “Contact Us.”

Please share your insights and comments with everyone by using the form located further below labeled “Leave a Reply.” We aren’t evil Google, facist facebook, thuggish Twitter, or a US Congressman’s Chinese girlfriend and so won’t sell, share, or profitably “misplace” your information. May puppies all hate me if I lie.

The Japanese Gennou & Handle Part 6 – The Ergonomic Anaya 穴屋

Don’t force it, get a bigger hammer

Arthur Bloch

The handle that is the focus of this series of posts is an interpretation of the gennou handle developed over several centuries by the anaya carpenters of Japan. In this post I would like to touch on some of their history and the ergonomic factors that drove their subtle innovations.

Historical Background

The word Anaya (穴屋) translates to “hole maker,” a type of carpenter that was common in Japan before the general availability of portable electrical mortisers. These craftsmen had their own guilds in major urban areas and specialized in cutting mortises in beams and columns for wooden structures. They didn’t do layout. They didn’t dimension timbers. They didn’t saw tenons. They didn’t do assembly or erection. Their only tools were the chisels and hammers they used from sunrise to sunset to cut mortises as quickly and accurately as they could.

Anaya did piecework, meaning they were paid according to the number of mortises they completed each day, not by the job or an hourly rate. Each individual Anaya was in direct competition with his fellows for speed and efficiency, so they were serious about the performance of their tools.

Consistent with the Japanese obsession with constantly making minor improvements to their tools, Anaya were forever asking blacksmiths to make them custom chisels and hammer heads reflecting their latest opinions. There are records of more than one chisel blacksmith, including the famous Chiyozuru Korehide, refusing to make chisels for Anaya because of their persistent, obsessive demands.

The gentleman that taught me how to make gennou handles 30 something years ago is now in his late 90’s. He was a young man back when the anaya trade in Tokyo was still burgeoning, and he learned from the best in the business. 

Ergonomic Factors

Following are four ergonomic principles related to hammers in general and gennou in particular you should keep in mind when planning your handle. These principles are applicable to not just Japanese gennou, but to all varieties of hammers swung with a single hand. You need to understand them before you design your gennou handle.

  1. Handle Length: Every person’s combination of bones, tendons, muscles and work habits is different. Therefore one size of handle does not fit all; There is a handle length that best fits your body, the way you work, and the type of work you do.  
  1. The Grip: For the reasons stated in No.1 above, one grip style does not fit all; There is a handle shape with dimensions that best fits your hand, the way you work, and the type of work you do.
  1. The Knuckles: The human body operates a hammer or gennou most effectively when the plane of the head’s striking face at the instant of impact is oriented in line with the surface of the finger knuckles, particularly the pinkie finger, of the hand holding the hammer. 
  1. Head Angle: When swinging a hammer, the arc of the hand naturally moves ahead of the hammer’s striking face. Therefore, instead of being in line with the arc of the swing, the centerline of a typical hammer head will typically end up cocked out and away from the arc of the swing, assuming the handle is straight and hung (installed) with its centerline perpendicular to the head’s centerline. As a result:
    1. The hammer’s face is unlikely to strike the nail or chisel squarely; 
    2. The center of mass of the head will most likely not be in alignment with the actual (versus intended) axis of travel of the nail or chisel on impact;
    3. The nail or chisel will therefore be kicked out of the intended axis of travel;
    4. Precision will suffer, and;
    5. Time and energy will be wasted.

Before you design your handle, I highly recommend you thoroughly understand these four essential principles. If you doubt their validity, investigate them yourself. Google will not suffice. There are a couple of tests described in future posts in this series you can perform to verify them. In the meantime, here is a homework assignment: Figure out a way to determine if your hammer’s face is striking the handle of your chisel squarely, or if it is cocked. Let me know your conclusions in the comments below.

The positive impact of incorporating these ergonomic principles into your handle design, as well as the negative impacts of ignoring them, can make a big difference in your performance and work efficiency. In future posts we will show you how to deal with these ergonomic factors to design and make a gennou handle perfectly suited to your body and the way you work.

But before our tumble ass-over-teakettle down this particular rabbit hole loses every semblance of dignity, in the next post in this series we need to examine a critical but oft-ignored part of any hammer : The Unblinking Eye.

YMHOS

The following link is to a folder containing pricelists and photos of most of our products. If you have questions or would like to learn more, please use the form located immediately below titled “Contact Us.”

Please share your insights and comments with everyone by using the form located further below labeled “Leave a Reply.” We aren’t evil Google, facist facebook, thuggish Twitter, or a US Congressman’s Chinese girlfriend and so won’t sell, share, or profitably “misplace” your information. May the fleas of a thousand camels infest my crotch if I lie.

Previous Posts in The Japanese Gennou & Handle Series

The Japanese Gennou & Handle Part 5 – Kigoroshi

A Japanese shipwright using a hammer to perform “kigoroshi” on the edges of planks for a traditional boat. The planks are joined using long nails “toenailed” from the upper plank into the lower plank. The pilot holes for these nails are made using a “tsubanomi.” When the boat’s hull is later wetted the fibers crushed during kigoroshi will swell back to near their original size filling gaps and tightly locking the planks together, even when the planks are once again dry.

The difference between something good and something great is attention to detail.

Charles R. Swindoll

In previous articles in this series about the Japanese hammer known as the gennou, we examined the background, history and general varieties commonly available nowadays. In this article, we will expand our analysis of the gennou to include a function not well known outside Japan. We hope Beloved Customers and Gentle Readers find it diverting.

Kigoroshi 木殺し

As mentioned in Part 4 of this series, the standard ryoguchi gennou hammer has a flat striking face on one end and a domed striking face on the opposite end. The flat face is well suited to striking chisels, driving nails and the ceremonial wacking of thumbs, while the domed striking face excels at setting nails below the surface of a wooden board, just as Western hammers are. It can also be used for a task called “kigoroshi.” Indeed, this is a technique that can be employed with any hammer having a domed face, although the domed face on many Western claw hammers may be too drastic in some cases. It is a technique worth knowing.

The term Kigoroshi (木殺し)translates to “wood killing” meaning to use a hammer to temporarily crush wood cells. It is achieved by judiciously striking the wood with the hammer or gennou’s domed face. Easy peezy.

When a piece of wood is subjected to successful kigoroshi, the wood cells are deformed reducing their internal volume, but if the pressure is later relieved and some moisture added, over time the cells of many (but not all) species of wood will swell back to near their original volume.

So how is kigoroshi used? For instance, in the case of a mortise and tenon joint, the tenon is cut oversized, and then struck with the convex face of a gennou to deform the wood cells to the point the tenon will fit into the mortise. With time, the tenon absorbs moisture from its surroundings and naturally tries to swell back close to its original size locking it tightly into the mortise. I’m sure you can see the possibilities.

In this short video, the carpenter is performing kigoroshi with the convex face of his gennou to the shoulders of an Akita Sugi (Cryptomeria japonica) beam to enable it to fit inside a housed dovetail mortise. The shoulders will later swell back to close their original dimension closing any minor gaps, hopefully locking the beam tightly into the mortise hole.

Another application of kigoroshi is seen in traditional Japanese boat building where the edge joints between planks forming the hull are hammered, effectively making the planks narrower. After the planks are attached to the ship’s ribs, their crushed cells gradually swell and attempt to return to their original volume, tightly pressing the planks against each other and closing any gaps to create a waterproof joint. In this way, a joint that might otherwise loosen with time and changes in moisture content can be made to remain tight and waterproof. This boat building technique is not unique to Japan, of course.

A Japanese shipwright performing kigoroshi on the edges of planking prior to joining them together.

One more example. When making a rectangular wooden cask or bathtub from hinoki-wood boards (not staves) in the Japanese style, grooves are cut in the bottom board to receive tongues from the vertical side boards. If these tongues are planed oversize and then their sides are pounded judiciously with a hammer with a slightly rounded face like that of a ryouguchi gennou to reduce their thickness to fit into the groove, when assembled and then wet with water the crushed wood cells in the tongue will rebound and will expand to close its original thickness not only locking the tongue and groove tightly together, but also creating a watertight connection. If done properly, the joint will remain tight even after all the boards are no longer wet, same as the ship’s planking mentioned above.

Many people’s understanding of kigoroshi is too shallow to use the technique effectively and consistently without some practical experience. The opinions of inexperienced people therefore should be scrupulously ignored, but the Beloved Customers of C&S Tools are expected to meet a higher standard of woodworking, so I share this advanced technique with you.

There are a few points you should be aware of before attempting kigoroshi in a professional situation, in other words, a situation where cost, schedule, or reputation are at risk.

First, make no mistake: kigoroshi works reliably only on long-grain, not end-grain.

Second, please remember that if the flat face of the genno is used for kigoroshi, or the domed face is cocked so its corners dig in too far, or is used with too much force, the striking face’s perimeter edges may crush cells and sever fibers permanently so that they cannot return to anywhere near their original volume thereby defeating the purpose of kigoroshi and simply weakening the wood. Not good.

Third, be aware that if used in fine cabinetry and joinery work, kigoroshi can create unpredictable tolerance shifts at joints, making, for instance what should be a flush joint offset, so caution and experimentation may be necessary to avoid embarrassing snafus.

And fourth, kigorishi does not work well with some woods, especially hard, stiff woods, and can cause permanent cell damage in some cases. We will discuss this further below. But first, let’s examine the mechanics of kigoroshi.

Nuts and Bolts

Most commercial varieties of wood grow in climates with seasonal changes of winter and summer. A tree is essentially a big water pump that pulls (not pushes) water and some nutrients up from the ground through the pressure differential created by water evaporation at stomata in its leaves. The highest volume of water pumped, and cellular growth, occurs when the weather is warm, water is moving, and the sun is shining. Without liquid water, sunlight, and functioning leaves, the pump stops. In the case of freezing weather, evergreen trees stop pumping water to prevent freezing and the resulting expansion that would destroy the tree.

During the colder months, beginning when leaves fall and the sun fades in Autumn, the pump as well as the tree’s growth slows and then stops. The pump starts up again during the spring thaw when water moves, the sun again shines, and leaves bud.

The stained cross-section of oak below is an excellent illustration of this point. The photo is bifurcated by a a nearly solid band of tight fibers bordered above and below by larger cells, some are rather large white voids. This nearly solid band of cells forms during late Autumn and early spring and is called “late wood” or “Autumn wood.” The areas of less density and larger voids is formed during warmer months of high-growth and is called “early Wood or “Spring wood.” These voids form branching and merging tubes leading from the tree’s roots to the tiny holes in the leaves where the water they carry evaporates powering the pump.

The difference in appearance between these bands of cells (aka growth rings”) can be seen on the surface of a board as its “grain.”

Every type of wood, indeed every piece of wood, is different and will react differently to kigoroshi attempts. Let’s review the physical properties of wood relevant to kigoroshi by examining a cross-section of a tree. For instance summer wood is carefully designed to transmit large amounts of water and nutrients, and so is comprised of large cells with thin walls. After the tree is felled and as the moisture content of the wood decreases, the cells shrink, the cell walls become thinner, harder, stronger and wrinkled and crinkled.

A cross-sectional slice of White Oak dyed red for clarity.

Winter wood in most commercial varieties is designed to resist wind and winter storms. It is comprised of much smaller cells with thicker, stronger walls.

Effective kigoroshi temporarily squashes the cells of summer wood in what is called “elastic deformation,” meaning the deformation is temporary so that the cells rebound to near their original volume when the pressure is removed, depending on the nature of the wood and the elapsed time.

The cell walls of winter wood, on the other hand, instead of squashing and then rebounding, are often shattered by kigoroshi and can rebound little. This permanent damage is due to “plastic deformation.”

Why does this matter? Consider a cube of quartersawn Douglas fir, a wood with soft summer wood, and strong winter wood. If we strike this cube perpendicular to the parallel rings, the larger, weaker cells of summer wood will squash down while the harder lines of winter wood will just be pressed closer together as the layer of summer wood squashes. An application of moisture to this block of wood will cause the summer wood to return to near its original volume and the cube of wood may retain any apparent damage.

https://i0.wp.com/www.microlabgallery.com/gallery/images/Pseudotsuga%20MenziesiiCS40X.jpg
Doug Fir

Now what happens when we wack an identical cube in-line with the layer of harder winter wood? Some of the winter wood cells are squashed elastically and will rebound. But the rebound will be less and some of deformation will be permanent.

Oak wood, on the other hand is more dense and the cell walls are stiffer than a softwood like pine, so crushing the cells in kigoroshi will result in even less rebound, and may greatly weaken the wood permanently.

The point is to be aware of the nature of the wood you plan to do kigoroshi to beforehand.

Kigoroshi for Gennou Tenons, and Chisel Handles

There are those who advocate using a hammer to perform kigoroshi on the tenon of gennou handles, the idea being that an oversized tenon can then be crushed a little allowing it to fit into the eye, and that the wood will rebound later locking it into the eye tightly. This sounds like a great idea, but it has problems that stem from the fact that gennou handles are typically made of dense hardwoods like white oak, and not softwoods like cedar.

We need the extra toughness and density that hardwoods provide when making a gennou handle because tenons cut in softer woods will loosen over time. Hard woods like white oak, for instance, do not submit well to kigoroshi because the more rigid cell walls are broken in plastic deformation instead of elastic deformation and won’t rebound enough. In other words, kigoroshi on hardwoods like oak, hickory or persimmon may decrease the cellular volume, but it will also physically weaken the wood. Why would you want to do that?

Instead of kigoroshi, a better solution is to use a good dense hardwood and to precisely cut the tenon just enough oversize so that a lot of force is required to overcome friction driving it into the eye under high pressure. In this way, you will have a tight tenon without compromising it’s cellular strength, a better long-term solution and a more craftsman-like technique.

Another option especially effective when making a gennou handle in humid months is to cut the tenon oversized and shrink it by removing water from the cells using gradual heat. Placing the handle in a more-or-less sealed container with a dry heat source such as an incandescent light bulb will do the job. Silica gel desiccant is another method, but slower. I do not recommend putting the handle in an oven of any kind to accomplish this, however. You have been warned.

Still others advocate performing kigoroshi on the ends of chisel handles to make the crown (hoop) fit better. They then insist one must soak the end of the handle in water to make it swell back to shape and lock the crown in place. While popular, this is poppycock that wastes your time and weakens a properly-sized handle. Please do not do this to C&S Tool’s chisels.

If the handle is in fact too big to accept the crown (unlikely if you purchased the chisel with a handle and crown already attached), first deburr the inside of the crown and chamfer the inside edges. If that is not enough, please shave or file the end of the handle down to a dimension where it takes a number of hard hammer blows from a steel hammer to drive the crown onto the handle. The crown will thereby automatically perform all the kigoroshi necessary. This method is more professional and will provide better service.

Kigoroshi is a useful technique in some applications and with some types of wood. You may not need it but it’s worth understanding, especially if you have a gennou.

In the next post in this series we will examine the ancient ergonomic roots of the gennou handle we advocate and the unusual Japanese carpentry guild that codified them.

YMHOS

The following link is to a folder containing pricelists and photos of most of our products. If you have questions or would like to learn more, please use the form located immediately below titled “Contact Us.”

Please share your insights and comments with everyone by using the form located further below labeled “Leave a Reply.” We aren’t evil Google, facist facebook, thuggish Twitter, or the US Democrat Senate’s Pakistani IT manager and so won’t sell, share, or profitably “misplace” your information. May worms drip from my eyes if I lie.

Previous Posts in The Japanese Gennou & Handle Series

The Japanese Gennou & Handle Part 4 – The Varieties of Gennou: Kataguchi, Ryoguchi & Daruma

It’s hubris to think that the way we see things is everything there is.

Lisa Randall

Varieties of Gennou: Ryouguchi Gennou

There are several types of gennou. The most popular is the standard, double-faced symmetrical gennou called the “ryouguchi gennou” 両口玄翁 pronounced ryoh/guchi/ghen-nouh. “Ryou” 両 translates to “both,” and ”kuchi” 口 means mouth, so a ryoguchi gennou is one with a striking face on both ends. This category includes its stumpy brother the daruma gennou, which is a shorter, stubbier version of the ryouguchi gennou. One face of ryouguchi gennou hammer is flat, and the opposite face is domed. The flat face is used for striking chisels and nails, while the domed face can be used for the last couple of hits on a nailhead to recess it below the wood’s surface. It can also be used for something called kigoroshi (“wood killing”木殺) which we will touch on in a future article.

This most popular style of gennou head is symmetrical in all axis, an extremely stable shape making it well-suited for using at many different angles and at different swing velocities to make powerful hits where stability during the swing is important. And stability is often not just important but critical because a hammer that easily wiggles or twists out of alignment during the swing, or jinks upon impact, will make the user look like a child.

Varieties of Gennou: Kataguchi Gennou

〔千吉〕片口玄能 小

Besides the ryoguchi, the other common variety of gennou is called a “kataguchi” 片口 or single-face gennou. “Kata” 片 in Japanese means “one” or “half” and “kuchi” 口 means “mouth” but for some reason unknown to me this term is used to mean “striking face” in the case of hammers. It has a slightly domed face on one end with the opposing end tapering to a small square face for setting nails. Besides setting nails, the tapered end is handy for “tapping-out” (uradashi) the hollow faces of Japanese plane blades. The domed face of the kataguchi gennou is shallow enough to be used for striking chisels, but is not as good for kigoroshi. Kataguchi genno include the yamakichi style common to Kyushu Island, the funate or Iwakuni style common to Western Honshu Island and Hokkaido way up north, and several variations thereof. 

The hammer pictured immediately below is the “Funate Gennou” 船手 which translates to “boat hand” or perhaps “shipwright” gennou. It is especially suited to driving nails, while it’s tapered tail can be used to make a starting hole for nails, a capability especially suited to ship building.

A funate-style gennou hammer with bubinga handle. The eye has a built-in forward cant. This style is popular in much of Western Japan, but not so much in Eastern Japan and Tokyo.
The face of the tapered end of the funate gennou, much smaller than the Yamakichi-style gennou pictured below. If this end is sharpened it can be used to start a hole for the diagonal nails used to join ship planking, perhaps why it’s name references ship building.

The style of gennou pictured immediately below is called the Yamakichi Gennou 山吉, with Yamakichi meaning “lucky mountain.” This was the working name of the blacksmith on Japan’s Kyushu Island who developed this style of hammer. It’s a stubbier, heavier hybrid of the ryouguchi and funate styles, better suited to chisel work while still being well-suited to driving nails. I am told that Kosaburo received permission from Yamakichi and modified the design slightly to better meet the requests of his customers in the Tokyo area. If you can only have one hammer with you in the field or when doing installations at the Client’s home or facilities, the Yamakichi gennou is hard to beat. It’s not only useful, but unusual and kinda sexy-looking.

A Yamakichi gennou by Hiroki with an American Osage Orange handle (thanks for the wood Matt!). This is the Kosaburo version of the Yamakichi style which originated on Kyushu Island. The face is not entirely flat, but is still flat enough for striking chisels without damaging them. The tapered end has a square face great for starting and setting nails. it also works well for “tapping-out” plane blades. Not quite as stable as the more symmetrical ryouguchi style, but it’s undeniably more versatile. If you need a gennou for driving nails, including finish nails, as well as striking chisels the yamakichi style gennou is hard to beat.
The tapered, square end of the Yamakichi gennou, perfect for starting and setting nails as well as tapping-out plane blades.
The butt of the osage orange handle. This shape, which we will explain in detail future posts, is a key factor in the handle design on which this series of articles is focused. Osage orange is a very tough, stringy wood used for fence posts, tool handles, musical instruments and bows for millennia. The color is a scary neon yellow when freshly cut, but when exposed to sunlight changes to this interesting color.

The Varieties of Gennou: Daruma Gennou

The daruma gennou (dah-ru-mah) 達磨玄翁 is a variation of the double-faced ryouguchi genno, but at the same weight, it is shorter and fatter. It is named after Bohdi Dharma, a Buddhist Monk who was the founder of the Zen (Chan) sect of Buddhism in China, as well as an important person in the history of the Shaolin Temple made famous in Hong Kong Kung Fu movies. You will remember seeing Shaolin Priests in Hong Kong movies dressed in saffron robes, and with rows of dots decorating their bald pates, jumping around thwarting evil drama-queen warlords with long mustaches. 

There are many legends about the Enlightened Dharma, but one story says that, while meditating for nine years in a cave near the Shaolin Temple, his atrophied arms and legs fell off leaving just his trunk and head. Because of this legend, in Japan he is portrayed as an oval-shaped figure without any limbs, and with bushy eyebrows glaring out from inside a red hood. He has come to symbolize wisdom and victory through persistence and endurance. This image has deep roots in Japanese culture.

The daruma genno is named after him because, like its namesake, it’s short, stubby, and round. Religious matters aside, at any given weight, the daruma is not as physically stable as the standard genno due to its reduced Moment of Inertia. 

The Moment of Inertia refers to the tendency of a body to resist changes in position. Quoting from Wikipedia (which is no doubt taken from some physics textbook): “It is the moment of inertia of the pole carried by a tight-rope walker that resists rotation and helps the walker maintain balance. In the same way the long axis of a dragster resists turning forces which helps to keep it moving in a straight line.” 

It is the increased Moment of Inertia that makes a steel I-beam so much stiffer and stronger than a plain steel rod of the same length and weight.

Like these three examples, the standard gennou head has its mass distributed away from the center, making it more resistant to movement than if the same mass were concentrated in a solid ball. 

The math for a rod about a center, which is a close approximation of a hammer head, is I = (1/12) x ML2, where I equals the Moment of Inertia, M equals the mass of the rod, and L equals the length of the rod. As you can see from the equation, the Moment of Inertia varies with the square of the object’s length, so that a ball has the lowest possible Moment of Inertia for a given mass, and is the easiest shape to get moving, while a hammer head with its mass moved away from the center will have a much higher Moment of Inertia, and will therefore be more resistant to changes in direction. 

For any given mass, the daruma gennou head has less length than the standard gennou head, and therefore has a reduced Moment of Inertia, and so is less stable. 

Why is this important? Because you, O Mighty Lord of Thunder, are not a machine, and when you swing your hammer several contradictory forces act on it, sometimes large and troublesome and sometimes small and insignificant, but too often they work to drive the hammer off-course so it misses the target, or more often twists during the swing so that a line drawn through center of the hammer’s face and the center of its mass is not aligned with the target producing a glancing blow that wastes time and energy. But since a longer hammer head has a higher Moment of Inertia, so long as you do your job it will tend to remain in alignment during the swing, making it more likely to impart more of its energy into the chisel even if the hit ends up being a bit off-center.

It may also be useful to remember that the head of a hammer is moved by the user in a cyclically pattern towards the chisel or nail, striking it, rebounding, and then swung to strike the chisel or nail again and again several times. If the rebound motion is wonky, one must struggle to realign the hammer head for each strike.

Compared to the shorter daruma, the longer standard ryouguchi gennou head, or even Yamakichi gennou, will tend to rebound straight back, instead of twisting, helping the user maintain a steady rhythm thereby saving time. Of course, with practice, the daruma can perform just as well as the standard ryouguchi gennou head, but if you intend to make a lot of fast, hard strokes at various angles, which is common in carpentry and timber framing, a standard ryouguchi gennou with its higher moment of inertia and resulting greater stability is a superior choice. 

The daruma gennou has traditionally been the preferred primary hammer for two trades: Joiners (tategushi), who use the daruma to their advantage in a specific way, and sculptors, who don’t require stability but do appreciate a large face. Cabinetmakers, tategushi and tansu makers often have a heavy daruma on hand for assembly work because the high face area/weight ratio is convenient for knocking joints together.

I learned about daruma gennou from a retired joiner in Tokyo who was kind enough to instruct me occasionally over a period of several years in the making of Japanese tategu, especially wooden doors, shoji, and free-standing screens (tsuitate). Nowadays, commercial joiners (tategushi) cut mortises mostly by machine, but traditionally, all joints were cut by hand, so the old boys were required to do very precise work, very quickly, frequently cutting hundreds of small mortises for a single screen or door.

The daruma gennou exceeds at this precise, repetitive, speedy work where the chisel is almost always oriented vertically in the cut, the workpiece is almost always located at an unchanging height from joint to joint, and the hammer is not so much swung at the chisel as dropped on it to ensure a very predictable depth of cut with stability not being a significant problem. In summary, the daruma gennou is especially suited for very precise cuts in narrower wooden components such as door and furniture parts.

For example, when cutting joints in shoji, the material remaining at the bottom of a mortise cut in a stile to receive a rail may be only be 1/4 millimeter thick, almost translucent, so if care is not taken, the chisel will cut all the way through ruining the stile. To avoid this, the joiner must be able to control the depth-of-cut very precisely, and rather than swinging the hammer, it is more-or-less allowed to drop imparting controlled, uniform impact forces than would be more difficult to achieve by swinging the hammer.

For this type of work the hammer should not rebound from the chisel but transfer all its energy to the workpiece for smooth, consistent cuts. When used properly, a daruma genno feels like it is sucked towards the chisel, and when it strikes, it feels like it sticks to the chisel for a fraction of second with little or no rebound providing more precise control of the depth of cut. This technique takes lots of practice to master.

I have seen carpenters in Japan laugh at a fellow that brought a daruma gennou to a jobsite because the stumpy things are thought by many carpenters to appear clumsy. I must agree. Also, they assume that a fellow that uses a hammer with a face as big as a daruma does so because he has a hard time finding the end of his chisel with a standard hammer. They may have a point. 

For reasons unclear to me, Americans and Europeans have an illogical affinity for the daruma gennou. That said, when I need to cut a lot of small, precise mortises, I use one. When I need to cut bigger or deeper mortises, or mortises at angles, however, I bring out a standard gennou of the appropriate weight for the relatively greater stability they provide. If you only have one gennou, the standard ryouguchi style head or even yamakichi style would be a good choice.

In the next chapter in this bodice-ripping yarn of romance and intrigue we will examine a more sinister application of the gennou hammer, namely kigoroshi, or “wood-killing.” Please visit the facilities before reading it to avoid embarrassing accidents.

YMHOS

The following link is to a folder containing pricelists and photos of most of our products. If you have questions or would like to learn more, please use the form located immediately below titled “Contact Us.”

Please share your insights and comments with everyone by using the form located further below labeled “Leave a Reply.” We aren’t evil Google, facist facebook, thuggish Twitter, or a US Congressman’s Chinese girlfriend and so won’t sell, share, or profitably “misplace” your information. May I be eternally tortured by ravenous ducks if I lie.

Previous Posts in The Japanese Gennou & Handle Series

Hammers to Use With Chisels Part 6 – Hammers & Health

A box-stock hardware store gennou hammer. Delicious Ambiguity. A good place to start.

I wanted a perfect ending. Now I’ve learned, the hard way, that some poems don’t rhyme, and some stories don’t have a clear beginning, middle, and end. Life is about not knowing, having to change, taking the moment and making the best of it, without knowing what’s going to happen next. Delicious Ambiguity.

Gilda Radner

In previous posts in this series about hammers to use with C&S Tools’s chisels, we looked at factors such as the type of hammer to use, the sort of face a hammer should have, how much it should weigh, and how to use hammers and chisel as a glorious dance team effectively. In this final post we will look at how the hammers can impact our health.

Health Matters

This image has an empty alt attribute; its file name is af71ca_8a6942899be847ba9fba7a468c6c1da6~mv2.webp

Swinging a hammer is a violent movement that places large, repetitive impact and vibration stresses on joints, tendons, nerves and muscles. These stresses can make our bodies stronger, or break them down. Carpel tunnel syndrome in office workers clicking away at computer keyboards gets all the attention, but hammers are much more likely to cause health problems. Before nailguns it was common for carpenters to have nerve damage in their hands and arms, but chopping dovetails with a pneumatic chisel is not an option, however.

When your humble servant was a young apprentice carpenter working in Las Vegas I wanted to be like the older more experienced carpenters on the jobsite that used shiny 32oz waffle-face Vaughn hammers to drive 16d nails through stacked 2×4’s in a single swing (this was before the advent of nailguns and LGS studs). I got where I could do that. I still own that hammer, but like me it is no longer smooth and shiny. I have replaced the wooden handle 3 or 4 times. Would that I could do the same with my knees.

I barely remember him, but he was a young man with lots of energy focused on gaining respect and being productive. Fortunately, I was blessed to work on crews led by older guys with no ego left, whose joints ached (like mine do now), and who just wanted to get as much good work done as efficiently as possible each day until beer-thirty. What I learned from them went beyond wacking nails, and more about actually building things. 

At first I wondered why the bosses would hire old farts when younger guys moved faster and got more work accomplished. What I learned, however, was that, while the old guys did not appear to be as active as the younger carpenters, at the end of the day they had always accomplished more actual work, and with less rework. It was difficult for the young man I was back then to accept, but the bosses new their business, including two important points:

  1. “Fast” and “productive” are not the same thing (the tortoise and the hare principle, “Festina lente“);
  2. Rework takes more than twice the time and money to accomplish than doing the work right the first time.

These two principles are key to being a successful professional woodworker, so a forehead tattoo might help Gentle Reader to remember them. Just a suggestion….

None of those old boys I worked with used extra-long extra-heavy hammers because they knew that productive work required driving nails of different sizes in many different directions (not just straight down or straight forward) more accurately with fewer misses, something a heavy single-purpose framing hammer did not do well. They knew how to avoid wasted motion and time. They knew about rhythm.

They were not what could be called kindly gentlemen, but looking back I prefer to imagine they were looking out for me when they ordered me to “bring more 2×12’s, quick now dammit,” and “stop being a pain in the ass, kid.” Ah yes, good times!

They were prophets too when they warned me that the stresses I placed on my hands, arms, knees and back when I was young and dumb and full of something may not hurt at the time but would hurt every day many years later. It truly pains me to admit it, but those crusty old farts might have been right.

So in memory of those curmudgeonly carpenters now sorting boards in the big lumberyard in the sky, let me summarize three pieces of profound wisdom they taught me. Do with them as you will. If you still have room, you might want to add them to that forehead tattoo you’ve got going (ツ)。

First, strive to use your hammer efficiently with minimum force, minimum wasted motion, and minimum stress on joints and tendons. Or as the old boys put it: “less swingin more hittin.”

Second, use an efficient hammer of the right type and weight that will get the job done without damaging your joints and tendons.

And third, stop being a pain in the ass.

Just be thankful that I am kinder than those crusty critters were and will tell you clearly in words what they communicated to me only with grunts, curses and boots while chewing on stogies and chortling as they watched me struggle with concrete form-work 16 feet in the air like the proverbial amorous monkey with his football. Yes, love was in the air…

Indeed, just to prove what a sweetheart I am, here are two more pieces of detailed advice specifically related to hammers: First, determine the style of hammer and weight that works best for you and the work situation. This will take experimentation.

Second, make handles for your hammers that suit your body and the combined natural frequency and the work you use them for instead of settling for the usual one-size-fits-nobody hammers hanging like noxious neon-colored plastic fruit on the walls of big-box retailers.

This last point will be the subject of another series of future articles.

That forehead tattoo is down past your chin by now, I suppose.

Series Summary

For such a simple subject this series has been rather long. Let me summarize what you should take away:

  1. Use a steel hammer to strike Japanese chisels instead of a mallet made of wood, rawhide, rubber, plastic or brass;
  2. Use a hammer with a flat, polished face to strike your C&S Tool’s chisels for greater work efficiency increased tool longevity;
  3. Through experimentation, determine and use the hammer weight(s) that best compliments the chisel’s weight and width, the hardness of the wood, and the natural frequency of your hand and arm;
  4. Make a handle for your hammer that follows sound ergonomic principles (versus marketing hype), fits your body, and helps you work with greater speed and precision. This series of posts about designing and making a handle should help;
  5. Less swingin more cuttin;
  6. Cut the wood with a sharp blade instead of beating it to slivers and prying them out with a sharpened screwdriver;
  7. Control your chisel’s depth of cut to prevent the cutting edge from binding in the wood, slowing the work down, and dulling the chisel;
  8. Do the “chisel cha-cha” but never the “chisel wiggle;” Just don’t.
  9. Don’t use the chisel to lever out waste, but instead flick waste out of joints with a quick twist of your wrist without slowing down or setting aside chisel or hammer;
  10. Work to a rhythm to maintain your cutting pace and focus.

Thank you for reading this series of articles. Until we meet around the water can next, I have the honor to remain,

YMHOS

If you have questions or would like to learn more about our tools, please click the “Pricelist” link here or at the top of the page and use the “Contact Us” form located immediately below.

Please share your insights and comments with everyone by using the form located further below labeled “Leave a Reply.” We aren’t evil Google, fascist facebook, or thuggish Twitter and so won’t sell, share, or profitably “misplace” your information. If I lie may my forehead tattoos melt.

Part 1 – Hammer Varieties

Part 2 – Hammer Faces

Part 3 – Hammer Weight

Part 4 – The Chisel Cha-Cha

Part 5 – Rhythm & Song

Part 6 – Hammers & Health

Hammers to Use With Chisels Part 5 – Rhythm & Song

A masterpiece goban made in 1910 from a single block of wood. Overall height: 29cm (11.4″); 45.2×42.4cm (17.8″square) x thickness: 16.1cm (6.3″). This is the old style goban and a little smaller than modern models.

This life’s hard, but it’s harder if you’re stupid.

George V. Higgins, The Friends of Eddie Coyle

In previous posts in this series about the characteristics of the hammers Beloved Customer should use with C&S Tools chisels, we looked at factors such as the type of hammer to use, the sort of face a hammer should have and how much it should weigh. We even examined ways to use our chisels and hammers more effectively when cutting mortises, and how to avoid the dreaded chisel wiggle. It was a footloose and gleeful post.

This time your humble servant will delve a little deeper into how to use hammers and chisels as a dance team.

The photos above and below are of gameboards, and while gameboards are not really the subject of this post, these photos illustrate an aspect of precise work with chisel and hammer intended not to create a shape to please the eye, but an artistic sound to improve concentration. Perhaps you never have thought about using a chisel to make beautiful sounds, but many of our Beloved Customers that make musical instruments professionally are focused like a laser on this very objective. I hope you will find this little article amusing.

Natural Frequency

Much hammer and chisel work is very repetitive with motions repeated thousands of times in a single day, each motion consuming time and energy, hopefully with precision and speed. Are time, energy, precision, and speed important to you? I propose that “Sure and steady wins the race,” sooner and more efficiently than a 2lb steel woodpecker on meth. If these factors matter not to you, then I will include some colorful bubblewrap in your next order for entertainment purposes.

If you studied pendulums and harmonic motion in physics classes you understand that every moving object, from watch balances, to buildings, to mountain ranges (yes, mountains wiggle) have a natural “frequency” that defines the vibration of that object when subjected to specific forces. This reliable characteristic is why both mechanical clocks and a quartz crystal timepieces can keep accurate time. Like the pendulum in a grandfather clock, within a certain range of energy input, the longer and heavier an object is, the longer it’s natural frequency is likely to be.

In the case of hammer work this means that a man with a long, heavy arm and hammer combination will naturally swing a hammer cyclically slower than a man with a shorter lighter arm/hammer combination. That does not mean one is better than the other, it just means that an arm/hammer combination will work most effectively if the assembly’s natural frequency is worked with instead of fought against.

There are several ways to reliably adjust this natural frequency, for instance changing the weight of the hammer/chisel combination, or changing the length of the hammer handle. The closer the hammer’s weight and length are to the ideal for a particular arm/chisel/wood combination the easier it becomes for us to consistently adjust the assembly’s frequency and rhythm of the cutting process while controlling the impact force and thereby the depth of cut.

Rhythm

So let’s say we have the hammer/chisel/wood/arm combination (or saw/wood/arm combination) where we need it to be and we start cutting wood in a repetitive motion. If we keep this motion consistent, like a clock pendulum, we will develop what in music is called “rhythm,” a phenomenon deeply rooted in the human beast. Rhythm is critical to cutting speed and precision. Anything that breaks that rhythm other than the job being completed is counterproductive.

Rhythm has psychological benefits too because it helps us to maintain focus and thereby accomplish more work quicker and more consistently.

But how does one maintain rhythm when cutting mortises? Perhaps you have an internal metronome. If not, it may help to take advantage of an extremely ancient tool called the “work song,” later called the “sea shanty.” These were songs sung by men and women working in groups to coordinate and make more efficient their physical labor, whether planting rice seedlings in flooded fields, pushing wagons over mountains, dragging logs through forests, or pulling ship anchors up from the depths. If the song is in your head instead of just your ear you can easily adjust the song’s rhythm to match the natural frequency of your body and your tools.

I hum a work song when I do repetitive chisel work. I suppose two of my favorites are “What will we do with drunken sailor,” and “Roll the Old Chariot Along.” There are also lots of old plantation and work gang songs that work well. Two modern tunes I sometimes hum are “Señorita” and “Poker Face,” depending on my mood. Here is another, more unusual version by an entertaining German polka band.

Just so there’s no confusion, unlike Miss Germanotta, I don’t wear a sequin bikini and white Gestapo hat when I hum Poker Face while sawing wood or chopping scarf joints. If I shaved my legs and trimmed my beard I am confident I would look devastating in such an outfit, but I must refrain for some of my chisels are quite sensitive in matters of decorum. Don’t hate me because I’m beautiful (ツ)。

Summary

The main points I wanted to make in this article can be summarized as follows:

  1. Whether you realize it or not, your chisel, hammer, and body have a natural frequency that you can either work with to your advantage, or fight against;
  2. Using the principles listed in earlier posts in this series you can develop a chisel/hammer combination that balances well with your body, adjusting your natural frequency to improve your productivity and precision;
  3. Develop a rhythm when doing repetitive work that compliments your natural frequency and that helps you maintain both focus and a steady wood-eating pace. Work songs really help. Sequin bikini, Ray Bans, and facial iron mongery are optional.

Well that’s enough German polka music and doggie apparel for now. In the final article in this series we will examine some health matters related to hammers. Y’all come back now, y’hear.

YMHOS

The traditional Japanese roof structure. Notice that no members are subject to tension forces, only compression and bending. Notice also that the bottom of the central beam is finished with just an adze in the classical “naguri” style.

If you have questions or would like to learn more about our tools, please click the “Pricelist” link here or at the top of the page and use the “Contact Us” form located immediately below.

Please share your insights and comments with everyone by using the form located further below labeled “Leave a Reply.” We aren’t evil Google, fascist facebook, or thuggish Twitter and so won’t sell, share, or profitably “misplace” your information. If I lie may all the sequins fall off my lederhosen!

Part 1 – Hammer Varieties

Part 2 – Hammer Faces

Part 3 – Hammer Weight

Part 4 – The Chisel Cha-Cha

Part 5 – Rhythm & Song

Part 6 – Hammers & Health

Hammers to Use With Chisels Part 4 – The Chisel Cha-Cha

Your Most Humble and Obedient Servant hard at work. A dab of skin lotion may be called for.
Stan Laurel

You can lead a horse to water, but a pencil must be led.

Stan Laurel

In previous articles in this series about hammers to use with our chisels, your humble servant discussed the varieties of suitable hammers, the appropriate faces on those hammers, and recommended some weight ranges. In this article I will examine some important hammer and chisel techniques Beloved Customer should consider to make your chisel work more efficient and help your chisels last longer.

The Chisel Wiggle

Something to keep in mind about our chisels when beating on them is that their cutting edges are intentionally and carefully hand-forged and heat treated by experienced blacksmiths (none with less than 40 years independent experience) to be especially hard to meet the demands of professional craftsmen for the extra sharpness and cutting longevity only hard, fine-grained steel makes possible. They are not the sharpened Chinese screwdrivers sold by the big corporations that amateurs are accustomed to using nowadays.

To maximize the advantage such excellent steel affords, Beloved Customer must avoid driving the chisel so deeply into the wood when cutting mortises, for example, that the extreme cutting edge binds in the wood forcing the user to wiggle the chisel forward and back to loosen and extract it from the cut. I call this undignified movement the “chisel wiggle.”

Your humble servant realizes this is contrary to what many woodworking gurus teach, but I unabashedly assert that it is irresponsible behavior in the case of our professional-grade tools because binding the blade in the wood this way creates what I call a “high pressure cut” situation, placing a tremendous amount of clamping force on the thin metal at the extreme cutting edge. Doing the “chisel wiggle” in this situation will damage the cutting edge dulling it quickly. If you doubt this, please dig out your hand-dandy loupe and do a before-after comparison.

In addition, the time lost extracting the wedged-in-place chisel and the resulting interruption in the workflow caused by repositioning one’s hands, and perhaps even setting aside the hammer (egads!) while doing the chisel wiggle, makes it impossible to maintain an efficient cutting rhythm. If you doubt this, we double-dog dare you to do timed comparative tests. The difference in efficiency will become instantly clear.

People accustomed to using Western chisels with their softer, plasticy blades made from high-alloy high-scrap metal content steel with higgledy piggledy crystalline structure are actively taught to use the chisel like a crowbar to lever waste out of cuts. This is another type of “high-pressure cut” that damages the tool’s cutting edge at the microscopic level.

The mass-produced screwdrivers sold as chisels in the West nowadays are tough but relatively soft, can’t be made that sharp to begin with, and they dull significantly during the first few hammer strikes anyway, so most people can’t detect the edge degradation the chisel wiggle and prying create. Those who are satisfied with sharpened screwdrivers don’t buy our chisels so I have no advice for those poor benighted souls, only prayers: Namu Amida Butsu. But it is of little matter: they seldom have the sharpening and tool skills required to tell the difference anyway. Horse, meet water; Ah… not thirsty I see.

The Chisel Cha-Cha

Now that we have explained what not to do, let us examine what we should do instead.

Here is wisdom: A more efficient, more craftsman-like way to remove waste when cutting a joint is to stop striking the chisel with hammer during each cut just before the chisel binds, or just before waste clogs the joint, and then, without changing your grip on its handle, or losing a beat in your cutting rhythm, flick your wrist forwards or backwards so the chisel blade flips the waste out of the joint you are cutting. And Voila! No time lost extracting a stuck blade or setting down and picking up your hammer; and no repositioning your grip on the chisel. And the cutting work can continue uninterrupted without the wasted time and effort of extracting a bound chisel thereby damaging the cutting edge.

It’s very much a crisp dance step performed by hammer and chisel with a rhythm something like: “chop, chop, flick, (reposition chisel for next cut)… chop, chop, flick, (reposition chisel for next cut) … chop chop flick.” With each “flick” bits of cleanly cut wood fly out of the joint. I call this series of movements the “ chisel cha cha.”

Next let’s examine the nexus between hammer weight and avoiding the dreaded chisel wiggle.

The Dance of the Hammer and the Chisel

Cha Cha

As mentioned above, the way to avoid the chisel wiggle and instead dance the more graceful chisel cha-cha is to avoid banging the chisel into the cut too deeply/tightly. You need to stop hammering just before the blade binds in the cut, precisely controlling the depth to which your hammer drives your chisel, stopping just before the blade binds. Easy to say but difficult to accomplish if the hammer is too heavy. On the other hand, too light a hammer is also inefficient. Therefore, there is no one-size-fits-all-situations hammer weight.

A well-balanced, stable hammer with a handle that fits your hand/arm, and of a controllable weight makes it easier to develop and maintain this precise, unconscious control. Lots of factors are involved but the weight of the hammer/chisel combination is the most important one of the bunch.

How to determine the best weight? Of necessity it varies with the work, tool, material and the nut holding the hammer so trial and error is the only practical solution. But generally, a hammer that feels a bit on the light side is best. And a good handle makes a world of difference. More on that in future posts, so stay tuned.

Summary

The following summarizes the points you should take away from this series of articles so far.

  1. Select a hammer weight that balances well with the width and weight of the chisel, the hardness of the wood you are cutting, your body, and the type of cuts you are making.
  2. The hammer should not be so heavy that you cannot precisely control the chisel’s depth of cut while maintaining an efficient cutting rhythm close to the natural frequency of the hand/arm/hammer assembly;
  3. Don’t drive the chisel so deeply into the wood that it binds forcing you to wiggle the chisel, or heaven forfend, set down your hammer to extract it;
  4. Use your sharp chisel for cutting wood, not like a screwdriver or crowbar for prying out waste. Instead, use your sharp blade to cut the waste loose and then remove it from the joint by flicking your wrist without stopping, disrupting your cutting rhythm, or setting down your hammer.

There is nothing to stop you and your hammer and chisel from performing as a precise and graceful, but oh so violent, dance team, so enjoy!

In the next installment in this tale of bold hammers and graceful chisels we will examine in more detail the rhythmical motions involved in doing chisel-work efficiently and the role of the hammer in that dance. Sorry, no champagne or pretty girls but there just might be a song or two. Until then, I have the honor to remain,

YMHOS

If you have questions or would like to learn more about our tools, please click the “Pricelist” link here or at the top of the page and use the “Contact Us” form located immediately below.

Please share your insights and comments with everyone in the form located further below labeled “Leave a Reply.” We aren’t evil Google, fascist facebook, or thuggish Twitter and so won’t sell, share, or profitably “misplace” your information. May my chisel forever wiggle if I lie.