And this is from my heart Which is deep inside my body: It’s better to look good Than to feel good
Fernando
This article is a little longer and more roundabout than your most humble and obedient servant’s previous posts, but I wanted to share with you some of Japan’s history, and examples of this country’s most fabulous practical art as produced by its blacksmiths and professional sharpeners as insight into the Japanese mindset regarding sharpening. But before I get into that, I would like to share some relevant words of wisdom from Hollywood’s wisest man.
The handsome gentleman in the picture above is Fernando (actually Billy Crystal). He is neither a blacksmith nor a sharpener of tools or weapons, but his insight into physical beauty and words of wisdom about happiness are pertinent to sharpening, as we shall see below. If you are not familiar with ‘Nando, I suggest you google him or view a video or two on NoobTube.
So what does this dapper Latin lover have to do with sharpening? And swords? Read on kind sir.
As ‘Nando taught the world, a wise person will not equate looking good with feeling good. Likewise, you would be wise to not confuse a blade’s appearance with its performance. Indeed, a blade that looks as sharp as the skinny end of nothing may not actually cut well in some applications. A good example is Japanese swords. Let me tell you a true story to illustrate my point.
When I was a university student in Japan, I was privileged to be entrusted with a number of swords that belonged at the time to the late Dr. Walter Compton, Chairman of Miles Laboratories and the inventor of Alka-Seltzer. He was a wealthy man who had a huge collection of swords obtained while an officer for the US military in Japan immediately after the war when Allied forces required the defeated Japanese people, on pain of death, to surrender all swords, civilian and military. Of course, many valuable and rare family heirlooms were surrendered or forcefully confiscated. Supposedly they all went to the bottom of Tokyo Bay in bunches, or were melted for scrap. But we know better, don’t we.
Towards the end of his life, Dr. Compton put a lot of money into having his better swords professionally sharpened, new shirasaya scabbards and furniture made, and formally evaluated in preparation for donating them to the Boston Museum of Art, where many of them reside in obscurity today. Sadly, due to progressive dementia, some of his most valuable swords were auctioned off without his permission. “The feckless sons of wealthy men” is the operative phrase in this case, I fear.
I assisted Dr. Compton’s representative by transporting over 70 of these swords to and from Japan and performing the necessary legwork to accomplish these goals inside Japan. During those years I held in my hands and feasted my eyes on rare and beautiful blades of great historical value several of which would have easily been designated National Treasures if they had been intended to remain in Japan (“National Treasures” may not leave Japan).
During those years I spent a lot of time meeting, questioning, and requesting services of the best sword sharpeners in Japan, learning much about swords, stones, and sharpening. Dr. Compton’s reputation was such, and his swords were of such rarity and high quality, that I had no difficulty persuading the very best craftsmen to work on them and speak with me, including a famous sword polisher named Mr. Okisato Fujishiro.
Interestingly, in Japan such craftsmen are called “Togishi” (研師), an unambiguous word that can only be translated as “sharpener.” However, in the West these same Japanese craftsmen are called “ Sword Polishers.” In the post-war context, this actually may be more accurate than the Japanese term. In a post-war world it’s certainly more politic.
A very subtle, high quality sword tip brought to life by the arts of the Sword Sharpener. Notice the peaceful elegant hamon (wavy milky pattern at the cutting edge oriented towards the top of the photograph), the grain of the steel just below the hamon, and the burnished polish surrounding the fuller. Notice also the clean delineation where the blade tip, the “boshi,” begins. Very nice work.
Before the elimination of the caste system Japanese society had 4 main divisions labeled “Shi No Ko Sho,” meaning, in descending order, Warrior (samurai), Farmer, Craftsman, and Merchant at the bottom. The Emperor, Court Nobles, and Shoguns were above these strata, although of the three, only the Shogun possessed any actual power because the man with the sword makes the rules, and those without weapons do as they are told and quickly, or they go away permanently. Thus it has always been because both fool and wise man leak red sticky stuff.
Blacksmiths and sword sharpeners were both in the craftsman caste, but curiously the sword sharpener was above the swordsmith in rank. Depending on their support among the warrior caste, and with the generous application of yellow metallic lubricant, both swordsmiths and sword sharpeners occasionally obtained noble rank, an honor to which few craftsmen, farmers, and merchants could aspire. My point is that sword sharpeners, while of relatively lower caste, often had a perceived rank higher than their craftsman position would suggest.
Why was the Japanese sword sharpener of higher effective rank than the swordsmith? I haven’t seen documentation from back in the day confirming it, but I suspect it is because the sharpener turns the swordsmith’s plain steel blade into a thing of jewel-like sculptural beauty that almost seems alive. One only has to see a sword blade fresh from the swordsmith’s shop and compare it with the same sword after the sharpener’s ministrations to understand.
The Nikko Sukezane sword, a designated National Treasure of JapanThis sword is known as the “Nikko Sukezane,” Nikko for the temple commemorating the Shogun Tokugawa Ieyasu (徳川家康, January 31, 1543 – June 1, 1616) where it is stored, and Sukezane (助真 meaning “Aid the Truth) for the name of the smith who forged it for the Kamakura Shogunate (1185~1333). The blade’s shape and crystalline pattern above the hamon are characteristic of Sukezane’s work. This sword’s brother was in my care for about 2 years while it was being polished and appraised in Tokyo.This sword is another of Japan’s National Treasures. It was forged by a swordsmith name Nagamitsu (長光)during the same time period as the Sukezane above. The tang (nakago) is corroded by exposure to bare hands over a period of around 700 years. Multiple holes were drilled in the tang to accommodate a variety of hilts during its lifetime. I also had a sword by this same smith and of very similar appearance in my care for about one year, although it was not owned by Dr. Compton.A different Nagamitsu sword, also listed as a National Treasure. An unusually healthy example.
I have even witnessed a skilled sword sharpener create a beautiful hamon (a pattern formed on the edge of a sword by the steel’s crystalline structure) on a sword forged by a famous smith that had lost the crystalline structure necessary to form an actual hamon. While a deception of sorts, the intention was not to deceive for profit (the sword was donated to a museum), but to return an unusual and historically important sword to its former beauty, a glory that would have been lost but for the sword polisher’s exceptional skills.
A dramatic chouji midare hamon in a modern sword. The pattern exists not because of a lamination or some silly pattern welding but because of the changing crystalline structure of the blade that results from the differential heat treatment process performed by the blacksmith. It only exists because of the swordsmith’s skill, but it is only visible and beautiful because of the sword sharpener’s stones and his skill with them. Is the blade sharp? Don’t judge a blade’s performance by its polish.
If we liken the swordsmith with his forge and hammer to the quarry worker cutting marble from the mountain, then the sword sharpener is Michelangelo cutting the Pietà with his chisels and files. Both craftsmen work on the marble and blade respectively, and both are essential. The sculptor uses steel to bring stone to life, while the sword sharpener uses stone to bring steel to life.
Another dramatic hamon in a modern sword. This pattern is a surface manifestation of the steel’s crystalline structure as created by the swordsmith, but revealed and made glorious by the polisher
But despite these artistic abilities, modern “Sword Polishers” have no interest in and put forth no effort to actually make a sword blade cut well. Indeed, in some cases, they actually intentionally dull the blade so it can’t cut, thereby making it safer. This intentional vandalism is called “habiki.”
A different style of hamon pattern on a blade with a different grain pattern. Notice the different colors and lines inside the hamon. All these crystalline details are categorized, have names, and are studied intensely by aficionados. All things equal, this sort of pattern and color is considered to be more elegant and desirable than the two more dramatic hamon pictured above. An extremely deep rabbit hole, I assure you. Please watch your step!
The Key Point
Here’s the key point your humble servant wants Beloved Customers and Gentle Readers to grasp: Despite the long years of apprenticeship, advanced skills learned, and gallons of red sticky stuff unintentionally leaked by sword sharpeners, the frank sword sharpeners I have spoken with all admitted that, of all the craftsmen in Japan that used edged tools, woodworkers like carpenters, cabinetmakers, and joiners routinely create sharper blades despite those blades not appearing to be as sharp as swords. This is consistent with my direct experience of handling over 70 swords before and after being worked on by sword sharpeners.
While there is great pleasure to be found in polishing a plane or chisel or knife blade to levels of great beauty, do not make the mistake of equating appearance with performance.
Appearance aside, and looking strictly at cutting performance, will a chisel or plane or knife blade skillfully sharpened on a 15,000 grit stone cut better and longer than if sharpened on an 8,000 grit stone? In the case of woodworking blades and kitchen knives, no it won’t. In fact, due to higher levels of friction the higher degree of polish produces in the cut, it will certainly not cut wood as well. More on this subject later.
An oiirenomi chisel by Hidarino Ichihiro. The hazy silver of the hard steel hagane lamination and the cloudy grey of the softer iron jigane lamination, combined with the shape and upward curvature of the corners of the lamination are indicative of excellent craftsmanship by the blacksmith, superior skills of the sharpener, and wonderful stones. Such details are considered sublimely beautiful to tool connoisseurs. But will the edge cut well? We can’t tell from this photo.
Keep in mind that the stones used to apply the beautiful polish and accentuate the hamon on Japanese swords are different from those used to sharpen woodworking tools. For instance, the uchigumori stones sword polishers use are small slices of soft stone glued to paper using urushi lacquer adhesive, and are only 3,000~5,000 grit. These small slips of stone are rubbed on the sword blade using thumb and fingertips.
Here is a link to a blog showing Mr. Fujishiro, son of one of the sword sharpeners I employed back in the day, making and using these thin slices of stone.
Tools are designed to perform specific tasks. Although it could do the job, more or less, you wouldn’t use a crescent wrench to stir spaghetti sauce on the stovetop would you? A longish spoon just might work better.
Does a sword’s edge need to be extremely sharp to cut the enemy effectively? No, it doesn’t because the sword’s geometry, blade orientation, speed, impact force, and the swordman’s technique drive its cutting effectiveness much more than simple sharpness. So sword sharpeners in Japan, and probably most of the world too, have always been more focused on edge durability, resistance to chipping, and appearance than absolute sharpness. In modern times, when swords are almost never used to cut living flesh outside of Saudi Arabia, the blade’s appearance may be critical, but sharpness is not a practical concern.
Another example is food preparation knives. A chef’s knife looks terribly sharp, and as it slices tomatoes and fillets fish we can see that it cuts well. But how sharp is it really? In comparison with a joiner’s plane blade, not really that sharp. But both tools are exactly suited to the job assigned them.
The “willow-leaf” yanagiba chef’s knife shown above is most effectively used in slicing or drawing motions, much as expert swordsmen use their weapons against enemies. In this style of cut, a smooth and uniform cutting edge does not perform as well as a more ragged, serrated edge as seen at the microscopic level. Therefore, there is little if any practical benefit (assuming beauty is not practical) to be obtained by sharpening a kitchen knife beyond 1,000~3,000 grit. In fact, at least in Japan, these are the upper-limit of stones in daily use by professional chefs of all varieties. Yes, and that includes sushi chefs.
But don’t misunderstand my point: In the case of both swords and yanagiba hocho knives, the bevel angle must be correct for both the blade being used and the material being cut, and the microscopic edge must be a clean intersection of planes. If you get these two factors wrong, a crescent wrench might work just as well.
The other point I want to make is that, while I enjoy using high-level skills to give a beautiful appearance to extremely sharp blades, such a blade will not perform better than an identical blade of equal sharpness but with a less polished appearance, and the extra time and money spent on improving outward appearance is wasted on bread and butter work.
Since easily-deceived, morally-challenged Hollywood celebrities have the answers to all the world’s problems (at the cost of other people’s money, labor and freedom, of course) perhaps our quest for the sharp edge can benefit from the wisdom of the famous Latin lover ‘Nando, Tinseltown’s most elegant star. ‘Nando once shared his father’s advice that it is “better to look good than to feel good.” Accordingly, perhaps we should all go crazy nuts and polish our blades like beautiful but dull museum swords and wear waistcoats and cravats as we cut sliding dovetails and plane door stiles. After all, one must be ready for every photo op. In this way, our woodworking blades may be worthy of ‘Nando’s highest praise: “You, dahling, you look mahvelous, absolutely mahvelous!”
Fernando Lamas in “The Merry Widow.” The crease in his pant leg could slice bacon.
No, on second thought, while there is much one can learn from Fernando’s elegant philosophy, his standards of beauty and suffering are too high for me. I would rather be a simple joiner or cabinetmaker in stained work clothes that has the ability to make a blade exceptionally beautiful but chooses not to expend the time and cost required to do so most of the time, rather than someone who doesn’t because they can’t.
Although Fernando has a pressing appointment for a tango lesson (discretion prevents me from naming the young lady he will be pressing) and won’t be providing further insight today, our adventures in sharpening Japanese woodworking tools will continue in Part 5 of this series.
Let’s meet at Tsukiji for sushi afterwards. Until then, I have the honor to remain,
YMHOS
If you have questions or would like to learn more about our tools, please click the “Pricelist” link here or at the top of the page and use the “Contact Us” form located immediately below.
Please share your insights and comments with everyone in the form located further below labeled “Leave a Reply.” We aren’t evil Google, fascist facebook, or treacherous TikTok and so won’t sell, share, or profitably “misplace” your information. If I lie may all my dance steps turn to stumbles.
“A wild boar was sharpening his tusks upon the trunk of a tree in the forest when a fox came by and asked, Why are you doing that, pray? The huntsmen are not out today and there are no other dangers at hand that I can see. True, my friend, replied the Boar, but the instant my life is in danger, I shall need to use my tusks. There will be no time to sharpen them then.”
Aesop (621~565 BC)
It’s nice to have a philosophy on a subject because it helps one distill random thoughts down to the essentials.
Allow your humble servant to explain his philosophy about sharpening woodworking tools, not because it is charming and unique, and not because you should emulate it, but because it will provide insight into the things written in this blog and elsewhere. Use it to calibrate your BS meter. It’s often nose-deep when people talk about sharpening.
My philosophy regarding sharpening was shaped by my experience as a carpenter, contractor, commercial cabinetmaker, and joiner working under pressure, against a clock, sometimes with a boss watching with eagle eye, and often in front of customers, not as a hobbyist fiddling around in a garage workshop. Married young with a growing family to support, I quickly discovered that children eat constantly and in ever-increasing quantities, so efficiency was and is important to me.
Efficiency was also important to the Clients who hired me. Sharpening and maintaining tools is, of course, part of the job, but from the viewpoint of Client or employer it’s wasted time, so it’s important to minimize time spent fiddling with tools during the work day. Accordingly, I followed the example of craftsmen I respected and started the day with sharp tools in good working order, and kept spare planes and chisels sharpened and ready to go as backup.
Self-employment hammered into me the monetary value of time. It also taught me that quality sharpening stones and tools are expensive and wear out, and that to feed wife and babies every day I had to work efficiently to minimize time and money expended on maintaining tools, while maximizing the amount of work I accomplished between sharpening sessions.
I developed a strong dislike, nay hatred, for blades that fail to perform, refuse to become extremely sharp, that dull quickly, or take too much time and effort to sharpen. I loathe them not just because they are irritating, but because they waste my time and money. Even considering the higher initial cash outlay, the cost-effectiveness of handmade, professional-grade tools in helping my mind and hands do good work and feed the family became as obvious as a burning road flare on a midnight highway.
You, Beloved Customer, may not feel the time and financial pressures that professionals do, but owning professional-grade cutting tools and learning how to sharpen them in an efficient and professional manner will make woodworking less frustrating, more profitable, and more enjoyable.
What is your philosophy?
The journey will continue in Part 4 with wisdom from a celebrity and pictures of pretty swords. Until then, I have the honor of remaining,
YMHOS
Sharpening a plane blade at the jobsite, then back to work, jiggity-jog.
YMHOS
If you have questions or would like to learn more about our tools, please click the “Pricelist” link here or at the top of the page and use the “Contact Us” form located immediately below.
Please share your insights and comments with everyone in the form located further below labeled “Leave a Reply.” We aren’t evil Google, fascist facebook, or thuggish Twitter and so won’t sell, share, or profitably “misplace” your information. If I lie may I never finish the journey.
You don’t have a soul, Doctor. You are a soul. You have a body, temporarily.”
Walter M. Miller Jr., A Canticle for Leibowitz
Life is neither a dead-end course nor a race, but a hard journey along many paths all leading to a single gateway. Without exception, all the physical things, possessions, financial wealth, qualifications, status, accomplishments and accolades we value and struggle like fevered demons to obtain and preserve in this life, even our own bodies, will all return to shadows and dust. What truly matters are the friends and family that journey with us, the kind deeds we do, the joy we share, the things we experience and learn along the way, and most importantly, the quality of our souls at the journey’s end, for these are all that will pass through that last gateway into eternity with us; Nothing else matters a handful of beans.
Woodworking can be a wonderful diversion and even a source of joy during this journey, one that can make our lives and the lives of those around us more pleasant. For many it is a way to keep body and soul connected. For those that rely on their tools to feed their families, the efficiency of that work, and the joy they find in doing it are not trivial matters.
Thoughtful woodworkers on this path learn early that dull tools are an impediment to making excellent wooden products regardless of the skill of the hand and eye that manipulates them, because, being an extension of the user’s mind and hands, a dull tool will often darken the mind and leaden the hand of even an accomplished woodworker.
Sharpening has always been the most important woodworking skill. It is no coincidence that for millennia the first thing apprentices were taught once they were permitted to handle valuable tools was how to sharpen them properly.
In our time the prevalence of machinery with built-in precision and spinning cutters driven by motors and sharpened by others has made it possible for those lacking even basic sharpening skills to represent themselves as craftsmen. Although they may be skilled, I believe such individuals are less craftsmen in wood and more machinery operators.
Those thoughtful souls who aspire to become accomplished woodworkers, and not just machine operators, need minimal sharpening skills. Untold thousands of years of human history verify the truth that all other woodworking accomplishments flow from this bedrock skill.
I believe, perhaps because the men I learned from and respected also believed, that free-hand sharpening is the way a skilled craftsman maintains his tools. My experience and observations over many years have confirmed the efficiency of this technique. It is consistent with my work-driven philosophy about sharpening which I will explain in more detail in the next post in this series.
Sharpening a blade free-hand is a zen-like activity. It requires observation. It requires muscle memory. It requires consistency. It requires composure. It requires meditative focus. And at the pinnacle, it requires one to feel and hear work being done in a place one cannot see, a place where destruction creates order; where nothing becomes something.
Some will disagree with my beliefs about free-hand sharpening, especially the machinist-types, the scribblers and gurus promising instant results in a few hours for the price of a book, DVD, or class, and the purveyors of sharpening jigs disinclined to work without “training wheels.” No mystery there, so I won’t even try to please everyone, just professional woodworkers.
When professional woodworkers gather in the presence of edged tools, they often talk about sharpening techniques and rare stones, and they are always curious about the quality of other men’s tools. In Japan, it is considered rude to pick up another’s tools and examine the edges, or even to look at them too hard, but the desire is always there nonetheless because it is human nature to compare oneself to one’s peers.
Indeed, much can be learned about a man’s quality standards and his skills from his blades. Perhaps the condition of one’s tools gives a tiny glimpse into the owner’s character.
What do your tools say about you? Some are terrible gossips, you know. (ツ)
Allow me to end this article with a quote from the best-selling book of fiction in human history:
End? No, the journey doesn’t end here. Death is just another path. One that we all must take.
J.R.R. Tolkien, The Return of the King
YMHOS
Tianmen Gate, China. 999 steps to the natural gateway above.
If you have questions or would like to learn more about our tools, please click the “Pricelist” link here or at the top of the page and use the “Contact Us” form located immediately below.
Please share your insights and comments with everyone in the form located further below labeled “Leave a Reply.” We aren’t evil Google or fascist facebook and so won’t sell, share, or profitably “misplace” your information. If I lie may I never finish the journey.
It is well with me only when I have a chisel in my hand
Michelangelo 1475-1564
This is the first in a series of 30 articles that describe the sharpening procedures your humble servant uses and recommends for Japanese plane and chisel blades. Links to the other 29 articles are located at the end of this one.
The purpose of these articles is to share with our Beloved Customers reliable techniques for sharpening and maintaining the tools we sell consistent with standard practice among advanced Japanese professional woodworkers.
Each article in this series describes separate but related aspects of sharpening Japanese woodworking tools, especially chisels, plane blades, and kiridashi knives. While 30 articles sounds like a lot, it is certainly not enough to cover all details of this first and most important woodworking skill. No doubt Beloved Customer could add chapters based on your own experiences.
If it seems less than concise, please understand that it is written with enough detail so even the first-time sharpener can benefit from it, but with enough advanced techniques to stimulate the interest of even jaded professionals.
Of course, if I wrote only for the professionals, then those new to the process would be left confused and frustrated. Likewise, if I wrote only for Beloved Customers new to sharpening Japanese tools, then the professionals reading it would begin to make snoring noises (highly intelligently, of course). I hope you can appreciate the conundrum and forgive the resulting compromises.
Unlike most of what is available on the internet, these techniques are not based on irresponsible rumors expounded as fact in smelly, troll-infested forums, articles in magazines written by self-educated journalists, or silly videos on NoobTube.
I didn’t invent the techniques described herein, but they are nonetheless my techniques, the results of hard experience working with, and lessons learned from, professional craftsmen in Japan over a period of some 30 years, sometimes working as a professional woodworker, and other times working as an employee of two of Japan’s largest “super” general contractors.
This series of posts has 4 objectives: To save Beloved Customer (1) time, and (2) money, and to make your Japanese blades (3) sharper, and (4) cut longer. These benefits are worth obtaining if you are serious about woodworking, as professional woodworkers must be, but the requisite attention to detail and manual skills may not come easily to some.
Indeed, you may need to unlearn bad habits, and develop new habits, skills and muscle memory in order to achieve these objectives. This is not a 90 minute process but will take weeks, maybe months. It certainly took me years to completely unlearn my bad habits and develop the necessary skills. I am confident these writings will make the process more efficient for you, if you follow them. I only wish I had the benefit of this information all in one place back in the day.
Of course these are not the only viable solutions available. Many woodworkers are self-taught nowadays and learn how to sharpen from books, magazines, videos, and classes, and have developed methods that work well for them. I am not minimizing those successes, merely proposing methods to further advance their skills.
However, be aware that several of the techniques described herein may directly contradict the teachings of the Holy Woodworking Gurus oozing virtue received from the Giant Pixie and who make a living scribbling, making videos, and teaching classes about woodworking.
These guys achieve popularity and financial success by helping amateurs get better results quickly after reading only a few pages in their $29.99 book, or attending their 2-hour class. To maintain their popularity and income, the techniques some (but not all) of them promote must be dumb-as-dirt simple, and often involve shortcuts and gimmicks yielding “instantaneous gratification,” without the need to learn real skills. Nothing wrong with that, but is it good enough for you?
Unlike amateurs satisfied with superficial results, professionals need real skills that yield consistent results long-term.
Don’t be shocked, but I am not offering 90 minute gratification in exchange for your money.
There are no “sponsors “of this blog. There are no advertisements, period, so this blog generates no direct income.
I have no “click goals, ” or “SEO strategy” to deploy; I don’t care if you “like” me, “subscribe” to my BoobTube channel (I don’t have one), or buy access to my online tutorials (don’t do those either). In fact, this website doesn’t require you to register, it doesn’t use Google Analytics, it doesn’t embed cookies in your computer or attempt to mine your data in any way.
The advice I offer is free, but if you prefer gimmicks to lifetime skills, the techniques described here are not for you. I am sure such Gentle Readers can find some brightly-colored bubble-wrap to keep themselves entertained.
Do I have a profit motive? Nope, this information is free. I am not a sneaky corporate shill trying to sell books, magazines, videos, video games, advertising space, banners, VPN services, home security systems, sharpening stones, or heaven forfend, powertools with laser sights. I have never been lent or given a tool in exchange for a review, nor have I been wined, dined, laid or paid to write good things about crappy tools.
Over the years, my professional needs and curiosity led me to purchase literally hundreds of planes and chisels made by many blacksmiths and companies. The operative word here is “purchased.” With my own money. Not a single one was ever given or loaned to me. Some I later sold, the good ones I kept. The two points I want to make are: (i) I put my money where my mouth is; and (ii) I have no financial conflict of interest.
I have several motivations for writing and sharing this information. One is selfish convenience. Over the years, people have asked me how to sharpen Japanese tools, and I have explained the process in letters, emails, and in person many times. This series of articles is essentially a collection of my scribblings on the subject over several decades, and is intended to save me time explaining processes.
Another motivation is to ensure that the people who buy the small number of hand-forged tools we sell (our “Beloved Customers”) know how to properly sharpen and maintain them, so that those tools will provide long, productive, high-performance service. Our tools deserve to be properly maintained.
Some who experience difficulties with Japanese woodworking tools blame the tools, but in many cases the problem lies not in defective tools but rather stems from an insufficient understanding of basic sharpening principles and lack of experience. Without exception everyone with aspirations to be an excellent woodworker must go through that learning process at least once. Your humble servant hopes these scribblings will enlighten more than confuse.
But my primary motivation for making this series of articles available at no cost is to fulfill a promise I made to freely share with others the techniques I learned from the many carpenters, joiners, blacksmiths, tool makers and professional sharpeners in Japan who taught me. In exchange for this free information all I ask of you, Beloved Customer, is an open mind and eager hands. Please, don’t cut either of them.
The adventure will continue in Part 2! But be forewarned, the price of admission may double. (ツ)
YMHOS
If you have questions or would like to learn more about our tools, please click the “Pricelist” link here or at the top of the page and use the “Contact Us” form located immediately below.
Please share your insights and comments with everyone in the form located further below labeled “Leave a Reply.” We aren’t evil Google, fascist facebook, or thuggish Twitter and so won’t sell, share, or profitably “misplace” your information. If I lie may the bird of paradise fly up my nose.
f set up and maintained properly, the blades of quality chisels and planes will endure many decades of hard daily use. In this article your most humble and obedient servant will describe a useful tool Beloved Customer can make yourself, one that will not only make maintenance easier and more efficient, but will make your tools perform better and last longer.
Historical Precedence
Versions of the oilpot have been used in all nations since ancient times. Indeed, we know from the archaeological record that tallow, simply rendered animal fat, was commonly placed in open grease pots to use as a tool lubricant in Europe and America from pre-Roman times right up until petroleum products, including petroleum-based waxes, became widely available in the 1920’s. I am told that the black crust found on many antique plane bodies (wood planes not airplanes) and workbenches is a remnant of this tallow, albeit oxidized, hardened, and combined with dirt.
Indeed, I can recall my father, uncles, and grandfather using sticks of paraffin caning wax for the exact same purpose when I was a child, and before that my English ancestors probably used tallow candle stubs.
Vegetable oil was more commonly used in Asia, and probably in Europe as well.
I haven’t tried soft tallow as a lubricant and probably never will since rancid fat has even less appeal to me than rancid vegetable oil, but I’m confident you will find the solution described below a serious improvement over these ancient methods.
Corrosion Protection
It’s a sad truth that the blades of woodworking tools often receive more damage while they impatiently wait to be used than when they are actually being used. Thankfully, microscopic pitting at the cutting edges of steel tools this sort of neglectful corrosion produces can be easily avoided.
When not in use, please store your chisels, planes and handsaws where they will be protected from dings, dust and large temperature swings. And oil your blades after every use to limit their exposure to oxygen, moisture, and chemicals that might persuade your expensive blades to “turn red and go away.”
A speedy and convenient way to apply good oil to your blades is to use an oilpot, or aburatsubo (ah/boo/rah/tsu/boh 油壺) as it is called in Japan, similar to the one in the photo above. This is an effective, inexpensive, and time-proven tool for this purpose, certainly better than bottles and more economical than spray cans.
Friction Reduction
Oil pots are useful not only for keeping corrosion at bay, they also help minimize the friction your chisels, saws, planes, and knives generate when cutting wood, as well as the energy you need to expend in cutting. By using an oilpot to reduce friction as your blade cuts wood, that same wood, and especially the “hairy” fibers that project into the kerfs of sawcuts, will not deflect the blade away from your intended line of cut as easily, noticeably increasing the precision of your work. Do you doubt me? Give it a try and prepared to be pleasantly surprised
Making the Essential Oilpot
In Japan, an oilpot is traditionally made by cutting a joint of well-dried, large-diameter bamboo into a cup 3 to 4 inches deep. If you don’t have access to bamboo where you live, a hollowed-out piece of some close-grained wood suitable for making water-tight barrels, such as white oak, or a plastic mug, or even a segment of capped PVC pipe will work just as well. The important thing is that the container not be made of metal, glass, ceramic or any other material approaching the hardness of a chisel blade. While convenient and sized right, tin-plated steel cans are risky.
Shape the bottom or foot of the cup so it will rest on a more-or-less flat surface with a few irregularities. Some people scallop the bottom and foot so it rests on only three or four spots at the foot’s perimeter thereby making it more stable on irregular surfaces. And a piece of sandpaper glued to the bottom of the container will prevent your planes from dragging it around when you pass their soles over the wick.
If you use bamboo or wood, be sure to prime and paint both the inside of the cup, and underside of the foot, with a high-solids urethane or polyurethane paint. I used a natural urethane extracted from the cashew tree called “Cashew” on the bamboo joint in these photos. The gaudy orange color is not a fashion statement, but makes it easy to differentiate my oilpot from others on a jobsite
If you make your oilpot from bamboo or wood, after painting it be sure to line the inside of the cup with an unbroken sheet of aluminum foil to prevent the oil from soaking through. The paint alone will slow down the oil’s movement through the wood’s fibers, but sure as hogs are made of bacon, without an impermeable liner of some sort, it will eventually seep out making a mess. An aluminum foil liner will fix this.
Next you will need some clean, white, cotton T-shirt fabric. Used clothing is fine. White because you want to be able to tell how dirty the fabric is at any time. T-shirt fabric because it’s knitted, not woven, and sheds the least fibers, unlike flannel. Clean because pixies hate it. If you don’t believe me, just ask them.
Roll the cloth up very tightly into a wick just a hair smaller in diameter than the inside of your container and bind it tightly with string or thread. You should be able to force this dense cloth wick tightly into the cup with approximately ½” projecting above the lip. It must be a tight enough fit to prevent the wick from falling or pulling out accidentally, but not so tight it breaks the container. It will take several tries to judge just the right amount of fabric, so be patient and keep at it until you get it right.
Add Oil
Now that the oilpot is made and wick installed you need to add some oil. Just soak the cloth wick with your favorite lubricant and you’ll be ready to rock-n’-roll like Zeppelin. It will take some time for the oil to saturate the dense wick, so be patient or it may overflow without saturating the wick. I get impatient and spill a little oil sometimes (ツ).
In Japan, I was taught to use vegetable oil and change the wick when it became rancid, which it always did. But I recommend Beloved Customer be smarter than I was back in the days when dinosaurs roamed the earth and use a non-organic oil from the start. Stinky wicks are not only unpleasant, but more importantly, rancid oil encourages corrosion.
Some people prefer to use straight mineral oil or scented furniture oil, which is just perfumed, industrial-grade mineral oil. The lemony smell of furniture oil is nice. But please avoid any furniture polishes or oils that contain insidious silicon because it will weaken glue bonds.
Please also be especially careful to avoid linseed oil. A wick loaded with such oil is inviting spontaneous combustion, a dangerous inconvenience in a woodshop.
Some people prefer to use camellia oil, an organic product with a long history of usage as a lubricant, cosmetic and hair oil in Japan. But beware that the so-called camellia oil sold for rust protection nowadays is actually just mineral oil with a bit of yellow dye and some fragrance added, sold at an inflated price, much like commercial furniture oil. Caveat emptor, baby.
Mineral oil is a petroleum distillate sold as lubricant laxative in pharmacies. It’s not only cheaper than the fake “tsubaki abura,” or “sword tsubaki” sold as tool oil, but is higher quality and performs better than genuine camellia oil because it will not become rancid and gummy.
While it sounds strange, the best lubricant by far in my experience is a lightweight, light-colored 100% synthetic motor oil such as Mobile-1 (5W). I have tried regular motor oil too, but the synthetic variety smells better, lasts longer and seems to perform better. And while I like to flatter myself that I’m a “high-volume guy,” my chisels never get hot enough nor rev high enough to justify the zinc, organic sulfur, or chlorine compounds added to high-performance motor oils. Your mileage my differ. (ツ)
Oilpot Storage
Store your oilpot in a metal or plastic container with a lid when not in use to prevent abrasive dust from contaminating it. Some people make a container from a segment of PVC pipe with a flat end-cap glued on one end to form the bottom of their oil pot and a domed cap slipped on the other end to serve as a lid. I use a tin can with a slip-on lid to store my bamboo oilpot.
Place a pad of newspaper in the bottom of your container to absorb any oil seepage and cushion the pot from rattling around.
Even a plastic bag will do until you find something better.
Using the Essential Oilpot
This is the most important part of this article.
When you are cutting a mortise with your chisel, make it a habit to occasionally jab its cutting edge into your oil pot’s wick, and even wipe the sides and ura (flat) on the wick to lubricate the blade. You will be pleasantly surprised to find that this bit of oil will make your chisel work not only go faster, but more precisely and with cleaner results. Don’t worry, mon ami, the oil will not weaken glue bonds, so long as it doesn’t contain silicon, I promise.
Likewise, when using a handplane, occasionally swipe its sole over your oil pot’s wick, or rub the wick over the plane’s sole. This little bit of oil will greatly reduce friction, reduce wear on your planes’ soles, and give you more control. But, if you value your public dignity, be forewarned that the first few cuts you make after doing this will make you grin like a lunatic! (ツ)
The same benefits of reduced friction and increased precision can be found in the case of handsaws too, although the difference may not be as noticeable.
Before you store your tools away for the day, a dab of oil from your ever-present oil pot will prevent rust and frustrate corrosive iron pixies.
Maintaining the Essential Oilpot
During use, the cloth wick will naturally become frazzled, coated with sawdust and wood chips, and will discolor accordingly. Not a problem!
If, heaven forfend, you drop the oilpot and it hits the ground, Murphy’s Law of Buttered Toast dictates it will land oily-cloth down contaminating it with abrasive grit (unless you work in a cleanroom). If ignored, frikin Murphy will smugly use your oilpot to damage your tools and ruin your work. But never fear: simply brush the wick vigorously with a steel-wire brush and all the sawdust, wood chips, dust, grit and pixie golf balls will be gone. The sound you will hear while doing this will be Murphy gnashing his teeth in frustration.
Of course you always have a steel-wire brush close at hand to remove embedded grit from boards before planing them, right?
When the wick becomes too dirty for the steel wire brush to clean (difficult to imagine though that may be) you can either cut off a few millimeters to expose uncontaminated cloth, or replace the cloth wick to present a clean surface.
As the cloth wears, the wick will shorten and stop projecting from the oilpot’s mouth. When this happens, simply remove the wick and place some clean rags in the bottom to elevate it thereby restoring the necessary projection.
The oilpot is an ancient, dirt-cheap tool you will find to be an invaluable addition to your woodworking tool kit. I promise it will make you grin when using handplanes!
If you have questions or would like to learn more about our tools, please click the see the “Pricelist” link here or at the top of the page and use the “Contact Us” form located immediately below.
Please share your insights and comments with everyone in the form located further below labeled “Leave a Reply.” We aren’t evil Google, fascist facebook, or a Director of the CIA and so won’t sell, share, or profitably “misplace” your information. If I lie may ticks, fleas and biting flies be my only friends.
In this post your humble servant will introduce this blog’s purpose, my qualifications and motivations for writing it, and a description of the sort of subjects to be discussed.
The blog’s purpose is simply to share sound information regarding woodworking techniques, woodworking hand tools, and construction work with an emphasis on Japanese hand tools and techniques
Although woodworking and construction are universal human activities, Japan has unique history and traditions that have produced woodworking and building techniques many find interesting. Indeed, most Japanese woodworking hand tools are different in some ways from their Western counterparts, and must be setup, maintained and used differently.
Unfortunately there is a lot of blather on the internet and even in print on these subjects that, pound for pound, is as valuable as road apples and smells as sweet. I intend to provide a more professional viewpoint.
The content of this blog will not be a regurgitation by an amateur of things learned or plagiarized from books, magazines, NoobTube videos, or heaven forfend, stinking, troll-infested woodworking forums, but will be based on real-world professional experience.
What relevant professional experience do I have, you ask? To begin with, I worked as a joiner, cabinetmaker and carpenter for many years. I have worked in the construction industry most of my life as a contractor and direct employee of some of Japan’s largest general contractors. You could say I know the trade.
Much of what I know about woodworking and tools I learned directly from the professionals I worked with and tool makers whose opinions I sought out, most of whom have gone to the big lumberyard in the sky. You could say I had good teachers.
I no longer use tools on the jobsite, but I am still involved in the Japanese construction industry. I have lived, studied and worked in Japan off and on for around 30 years since first coming here 46 years ago. You could say I know the neighborhood.
I have a masters degree in architecture and engineering from a prestigious Japanese university and am bilingual in both written and spoken English and Japanese languages, so you could say I know how to research and ask intelligent questions about technical subjects and understand the answers.
But what about the quality of the information on this blog? In this question Gentle Reader’s blazing intelligence shines forth! You must judge the quality for yourself, but here are a few things you should keep in mind when doing so.
We live in a confusing era of fake internet experts, absolutely corrupt journalistic standards, and blogs and publications authored by lazy opportunistic shills. Is this evaluation too harsh? I don’t think so. But whether opinion or so-called scientific research, a wise man will consider the writer’s motivations which inevitably skew the focus, quality, and sometimes even the veracity of information he presents, especially in the case of blogs.
I think there are three common and not mutually exclusive motivations for people to write blogs. One is a desire to share useful, interesting information. I like to think this is my motivation.
Another motivation is a desire to be popular and make money in the process. For these gadflies, success is partly measured by the number of “clicks,” “likes,” and subscribers they get, and of course the acreage of banners and adverts on their webpage. Both their self-worth and income relies on infrastructure controlled by monstrously unethical companies like Google, facebook, Instagram, Twitter, YouTube and Patreon, and the funding of viewers and sponsors. I pity them.
I have no problem with people touting a product or service or belief. Who knows, the information may be useful, so long as it doesn’t include too many lies or exaggerations and the touter is honest about his relationship with the item or service he is touting, as I am with my products. Sadly, too many bloggers, BoobTubers, and “Influencers” don’t reveal sponsor contributions in cash or goods but pretend their opinions and reviews are unbiased. Such behavior is indisputably unethical. I think a famous French soldier expressed my thoughts about such dishonest people well when he said: “I don’t want to talk to you no more, you empty-headed animal-food-trough wiper! I fart in your general direction! Your mother was a hamster, and your father smelt of elderberries!”
C&S Tools will never accept sponsorships, contributions, banners, or freebies. We have no SEO goals. Those who want to read the things I have to share must find this blog without guidance from the Silicon Valley decepticons.
Perhaps the third blogger motivation is a disease called “writer’s dysentery.” This horrific affliction makes the victim feel sick in their guts unless they write and post something, anything, everyday regardless of relevance or quality. Many scribbler-types suffer from this frightful disease and practically gush like a trash pump. Thankfully, your humble servant is not infected with this malodorous malady. I spend too many hours every working day writing boring but necessary documents for my company and clients and the construction projects I run, so I feel no compulsion to spend my free time writing for free.
Therefore, I will not subject Gentle Reader to diarrhetic descriptions of my vacation, hobbies, car, boat, motorcycle, kids, grandkids, pets, my grandkid’s pets, retirement plans, medical adventures, or rambling step-by-step descriptions of landfill-ready woodworking projects imitating those eternally recycled in woodworking periodicals, subjects which make up 80% of the content of most blogs.
Now that it’s clear what I won’t write about, let’s look at what I will.
The craftsmen that make and use the tools that are a major subject of this blog are located far from most English-speaking readers, both culturally, technologically, and as the crow flies. Communication with these people on technical subjects can be especially challenging since the most experienced of them have no social media presence, zero computer skills, and almost as many smartphones. To most of them, a Fax machine is high-tech sorcery. I am not exaggerating.
During my years living and working in Japan I have built relationships with these craftsmen and learned much from them. I will share that knowledge with Gentle Readers and Beloved Customers.
As a construction-industry professional in Japan, I routinely evaluate and hire Japan’s top general contractors and subcontractors for my Client’s projects. We will share some of those stories too (non-disclosure agreements permitting).
Some of the how-to subjects we intend to discuss will include tool setup, sharpening, maintenance and proper usage, as well as how to make some tools. And of course, woodworking techniques.
Regarding the frequency of posts, your humble servant dislikes wasting valuable time with pointless drivel, so I will post only what I think is worthwhile, measured by my standards and your requests, time permitting. No schedule commitments.
The one thing I do wholeheartedly promise is that the content of this blog will be worth more than you pay for it. You won’t find a better deal anywhere at twice the price.
Wanted: Single grey cave orc looking for freaky, scratchy love. Must like cold, damp, dark holes and enjoy bat wings marinated in Tabasco sauce.
If you have relevant questions, please ask. If you have suggestions or corrections, all are welcome. But to those who would use the internet’s anonymity to morph into snapping orcs or bellowing trolls, I say Go back to the Shadow!
All others I welcome with bunny hugs.
Hmmm.. Do I smell orc?
Your Most Humble and Obedient Servant
If you have questions or would like to learn more about our tools, please click the “Pricelist” link here or at the top of the page and use the “Contact Us” form located immediately below.
Please share your insights and comments with everyone in the form located further below labeled “Leave a Reply.” We aren’t evil Google, fascist facebook, or thuggish Twitter and so won’t sell, share, or profitably “misplace” your information. If I lie may a thousand moth eggs hatch in my nose.
A 48mm Oiirenomi chisel by the Yamazaki brothers (RIP) under the brandname Hidari no Ichihiro, one of Japan’s most famous and excellent chisel blacksmiths
Introduction
This article contains information for the Beloved Customers of C&S Tools to reference when setting up their new chisels.
All of C&S Tools’s chisels are professional-grade, hand-forged tools intended for the professionals among our Beloved Customers that will use them to make products for their customers, and require excellent lifetime service of their tools under daily working conditions.
By publishing these instructions C&S Tools is not suggesting our chisels are incomplete or require work by the purchaser before they can be used. To the contrary, our chisels are entirely usable and will provide fine service when new as-is without performing the procedures described below. Indeed the condition in which we supply them is standard for tools sold in Japan, where they were handmade.
Some may find these procedures to be too heavy a burden of time and effort. If, Beloved Customer, you don’t require professional levels of performance and durability, then there is no need to bother with these setup procedures. But please don’t tell anyone that we at C&S Tools agree with the abuse of chisels through amateurish techniques like kigoroshi, or soaking handles in water, or micro-bevels, or using grinders. BS is piled so widely, deeply, and fragrantly on the internet that there is no need to add more.
It is certain that these setup procedures will ensure your chisel’s handles will endure hundreds of thousands of hammer blows and provide trouble-free service for many decades. They may also help your chisels perform more efficiently. And they will protect your warranty. The choice is yours.
Which Chisels Require Setup?
There are several general categories and many types of Japanese chisels. Your humble servant will delve into this subject in greater detail in future posts, but the two general classifications are Tatakinomi (叩鑿)meaning “striking chisel,” which are designed to be motivated with a steel hammer to cut larger quantities of wood, and Tsukinomi (突き鑿), which translates directly to “thrusting chisel,” the equivalent of “paring chisel” in the Western tradition, and are designed to be pushed by hand for paring operations. The setup measures described herein are not entirely irrelevant, but are normally unnecessary for tsukinomi or other paring chisels.
Tatakinomi, including oirenomi (bench chisels), hantatakinomi (very similar to oiirenomi but a bit larger, probably the size the more popular oiirenomi evolved from), atsunomi (oiirenomi on steroids), and mukomachinomi (mortise chisels) are the focus of this post.
Why Should I Setup My Chisels?
C&S chisels are professional-grade tools, not mass-produced, consumer-grade, chisel-shaped Chinese screwdrivers. They will serve you best if you treat them in a professional manner, including performing proper setup.
In fact, Japanese tatakinomi chisels are designed and manufactured assuming the end user will perform some setup work before using them in accordance with Japanese tradition. It was not that long ago that craftsmen in Japan purchased chisels as components and made the handles themselves. Accordingly, until fairly recently the tradition has been for the competent craftsman to not “purchase” but rather “make” his tools to his own preferences, or at least those of his master. Even today chisels and handplanes purchased from retailers in Japan are mostly usable when brand new, but still require some modifications and tuning by the end user to achieve their potential, even though most customers are unaware of this fact nowadays. In this case, Beloved Customer, that is your job.
Performing these setup procedures will probably help your chisels perform a little better and will absolutely ensure the handles last longer. And by avoiding the slow deformation resulting from heavy usage over many years that often creeps in when proper setup is neglected, you will preserve your reputation as a professional woodworker in the eyes of other professionals.
The Example
The example chisel we will use in this article and pictured below is a variety of tatakinomi called an Atsunomi.
It was forged by a famous Japanese blacksmith named Shimamura Kosaburo (RIP) who used the brand Kiyotada, written 清忠, meaning “pure and faithful.” A founding member of the Tokyo Chisel Guild, during his lifetime Mr. Shimamura was lauded by experts in the fields of blacksmithing and metallurgy as the finest chisel blacksmith in Japan. Although my experience is limited, I agree with their assessment.
Kiyotada Brand Atsunomi Chisel in brand-new unused condition prior to setup
The Purpose of these Procedures
Unlike western chisels, the wooden handles of Japanese tatakinomi chisels are designed to be struck with a steel hammer. These impact forces tend to cause the handle to mushroom and even split, but the crown or hoop (called the “katsura” or “sagariwa” in Japanese) installed at the far end of the handle combined with the coned ferrule (called “kuchigane” in Japanese) installed at the blade end of the handle contain and compresses the wood fibers preventing this damage. Even then, the impact forces of steel hammers do crush and break fibers at the handle’s end such that over decades of hard use the handle will gradually become shorter.
In order for the crown to continue to protect the handle from splitting as the handle becomes shorter, it must be able to travel down the handle in tiny increments without gouging and/or splitting the handle. A primary goal of these procedures is to ensure the crown can move without damaging the handle.
Occasionally your steel hammer may strike the end of the handle a bit off-center impacting the mild-steel crown. After this occurs a few thousand times the crown may mushroom preventing it from traveling smoothly down the handle without gouging it. Another goal of these procedures, therefore, is to prevent, or at least minimize, this deformation of the crown thereby avoiding damage to both handle and hammer. Of course, if Beloved Customer notices such deformation developing in one of his faithful chisel’s crowns, please use a file to refresh/increase the crown’s chamfer before it gets excessive.
The kuchigane mentioned above is a truncated metal cone or ferrule that fits between the handle and blade. Written 口金 in Chinese characters (which translates to “mouth metal” ) this bit of mild steel is key to the handle design of Japanese chisels because it serves to keep the hammer’s impulse forces from splitting the handle by compressing the tapered end of the handle against the tang under great pressure. And when installed properly it also improves the flow of impact forces from a steel handle to the cutting edge while at the same time minimizing unpleasant harmonic vibrations. This is a genius-level design feature critical to the wooden handle’s durability.
But if the fit between the kuchigane, the blade’s tang, and the wooden handle is a bit off, strange harmonics may develop causing skittish behavior. Also, if the fit between handle and kuchigane permits the kuchigane to ride-up and dig into the handle after many hammer strikes the handle will become gouged and weakened.
Therefore two additional goals of these procedures are (1) to ensure the handle, ferrule and tang fit properly to provide efficient transfer of impact forces acting on the blade; and (2) to ensure the kuchigane will not damage the handle during the hard work to which professionals routinely subject their chisels.
The following pictures show what these measures will help avoid.
Split HandleMushroomed Crown and Handle Crack
A mushroomed crown and resulting damage to the handle. A crown exhibiting this type of deformation ends up dancing around loose on the handle without protect it from splitting. Indeed, if not remedied, the crown itself may eventually gouge and even split the handle
Tools and Materials Needed for Performing Setup
Masking tape
Fine point marking pen or ball pen
Sharp knife for cutting wood
Sharp knife or de-burring tool for de-burring and chamfering mild steel (an inexpensive kiridashi kogatana with an edge sharpened to 45 degrees shaves metal faster and cleaner than a file)
Rat-tail file or chainsaw file (can also be used for deburring)
Flat mill file
Pliers
Block of hardwood for driving off crowns
Wet/Dry sandpaper (220, 320, 600 grit)
Satin varnish or polyurethane and thinner
Gas stove or propane torch (optional; outdoors use)
Silk cloth (optional)
Disassembly
Mark Orientation of Handle to Blade
Step 1: Safety first. You will need all your fingers for this process, and sticky red stuff on everything is unsightly, so please tape some cardboard around the cutting edge to ensure your digits remain firmly attached to your hands.
Step 2: Mark the blade’s orientation on handle. Place a mark or arrow on the end of the handle in line with the flat of the blade to help you reassemble the handle in the same orientation. If you are setting-up multiple chisels at the same time, write the blade width or other designation on the handle’s end to avoid confusion later.
Step 3: Separate the blade from handle. If the process of removing the crown did not loosen the blade, hold the blade in one hand and strike the kuchigane against the corner of a wooden workbench or block of wood. The best locations to strike the kuchigane are at points in line with the corners of the square tang, as seen in the photos of the bare tang below. Notice how the tang’s flats are aligned with the top and bottom of the blade.
Strike each corner twice, then shift the point of impact 90° and repeat. The goal is to gradually rattle the handle off the blade’s tang, so don’t be shy. If the blade and handle still refuse to separate, expand the kuchigane and shrink the wood using a heat gun or by placing the kuchigane nearly (but not quite) touching a hot incandescent light bulb for a few hours. Do not place the chisel in an oven!
Rap the Kuchigane on the edge of your workbench or a piece of wood to separate it from the handle and tang. You can see the gap at the top of the kuchigane where it is beginning to separate from the handle. Be persuasive!
Step 4: Remove the crown (hoop). Now that the blade and handle are separated, grip a block of hardwood tight against the handle in one hand, with one end butting up against the crown, and strike the opposite end of the block with a hammer. Work the block around the crown and repeat until the crown comes off.
Remove the Crown
A view of the end of the handle where the crown was previously installed. Notice the compression lines produced in the wood when the crown was first installed. The inside of the hoop needs to be cleaned up and the end chamfered to prevent the hoop from gouging the handle, obviously, but this sort of tight fit is desirable.
Step 5: Disassemble the handle and kuchigane. If you are setting-up multiple chisels at the same time be sure to mark/label each chisel’s components to ensure they can be matched for reassembly. I usually write the blade’s width on the handle’s end with a marking pen and scratch it inside the kuchigane and crown with a pointed scribe.
The Chisel’s Four Component Parts
True the Tang and Shoulder
Step 6: True the Tang and Shoulder: The tang and neck/shoulder should meet at a clean 90° angle, however a slight filet is acceptable. The shoulder should be clean and flat. If necessary, true it up carefully with a flat file, but be careful to only true the shoulder without filing gouges into the tang. Also, use the file to remove burrs and gross irregularities on the tang as necessary. Please remember that the tang will always be hidden, so please don’t weaken it by trying to file it to perfection.
The tang before cleanupThe tang after cleanup
As you can see in the photo above, the tang does not need to be perfect, just free of big irregularities, burrs and sharp corners that might cause the fit between handle and tang to loosen after hard pounding,
When you are done, there should not be a pronounced gap between the shoulder and kuchigane when the chisel is assembled.
Prepare the Kuchigane(Ferrule)
Step 7: Check the Kuchigane:Check the blade end of the handle with the kuchigane in place. If it is a sloppy fit, adjust the handle using knives, files, and sandpaper as necessary.
Step 8: Flatten the End of the Kuchigane: Flatten each end of the kuchigane with a flat file without removing more material than is absolutely necessary. Be sure the ends are in planes perpendicular to the kuchigane’s centerline. I usually accomplish this by holding the kuchigane in one hand and running it back and forth over the surface of a wider file.
Kuchigane before chamfering
Step 9: Chamfer the Kuchigane: Chamfer the inside of the kuchigane’s wide end (not narrow end) with a knife or round file. Shave or file a a 45° chamfer 1/2 to 2/3 the thickness of the kuchigane’s wall on the inside corner of the kuchigane’s wide end. An inexpensive kiridashi kogatana knife or deburring tool with a blade angle of around 40 degrees will easily shave the mild steel used for crowns and kuchigane and works quicker and cleaner than a file. Please don’t cut yourself.
A stopped hole drilled into a board works well to secure parts when deburring and chamfering them. Vise grips also work well for securing crowns if you pad the jaws to keep them from gouging the parts, but such clamping tools tend to deform kuchigane, so please exercise caution.
Allow me to repeat: Be extremely careful not to cut yourself. They may be beautiful and very useful, but many chisels and knives are cold vampiric geniuses that fear neither sunshine nor spaghetti sauce and want to cut you, so beware! Hold parts in a way the blades absolutely can’t bite you no matter how hard they try. A severed tendon can be a life-changing surprise.
Kuchigane after chamfering
Step 10: Refinish the Kuchigane: If you decide to refinish the kuchigane, remove the existing chemical bluing with sandpaper at this time.
Prepare the Crown(Hoop)
The Crown Before Deburring and Chamfering
Step 11. Chamfer the Crown: Chamfer both inside corners (top and bottom edges) to a nice round 45° angle with a knife or a rat tail file. This step is very important.
The crown after chamfering. This step is critical.
Step 12. Debur the crown:Debur and clean up the crown’s inside surface. However, be careful to not remove too much metal or the crown may fit too loosely.
Deburred, Chamfered, Filed and Sanded Crown
Step 13: Clean the crown’s exterior surfaces: Lightly file and sand the crown’s exterior surfaces to remove major irregularities. However, there is little point in trying to make these surfaces perfectly smooth since they will get banged up by hammers.
Prepare the Handle
Step 14: Check the Depth of the Tang Hole. If the hole in the handle which receives the tang is too shallow, the pointy end of the tang will bottom-out and can cause the handle to split. Measure it’s depth with piece of wire or a stick. If it is not deeper than the length of the tang, drill the hole just a tad deeper.
Step 15: Check/Adjust Blade Alignment. With the kuchigane removed, insert the tang into the handle correctly oriented, and sight down the handle. If the handle and blade do not line up properly, you may need to correct the misalignment.
To do so, first try fitting the blade to the handle in a different orientation (90˚). If this does not improve things, make thin slips of wood the width of the tang’s flat and fit one into the hole before inserting the blade. Slips made of cardstock, manila folder, or cotton typewriter paper work well too. If you feel a lot of resistance when inserting the tang, attach the kuchigane to prevent splitting.
Thinner or thicker slips can be inserted if more correction is necessary, but there is a point where too many slips will make it impossible to insert the tang without splitting the handle. In this worse case scenario, shave the hole a bit wider with a chisel or other slender piece of steel sharpened as a scraper to permit adequate shimming. Be careful to remove the absolute minimum amount of wood.
Step 16: Check/Adjust Crown Fit. It is acceptable for the crown to leave a shallow ring depression in the handle, but if the crown digs deeply into the handle, shave or sand the handle to ensure the crown will not gouge it.
The Handle’s Coned End Before Fitting. The step or shoulder turned into the handle is visible.
Step 17: Prep the Shoulder. Most chisels have a shoulder turned into the handle where the kuchigane terminates, making for a smooth, attractive transition between kuchigane and handle. This is most pronounced in chisels made in Western Japan. However, if the kuchigane butts tightly up against this shoulder, over time the force of the hammer can drive the kuchigane into this shoulder damaging the handle.
Relieving this shoulder with scallops will provide some room for smooth movement of the kuchigane over time. To do this, first mark a line around the handle where the kuchigane ends. Then remove the kuchigane.
Step 18. Place a Guide Around the Handle: Wrap a piece of paper or light cardboard 3/16″ to 1/4” above the line of the shoulder, secure it with tape, and using it as a guide, mark another line around the handle with a fine-point marking pen, ball pen, or knife. When done,remove the kuchigane and paper.
Step 19: Mark the Handle:Use a pen, pencil or marking pen to mark the cone at diagonals across the tang hole and extend these marks to the line you made in the previous step. This will leave four lines 90° apart. Now make similar marks at the flats of the tang and extend the lines. There should now be eight lines separated by 45°.
Step 20: Cut the Scallops: Wrap masking tape around the cone as shown in the picture below to protect the cone from cuts which might weaken it. With a very sharp knife or chisel, make four cuts in small increments centered on one of the lines and forming a concave scallop between the two adjacent lines. Repeat for the other four lines. These curved scallops should transition smoothly into the wooden cone, but should not cut into it. This may not be as easy to accomplish as it seems. If done properly, the scallops should appear uniform and attractive, but perfection is neither attainable nor desirable in a handmade tool. Finally, shave off the ridge between the scallops creating a total of sixteen scallops at 22.5°.
Finish the Handle
Some people prefer a handle without any finish, while others like a shiny finish.
Hand sweat tends to react with the tannic acid in Japanese White Oak handles turning them a dirty-looking grey. Japanese Red Oak, as in the handle in the pictures above, does not discolor as much.
Whether you refinish the handle, leave it as-is, or sand it bare is your choice. It makes no difference to the chisel’s performance.
Step 21: Sand the Handle. At this point, you can either (1) Not sand the handle (unless it is damaged), and varnish the scallops and any areas shaved at the crown end of the handle to match the existing handle finish; (2) Sand off the existing finish entirely to bare wood; or (3) Refinish the entire handle.
Step 22: Apply a Finish: This step is applicable if you decide to apply a finish to the handle. Sweat may cause Japanese White Oak, a wood commonly used for chisel handles, to discolor, so a light finish (not a thick glossy finish) is appropriate in your humble servant’s opinion. The following is the method I recommend. First, sand off any remaining finish on the handle. Apply a coat of satin varnish or polyurethane diluted 100% with thinner. Allow as much of this mixture to soak into the wood’s fibers as possible. Rub the wet varnish mixture forcibly into the wood using wet-or-dry sandpaper. Thinned varnish will penetrate further into the wood than straight varnish, and the pressure of sanding will force it deeper into the fibers than just capillary action could achieve. In addition, sanding will create a wood/varnish slurry filling the grain.
Allow this mixture of varnish and wood dust to dry without wiping it off. It will look terrible, but never fear. Repeat these steps for a second coat and allow to dry. Apply a third coat, sand lightly, and then wipe off the varnish slurry with a cloth.
When dry, the result will be a non-slip surface free of lathe marks that does not appear to have any finish, but that will protect the wood from sweat and moisture. If a little bit of visible surface finish is desired, a final single coat of thinned varnish can be applied. To ensure the previously cut scallops remain nice and crisp, do not sand them.
Warning: Do NOT apply finish to the crown end of the handle because the finish will make the wood fibers too stiff to deform properly. If you want to go the extra mile, a bit of melted paraffin wax or beeswax allowed to soak into the end of the handle will protect it from water and make it more resilient over time than just bare wood.
Finish the Kuchigane and Katsura
This is an optional cosmetic step, but will make your chisel more attractive. There are several ways of finishing the metal of the kuchigane and crown:
Heat Bluing: Simply heat the kuchigane and crown on a stove until it is blue-black. Do not heat the blade! This is an ancient steel-finishing technique, indeed one routinely used to colorize plate armor in medieval times. Not very durable, but it looks cool.
Oil Black: Coat the metal with motor or transmission oil and heat it until the oil is burnt off. This method makes a lot of stinky smoke, so don’t do it indoors. Fairly durable. Do not heat the blade!
Gun Blue (chemical bluing): Brownells’ cold blue formula works well. Birchwood Casey also makes a convenient chemical bluing product. Looks nice, but not very durable.
Rust Blue or Rust Black: These are classic, beautiful steel finishes that are much more durable than chemical or heat bluing. However, the process requires dangerous chemicals, a fine-bristle stainless-steel brush and time. A description of the process is not possible here.
Burnt Silk Finish: This is one of my favorite finishing methods because it is quick and easy and looks good. Simply heat the metal parts over a flame, and using pliers so you don’t burn yourself of course, wipe the metal in a wad of scrap silk. An old silk necktie works fine. The silk protein will char, coating the metal with a carbon finish with an interesting texture. Wipe the metal quickly but thoroughly to prevent globs of melted silk from sticking to the metal. Don’t do this inside the house because the smoke will set off the smoke alarm and the stink will endure for weeks. SWMBO will not be pleased. Do not heat the blade!
Reassemble the Chisel
If this is a new chisel, it may be convenient to true the blade’s ura and sharpen it before final assembly. These tasks are a little easier with the handle removed.
Step 23: Install the Crown: To begin assembly, hold the handle in the air by one hand and drive on the crown using a wooden, plastic or rawhide mallet, not a steel hammer. You should always remove your wrist watch before wacking chisels if you want it to keep working. A word to the wise.
There is a specialty tool for this job, essentially a steel cone that fits over the crown, which you strike with a hammer. If you enjoy spending money on heavy tools that take up space and are seldom-used, then you must have one. But a hammer works just as well and can do many more tasks.
Once the crown is flush with the handle, angle the handle and strike the crown with your wooden mallet or steel hammer at an angle driving it further onto the handle. You only need to be drive it down far enough so the top of the crown is below the end of the handle by 1/16”. More is wasteful. Then strike the edges of the handle projecting beyond the crown at an angle with a steel hammer to lightly mushroom over the corners of the handle securing the crown in place. Do not soak the handle in water, for Pete’s sake!
Soaking the handle in water prior to fitting the crown is a method preferred by handlemakers and wholesalers that fit hundreds of crowns a day. They will soak 50 handles at a time in a shallow pan of water to soften the ends making it easier to mushroom. Convenient for them, but bad for the chisel because the water will also cause the wood to swell, and when it later dries and shrinks, the crown may become loose over time. Your handle deserves better.
Step 24: Install the Kuchigane: Fit the kuchigane to the handle lightly and insert the blade’s tang oriented according to the marks you made previously. Tap the end of the handle to lightly seat the blade, but allow enough room so the kuchigane can be rotated by hand. Rotate the kuchigane to minimize any gaps between it and blade’s shoulder.
If you see any big gaps, lightly file the kuchigane to match the blade’s shoulder.
If any part of the handle projects past the kuchigane’s mouth, carefully shave it off with a sharp knife.
Step 25. Seat the Blade: With both crown and kuchigane now installed on the handle, finish seating the blade by holding the chisel by the handle in the air and striking the end squarely with a mallet or hammer until it seats tightly. Don’t cut yourself!
Voila!
Step 26. Final Check and Adjustment of Kuchigane to Shoulder Fit: Now that the chisel is assembled, there is one last check to make. The fit between the blade’s shoulder and the narrow end of the kuchigane need not be perfect (perfection is unattainable for mere mortals) but it does need to be fairly uniform because most of the impulse energy from the hammer flows through this tiny interface. Therefore, if there is a big gap, or if half the kuchigane on one side, for instance, is not contacting the shoulder, the flow of impact forces will not be smooth and the chisel will feel “skittish.” Examine this fit for gaps and irregularities, and correct them by filing the kuchigane. You will need to loosen the blade and handle enough to insert a small file, but you don’t necessarily need to completely disassemble the chisel.
Congratulations! Your chisel is now setup for professional use.
Use the Right Hammer
When cutting wood with a tatakinomi, please use a hammer with a flat face, such as a Japanese gennou, to strike your chisel. A hammer with a domed or convex face, as are almost all hammers sold outside Japan nowadays, may damage the chisel’s handle after enough strikes. Ergonomics aside, a ball peen hammer or claw hammer with its face ground flat will work just as well as a Japanese hardware-store gennou.
And while we are on the subject of hammer faces, I recommend you smooth and even polish your hammer face so it will strike cleaner and reduce the wear on your chisel handles, counterintuitive as that may seem. Slipping will not be a problem, trust me.
I encourage you to select a hammer weight that balances well with the weight and blade width of your chisel, the type of wood and type of cutting you plan to do, and your body and style of work. This decision will make a difference in the precision and speed of your work, the energy you expend, and the stress on your joints.
The standard range of weights for gennou hammers for carpentry work in Japan is 100mome to 120monme (375gm (13oz) to 450gm (16oz), perfect for driving nails, general carpentry work, and motivating atsunomi. However, many find a lighter-weight head, perhaps in the neighborhood of 60~80 monme ( 236gm (8.3 oz) to 300gm (11 oz)), works better with smaller chisels, such as oiirenomi, for furniture and joinery work.
I also encourage you to make a handle for your hammer that suits your body and style of work.
This article is already too long so I won’t go into details, but suffice it to say that commercial hammer handles are a one-size-fits-nobody design that confuses the hand, is non-aerodynamic (I bet you never thought about air-drag in relation to hammer handles), transmits excess vibration to your joints, and ignores obvious ergonomics causing the head to impact the chisel off-center and out-of-kilter. There is a better way, and you will love the results.
We will dive head-first down that rabbit hole, screaming like a banshee on fire, in future posts!
Kosaburo Gennou Head and Black Persimmon Handle
Rust Prevention & Storage
If set up properly, a quality set of Japanese chisels will endure decades of hard daily use with no maintenance beyond oiling and sharpening.
You should store your chisels where they will be protected from weather, water, sudden temperature changes, dust, fly-specs, spilled beer, and paint overspray. Convenient though it may be to store chisels in an exposed rack or bare on a shelf, unless your workshop is a temperature and humidity controlled cleanroom, or you use chisels stored this way nearly everyday and clean and oil them frequently, such storage methods are guaranteed to reduce their useful lifespan and will waste your sharpening efforts and sharpening stones sure as eggses is eggses.
I recommend you make a wooden chisel box with a lid to store your chisels. I am preparing an article on how to design and make a chisel box, and will post it on the blog when it is ready.
After every use, oil the blade to prevent rust. An aburatsubo or oilpot is a critical accessory for chisels, and is easily made. You can find details here.
A Final Note
Since we wrote this tutorial ten years or so ago, we have frequently received questions from Beloved Customers and Gentle Readers about the fact that the chisel setup procedures described herein differ in important ways from those taught by most retailers of Japanese tools in the USA and Europe, as well as those expounded in videos on NoobTube, or posted on the woodworking internet forums.
This Final Note is intended to dispel confusion among Beloved Customers and Gentle Readers on these points.
The Question
So why is are the techniques presented in this tutorial so different from those found online?
When asked this question, your humble and obedient servant is often tempted to respond that the questioner should perform the “Big Spoon Quality Test.” This QC technique involves taking a big, heaping spoonful of the online advice in question, then holding one’s nose and swallowing it down, yes, all the way down, …. keep swallowing now, no don’t upchuck, and afterwards deciding for oneself if it is fragrant wisdom or stinky BS. As the saying goes: “the proof is in the pudding,” or was it “laughter is the best medicine?” I forget.
In any case, while such a hasty reply would be hilariously entertaining, it would also be crude. Fortunately, your humble servant is nothing if not exquisitely refined, so I will instead try to provide a more detailed and tasteful explanation below instead.
The Long Answer
Yes, Virginia, we have seen the various online videos about setting-up Japanese chisels. The creators of most of them are simply parroting instructions that some long-gone employee of a wholesaler, probably some soft-handed office worker who had never used a chisel professionally, heard from another guy working at a chisel factory assembling hundreds of chisels everyday as quickly as possible from cheap parts, some of which may have been imported from China.
Some of Gentle Readers are now saying to themselves: “Wait just one frickin minute there! What do you mean, “made in China!?” Please take a deep breath, smell the napalm, and realize that too many of the components assembled into products in advanced countries are actually made in China at low cost. The lie of “Made in Switzerland” foisted off by Rolex watches to justify ridiculously inflated prices is a prime example.
Poor quality is the natural consequence of procurement policies intended to maximize profits, all other considerations be damned. The components used in C&S Tools’s chisels, however, are all made in Japan of quality materials and to reasonable tolerances.
Here’s the problem: Imagine a chisel handle and/or crown manufactured to such careless tolerances that one must beat the heck out of the handle with a hammer (kigoroshi) crushing the wood’s cells to reduce the handle’s diameter enough so the poorly-matched crown or ferrule will fit.
Now ask yourself two questions: (1) How difficult can it be to control the tolerances of wooden handles and mild steel rings? And (2) will permanently crushing the hardwood handle’s cells improve its durability and/or longevity?
Or imagine, if you possibly can (difficult, we know), a handle and its crown or ferrule so poorly matched that one must swell the wood with water to get the crown or ferrule to stay attached long enough to ship the chisel overseas. Is your mind not boggled yet?
Do you think such poor manufacturing tolerances or either of these ham-handed techniques make for a better chisel, one that will provide good long-term service in the real world? Sadly, this is the grade of chisel with which the PooTube “Creators” and the so-called “experts” on the slimy orc-infested woodworking forums have hands-on experience.
The manufacturers of these shoddy tools provide zero warranties. Their products disappear into overseas markets where consumers are accustomed to being deceived as a matter of course, and the quality of most of their competitor’s products in the local markets, essentially sharpened Chinese-made screwdrivers, are of even poorer quality, so there is no backlash, only profits.
If any of this sounds to you like proper quality control or good value for the consumer, then there’s some swamp land located next to an abandoned chrome plating plant in North Korea, shovel-ready for resort development, that’s for sale at an amazingly low price. We read about it on an internet forum, so it must be true. All you have to do is send US$3,000 in small unmarked bills via FedEx to a private P.O. Box in Abuja, Nigeria belonging to Prince Musa Adebayo. It’s a limited time offer, so you’d better hurry ( ͡° ͜ʖ ͡°)
Most of our Beloved Customers are not new to Japanese tools. They have bought the sizzle before, found the flavor revolting, and came to us for real bacon. They want honest handmade tools that meet the rigorous demands of advanced Japanese professional woodworkers. That is what C&S Tools routinely delivers.
The Short Answer
Let’s wrap this up by concisely answering the original question.
First, we promote different chisel setup techniques because the tools our Beloved Customers need to setup are different from those with which the “Creators” on Gooble’s SpewTube and the trolls on the internet forums are accustomed. They are made by true craftsmen, not unskilled factory workers using Chinese components.
Our craftsmen are Japanese gentlemen living and working in Japan using crowns, ferrules, and handles made by them to reasonable tolerances, attached to the highest-quality hand-forged blades, also made by real Japanese blacksmiths working in their own smithies. Kigoroshi and water soaks are not necessary to setup these chisels, and will in fact harm them.
Second, because our Beloved Customers selected C&S Tools, we assume they are more advanced woodworkers than the easily-deceived amateurs that typically buy the hardware store-grade mass-produced chisels commonly available outside Japan, and therefore actually want to do initial setup in accordance with the highest standards, not the lowest. It’s their choice, of course, but it would be unimaginably irresponsible of your humble servant to advocate lesser techniques just to match the posers on GuberLube.
And third, unlike the wholesalers and distributors that peddle hardware store-grade tools overseas at inflated prices, we take our warranty seriously, and therefore actually care about the performance and longevity of the tools we sell. We need our Beloved Customers to set them up properly using the advanced techniques we promote because we have a reputation to protect and a direct financial interest in customer satisfaction.
Five Potential Solutions
We hope this explanation clears up the original question. In addition, the following list describes five solutions to the other problems we touched on above. Sorry, but you’re on your own with Prince Musa’s real estate deal:
Purchase only high-quality tools made to reasonable tolerances from quality materials by genuine professional craftsmen and blacksmiths that have long-term relationships and reputations that might be damaged by shoddy quality, not mass-production factories filled with low-wage workers.
Buy chisels and other edged handtools only from retailers (like C&S Tools) that both offer and honor a full international warranty on materials and workmanship, one that doesn’t require you to expend additional funds to benefit from. Good luck finding anyone else;
Beware the posers on Yoogle’s GoobTube (or is it Toogle’s YoobGube? We forget) who profit financially from spinning a pound of BS into 7 click-bait-filled minutes of visual entertainment, all without any responsibility for the accuracy, completeness or honesty of their representations;
Beware the howls of the pustulous trolls and the chittering of the execrable orcs scuttling about in the fetid darkness of the internet woodworking forums;
And last but not least, always remember the most reliable litmus test for veracity: “Money Talks and BS Walks” (see point 2 listed above).
Or, you can always try the big spoon test described above, for after all is said and done, bitter lessons stick best (ツ).
If you have questions or would like to learn more about our tools, please click the “Pricelist” link here or at the top of the page and use the “Contact Us” form located immediately below.
Please share your insights and comments with everyone in the form located further below labeled “Leave a Reply.” We aren’t evil Google, fascist facebook, or thuggish Twitter and so won’t sell, share, or profitably “misplace” your information. If I lie may orcs nest under my bed.

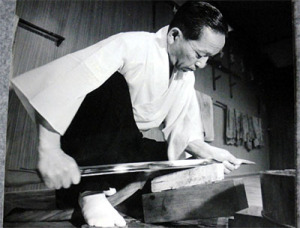
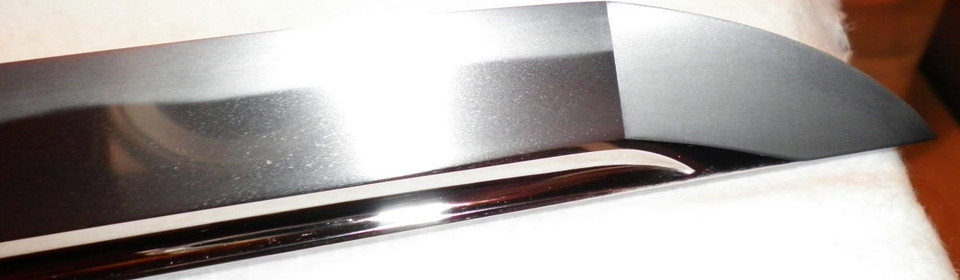


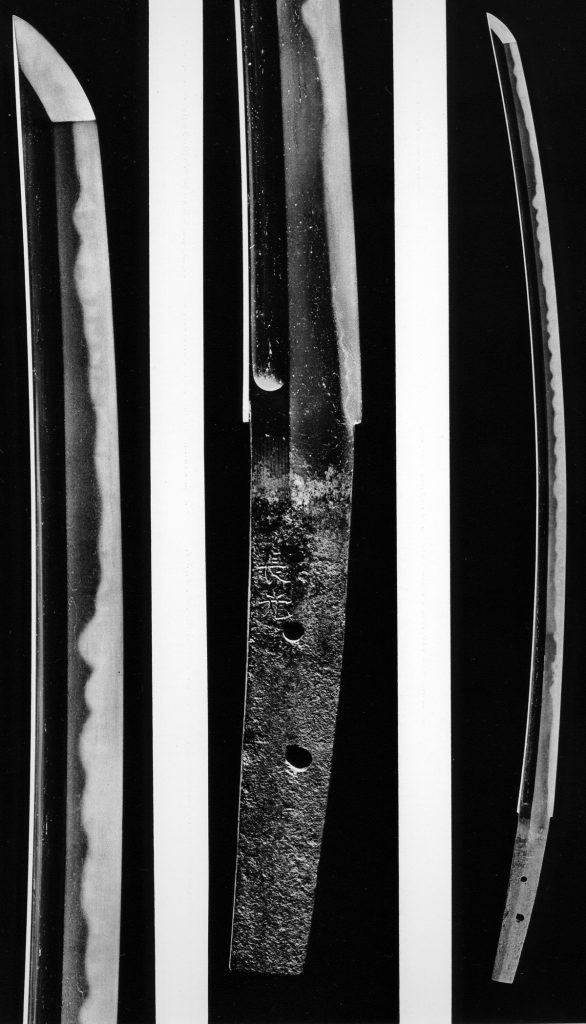
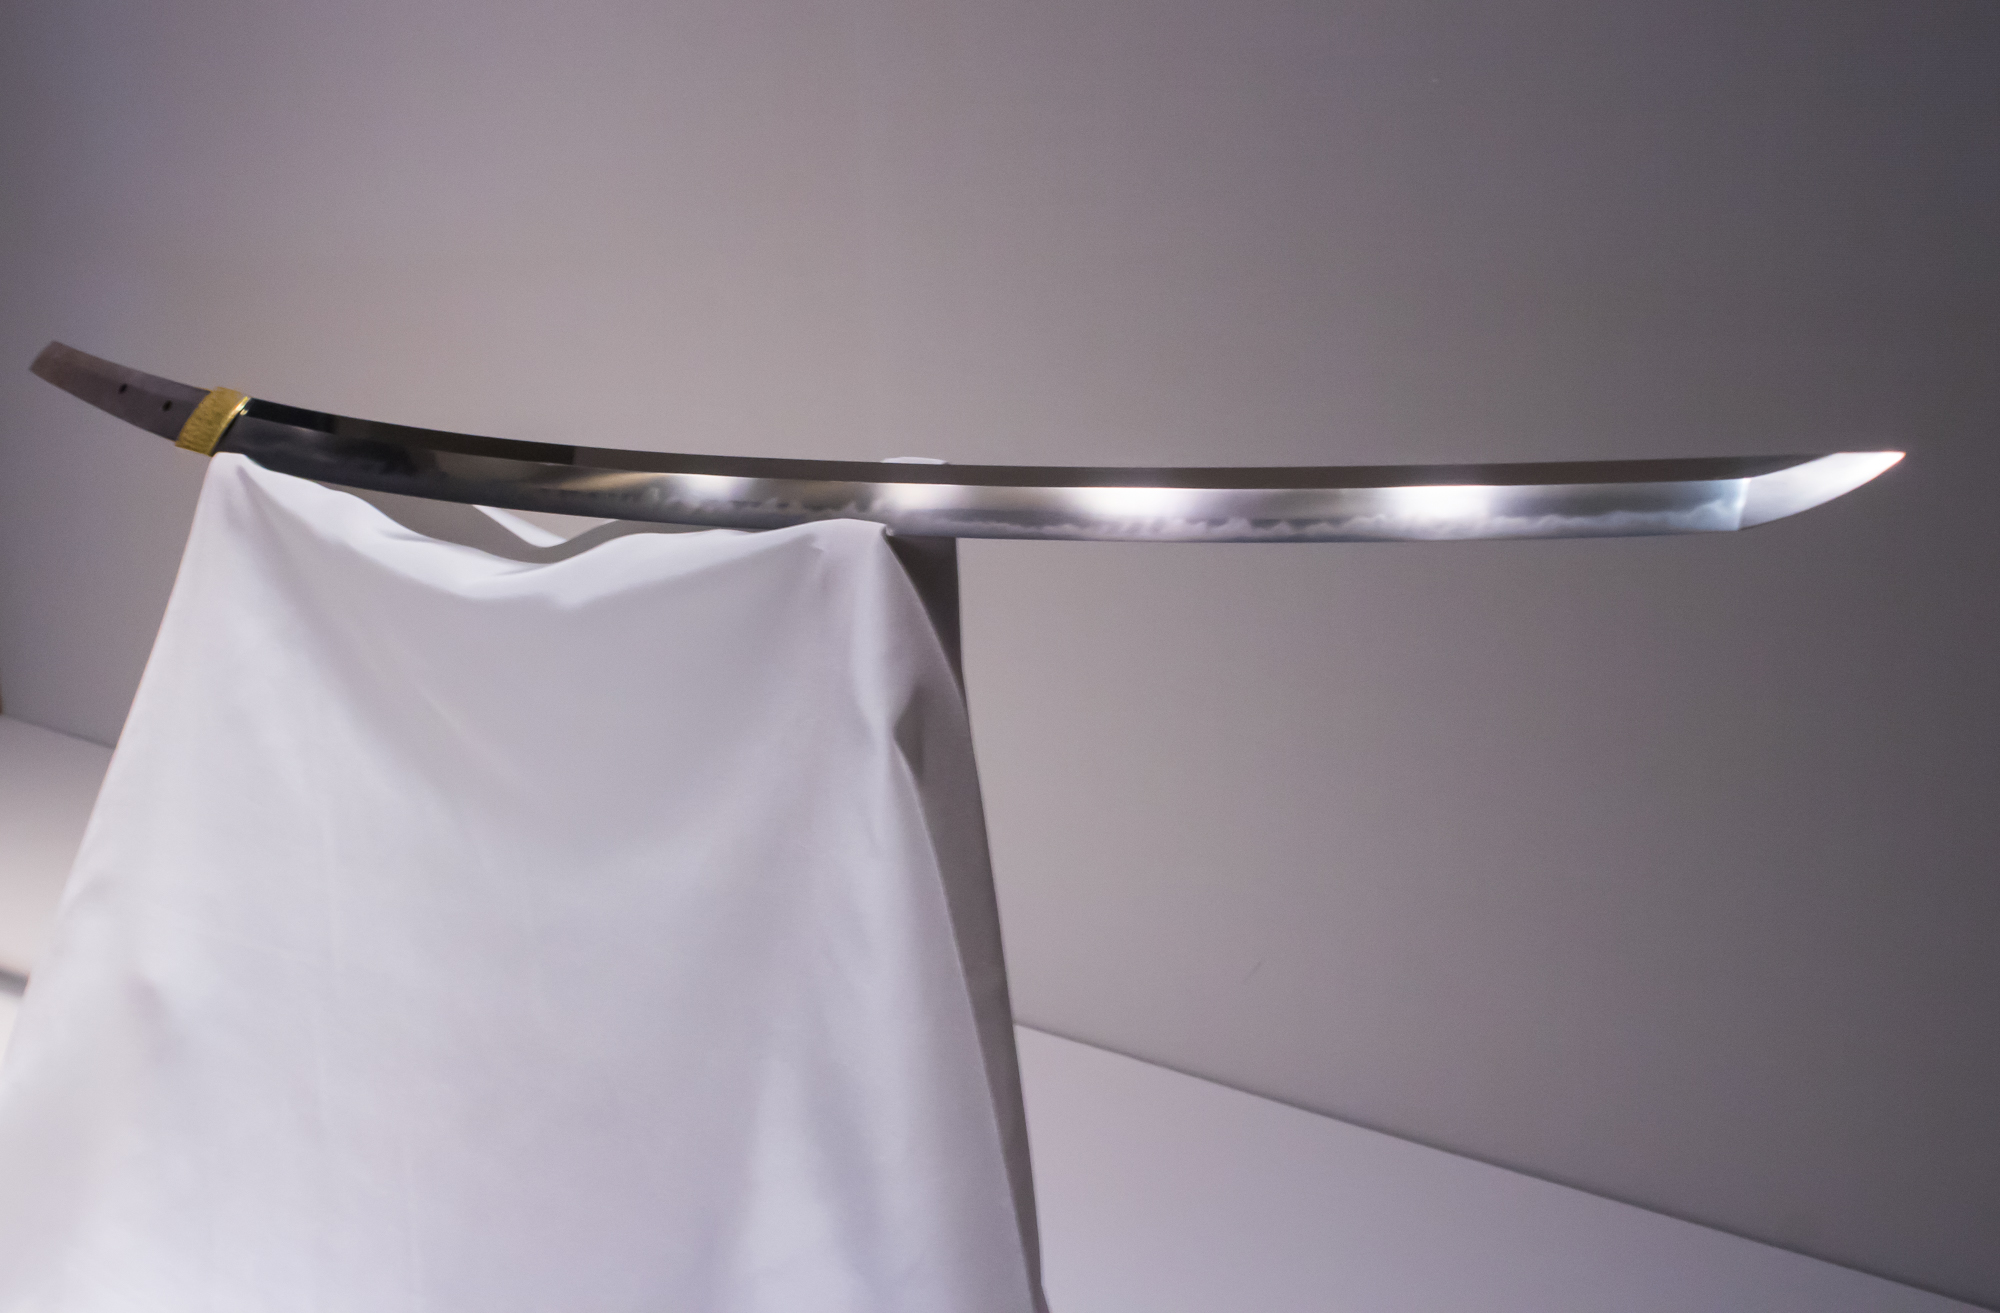
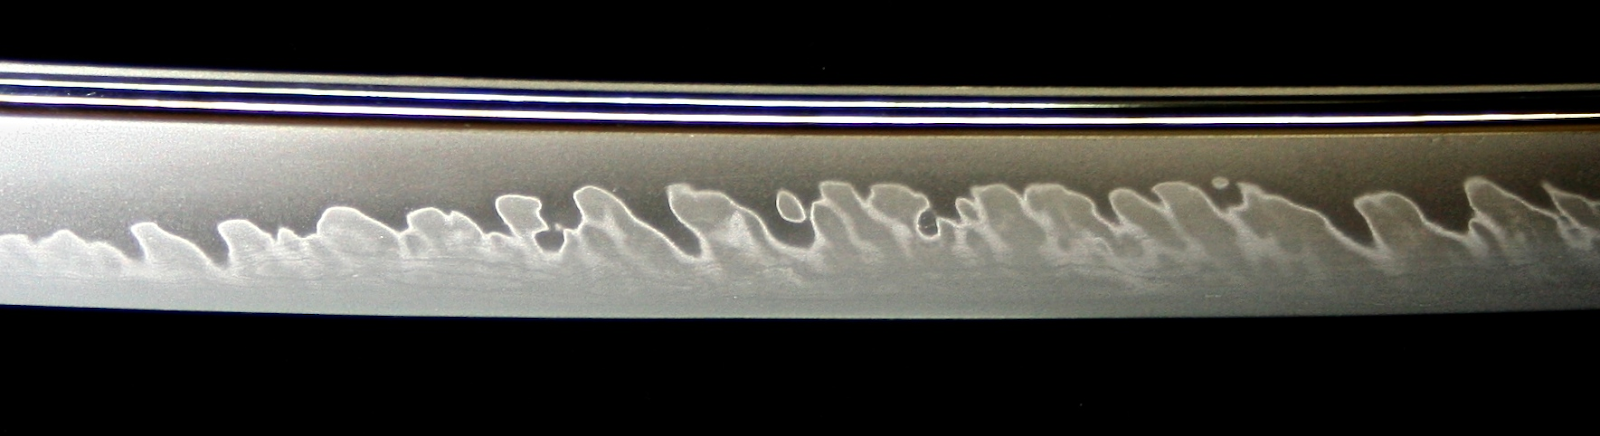
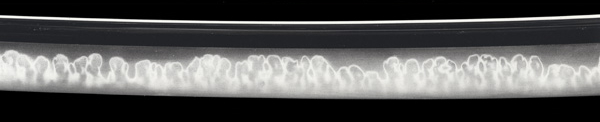


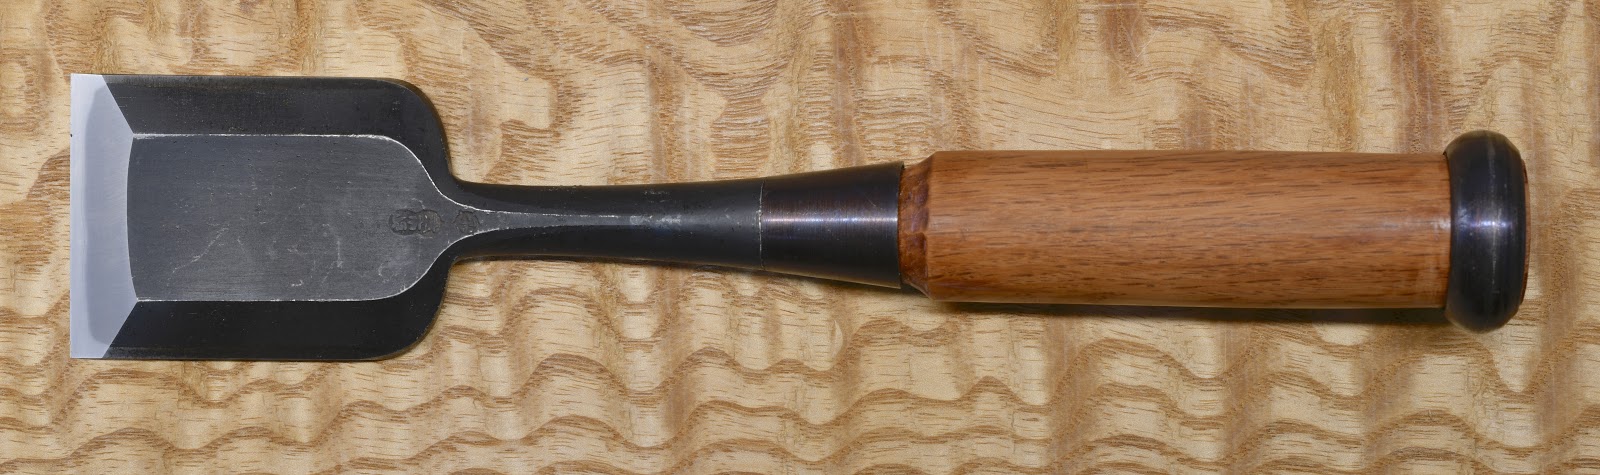
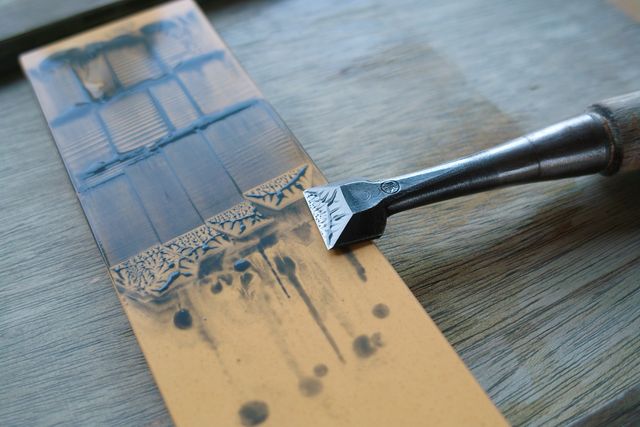
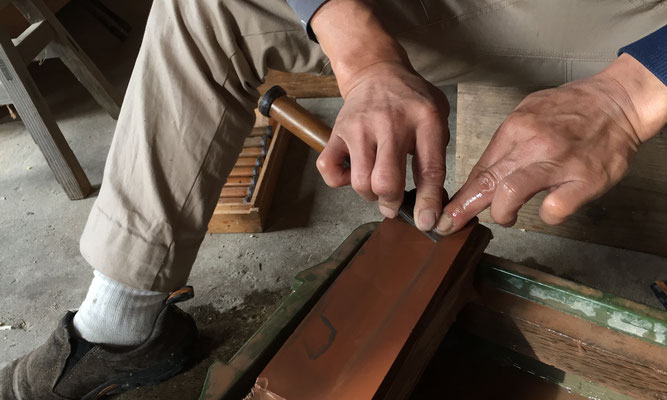


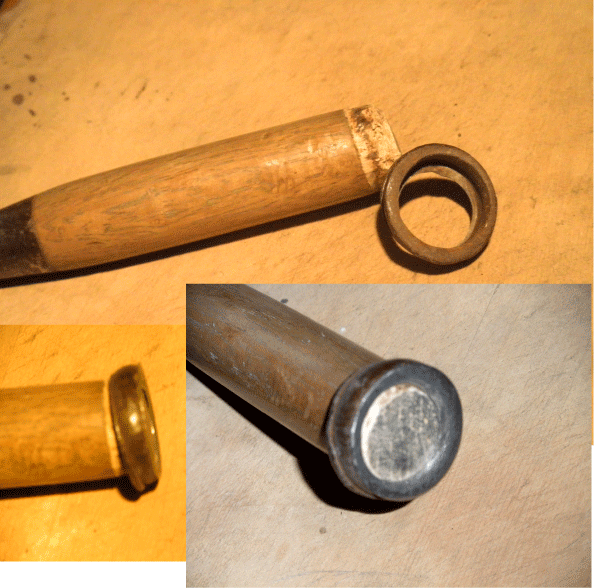
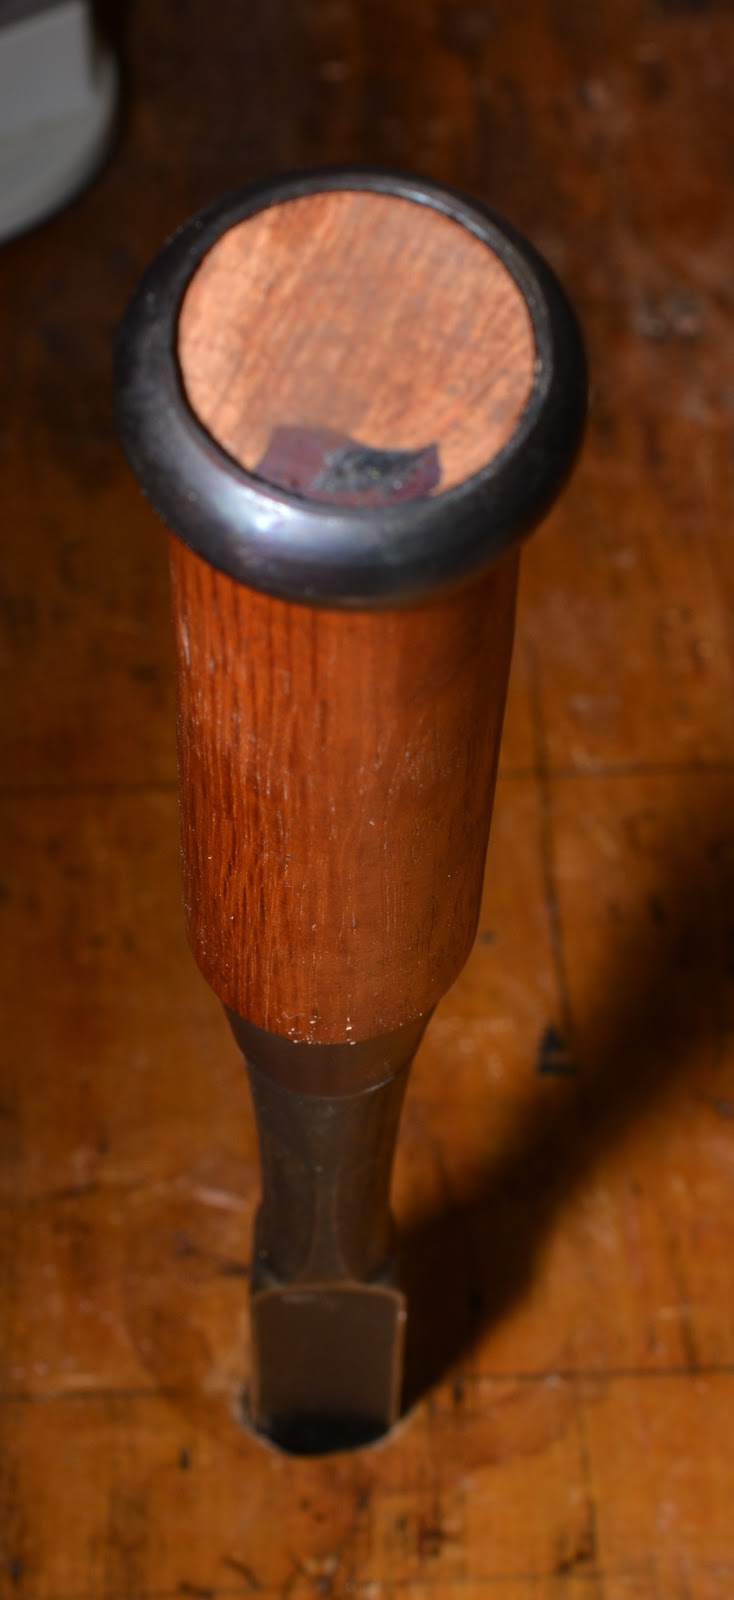
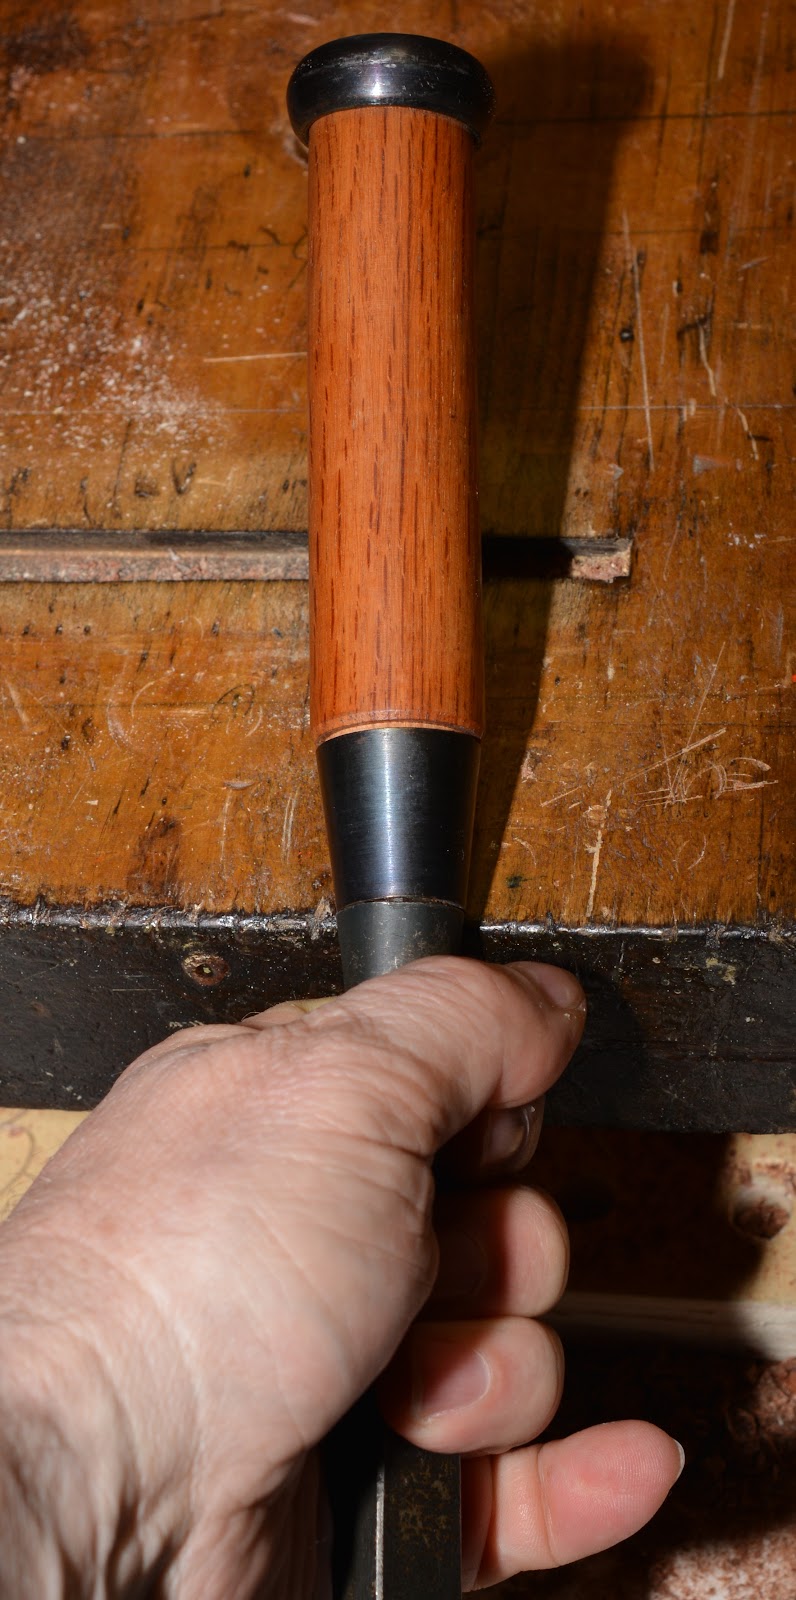
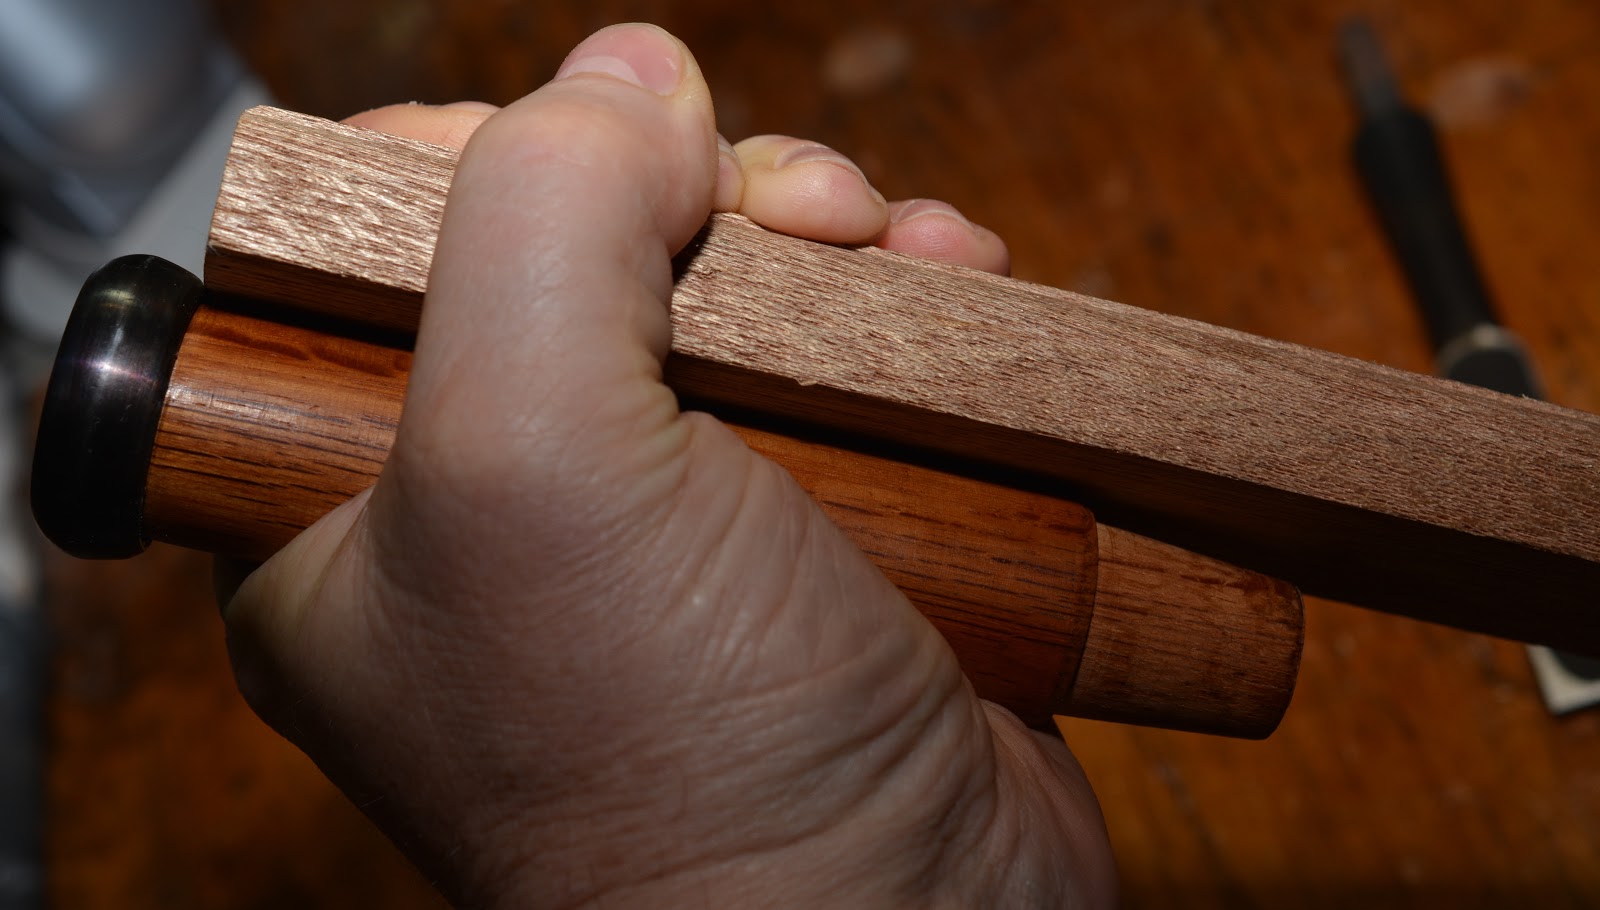
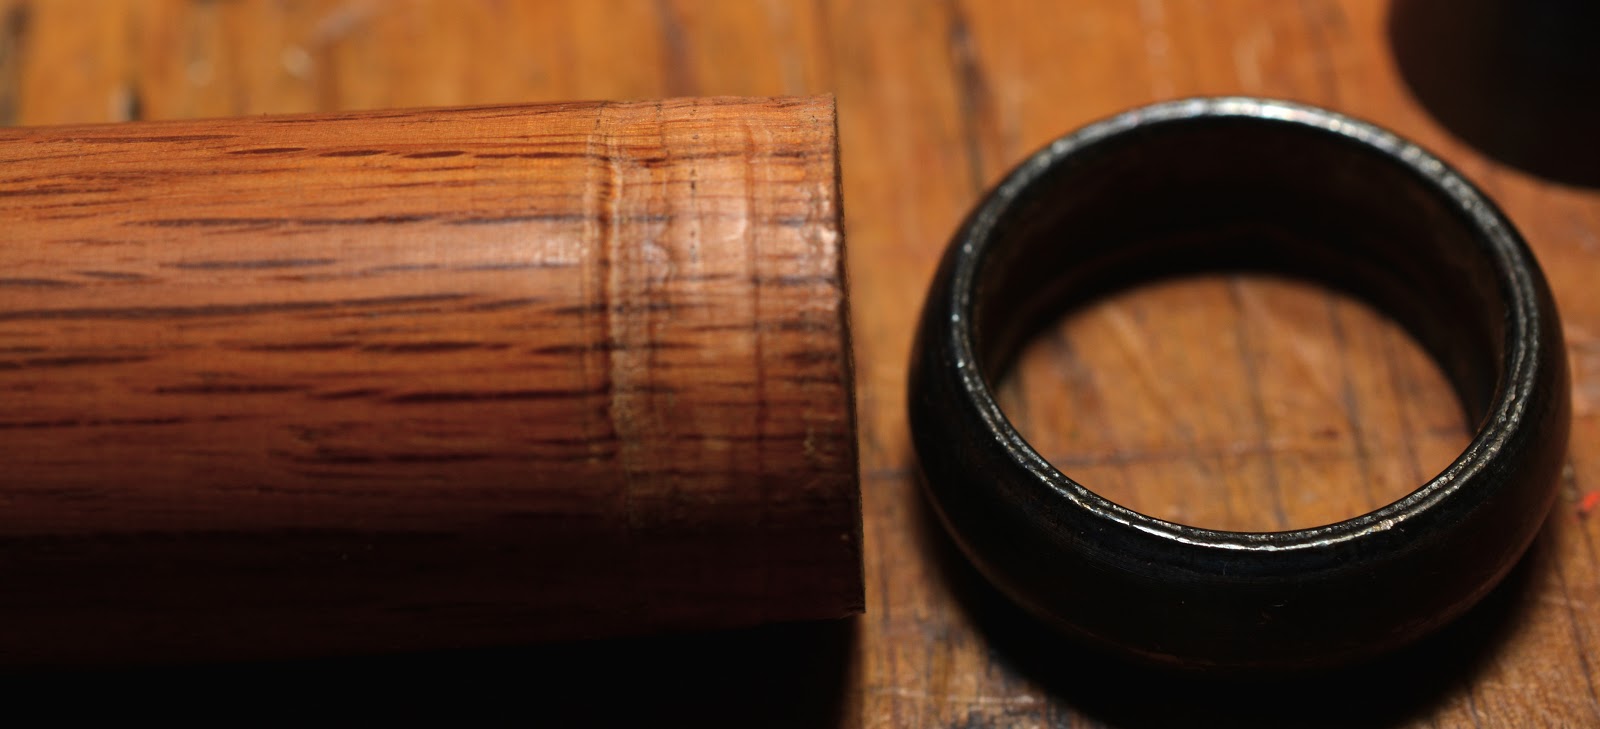
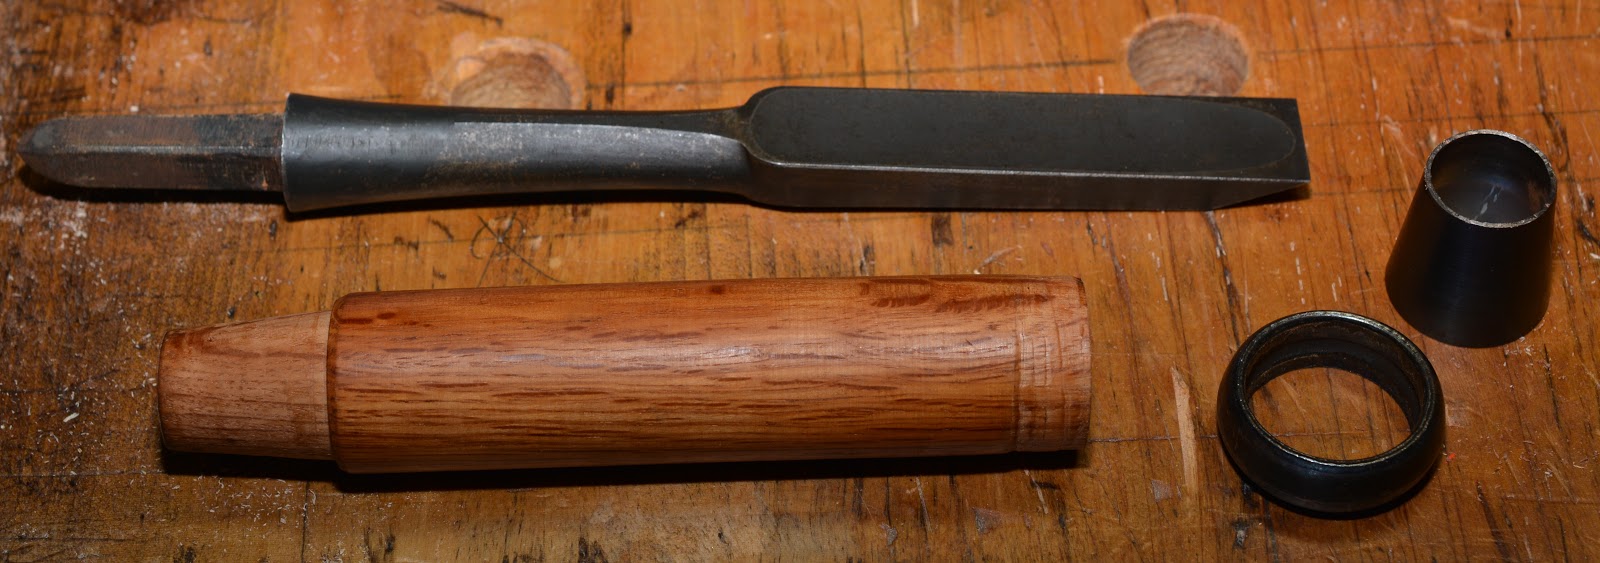
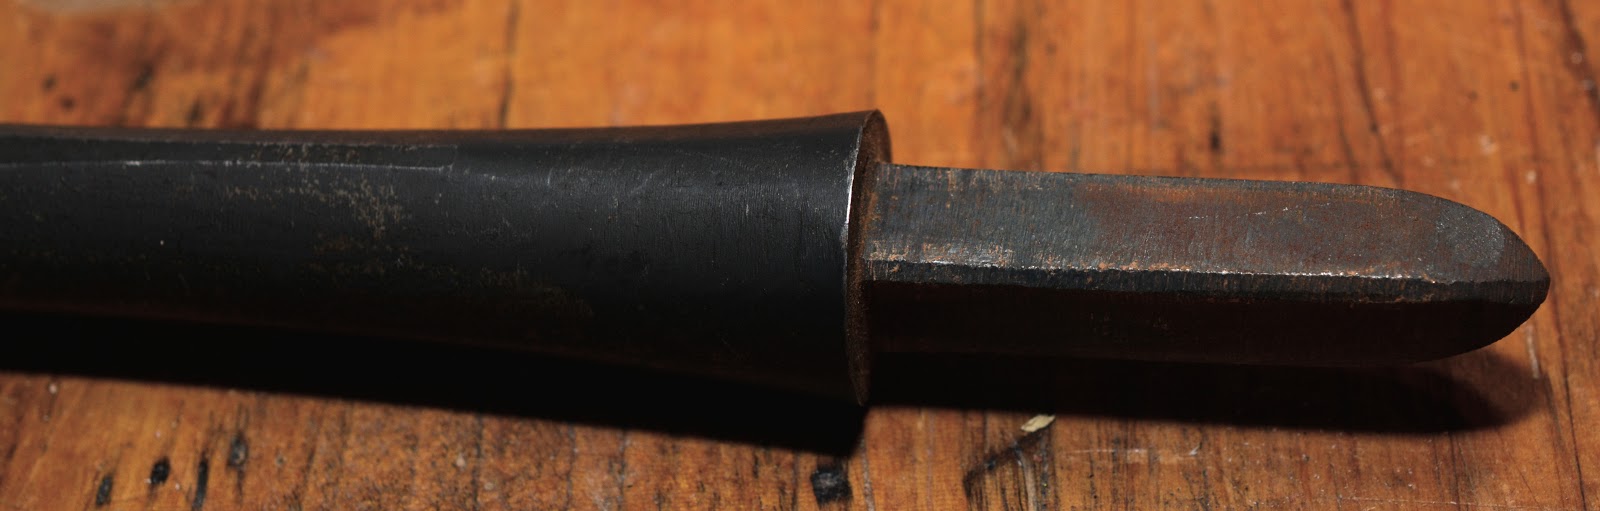
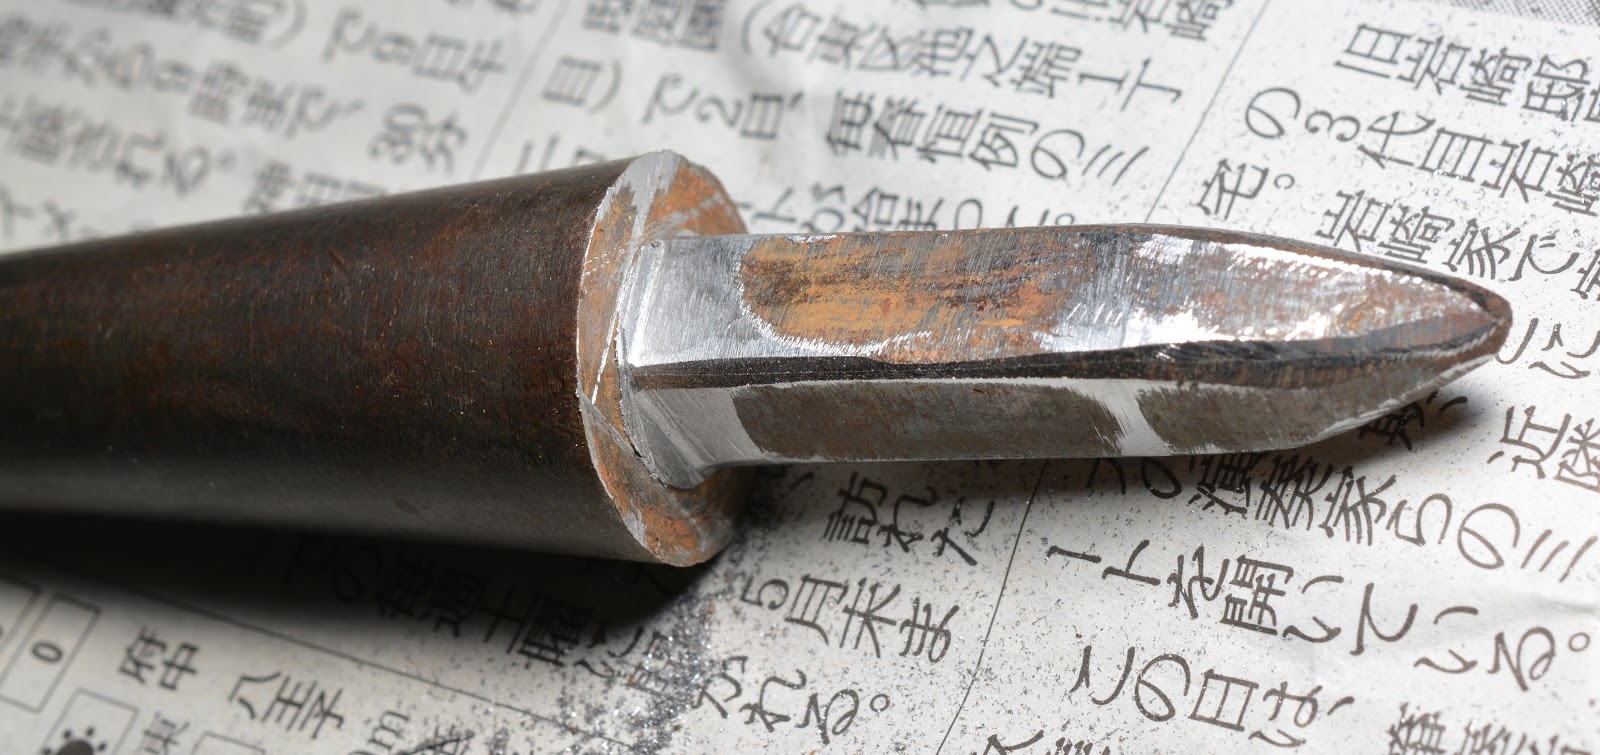

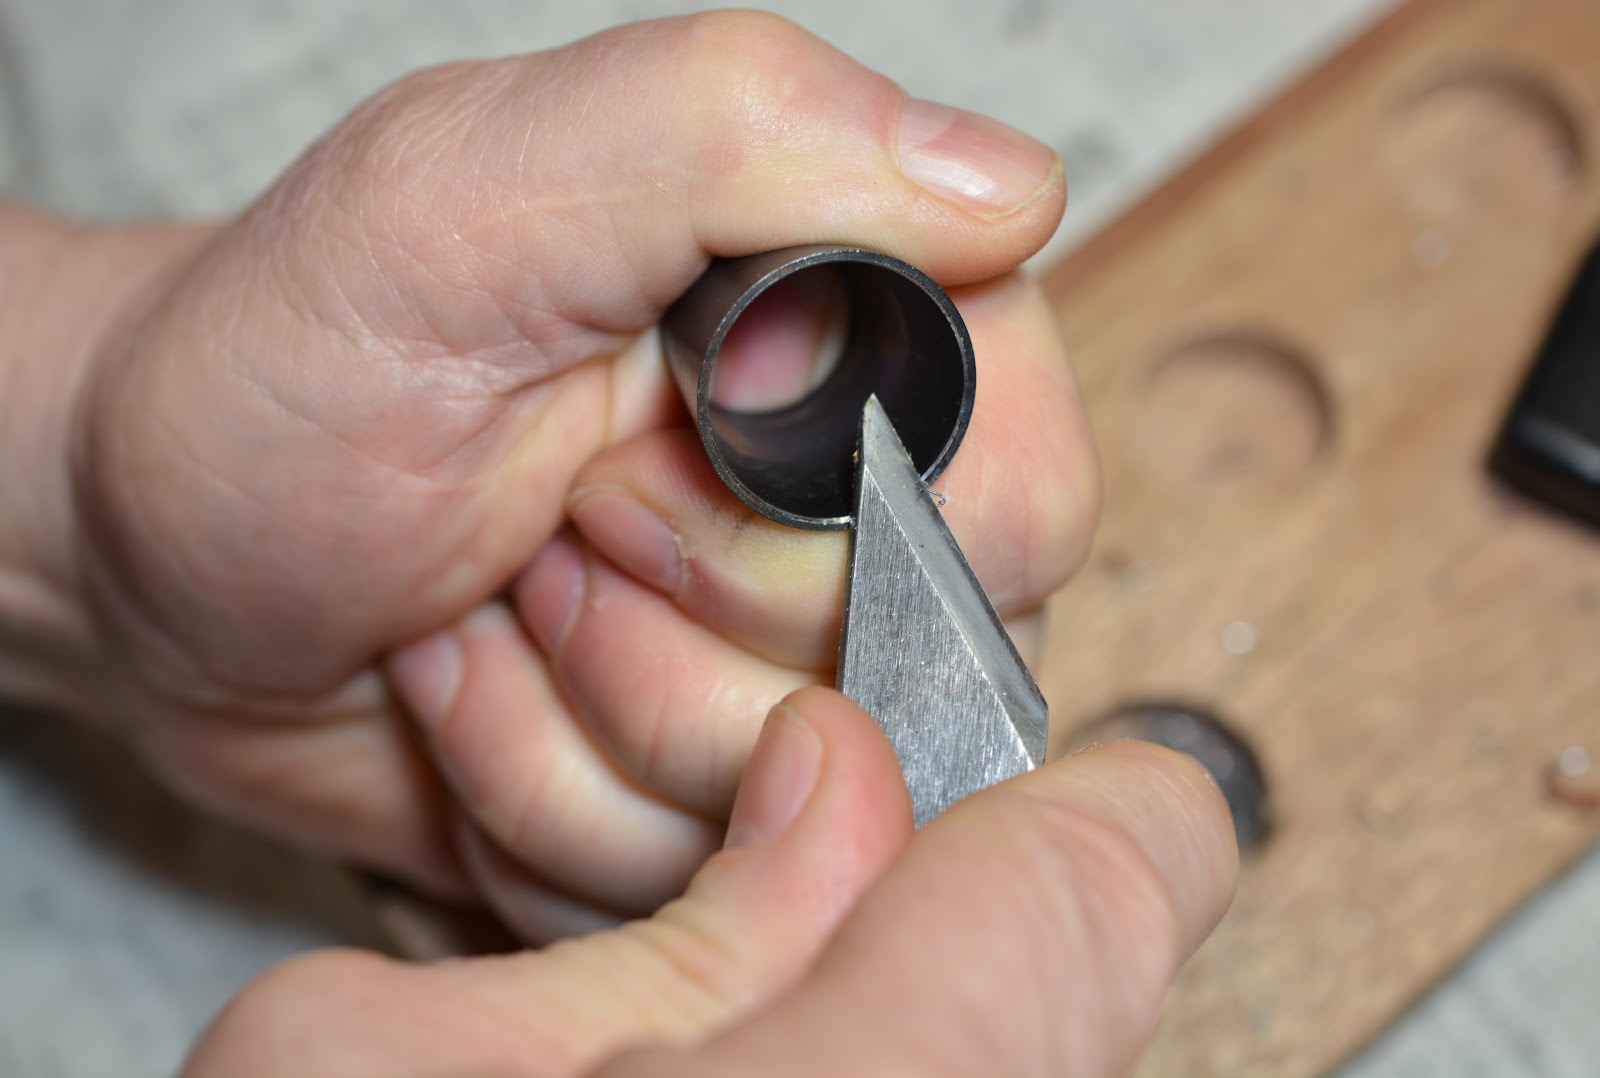
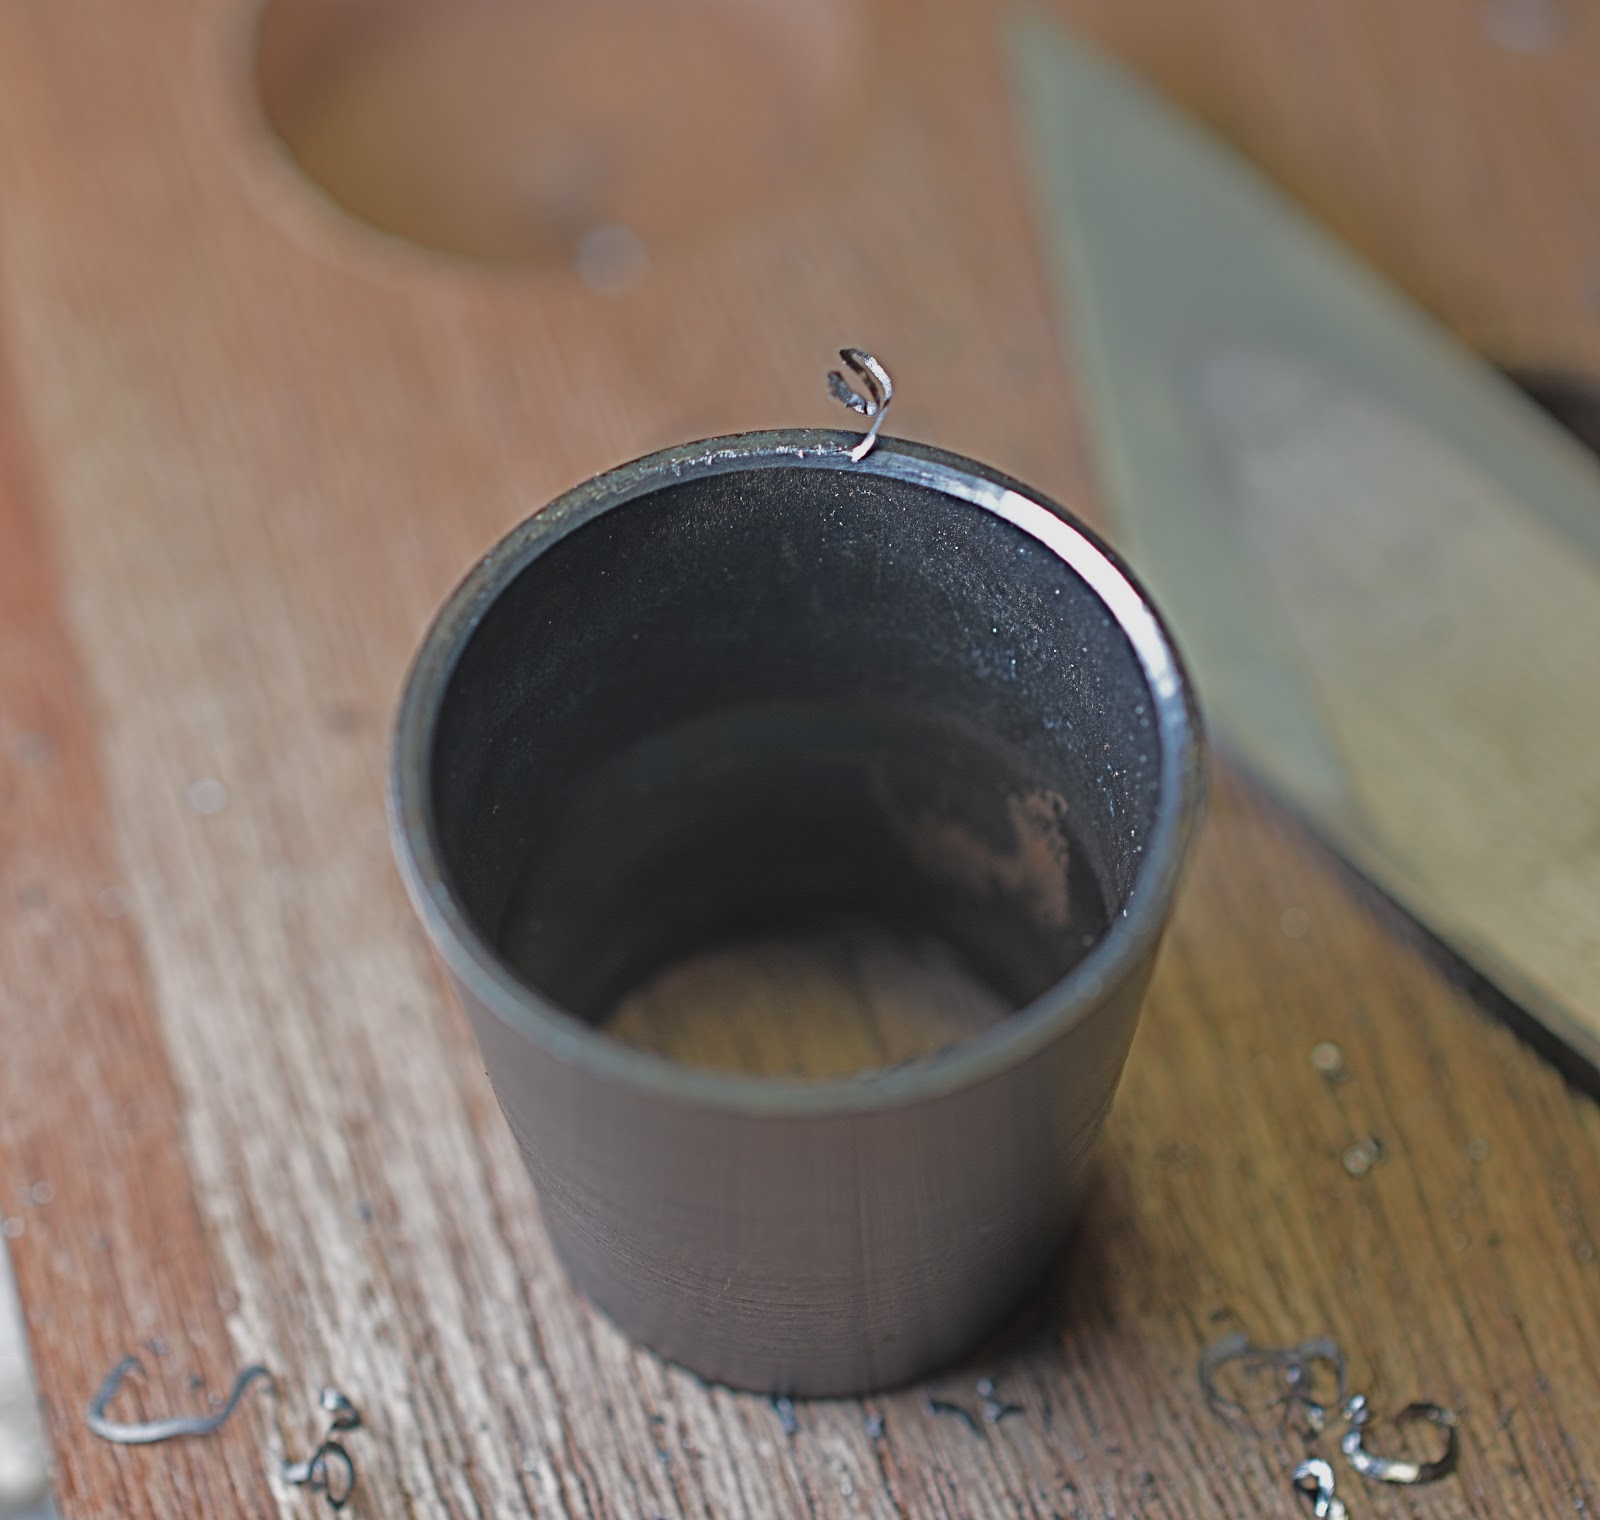
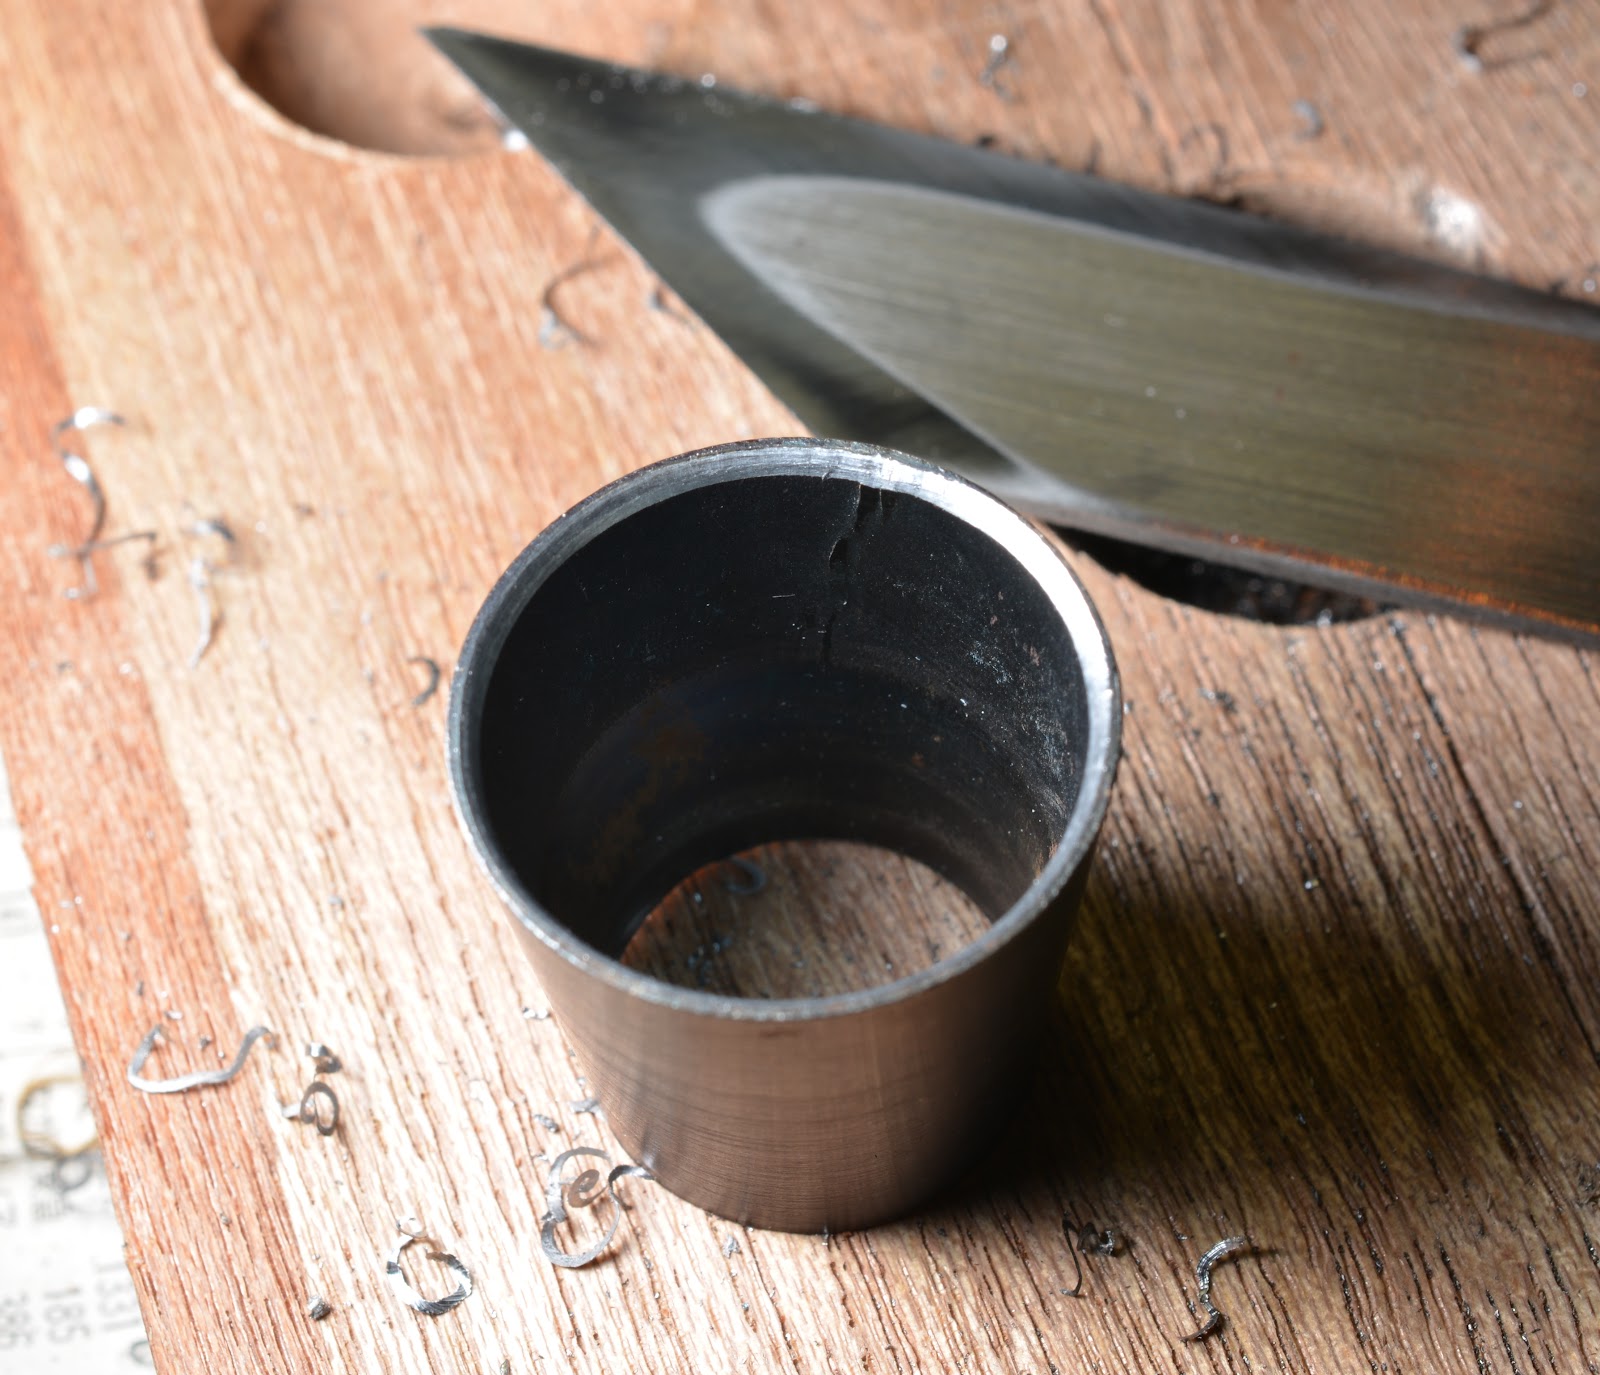
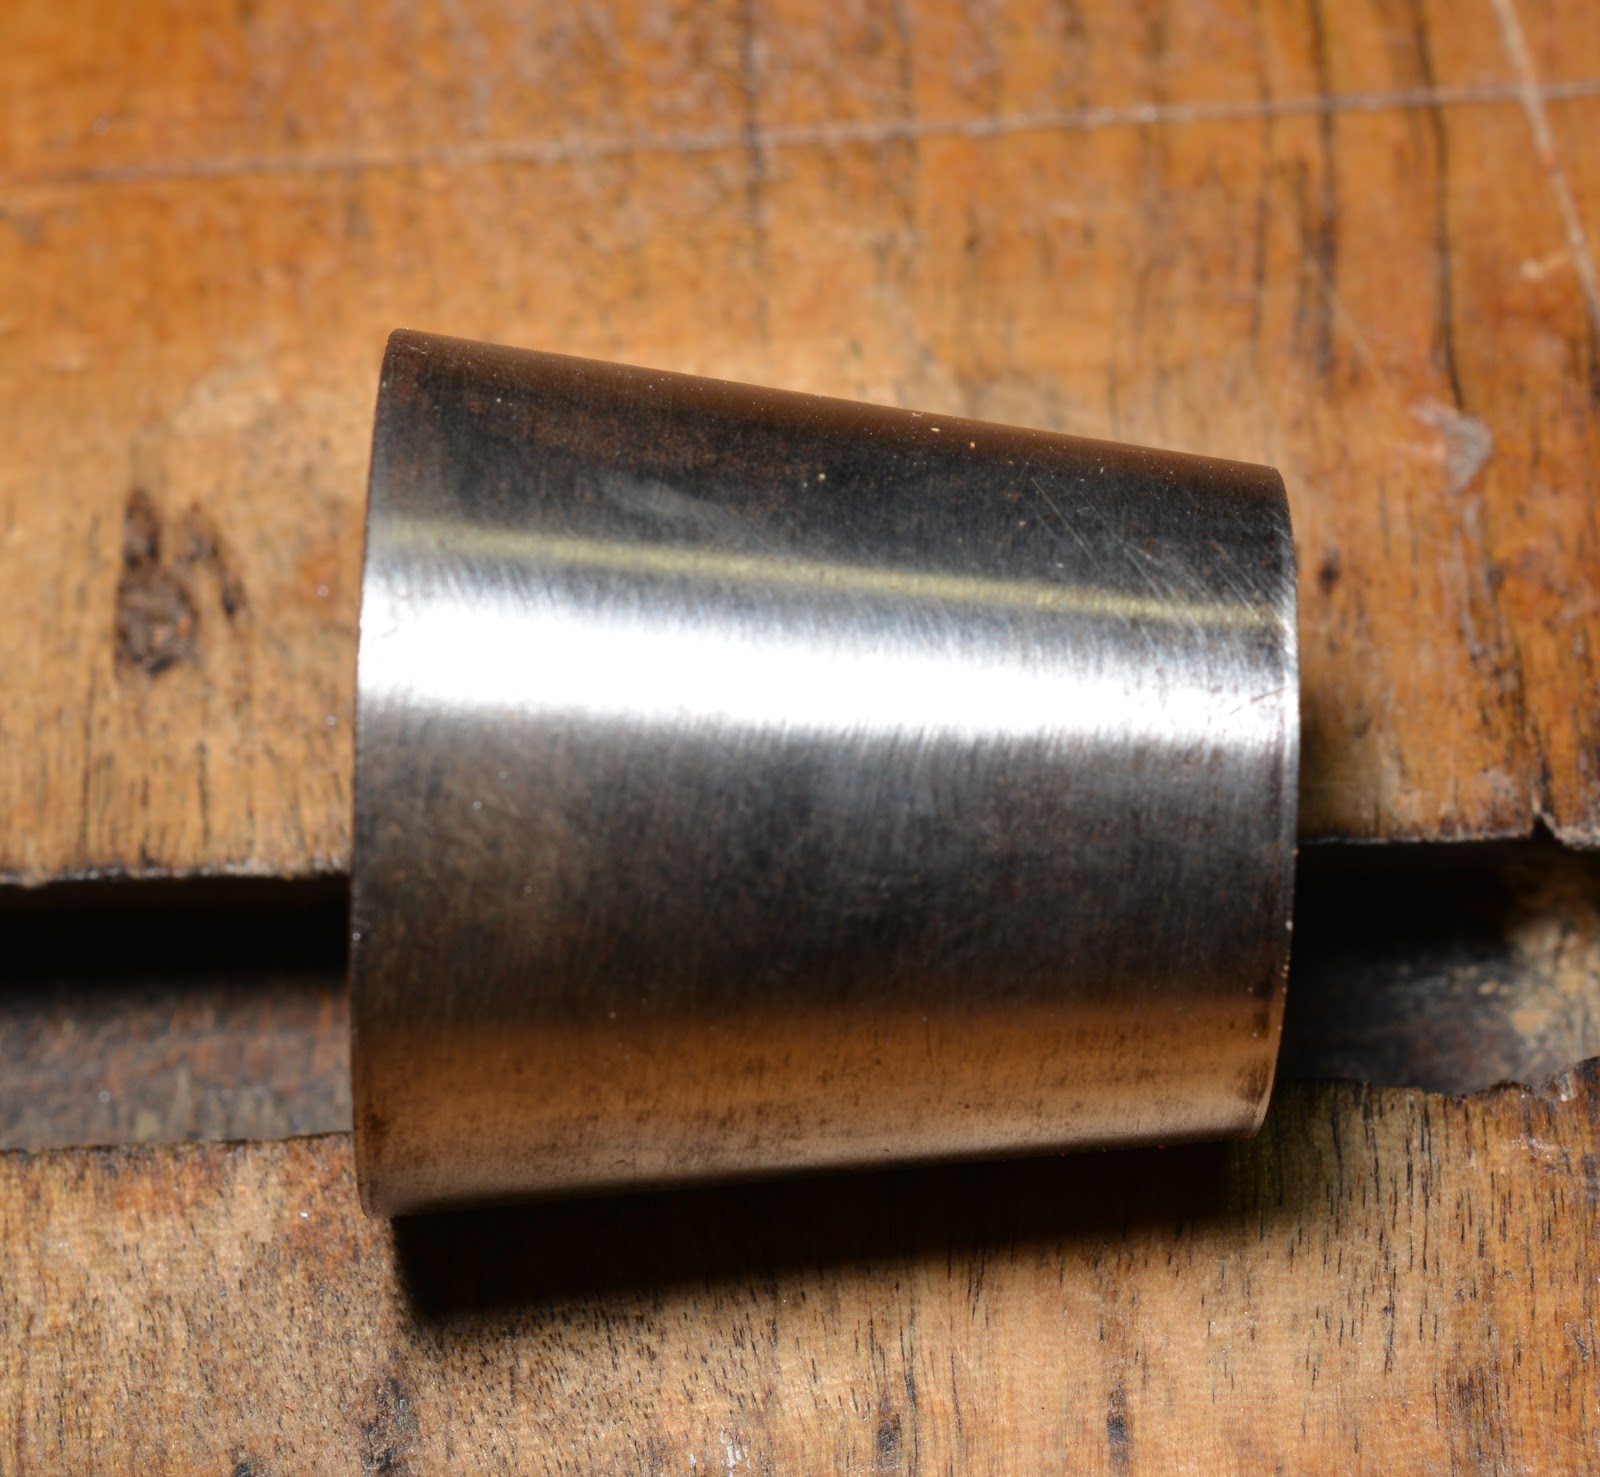

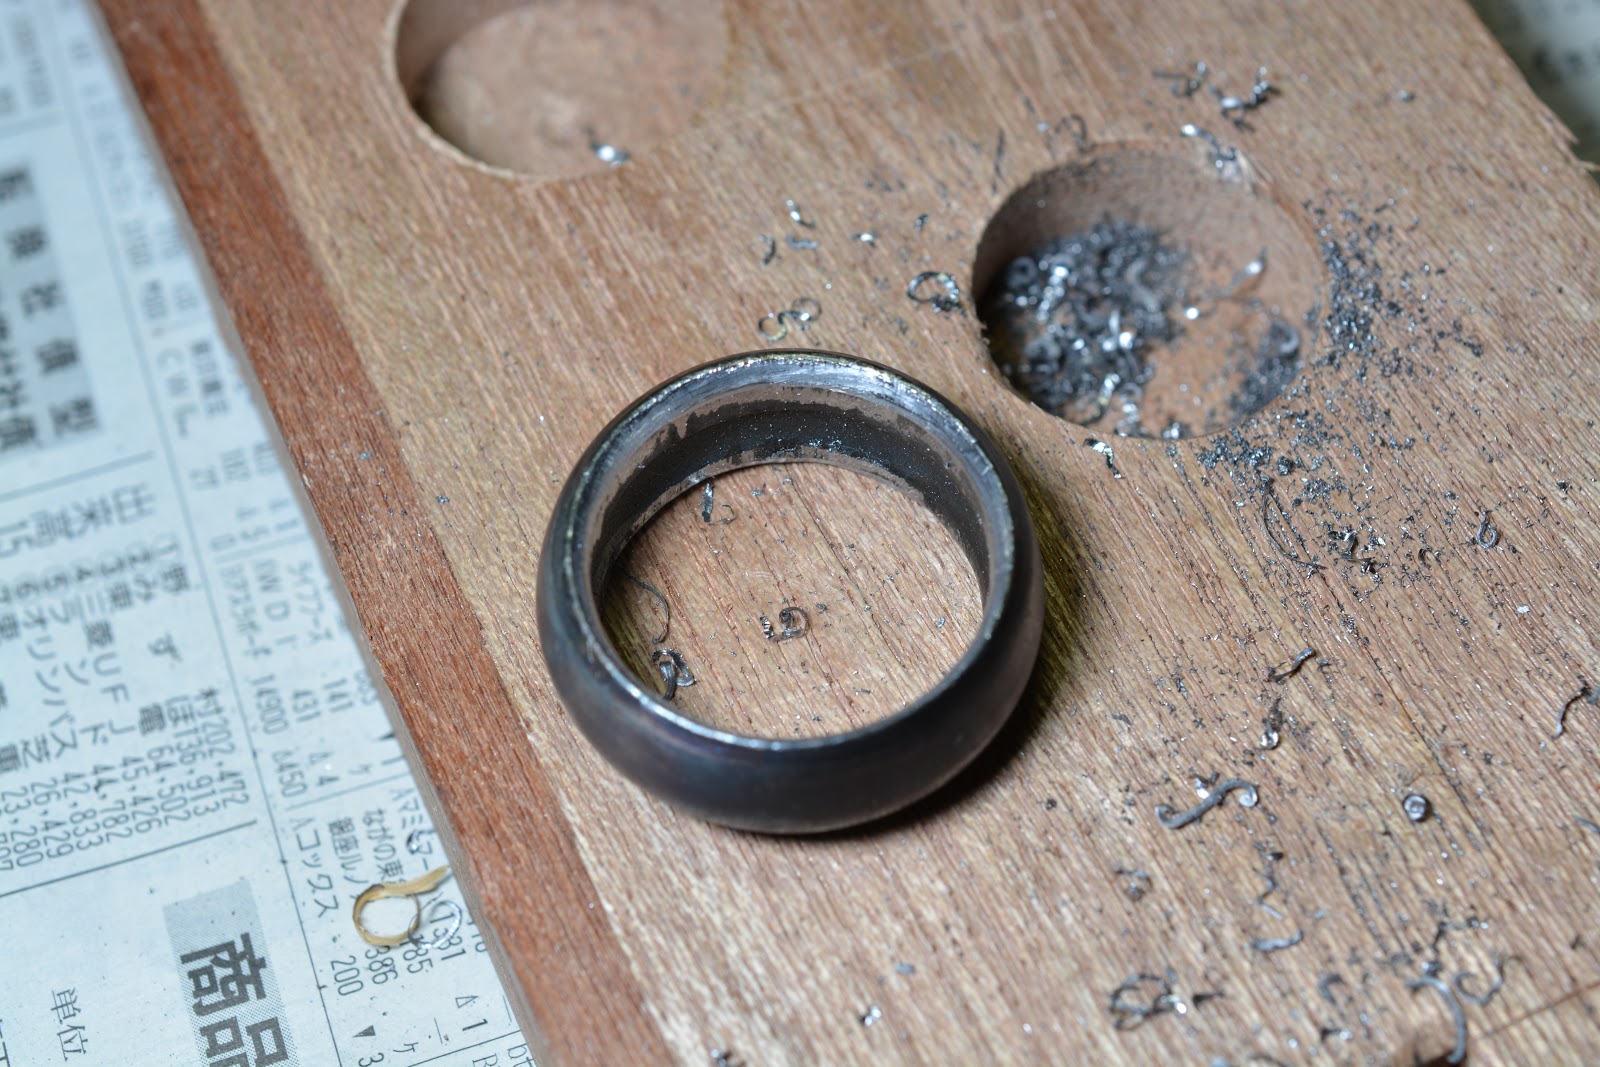
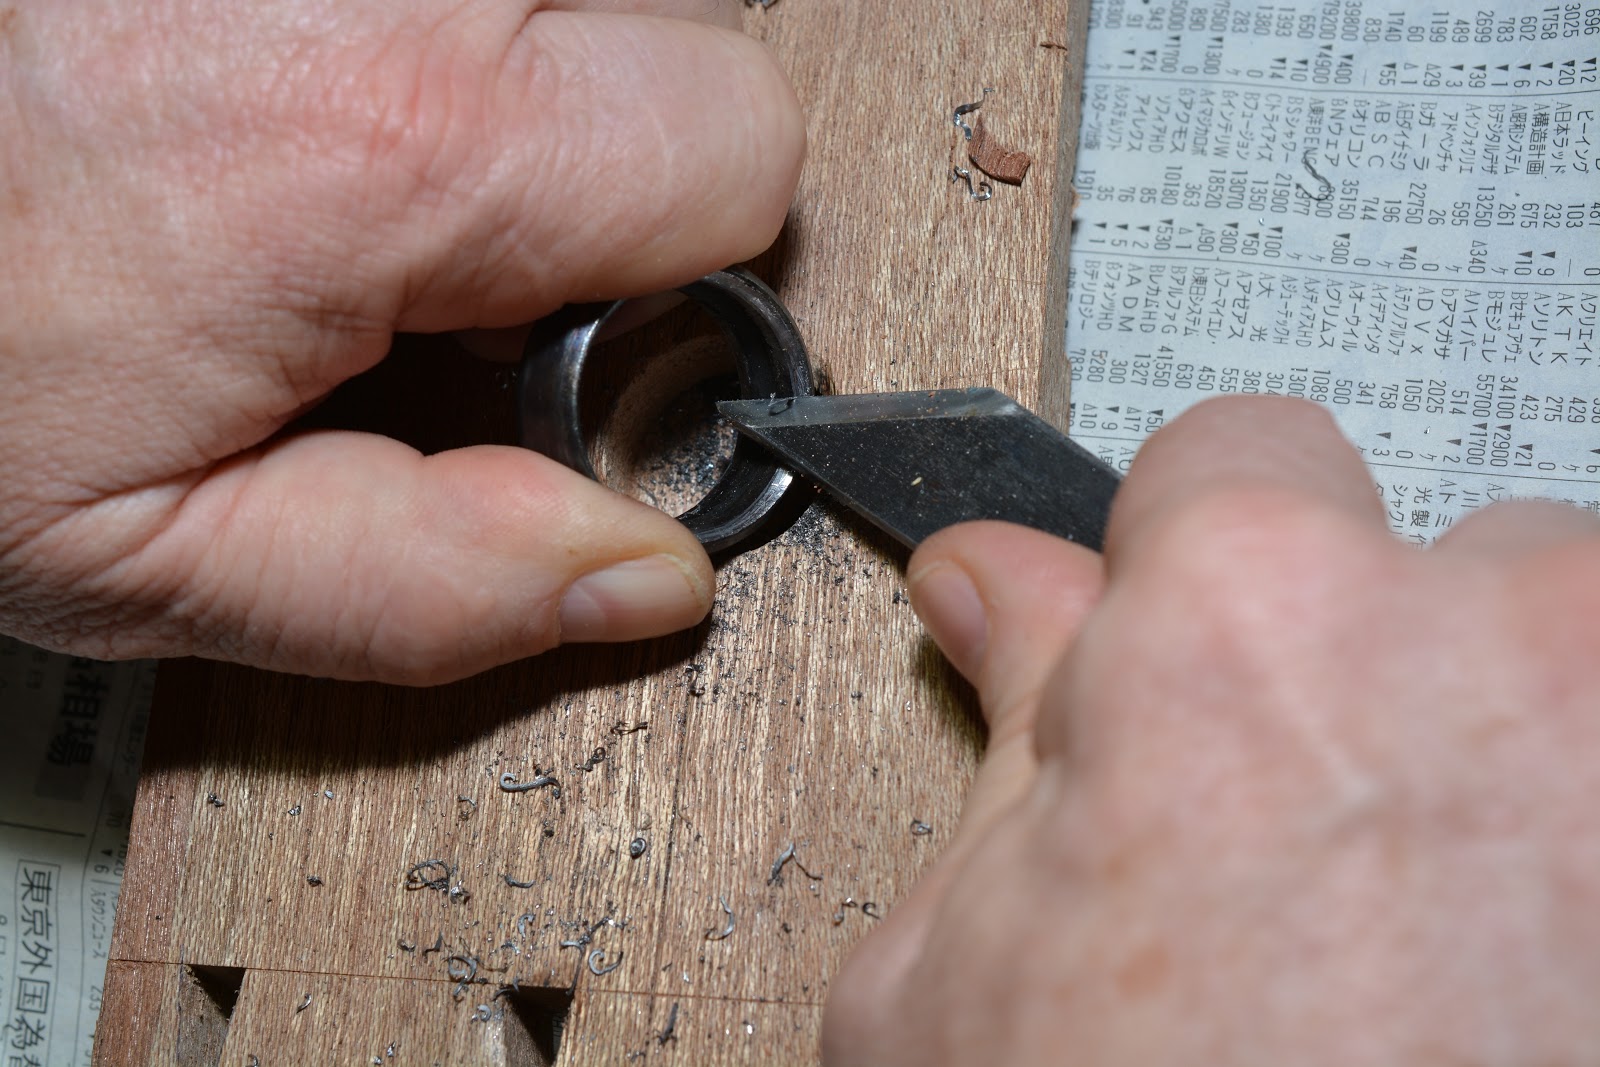
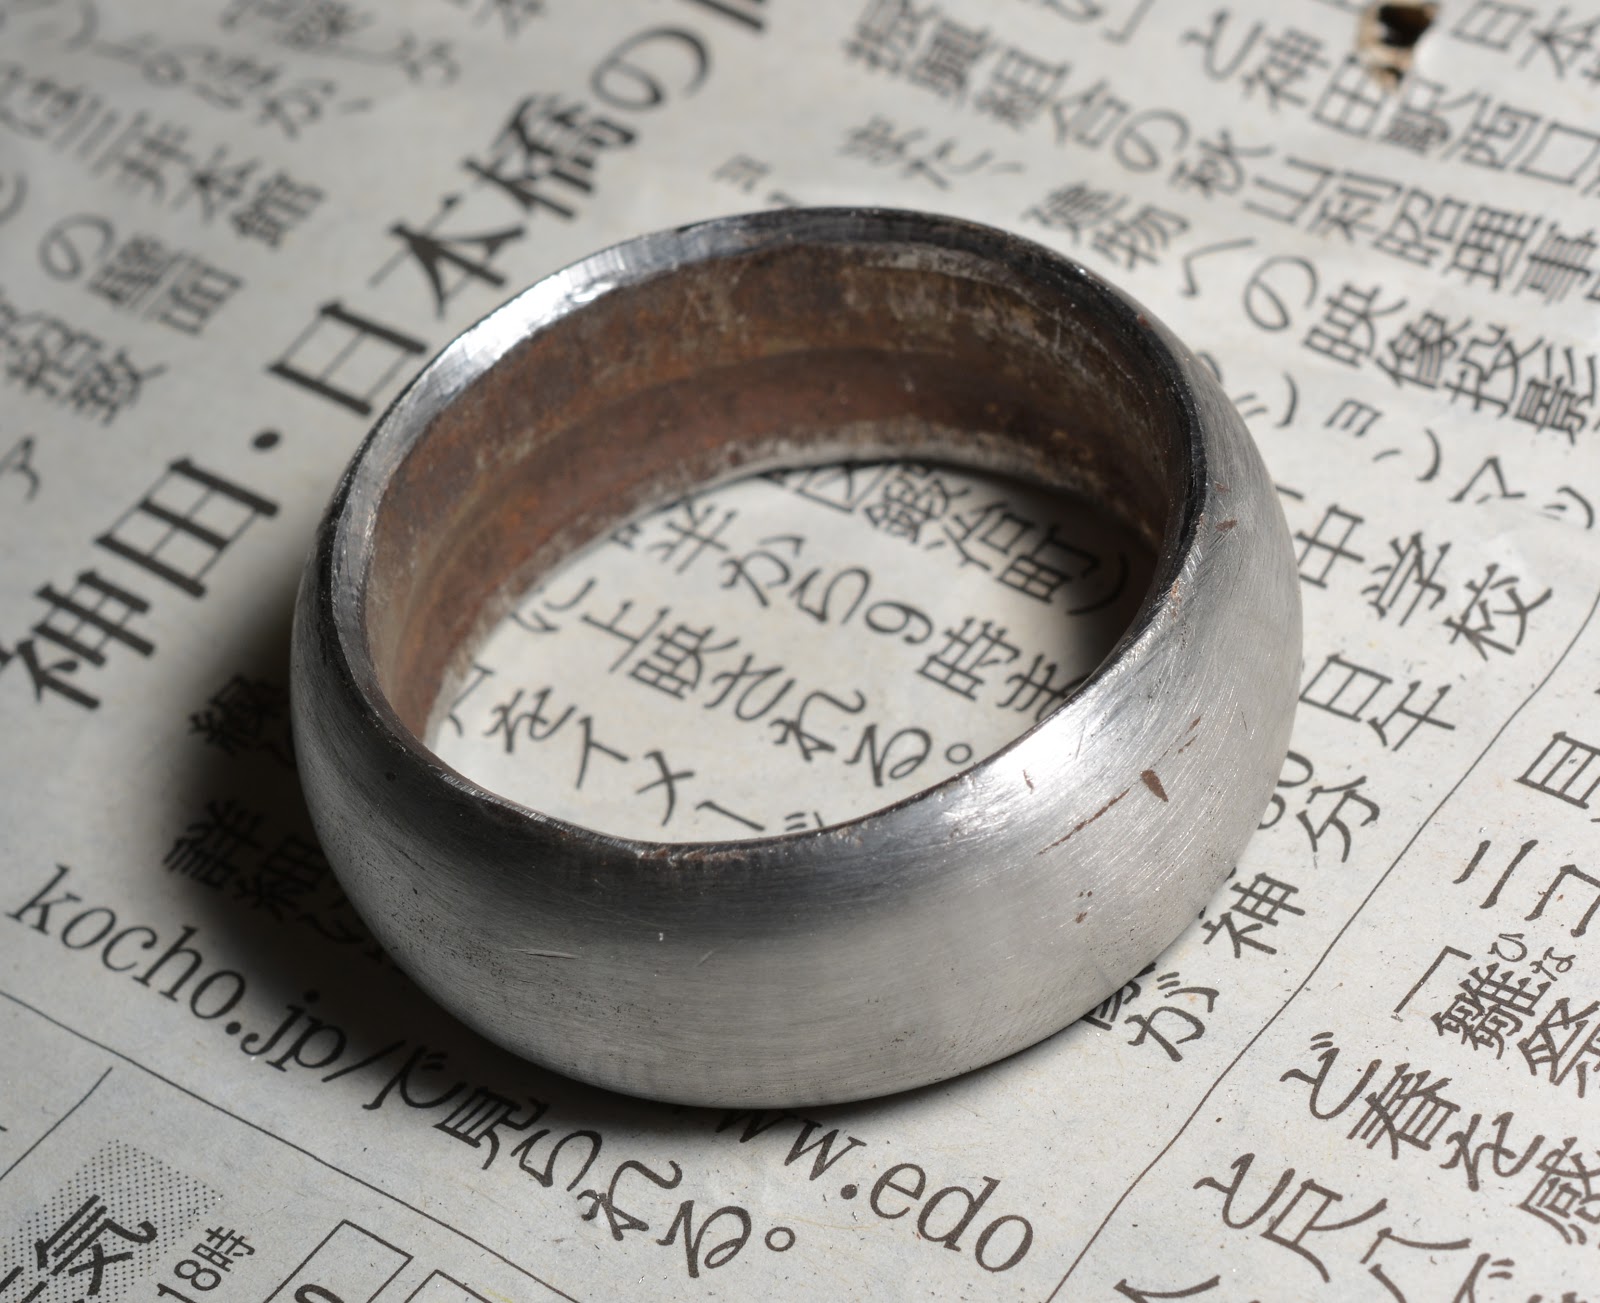
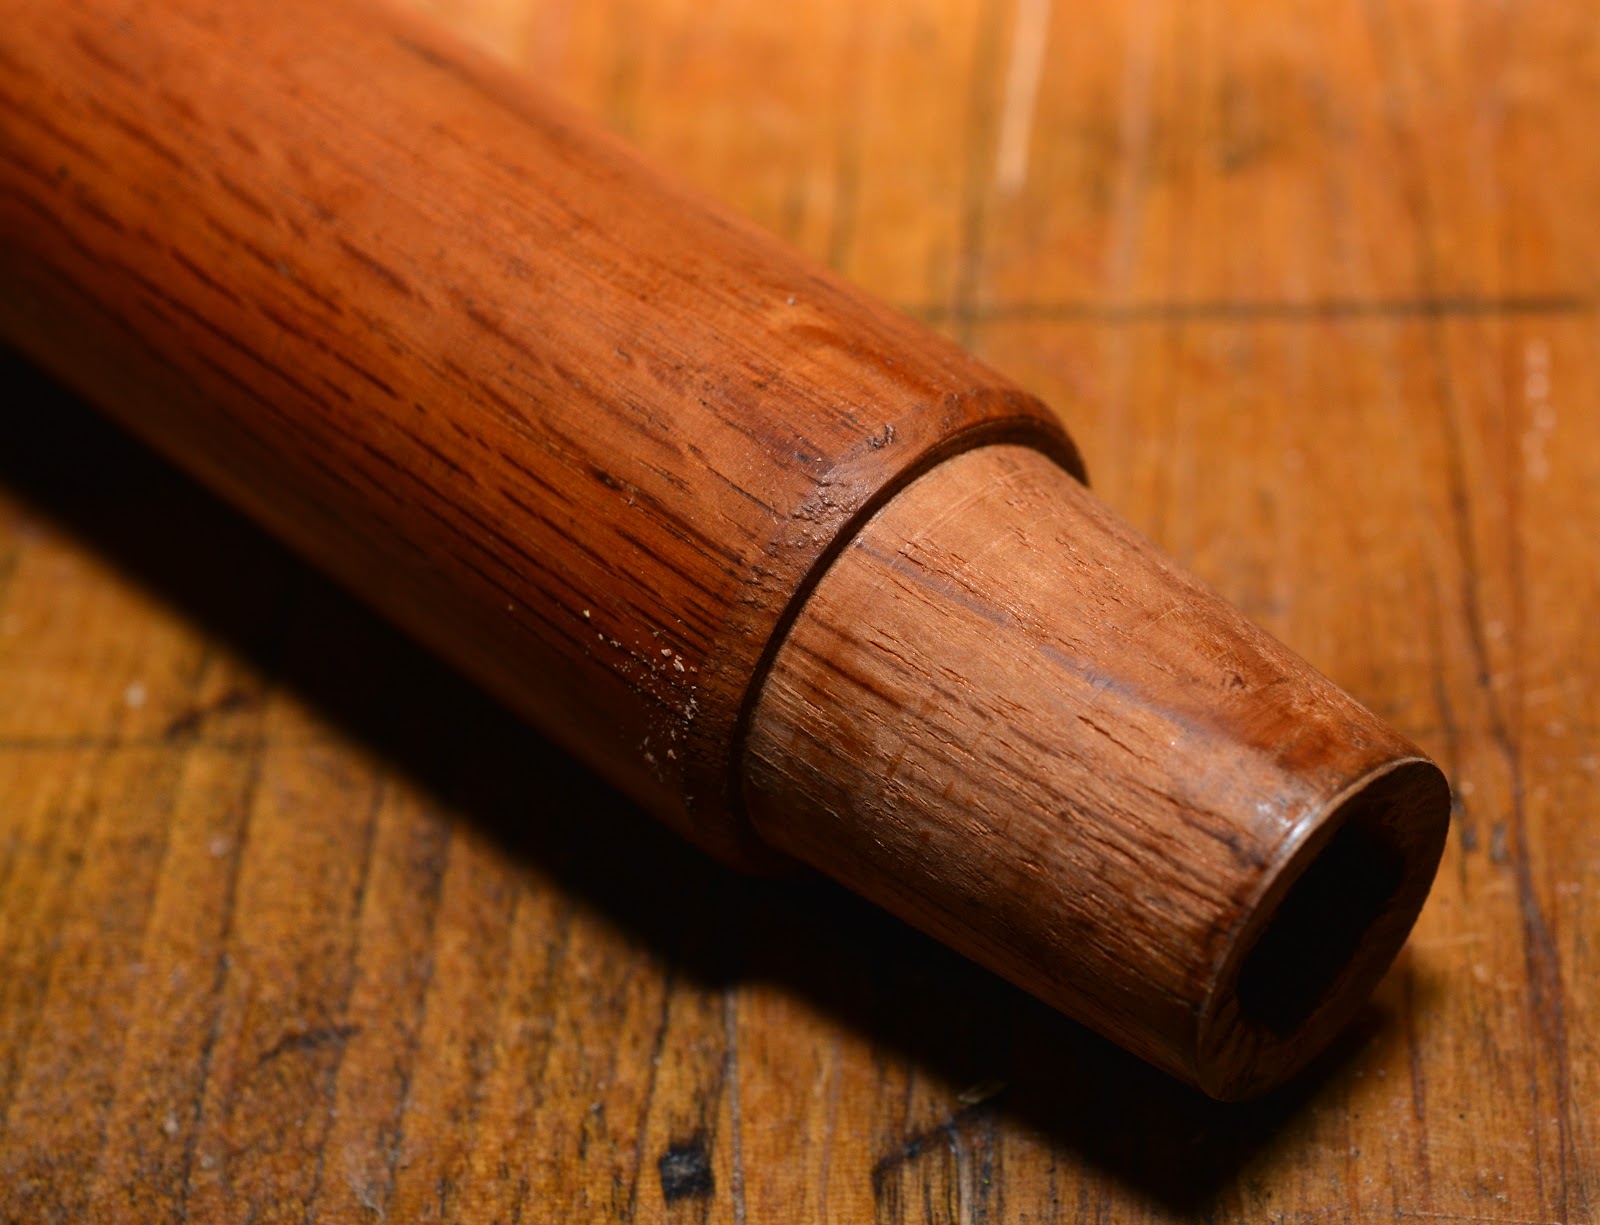
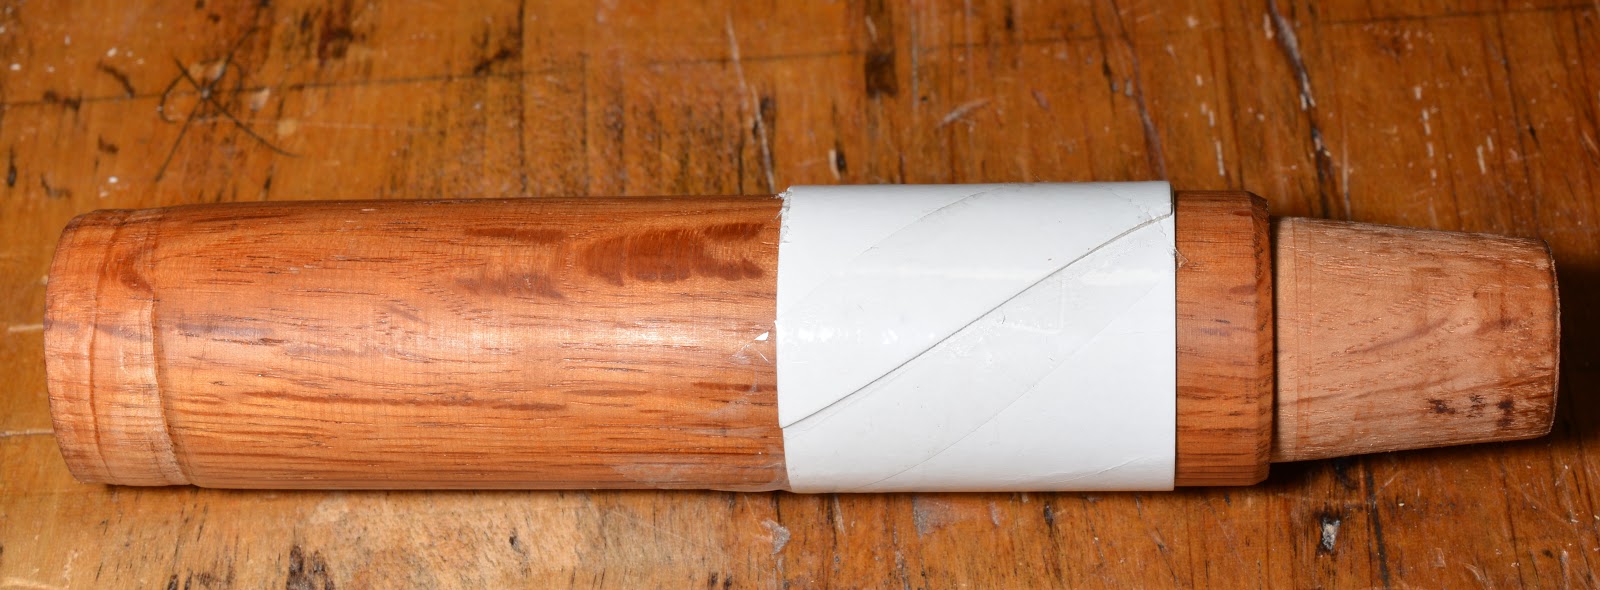
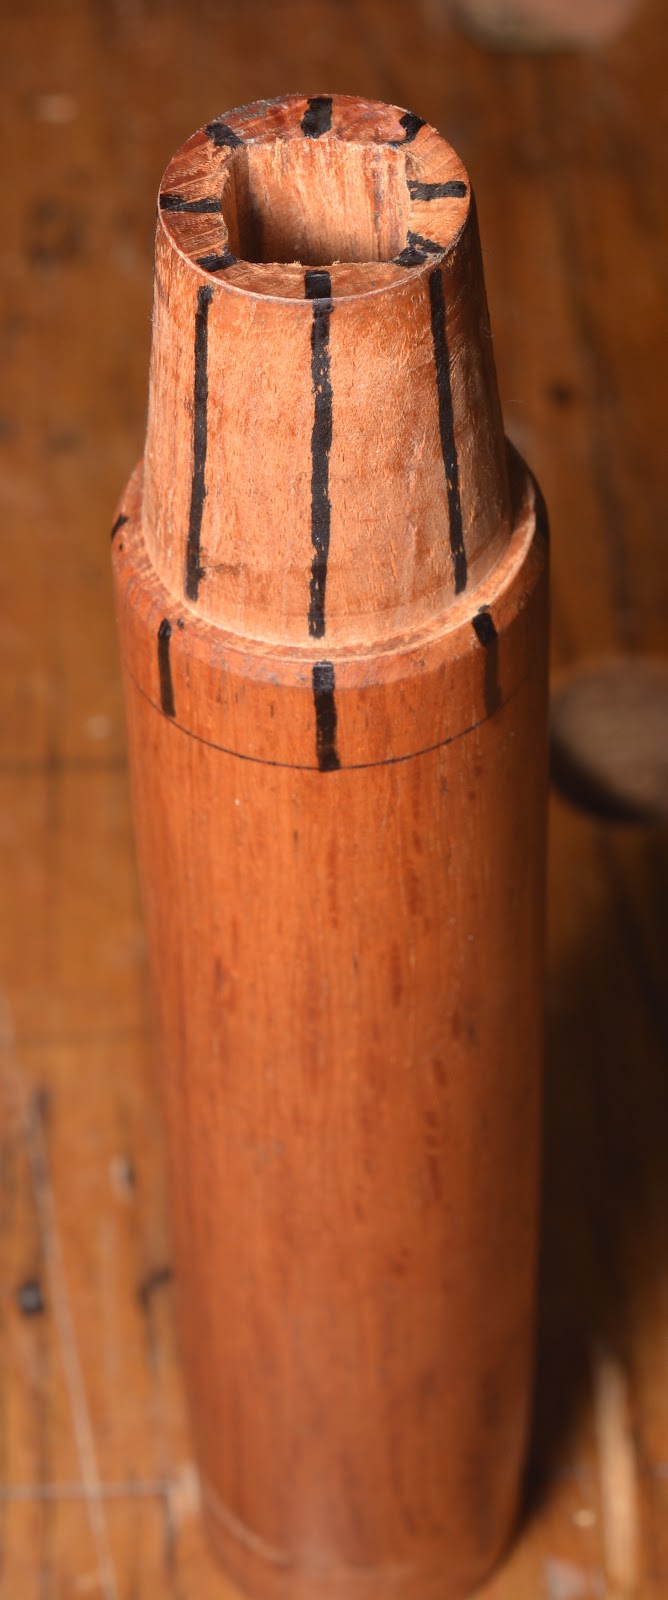
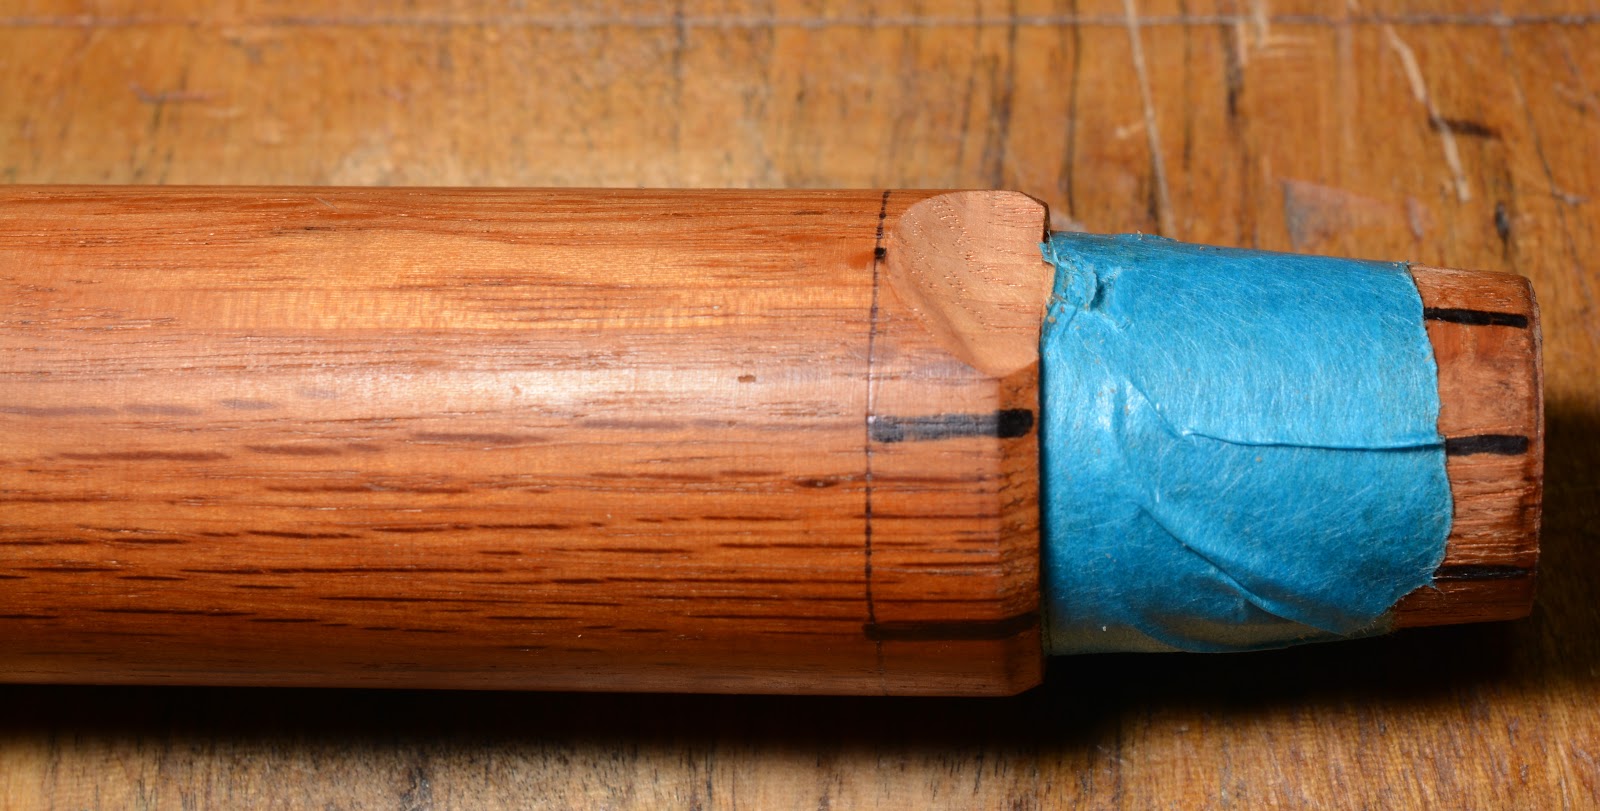
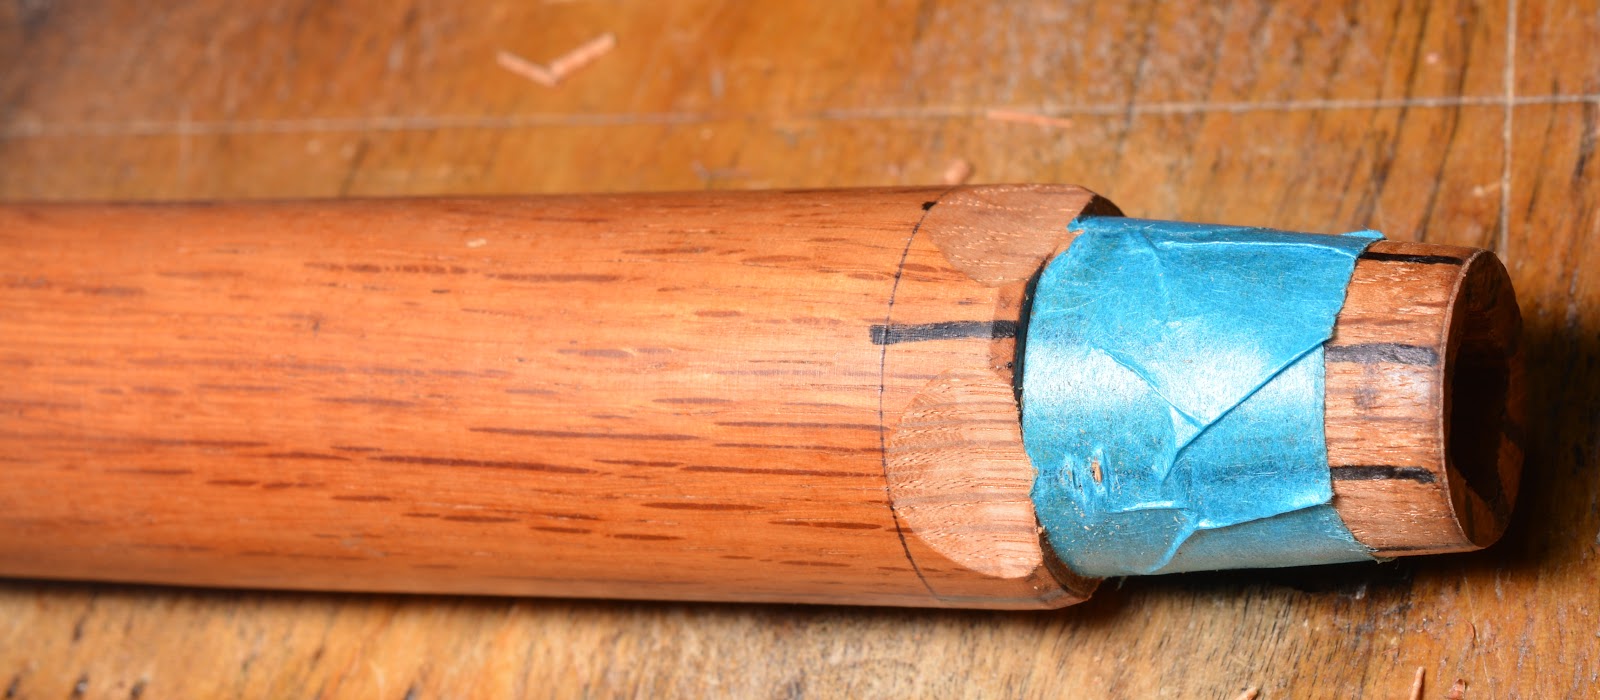
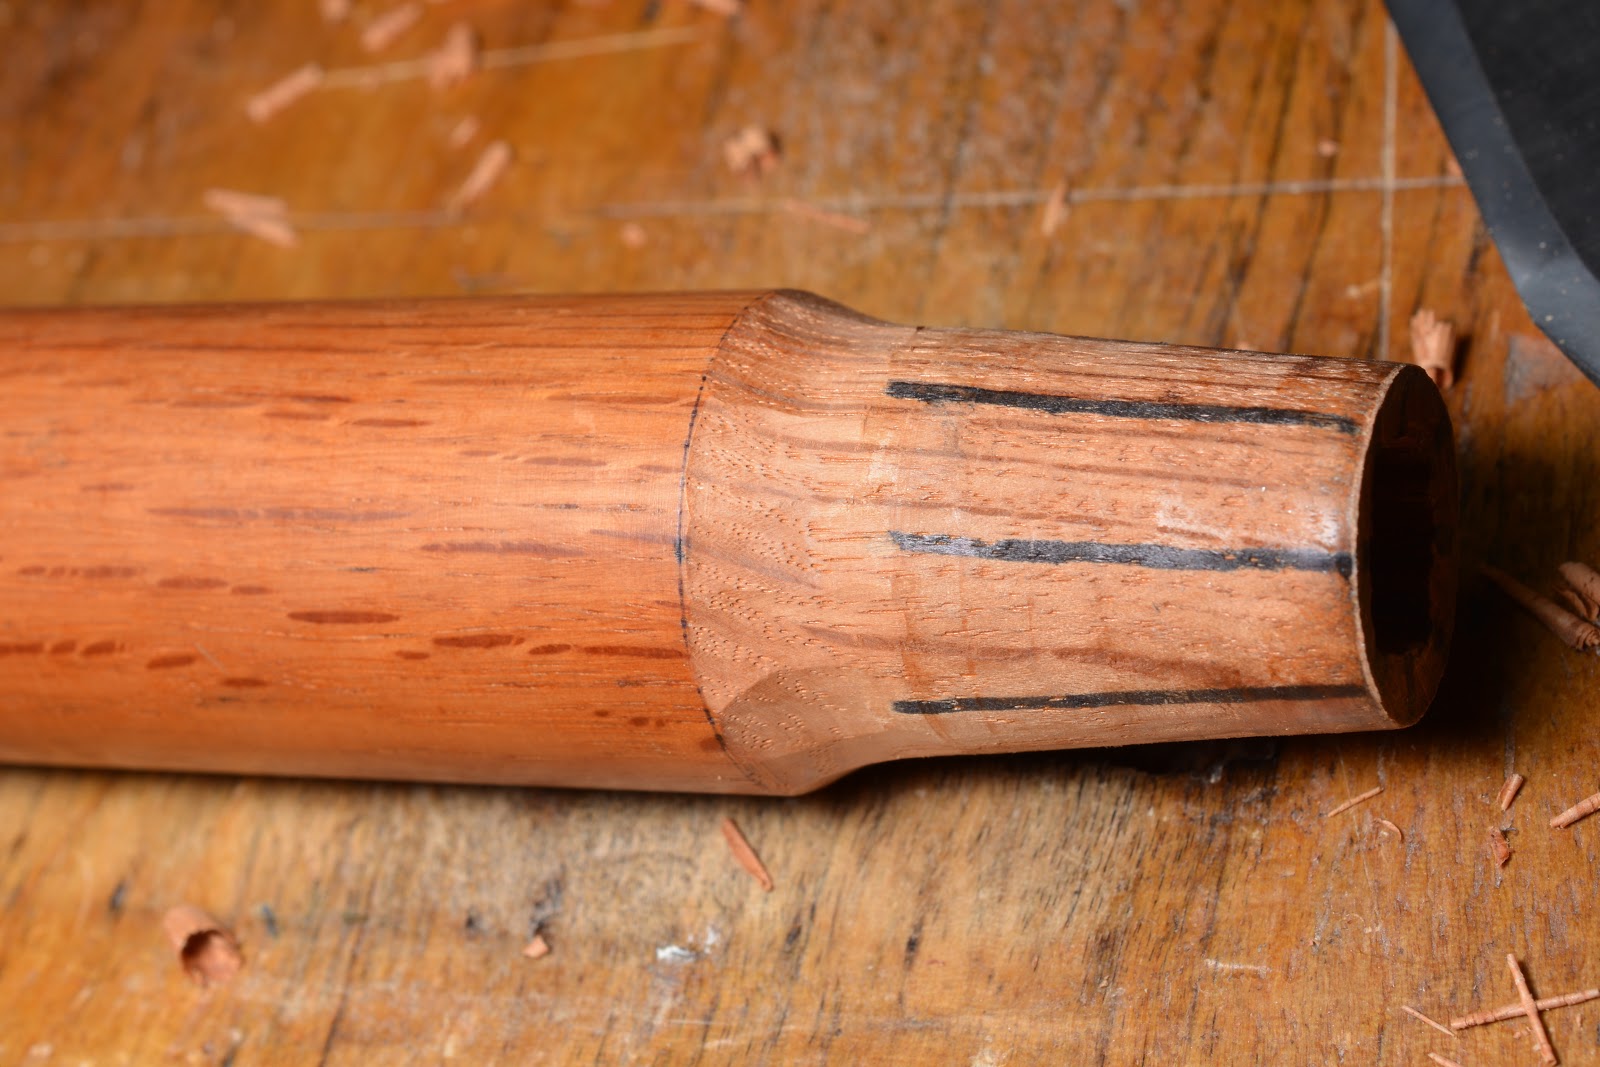
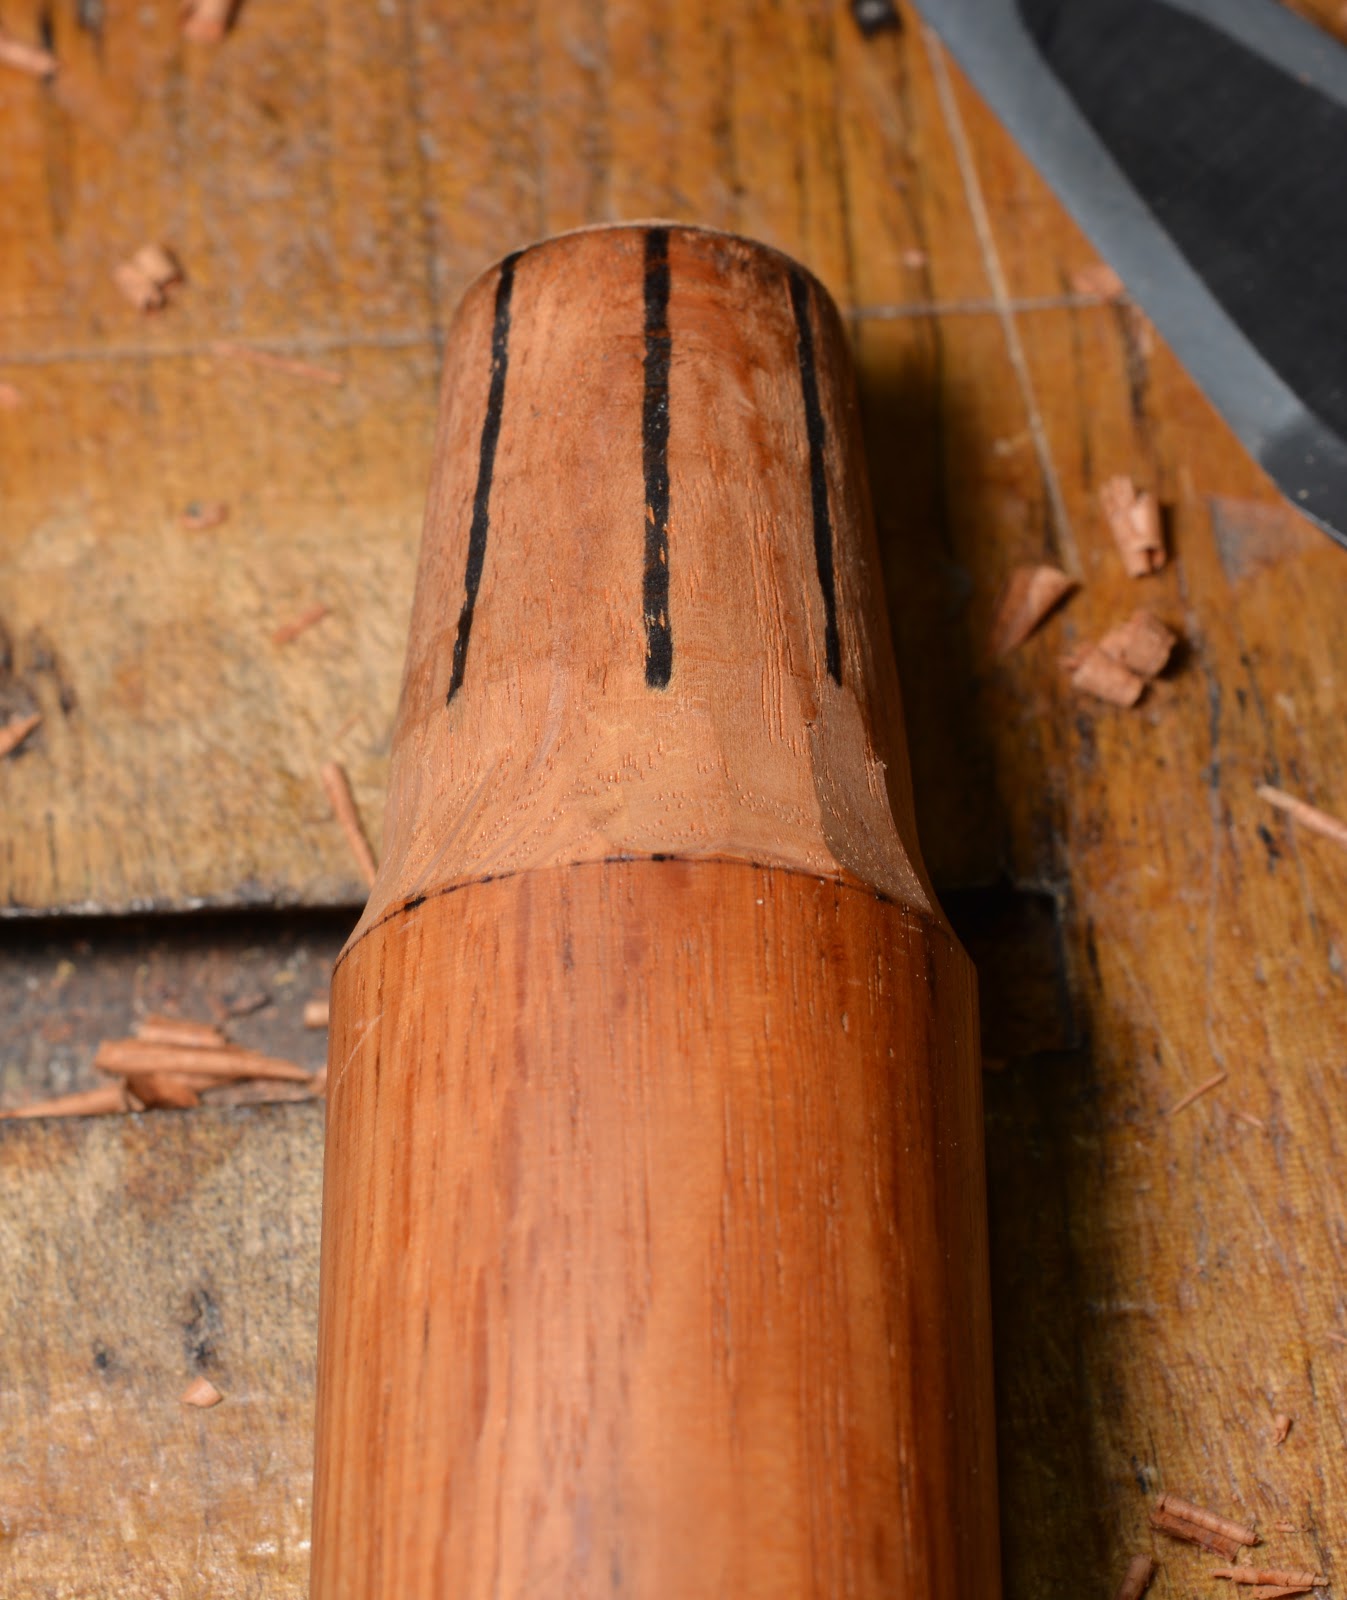

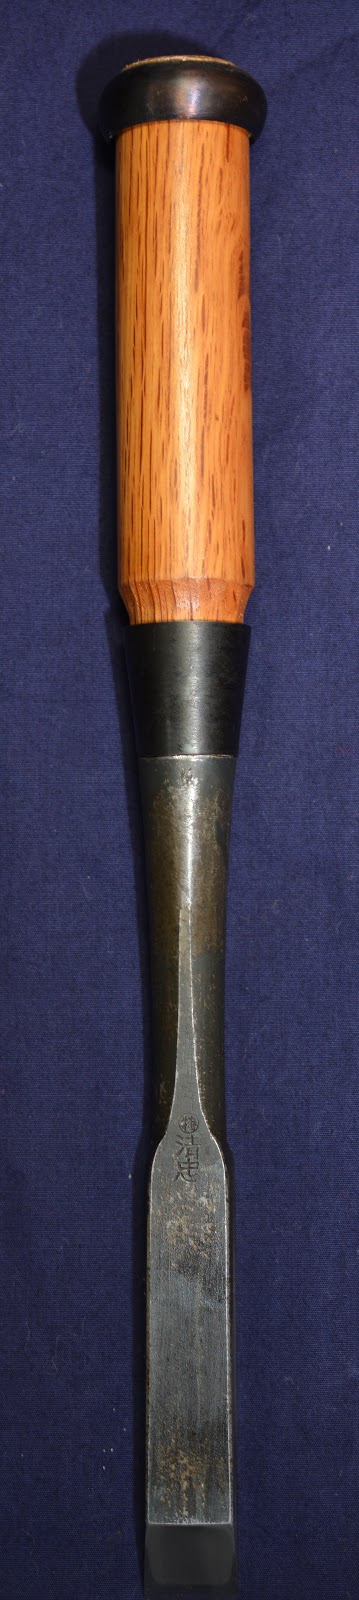


Leave a comment