

Men are like steel. When they lose their temper, they lose their worth.
Chuck Norris
While Beloved Customers are of course familiar with the features of the high-quality woodworking blades we purvey, some Gentle Readers may have little knowledge of the important details essential to Japanese woodworking tools. So in this article we will try to remedy that by examining some simple historical points common to woodworking blades around the world, as well as some details that make Japanese blades unique.
Your humble servant believes an understanding of these basic facts will aid Beloved Customer’s sharpening efforts, or will at least tickle Gentle Reader’s interest in Japanese blades. Please comment and let me know your thoughts.
Laminated Bi-Metal Construction

As discussed in previous articles in this series, before technological advances in the 1850’s, steel was difficult to make and expensive. Consequently, it was standard practice not only in Japan but everywhere, including Europe and the United States, to reduce production costs by minimizing the amount of precious steel used in producing all types of edged tools including axes, scythes, handplanes and chisels etc.. This was achieved by laminating smallish pieces of high-carbon steel to softer and much cheaper wrought-iron bodies through a process called “forge welding.” The photo at the top of this article shows the blacksmith placing the piece of high-carbon steel on the softer iron body of a blade prior to beating the hell out of it as part of the forge-welding process.
Most chisel and plane blade blacksmiths in Japan continue to employ this lamination technique even today, not because of some navel-gazing infatuation with the archaic, but because it has serious advantages.
The best Japanese plane and chisel blades are generally comprised of a layer of very hard high-carbon steel called “hagane” (鋼) in Japanese, forge-welded to a softer low-carbon/no-carbon iron body called “jigane” (地金). We discussed both of these metals in the previous two articles in the series here and here.
Here is the key point to understand: When a blade made from a lamination of high-carbon steel and iron (or low-carbon steel) is quenched, the sudden temperature change causes the high-carbon steel layer to become hard, even brittle, while the softer low/no carbon layer is unaffected and remains soft.

Why go to so much trouble? One advantage of this construction is that it allows the cutting edge to be made much harder than is possible in the case of an non-laminated blade therefore staying sharper longer in use than can be expected of a softer blade. But why does lamination make this possible? Consider the absolute fact that a chisel blade made of uniform material heat-treated to a uniform hardness of, say, HRC65 might cut very well, and stay sharp a long time, but it will always break in use. Not just chip, but actually break in half. The softer low/no carbon jigane layer supports and protects the hard high-carbon steel layer preventing it from rupturing. Such durability is a huge advantage.
Another benefit of laminated construction is ease of sharpening. Remember, the harder a piece of steel is, and the larger its area, the more work it takes to abrade it. But in the case of a laminated blade, the amount of hard-steel exposed at the bevel the user must abrade is just the relatively thin strip of shiny metal seen in the chisel photos above and below. Please also recall that the grey low/no carbon jigane layer is relatively soft and melts away on the sharpening stones without much effort.
So the laminated construction of hard hagane to soft jigane produces a blade that is tough but at the same time hard, one that will become very sharp and stay sharp a relatively long time thereby improving work quality and productivity while at the same time needing less time, effort, and stone to sharpen.
BTW, this is not a blacksmithing technique that was discovered only in Japan. Indeed it was once standard procedure for making high-quality cutting tools worldwide, but it has been discarded and forgotten over the last 100 years almost everywhere else because it costs more to accomplish, it requires real trained blacksmiths to perform (not just factory workers), and because most consumers can’t tell the difference, fools that they are.
A relatively few, highly-skilled Japanese blacksmiths continue to employ this ancient and clearly superior technique despite the difficulty and decreased profitability, but only because their professional Japanese woodworking customers demand it. At least, that is, for a little while longer. A word to the wise.
Laminated Blades in the West
If you have examined antique plane blades with wooden bodies you may have noticed many have blades stamped ” Warranted Cast Steel”

Despite being designated “cast steel” in England and America in past centuries, unlike Conan’s Daddy’s sword, or the orc blades made in the bowels of Isengard, plane, chisel and saw blades with this mark were not “cast” by pouring molten metal into a mold to form a blade. Rather the process to make the steel involved melting iron ore in a crucible and pouring it into molds “casting” a strip, bar, or ingot of high-carbon steel which was then forged to make the blade, hence the name.
This became possible only when the technology required to reliably and fully melt steel to a more-or-less liquid state on an industrial scale was developed. Such steel was also called “Crucible Steel” after the crucible container used to melt iron ore.
This technology was widely used in the United States and Europe through the 1870’s. In fact, one steel mill is said to have been producing crucible steel until the 1960’s. Toolmanblog has an interesting summary on cast steel.
With few exceptions, these European plane blades have a thin piece of high-carbon steel forge-welded to a soft wrought iron body, very similar to Japanese plane blades. I have reused a couple of these antique blades to make Krenovian-style planes and testify of their excellent cutting ability.
Chisels were also once made in Europe using this same lamination technique, although fewer examples remain extant.
Axes, hatchets, and many farming implements were also mass-produced up until the 1920’s in the US using a variation of this same technique with a “bit” of steel forming the cutting edge laminated to or sandwiched inside a body of low-carbon steel or wrought iron. Axes are still made this way in Japan. It’s a proven technique with a lot of advantages, but it does require a skilled blacksmith to pull off successfully, and customers that appreciate the improved performance.
The point I am trying to make is that blades made using forge-welded laminated technology were the very best available in Europe and the United States for many centuries.
Here is a link to a blog post by Paul Sellers where he praises the old chisels and laments the new.
U-Channel Construction
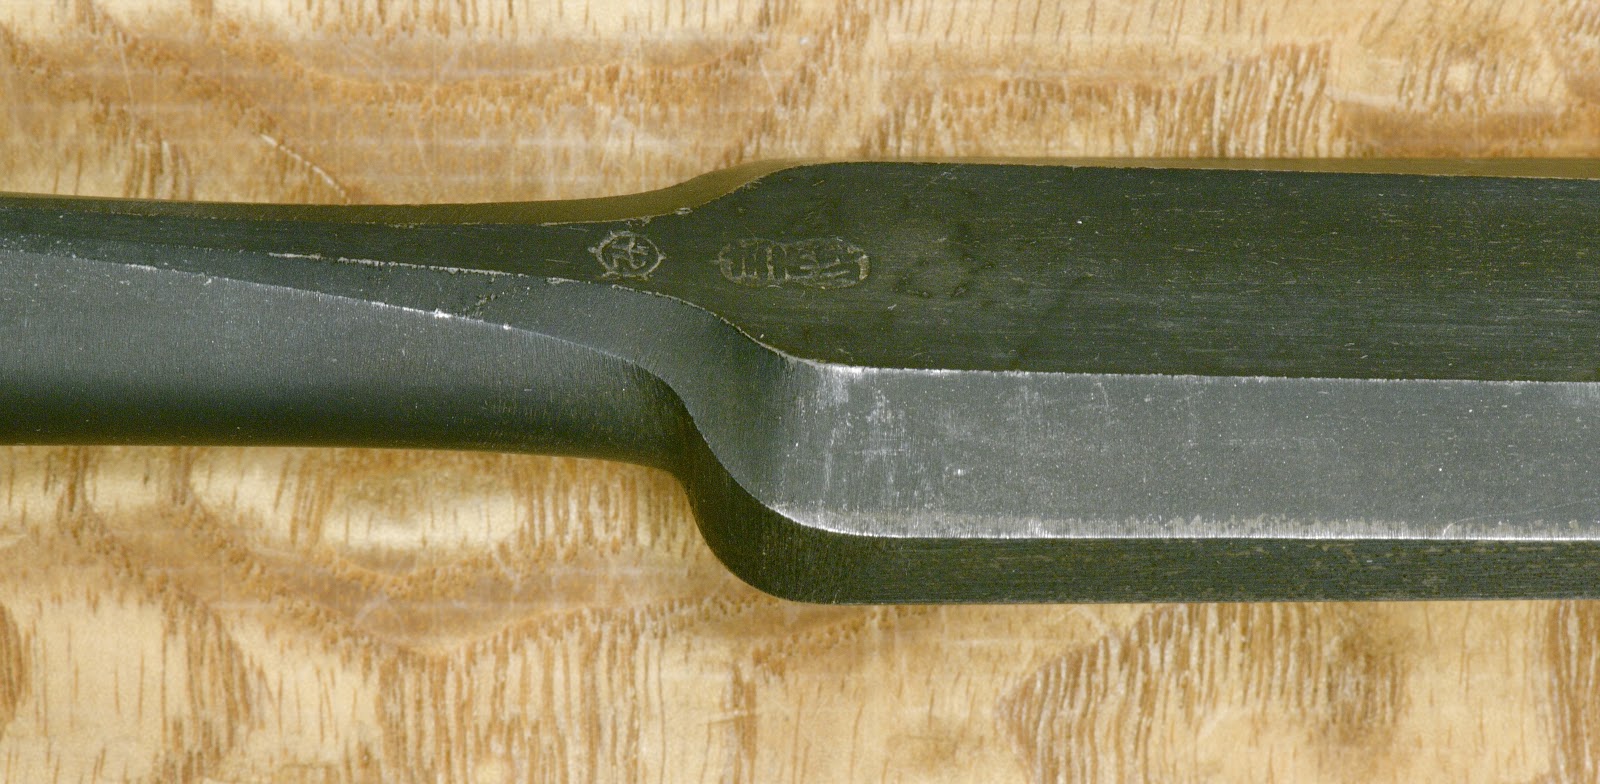
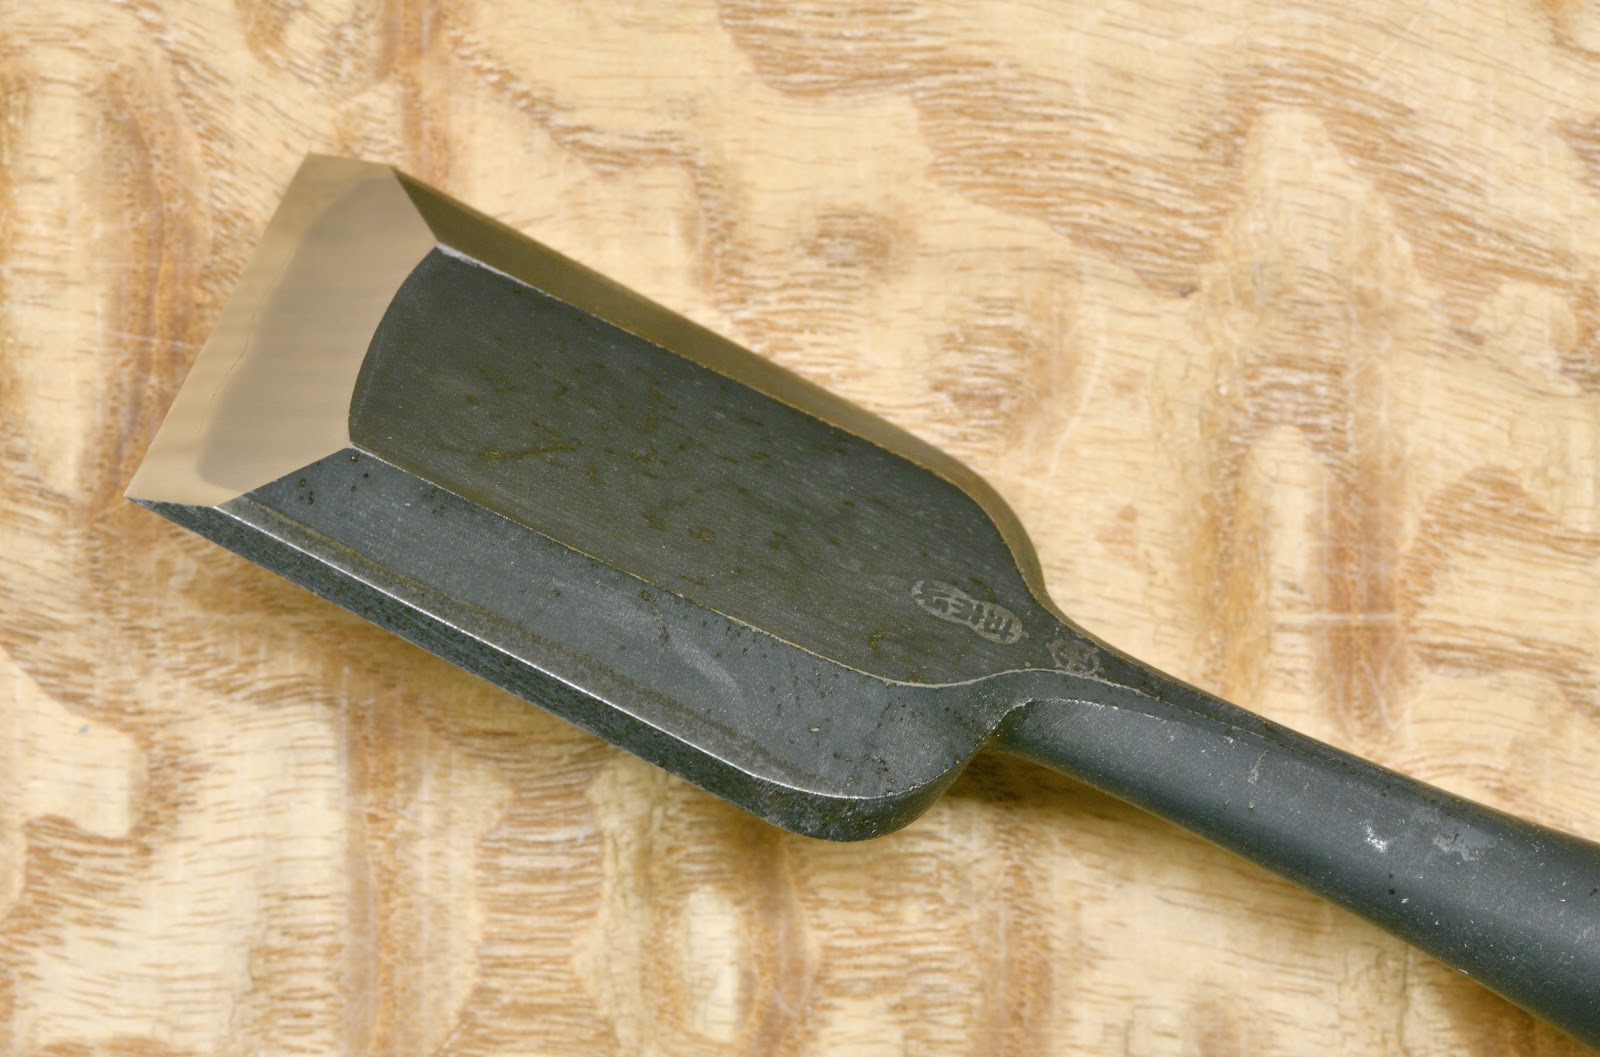
The shape of the hard steel cutting layer laminated to the softer low-carbon steel (or wrought iron) body of chisels was historically a simple flat plate in Western blades. This is still the case for Japanese plane blades, axes, and farming implements. But if you imagine Japanese blacksmiths would be satisfied with such a simple design for all applications, you don’t know them well.
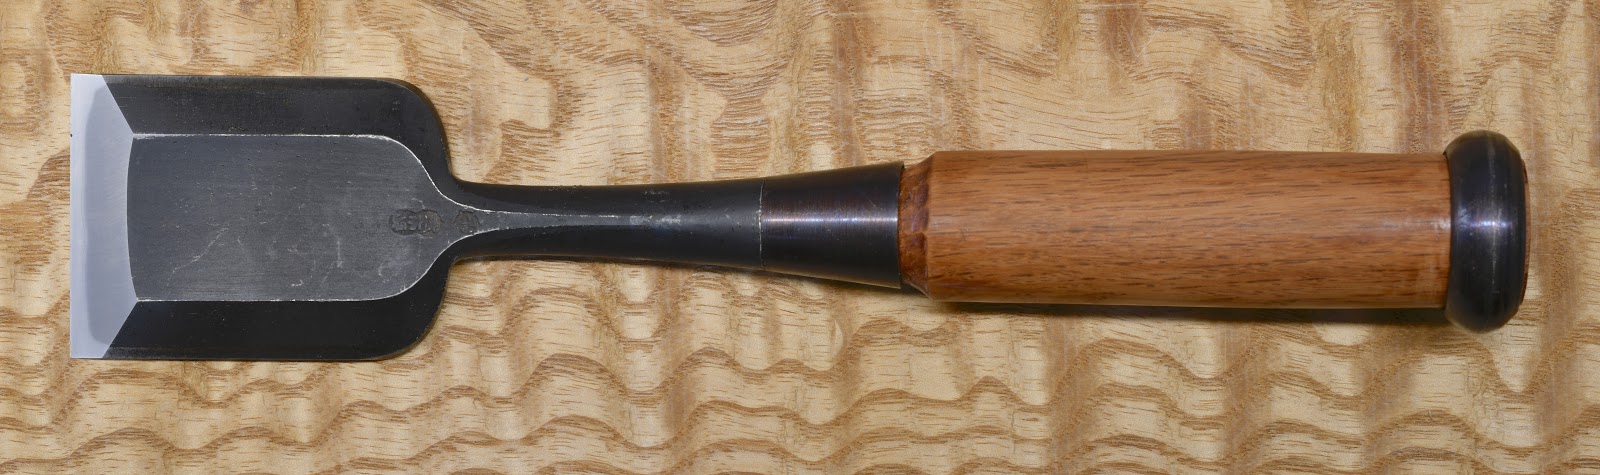
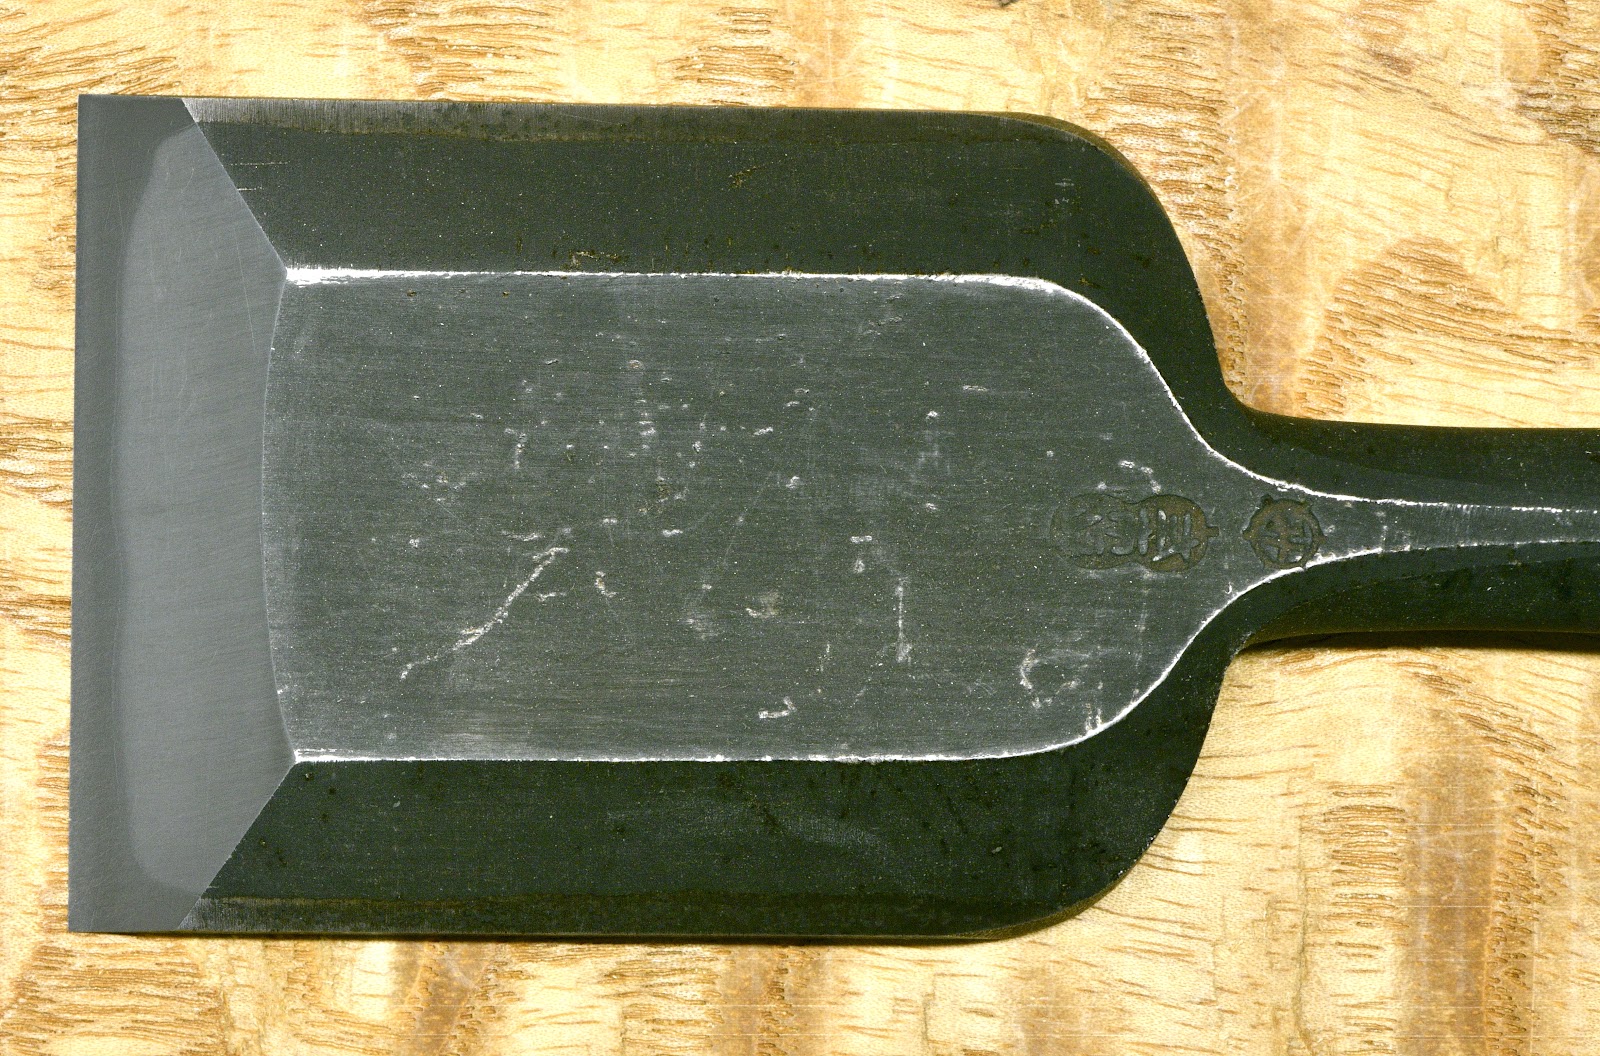
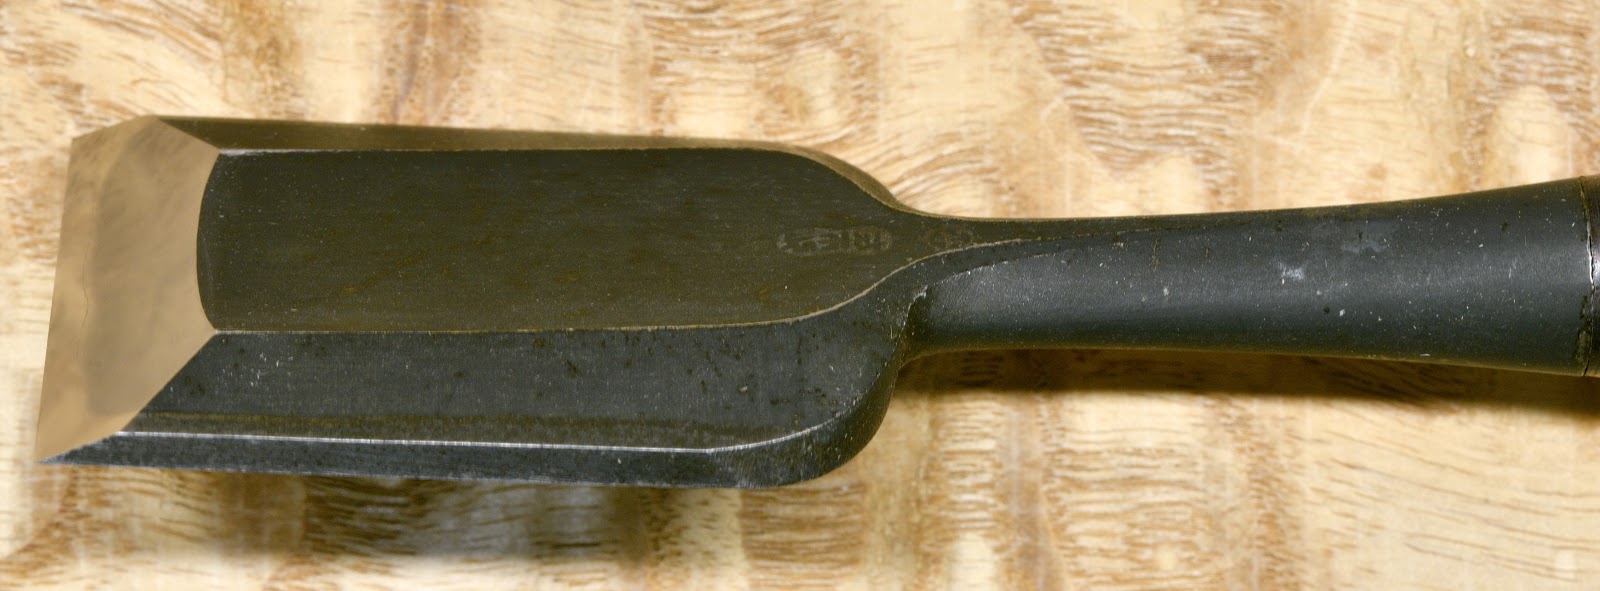
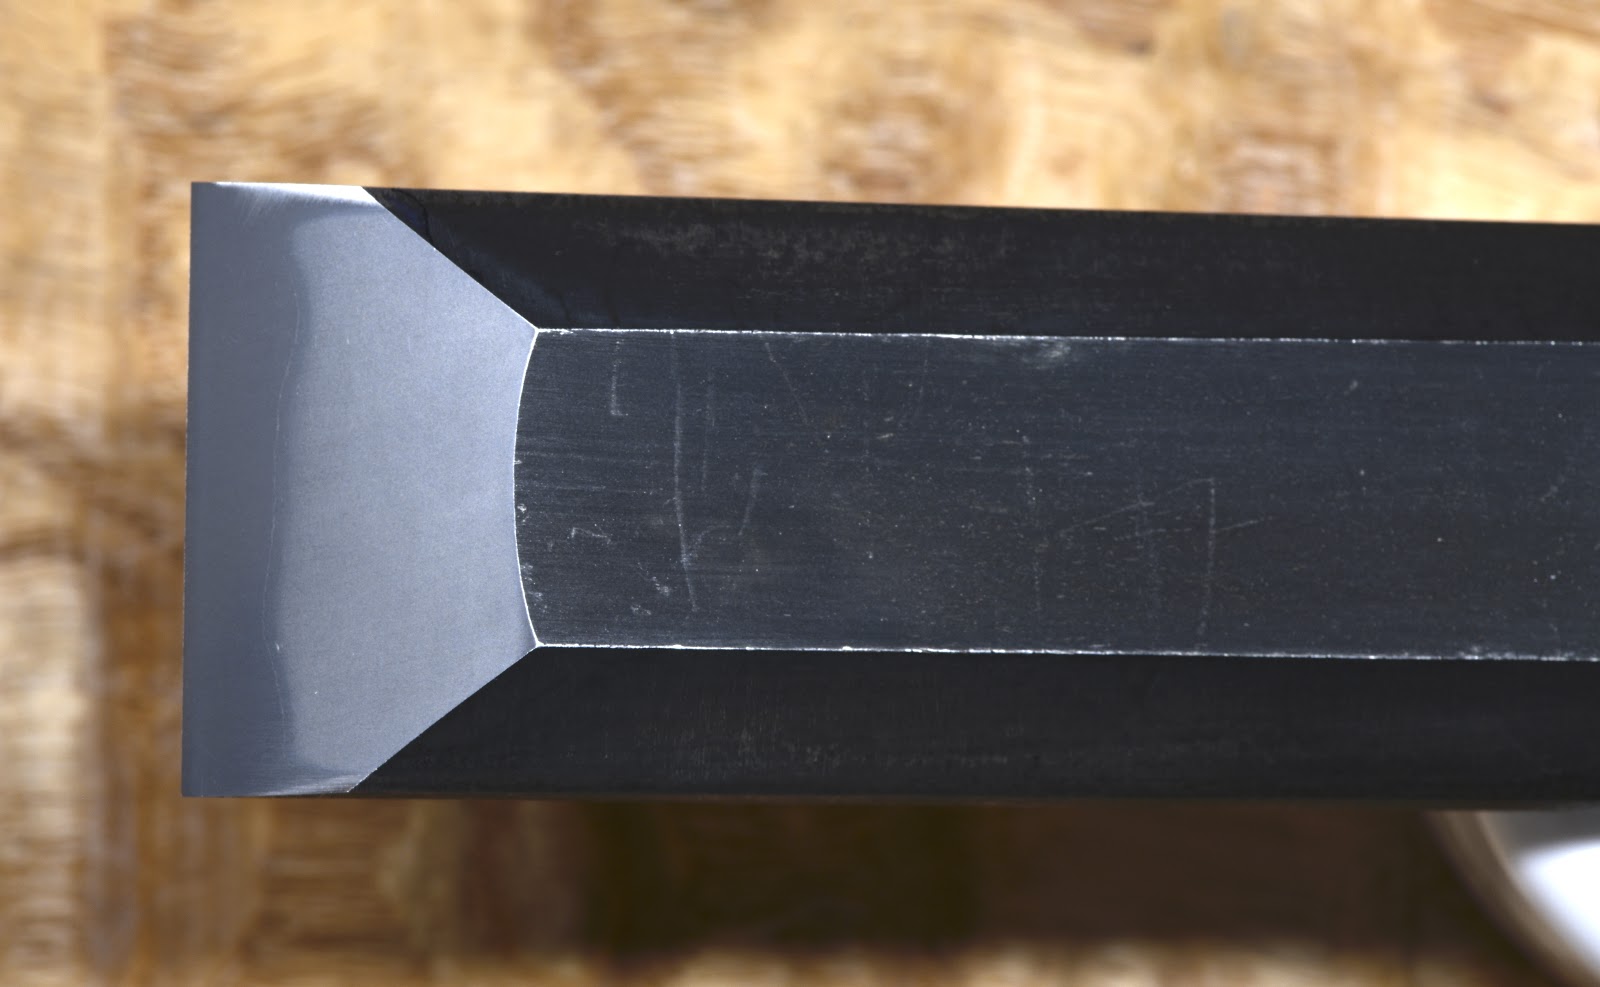
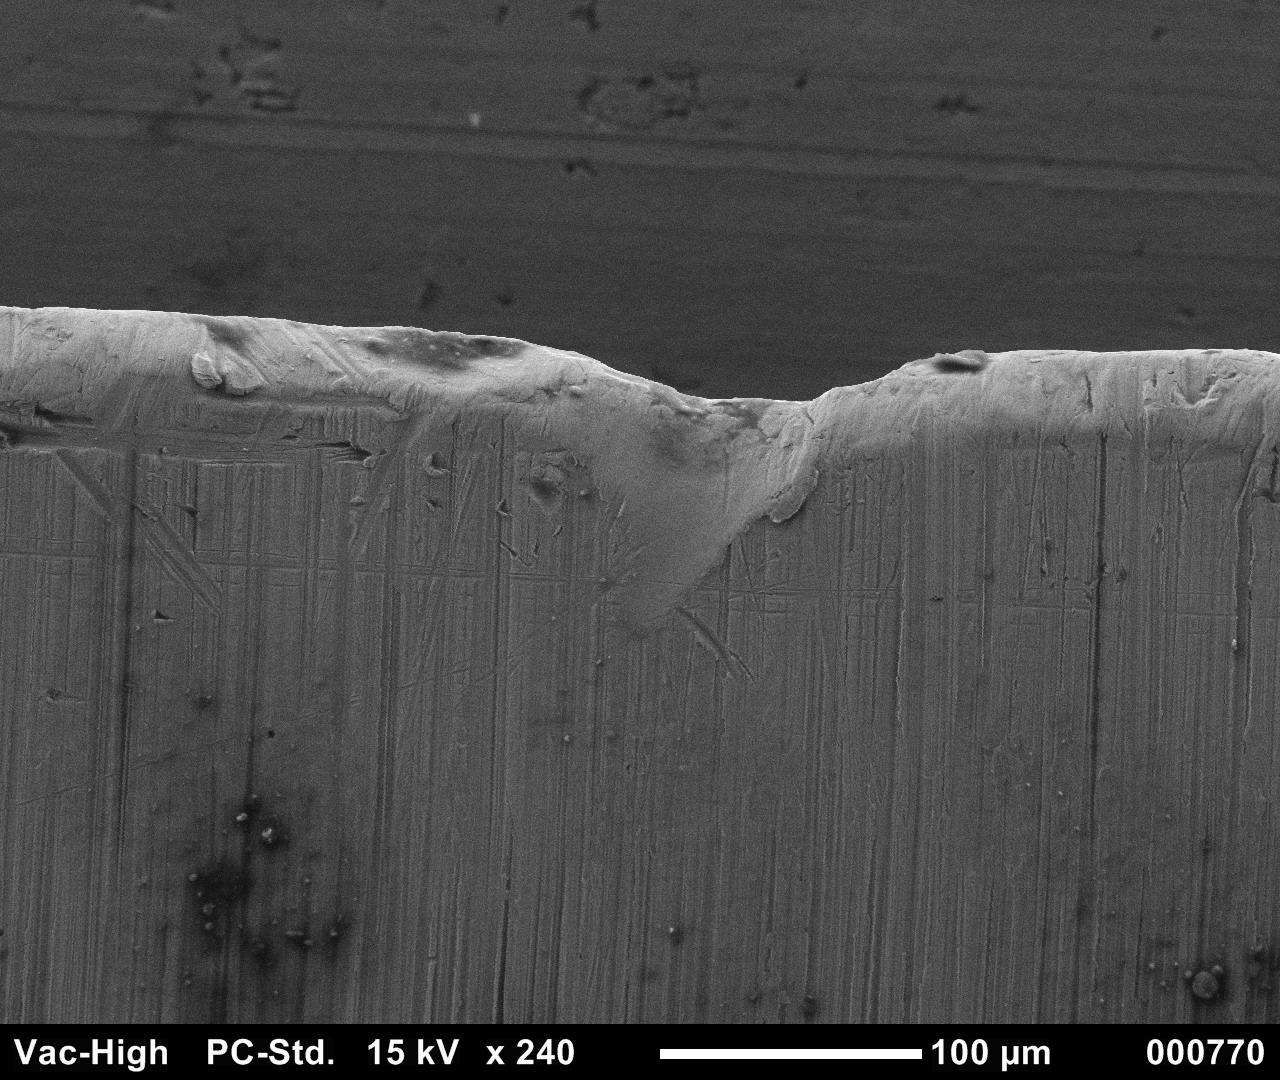
If Beloved Customer will carefully consider the blades pictured in the four photographs above, you will notice the lighter-colored hard steel lamination wrapped up the chisel’s sides forming a “U channel” of hardened steel adding necessary rigidity and strength. This is a critical detail for Japanese chisels intended to be struck with a hammer. Interestingly, Japanese carving chisels are not typically made this way, and are consequently structurally weaker.
Plane blades are not subjected to the high loads chisels experience and so would not benefit from this structural detail.
The Ura
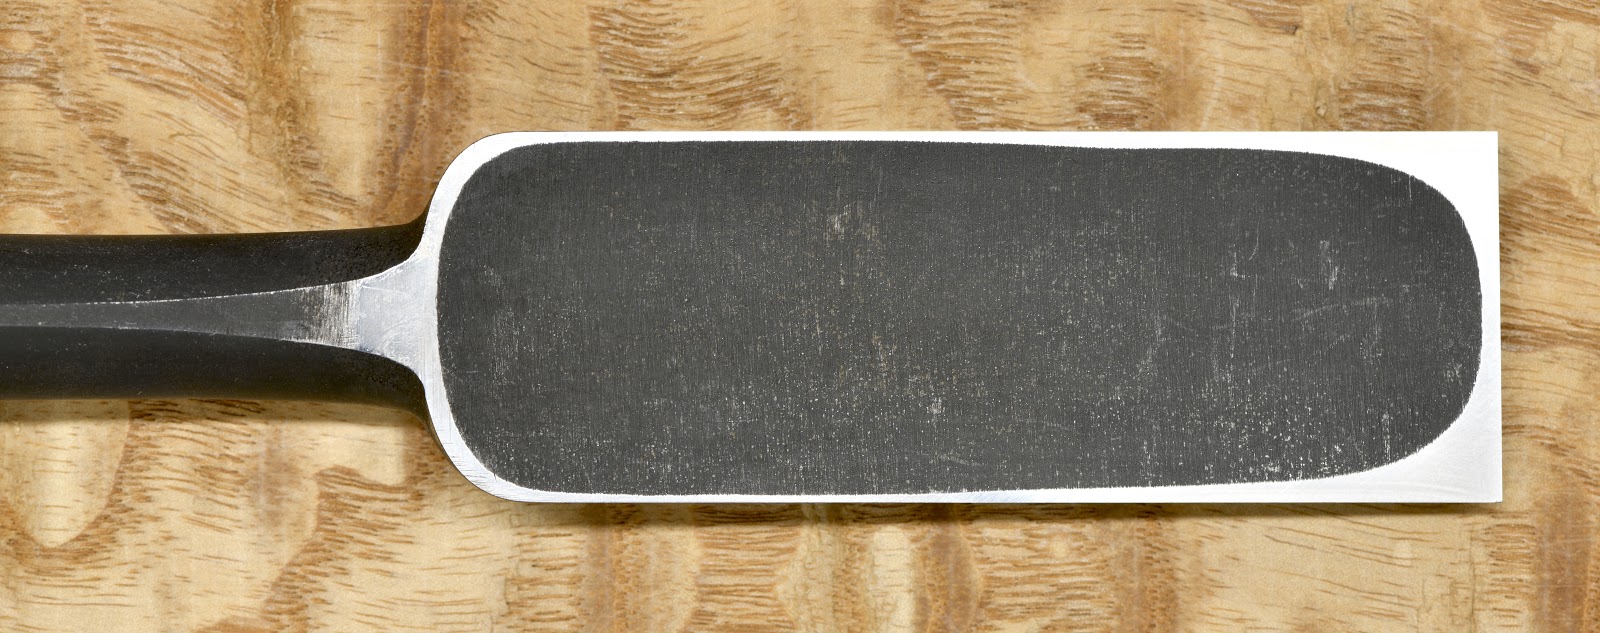
Japanese chisel and plane blades, among others, typically have a hollow-ground depression called the “Ura” (pronounced “ooh/rah”) which translates to “ocean” or “bay,” located at what is called the “flat” on Western blades. Notice the polished hard steel lamination extending from the cutting edge to several millimeters up the neck. The black area encompassed by these shiny lands is the same hard metal, but it has been hollow-ground to form the swamped “uratsuki.”
This clever and effective design detail is unique to Japanese tools to the best of your humble servant’s knowledge. We will look at this design detail more in the next article in this series.
The Point
What does any of this have to do with sharpening? These design details cleverly turn potential disadvantages into distinct advantages you need to understand when sharpening Japanese woodworking blades.
For instance, the layer of high-carbon steel laminated into our chisels and planes is usually 65~66 HRc in hardness. Western blades are made of a single uniform piece of steel heat-treated to approximately 50~55 HRc to make the tool softer/tougher thereby limiting breakage while sacrificing the longevity of a blade’s sharp edge, the most important performance criteria in a quality cutting tool, IMHO. The extra hardness of the Japanese blade helps it stay sharper longer, an important benefit if your time is worth anything. This is good.
But if the entire blade were made of a solid piece of this extra-hard steel, it would a royal pain in the tukus to sharpen, I guarantee you. It would also break. Oh my, that would be bad.
The softer low-carbon/no-carbon steel or iron jigane body, however, is much softer and easily abraded making it possible to keep the hard steel layer thin, and therefore easily abraded, while protecting it from breaking. This is good.
Unlike the blade’s bevel, however, the ura (or “flat” as it is called in Western chisels) is all one-piece of hard steel. Without the hollow-ground uratsuki depression, you would need to abrade all that hard steel at one time to initially flatten and regularly sharpen the blade, a necessity I guarantee would ruin your mellow mood even if you consumed massive quantities of controlled substances with the fervor Beldar and Prymaat exhibit when sucking down triple-ply toilet tissue. But with the addition of the ura detail, we only need to abrade the perimeter planar lands (the shiny areas in the photos above) surrounding the ura. This is exceedingly good.
The ura with its lands surrounding the “uratsuki” depression makes it easier and quicker to not only sharpen the blade, but also to keep the “flat” planar (in a single plane). Without the ura, such a hard blade would be difficult to maintain planar and frustrating to sharpen. With the addition of the ura, however, the blade is genius.
An important skill to learn when sharpening Japanese blades is how to maintain the lamination and ura effectively. We will discuss this subject more in future posts, including the final article in this series.
Conclusion
If you didn’t learn at least three new things from this post then you are either very smart or weren’t paying attention. ¯\_(ツ)_/¯
In the next installment in this bodice-ripping tale of romance and derring-do we will examine the hollow-ground “Ura” in more detail. It’s important enough to deserve a special post.
YMHOS

― Sir Arthur Conan Doyle, The Hound of the Baskervilles
If you have questions or would like to learn more about our tools, please click the “Pricelist” link here or at the top of the page and use the “Contact Us” form located immediately below.
Please share your insights and comments with everyone in the form located further below labeled “Leave a Reply.” We aren’t evil Google, fascist facebook, or thuggish Twitter and so won’t sell, share, or profitably “misplace” your information. If I lie may I cough up a hairball during every meal.


Links to Other Posts in the “Sharpening” Series
- Sharpening Japanese Woodworking Tools Part 1
- Sharpening Part 2 – The Journey
- Sharpening Part 3 – Philosophy
- Sharpening Part 4 – ‘Nando and the Sword Sharpener
- Sharpening Part 5 – The Sharp Edge
- Sharpening Part 6 – The Mystery of Steel
- Sharpening Part 7 – The Alchemy of Hard Steel 鋼
- Sharpening Part 8 – Soft Iron 地金
- Sharpening Part 9 – Hard Steel & Soft Iron 鍛接
- Sharpening Part 10 – The Ura 浦
- Sharpening Part 11 – Supernatural Bevel Angles
- Sharpening Part 12 – Skewampus Blades, Curved Cutting Edges, and Monkeyshines
- Sharpening Part 13 – Nitty Gritty
- Sharpening Part 14 – Natural Sharpening Stones
- Sharpening Part 15 – The Most Important Stone
- Sharpening Part 16 – Pixie Dust
- Sharpening Part 17 – Gear
- Sharpening Part 18 – The Nagura Stone
- Sharpening Part 19 – Maintaining Sharpening Stones
- Sharpening Part 20 – Flattening and Polishing the Ura
- Sharpening Part 21 – The Bulging Bevel
- Sharpening Part 22 – The Double-bevel Blues
- Sharpening Part 23 – Stance & Grip
- Sharpening Part 24 – Sharpening Direction
- Sharpening Part 25 – Short Strokes
- Sharpening Part 27 – The Entire Face
- Sharpening Part 28 – The Minuscule Burr
- Sharpening Part 29 – An Example
- Sharpening Part 30 – Uradashi & Uraoshi


Please Leave a Reply