“The true mystery of the world is the visible, not the invisible.”
Oscar Wilde
In this post we will dig into a few important nitty gritty points about sharpening stones everyone needs to know. Perhaps Beloved Customer already knows all these points, but please ready your shovel anyway because there may be at least one buried surprise to unearth.
A Wood Shavings-Eye View
When seen under high-magnification, the surface of a sharpening stone looks like millions of densely-packed stones embedded in a flat field. The smaller the stones, the finer the grit.
As the blade is pushed and pulled over these stones, they scratch and tear metal from the blade’s surface leaving behind scratches corresponding to the size of these small stones. This violence needs to continue until the blade’s ura and bevel form a clean intersection of two planes.
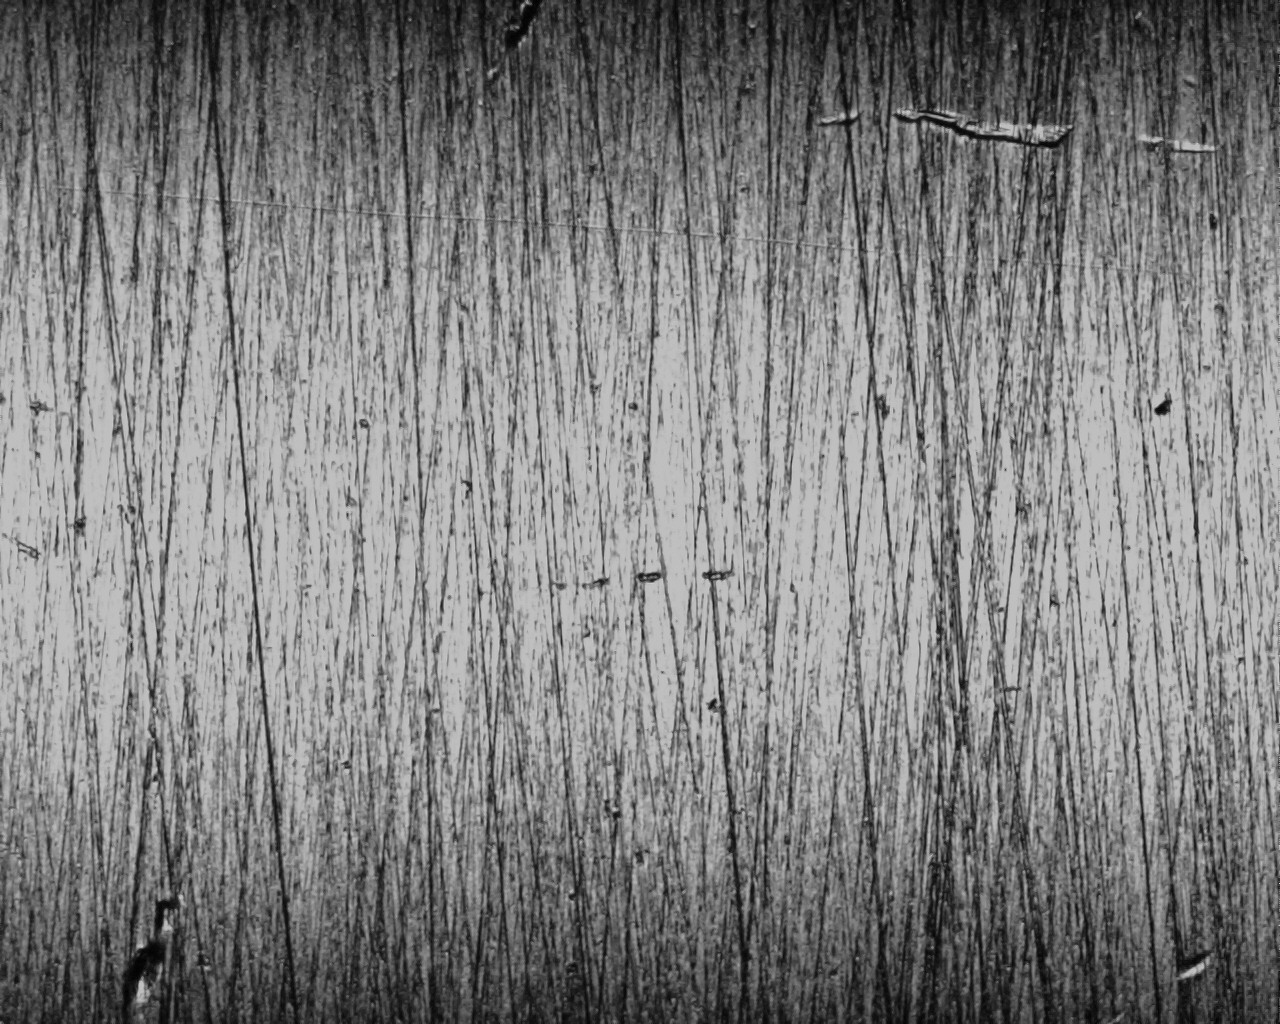
A view of a blade sharpened with 1200 grit diamond plate showing the furrows left by individual pieces of grit
Seen under high-magnification, the cutting edge is jagged where these furrow-like scratches terminate at the cutting edge. To some degree, it may even look like a serrated sawblade. Some blades, like kitchen knives and swords used in a slicing motion to cut soft materials like meat and vegetables and enemy arms, benefit from a serrated cutting edge more than a highly-polished edge, and so do not need to be highly polished on fine-grit sharpening stones.
Plane and chisel blades, however, are used to cut wood, a material typically harder than foodstuffs, mostly in a straight-on approach, not in a slicing motion. In this situation, a rough, serrated cutting edge is weaker than a highly polished edge because the jagged edges are projecting out into space like the teeth of a handsaw blade. Being relatively unsupported, the pointy parts of this serrated edge are more easily damaged than a highly-polished blade with smaller, more uniform scratches terminating more cleanly at the cutting edge.
Therefore, in order to produce a sharp durable blade, we must make the microscopic cutting edge smoother and more uniform by using progressively finer grit stones to produce shallower and narrower scratches, and a thin, uniform cutting edge.
But how fine is fine enough? There is a curious phenomenon related to friction that is applicable to cutting edges, and is useful to understand.
The Friction Paradox
Imagine a cube of heavy, polished stone with its downward flat face resting on the level, flat surface of a larger slab of similar stone. Let’s say it takes some specific measure of force pushing horizontally on the top stone cube to overcome the static force of friction between the two stone surfaces in order to get the cube moving.
If we gradually increase the degree of polish between the two contact faces and measure the force required to start the top cube moving at each progressively higher level of polish, we will find the force decreases with each increment of increased polish, at least for a time. This is at least partially because the irregularities between the two surfaces (asperities) do not interlock as deeply when the surfaces become more polished.
However, at some point, more polishing brings the surfaces of the two stones into such intimate contact that the molecular attraction between them, and therefore the force necessary to move the cube, actually increases.
The same phenomenon occurs with tool blades. If you sharpen and polish your blades past a particular point, the friction and heat produced during the cut between blade and wood will increase, as will the energy that must be expended, while the resulting quality of the cut and durability of the cutting edge will not improve significantly. Of course, the money invested in stones and time spent sharpening past this point will be mostly wasted.
The Inflection Point
The inflection point where additional polishing yields increased friction with little improvement in cut quality will depend on your tool and the wood you are cutting, but you can get a pretty good idea of where it is if you pay attention over time. While the sharpening stone manufacturers turn red in the face and salesmen froth at the mouth and spray spittle in anger when I say it, in my well-informed opinion there is little practical gain, beyond self-satisfaction, to be had from sharpening chisels or planes past 6,000~8,000 grit, making this range of grit an inflection point in my mind. What about you?
Conclusion
I encourage Beloved Customer to conduct your own experiments to determine the practical inflection point in the case of your planes and wood you cut. Many who figure this out save themselves significant amounts of time and money sharpening over the long-term.
To those Gentle Readers that love sharpening more than woodworking, and enjoy putting money in the pockets of sharpening stone manufacturers more than keeping it for themselves, I apologize for pointing out the icky floater in the punch bowl. But you probably would have it noticed it eventually anyway, if only from the taste difference.
I will touch more on this important point in the next exciting installment in this scientificish adventure.
YMHOS
The Repentant Mary Magdalene by Canova
If you have questions or would like to learn more about our tools, please click the “Pricelist” link here or at the top of the page and use the “Contact Us” form located immediately below.
Please share your insights and comments with everyone in the form located further below labeled “Leave a Reply.” We aren’t evil Google, fascist facebook, or thuggish Twitter and so won’t sell, share, or profitably “misplace” your information. If I lie may frogs infest my boots.
A famous wood carving of 3 monkeys located at Nikko Toshogu Shrine post re-construction that illustrates a famous saying originating in China that also works as a pun in the Japanese language. From right to left: See no evil; Speak no evil; Hear no evil (見えざる、聞かざる、言わざる).
Even monkeys fall from trees (猿も木から落ちる)
Japanese saying
Ideally, a tool blade will have absolutely uniform dimensions: the right thickness and taper, perfect cross-sections, uniform curvature, straight edges and flat surfaces. However, professional grade Japanese tools are not made on CNC machines, but are hand forged and so may include some dimensional imperfections. Indeed, imperfections are part and parcel of all human endeavors. Most imperfections don’t matter; sometimes they make the tool better, sometimes they need to be remedied.
At sometime in Beloved Customer’s woodworking career you may experience one of your blades producing less than ideal, “skewampus” results. These poor results may reflect the influence of predacious, pernicious or perhaps even perfidious pixies. Perhaps you don’t acknowledge the existence of supernatural pests and instead blame the trouble on your technique in using the tool, or even on the irregular grain of the wood you are working. But if not pixies, please consider that the real culprit may be the shape of the blade’s cross-section, or perhaps your unintentionally sharpening the blade with a skew. We will examine some of these problems in this installment in our series on romance and monkeyshines.
We will also look at the curved or “cambered” cutting edge profile in plane blades, the benefits and undesirable results it can produce, and how to incorporate this blade profile intelligently into your woodworking repertoire.
Many people, like monkeys in trees, learn bad habits from their friends and teachers. We hope this article will help you understand what’s going on with your woodworking blades, and how to better shape and sharpen them intelligently instead of just monkeying around. Please be sure to BYOB (bring your own bananas).
A serious craftsman doing Fine Woodworking in a pixie-free, clothing-optional workshop (notice the strategically-placed boots).
Dealing With SkewampusBlades
Skewampus is an interesting word I learned from my mother. I am told it is a combination of the word “Cattywampus” meaning “in disarray,” and “askew.” I think it is the perfect word for describing the ailments some blades suffer.
While less than ideal, it is not unusual for the thickness of a chisel blade’s cross section to vary slightly across its width, with one side being thicker than the other, forming an irregular quadrilateral cross section. This irregularity is frequently found in plane blades too. Since there is more steel on the thicker side of such a blade, unless care is taken, it will abrade differentially during sharpening and tend to develop a skew.
As discussed in previous articles in this series, Japanese plane and chisel blades are formed by laminating a layer of hard steel to a much softer body made of low-carbon steel or iron. If the lamination exposed at the cutting edge is not uniform, all else equal, the area of the blade with more hard steel touching the sharpening stone will abrade slower than areas with less exposed hard steel such that the cutting edge will tend to become skewed during sharpening. Perfection is neither attainable nor necessary, but the uniformity of the lamination is an important detail to observe when purchasing and sharpening Japanese tools.
Likewise, plane and chisel blades that are not uniformly heat-treated but that exhibit differential hardening across the bevel’s width will tend to become skewed during sharpening as one side of the bevel abrades quicker than the other. This problem is more common than you might imagine, especially in the case of inexpensive tools where appearance and low price are given priority over quality control.
Anyone that has experienced bidding high-dollar construction projects will understand the adage “the most profitable job may be the one you lose.” Cheap tools are much the same way: that low-cost chisel or plane you buy on PeeBay may look good in online photos and even during the unboxing ceremony, but if you count your time worth anything, if you dislike headaches, and if real-world performance matters to your bottom line, then such tools are often prove disastrous. Caveat emptor, Skippy.
A chisel or plane blade that has an irregular cross section or a skewed cutting edge often works just fine for many cutting operations. However, when cutting mortises, a chisel blade with a skewed cutting edge or irregular cross section will tend to drift to the side gouging the mortise’s walls and ruining tolerances. If you find that your mortise walls are gouged, or that tolerances are poor, check your chisel blade’s shape, and correct any deformities. It usually isn’t difficult to do.
Like all human work spaces, Japan’s smithies are not immune from pixie infestation despite annual blessings by Shinto priests and periodic offerings of salt, rice, and wine to the spirits. I will refer you to this previous post and another wherein we discussed supernatural predators and described some antidotes for the pixie pox. But the deformities we are examining in this post are more often the natural result of the human eye misreading temperature gauges, or the hand misjudging hammer blows or the non-judicious use of grinder wheels rather than precocious pixies at play.
If your blade’s deformity is not excessive, you can often correct or compensate by applying a little extra pressure on the blade’s thicker side while sharpening it.
It’s interesting how a little off-center pressure on a blade being sharpened over many strokes can change its shape. Many people unintentionally deform their cutting edges by not paying attention to the amount and location of the pressure their fingers apply, or by skewing the blade on their stones. A word to the wise.
On the other hand, purposefully skewing one’s blade in relation to the direction of travel when sharpening the bevel can be useful in gradually and economically correcting a skewed cutting edge. This works because the leading corner of a blade held in a skewed orientation on the sharpening stones is abraded quicker than the trailing corner. But once again, inattention causes many people to skew their blades when moving them around on their sharpening stones unintentionally creating, instead of intentionally correcting, skewed cutting edges. BTW, there’s nothing wrong with skewing the blade when sharpening so long as you are aware of the distortion this practice can produce and compensate accordingly. Another word to the wise.
If these methods don’t mitigate adequately, you may want to grind and lap a chisel blade to a more uniform cross-sectional shape. A chemical bluing solution used afterwards will help conceal the shiny metal exposed by this operation if your chisel objects to shiny spots. Some of them can be quite vain, you know.
A chisel with a nicely uniform lamination and cross-section, and pretty polish produced using a natural finishing stone.
Cutting Edge Profiles
Many people have access to electrical jointers and planers, but relatively few have industrial equipment with the capacity to dimension wide boards such as tabletops. And of course architectural beams and columns are typically too long and heavy to dimension with most stationary electrical equipment.
The choices available to most people for dimensioning such materials therefore are either handheld electrical power planers and/or sanders, or axes, adzes and hand planes. Powerplaners, sanders, axes and adzes are beyond the scope of this article, but let’s consider hand planes.
I need more than one plane? You can’t be serious!
Although the very idea gives some woodworkers vapors (I don’t mean gas), an efficient craftsman will have multiple planes with cutting edges honed to profiles matched to specific operations. It doesn’t take many but it does take more than one, unless results don’t matter.
Everyone that dimensions larger pieces of lumber by hand needs a plane with a wide mouth and a curved or “cambered,” cutting edge called a “scrub plane” in the West, and “arashiko kanna” in Japan.
This variety of plane excels at hogging a lot of wood quickly when the craftsman needs to significantly reduce the thickness or width of his lumber. If the blade is narrow, curvature is deep, and the mouth is wide this plane will hog wood quickly, but it will often leave a deeply rippled surface, often with bad tearout.
One might also have a second arashiko, essentially a jack plane with a wider blade with a shallower curvature for the next steps in the dimensioning process. Such a plane will not hog wood as quickly, but it will produce a surface that is closer to flat and smoother with less tearout. You can see the advantage of having two arashiko planes, or a scrub plane and a jack plane, with different cutting edge profiles when dimensioning lumber.
Many Beloved Customers use electrical-powered planes to dimension lumber before turning it into furniture, doors, chairs, or sawdust, etc. and are aware that planers always leave tiny ripple-like scalloped cuts on the wood’s surface, often with some tearout, that is unacceptable as a final surface. A hand-planed finish is far superior, but it doesn’t make sense to remove more than the bare minimum of wood necessary to remove this washboard.
A finish plane, in fact, is the perfect tool for removing these ripples and producing a smooth, uniform, even shiny surface on condition that the plane is sharp, it has a fine mouth, its set to a fine cut, its chipbreaker is tuned and set properly, the blade profile is appropriate for the width of the wood to be finished, and the wood does not have too many large knots. In one or two passes such a plane can easily remove all the ripples and leave the wood clean and shiny without changing its thickness much at all.
Assuming the wood is cooperative and one knows how to sharpen and setup their plane properly, blade profile frequently remains a key factor many fail to grasp. Obviously, the curved cutting edge of a scrub plane cannot produce the perfectly flat surfaces required for joining two pieces of wood together, nor a smooth surface. On the other hand, the corners of a perfectly straight blade will leave clearly visible steps or unsightly tracks on the surface of a board wider than the blade, which is not a problem when rough-dimensioning a board, but is not ideal for joined surfaces and painful to look at if the board’s surface is to be left with just a planed finish.
So how do we solve this conundrum? When finish planing, the professional approach is to use two finish planes each with a different cutting edge profile.
The first type of finish plane has a perfectly straight cutting edge used to plane pieces narrower than the blade’s width. Since the blade’s corners are not riding on the wood but are straddling either side of the board while cutting, they won’t leave tracks or ridges, and the finished surface will be truly flat, perfect for joinery.
The second type of finish plane found in the professional’s toolchest has a curved cutting edge, or more correctly, curved just at the right and left corners to prevent it from leaving tracks and ridges when planing boards wider than the blade. Nearly all the cutting edge is left straight, but creating this tiny amount of curvature at the right and left corners causes them to smoothly disappear into the plane’s mouth so no tracks are made and any ridges are nearly impossible to see or feel. In other words, the corners of the cutting edge never touch the surface of the board, and so don’t leave discernible tracks or ridges. The finer the cut made the smaller any ridges created will be. Indeed, where a high-quality surface is required, the final cut with the finish plane will produce shavings thin enough to see one’s fingerprints through.
You may want to reread the previous two paragraphs to make sure you understand what these two cutting edge profiles are and what they can accomplish before you read further.
Naturally, a professional doing high-quality work needs at least two finish planes, one with a straight cutting edge used to produce flat, precisely-dimensioned surfaces on wood narrower than the blade’s width, and another finish plane with a cutting edge very slightly curved at the corners used to finish surfaces wider than the plane blade.
There are those that advocate using a curved blade, sometimes dramatically “cambered,” as some call this shape, for all applications. Those who advocate this sloppy technique twist themselves into knots justifying tricks to approximate flat surfaces using such blades. I have no doubt this is an ancient technique, but I suspect it is a sad practice that sprung from the carelessness of some craftsmen in flattening their sharpening stones, and with time this bad habit became a tradition in some quarters. I strongly suspect fans of this strange way of doing business habitually sand all visible surfaces anyway so tracks and ridges are not a problem for them. But the fact remains that perfectly flat, track/ridge-free surfaces work best for joinery.
Tradition and “monkey see monkey do” are a useful place to start, but as his skill level increases, the thoughtful craftsman will eventually seek to confirm the validity of the traditions he has been taught. I urge Beloved Customer to get started early.
Sadly, too many people never notice the strange instruction label pasted to their boot’s sole, nor that smelly stuff sloshing around inside.(ツ)
Mommy monkey teaching baby monkey bad habits. Will they ever learn?
Conclusion
As we come to the end of this article allow your humble servant to leave Beloved Customer with a word or two of advice about two bedrock basic skills you should master.
First, learn how to keep your sharpening stones flat. This will save you much grief.
And second, learn how to sharpen your blades to have a straight cutting edge. Everything else will flow naturally from these skills. Your blades deserve it. We will talk more about these subjects in the future.
In this article, we have discussed 12 serious points about plane and chisel blades and how to use and improve them all but a few woodworkers in the West are unaware of, or ignore, but which are common knowledge among professional Japanese woodworkers in advanced trades. While condensed, it is enough information to fill a book. But in return for this river of knowledge all your humble servant requests is the bananas you have in your back pocketses right now (BYOB, remember?). You didn’t sit on them did you?
The next installment in this simian soap opera of sharpening will focus less on monkeyshines, and more on stones and techniques. Please stay tuned. Until then, I have the honor to remain,
YMHOS
Oh my! I can’t wait to read more!!
If you have questions or would like to learn more about our tools, please click the “Pricelist” link here or at the top of the page and use the “Contact Us” form located immediately below.
Please share your insights and comments with everyone in the form located further below labeled “Leave a Reply.” We aren’t evil Google, fascist facebook, or a Minnesota congresswoman and so won’t sell, share, or profitably “misplace” your information. If I lie may icky boils burst forth on my nose daily.
Pixie, kobold, elf, and sprite,All are on their rounds tonight;In the wan moon’s silver ray, Thrives their helter-skelter play.
Joel Benton
Iron Pixies
Beloved Customer, have you ever placed a tool down, only to later discover it has vanished into thin air? Do your tools ever become inexplicably dull or corroded within what seems like just a few days after cleaning and sharpening them? If so, you may have an Iron Pixie infestation without realizing it.
Respected fairyologists theorize that, unlike their timid brethren frolicking in forests, or their blingy cousins infesting Hollywood, New York, and Washington DC who delight in tricking the mass media, film industry and corrupt politicians into constantly making greedy, immoral, lecherous, hypocritical fools of themselves, Iron Pixies (genus Fatum Ferrum), do not fear iron or iron alloys. Indeed, besides pilfering and concealing tools that contain iron, they love nothing more than to use their corrosive powers to return this metal to its natural state through the thermodynamic chemical process known as “rubeum, et conversus abibo” (turn red and go away).
These piratical pixies become especially joyful if the owner of the pilfered tool is unable to find it after much frantic searching and he is eventually forced to buy a replacement. Only when they see the replacement tool will pernicious pixies permit the owner to locate the pilfered tool, usually in a deplorably rusty, chipped and paint-covered condition. Nasty, vicious little pests!
We’ll come back to the supernatural impacts of these maniacal monsters on woodworking tools, but first let’s examine some more mundane details about sharpening blades, and a few things that typically go wrong with them.
The Ideal Bevel Angle
There is such a thing as an “ideal bevel angle” for each blade in each cutting situation, one that cuts the wood quickly, cleanly, with minimum force expenditure and that keeps the blade effectively sharp for the maximum amount of cutting possible, but determining this angle is not an easy calculation since it is difficult and expensive to actually observe what is happening at the cutting edge from a shaving’s-eye-view.
For example, a steep 60° bevel angle on a chisel will support the cutting edge thoroughly and will be durable, but it will pound the wood more than cut it wasting time and energy and damaging the wood unnecessarily. On the other hand, a 15° angle will cut very nicely, thankee kindly, but the blade is certain to chip and dull quickly. A balance is necessary.
This balance will depend on many factors including hardness and abrasiveness of the wood you are cutting at any time (e.g. Sugar Pine versus Ipe), the quality and nature of your chisel blade, the type of cut you are making (low-pressure surface paring versus high-pressure deep mortises), and the care you take to protect the cutting edge. Yes, technique matters.
Determining the ideal bevel angle is ultimately a trial and error process the diligent craftsman will perform until it is second nature, but the following are some general guidelines to get Beloved Customer started.
Most Japanese woodworking tools, including plane blades and striking chisels (oiirenomi, atsunomi, mukomachinomi, etc.) perform well in most construction and furniture woods with the standard 27.5°~30° bevel angle. This is a good compromise, acute enough to cut most wood efficiently without too much friction, while still providing adequate support to the thin cutting edge to avoid chipping. Indeed, this is the bevel angle we insist Beloved Customers maintain as a condition of our warranty.
But as Captain Barbosa advised, these are only guidelines. For example, 35° is often a superior bevel angle for chisels when quickly cutting mortises in harder woods or planes shaving tropical hardwoods.
When cutting very soft woods, such as Kiri (Paulownia Tomentosa), similar to balsa wood, a 22~24° bevel angle may work best, however.
Paring chisels (tsukinomi), when used properly, are subject to less violent impact forces than striking chisels, and can usually handle a 24° bevel angle. But for most woods, a professional-grade Japanese plane or chisel blade will likely experience chipping if the angle is much less.
There are many variables and potential solutions one might consider, but your humble servant recommends starting your experiments with a 27.5~30° bevel angle for plane and chisel blades.
If Beloved Customer finds that your blade chips or dulls quicker than you think it should, increase the angle gradually until it calms down. This can result in a double-bevel blade, one difficult to sharpen freehand. In this case, your humble servant fully supports using a honing jig, at least until you achieve a flat bevel wide enough and stable enough to sharpen freehand. But don’t handicap yourself by relying solely on honing jigs forever because they can become like training wheels on a bicycle: slow, awkward and childish.
Mercurial Bevel Migration
There is a strange, almost supernatural phenomenon many woodworkers experience, the first evidence of which is a plane or chisel blade that previously held a sharp edge a long time suddenly and inexplicably dulling sooner than before, or heaven forfend, chipping. Even professionals with many years of experience occasionally see their tools exhibit this nasty behavior.
Some craftsmen faced with this demonic dilemma begin to question their sanity, even asking themselves: “Has heaven turned its face against me? Where to flee to escape this curse? Do I need a witch doctor or a shrink? Is cranial surgery my only hope?” In past centuries and millennia craftsmen more aware than us modern folk of the dangers of pernicious pixies drew strange hex symbols on their walls or inlaid stone or brass circles and pentagrams into their floors to exorcise them from their workshop. No, the origins of those floor decorations are not just decorative, indeed they have a long history in Europe and America of fending off supernatural pests and bad juju.
An old barn with hex symbols on the exterior walls.
Unfortunately, more than one blacksmith has been falsely accused of poor workmanship when the fault actually lay with the tool’s owner unwittingly allowing Iron Pixies to run amok. If this happens to your tools, please use the methods described below to purge any pestilent pixies within the perimeter of your woodworking palace.
Beloved Customers would be wise to consider all possible causes of Mercurial Bevel Migration (MBM), including those unrelated to any infernal fiends that may or may not be skulking in your lumber stacks.
But if not pesky pixies, what else could cause this maniacal metallurgical malfeasance? Never fear, Beloved Customer, there is another possible explanation, one that can be resolved without drilling holes in one’s skull, or paying for years of expensive psychotherapy, or consuming mind-altering mushrooms, or conducting stinky ceremonies involving burning sage and spirit drums, or placing small bowls of blood and milk around your workshop, or enduring the pain of tattoo needles, or even the simple ritual described in the postscript below.
The more likely cause is simply that it’s human nature when sharpening chisels and plane blades with their tail-heavy construction to apply more pressure to the bevel’s rearward half (farthest from the cutting edge) abrading the softer iron jigane body more than the harder high-carbon steel cutting layer. Eventually, as the soft jigane wears away, the bevel angle will gradually decrease to the point where the cutting edge loses support becoming fragile and causing dismay.
Once you are aware of this tendency and take preventative measures (and assuming you don’t have an iron pixie infestation), all should be well.
Next let’s examine some measures to get rid of both this bad habit and trixy pixies.
Pixie Predation Prevention & Pacification
If you suspect the presence of iron pixies, you should perform the Covington Pixie Detection Test (CPDT). A reliable method is described in the next section below.
In any case, and because prevention is better than Prozac, you should begin your efforts by creating a workshop environment unfriendly to pixies. The following is a partial list of measures your humble servant has found to be effective.
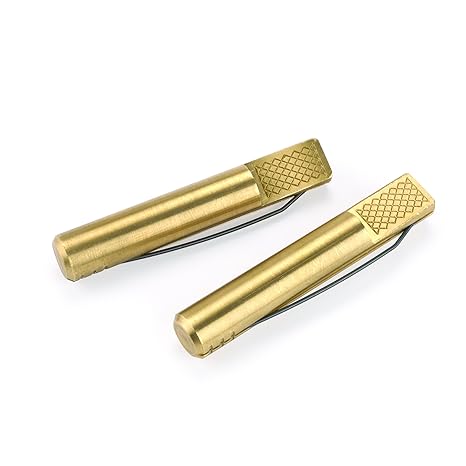
Brass bench dogs are an effective pixie repellent
Cleanliness: Clean bench surfaces and sweep the floors daily. Vacuum and wet-mop workshop floors at least twice a year during the winter and summer solstices (approximately June 21 and December 21);
Add more lighting: Iron Pixies fear light because it reveals them to their enemies;
Keep a pair of boots near the door into the workshop: Pixies are deathly afraid of boots, especially when they contain the feet of sharp-eyed human children, but just the sight of boots will usually prevent them from entering a space;
Keep brass benchdogs in your workshop. Expert fairyologists insist, and I agree, that having a brass bench dog (remember, Iron Pixies do not fear iron or steel or even the IRS) or two on hand will repel Iron Pixies to the workshop’s dark recesses and keep their nasty claws away from tools. The deterrent effect of bench cats is unclear, but if you decide to rely on one, be sure it bothers to stay awake;
Welcome spiders: Although this may seem to contradict No. 1 above, Iron Pixies fear spiders, especially daddy longlegs, who delight in tangling them in their webs and tickling them to expiration.
Make regular offerings to the gods of handsaws. More on this subject in a future article.
A compact and effective brass bevel angle gauge by Richard Kell
A more mundane but sure way to prevent MBM is to make or buy and frequently use a bevel angle gauge. This is very important!
Aluminum, stainless steel or even plastic gauges will work of course, but brass or bronze are more effectual at purging perfidious predatory pixies because copper is toxic and zinc gives pixies noisome gas. Be sure to store it close to your valuable steel tools to help repel the vicious little bastards.
Here’s the important thing: Once you have this tool, use it to check your blades during each sharpening session to ensure you are maintaining the correct bevel angle instead of allowing it to decrease incrementally over repeated sharpening sessions. Make this a firm habit. More on this important subject in future posts.
Here’s another important thing: Remember to measure the bevel angle at the blade’s far right or far left edges because the hollow-ground uratsuki of Japanese blades makes it difficult to correctly measure the angle if you check it elsewhere.
Pixie Detection Methods
A serious pixie infestation in a toolchest located in a clothing-optional workshop. Notice the absence of bench dogs, brass bevel-angle gauges and boots in this image. Pure madness, indeed an invitation to disaster!
Iron Pixies are secretive creatures most people never see, but if you suspect you have an infestation, a detection test is called for.
While there are many proven methods to test for pixie infestation, the least expensive non-toxic method to test for pixie infestation is the Covington Pixie Detection Test (CPDT). The execution is simple, but it requires some skill and confidence in one’s abilities.
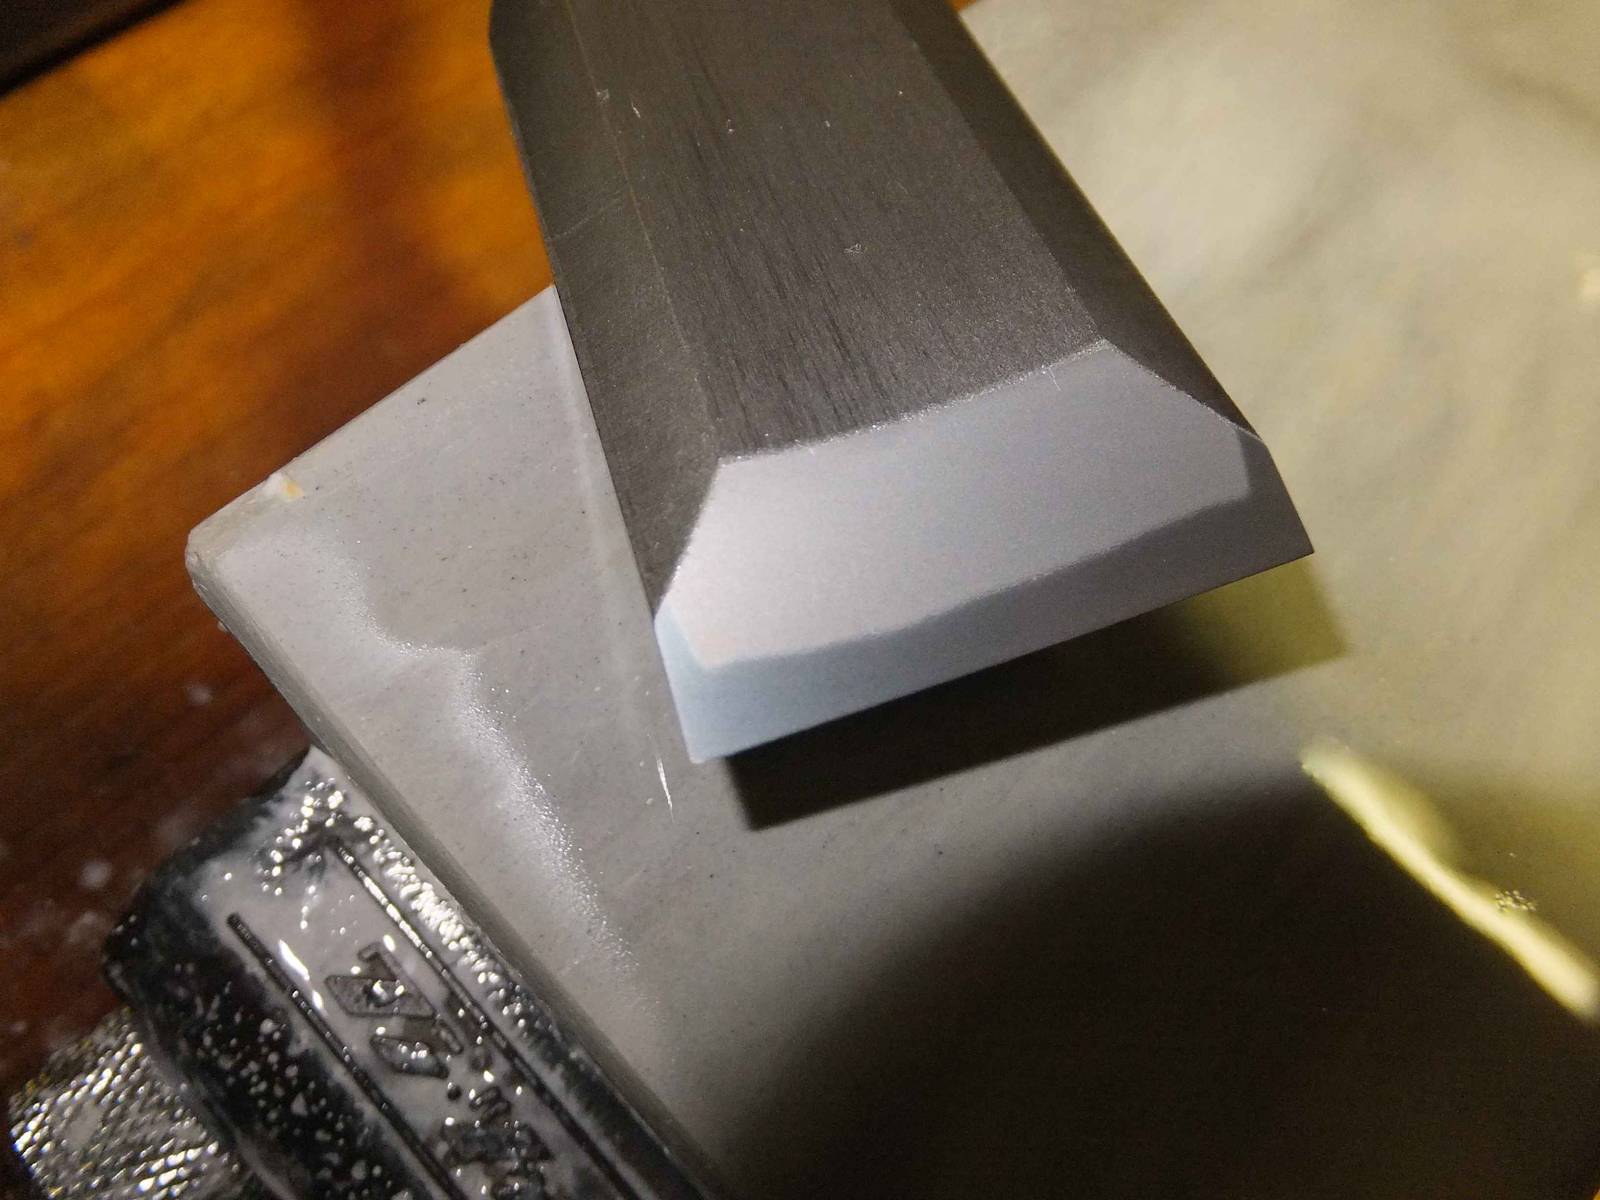
To the perform the CPDT, sharpen a plane blade, and while doing so, attempt to “stick it” on the stone as shown in the photo below. This phenomenon is evidence the stone and the blade are in such perfect contact that the suction between the blade and the stone’s wet surface is strong enough to support the cantilevered weight of the blade. It can only be achieved when localized sources of natural chaos, of which iron pixies are a prime example, are firmly under control.
No, this is not a trick photo with concealed supports, superglue, or photoshop enhancements. This blade, hand-forged by Mr. Nakano Takeo, is supported only by the bevel which is “stuck” to the wet stone’s surface. This is a rite of passage those who wish to become proficient in sharpening must eventually accomplish, iron pixies or no. Not recommended for potato chip-thin Bailey-style plane blades.
Assuming your blade, stones, and skill level are up to the task, if you are unable to accomplish this marvelous feat even after many attempts, the likelihood of an infestation of peevish pixies nearby is high. In that case, use the preventative measures listed in the section above, or the banishment ritual described in the postscript below. You should also flatten your sharpening stones (especially the rough and medium grit stones) and make sure your blade’s bevel is perfectly flat, for bulging bevels are the pernicious pixie’s playground. (Aha! Iambic pentameter!)
Fair warning: If you stubbornly persist in your efforts to “stick” a plane blade before purging the area of pixies, they may go berserk to prevent this sublime event from occurring. If that happens, Katy bar the door!
Infernal Pixies! You Shall Not Pass!!
In the next stage of our adventure, we will examine some of the health ailments blades commonly suffer. High cholesterol in chisels? Planes with pneumonia? Or just toolish hypochondria? Stay tuned to find out more.
YMHOS
Postscript: Pixie Catch-and-Release
A few tender-hearted Beloved Customers and Gentle Readers, sick and tired of their precious tools rusting to dust and being stolen, have asked your humble servant for advice about live-catching the Iron Pixies they sense scuttling around in the dark and dusty places of their workshop and then releasing them back into the wild. I can only share my meager experience.
While the concern gentle souls have for the welfare of natural creatures is laudable, it is decidedly misplaced because pixies are not natural creatures like squirrels, cows or even tax collectors (there are some who contend the later are closer to trolls than natural beings, but that is a scurrilous rumor promulgated by tax accountants). But I digress.
Gentle Readers should note that Iron Pixies are not natural beings, but rather supernatural creatures from the land of Faerie that choose to leave their native plane of existence to inhabit workshops in our mortal world for the simple malevolent joy of ruining iron and steel tools and inducing mental anguish in mortals. We may catch them and we may crush them, but few have the ability to banish them entirely from our world, contrary to the claims of The Learned Society of York Magicians, the only documented exception being Mr. John Uskglass and perhaps, it is rumored, an obscure magician named Mr. Jonathan Strange.
My point is that, since we mortals have no access to the supernatural environment from whence pixies hale, we cannot “release” them back into their natural environment at all, but can only strive to make our workshops less attractive places for them to pursue the malevolent mischief they love.
Your humble servant has not researched all methods of trapping pixies and so can offer no certain advice. However, if you are determined to design and deploy such a live-trap, remember that iron pixies are exceptionally clever and can easily avoid and certainly destroy most any trap, especially if it has metal parts.
Bench cats have been known to frighten pixies away, but most are just too damn lazy to keep at it. And no matter how you cook them, and regardless of the hot sauce used, iron pixies always taste like old garbage dumpster wheels and are almost as hard to chew, so scrumptiousness is never sufficient incentive for our feline masters.
I have experienced moderate success banishing iron pixies from my humble workshop, at least temporarily, using a combination of the techniques listed above and the following ancient ritual.
To perform a pixie banishment rite, you will need a few things, chief of which are at least one small, quick, sharp-eyed, strong-lunged child that still believes in Santa Clause, and a pair of large, leather work boots. Never steel-toed boots, mind you, no steel at all!
The more children the better. You may need to borrow boots from friends and family. Don’t forget the Santa Clause thing.
Open one door leading directly to the outside just a crack. Not too far, only 1~2 inches.
Help your sharp-eyed children put the boots on their little feet in your workshop where the pixies can observe (this forewarning visibility is important), being sure the boots can’t accidentally slip off.
Direct said child (or children) to march around your workshop in three circuits widdershins (counter-clockwise) while stomping their boots loudly and screeching “Pixies Flee!!” (ear protection may be necessary).
Have each circuit end at the partially-open door or window whereupon each child should toss a small piece of steel or iron, such as a nail, screw or nut, through the opening while shouting this same spell as loudly as they can.
You should lead the way and set the example, of course.
Nothing scares pixies as much as small children stomping close by in big boots while screeching loud magical commands. Seeing iron or steel then fly through an opening to the outside will usually drive them away.
A word to the wise: Incentive must be provided to the child (or children) for the ceremony to succeed because, as Jeffy Chaucer famously wrote: the “Labourer is worthy of his hire.” Chocolate or other sweets work fine. The child’s mother may object to this form of incentive pay, but carrot sticks provide neither sufficient energy nor adequate motivation to small children in my extensive experience. Besides, who ever heard of fruits and vegetables helping magic? Codswallop!
All the same, best to do it when Loving Mother is away if you think she might degrade the ritual through nagging about nutrition or cavities.
Some Faeriologists have suggested that a variation of this ritual is also effective at driving hidden monsters from under beds and out of closets in residences. Indeed, such a ceremony has been an annual traditional ritual in most households in Japan since ancient times.
For banishing demons and monsters from living spaces in the Japanese tradition, open all doors and windows during daylight hours on February 4th, and, while screaming “Demons Depart!!,” members of the household, including children of course, should each toss a handful of dried beans through each open door and window to the outside, closing them tightly afterwards. Apparently demons like beans. Boots are not worn indoors in Japan.
Children may be small, but they have an important role in protecting the home and family and your tools too. It’s a father’s duty to let them know it and show them how. And they deserve magical chocolate!
YMHOS
The scene of a conversation between your humble servant and a small child regarding pixie purging. Do you think the jewels in my wig are too much?
If you have questions or would like to learn more about our tools, please click the “Pricelist” link here or at the top of the page and use the “Contact Us” form located immediately below.
Please share your insights and comments with everyone in the form located further below labeled “Leave a Reply.” We aren’t evil Google, fascist facebook, or thuggish Twitter and so won’t sell, share, or profitably “misplace” your information. If I lie may pixies gnaw my bones every hour I live.
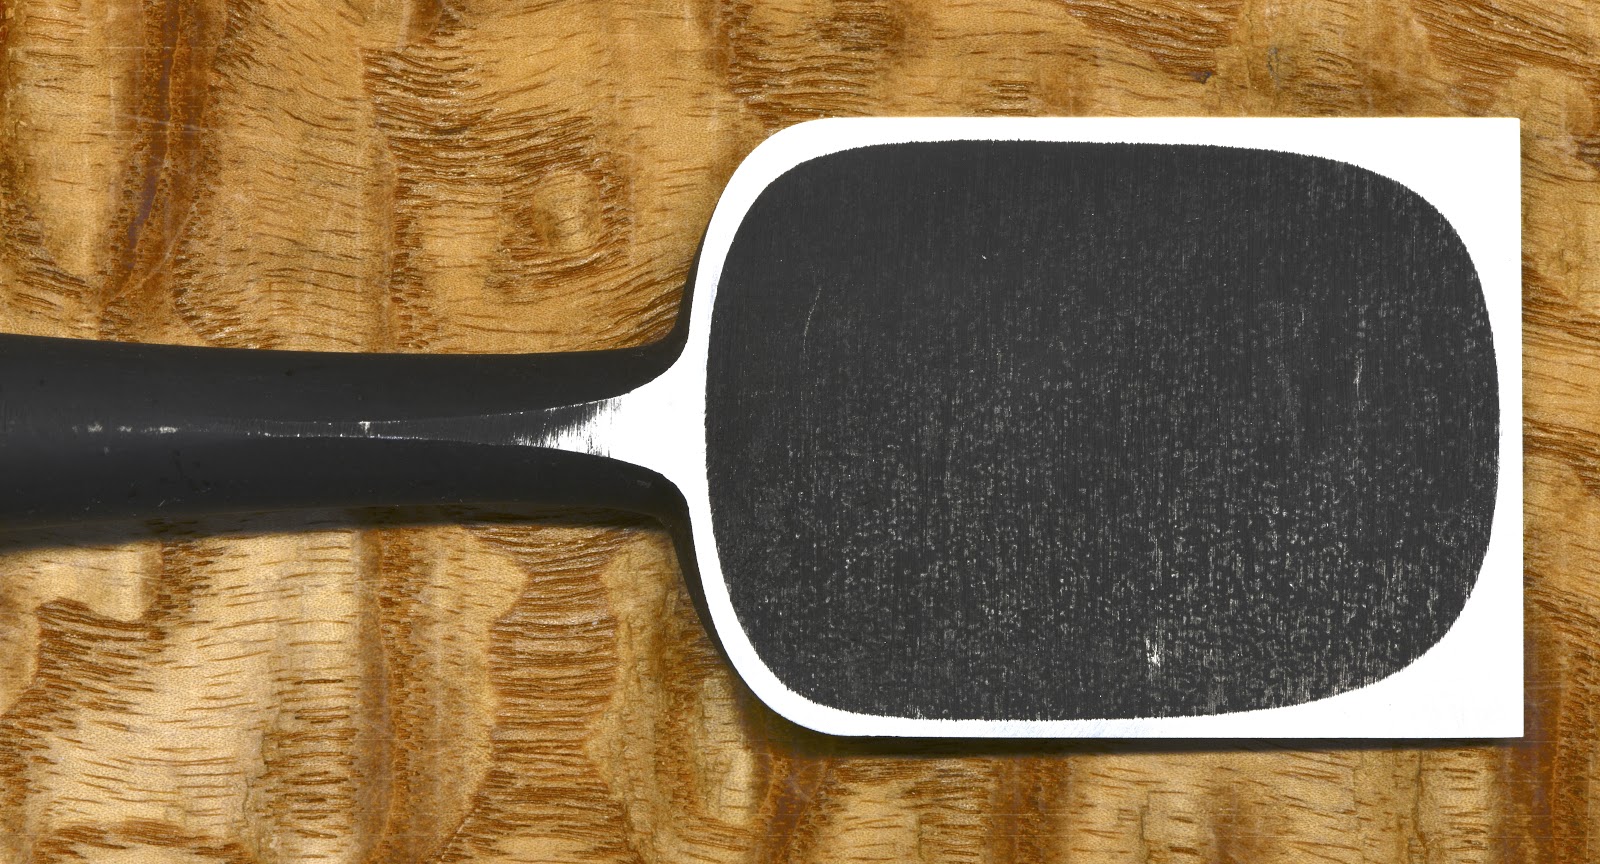
Chisel “Ura.” This feature includes the hollow-ground uratsuki in the center (black color), the upper and lower skinny lands called “ashi” (bright steel), the less-important land at the neck (bright steel), and the supremely important “ito-ura,” the narrow bright steel land located immediately behind, and which comprises on-half of, the cutting edge. By any calculation, a genius design.
If a craftsman wants to do good work, he must first sharpen his tools.
Confucius, The Analects
We talked about the Ura in the previous article in this series (Part 9).
It is a defining detail in most Japanese woodworking blades, and one we must understand if we are to efficiently sharpen them, so in this post we will examine this important feature in more detail.
What is the Ura?
Japanese plane and chisel blades have a unique and intelligent design feature at what is called the “flat” on Western plane and chisel blades, and is called the “Ura” (pronounced oo-rah) in Japan.
Ura translates into the English language as “bay,” as in a protected area where the sea meets the shore. At the center of the ura is a hollow-ground, depressed area in the hard steel hagane layer called the “uratsuki,” meaning the ura hollow.
In the photos on this page the uratsuki is left black from the forge, but some prefer this to be polished bright. Your humble servant prefers the natural, old-fashioned, black oxide finish, not because of my exquisite fashion sense (fashion is my life, after all!), but because the unpolished, oxidized surface can tell us much about what the blade experienced during the quenching process, and perhaps even the quality of the blacksmith’s work.
On the other hand, while a polished ura is by no means a hallmark of shoddy workmanship, it’s an undeniable fact that polishing the uratsuki polished ura hides all this information.
The ura is neither an accident nor a fashion statement, but serves two distinct purposes.
The first purpose of this design is to make that it easier and quicker to keep the four bright steel lands on this face of the blade planar. But why is that a matter of concern? If you pay attention when sharpening your wide Western chisel and plane blades lacking the details of the Japanese uraura, you will notice that, after many sharpening sessions, the blade’s flat, which was once planar, tends to become convex with a high point at the flat’s center making it difficult to keep the extreme cutting edge, especially the corners of the blade, in close contact with the sharpening stone. Yikes!
This doesn’t occur because you don’t know how to sharpen your blades, or because of pernicious pranks by pesky Pixies, but simply because your sharpening stones/platens/paper tend to abrade the blade’s perimeter more aggressively than the center. The resulting curvature makes it more difficult and time consuming to accurately polish, and thereby sharpen, the flat’s extreme cutting edge. Major buzzkill.
Because of the most excellent ura, Japanese woodworking blades are quickly fettled initially and tend to stay planar without a second thought for many years of hard use, an important benefit if you count your time worth anything.
The second purpose of the ura is to reduce the square inches or square millimeters of hard steel you must polish during each sharpening session. As you can see from the photo above, the four shiny perimeter lands are all that touches the sharpening stone. Compare this with the central black area which doesn’t touch the stone at all. That’s a lot of hard steel you don’t have to deal with.
Besides making the job easier, this detail saves a lot of time when sharpening and helps one’s expensive sharpening stones last longer. Time is money and stones ain’t cheap, as my old foreman scolded me many times (lovingly, I’m sure).
Even if you don’t use your tools to make a living, you should at least recognize that time spent sharpening is time making wooden objects lost.
The Downside Of the Ura
A worn-down multiple-ura chisel
Despite my poetic praise, the ura detail is not all blue bunnies and fairy farts, because it does have one unavoidable downside: Over many sharpening sessions the Ura unavoidably becomes gradually shallower, and the lands surrounding the Ura on four sides become correspondingly wider. Nothing lasts forever except regrets and taxes.
It is not uncommon to see old chisels and plane blades with the hollow-ground area of the ura almost disappeared. You can postpone this day by sharpening your blades wisely. However, in the worst case where the ura disappears entirely, you will still be left with an entirely usable Western-style flat, so not all is lost.
In future articles in this series we’ll consider how to keep our lands as skinny as possible as long as possible, and how best to keep uratsuki as deep as possible as long as possible.
In the case of plane blades, unless the plane’s ura is subjected to a brutal sharpening regime, the land that forms the cutting edge (called the “ito ura” meaning “strand” as in a flat area on a riverside, in Japanese) tends to gradually become narrower, and even disappear entirely after numerous sharpenings. Of course, when this happens, the blade loses its cutting edge, and the land must be restored by “uradashi” (oo-rah-dah-she) aka “tapping out” or bending the cutting edge towards the ura side, and then grinding it flat to form a new ito-ura land. Tapping out a blade requires some caution, but is not difficult. We will discuss the how-to of this aspect of blade maintenance in a later article in this series.
In the case of chisels, which have smaller and shallower ura compared to wider plane blades, the land at the cutting edge does not typically require tapping out, although it’s certainly possible to tap out wider chisel blades. Narrow chisel blades, on the other hand, are difficult to tap out without damaging them due to the rigidity produced by the hard steel layer (detailed in the previous post in this series) wrapped up the blade’s sides.
Mitsuura Chisels
Ichimatsu Nomi Ura (by Kiyotada). After many years of hard use, the multiple ura (aka “mitsuura”) on this oft-sharpened chisel used to pare precision joints has become shallower and the planar lands have become wider. Still entirely useful, it now takes more effort to sharpen than when new.Spearpoint Mitsuura chisels made by Sukemaru using EDM technology. Sadly, Mr. Usui no longer produces them.
Some chisels are made with multiple ura, typically called “mitsuura” meaning “triple ura.” Mitsuura chisels are more difficult to sharpen than chisels with a single ura because the total area of hardened steel that must be polished is comparatively larger. The ura of mitsuura chisels also tend to wear-out quicker than single-ura chisels because each individual uratsuki is shallower in depth than standard uratsuki. They look cool, but I am not a fan of multiple ura except in a few specific applications.
In the next stage of our journey into the mist-shrouded world of sharpening hard steel blades, we will wander through the metaphysical realms of the “Fae.” A word of caution: Be sure to have a brass bench dog in your pocket when you leave the well-lighted pathways and accept neither food nor drink from anyone’s hand until we return, not even a cheeseburger with fries. ☜ (◉▂◉ )
YMHOS
If you have questions or would like to learn more about our tools, please click the “Pricelist” link here or at the top of the page and use the “Contact Us” form located immediately below.
Please share your insights and comments with everyone in the form located further below labeled “Leave a Reply.” We aren’t evil Google, fascist facebook, or the CCP and so won’t sell, share, or profitably “misplace” your information. If I lie may I drown in my own uratsuki.


Leave a comment