
By concentrating on precision, one arrives at technique, but by concentrating on technique one does not arrive at precision.
Bruno Walter
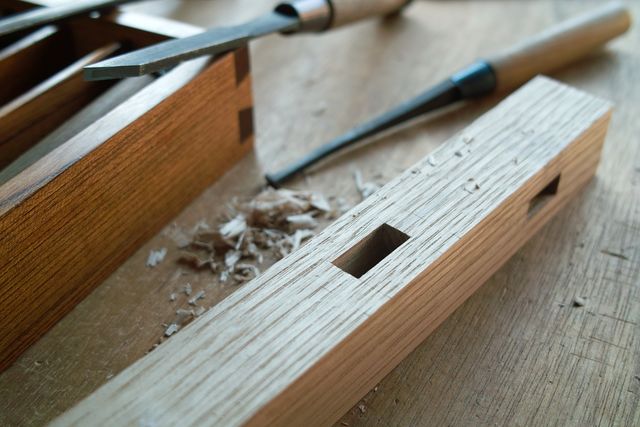
As mentioned in the previous post in this series, in Japan the mortise chisel is called the “Joiner’s Chisel,” because it is specifically designed for precisely and quickly cutting the many small mortises craftsmen in the joiners trade use in making doors, windows, shoji, screens, furniture and cabinetry.
Why must it cut mortises quickly? Simply because a few seconds of time wasted on each of many mortises cut during the workday by an uncooperative chisel will quickly add up to hours of lost productivity.
Why must it cut mortises precisely? Simply because defects hidden inside mortises with poor internal tolerances tend to accumulate and too often turn what would otherwise be a well-made piece of furniture or joinery into a rickety old Chinese lawnchair.
In this post we will discuss what to look for in a mortise chisel, and how to correct some typical problems. Most of the concepts discussed in this post are applicable to oiirenomi and atsunomi used for cutting mortises as well, although such chisels lack the same shape advantages.
Klipstein’s Law of Thermodynamics
Just in case Gentle Reader didn’t notice, your humble servant has strong opinions about mortise chisels, partly because I was trained by no-nonsense professionals to routinely cut hundreds of mortises in a single sitting, and partly because bitter experience has taught me the truth that sloppy mortises result in both sloppy products and crushing headaches. Nothing like a bunch of tiny errors when making a series of latticework doors to painfully confirm the validity of Klipstein’s Law of Thermodynamics: “Tolerances inevitably accumulate unidirectionally toward maximum difficulty to assemble.”
Because of this hard-earned experience we have given our blacksmiths specific dimensional tolerance criteria for the mortise chisels they make for us. My hearing isn’t what it once was, so I’m not sure what they are muttering in response to my pointed insistence, but it sounds something like “frikin prissy pink princess expects too much of a damned chisel.”
Your most humble and obedient servant, however, is much too dignified and polite to respond in so many words, but at such times I think they are stubborn old farts that have never used a mortise chisel. In any case, those who use our mortise chisels benefit from the princess impulse in your humble servant.
What to Look For
Mortise chisels are used routinely by only the most skilled craftsmen. Despite their simple appearance, mortise chisels are required to cut to tighter tolerances than other type of chisel, but because our’s are handmade in the traditional manner without the use of CNC machinery, and because perfection is unattainable in mortal endeavors, they are seldom perfect when new, so Beloved Customer should plan on tuning your mortise chisels before doing serious high-volume work.
Indeed, it has long been standard practice among Japanese joiners to modify their chisels and planes to their preferences, and correcting the dimensional imperfections of mortise chisels is at the top of the list, not because they tend to have more imperfections than other chisels, but because more precise work is expected of them.
If you recall some of the mortises you have cut before now you may have noticed that despite your best efforts and forehead-splitting concentration, the sides ended up out-of-square with the workpiece’s top surface, or the side walls were raggedly gouged, or even undercut. While of course unacceptable, these defects are not unusual, and may be due to perfidious pixies, your technique, or perhaps a combination of both, but my money’s on the chisel being the culprit.
If you’re experiencing such problems, please examine your mortise chisel. If it does not meet the ideal standards in the list below (and it won’t), you should make corrections. You’ll be glad you did. There is a link to a document below that illustrates the ideal mortise chisel as well as some typical problems that may prove useful.
- The plane formed by the flat lands surrounding the hollow-ground ura depression should be truly flat and without twist over its entire length from cutting edge to shoulder.
- The blade’s width should be consistent over its entire length. Alternately, it is acceptable if the blade’s width becomes just slightly and gradually narrower moving from cutting edge to neck. But not too much. On the other hand, a blade that widens towards the neck is an abomination to be avoided like the spotty-bottom footpads at the California Franchise Tax Board.
- The blade’s sides should be flat, planar, free of twist, square to the ura, and square to the blade’s top face. Accordingly, a cross-section taken anywhere across the width of the blade should be rectangular anywhere along its length, with all corners 90°. Picky details, but they can make a big difference in the quality of the finished mortise.
- The top face (surface where the brand is stamped) need not be planar along its length, but it must be square to the sides (and therefore parallel with the ura) at all points along the blade’s length.
Make no mistake, this is a tall order in a hand-forged tool that has never seen a milling machine, planer, or CNC grinder. Few handmade mortise chisels can meet these standards when new, but these details can make all the difference.
Let’s begin the examination part of this job. You will need a 6~12″ straightedge, a small precision square like the Matsui Precision products we carry, and a precision caliper, whether vernier, dial or digital it matters not.
Record Your Observations
Too often the number of dimensional irregularities that require attention are complicated enough to create confusion. This can result in even experienced people making one irregularity worse, or even generating new problems, while attempting to resolve the initial irregularity, like inadvertently creating more knots while trying to untangle a snarled mess of string.
To avoid confusion, I recommend you make a simple orthogonal hand sketch of your chisel to record irregularities. This sketch should show at least four views of the blade including left and right sides, its face (opposite the hollow-ground ura), and an end view looking towards the cutting edge’s bevel. You may also need to make a few cross-section sketches
Record the results of your examination as annotations and red lines on these sketches to help you plan and execute the work of correcting any problems you may find. There are always a few, and you will need to keep track of each one, and its relationship with the others.
Examine and True the Ura
The first step is to check the ura, the polished lands (flat surfaces) surrounding the hollow-ground depression on the chisel’s back. These must be flat and in the same plane (coplanar). This detail is very important.
A straightedge is good enough for a quick examination, but a more reliable method is to use a granite surface plate. A less expensive and handier option is a simple piece of ⅜” or thicker float glass.
To use a glass surface plate, apply marking pen ink or Dykem to the ura’s lands. Smear a tiny amount of finishing stone mud around on the glass plate. With the entire blade resting on the plate, and finger pressure straight down in the middle of the blade’s face, move it in a oval pattern through the sharpening stone mud. The ink or Dykem at the high spots will be rubbed off, but will remain at the low spots. This will show you where and how much material must be removed to flatten the ura’s lands
Then, true the ura using a diamond plate, diamond stone, sharpening stones, and/or the glass surface plate. This step is not so important in the case of other types of chisels, but a mortise chisel must have a reasonably flat ura. Without a planar ura, the rest of your examination may be inaccurate. The article at this LINK contains a more detailed discussion with pretty pictures.
Do this work carefully, for if you heavy-handedly remove too much steel, the useful life of the chisel will be significantly reduced. Note that this is a one-time operation in the life of most chisels.
Examine the Blade’s Width and Taper

Next, check the width of your mortise chisel measured across the ura using a caliper, micrometer or other reliable gauge. Relative width is what you need to check, not absolute inches or millimeters, unless you expect your chisel to cut precisely-dimensioned mortises, something that is seldom necessary in the real world.
Measure the blade’s width at five or six locations along the cutting edge, in the middle, and near the neck before it narrows. Make a sketch of the blade and annotate these dimensions on it
Use the glass surface plate at this time to check the sides for flatness. The black oxide surface skin will be worn away by the sharpening stone mud marking the high points, but don’t let the change in cosmetic appearance bother you.
Ideally, the blade will be the same width its full length. However, it is usually acceptable for the blade to be slightly wider at the cutting edge than near the shoulder. But if it is wider at the shoulder than the cutting end, it will bind in the cut, tend to split the mortise, and the finished mortise will be skiwampus. This must be remedied by grinding the blade on diamond plates and polishing on sharpening stones.
But don’t do anything yet since there are more details you need to examine first. Just make a note on your little sketch.
Examine the Blade’s Sides
Straight Sides
Use a good straight-edge to check both of the blade’s sides. They must be straight. If they curve in or out it will be difficult to convince it to cut a clean straight mortise. If the blade is banana-shaped, it can’t cut a straight mortise anymore than a politician can tell the truth while his heart beats (it’s rumored that some have hearts).
If the blade’s sides are not straight, they must be corrected by carefully grinding and polishing them. But hold your horses there Hoss, don’t do anything drastic yet, just make a note on your little drawing: there’s still more to check first.
Flat Sides
Next check the sides of the blade across their width. They must be either flat (best) or hollow ground (acceptable). But if they bulge outwards the blade will bind and can never cut a clean precise mortise, so corrections are absolutely necessary.
Mark any irregularities on your sketch.
Right Angled Sides
Sides angled with respect to the ura Slightly less than 90˚ may be acceptable (but less than ideal) on condition that both sides are the same angle. If, however, one side is 90˚, for instance, and the opposite side measures 80˚, well that is not good and may require correction.
The sides of the blade should be at right angles (90°) to the ura lands. If not, the chisel will skew left or right during each cut, a common problem with most chisels. Beloved Customer has no doubt experienced this.
For now, just mark any irregularities on your sketch.
Examine the Blade’s Face
Next, examine the chisel’s face (the surface with the brand stamped into it).
This oft-ignored surface need not be straight along its length. It doesn’t even need to be flat across its width. Indeed, it can even be be hollow or bulging to a minor degree without causing trouble. But you do need to pay attention to two key details.
First, if it is hollow or bulging, the curvature of the bulge or hollow across the blade’s width must be uniform. If not, you should grind it to be more uniform.
The second thing to check for is that a line between and touching the corners where the surface of the face meets the blade’s sides must be parallel with the ura. In other words, if you draw a line 90˚ across the width of the face, that line should be parallel with the ura. If it isn’t corrections are necessary.
Why does the relationship of these two surfaces with each other matter? Two reasons. First, if they are not properly aligned, and assuming the ura is flat, it means the blade is thicker in cross-section at either the right side or left side. There is a strong tendency for the bevel to become skewed during sharpening, with the result that the cutting edge is not square to the center line of the blade’s long axis.
Of course a skewed cutting edge will push the blade to the right or left in the cut, and cannot cut a flat bottom, a serious defect in advanced mortise and tenon work. This deformity can be compensated for with careful attention during sharpening, but you should not have to work so hard. Better to correct the problem now and get it over with once and for all, I promise.
The second and most important problem created by a skewed bevel is that it will cause the blade to dive to the right or left when cutting a mortise ruining precision and gouging the mortise’s walls. This is different from the problem noted in the previous paragraph, although it may seem to be the same. It’s a serious defect in a mortise chisel, one that causes the most self-doubt among craftsmen.
Even the very best blacksmiths frequently fail to give this surface proper attention. You are hereby warned: Do not underestimate the importance your chisel’s face.
Examine the Blade’s Corners
Finally, examine the two lines formed by the 90° intersection of the sides and the ura. Are they clean and sharp, or are they ragged, radiused or chamfered? These corner edges serve an important function in dimensioning and shaving the mortise’s side walls. They must be clean and almost acute enough to cut your fingers, but please don’t.
If they are not up to snuff you can make corrections now or a little bit at a time during subsequent sharpening sessions. The important thing is to be aware of any defects so you can make corrections, so make a note on your little sketch.
The Plan
You should now have a sketch describing those areas that need to be corrected. Use it to make a plan. A rough sketch showing how a mortise should should be and common problems is linked to below.
Beloved Customer should keep two important factors in mind in mind when planning and executing corrections to mortise chisels.
First, you should strive to achieve the corrections with the minimum expenditure of time, effort and stone/diamond plate, and while wasting the minimum amount of steel. I am not saying work hard or work fast, but rather to work efficiently.
Second, you should work carefully to avoid creating new problems while attempting to fix existing ones. This is why you need a plan, one that will vary a little with each chisel, to guide you in working efficiently and carefully. Remember, double work takes more than twice the effort and time, and often wastes a lot more expensive steel.
Correction Guidelines
The procedures your humble servant recommends for correcting a mortise chisel (or any chisel used for cutting mortises), based of course on the sketch you prepared, are as follows:
- As mentioned above, the first step is to true the ura so it is planar. It need not be perfect at first; Close is good.
- After the ura is more-or less planar, grind the right and left side of the blade, whichever is in better shape, straight along its length, flat (or sightly hollow) across its width, and perpendicular to the planar ura. If the angle between the ura and the sides is less than 90°, that’s OK too, so long as the angle of both right and left sides to the ura is the same. An angle here greater than 90° will cause problems and must be corrected. Diamond plates or diamond stones work well for these corrections. Electrical grinders and sanders can be used, but there is a real risk of ruining the temper if you allow the steel to get hotter than is comfortable to touch with your bare finger (seriously), so great caution is necessary. This means working slow and using lots of water.
- When one side of the blade is true (perfection is not necessary), grind the opposite side straight along its length, flat (or sightly hollow) across its width, and perpendicular to the planar ura using diamond plates (if necessary). It will be at the same angle with the respect to the ura as the opposite side, of course, because the plane of the ura is the surface against which all others should be measured. Here is where more caution is necessary: pay close attention when grinding this side to make it parallel with the opposite side. If the blade width measured across the ura is slightly wider at the cutting edge than the neck, that’s fine too.. On the other hand, a blade narrower at the cutting edge than near the shoulders is useless for cutting mortises and must be corrected.
- Finally, grind the face of the blade (the upper surface with the brand) so that any point along its length is parallel with the ura. It need not be straight or even perfectly flat over its entire length, just parallel with the ura to guide the chisel straight in the cut.
Beloved Customer has no doubt observed that it is entirely possible to succeed in executing one of the corrections in this list while making another worse. Please pay attention. This is why you made the drawing and a plan.
At the conclusion of the steps described in this article, your mortise chisel should now have an ura with all the lands surrounding the hollow-ground swamp forming a single flat plane.
Blade Color
The process of truing the blade’s face will remove some of the black oxide skin. If this changed appearance bothers you, use a chemical bluing/blacking solution such as Birchwood Casey products or those sold by Brownells should work well if used properly. The color may not perfectly match the black oxide finish fresh from the forge, and it won’t be as durable, but it should be less glaring than bright metal.
Blade Hardness
New chisels are often a bit more brittle than the specified hardness at the extreme edge, and may exhibit small fractures and/or chipping. This is a result of the cutting edge cooling quicker than the rest of the blade during heat treat and tempering.
This is not necessarily a bad thing, but to the contrary is often a sign of a well-made blade. A new chisel that is too hard at the extreme cutting edge when new may well improve after a few sharpenings, but one that is too soft and rolls an edge, or develops a burr, or, heaven forfend, dents in use will almost always be junk forever, unless it was burnt (lost its temper) during grinding, in which case it too may improve with a few sharpenings. I shared the story of Woody and the difficulties he experienced in the “Mystery of the Brittle Blade.” (soon to be out on NetFlix and starring Benedict Cumberbatch (ツ)】
Often the blacksmith or wholesaler will subcontract sharpening job out to a specialist. This practice allows the blacksmith to focus his attention on what he does best, which is a fine thing. But if the sharpener is careless or gets in a frikin hurry and burns the edges while grinding them, without exception the blacksmith gets blamed, resulting not only in an immediate financial loss and wasted time dealing with defective product claims, but a degradation of his valuable reputation. Having experienced this entirely avoidable damage, some blacksmiths, including our honorable plane blacksmith Mr. Nakano, insist on doing their own sharpening, or require the sharpener to work under their eye in their smithy, as does Konobu, to avoid this problem.
Bevel Angle
Bevel angle is critical to cutting edge durability. I recommend maintaining a bevel angle of at least 27.5°. 35° is even better when cutting harder woods.
You should use a bevel angle gauge of some sort to check the angle during each sharpening session.
You may be surprised how the angle will become gradually smaller with each sharpening if you don’t do this check. Even professionals frequently allow the angle to wander by mistake or through supernatural influences. There are several useful gauges commercially available for this purpose, or you can easily make one from scrap brass or aluminum.
In future articles we will consider the feeding of the Wild Mortise Chisel. They are fastidious diners, after all.
Until then, I have the honor to remain,
YMHOS

If you have questions or would like to learn more about our tools, please click the see the “Pricelist” link here or at the top of the page and use the “Contact Us” form located immediately below.
Please share your insights and comments with everyone in the form located further below labeled “Leave a Reply.” We aren’t evil Google, fascist facebook, or thuggish Twitter and so won’t sell, share, or profitably “misplace” your information. If I lie may my mortise chisels all turn to glass.


Thanks for this posting, Stan. I have a set of Japanese mortise chisels bought decades ago that I have used a little but have been languishing since I got a mortiser. Now that I’m doing more hand joinery it is time to tune them up. Thanks for a path forward.
LikeLiked by 1 person
You are welcome. I’m sure they will appreciate the attention. Maybe even wiggle and squeak (ツ)。Stan
LikeLike