

One accurate measurement is worth a thousand expert opinions.
Grace Hopper
As your humble servant mentioned in a previous post, and contrary to what corporate product development departments appear to assume, it is the nature of the human body for the hand to precede the hammer head during the arc of travel, with the result that, if the handle is affixed perpendicular to the axis of the head, the hammer’s face will hit the nail or chisel handle off-center and at an angle.
In this post we will discuss this eccentric phenomenon in more detail and suggest how to compensate for it in Gentle Reader’s drawing.
The Angle of the Dangle
In evidence of your humble servant’s counter-intuitive assertions above, let us view some stop-motion high-speed photography of a shockingly ugly hammer (I can hear ‘Nando simply clucking with disapproval at the sight).

Although the wood-butcher in this photo is using the inefficent Hobbit-basher grip, please notice the location of his pinkie finger with respect to the hammer’s face shown in this photo, as well as the angle between the hammer’s face and the nail’s axis at the point of impact seen in the last frame.
Now riddle me this, Oh Enigmatic Sphinx:
- In this series of photos did the impact between hammer face and nail head occur in the center of the claw hammer’s face, or in the lower half of the face?
- Was the center of mass of the hammer head in-line with the axis of the nail at the instant of impact, or was it offset? If offset, does the impact force of the hammer tend to drive the nail straight, or to bend it?
- Was the striking face oriented perpendicular to the axis of the nail at the instant of impact, or cocked? If cocked, does the impact force of the hammer tend to drive the nail straight, or to bend it? Does it tend to conserve or waste energy?
Gentle Readers who answer all three questions correctly will win one-half of a day-old Crispy Creme glazed donut the next time they are in Tokyo (I get the first bite of course (ツ)). But rather than just giving out the correct answers (and risk losing half a donut!), Gentle Readers should perform the following tests themselves to gain irrefutable personal knowledge.
The Experiment & Analysis of the Results
Color the face of your hammer or gennou with a marking pen, or Dykem, then use it with a chisel to cut a mortise, without giving the hammer special attention. Perhaps a dozen blows to the chisel while it is held vertical. Then examine the hammer’s striking face and chisel handle.
Now that’s done, please examine the chisel handle. What Rosetta Stone should we use to decipher these mysterious marks?
If the ink has transferred from the hammer face to the chisel mostly dead-center, then all is well. But if it is off-center, it usually indicates two things. First, the hammer handle is either too long, too short, or your grip is goofy. Second, it may indicate that the hammer’s head is cocked at the instant of impact. More on that next. In any case, a clean impact on the end of the chisel must be our goal if we are to work efficiently (“A little nod to the gods,” as Roy McAvoy would say, “for we are fallible, and perfection is unattainable”). Therefore an adjustment to either the hammer, or the way we grip it may be called for.
Let’s take a gander at the hammer’s face next. Most people discover that the ink has been scrubbed off the bottom half of the hammer’s or gennou’s face (closest to the hand), and that the ink marks transferred to the chisel are off-center.
If the bare spots (where the ink was scrubbed off) are not centered on the hammer’s striking face, two things are indicated: First, as seen in the photo above, the hammer’s face is probably not striking the chisel’s handle squarely, but is angled at the time of impact instead of being perpendicular. Not good.
The Consequences
Why should we be concerned about something as insignificant as an angled impact? How clever of you to ask such a intelligent question!
Vector analysis suggests that an angled impact must cause the hammer to push the chisel away from the intended direction of cut, or the nail away from the intended goal (maybe even bending it). This has consequences we need to be concerned about.
The second thing these uneven marks indicate is more certain, namely that the centerline of the hammer’s head is not in-line with the centerline of the chisel’s handle at the time of impact. Once again, physics and vector analysis tells us this misalignment causes impact energy to be misdirected and wasted instead of being transmitted through the chisel to its cutting edge and into the wood being cut. The resulting feeling is a whack followed by a kick instead of a clean chopping sensation.
Where does this wasted energy go and what does it do? It forces the chisel out of the ideal alignment and makes it feel squirrely. It beats on the hand holding the chisel. It also converts to friction heat as the blade beats on the wood instead of cutting it cleanly.
This wasted energy destroys your hammering rhythm, dulls your chisels, hurts your hand, bends your nails and makes your chisel-work sloppy. This condition can no more be tolerated than a rabid dog or a corrupt politician with a functional mouth. Or is that a rabid politician and a corrupt dog? I forget, but it’s a difference without a distinction.
In any case, if we want the hammer’s energy to enter the chisel cleanly and motivate it to cut both efficiently and precisely, we need the center of mass of the head to be oriented closely in-line with the central axis of the chisel or nail at the instant of impact. Likewise, we need the gennou’s flat striking face to impact the chisel handle or nail head squarely, not at an angle.
Solutions
Your work with a hammer will be most efficient and precise if you meet the following three conditions:
- Grip the hammer’s handle correctly;
- Use a hammer with a handle length that fits your body best;
- Use a hammer with head alignment and striking face angle that corrects the misalignment and cocking inherent in standard hammers as mentioned above.


The following guidelines should get your handle design in the ballpark.
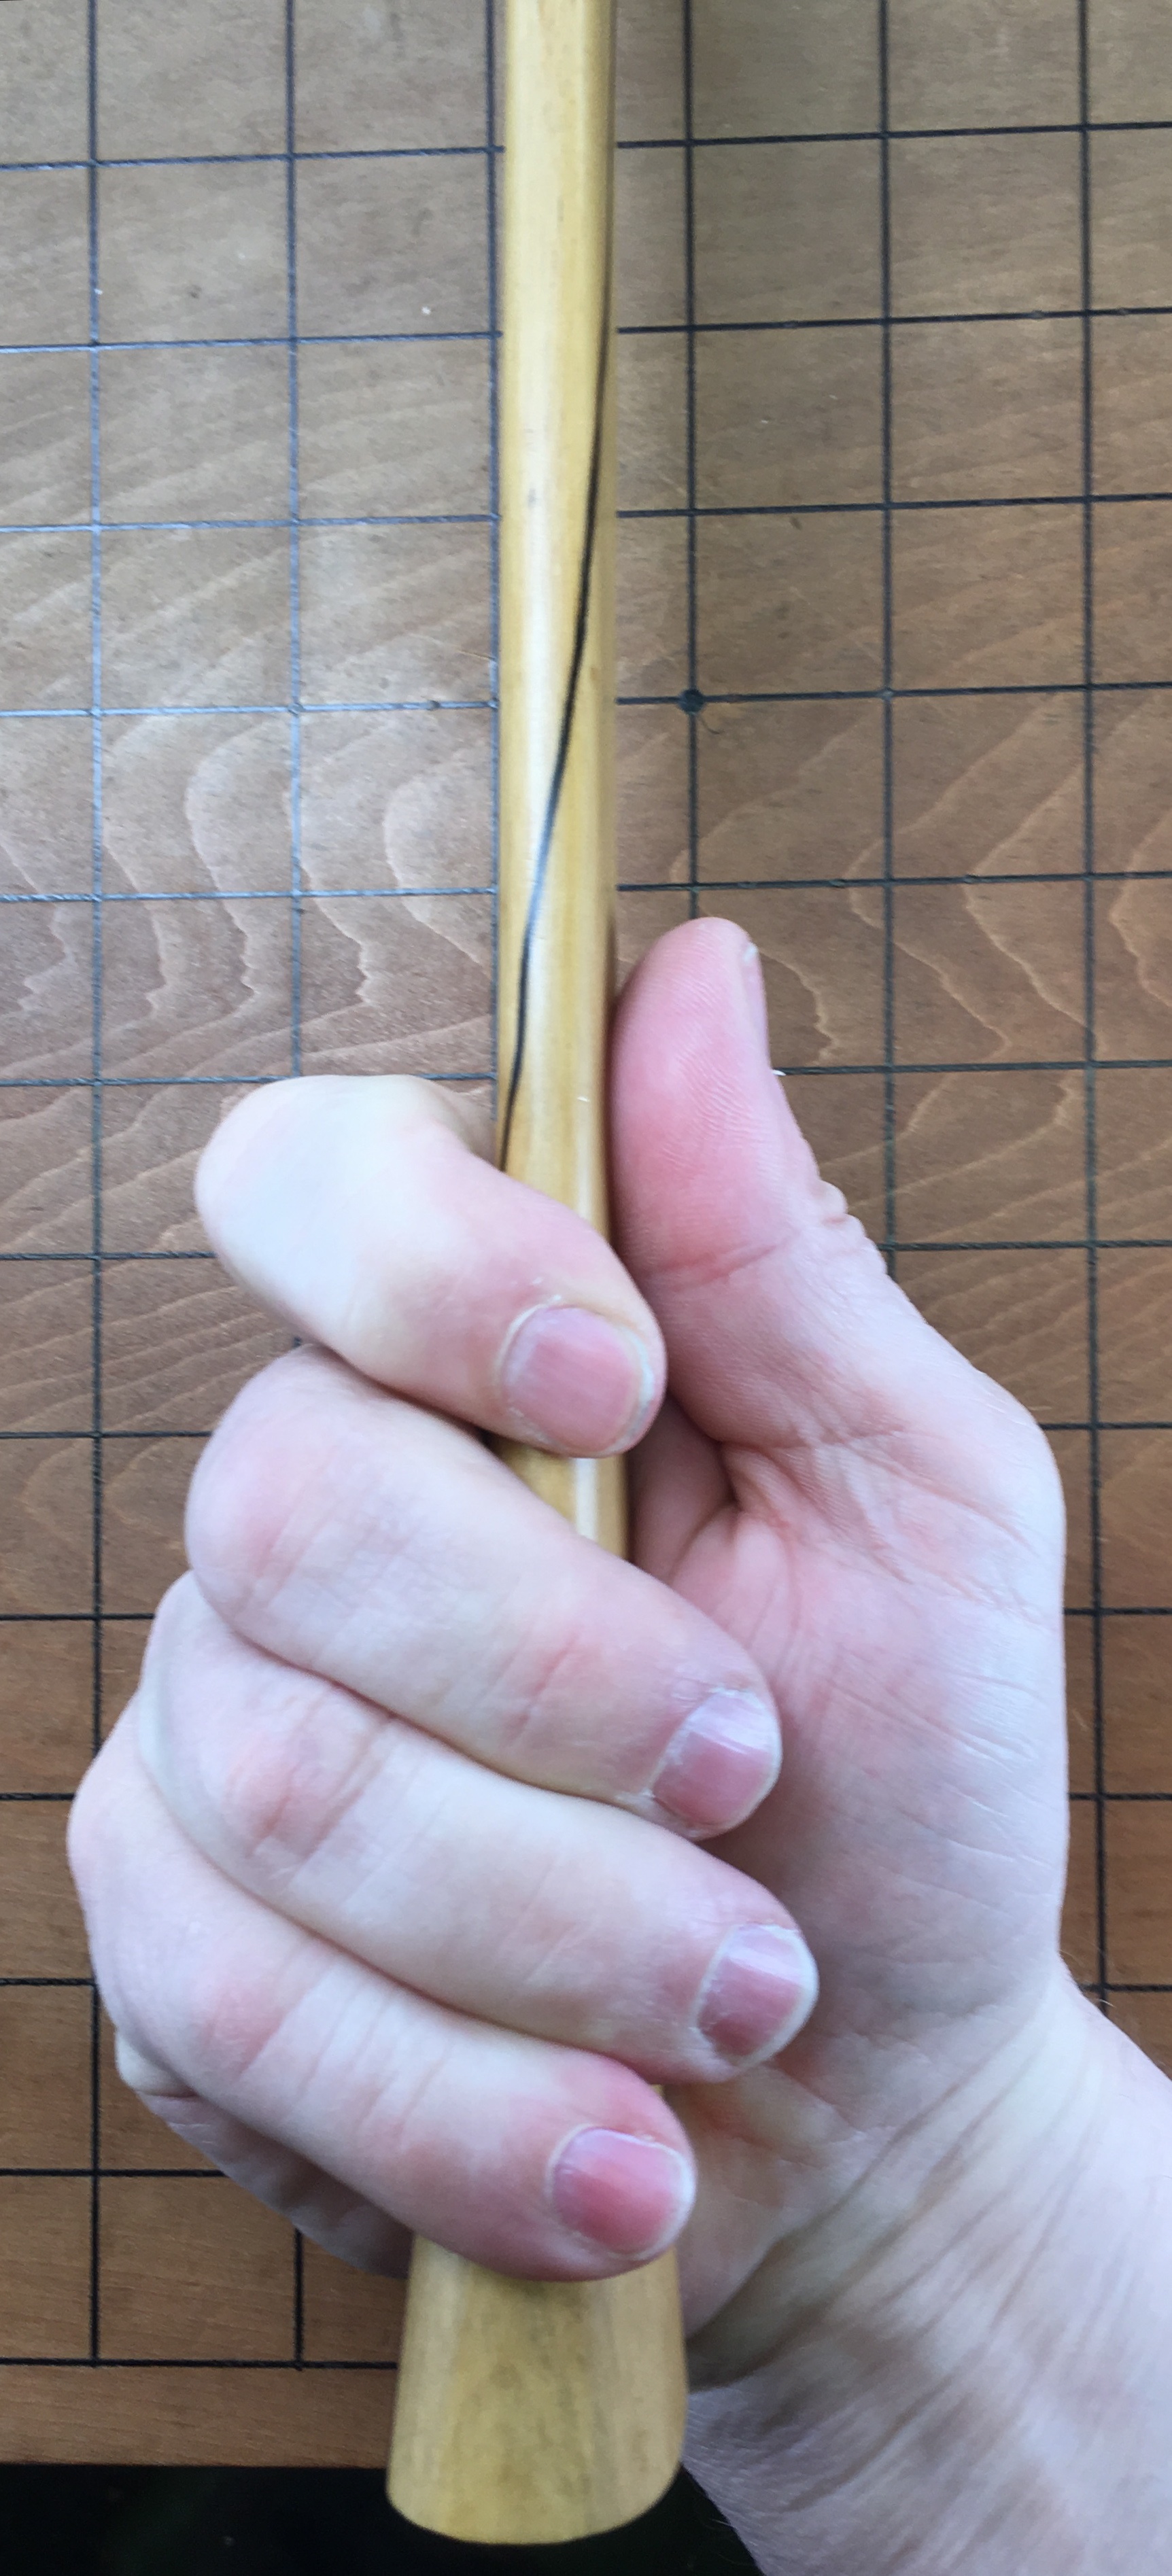
When gripping the hammer as described in Post 13 in this series, your pinkie should just fit between the front edge of the handle and the plane of the flat striking face. The small circle drawn near the end of the hammer in the drawing is the pinkie, a dimensions that varies from person to person.
This means that if you place the gennou on a flat tabletop as shown in the drawing, and press straight down on the head so the flat striking face is flush with the tabletop, the toe of the handle will float above the tabletop with just enough clearance for your pinkie to fit between handle and table when you grip it properly.
So let’s take some more measurements and add them to our drawing.
Grip Layout
First, measure the diameter of your pinkie. Approximate is fine.
Next, we need to determine where to draw the pinkie in cross section on our drawing, but to do that we first need to measure the size of your grip. To do this, hold a hammer handle or stick in your hand gripping it lightly across your palm as described in the previous post in this series (not in a Hobbit-basher fist) with the heel of your palm and the first segment of your index finger resting on the handle’s back edge (opposite the head’s striking face), and your fingers wrapped around the handle. Use a pencil or pen to following mark 3 points on the handle or stick:
- Make the first mark at the point where your palm’s heel ends on the handle’s back edge near the butt. Let’s call this Point 1;
- Make another mark at the point where the first joint of your index finger begins to curve around the handle/ Let’s call this Point 2;
- Make the third mark where the front and back edges of your pinkie finger touche the handle’s front edge. We’ll call this distance your “pinkie diameter.”
The length of the “grip” is the distance from Point 1 to Point 2.
Going back to our drawing, layout the “grip” length or “forefinger” location as shown in the drawing.
A line drawn from the top of the butt to the intersection of the grip length, as shown by the arc in the drawing below, will give you the grip angle.

Next use your divider to transfer the location and width of your pinkie finger onto the bottom edge of the drawing’s handle touching the horizontal line. Sketch a circle representing your pinkie finger in cross-section.
With the addition of these details to your drawing, it is close to being complete. I’m excited as a puppy on Christmas morning!
In the next post in this saga spanning time and the islands of the seas we will add the handle’s top and bottom edges.
YMHOS

The following link is to a folder containing pricelists and photos of most of our products. If you have questions or would like to learn more, please use the form located immediately below titled “Contact Us,” or email us directly at Covingtonandsons@gmail.com.
Please share your insights and comments with everyone in the form located further below labeled “Leave a Reply.” We aren’t evil Google, fascist facebook, thuggish Twitter, or a US Congressman’s Chinese girlfriend and so won’t sell, share, or profitably “misplace” your information. May I swallow a thousand needles if I lie.


All Posts in The Japanese Gennou Hammer & Handle Series
- Part 1 – Introduction
- Part 2 – Ergonomics
- Part 3 – What is a Gennou?
- Part 4 – The Varieties of Gennou: Kataguchi, Ryoguchi & Daruma
- Part 5 – Kigoroshi
- Part 6 – The Ergonomic Anaya
- Part 7 – The Unblinking Eye
- Part 8 – Head Style & Weight
- Part 9 – Factory vs. Hand-forged Gennou Heads
- Part 10 – Laminated Gennou Heads
- Part 11 – Decorative Gennou Heads
- Part 12 – The Drawing: Part 1/6
- Part 13 – The Drawing: Part 2/6
- Part 14 – The Drawing: Part 3/6
- Part 15 – The Drawing: Part 4/6
- Part 16 – The Drawing: Part 5/6
- Part 17 – The Drawing: Part 6/6
- Part 18 – Wood Selection
- Part 19 – Laying-out the Handle
- Part 20 – Making Sawdust
- Part 21 – Installing the Head
- Part 22 – Tasting the Pudding
- Part 23 – Finishing the Job

Please Leave a Reply