“The beginning of wisdom is to call things by their proper name.”
Confucius
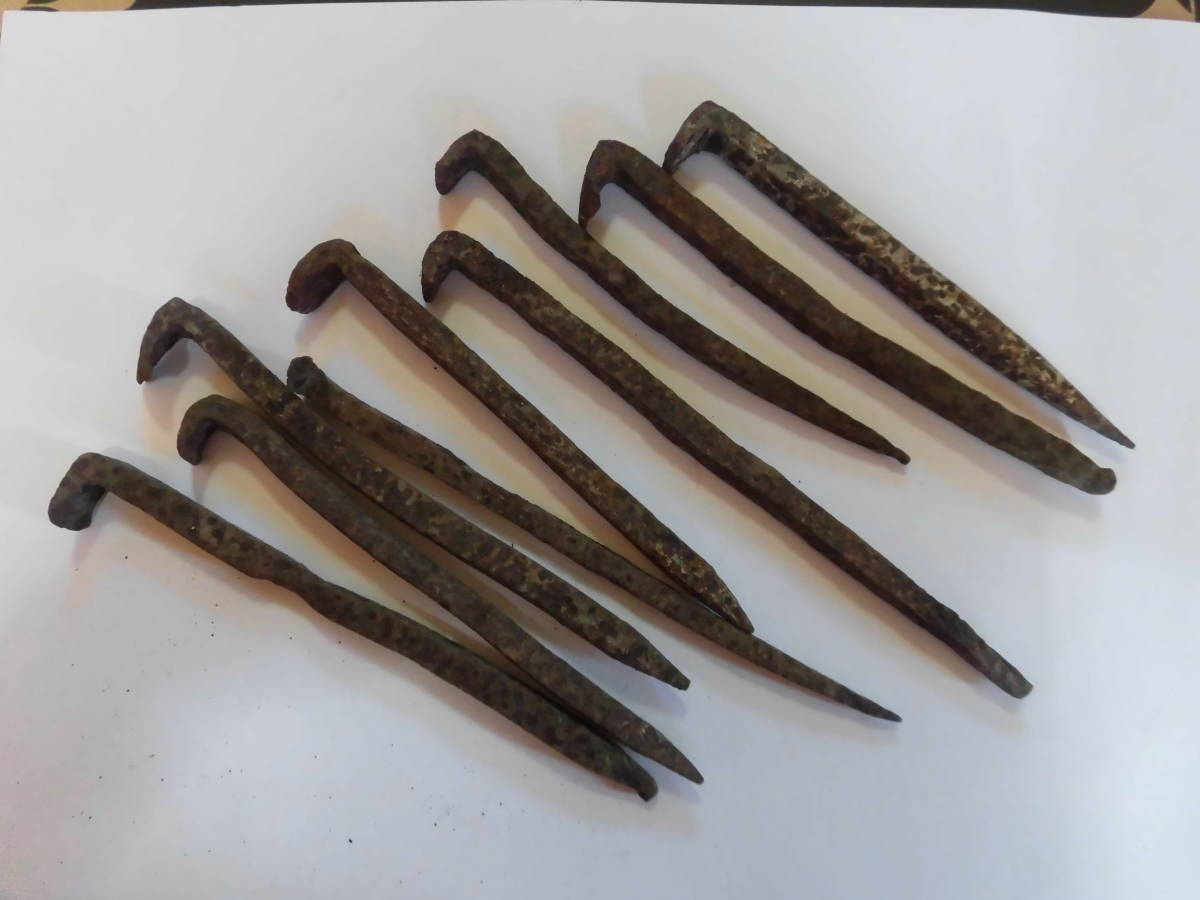
The “Tsuba” in Tsuba Nomi is the Chinese character 鍔 which means “guard” as in a sword or knife guard.
Two nubs attached to opposing sides of the blade just below the handle look like the guard for a knife or sword. This chisel is driven with a hammer to quickly create a pilot hole for nails or screws. The blade becomes tightly wedged into the wood, but by striking up on these projections with a steel hammer, the blade can be extracted.
An old traditional Japanese boat made with tusbanomi chisels and nails.Three styles of tsubanomi, and using a mallet to remove the blade after cutting a nail hole
This unique chisel comes with blades with round, square, or rectangular cross-sections.
Square and rectangular blades usually have a chisel-point beveled on two sides, but sometimes are beveled on just one side. Round blades may have simple pointed ends, but sometimes they have short triple tines to drive the crushed wood fibers into the hole.
While this chisel severs the wood fibres, unlike an auger, drill, or gimlet, it does not remove material from the hole. The ends of the severed fibers are angled down into the hole, and over time and exposure to humidity and water, will partially swell back to their original shape locking nails in tightly.
This chisel is still used in the wooden shipbuilding industry, but other than that sees very little practical use nowadays. Your humble servant owns one but has never used it in anger.
YMHOS
If you have questions or would like to learn more about our tools, please click the see the “Pricelist” link here or at the top of the page and use the “Contact Us” form located immediately below.
Please share your insights and comments with everyone by using the form located further below labeled “Leave a Reply.” We aren’t evil Google, fascist facebook, or thuggish Twitter and so won’t sell, share, or profitably “misplace” your information. If I lie may every nail I touch bend in half.
“There is a great satisfaction in building good tools for other people to use.”
Freeman Dyson
This is the second and final post about the heavy-duty Japanese carving gouges.
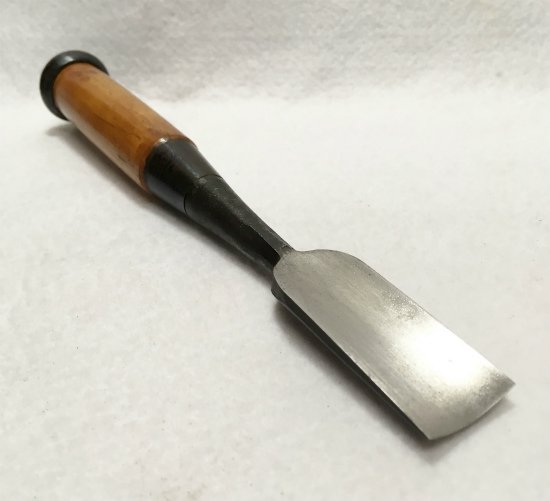
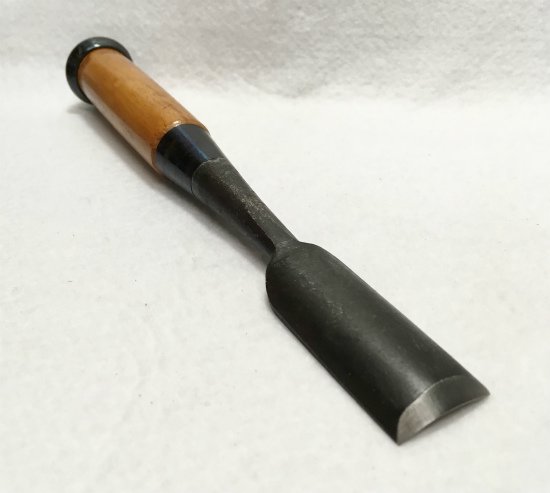
The Sotomaru Nomi” 外丸鑿 is what is called an “Incannel Gouge” in the West. “Soto” 外 means “outside” or “external,” “maru” 丸 means “round,” and “nomi” 鑿 means “chisel.” The name corresponds closely to the English language term for incannel gouges.
As with other Japanese chisels, the Sotomaru Chisel has a thin layer of high-carbon steel laminated to a softer low-carbon steel body with a neck and tang. They also have the ferrule which compresses the handle’s wood to keep the blade’s tang firmly attached to the handle and prevent the handle from splitting, and a crown to prevent the handle from cracking when struck with a steel hammer. Unlike most Japanese chisels, however, they do not have a hollow-ground ura.
The cutting edges differ from their Western counterparts in that the bevel is a single, flat plane, instead of a curved surface. The advantage of this detail when sharpening would be difficult to overstate. The blade can be sharpened on a normal, flat sharpening stone without pesky slips, finger contortions, or heaven forfend, miniature die grinders.
APPLICATIONS
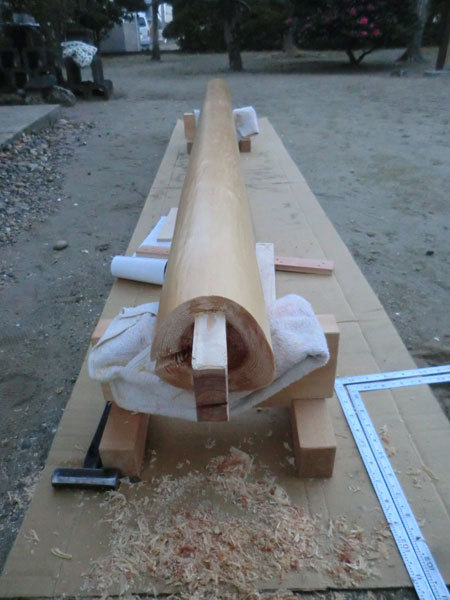
This is an unusual chisel outside Japan, but is indispensable for working round wood and bamboo used in Japan’s sukiya and teahouse construction traditions. Although this chisel has many advantages, and some disadvantages. For instance, it will not waste wood as rapidly as the uchimaru chisel we looked at in the previous post, but it tends to hold an edge longer and is definitely quicker/easier to make fiendishly sharp. In addition, its shape is much more conducive to cutting precisely curved surfaces than its concave sisters.
The coped end of a post to beam tenon joint cut with a sotomaru nomi. Notice also the “sewari” kerf cut into the post in this and the next photo. I will discuss this interesting detail more in a future post, God willing and the creek don’t rise.A “Sukiya” style exposed structural frame in peeled cedar wood with coped mortise and tenon joints, the ideal application of the Sotomaru Gouge. “Round Work” in peeled cedar woodSONY DSC
The hard steel lamination in this chisel has more support than its brother the uchimaru gouge we looked at in the previous post, making it a bit tougher.
Sharpening is easier and quicker than other gouges because the bevel can be treated as a single flat plane. The area called the “flat” or “ura” on conventional chisels is convex so it can be worked on a flat stone eliminating entirely the need for those pesky grooved stones and slips.
The disadvantage is that the flat bevel/curved cutting edge cannot make clean stopped cuts against 90 degree surfaces. This shortcoming is easily dealt with, however, by making a few more passes.
The sotomaru nomi is perfect for fitting straight line curved surfaces in some situations because its convex surface can ride and index directly on the concave surface being shaped, whereas the more common concave gouge must be tilted at an angle on its axis to cut, with less precision.
Since this chisel can cut parallel to its axis, and does not need to be angled up from the surface being worked to cut, it can cut and carve in much tighter locations than standard gouges.
If you need to make curved cuts at 90° to the workpiece’s surface, as in the photos above, then this chisel is indispensable. I’m sure you can see why this chisel is a must-have for the elegant ” round work” the Japanese love so much.
Another advantage is that the sloped cutting edge can easily make undercuts, something their Western counterpart cannot do. This is an essential performance criteria for accomplishing a few traditional Japanese architectural details such as the edge detail in the beam nose shown in the photo below. Good luck cutting that with a standard gouge!
It’s always nice to have the right tool for the job at hand.
Standard sizes are 9mm, 12mm, 15mm, 18mm, 24mm, 30mm, 36mm, and 42mm.
YMHOS
If you have questions or would like to learn more about our tools, please click the “Pricelist” link here or at the top of the page and use the “Contact Us” form located immediately below.
Please share your insights and comments with everyone in the form located further below labeled “Leave a Reply.” We aren’t evil Google, fascist facebook, or thuggish Twitter and so won’t sell, share, or profitably “misplace” your information. May I gag on a hairball if I lie.
Carving a wagatabon container using an uchimaru gouge
“A good tool improves the way you work. A great tool improves the way you think.”
Jeff Duntemann
The Uchimaru Nomi is a gouge, very much like those seen in the West
The name is composed of 3 Chinese characters (kanji): 内 pronounced “uchi “which means “ inside” or “interior,” 丸 pronounced “maru” which means “round,” and 鑿 “nomi” which means chisel.
This gouge has a blade very similar in cross section to its Western counterpart, but unlike Western gouges, it is made of laminated steel, has the combined tang and ferrule construction typical of Japanese chisels, and a crown to reinforce the handle and protect it from violent hammer blows. These are strong chisels used by carpenters to carve large-scale architectural components, and sculptors.
They come in different sizes and sweeps, although not as many as the Swiss make. Some are the size of typical oiirenomi bench chisels; others are the size of the larger heavy-duty atsunomi.
As you can see, these blades are are not hollow-ground.
The relatively hard layer of steel which forms the cutting edge is often subjected to more lateral forces when carving than their straight-bladed cousins, and are sometimes damaged as a result. Professional carvers will hold the thin cutting edge over a small candle flame to reduce the hardness over a small area to reduce this tendency. Your humble serrvant is not recommending this practice, just conveying information.
The technique used for sharpening Japanese gouges is identical to their Western counterparts. To sharpen the outside bevel, typically one will use dedicated sharpening stones with grooves worn into them that are slightly greater than or equal to the radius of the gouge. One removes the burr and polishes the inside curve by using a short stone with a radiused edge.
A piece of leather charged with polishing compound can be used to put a final polish to the bevel. One can also bend this piece of leather to polish the gouge’s inside surface. Easy peezy.
Standard sizes are 9mm, 12mm, 15mm, 18mm, 24mm, 30mm, 36mm, and 42mm.
There are also uchimaru gouges made as paring chisels, with longer blades and handles, slimmer necks, and without crowns.
If you need a gouge that that can hog a lot of wood, will take an exceptionally sharp edge and will maintain it a long time, then this is a tool you should consider.
In the next post, we will look at a different type of gouge, one you may not have seen before.
YMHOS
If you have questions or would like to learn more about our tools, please click the “Pricelist” link here or at the top of the page and use the “Contact Us” form located immediately below.
Please share your insights and comments with everyone in the form located further below labeled “Leave a Reply.” We aren’t evil Google, fascist facebook, or thuggish Twitter and so won’t sell, share, or profitably “misplace” your information. May I gag on a hairball if I lie.
“Along with the milk of my nurse I received the knack of handling chisel and hammer, with which I make my figures.”
Michelangelo
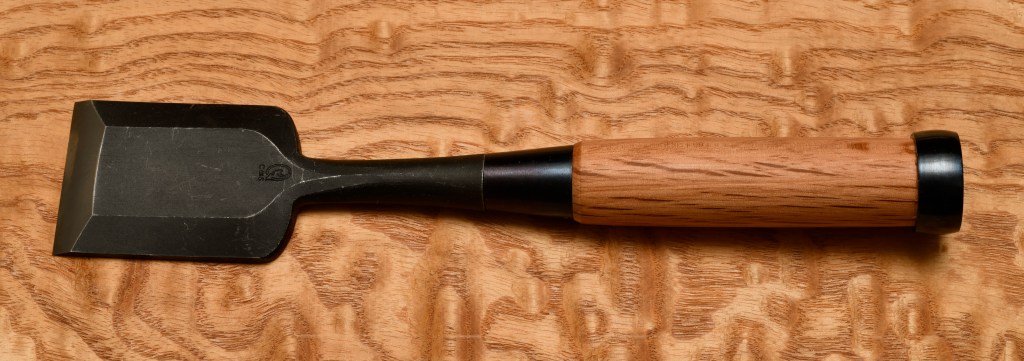
In a previous post, we looked at various types of oiirenomi (bench chisels) and mortise chisels. In this post we will examine a type of tatakinomi called the “Atsunomi.”
DESCRIPTION
The ”Atsunomi, ” written 厚鑿, translates to “thick chisel.” This is the largest variety of tatakinomi readily available nowadays and is almost identical in design to its more petite oiirenomi sisters, but being larger, longer, heavier and stronger it is able to transmit and endure the impact forces of heavy hammer blows from sunup to sundown to cut a lot of wood. Indeed, I can remember times when the handles of my atsunomi in the photographs on this page became seriously hot after long hours of heavy hammer blows.
The 24mm chisel in the photograph below was the first atsunomi I owned, and has seen hard use with heavy hammers, but has held up well.
24mm Atsunomi by Kiyotada (Japanese White Oak handle)
If I can liken the bench chisel or oiirenomi to a 1/4″ cordless drill, then the atsunomi is a 9 amp 1/2″ corded drill (when combined with the right steel hammer). Serious business indeed.
APPLICATIONS
The atsunomi is ideal for heavy work such as timber framing and wasting large amounts of wood quickly. However, carpenters are not the only trade to use them. Many professional craftsmen in Japan, even those that never work on construction sites, prefer to use atsunomi even for delicate work because of their relatively longer blades, greater durability, and cost-effectiveness.
Because of its greater size and weight, the atsunomi is not as nimble as the smaller varieties of tataki nomi and demands the user to have greater strength and skill. But on the other hand, it’s very stable in the cut, and wastes wood with impressive gravitas.
A comparison of a 42mm oiirenomi (top) and a 54mm atsunomi (bottom) by Kiyotada. The atsunomi is longer, thicker and stronger in every way.
As with all tataki nomi, the handle is big enough to use with one hand, but not two. Atsunomi always have a mild steel katsura crown installed at the end of the handle to reinforce it and prevent it from splitting under hammer blows.
Standard widths for atsunomi are: 12㎜, 15㎜, 18㎜, 21㎜, 24㎜, 30㎜, 36㎜, 42㎜, 48㎜, 54㎜.
There are several varieties of atsunomi, some with very wide blades and others with very long necks, but I will not go into that level of detail in this post.
In Part 9 of this saga of romance and derring-do, we will examine the Uchimaru Nomi.
YMHOS
48mm Sukemaru atsunomi w/ Japanese white oak handle. A serious tool for serious work
If you have questions or would like to learn more about our tools, please click the “Pricelist” link here or at the top of the page and use the “Contact Us” form located immediately below.
Please share your insights and comments with everyone using the form located further below labeled “Leave a Reply.” We aren’t evil Google, fascist facebook, or thuggish Twitter and so won’t sell, share, or profitably “misplace” your information. If I lie, may all my chisel’s uras dissapear.
“You can complain because roses have thorns, or you can rejoice because thorns have roses.”
Tom Wilson
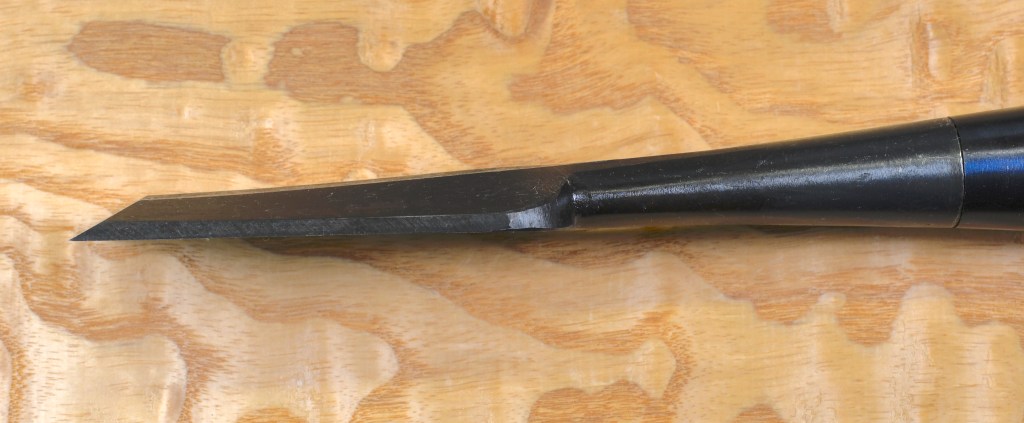
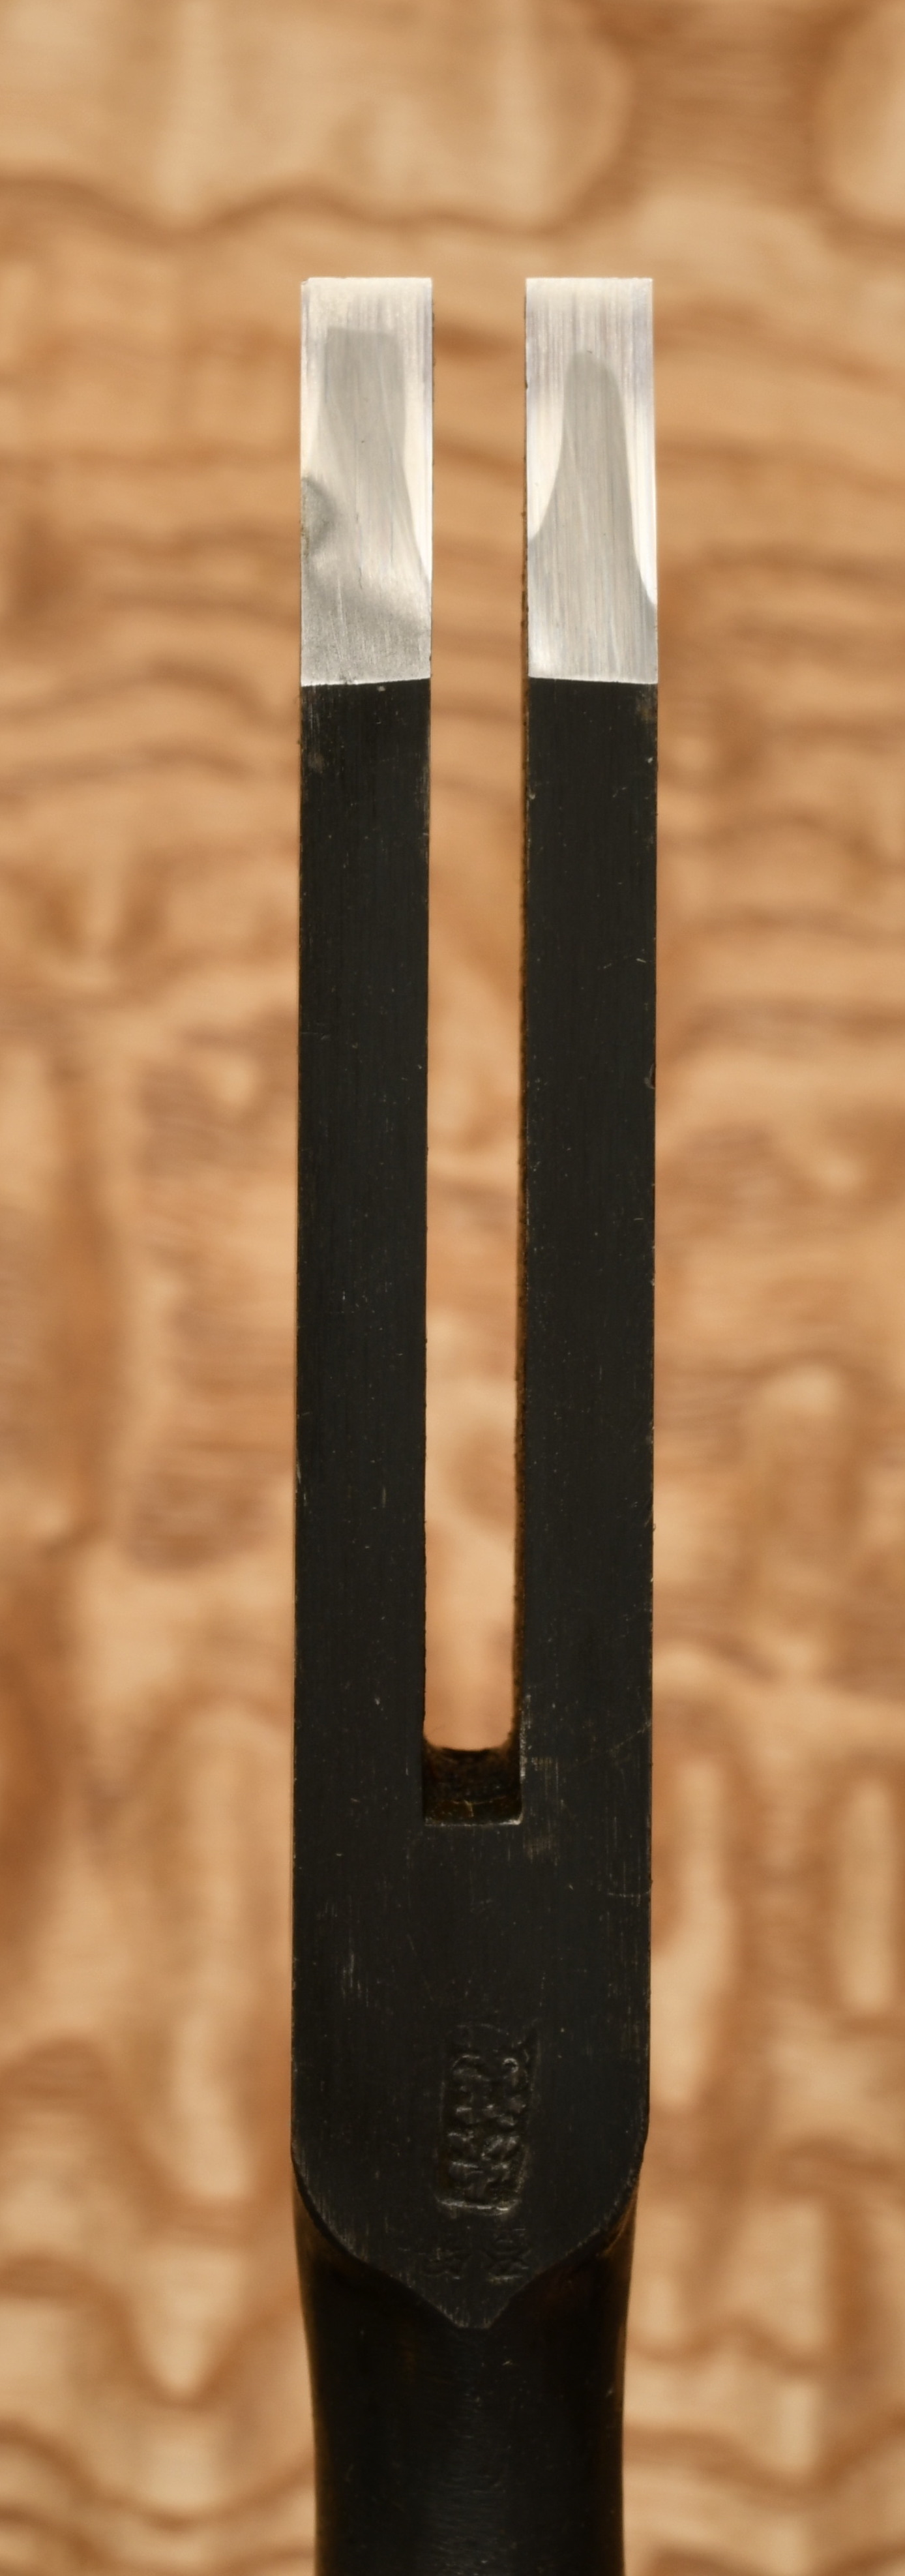
Nihon Mukomachinomi. Definitely in the Miki City style
This tool is a specialty mortise chisel with two blades for cutting twin mortises at the same time. It was developed specifically for cutting mortise joints in wooden stiles and rails for doors, shoji, cabinets and other joinery.
DESCRIPTION
Interestingly, double or twin tenons are not called ” nihon hozo” (hozo means ” tenon”) but “ nimai hozo “ (二枚ほぞ) with “ni “ meaning 2. In this case the number is combined with the counter “mai “ used to count flat things like a sheet of paper or tenons. Japanese is almost as messy as English… Your humble servant blames those pesky Buddhist priests for the complications involved in reading and writing Japanese, but I’m not sure who to blame for English.
The name is a variation of the name of the standard mortise chisel ” mukomachi nomi” in my previous post, and no, I still don’t know what it has to do with ” waiting over there.” In front of this is added ”nihon” (二本) with ” ni” meaning ”2” and ” hon” being a counter for longish things, like pencils or trees, or in this case, blades. The word is pronounced ” knee hone.”
Allow me to wander off the path a bit and talk about the Japanese language since you might find a few details interesting. If you don’t feel international today, please feel free to jump over the next few paragraphs.
The nation of Japan is called “Nihon” or “Nippon “ in the Japanese language and is written with the two characters “Ni “ 日 and ”Hon” 本 sometimes pronounced “pon.” Yes, the same pronunciation and one of the same characters used in nihon mukomachi nomi. Besides being a counter for pencils and trees and longish things, it also means ” book” and ” source. ” The word for the nation of Japan means “The source of the sun,” a jab by the Japanese at an arrogant Chinese emporer some millenia ago.
Spoken Japanese is not that difficult for English speakers to figure out, but the reading and writing are crazy difficult because of the vast quantity of Kanji, the multiple pronunciations possible for most of them, and the multiple meanings attached to many.
Elementary children are required to learn 1,006 kanji characters along with the various meanings and pronunciations. In total, a minimum of 4,272 characters are used in newspapers and magazines and must be learned before graduating middle school. Most educated people in Japan can read well over 6,000 of the over 13,000 registered kanji in Japan. Universal literacy requires a lot of study and memorization at a young age. This should give you an idea why education is so highly valued in Japan.
When I was a young missionary in Japan in the 1970’s, I spent several months stationed to Ehime prefecture in rural areas of the island of Shikoku, back when many farmhouses in that locale still had thatched roofs, no glass windows, and no electricty. Many of the older residents had spent their entire lives on their little farms and could not read or write, and had never seen a brown-haired blue-eyed foreigner before.
But the children in these mountain villages were always excited to see a foreigner and would swarm around and ask us where we were from. My standard response to this somewhat rude but innocent question was to point down at each of my legs and count them saying ”One leg, two legs. I’m a Nihonjin.” The “nihon” I was was jokingly referring to was the same as the mortise chisel which is the subject of this post, not Japanese Nationality which is pronounced identically.
Now you know a stupid pun in Japanese, so never say you didn’t get your money’s worth at this blog!
The twin-blade mortise chisel is exceptionally difficult to make, and even new ones require the owner to perform a significant amount of tuning to convince them to perform well. They have never been common, and I am not aware of anyone forging them now.
APPLICATIONS
The twin tenons this chisel specializes in cutting are almost twice as strong as a larger single tenon, and are the preferred joint for high-stress wooden connections worldwide, especially joints in doors and windows. If you haven’t tried them before, you should. They look pretty cool as through tenons too.
Twin tenons have three advantages that justify the extra work. First, while they may have the same or even less cross-sectional area, they have more surface area than a single tenon in the same space, creating greater friction when assembled, if properly cut, creating a joint that is much more likely to stay assembled when stressed.
Second, this larger surface area also means a larger glue area, a big advantage with the right glue.
And finally, twin tenons are much more resistant to twisting, an huge advantage for highly stressed joints in operable doors and windows. This is their biggest advantage and is nothing to sneeze at. If you want a door to last, always use twin tenons, at least at the bottom rail.
Sokozarai chisel used to clean and shave the bottom of mortises
I purchased one of these chisels many years ago. They are difficult to tune. But even after all that work, the gentleman I learned tategu work from many years ago was not impressed with my clever tool insisting that a regular mortise chisel does a better job. There is an obscure structural reason why this makes sense, which I will not delve into here, but I did not ask Mr. Honda at the time for an explanation because it would have been improper to question a master who had been a professional joiner at his level for 60 years.
I can’t get these chisels made anymore, and know of no blacksmith that makes them nowadays. The time is not far away when handmade tools will not be available except as collectors items.
YMHOS
If you have questions or would like to learn more about our tools, please click the see the “Pricelist” link here or at the top of the page and use the “Contact Us” form located immediately below.
Please share your insights and comments with everyone in the form located further below labeled “Leave a Reply.” We aren’t evil Google, fascist facebook, or thuggish Twitter and so won’t sell, share, or profitably “misplace” your information. If I lie may my mortise chisel split asunder!
Japanese mortise chisels are called “Mukomachi Nomi” 向待鑿. I am unsure of the origin of the name, but the Chinese characters can be read as meaning “wait over there.” A curious name, it may refer to the shape of the transition from blade to neck, called a “machi” which is unique in Japanese chisels. Your humble servant will simply call them “mortise chisels.”
DESCRIPTION
12mm Mortise Chisel – Sukezane (Ura View)
Mortise chisels are single-purpose tools for cutting rectangular holes in wood for mortise and tenon joints, the oldest recorded wood joint known.
Unlike other Japanese chisels, and even Western mortise chisels, the sides of the Japanese mortise chisel are shaped square to the “flat” instead of being angled slightly less than 90 degrees. The surfaces of the sides are of course straight along their length, but are either flat or slightly hollow across their width.
Other varieties of chisels have sides angled inwards to prevent the chisel from binding in the cut. This is less than ideal, however, when cutting small mortises because it allows the chisel to twist inside the mortise scoring the sides and reducing precision. The Japanese philosophy is that the blade’s sides should shave and clean the mortise at the same time it is cutting it so the sides don’t require additional cleanup with a paring chisel. Its a matter of precision and efficiency.
The straight flat sides of the mortise chisel have a relatively larger surface area that can create a lot of friction in the cut making extraction difficult in some cases, so the standard maximum width is 15mm.
Many advocate using double bevel cutting edges for Western mortise chisels. I have no problem with double bevels for atsunomi used to cut wide, deep mortises because the double bevel tends to kick more waste out of the mortise hole than a single flat bevel, although double bevels are more trouble to sharpen. But in the case of the standard Japanese mortise chisel, I recommend using a simple flat bevel for two reasons:
The first reason is that, since sharpness is critical for precise work, and a flat bevel is quicker and easier to sharpen, a flat bevel is more precise.
The second reason is that a flat bevel tends to stabilize the chisel in the cut more than a double bevel blade can, keeping it from twisting out of alignment and gouging the sides.
The mortise chisel is a specialist chisel for joinery, cabinetmaking and furniture work. It is not generally used by carpenters. Craftsmen that routinely use mortise chisels work to much tighter tolerances than most woodworkers, so a professional-grade mortise chisel must be forged and shaped to tighter tolerances than other chisels.
I only have one blacksmith with the skills and attention to detail required to make mortise chisels to my specifications. He thinks I’m a prissy pink princess. I think he’s a stubborn old fart. We’re like an old married couple(ツ).
If you need to cut lots of precise mortise holes quickly, then this tool will definitely improve your results and increase your satisfaction. It may not be the most handsome chisel in your toolchest, but you will come to rely on it more than any other for quality joinery work.
Standard widths for mortise chisels are 3mm, 4.5mm, 6mm, 7.5mm, 9mm, 12mm, and 15mm, but Sukezane won’t make 15mm mortise chisels for me anymore, dagnabit.
More than any other, mortise chisels are subtle, intelligent beasties, or at least they can be. I will talk more about what to look for in a good mortise chisel, as well as how to realize their Einstein-like focus to help you do better work, in future posts.
If you have questions or would like to learn more about our tools, please click the see the “Pricelist” link here or at the top of the page and use the “Contact Us” form located immediately below.
Please share your insights and comments with everyone in the form located further below labeled “Leave a Reply.” We aren’t evil Google, fascist facebook, or thuggish Twitter and so won’t sell, share, or profitably “misplace” your information. If I lie may mortise chisels all turn to rubber.
“Life is not a matter of holding good cards, but of playing a poor hand well.” – Robert Louis Stevenson
So, you finished building that fine cabinet, or 8-panel entry door, or carved balustrade and the day has come to install it at the jobsite. Will you need to cut a bit of gypboard or lath-and-plaster while installing it? Might your chisel get jammed against or into bricks or concrete in the process? Will you need to cut a notch in sandpaper-grit filled plywood or OSB? Any hidden screws or nails in the way that might require more than stern words?
Jobsite installations and remodeling often demand work everyday tools can’t accomplish without being serious damaged. At that moment, having a tool tougher than the job is the difference between working and whining. This is that tool.
DESCRIPTION
HSS oiirenomi are a modern variation of mentori oiirenomi made using high-alloy steels tougher and more resistant to abrasion and high temperatures than more traditional steels.
Sukemaru High-speed Steel Oiirenomi
These chisels are useful for doing remodeling work and cabinet and equipment installations where plywood, MDF, OSB, LVL, drywall, acoustic board, insulated board, plaster, mortar, underlayment and studs full of hidden nails, and even ALC (autoclaved lightweight concrete) panels need to be cut, trimmed, fitted or demolished. Demolition…Oh joy (not).
What is High-speed Steel?
So just what is high-speed steel (HSS), and why bother with it?
HSS is a tool steel developed for manufacturing commercial cutters, dies, etc. In this case, Usui-san uses a high-speed steel designated SKH51 in Japan, the equivalent to M2 in the USA, BM2 in the UK, HS6-5-2 in Germany, and Z85WDCV06-05-04-02 in France. This is the most popular HSS in the world. If you own router bits without carbide cutters, and not made in China, you own this steel.
This variety of HSS contains buckets-full of tungsten, molybdenum, chrome, with a stout vanadium chaser.
After oven heat-treat, these chemicals make the steel tougher, more abrasion-resistant, and more resistant to softening (aka “temper-loss”) when subjected to high-temperatures than regular high-carbon steel. Its nickname of high-speed steel comes from the tendency of cutters made from this steel to retain their hardness even when worked so hard blade temperatures become hot enough to draw the temper of standard steel cutters, softening and making them useless.
The chemical composition is listed below, just in case you are interested. You can see what I mean about buckets.
C
MN
Si
Cr
W
Mo
V
0.85%
0.28%
0.30%
4.15%
6.15%
5.00%
1.85%
Chemical composition of SKH51/M2 High-speed steel
Why Use HSS?
The next question arising in Gentle Reader’s exquisitely perceptive mind, no doubt, is “what are the properties of high-speed steel and what difficulties can a chisel made from this special steel help me overcome?” Let’s answer these questions below.
Toughness and Shock Resistance
Perhaps the most significant property of high-speed steel is its toughness. SKH51 (M2) steel is the most shock-resistant of the high-speed steels, making it especially suitable for use in a chisel that may impact hard objects in daily use but must survive without chipping or breaking. This toughness provides huge benefits in the situations described further below.
Abrasion Resistance
Abrasion resistance goes hand-in-hand with toughness, but it is a different characteristic many misunderstand. It does not mean a cutting edge will be sharper than a cutter made of high-carbon steel, only that it won’t wear and become dramatically rounded-over as quickly. In the case of chisels, a blade made from highly abrasion-resistant tool steel will reach a certain level of sharpness (or dullness) and remain at that level a relatively long time allowing a cutter to keep on cutting without becoming useless. But the quality of the cut will decrease, the blade’s ability to cleanly cut weaker woods, and the energy necessary to motivate the blade will of course increase as the blade gradually dulls.
Abrasion resistance is not typically considered overly important in blades where great sharpness is given priority, but it is extremely important when the blade is used to cut materials such as exotic hardwoods that contain silica crystals, or Engineered Wood Products that contain hard adhesives and/or highly-abrasive particles such as silicon carbide deposited by sandpaper, or dirty wood contaminated with sand and grit, contaminants that will literally destroy the cutting edge of a plain high-carbon steel blade making it useless.
Just as a strong truck with a trailer hitch would be at a hopeless disadvantage in a Formula One race, a McLaren MP4/6 with all its speed, power and agility couldn’t tow a heavy trailer 100 yards through the mountains. Horses for courses.
Engineered Wood Products
One major challenge the HSS Oiirenomi excels at overcoming is working modern wood products called Engineered Wood Products (EWP)
Commercial carpenters and cabinet makers nowadays have no choice but to use modern EWP such as plywood, MDF, HDF, OSB, LVL, glu-lams, etc.. Unlike new, clean, solid lumber cut with saws and planed with knives to final dimensions, engineered wood products are comprised of wood veneer, chipped wood and/or sawdust glued together by hard adhesives that will harm standard steel tool blades. HSS handles these difficult adhesives easily.
A bigger problem associated with EWP is the extremely hard abrasive particles left embedded in them by the sanding belts used to dimension and smooth them, particles much harder than any heat-treated steel, that will quickly destroy a good high-carbon steel chisel. Being much tougher and more abrasion resistant than high-carbon steel, HSS can handle this abrasive residue without being destroyed. That does not mean abrasive particles do not scratch and dull HSS cutting edges, it just means they won’t chip or break and will keep on cutting longer than HC steel blades.
Restoration & Remodeling Work
Velkoprevorsky PalaceVelkoprevorsky PalaceBeloved Customer Pavel cutting timber joints using his Sukemaru HSS atsunomi for the restoration of the Velkoprevorsky Palace located in Prague. Notice the tight working conditions. More photos can be found at this link.
Another type of work this HSS Oiirenomo excels at is restoration work, remodeling work, and chisel work around concrete and masonry.
In the case of restoration work, the job usually involves cutting wooden structural members and finish materials that are old and dirty and contain hard abrasive dirt, sand, small stones and of course hidden nails and screws that will not only dull a chisel blade but may badly chip it.
For instance, a Beloved Customer who is a timber-frame carpenter in the Czech Republic was tasked with splicing segments of new timber to replace rotted-out sections of a large number of 400 year-old rafters in a restoration project located in Budapest, an ancient city with many beautiful, old structures. The wood was dirty and full of gravel and broken-off nails that chowed down on standard chisels without pausing for a drop o’ Tabasco Sauce. But this Beloved Customer’s set of our HSS Atsunomi chisels (identical to the HSS Oiirenomi chisels which are the subject of this article only much bigger at 300 (12″) overall length) made it possible for him to cut and fit the timber splices while working on the steeply-slanted roof four-stories above a cobble-stone road without chipping the blade and without frequent resharpenings, as professional timber framing work frequently demands.
Being smaller in size and weight, oiirenomi are often handier than atsunomi for remodeling work and installation work, a job that requires one to cut precise holes through existing wood contaminated with abrasive dirt and hiding screws and nails, as well as lathe, plaster and drywall containing abrasive sand, and in close proximity to mortar and concrete which contains sand and gravel aggregates that will dull, chip and even destroy a standard chisel in two shakes of a lamb’s tail.
If you have ever done remodeling work or an installation that took a chisel to perform, you know the despair one feels when gazing upon the damage done to a beloved tool.
Likewise, during installations, cabinetmakers must make precision cuts in abrasive engineered wood products such as plywood, OSB and MDF. Our HSS Oiirenomi are far more durable than standard chisels with high-carbon steel blades for these jobs.
Plasy monastery by Santinii located near Pilsen, CZ, another historically-important project that benefited from Usui-san’s HSS chisels.
Jigane
The jigane Usui-san uses for his HSS Oiirenomi is a harder version of the standard low-carbon steel he uses for his other chisels. The furniture (katsura (hoop) and kuchigane (ferrule) are made from ordinary mild carbon steel, not stainless steel, despite the bright appearance, and will exhibit corrosion over time. As an option, these two parts can be ordered blackened creating a two-toned chisel some people find attractive.
Heat-treat and Hardness
To prevent chipping, the HSS blade is heat-treated in a special oven in accordance with a prescribed formula to a hardness of Rc63, intentionally a little softer than the Rc64 max hardness listed for this steel. Even then, this is harder than nearly all currently-available Western chisels we are aware of.
The blade’s bevel angle is 30°, the standard angle for Japanese woodworking chisels. You may want to increase this angle to 35° if you will be routinely cutting through hard materials to reduce denting.
Resharpening in the Field
Another huge advantage of Sukemaru’s HSS chisels is that they can be quickly resharpened to a useful cutting edge in the field using angle grinders and/or belt sanders without losing temper and softening, so long as one is careful to keep temperatures below 650°C (1200°F), not difficult to do if one pays attention. Don’t underestimate the efficiency this feature will bring to your work some days in the field. For instance, in the case of the project
The compromise with HSS chisels is that, while they can be made extremely sharp using stones and proper technique, they will never become as sharp as our hand-forged high-carbon steel chisels. Moreover, they will take twice as long to sharpen by hand using conventional wetstones and waterstones. Thus, they are not ideal for all jobs.
Sharpening time can be reduced dramatically by using aggressive diamond plates.
Before I tried my first HSS oiirenomi, I kept a couple of old plastic-handled steel-cap Stanley chisels in my toolkit as “beaters” for cutting gritty, abrasive materials. They were soft and instantly dulled, but their edges would dent instead of chipping and were easily repaired. Poor things; some days they ended up looking more like rounded-over wide-blade screwdrivers than wood chisels. HSS chisels, by comparison, are just the ticket for this kind of brutal work.
We have personally tested these chisels to failure and resharpened them, and therefore are confident of their quality and performance.
Standard widths for high-speed steel oiirenomi are 3mm, 6mm, 9mm, 12mm, 15mm, 18mm, 21mm, 24mm, 30mm, 36mm, and 42mm.
YMHOS
If you have questions or would like to learn more about our tools, please click the see the “Pricelist” link here or at the top of the page and use the “Contact Us” form located immediately below.
Please share your insights and comments with everyone in the form located further below labeled “Leave a Reply.” We aren’t evil Google, fascist facebook or the IT department for the US House of Representatives and so won’t sell, share, or profitably “misplace” your information. May my high-speed steel turn to turtle steel if I lie!
Kakuuchi Oiirenomi by Hidari no Ichihiro (Hyotan mark)
“Do not wait; the time will never be “just right.” Start where you stand, and work with whatever tools you may have at your command, and better tools will be found as you go along.”
George Herbert
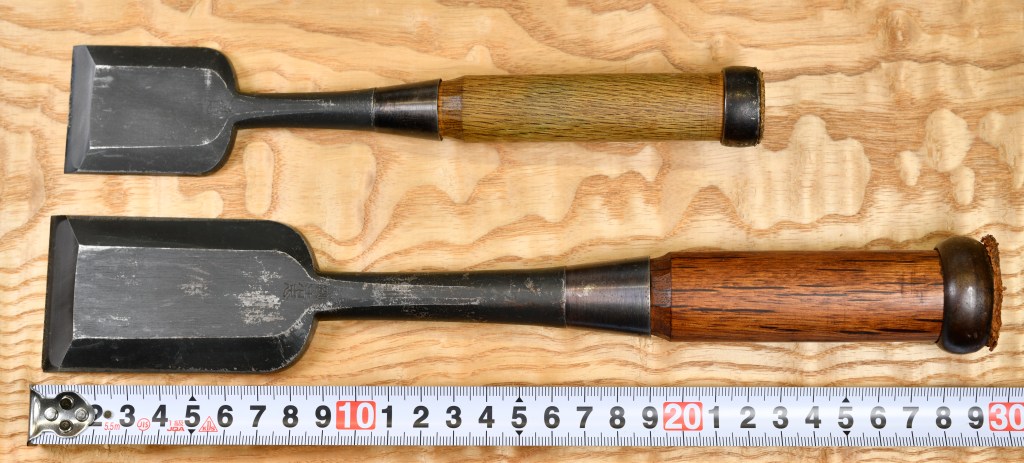
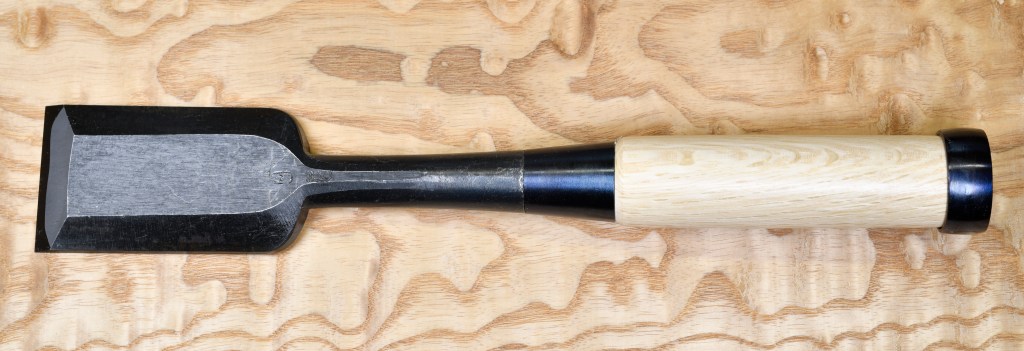
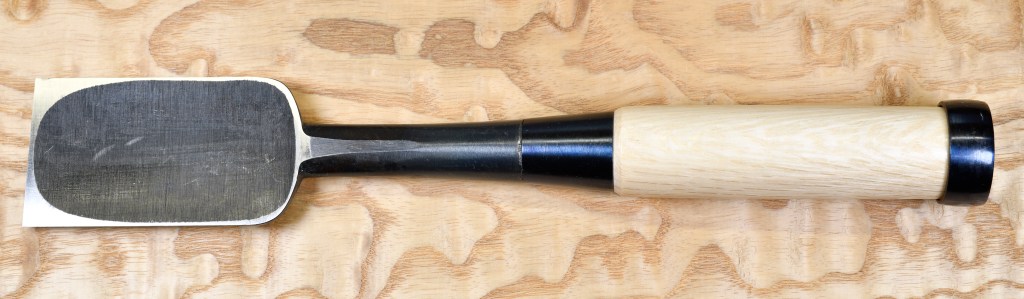
The oldest style of oiirenomi currently available nowadays is called the ”kakuuchi oiirenomi” (角打追い入れ鑿)which means ”square-forged oiirenomi,” referring to the squarish shape. In cross section, the blade is rectangular with 4 more-or-less square outside corners. Other than this cross-sectional detail, it is identical in appearance to the mentori oiirenomi we discussed in my earlier post here.
DESCRIPTION
Where the Shinogi Oiirenomi in the previous post is thin and light, the Kakuuchi Oiirenomi is bulkier and heavier. They are also stiffer in the blade and even in the neck, which can be an advantage in narrower widths.
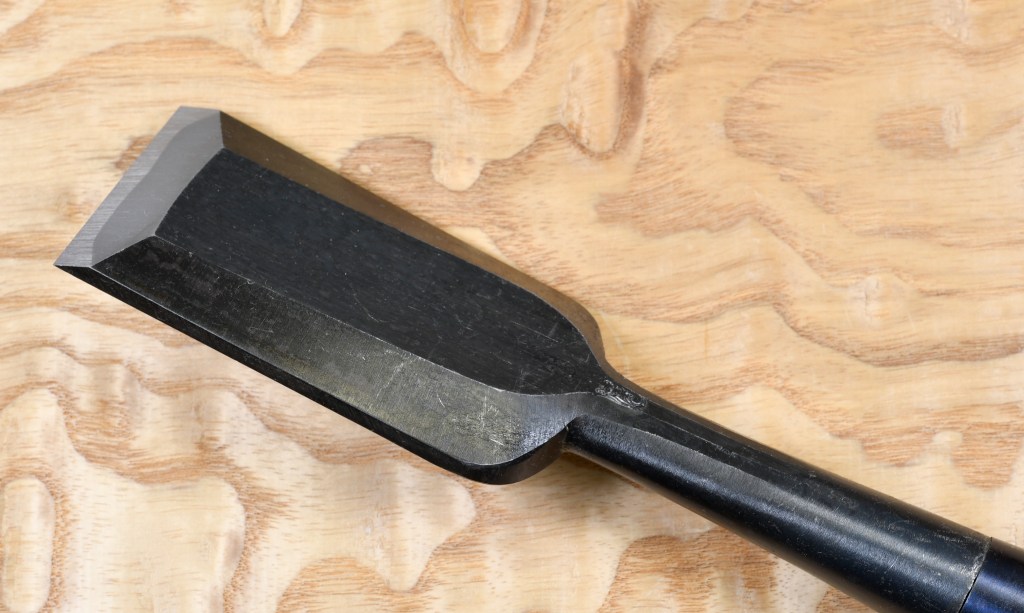
This added stiffness is not due to the extra mass of metal alone, but also to the fact that the steel layer is wrapped further up the blade’s sides than is possible for the thinner beveled sides of the mentori oiirenomi, as you can see in the photos above. Wrapping the high-carbon steel cutting layer up the blade’s softer low-carbon steel sides in this way creates in effect a hardened steel “U” channel with an increased moment of inertia, which makes the blade much stiffer. The thicker the chisel’s sides, and the deeper the U channel, the stiffer the blade will be.
The U-channel construction of Japanese chisels is a clever but subtle structural detail unique in the universe of chisels and one few are aware of.
Carving chisels do not have this U-channel detail and therefore are not as stiff or as tough as chisels that do. When you are considering buying a chisel, this is an important feature to confirm.
This style of chisel is better suited to cutting mortises than mentori oiirenomi (beveled oiirenomi), not simply because they are stronger, but because the squarer side edges tend to keep the blade better aligned in the mortise hole leading to a cleaner cut with a little less effort, especially in contrary wood.
The following are some pictures of two of our Kakuuchi Oirenomi by Nagamitsu, hand-forged, of course, from Hitachi Yasugi Shirogami No.1 Steel (aka “White Steel).
36mm Kakuuchi Oiirenomi by Nagamitsu (face)36mm Kakuuchi Oiirenomi by Nagamitsu (ura)36mm Kakuuchi Oiirenomi by Nagamitsu (Side)12mm Kakuuchi Oiirenomi by Nagamitsu (Face). This was the standard shape of Japanese chisels until about 70 years ago when the mentori variety became popular. Please notice how the angle between the face (surface with brand) and right and left sides is more or less 90˚.12mm Kakuuchi Oiirenomi by Nagamitsu (Ura)12mm Kakuuchi Oiirenomi by Nagamitsu (Side)
Kakuuchi chisels take less time for a blacksmith to shape than the mentori oiirenomi we discussed in Part 2 of this series. The difference in shaping these two styles of chisels is the added step of grinding the extra bevels that make the mentori oiirenomi sleeker.
Indeed, most styles of Japanese chisels can be obtained with a kakuuchi cross section, including the oiirenomi version shown in my previous post, as well as atsunomi and usunomi chisels we will examine in future posts.
Kakuuchi-style chisels take a little more effort to sharpen because the area of the bevel is larger, and more significantly, the area of the hard steel layer is greater, but on the other hand, they feel more stable on the stones.
More than a preference for greater weight, stiffness and stability, I suspect most individuals who prefer this old-fashioned style of chisel are making a fashion statement, something like “brogues not oxfords,” if I can adapt a movie quote.
In my opinion, they are not quite as elegant in appearance nor as handy as either the mentori oiirenomi or shinogi oiirenomi referenced in previous posts, but they do have undeniable dignity and presence.
What do you think?
YMHOS
If you have questions or would like to learn more about our tools, please click the see the “Pricelist” link here or at the top of the page and use the “Contact Us” form located immediately below.
Please share your insights and comments with everyone in the form located further below labeled “Leave a Reply.” We aren’t evil Google, fascist facebook, or thuggish Twitter and so won’t sell, share, or profitably “misplace” your information. If I lie may my dignity perish and my diapers leak.
“The best investment is in the tools of one’s own trade.”
Benjamin Franklin
The next variety of oirenomi we will look at is called the ”shinogi oiirenomi” (鎬追入鑿).
Shinogi Oiirenomi – Nagamitsu 長光
Shinogi (鎬) means ”ridge” as in the angled ridge of a rooftop or mountain. It is pronounced “she/noh/gee.” I believe the word was borrowed from the sword world where it refers to an angled ridge design on the back edge of Japanese swords (shinogizukuri 鎬造り). This detail is used not only in tatakinomi but in tsukinomi as well.
Two Angles of Sword Shinogi
Blade Cross-section
View of Sword’s Shinogi and Hamon
Shinogi oiirenomi are beveled like mentori oiirenomi but are different in that the bevels extend all the way to the center line of the blade’s face creating a definite ridge. The thickness of the blade’s right and left edges is typically thinner than oiirenomi making it easier to get into tight corners.
I am very fond of this handy, lightweight style of oiirenomi and keep a 10pc set mounted to the inside of my toolchest’s lid.
The downside to this design is that the chisel blade loses some stiffness compared to other styles, so they are less than ideal for heavy-duty wood hogging.
Some call these ” umeki” or ” dovetail” chisels. Indeed, some blacksmiths will grind the bevels to a very thin edge for this purpose.
My blacksmiths will not create these thin edges for three reasons: First, shinogi oiirenomi are not all that rigid to being with, and thinning the sides further is inviting breakage. Second, warpage is especially difficult to control in thin cross-sections resulting in more rejects and increased costs. And third, people always cut themselves badly using chisels with sides made thin enough to actually fit dovetails. Neither my blacksmiths nor I want that responsibility.
Most umeki chisels do not have the thin sides most people expect.
If you need very thin, sharp sides, you should grind and polish the side bevels yourself. Don’t forget to keep a first-aid kit close by, one you can use with just one hand. Seriously.
Shinogi oiirenomi are available in the same widths as oiirenomi.
In the next post I will introduce an old-fashioned but still useful oiirenomi called the “kakuuchi oiirenomi.” Stay tuned.
YMHOS
If you have questions or would like to learn more about our tools, please click the see the “Pricelist” link here or at the top of the page and use the “Contact Us” form located immediately below.
Please share your insights and comments with everyone in the form located further below labeled “Leave a Reply.” We aren’t evil Google, fascist facebook, or thuggish Twitter and so won’t sell, share, or profitably “misplace” your information. May all my blades dull if I lie!
42mm Mentori Oirenomi by Hidari no Ichihihiro, a beautiful sculptural chisel by a renowned blacksmith, Mr. Yamazaki (RIP)
The Oiirenomi (pronounced oh/ee/reh/noh/mee) is the most common variety of Japanese woodworking chisel, and the style best known both inside and outside Japan. There are several varities of oiirenomi made, but in this post we will examine the most popular one called the ”mentori oiirenomi” ( 面取り追入鑿) meaning ” beveled” oiirenomi.
DESCRIPTION
As your most humble and obedient servant mentioned in the previous post in this series, “nomi” means ” chisel” in the Japanese language, but the term ”oiire” 追入れ” is not so straightforward. I am uncertain of the origin of this word, but some hints of the original meaning may perhaps be deduced from the Chinese characters used to write it: ”Oi” 追い meaning ”to chase” or ” to follow,” and ”ire” 入れ meaning ” insert” or ”place in.”
As the name suggests, this chisel’s face is beveled at both sides making it lighter and better able to get into tight locations than the bulkier kakuuchi oiirenomi, the older forerunner of this chisel, which we will examine in a future post.
I think most people agree that the two bevels moving up the blade, curving around the shoulder, and feathering into the neck give this chisel a sculptural, elegant appearance. While these bevels do indeed make this chisel handier and better able to access tight spots, they also sacrifice some stiffness, and authority compared to the kakuuchi style. But clearly, these compromises are acceptable to most consumers.
APPLICATIONS
A member of the tatakinomi family, it is designed to be struck with a steel hammer and has a hoop (called a “katsura” in Japanese which means “crown”) on the handle’s end to prevent it from cracking.
There are larger types of tatakinomi called atsunomi better suited than the oiirenomi to heavy cutting and wasting wood in applications such as timber frame joints, and most of those share the same mentori bevel detail, but oiirenomi are handier and better suited to lighter tasks such as furniture work and interior installation work the same as Western bench or butt chisels.
Oiirenomi in general and mentori oiirenomi especially are light-weight, relatively inexpensive, and handy to use. All woodworkers in Japan own at least a few of these.
Materials and Manufacturing Techniques
Our oiirenomi are hand-forged by traditional self-employed blacksmiths each with more than 40 years of experience working in their self-owned one-man smithies. They are stubborn gentlemen absolutely dedicated to quality.
These blacksmiths use onlyHitachi’s Metal’s Yasugi Shirogami No.1 Steel (aka “White Label Steel”) for the cutting edge, a plain, exceptionally high-purity, high-quality, high-carbon steel that does not contain significant amounts of chrome, molybdenum, nickel, vanadium, or tungsten, chemicals which are added to nearly all commercial tool steels to make products easier to mass-produce by factory workers (instead of more expensive skilled blacksmiths) with fewer rejects. These alloys add considerably to the cost of the strip steel, while resulting in a finished product that will not become as sharp as Shirogami steel, will not hold a sharp edge as long, and will be more unpleasant and more time-consuming to sharpen. If you have the sharpening skills, then Shirogami No.1 is a steel you should experience.
The blade of this chisel combines a strip of this high-carbon steel forge-laminated to a softer low/no-carbon steel body and neck. During heat treatment the high-carbon steel layer becomes very hard, but the low-carbon steel body and neck remain relatively soft. In use, this construction protects the more brittle steel from breaking, which is what would happen if the entire chisel was made of one piece of steel hardened to the degree Japanese professional woodworkers demand. It also makes it easier to sharpen the hard cutting edge, a task that would be difficult if the blade was all the same hardness. Please see this page, this page, and this page to learn more.
Our blacksmiths perform a minimum of 3 heats to each blade while using hammers and spring hammers to forge this special steel. This “hand-forging” process, combined with special heat-treating techniques they have perfected over many years, such as multiple quenchings, the application of temperature modulating clay coatings, normalization and low-oxygen carbon soaks produces a “fine-grained” steel of the sort that has been coveted by professionals for tools and weapons since ancient times.
The final hardness is between 65~66 on the Rockwell C hardness scale. Most Western Chisels are softer at 55~60 HRc. This extra hardness makes the blade stay relatively sharper longer, and the fine-grain crystalline structure of the steel ensures each blade will become sharper without sacrificing durability.
These are professional-grade tools made by craftsmen in their own smithies, not factories, and are intended to meet the severe performance expectations for Japan’s most uncompromising woodworkers, unlike the mediocre-quality but attractive-looking “hardware-store-grade” chisels peddled inside Japan to the amateur market, and outside Japan to the uninformed. How much bacon do you like with your sizzle?
Availability
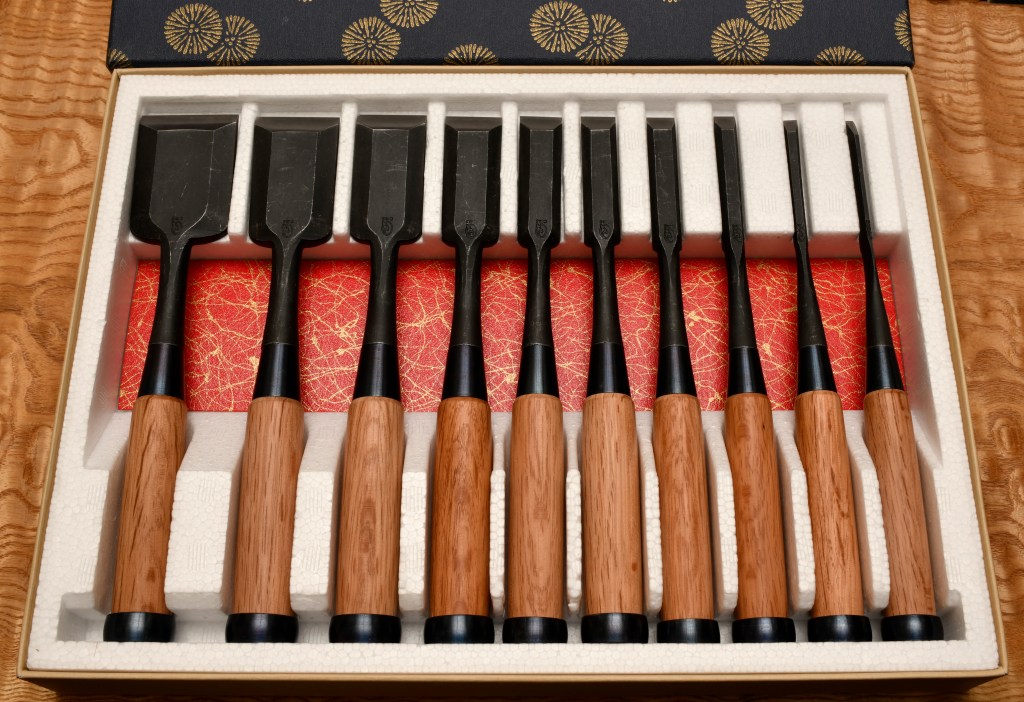
Our oiirenomi are available individually, or in discounted 10 piece sets with Japanese Red Oak or White Oak handles. Standard blade widths are 3, 6, 9, 12, 15, 18, 24, 30, 36, 42mm. 48mm and 54mm are available custom-order.
We usually have all varieties in-stock ready to deliver, but as the blacksmiths that can reliably produce these handmade products are few, and are becoming fewer every year, there are occasionally times when our stock is low. We apologize for any inconvenience that may result and humbly beg your kind understanding.
Our Sukezane brand 42mm oiirenomi with Japanese Red oak Handle. Face ViewOur Sukezane brand 42mm oiirenomi with Japanese Red oak Handle. Ura ViewOur Sukezane brand oiirenomi 10pc box set with Japanese Red oak Handle. Also available with White Oak handles
If you have questions or would like to learn more about our tools, please click the “Pricelist” link here or at the top of the page and use the “Contact Us” form located immediately below.
Please share your insights and comments with everyone in the form located further below labeled “Leave a Reply.” We aren’t evil Google, fascist facebook, or thuggish Twitter and so won’t sell, share, or profitably “misplace” your information. If I lie may I swallow a thousand needles.


Please Leave a Reply