The Japanese Gennou & Handle Part 23 – Finishing the Job

A man in love is incomplete until he has married. Then he’s finished.

– Zsa Zsa Gabor

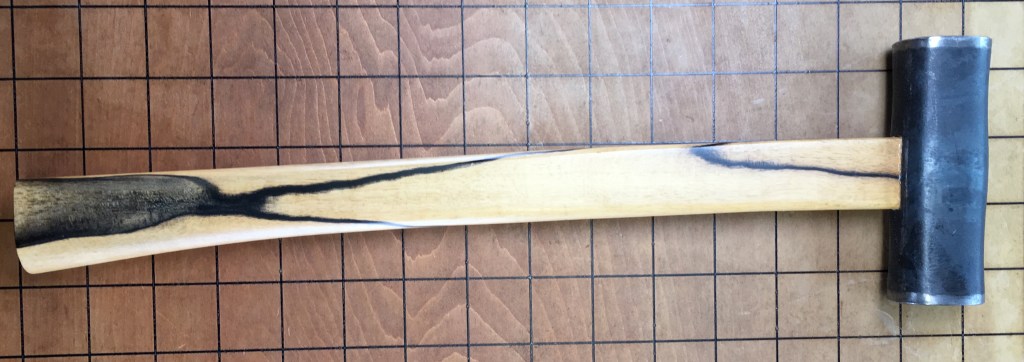
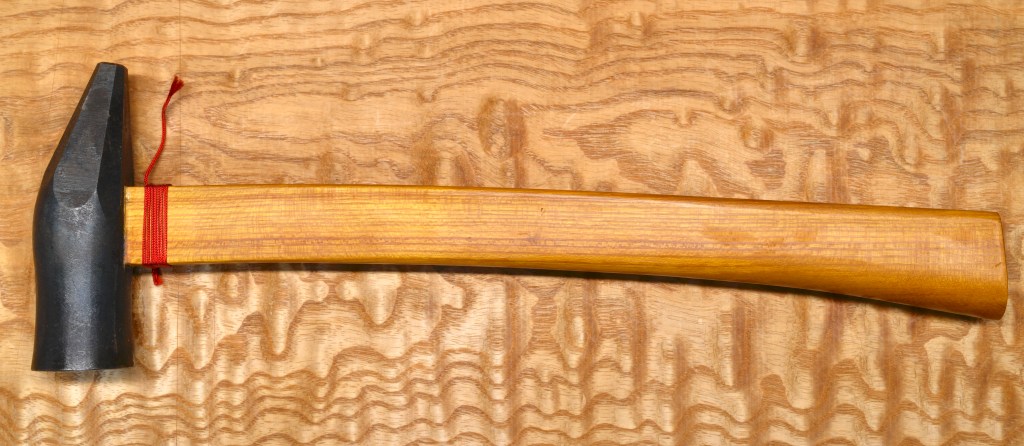
This is the last article in our series about designing and making a handle for a Japanese gennou hammer.

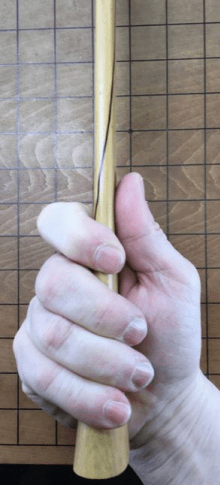
In previous articles in this series Beloved Customer completed designing, shaping and fitting the handle of your gennou hammer and attached the head. Then you tested it and perhaps made adjustments. Assuming Beloved Customer is satisfied with the results of those adjustments, at least for now, the time has come to sand it and apply a finish.

Finishing Options

There are a couple of approaches your humble servant might propose on the subject of finishing tool handles. The first is perhaps the oldest, and easiest, and that’s to do nothing. After all, tools are made for hands not museums, and flashy finishes too often make otherwise honest, workmanlike tools look silly.

In addition, most woods (except for those that might cause allergic reactions) perform just fine unfinished, thankee kindly. In this “au natural” approach, you may choose to leave tool marks on the surface of the handle without sanding them into oblivion, lending your handle undeniable gravitas and dignity, even character.

If the au-naturel approach appeals to you, I recommend erasing marks left by files and rasps and replacing them with crisp marks and cleanly cut surfaces left by sharp edged tools like knives, carving tools, and spokeshaves.

An unsealed, unfinished handle will, however, unavoidably become stained and discolored, and it’s head may not stay attached as long as a well-sealed, well-finished handle. I say this from experience.

Unless a chemical sealer/finish material is applied afterward, a plain sanded finish is probably the worst surface treatment possible, whereas a surface cleaned with sharp blades will serve you better. I often use this texture for the endgrain butts of my hammers and saws.

A convenient and expensive light-duty finish material for an au-natural handle is a quality non-slip floor paste wax like Johnson’s well-known product in the yellow metal can. Does it seal the wood? No, but it does help keep the handle looking cleaner. Why floor paste wax? Some waxes, for instance those used to polish furniture and automobile paint, are intended to provide a slick surface that encourages water to run off and to which dirt doesn’t adhere well. History has shown that slippery waxes used on floors will result in slips, falls, and a transfer of wealth to the legal profession. Accordingly, carnuba automotive wax is not ideal for tool handles, while non-slip floor wax is, IMHO.

And then there are the chemical finishes such as linseed oil (BLO), milk finish, tung oil, shellac, varnish, lacquer, polyurethane, etc. To one degree or another, these chemicals tend to seal the wood reducing the penetration of dirt and oil, and (sometimes) slowing the movement of moisture into and out of the wood.

But what chemical finish is best suited to a gennou handle? It is far beyond the scope of this humble scribble to properly describe, much less evaluate, the many varieties of finish applied to wood, so I will simply provide a few comments.

Linseed oil and BLO, a by-product of the flax plant, are organic materials used for centuries if not millennia as a traditional finish in Europe. It was once used widely for paint and, until it was replaced by rubber and later petroleum products, flooring and waterproofing materials. Have you heard of “linoleum” floor tiles? They were once extremely popular covering thousands of square miles of floors, including the floors of every school I ever attended, and for a long time most of the offices I worked in as an adult. The death of these floor tiles, however, was the unfortunate practice of mixing in asbestos, a decidedly hazardous material. Of course, this was back in the day when lead was a common ingredient in paint and even makeup.

I had thought linoleum had gone the way of disco, but on a recent project here in Tokyo I learned that not only are floor tiles made from linseed oil still available commercially, but the equivalent of “sheet vinyl” floor covering made of linseed oil is too. It still has that smell of processed linseed oil I remember from my deranged youth, but without the asbestos filler.

Linseed oil no longer has much value as an applied finishing material for wood because it never really dries without adding problematic, even toxic, chemicals called “driers,” it seals poorly, collects dirt, and discolors badly over time. But because it’s constantly mentioned in old writings, which many people trust just because they are old, linseed oil products are still in-use today.

To advocates of liquid linseed oil finishing products I say “make sure you soak your oily rags in water and dry them outside well away from any fuel (like your house).” You’ve been warned.

I am a fan of the modern milk paints, but do not like them for tool handles. Nonetheless, it’s a valid option.

Tung oil is an ancient finish, but the price nowadays far exceeds its value, assuming you can even find an unadulterated source. The immoral and corrosive CCP corrupts so much that was once good.

Shellac creates a beautiful surface coating but it’s far too delicate for tool handles.

Standard synthetic varnish, nitrocellulose lacquer, urethane and polyurethane are readily available, easy to use and can create a beautiful, durable finish, but when used in the traditional manner, the surface film coating they produce eventually chips and cracks with time, exposure to ultraviolet light, and expansion and contraction of the wood to which they have been applied. And every scratch accelerates this degradation.

Why is degradation of film finishes the a problem you say? The obvious downside of a once beautiful finish looking ratty aside, every defect in a surface film finish promotes the movement of moisture into and out of the wood, and of course increases the swelling and shrinkage of the wood it’s intended to protect. What most people don’t realize is that, as time goes by, the solvents and compounds in film finishes intended to provide flexibility in dealing with expansion and contraction of the wood dissipate causing the finish to gradually become more brittle, and break down, crack and peel at a ever-increasing rate, independent of dings and other defects.

In modern times, the use of latex rubber in water-based paints has greatly reduced this problem, but such paints are not especially durable as a tool handle finish.

Sanding

If you prefer a smoother finish, and are prepared to apply a chemical finish, then by all means sand away. But please do not sand the tenon. If you decide to sand the handle before installing the head, please apply masking tape protection to the tenon.

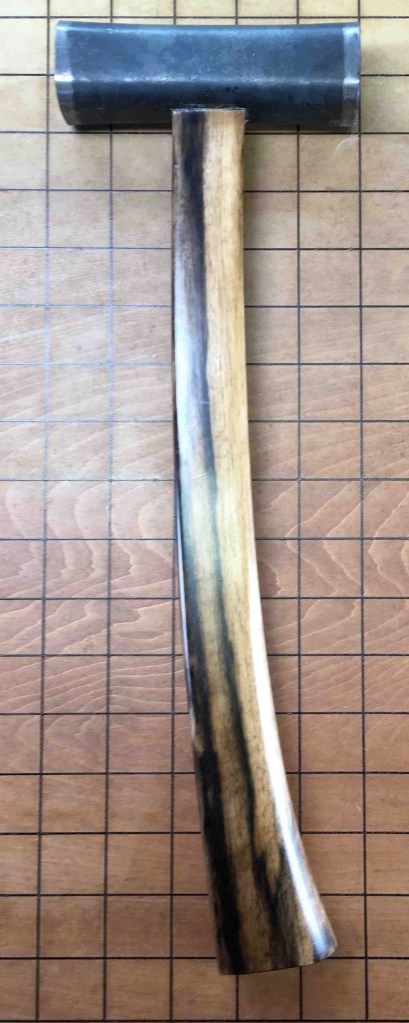
How fine should you sand your handle? I think 600 grit is fine enough, but I’ve gone as high as 1200 grit on fine-grained, hard woods like black persimmon. Did using such fine sandpaper make a difference? Nah.

After you’ve sanded the surface to where you like it, the next job is to eliminate hidden hairs. No, this does not involve applying hot wax to delicate areas of the body and then violently ripping out body hair so that you look delightfully-sleek in your new sequin string bikini, but rather it’s the job of encouraging the naughty ends of wood fibers still connected to the handle, but currently pressed flat onto and into the handle’s surface, to stand up so we can cut them off using sandpaper.

Dealing with these fiber is always important when finishing wood because, with time and moisture, they may pop up over time creating rough patches in the finish encouraging degradation. Once they are standing and no longer hidden, we can cut them off at the base with sandpaper to create a durable, smooth surface long-term even when exposed to moisture and sweat.

Although it’s not used much nowadays, sanding sealer was originally a shellac product developed specifically for this purpose.

To raise hairs, lightly wet the handle’s surface (but never the tenon) with water and allow it to dry completely. Some hasty people like to dry the wood quickly with a forced-air blower or even propane torch at this point to make any loose fibers stand up immediately in preparation for the next sanding pass. But simply allowing the wood to dry naturally is effective too.

This is an ancient, very effective technique. Please do this at least twice, after which you can apply the finish material of your choice.

Kanō Hōgai, Two_Dragons_in_Clouds (1885), ink on paper. Philadelphia Museum of Art. Father and son dragons are depicted playing in the clouds.

The London Finish

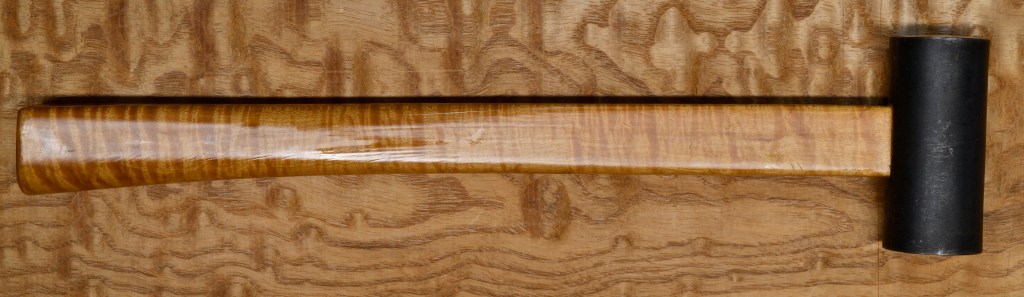
There’s a durable wood finishing technique I learned from custom gunstock makers that I wrote about in an earlier article about handplanes called the London Finish. This is the finish I recommend for hammer handles too. It can be as subtle or as flashy as you like.

A pretty handle is nice, but the key objectives for applying a finish to your gennou handle should be (1) to moderate swelling and shrinking of the tenon during seasonal and climactic changes in humidity; and (2) to prevent oil and dirt from penetrating the wood making it look grubby. This matters because such swelling and shrinking can cause the head of your gennou to loosen and do naughty, acrobatic stuff at inconvenient times. And a greasy, dirty handle is no way to treat a friend.

If the head is attached when applying the chemical finish of your choice (I recommend it be so), please tape it well to keep finish off the metal. Apply masking tape to the hammer head on all four sides of the eye, but leave the end of the wooden tenon exposed.

Tape the rest of the head well with masking tape.

Soak the finish material (flat varnish or polyurethane thinned 100% with high-quality thinner) into the eye and the butt as deeply and thoroughly as possible. Plan for three or four applications allowing time for the material to soak in and dry.

Do no use low VOC thinners as they contain politically-correct compounds of water, acetone, emulsifiers and other counterproductive substances the State of California’s poorly-educated but thoroughly-conflicted and richly-corrupt environmental lawyers have determined will save the polar bears while crippling the State’s industry, but that will weaken the finish.

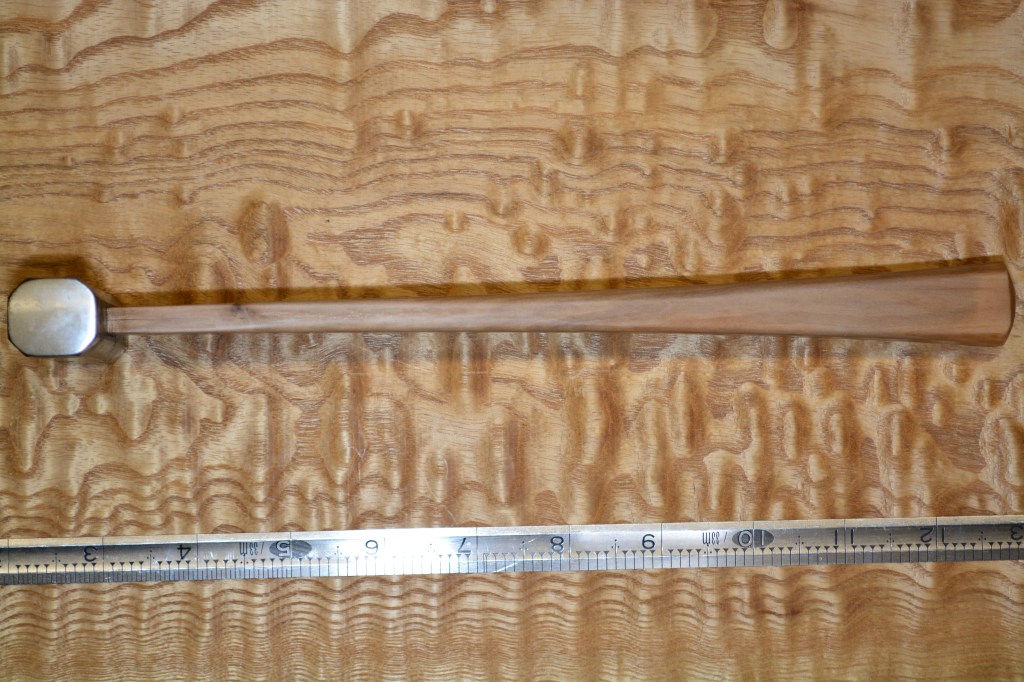
If you faceted the butt and want to keep it that way, you must be careful when sanding it or the facets will disappear. This is a matter of personal preference.

Of course, be sure to apply lots of finish to other surfaces of the handle, and wet sand them well as described in the article linked to above. Don’t allow a surface film to dry except for the first time as described in the webpage linked to above.

Hammers are lifelong tools, but too often handles are not. You can help your gennou’s head stay tight longer, and the handle stay cleaner and look better longer by applying a London Finish instead of a thick surface film finish.

I hope this series of articles has been useful. I’m certain the lifetime friend you will make by following this tutorial will be grateful for your kind diligence.

YMHOS

A fairy princess discussing the best lures for trout fishing with her friendly blue bird. I wonder which brand of outboard motor fairies prefer…

If you have questions or would like to learn more about our tools, please use the questions form located immediately below or email us at Covingtonandsons@gmail.com.

Please share your insights and comments with everyone in the form located further below labeled “Leave a Reply.” We aren’t evil Google, incompetent facebook, or gossipy X and so won’t sell, share, or profitably “misplace” your information. Promise.

A list of our gennou heads: C&S Tools – Gennou Hammer Head Pricelists & Photos

Previous Posts in The Japanese Gennou Hammer & Handle Series

← Back

Thank you for your response. ✨

Leave a comment

The Japanese Gennou Hammer & Handle Part 22 – Tasting the Pudding

True perfection is unattainable, but if you chase perfection you will catch excellence!

Vince Lombardi

In previous articles in this series about a craftsman-made gennou hammer handle, we discussed how to design and make a handle to fit Beloved Customer’s body and way of working. This article assumes you’ve mostly completed your handle, attached the head, and are now ready to test it. So let’s get started.

Why Testing Matters

I don’t know about you, but after all the research, design and fabrication work we’ve invested in your gennou handle, I need to see how it performs and determine if its performance is superior to a Minion impaled on a stick. Being a Beloved Customer and therefore highly intelligent, you’ve asked yourself the following three indubitably perspicacious questions about testing.

  1. What can I learn from testing?
  2. Against what performance standards should I compare my most excellent new hammer handle (besides to a Minion on a stick)?
  3. How should I conduct that evaluation?

To perfect your hammer, you will need the answers to these questions and more. You can get them over years of use, or get many of them now by testing it in a methodical manner and paying attention, but one way or another, you must get answers, bro.

Desired Testing Results

We can learn several things from testing our gennou with its new handle, but I encourage you to do your best to ascertain the following two things at minimum.

The first thing, of course, is whether or not the hammer with its new handle is comfortable and stable to use, and if possible, what needs to be improved to make it more stable and comfortable. This may entail many small details depending on your requirements and powers of perception.

Whether it’s comfortable in-use or not is subjective and entirely up to you, but you can probably identify problems easily through this testing process. Pain, soreness and blisters and the lack thereof are solid indicators (ツ).

Whether or not it’s stable in use is another important thing to determine early. Does it tend to track straight on the downstroke, or does it want to twist off your intended path of travel striking chisel handle or nail head erratically? When it hits the chisel or nail, does it convey its energy into the target smoothly, or does it wiggle like an eel on a hook on impact?

An unstable head and handle combination may perform well for one or two consecutive strikes, but because Murphy’s Law of Buttered Toast irrevocably dictates that small errors accumulate to maximize damage, an unstable head will often wiggle off-line enough for the third swing to hit weakly, even miss entirely, ruining your rhythm, damaging your confidence, and eliciting snide looks from resident bench cats. Oh, the shame…

A second thing you need to learn is whether or not the face of the hammer is striking the chisel/nail squarely and if the center of mass of the head is aligned with the vertical axis of the chisel handle or nail. Please make sure you understand the meaning of the previous sentence.

With this experience and the answers to these questions under your belt, you will be in a position to adjust the handle to perform its best for you and the way you work.

Testing Procedures

Out of an abundance of well-deserved humility combined with a strong desire to avoid looking even more the fool, your humble servant will refrain from suggesting any specific objective tests, or urge you to use quantifiable standards, or seek concrete empirical results because that would be too silly to even contemplate. Unless, of course, Beloved Customer will conduct these tests in your super-secret laboratory, possibly located at the heart of a dormant volcano on an uncharted South Pacific island, maybe covered by coconut palms with cold beer taps, probably surrounded by hundreds of horny bikini babes, likely frolicking in crystal surf. BTW, if you do have such a lab, please text me the address!

In this super-secret lab you will probably have access to equipment and software suited to more scientific, empirical, replicable methods of comparison, such as those developed for analyzing and improving the apparent performance, marketability and profitability of mass-produced sports equipment such as baseball bats, golf clubs, and green dildos (シ). Sadly, while your humble servant does not possess such equipment, most (but not all) humans own and operate one of the world’s most refined super-computers and sensor networks: our bodies and brains. I therefore propose you focus these formidable tools on this analysis. (brains and bodies, that is, not dildos).

Below are four absolutely subjective tests only you can perform, the results of which only you can evaluate.

Incorporating Test Results

To thwart the confusion promulgated by Murphy and his multitudinous malevolent minions, I strongly recommend you use the results of your analysis to guide you in making incremental improvements to your handle over time rather than large changes immediately, so to that end, please plan to remake your handle, once, twice or even thrice, improving it a little each time. Such is the true path of the craftsman.

Please update your handle drawing each time to record the improvements you’ve made and ensure no “increments” are misplaced.

In scobe veritas. (“In sawdust, truth”).

The Grip

As you are aware, for any testing other than drinking beer or women choosing wall paint color to be meaningful, some basic techniques must be established and followed to reduce variables to a manageable degree. How you hold the gennou handle to be tested is just such a basic technique.

The handle design presented in this series of scribbles is intended to work best when gripped in a particular way, so when performing the following tests, it’s important that you grip the hammer correctly thereby removing one huge, often-problematic variable.

Of course, I’m describing a particular grip here as being “correct,” but that’s just my well-informed opinion. In any case, I promise your hammer will work more efficiently if you abandon the so-called “hammer grip” (what I call the “Hobbit-killer” grip with the handle grasped in your fist) right away and switch to this more advanced grip.

I didn’t invent this grip, BTW, but observed and consulted with craftsman I respected in the USA and Japan who used it for many decades, all of whom are now working overtime in the big lumberyard in the sky. I later came to call it the “Sam Snead grip,” after the extremely successful pro-golfer of the same name who made it famous, and him rich, in tournaments and in dozens of books he wrote on the subject of using golf clubs skillfully.

We’ve talked about this grip in some detail in Part 13 of this series, but please review the photos below to confirm your understanding.

The first photo labeled “Bridging the Palm” shows how the hammer’s handle is NOT held in a fist, but is angled diagonally across the palm, supported on the first joint in the index finger, as well as the heel of the palm.

You can see how the index finger wraps around the handle while the thumb is pressed against the side so that the handle is strongly clamped between index finger and thumb, but can still pivot the handle if the operator so desires. This grip affords the joints of the forefinger and thumb, digits accustomed to fine motor control (unlike the fist), absolute control over three critical surfaces of the handle.

This grip also provides better control, more power, and greater reach without forcing the wrist to do the strange, unnatural contortions the Hobbit Killer grip does.

The Three Tests

Following are three tests to help you ascertain how well your new gennou and its handle suits your body and your work style.

Before attempting these tests, however, it is important to use your new handle for a time to establish a connection between it, your hand, and your eye (using the proper grip, of course).

Besides moral virtue and a sense of humor, you will need a few things.

  1. A wood chisel suitable for cutting a mortise hole, around 24mm.
  2. A piece of light-colored scrap wood for cutting a test mortise hole;
  3. A stick of light-colored wood approximately the size and shape of the handle of the chisel you would normally use for cutting mortise holes:
  4. An ink pad, wide-tip marking pen, or Dykem.
  5. A lab assistant. I recommend a buxom, young lass with a cute giggle wearing a sexy lycra lab uniform (Warning: bad stuff may happen if you let She Who Must Be Obeyed meet, or even see, this assistant!)

So, now that we have our supercomputer and its sensor suite warmed up and focused, our tools laid out, and a bubbly lab assistant standing by, sound the trumpets and let the testing begin! We who are about to dye salute you!

Test No. 1: The Blind Retrieval Test

After you have used your gennou with its new handle for a few weeks such that your hand has become accustomed to it, please give your bench dogs a few treats, shoo away any arrogant bench cats, set it on your de-cluttered bench, step back a few steps, close your eyes and turn in-place once or twice like a ballerina with hairy legs. Now, have your lab assistant, perhaps a child, a friend, a neighbor, your girlfriend, or wife, or even a clever bench dog (but never your neighbor’s girlfriend’s wife’s cat!) change the gennou’s orientation on your benchtop by turning it over, switching it end for end a few times, spinning it, or whatever. Random orientation is what’s needed.

Next, with your eyes still closed, grab the gennou with your hammer hand in a correct grip ready to rock-n-roll. Notice how easy or difficult it is to grip the handle correctly, without fumbling and without opening your eyes. If it’s not easy to do, however, you need to know it now. It may be simply that you’re not accustomed to your hammer, or that the geometry or details are out-of-wack.

By “correctly” in the previous paragraph, I mean (1) the flat striking face of the head is facing away from you and toward the chisel or nail; (2) the handle and head are aligned straight in your hand, and not twisted, (3) the heel of your hand is pressing against the flat spot on the back edge of the handle adjacent the butt; (4) the distance from the center point of the face to the heel of your hand is located precisely the distance shown in your design drawing.

BTW, whether you picked up the habit from your daddy or some internet guru, choking-up on the grip is an inefficiency you should discard simply because it’s counterproductive and silly, like a powerful cane corso dog wearing flower brocade.

If the grip area of your handle is shaped as shown in the drawing with a flat back edge and sides perpendicular to it, a radiused front edge, and flared toward the butt, it should be easy to instantly grip the handle in precisely the proper place, with the intended striking face oriented properly, without opening your eyes and without any fumbling whatsoever. 

If, on the other hand (the one with six fingers (ツ)), your hammer doesn’t leap into your hand in perfect alignment without argument or eyeball action, some adjustments to the handle are called for.

For example, a frequent cause of confusion between handle and hand is the leading edge of the grip being square instead of rounded. Or the sides and butt of the handle being angled wrong. These details can all be adjusted once you know they need to be adjusted

A gennou that naturally orients itself in your hand with the striking face in the right direction, the same distance from the striking face first time every time without your having to look at it, will provide you a tremendous advantage in speed, efficiency and confidence. It will become a good friend and companion.

BTW, just for gits and shiggles, try this test with any name-brand one-size-fits nobody nail bender you have laying around. The virtues of your new handle will become immediately apparent.

Test No. 2: The Blind Swing Test

This test will teach you something about handle length and other details.

Once again, perform this test after you have used the gennou with its new handle for some time and have become accustomed to it. A sexy lab assistant (one who doesn’t talk too much) in slinky woodworking togs is optional (ツ).

Grip the gennou properly in one hand and the stick shaped like your chisel handle in the other just as you would an actual chisel. But instead of placing the end of the stick against something as if you might cut it, please keep the stick in the air without butting it against anything. Now, with your eyes still closed, swing the gennou at the end of the stick of wood.

You should be able to strike the stick with the flat end of the gennou solidly and squarely on the first, or perhaps second try. Success in this test is common.

If your hammer misses the stick consistently, it may be because you aren’t yet accustomed to the handle, or it may be that you are choking-up up on the grip, or it may be you need to make it shorter or longer, or the grip shape needs to be adjusted. Or it may be that Murphy keeps distracting you by sending dickpics. It’s absolutely worth figuring out.

Once again, if you consistently miss the target, pay attention to why and where you are missing. Is the handle too long? Is it too short? Are you missing off to the side? Make notes recording the results and your observations on the design drawings to incorporate into your Mark II handle.

If accuracy can be improved by shortening the handle or modifying the grip, go ahead and make the necessary changes a little at a time. It’s easy to shorten the handle, but lengthening one requires an ACME Wood Stretcher Mark 2. I can lend you mine if you don’t have one (ツ)

Test No. 3: The Ink Test

Never fear: this test has nothing to do with gossip screeds or Rorschach drawings. It will help you determine if the handle of your gennou is the right length, if it is cocked at the most effective angle, and whether or not it should be canted to the left or right, and all without pulping an innocent tree.

This test works best if preformed after the Blind Retrieval Test and Blind Swing Test.

Begin by coloring the striking face of your gennou with an ink pad or by applying dark marking pen ink or Dykem to the gennou’s striking face (the flat face). Clean or sand the end of your chisel’s handle to produce a clean, white surface. Then cut a mortise using this gennou in the same posture you assume when cutting most of your mortises.

For instance, if you mostly cut mortises in wood located at a constant height on your workbench, such as drawers and furniture parts, you should employ that position. Or, if you tend to cut mortises in timbers while sitting on or straddling them using the venerable butt-clamp, please assume that position.

The impact with the chisel’s handle will wipe ink off the face of hammer and deposit it on the end of the chisel’s handle at the same time. This ink transfer will print the story you need to read. Check the ink on the gennou’s face and the end of the chisel every two strikes.

This is a time-tested technique professional golfers use to select/design golf clubs, BTW.

If the ink at the center of the striking face is scrubbed clean first, and the center of the chisel handle becomes inked first, then you have made your handle the right length with the head angled correctly. If not, you should make notes describing the results in the handle drawing you made earlier, and adjust the design of your next handle accordingly.

Again, you may find it enlightening to perform this same test with conventional hammer with a standard handle.

When your done testing, be sure to record your conclusions. Either erase and adjust the drawing, or trace over it to make and date a new drawing with your revised details. Tracing paper is our friend.

In either case, be sure to add a date and/or revision number to the drawing to ensure you don’t confuse it with older, superseded drawings. Don’t put this off but do it right away before you forget. This applies to all the tests described herein.

Adjustments to Your Handle

You should use the results of these tests to make small, incremental adjustments to your handle, as you deem necessary, rather than big, drastic changes.

For instance, you may need to shorten the handle. This is easily done if your handle is a little long and you’ve made the neck as I recommended. Worst case, make notes, adjust the drawing and remake the handle with as few changes as possible to avoid confusing over-complication.

A common correction you may want to try is, after becoming accustomed to using the hammer, to reshape the grip area to distribute pressure more evenly over the hand, and to reduce stresses induced in skin, muscle, tendons and bones by easing edges and corners while maintaining control and indexing. Most importantly, you should shape the handle so it doesn’t twist in your hand stretching your skin in uncomfortable ways, a common cause of blisters, especially in plastic-handled one-size-fits-nobody hardware store hammers.

If I may share an example from my experience, every new hammer handle I make tends to produce a blister on the first joint of my right hand index finger. Obviously a lot of pressure focus on this location on my hand. So I know to smooth the transition from back edge to the side just where this joint bears to avoid blisters.

This modification creates an obvious dent in the smooth lines of my handles, but your humble servant is resigned to sacrificing beauty for performance when necessary. Just look at the sorry state of my career as a fashion supermodel if you doubt my dedication to performance.

Another less-common problem is the hammer’s face striking the chisel handle or nail head at an angle instead of being centered on, and at a 90˚ angle to, the long axis of the chisel handle. The ink test will reveal such impish behavior.

This tendency usually improves with practice, but you can adjust for it by making a new handle with the head skewed to the left or right as necessary.

As a way to determine how much skew is required, you can plane down the sides of your test handle, glue on slips of wood, shape them as you see fit, and test the results. Once you’ve determined how much total correction is necessary, you can remake your final working handle accordingly.

Once again, work patiently to achieve small, incremental improvements, and be sure to record the results on your drawings.

Don’t hesitate to methodically scrape, shave and experiment with this first handle.

The design of this handle, and the process your humble servant has described for making it, is suited not just for Japanese gennou hammers but for all short-handled hammers and axes. Give it a try and you’ll see what I mean.

In the next article of this series we’ll apply a protective, and maybe even tastefully elegant, finish. Please remind me to call Ramon and beg him cater the unveiling party! I simply love his cheesy shrimps on crackers, don’t you?

YMHOS

A list of our gennou heads: C&S Tools – Gennou Hammer Head Pricelists & Photos

If you have questions or would like to learn more about our tools, please use the questions form located immediately below. To see a list of our tools and their pricing, please click the “Pricelist” link here or at the top of this page. To contact us please use the Contact form below or email us directly at Covingtonandsons@gmail.com.

Please share your insights and comments with all Gentle Readers in the form located further below labeled “Leave a Reply.”

We see data miners and their bilious bots as dastardly sneak thieves and so promise to never share, sell or profitably “misplace” your information for any reason. If I lie may the heads of all my hammers fly away to Valinor!

Brother Saint Martin and the Three Trolls by John Bauer. Supernatural creatures are everywhere, if you have eyes to see.

Leave a comment

← Back

Thank you for your response. ✨

Previous Posts in The Japanese Gennou & Handle Series

The Japanese Gennou Hammer & Handle Part 21 – Installing the Head

No one should be ashamed to admit he is wrong, which is but saying, in other words, that he is wiser today than he was yesterday.

Alexander Pope

In the previous article in this series we finished fitting and shaping the handle of our gennou hammer in accordance with our design document. Some refinements may be pending the results of testing, but in any case the time has come to attach the head.

This is an important task, perhaps not as easy as it sounds, because this is a craftsman’s handle, made with love and skill, not a mass-produced cockroach killer ground out by barefoot Bangladeshi farmers and secured with crude wedges. Nor is it typical of the tools sold at Home Despot designed to fail quickly and be tossed into a landfill soonest. And because the head is not secured with barbaric wedges but relies entirely on the extremely tight fit between the eye of the steel head and the tenon Beloved Customer cut on the end of the handle, some careful, but nonetheless violent action is required to successful connect head and handle. The purpose of the article, therefore, is to help you install it carefully with all due violence.

Installing the Head

Beloved Customer can install the head either before or after sanding and finishing the handle, but in this example we’ll attach the head before testing and finishing the handle. This approach will be most efficient if you decide to adjust or rework the handle after performing the tests I recommend in the next article.

In this case, I use the word “finish” to mean to apply a chemical “finish material” to the wood, not to “complete” the work or “conclude” the job. This difference in definition matters to me because confusion regarding the dual, even treble meaning of the word “finish” has caused problems for me in the past. So there you are.

Preparing the Tenon

First, remove any tape remaining on the tenon and, if necessary, use a solvent such as lacquer thinner to remove any adhesive residue. DO NOT USE soap, water, or any water-based chemical as this will make the tenon swell! After cleaning there should be no finish material, wax, oil or unicorn wee wee left on the tenon.

Depending on the relative humidity the handle is acclimated to, it may be advisable to make an effort to shrink the tenon a bit by placing the handle in a low-humidity environment for a time. Please do NOT microwave your handle, cook it in your oven, or heat it in your toaster, not even with cheese and Tabasco Sauce.

There are several ways to remove moisture from the tenon in order to shrink its width and thickness a bit without ruining the handle or burning down your workshop. Perhaps the safest way is to store it for a time in a tightly-sealed plastic container with packages of silica desiccant. Other ways include placing it in a warm spot close to an operating gas furnace, or indirectly exposing it to an electric room heater for a day or so.

If you use any method that involves heat, make sure you are nearby to monitor progress and deal with scorching and fires.

Orienting the Tenon

You’ve already shaped the handle, and shaved and lightly chamfered the tenon so it should partially fit into the head’s eye almost as deep as the chamfer, but should go no further using only hand pressure.

Please keep in mind during this process that it’s extremely important to get the tenon started in the eye straight, and to keep it straight, without allowing it to become cocked.

It’s also important to install the head in the correct orientation. This usually means its flat striking face is oriented towards chisel or nail, and the brand oriented towards the handle’s butt.

Some people like to orient the head’s brand so it faces up (away from the butt) when using the hammer. I can understand this compulsion, and while it makes no difference in performance one way or the other, you should be aware that it’s seen as bass-ackwards among professionals in Japan.

Starting the Tenon

Of course, in accordance with your humble servant’s advice in previous articles, you’ve already created an elegant dome on your hammer’s butt to prevent these taps and strikes from damaging the handle.

I like to place the head on a working surface such as a benchtop or a softwood board like pine or cedar resting on the floor/ground cushioned by a piece of leather or rubber to prevent slipping.

Insert the tenon into the eye, and, after sighting the handle and head from multiple directions to check alignment, when you are absolutely certain the tenon is poised to go into the eye straight, tap the handle’s butt with a flat-faced hammer, genno (not a domed-face hammer) or mallet. After a few taps, stop tapping, check your progress, and make sure the tenon is going in straight and not cocked.

Although the tenon should not have entered the eye more than a millimeter or two, it should be an extremely tight fit, with each tap making barely any progress.

I can’t describe the sensation in writing, but if the fit is too tight at this point in the process, you may need to scrape or sand the tenon a little.

Driving the Tenon Home

This is where the “violent” part of the job begins.

With the tenon properly aligned and started in the eye, stand up, hold the hammer in a fist with the head hanging straight down, and strike the butt of the handle with your hammer or mallet paying attention to its progress into the eye with each strike and the friction created. Gradually adjust the impact force of your strikes accordingly. Don’t be surprised if it takes literally dozens of extremely hard strikes to install the handle completely. If the tenon just slips in, however, we have a problem, Houston.

If you find that the fit is too loose, however, don’t despair, simply shim it with quality paper as described in the last section of the previous article. Remember, most people find it difficult to get the tenon/eye fit right the first time. Such adjustments to a new handle are nothing to brag about, but neither are they something to be ashamed of. It’s more the rule than the exception until experience is gained.

Some people like to make their tenon extra-long so it projects out of the eye 6-12mm or so. Nothing wrong with this approach, but it looks silly to me in the case of a new handle. Once again, beauty is in the eye of the bean holder.

I was taught that the ideal is for the tenon of a new handle to remain recessed inside the eye a few millimeters. The purpose for this goes back to one of the reasons for the gennou handle design described in this series of articles, namely, that the handle does not have a tumorous swelling below the head but the neck is approximately the same dimensions as the eye for a portion of its length to permit the user to tap the handle further into the eye should it loosen. By leaving the end of the tenon short of the end of the eye in the case of a new handle, one provides visual evidence that (1) the handle is tightly fitted and; (2) that plenty of tenon length is available for making such adjustments.

Accordingly, a tenon projecting a long way out of the eye indicates to the knowledgeable observer that either the handle is old and has been adjusted many times, or the tenon fit was sloppy from the beginning. In my humble opinion, a tenon of a new handle projecting from the eye a significant distance looks odd, but in practice, it doesn’t make much difference. The choice is yours.

In the next article in this series of articles about danger and violence, we’ll test you’re new handle. How exciting!

YMHOS

If you have questions or would like to learn more about our tools, please use the questions form located immediately below, or email us at Covingtonandsons@gmail.com. To see a list of our tools and their pricing, or to contact us, please click the “Pricelist” link here or at the top of this page.

Please share your insights and comments with all Gentle Readers in the form located further below labeled “Leave a Reply.”

We see data miners and their bilious bots as dastardly sneak thieves and so promise to never share, sell or profitably “misplace” your information for any reason. If I lie may all my hammers swim away from me!

Title: Cormorant. This ink drawing was made by Japan’s most famous swordsman, Miyamoto Musashi (c. 1583 – 13 June 1645). This style of art (suibokuga) is not well-known outside Asian countries, but despite the few materials used (paper, ink stick, inkstone, brush and water), it’s an extremely difficult art to master. Why? There’s no pencil layout to follow, so the artist must have the drawing planned down to the last stroke in his mind’s eye. Each stroke must be made precisely but without hesitation or mulligans. The ink is black, so color gradations can only be achieved by altering the speed of the brush and the ever-changing water/ink balance contained in the brush. High-speed, high-precision, powerful lines, no wasted strokes. Very much the work of a swordsman.

A list of our gennou heads: C&S Tools – Gennou Hammer Head Pricelists & Photos

If you have questions or would like to learn more about our tools, please use the questions form located immediately below. To see a list of our tools and their pricing, or to contact us, please click the “Pricelist” link here or at the top of this page, or email us at Covingtonandsons@gmail.com.

Please share your insights and comments with all Gentle Readers in the form located further below labeled “Leave a Reply”

We see data miners and their bots as dastardly sneak thieves and so promise to never share, sell or profitably “misplace” your information for any reason. If I lie may my eyes go blind!

Previous Posts in The Japanese Gennou Hammer & Handle Series

Leave a comment

← Back

Thank you for your response. ✨

The Japanese Gennou Hammer & Handle Part 20 – Making Sawdust


Woodworking minus patience equals firewood. 

– Author Unknown

In the previous article in this series, we selected and prepared the wood for our gennou handle and layed-it out in accordance with our design drawings.

The next step in the process is to gather our tools and begin the fun work of making sawdust.  Yeeehaaaa!

Tools

I prefer to use the following tools when making a gennou handle. You will need to have similar tools on hand for layout and fabrication, but the specific choice is entirely yours. 

  1. Divider with sharp points (transferring dimensions and tenon layout); 
  2. Sharp pencil (making pencil marks (ツ); 
  3. Small try square (laying-out and checking tenon); 
  4. Marking gauges (Titemark and kama kebiki. Marking tenon and centerlines) ; 
  5. Marking knife (layout); 
  6. Hozohiki rip saw and/or dozuki crosscut saw for cutting the tenon (in hardwood, a sharp hozohiki rip saw frequently makes both rip cuts and crosscuts cleaner and more precisely than a crosscut dozuki saw);
  7. A fine saw such as a fret saw or coping saw for making curved cuts;
  8. Auriou cabinet rasp (Lie-Nielson) (optional); 
  9. Boggs-pattern flat-sole and curved-sole spokeshaves (Lie-Nielson. Optional but very handy and pleasant to use if you can tolerate A2 steel);
  10. Sandpaper; 
  11. A board to support the handle-in-progess. I suggest dimensions of 300-400mm long x 50-60mm wide x 40-50mm thick, with a “V” groove cut full-length and a cross-stop inlet about 2/3 its length. The handle will rest, more-or-less securely in this groove, and be restrained at one end by the stop when using spokeshaves and rasps. This support board can be clamped in a vise, or clamped to a workbench with a C clamp. I also find it most efficient to place this board on my benchtop with the gennou handle resting in the v-groove with one end touching my chest, perhaps cushioned by a rag, and use rasps and spokeshaves pulled towards me to shape the wood.

Safety

I dislike safety nannies and never want to become one. But Gentle Readers of this humble website include everything from venerable old-timers to fresh newbies, so it would be unkind of me to write for the benefit of only accomplished woodworkers while ignoring the new guys. And since the operations described herein include sharp tools, and potentially harmful substances, please plan to work safely. The following webpages may help.

In addition, before you start making (and sucking into your pretty pink lungs) the millions of the tiny airborne wood particles that comprise sawdust, please check that the species is not dangerous in general, and that you do not have allergies in particular. The website at the link below might be useful.

Wood Allergies and Toxicity

The Tenon and the Unblinking Eye 

Let’s start by cutting the tenon and fitting it to the gennou head’s eye. 

You’ve already layed-out the tenon, so next use a fine precision rip saw like a 210mm hozohiki to cut the four cheeks being extremely careful, like a big-eyed kitten stalking a grasshopper, to stop short of the layout line. Be careful to work very precisely with your saw to not cut too deeply as any excess meat removed from the tenon, or sawcuts left in the tenon, will fatally weaken it. I’m not kidding!

I humbly confess to making this mistake more than once, ruining all my work to that point and wasting some nice wood. Indeed, it may be best to cut the shoulders shallow and trim with a chisel, once again being careful to not cut too deeply. Ruthless, merciless, unrelenting control of your coke-snorting inner-badger is critical!

At this point, the handle is a chunky, graceless block with square edges, flat surfaces and a stubby tenon sticking out at one end. That’s alright. There’s no need to contour the handle yet.

Cut itsy-bitsy teeny-weeny chamfers on the end of the tenon to help guide it into the eye without cocking and binding. A big chamfer will benefit nothing and look ghastly.

Mark the reference face annotation on the corresponding tenon cheek because you don’t want to mistakenly force the tenon in bassackwards.

Test fit the tenon into the eye a few millimeters but without driving it all the way on. It should not start by hand pressure. 

Although you shouldn’t have yet tried a full-length, full-power test fit, when you are satisfied that the tenon will fit into the eye of your gennou head without the tight fit shaving off much wood, and marked the reference faces, then tape the tenon with masking tape so you don’t accidentally knick or shave it. Don’t ask me why I know this risk exists.

With the tenon close to completion, let’s next shape the curved front, back and side surfaces to fit.

The Back and Front Edges 

The tools you use don’t matter so long as when this step is complete the back edge is perpendicular to the reference face, the opposing side face, and is consistent with the layout lines. 

Cut the back and front edges (surfaces parallel with the long axis of your gennou head) to your design profile using saws, rasps, knives and/or spokeshaves. The two guiding details in this process are the butt and the tenon, with the tenon being most important. These two surfaces should be shaped to smoothly connect the butt with the tenon, not the other way around.

However, leave the corners of the neck and handle area square for now to help guide you in shaping the critical back and side surfaces because, if you start rounding and smoothing edges and corners now, it often happens that the geometry which aligns the hammer’s face with chisel and nail will be compromised.

I recommend you cut outside the layout lines plus a millimeter or two because accidentally cutting deeper than your layout lines will not only disrupt the even flow of the design but may damage the structural integrity of this elegant, minimalist tool. 

Do not shave the handle’s sides flush with the tenon yet, but leave them just a hair proud. 

When done with the this, lightly remark the centerline and extended the eye’s lines. 

The Sides 

At this point in the process the right and left sides should still be flat and parallel, perpendicular at any point with the back surface, and have neat, square corners.

Use the paper/cardboard profile pattern from your design drawing to mark the handle’s layout on the back and front edges. 

Just as with the back and front edges, cut the side surfaces using saws, rasps, knives and/or spokeshaves.

Although some prefer handles with a broken dogleg shape, I recommend you make the transition from tenon to butt gradual and smooth.

As you approach the final dimensions, be careful to avoid tearout or gouging in the neck area since removing these irregularities may require you to reduce thickness too much. 

Do not cut or shave the sides flush with the tenon’s cheeks yet, but leave them just a hair proud. 

Smoothing and Rounding 

I find it most effective at this point to shape the back edge (opposite the flat striking surface of the head) flat with slighty relieved corners, not rounded-over corners. You can always change it later.

Some people like to make the back edge of the handle oval or egg-shaped, but I recommend you leave it flat at first and then adjust it to fit your hand as you use the gennou. 

At this point your industrial-designer sensibilities will scream at you in a voice like a nazgul commanding you to round the the back surface entirely or to make it oval or egg-shaped, but while such surfaces might look better hanging on a peg in a hardware store, or in pictures in a magazine, or as an image on you facebook or Instagram page, and may even feel better when used to kill cockroaches, I promise you it is counterproductive when doing serious work.

Why? Because, despite what you may think, a flatter back surface does not bite into the hand in-use, but because of the greater surface area in contact with the hand it provides, it actually reduces the pressure of impact reaction forces on the hand reducing fatigue and bruising. More importantly, it helps with quickly and unconsciously indexing the striking face of the head correctly.

With the back edge where it needs to be, next round the front edge into the design profile. I prefer this surface to be more-or-less a perfect radius at any point in the handle area, but some guys feel an egg-shaped cross-section fits their fingers better. Six of one half-dozen of the other.

In any case, this surface must smoothly morph into a flat surface with slightly radiused corners in the neck area, and finally with no radius as it approaches the tenon. Yes, you read correctly: no radius.

I usually round-over the flat on the back edge right where my index finger wraps around to the side just a little to avoid developing a blister. But keep in mind that the only way to tell what small details works best for you is trial and error. 

Doming the Butt 

The butt should be flat with sharp edges at this point in the process. 

You may find a domed butt strange, but it has both practical and aesthetic purposes.

Let’s consider the structural, practical purpose first. If the wood is adequately hard, and the tenon is not too skinny, you will need to pound on the butt like a son-of-a-gun dozens of times to get the tenon into the eye. That’s as it should be. Don’t start yet, but when the time comes you must be careful with the accuracy of your hammer strikes to avoid damaging the butt or breaking the tenon.

If the butt is flat with crisp edges, unless you have perfect aim with every swing, your hammer might chip or even split it. A domed butt, by comparison, directs impact forces of your hammer away from the edges of the butt and into the neck to help to prevent chipping. Likewise, a domed butt will also reduce damage to the handle over many years of hard service.

Moving on to aesthetics, a domed surface is more organic and, to my beauty-deprived sensibilities, more elegant than a flat one because straight lines seldom exist in nature, are boring to the eye, and are seldom aesthetically pleasing

A warning. Everyone has different opinions about what pleases the eye, as you know. Beauty is in the eye of the bean holder, or something like that, so I entirely understand if you dismiss the aesthetic reasons I’ve suggested. But please don’t ignore the practical, structural reasons if you want to avoid wasting your time and wood.

Assuming the butt is flat and its surface is more or less perpendicular to handle’s centerline, use a marking gauge set at ¼” to scribe a shallow line on the butt’s face (the part the will be domed), and around the butt’s sides (the handle’s sides and front and back edges). These lines will be the limit of the chamfer between the grip and the butt. 

Next, mark a cross on the butt using the front and back edge’s centerline, and a perpendicular line parallel to the back edge. This cross will be useful in maintaining the centerline while profiling the butt. 

Use a knife, chamfer plane, block plane, files or other tools to make a 45˚ chamfer up to the lines just scratched.

Next facet the butt using planes or a sharp kiridashi kogatana knife and remove all tearout and filemarks Try to keep it symmetrical if you can.

The butt can be left faceted (my preference) or smoothed using sandpaper later. That decision must be made before finishing the handles, but need not be made now.

Why might one elect to leave the butt faceted instead of smoothing and polishing it? I’ve done it both ways, and if I’m in a hurry, I sand it smooth and get it over. All commercial products nowadays are machine made and so smooth and symmetrical. And of course, a factory cannot facet a curved surface easily. A faceted butt sets my hammers apart from all commercial products while giving them the craftsman’s signature.

Fixing a Loose Head

So here’s the “I toljaso” in advance.

If you were not as careful and clever as big-eyed kitten stalking a grasshopper when fitting the tenon, you may find it becomes loose and the head begins to wiggle with the passing of a few seasons. A Sergent Elias moment!

I won’t say it out loud, but just between you, me and CCP, you can remedy a loose head by removing it and shimming the eye with quality high-rag-content typing paper. Don’t have any typewriter paper left in your bat cave? It may be your not using your IBM Selectric much nowadays. Are there alternatives?

Don’t tell the Secret Service I said so, but nothing works better for shimming a tenon than a strip cut from a dollar bill. Crane Stationary makes the best paper in the world, and by no coincidence, also makes the paper used in US currency.

In the next few articles in this series we will attach the gennou head to the handle, apply a London Finish, and sample its performance. Yummy!

Until then, I have the honor to remain,

YMHOS

Lena Dances With the Knight by John Bauer 1915

If you have questions or would like to learn more about our tools, please use the questions form located immediately below. To see a list of our tools and their pricing, or to contact us, please click the “Pricelist” link here or at the top of this page, or email us at Covingtonandsons@gmail.com.

Please share your insights and comments with all Gentle Readers in the form located further below labeled “Leave a Reply”

We see data miners and their bots as dastardly sneak thieves and so promise to never share, sell or profitably “misplace” your information for any reason. If I lie may my eyes become egg-shaped!

Leave a comment

← Back

Thank you for your response. ✨

Previous Articles in The Japanese Gennou Hammer & Handle Series

The Japanese Gennou & Handle Part 19 – Laying-out the Handle

Not all those who wander are lost.” 

J.R.R. Tolkien, The Fellowship of the Ring


Introduction 

In previous articles in this frightfully sexually-charged series, Beloved Customer produced a design drawing for your gennou handle based on the parameters of your actual gennou head and your body. You should have also selected, or at least rolled out of bed onto the floor, bumped your head, partially opened one sticky eye, and seriously considered selecting, an appropriate stick of wood. Assuming you’ve procured said stick, let’s get to the layout. 

Tools 

There are as many ways to layout a hammer handle as Carter has pills, so I won’t insist you do it my way, nor will I dictate what tools you use, but after making dozens of gennou, hammer, axe and adze handles for myself and customers, I’m confident in recommending the following minimum set of tools:

  1. Divider with sharp points (for finding centers and transferring dimensions and lines from drawing to stick; 
  2. Sharp pencil; 
  3. Small try square; 
  4. Marking gauges (Titemark and kama kebiki for quickly laying out centerlines and other details); 
  5. Marking knife; 
  6. Calipers (vernier, dial, or digital. For measuring internal dimensions of the eye, and precisely laying out the tenon)
  7. Handplanes (for dimensioning purposes).
Dominic Campbell’s atedai workbench (in-progress) and his tools, including his gennou with classical-style Kosaburo head and beechwood handle

Preparing the Stick

You need to prepare the stick or board you selected after bumping your head to have 6 flat, parallel, square sides. As far as dimensions go, we need it to be a little oversized, e.g. longer, wider and thicker than the maximum final dimensions shown in the drawing.

You can prep this board or stick using electrical tools, but if you can’t do it with handtools alone, I strongly encourage you to work on your basic skills. Not as flashy as a halfgainer with a twist of lemon while falling from the bed, but surprisingly few have these skills nowadays.

Looking back on the old texts, one of the first tasks assigned trainees in cabinetmaking technical schools and apprenticeships was making a number of sticks or boards with six precisely dimensioned, flat, wind-free, parallel, 90˚ sides just like this because this simple job combines many of the essential woodworking skills, readily makes mistakes apparent to encourage improvement of basic skills, and helps one’s develop an understanding of the material.

Your humble, bumbling servant too was once required to make several boards and sticks just like this using handsaws, handplanes, a trysquare and marking gauge in front of others before I was permitted to be taught more advanced skills. Powertools are fine, but if you haven’t done this before, now is the time to perfect your technique.

Layout 

The following layout steps assume the stick has already been dimensioned as described above.

  1. Begin your layout by selecting and marking a flat and wind-free side of the selected board corresponding to a profile view on the drawing to be the “reference face.” You can write “RF” on it to avoid confusion. I just draw two quick lines in pencil at an angle across the board’s surface at both ends. Don’t forget to label this critical surface somehow so there will be no confusion moving forward.
  2. Plane the surface of the board that will form the handle’s back edge (seen from above in plan view) flat and perpendicular to this reference face. All further layout will be indexed from these two faces. 
  3. Mark the maximum thickness of the handle on the surface opposite the reference face, as determined by the widest dimension of the butt, using a marking gauge against the reference face.
  4. Plane all the surfaces flat, free of wind, and where appropriate, planar. This needs to be done pretty precisely.
  5. Use a marking gauge to draw the appropriate centerlines on both sides, edges, ends of the board/stick.
  6. Use dividers to measure and layout the width of the eye, plus a little extra, centered on the centerline you just marked, and spin this around the eye, butt, back edge and front edge. 
  7. Make paper, cardboard, or wood patterns based on your design drawing of the handle’s elevation and profile views. Paying close attention to minimize grain runout, especially in the tenon and neck area, position the patterns and mark the board accordingly. 
  8. Using these cardboard patterns, carefully layout all the tenon’s dimensions on the board, measured from the reference face and back edge. Be sure to make the tenon a half-sheet of copy paper too large in width and thickness. This can be trimmed down later if the fit is too tight. Layout of the tenon is critical so don’t f* it up.
  9. Adjust the lines of the handle design to meet your requirements for beauty.

In the next post in this series we will begin making sawdust. Oh joy!

YMHOS

Two Trolls by John Bauer, 1909. Not wanting to pay the construction costs of the bread oven with its gracefully artistic hinges your humble servant has just installed, exceedingly parsimonious Granny Troll is trying to convince me to climb inside the hot oven and do a closeup inspection. Will I fit? More importantly, do you like my fetching new safety shoes?

If you have questions or would like to learn more about our tools, please use the questions form located immediately below. To see a list of our tools and their pricing, or to contact us, please click the “Pricelist” link here or at the top of this page, or email us at Covingtonandsons@gmail.com.

Please share your insights and comments with all Gentle Readers in the form located further below labeled “Leave a Reply.”

We see data miners and their bots as dastardly sneak thieves and so promise to never share, sell or profitably “misplace” your information for any reason. If I lie may the heads of all my hammers fly away to Valinor!

Leave a comment

← Back

Thank you for your response. ✨

All Posts in The Japanese Gennou Hammer & Handle Series

The Japanese Gennou & Handle 
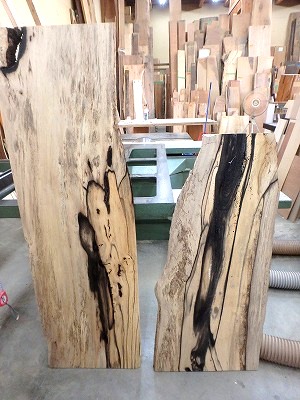
Part 18 – Wood Selection

Stanley “Stan the Man” Musial, one of baseball’s greatest players and most consistent hitters.

Used to be that bats had thick handles and a big barrel. Then they found it’s not the size of the bat that gets the home run – it’s the speed with which you can swing it.

I think I had the smallest handle around. When I got my bats, I even trimmed them down. I used to scrape them. Some years later when I started getting older, I used to start with a 33 and in the summer it got down to 31 and then probably in September got down to 30.

Stan Musial

In the previous 6 posts in this series we guided Gentle Reader in creating a drawing of a high-performance, minimalist handle to fit your gennou head and body closely. 

The handle in this drawing may not fit your body and the way you work perfectly at first; It may require adjustment, but it is a good place to start. 

Keep this drawing so you can remember what you based the original design on to help you analyze and record improvements for your next new-and-improved handle.

With the initial design complete and recorded in your drawing, the next step in this epic adventure of love, lust and sawdust is to select a stick of wood. Oh joy!

Your humble servant will not be so forward as to recommend a specific wood Gentle Reader should use. Instead, let’s consider some performance criteria first.

The quotes above by Stan the Man Musial, a famous baseball player and coach that made a career swinging wood fast and with great precision, are especially relevant to the subject of gennou handles.

Please remember that, just like a baseball bat, a slender hammer handle is almost always superior to a fat one, and its length requires experimentation and adjustment to get right. And of course, being a minimalist, relatively slender instrument, it must be made from a piece of wood that can handle the forces that will act on it.

Strength & Toughness

Hammer handles are subject to relatively high impact forces during use which produce stresses and vibration, so the wood must be not only strong, as in resistant to compression, tension and bending forces, but tough. It must also have properly oriented grain.

Softer woods are easy to work and feel good in the hand, but the tenon of a gennou handle made from a soft wood such as pine, cedar, poplar or maybe even cherry, for example, will often loosen quickly as thousands of impact forces over time crush the cells.

In addition, since the fit between tenon and eye must be very tight indeed, the process of driving a properly-sized tenon into the eye will not be easy. Your humble servant has broken more than one handle while attempting this. The last instance was a few years ago with a gennou handle I made from Chinese mulberry, a wood cherished in Japan for fine cabinetry work and of which I am unreasonably fond due to it’s dramatic grain, its golden color when freshly cut, and the purplish-brown color it changes to over time. I suspected it might be too weak for the job, but tried anyway. A sad waste of time and beautiful wood.

BTW, if you have the opportunity to use mulberry wood for cabinet or joinery work, by all means give it a try. I think you will be pleasantly surprised especially as the item made from the wood ages.

Chinese Mulberry Wood

The material you ultimately select must be both strong and tough, but it is important to understand the difference between strength and toughness when considering materials.

The term “tough” in engineering parlance means a material has the ability to absorb energy and/or forces without permanently deforming or breaking. A tough wood will still deform and bend, but when the forces that caused it to deform/bend are removed, it will return to its original shape instead of being permanently bent or breaking. In the case of a handle, if it is tough, it will flex somewhat and return to its original shape all without rupturing.

Gentle Readers are, without exception, highly intelligent, possessing a refined eye and therefore will of course be tempted to use beautiful, dark exotic hardwoods such as ebony, rosewood, bubinga, wenge, kingwood, snakewood, etc.. These are fine woods that make beautiful handles, but I don’t recommend them for a first handle due to their high cost and the likelihood that Gentle Reader will want to replace the first handle you make, and maybe even the second and third, as your skills and understanding of the handle that best suits body and working style improves with time and experience.

And while they may have beautiful color, sexy figure, and great compressive strength, many exotic woods like ebony and rosewood are very strong in compression, but sometimes lack adequate toughness in some (but not all) cases, and crack easily. And the extra weight of such dense woods is seldom an advantage.

Your humble servant has used them successfully, and so won’t suggest they can’t make fine handles, but I simply urge Gentle Reader to be cognizant of the higher risk of failure. If you choose to use an exotic hardwood, please be especially careful of runout, a subject we will discuss below.

Friction

If you consider the vibration and angular acceleration forces acting on the gennou’s head and handle, you will understand the wisdom of choosing a wood that has a high coefficient of friction. Take my word that it is embarrassing to have the head slip off the handle mid-swing even if none of your bench dogs are watching.

Oily woods like teak lack adequate friction to keep head and handle attached, in my experience. Bocote is another wood that tends to allow Murphy to slip the head off and create unplanned openings in gypboard walls. (ツ)

Stability

Another important performance criteria to consider when selecting a species of wood is that it be stable and exhibit minimal expansion/contraction with humidity changes.

If the wood forming the tenon connecting handle to head shrinks too much when the ambient humidity decreases, the head will of course loosen.

If the tenon swells too much when ambient humidity increases, the wood cells may be crushed inside the unblinking steel eye causing the tenon to lose the ability to spring back to its original dimensions when humidity again increases, eventually resulting in a loose head. To make matters worse, the handle will then loosen up even more when the humidity drops again. Murphy does backwards somersaults and clicks his thorny heels at the apex while cackling with demented glee when this occurs.

This detrimental plastic deformation is the big downside to kigoroshi in hardwoods. Let he who has ears to hear listen.

I encourage you to use a wood with a low tangential/radial expansion/contraction ratio.

The traditional way to deal with tangential/radial expansion/contraction in tool handles such as hammers and axes is to orient the rings of winter wood in the tenon in the long axis of the hammer head/eye. I don’t think this matters much with small hammers with small eyes, but it can make a difference in larger hammer heads with long eyes.

Limb Wood

It’s tempting to use limb wood or orchard trimmings to make handles, especially if the grain’s curvature matches the intended design. And leaving some of the natural bark in the grip area can be interesting too. In fact, there was a period a few years back here in Japan when, probably due to the kezuroukai effect, many people were making handles from mountain cherry wood with the shiny dark-red bark left attached in the grip area.

This is a grand idea, especially if it means you can procure good wood for free. But for heaven’s sake don’t use such wood until it is well-seasoned and stable or you may find your wall has a new dent and your bench dog and his fleas have fled, or your bench kitty has started muttering to the iron pixies skulking in your shop about your parentage and the size of the bus you rode to elementary school. Cats are like that, you know.

Wood Grain and Runout

Many fail to understand or choose to willfully ignore the contents of this section, but I adjure Gentle Reader to not be a chuckle head.

Grain runout is an important factor to take into account when selecting a piece of wood for a handle. A good definition of runout is as follows:

“Runout refers to the orientation of wood cells being other than parallel to the edge (face) of the board. Often difficult to detect visually, severe runout can be detrimental to strength and resistance to vibration and impact forces.”

When a board’s annual rings do not remain within the boundaries of a given pattern, be it straight or curved, the locations where the grain exits the pattern’s boundaries are called “runout.” This is an engineering term used in structural design that is applicable to selecting handle wood. In this case, it has nothing to do with the rotation of wheels and gears. Cracks tend to begin at runout locations and propagate quickly. Excessive runout can significantly reduce the ultimate strength of a board, especially when subjected to the impacts and bending forces of the sort tool handles experience. 

In the case of a hammer handle, these potentially destructive forces are of greatest magnitude nearest the eye, and tend to make the handle crack along the leading edge and back edge of the handle, so we need to reduce the lines in the grain running-out and exiting the handle near the eye and at the back and front of the handle.

There are those who will dispute this structural reality, but they have done neither the engineering studies nor the destructive testing that would give their opinions value, and are herewith directed to proceed posthaste to a pharmacy to procure the salve Mifune Toshiro recommended to the tattooed criminals in the movie “Yojimbo” before educating them about pain.

Whatever wood you use, and this is extremely important, you want the grain runout to be minimal, especially in the tenon and neck. Ideally, the grain will exhibit zero runout through the tenon and neck and be curved to match the handle shape. In other words, the ideal stick of wood will have a high-percentage of fibers that are continuous from eye to butt. Such wood can be found but it may take time and effort and eye strain to select. Using riven wood is a traditional way to reduce runout and provide maximum strength. On the other hand, some gradual runout in the grip area is usually acceptable.

Here is wisdom: The key to judging runout is to not examine just the board, but more importantly the individual stick of wood you are considering using for a handle after it has been cut into a rectangular cross-section in preparation for layout because only when you can see all four sides the handle’s entire length will you be able to reliably judge runout. Murphy will make a fool of you if you let him.

The following link may be informative on the subject of runout: Link 1

Useful Woods

In Japan, the best traditional woods for tool handles are said to be Soraki and Ushikoroshi, both domestic ornamental bushes with white wood and plain-jane grain which are no longer grown commercially and are difficult to obtain. We have a few sticks in-stock for interested parties.

A Hiroki head with a Ushikoroshi wood handle

Nowadays Japanese White Oak is the standard handle wood in Japan. It is denser, stronger and whiter in color than its American and European counterparts, but the grain is quite plain.

Hickory is recognized world-over as the best generally-available material for handles, but it’s grain and color are boring. It should be easy for Gentle Readers to procure since it is sold as replacement tool and axe handles in most hardware and home centers.

Black Persimmon Planks

Other reliable options are Ash, the various species of White Oak, Maple, and Birch, etc..

I have made several handles from Black Persimmon, a fruitwood in the ebony family, yellowish in color but with a dramatic, smoky black grain. Black Persimmon has been highly prized in Japan for hundreds of years as a wood for high-end cabinetry. The grain and color are unique.

Since around 1900, American Persimmon was considered the best wood for golf club heads because of its toughness, the “pop” it gave the ball on impact, and its relative light weight compared to its toughness. It makes a great gennou handle. I am told it is still available in some areas.

A Kosaburo Classic-profile head with a Black Persimmon handle
A Kosaburo Modern-profile head with a Black Persimmon handle

I have also made handles from American Osage Orange, a dense, stringy wood used for bows and musical instruments that makes an extremely good handle, at least once the scary neon orange color mellows through exposure to sunlight. I highly recommend it, especially if you can get it for free, which shouldn’t be too difficult in the US Midwest where it was once used extensively for fenceposts and still grows like weeds around old fence lines.

Just make sure it has reached equilibrium moisture content before making a handle from it.

Top: A 100monme Hiroki Yamakichi head with a new and shockingly-colored American Osage Orange handle. Bottom: A 60monme Kosaburo Classic-profile head with a mellowed American Osage Orange handle.

Maple can make an excellent handle too. I used a stick of highly-figured tiger stripe maple for the daruma gennou handle below, and another piece of Maple with only a little figure for the smaller daruma gennou further below.

A 80monme Hiroki Daruma head with a tiger maple handle (side view)
A 80monme Hiroki Daruma head with a tiger maple handle (face)
A 60monme Hiroki Daruma head with a tiger maple handle (side view)
A 60monme Hiroki Daruma head with a tiger maple handle (face view)

In the next post in this series we will layout our handle in preparation for making sawdust.

YMHOS

Stan the Man Musial. Please notice the skinny bat he used with great success.

If you have questions or would like to learn more about our tools, please click the “Pricelist” link here or at the top of the page and use the “Contact Us” form located immediately below, or email us directly at Covingtonandsons@gmail.com.

Please share your insights and comments with everyone in the form located further below labeled “Leave a Reply.” We aren’t evil Google, fascist facebook, or the IT department for the DNC and so won’t sell, share, or profitably “misplace” your information. If I lie may all my hammer handles split!

← Back

Thank you for your response. ✨

Leave a comment

All Posts in The Japanese Gennou Hammer & Handle Series

The Japanese Gennou Hammer & Handle Part 17 – The Drawing 6/6

Dom Campbell’s in-progress atedai, and a few of the tools he used, including several atsunomi chisels by Sukemaru and a most excellent gennou with a Kosaburo head and handle he made himself.

Used to be that bats had thick handles and a big barrel. Then they found it’s not the size of the bat that gets the home run – it’s the speed with which you can swing it.

Stan Musial

In the previous five posts in this sub-series about making a drawing for a high-performance custom gennou handle, we measured various dimensions and incorporated them into our drawing. In this post we will bring everything together, and then discuss some of the strange features of this design, including a physics equation that drives it.

During this phase of the handle-making process you will have another opportunity to express the minimalist artiste lounging stylishly within your soul, probably wearing a cravat and sipping brandy stylishly. C’est Magnifique!

The Sides

Let’s start work by drawing the butt’s width, determined in the previous post, on the plan view (upper half of the drawing above) centered on the handle’s centerline.

Next, once again in the plan view (upper half of the drawing above), draw two lines from where the tenon exits the eye to the butt.

Beginning at the grip area, draw curves from these two lines to to the right and left sides of the butt in a smooth transition, gradually expanding in width. The curvature/flair you produce will depend on the size of your grip, the width of the butt, and your sense of what makes a beautiful line. Feeling artistic yet? More brandy please.

Whither the Bulge?

Gentle Readers will have noticed from the drawings and photographs in this series so far that, unlike commercial handles, the handle we are designing does NOT exhibit a cancerous swell just below the eye. Make no mistake, this is not an error of omission nor the would-be supermodel in me seeking skinny expression! Remember, we are making a lean, mean, racing machine, not a nail bender with a sloppy eye and mass-produced tenon that needs wedges to hold it together.

This shape, with its narrow neck, flare towards the butt, and lack of the typical bulge below the eye strikes most people as strange, so an explanation may be useful.

To begin with, Japanese gennou heads of the quality assumed in this article are not secured with wedges, but by an extremely tight fit between the wooden tenon of the handle and the surfaces inside the precision-forged eye. Indeed, the fit should be so tight that, if by accident or some terrible oversight, one attempts to drive the tenon of a handle made from a wood too weak for the job into the head’s eye, the handle and/or tenon will fracture. Your humble servant has done this several times. Such a tight fit does not occur by accident.

Because it is a craftsman’s hammer, not a wood butcher’s maul, there are no wedges to split the handle, and therefore no need for a tumor below the eye to both reinforce the sloppily-made handle and to keep the wedge from pushing the head down the handle.

Indeed, without the cancerous bulge, if the handle loosens sometime in the future, tapping the handle further into the eye will tighten it up, something a bulge would make impossible. Best to eliminate unsightly, unnecessary bulges entirely.

To ensure this fit is indeed tight and secure, Gentle Reader may need to rework the eye of a lessor-quality head with files. Heads by Hiroki or Kosaburo never require this effort due to the excellent precision of their eyes, BTW, saving lots of time and blisters. I will assume any such rework, if necessary, has already been completed.

Gentle Reader must use a strong, tough wood suitable to the task. The selection of wood will be the subject of the next chapter in this series.

You will also need to cut a properly-sized tenon on the handle’s end.

Formula for Air Resistance

Your humble servant has previously suggested that the handle we are designing will be a “high-performance tool,” indeed a “racing machine.” While not in the same class as a Formula-1 race car, air resistance is definitely a factor affecting performance, one impeded by an unnecessarily large hammer face, a thick, obese handle, and a bulge below the eye as is typical for commercial handles.

Why is air resistance an issue, you say? Of all the hand tools used in woodworking, aside from the long-handled axe and maul, the hammer is the one that moves the fastest, and since air resistance varies with the square of the object’s velocity, hammers, mauls and axes are impeded by air resistance more than any other hand tools. And remember, pushing all that air around unnecessarily wastes your energy.

For those Gentle Readers that enjoy math, the formula for calculating air resistance includes the area of the object, a drag coefficient specific to the object’s shape, and the object’s velocity squared. 

F = Force due to air resistance, or drag (N)

k = A constant that combines the effects of density, drag, and area (kg/m)

v = The velocity of the moving object (m/s)

ρ = The density of the air the object moves through (kg/m3)

CD = The drag coefficient, includes hard-to-measure effects (unit-less)

A = The area of the object the air presses on (m2)

We can’t control air density.

The total CD drag coefficient is a combination of the CDhead of the head and the CDhandle of the handle. We can reduce this combined Total CD by using a more aerodynamic steel hammer instead of a huge, silly mallet, and by reducing the area of the handle pushing the air aside during the swing. I haven’t made the calculations, but the energy squandered by the excess drag of an obese handle over thousands of swings during a day’s work is not insignificant.

The Elegant Neck

Gentle Reader will recall that the handle we are designing has a narrow neck sans the unsightly bulge that grows on commercial handles. In addition to reducing the area “A ” in the equation above, and thereby the air drag acting on the hammer, this slender neck greatly reduces vibration transmitted to the user’s hand, saving wear and tear on joints. This alone makes it a worthwhile improvement in my experience.

But all is not blue bunnies and fairy farts, I fear, for there are two downsides to a skinny super-model neck on a handle. First, if you tend to miss a lot when driving nails and bang the nail heads with the hammer’s handle instead of it’s face, revengeful nail may chew up the handle in an area where there is not much material to spare weakening the handle. Gentle Reader would be fully justified in blaming this damage on the malfeasance of malicious pixies, or the luck of Murphy, but my advice is: don’t miss.

The second downside to a slender neck in a gennou handle is that it’s inconvenient for choking-up on. But on second thought, that’s not a disadvantage to anyone except grannies, bless their fluffy-white souls. The solution? Don’t choke up on the handle; The grip is the grip.

All Choked Up

Commercial hammer handles are a one-size-fits-nobody design, intended to accommodate many grip styles, apparently by many species, along most of the handle’s length. Holding the hammer like a hungry troll tenderizing a dwarf for the stewpot (perhaps with a delicate sprinkle of sage or a more bold glob of “floater” spice), and choking up on the grip like a near-sighted grandmother is the lowest-common-denominator design standard for commercial hammers, a crude detail simply not to be borne by C&S Tool’s Beloved Customers and the exceedingly refined Gentle Readers of this blog.

“They should be grilled and sautéed with a sprinkle of sage”

The ultimate goal of this exercise is to produce a hammer that fits Gentle Reader’s body perfectly, not every Tom, Burt or William that staggers into The Home Despot from the Ettenmoors. It will fit your arm, and your hand, and your grip without choking-up on it.

What’s wrong with choking up on the handle? What’s that? Did I just hear you say: “If it’s good enough for Granny it’s good enough for me?” If so we may need to procure more of the salve Mifune Toshiro lamented not having.

Choking up on the handle is inefficient for two reasons. First, because it changes the balance of the hammer and your working rhythm (pendulum physics). This is bad.

Second, when you choke up on the handle, for at least a couple of strikes you lose the sense of the distance from your hand to the striking face’s center, reducing both your precision and confidence, and the energy imparted to the chisel or nail. Reestablishing the correct distance in your mind requires a glance at the hammer, an adjustment in your head, and an interruption in your hammering rhythm. All this nonsense is easily avoided by gripping the handle in the same location every time.

You have basically designed most of the grip’s details when you set the butt’s shape and dimensions, and the location of your palm’s heel, index finger, and pinkie finger. I suggest you leave well-enough alone for now, and, assuming this is your first custom handle, make it a tad oversized at first, and then whittle, shave, and sand it as you use it until it fits you perfectly.

In the next post in this series we will select a piece of wood from which to make our craftsman’s gennou handle. Soon we will be making sawdust… how exciting!

YMHOS

If you have questions or would like to learn more about our tools, please see the “Pricelist” link at the top of the page and use the “Contact Us” form located immediately below, or email us directly at Covingtonandsons@gmail.com.

Please share your insights and comments with everyone in the form located further below labeled “Leave a Reply.” We aren’t evil Google, facist facebook, or thuggish X and so won’t sell, share, or profitably “misplace” your information. If I lie may the heads fly off all my hammers and each break a window!

← Back

Thank you for your response. ✨

Leave a comment

All Posts in The Japanese Gennou Hammer & Handle Series

Hasegawa Kosaburo and the “Classic Profile” Gennou Head

A 200monme (750gm/26oz) classic-profile gennou with a black persimmon wood handle. Notice the swollen area near the eye of this archaic design

“The Road goes ever on and on

Down from the door where it began.

Now far ahead the Road has gone,

And I must follow, if I can,

Pursuing it with eager feet,

Until it joins some larger way

Where many paths and errands meet.

And whither then? I cannot say”

J.R.R. Tolkien, The Fellowship of the Ring

In this post your humble servant will introduce a famous modern-day Japanese gennou hammer blacksmith and a somewhat archaic product he infrequently forged. It is our fervent hope to provide Gentle Readers some insight into the world of the Japanese blacksmiths of yesteryear.

Hasegawa Kosaburo

Let’s begin with some background about the gennou (hammer) blacksmith known as “Kosaburo.”

Hasegawa Kosaburo 長谷川幸三郎 was born Sakai Kosaburo in 1935 in Sanjo City in Niigata prefecture Japan, the third son of a pruning shear blacksmith. He married and was adopted into the Hasegawa family and changed his legal name from Sakai to Hasegawa, a tradition in Japan used to maintain genealogical lines in the case of acute male heir deficiency.

The Hasegawa family were blacksmiths that specialized in mass-producing hammer heads.

Kosaburo worked in the family business but eventually tired of factory work and began working with his adopted brother, Hasegawa Kanichiro, who later became famous for his “Hishikan” brand gennou heads. After 10 years of practical experience in both mass-producing and hand-forging gennou heads, Kosaburo decided to devote himself to the deceptively-difficult work of hand-forging high-quality gennou heads, eventually becoming independent under his own “Kosaburo” brand.

A more detailed description of Hasegawa Kosaburo’s life and work is found at this webpage. Sorry it’s in Japanese.

Here is a video of Hasegawa-san forging a modern-profile gennou with laminated steel faces, a common method worldwide when steel was still expensive. Seeing this I think you can understand how the swell discussed below was a standard feature of forged hammers throughout most of human history.

Mr. Hasegawa has since moved on to the big woodpile in the sky where he is probably cutting charcoal. His products are no longer being manufactured, of course, but even when he was active, Kosaburo products were widely recognized as the best-quality gennou heads ever produced in Japan. At this juncture, I believe Hiroki heads are the very best new heads available.

Kosaburo’s Students

Kosaburo trained two gennou blacksmiths that are still active today: Baba Masayuki (born 1949), who uses the brand name “Doshinsai Masaykui” (道心斎正行), and Aida Hiroki (born 1964), who uses the brand name “Hiroki” (浩樹).

Mr. Baba produces beautiful decorative gennou heads. Sadly, I am not fond of his products because, in my direct experience, sometimes the eyes are not true. Am I being too severe? Should I value external beauty foremost and wink at the ugly void where the handle attaches?

Here’s my thought process in the matter; You must judge for yourself. Decoration can compensate for many shortcomings, but the used car salesman’s schtick that “It isn’t a flaw, it’s a feature” doesn’t impress me, at least not in a tool as simple as a hammer head and at the prices for which his products sell. Kinda like the city slicker who paid a high price for a stunningly beautiful Arabian horse named “tripod” and justified its missing leg because it had three good ones left, and the hopping was not really that noticeable. For me, craftsmanship and functionality take precedence over decoration. But I won’t tell you what you should think because, well, that’s your wife’s job. (ツ)

Mr. Aida’s products, on the other hand, are less decorative but of accurate construction and hardness of the sort that makes the hearts of true craftsmen sing. Making a precise, properly-forged and differentially-hardened gennou head (hard face but soft body) is no mean feat. When I can’t get Kosaburo heads, Mr. Aida’s Hiroki brand are my next choice. The last I asked Mr. Aida, he had a three-year waiting list for his products. Very popular over here.

Most blacksmith’s shops are dark, dirty, smoky places like a dungeon in hell minus the demon torturers, lakes of blood, and the bitter stink of rotisserie lawyers, but when I visited Mr. Aida’s forge I found it to be neater, cleaner, and tidier than most CNC machine shops.

The Classic-profile Gennou Head

The head pictured in this article is the primary subject of this article. It’s an antique style seldom seen anymore, one that was once the standard shape for blacksmith-forged heads throughout most of the world. I like to call it the “classic profile” gennou head. It really doesn’t have a specific name in Japanese that I have been able to discover.

The polished areas at each striking face are non-functional vestiges of the laminated steel faces applied to gennou heads back when steel was very expensive.
Please be aware that, while new, this head is old-stock, at least 40 years old. Notice the eye. Not only are its dimensions perfect, but it is centered in the body and aligned with the head’s axis in both directions. Not an easy thing to do by hand in yellow-hot steel.

We have a few of these in-stock, but they are now serious collector’s items and pricey. Few were ever made in this style and I have never seen one in an auction. Please be aware that the head shown is old-stock, at least 40 years old. During those years in storage in a cardboard box the head developed some surface rust of the sort antique dealers call “patina” in reverent tones which is easily removed, but no deep pitting.

The shape is subtle. The swollen waist is a feature all hammer heads worldwide once exhibited, a remnant of the blacksmith driving a steel drift into the yellow-hot head to form the eye into which the handle’s tenon fits. Kosaburo used this same technique to create his eyes, as does Hiroki nowadays, as seen in the video linked to above.

Traditionally this swell was very roughly formed, but Kosaburo carefully hand-filed the swells to be smooth and uniform. I am told by those who know how these things are done that it is much more work to create a pretty swell like this than to quickly grind a head into the modern shape with a uniform waist and flared faces.

From a physics viewpoint, given the same total weight, the modern-style gennou head with its narrower waist and flared faces will have a higher moment of inertia, and will therefore be more resistant to twisting out of alignment during the swing. The flared faces of the modern design also have the advantage of protecting the waist from wear and scratches when the hammer is laid on the ground or on concrete. Most people think the modern design with its flared faces to be a more attractive product. I did too until I purchased my first classic-profile head.

You will of course wonder why Kosaburo bothered to even forge this strange antique-style head. I once asked the same question to an ancient joiner that used this style of gennou head. He was much senior to Mr. Hasegawa, BTW. His answer was three-fold:

First, nostalgia. Remember, he was an old dude back when I was a younger man.

Second, while you may not think so, this shape is more difficult to produce by hand than the modern style, and although it is undeniably “jimi” (地味), meaning plain, or understated, those who know the difference appreciate the subtle details of this design. Very much a wabi sabi thing, one only true craftsmen understand. Remember, ancient dude. I thought he was full of crap at the time. Not anymore.

Third, the swell allows one to use the side of the hammer to drive nails or bang wood in tight spaces. Finish carpenters, joiners and cabinetmakers have this need, as I know from my days in the business. Many Western claw hammers have this ability, but the modern-style gennou head simply doesn’t.

So we have nostalgia, aesthetics, and functionality as factors. As far as I’m concerned, that’s a home run, baby!

This was once the standard profile for gennou heads in Japan, but sometime in the late 1890’s, I am told by people who study these things, and perhaps due to the direct influence of an exceptionally talented master blacksmith named Chiyozuru Korehide, the modern profile head with the flared ends and lacking the swell around the eye became popular.

Any old-fashioned styles that appeal to you?

YMHOS

This image has an empty alt attribute; its file name is 1956-ford-f100
Nostalgic, aesthetically interesting, and functional.

If you have private questions or would like to receive information about our tools, please use the contact form located immediately below. Or you can view this link to our pricelist and photos of this gennou head. Please share your insights and comments with everyone using the form located further below labeled “Leave a Reply.” We aren’t evil Google, incompetent facebook, or thuggish Twitter and so absolutely will not share, sell, or profitably misplace your information. That would be theft. Cross my heart and hope to die.

← Back

Thank you for your response. ✨

The Japanese Gennou Hammer & Handle Part 16 – The Drawing Part 5/6

The Christian does not think God will love us because we are good, but that God will make us good because He loves us.

C.S. Lewis

In this post we will continue working on the design drawing of a craftsman’s gennou hammer handle designed and made to specifically fit Gentle Reader’s body and way of working.

We will layout the top and bottom of the grip area, and include clearance for Gentle Reader’s pinkie finger. The resulting curvature will ensure the striking face will be in proper alignment with either chisel or nail when in use, providing improved accuracy and efficiency, while reducing stresses on joints.

Adding the Top and Bottom Edges

We touched on the shapes of these edges in a previous post, but the time has come to add the lines to our drawing. In a previous article in this series ( links below) we extended the two lines in the side view drawing from the eye straight back towards the butt.

With the butt sketched on the drawing with the lowest edge of its downward-facing radius just touching the head’s “striking face plane,” draw an arc the length of your grip from the heel of your palm to the second joint of your index finger, with the compass’s leg pivoting on the intersection of the overall-length line, and top edge of the butt.

Then draw a straight line between the intersection of the OAL line and butt’s upper edge and the top line that you extended from the eye previously. This line will be angled downwards toward the butt.

Next draw a straight line from the intersection of the OAL line over and just touching the pinkie finger circle, until it intersects the bottom line extended from the eye. Combined with your body, and nature of your individual swing, the angle of this line will determine the angle of the head at the point of impact.

Since everyone is different, only you can decide what angle works best for you. These guidelines are a good place to start, but understand you may need to modify or remake the handle until you find the angle that works best for you. By recording the angle in a drawing each time you can adjust it to find the angle that works best for you.

Now smooth out the transition of these lines into a smooth curve, with all edges relieved and radiused, but without making the top edge of the grip area too rounded.

Some people prefer to make these lines and the handle more or less straight, and to change the angle of the handle abruptly at the point where the handle exits the head’s eye producing a handle that is straight over most of its length. Make no mistake: this is entirely acceptable, but realize such a design must rely on either really tough wood with interlocked grain at the point of transition or an unusual natural kink in the grain direction to avoid eventual failure.

I prefer to deal with this change in angle by using a smooth curvature instead. I think it looks better. I know it fits my hand better. It is easier to find wood with a gradual curvature than kinked grain. And my engineering background tells me that I want to avoid sudden transitions that induce stress concentrations, especially where steel meets wood and when grain runout is possible. But it is your decision.

Draw the curves with a pencil, then erase and redraw, erase and redraw until it looks right. 

In the next post we will add the handle’s sides to our drawing.

BTW, links to all the published posts in this series are located below.

YMHOS

If you have questions or would like to learn more about our tools, please see the “Pricelist” link at the top of the page and use the “Contact Us” form located immediately below, or email us directly at Covingtonandsons@gmail.com.

Please share your insights and comments with everyone in the form located further below labeled “Leave a Reply.” We aren’t evil Google, facist facebook, or thuggish X and so won’t sell, share, or profitably “misplace” your information. If I lie may the bird of paradise fly up my nose.

Leave a comment

← Back

Thank you for your response. ✨

All Posts in The Japanese Gennou Hammer & Handle Series

The Japanese Gennou Hammer & Handle Part 15 – The Drawing Part 4/6

Statue of Filippo Brunelleschi, the father of technical drawing and linear perspective, and both architect and builder of one of the largest and most magnificent domes in the world. Thanks, Maestro Brunelleschi, for teaching us how to draw! But what’s up with pokin holes in pizza dough…?

One accurate measurement is worth a thousand expert opinions.

Grace Hopper

As your humble servant mentioned in a previous post, and contrary to what corporate product development departments appear to assume, it is the nature of the human body for the hand to precede the hammer head during the arc of travel, with the result that, if the handle is affixed perpendicular to the axis of the head, the hammer’s face will hit the nail or chisel handle off-center and at an angle. 

In this post we will discuss this eccentric phenomenon in more detail and suggest how to compensate for it in Gentle Reader’s drawing.

The Angle of the Dangle

In evidence of your humble servant’s counter-intuitive assertions above, let us view some stop-motion high-speed photography of a shockingly ugly hammer (I can hear ‘Nando simply clucking with disapproval at the sight). 

Although the wood-butcher in this photo is using the inefficent Hobbit-basher grip, please notice the location of his pinkie finger with respect to the hammer’s face shown in this photo, as well as the angle between the hammer’s face and the nail’s axis at the point of impact seen in the last frame.

Now riddle me this, Oh Enigmatic Sphinx:

  1. In this series of photos did the impact between hammer face and nail head occur in the center of the claw hammer’s face, or in the lower half of the face?
  2. Was the center of mass of the hammer head in-line with the axis of the nail at the instant of impact, or was it offset? If offset, does the impact force of the hammer tend to drive the nail straight, or to bend it?
  3. Was the striking face oriented perpendicular to the axis of the nail at the instant of impact, or cocked? If cocked, does the impact force of the hammer tend to drive the nail straight, or to bend it? Does it tend to conserve or waste energy?

Gentle Readers who answer all three questions correctly will win one-half of a day-old Crispy Creme glazed donut the next time they are in Tokyo (I get the first bite of course (ツ)). But rather than just giving out the correct answers (and risk losing half a donut!), Gentle Readers should perform the following tests themselves to gain irrefutable personal knowledge.

The Experiment & Analysis of the Results

Color the face of your hammer or gennou with a marking pen, or Dykem, then use it with a chisel to cut a mortise, without giving the hammer special attention. Perhaps a dozen blows to the chisel while it is held vertical. Then examine the hammer’s striking face and chisel handle.

Now that’s done, please examine the chisel handle. What Rosetta Stone should we use to decipher these mysterious marks?

If the ink has transferred from the hammer face to the chisel mostly dead-center, then all is well. But if it is off-center, it usually indicates two things. First, the hammer handle is either too long, too short, or your grip is goofy. Second, it may indicate that the hammer’s head is cocked at the instant of impact. More on that next. In any case, a clean impact on the end of the chisel must be our goal if we are to work efficiently (“A little nod to the gods,” as Roy McAvoy would say, “for we are fallible, and perfection is unattainable”). Therefore an adjustment to either the hammer, or the way we grip it may be called for.

Let’s take a gander at the hammer’s face next. Most people discover that the ink has been scrubbed off the bottom half of the hammer’s or gennou’s face (closest to the hand), and that the ink marks transferred to the chisel are off-center. 

If the bare spots (where the ink was scrubbed off) are not centered on the hammer’s striking face, two things are indicated: First, as seen in the photo above, the hammer’s face is probably not striking the chisel’s handle squarely, but is angled at the time of impact instead of being perpendicular. Not good.

The Consequences

Why should we be concerned about something as insignificant as an angled impact? How clever of you to ask such a intelligent question!

Vector analysis suggests that an angled impact must cause the hammer to push the chisel away from the intended direction of cut, or the nail away from the intended goal (maybe even bending it). This has consequences we need to be concerned about.

The second thing these uneven marks indicate is more certain, namely that the centerline of the hammer’s head is not in-line with the centerline of the chisel’s handle at the time of impact. Once again, physics and vector analysis tells us this misalignment causes impact energy to be misdirected and wasted instead of being transmitted through the chisel to its cutting edge and into the wood being cut. The resulting feeling is a whack followed by a kick instead of a clean chopping sensation. 

Where does this wasted energy go and what does it do? It forces the chisel out of the ideal alignment and makes it feel squirrely. It beats on the hand holding the chisel. It also converts to friction heat as the blade beats on the wood instead of cutting it cleanly.

This wasted energy destroys your hammering rhythm, dulls your chisels, hurts your hand, bends your nails and makes your chisel-work sloppy. This condition can no more be tolerated than a rabid dog or a corrupt politician with a functional mouth. Or is that a rabid politician and a corrupt dog? I forget, but it’s a difference without a distinction.

In any case, if we want the hammer’s energy to enter the chisel cleanly and motivate it to cut both efficiently and precisely, we need the center of mass of the head to be oriented closely in-line with the central axis of the chisel or nail at the instant of impact. Likewise, we need the gennou’s flat striking face to impact the chisel handle or nail head squarely, not at an angle.

Solutions

Your work with a hammer will be most efficient and precise if you meet the following three conditions:

  1. Grip the hammer’s handle correctly;
  2. Use a hammer with a handle length that fits your body best;
  3. Use a hammer with head alignment and striking face angle that corrects the misalignment and cocking inherent in standard hammers as mentioned above.

The following guidelines should get your handle design in the ballpark.

When gripping the hammer as described in Post 13 in this series, your pinkie should just fit between the front edge of the handle and the plane of the flat striking face. The small circle drawn near the end of the hammer in the drawing is the pinkie, a dimensions that varies from person to person.

This means that if you place the gennou on a flat tabletop as shown in the drawing, and press straight down on the head so the flat striking face is flush with the tabletop, the toe of the handle will float above the tabletop with just enough clearance for your pinkie to fit between handle and table when you grip it properly.

So let’s take some more measurements and add them to our drawing.

Grip Layout

First, measure the diameter of your pinkie. Approximate is fine.

Next, we need to determine where to draw the pinkie in cross section on our drawing, but to do that we first need to measure the size of your grip. To do this, hold a hammer handle or stick in your hand gripping it lightly across your palm as described in the previous post in this series (not in a Hobbit-basher fist) with the heel of your palm and the first segment of your index finger resting on the handle’s back edge (opposite the head’s striking face), and your fingers wrapped around the handle. Use a pencil or pen to following mark 3 points on the handle or stick:

  1. Make the first mark at the point where your palm’s heel ends on the handle’s back edge near the butt. Let’s call this Point 1;
  2. Make another mark at the point where the first joint of your index finger begins to curve around the handle/ Let’s call this Point 2;
  3. Make the third mark where the front and back edges of your pinkie finger touche the handle’s front edge. We’ll call this distance your “pinkie diameter.”

The length of the “grip” is the distance from Point 1 to Point 2.

Going back to our drawing, layout the “grip” length or “forefinger” location as shown in the drawing.

A line drawn from the top of the butt to the intersection of the grip length, as shown by the arc in the drawing below, will give you the grip angle.

Next use your divider to transfer the location and width of your pinkie finger onto the bottom edge of the drawing’s handle touching the horizontal line. Sketch a circle representing your pinkie finger in cross-section.

With the addition of these details to your drawing, it is close to being complete. I’m excited as a puppy on Christmas morning!

In the next post in this saga spanning time and the islands of the seas we will add the handle’s top and bottom edges.

YMHOS

Christmas Cheer Christmas Is Coming GIF - ChristmasCheer ChristmasIsComing Excited GIFs

The following link is to a folder containing pricelists and photos of most of our products. If you have questions or would like to learn more, please use the form located immediately below titled “Contact Us,” or email us directly at Covingtonandsons@gmail.com.

Please share your insights and comments with everyone in the form located further below labeled “Leave a Reply.” We aren’t evil Google, fascist facebook, thuggish Twitter, or a US Congressman’s Chinese girlfriend and so won’t sell, share, or profitably “misplace” your information. May I swallow a thousand needles if I lie.

← Back

Thank you for your response. ✨

Leave a comment

All Posts in The Japanese Gennou Hammer & Handle Series