
There was no such thing as luck. Luck was a word idiots used to explain the consequences of their own rashness, and selfishness, and stupidity. More often than not bad luck meant bad plans.”

n this article we will consider how to use the Japanese “hiraganna” plane to prepare boards, sticks, beams and posts for woodworking projects. For those earnestly focused on becoming proficient with the hiraganna, and desirous of avoiding most of the confusion and difficulties those without a kind mentor whispering guidance in their shell-like, and wacking them upside the head with a memory mallet to correct their mistakes, this article will have special value.
Let’s begin this adventure through fields of daisies by breaking down the work of the hiraganna handplane into two primary activities, namely dimensioning and finishing.
What is Dimensioning?
I apologize if this first part seems tedious to those Beloved Customers already well-versed in using handplanes, but as I’ve written many times before, the Gentle Readers of this blog include newbies, professionals, and many in-between, so a few extra words to aid the comprehension of less-experienced persons will not go amiss. Your excellency’s indulgence is humbly requested.
“Dimensioning” in this case means to reduce the thickness, width and/or length of a wooden log, board, stick, beam or post to predetermined dimensions using axes, adzes, froes, drawknives, spokeshaves, saws, handplanes, files and even electrical equipment. It’s a part of a larger job called “material preparation.”
Depending on the starting sizes of the lumber you’re using, dimensioning material can consume a lot of time and energy, which is why electrical equipment such as bandsaws, tablesaws, circular saws, jointers and thickness planers are so popular. But such equipment, especially if it has the capacity to mill thick, wide lumber, can be expensive, take up a lot of space, generate ear-damaging racket and belch veritable clouds of lung-clogging sawdust. And all of them are eager to nibble on yummy fingers with or without hot sauce.
But in the smaller shop in the hands of an energetic, skilled craftsman keen on doing a higher grade of work in a calmer, more creative and healthier environment, the ancient handplane reigns tranquilly supreme.
Planes used for dimensioning must be designed and setup to accomplish the goal of removing material quickly and precisely yielding straight, flat, square surfaces free of wind on the faces, sides and edges and ends of the target board, stick beam or post.
On the other hand (the one with six fingers) planes used for “finishing” tasks are setup and tuned with different goals in mind. We will examine these two types of planes in more detail below.
It’s important to understand that, at the conclusion of the dimensioning stage in the process of material prep, the surface left by the plane need not be perfectly smooth much less shiny, just the right size, flat, free of twist and with square edges.
For this job the Arashiko and Nagadai planes are the tools of choice in Japan.
The Arashiko Plane
The Arashiko (荒仕子鉋) plane is more-or-less equivalent to the benchplane or jackplane in the Anglo-American tradition, typically a general-purpose plane suited to quick, hard work.
While the arashiko plane can, of course, take long, continuous shavings beginning and ending at the board’s perimeter edges, the job of efficiently flattening and truing boards requires more planning and technique than most woodworkers imagine.
Being shorter than, for instance the nagadai jointer plane, the arashiko plane is easier to control and therefore excels at work requiring shorter cuts including those started and/or stopped inside the perimeter of the surface being planed, to shave down high spots and ridges while avoiding valleys and ditches in accordance with a sequenced plan the craftsman formulates for his work, a technique not commonly taught to newbies, but one Beloved Customer would be wise to master.
Despite what many imagine, to use an arashiko efficiently the craftsman needs to have a plan in his head for working each board, as described above, along with trained eyes and physical skills sufficient to effectively and efficiently execute that plan instead of just thoughtlessly pulling his plane around like a goat dragging around a tin can snagged on the hair of its tail.
The Nagadai Plane
The nagadai (長台) plane is the other variety of plane typically used for dimensioning. It performs more-or-less the same role as the Bailey-pattern foreplane or jointer plane.
With a jig length longer than the arashiko, it’s especially suited to flattening bigger surfaces using longer strokes, and shooting straight, square edges, but it usually does its best work when employed after the arashiko has quickly and efficiently conquered more problematic areas on the board. It too can be used for “stopped cuts,” but not as deftly as the arashiko.
Horses for courses, as it were.
What is Finish Planing?

After a board is dimensioned, whether by hand or electricity, its surfaces, especially if they are wider than the craftsman’s plane, will often display steps left by the corners of the arashiko and nagadai plane’s blades, or shallow ditches and ridges left by start/stop cuts, or striations and ripple marks left by the circular cutters of electrical saws, planers and jointers.
The finish plane specializes in taking thin shavings to remove these residual defects producing a uniform, smooth, and even shiny surface ready for joining. And because it takes thin shavings, it does so without significantly changing the thickness or width of the board or stick. However, this is only true if one limits the number of passes with the finish plane, ergo the importance of having a plan for one’s arashiko and nagadai planes and working that plan.
The well-tuned, expertly-manipulated finish plane, therefore, is the perfect compliment to the electrical jointer and thickness planer, which explains it’s continued popularity in a world under the brutal dominion of noisy pig-tailed tools.
Although it can produce flat, planar surfaces, the sole of the finish plane is setup different from, and will typically not work as efficiently at dimensioning as, the arashiko and/or nagadai planes. More details can be found in Part 6 in this series.
In short, the finish plane, or “shiage ganna,” (仕上げ鉋) must be setup and fettled to closely follow the contours of the surface it is cutting, rather than bridging over small defects and undulations, with the goal of taking thin, uninterrupted shavings of uniform width and thickness.
Please note that the first few passes made with this plane following the ministrations of the arashiko/nagadai planes will not typically produce uniform shavings because of the thinness of the shavings it takes compared to the depth of defects left by planes and equipment during the dimensioning phase of material prep. However, two or three passes will usually remove these last few defects and get the job done, depending of course on the skill of the craftsman or goat motivating it and the nature of the wood.
We neither need nor want the finish plane to take thick shavings which would substantially change the dimensions of the board already achieved. Please be sure you understand this point and its ramifications
Next, prior to making shavings, let’s do some housekeeping.
Clean the Wood.
Before you touch any piece of wood with your valuable, noble planes, please evaluate the wood’s condition and clean it if necessary.
Please do not dismiss this admonition unless, that is, you despise your edged tools, revel in wasting money, love to see your sharpening stones pointlessly turned to mud, and feel joy at spending extra time resharpening unnecessarily dulled and damaged blades. How brutish!
The answers to “The Mystery of the Scratched Blade“ may provide some useful insight.
Let’s next consider how to make and execute a plan for planing.
Planing Plan
Most people, including me for a long time, allow their planes to wander wherever their goat pulls them without much control, happy so long as they’re cutting wood. Why? I think it’s because most people never think to make a real plan for planing. Of course, many simply get carried away with making shavings imagining that shavings equal progress. And without a real plan they end up planing areas out of proper sequence, so instead of efficiently flattening the board, they waste much energy, time and steel digging valleys and trenches deeper. While natural and satisfying, this is decidedly not professional technique.

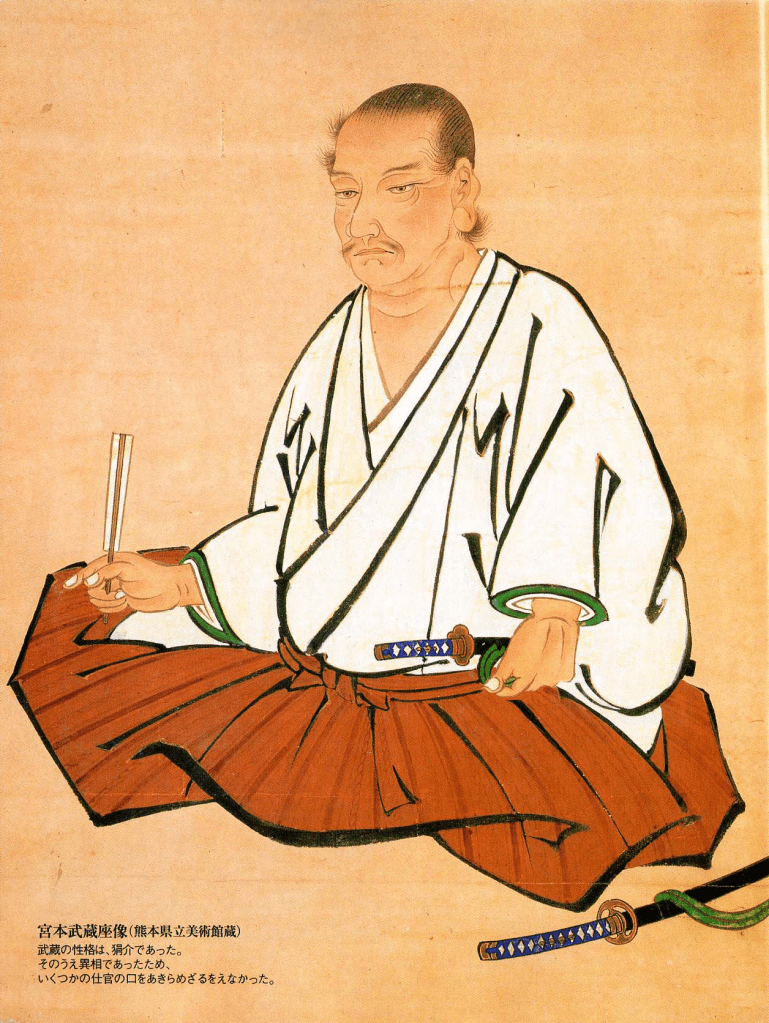
Beloved Customer may recall the words of Japan’s most famous sword saint Miyamoto Musashi In his book titled “The Book of Five Rings,” (ca 1645) quoted at the top of Part 6 of this series: “First lay his plans with true measure and then perform his work according to plan.”
With these words Master Miyamoto instructed the craftsman to do 3 things:
- Formulate a work plan;
- Delineate that plan with accurate dimensions;
- Execute the work in accordance with that work plan.
I believe these to be wise words even if they were written by a brutal killer of men. But how do they apply to using a plane?
The first step in formulating a plan for planing is to evaluate the condition of the board, stick, beam or post to be planed and identify problems by sighting down the sides and edges of the board from a low angle so that any deviations from straight/flat are apparent. It often helps to have a low-angle light source shining on the surface you’re evaluating to make defects and problems easier to spot.
Don’t forget to identify and mark any problem areas that will prevent the board from resting flat and stable on your workbench, or that might cause it to deflect, twist or wiggle lewdly when subjected to the pressure of planing.
Next, check the board carefully with a straightedge, lengthwise, crosswise, and diagonally too.
But the job doesn’t end with eyeballs and flashlights. As you identify them, mark bows, hollows, humps, high spots, low spots and twist with a carpenters pencil or lumber crayon using any marking convention you find convenient so there will be no confusion about the location and nature of any areas that need to be shaved.
The next step is to formulate the sequencing of the job.
With problem areas marked and tasks identified, at least in your mind, you can formulate sequencing based on the condition of the board and your priorities for executing the tasks.
When using handplanes to dimension lumber, your first priority must be to cut down any high spots before removing a single shaving from low spots. The marks you make will guide your work to minimize wasted time and effort.
It may sound like a lot of work, but with practice most boards can be evaluated, marked, and the requisite sequencing established in a few seconds without incurring permanent brain damage.
This completes step two of Master Miyomoto’s directions.
Preparation for Planing

When you are ready to begin planing, make sure the board is supported on a flat, stable, rigid surface free of wind. This is important.
A workbench, atedai, or planing beam is the conventional working surface, but it need not be pretty.
When planing the first side of a board or stick, if necessary (and it usually is), position slips of wood or cardboard to fill gaps between the board’s off-side and your workbench’s surface to prevent the board from deflecting downwards (away from your blade) excessively, twisting and/or wiggling, movement which will mess up your pretty plan. It makes a difference.
Depending on the condition of the board and its grain, planing it flat and true may require many changes in the plane’s direction of movement and many “stopped cuts,” so tighten the razor-wire choker around the neck of your inner badger and patiently and thoughtfully work the plan. Speed will come with practice. Remember the moto of emperors Augustus and Titus, and the Medicis: “Festina Lente.”
Plan to frequently use your straightedge to check the board’s length, width and its diagonals.
Its OK to plane one side (the off-side) of the board roughly flat and then switch to the other side so the shimming material previously placed can be removed soonest. Then switch back to the first side and finish it.
Let’s next examine how to best to hold and motivate the Japanese handplane in a professional manner.
Teamwork

Let’s consider some basic teamwork techniques for operating Japanese handplanes, none of which involve goats, thankee kindly.

Imagine if you will a halcyon day under blue skies when Beloved Customer used a short shovel, perhaps as a carefree, optimistic youth, to move heavy mud or push wet concrete around on a farming, construction or cleanup project. You will recall it was hard work, but that the job went faster and easier when both hands, joined together by the shovel handle, worked together as a team transmitting the motivating power of shoulders, back and legs into the tool. It’s the same with handplanes, except for the yucky mud and concrete.
But whether shovel or plane, such teamwork doesn’t develop automatically for most people. Indeed, more often than not a human team in the real world either doesn’t really form or it breaks down quickly. C’est la vie, mon chéri? But when a team comes together working with a single mind to a common purpose, well now, that’s a beautiful thing!
It’s a simple thing for hands and body to work in harmony, but there will be failures at first, so let’s consider a common breakdown mode to make detection and remediation easier.
For example, instead of both hands working in concert with the wooden body of the eager handplane, frequently one hand/arm does most of the work while the other hand/arm just tags along, pretending it’s working hard but actually just freeloading. Of course, seeing this, the shoulders, back, hips and legs become disgusted and end up sitting in the shade dozing and drinking beer instead of helping in the teamwork. Do you have a brother-in-law like that?
The point is, please make sure both hands and your entire body are working together and not shirking.
So with that bad example behind us, let’s assemble our effective team by assigning each hand a specific role.
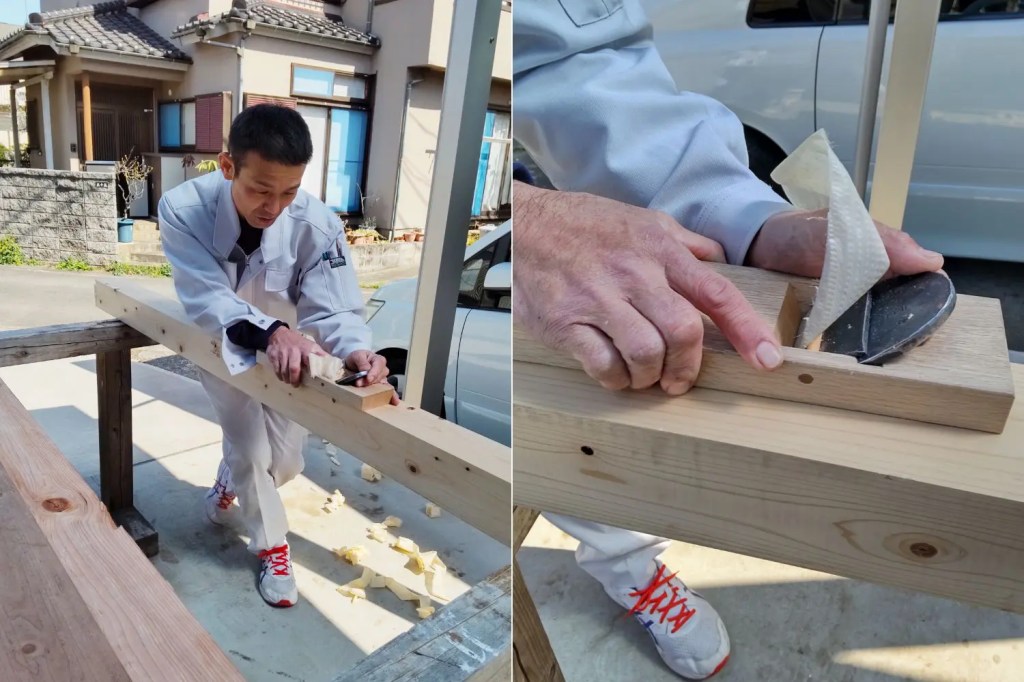
But first, please carefully examine the craftsman’s hands in the photo below.
The Right Hand’s Job

Assuming (1) you are right-handed, and; (2) you will be pulling the plane towards you along your right side, the right hand’s job is to press straight down on the plane focusing pressure primarily on the contact strip in front of the mouth.
It’s a fundamental trait of right-handed people (not goats) to want to use their right hand to apply heavy pushing or pulling forces on a tool, and their left hand to control its direction, so the division of labor your humble servant is proposing may seem clumsy at first, but if you focus the teamwork will become second nature quickly, I assure you.
I know I’m being irritatingly repetitive, but for good reason, so please remember that your right hand’s job is NOT to pull the plane, not even a little, but rather to apply downward pressure on the plane’s body causing the contact strip in front of the mouth to firmly press on the board in turn while keeping the plane’s body level.
Next let’s look at how the right hand should grip the plane’s body.
With the blade’s face (the side with the brand) and chipbreaker facing you, place the tip of your right thumb on the left hand side of the plane’s body aligned with the mouth and about 3/4 down the side.
Place the tip of your right hand’s middle finger in the same position on the opposite side of the body. You may need to adjust your finger’s positions somewhat, but if placed correctly a well-made plane should balance nicely between just these two fingertips when you lift it. This is an intentional design feature, BTW, and one reason why standard finishing planes are seldom wider than 70-80mm.
With your fingertips positioned thusly, lower your palm so it rests on the upper surface of the body, touch the tip of your index finger against the blade’s face or the chipbreaker, and press your ring and pinkie finger on the right side of the body.
Using this grip the plane should be absolutely stable in one hand, even when held in the air or upside down, assuming your hands aren’t small or weak.
If you can’t control the plane with this grip, you may be doing it wrong, or the plane may be extra long, or extra short, or the plane’s body may be too wide for your hand. Please adjust your grip as necessary.
The Left Hand’s Job

The job of your left hand is NOT to press down on the plane but only to PULL it towards you. This division of labor between left and right hand is important.
Place the pad of your left thumb on the blade’s face. It doesn’t need to be centered.
Place your index finger either on top of the blade’s head, or wrap it behind the blade. Depending on where you placed your index finger, your middle finger can either stretch behind the blade and rest on the wooden body with your remaining fingers press against the flat end of the body, or you can position your middle, ring and pinkie finger all pressing on the tail end of the body. Use whatever position feels most comfortable and pull the plane in a straight line.
Moving a plane using only the left hand is pretty much the opposite of how Western planes with their tote handle and knob are used. But once your body learns this division of labor your effectiveness and efficiency using Japanese handplanes will skyrocket, I promise.
Combining the Right Hand and Left Hand
Now that we’ve assigned different but complimentary jobs to each hand, we must next put them to work as an harmonious team like the draft horses and plowman in the photo above.
This will feel unnatural at first, and indeed, until muscle memory is developed, most people quickly forget these principles and revert to the careless techniques their pet goat taught them. You will too. But when your plane stops behaving, review the words in this series, wack yourself in the forehead with your wooden “memory mallet” as if you were a green apprentice back in olden times, and get back to work. The pain will feel so good!
Now that we have our grip, the division of labor and our team figured out, let’s bring the rest of our body into the dance.
The Handplane Shuffle
Using a Japanese hiraganna handplane can involve many stances, some standing. some walking, some sitting, and even laying down occasionally. Interesting footwork is sometimes necessary.
When sitting or standing while planing shorter boards or sticks, no special footwork is necessary unless you get an irrepressible urge to boogie down, baby. Indeed there simply isn’t enough space in this humble, unworthy blog to go into the subject in exhaustive detail, but there is one standing technique I would be remiss to neglect, one that has never seen the footlights of the Soul Train stage, one that your humble servant calls the “hiraganna shuffle.”
Unfortunately, C&S Tools’ IMAX video studio is closed for renovation and our photography crew, lighting and sound technicians, makeup artists, drapers and choreographers are currently all on a well-deserved vacation, probably enjoying prodigious quantities of neon-colored adult beverages containing colorful fruit and little umbrellas right about now, so we won’t be producing a video about the hiraganna shuffle starring hip hop hamsters and hipper combat robots anytime soon. Sorry about that. But I will try to explain the technique.
A good example of a carpenter using a finish plane on both solid wood and glulams with joints cut by CNC machinery can be seen in this video.
Obviously this scene of good old Shoyan the carpenter at work wasn’t staged, nor was a professional makeup artist involved in this serious example of the hiraganna shuffle. And unlike the photo at the top of this article, it’s not narrowly-focused kezuroukai stuff, but typical of 90% of high-quality classical architectural structural woodwork.
It’s worthwhile noting that the beams he’s working, even the glulam, are made of well-behaved, easily-planed softwood, probably hinoki cypress. I wish all woods were so pleasant to work.
If I may be allowed to digress for a moment, this carpenter (he has many practical videos on youtube, BTW) makes two comments Beloved Customer may find interesting.
One of his comments is that the shine produced by a handplane will vary with the direction of the cut, so it behooves one to pay attention and vary the planing direction accordingly. Obviously a pro of the first water.
His second comment is that the final planed surface will not only have a shine, but will repel both water and dirt making the beam last a long time even when exposed to the elements. This is an important and true observation supported by scholarly research at top Japanese Universities. Just one more reason the finish plane reigns supreme and why so many wooden Japanese temples and shrines have lasted centuries without stain, paint or varnish.
Anyway, so just what are the steps in the hiraganna shuffle, and can it be done in steel-toe safety shoes?
- Stand on the left side of the board facing the end where you intend to begin the shaving.
- Place the plane on the end of the board with its mouth just off the edge.
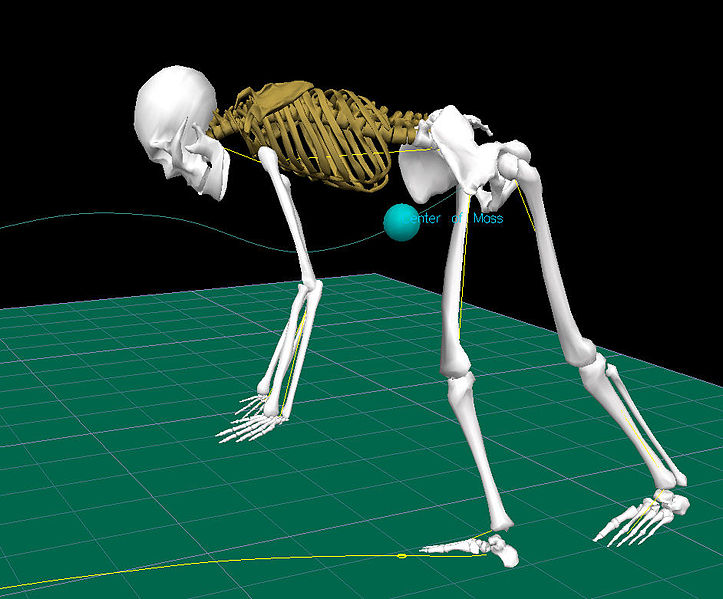
- While gripping the plane as you prefer, lean forward over the board while extending your arms, and take a half-step back. At the same time extend your right leg back and keep your left leg under you. Most of your weight should now be on your left foot and your right hand, with little weight on your right foot and no weight on your left hand. Don’t move the plane during this step.
- To initiate the cut move your hips along with your body’s center of gravity backwards while directing the forces of this movement of your legs and hips through your left hand into the plane while applying downward pressure with your right hand. Don’t try to use the devastating power of they mighty arms, Oh Lord of Thunder, but just the momentum produced by your legs, hips and back.
- Have faith and pull through the stroke with a positive attitude. The speed you generate will depend on the wood and your urgency, but it’s your mind that will get the job done, so long as your plane is sharp, so pull through the stroke without hesitating.
- Depending on how long the board and the stroke you intend to take are, as your hips and hands shift backwards you will reach a point where the weight is gone from your left foot and you will begin you lose the leverage needed to keep pulling the plane. Just before you reach that point, however, stop the plane’s movement briefly, shift/shuffle your left foot back and your center of gravity with it, and then move your right foot back and extend your leg, while once again moving your hips back while extending your arms.
With practice, the pause in the plane’s movement in step 6 can be eliminated, but it’s sometimes difficult to do smoothly when making heavy cuts. In any case, try to keep the pause brief so you don’t lose much momentum, and most importantly, don’t lift the plane or allow the blade to shift to or fro, side to side or up and down during this pause because any shift of the blade will result in a discontinuity in the cut and perhaps even a step. Yikes!
When making fine finishing cuts in well-behaved wood, the cut can be kept continuous by taking tiny backward steps as this guy is doing.

Execution
As in most things, a good start is the key when planing. Once the cut is started with confidence, just keep your hands working as a team, connected by the plane, and confidently pull through the cut like a draft horse pulling a plow, all while keeping the plane’s body level.
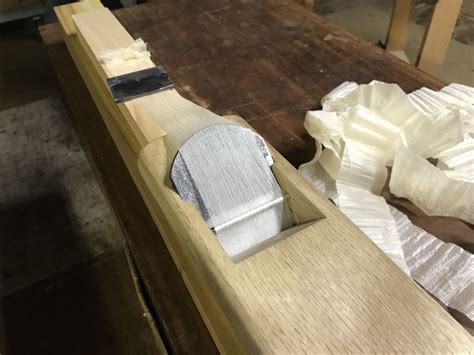
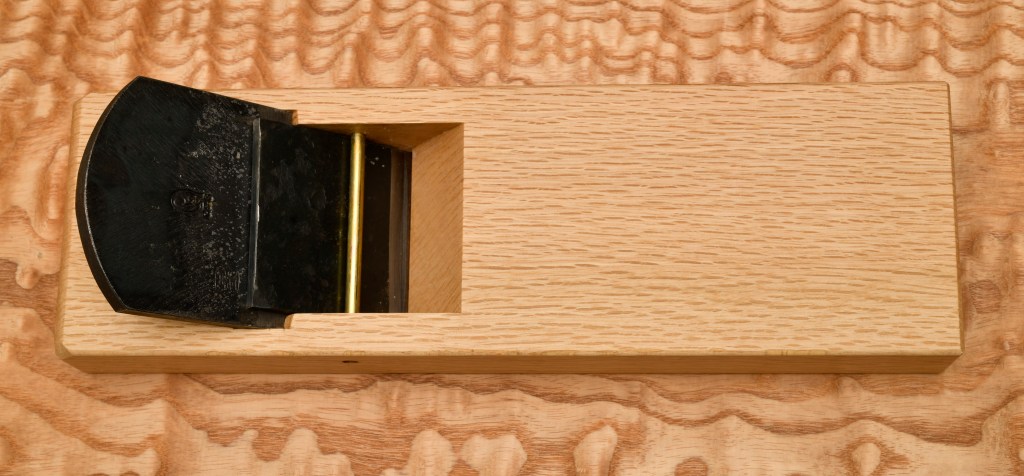
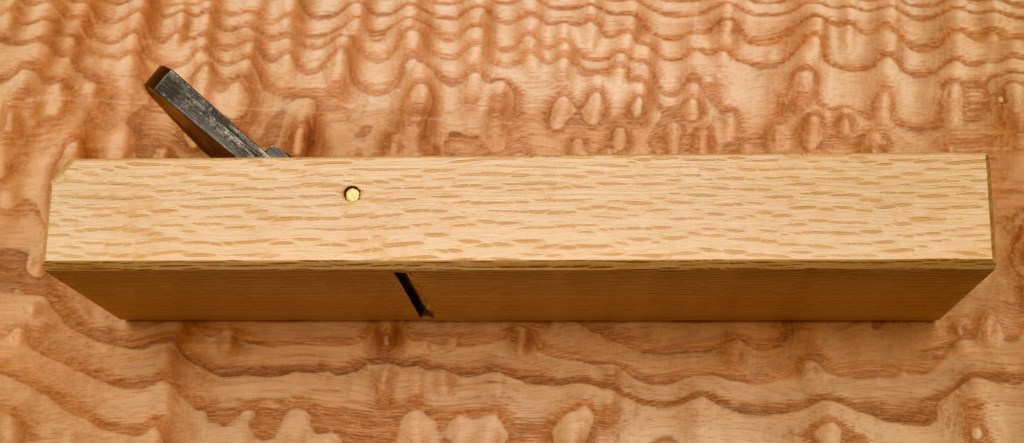
As an example of how its done, let’s feed my favorite 80mm (2-sun) finish plane a snack. It’s a happy tool with a wide body but slender mouth and only one big, very sharp tooth. It always beams a silvery smiles and sings a little song of steel and oak as it munches on yummy wood.
I’ll take a single, uninterrupted shaving from one end of this board to the other. Even though most cuts with a handplane are not this boring, it will illustrate some important techniques Beloved Customer will need to master.
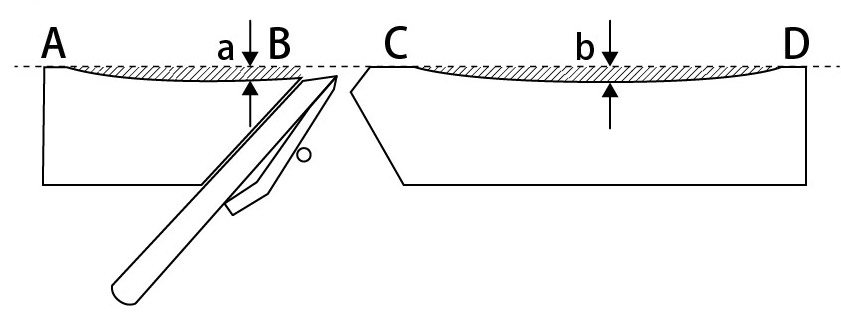
I’ll start the cut with the plane’s mouth resting just off the far edge of the board, the tail end hanging entirely off the board, the contact strip in front of the mouth and the contact strip at the leading edge of the plane’s sole firmly resting on the board. In this position, so long as I don’t apply any downward force with my left hand, there won’t be any downward force trying to tilt the plane out of level.
While gripping the plane’s body and pressing down with my right hand, and pulling the plane towards me with my left hand, a shaving will begin to flow out of its mouth, assuming the board is fairly flat, the blade and sole are in good fettle, and the blade is adjusted for a nice cut.
The plane is moving along smoothly now, but just guess what will happen if I carelessly apply downward pressure with my left hand about now? If the plane is an arashiko or nagadai specialized in making flat, straight surfaces, nothing tragic will occur except perhaps the cut will wobble a bit. But since it’s my finish plane, the setup of the sole will cause the blade to be levered entirely out of the cut depositing rotten egg on my face. I hate it when that happens, so I’ll do my best to not press down with my left hand. Daijoubuka?
The plane continues it’s run and before you can say bobsurnunkel, the contact strip at the leading edge of the plane’s sole runs off the end of the board and the blade stops cutting, even though the plane’s motion continues. Because I am a highly intelligent craftsmen (or was it a wild and crazy guy?), I’ve been thinking ahead, and shifted the downward pressure of my right hand so it acts just on the contact strip in front of the mouth, relieving pressure on the sole everywhere else. As the plane’s mouth goes off the end of the board (did I just hear a little scream of fright from my gentle plane?) I hold onto the plane with both hands to keep its body level and prevent a Peter Pan performance, then follow-through for perhaps half a plane length, ending this pass.
Repeat as necessary.
Please note that this requires one to actually manipulate and intelligently control the plane using one’s hands rather than just thoughtlessly pulling it around like the aforementioned goat does his tin can.
Final Tips
Prevent Deflection
As mentioned above, in order to plane truly, the board or stick you are working must be firmly supported on a relatively rigid surface.
You also need to prevent the downward force your plane applies when in motion from deflecting the board or stick downward away from the cutting edge because the plane can’t cut a surface that deflects away from it, and therefore cannot make it flat. If such a support condition is left uncorrected, your plane’s best efforts will be as productive as a goat.
To resolve this extremely common problem, you may need to roughly plane the off-face of the board or stick oriented downwards, and/or shim the board to prevent excessive deflection/twisting. Remember, you located and marked areas on the board likely to deflect like this during your planning efforts.
Many will studiously ignore this advice. To those I am prepared to offer a wonderful deal on a huge parcel of shovel-ready resort hotel property located on the banks of a majestic chrome-plating settlement pond in North Korea. Great fishing!
Keep the Body of Your Plane Level
Please observe that these techniques don’t rely on fancy hand movements, psychic abilities or a masters degree in wood butchery, but rather on always focusing pressure on the contact strip in front to the mouth, and instead of simply pressing down on your plane like it’s an iron to make your pleated pink apron pretty (say that 10 times fast), you must use your hands as a team to keep the plane’s body flat on the board you’re planing, and level as it leaves the end of the board.
Imagine that, real hand skills!
Use Your Whole Body
Remember to not rely on just the strength of your arms, oh might Thor, but rather on the strength of your shoulders, back, hips, and legs. They will add a lot more momentum-retaining mass and provide better control too.
Cut Confidently
Start cuts with confidence and pull through the cut. Any hesitation and your plane will giggle at you through its narrow little mouth.
Perform Timely Dental Hygiene
Sometimes the mouth of your noble plane will become clogged with shavings, but frequently allowing the mouth to develop a tightly-compacted clog will damage it, so if you feel a clog starting, stop work immediately and give it a dental exam to figure out why. Depth of cut too deep? Blade setting wrong? Chipbreaker getting in the way or not functioning properly? Slivers of wood, pixie toenail clippings or fragments of divorce lawyer’s hearts jamming the mouth? The only way to know for sure and prevent more clogging is to check.
Clear the clog by either removing the blade and chipbreaker, or using a splinter of wood to pick the mouth.
Keep It Lubed
Oil the chipbreaker’s edge, the blade and the surface in your plane’s mouth opposite the chipbreaker’s bevel whenever you remove the blade to help shavings flow freely and to reduce clogging. You do have the essential oilpot on-hand right?
Clean the Wood
Before planing use a steel brush to scrub and clean the surface of wood that has been exposed to dust and/or grit. You must get any embedded dirt/soil/sand out of the wood first or your tools will be damaged and your time wasted like tax money in California.
Cut 1/8″ from each end of each board, stick, beam or post, or at least use a block plane or drawknife to chamfer the ends before planing to remove the most stubborn, deeply-embedded and well-hidden grit. This is really important because the grit will always be there even if you can’t see it, I promise.
Conclusion
In my experience, many of the Westerners who receive these instructions without benefit of a mentor or memory mallet close at-hand immediately and meticulously ignore the critical points, and then, when their results prove inconsistent, assume the instructions are crapola smothered in piquant marinara sauce. I strongly urge you, Beloved Customer, to do better, please, because if you internalize these instructions and develop the correct muscle memory, for the rest of your life you will find Japanese handplanes to be joyful and efficient tools for working wood. Thus it was with your unworthy servant.
This article is by no means exhaustive or comprehensive, but it should be enough for a good start. It’s far more than I had for many years.
YMHOS

If you have questions or would like to learn more about our tools, please click the “Pricelist” link here or at the top of the page and use the “Contact Us” form located immediately below.
Please share your insights and comments with everyone in the form located further below labeled “Leave a Reply.” We aren’t evil Google, fascist facebook, thuggish Twitter or the Chinese Communist Party’s coordinator of funding and blackmail for US elections, and so won’t sell, share, or profitably “misplace” your information. If I lie, may my goat eat all my socks.


Other Posts in the Japanese Handplane Series:
- Handplanes Part 1 : East vs. West
- Handplanes Part 2: Blade Adjustment
- Handplanes Part 3: The Blade
- Handplanes Part 4: Fitting Blade and Body
- Handplanes Part 5: The Chipbreaker
- Handplanes Part 6: Setting-up and Maintaining the Sole
- Handplanes Part 7: Bedding the Blade – Correcting Some Common Misunderstandings
- Handplanes Part 8: Operator’s Manual


Leave a comment