The Japanese Gennou & Handle Part 14 – The Drawing: Part 3/6

Top: A 100monme (375gm) gennou head by Hiroki mated to a new Osage Orange handle. Bottom: A 60monme (225gm) Kosaburo classic ryouguchi head joined to a mellowed Osage Orange handle. The difference in the size of the eyes and weights of the heads combine to make handles of different dimensions. Therefore the design begins with the head.

“This life’s hard, but it’s harder if you’re stupid.” 

George V. Higgins, The Friends of Eddie Coyle

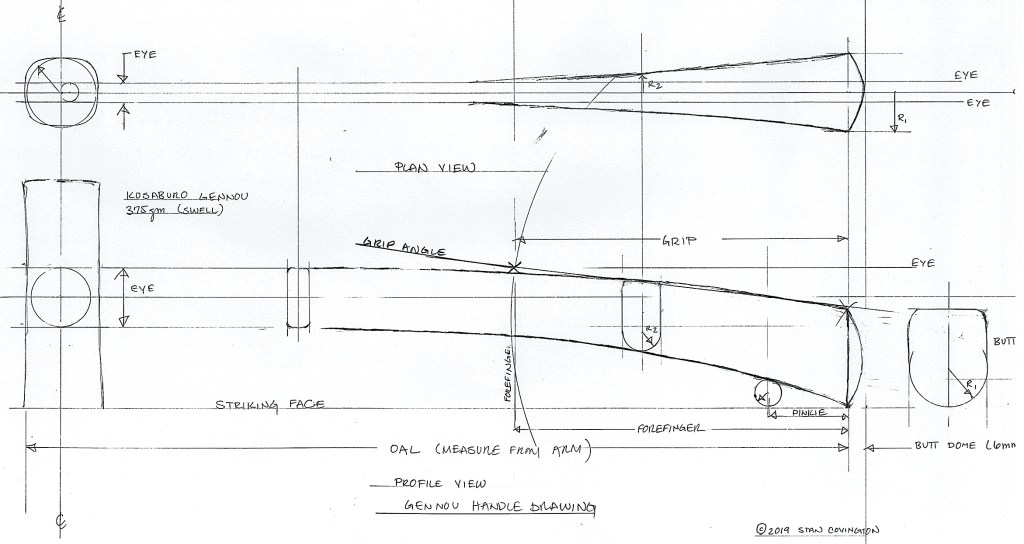
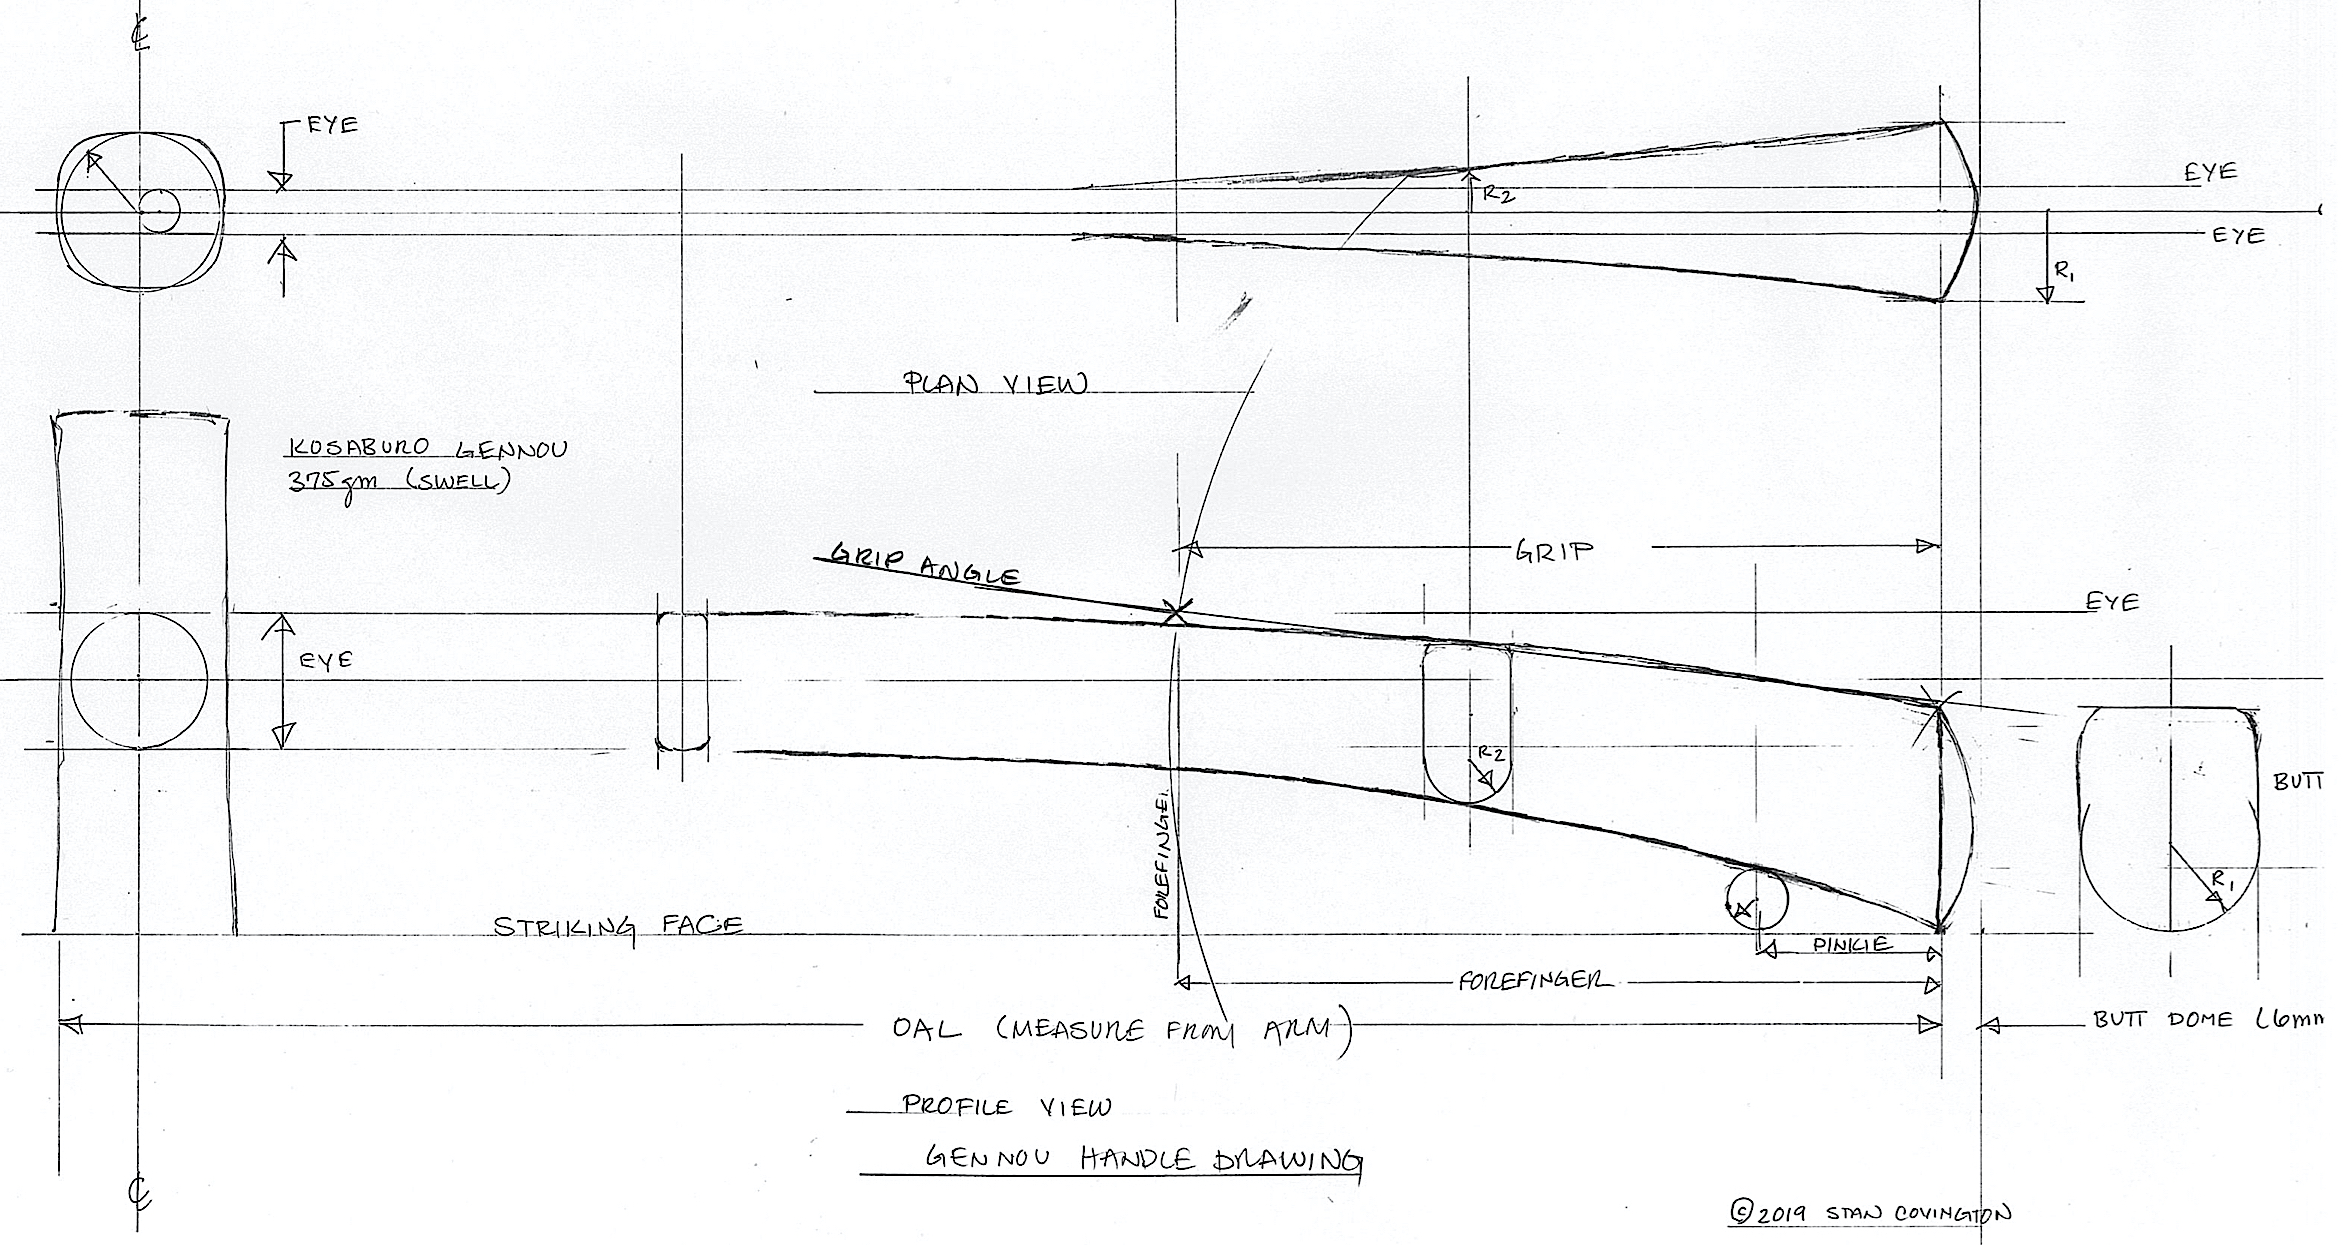
In the previous post we started the drawing of our gennou handle using the gennou head as a template. In this post we will determine critical design details including the overall length, butt dimensions, and typical cross sections.

But first, since we are talking about making a tool we must grip in the hand, let’s consider how to hold it. You would be surprised at how many people get this simple action wrong. It matters in the context of this article because we are designing a minimalist tool for which the smallest details matter.

A perfect example of the “hammer grip,” or as I was taught, the Hobbit basher grip.”

The Grip is the Grip

There are many ways to hold a gennou handle. The hobbit-basher grip in the fist is popular among many hammer wigglers, even those with five fingers, but it provides both low power and poor control, good for Bagginses but not so much for woodworkers.

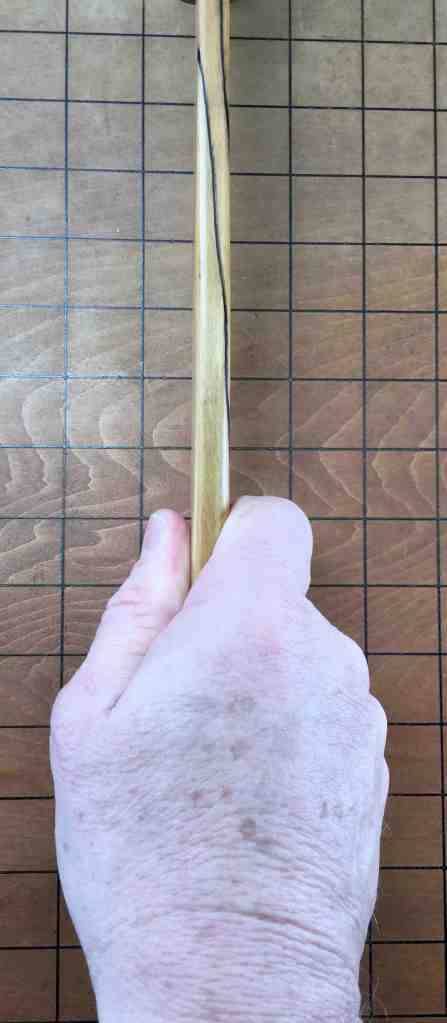
The most efficient grip is to orient the handle diagonally across the open palm, touching the heel of the palm at one end and the pad at the base of the index finger at the other. The index finger and other fingers then wrap around and under the handle on one side, with the thumb gripping the opposite side of the handle so its is pinched between the index finger and thumb. This is similar to the grip recommended by the famous golfer Ben Hogan.

This method of holding the handle provides significant advantages:

  1. The wrist is able to rotate more freely and to a greater degree;
  2. The length of the hand touching and motivating the handle is much longer than the Hobbit-basher fist grip thereby providing more leverage (couple) with less effort and more control;
  3. The touchpoints at the thumb, index finger, and heel of the palm triangulate the handle in the hand and mind so the user always knows exactly where the gennou’s face is located and its angle with respect to the target without looking at or fiddling with the gennou.
  4. The grip on the handle is more secure so the handle wiggles around less in the hand reducing blisters and stresses.

If you find this grip difficult, please stick with it until it becomes a good habit that displaces a bad habit.

Determine Overall Length

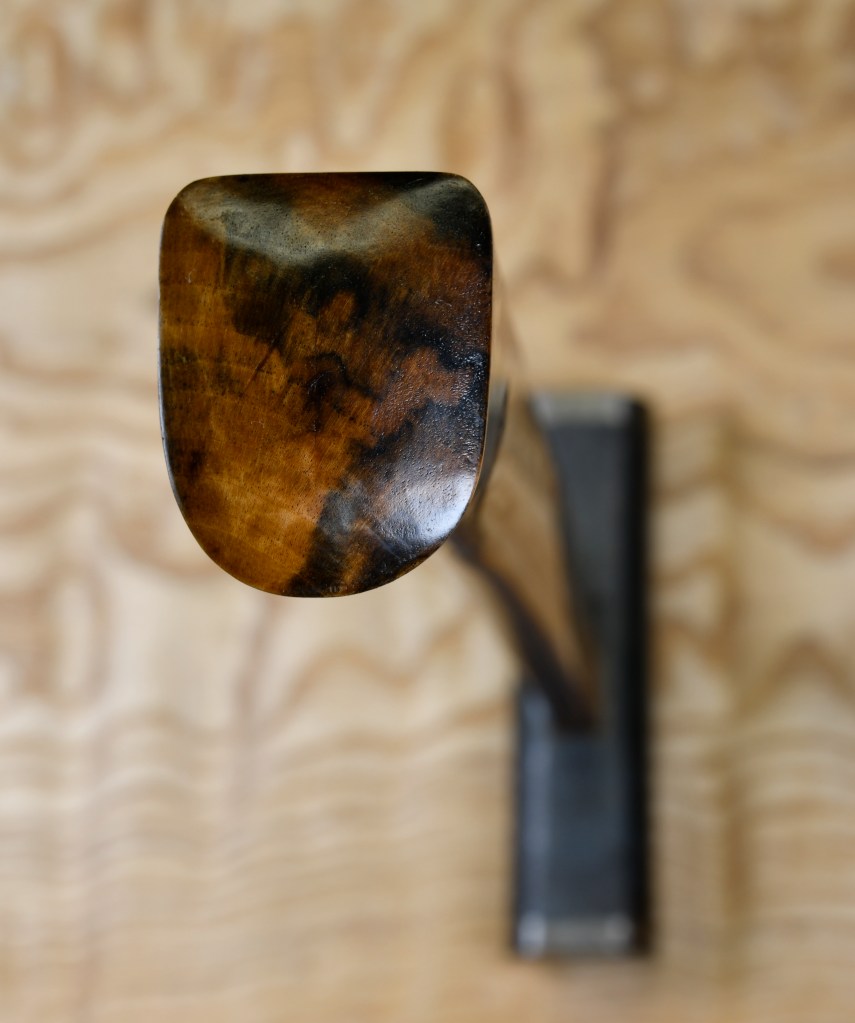
The next thing we need to add to our drawing begun in the previous post is the gennou’s overall length (OAL) measured from the handle’s butt (not including the dome) to the Vertical Centerline through the head’s face. This dimension comes from your body with some adjustment for how you grip and swing.

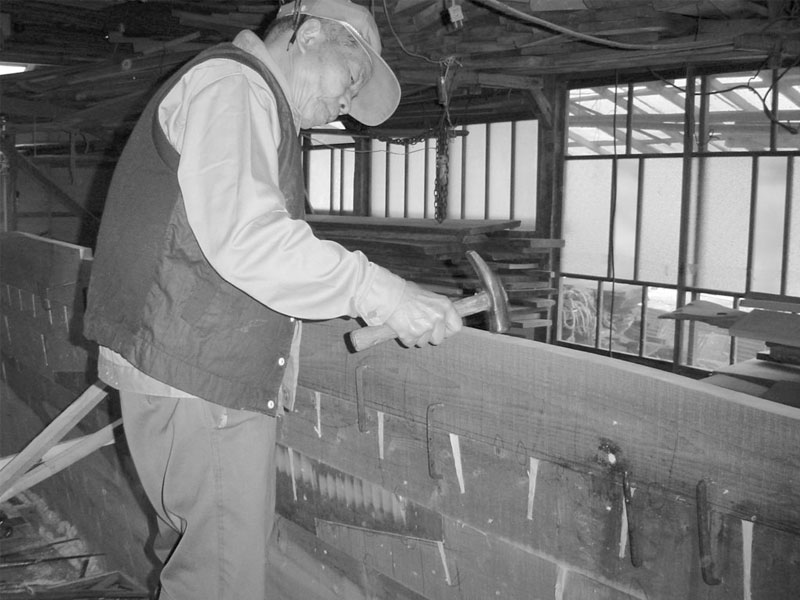
For most people, a good starting length can be measured by bending your hammer arm 90° at the elbow and laying a straightedge or folding ruler across your upward-facing palm and forearm. Touch one end of the straightedge against the tendon at your elbow and measure the distance to the base of your middle finger. In my case this 12 inches, but I’m not a big guy.

A classic Kosaburo gennou head mounted to a 12″ osage orange handle.

You may want to add an extra inch to your first handle. If you later decide the handle is too long, you can whittle it shorter.  Remember, the first handle you make will be experimental, and probably not a keeper. I suggest you plan on making at least three over a period of a few years and after sufficient testing to determine the ideal length for you.

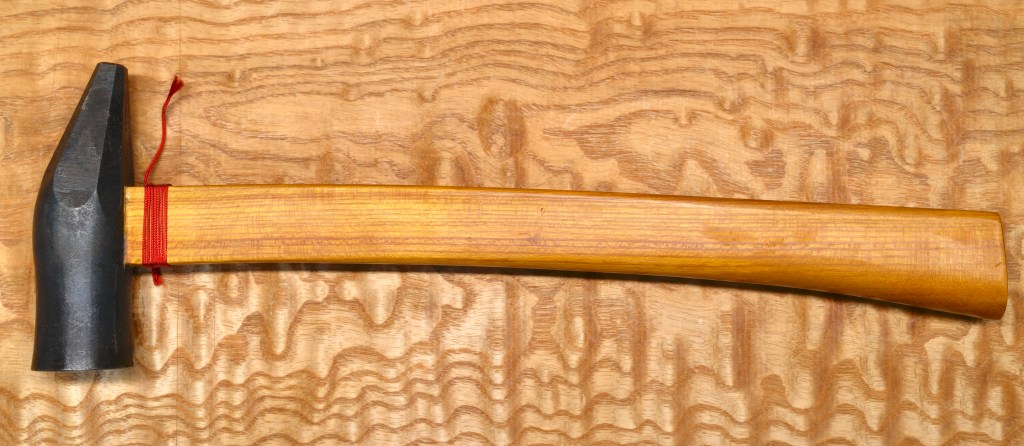
As seen in the photo above, with the head held in a flat palm (not a fist), and the fingers wrapped over the head, the butt just touches my bicep tendon. In my case, by total coincidence, this is 12″. Add ¼” to the length for the domed butt; you will need it. At 5’8″ I am not a big man and have neither long arms nor big hands. Your handle may well be different.

Add this OAL dimension to your drawing.
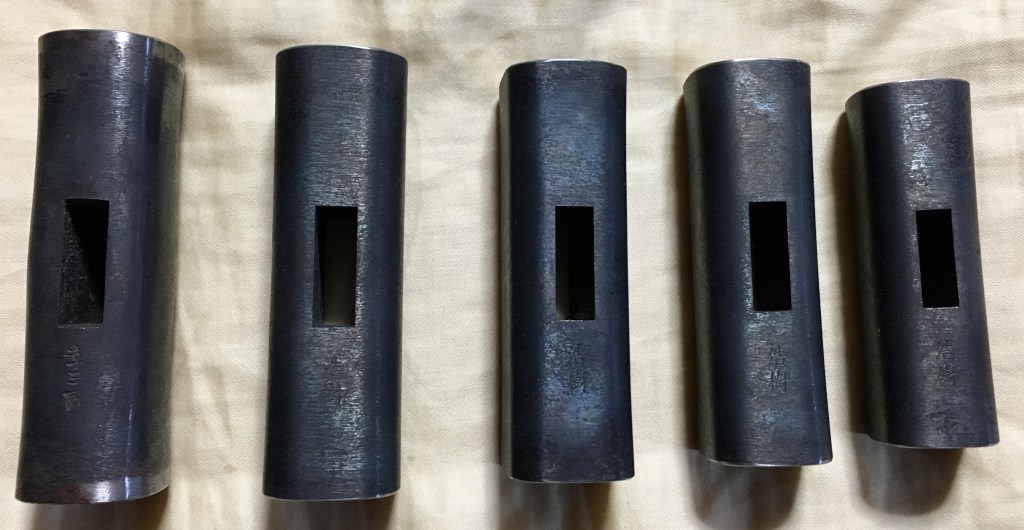
Measure the Butt

So far we have focused on the head and overall length. The next details we need to determine are the dimensions of the butt, most importantly, its height.

The height of the butt is important not only because it determines how large the grip area’s circumference will be, but also because it partially controls the angle of the grip, and therefore the angle of the head and striking face at the time of impact.

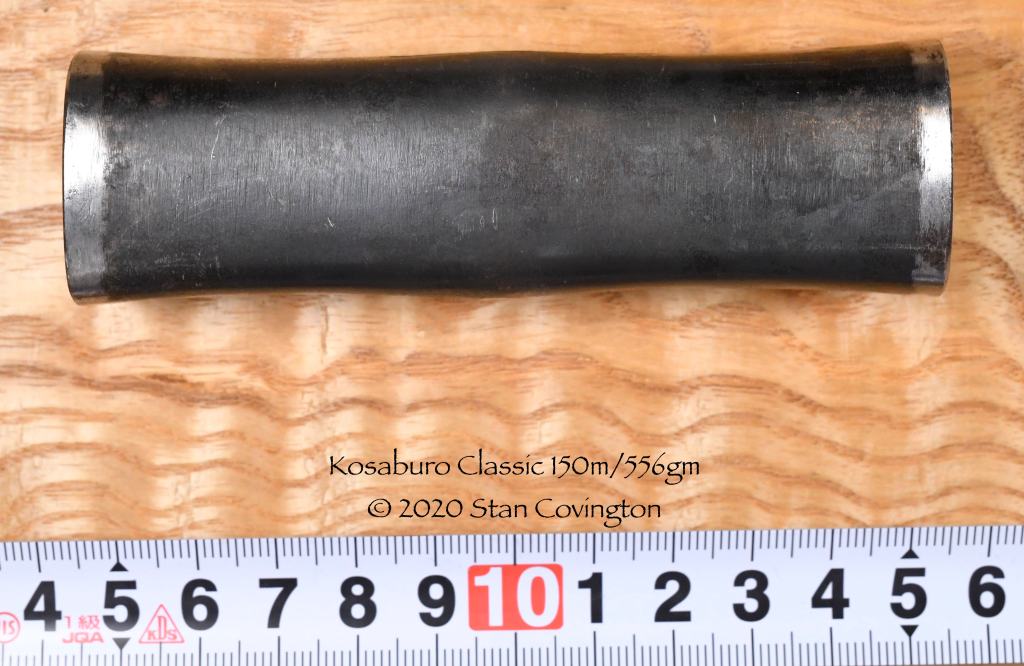
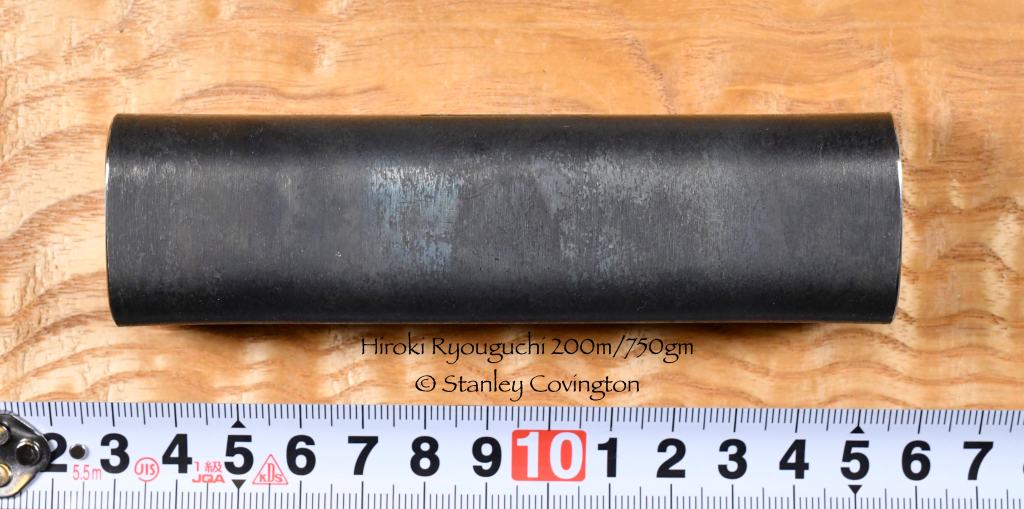
Only you can decide what dimensions will work best for you, but since we need to start somewhere, I suggest you make the handle’s butt at least l” (25mm) wide (seen from above), and 1-⅜” (35mm) high. If you have large hands or prefer a large grip, or are using a heavier head, then the flat area should be wider to reduce pressure on the hand.

Reaction Forces

Next let’s consider the forces acting on the handle and the user’s hand, and their influence on the hammer’s performance and user’s comfort and endurance.

Commercial handles typically have a symmetrical oval cross-section that looks good, is easy to manufacture, and is consistent with the one-size-fits-nobody philosophy convenient for mass-production and mass-marketing. Sadly, this oval cross-section ignores the three reaction forces that act on the user’s hand. 

The first reaction force occurs when the user brings the hammer up in preparation for a strike. In this case, a force couple (matched forces) presses the handle into the first joints of the fingers and the heel of the hand (assuming, of course, one is gripping the handle as recommended above and not like a demented mountain troll).

The second reaction occurs when the hammer reaches the top of its swing and the user changes the direction of the hammer head towards nail or chisel. At this point a force couple is produced which presses the handle against the first joint at the base of the user’s index finger, and the tips of the other fingers. The pinkie finger has a major role in retaining the user’s hold on the tool, you will notice.

The third reaction occurs when the speeding hammer head impacts nail or chisel and the handle kicks back at the user’s palm and fingers, just as Sir Isaac Newton predicted.  

If these reactions are balanced to the object being struck/cut by the weight and speed of the hammer, this cycle can be smooth and efficient and the kickback forces minimal. But if the hammer is too heavy, or too light, the forces the user must apply to the hammer and the force and pressure of the resulting reactions can be become tiring and even bruising. A good handle made to fit the head and the user’s body and hammering technique will improve efficiency and reduce wear and tear on the user’s body.

What is this wear and tear you say? All the aforementioned reaction forces cause the handle to kick the muscles, tendons and bones in the user’s hand, and can cause bruising. Even if it doesn’t bruise, after a long day of chiseling the hand wielding the hammer will be more worn and tender than when the day started.

Even if you never grow tired and pain means nothing to you, Oh Master Blaster, these reaction forces tend to push the handle out of alignment in the user’s hand shifting the next hammer stroke slightly off-line, and twisting the hammer’s face slightly out of ideal alignment. Have you ever noticed how your hammer becomes wobbly after two or three of strikes in quick succession? Guess why that happened.

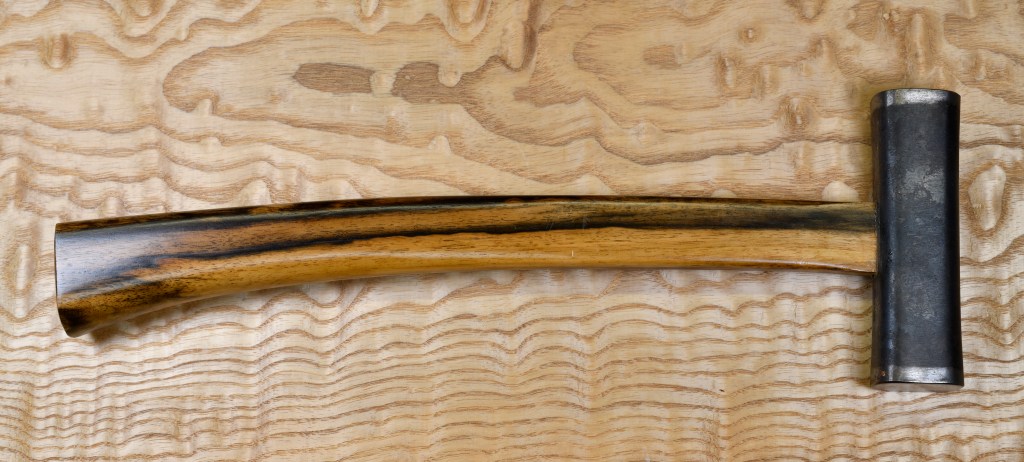
Back-edge/Top Cross-section: Flat

In the case of this Yamakichi gennou by Hiroki, the striking face is is towards the right side of the photo. Please notice the shape of the handle with respect to the striking face.

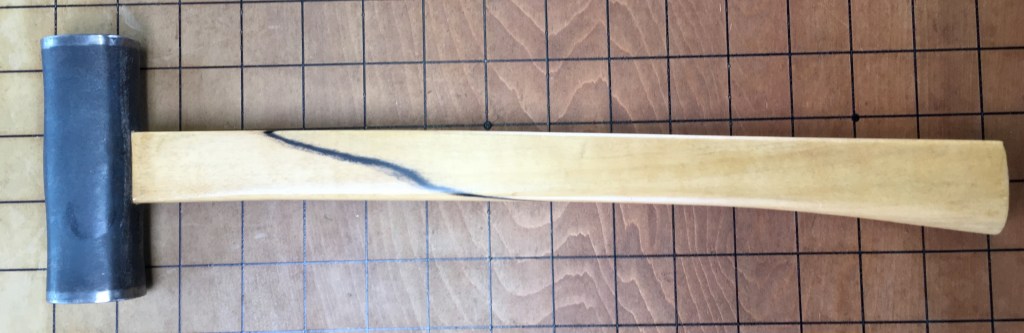
The solution to these troublesome physics problems is simply to make the top/back edge of the hammer in the grip area more-or-less flat instead of round or oval, a modification that will spread the reaction forces more evenly across your hand, preventing bruising and reducing fatigue. It will also stabilize the handle in your hand improving unconscious alignment and reducing twisting.

You have probably never seen a handle shaped like this much less used one. It may look uncomfortable in your mind’s eye or on paper, but it is comfortable in-use. Try it before you dismiss it.

Another big advantage of the flat on a hammer handle is one you have probably never thought about, but the lack of which has wasted much of your time while using hammers. When doing woodworking especially, we tend to set our hammers down while we change position, move the workpiece, remove chips, enjoy a refreshing beverage, or shoo away a pesky feline overseer. Often, we don’t recall the angle or direction we set the hammer down, so when we pick it back up we must double check two things by eye: First, where our hand is located on the grip, which distance of course determines how far the center of the striking face is from our hand; and second which face/ claw of the hammer is facing which direction.

I don’t know about you, but I want my hand to learn this information and get the hammer oriented properly without my having to take my eyes or attention away from the work at hand. Anything else is stupid.

The flat and rounded contours on the handle immediately tell your hand which direction the striking face is oriented, and where your hand is located on the handle, all without using your eyes or giving the matter a single thought. It’s a psychic handle, sorta (ツ)

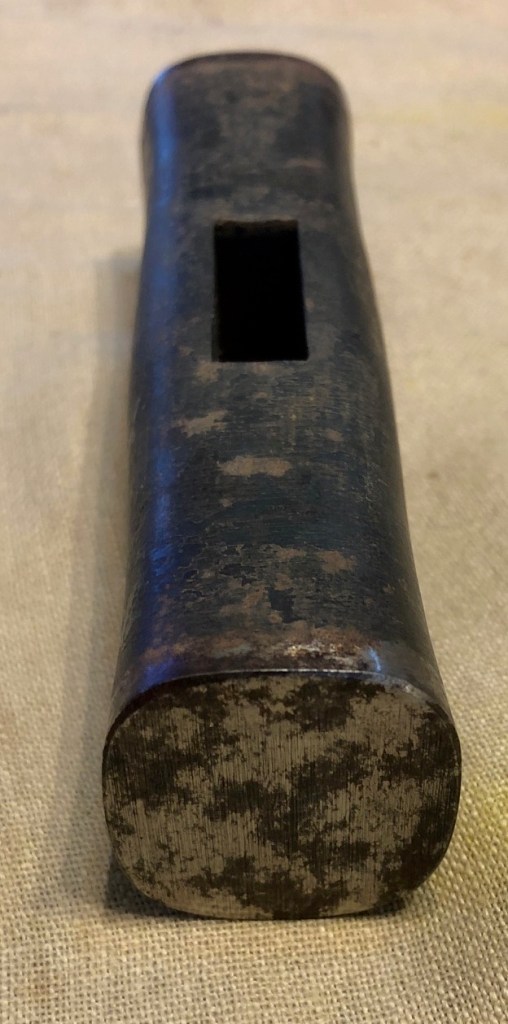
Front-edge Cross-sectional Shape

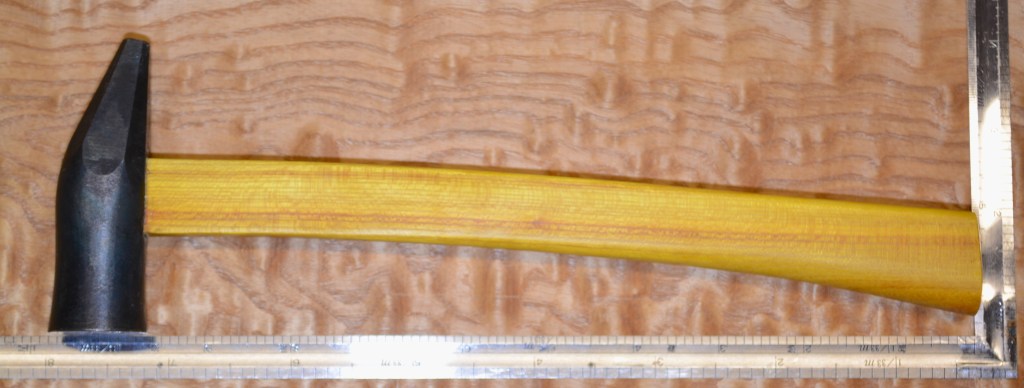
While the top/back of the handle is more or less flat, as seen in the photo above, the lower/leading edge (surface facing the chisel or nail) should be circular at the butt, gradually transitioning to a flat surface as it nears the eye. Some people like this surface to be egg-shaped. I prefer a simple circular radius. For your first gennou handle, I recommend you begin by making it a simple circular radius and shave and whittle it to fit your hand more precisely later.

The reasons for making this surface rounded are simply to maximize the surface area of contact between hand and handle, and to make the grip comfortable.

Put all this into a simple sketch and transfer it to the drawing. At this point the end view of the butt should be shaped more-or-less like a pregnant letter  “D” with the curved surface oriented downwards towards the bottom of the page of the profile drawing.

Side Surface Cross Section: Flat and Parallel

So far, we have determined the back/top edge will be mostly-sorta-kinda flat, and the front edge will be more-or-less rounded. Next, let’s examine the two side surfaces.

Looking at the butt in cross-section, the handle’s right and left sides should be perpendicular to the flat on the handle’s back/top edge (plan view). These curved-plane surfaces begin at the head’s eyes, and curve down the handle all the way to the butt, with some radiusing and softening along the way, of course.

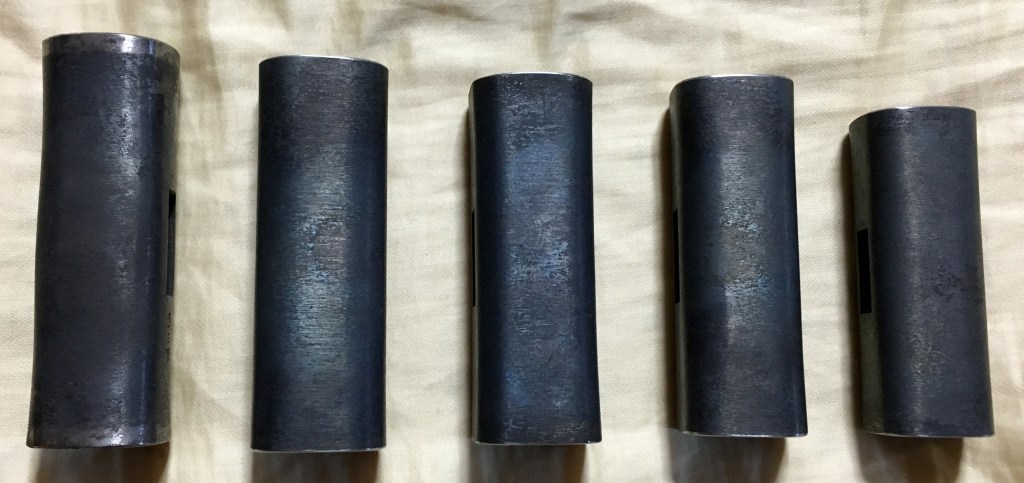
Please note that, unlike commercial wooden hammer and axe handles that need a goofy flair below the eye to keep steel wedges from splitting the poorly-made handle, this minimalist gennou handle does not. It is an elegant, handmade craftsman’s tool, not a nail-bender or cockroach killer, and simply doesn’t need wedges.

Instead of a cancerous bulge, the handle remains a few shavings thicker than the eye for some distance until it smoothly flairs into the grip area. This design has serious advantages we have discussed in earlier posts in another series about what hammers to use with chisels, which I will briefly summarize.

  1. A minimalist, thin handle experiences less air resistance, and wastes less energy, a serious concern in a tool moved as quickly and as often as a gennou;
  2. A thin handle transits fewer shocks and vibrations to the user’s hand;
  3. A thin handle is easier to pinch between index finger and thumb providing maximum control in the Ben Hogan golf club club grip;
  4. If and when the handles loosens (it’s only wood after all, not eternal Chinese-made plastic-covered bent sheet metal), the user can tap the handle further into the eye quickly tightening the handle without pausing work. Note that this is not necessarily the ideal permanent fix, although it certainly can be.

Some will look at the thin handle and fear it will break. This is always a possibility with any wooden handle, but your humble servant has never broken a properly-made gennou handle, although I have broken plenty of commercial hammer handles. The key is to make your handle from the right wood, with proper grain orientation and minimal runout (we’ll talk more about these details in future posts), and to always use the head, not the handle, to drive nails and wack chisels. Duh.

We will talk about these specifications and details in future posts in this story of crime and passion.

In the next post we will determine the angle between the head and the handle. If you think this angle is unimportant then you’re in for a big surprise.

YMHOS

PS: We will provide a comprehensive document covering all the steps of making a gennou handle to our Beloved Customers (may the hair on their toes never fall out) upon request.

A confused, lost Hobbit basher. And just look at that dried-out skin! Won’t you please help him find his way back to a dark, damp woodworking forum somewhere? A stop-off for a pedicure and a moisturizing treatment would not go amiss.

The following link is to a folder containing pricelists and photos of most of our products. If you have questions or would like to learn more, please use the form located immediately below titled “Contact Us,” or email us directly at Covingtonandsons@gmail.com.

Please share your insights and comments with everyone in the form located further below labeled “Leave a Reply.” We aren’t evil Google, fascist facebook, thuggish X, or a US Congressman’s Chinese girlfriend and so won’t sell, share, or profitably “misplace” your information. May my nose hairs explode all at once if I lie.

← Back

Thank you for your response. ✨

Leave a comment

All Posts in The Japanese Gennou Hammer & Handle Series

The Japanese Gennou Hammer & Handle Part 13 – The Drawing Part 2/6

This relatively large gennou’s handle has a pronounced curvature, a design detail that is neither artistic or whimsical but is based on sound engineering principles employed to achieve specific functional objectives.

The least initial deviation from truth is multiplied later a thousandfold.”

Aristotle (384-322 BC)

n the previous post about designing a handle for your gennou hammer on paper we discussed the reasons for making a drawing and a few of the details. In this post we will begin by representing the head and its key lines in our drawing.

But first, a disclaimer. Some Gentle Readers may find the idea of making a drawing in preparation for fabricating something as apparently simple as a handle from a single stick of wood nonsense. Indeed, I felt the same way once, but I was wrong. That is not, heaven forefend, to imply that Gentle Reader could ever possibly be wrong in anything you undertake, or less than a towering intellectual giant, only that the gennou handle is not as simple as it appears.

You may recall your humble servant mentioned the two points listed below in a previous post. They remain valid principles that should guide your eye and hand when making a drawing. Or, if wood costs you nothing and your time is worth even less, feel free to ignore them.

The first point goes like this: “When making some things, past a certain point there is simply no room for either improvisation or trial & error without starting all over again.”

The second point is a little longer, but no less valid: “The principle of “less is more” absolutely applies, but achieving an elegant and functionally superior “Less” is neither accidental nor serendipitous, but can only be consistently realized through “More” thought, planning, and eyeball time, things difficult to do without a drawing.”

A Sample Drawing

The drawing below is an actual drawing your humble servant prepared for one of his gennou incorporating a 375gm (100monme) classical-style head forged by Kosaburo. Although it’s a simple drawing made entirely by hand, it includes all the critical details other than the species of wood and flow of the grain. Please notice that it consists of a top view, side view, end view (butt) and 2 sections, all combined in a one-sheet, compact drawing.

You will want to make a similar drawing incorporating all the lines shown but adapted to your gennou head, your body’s dimensions, and your preferences.

You can download this drawing in jpeg format by clicking the link below.

Draw the Key Lines for the Side-view

The gennou that resulted from the drawing above. This handle has a distinctive curve that is neither a result of warpage nor evidence of your humble servant’s advancing senility, but an intentional design feature we will discuss in the next post. I’m supposed to take these Gingko pills, but I forget why…

You can make your drawing on paper or wood, with wood being the more durable medium since ancient times because it does double duty as both parchment and drafting board, and can be erased entirely with a handplane. Moreover, the combined drawing and drafting board can be hung on a nail on the wall for future reference without fear of deterioration. But paper is easier to use.

Begin by making one horizontal line across the sheet of paper. In the drawing above, this is the horizontal line touching the flat face of the hammer labeled “Striking Face.”

When orienting your head on the drawing, its flat striking face must be touching this line.

Gennou heads usually have a maker’s brand stamped into the steel body adjacent the flat striking face and facing the handle’s butt. Please orient this brand closest to the “Striking Face” line.

You can of course orient the brand facing either the butt end or the tenon end of the handle. In Japan the standard convention is the butt, making the brand a little less visible. Some Westerners prefer the opposite orientation because, I assume, they want the brand to be immediately visible. This is understandable and entirely practical, but from the viewpoint of the Japanese craftsman it is akin to using underwear as headgear.

Your humble servant would never be so rude as to dictate fashion to anyone, after all, beauty is in the eye of the bean holder.

Back to the drawing, next make a vertical line, of course perpendicular to the Striking Face Line you just drew, and to the left of the page through the centerline of the gennou head. We will call this the “Vertical Centerline.”

Next, draw a horizontal line parallel with the Striking Face line, through the perfect center of the head’s eye (the mortise hole in the gennou head). To do this, you will need to first mark the center of the eye on the Vertical Centerline.

Begin by measuring the distance from the actual head’s striking face to the endwall of the eye closest to the striking face, and transfer this distance onto the Vertical Centerline starting from the Striking Face line using either a caliper or a sharp compass. Then measure the interior length of the eye, and add this distance to the measurement you just made. Now you have the location of both endwalls of the eye located on the drawing. Divide this line in half using your calipers or compass, and you now have located the center-point of the eye.

Be sure to precisely measure and mark these distances because if you get it wrong, problems will result. Please see the quote listed above of the Greek dude Aristotle’s opinion on the subject.

Next draw a “Horizontal Centerline” through the center-point of the eye across the sheet, of course perfectly parallel with the Striking Face line.

Next draw two more horizontal lines from the top and bottom endwalls of the eye across the page. The width of these two lines is labeled “Eye” on the side-view drawing above.

Place the head on the drawing, with its flat face perfectly flush with the Striking Face line. You may want to lay/clamp a piece of wood along the Striking Face line make sure you get the head oriented properly centered on the vertical and horizontal centerlines you drew earlier. Then draw the outline of the head on the drawing.

Insert the wooden layout tenon you made previously into the eye, place the head back on the drawing as before, and transfer the layout tenon’s outline onto the drawing. If the eye is perfectly perpendicular to the head’s centerline then the layout tenon may not be necessary, but using the layout tenon helps to ensure the eye’s angle is accurately represented in the drawing to avoid unpleasant surprises.

Draw the Key Lines for the Top-view

Moving onto the Top View, make another horizontal line 5~6 inches above the Horizontal Centerline across the page. This line will be the centerline through the head and handle seen from above. Measure the width of the eye (the narrowest dimension), divide it in half, and transfer it to the drawing. Draw two horizontal lines from the location of the eye’s endwalls across the page. These lines are labeled “Eye” on the Top View.

Place the gennou head on the drawing and trace the outline of the striking face.

The butt of the gennou shown at the top of this article. Notice it is domed. Once again, not a sign of sloppy work or senility, but an intentional and entirely functional feature, the lack of which could result in the destruction of the handle during installation (seriously). Notice also how the top edge of the butt is nearly flat/straight, while the lower edge (leading edge) is a uniform radius. These two details are neither artistic nor whimsical but have distinct functional purposes.

The head, it’s striking face and profile, the width, length and angle of the eye, the centerline of the handle in both side view and top view are all now accurately represented on the drawing. 

In the next post in this series we will measure your body and add those details to the drawing. You don’t need a Savile Row tailor for this task, but if you have one just lounging around on your couch, hogging the remote control, drinking your beer and smoking your cigs, go ahead and put the bum to work! (ツ)

A big-nosed Dandy leaving London’s Saville Row in a sharp morning coat. The extra hand is that of his out-of-frame bride and not a birth defect. Please notice that his head covering may resemble a small garbage can but is definitely not underwear.

YMHOS

The following link is to a folder containing pricelists and photos of most of our products. If you have questions or would like to learn more, please use the form located immediately below titled “Contact Us,” or email us directly at Covingtonandsons@gmail.com .

Please share your insights and comments with everyone by using the form located further below labeled “Leave a Reply.” We aren’t evil Google, fascist facebook, thuggish X, or a US Congressman’s Chinese girlfriend and so won’t sell, share, or profitably “misplace” your information. May I inhale a thousand needles if I lie.

← Back

Thank you for your response. ✨

Leave a comment

All Posts in The Japanese Gennou Hammer & Handle Series

The Japanese Gennou Hammer & Handle Part 12 – The Drawing 1/6

A gennou with a modern-style 180monme head (700gm/25oz) by Kosaburo and a black persimmon handle.

A drawing is simply a line going for a walk. 

Paul Klee

This is the first of six posts in a sub-series describing why and how to make a full-scale drawing in preparation for making your gennou handle. 

Please note that the principles described in these posts on Japanese gennou handles apply to all varieties of hammer and axe handles, and can be adapted to Western tools with great success.

Why Bother Making a Full-scale Drawing?

The greatest fun in working wood as a hobby for your humble servant is watching an object evolve in my hands, sometimes magically becoming better than what I had imagined it would be. Many Gentle Readers have the had same experience.

My day job in Japan’s construction industry is not so spontaneous or fancy free: I spend too many hours each day planning, discussing, reviewing/marking-up, and writing about complicated drawings, so drafting a drawing to make something from just a single stick of wood feels kinda sorta silly on the one hand and too much like real work on the other. But despite these conflicting emotions, please understand I am dead serious about the importance of a drawing, and you should be too.

So why am I recommending you make a drawing? There are 3 reasons: 

1. Record & Refine Ergonomic Parameters

A gennou design must begin with the fixed parameters of your gennou head, but there are several ergonomic measurements from your own body you will need to incorporate into your handle design and meld with the specific details of the head you select. This isn’t difficult to do, but because every head, every body, and therefore every handle is different, and because there are a surprising number of details that must be taken into account, it can be difficult to get everything right without a drawing, especially the first few times.

2. Develop an Elegant Minimalistic Design

The second reason for making a drawing before sawdust is that the gennou I am teaching you how to make is in every way a minimalist object comprised of only two simple components, the details of which require thoughtful planning to get right. 

Allow me to share a couple of points about minimalism I learned from observing the successes and failures of world-class architects and designers in New York, San Francisco, London, Hong Kong and Tokyo: When making some things, past a certain point there is simply no room for either improvisation or trial & error without starting all over again. Assuming one is not so fatuous or deluded as to accept a monkey’s scribbling as high-art, you can imagine the resulting potential for wasted time and money and brain cells.

The famous architect Frank Loyd Wright once said: “An architect’s most useful tools are an eraser at the drafting board, and a wrecking bar at the site.” When used with skill, which of these tools do you think is the most cost and time effective?

Here is wisdom: The principle of “less is more” absolutely applies, but what most people not involved professionally in the design and fabrication of expensive minimalist physical objects do not realize is that achieving an elegant and functionally superior “Less” is neither accidental nor serendipitous, but can only be consistently achieved through “ More” thought, planning, and eyeball time, things difficult to do effectively without a drawing.

How does this apply to making a simple gennou handle, you ask? Excellent question; You really are paying attention, I see. Once you have cut or shaved away too much wood (even a single shaving can easily be too much), there can be no more thinking, planning or eyeball time without starting over, wasting much of your valuable time and wood. Best to avoid that nonsense if possible, don’t you agree?

3. Take a Mulligan

The third reason for making a drawing is related to the first and based on the unfortunate likelihood that your first attempt is unlikely to produce perfect results. But don’t be discouraged because your second attempt will be much better. If you begin with a drawing, by the third attempt you will have figured out precisely what works best for you, knowledge that will serve you well your entire life. I promise.

In order to accomplish the goal of the perfect handle in just two or three iterations you will need to record the measurements, assumptions and changes you made each time so you can effectively refine them without having to start over from zero each time. A drawing is the best tool for this purpose.

A drawing will also help you avoid repeated errros. A drawing will also help you avoid repeated errros.

What to Include in the Drawing

I recommend you make a full-scale drawing of the handle viewed from the side, the top (back) edge, and the butt for a total of 3 viewpoints on a single piece of paper. You should also make cross sections at several locations at the handle inside the side view.

It is also useful include general dimensions, such as overall length, width at the eye and width at the butt to help you select a suitable piece of wood.

Developing Drawing Skills

Many have no experience making drawings. That’s perfectly OK. The only way to become competent at making simple drawings using orthographic projection is to do it.

The basic idea of orthographic projection is to represent a 3-D object in 2-D drawings, usually a side view(s), top/bottom view, and end view(s), but for the purpose of drawing a simple gennou handle without power windows and tuned exhaust, a side view, top view, end view and a few simple sections are plenty.

The drawing below is one I made for one of my gennou showing just top and side views. As you can tell, it starts with the head. Sorry, no sections. I will provide more drawings beginning with the next post.

A handmade drawing for gennou hammer made to fit the author with an 85monme Kosaburo head. You can download this drawing for your reference by clicking the button below.

If you are serious about making quality objects in wood long-term, the ability to make a simple drawing is a skill you should develop. The drawing doesn’t need to be pretty, it doesn’t even need to be detailed or show numerical dimensions if you are making it full-scale and for your own use, but it should represent and record things like critical dimensions (length and width), straight line/curves, and the locations of features.

“Why can’t I just do it in my head?” you ask? Of course that is an option. There are times when we all shape wood as we imagine it, the instant we imagine it.

But a drawing lets you combine and adjust details, and allows you to wait some time to grow “fresh eyes” to reexamine the design. A drawing makes it easy to make fine adjustments to a minimalist object. It lets you share the design with others and get their opinion. It lets you record your successful designs for future use. It is a powerful tool, one that will improve your woodworking skills.

And with practice, the act of making drawings refines your eye and your imagination, improving not only your design ability on-paper, but your ability to create an object in your head and examine it from different angles. Just ask any second-year architecture student.

Tools for Drawing

I will go into more details about drafting tools every woodworker should own and become proficient with in a future post, but in preparation for producing the drawing we will begin in the next post, and assuming you will make the drawing on paper instead of a board, you should gather the following minimal tools:

  1. Drawing board: A plain wooden board with four straight sides and square corners at least a little bigger than the finished gennou. Any smooth, flat board will suffice;
  2. Paper: Better quality drafting paper, vellum, or mylar is best, but any smooth, white paper will suffice;
  3. Masking tape: To secure paper to board (drafting tape will damage the drawing least);
  4. Straightedge: 12″ or longer (must be truly straight);
  5. Mechanical pencil with lead;
  6. Eraser: A good quality one that won’t leave smudges;
  7. Square: A clean framing square without burred edges will suffice;
  8. Drafting Triangle: A 45° plastic or steel drafting triangle, with minimum 8″ legs (cheap is OK);
  9. Compass: With pencil;
  10. Divider: With sharp points;
  11. Vernier caliper (not mandatory but helpful);
  12. Eraser shield (not mandatory but helpful).

The Gennou Head

So far in this series we’ve looked at a lot of gennou heads of many different varieties and weights made by different blacksmiths. Now that we are on the brink of making a design drawing, however, the time for talking is over. If you don’t have a good gennou head in-hand, please get one. The design of your handle simply cannot begin without it.

In the next installment in this story of love and longing we will begin our drawing. Please sharpen your pencils and get your eraser ready.

YMHOS

Can I eat your eraser? Pleeeeeease?

The following link is to a folder containing pricelists and photos of most of our products. If you have questions or would like to learn more, please use the form located immediately below titled “Contact Us,” or email us at Covingtonandsons@gmail.com.

Please share your insights and comments with everyone by using the form located further below labeled “Leave a Reply.” We aren’t evil Google, facist facebook, thuggish X or a US Congressman’s Chinese girlfriend and so won’t sell, share, or profitably “misplace” your information. May I swallow a thousand needles if I lie.

← Back

Thank you for your response. ✨

Leave a comment

All Posts in The Japanese Gennou Hammer & Handle Series

The Japanese Gennou Hammer & Handle Part 11 – Decorative Gennou Heads

Simplicity is the ultimate sophistication.

Leonardo Da Vinci

n the previous post in this series about the Japanese gennou hammer we looked at an old-fashioned laminated gennou with some simple surface decoration by Hasegawa Kosaburo and discussed its construction and benefits.

In this post we will take a gander at some other styles of expensive heads with decoration for the sake of being decorative.

Decorative Gennou Heads

A chemically-blackened square head by Masayuki with his name engraved in red-filled characters

For a higher price, more decorative gennou heads can be had. Some of these have various surface textures and applied finishes, while others have designs etched into their surfaces, with the more expensive varieties even having designs of dragons, tigers, zodiac and religious figures deeply hand-engraved into their surfaces.

A “suminagashi” pattern-laminated octagonal head by Masayuki
Hand engraved images of the gods of wind and lightning. Despite the polished hachimaki strip, these are not laminated heads.

One of my favorite gennou is an 80monme square head with the figure of a monkey acid-etched on one side and some Chinese characters on the other referring to the patron god of those born in the Year of the Monkey, which I am. Sorry, I don’t have the hammer with me here in Tokyo, so no pictures. It was a gift from my Japanese Mother-in-Law (RIP) and so I value it highly although I don’t use it anymore.

She had it blessed by a Shinto Priest at the same time he came to perform the annual blessing of their book-binding factory in Sendai, so I consider it more of a good-luck charm than a working tool. It has not aged gracefully.

BTW, it’s not at all unusual for carpenters, construction companies and factories to have Shinto Priests perform similar ceremonies at least once a year to purify their tools and equipment and to bless their workplaces for safety purposes. Both of the large construction companies I worked for in Japan had Shinto “kamidana” shrines made of wood mounted high on the interior walls of their offices, and smaller ones installed at their major jobsites, to encourage deities and local spirits to protect the jobsite, people and tools, and to drive off malevolent spirits that might cause harm. Belt, suspenders, and safety harness.

Construction companies in Japan are especially old-fashioned this way. One large construction company I worked for in Japan was established 147 years ago, just a youngster by Japanese standards. Perhaps the oldest construction company in Japan is Kongo Gumi Co., Ltd. established in the year 578 AD. Other large and old Japanese construction companies include Kajima Corporation, established in 1840, Shimizu Corporation, established in 1804, and Takenaka Corporation, established in 1610. Long memories and deep traditions.

A typical kamidana shrine in an office.

Of course, decorating a gennou head adds nothing to its functionality while significantly increasing cost, so highly-decorated heads are probably more suitable for ceremonial purposes, for displaying in a collection, or as gifts rather than practical tools. In fact, the older generation of Japanese craftsmen I learned from, now all either in their late 80’s and retired or passed on to the big lumberyard in the sky, considered such decorated tools frippery beneath the dignity of a respectable “shokunin” (a wabi sabi sorta thing) and would mercilessly rib someone who brought a gaudy tool to the jobsite or workshop.

Aging Gracefully

If you are considering purchasing a decorative gennou head, one factor you should seriously consider is the appearance of the head after many years of use. After all, a quality gennou head should be a lifetime investment and an heirloom tool. It may look as beautiful as Raquel in her fur bikini when new but will it look better than my scratched and rusty etched zodiac monkey head hammer after 20 years of use?

A “suminagashi” pattern-laminated square head by Masayuki

Some heads pictured in this article show a pattern-welded structure incorrectly called “damascus steel” in the West, or “suminagashi,” meaning “ flowing ink,” in Japan. This structure is not the famous damascus steel developed in the Levant centuries ago and made famous by swordsmiths. It is simply a mix of at least two different types of steel, one of which resists oxidation/discoloration (usually containing nickle) when exposed to an acid wash, producing a pattern. Theoretically, this construction neither improves nor harms the performance of the steel so long as the deferential hardening process is handled properly, but personally, while it looks fun, I distrust this material for gennou heads and blades that must do real work.

Hand-engraved dragon

Other heads have received fancy decorative surface treatments that neither harm nor improve a hammer’s performance, supernatural effects aside. However, being decorative, one should consider the durability of such treatments. Chrome, nickel, copper plating, bluing, chemical pickling, or burnt-silk for instance, will not remain unchanged long in the case of a hammer used frequently on the jobsite or if laid on the concrete floor of a workshop frequently. Indeed, color case hardening, pickled finishes, paint, and even most bluing will look nasty and may rust before too long.

Perhaps the most durable surface finish is the black oxide that forms naturally on the steel surface during the heat-treatment process because it is reasonably rust resistant and naturally harder than the steel/iron it covers. It’s my favorite, but for some reason doesn’t seem to attract the ladies. Bummer. Decisions, decisions…

YMHOS

Raquel Welsh wearing her iconic fuzzy bikini in the 1966 film that made her an international sex symbol “One Million Years B.C.

The following link is to a folder containing pricelists and photos of most of our products. If you have questions or would like to learn more, please use the form located immediately below titled “Contact Us,” or email us at Covingtonandsons@gmail.com.

Please share your insights and comments with everyone by using the form located further below labeled “Leave a Reply.” We aren’t evil Google, facist facebook, thuggish X or a US Congressman’s Chinese girlfriend and so won’t sell, share, or profitably “misplace” your information. May the bird of paradise fly up my nose if I lie.

Leave a comment

← Back

Thank you for your response. ✨

All Posts in The Japanese Gennou Hammer & Handle Series

The Japanese Gennou Hammer & Handle Part 10 – Laminated Gennou Heads

This image has an empty alt attribute; its file name is kosaburotansetsugennou.jpg
This image has an empty alt attribute; its file name is kosaburotansetsumei.jpeg
A modern-style (post 1890’s) gennou with high-carbon steel faces forge-welded to a soft jigane (low-carbon/no-carbon) iron body. You can see the difference in color between the soft jigane body and the hard high-carbon steel faces. This laminated construction was commonly used in Japan before inexpensive steel imported from England became available. The finish is hand-filed, and the blacksmith’s name, “Kosaburo,” meaning the “happy third son,” is hand-engraved. A high-quality gennou head is truly a lifetime tool. In fact, I have used this head hard as a professional and hobbyist for over 35 years, as you can tell from the dings and light corrosion. The handle is made from Japanese kurogaki wood (black persimmon, ebony genus), a rare variety valued for high-end cabinetry and casework in Japan. Kosaburo’s eyes are always as close to perfect as a man can forge them by hand, and better than all but a few expensive machines can manage.

Fast is fine, but accuracy is everything.     

Wyatt Earp

n the previous post in this series we talked about the difference between mass-produced and hand-forged gennou heads. In this post we will take a look at a more antique style of gennou head.

A Laminated Gennou Head

Prior to the advent of inexpensive steel imported from England, gennou had bodies forged of soft low/no-carbon steel with wafers of hard, high-carbon steel forge-welded to each face. The shiny strips of steel called “Hachimaki,” meaning “ headband,” polished onto the sides of the ends of gennou heads sold nowadays, while purely decorative, are vestiges of this old-timey method.

The photos above are of a laminated gennou head hand-forged by Kosaburo which came to me long ago as payment for a debt. Laminated gennou heads made this way are still available today at exorbitant prices. I understand Hiroki occasionally makes a few.

Some believe the combination of hard face and soft body produces a softer impact and less vibration making the gennou less tiring to use. Others prefer the slightly different sound they imagine a laminated gennou head makes. I have used this laminated Kosaburo head for many years, and while I am very fond of it, I cannot detect any advantage to its laminated construction.

While laminated gennou are much more expensive to purchase, the blacksmiths I have spoken with have told me that they are significantly easier to make than one-piece high-carbon steel gennou since they do not require the more difficult differential hardening process. And they all agree that laminated construction provides no practical advantage to the end user. A curio in other words. Nothing wrong with that so long as one’s expectations are calibrated accordingly.

If you are just getting started in woodworking, or are on a tight budget, a quality mass-produced gennou head will do the job if you clean up the eye and replace the handle with one that fits your body.

Better yet, buy a hand-forged head by Hiroki or Kosaburo and make your own handle in the best craftsman tradition, and take pride in a custom tool of the highest possible quality that will serve you well for your entire life.

However, if you have the budget and enjoy collecting traditional tools, then by all means try a laminated gennou head. They are not easy to find nowadays.

YMHOS

The following link is to a folder containing pricelists and photos of most of our products. If you have questions or would like to learn more, please use the form located immediately below titled “Contact Us,” or email us at Covingtonandsons@gmail.com.

Please share your insights and comments with everyone by using the form located further below labeled “Leave a Reply.” We aren’t evil Google, fascist facebook, thuggish X, or a US Congressman’s Chinese girlfriend and so won’t sell, share, or profitably “misplace” your information. May ice cream forever taste like burnt rubber if I lie.

Leave a comment

The Japanese Gennou Hammer & Handle Part 9 – Mass-produced vs. Hand-forged

The gentle reader will never, never know what a consummate ass he can become until he goes abroad. I speak now, of course, in the supposition that the gentle reader has not been abroad, and therefore is not already a consummate ass. If the case be otherwise, I beg his pardon and extend to him the cordial hand of fellowship and call him brother. I shall always delight to meet an ass after my own heart when I have finished my travels.

Mark Twain, The Innocents Abroad

n the previous post in this series we discussed the various styles of gennou heads you might consider when planning a custom-made gennou that fits your body perfectly, as well as the range of weights for each application.

While one has few options besides either using a mass-produced head or making one yourself nowadays, in Japan there are still one or two overworked blacksmiths that specialize in hand-forging high-quality gennou hammer heads. In this post we will compare mass-produced heads and hand-forged heads to help you make an informed decision.

Comparing Mass-produced Heads to High-quality Hand-forged Heads

When selecting a gennou head you have the choice of a mass-produced gennou (usually with a handle attached) or a handmade gennou head without a handle, if you can find one. Lets examine the differences.

Mass-produced genno are readily available, relatively inexpensive and for the most part, entirely useable. However, as with any product, it is wise to inspect a gennou carefully before purchasing it, as discussed in a previous post in this series, or to at least buy from a retailer with a solid return policy. When purchasing any gennou, check to make sure the eye’s walls are clean, it’s centered in the head, and not skewed.

The practical advantages of a hand-forged gennou hammer head over a mass-produced factory head are as follows:

  1. Proper differential hardness;
  2. Precise eye placement and alignment;
  3. Uniform interior dimensions of the eye, resulting in time saved and aggravation avoided when fitting/refitting a handle;
  4. Faces are square with the long axis of the head;
  5. Improved Performance due to more uniform distribution of mass providing improved stability during the swing with fewer wiggles, more solid strikes, and fewer off-center hits.
  6. Unique appearance and pride of ownership.

Let’s examine these points in more detail next.

Heat Treatment

Most Gentle Readers will have not given this matter any thought, but the quality of the heat treatment matters… a lot. This is a chemical/crystalline property impossible to confirm long-distance, so we must rely on the manufacturer, be it factory or blacksmith, to get right. Therefore, the manufacturer’s QC reputation as well as the retailer’s guarantee also matters.

A good head will be hard at the faces, becoming gradually softer towards the eye, certainly softer than a file, to make the head “tougher,” using the materials engineering term, and to reduce resonant harmonic vibrations. If you have used hammers with uniformly hard heads and integral steel handles you have felt this tiring vibration before.

The faces must be hard, around 50~55Rc, to prevent deformation, but not so hard the hammer will chip or crack. You may think that wooden chisel handles could not deform a steel hammer face, but if the striking faces are not properly hardened, they will mushroom sure as eggses is eggses, something your humble servant learned when he made a gennou head for himself from unhardened octagonal steel bar stock back when dinosaurs roamed the earth.

It’s interesting to note that the handle I made while residing in a cave (no plumbing!) was straight, unlike the handles your humble servant currently advocates, and that the lower 1/3rd of the face (closest to the hand) mushroomed, while the upper 2/3rds did not deform at all. Curious….

This was the first time I really noticed that the head of a hammer with a straight handle attached perpendicular to the head’s centerline tends to hit the chisel/nail cocked and not in-line with the long axis of the chisel/nail. I also realized that the direction of deformation of the head’s steel indicated a lot of energy was being wasted by my straight handle. I hope you can see why the solution the anaya carpenters of Japan developed so long ago resonated with me so strongly.

But what happens if the heat treatment results in a head that is too hard? In this case, while the head and faces may not deform, the face may chip and the entire head may fracture, sometimes even causing embarrassing leakage of sticky red stuff (or at least that’s what the product liability lawyers scream).

A word to the wise: always use properly heat-treated hammers and wear safety glasses when pounding nails, adding nitric acid to highball cocktails, or when writing your name on your forehead with ballpoint pen after losing a tequila shot contest.

Precision of the Eye

Gentle Readers may think it passing strange that your most humble and obedient servant is seemingly fixated on the precision of something as boring as the hole in a hammer’s head. Rest assured, this concern is not a fever dream resulting from an obsessive/compulsive over-analysis of negative space, but was born of bitter experience. My new therapist concurs.

Of all handtools, the hammer is one of the simplest. But is also the one that moves the fastest and is most influenced by dynamic physics. Things like concentricity, center of gravity, and moment of inertia make a difference to an object moving this quickly, then suddenly slowed by an impact with a chisel or nail, and then returned to battery for another blow faster than Ilhan Abdullahi Omar can say “gimme.”

Negative spaces like holes influence the physics, and therefore the stability, of hammer heads. Don’t make me inflict you with differential equations, just take my word the hole needs to be centered, not skewed, and of uniform size or the hammer will be skittish resulting in twisted mortise holes, bent nails, and maybe even smashed thumbs.

Another advantage of a well-made gennou head is that its eye will have uniform interior dimensions. We talked about this in an earlier post. In summary, all four walls will be straight, clean, flat, free of wind, parallel and square to each other. This matters because a sloppy eye will not apply uniform pressure on the handle’s tenon, ensuring it will come loose sooner than later. In addition, this uneven pressure may also induce unwanted vibrations in the handle. I kid thee not.

Nothing can be done to economically renovate an offset, misaligned or skewampus eye, but if it’s just rough or sloppily forged, it may be possible to improve it using small files while ruining one’s vision (not an exaggeration).

Depending on the degree of error, correcting the inside walls of that tiny hole in a steel head with skinny files and a flashlight can be frustrating work and may even help your therapist buy that new bimini top he wants for his fishing boat. You see, most people make the problems worse the first time they try to correct them. I know I did.

If you count your time worth anything, the extra cost of a precision eye is money well spent, and certainly cheaper than the price of a Swiss-made (vs. Chinese-made) Rolex for your therapist’s girlfriend.

This image has an empty alt attribute; its file name is kosaburotansetsugennou.jpg
A “Modern”style hand-forged gennou head by Hasegawa Kosaburo. This head is of antique construction with high-carbon steel wafers forge-welded to both striking faces of the softish iron body. Prior to the importation from Europe of cheap steel to Japan, all gennou had this laminated construction. I have been using this head for over 35 years. I think this is its third handle (black persimmon wood).
This image has an empty alt attribute; its file name is gennou.jpg
A standard hardware store mass-produced gennou made by a large corporation and sold everywhere in Japan. The eye is sloppy, so the head is secured with steel wedges. The handle is tapered towards the eye to compensate for and conceal dimensional irregularities. Of course, this hammer can hit stuff just fine, but it will never feel right, the head will loosen much sooner than later, and it will be impossible to adequately repair. A decidedly unprofessional, disposable tool.

Precision of the Face

Let’s move on to item 4 “Faces are square with the long axis of the head.” The striking faces of mass-produced hammer heads are often not square with the head’s axis (i.e. manufactured 90˚ to the head’s longitudinal axis) resulting most obviously in bent nails, but the less obvious consequence is that energy we intended to transmit directly to the chisel and into the workpiece ends up being wasted as heat and violent twerking of the chisel out of alignment. It also wastes time and undermines the user’s confidence, once again providing a windfall to head doctors everywhere.

A precisely manufactured face square to the tool’s centerline will yield better static performance and more precise chisel work and nail bashing than a mass-produced head ever can.

The hammer that is stable during the swing and makes a solid impact exactly where you aimed it without producing strange vibrations, wasting energy or bending nails, will help you make every strike with confidence and greater control, and will make your woodworking more enjoyable and profitable. Not insignificant benefits.

Improved Dynamic Performance

In addition to the advantages described in the previous paragraph, a hand-forged head, if made correctly, will be more stable during the swing, and wiggle less upon impact because its mass is more uniformly distributed. This means fewer misses and more energy transmission on impact. And that’s the whole purpose of a hammer, right?

A hammer made using a good head and a handle made to fit both that head and your body will perform better than any tool you have experienced before. You won’t need to look when you pick it up to tell which face (or claw/vs face) is oriented towards the nail/chisel because your fingers will know instantly. The handle will fit your hand perfectly without slipping or causing blisters or needing to be “choked-up on.” Without looking at your hammer you will be able to sense beforehand exactly where the center of its face will strike, and will be able to hit the target dead-center and squarely even with your eyes closed.

Appearance and Pride of Ownership

And finally, let’s examine the more ephemeral item 5: “Unique appearance and pride of ownership.” I have mentioned it elsewhere before, but it is a fact that, no matter how much they may deny it, humans are a competitive herd of beasties in all their endeavors.

As a day job your humble servant manages construction projects in Japan and spends a lot of time inspecting jobsites, meeting with construction companies and speaking with craftsmen. Indeed, there was a time when I was labor instead of management on construction jobsites, so I have enough experience to know that, while some professional woodworkers may not read those glossy fashion magazines with titles like “Amazing New Toolbag Design that Will Lift and Shape Your Butt” during coffee breaks, or wear sleek, handmade calf-skin steel-toe Italian footwear during the workday, they are conscious of their personal performance, and the performance of their tools, in comparison to those of their peers. It’s a guy thing, something women think they understand because they have similar tendencies in other areas, but rarely do. This performance is difficult to ascertain unless one is working side by side with one’s peers, so it is human nature to make indirect judgements about performance by observing the quality and condition of a fellow worker’s tools.

Of course, one casually notices the brand of chisel or plane a fellow craftsman is using. Next, if it can be done without being rude (sometimes a difficult thing to accomplish), one examines the fellow workman’s tool’s cutting edge and its sharpness because this tells much about his character and skill (chisels are terrible gossips, you see). Such a close examination may not be possible, but one can usually examine the finish left by his plane and crispness and precision of his chisel cuts.

But more than plane or chisel, the tool that is always visible to others during the workday is the craftsman’s hammer comprised of the head forged by the blacksmith, and the handle made by the craftsman himself. The quality of this combination tells Japanese craftsmen much about the man that owns and uses the tool. A hand-forged head by Kosaburo or Hiroki with a graceful, professional-grade handle made by the owner, even if it is dinged through years of hard use, will be noticed by those with eyes to see for decades, even generations.

Among the Japanese professional woodworkers your humble servant knows well, most of whom are sorting boards in the big lumberyard in the sky nowadays, a highly-decorated expensive gennou head is thought to be a gaudy, obvious plea for attention in poor taste, akin to wearing a sequined, high-visibility safety suit of fluorescent purple silk with Jimmy Choo 8″ gold-plated steel-toe stilettos to the hardware store (best saved for the New Years party anyway, you sexy beast).

A plain head by Hiroki or Kosaburo, on the other hand, is understated, tasteful evidence of a serious craftsman that appreciates tradition and places quality first. Very much a wabi sabi kinda thing.

And finally, a quality hand-forged head is a lifetime tool, one that won’t wear out or break. The handle may be damaged and wear out over time and need to be replaced, but such wear and tear is unavoidable if the tool is actually used, like a good pair of workboots. But the handle made for a quality head will last longer and be much much easier and quicker to replace. To the professional focused on turning his time into money, this is not an insignificant consideration.

A mass-produced factory head, by comparison, simply won’t work as well. It is of course neither high-quality, unique, nor a lifetime heirloom tool. It isn’t pleasing to the owner’s eye nor impressive to his fellow workers. It is a consumable, expedient tool, the sort of thing a craftsman does not want himself to become.

Conclusion

A high-quality head combined with a handle that fits your body will accomplish more work more precisely with less mental concentration and physical effort. It will become a lifetime friend and a source of satisfaction boosting your confidence. It will be relatively easy to make replacement handles for during your lifetime, and those handles will stay tighter longer. It will tell those who see it that you are serious, no-nonsense craftsman who understands true quality and prefers understated elegance.

If you take pride in your tools, appreciate heirloom value, don’t want to waste time trying to rework sow’s ears into silk purses that smell piggy, and are not inclined to pay cashy money to psychiatrists to rummage around in your head, then a hand-forged gennou head is worth owning, in the opinion of your most humble and obedient servant.

In the next post in this shockingly fashionable adventure I will try to dispel some rumors about laminated gennou heads.

YMHOS

My newest gold lame safety shoes by JC. I must say they go really well with my dual-reel safety harness! What do you think about the steel-toe safety shoes shown above? Too severe?

The following link is to a folder containing pricelists and photos of most of our products. If you have questions or would like to learn more, please use the form located immediately below titled “Contact Us,” or email us at Covingtonandsons@gmail.com

Please share your insights and comments with everyone by using the form located further below labeled “Leave a Reply.” We aren’t evil Google, facist facebook, thuggish X, or a US Congressman’s Chinese girlfriend and so won’t sell, share, or profitably “misplace” your information. May puppies all hate me if I lie.

Leave a comment

The Japanese Gennou Hammer & Handle Part 8 – Head Style & Weight

This image has an empty alt attribute; its file name is dsc_0048.jpg
A comparison of two styles of hand-forged gennou heads. Top: A Yamakichi gennou head by Hiroki. Bottom: A classical ryouguchi head by Kosaburo with the antique “swollen eye.” Both handles are made from American Osage Orange, an excellent wood for hammer handles. The top handle still exhibits the neon yellow color typical of OO, while the bottom handle has been exposed to sunlight for a few weeks and turned a nice but unusual brown color.

Better a bald head than no head at all.

Seamus MacManus

In the previous post in this series about Japanese hammers we examined a feature found in all modern hammer heads: the essential, unblinking, unseeing eye. In this post we will touch on the style of heads recommend for using with Japanese chisels. We discussed this subject in this post as well.

Gennou Head Shapes

The most popular head shapes commonly available in Japan nowadays are: ryoguchi, daruma, funate, yamakichi and various hybrids thereof.

Ryouguchi

Ryouguch is the most common style of head, at least in Eastern Japan. It has two faces: A flat one for striking chisels and nails, and a slightly domed opposing face for kigoroshi and setting nails below the surface of boards.

While a simple design, this style of head has a relatively high moment of inertia, making it is more stable than other styles and therefore less likely to twist out of alignment during the swing, or twitch upon impact, a positive thing if you are a card-carrying member of NBA (Nail Benders Anonymous). (ツ)

Face designs in this style vary widely including round, oval, square, rectangular (usually with corners removed for a more octagonal shape) true octagonal, and the “Ichimonji” style with roundish sides and a flat top and bottom. We prefer the rectangular shape with cut corners best, but one style is no better than another. We don’t recommend, however, faces with 90 degree corners as the corners are counter-productive during kigoroshi operations and are structurally weaker.

If you are worried about pulling nails, we encourage you to use a nail bar to reduce the number of broken hammer handles wandering the world sad and lonely as a cloud.

A 200monme/ 750gram/ 26oz Modern-style ryouguchi gennou by Kosaburo. Notice the symmetrical shape, slightly flared ends, and the polished “hachimaki” band near each striking face.

The Daruma

The enlightened Bodhisattva Dharma meditating like a house afire

The Daruma (pronounced dah/rhu/mah) gennou head takes its name from a famous Buddhist priest of oval stature who lost both arms and legs through excessive meditation, a blessed state doubtless achieved by many of our enlightened Beloved Customers (spiritual enlightenment that is, not quadriplegia). This gennou head is a stubbier version of the ryouguchi gennou, and always has a round face.

It’s more popular outside of Japan than domestically, for reasons your most humble servant fails to understand. From a physics viewpoint, at a given weight and because of its lower moment of inertia, it is less stable than other styles of gennou, but because it has a bigger face, and is intended to be used at constantly differing angles such that stability is less critical, this style is preferred by carvers. Joiners like it too for cutting repetitive mortise and tenon joints, but it is not favored by most other trades and may invite remarks at jobsites from other workers about the owner being unable to find his derriere with a mirror on a stick and a GPS. That said, your humble servant frequently uses daruma heads for cutting precise mortise joints in joinery.

An 80monme/ 300gm/ 11oz daruma head with an rock maple handle.

The Funate

A funate gennou with bubinga handle.
The tail of a funate gennou. This point can be sharpened for creating pilot holes for nails when shipbuilding, or left as a rectangle of starting and setting nails. The face is slightly domed, but still flat enough for striking chisels. A good multi-purpose head that favors nails more than chisels.

The funate gennou is closer in appearance to Western hammers with a skinnier neck behind the striking face, but without the split-tail “piano chisel” a foreman from my misspent youth named Jack Frost called the claw on his 28oz waffle-face framing hammer.

The funate gennou is more commonly seen in the Western Japan than Eastern Japan where I learned Japanese woodworking. It’s useful for finish work involving nails and for tapping-out plane blades, but less useful for wacking chisels.

The Yamakichi

Yamakichi was the name of a gennou blacksmith working in Fukuoka on Kyushu Island that originated this style of head and gave it his name. Kosaburo introduced this style to Tokyo in response to customer demand and with Yamakichi’s permission, we are told, improved the design somewhat.

This style is a heavy-duty stubbier version of the funate with a slightly domed face and a kinda sorta pointy tail, perhaps better suited to starting/setting nails than the ryouguchi head, but certainly better for striking chisels than the funate style.

Better with nails than the ryouguchi style, this head makes an excellent all-round hammer for working in the field, and can even handle tapping-out tasks.

The design has a unique and interesting appearance which reminds this humble scribbler of a 1956 Ford F100 truck in that, while neither sleek nor smooth, it has a sculptural quality not seen in the other styles that “grows on you.” It feels good in the hand too.

There are other in-between head shapes, but these are the four basic styles generally available for woodworking today.

Another view of the Yamakichi gennou pictured at the top of this article after the color has mellowed through exposure to sunlight. This is 300monme/375gram/ 11oz head by Hiroki has an American Osage Orange handle. (The decorative twine was added at the tool’s request. It has a thing for the color red).

Weight

The subject of gennou head weight was examined at some length in a previous post.

Regardless of the type of gennou head you select, weight is a critical factor that will depend on what you plan to hit, your height above the thing you are hitting, how hard you need to hit it, and how precisely you need to hit it. Your own practical experience is the best basis for selecting the genno weight for a particular job, but some guidelines can be suggested.

To begin, the traditional measure used for gennou in Japan is the “monme,” with 100 monme equaling 375 grams or 13.2 ounces (1 ounce = 28.35 grams). 

The standard middle-of-the-road weight for gennou used by carpenters in Japan ranges from around 100monme (375grams/ 13.2 ounces) to 120monme (16oz). The most common hammer used for finish carpentry in the United States weighs 16oz. So if you are going to buy your first gennou, and you intend to use it for general finish carpentry or furniture making, a 100 or 120 monme head is a good place to start. 

For finer work, 50-80 monme (7~11 oz) is a good choice. If you intend to make furniture or joinery, one in this weight range is a must-have.

For cutting deep mortises in heavy timbers with large chisels, as in timber framing or boat work, a 200monme (26oz) hammer is frequently used, but 250 (33oz) and even 300monme (40oz) heads are available. I own and use them when necessary.

Some factors to consider when selecting a heavy gennou are that with greater weight comes greater impact force, and greater penetration, but heavier gennou are more tiring to swing and harder to control precisely, especially depth of cut.

Other factors to consider are the weight of chisels to be used, the width of their blades, and the hardness of the wood to be cut because a heavier chisel with a wider blade cutting white oak requires more force to cut to a given depth than, for instance, a 3mm oiirenomi (bench chisel) cutting sassafras. Only experience can instruct Gentle Reader what weight will work best in a given situation. Just be aware that, unlike athletic socks and gubmint health care (aka medical fraud collusion), there is no such thing as one-size-fits-all.

Conclusion

We hope this article has answered some of Gentle Reader’s questions on the subject of selecting a gennou head. If you have additional questions or need clarification, please use the “Leave a Reply” form below.

In the next article in our ongoing quest for spiritual enlightenment and metaphysical stability we will discuss the differences between mass-produced and hand-forged gennou heads. We will also consider the necessary attributes of woods suitable for making handles along with more design details in future posts, I promise. Until then, I have the honor to remain,

YMHOS

The following link is to a folder containing pricelists and photos of most of our products. If you have questions or would like to learn more, please use the form located immediately below titled “Contact Us,” or email us at Covingtonandsons@gmail.com.

Please share your insights and comments with everyone by using the form located further below labeled “Leave a Reply.” We aren’t evil Google, facist facebook, thuggish X, or a US Congressman’s Chinese girlfriend and so won’t sell, share, or profitably “misplace” your information. May my toes all grow black, stinky mushrooms if I lie.

The Japanese Gennou Hammer & Handle Part 7 – The Unblinking Eye

Tempo is all, perfection unattainable,
As at the top of the swing… …there’s a hesitation, a little nod to the gods, that he is fallible. That perfection is unattainable.

“The Golf Swing” by Roy McAvoy

The Japanese gennou is outwardly the simplest of hammers comprised of just a differentially-hardened steel head attached to a wooden handle without wedges, pins, epoxy or rubber. But as simple as it is, there are several factors that drive this tool’s performance. One critical factor is its “eye.”

The Unblinking Eye

Since ancient times, hammer handles have ended in a “tenon” designed to fit inside a rectangular or circular through-mortise hole in the hammer’s head called the “eye,” in English, and “hitsu” in Japanese.

As a matter of fact, the ancient armies of Egypt used a stone mace with an eye cut into the head. Goofy hats were optional, I suppose.

In both Western hammers and the majority of Japanese hammers the interior walls of the eye are angled so that a wedge driven into the end of the handle will splay the handle’s tenon keeping it from slipping out of the eye. This connection works as well as can be expected, if the eye is deep and tolerances are acceptable, but Japanese gennou heads are not wide and their eyes are not deep, so a better solution was called for.

The huge downside to securing the head with a wedged tenon is that the wedge acts so as to split the tenon, an action that, once started may not end, and which will frequently cause the handle to split over time weakening it considerably. We’ve all seen old, abused hammers like this.

Also, a wedged connection seldom has uniform contact and pressure inside the eye and may therefore loosen as the wood wears from vibrations produced by impact forces.

In addition, uneven pressure between tenon and eye may induce unpleasant vibrations in the handle, a phenomenon you have not doubt experienced without realizing it, like an itch on the back of the neck felt long after that damned mosquito’s smash and grab.

A tight, high-friction, uniform-pressure fit between the eye’s walls and the tenon keeps the quality Japanese gennou head in place and working efficiently. Straight, parallel, square, clean walls of the sort an accomplished blacksmith can forge if he really tries (sadly so few bother anymore), are therefore critical.

Inexpensive mass-produced gennou and hammers typically have eyes with poor tolerances hidden by the handle tenon and sometimes concealed under resin caps. The heads and handles of such hammers and gennou seldom remain securely attached if used heavily long-term. Experienced Japanese professionals, therefore, have traditionally preferred to buy just the head without a handle so they can inspect the quality of the eye before laying down any cashy money. They then make the handle themselves.

This approach is consistent with the frugal craftsman ideology once common throughout the civilized world wherein the craftsman would make as many of his own tools as possible, often in imitation of his master’s tools and using metal components forged by the local blacksmith, all to be completed by the conclusion of his apprenticeship and graduation to “journeyman.”

This explains the demand in Japan for high-quality relatively expensive heads such as those hand-forged by Kosaburo or Hiroki. Not only are they properly shaped and consistently heat treated, but they have precisely dimensioned eyes that will not only hold onto the tenon a long time and reduce unwanted vibrations, but will save the owner a ton of effort both truing the eye and replacing failed handles later. And since the gennou is a lifetime, heirloom tool, the extra cost of such a head is not wasted.

Four hand-forged gennou heads: L~R 375gm Kosaburo Classic (with the traditional polished “hachimaki” band at each end); 100gm Hiroki Modern; 338gm Hiroki; 300gm Hiroki; 25gm Hiroki. All differentially hardened. All made entirely by only power-hammer, forge, and grinder by hand. Dies, presses, mills, CNC equipment, EDM equipment were not used to shape these heads or form these eyes.
Mr. Aida studied under Kosaburo. Although their styles are different, most notably the lack of a polished “hachimaki” headband in Hiroki’s products and the very different oxidized forge skin, both blacksmiths made/make precise eyes.

Since so much relies on the connection between the handle’s tenon and unseeing eye, let’s examine it and correct any deficiencies revealed.

Examining the Eye

This section contains hard-earned but subtle wisdom for those with eyes to see. Please open them.

‘Tis human nature to pay closest attention to the outward appearance, size, weight, texture, color, smell, and cost of physical objects while neglecting those things difficult to see or inconvenient to “try.” Accordingly, most folk never think to check the void that is the unseeing eye. Fie, nay, not thee, Beloved Customer. Prithee first inspect the eye for if ought is amiss, then the head will not only be the very devil to hang a handle for, but will be unstable during the swing and wiggle like an ell on a fishhook hook on impact, intolerable failings in a tool we need to use with speed and precision unconsciously.

How to do this examination? Just sight down the length of the head’s body with the eye in view. A flashlight/torch will be helpful in this process.

What to look for? The eye should be of uniform width over its entire length, and the sides parallel, of course. It should also be centered in the body and not skewed. The narrow end surfaces of the eye should also be straight and square to the sides.

Mass-produced gennou heads typically fail this examination to some degree, and even some expensive handmade heads will too, sorry to say. Be sure to inspect they eye this way on both sides of the head.

560gm Kosaburo Classic-style gennou head. Old-stock with surface patina. This is how all Japanese gennou were shaped prior to around 1890. The swollen area around the eye was created by the pressure of the mandrel being hammered into the yellow-hot metal to form the eye. This bulge was also once common in European, Roman and even American hammers.
560gm Kosaburo Classic-style gennou head (slightly rusty).

Next you need to inspect inside the eye. Use a flashlight to check the interior walls are straight, parallel, square, free of twist, and without significant bumps, bulges or gouges. You may need to make a tiny square from wood or metal to perform these checks. There are special machinists squares and depth gauges that are ideal for this purpose. An accurate caliper (vernier, dial or digital) will prove useful.

Ofttimes the eye’s walls are intentionally sloped inwards from both ends so the center of the eye is narrower than either opening. This geometry is intended to compress the tenon as it is driven through the constriction locking the tenon into the eye. The crushed tenon is then supposed to expand afterwards, essentially relying on kigoroshi to bind the tenon in the eye. This geometry does work, kinda sorta, if a wedge is driven into a sawkerf cut into the tenon. Gennou heads with this style of eye are much easier to produce and are intended for mass-produced beaters. Such head/handle combinations may exhibit strange harmonic vibration, which you may or may not be able to detect, and since pressure on the wooden tenon is not uniform, swelling/shrinking of the tenon with seasonal humidity changes will always cause the head to loosen over time.

If a gennou head is secured to the handle with wedges, it may be because the eye is sloppily made, or just because that is what amateurs are accustomed to seeing, but a quality gennou head fitted to a proper handle does not need wedges to secure it no matter what Fat Max says.

Correcting the Eye

As the philosopher and erstwhile golf poet Tin Cup taught the World: “Perfection is Unattainable,” so I caution against an OCD attack over a hammer, but if you are patient, have abundant time, tough fingers, and a collection of needle files you can try to true the unseeing eye. This is a tedious job because only small files can be used, and that within a narrow space both difficult to see into and with little room to develop leverage. Sorta like removing corruption from the US Senate.

Related image
Kevin Costner as Tin Cup testing various apparatus to correct his golf swing which he laments “feels like an unfolding lawn chair.” Woodworkers too are susceptible to the allure of commercial mechanical fixes such as honing jigs and sawing jigs despite the solution being in themselves.

And as when rooting out evil politicians and bribe-swilling public employees, please be careful when filing to avoid making things worse. Remember, flat, parallel walls free of twist with clean sharp corners are the goal. Once you have trued one poor quality eye you will understand the value of a high-quality premium gennou, which has nothing to do with finish or decoration.

If your gennou head has a constricted eye, please file all four walls straight.

Whatever you do, don’t leave the walls curved outwards so that the eye is wider at any point inside than at its openings, because the handle can never be properly fitted to such an eye and will always work loose.

Make a Layout Tenon

Once the eye of your gennou is true, cut and plane a piece of softwood that perfectly slip-fits into and through the eye with 3 or 4 inches protruding out both sides. Draw lines on the stick where it projects from both ends of the eye. We will call this stick the “layout tenon.” Save it to use later in the handle-making process.

In the next post in this series on making a handle for the Japanese gennou hammer we will look at selecting a gennou head.

YMHOS

A 750gm Kosaburo Modern-style head with a Japanese black-persimmon handle. This was the first Kosaburo head I purchased over 30 years ago. A good friend and a lifetime tool.

The following link is to a folder containing pricelists and photos of most of our products. If you have questions or would like to learn more, please use the form located immediately below titled “Contact Us,” or email us at Covingtonandsons@gmail.com

Please share your insights and comments with everyone by using the form located further below labeled “Leave a Reply.” We aren’t evil Google, fascist facebook, or a US Congressman’s Chinese girlfriend and so won’t sell, share, or profitably “misplace” your information. May scorpions nest in my shoes if I lie.

← Back

Thank you for your response. ✨

The Japanese Gennou Hammer & Handle Part 6 – The Ergonomic Anaya 穴屋

Don’t force it, get a bigger hammer

Arthur Bloch

The handle that is the focus of this series of posts is an interpretation of the gennou handle developed over several centuries by the anaya carpenters of Japan. In this post I would like to touch on some of their history and the ergonomic factors that drove their subtle innovations.

Historical Background

The word Anaya (穴屋) translates to “hole maker,” a type of carpenter that was common in Japan before the general availability of portable electrical mortisers. These craftsmen had their own guilds in major urban areas and specialized in cutting mortises in beams and columns for wooden structures. They didn’t do layout. They didn’t dimension timbers. They didn’t saw tenons. They didn’t do assembly or erection. Their only tools were the chisels and hammers they used from sunrise to sunset to cut mortises as quickly and accurately as they could.

Anaya did piecework, meaning they were paid according to the number of mortises they completed each day, not by the job or an hourly rate. Each individual Anaya was in direct competition with his fellows for speed and efficiency, so they were serious about the performance of their tools.

Consistent with the Japanese obsession with constantly making minor improvements to their tools, Anaya were forever asking blacksmiths to make them custom chisels and hammer heads reflecting their latest opinions. There are records of more than one chisel blacksmith, including the famous Chiyozuru Korehide, refusing to make chisels for Anaya because of their persistent, obsessive demands.

The gentleman that taught me how to make gennou handles 30 something years ago is now in his late 90’s. He was a young man back when the anaya trade in Tokyo was still burgeoning, and he learned from the best in the business. 

Ergonomic Factors

Following are four ergonomic principles related to hammers in general and gennou in particular you should keep in mind when planning your handle. These principles are applicable to not just Japanese gennou, but to all varieties of hammers swung with a single hand. You need to understand them before you design your gennou handle.

  1. Handle Length: Every person’s combination of bones, tendons, muscles and work habits is different. Therefore one size of handle does not fit all; There is a handle length that best fits your body, the way you work, and the type of work you do.  
  1. The Grip: For the reasons stated in No.1 above, one grip style does not fit all; There is a grip shape with dimensions that best fits your hand, the way you work, and the type of work you do.
  1. The Knuckles: The human body operates a hammer or gennou most effectively when the plane of the head’s striking face at the instant of impact is oriented in line with the surface of the finger knuckles, particularly the pinkie finger, of the hand holding the hammer. 
  1. Head Angle: When swinging a hammer, the arc of the hand naturally moves ahead of the hammer’s striking face. Therefore, instead of being in line with the arc of the swing, the centerline of a typical hammer head will typically end up cocked out and away from the arc of the swing, assuming the handle is straight and hung (installed) with its centerline perpendicular to the head’s centerline. As a result:
    1. The hammer’s face is unlikely to strike the nail or chisel squarely; 
    2. The center of mass of the head will most likely not be in alignment with the actual (versus intended) axis of travel of the nail or chisel on impact;
    3. The nail or chisel will therefore be kicked out of the intended path of travel;
    4. Precision will suffer, and;
    5. Time and energy will be wasted.

Before you design your handle, I highly recommend you thoroughly understand these four essential principles. If you doubt their validity, investigate them yourself. Google will not suffice. There are a couple of tests described in future posts in this series you can perform to verify them. In the meantime, here is a homework assignment: Figure out a way to determine if your hammer’s face is striking the handle of your chisel squarely, or if it is cocked. Let me know your conclusions in the comments below.

The positive impact of incorporating these ergonomic principles into your handle design, as well as the negative impacts of ignoring them, can make a big difference in your performance and work efficiency. In future posts we will show you how to deal with these ergonomic factors to design and make a gennou handle perfectly suited to your body and the way you work.

But before our tumble ass-over-teakettle down this rabbit hole loses every semblance of dignity, we need to examine a critical but oft-ignored part of any hammer : The Unblinking Eye, the subject of the next article in this dramatic series of love and adenture.

YMHOS

The following link is to a folder containing pricelists and photos of most of our products. If you have questions or would like to learn more, please use the form located immediately below titled “Contact Us,” or email us at Covingtonandsons@gmail.com

Please share your insights and comments with everyone by using the form located further below labeled “Leave a Reply.” We aren’t evil Google, facist facebook, thuggish Twitter, or a US Congressman’s Chinese girlfriend and so won’t sell, share, or profitably “misplace” your information. May the fleas of a thousand camels infest my crotch if I lie.

Leave a comment

The Japanese Gennou & Handle Part 5 – Kigoroshi

A Japanese shipwright using a hammer to perform “kigoroshi” on the edges of planks for a traditional boat. The planks are joined using long nails “toenailed” from the upper plank into the lower plank. The pilot holes for these nails are made using a “tsubanomi.” When the boat’s hull is later wetted the fibers crushed during kigoroshi will swell back to near their original size filling gaps and tightly locking the planks together, even when the planks are once again dry.

The difference between something good and something great is attention to detail.

Charles R. Swindoll

In previous articles in this series about the Japanese hammer known as the gennou, we examined the background, history and general varieties commonly available nowadays. In this article, we will expand our analysis of the gennou to include a function not well known outside Japan. We hope Beloved Customers and Gentle Readers find it diverting.

Kigoroshi 木殺し

As mentioned in Part 4 of this series, the standard ryoguchi gennou hammer has a flat striking face on one end and a domed striking face on the opposite end. The flat face is well suited to striking chisels, driving nails and the ceremonial wacking of thumbs, while the domed striking face excels at setting nails below the surface of a wooden board, just as Western hammers are. It can also be used for a task called “kigoroshi” pronounced kee/goh/roh/she. It is a technique worth knowing. Indeed, it can be employed using most any hammer having a domed face, although the domed face on many Western claw hammers may be too drastic in some cases.

The term Kigoroshi (木殺し)translates to “wood killing,” meaning to use a hammer to temporarily crush wood cells. It is achieved by judiciously striking the wood with the hammer or gennou’s domed face. Easy peezy.

When a piece of wood is subjected to successful kigoroshi, the walls of the wood’s cells are deformed and/or partially collapsed reducing the internal volume of the impacted cells, but if the pressure is later relieved and some moisture added, over time the cells of many (but not all) species of wood will swell back to near their original volume.

So how is kigoroshi used? For instance, in the case of a mortise and tenon joint, the tenon is cut oversized, and then struck with the convex face of a gennou to deform the wood cells to the point the tenon will fit into the mortise. With time, the tenon absorbs moisture from its surroundings and naturally tries to swell back close to its original size locking it tightly into the mortise. I’m sure you can see the possibilities.

In this short video, the carpenter is performing kigoroshi with the convex face of his gennou to the shoulders of an Akita Sugi (Cryptomeria japonica) beam to enable it to fit inside a housed dovetail mortise. The shoulders will later swell back to close their original dimension closing any minor gaps, hopefully locking the beam tightly into the mortise hole.

Another application of kigoroshi is seen in traditional Japanese boat building where the edge joints between planks forming the hull are hammered, effectively making the planks narrower. After the planks are attached to the ship’s ribs, their crushed cells gradually swell and attempt to return to their original volume, tightly pressing the planks against each other and closing any gaps to create a waterproof joint. In this way, a joint that might otherwise loosen with time and changes in moisture content can be made to remain tight and waterproof, even after the hull dries. This boat building technique is not unique to Japan, of course.

A Japanese shipwright performing kigoroshi on the edges of planking prior to joining them together.

One more example.

When making a rectangular wooden cask or bathtub from hinoki-wood boards (not staves) in the Japanese style, grooves are cut in the bottom board to receive tongues from the vertical side boards. If these tongues are planed oversize and then their sides are pounded judiciously with a hammer with a slightly rounded face like that of a ryouguchi gennou to reduce their thickness enough to fit into the groove, when assembled and then wet with water the crushed wood cells in the tongue will rebound and expand to close its original thickness not only locking the tongue and groove tightly together, but also creating a watertight connection. If done properly, the joint will remain tight even after all the boards have dried, same as the ship’s planking mentioned above.

Many people’s understanding of kigoroshi is too shallow to use the technique effectively and consistently without some practical experience. The opinions of inexperienced people therefore should be scrupulously ignored, but the Beloved Customers of C&S Tools are expected to meet a higher standard of woodworking, so I share this advanced technique with you.

There are a few points you should be aware of before attempting kigoroshi in a professional situation, in other words, a situation where cost, schedule, or reputation are at risk.

First, make no mistake: kigoroshi works reliably only on long-grain (side grain), not end-grain.

Second, please remember that if the flat face of the genno is used for kigoroshi, or the domed face is cocked so its corners dig in too far, or is used with too much force, the striking face’s perimeter edges may crush cells and sever fibers permanently so that they cannot return to anywhere near their original volume thereby defeating the purpose of kigoroshi and simply weakening the wood. No bueno Bubba.

Third, be aware that if used in fine cabinetry and joinery work, kigoroshi can create unpredictable tolerance shifts at joints, making, for instance what should be a flush joint, offset, so caution and experimentation may be necessary to avoid embarrassing snafus.

And fourth, kigorishi does not work well with some woods, especially hard, stiff woods, and can cause permanent cell damage in some cases. We will discuss this further below. But first, let’s examine the mechanics of kigoroshi.

Nuts and Bolts

Most commercial varieties of wood grow in climates with seasonal changes of winter and summer. A tree is essentially a big water pump that pulls (not pushes) water and some nutrients up from the ground through the pressure differential created by water evaporation at stomata openings in its leaves, a process called osmosis. The highest volume of water is pumped, and the most cell growth occurs, when the weather is warm, water is moving, and the sun is shining. Without liquid water, sunlight, and functioning leaves, the pump stops. In the case of freezing weather, evergreen trees stop pumping water to prevent freezing and the resulting expansion that would destroy the tree.

During the colder months, beginning when leaves fall and the sun fades in Autumn, the pump as well as the tree’s growth slows and then stops. The pump starts up again during the spring thaw when water moves, the sun again shines, and leaves bud.

The stained cross-section of oak below is an excellent illustration of this point. The photo is bifurcated by a a nearly solid band of tight fibers bordered above and below by larger cells, some are rather large white voids. This nearly solid band of cells forms during late Autumn and early spring and is called “late wood” or “Autumn wood.” The areas of less density and larger voids is formed during warmer months of high-growth and is called “early Wood or “Spring wood.” These voids form branching and merging tubes leading from the tree’s roots to the tiny holes in the leaves where the water they carry evaporates powering the pump.

The difference in appearance between these bands of cells (aka growth rings”) can be seen on the surface of a board as its “grain.”

Every type of wood, indeed every piece of wood, is different and will react differently to kigoroshi attempts. Let’s review the physical properties of wood relevant to kigoroshi by examining a cross-section of a tree. For instance summer wood is carefully designed to transmit large amounts of water and nutrients, and so is comprised of large cells with thin walls. After the tree is felled and as the moisture content of the wood decreases, the cells shrink, the cell walls become thinner, harder, stronger and wrinkled and crinkled.

A cross-sectional slice of White Oak dyed red for clarity.

Winter wood in most commercial varieties is designed to resist freezing weather and winter storms. It is comprised of much smaller cells with thicker, stronger walls.

Effective kigoroshi temporarily deforms the cell walls of summer wood in what is called “elastic deformation,” meaning the deformation is temporary so that the cells rebound to near their original volume when the pressure is removed, depending on the nature of the wood and the elapsed time.

The cell walls of winter wood, on the other hand, are less flexible and so instead of squashing and then rebounding, are often shattered by kigoroshi and can rebound little. This permanent damage is due to “plastic deformation.”

Why does this matter? Consider a cube of quartersawn Douglas fir, a wood with soft summer wood, and strong winter wood. If we strike this cube perpendicular to the parallel rings, the larger, weaker cells of summer wood will squash down while the harder lines of winter wood will just be pressed closer together as the layer of summer wood squashes. An application of moisture to this block of wood will cause the summer wood to return to near its original volume and the cube of wood may retain any apparent damage.

Now what happens when we wack an identical cube in-line with the layer of harder winter wood? Some of the winter wood cells are squashed elastically and will rebound. But the rebound will be less and some of deformation will be permanent.

Oak wood, on the other hand is more dense and the cell walls are stiffer than a softwood like pine, so crushing the cells in kigoroshi will result in even less rebound, and may greatly weaken the wood permanently.

The point is to be aware of the nature of the wood you plan to do kigoroshi to beforehand.

Kigoroshi for Gennou Tenons, and Chisel Handles

There are those who advocate using a hammer to perform kigoroshi on the tenon of gennou handles, the idea being that an oversized tenon can then be crushed a little allowing it to fit into the eye, and that the wood will rebound later locking it into the eye tightly. This sounds like a great idea, but it has problems that stem from the fact that gennou handles are typically made of dense hardwoods like white oak, and not softwoods like cedar.

We need the extra toughness and density that hardwoods provide when making a gennou handle because tenons cut in softer woods will loosen over time. Hard woods like white oak, for instance, do not submit well to kigoroshi because the more rigid cell walls are broken in plastic deformation instead of elastic deformation and won’t rebound enough. In other words, kigoroshi on hardwoods like oak, hickory or persimmon may decrease the cellular volume, but it will also physically weaken the wood. Why would you want to do that?

Instead of kigoroshi, a better solution is to use a good dense hardwood and to precisely cut the tenon just enough oversize so that a lot of force is required to overcome friction driving it into the eye under high pressure. In this way the wood’s cells will be tightly compressed creating a tight tenon without compromising it’s cellular strength, a better long-term solution and a more craftsman-like technique.

Another option especially effective when making a gennou handle in humid months is to cut the tenon oversized and shrink it by removing water from the cells using gradual heat. Placing the handle in a more-or-less sealed container with a dry heat source such as an incandescent light bulb will do the job. Silica gel desiccant is another method, but slower. I do not recommend putting the handle in an oven of any kind to accomplish this, however. You have been warned.

Still others advocate performing kigoroshi on the ends of chisel handles to make the crown (hoop) fit better. They then insist one must soak the end of the handle in water to make it swell back to shape and lock the crown in place. While popular, this is poppycock that wastes your time and weakens a properly-sized handle. Please do not do this to C&S Tool’s chisels.

If the handle is in fact too big to accept the crown (unlikely if you purchased the chisel with a handle and crown already attached), first debur the inside of the crown and chamfer the inside edges. If that is not enough, please shave or file the end of the handle down to a dimension where it takes a number of hard hammer blows from a mallet to drive the crown onto the handle. The crown will thereby automatically perform all the kigoroshi necessary. This method is more professional and will provide better service.

Kigoroshi is a useful technique in some applications and with some types of wood. You may not need it but it’s worth understanding, especially if you have a gennou.

In the next post in this series we will examine the ancient ergonomic roots of the gennou handle we advocate and the unusual Japanese carpentry guild that codified them.

YMHOS

The following link is to a folder containing pricelists and photos of most of our products. If you have questions or would like to learn more, please use the form located immediately below titled “Contact Us,” or email us at Covingtonandsons@gmail.com

Please share your insights and comments with everyone by using the form located further below labeled “Leave a Reply.” We aren’t evil Google, facist facebook, thuggish Twitter, or the US Democrat Senate’s Pakistani IT manager and so won’t sell, share, or profitably “misplace” your information. May worms drip from my eyes if I lie.

← Back

Thank you for your response. ✨

Leave a comment

Previous Posts in The Japanese Gennou Hammer & Handle Series