[This article was written by the energetic Doctor Antone Martinho-Truswell, a Most Beloved Customer and Dean at St Paul’s College, University of Sydney. While not as scholarly as his fascinating and romantic earlier guest post titled Permanence, in this article Antone has graciously shared an aspect of his woodworking experience that will resonate with many Gentle Readers. Please enjoy.]
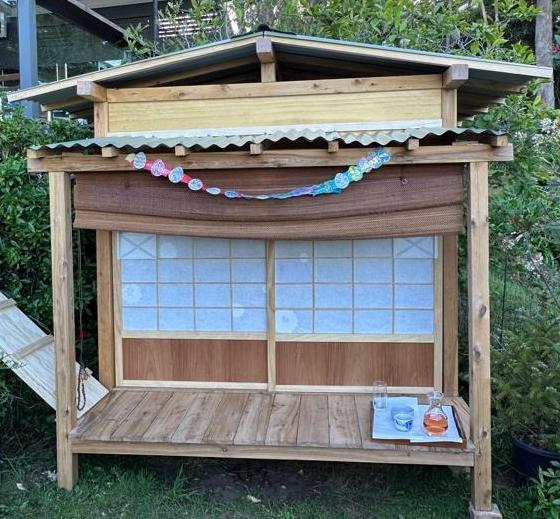
A few weeks ago, I was putting the final touches on my most recently finished, and largest, woodworking project to date. Over the past 18 months, interspersed with dozens of smaller and more pressing projects, I’ve constructed this tea-house styled cubby house for my daughters, complete with engawa, shoji screens (already torn and patched), Aussie-style “tin roof”, and tiny roofed reading nook overlooking Australia’s Blue Mountains National Park. My daughters made the paper garland to celebrate the opening of their new palace.
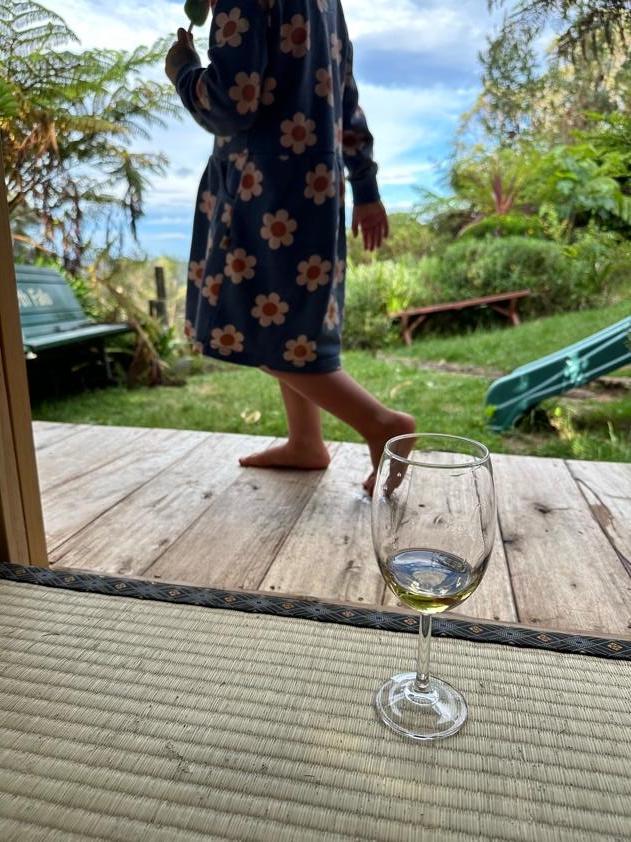
Engawa view
With this project I set myself the challenge of making the entire structure using only handtools (save a cordless drill for the roofing screws), and to use primarily reclaimed timbers. The timber frame, floors, and inside surfaces of the wooden walls were all hand-planed with a kanna, and all of the joints hand-cut. This involved cutting some 300 joints, and an almighty amount of handplaning.
But it was the ripping that did me in. Or rather, did in my tools. Between the wall panels, floorboards, shoji frames, and the joints themselves, this involved a tremendous length of rip cuts in very hard Australian woods. As I celebrated the completion of the project with a glass of vintage Château Thames Embankment while gazing across the verdant valley, I considered the small collection of exhausted Japanese rip saws the project had left in its wake.
I had been using modern, disposable-blade, induction-hardened Japanese saws on this project, and two, in particular, gave the ultimate sacrifice in the process.
One saw was a rip single-edged kataba already fairly used up on other projects, the other a fresh but inexpensive ryouba that I dedicated to this project in particular. As Stan has noted before, these induction-hardened and mass-produced Japanese saws are excellent tools – sharp, effective, and long-lasting. Moreover, I had been putting them to more punishing work than usual – “in the field” rather than the workshop, cutting reclaimed timber replete with grit, dirt, and other dulling faeries that grinded away their cutting edges.
I am normally meticulous in following Stan’s advice to clean one’s timber and remove dirty, gritty surfaces with dedicated roughing tools before putting quality blades to work, but this project called for a different approach – there was too much timber to efficiently clean before working it, and the inexpensive saw was purchased and dedicated to the project in order to prevent needless back-and-forth while assembling the structure in the garden, so it served as both roughing and finishing tool.
Later, while enjoying a refreshing beaker of Château Fleet Street, I realized two things. First, that my much older furniture-making ryouba had also been dulled by local faeries; and second, that I needed to replace my other workhorse handsaws.
Naturally, this meant contacting Dear Old Stan, the only solution when tools that work are wanted. (Stan, I’m waiving my copywriting fees for that tagline.)
After some back-and-forth with our reliable proprietor, I settled on three saws to renew the capabilities of my saw-box. Our discussion covered a few considerations:
I have no shortage of fine-tooth saws like dozukis and hozohikis, all of which are working fine and providing good service.
I am up for the challenge of re-sharpening rip teeth, but am wary of the time investment versus benefit of trying to sharpen the complex shape of Japanese crosscut teeth.
These new saws would be used for sawing stock to rough dimensions. I frequently make furniture from locally-sawn slabs, and so need to make long rips and crosscuts to efficiently break these down into smaller components.
I wanted saws that are nicer, more real, and more meaningful than mass-produced tools, if possible.
Gentle Reader will not be surprised to learn that Stan delivered all I needed and then some.
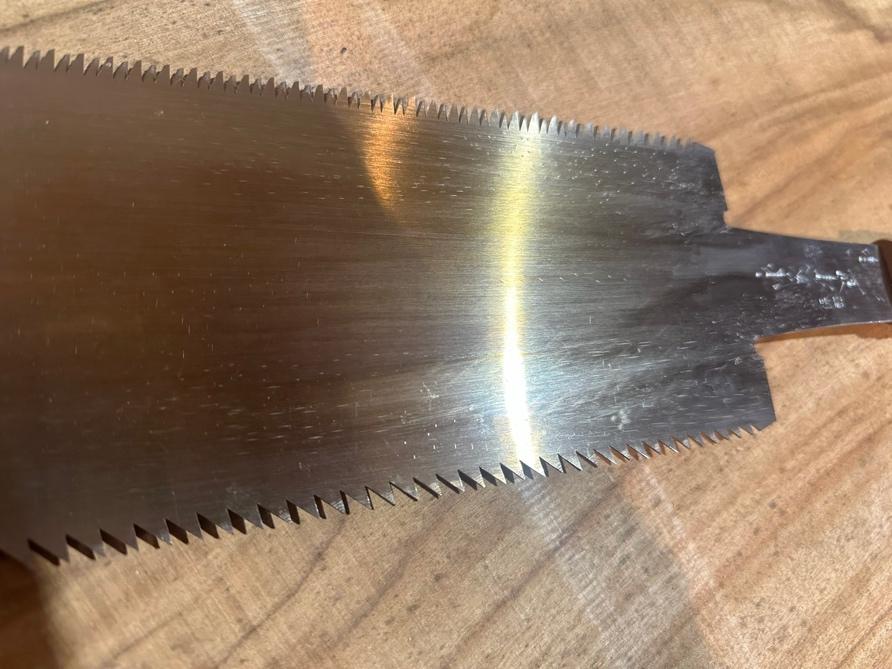
The firstcab off the rank was an antique 300mm ryouba labeled as being made of Tougou steel – a now rare tool steel produced by Andrews Steel of Britain. This is a stiff bladed, large ryouba, and a very handsome saw. Stan offered, and I enthusiastically agreed, to have this saw tuned, sharpened, and teeth re-profiled for hardwood by his saw-smith, Takijiro.
Takijiro trued and tensioned the blade, leaving behind the telltale henpecks seen on the sides of the blades.
This new saw’s first challenge was crosscutting a slab of camphor laurel planned for a coffee-table top, about 650mm wide and 40mm thick (after giving the slab a good scrub with a wire brush first). It took me about 2 minutes to complete this cut, and it was exceptionally easy to keep straight. I followed this with a 1200mm long rip cut through the same in about 4 minutes and equally satisfying. The cut surfaces were exceptional – very smooth and very straight, even with my paltry skills.
I could not have been happier with this saw, which came from Stan’s “miscellaneous ryouba” selection, and the decision to have the blade tuned and the original teeth replaced with dedicated hardwood teeth is something entirely to be recommended to all potential purchasers.
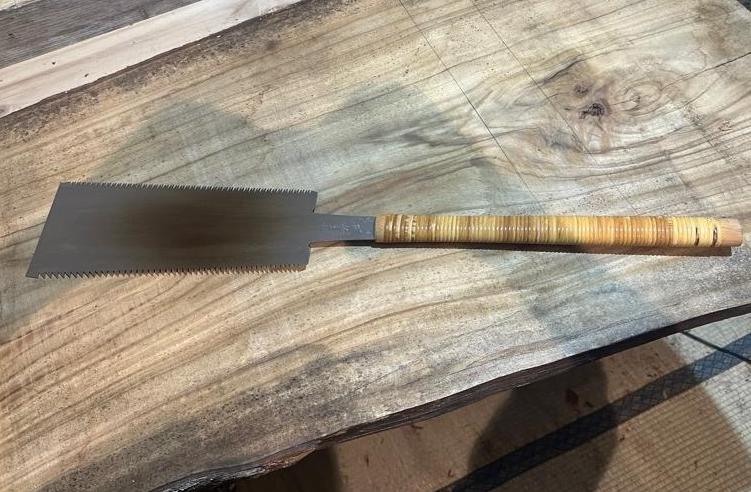
But one is never enough. And after years of reading Stan’s enthusiastic praise of them, I also wanted my own bukiri gagari, a much rarer and more specialized saw. Here, Stan was able to provide this beautiful 330mm blade made by Takijiro, again, sharpened, trued, tensioned, with hardwood teeth, and with a beautiful natural wooden handle to boot.
Nakaya Takijiro Masayuki, sawsmith extraordinaire
This saw is a joy to use. It’s much bigger than its 330mm size might suggest on first read. It feels like a much bigger, more substantial tool than the 300mm ryouba, despite the blades being notionally similar in size.
I soon became accustomed to using a pull saw with a “pistol grip” handle (aka “shumoku” handle), and sure enough it delivered a straight cut and quickly. I put this saw to the task of making the matching 1200mm rip cut on the other side of the slab, and the results were, as expected, fantastic.
I can’t overstate how much easier it was to make quality cuts with these quality tools. I’m not a professional carpenter, but neither am I a turnip, and can usually make a fist of accurate work even with subpar tools. And while I have some higher-end dozukis and other fine-toothed saws, I had kept my ryoubas and rough work kataba saws cheap and cheerful to this point. These saws were, if not quite like the light that shone round Saul on the road to Damascus, at least a bit like scales falling from my eyes.
The third saw I ordered from Stan was a mass-produced and induction-hardened crosscut ryouba, with an exchangeable 300mm blade – larger than is easily found here in Australia. The reason for this choice was explicitly related to one of my purchasing criteria above, namely that I suspect that I will not be attempting much crosscut saw sharpening any time soon.
The aforementioned ryouba and bukkiri gagari saws are both traditional, handmade saws with teeth that will require regular sharpening.
Stan kindly included in his package a tiny specialized saw file to accomplish this task. But I will be babying the crosscut teeth on the ryouba out of my own hesitancy to try to sharpen them. As such, I thought it wise to make use of the best of modern technology in this affordable, induction-hardened saw to be used whenever extensive rough cross-cutting, sometimes through less than immaculate timber, is required. It cuts very well indeed, and quickly, if without some of the romance and spirit of the handmade saws.
These saws are already the new front-benchers in my workshop, and doing excellent work. The only thing I recommend more strongly than Stan’s tools are his advice and counsel in selecting, using, and caring for them.
There are many people selling tools. But the world will never see the likes of dear old Stan.
As we say in Australia, here’s wishing you a Ripper Christmas! May the greatest of all carpenters be a light unto you and your loved ones.
Antone
Christ in the House of His Parents, oil on canvas by John Everett Millais (1849-1850), at the time a controversial painting much criticized by the likes of Charles Dickens because of its realistic depiction of a country carpentry workshop, especially the dirt, sawdust and shavings on the floor. But surely this is what a poor carpenter’s workshop in rural Nazareth would have looked like when Jesus was a small boy. Joseph is shown working on a simple battened door joined with nails, a standard carpenter’s job in all places at all times, but he’s stopped work to examine an injury on Jesus’s hand, perhaps caused by one of those nasty nails, foreshadowing future wounds, while Mary comforts her boy with a kiss. By no coincidence, a drop or two of blood has dripped onto the child’s foot further hinting of unpleasantness to come. In the background grandmother Anne takes over the job the injured child had been doing prior to the accident of clipping clinched nails, while young cousin John on the right (later known as John the Baptist) brings water to cleanse the wound, another ominous foreshadowing indeed. The apprentice shown on the left is said to represent Jesus’s future apostles while the sheep seen gawking through the open workshop door are said to represent the flock of Christianity. The ladder and the dove resting on it are also symbolic.
If you have questions or would like to learn more about our tools, please click the “Pricelist” link here or at the top of the page and use the “Contact Us” form located immediately below.
Please share your insights and comments with everyone in the form located further below labeled “Leave a Reply.” We aren’t evil Google, fascist facebook, or the Chinese Communist Party’s coordinator for blackmail, and so won’t sell, share, or profitably “misplace” your information. If I lie, may the tang of my bukkiri gagari saw break off.
A Huon Pine, native only to the Island of Tasmania
Serit arbores quae alteri seculo prosint – “He that plants trees labours for future generations.”
Caecilius Statius, quoted by Cicero. Motto of John Quincy Adams and his family, among others
This is a guest post by Dr. Antone Martinho-Truswell regarding a highly unusual tree, his adventures working its wood, and his thoughts about permanence. Enjoy.
What Does It Mean to Build Permanence?
Woodworkers – and especially we odder, curmudgeonly, hand tool woodworkers – have a vexed relationship with permanence.
On the one hand, spend any time reading, listening, or talking to a woodworker of any integrity (not least our distinguished host, Mr. Covington), and you will inevitably hear about building things that last, creating furniture or structures that will outlive the creator. Or else you might hear lamentation of the impermanent, throw-away culture represented by particle board, OSB, melamine, wire nails, and so forth and so on. Stan writes regularly here about building for future generations, about tool chests that preserve and workshop stools that endure. When we chop a mortice or fit a dovetail, the idea is that the end product is permanent – the strength and durability of the outcome justifying the labour-intensive process of creating it
And yet: wood. We are not stonemasons. We are not goldsmiths. We work with a biological material, one subject to biological processes such as mold, rot, borers, gnawing things, weather, sunlight, fire and friction which eat and wear away at wood until it’s gone. Japan’s venerable old wooden structures, record holders across all human construction efforts, pale in age compared to those made of stone. Wood perishes as do all living things (at least since Valinor was sundered from the sphere of the Earth).
This is the story of a permanent wood. A wood as magnificent as it is rare, a wood that is itself a lesson in permanence, and my attempts to make beautiful things for now and the future.
Old and Young Places
I like to think about old things. I was born and grew up in Southern California, where almost everything is new, even the old things. I remember as a child a small water tower near my elementary school, proudly fronted by a sign announcing that it was the oldest building in the area – an august 25 years old. The tower is older now and so am I, but there were old trees around even then. Up north, there are sequoias and redwoods, and of course, the oldest of all, bristlecone pines. I was young then, and didn’t think too much about wood or lumber, but I knew the trees were old.
As a young man, I moved to England for graduate school, and the world was much older. There was a sense of permanence, in the material things at least: old buildings and old furniture and old books and old wood. Oaken chapel pews and blanket chests and linenfold panelling – the sorts of adornments that, in the USA, are the enviable preserve of grand old institutions in grand old East coast cities, but in the UK, found in all manner of great and humble places. But the trees weren’t so old. England’s ‘green and pleasant land’ is green with farms and fens, but not so much old forest anymore. Like much of Europe, over aeons humans have harvested so much timber that little old-growth forest remains, only secondary growth, coppices and managed woodland. The trees in England are fairly young because the culture is relatively old. I was not yet a woodworker, and I did’nt think much on trees and timber at the time, but I knew the culture was old.
As a married man, I moved to Australia, and here I remain. The prevailing culture – that of the settlers rather than the indigenous people of Australia – is young, and so are the trees. Mostly.
Australia’s frequent natural fires mean that most of the trees that grow here are adapted to grow fast and big, but not long. Generations of forest turn over quickly – in ecological terms that is – with bushfires killing off adult trees and causing their scattered seeds to germinate and grow a generation of newer, younger trees. What’s more, as in America, the brash, youthful settler culture did not have a good track record as stewards of the natural gifts of the island continent, and the few old hardwood forests that once existed have been over-exploited.
Perhaps with age comes wisdom, but now I am both a father and a woodworker, and I ponder permanence, and wood, a great deal, and what all this youthful forest means for woodworking here in the sunburnt country.
Hard, Stringy Wood
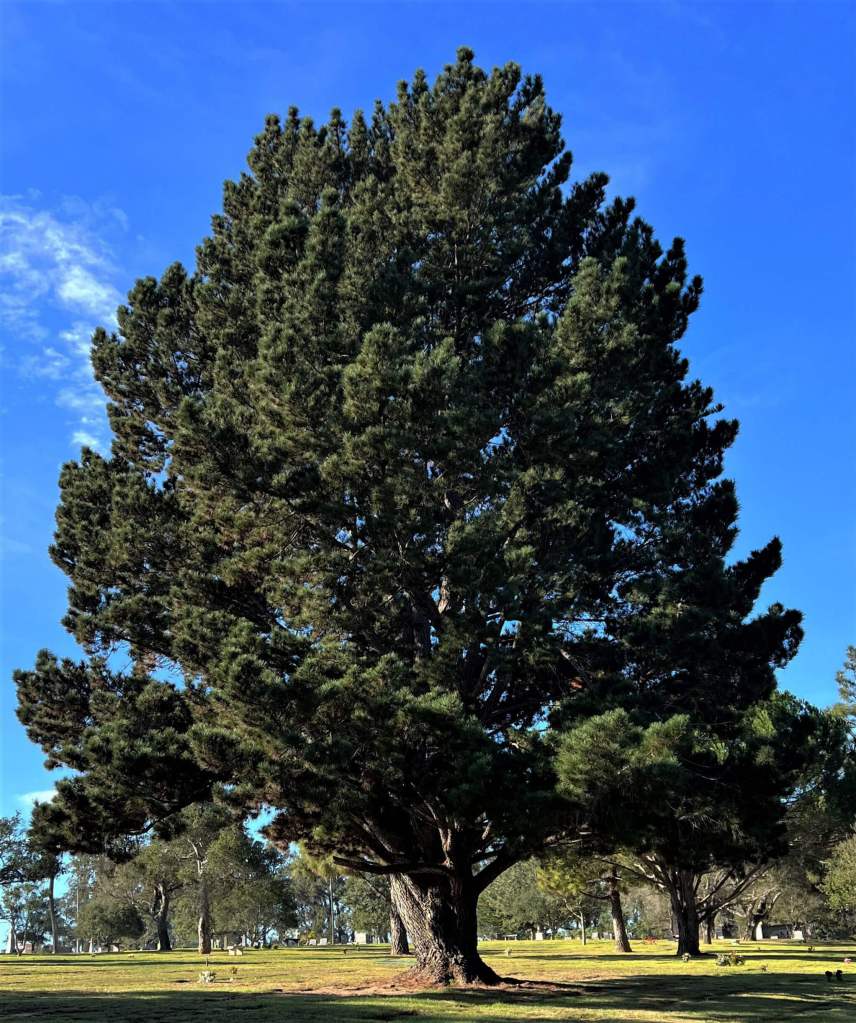
If you know anything about Australian woods, you know they have a well-deserved reputation for being really, really hard.
The vast majority of our forests and the trees that grow in them are the various and many species of eucalyptus and its near relatives, with two qualities that make them a mixed blessing to woodworkers.
First, they are fast growing, so as to quickly repopulate the land after fire, and second, they are extremely hard – the softest commercially available eucalyptus wood is called “Victorian Ash” (or “Tasmanian Oak” – same wood, different source) in the timber trade with a hardness similar to white oak or rock maple. The hardness of other varieties can easily range up into ipe and ebony territory.
Rainbow Eucalyptus
The result is an abundance of eucalyptus wood great for things like flooring and fenceposts, but fast growth makes it especially stringy, which together with phenomenal hardness makes it difficult to work with handtools. That same Victorian ash, the most common of all hardwoods in commercial use here, is among the best behaved, and a straight grained piece can take a nice glassy finish from a hand-plane, but we have nothing commonly available with the smooth texture of a maple or beech. Victorian ash works like oak at best. The other good furniture eucalypt is Jarrah, which is a lovely orange-brown colour and less splintery than most, but it’s expensive and a good bit harder than maple, so still a challenge. Moreover, it comes from Western Australia, which, along with Victoria, banned all native forestry at the start of 2024, so it is likely to recede to only niche use in the future.
There are many other beautiful, softer, easier working, and often fragrant Australian hardwoods, but for one reason or another all of them are scarce and hard to track down.
There are few species under plantation production here, and the fast-growing eucalypts crowd out most other species in our forests, so the best cabinetry timbers, like acacias and mahogany relatives, are rare. If you find these timbers for sale, it’s usually from a small-time operation that harvested a fallen tree – so you have to wait around for luck to smile on you. I try to snap up Australian Rosewood priced reasonably. The vast tracts of cabinet timber we once had – the famed Australian Red Cedar, which is actually a mahogany cousin, for example – were all irresponsibly exploited down to commercial extinction decades ago. A permanent culture of wood use requires a forestry industry with an eye toward permanence, which we didn’t have for a long time, and many argue we still don’t – hence the aforementioned bans and the limited selection of commercial wood.
A few government agencies and private companies are trying to improve sustainable forestry in Australia focusing on Australian blackwood (Acacia melanoxylon). This species should not be confused with the African blackwood of oboe, clarinet and bagpipe fame. Australian blackwood is a dead ringer for Hawaiian koa, and is its closest living relative. It has a rich, deep, brown colour with the same gleaming chatoyancy of koa, but its name comes not from the colour of the seasoned wood, but rather the black color the sap turns sawyers’ hands.
It’s a breathtaking timber deserving of widespread admiration, and one of the few beautiful cabinet timbers down here that weren’t over-exploited to near extinction in the last century. The blackwood timber industry is apparently a bit wiser than their forebears, and so harvests less and charges more to promote sustainability. It’s the nicest timber that can be bought here straightforwardly, and is priced accordingly.
The Ships that Took Our Trees
Clipper Ship, City of Adelaide, 1000 tons
Of particular interest to users of Japanese tools and Japanese woodworking methods and mindsets are softwoods, and this is where Australia is confusing. There are no true pines native to any part of the Southern Hemisphere – but settlers insisted on naming all the fascinating and unusual softwoods down here “pines” – and then importing a northern hemisphere species for most of our plantation wood.
Norfolk Island Pine
Norfolk Island Pine
When Britain established the first penal colony at Sydney in 1787, the site was chosen partly because it was thought to offer a good strategic back-up to the British claims on Norfolk Island – a speck 900 miles out into the Pacific. The trees covering this island – Norfolk Island pines – were thought to be particularly valuable to the Royal Navy, as they tended to produce ramrod-straight single trunks, almost as if replacement masts had been conjured up from the Earth. However, the timber proved too flexible for masts, and the idea was abandoned, though the Norfolk pines got their second act as a popular ornamental plant (including a few all the way back in my home town in California).
Hoop Pine
Much more useful is hoop pine, a near cousin of the norfolk pine that grows on the Australian mainland, and is our only plantation-grown native conifer. I’ve made shoji from hoop pine; it has nice straight grain producing a good shine when hand-planed. The only other commercially available native softwood is Australian white cypress which has a beautiful smell and is famously insect resistant, but unlike most softwoods it’s harder than American oaks. It also doesn’t grow very big, so is mostly used for knotty, sapwood-sapwood edged fence posts, or equally knotty floorboards and decking. I understand that it is not a sustainably managed species, and conservationists often recommend against its use.
Monterey Pine
The Australian construction industry relies on plantation grown monterey pine (also called radiata or pinus radiata) for all of its general purpose lumber. This is an import from California, now very rare in its natural habitat but grown all over the Southern Hemisphere to compensate for a dearth of native pine species. It is a particular pet-hate of Australian woodworkers, in online forums and general conversation, who lament its often crumbly texture and poor strength. I don’t hate it though – it can take a lovely plane finish and the wide grain does make for beautiful patterns on clear, flat sawn boards.
Huon Pine
Like all Australian trees, huon pine is misnamed. It isn’t a pine at all but rather the only member of its genus – more akin to a cypress than anything else, yet still not a cypress, a thing of its own.
Fans of Tolkien’s works may lament that its name is Huon and not Huorn, but no tree was ever more deserving of association with Tolkien’s tree-herding Ents, that ancient race of sentient defenders of the forest.
Huon pines grow only in Tasmania, and only in the wet and mountainous western regions protected from fires. Provided they have that protection, they may achieve something most Australian trees do not – great age. Huon pines grow incredibly slowly, barely thickening as century after century wash over them, living at least 2000-3000 years, with some thought to be even older. This is best evidenced in the astonishing tightness of their annual growth rings. It is not uncommon to see specimens with annual growth less than half a millimetre – or to put it another way, the trees gain less than two inches of trunk radius per century. While immensely slow, these trees can still grow immensely large when given that precious critical thing – time. They are probably the longest-lived trees in the Southern hemisphere, and certainly in Australia.
There are lots of small huon pines growing now, though few big ones. They should be huge, but they are not, because the great ones were all mostly cut down to build boats – a vast fleet of huon pine watercraft were constructed in Tasmania, using up most of the big trees. The promise of the perfect tree for shipbuilding that had fallen flat on Norfolk Island paid off big time in Tasmania with the huon pine. The reason for the single-minded use of these ancient trees for shipbuilding will become obvious, but as a result of this hasty zeal, they are now the single most protected species of tree in Australia, both to allow the forest, with Ent-like patience, to recover, and to preserve the few very old and very large specimens that remain.
Beyond the Grey Rain-curtain
These trees are old, though their lives are but the beginning, and death, as Gandalf once taught young Peregrin Took before a fateful battle, is just another path beyond which the journey does not end. This is, cynically, true of all wood that gets put to human purpose, but it is true in a special way for huon pines because of a unique chemical in their wood. Not unlike other fragrant cypress-like softwoods – including Japanese hinoki – huon pines contain great amounts of oil, in this case, an oil called methyl eugenol that protects them from insects and other wood-hungry nasties. Methyl eugenol is, as it happens, the ticket to eternity for wood.
For whatever reason, methyl eugenol, in the very high concentrations in which it is found in huon pine, is astonishingly successful at preserving timber. Huon pine timber is highly prized for shipbuilding because it’s easy to bend and work, completely impervious to insects and fungus, and readily survives the rigors of the aquatic environment. All that ever seems to happen to huon pine is that the surface turns grey in the sun – much like teak. And then it simply endures.
And I mean it endures. The 3,000-year age of living huon pines is one thing, but researchers have found fallen huon pine logs on the floor of the forest that have lain there, unmolested by decay, for as much as 38,000 years! Not petrified, not fossilized, just oily wood under a weathered surface, simply enduring.
These characteristics are also why we still have a bit of precious huon pine timber available nowadays, reclaimed from time to time from old boats and old furniture, as durable and enduring as ever. Moreover, the foresight that was missing when the trees were mostly cut down a century ago was not blind when hydroelectric dams came to Tasmania. In the 1970s, with two valleys set to be flooded, the Tasmanian government allowed loggers to go into the valleys and cut down the pines – but not to take them. The loggers, working in tall boots even as the dam waters were rising, would leave the logs where they fell, to float up to the surface of the new lake as the waters rose.
That was 50 years ago – the logs are still there, floating on the lake. The outer layer turns grey to about 1-2mm in, and then, inside, the creamy golden wood, as perfect as the day it was felled, endures. The decades afloat harms it not at all, and every year a tiny portion is licensed to be taken for restoration and preservation jobs.
This is all the unreclaimed huon pine that there is or ever will be for woodworkers to use, and they estimate they have about 50 years’ worth left at current extraction rates. But with the wood so impervious and eternal, what is already in cabinets and drawers and tables and ships will continue to circulate and be reused. It is a wood with true permanence.
An Unexpected Responsibility
At this point I will enter the story to share the most harrowing and rewarding of my experiences as a woodworker.
By chance, I had the opportunity to acquire three large slabs of huon pine, cut and dried in ages past but never used. Compared to the tiny crafting boards and turning blanks that are generally available (at great price), this was a bit of a windfall. I could have, with all cynicism, listed each one for sale for several hundred dollars, pocketed the profits, and went on to buy more quotidian woods. I did not do this for two reasons.
First, and perhaps most pointedly, with visions of epoxy pours and hairpin legs plaguing my dreams, I was overcome with a sense of responsibility to “protect” this precious wood – whatever that means. I wish to acknowledge, in self-reflection and humility, that I am an amateur woodworker. A reasonably experienced and meticulous one – but an amateur nonetheless, albeit one who works with hand tools and has the hand tool mindset. My work is fine but not perfect. But I suppose I like to think that the tool marks I leave here and there, occasional tear-out, and other mistakes that remain have a certain honesty and worthiness to them, becoming of a slab of great age. Vanity of vanities, all is vanity…
More than that though, I saw in these slabs of huon pine, and in the legends of these trees, an opportunity for permanence. Here were three great hulking slabs of a tree older than the nation-state it was felled in (I counted 800 growth rings on one of the slabs – and it wasn’t even a centre slab), thick and strong, and made of the closest wood comes to being an imperishable material. Here was the opportunity, if it was ever going to exist, for a piece of furniture that might outlive the memory of my name.
It had to be a table. Only a table could use to best effect the wide expanses of precious wood – laying them out on full display for all who saw them to admire. No matter how perfectly I might make a cabinet or chest, it would not do justice to the material. And, as history, archaeology, and literature show, only a table is so intimately connected to life and family and holiness by its proximity to hungry mouths, little hands, and eager minds as they first do their colouring and then their maths homework, and then their college applications. Only a table is ever so truly loved by generations as to be worthy of wood older than all those generations combined. I simply couldn’t bear cutting the beautiful slabs into small pieces. So for months I fretted; and worried; and stressed about the crushing responsibility of making the first cuts.
The Weight of History
I am an apartment woodworker. My family home is a house in the mountains west of Sydney, but I work as Dean of a university college and we live most of the time in the Dean’s residence, an apartment on campus. I am blessed with a very patient and indulgent wife and an apartment that happens to have a sort of wide corridor I use as a tiny woodshop. Space is still limited, though, and I try not to stockpile wood (in the interest of stockpiling tools – ahem). So, three slabs, two metres long and the best part of a metre wide, mocked me each time I had to shuffle past them. And still, I fretted.
I eventually decided upon a refectory table so that no matter how many chairs are crammed around it, none clash with the legs. And with a strong stretcher tusk-tenoned into each leg to allow it to knock down, so that I could make it big but still fit it through doorways. Most importantly, I needed to keep the two 800mm wide boards that made the tabletop flat – so sliding dovetails across the bottom to counteract any cupping. And those sliding dovetails would be a perfect place to pin the top to the legs, with removable dowels, again so it could be knocked down to move. Drawbored mortise and tenon joints to hold the I-shaped legs together without glue (since all that wonderful oil makes gluing troublesome anyway). A kanna-shiage (handplane finished) top for beauty and touch, with just a light coat of oil and hard wax, so that the wood itself can be appreciated. A magnificent vision. Complex and well-chosen joinery. Perfection worthy of the tree. Entirely beyond my experience or skills…
I had to start by getting to know the wood. Before any cutting or marking or anything, I realized I could not confront the massive task I had set myself without first knowing what it was to get huon pine under saw and plane, to see, feel it, and smell it.
.
I hoisted one of the slabs onto my sawhorses, and with a few strokes of the little aogami roughing plane on the left, and a few more of the shirogami finishing plane on the right, I had my first look at the slab, and my first curls of huon pine shavings. (No, Stan, I don’t London finish my plane bodies. They are dirty, it’s patina.)
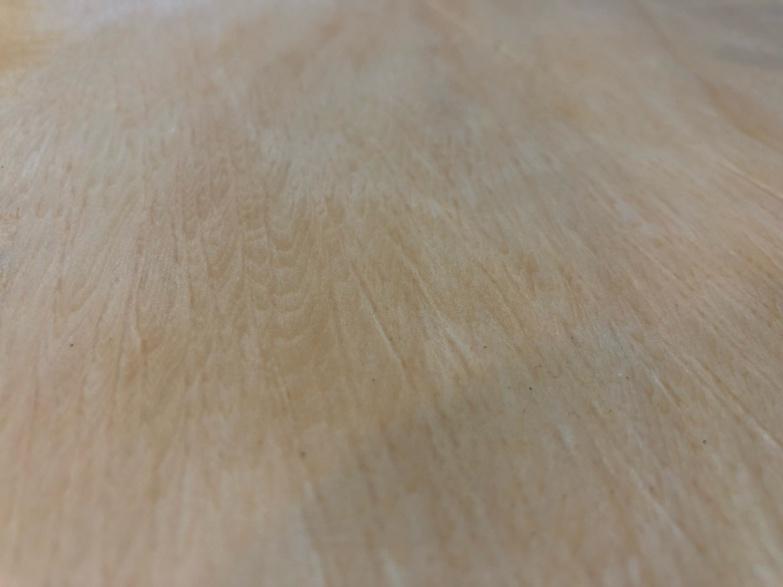
The smell – oh the smell. The smell of huon pine is unlike anything I have ever experienced. It is sweet and rich and almost creamy, but without even a hint of sugariness or caramel, nor any of the medicinal notes of cedars or cypress. I suppose the aroma is a little like gardenia flowers, but different. And it’s persistent. I saved bags of little offcuts that are no less fragrant now than a year ago.
The scent was such that I almost did not notice the figure at first. From some angles, nothing more than a very tightly grained, golden softwood, with rippling grain caused by the irregular growth of the tree’s surface over the centuries is visible. But when the light strikes the surface of the top at the right angle, a shimmering sea of lamellar rays cutting across the grain pop out, almost obscuring the grain with its gleam. Beautiful but subtle – much like the scent. This image and this aroma is now linked with permanence in my senses.
With the feel, smell and appearance of the wood now embedded in my mind I began to feel more confident about beginning my table project. One serious concern remained, however, namely: tear-out.
Layout That Fills the Workshop
I started in with trepidation, hoisting the two closest matched slabs onto my horses and getting to work. In my little shop, I have no room for a great big assembly table, so the slab was my workbench, and took up the whole shop. Here you can see my cramped little shop, replete with little atedai against the wall, assorted tat taped and hung on the walls (including my Palm Sunday palm, awaiting the coming Ash Wednesday), my tool chest brusquely stolen from Stan’s design, and a lovely old tansu filled with bric-a-brac.
Layout was painstaking, although not because the joinery was especially complex. Before shaping, the two “I” shaped legs were six simple boards and the stretcher would resemble nothing so much as a 2×4. The only complexity to the initial layout arose from the graceful radius I had planned for the long edges of the two top slabs. I could have cut them with straight edges and cut the curved edges later but that problem would have been unnecessarily wasteful.
One simply cannot waste this wood. If you have any respect or regard for the trees that support our craft, it repulses the conscience to even put plane shavings into shop bins. Moreover, I absolutely refused to cut these slabs in anything but the most efficient, offcut-preserving way. As a result, layout took days (or, rather, nights. Amateur, remember?).
The two surfaces of the slabs I used for the top each had unique flaws and virtues. In the end, curving the tabletop’s edges to accommodate the natural edges and features of the slabs proved effective in maximizing the tabletop’s size while minimizing waste of this rare and valuable wood. For example, in the photo above you can see where the near right corner of the slab narrows towards the end, an inconsistency my layout had to accommodate. This layout was also necessary because two of the slabs were contiguous in the bole and one was not, such that the two contiguous, matched slabs had to be used for the top even though one was somewhat larger than the other.
Dealing with the constraints that imposed this layout taught me important lessons in collaborating and compromising with the wood. In line with Japanese tradition, I knew I wanted the “outside” surface of the board to be oriented upwards in the table, and so my layout prioritized that side. As a result, both slabs ended up with prominent natural flaws on the underside – like greyed areas, bark incursions, and even one gash that looked as though the tree had been struck with a red hot poker.
There is a school of thought in modern, machine assisted, YouTube recorded woodworking that cannot tolerate such defects, no matter how small or natural, in any piece of furniture, demanding they be either removed entirely or filled with colored epoxy. The first approach I reject because wood is natural and I believe it should feel natural. I enjoy the fragrance of the wood, and the feel of running my hand along the underside of the table, sensing the evidence of the tree’s story, together with the tool marks I intentionally left. The latter approach I reject because epoxy is plastic, and I work with wood. The table bears the scars it earned in life, but only reveals them to those with enough appreciation and humility to get down on their hands and knees to gaze upon them.
Putting Blade to Wood
I do not now, and suspect I never will, own a table saw. Someday I might own a bandsaw, but I’m not convinced. In any case, I won’t have any of these things in the house whilst my daughters are young, as much to spare my family’s lungs from dust as to avoid injuries, however unlikely.
So that meant I had to figure out a way to accurately break down these slabs along my layout lines with hand saws, in a room that barely contained the slabs.
I couldn’t do it on the sawhorses – that would require me to stand on the slabs to make the long rip cuts, which seemed risky to their integrity without a supporting table underneath, especially when sawing the narrower pieces. And the slabs were too long and too heavy to comfortably use the Japanese low horse and foot-clamp method, which I am normally fond of for long rips.
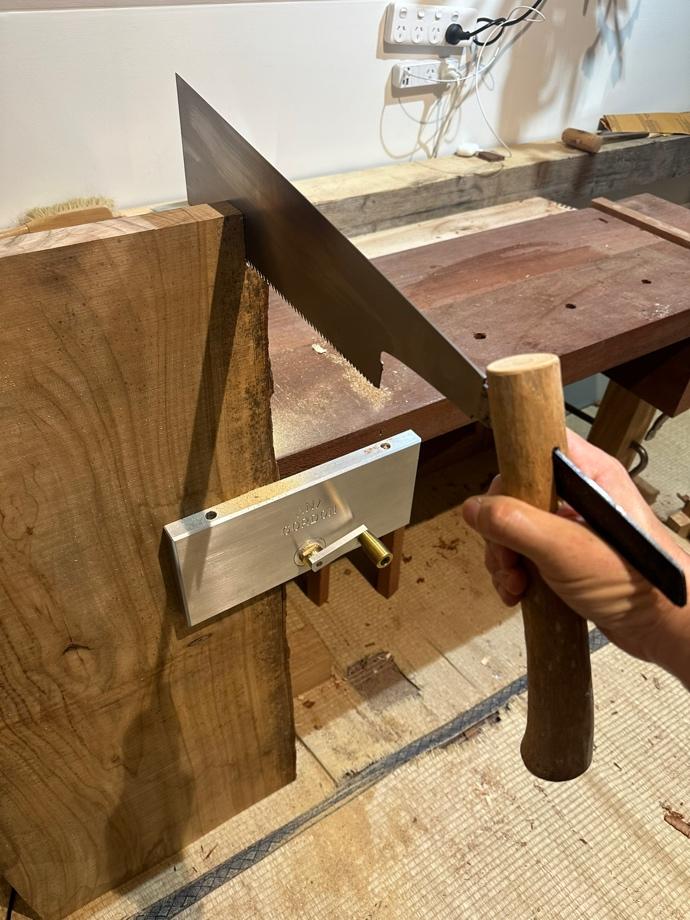
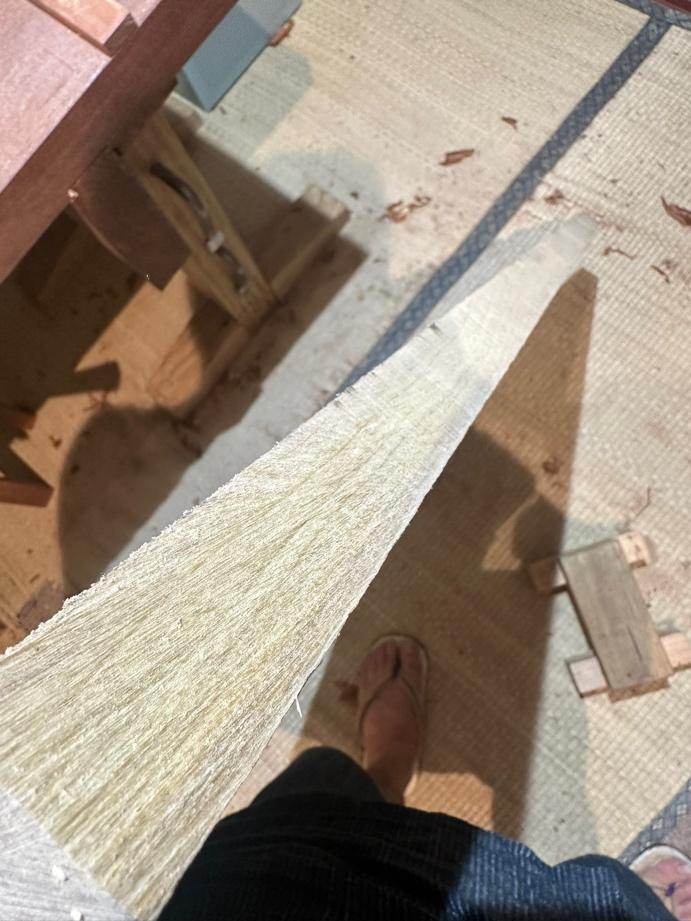
The solution I selected was to support the slabs horizontally on one long edge using my 6-inch thick planing beam, with the other long edge supported on low horses with extra boards taped to them to make up the difference in height. This provided enough vertical clearance under the slab for a kataba saw. This arrangement had other advantages too. As I ripped from one end of the slab to the other, I could stand on the slab directly above the supporting planing beam, which was in turn resting on the floor, preventing the slab from shifting position while avoiding downward deflection of the ever-narrowing slabs.
My back did not love this hunched sawing position, but it was more comfortable than you might expect, and in two long sessions of rip-sawing, I had everything broken down to pieces: two wide top planks, each tapered on one edge, two vertical leg pieces, four feet and aprons for the I-shaped legs, and one long stretcher. As it happened (and as you can see below) the offcut from the third slab was almost a perfect extra stretcher. I still have it and will use it for something someday. It is the world’s most magnificent (and I suspect valuable) pine 2×4. The two venerable katabas, one rip and one crosscut, may be seen taking a well-deserved rest after rendering magnificent service.
With designing, planning, layout and rough cutting done the project shifted to the shaping and joining phase requiring greater attention, so I put down the camera, and did not pick it up again until the job was done. Sadly, I don’t have photos of gorgeous shavings rippling off planes, or of the massive Anaya-nomi I used to cut the mortises for the stretcher to pass through the legs, or of the nakin-kanna rounding off edges.
This work was more-or-less conventional furniture-making; taking the neatly rectangular pieces of wood I made in the rip-fest above and shaping them into components using good steel and keen eye. I didn’t follow a borrowed or historic pattern for any of this, but worked out my own take on the refectory style of dining table with two I-shaped legs and a single stretcher.
I made a pattern of a single asymmetric curve using a bit of sturdy brown paper shopping bag, leaving the carry handle attached to hang it on my shop wall throughout the process so it was always to hand. I used this same curved pattern throughout to define all the curves in the project, starting with the concave slope from the mortise in the feet to their toes, the tapers from centre to ends on the vertical legs, and again as the most important curve in the project – the gentle swell of the tabletop’s long edges from one end to the middle and then tapering back to the opposite end again.
Once the base was completed, the conventional woodworking ended and the real gauntlet began – the top.
The top was made with the two long, wide boards shown with my kataba saws in the photo above. At almost 400mm wide each, they were a challenge to handle, a bigger challenge to plane, and an even bigger challenge to keep flat.
The work of planing the wood went alright. The swirly grain of huon pine is not terribly prone to tearout, and like all quality softwoods, is a joy to plane in the direction to which it agrees, producing shimmery, breathtaking surfaces. The trouble is that each 400mm board contained 800 years of growth rings with grain direction changing within each board many times due to storms, cool summers, and a lightning strike or two as empires rose and fell. And with such tight grain an entire century of growth, along with the changes in the tree’s environment that impacted that growth, ended up recorded within a mere five centimetres of width – narrower than the thickness of a standard 70mm kanna – and often without apparent visual clues. As a result, seemingly neat, fine ribbons of shavings pulled end to end would be followed by tiny but significant tearout here and there across the board.
Reader, this took days – days of sharpening by very best white #1, fine mouthed, perfectly (amateur-perfect, mind you) tuned kanna. Days of shaving just exactly to this specific point, in just this direction, just so, to clear up a spot of tear out, then switching sides and going the other way, hoping and praying and watching that I didn’t overstep the boundary and have to start over – which I did, many times. And all the while, awkwardly walking around the massive slab, leaning over it to plane the far side, getting half up onto it like a billiards player, and then doing it all over again on the other slab. There is still some tear out in the surface, especially around the teardrop-shaped bark inclusion that gracefully adorns one corner of the tabletop. But it’s pretty close.
Keeping it Flat
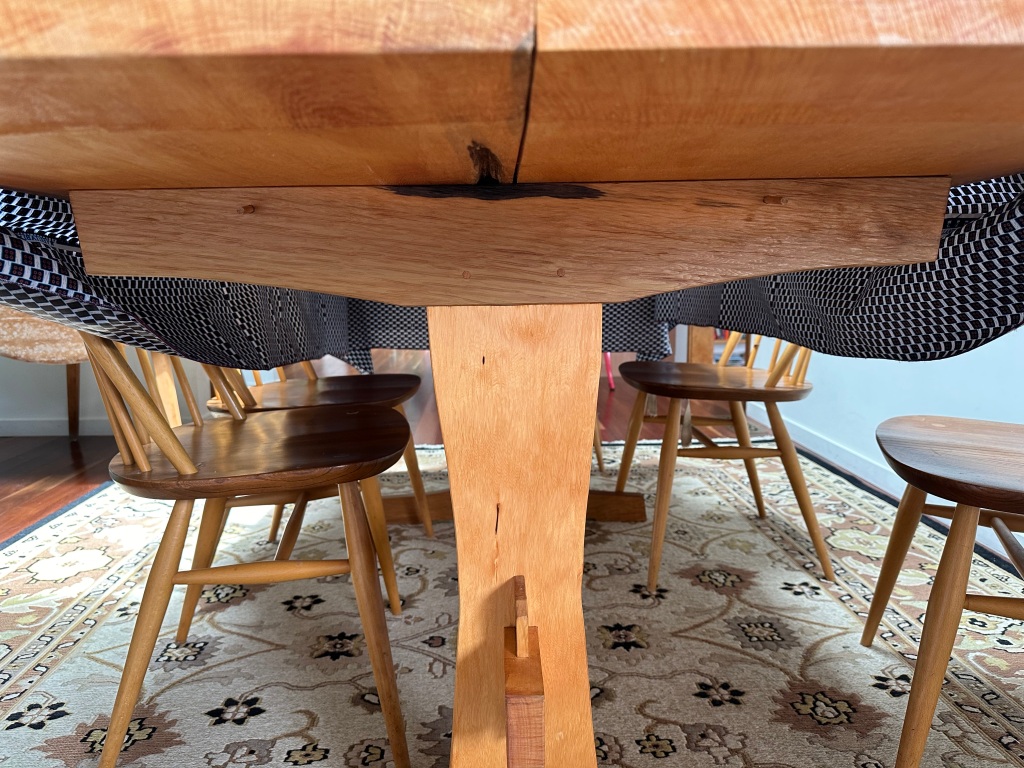
An important aspect of the project was ensuring the wide, solid-wood tabletop remained permanently flat through changes in temperature, humidity, loading and coverings. In the case of such wide slabs, there was only one realistic solution – sliding dovetailed battens on the underside. This design detail had the advantage of providing two level, perpendicular surfaces to connect the legs to the tabletop.
Of course, a hard cross-grain connection between the battens and the tabletop using glue and screws would end in tears after just a few years, so I cut two blind sliding dovetail slots in each half of the tabletop beginning at centre joint of the toward to about 8-10cm of the edges, then cut dovetails into the battens to fit. The two planks hold the battens captive between them once installed, and the friction in the sliding dovetails locks the two slabs together without glue, dowels or hardware.
To use glue anywhere in this project seemed wrong. In any case, the oils in huon pine don’t play nicely with glue, and the joinery connections were the better plan.
I cut the dovetails in the battens and tabletop planks using my cleverest of all Japanese planes – the male and female dovetail plane, a rare beast indeed.
With the battens installed I cut 10cm wide shallow bevels on all four lower edges of the top, tapering the top to create the illusion of a tabletop only 20mm thick from a slab about 40mm thick in the centre. This involved a lot of plane work.
I left the underside a bit more rustic, even allowing large areas of “live” bark to remain as a lagniappe to the worshipful person who surveys the underside. You might think that leaving bark on the underside meant that I contravened the usual practice of Japanese woodworkers of using the outside surface of a plank as the show surface, but no – though not Japanese, I cleave to this principle invariably, but in this case, the history of the tree involved so many twists and turns that the bark inclusion was exposed on the inner surface of the board.
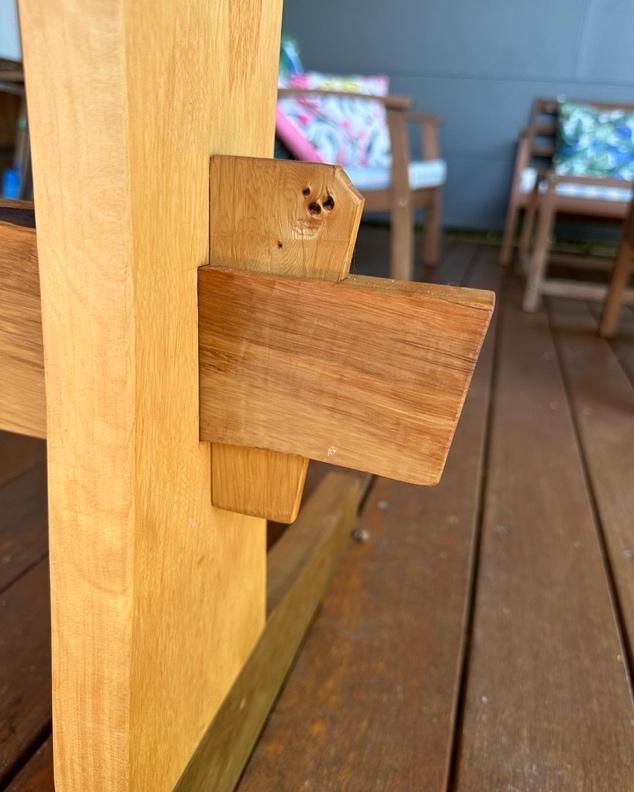
For clarity, allow me to explain what may not be obvious from the photos. The two legs are connected by mortise and tenon joints to horizontal feet at their lower ends and horizontal beams at their upper ends. In turn, the trestle leg beams are connected to the two battens by four dowels, two at each batten, that pass through the beams and battens at an upwards angle. After exiting the batten, the end of each dowel presses tightly against the underside of the tabletop, slightly bending and binding it in place.
To disassemble the table in preparation for relocating it to our home in the mountains outside Sydney, I just need to knock out these four dowels and slide the battens out of their dovetail slots, and knock out the two wedges in the ends of the tusk tenons securing the spreader beam connecting the legs. This design has worked well, and the dowels are strong enough that the table can be lifted and carried by the top alone.
The Finish
Now, a great part of me wanted to leave the wood unfinished, both to enjoy the raw kanna-shiage surface, and to ensure the magnificent smell would not be diminished. But, to provide some protection and give a bit of extra visibility to the lovely grain, I gave the wood a couple of coats of thinned pure natural tung oil, and then rubbed on and buffed out several coats of carnauba wax creating a surface hard enough to help protect the relatively soft wood from dings and scratches. Also, my wife liked the colour better oiled than unfinished, a very important consideration for all of my woodworking efforts.
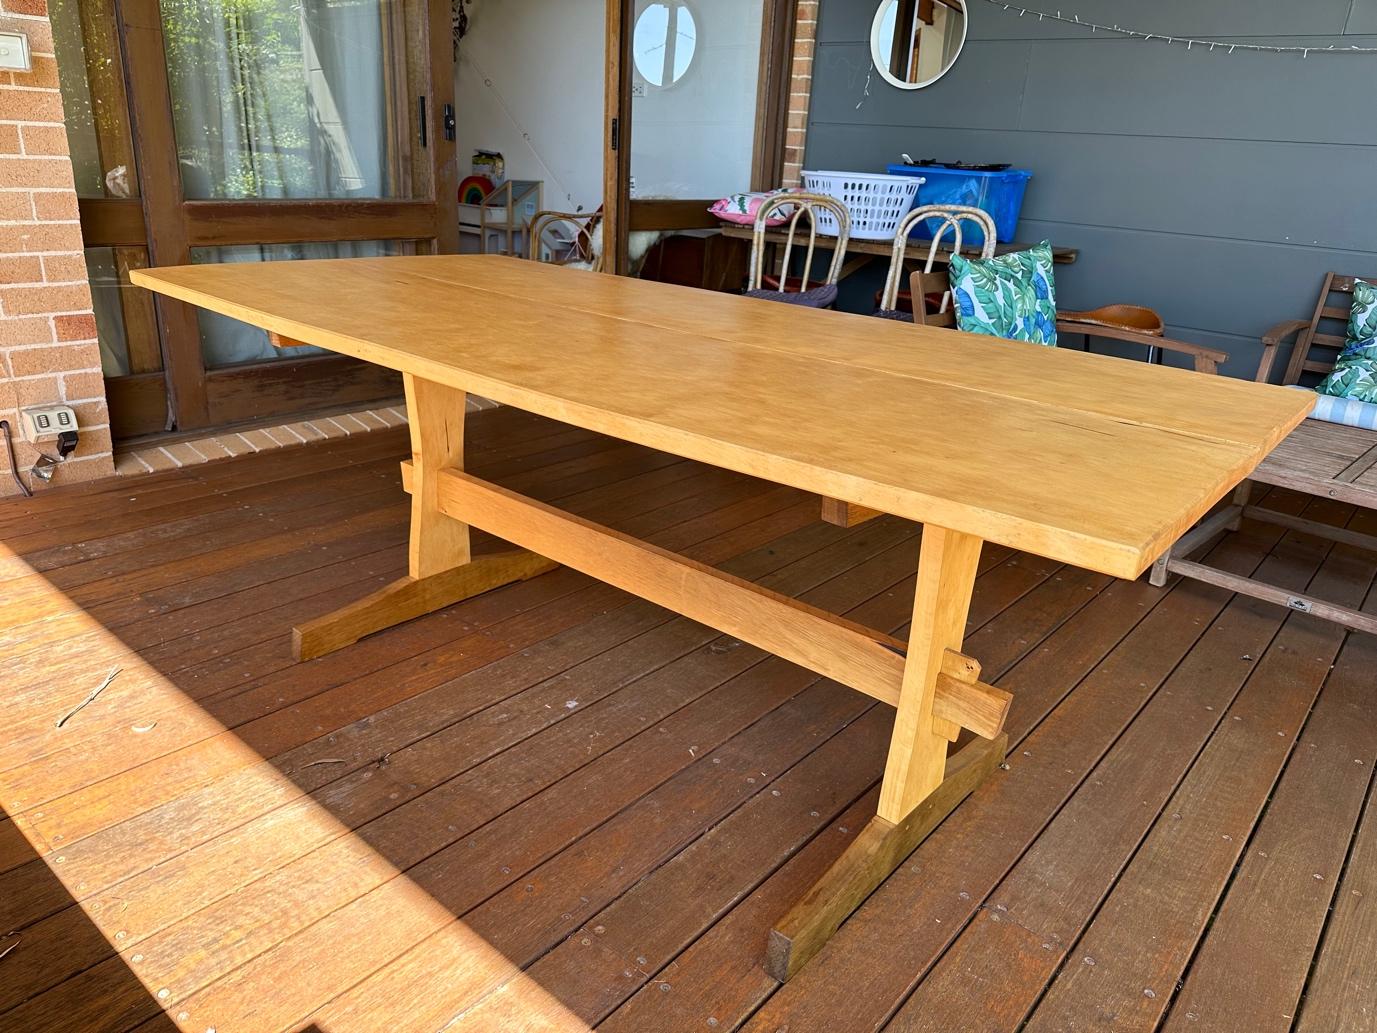
And that was the job done, and here it is, in its home on the covered veranda of my house:
As you can see, the finish turned the feet, which I cut from a discontiguous slab, a darker color than the rest of the table, but it’s an effect I rather like. The clouded figure of the top shimmers beautifully in the morning light from the East, and the little imperfections quietly witness to handwork, something for me to fret over in my quietude at meals around the table. The horizontal beams at the top of each leg that mate with the battens, not visible in the photos, are identical to the feet, except of course inverted.
I do not think I am testing the permanent nature of this table by using it outdoors – though I may move it inside for a different practical reason: it is now the largest table we have, and has already made a couple of trips inside for big family gatherings. Rather, faced with a true forever wood that can endure against the elements, it seems only right that it should experience them and demonstrate its aplomb. I am glad in the end that I did not glue the centre joint of the top surface because it allows the two slabs to move and stretch a bit on humid days without cracking or busting the seam, and while this does mean they become un-flush for a day or two, they settle back in becoming flush once again when the weather dries out. The table can breathe.
I will inevitably make little corrections as the table and I get used to each other. I remain unsatisfied with the very rectangular shape of the stretcher, and when the time comes to break down and refinish the table I will add some curvature to the stretcher. I will also probably resurface the top perhaps once a decade, as it ages and my skill with a kanna (hopefully) improves. Part of the joy of using a wood that should outlive my bloodline to make a table of great permanence that can be disassembled and reassembled as needed is the anticipation of ongoing minor improvements, and the relationship I and future generations will have with it.
In the end, I still do not quite deserve this wood, because no one does. It is right and just that the Tasmanian government has banned the felling of any more of these trees, and it is right and just that the remaining wood is hard to come by and cherished. I am happy for the opportunity to make something permanent with this magnificently permanent and beautiful material.
Antone Martinho-Truswell is a professional zoologist and amateur woodworker. His work can be found on Instagram at @stjosephwoodworks, where he posts his projects, experiments, and failures, and takes the odd commission. If you enjoy his writing and want to learn more about his day job, his book, The Parrot in the Mirror, is available from booksellers online and worldwide.
To learn more about and to peruse our tools, please click the “Pricelist” link here or at the top of the page. To ask questions, please the “Contact Us” form located immediately below. You won’t be ignored.
Please share your insights and comments with everyone in the form located further below labeled “Leave a Reply.” We aren’t evil Google, fascist facebook, treacherous X, Harvard University, or H. Clinton’s IT dude and so won’t sell, share, or profitably “misplace” your information. If I lie may someone bukkiri my neck.
Woodworking matters. It’s more than a pastime or hobby—being a woodworker means that you know the satisfaction and pride that comes from using your hands and mind to build beautiful, functional objects, and that you’re as interested in the process as the outcome. Amid the speed and chaos of the modern world, woodworking gives us a place where we can slow down, pay attention, and take the time to do things right.
Aimé Ontario Fraser
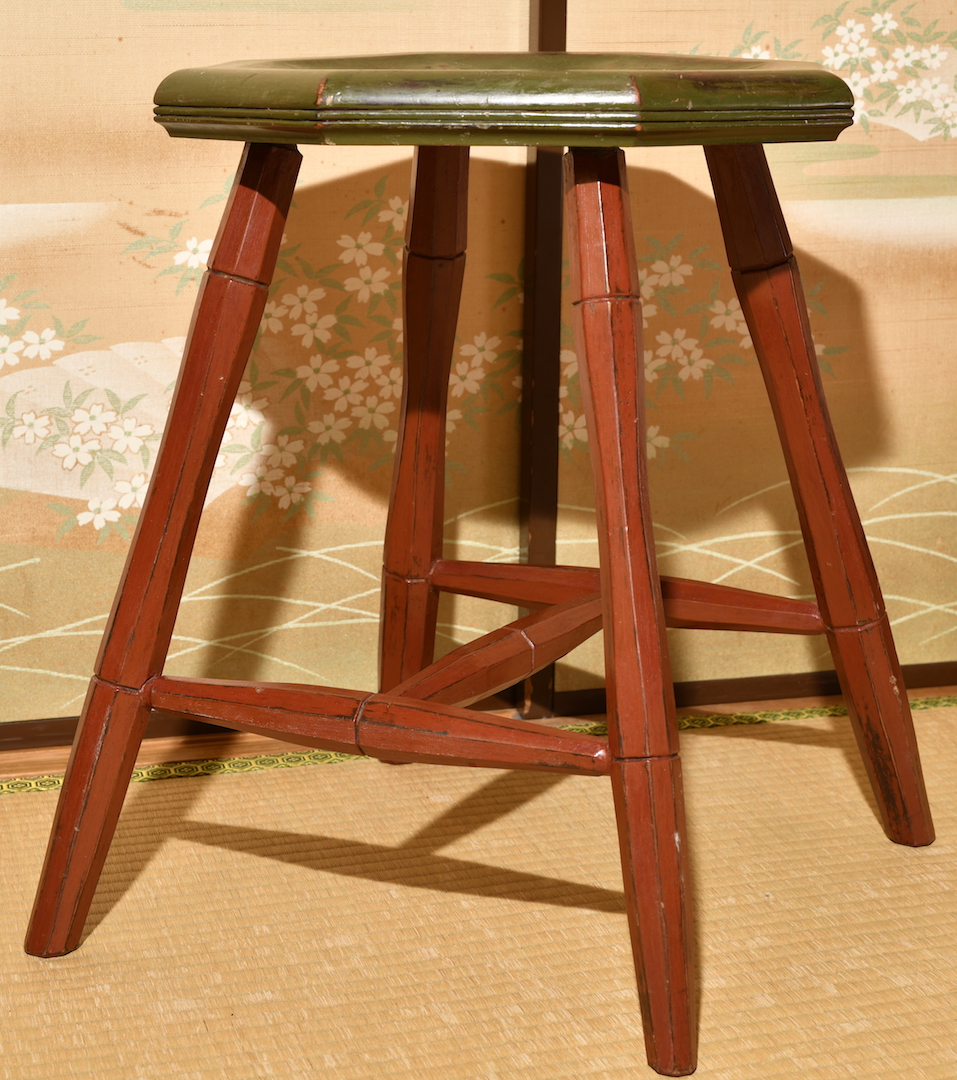
Your most humble and obedient servant is proud as a peacock with diamond gonads to have never made any project published in a woodworking magazine, with one exception: The Michael Dunbar Windsor Shop Stool. This is the story of my version of his stool. With some twists.
Policy Statement
I have a policy: While I have no qualms about showing portfolio pictures of past work to prospective Honored Clients, I don’t publish, distribute or email images of work done for HC’s. The reasons are simple. First, to avoid violating their privacy, I need to get their permission in-advance, in writing, which can be a pain. Second, while showing pictures of their property may not offend them now, it may in the future. Misunderstandings can occur even when backed-up by a piece of paper.
I also dislike bragging about my work in public, and nothing can be more public than the internet. But I am making an exception with this post because the subject is something I made strictly for myself, and it is decidedly ridiculous. If Gentle Reader doesn’t find it interesting, perhaps you’ll find it amusing. I invite you to snigger gracefully at your humble servant’s atrocious efforts.
Pragmatic Contrarianism
The title of this post includes the strange term “Pragmatic Contrarianism.” What does it mean? It’s a term I invented, I suppose, but the intended meaning is to consistently examine problems from an angle opposite of what is considered conventional, and then to formulate workable solutions based on an analysis of those observations, without regard to whether or not the resulting conclusions and the solutions implemented contradict standard theories and/or common practice, so long as they achieve the designated goals and objectives more efficiently than the conventional solutions. It does not mean an uncontrolled compulsion to be idiotic, disruptive, argumentative, deceptive, sexually abusive or psychotic like the management and staff of the Communist News Network.
A contrarian is a person who takes an opposing view, especially one who rejects the majority opinion.
One definition of pragmatism is as follows: “A reasonable and logical way of doing things or of thinking about problems that is based on dealing with specific situations instead of on ideas and theories.”
A pragmatic contrarian therefore is a person who actively seeks solutions different from standard convention, and implements those solutions in a way that yields desired performance and functionality.
This stool is your humble servant’s expression of this concept.
Motivations
A good workshop stool must be more than just simple furniture: it is a woodworking tool in and of itself, especially in a small shop, where it must serve not only as a butt rest but as a step-ladder, tool rest, sawbench, parts table, paint-can holder, cat bed, and even weight-spreader during glueups. These jobs require a stable, durable and reliable tool. Lightweight is a big plus too. And bench kitties always demand comfort of their servants (that’s me and thee).
Let me begin by telling you why I needed to build a stool. Perhaps you share some of these same reasons. Perhaps the solution I struck on will give you some ideas. Stranger things have happened.
Since moving to Japan, my workbenches have been in storage back in the U.S., so while stationed on the remote island of Guam planning construction projects for the Japanese government, I built one for the little woodworking shop I set up in my garage for making sanity retention components. Of course, I needed a stool too, so I considered my options.
On the US mainland I used cheap wooden stools produced in Eastern Europe or China that became rickety as quickly as a newly-elected politician’s moral convictions, so I was in the habit of tossing them each time we moved and buying a cheap replacement at the new location. Sigh… Would that morally-decrepit politicians were so easily disposed of.
Thinking back, those stools were clunky, ugly, top-heavy, and too tall requiring me to cut them down to a height convenient for hammer and chisel work at the workbench. This time I wanted a lighter, more stable, more comfortable, more attractive stool that would provide good service past my lifetime instead of being temporary mass-produced garbage-in-training. There aren’t many stores on the island, selection is bad and prices are high, so after shopping around I decided to build a lifetime piece of furniture myself this time instead.
Now, I am not a chairmaker, but lack of experience never stopped me from making a fool of myself before, nor did it this time.
The Design
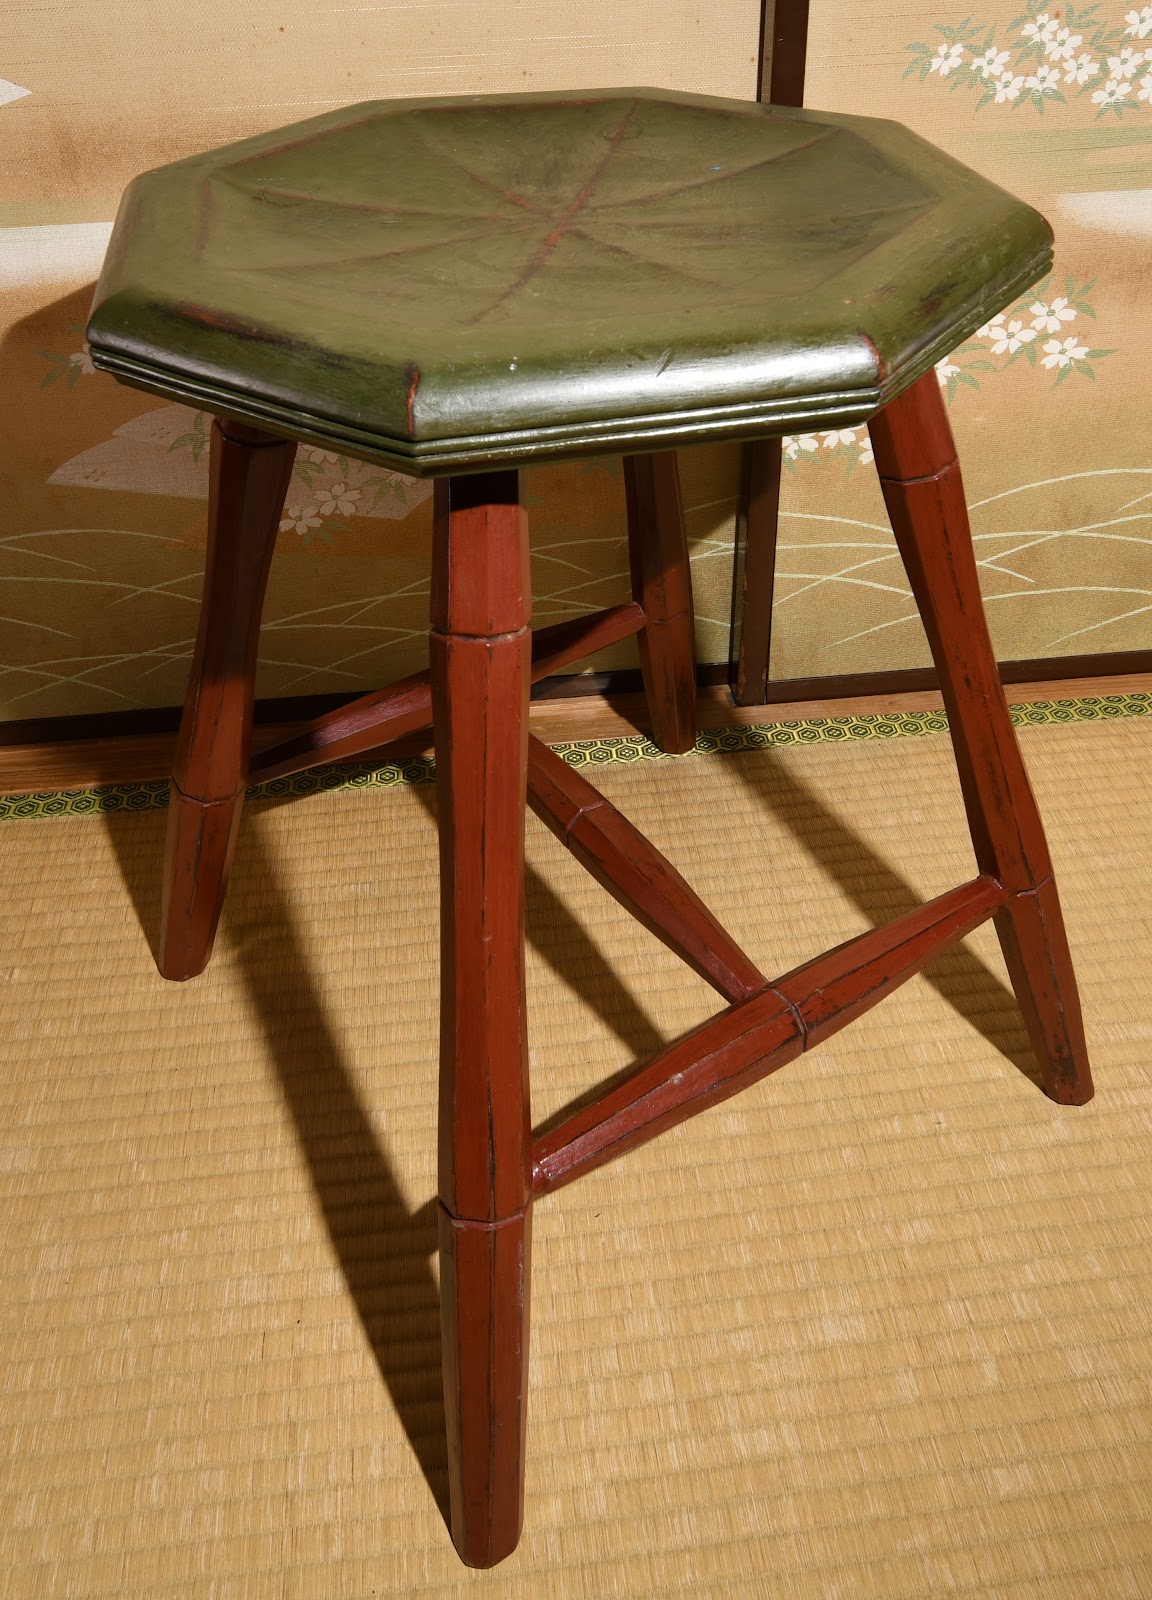
As I contemplated the design of the stool I remembered seeing an interesting example in an article by a professional Windsor chair maker, instructor, and author named Michael Dunbar, and decided it would be just the ticket. Of course, true to my pragmatic contrarianistic principles, I modified the design to fit my needs, tools, and peculiar sense of beauty.
I do not own, have never owned, and do not want to own a wood lathe, so I didn’t even consider attempting the elegant turnings that beautify every component of Mr. Dunbar’s stools. Being a contrary sort of fellow, I decided that instead of trying to imitate his lathe-work, I would design my stool to only slightly mimic the outward profiles of traditional turnings, but so that not a single piece of it could possibly be produced on a lathe, not even by mistake. And since I didn’t have any stationary power tools with me on the island, the design ensures the final shapes could not have been made on a tablesaw, bandsaw or shaper. Every component is shaped entirely by hand, no exceptions. How’s that for pragmatic contrarianism?
The legs are designed similar to the birdcage style seen in Mr. Dunbar’s simplest design except for being octagonal. I am fond of the birdcage style, enough so that I commissioned a dining room set in cherry wood from an Amish furniture maker back when we lived in Ohio. In this case, however, the legs all have different dimensions, thinner in some places and fatter in others. No rounded swells, but closer in appearance to irregular octagonal bamboo segments. None of the curves between segments are uniform. The picture does not do justice to the artistically (ツ) chaotic angles and uneven surfaces.
An octagon has 8 angles of 45 ° each, so, consistent with my contrarianistic aspirations for this stool, I made each angle just a little less or a little more than 45°. It looks kinda sorta strange until you carefully examine the stool and realize that it is definitely strange. Perfecto!
Just to extend the contrarianist principle to its ludicrous conclusion, I made all the angles between seat and legs slightly different too. It would have been a lot easier to make them uniform, but what’s an adventure without some pointless struggle? At least this adventure didn’t leave me dead in a pile of garbage on K2!
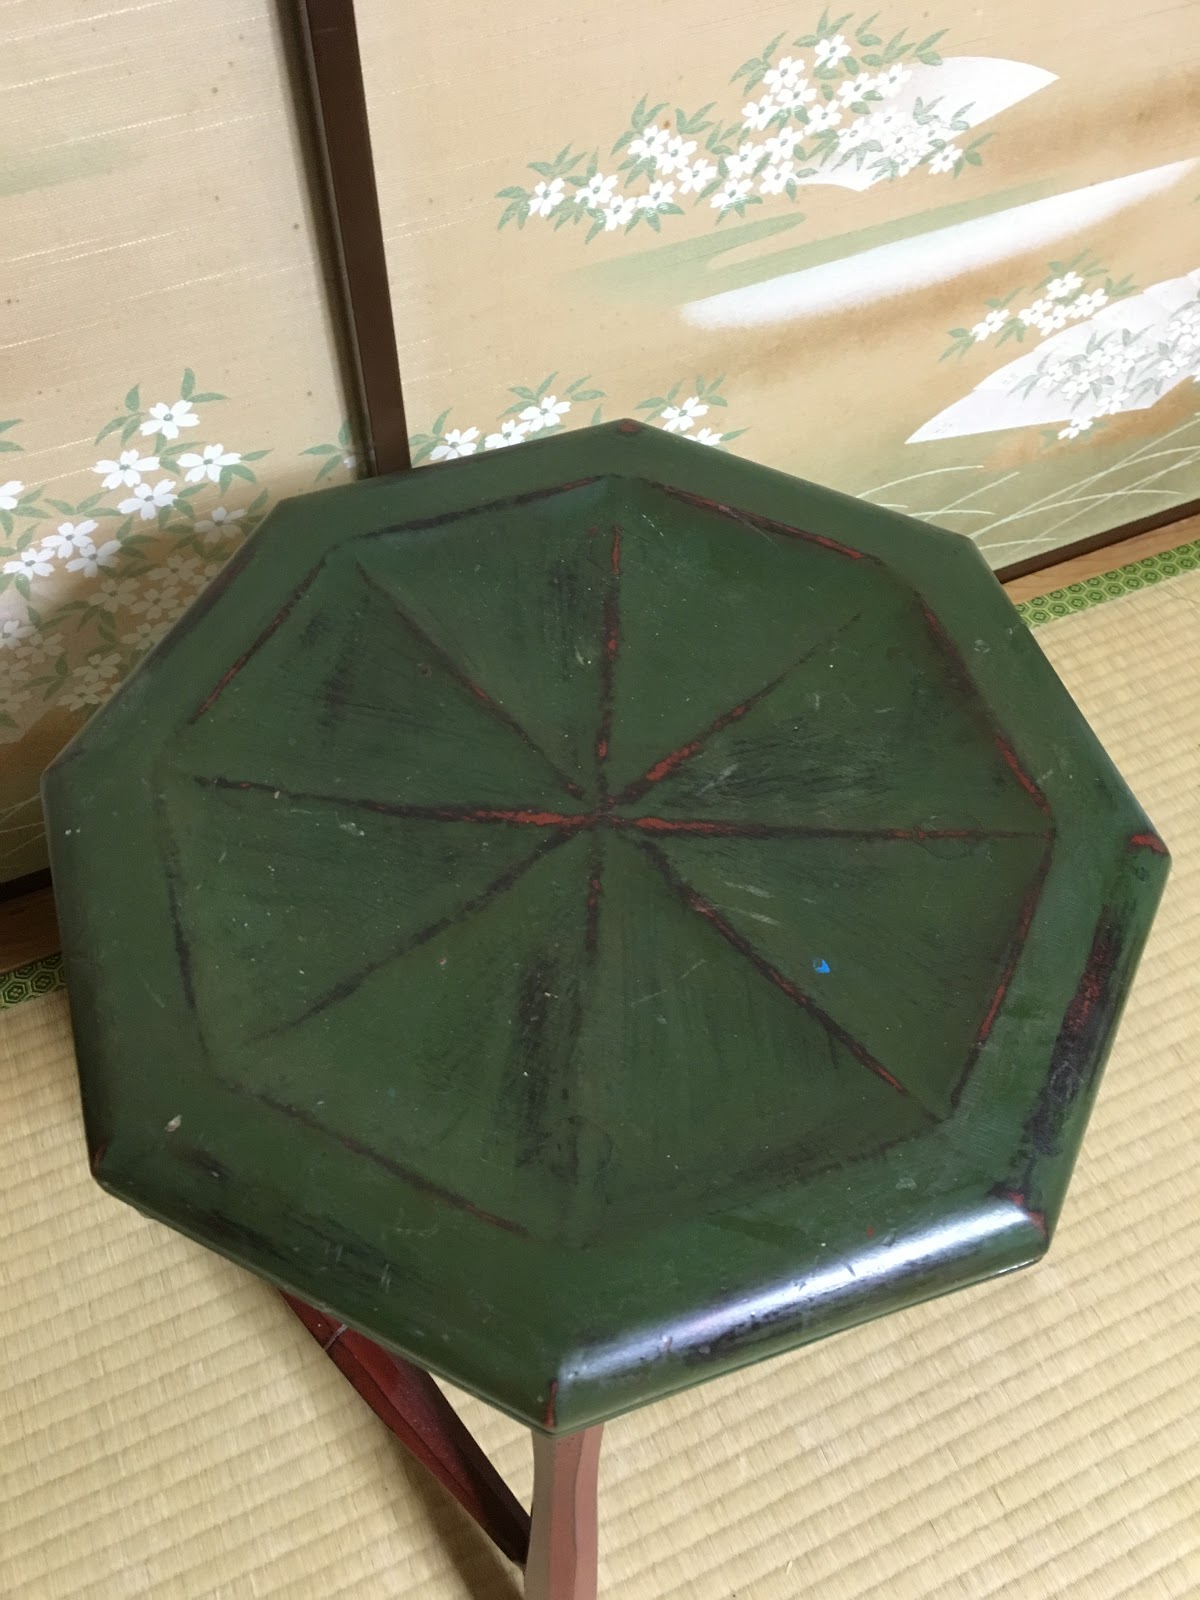
Like Mr. Dunbar’s stool, the seat is hollowed out, but instead of being circular, it’s octagonal and sculpted to look as if it has a segmented joined perimeter covered with worn green leather sagging over 8 ribs radiating from the seat’s center. There are no segments, no ribs, and of course, no leather, just a single board seat, but I carved 8 little ridges into the seat to suggest the existence of these supporting ribs, just another detail that could not be made with a lathe.
The green color of the seat is intended to imitate the green leather commonly used for furniture in days of yore.
The Construction
The wood I used was exceptionally-dense mahogany from a board I found fallen behind the racks of an old lumberyard on the termite-infested volcanic rock that is Guam. The figure was nothing special, but my hand plane turned the dirty grey board a beautiful dark red color. Better than a paintbrush.
If I recall correctly, it was an exceptionally large and clear 8/4” x 23” x 14’ board. I had already used most of it for other projects by the time I got around to making this stool, but had just enough scraps left for the job.
I made the stool without using power tools of any kind, just handsaws, handplanes, spokeshaves, chisels, knives, Auriou rasps, and my Father’s old brace with fine-screw Jennings bits. I cut the beading detail using carving chisels. It was fun, partly because there was no customer to complain (not even the Mistress of the Blue Horizons), and partly because it was something new.
I did not sand the wood but left all the tool marks in place. Mecha retro.
I followed Mr. Dunbar’s advice and finished the stool with three color coats of red, green and black milk paint topped with a coat of thinned flat polyurethane. This was my first experience using milk paint and I loved the results. I highly recommend it.
After applying the milkpaint, but before the PU topcoat, I distressed the finish with files and sandpaper, especially at high-wear areas, exposing the various layers of color unevenly to produce the appearance of a chair that has been used, abused and repainted in different colors several times during its lifetime.
Applying multiple layers in different colors is not an original idea, but it is genius. Each coat creates a distinct layer of color over the uneven toolmarks which remain on the wood’s surface.
I have no interest in reproducing antiques, but the colors are charming to my eye and there is something to be said for accelerating the process of perceived wear from shiny-and-new to worn and patinated instantly bypassing the grungy-looking intermediate period. Besides, no matter how much I use it and abuse it, additional wear and damage have only changed its appearance without making it perceptibly worse. I can’t think of another applied finish that does this better.
And this finish has ensured that as the stool has become worn, scratched and paint-splattered over the years in my several shops it’s character has not degraded but only improved. Would that my face had improved over the years to the same degree instead of growing more purple warts sprouting vigorous clumps of long black hairs
Another advantage of traditional milk paint (v.s. the latex-based faux milk paint sold in home-centers and hobby stores) is that, since it contains large amounts of ground minerals, it cures to a hard surface that is surprisingly wear resistant — certainly more abrasion-resistant than standard latex, acrylic or polyurethane coatings commonly used for finishing wood. Excellent for rough use in a workshop.
I don’t have specialized tools for coning mortises and tapering tenons, so the leg/stretcher/spreader joints are simple round tenons fitted forcefully into tight round mortises, pared larger in diameter at the top, saw-kerfed and wedged in-place.
The geometry of the seat to leg joints places the leg/stretcher and stretcher/spreader joints in tight compression ensuring they will never loosen or come apart unless the seat fails or the tenons break off. So far so good, knock on numbskull.
Performance
Windsor chair leg geometry is genius, if a bit tricky to assemble. Not only have the joints remained tight, but 16 years later I can still strike any part of the stool with a mallet and it rings like a wooden bell even during Japan’s dry winters and humid summers despite being built in the unchanging 85% relative humidity of Guam. Amazing.
I was doubtful at first, but Mr. Dunbar’s seemingly-unlikely assertion that a hollowed-out seat is more comfortable than a flat seat for a workbench stool was curiously correct. It’s not only more comfortable but more stable because instead of being perched on top of a flat surface, my posterior fits down into the seat giving me better purchase and stability, another application of the time-tested “ butt clamp“ principle. This extra stability is a big advantage when using handtools at the workbench. And it has the added benefit of sparing sleeping bench kitties the indignity of sliding off onto the shaving-strewn floor. Perish the thought!
No matter how many scrapes, scuffs, dents, paint drips, or other abuse this stool has suffered, like a good pair of boots it has taken them all in stride without complaint
It remains to be seen, but I think this stool just may meet my 200-year service lifespan goal. I intend to hang around and personally confirm this, of course, but please remind me in 184 years to post the results on the subspace net if I forget.
If you want to try your hand at the basics of Windsor chair making while gaining a shop stool superior to any other type—one with the potential to become both a useful tool as well as a family heirloom and high-demand bench kitty bed—you might want to give Mr. Dunbar’s stool a try. Or, even better, be a fellow pragmatic contrarian, run with his design concept, and make your own interpretation.
And don’t forget to sign and date the seat’s underside. In 200 years some of your descendants might be curious about who made it, just in case you’re not around to remind them.
Lessons Learned
You might take away several lessons from this story of a silly stool. Perhaps the first one is that instead of spending hard-earned cash on future landfill stuffing made in the PRC, you can build the furniture you need for your house and workshop yourself at less cost and without powertools.
You don’t need to go into debt or put off making that table or chairs or bed until you can afford or have space for a tablesaw, bandsaw, jointer, lathe and thickness planer. And you don’t need to save pennies for years to buy expensive hardwoods, just be pragmatic and design the furniture around the tools you already own and the wood you can get your hands on cheaply.
In fact, the first furniture I made as a married starving student with a newborn baby was a knock-down coffee table, two end tables, a sofa and a loveseat from 2×4 DF/Larch concrete formwork I salvaged from the construction jobsite I was working as a carpenter in Las Vegas during Christmas vacation. The only hardware I used was a mix of left-over door hinge screws (I hung several hundred doors in a hotel construction project that winter) and used lag bolts scrounged from the guys who installed the rollup doors at the jobsite’s loading dock (thanks, guys!).
I worked on that furniture set nights and weekends using the concrete slab in front of our dingy Las Vegas apartment and three 8″ high horses as a workbench and only limited handtools and a flea market B&D electric drill. I finished it with WATCO danish oil.
We bought discount cloth and foam from an industrial upholstery supply house, and my diligent and intelligent wife sewed all the cushions using a friend’s sewing machine. The neighbors thought I was strange, and of course I was, but they kindly tolerated the energetic college kid with the cute Japanese wife who was always making sawdust and sweet-smelling plane shavings out on the sidewalk as they provided sage advice while smoking their cigarettes and drinking beer in the gloaming.
I could disassemble the entire set to fit flat in our VW van when we moved, and it served us well for seven years for only the cost of some fabric, upholstery foam, sandpaper, and a quart of Watco Danish Oil wood finish.
If, like me, you are pragmatic and sometimes a wee bit contrarian, you might want to use your handtools to make something that couldn’t possibly be made by stationary powertools. After all, what’s the benefit of owning and being proficient with handtools if everything you make with them looks just like the stuff sold at the local “Furniture Warehouse” or whatever they call the purveyor of discount garbage-in-training in your community?
Another possible lesson is that, depending on the design of the furniture you make and how it mutates during the fabrication process, you can use classical structural details and design elements, such as durable mortise and tenon joints and the clever details of the Windsor chair to turn inexpensive wood into family heirlooms that get better with age. Imagine that, the victory of intelligence, adaptation and diligence over money. I like it a lot!
You don’t need to spend a lot of money or have lots of space or own fancy powertools to have lifetime furniture with character so long as you are willing to be pragmatic and a little contrary.
Your humble servant (the devastatingly handsome fella on the right) discussing a construction project with a noble Beloved Customer of the Fae. Fashion is my life, as you know, but do you think I might have gone just a tad overboard with the jooles and ironmongery?
If you have questions or would like to learn more about our tools, please click the “Pricelist” link here or at the top of the page and use the “Contact Us” form located immediately below.
Please share your insights and comments with everyone by using the form located further below labeled “Leave a Reply.” We aren’t evil Google, fascist facebook, or the spouse of a Democrat Senator and so won’t sell, share, or profitably “misplace” your information. If I lie may termites eat all my wooden furniture.


Leave a comment