Even the smallest person can change the course of history.
Lady Galadriel – The Lord of the Rings
In previous posts in this series about toolchests, and your humble servant’s toolchest in particular, we looked at how the design was guided by performance criteria such as portability, tie-down and lifting, and pixie infestation prevention. In this post we will examine one solution to another performance criteria. Perhaps the solutions in this article will help you solidify your storage requirements.
Inside the Lid
Key Performance Criteria No.4 defined in Part 5 of this series is as follows:
Tool Access: Tools used frequently to be quick to locate and easy to remove and replace without bending, kneeling, or shifting trays around.
The solution I selected was to mount many of the tools I use most frequently inside the lid where they are in clear view and quickly accessible. This technique is one seen in historical examples, but as always, I wanted to do things a little bigger, a little better.
Alas, unbeknownst to me I had fallen prey to a sophistry that has afflicted many, indeed one that has destroyed entire civilizations and can be summarized as: “ if a little bit is good then too much must be excellent.”
I began the planning of this space with visions of Mr. Studley’s famous toolchest dancing in my head. The image in my mind was mahvelous dahling, simply mahvelous, but the conceptual drawing was only good. While I was distracted by my dreams, reality snuck up behind me, shot me in the head and dumped my virtual body in the river. The water was cold!
After a refreshing swim I realized my plan was too dense, too inflexible, too expensive, and most importantly, violated the unwritten performance criteria common to most human endeavors: “It must be finished in my lifetime.”
The compromise I arrived at is shown in this post. It is not perfect. You should not emulate it. But it is the fruit of trial and lots of error over many years and it works reliably.

An obvious problem with mounting tools inside a lid is their rebellious desire to drop to the bottom of the chest when the lid is closed, especially if the petty pernicious pixies that sometimes skulk in the shadows of my workshop lend a claw.
To deal with this mischievous propensity, each tool’s mounting mechanism must retain the tool securely in place while the lid is opened, closed, and even while the toolchest is being moved around. At the same time, the mounting mechanism must be simple and quick to operate. This combination of security and speed is not as easy to accomplish as Gentle Reader might imagine because, well, tools can be naughty, and gravity is not our friend when the lid is closed. And pixies.

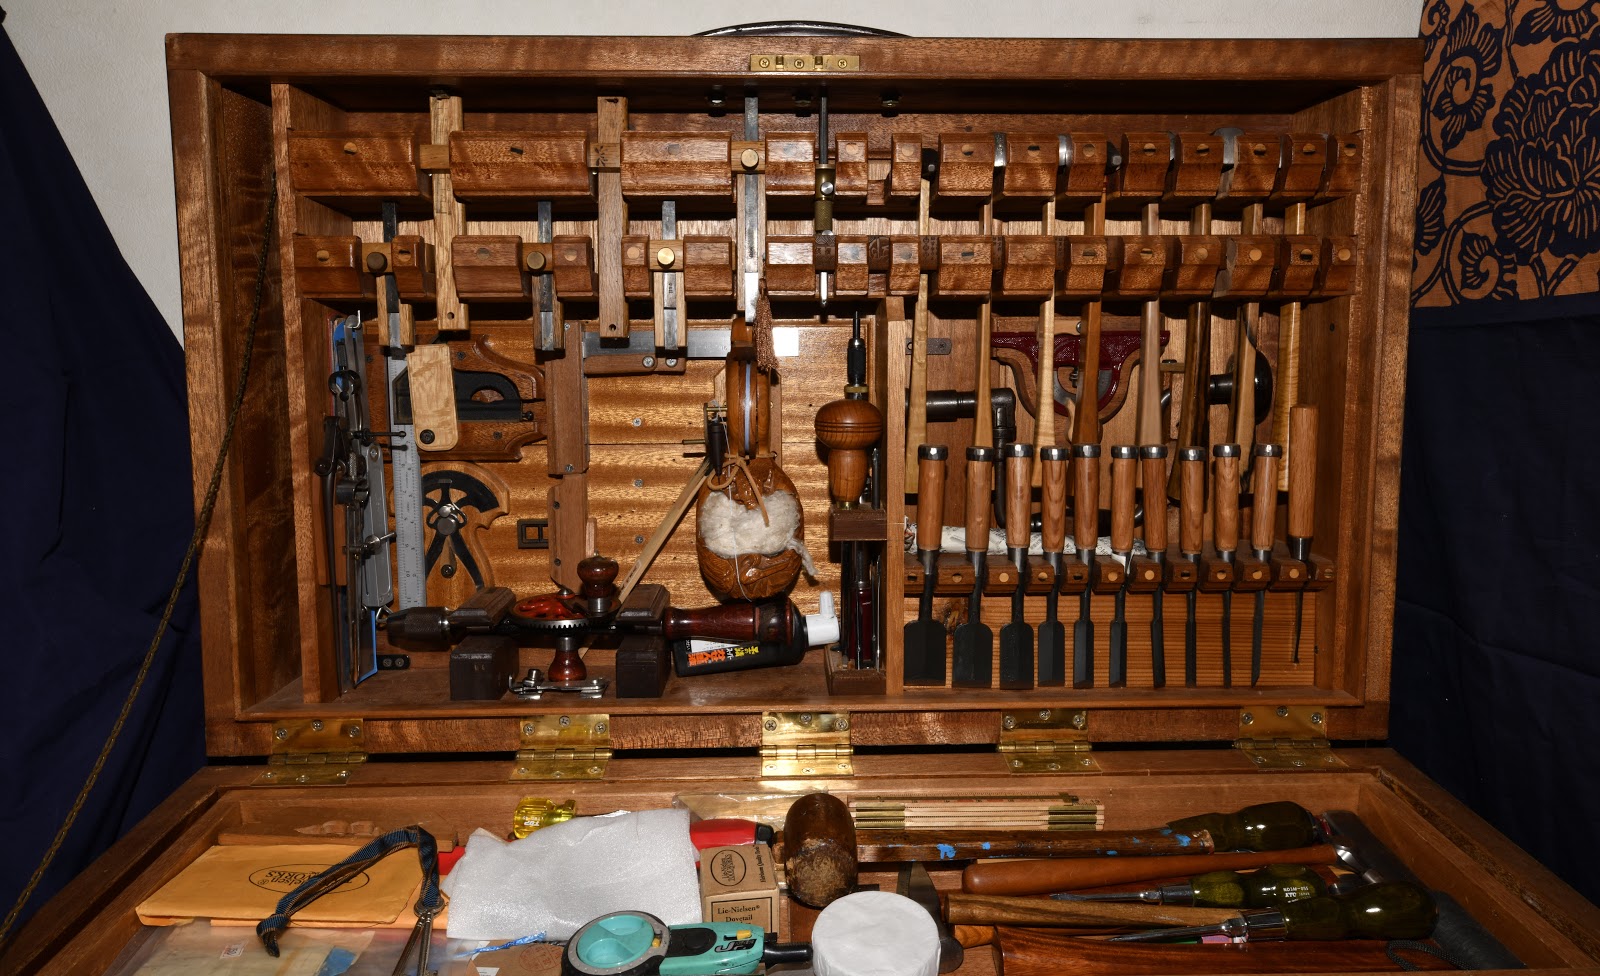
So let’s examine the tools mounted inside the lid and how they are secured.
The upper third of the lid is dominated by two full-width parallel boards secured to both sides of the lid. These two boards have edge lips and matching notches. The left side holds 7 marking gauges of various lengths and types. Four of them are dual-blade mortise gauges (kamakebiki) made by Kinshiro. After placing a marking gauge in its designated set of slots, it is secured by extending the tool’s beam or blade upwards and locking it in place with its own adjusting screw. This mounting method has been entirely successful.
The right hand side of these parallel boards holds 8 hammers (gennou). The back-side of each notch and the surrounding lip is shaped to fit a specific hammer, and super-magnets help hold each hammer’s steel head in place.
The handles of the chisels mounted below also help to retain the hammers, as you can see from the photo. This is not a perfect solution, but it has not let me down so far.
The 11 chisels on the right side are held in place by friction between the chisel’s cone-shaped ferrules and the closely-fitted wood notches, and stay in place even when the lid is closed. But vibration can become a problem if I need to move the chest over a rough surface with the lid closed, so I wrap a rubber bungee cord around the chisel’s handles to keep them in their slots during jiggly transport.
The chisel’s cutting edges are oriented downward when the lid is open, close to the lid’s side (below) so that there is little danger of snagging a finger or wrist on the extremely sharp edges. I strongly dislike getting red sticky stuff all over my tools, and accordingly I disdain any storage system that leaves sharp cutting edges exposed.
Whatever chisel storage solution selected, I strongly urge Gentle Reader to ensure there is no opportunity for chisels to express their peckish nature for three reasons: First, 10 fingers are better than 9 (just ask Frodo); Second, red sticky stuff promotes rust; and Third, Murphy always has the last laugh. I promise you won’t like whatever gives that bloody bastard the giggles when chisels are involved.

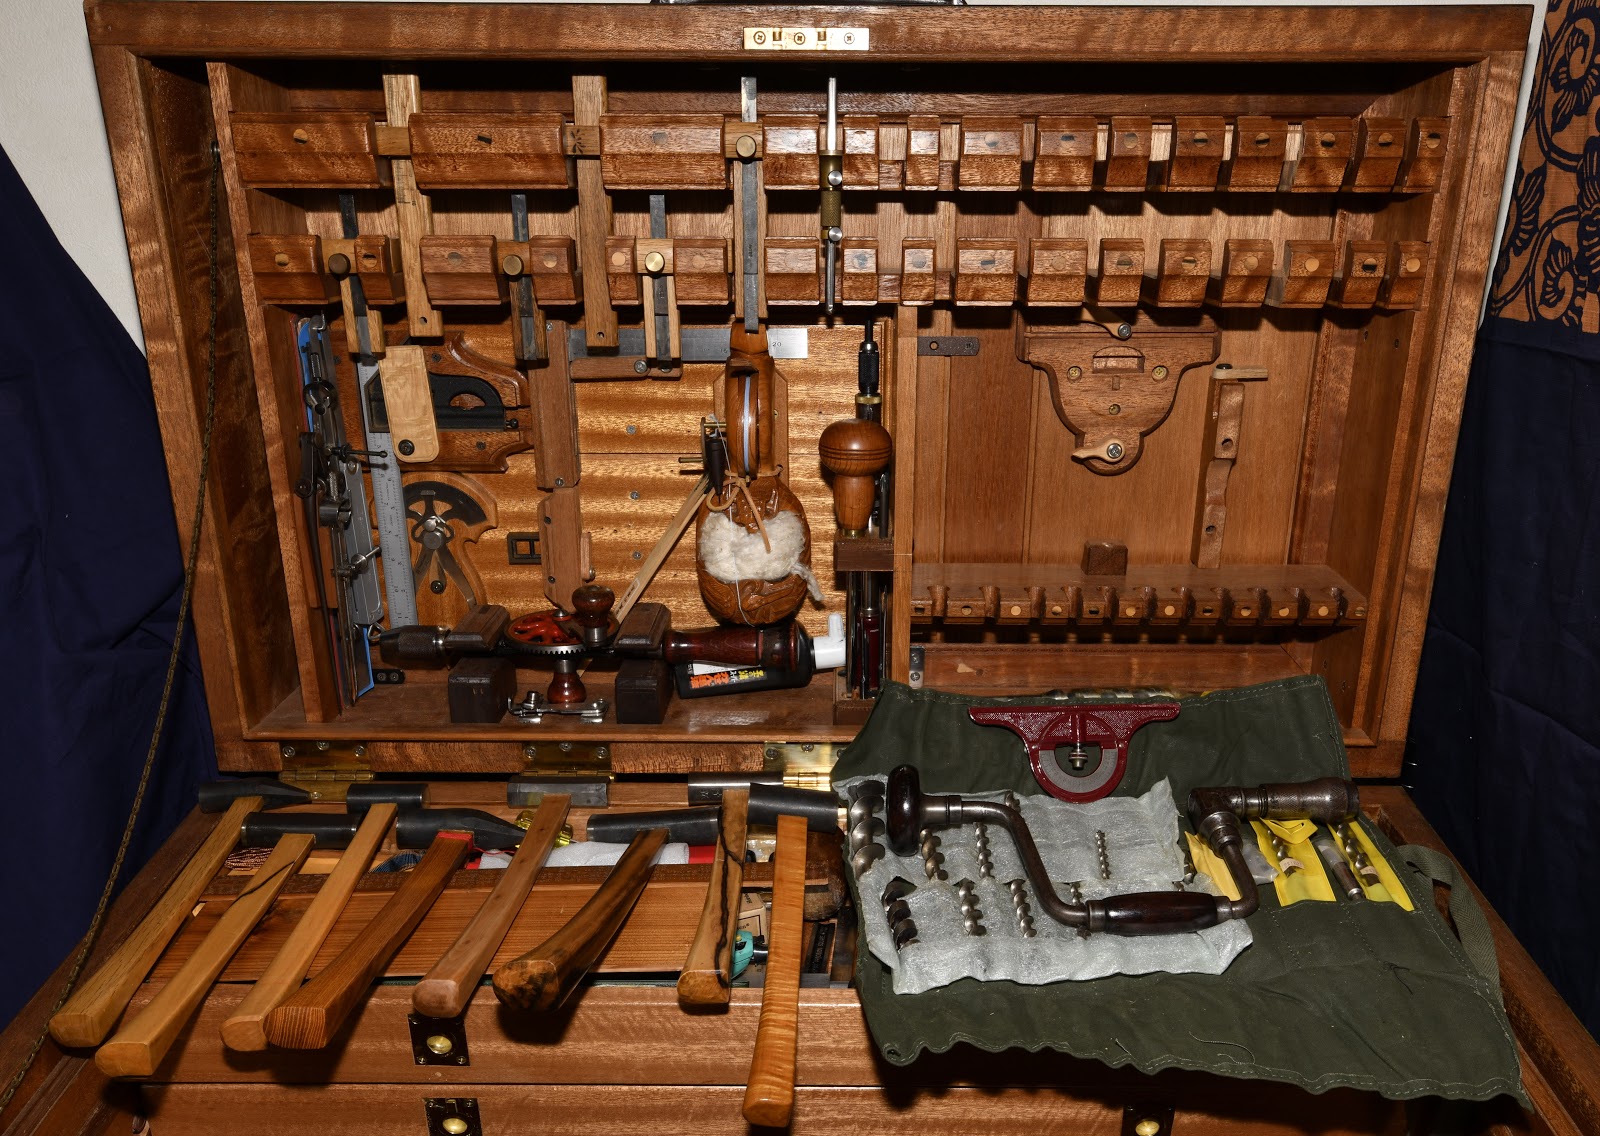
Behind the chisel and hammer handles, you can see my Starrett protractor head, and my father’s old Stanley brace with rosewood fittings. Bits are placed in tool wraps and stored in a compartment behind the chisel blades. Not easy to get at. I have thought about combining the chisel rack into a drawer to hold the bits, but have not done anything yet because I’m not sure it would be an improvement.
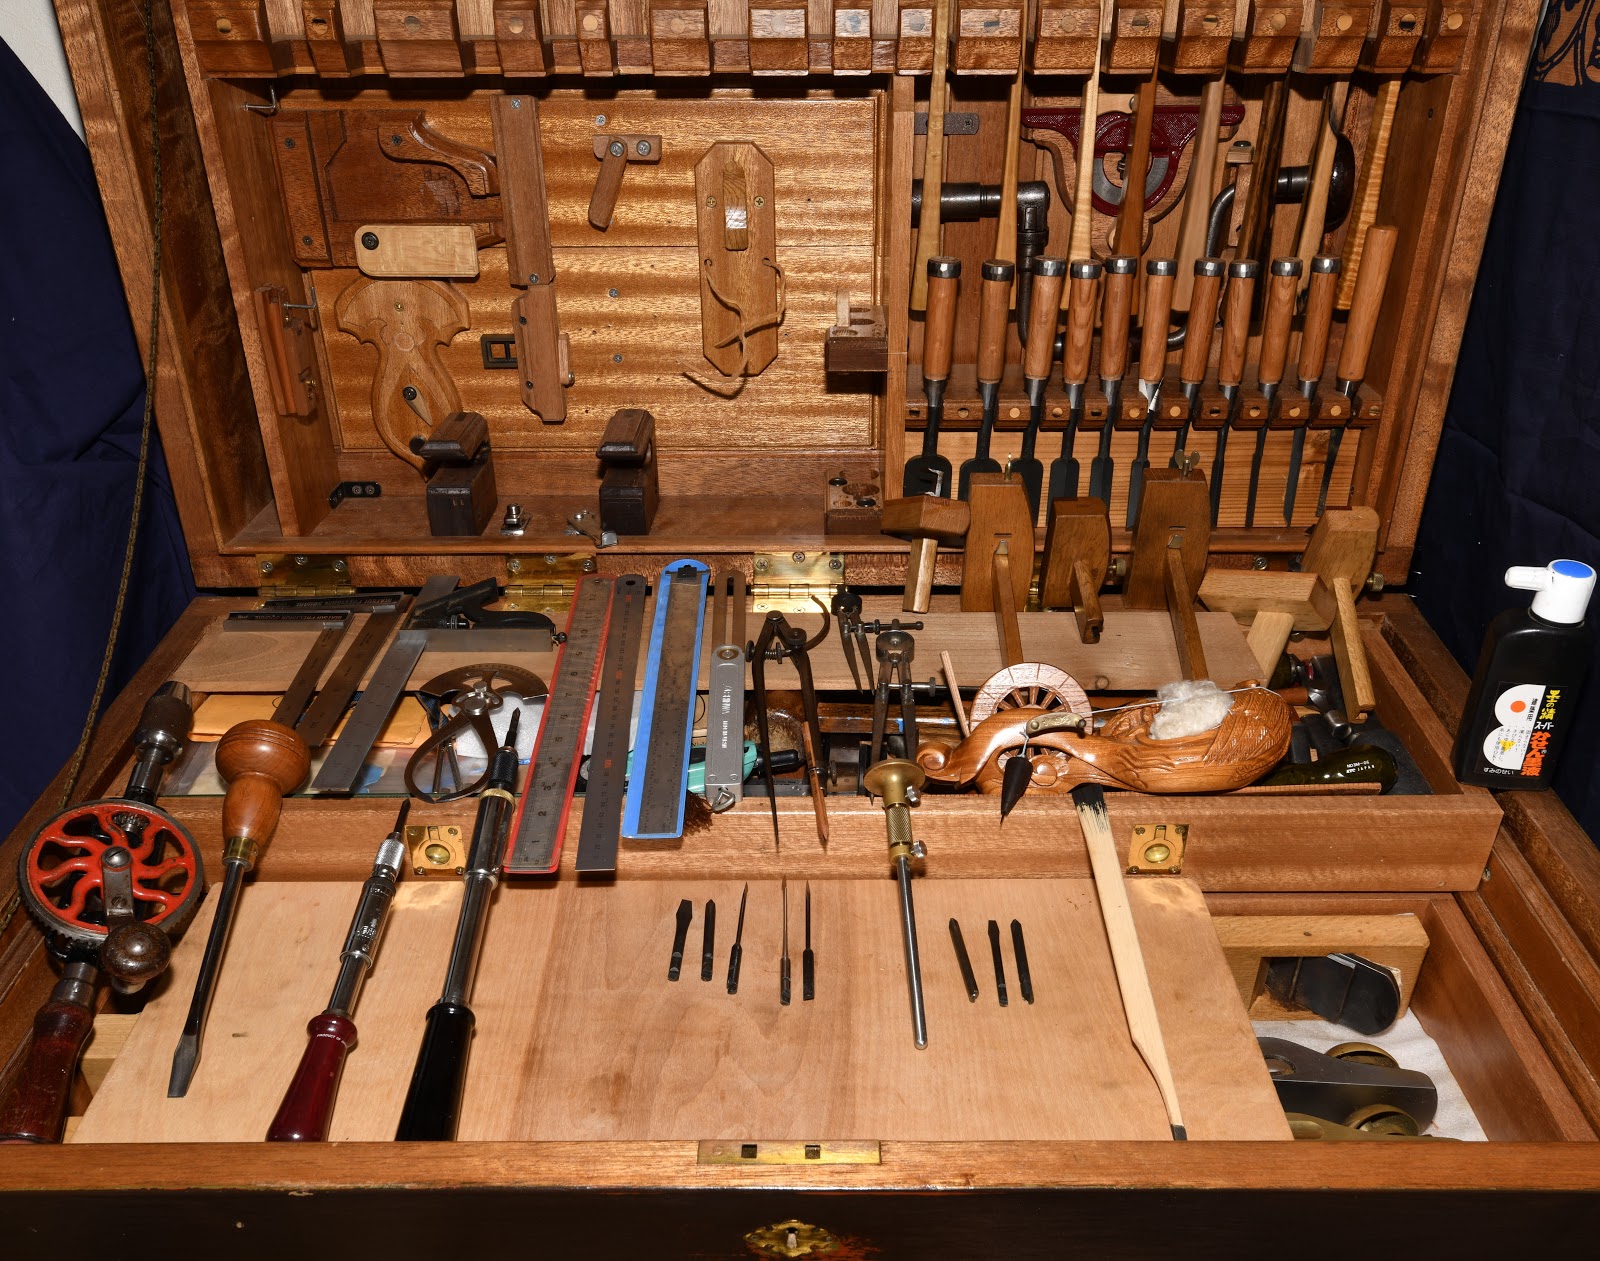
On the left side, a Starrett 92 divider and two spring dividers are secured by a block screwed to the far left sidewall. Chastely closing the divider’s legs together pinches a screw head locking them securely in place. If you don’t already own a Starrett 92, you need to get one.

Behind the dividers, there are several steel rulers and a bevel gauge secured by a hook on top and retained by the Starrett 92’s arm. In the center are mounted 3 Matsui Precision stainless steel squares, a Starrett combo square, a Starrett adjustable mini square, and a thickness caliper.
I also mounted an unused hand-carved Zelkova-wood Japanese inkline/inkpot (墨壷 sumitsubo) with silk wadding in a central position of honor. While this is a practical tool, I mounted it there just as decoration and for good luck, as you can tell because the line is still blue and the silk wadding is still white. I have a more convenient sealed Shinwa-brand plastic sumitsubo stored in the top tray I use when I need to snap a line.
At the bottom of the lid I mounted an old Millers Falls eggbeater drill. I don’t recall the model number, but I purchased it used in Delaware, Ohio many moons ago. The cap on the handle was damaged by fire sometime before I bought it. It’s a handy a little guy, but nothing special.
On the left side of the center vertical divider are mounted 2 Yankee spiral screwdrivers, bits and gimlet blades, as well as an antique Japanese screwdriver with a polished steel shaft and a bulbous Zelkova wood handle. I am irrationally fond of this old tool.
I have tried different arrangements for mounting tools inside the lid over the years, and I will continue to improve it because I am confident the solution shown is not the best possible arrangement. It’s a difficult planning problem for two reasons. First, the tools in the lid are the most easily accessible and therefore must be ones I need all the time. Assigning priority and ease of access seems as easy as falling off a greasy log, but it isn’t. The Studley solutions to storing tools are amazing, but not really practical. Second, I need to be able to remove and store these tools quickly, but at the same time, they can’t be so heavy or so difficult to secure they fall out when the lid closes or opens. Once again, the conflict between safety and security is tricky to resolve.
Regarding priority, marking gauges and other layout tools see the highest frequency of use, followed by chisels, hammers, drills and screwdrivers. This priority is reflected in their location inside the lid, as you can see.
I don’t use the protractor head, brace or bits very often, so they are assigned a lower priority and reside behind the hammers and chisels. It takes time to remove them, but on the other hand, they would always be in the way if placed in the trays, which is more valuable real estate, so this is their home.
To hold the lid open and keep it from flopping back, I installed a brass toilet tank chain on the left side, and boxed out a space so it doesn’t hang up on tools. When the lid is closed, it automatically lays alongside the top tray. This chain was inexpensive, it’s strong, it will never rust, and it has never caused me a second of grief.
Well, that’s all for this post. Next time we’ll look at the trays. There will be planes. Oh joy!
YMHOS

If you have questions or would like to learn more about our tools, please click the “Pricelist” link here or at the top of the page and use the “Contact Us” form located immediately below.
Please share your insights and comments with everyone in the form located further below labeled “Leave a Reply.” We aren’t evil Google, fascist facebook, or thuggish Twitter and so won’t sell, share, or profitably “misplace” your information. If I lie may my toilet chain break and the lid crush my stupid head.

Finally, a look under the lid. And it did not disappoint. Humbly I submit that the quote this post should have been from General Maximus: “Are you not entertained?” Now bring on the kanna shot.
LikeLike
Excellent quote, BR. I do seek to entertain, if only because I hate to be bored. After all, as General Maximus went on to say: “Is this not why you are here?” There will indeed be some planes in the next post, but I have too many to discuss in much detail. And many are shy. Perhaps I will do a future post that presents some of the unusual planes I have that are not in residence in the toolchest. They have their own little cabinet, you see.
LikeLike
He does indeed. I’m quite partial to some Tolkien as well, though. Unusual planes and unusually useful planes could be interesting. Admittedly I have not ventured far from hira-kanna, kiwa-kanna and the occasional plow plane. I have a few others but they don’t seem to see much use. I wouldn’t mind hearing more about those Kiyohisa oiirenomi and what constitutes poor quality.
LikeLike
BR: Tolkien wrote some good stuff. The most published works in human history, second only to the Bible, of course. And that was even before the movies. Regarding the Kiyohisa chisels, you can read more about them at “The Story” at the top of the page. If you are a Kiyohisa fanboy, however, you might want to let dead dogs lie.
Stan
LikeLike